


cardensb
-
Posts
29 -
Joined
-
Last visited
Content Type
Profiles
Forums
Gallery
Events
Posts posted by cardensb
-
-
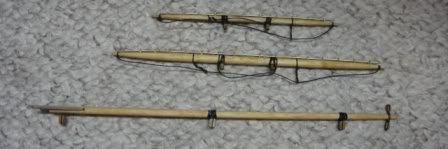
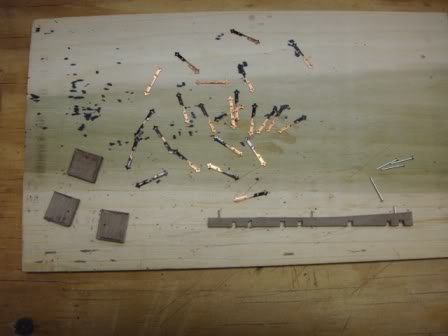
In my box of leftover parts, I have a set of chainplate assemblies that a 3/16" dead eye from Model Expo fits into but the plate is a hard wire material. I am trying to find a way to insert the dead eye without damaging one side when squeezing it into the plate. Seeking suggestions.
I have 16 of these assemblies that consist of a small "plate" with a ring at the bottom; a single section of wire chain link that is unsoldered to allow connecting the bottom plate to the ring on the plate and finally a soft metal plate with three holes that attach to the hull and to the chain link.
They might be from the MS model 1:64 Prince de Neufchatel. My model looks like I may have figured it out once, years ago.
Anyways, I am trying to press the wooded deadeye into the hard metal wire ring using a vise now and am damaging about every 3rd deadeye.
-
My list is not as thorough but here is how I have tackled it for the few I have fully rigged.
1. Install all eyebolts into the hull before installing guns or anything that may get in the way. Sometimes I attach a block and run a started line through it to tie it out of the way. Te starting threads allow me to just glue the actual line to the end and carefully pull it through later, only need a few inches (less is better to keep from getting confused)
2. As a general rule, I install all rigging from the center of the ship towards the edges and start at the front and work my way back. this means I am not trying to reach through standing rigging later to try and attach something or I have through through how I am going to reach a center line located block later (starter thread used)
3. Generally work bottom up. so I rig all the lower mast assemblies before moving up a layer.
4. On the bow spirit, I generally rig the entire assembly of wood sections together before installing it and make sure all blocks are in place for running rigging.
5. I have not actually used any sort of pre-rigging jig assemble holding thing yet so when I do my stays for example, I rig a left and then a right side while on the ship. I use a few sections of bent wire fitted to both dead eyes so my cord length is consistent. I do serve the cords prior to installing at the top of each mast assembly using a 3rd hand tool to hold the loop in one end while I whip/serve the middle where needed.
Yes, so my ratlines are done on the ship. I just took an index card and drew a few lines spaced at the distance between "rungs" and clipped it below my work. I tied a few at a time and took a break. I tired to keep a little slack in them but was not always consistent. A jig will probably make it more consistent but I hate seeing all that thread wasted when tying off to a square frame.
6. I pre-rig all blocks to spars and if a block may be in a tough spot, I run a starter thread through it too.
7. All of my standing rigging is tied off at a pin or wherever it should then cut short. Later I coil a bunch of cord around a pair of finishing nails as a holder and leave a long enough tail to neatly wrap around the pin like it should appear.
Hope that helps. I have an old build log on here where I posted lots of photos as I rigged the Prince de Neufchatel.
- bc_63, William-Victory and mtaylor
-
 3
3
-
I hate having a ship model with no one on board so I am looking at wargaming miniature figures. Does anyone have any experience with them?
I am looking at Old Glory brand 25mm figures trying to determine if they fit a 1:48 or 1:64 scale ship. I "war game" in 28mm scale and the brand (Warlord Games plastics), I use are too tall for either scale.
Perry's Miniatures 28mm in plastic also seem a little too tall and do not have many poses that would work beyond altering an infantry based box set. (I have an American Infantry regiment set).
Old Glory brand has sets with titles like "men climbing rigging", "pirate deck crew gunners", "AWI (American War of Independence) Naval Crew" (spelled Navel though) and "Swivel guns with crew". I don't have much experience with metal based figures.
Before I spend $20 to $40 plus shipping, I was hoping someone else had tried these already and could provide feedback.
- Keith Black, DaveBaxt and mtaylor
-
3
-
17 hours ago, GrandpaPhil said:
Hahn’s book “The Colonial Schooner” has a complete discussion about how he built his model of the Hannah.
Appreciate the tip, I found the book on Amazon and ordered it.
Pretty good progress over the weekend. I finished the inner bulwarks (bloodwood is a pain to work with, I had forgot how fragile it is even after a good steaming). I installed apple wood rail caps (opportunity to remember how to use and maintain by scroll saw). Cleaned up the gun ports so they are all the same size. cleaned up the exposed framing below the few rows of planking I had installed years ago. Began planking the quarterdeck above the cap line. Started shopping for pre-cut grating for the 5 hatches and 10 swivel guns.
Now if I can just find where my wife hid my digital calipers so i can get some accurate measurements.
- Keith Black, GrandpaPhil, mtaylor and 1 other
-
4
-
Just now, mtdoramike said:
HONEYMOON? You just got married and already spending your free time building ship models? Heck, when I got married we didn't come out of the bedroom for the first year😋 much less working on hobbies. It wasnt until I had been married for 5 years before I took up any hobbies. Take a little advice from an old man whose been married to the same special lady for the past 49 years this month: less time on the hobbies and more time romancing your honey.
Our honeymoon was 11 years ago...
-
1 minute ago, ccoyle said:
Which is why we strongly encourage our members not to use third-party image hosting sites.
I never knew another way to host the photos back then.
I hope you were able to make some progress on your model since your last update?
Well, this build was finished in 2012 but I never completed a build log online.
-
I don't know if my photos will remain available after this month, they were uploaded to photobucket and now the bucket wants to charge a fee for use. If you are looking for a photo described, message me and I will see where it is in a cloud or hard drive.
-
-
I'm returning from about a seven year break and just picked up the box of Harold Hahn's "Hannah" based on his plans sold through The Lumberyard with a wood material kit for plank on frame. Apparently I stopped while planking the inner bulwarks but also had not planked the stern. I cannot find any pictures or diagrams of how the stern should look. Did your kit include anything? I think I have all my blueprints displayed again but no stern view....
I started to make a punch list to re-orient myself to the model.
-Plank transom and stern
-Figure out how to get the keel to fit past the inner planks. then fabricate rudder attaching strips/hinges (I cannot remember the term)
-Steam and finish inner bulwark planking then clean up gun ports.
-Clean up glue residue below planking where I am going to leave lower framing exposed.
-Sort and ID remaining strip wood from the box - it appears that I have some that does not go with my build... pine planking???
-Figure out the deck furniture builds before planking deck to know what will be exposed or not. How many cannons to build if partially decked?
- mtaylor, Keith Black and Dave_E
-
3
-
Retired Army guy here so I did quite a few moves across the USA. I custom built moving crates for each ship from scrap lumber and found plywood. I built each case so I had 4-6 inches space around the outer edges of each model. I built cradles for the hulls that screwed to the base and then drilled 1/2 inch holes along a line that was just beyond the hull. Two moves, I laced paracord carefully through the model, passing through lines and making sure no line was up against anything that would break using the 1/2 holes in a plywood base as my attaching point. Two moves I used zip ties as a different method that did not need me pulling 20 feet of cord over a railing. The sides of the cases were often just heavy cardboard staple gunned to the framing. I left the top open so handlers could see what moving but most moves, I packed them in my own box trailer with cushions from patio furniture as additional padding. One year I dumped a bunch of packing peanuts inside but did not seem to make a difference.
My last move was more along the line of the rolled towels in the back seat of my pick up with pillows around them and did not bother with the crates. Worked fine for about a one hour drive on I-95.
For ships without tall masts and rigging like admiralty models or works in progress, I really just wrapped with the small bubble bubble wrap and made sure to mark this side up with tape in case I had anything on the deck that may come lose and get lost. Those got laid into a large box with pillows and other random items from the basement.
- Canute, Dave_E, thibaultron and 2 others
-
5
-
Well, It has been almost two years since I updated the journal. My PdN has been completed for almost a year and a half and I completed LSS's Fair American during this time. Now that I am in the middle of leave and my household goods have shipped to my next assignment, I find myself with lots of time to provide an update.
In July 2012, I moved on to the main mast installation and rigging. The main is much simplier than the fore, none of those mysterious lines to figure out and I had worked out my techniques for ratlines, serving, etc... I did however, run out of rigging lines and had to order more.
I installed the stays and shrouds in pairs and added the horizontal planks to the shrouds. I decided to exceed the model kit in a few places such as the hearts being added. (It appears I have forgotten how to have my images orient properly' they look fine on photobucket...)
The ratlines went fast due to my index card that was marked for spacing. although I did have some sliding since I was not gluing each knot as I progressed.
The upper ratlines got tight as expected but were not too bad.
Here is an in progress photo taken on the 17th.
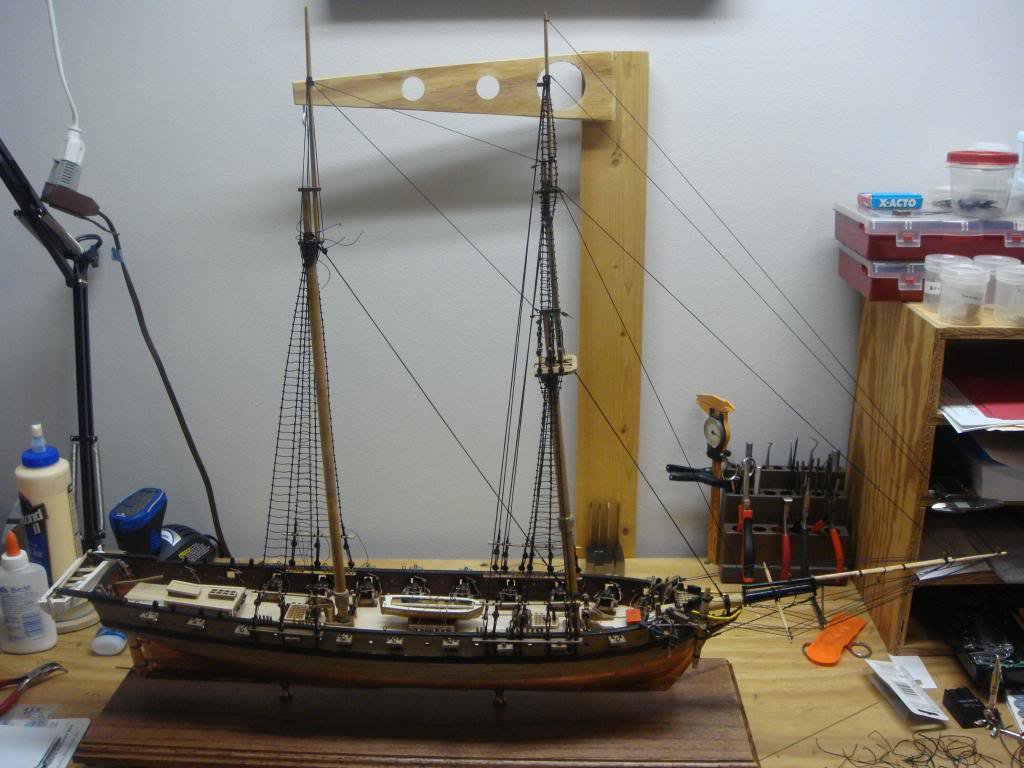
This week ended with a decision to sew sails and add them causing some changes such as having to remove the rings from the masts and fashion new ones as well as more research into how a sail is actually fashioned, attached and manipulated.
As I reveiw my excel spreadsheet daily journal, I loved my comment "I love ratlines" and also noticed this was the week after our honeymoon (finally) in New Orleans.
-
Rob
Welcome to the AVS ranks! I really enjoyed this kit and learned a lot from my mistakes. Here are a few things I learned.
1. Install spacers on the bulkheads and their extensions.
2. Make sure the plywood sits level and slopes as required. I did not and after installing my decking and planking the bulwarks, my cannons did not sit well.
3. Spend the time studying plans looking for eyebolts that will be needed later and at least pre-drill the holes. Install if possible. Trying to fit a pin drill in later may be difficult.
4. Pre-rig the cannons as much as possible before gluing in place.
5. When installing the rigging, I found it easier to work from the center of the ship outward once you get the shrouds in place.
Enjoy! I became addicted after the AVS.
-
Bill
Another option is 3D printing. A gentlemen on Shapeways.com has a set of cannons for the Hannah. I contacted him offline and asked him if it were possible to change the scale and quantity. He is going to adjust to my needs and re-post. You could have them printed with a black material so clean-up would not require touch up.
-
Philo426 - this sounds like a disaster for one of those women!
I have tried the microwave method with planks in paper towels and also in bowls of water. My only problem is when trying to do a longer plank than will fit. I have found tall, skinny vases filled with hot water from a tea pot of coffee maker work great. Once soaked I clamp the plank into a wooden mold that came with a starter model ship tool kit. I gave up on the plank bender that came with the kit. I ended up just scorching the plank each time.
-
I often wonder how many build logs are just never completed. I know I followed one that had a two year break. The builder had something happen in life that made him put the kit down for a while. I know I am lazy on the logs. it takes time to properly capture our work and then turn that into a journal that others can follow. I know I still have more work on my second to last build which was stretched out over several years due to a long break. I was lazy and did not photograph the rigging and sail construction as much as I wanted. I have since completed another model and never documented anything beyond hours spent on it since there were more than one logs on the same kit already here.
If you want feedback and help, the log is a big plus. As a first time builder about 8 years ago, I would have loved to have known this site existed to use other logs as reference and to ask for clarification.
-
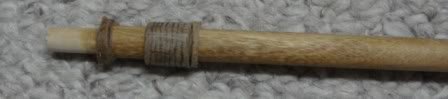
The lower masts did not recieve much documentation. They were pretty straightforward. I did create the rings for the sails to be attached too by laminating strips of brown paper from a grocery bag around a same size dowel rod. This modification would later be removed when I decided to sew my own sails and replace the rings with wire.
Here is the base of the main mast.
Here is the bowsprit getting a stay attached. The lower fore mast is barely in the shot.

Here is the lower fore mast getting a shroud attached. My shrouds were partially rigged with a third hand tool to help with the serving. Then I would run the line through the trestle, sew a few loops on it and serve it on the model. Finally, I would measure the second side of the shroud and serve it on the model. Not the most efficent method but everything stayed even and taut.
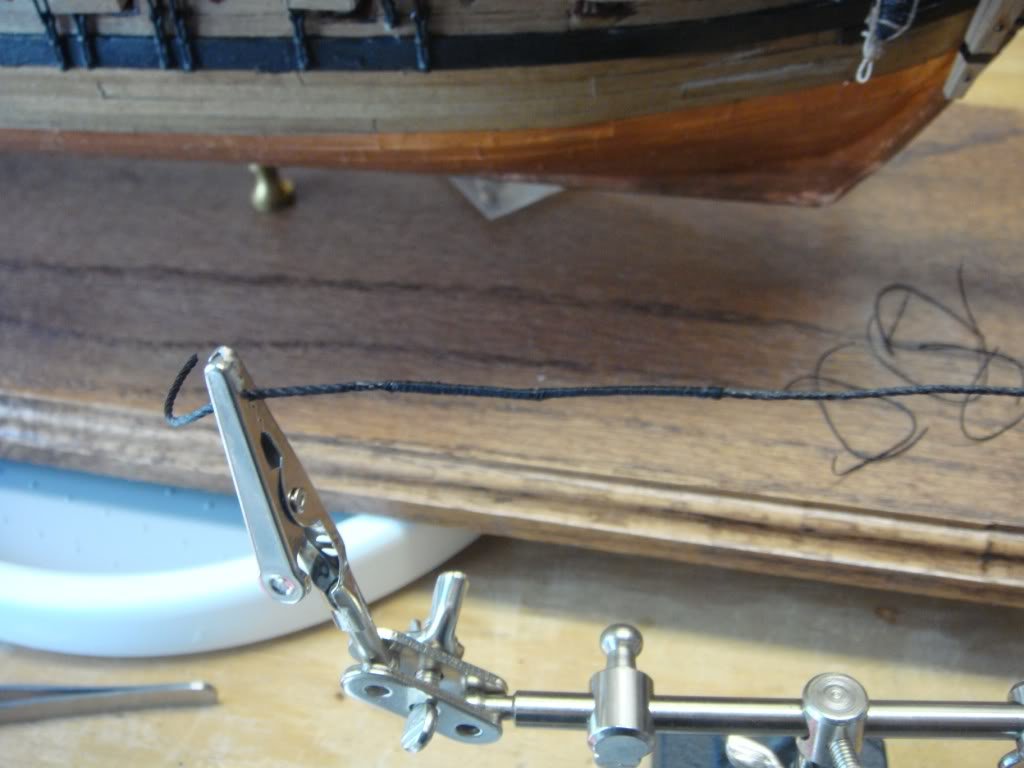

The upper masts were shaped and added. Intersting point about the PdN, she has extra standing rigging. This frustrated me and I turned to several fourms for help. The rigging plans had so many lines on them, I could not tell what went where towards the trestle areas. I took a break to build and then rig the spars. All were unpainted and clear coated with poly.
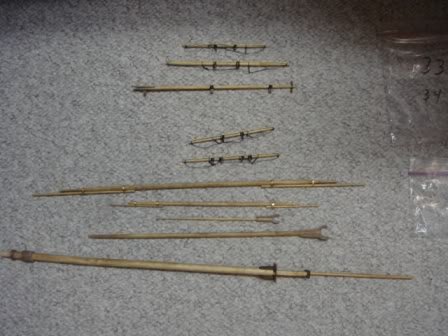
Here is a photo of boom jaws and a trestle.

Here are photos of many of the masts and spars assembled. This is my first multi-masted ship to rig. I put the smaller spars in ziplocks with their part numbers on them so I would not put them in the wrong place.
The plans are hard to follow and I ended up re-rigging several shrouds and stays. For reference here is how I rigged my fore mast. pairs 1&3 go to the platform and will have ratlines attached. pair 2 goes to the top mast. pair 4 is a stay that goes to the platform and is not rigged with ratlines. pair 5 goes to the platform and was rigged with ratlines. pair 6 goes to the fore mast tree as a stay and pair 7 went to midway up the topgallant mast as a stay. The main mast was simply with 3 pairs of shrouds and 1 pair of stays.
I temporarily tied stays in place to make sure everything remained orderly.
Well, it is late. I will add more when I have time. I need to show rigging the tops, ratlines, running rigging and sails. I probably need to photograph her completed too still. I know I did not allow any photos of me operating the sewing machine. lol.
-
For the rest of Spring 2012, I worked on the ship's boats, anchors and started on the lower masts. I enhanced the model with cannonball racks too. I took a short break for a training exercise, my wife had surgery and we sprung a leak in our second home that was being prepared to be sold that ended up costing us a lot of time to repair the water damage. Water leaked from a second floor toilet pipe through the floor that had been stripped for new tile, through the first floor ceiling (ruined in living room and kitchen), through the brand new hard flooring (causing 100% replacement on the first floor) through the subfloor and into the crawlspace ruining much of the insulation.
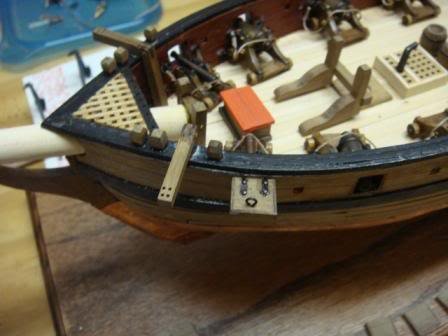
Here is a photo showing the stern davits that I added based on pictures on a book on the same ship.
Here is a picture showing one anchor in storage and some of the cannonball racks. The cannonballs are 4mm beads found at Hobby Lobby. Notice, I replaced all the brass eyebolts with black wire that I shaped myself instead of having to paint them all.
Here is a photo of the waist.
Here is a photo showing the ground tackle or anchor rigged in a stored position. You can also see the additional rigging added to the gunport hatches.
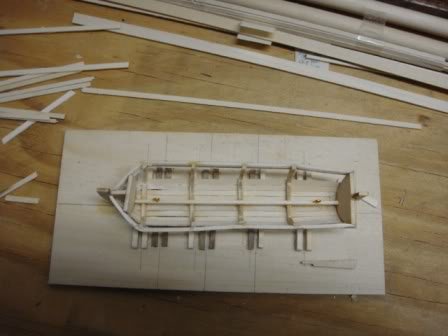
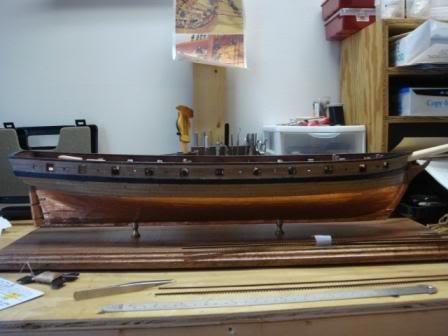
Here are several photos of the ship's boats under construction. I built the one provided with the kit and bought an additional one from Model Shipways. Both were built at the same time.
Here is the larger one on it's frame assembly.
Here is the small one on it's frame assembly.
Here is one of them removed from the frame and partially planked. The planking was quick and required minor shaping. I regret not taking enough photos. I planked as in the plans. The I installed the rails, seats. and stratchbuilt accessories.
Here is the stern boat attached. This was the larger one which was bought separetly.
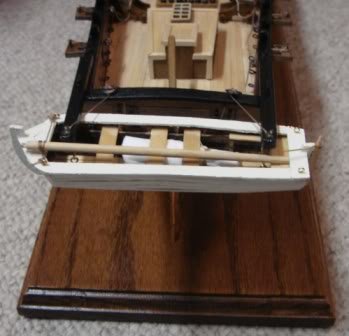
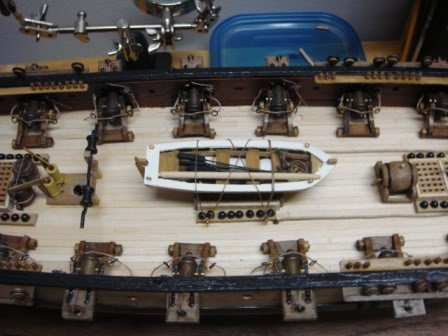
Here is the kit provided boat on the deck. Note the addition of oars, masts, sail cloth, coils of rope and you might be able to see a small grapple hook towards the bow which was made from four short lengths of thin wire.
-
Hello
I am am closing in on the last chapter and thought I would offer up some more comments and answer your questions.
#1 I did not start a log on this build, his site had several already before the data loss and I figured I would just add to them like now. I have some general notes which show I am currently at 145 hours of work and on the chapter for finishing the quarterdeck, installing the rudder.
#2 The ebony and bloodwood were not too difficult to work with overall. I did have some some issues with shaping the inner bulwarks planks and had a few random chips in the bloodwood. Luckily, I found the chips and was able to glue them back on. Eventually, I will psot some photos.
#3 I really wish I would have installed the cabin lower deck beams before the main deck's beams. Turns out I removed too much from the inside and the beams sat about 1/8 inch lower when using the ladder assemblies as a reference. Next build, I will know better. Today, as I was layering up planks for a partial cabin floor I thought "why did you not just install a shelf along the frames like you did fore the main deck and shim the gaps?" I could have covered the shims with a plank on each side...
#4 I decided to make the gungeons and pintles functional. I cut the brass tubes in half and used pins inside them as the hinge pin. I superglued the brass strips around the hinges' barrels and into the notch in the rudder which I made a little deeper than in the plans to compensate for the additional material. The brass supplied had been indented at bend points which during attachment proved to be weak points that broke so all the effort was for a little less since I ended up gluing more than I wanted so the rudder does not move now. I did install pins through the gungeons on the rudder as I have on previous builds.Since the brass is so fragile, I decided not to try it on the sternpost though.
I am currently rigging the rudder assembly and added a rudder chain assembly tonight.
-
I am working on the same model. I agree with most of your comments on materials, documentations, directions and support. I was disappointed when Mr. Hunt cut me off from his forum for lack of active participation. I guess not everyone has as much time to devote to this hobby to remain active. I also want to highlight your comment about the fragile parts. I had many knees, ship wheel parts and who knows what else just break into multiple pieces during removing them from the blanks. I ended up using my scroll saw to cut out the gun port frames and probably should have done the same on all those thin walnut and cherry parts.
After looking at your pictures I immediately noted that you had a much tighter fit of your frames to the keel and then realized I never installed the two outer pieces with the cut outs.
I also agree with the directions being confusing when referencing up, down and port starboard when the model is upside down in the jig.
When cutting my jig away, I spaced it out over a few days and thinned out the frames throughout the assembly. This allowed me to not lose my mind while sanding the interior. Next time I do a POF, I will not make the frames so thick. It really seemed like I was reducing 50% of the frames at some times and the bow was just not fun. I tried several different dremel attachments, sanding blocks, my drill press with a drum sander but nothing made it easy or even beyond mindless hand sanding.
I also traced the stern transom pattern onto the plywood and cut it out with a blade and scissors.
I also agree with the transom frames, they took a lot of effort to fit. I think making my own pattern would have been easier. I probably should have pinned them in place since clamping was tough too.
How did you get such an even sanding line on the interior? As I mentioned before, I just did not do a good job and satisfied myself knowing the planking would conceal my inaccuracy.
I really enjoyed building the deck but I am not sure about my templates placement. I had built the recommended MS cannon kit and had to do some serious adjustments to get it to sit in the gun port without any decking installed. I ended up cutting away about 1/8” of the deck clamp pieces and some serious fairing of the deck to maintain the camber and some sort of evenness from piece to piece.
I am presently installing the deck planks and regret covering up so much effort spent in getting tight fits between knees, carlings, ledges, and the beams.
I am going to attempt to replace some of the walnut with ebony, I like the dark contrast. I prefer the artistic angle instead of paint too so my bulwarks will be planked with bloodwood.
For anyone still looking for this kit, LSS was bought by Royal Shipyard of Plymouth and they will still provide support for replacement parts needed for an early kit. Mine is #135 from December 2006 and they offered to laser cut me some replacement parts.
-
Oh man, I missed your old log. I was using it as a guide as I completed mine. Sadly my log was lost in the data crash too and I have been to busy on my next build (which is completely undocumented) to reload and rewrite it.
-
I probably overcomplicated the gunport lids but I made an assembly line for them. I used the plywood ones that came with the kit. Then I installed three rows of planking on each side with the same material used on the main body's planking. Next, I wrapped the edges with additional planking to cover the end grain of the plywood. Next, I sanded everything and removed the excess. Then, I drilled holes for the hinge pins, an eyebolt and a pin that would assist with mounting to the hull.
Once I had completed the first one I began installing them. Some were still slightly missized so I did a little mixing and matching.
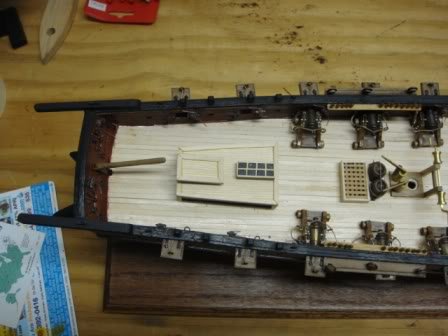
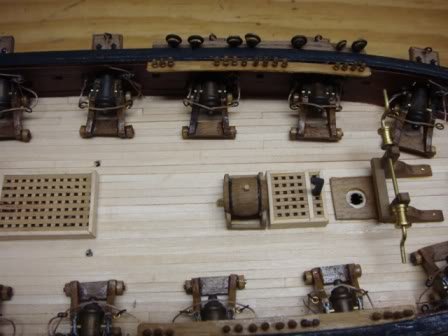
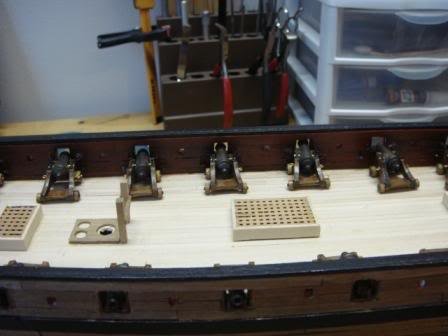
To break up the monotony, I started attaching the rest of the deck furniture. I know the red lid for the bow hatch is not accurate but I wanted a little color.
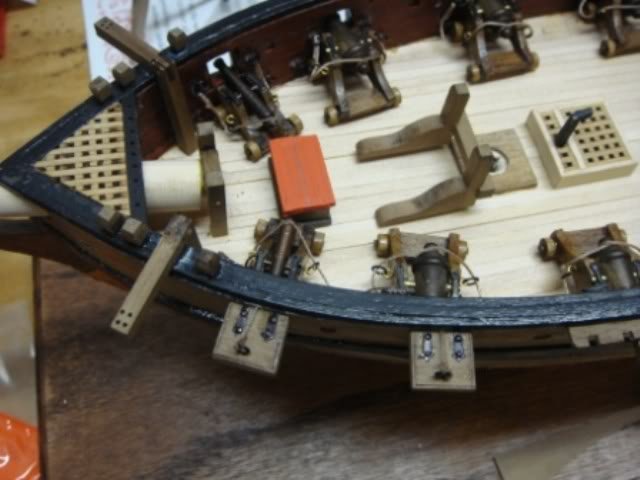
At some point I decided to do some enhancements like I found in a book on building the same ship in a different scale. I decided to add a water cask, some barrels on the deck and various cannonball holders with beads as cannonballs. Here are some pictures showing the effort. I also built and installed the pin rails and repaired a damaged channel. My placement of the cuts in the channels could have been better planned and executed. I think just drilling small holes and squaring up the corners would be easier than cutting each channel then installing caps. I also installed the stem framing. I am not sure if I like the yellow paint but the directions called for it. I doubt I installed it correctly, the plans and directions were not very enlightning.
Well that is enough rebuilding of a log for the night. My next post wil cover the addition of davits on the stern for a boat, the ground tackle being installed and building the small boats.
-
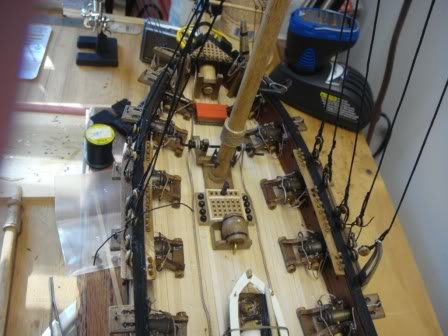
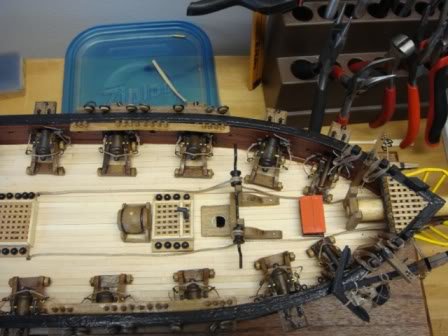
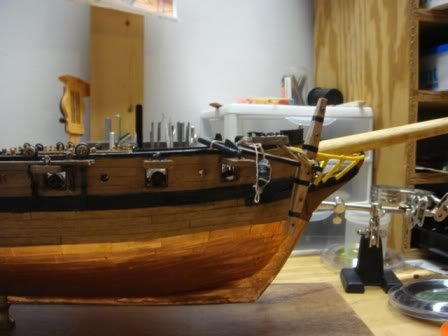
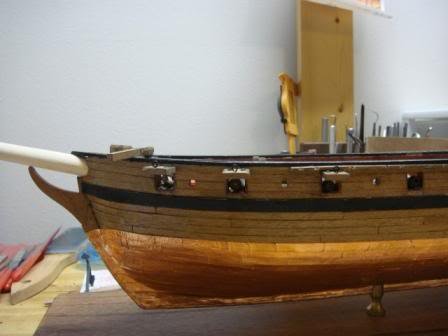
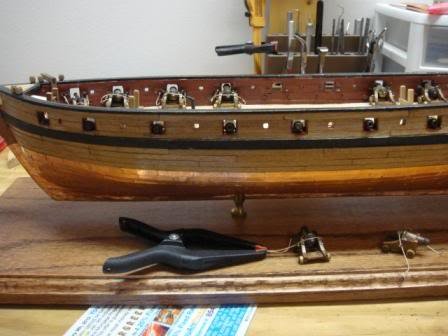
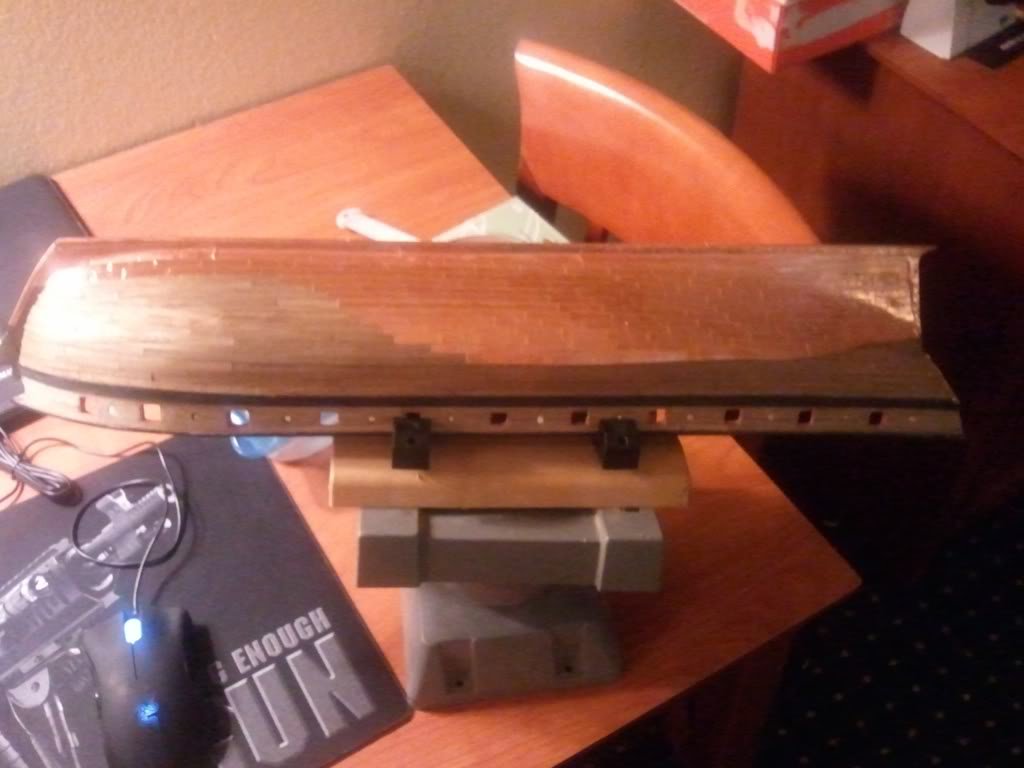
Here is a starboard side view after repairing the gunports and completing the copper plating.
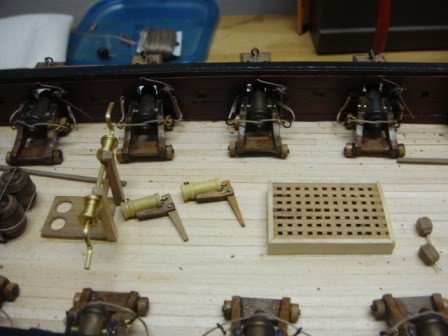
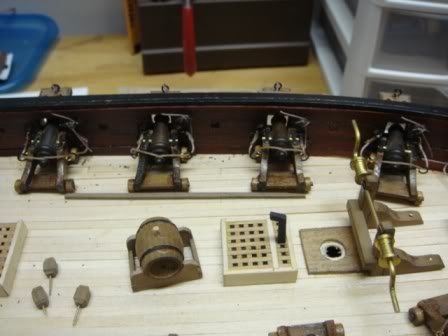
I built all of the deck furniture and did some dry fitting so I could work out spacing. I was concerned that the carronades would not have sufficient space to recoil.
Here is a shot of the waist area.
Here is a wider view. Notice the catheads have not been installed yet.

In February 2012 I began with the bow equipment. Here is a work in progress of the catheads.
I wish I would have spent more time studying the rigging plans. I would have discovered all the various hardware that needed to be mounted which could have been done before gluing everything in place. No, the furniture has not been attached, it is all loosely placed on the deck, I promise nothing was installed obviously crooked.
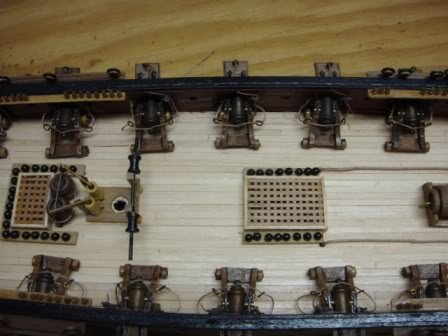
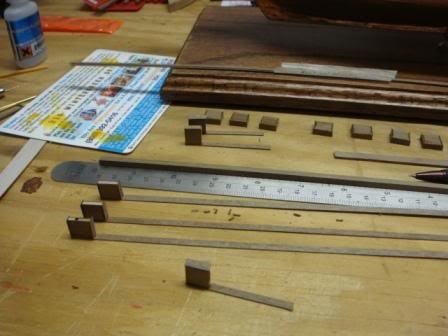
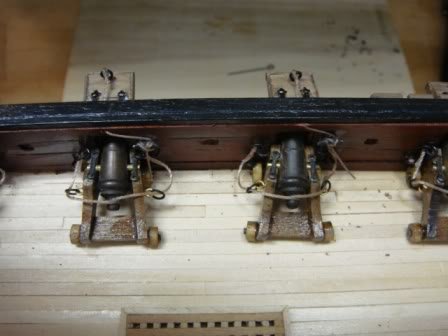
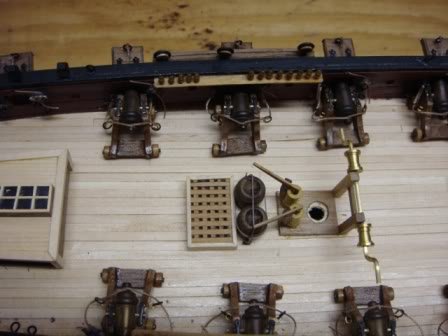
Here is a shot of the stern after installing some eyebolts. I made all of the eyebolts used on the ship from 22 gauge annealed wire. I chose to only install the breach lines. I made several attempts at the tackle assemblies but was never satisfied; everything looked too cramped. i tried making a false assembly with cordage, a short piece of scrap wood that I drilled through and inserted wire through for the hooks but was not satisfied so I left them off.
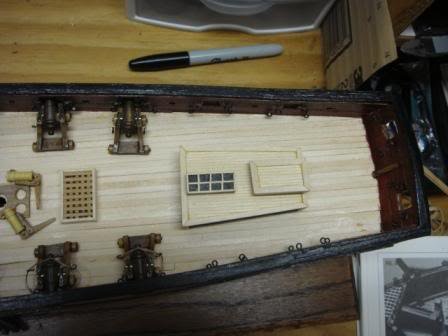
During the rigging of the arms, I ran an assembly line similar to how I had constructed them in 2006. Gun #1 was being rigged on the deck and glued in place. Gun #2 had the breach line threaded through the rings and had one eyebolt being glued to the line. Gun #3 had rings being installed on the carriages' eyebolts. Gun #4 had the carriage eyebolts being installed. I had a side production of eyebolts and eyebolts being attached to a precut breach line going too.
Overall, my log shows I spent about two weeks, 1-3 hours a night working on the deck furniture.
Next update, I will spotlight my assembly line for the gun port lid assemblies being built and attached.
-
Imagine a beautifully walnut planked hull. Now imagine that the gunports are misaligned so the carronades will not fit properly. Add to that, inner bulwark planking that was uneven, had cracked and be patched then painted over to hide the errors of a rushed job.
That is how I found my PdN after unwrapping the bubble wrap that had protected the hull from 2006 to 2011. I could not continue the model and thought about tossing the whole thing into the wood burning stove. Luckily, myfiancée challenged me and basicly said, "you can fix it".
While working on finishing a pair of Clay Feldman's Lexingtons, I ordered some bloodwood planks from The Lumberyard and started cleaning out the mess. I made a protective cover for the deck out of paper and taped off the rails. Then I commenced to grinding away the inner bulwarks until they were flat and a proper thickness minus 1/16" planking. I cut away all of the gunport linings and planking that was in the wrong place. Who knows maybe the gunports were right but my desk was wrong. Either way, the deck looked nice and the bulwarks were terrible.
In January 2011, I was in Virginia attending some training and thought I could work on the hull in the hotel room at night. I had decided to copper plate the hull while plating one of the Lexington's to cover up a poor planking job - It was good practice. The earthquake did not disrupt my work. I bought a roll of 1/4 inch copper tape at Hobby Lobby and started cutting it into one inch strips. I also bought a roll of the copper sheeting. I cut a one-inch strip of the sheeting and wrapped it around the keel and the garboard strake in order to give a smooth surface for the tape strips. I marked the waterline (my limit of advance). Then I started at the stern by wrapping strips around the sternpost from the keel to the waterline. I worked in staggered rows while applying hundreds of plates and made sure they were staggered. When I reach areas that were not an orderly fit, I laid plates and then laid a new set over them. This was necessary in the waist area as the hull bows outward. I completed one side before starting the other. I tried to replicate the first side as much as possible.
Here is a photo taken in the hotel room of the plating in progress.
Upon returning home, I had bloodwood 1/16 inch planking waiting to be installed for the inner bulwarks. Some may complain that this area should be painted but I am taking the approach that my model is more art than a faithful, museum quality replica.
Next I will post some comments and photos on deck furniture.
-
This space is reserved for me to repost/rewrite my build log from when I picked the hobby back up in 2011 and started to fix errors on my Prince de Neufchatel (PdN) that I had stopped working on in 2006. This log will pick up with a completed hull that had gunports in the wrong positions and poorly planked bulwarks.


US Brig Niagara by Abelson - Model Shipways - 3/16" scale
in - Kit build logs for subjects built from 1801 - 1850
Posted
I just scrolled through your log, I have the MS kit sitting in my pile of kits bought when they had a great sale about 10 years ago. I think this will be my next build based on your log. Echoing many others, love the amount of photos that are quality and clear. Also love the drawing on the plans for clarity.
I really appreciate you identifying all the small eyelets and chock points needing mounted to the hull before starting to rig and find it difficult to get a pin vise in later.
Any major lessons learned to pass along that did not get documented but as you reflect back to the early steps of the build?
Some specific questions:
1. Frames and filler blocks: Any regrets for not using filler blocks entirely between all of the framing? (I had a keel take a bend during a break in planking years ago)
2. Additional purchases: Have you compiled a list of "must buy" additional parts or do I need to scroll back through? I would rather shop all at once if possible. I see you id'ed shortages of many smaller items that add up in shipping charges.
3a. Gun tackle: Do you like how the brass hooks turned out in the armament tackle assemblies for the time it was worth or should I stick with bending wire?
3b. Or should I skip the hooks completely and just attach the lines to the rings with a little glue like many of MS kit's have us do? (I like the hooks ideally but once done, not sure if it looks to busy or out of scale?) Or should I skip the gun tackle completely to reduce "deck clutter"
4. Copper plating: your photos of the real ship appears to have copper plating below the waterline, any recommendations to do it or not do it? I have done it on some and not others so it's not the repetition that makes me think otherwise.
5. What's next for you? You are into the rigging now, have you thought what is your next build? I like the Niagara for the different cannonades than I have done before but I really enjoy building frames so my follow-on will like be a one where each frame is cut from about four pieces of cherry locally harvested. I recently purchases the Washington Galley plans. I find myself thinking ahead as I finish up a Hannah build based on plans and a wood only kit from The Lumberyard that has been a work in progress for about 7 years. I wonder if I need to try a completely different style of ship to expand my skills like a viking longboat or an Egyptian ship from a two-thousand years ago.