


Ulises Victoria
-
Posts
1,790 -
Joined
-
Last visited
Content Type
Profiles
Forums
Gallery
Events
Posts posted by Ulises Victoria
-
-
EJ. Use hooks instead of closed rings/eyeletes. That way you tie only once at the starting point and just go through the hooks placing your thread. That way you can use a single length of thread to make multiple strands. Saves time and it keeps an even tension in all the strands. Not sure if I am being clear with this. If not, I will assemble my ropewalk tomorrow and take some pictures.
- Old Collingwood, EJ_L and TimC
-
 3
3
-
Thanks a lot EJ. I've been obsessed with making my own ropes since my days of plastic building. I tried everything from twisting the thread with a rotary drill and then just bend it in half and it would twist over itself. Very rudimentary. At his moment I have spend a large amount of money in ropewalk machines: I have the Byrne's, the Domanoff and one which was made by a friend who has a metalworking business. Each has its pros and cons. The one made by my friend makes really tight and even ropes, but you can only make fixed lengths of about 250 270 cms. Another nice feature is that since the thread goes to some hooks you can have a single length of thread in 2, 4, 6, 8 strands to make different sizes of rope, and since it is one single thread it always keeps the same tension. But is very tiresome to work with. The Domanoff makes a continuous length of rope but you can use one strand at a time, so to make bigger rope you need bigger thread. I just found some thread called Cordonnet that is available in 7 different sizes and comes in white color. I will received it in a few days. I hope I can use these in the Domanoff machine to make various sizes. Will post my findings after a few trials.
- Old Collingwood and EJ_L
-
2
-
EJ...What ropemaking machine are you using?
- EJ_L and Old Collingwood
-
2
-
Update April 17 2021
Running rigging of Main Mast finished. Working with the fore mast now.
Here a few general photos of the Main Mast.
By the way... if you have problems with your knots untying, do yourself a favor and go to a music store... yes.... a music store, and get a cake of rosin, the stuff violinists rub their bows with. A few passes of your thread over it and your knots will never undo.
Pros: knots will not untie...
Cons: knots will never untie... once is tightened it is forever...
.JPG.b0d70d0713b94b488d85b1c0a1fe8cc6.JPG)
.JPG.6f338edb6d8a36a19a0df1d6f13fd2a6.JPG)
.JPG.54c1cc491f3f6ec0346aca71cdccc69c.JPG)
.JPG.6be7e6c446f6ca4cbe62fa43e85dba98.JPG)
And a couple of general views. As old Frankie and Elvis said: "And now, the end is near...."
.JPG.4b7368583e89f1e1510a7ed34ffafa8b.JPG)
.JPG.dcad6d27f53fa14c903fe28e0bd7cec3.JPG)
Thanks for watching!!!
- GrandpaPhil, marktiedens, JanV and 3 others
-
6
-
Small update:
Mizzen running rigging finished!
A few photos. All those loose scrambled threads on deck will be trimmed in due time. What I do is pass the thread through the belaying pin hole, and then "plug" the pin in the hole. This way is easier to make adjustments later. Just pull the pin out, pull or adjust the thread and plug again.
When I'm satisfied with everything, I apply a minuscule drop of diluted glue to secure things.
Thanks for visiting!!! Cheers!!!
.JPG.064f9cc7b4ae90eea77a9bf685a42616.JPG)
.JPG.edb959a7b09c5f48e15cd723959f4261.JPG)
.JPG.703029bac2b5852d7e969927bae272e4.JPG)
.JPG.9113a9a7cba6357fdaf2f9d9504b20e6.JPG)
.JPG.9ef157d003ec8a6082fefbec85f23a5e.JPG)
-
Fantastic!!! Your work is awesome!!! Very clean and neat. Congratulations on a magnificent work!
- EJ_L, J11 and Old Collingwood
-
3
-
On 5/16/2017 at 11:43 AM, *Hans* said:
The Dutch shipbuilders in the 17th century knew very well how to bend wood.
You need in fact three things: water to soften the cell membranes (which in fact is cellulose which dissolves in the water) - then heat to make these cell membranes flexible - and then some force to bend and twist the wood.
Steam has both the water and the heat - whereas a heat gun only has heat and uses the existing water still in the wood. For both methods you need force to bend it.
In Holland wood was often still quite wet - because it was transported via rivers and canals to the sawing mills, and also stored in water.
When a plank was ready in shape to be bend it was stuck into a special construction at one end - then with reed a fire was made under the plank, and with weight (stones) and forcing clamps the plank was bend into the right form.
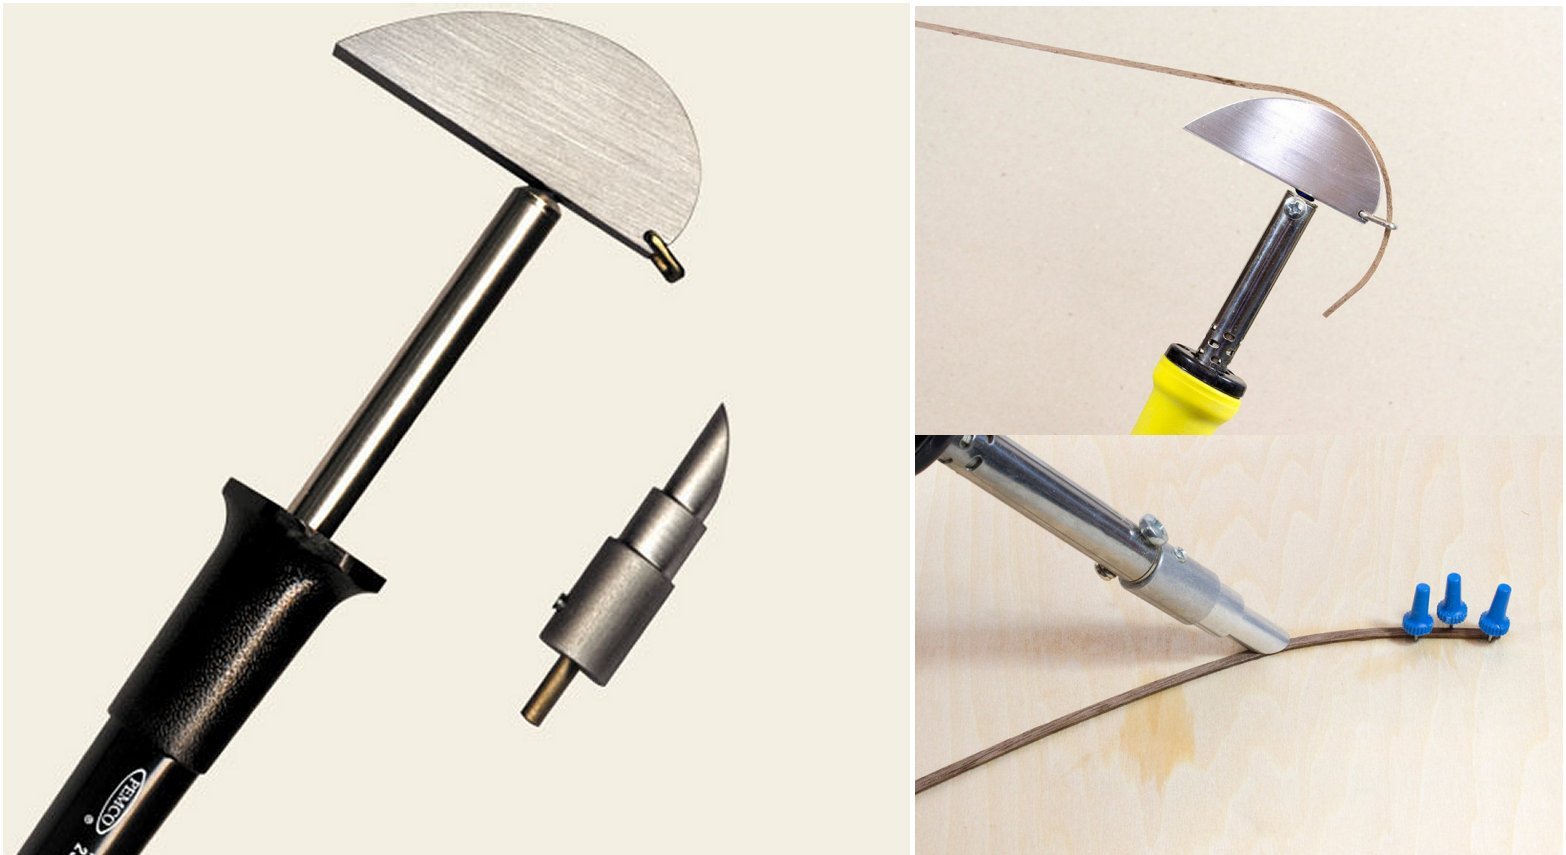
I have a special device to bend planks. It works with a soldering iron and a curved head. You need to make the small strips of wood wet (and it does not have to be soaking wet - for basswood and walnut 30 minutes in water are more than enough) - put it onto the head of the hot plank bender and force it slowly into its needed shape.
Everyone has his (or her) own method, but this one works very good for me.
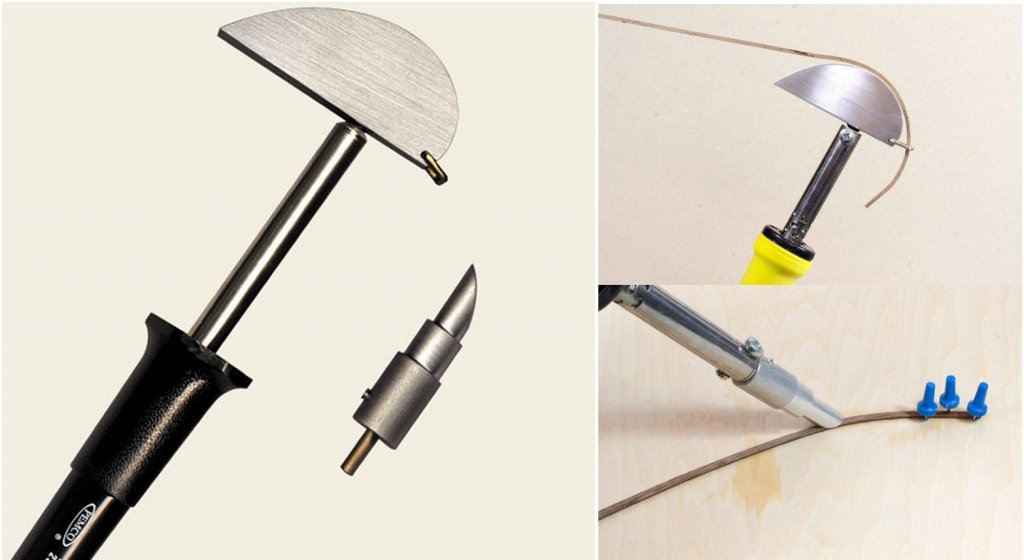
I have been looking for this bender but can not find it anywhere. Where did you get it???
-
Hello all. Thanks for the kind words. Here is another update.
First the wrong stuff...
I tried to drill the holes for the bowsprit gammoning and this was the result: ugly holes!
.JPG.2bddb2923effa382bd38c2e041138fcc.JPG)
So I made these "plates to cover up the mistake.
.JPG.035b3d5f39e5cc0e8c448fb34c665287.JPG)
And here is the result
.JPG.7fe4cd516e7a0ad7771148775f5a4dbc.JPG)
.JPG.303b20181191a54ca91668cda4e96672.JPG)
I am glad to say that the standing rigging is done!
I followed strictly the steps in the instructions:
.JPG.c3f627786894da9d7326072888ec9dac.JPG)
So here is some photos of the ship in her present state:
.JPG.6d9686d6da052666ec970448591e6748.JPG)
.JPG.df24f2b410d084cfd1f65aa932847f94.JPG)
.JPG.eb8f6ff3376cb37d1872853eda9de00e.JPG)
.JPG.8c758797e2b6913196da6119507ec754.JPG)
.JPG.bbc2b8ef624ae976faf07e749b49ed31.JPG)
.JPG.131aa9a0a4852d0c863a329ac729bf77.JPG)
.JPG.5eb8f0b94b2fbc24270ad212a28e04de.JPG)
.JPG.7812836bca88291c436cf9ef9bde9356.JPG)
.JPG.586f8314ee8f8c1a52f799919483157b.JPG)
Thank you all for your time. On with the running rigging, which has already been placed in some parts as you can see by all those light color threads placed everywhere.
See you next time!!!
- marktiedens, Mike Reader, zappto and 5 others
-
8
-
No! It is MY opinion. To me there is not a faster and more effective way to spoil a historical ship model, than paint it with bright colors and then apply a coat of gloss varnish. The same goes for golden hinges, chains, or any metal fittings.
- Chuck Seiler, Keithbrad80, mtaylor and 1 other
-
4
-
Hello Guys. I'm Back!
After a long period of no nautical activity, due to several reasons, in part (not necessarily in that order) procrastination, boredom (ratlines... do I need to say more?) health issues (nothing serious thanks God) I have already 5 of my fingers surgically intervened. I had to stop doing things I love and that made me loose the momentum, my guitar playing skills went down and my mood was in general very down. But finally I managed to slap myself in the head and started working on my project again. I am happy to announce that I am finished with the dreaded ratlines, and I am very excited (again) to start the fun part of the rigging of my ship. Here are just a few photos of my ship at its state at this very moment. If you see it dirty and covered in dust, is because it is!
") Also all those loose ropes are awaiting their proper placement. I just want to finish this project. I have to tell you I am not very proud of it. It is full of errors, mistakes and wrong doings, which I am NOT going to tell you about... (and if you find them, please keep it to yourself
Also all those loose ropes are awaiting their proper placement. I just want to finish this project. I have to tell you I am not very proud of it. It is full of errors, mistakes and wrong doings, which I am NOT going to tell you about... (and if you find them, please keep it to yourself ") ) It will look nice in my living room, though...
) It will look nice in my living room, though...
Thanks for watching, and I'm glad to see you guys again!
.JPG.16a8efef870c29fa4f330d504c94d894.JPG)
.JPG.9e602ec8dff6b2458a6ec67c915d9c15.JPG)
.JPG.4d64bd106efb8478c6a60d2995524014.JPG)
.JPG.4f105b35533873969ba13c36865c6ec9.JPG)
.JPG.541d145ccfcba14341d6f3b89828148c.JPG)
.JPG.c946be309a88d8fff224ba0e82a69741.JPG)
.JPG.223dd0f16697cea2164608058bc1ca0c.JPG)
.JPG.7bbc72224b16cd95a9cc298a0c8a250e.JPG)
.JPG.bb08a858db149e3a59b06a25855f8381.JPG)
- Duanelaker, Blackreed, md1400cs and 5 others
-
8
-
I have this book. I don't know if there was ever a Vasa II book
- mtaylor and thibaultron
-
2
-
-
A small update and a "Why-have-I-been-so-slow" excuse.
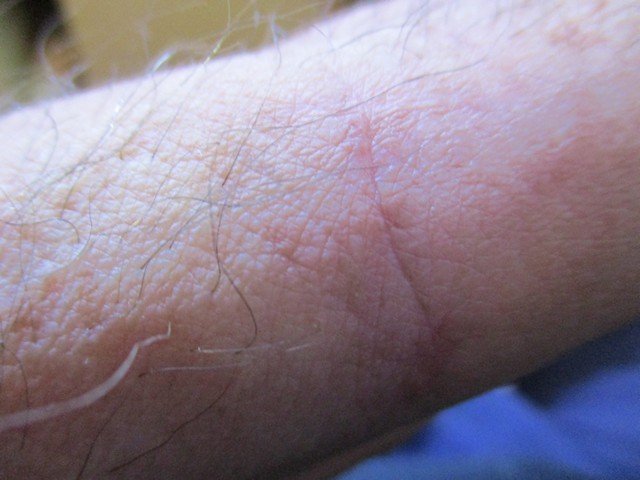
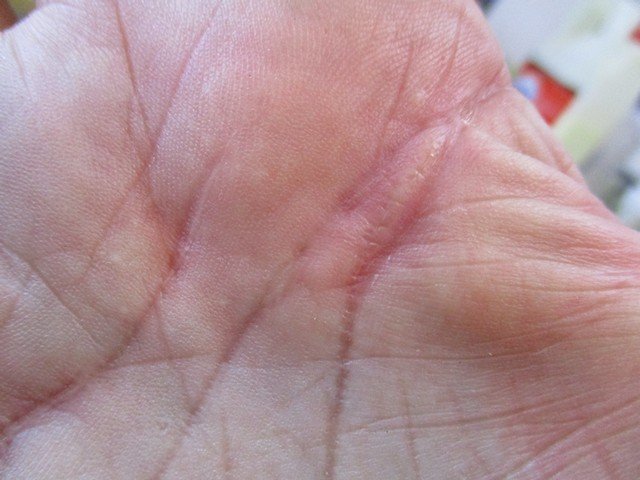
Hello all. Since August I started feeling a nasty pain in my left thumb that prevented me from doing almost anything with my left hand. Shortly after, I started developing a "trigger finger" condition in my right index.
I tried different alternative options before undergoing surgery, but nothing worked. I wasn't able even to hold my guitar, much less playing it. My chops went downhill terribly. So I decided there was nothing else to do but surgery. I had it on Sept. 17th.
Here the scars barely noticeable now
I wasn't able to do many things during the recovery time, and my mood went to floor level.
I finally and slowly began working again in my guitar and also in my ship. Here is a small update on my build.
Here is a general view. Shrouds in the mizzen mast are completed, as well as those in the lower main. 5 pairs still to go.
.JPG.af3154428609338c2ef80f871303d164.JPG)
Some details of the ongoing rigging. I am following strictly the instructions order. Not sure how wise this ultimately be
This were very difficult to make,,,
.JPG.e4b5e444f2a5fdb0a673a53d480226a0.JPG)
.JPG.ceebbed3b94910271ee7f506cbf1893e.JPG)
.JPG.46a42f7c01afd645848de25b4bce4677.JPG)
.JPG.f27772d13b4bcd590b2b779918f6dcce.JPG)
.JPG.08a252a3aa66cc461ab192b1ff7628fb.JPG)
And my super high tech jig to make coils
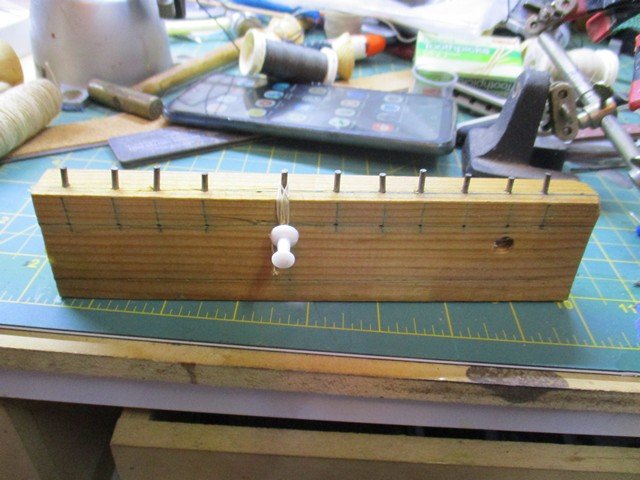
Result:
.JPG.436fad1306c096fcefd216a0c81dd5d6.JPG)
Thank you all for visiting. I feel I'm on track again!!!
Best regards!
-
Just a clarification: I said I developed this method because I did not copied it from anyone/anywhere else. One day I was thinking about how to make eyebolts easier and this came up to my mind. No doubt somebody else had came with the same idea. I don't want to take undue credit!
-
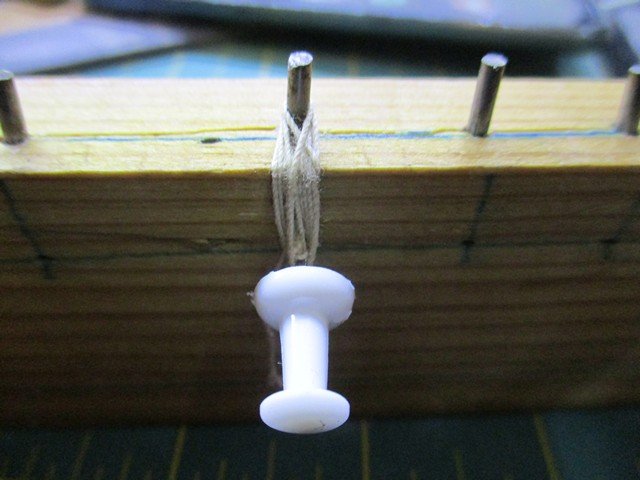
This is the method I developed many years ago.
.JPG.eb6f0781aa647dbbfdb260ad2ed97031.JPG)
.JPG.1e56688248a23cf788ee4e85fbbf08b6.JPG)
.JPG.2c39465fb3da4a385808e16307747b11.JPG)
.JPG.ac8d45645177584a1a59b47f14c878c2.JPG)
.JPG.47841c59aba45323fd392fc77df776d8.JPG)
.JPG.d9a7d2003c15ae11fa7a2d306d54f961.JPG)
The twisted part adds some strength to the joint
- mtaylor, EricWilliamMarshall, Canute and 1 other
-
4
-
Well done, my dear!!!
Happy days to you too!
-
2 hours ago, SHIPSCAT said:
Again thank you for them lovely comments, but believe me I have made lots of mistakes, I will try and do better next time.
Jo.
Part of the learning process, my dear, and looks like you are taking full advantage of it. 😉
- mtaylor, cog, popeye the sailor and 2 others
-
5
-
Wow Jo. Hard to believe this is your first build!!! You are doing an outstanding job here. Congratulations!!!
- paulsutcliffe, mtaylor, SHIPSCAT and 2 others
-
5
-
Jo. You can use fine sandpaper to get rid of the shine. More work but maybe that is something you already have at hand.
- Old Collingwood, mtaylor, cog and 2 others
-
5
-
Hello Jo. Outstanding job you doing here. In my very personal opinion, those barrels would look a lot better in a matte finish. They never were that shiny in real life.
-
I know, I know... I have been so slow... When furnishing my new workshop some things didn't quite came out right, and I need the guy who helped me to come back and fix some things, like the height of my main table. Working in the upper rigging has to be done standing up, and I tire very soon. Ok enough excuses.
Mizzen mast standing rigging is finished, including shrouds and ratlines up to the topmast.
I am following strictly the order laid down in the instructions. Not sure if this is the wisest thing to do, but time will tell...\
Making a mouse in Chuck's Serv-O-Matic machine
.JPG.a149282efbc64fe6645cd78530cb8b5d.JPG)
Placement of shrouds
.JPG.27261215ed3de800d506ceb3525695aa.JPG)
First stay
.JPG.e73721764d16086b619c1aac5c06904c.JPG)
.JPG.4fd54b9cebf6f115209f498dd3202ec2.JPG)
Tying of deadeyes
.JPG.24e9b154587432670772a48c19518cf0.JPG)
Some more rigging done
.JPG.d4bffe87049ccfee44b3cf6ee9714d7c.JPG)
.JPG.86aa27bf88f510c30a4fbd7c5229d58c.JPG)
Mizzen mast finished
.JPG.3bb53c0ae26ddcfa77caca54632245c9.JPG)
.JPG.db83a23d045e9db8774be104fac24fdc.JPG)
Thank you all for visiting!!!
Best regards!!!
- GrandpaPhil, paulsutcliffe, BANYAN and 5 others
-
8
-
Good topic and as usual, you will get as many different answers as people answering.
I usually work in strict order. One of my great pleasures is to go through all the manuals and instructions of a new kit while sipping my morning coffee. So the kit initially is built in a strict order, at least in my mind.
That being said, If I see a clear opportunity to do something in a different order I go for it. As an example, some kits have the anchors as the final step... I (may) put them as soon as I finish the hull...
At this moment I'm in the process of rigging my Royal Louis. I am following the order of the lines in a strict order. Still not sure if this is the wisest thing to do. Time will tell.
Also, so far I have been working on one model at a time, but that was mainly due to lack of space. Since I moved to a new house with plenty of room (3 bedrooms all for my self
) I've been thinking about working on two models at a time, and one being plastic and the other wood, to break monotony
Cheers!
- mtaylor and marktiedens
-
2
-
My best wishes for your prompt recovery.
Hugs
Ulises
- cog, mtaylor, popeye the sailor and 2 others
-
5
-
Royal Louis 1780 by Ulises Victoria - FINISHED - Mamoli - Scale 1/90 - French 126-gun ship
in - Kit build logs for subjects built from 1751 - 1800
Posted
One more update.
This side of this rigging sheet plan has been completed. Plenty of red marks lol. The other side will deal with bowsprit rigging and of the large diagonal sail in the mizzen mast.
Every little red line here is a step that has been completed. Most of them (those marked with "D") had to be done twice: one per side.
Here are some general photos...
I like to leave some loose ropes in my ships. It is my feeling that it breaks rigidity and makes the ship feel more... I don't know... I just like it!")
OOPS! This last photo does not belong here. Hehe. I couldn't resist and just took out the keel and bulkheads and assemble them just to have an idea of the size of my next project! Nothing glued or even squared... can't really say I already started this ship!!! ... hehehe.
Thanks for visiting. Have a great day, all...