roach101761
-
Posts
204 -
Joined
-
Last visited
Content Type
Profiles
Forums
Gallery
Events
Everything posted by roach101761
-
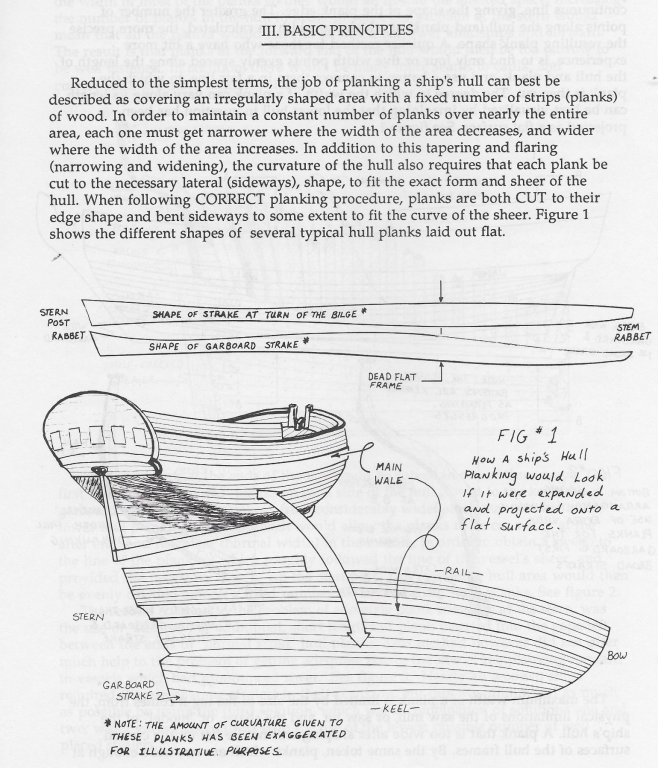
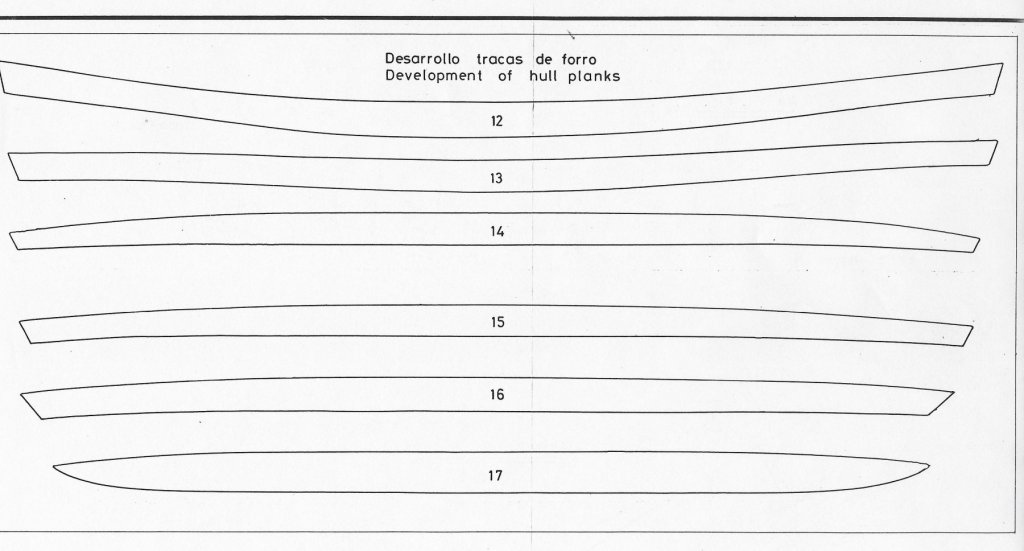
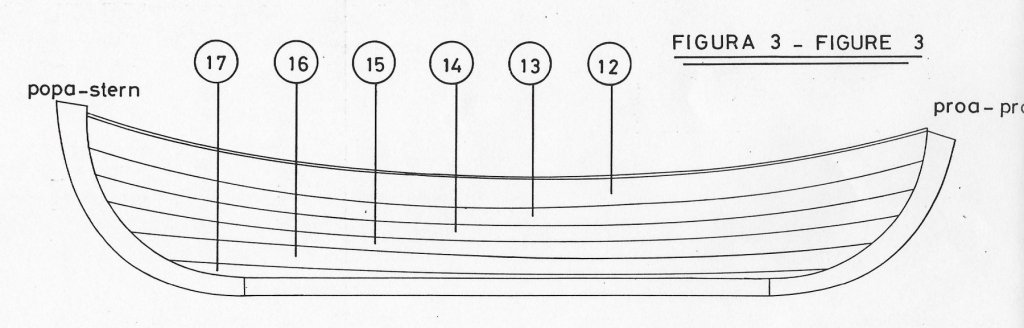
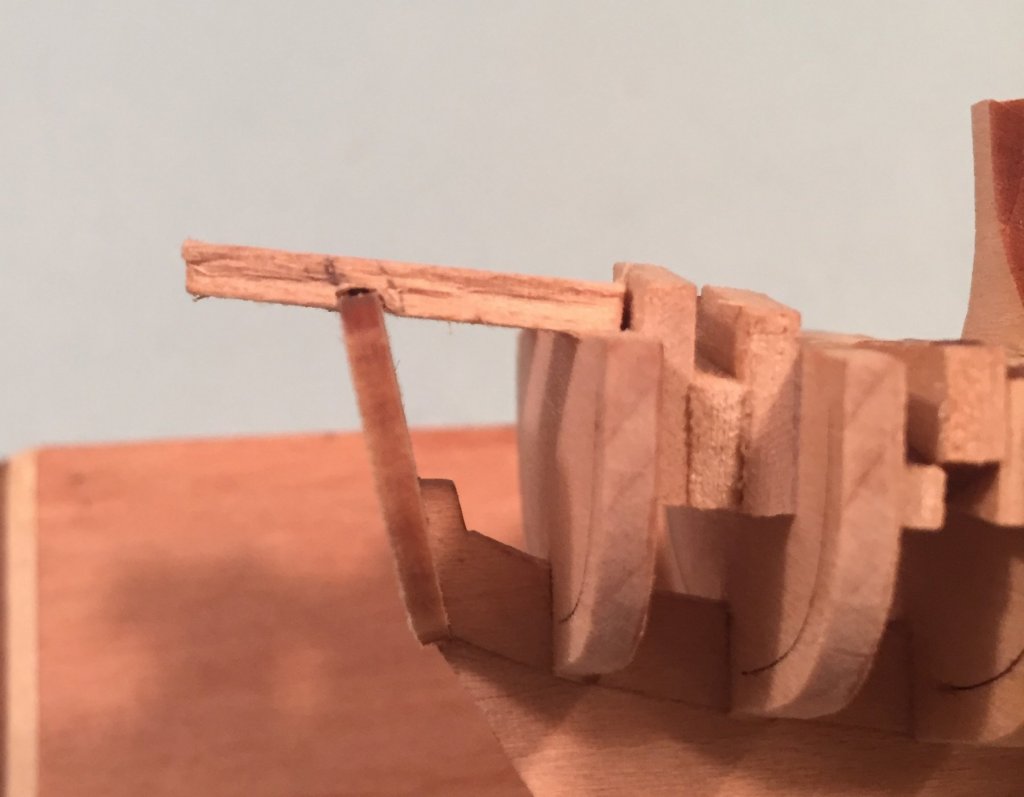
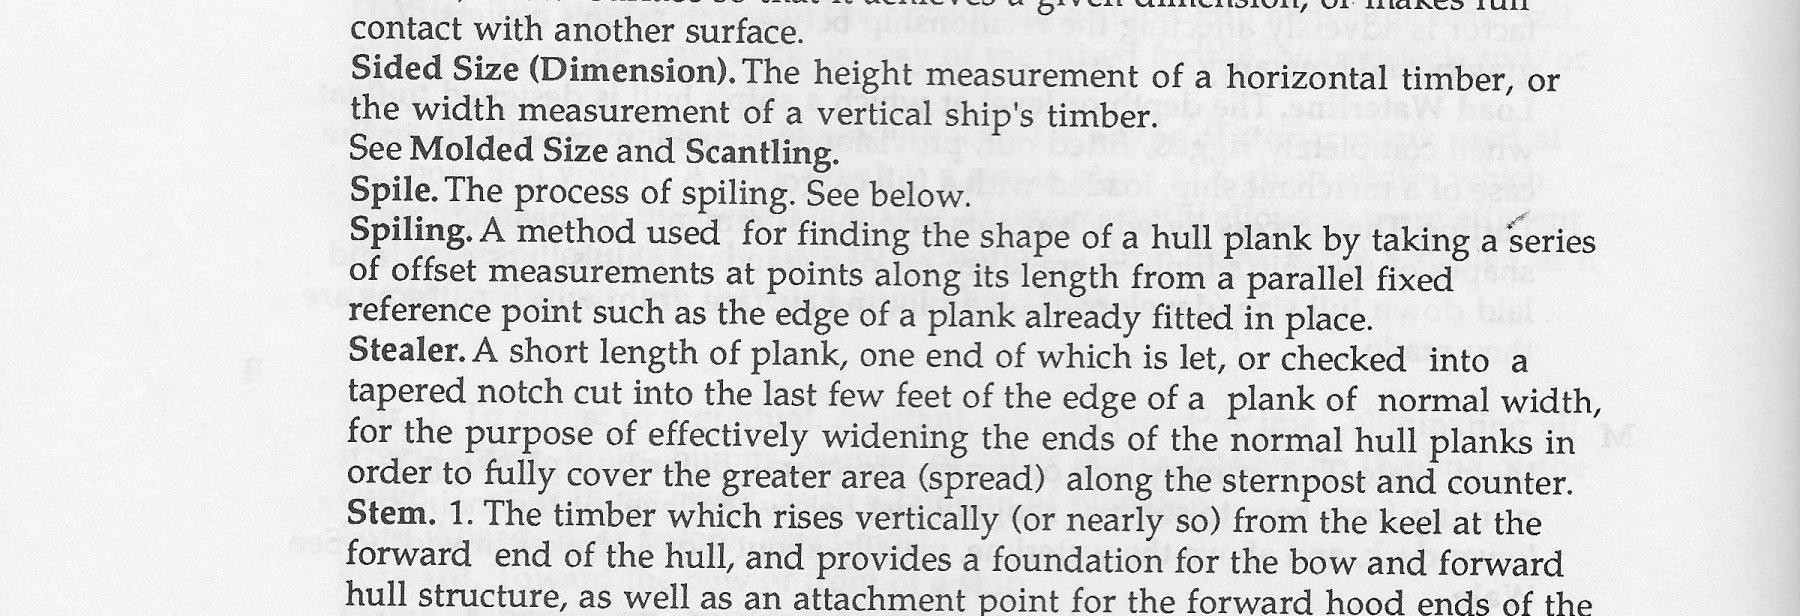
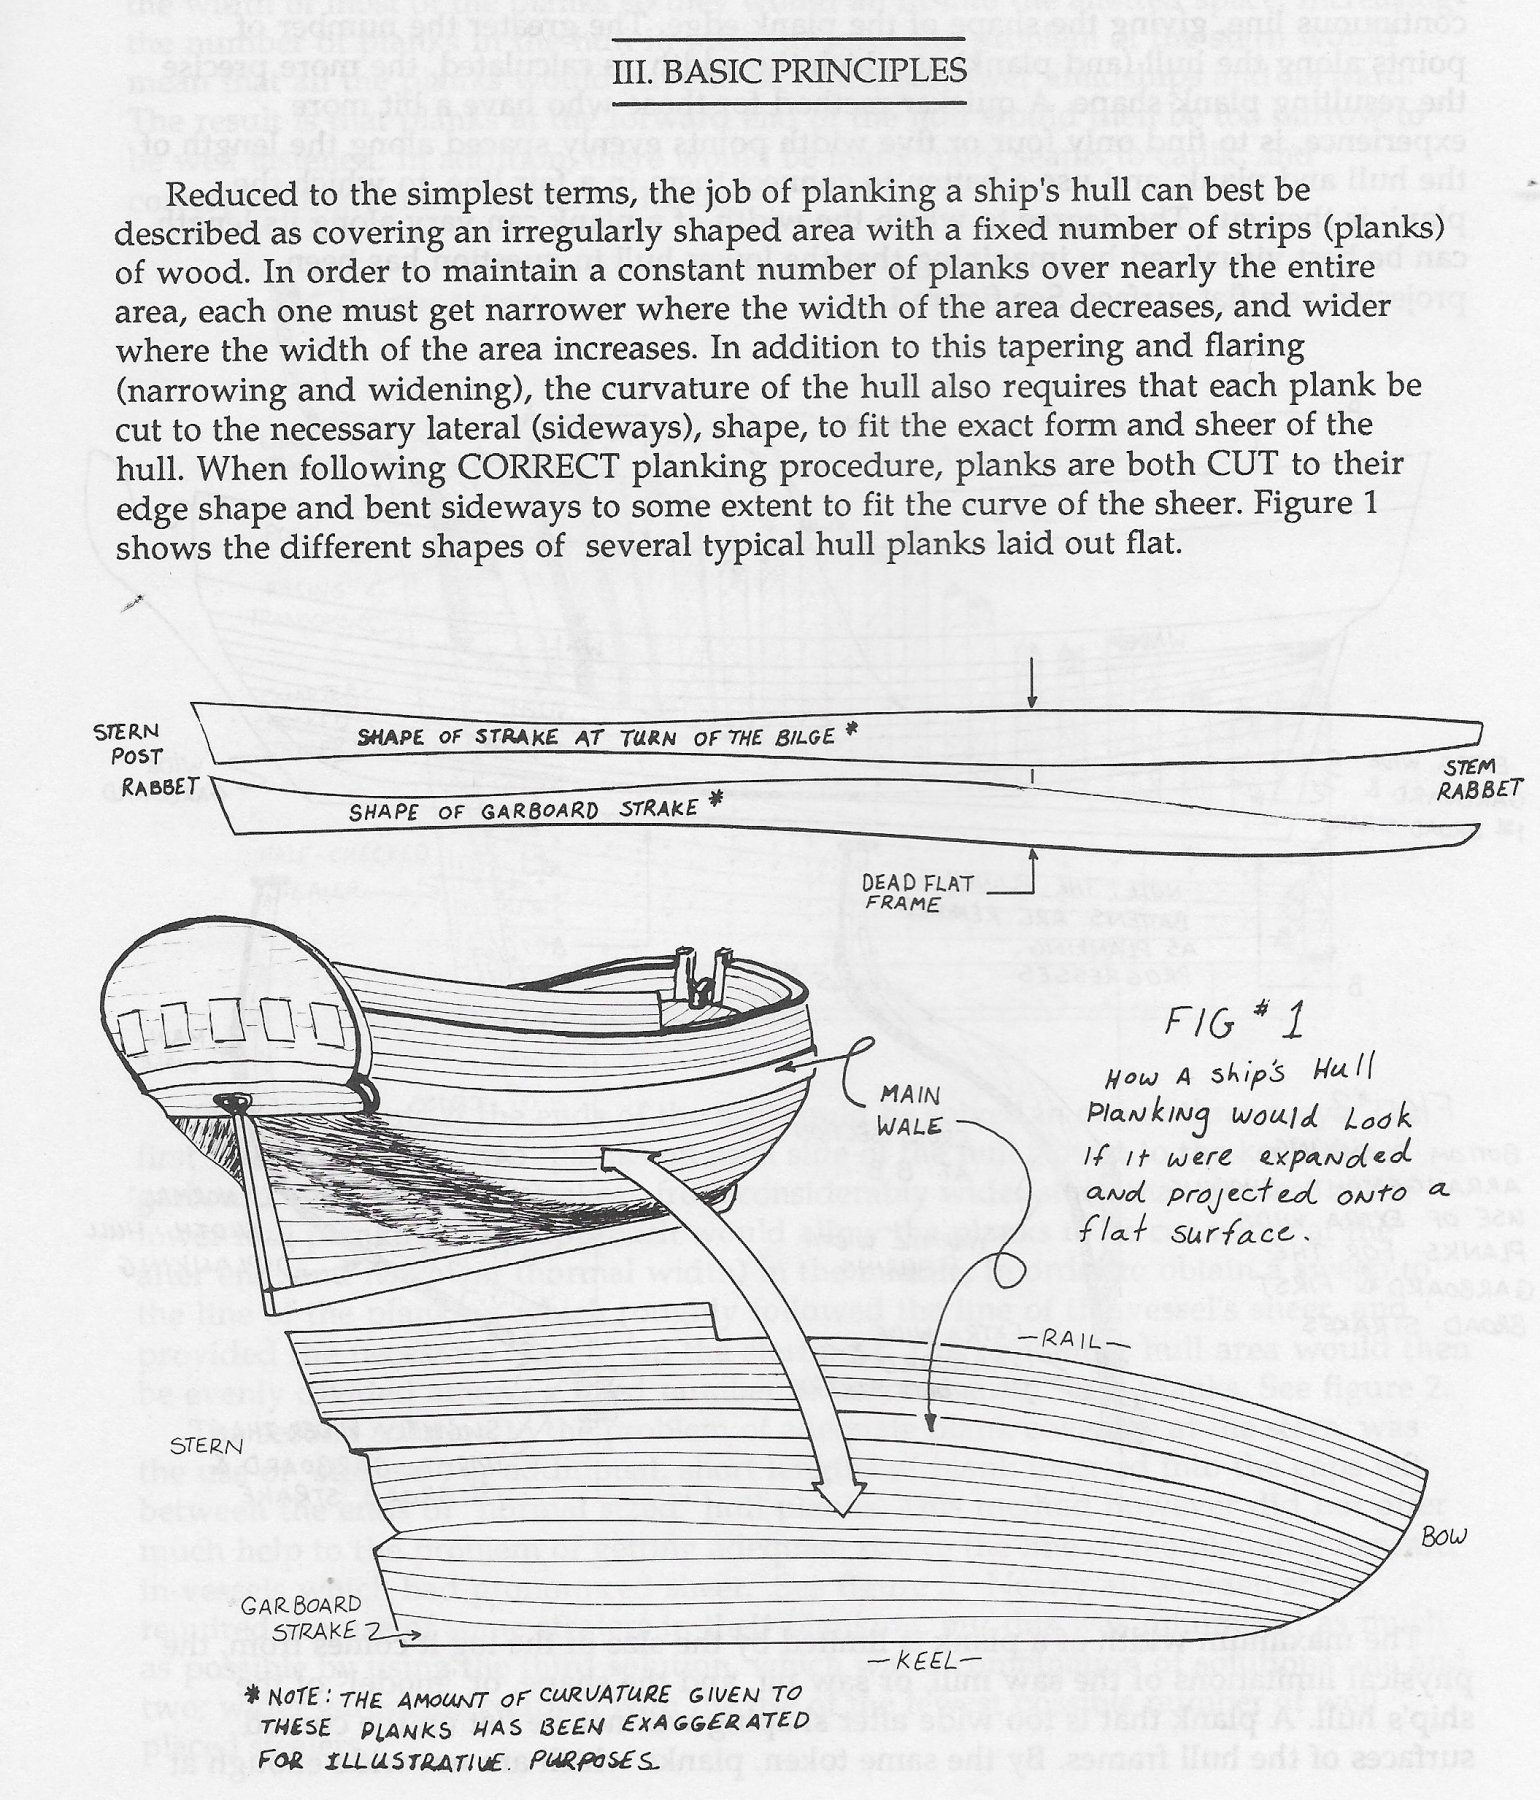
BENDING PLANKS It is time to move on toward planking this model. To begin this process it is necessary to install the sheer planks as instructed in the manual. There will be two planks installed on the Port side and two installed on the Starboard side. In a larger subject these planks would be the wales. These are the planking strakes that bind the hull together to solidify the hull shape. The instruction manual describes two very good techniques for bending the planks. First, to bend the planks to take the shape of the bow, and second, to to edge bend the planks to take the shape of the hull around a compound curve in the stem. You edge bend the plank in a downward direction. It seems counter intuitive, but it is correct. Bending planks to the proper shape is a SHORT CUT developed for building a model ship or boat. IT IS NOT SPILING. Spiliing is a much more difficult process to plank a boat or ship model and the most correct method. Let me define spiling and show you an example or two so you will understand that Spiling is not for the beginner. Jim Roberts defines spiling as follows: Further Jim Roberts defines the basic concept of planking a hull as follows. This example also shows a few drawings demonstrating the problem of what the shape of the planks should be, although exaggerated. The best example that I have ever run across to demonstrate the issue is the Artesania Latina kit and plans for the Morgan Whale boat. It is a double planked kit of a whale boat. However, the first layer of planks are actually spiled planks to cover the frames and form the basic shape of the hull. The model actually provides the cut planks spiled to fit the shape of the hull. Here is a portion of the plans showing actual shape of the planks. Here is the profile of the hull showing the run and installation of the spiled planks. In the boat yard or ship yard these planks would actually be cut from larger material to fill the space needed. After they were cut, they would be put in the steam box in order to bend them to the shape of the hull, and when installed they would take the compound shape the hull and be fixed in place. In the next installment I will show and describe the method I used to bend planks for the sheer strakes of the boat. As hint, I suggest you start looking at your frying pans. Especially those that slope from the top edge to the bottom of the pan just like the curves of a boat.

-
Just when I thought I was done buying ship model kits, Model Expo dangles a model in front of me that temps me greatly. The most recent Model Expo Sales email features CCV Modelli's Bilancella, a small work boat from the mid to late 19th century. It appeals to me because it is a less complicated subject, thus promising success in completion in a short amount of time. With a little bit of additional research perhaps it can be super detailed to improve the quality of the end result. Does anyone here have any experience with this kit?
-
Just when I thought I was done buying ship model kits, Model Expo dangles a model in front of me that temps me greatly. The most recent Model Expos Sales email features CCV Modelli's Bilancella, a small work boat from the mid to late 19th century. It appeals to me because it is a less complicated subject, thus promising success in completion in a short amount of time. With a little bit of additional research perhaps it can be super detailed to improve the quality of the end result. Does anyone here have any experience with this kit?
-
Making small nails with round head
roach101761 replied to Aleksei Domanov's topic in Metal Work, Soldering and Metal Fittings
That was fantastic. What a neat trick. -
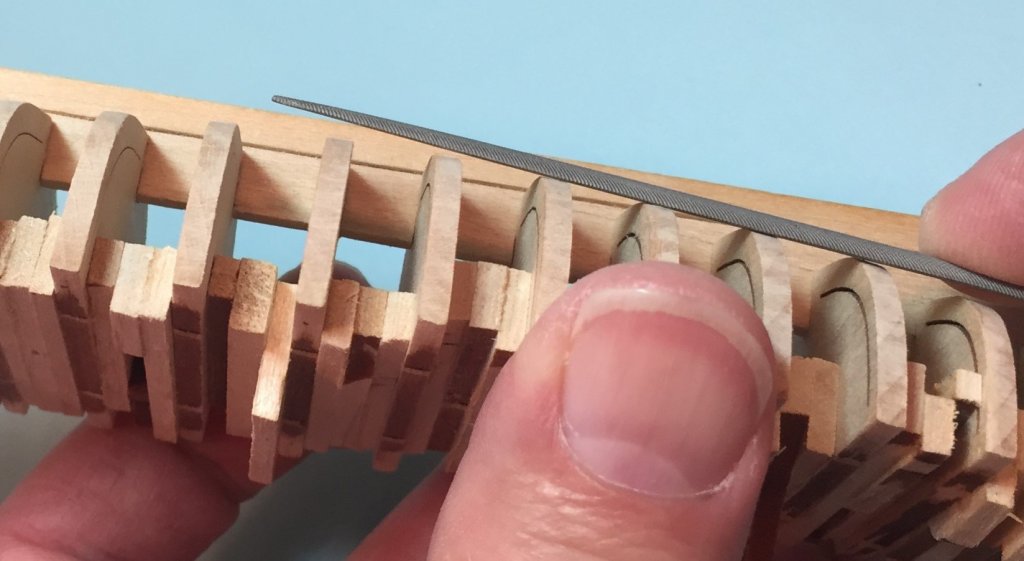
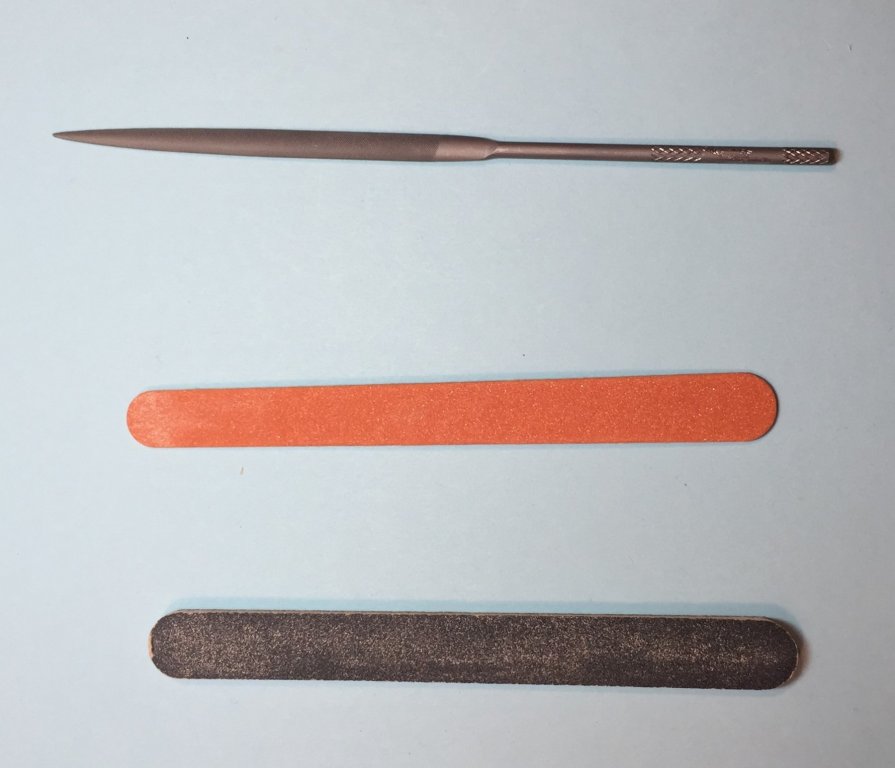
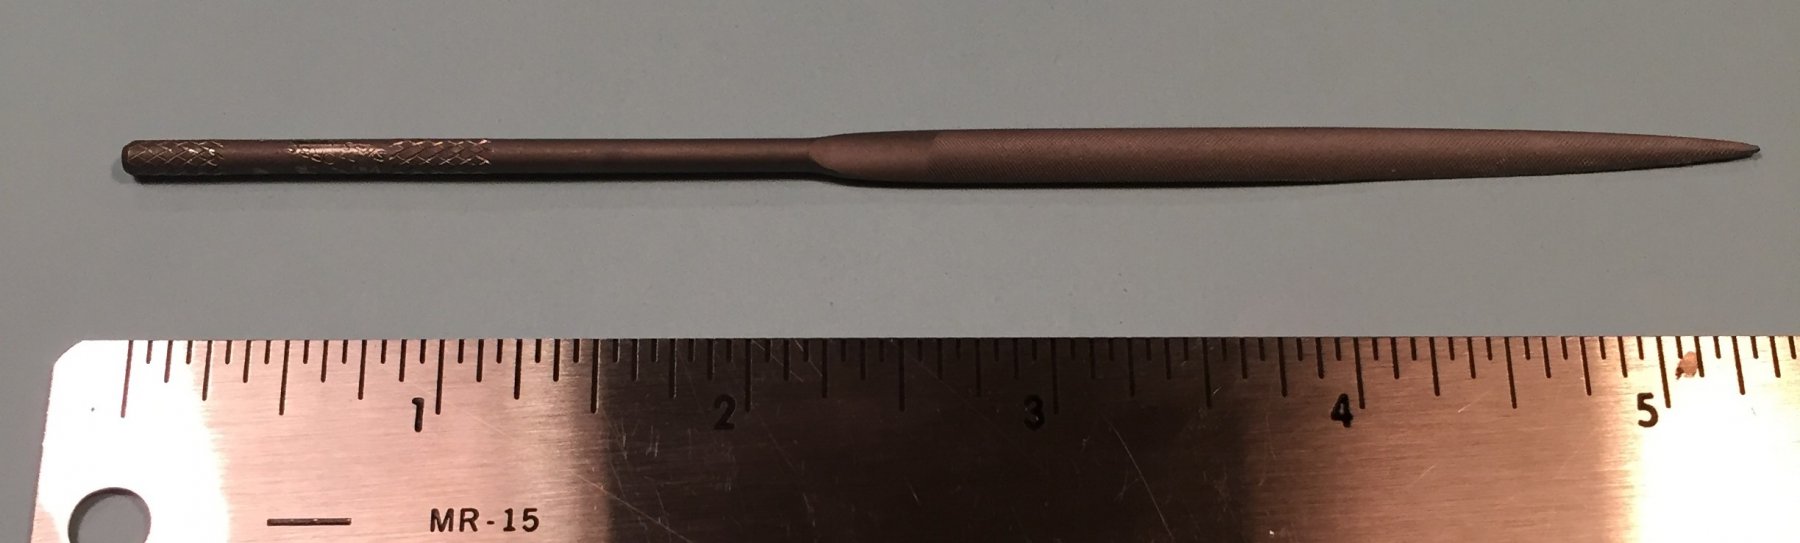
FAIRING THE TRANSOM TO THE HULL It was a few days before I could return to the model to fair the transom. The white glue had days to set up. The transom was very rigid as glued and braced. It showed very little movement as I filed it down with my Swiss half round 5 1/2 inch needle file. This was the only tool I used for fairing the transom. It worked very well and the work went surprisingly fast. It only took me about 35 minutes to get the desired result. The more I use this file the more I appreciate the advice given by Jim above. He says you can complete the model with this one high quality file and recommended buying one file rather than a set of lesser quality files. Here is the picture of my file, followed by the photos of the transom.

-
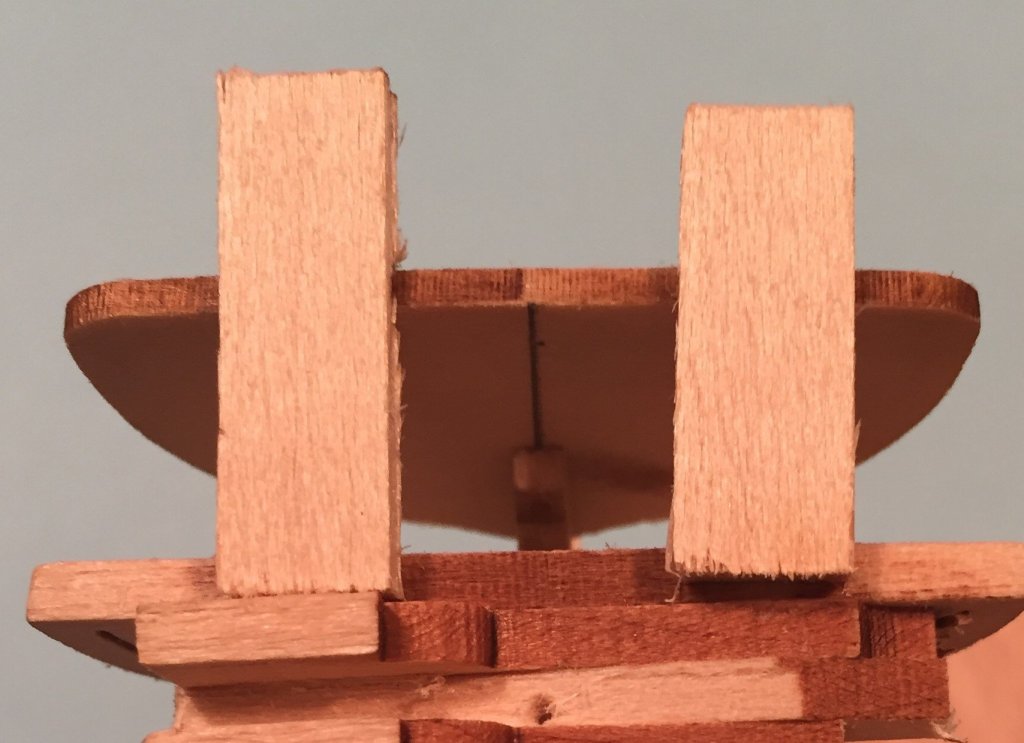
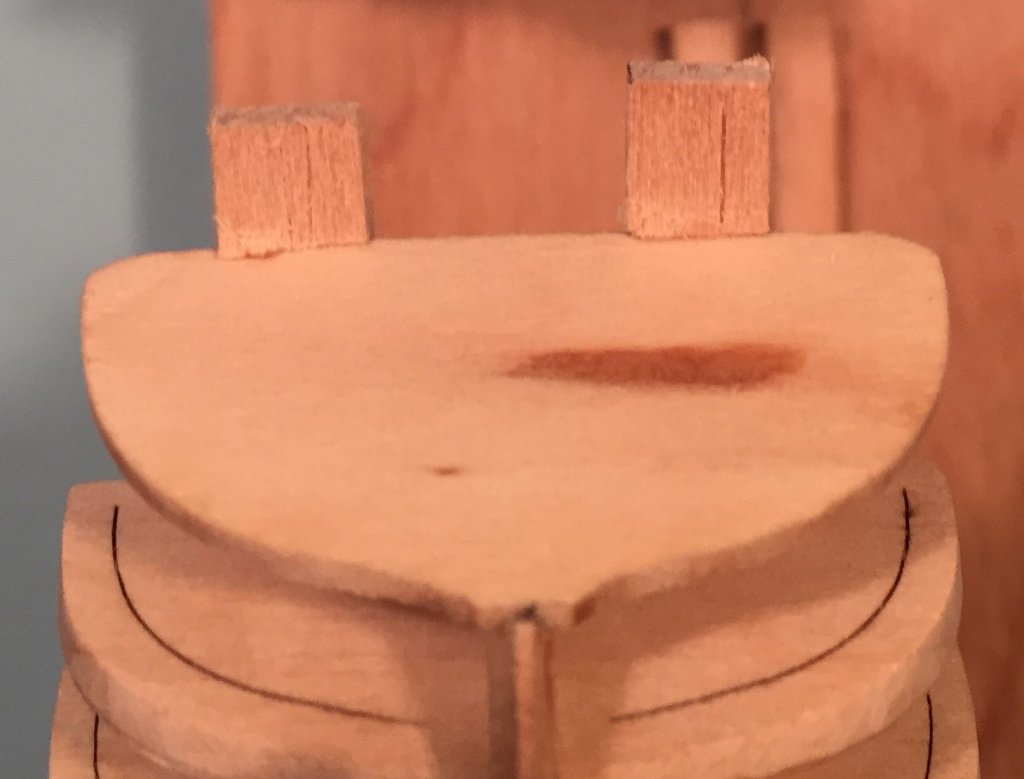
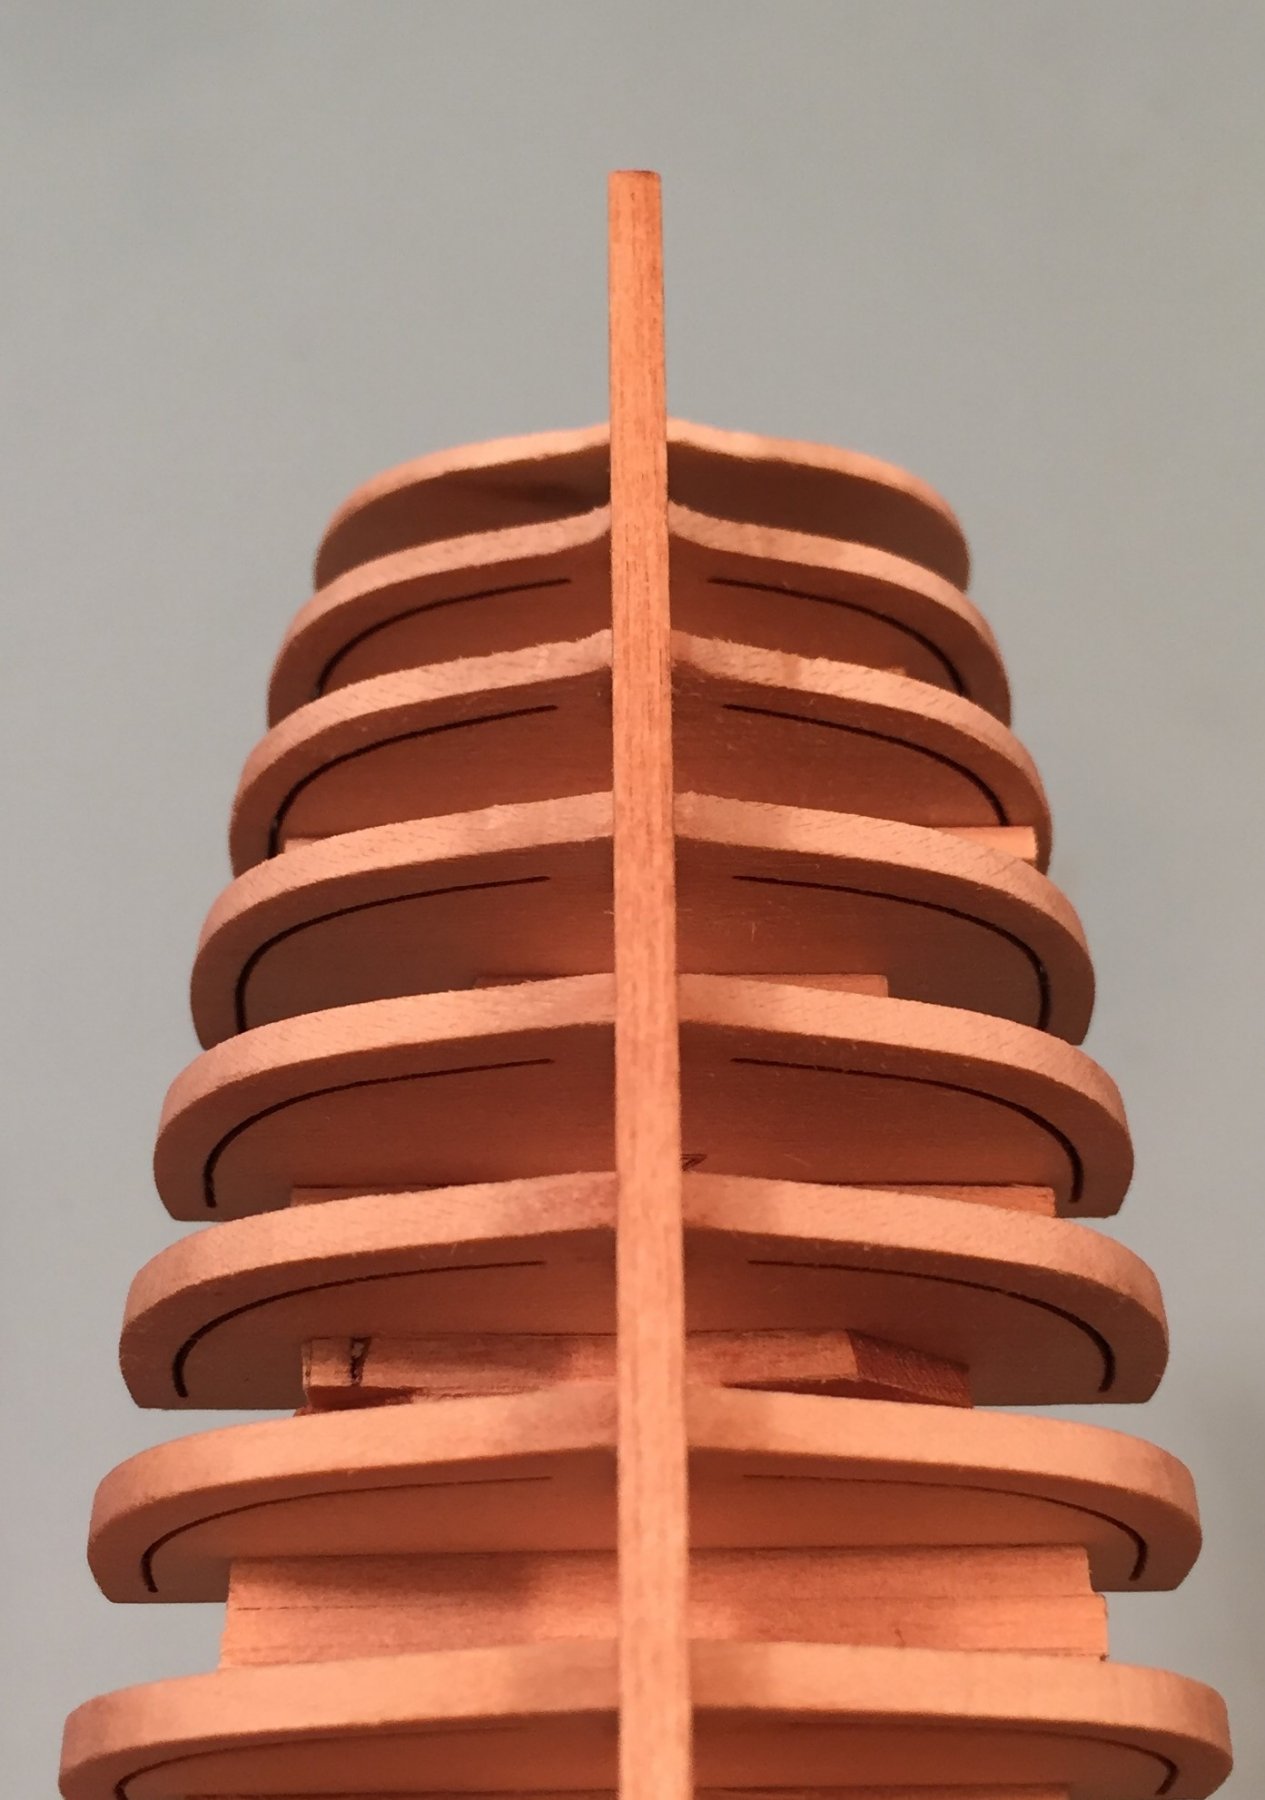
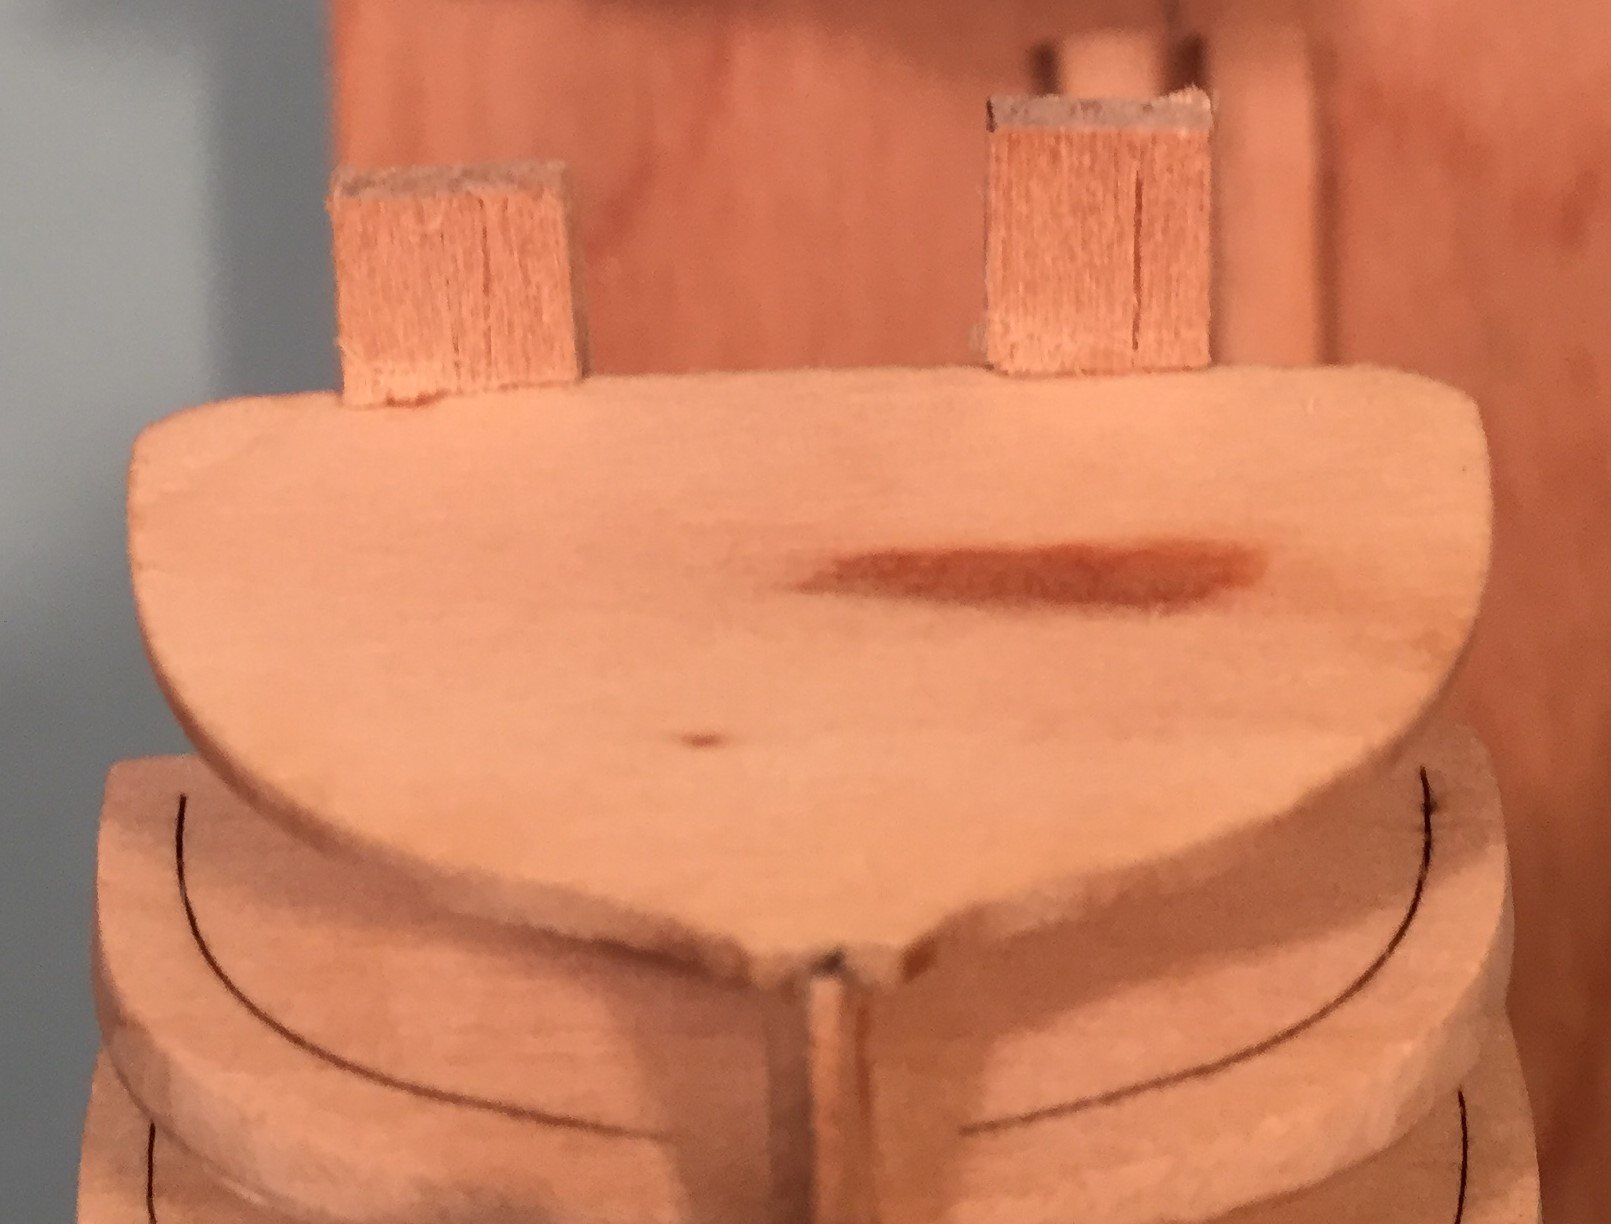
CENTER LINE ON BRACED TRANSOM As promised above here are a few pictures of the center line I placed on the transom and photos of the braced transom prior to fairing it to the hull. Just so all of you know, one of my personal short comings is that I have a terrible time finding the center of anything. I may have slightly missed. However, I believe the transom is centered and my line is a midge off. Here is the center line and the braced transom from above. Here is the braced transom from below. Here is the braced transom from the starboard side. The brace pieces are more scrap from the kit. I cut grooves in them to have them saddle or fit over the transom. I did this with an xacto #11 and my files. I sanded down the part that rests on the bulkhead to match the angle to provide a good bond for the white glue. White glue rules. The bottle says to let it set overnight for maximum strength. I have put the transom on three times now. I glued up and clamped the transom. I let it sit overnight. Actually 24 hours because I came back to it after work the next day. I then made the braces and glued them on and left it over night. Actually, more than 24 hours because home life and work life did not allow any modeling. None the less, I let the glue set up pursuant to the instructions on the bottle. I will let you know how it turns out when I fair the transom to the hull.
-
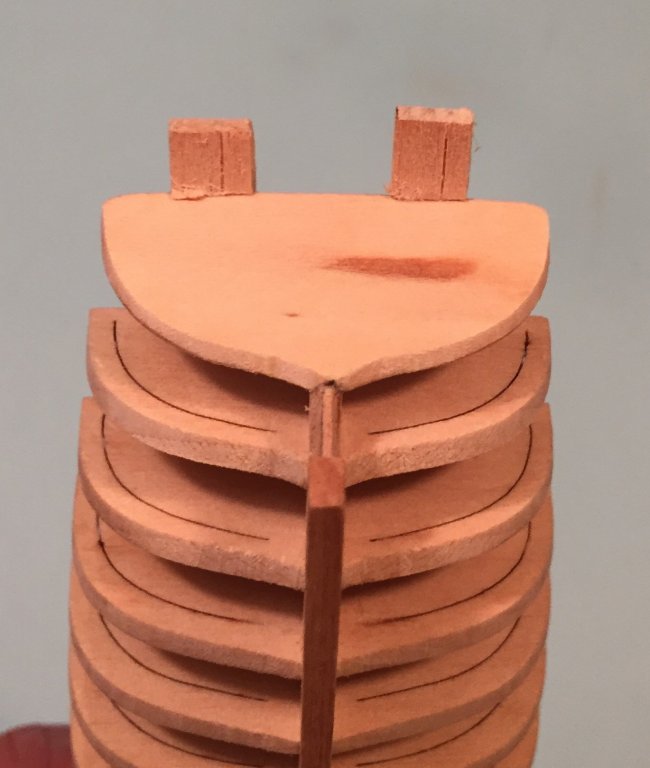
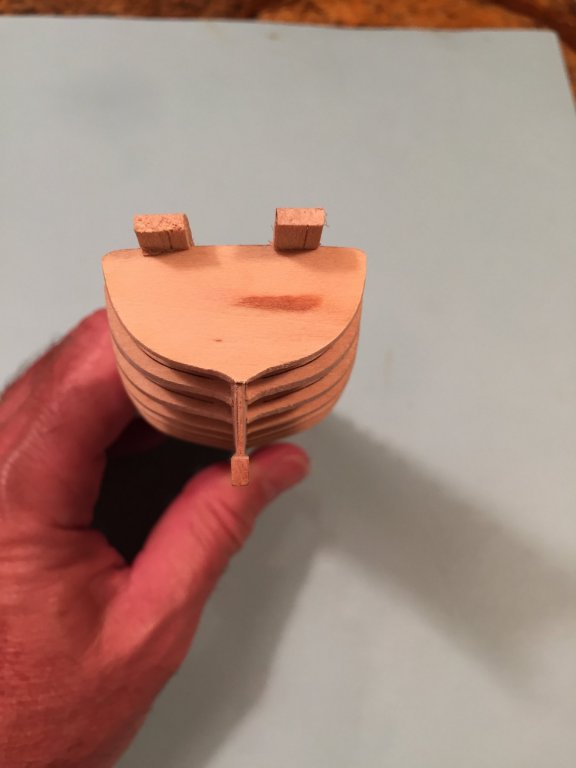
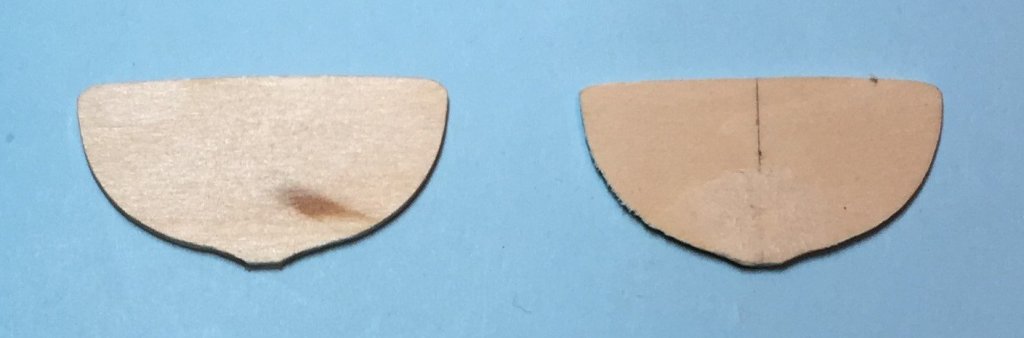
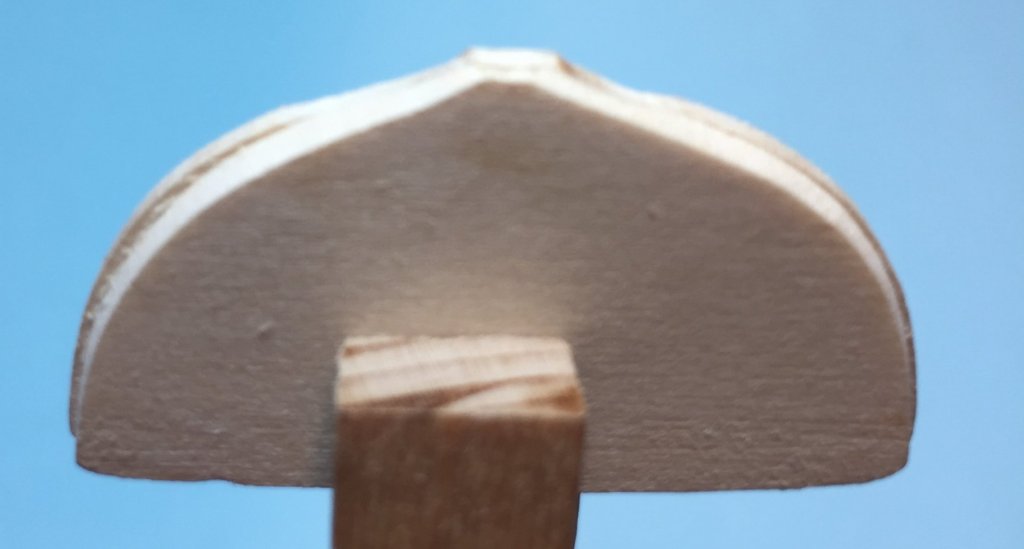
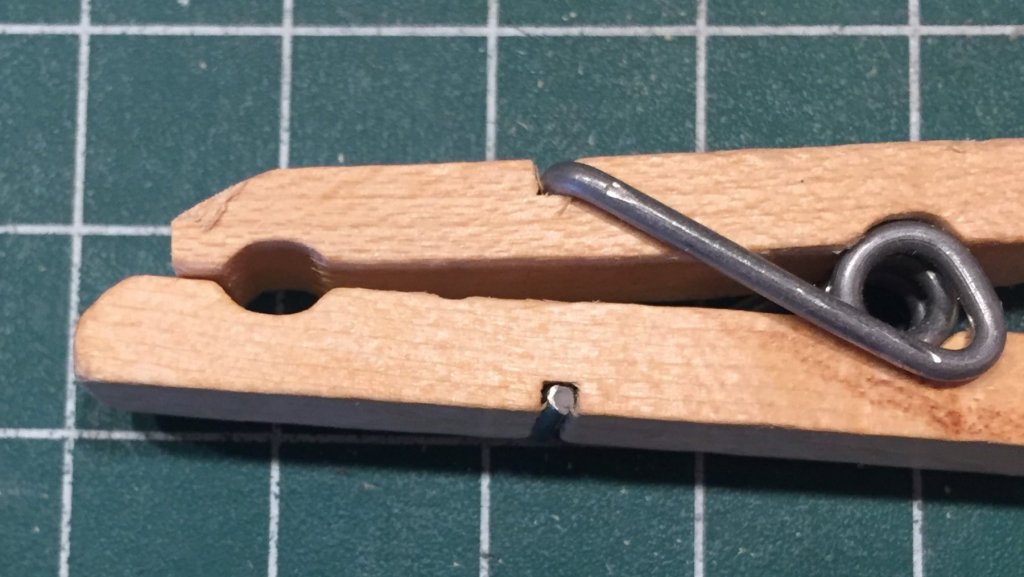
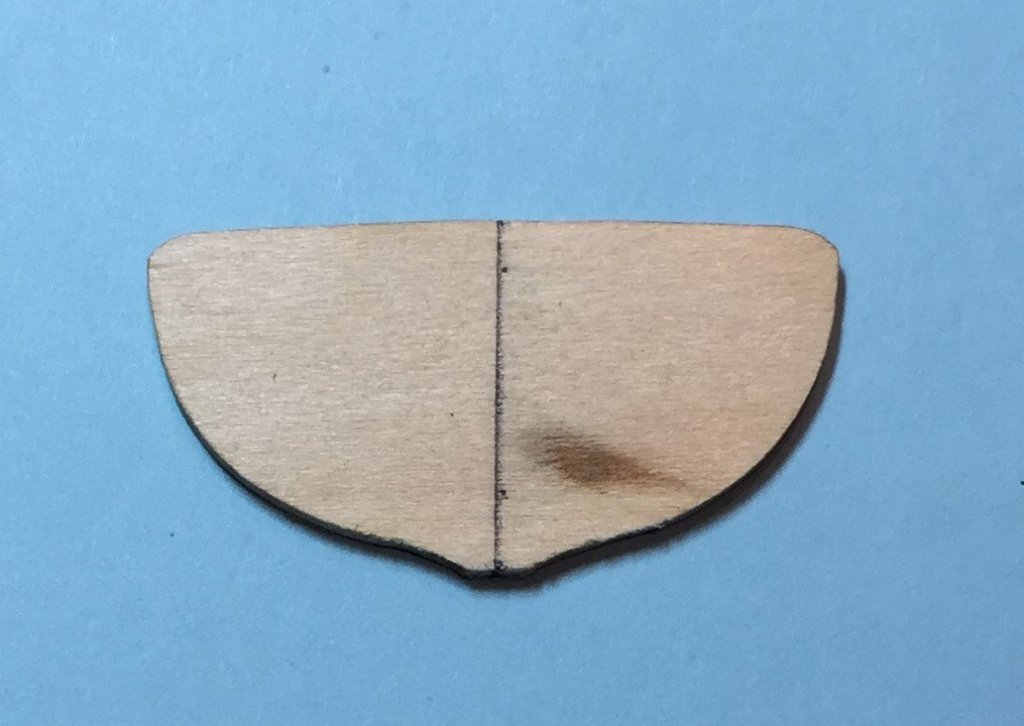
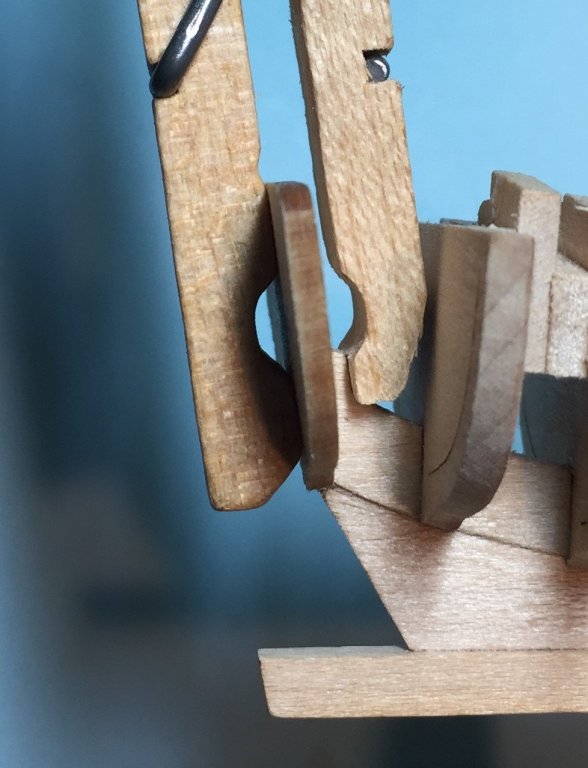
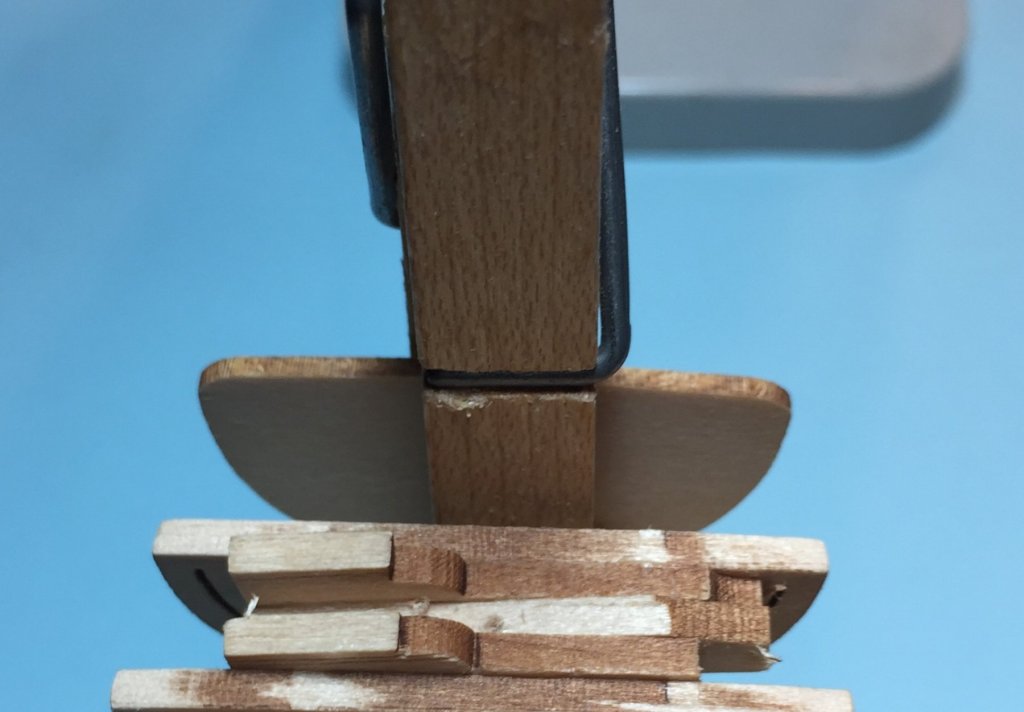
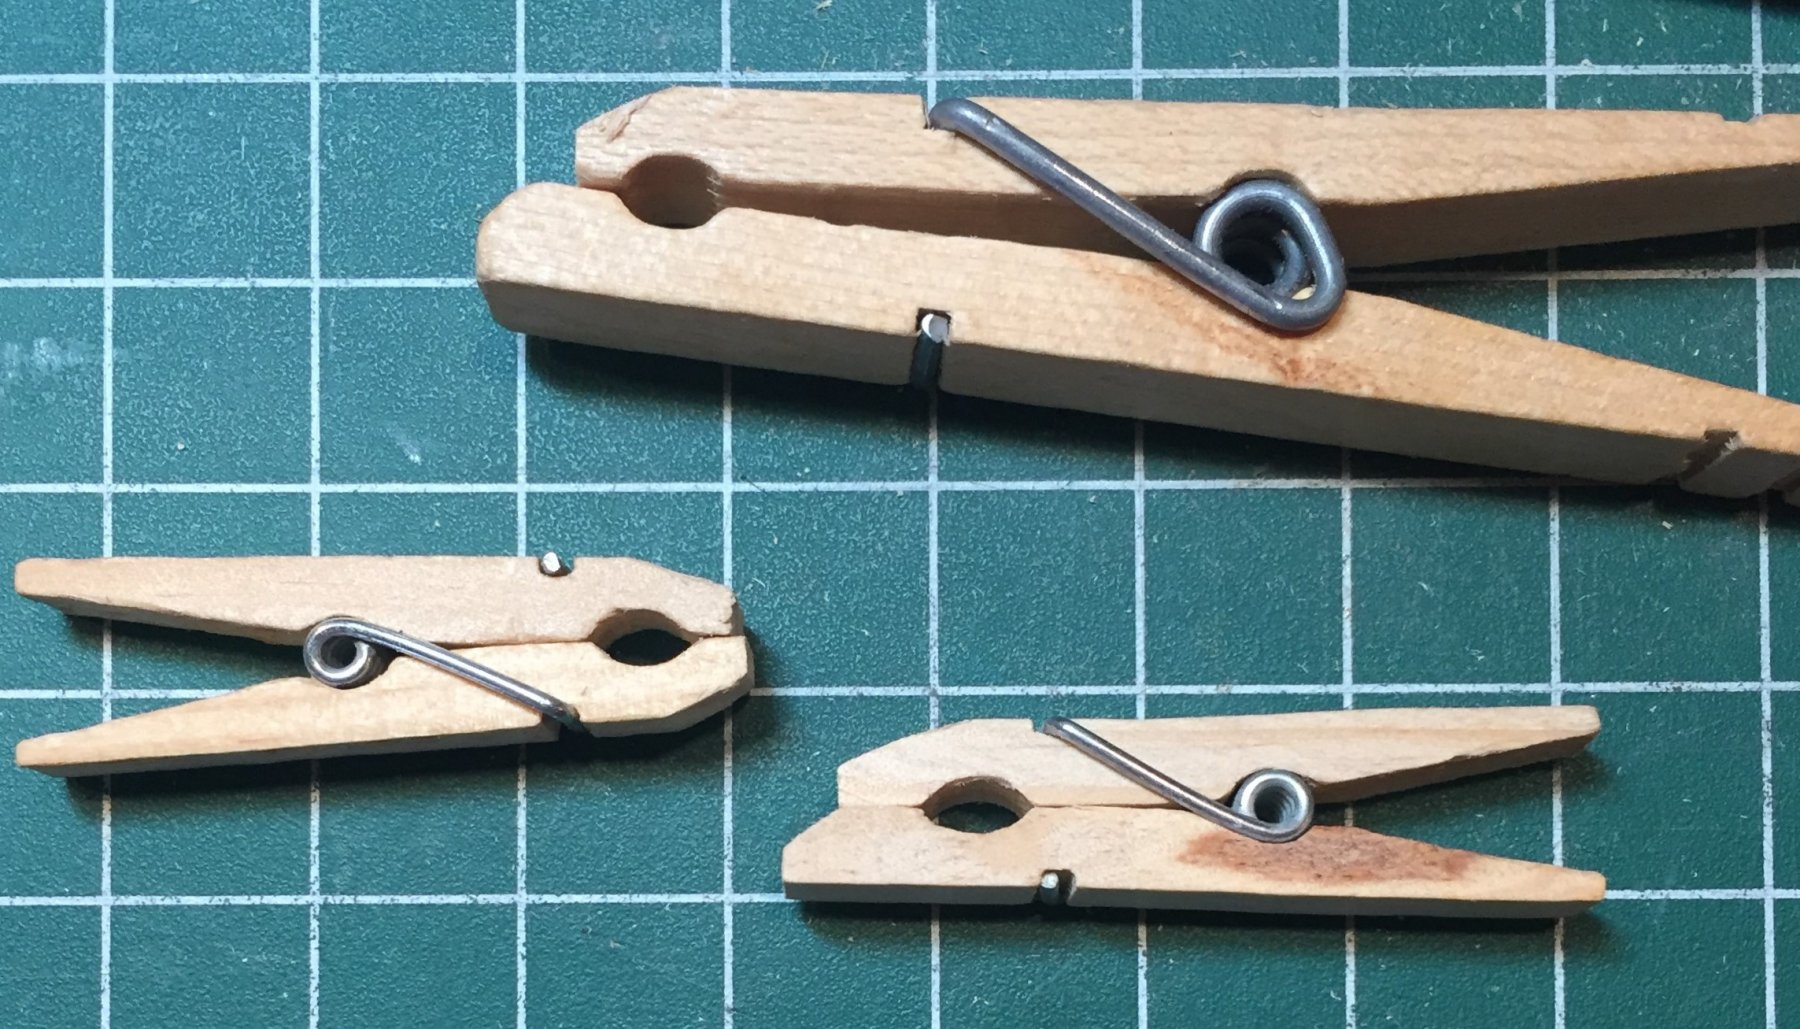
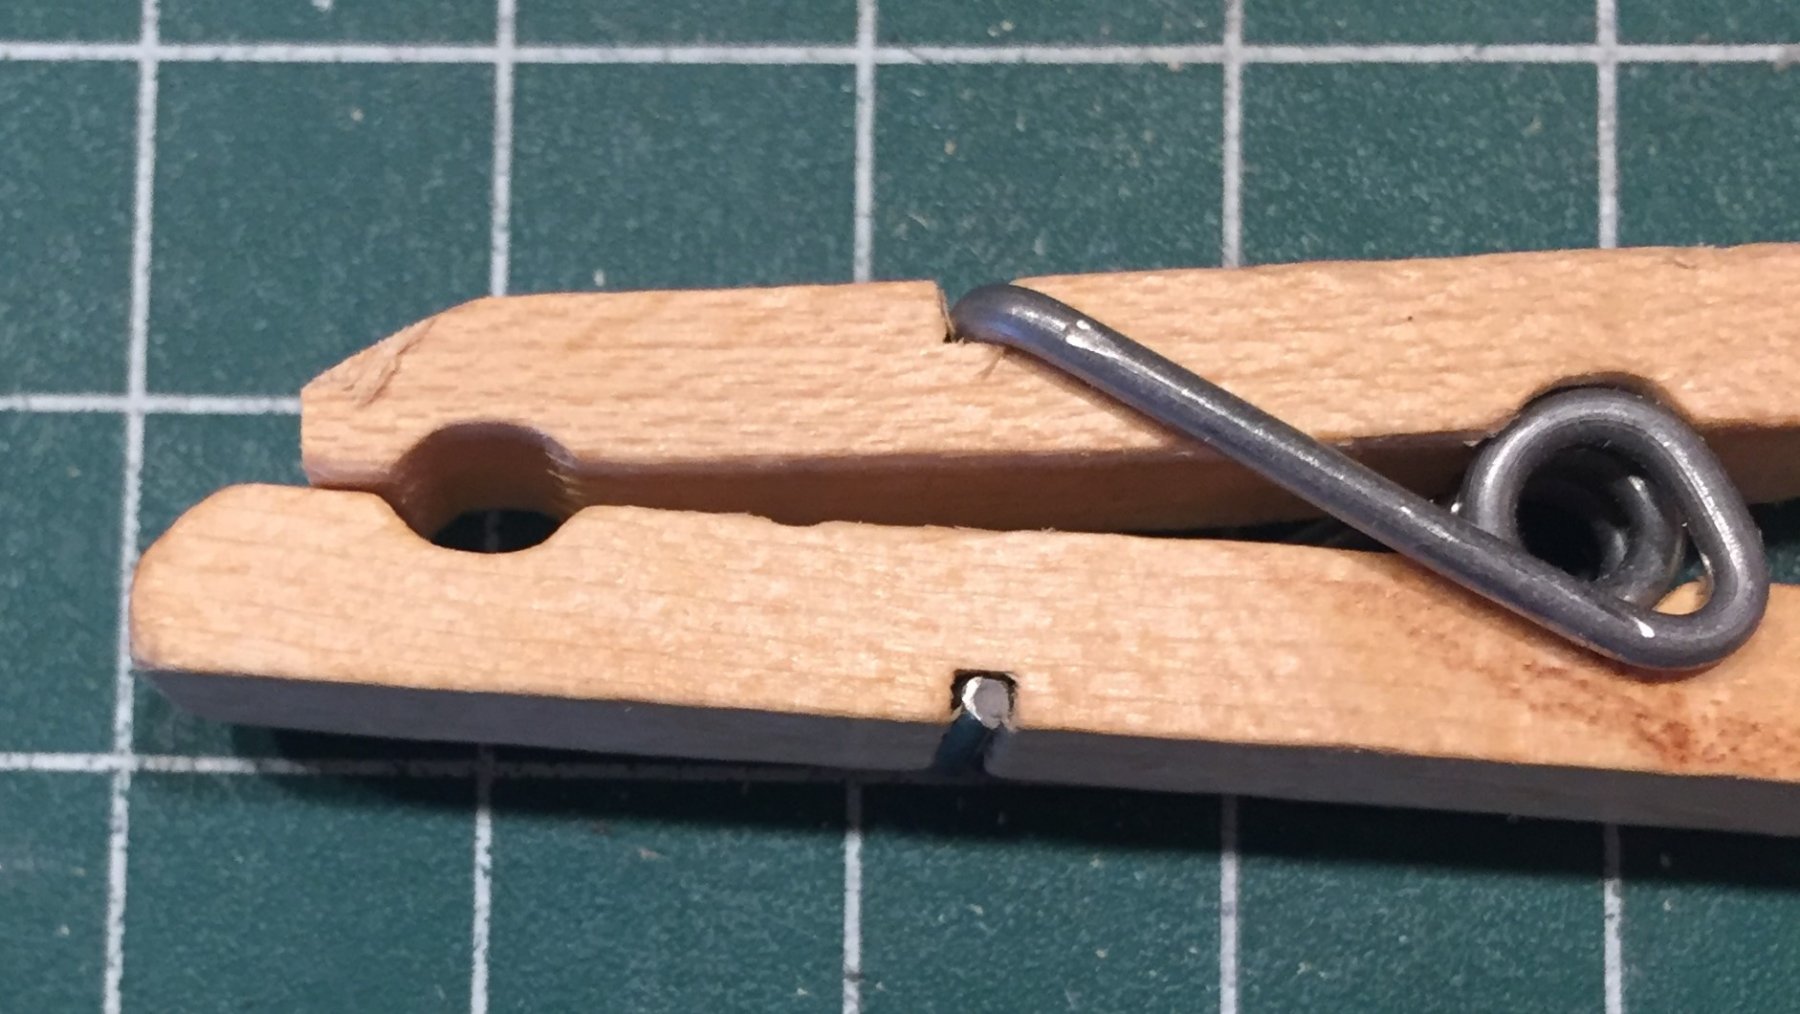
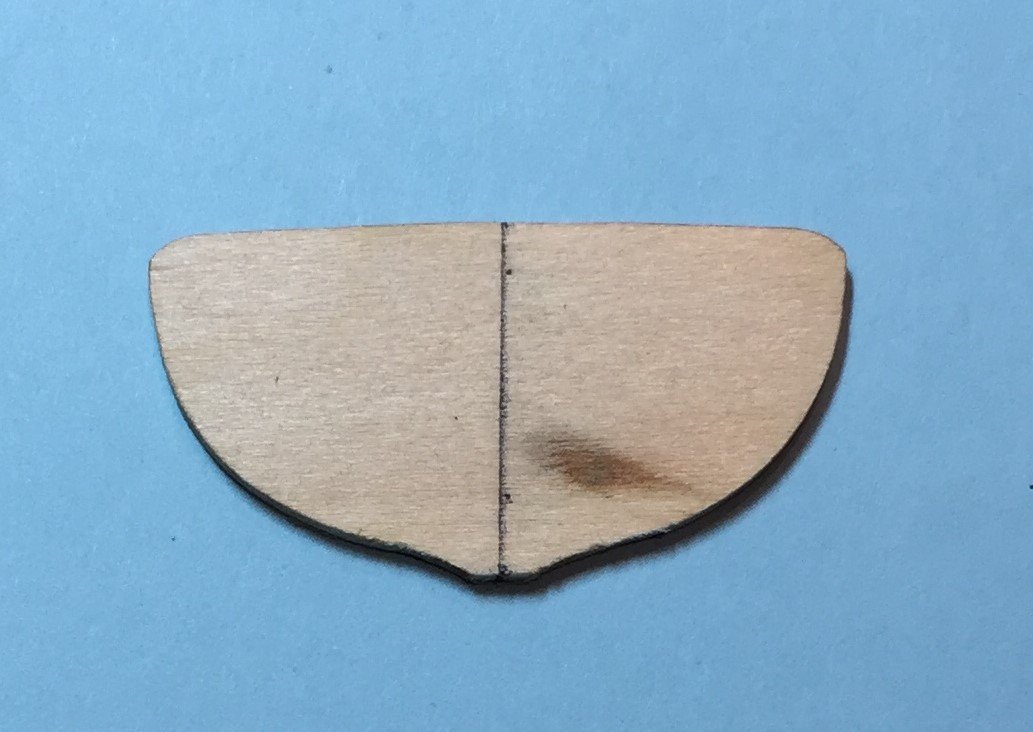
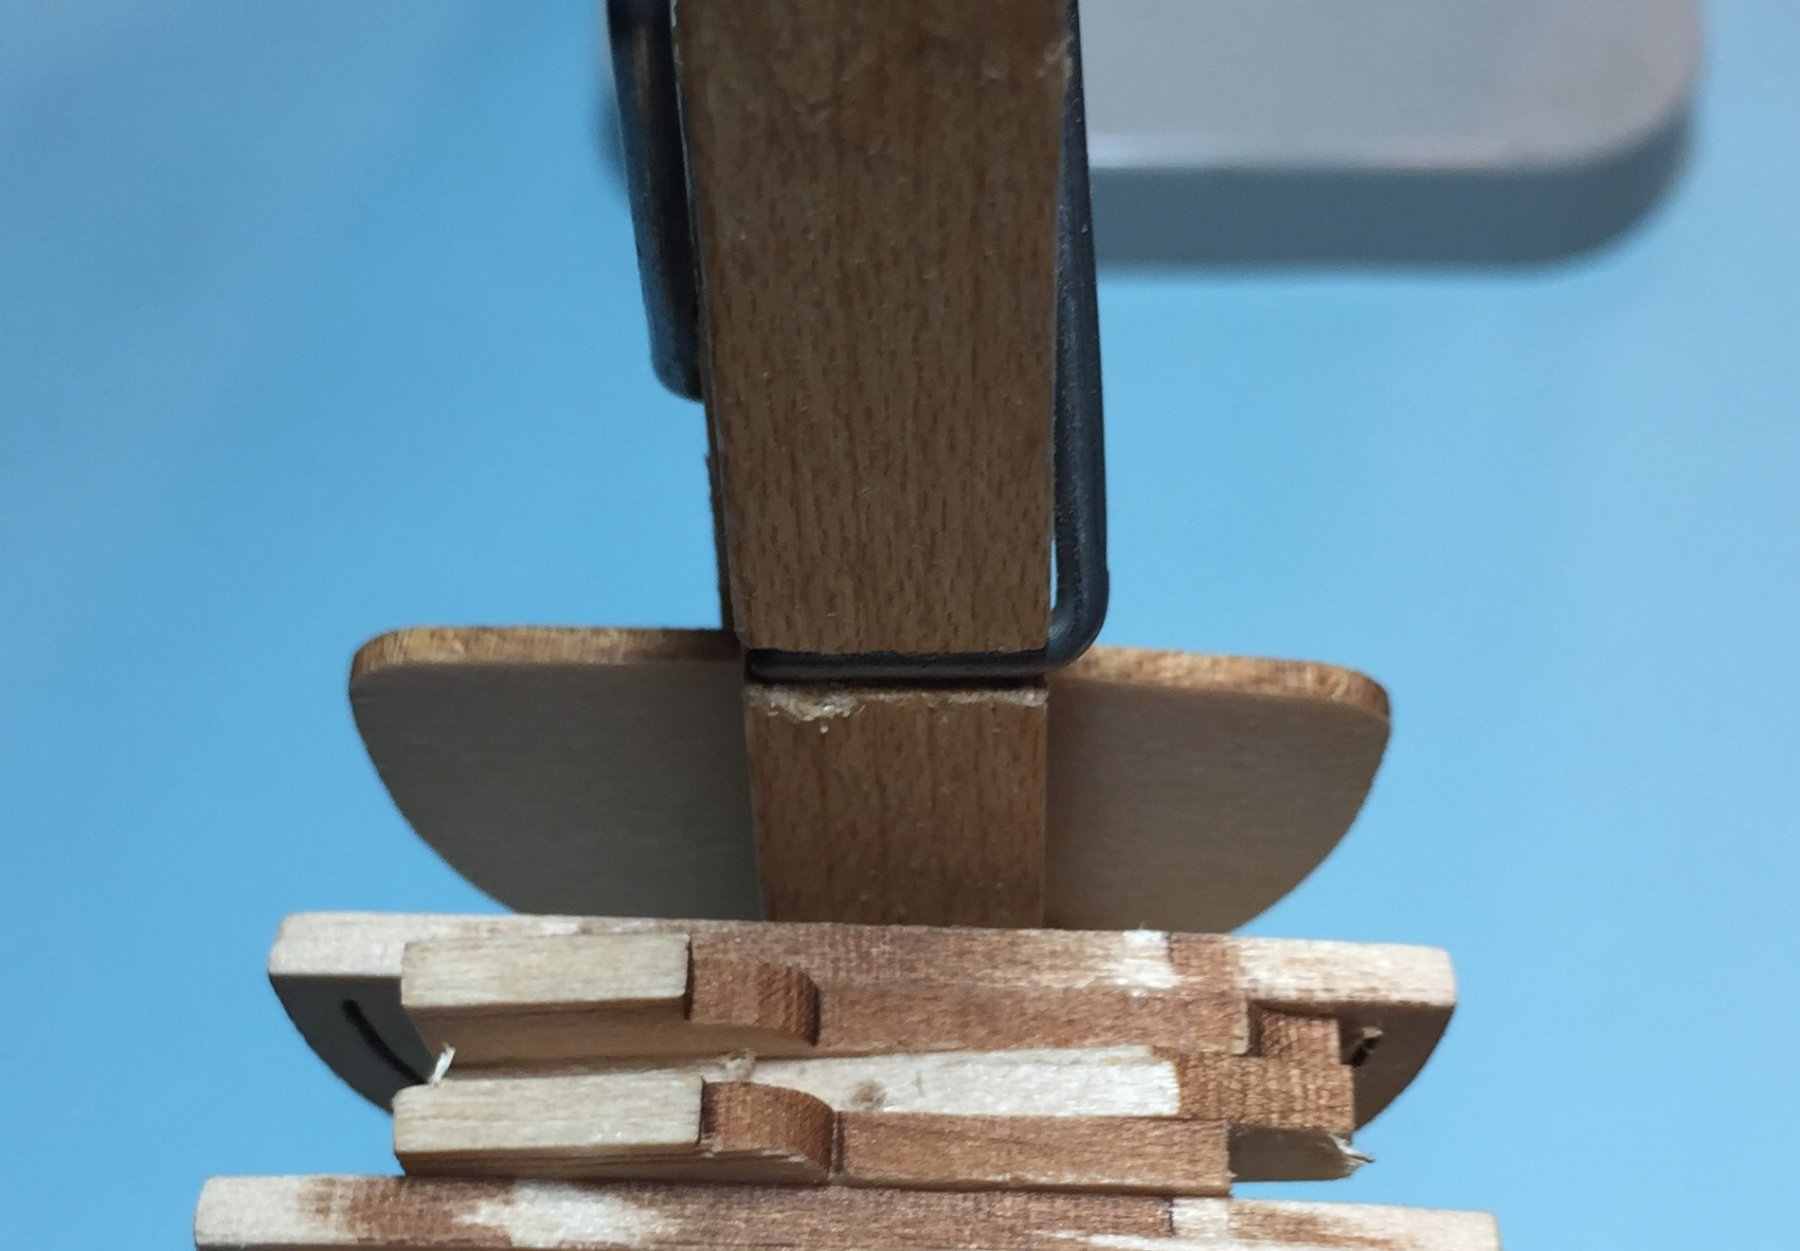
ATTACHING THE TRANSOM WHITE GLUE AND MODEL EXPO = SECOND CHANCES AND A DO OVER My replacement transom came from Model Expo. Now I get to reattach the transom and pursuant to the instructions fair it to the hull after the rest of the hull has been been made fair. The first thing I did was compare the the old part to the new one. Here are two photos to show the new and old. I did not alter the part as much as I thought, but more than I liked on one side. Next I had to determine how the transom would be clamped in place while the white glue set up and dried. The regular close pin would not work because it was too big. Both too thick and to long on the inside portion of the hull. Rather than look for another clamp, I decided to modify a close pin. Fortunately, on the outside portion of the hull the close pin was the right size to clamp the transom in place. I decided that I would not block up the space between the bulkhead and the transom because of the angles involved. I tried the the small close pin as well. The modification of the close pin was done with my Zona saw and my sanding block. First I cut off the end of one side with the saw. Next I sanded down the one side so it would fit the space between the transom and the next bulkhead. I modified a regular size pin and and smaller one. The regular size turned out to be the best option. The entire operation took about three minutes. The close pin sanded to shape very easily. Next I coated the end of the false keel where the transom is mated to the false keel with alcohol to remove any remaining white glue. I rubbed it off with my fingers and then filed it down smooth and flat. Next you have to find the center of the transom. Measure carefully. It is an odd and not square shape. Finding the middle is difficult. I located the middle at the top and bottom and drew a line with my sharp pencil. When I measured I obviously missed the mark for the two middle dots. You must line up the middle of the transom with the middle of the false keel. That will be the last photo. I will not remove the clamp till the next day to insure that the part has set. Here are two photos showing the transom clamped to the hull to dry.

-
S. The fairing looks as if it is going well. You have made a good start to the model.
-
Making a New Transom from Scratch? Steve, thanks but no thanks. I did think about it though. However, I fell victim to the profit making goals of Model Expo this week and placed an order. While I was there I requested the replacement part. Also it will be a trial of the printed instructions to fair the hull and then attach and fair the transom to the hull. Also I obliterated any chance of making a pattern for any of the other bulkheads because I cut up the scrap to block up the model and constructing the building board. However, as you are between models please fell free to add the lesson here.
-
SYMMETRICAL HULL Eric; Thanks for your interest. Two of the bulkheads gave me more trouble that the other 14. The first bulkhead in the bow (H) and the fifth bulkhead from the bow (D). D is the one I described as pesky. Bulkhead H was a little more difficult for me because of the extreme angle of the bevel necessary to for the planking material to curve gently into the rabbet at the stem. As a result, I may have been too aggressive from time to time. During the fairing process the port and starboard of bulkhead H took on different profiles from time to time. They must have the same profile or both sides of the boat will not match or will not be symmetrical. It was therefore necessary to insure that bulkhead H was the same on each side. If I was heavy handed on one side, I had to show the same heavy hand on the other. I did it all by eye and with the planking batten. Pesky bulkhead D caused other issues. I could not get one side fair without what I though was much more effort than I expended on the other side of the boat. I had a similar problem with one of the bulkheads in the stern section, but not as pronounced. The other issue with this bulkhead is that I was only having problems with top of the bulkhead. Everything was fine for 80% of its surface. I went looking for reasons for my trouble here. I came up with a few possibilities. Perhaps: 1. The bulkhead was not seated properly on the keel and may have been high on one side and low on the other. 2. The bulkhead was not seated properly on the keel in that it was seated a hair too high. This however would not explain why I had the most trouble on one side. 3. I placed the bulkheads in the wrong order on the keel. I quickly eliminated this as the issue because I did not make this mistake. 4. The bulkhead was mislabeled in the kit. Remember, the numbers and letters are laser burned into the bulkhead, except in my kit bulkhead F was blank and I had to label it myself. Is this even a possibility? Maybe. Most of the adjacent bulkheads are really close in size to one another. Could this error occur at the plant when they do a new run of the model? I do not know. What I did not do was compare each bulkhead to the printed plans. I took it on faith that the bulkheads were labeled correctly. I should not have done this. I should have checked. Especially because one of my bulkheads was not labeled. I think I will add an edit above to tell my readers to take this step. In days of old (before laser cutting) when bulkheads were stamped from a ply sheet, bulkheads had issues of not being symmetrical and in some kits made from old stamps or worn out stamps, it was necessary to correct them. 5. Anyway, I devoted a lot of time to pesky bulkhead D and those two forward from it to obtain the fair line in the top 20% of the bulkhead. My efforts had to match on each side to keep the hull symmetrical to keep the lines of the hull. 6. In the end I decided that perhaps I was too aggressive in removing the char from this bulkhead on one side, causing my issues later. The boat must be symmetrical. I will not measure mine, nor will I make templates from the plans to do so. It looks good now.
-
Steve; TRANSOM TROUBLE So you noticed the transom was gone. It has been a here today gone tomorrow nightmare. Well, I was holding the model and adding the final touches to fairing it and I dropped it about 6 inches onto my work surface. The hull hit the table on the top edge of the transom and it popped right off. There was no damage to the model or the transom, except that the transom was no longer attached. I spent a lot of time filing it to fair it to the hull. During that process I had no issues. After I braced it, it did not move. Here is the plan to re-attach it. 1. I love White Glue. Both the stern and transom will clean up nicely. 2. I have ordered a replacement transom from Model Expo. They will replace any part. 3. When I receive it I will compare it to the transom that I made fair with the hull to see how much I really altered the shape of the part. 4. I will follow the instructions in the kit. Those instructions advise to fair the hull and then attach the transom and then fair the transom to the hull. Previously I attached the transom about half way through the fairing process because I was concerned about matching the bevels to the last 2 bulkheads and thought it would be easier to fair. I love second chances. White Glue and Model Expo make it possible.
-
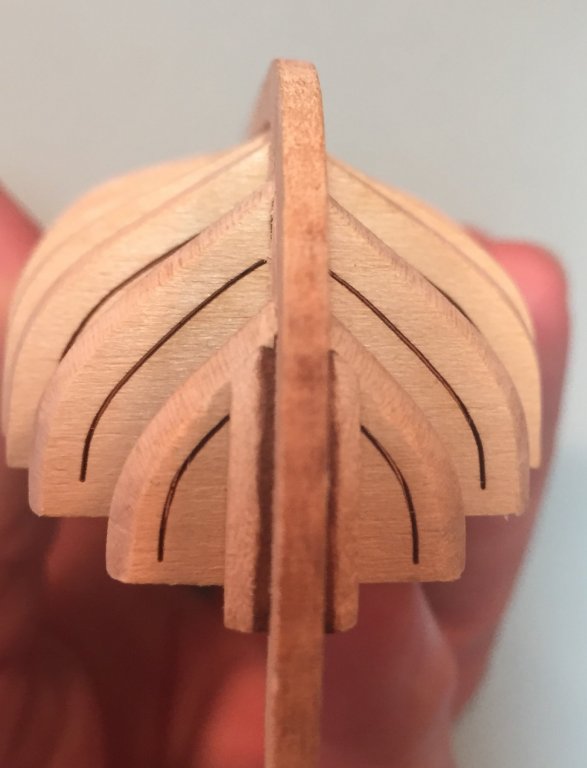
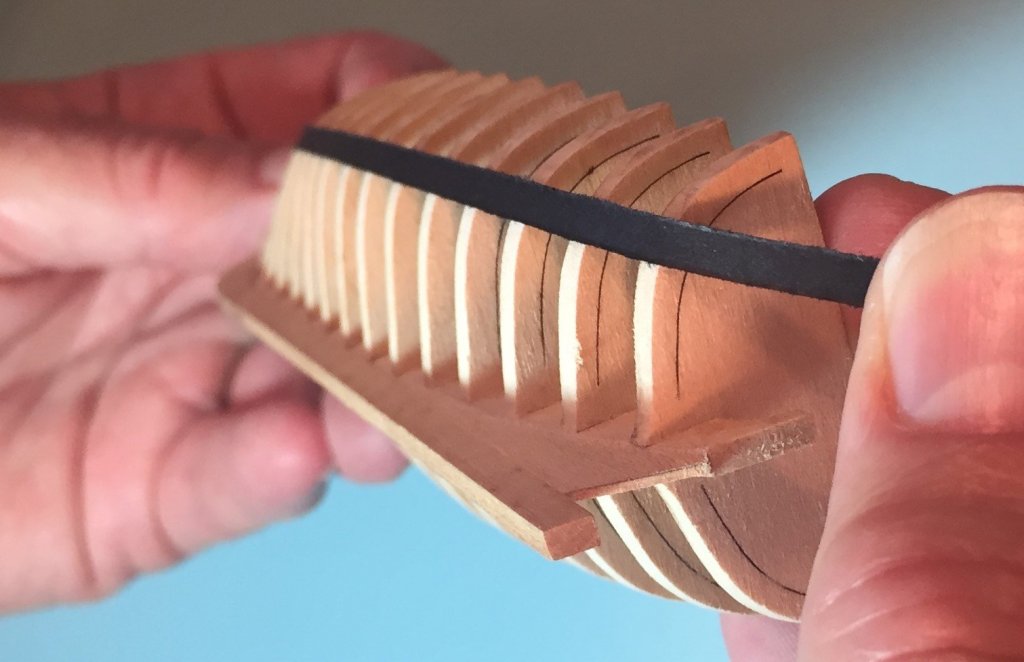
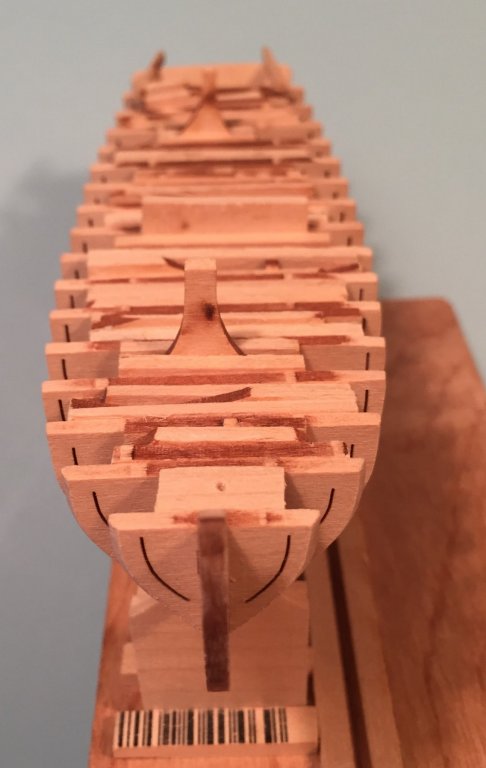
MY RESULTS WITH FAIRING HE LONG BOAT--CONCLUSION. I ran into some unexplained technical difficulties above with posting a lot of photos and could not complete my task above. So here it is continued. As I said above, trying to describe the process of fairing a hull is difficult and I think it much more of a show me kind of thing. Therefore, here are some photo's of my hull after the fairing process. Please compare them with the bulkheads that are not fair posted above.
.thumb.JPG.688eea84d2690368a2a4ac3cb5a7c6fd.JPG)

.thumb.JPG.47ccc140ce1d241b95e3936e4b185542.JPG)


-
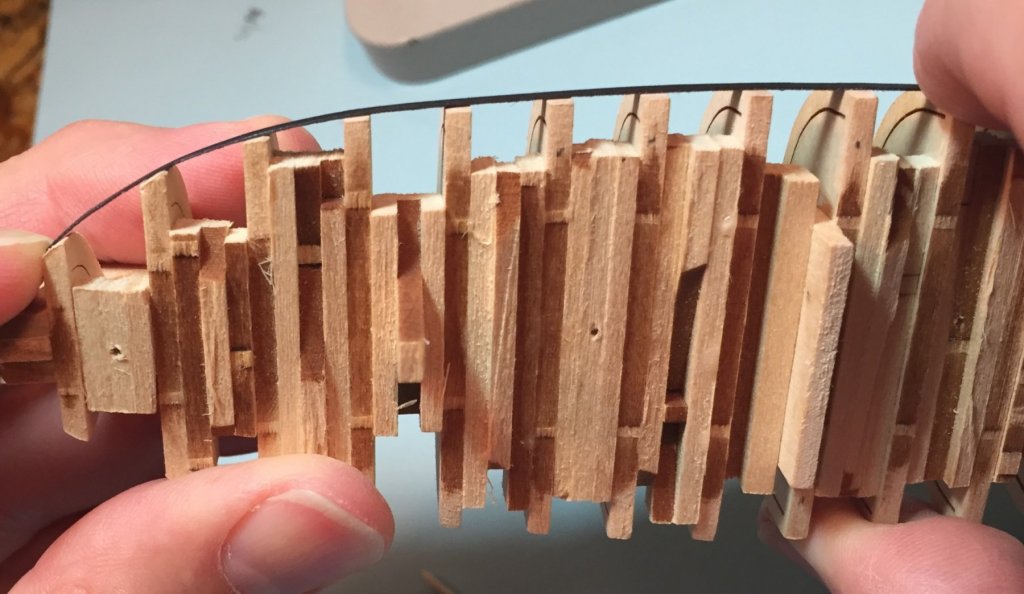
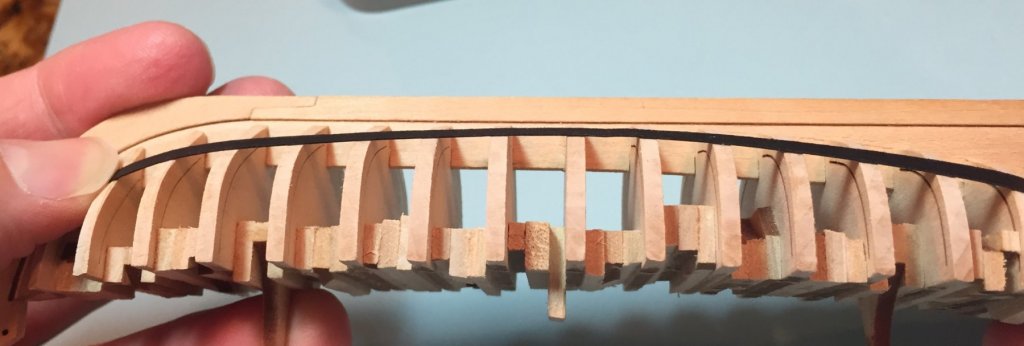
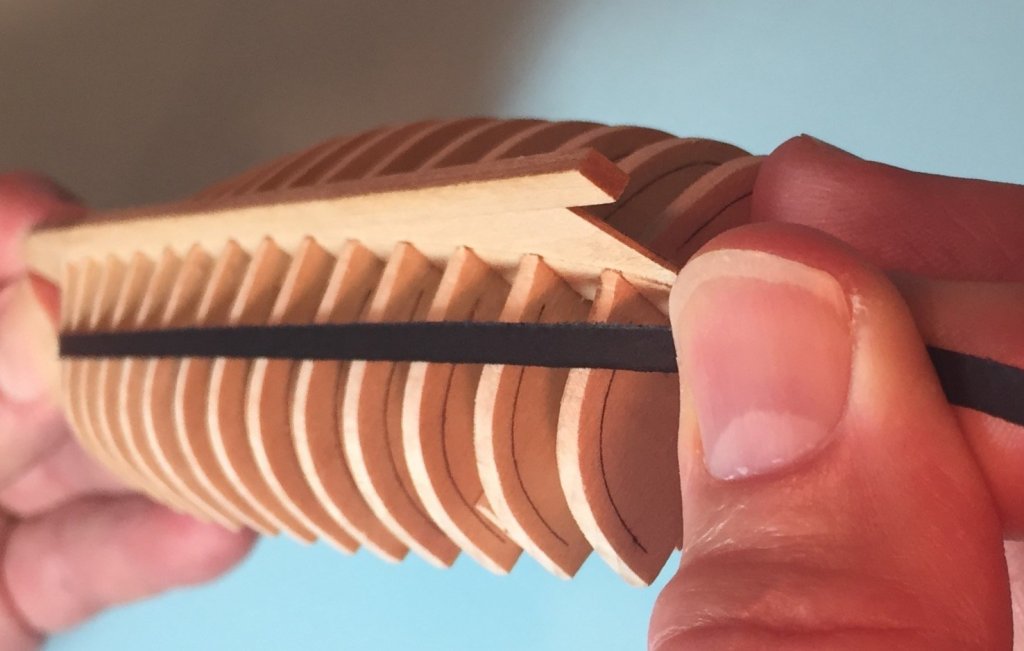
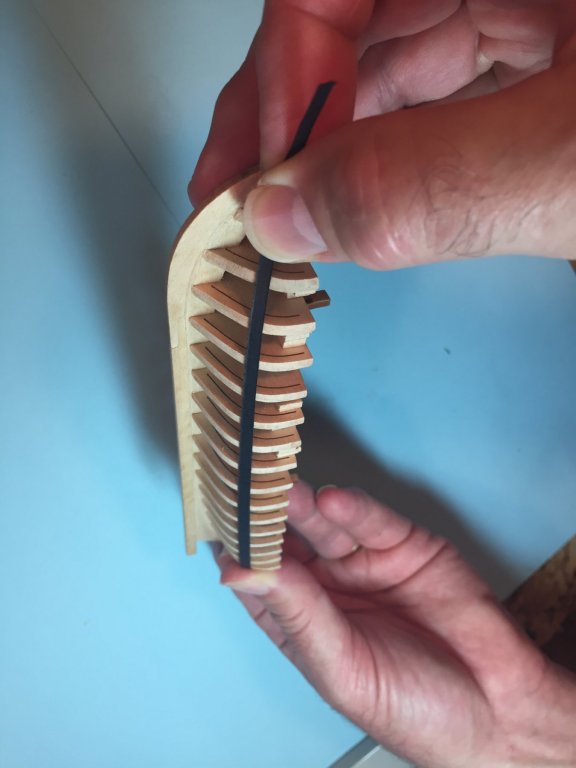
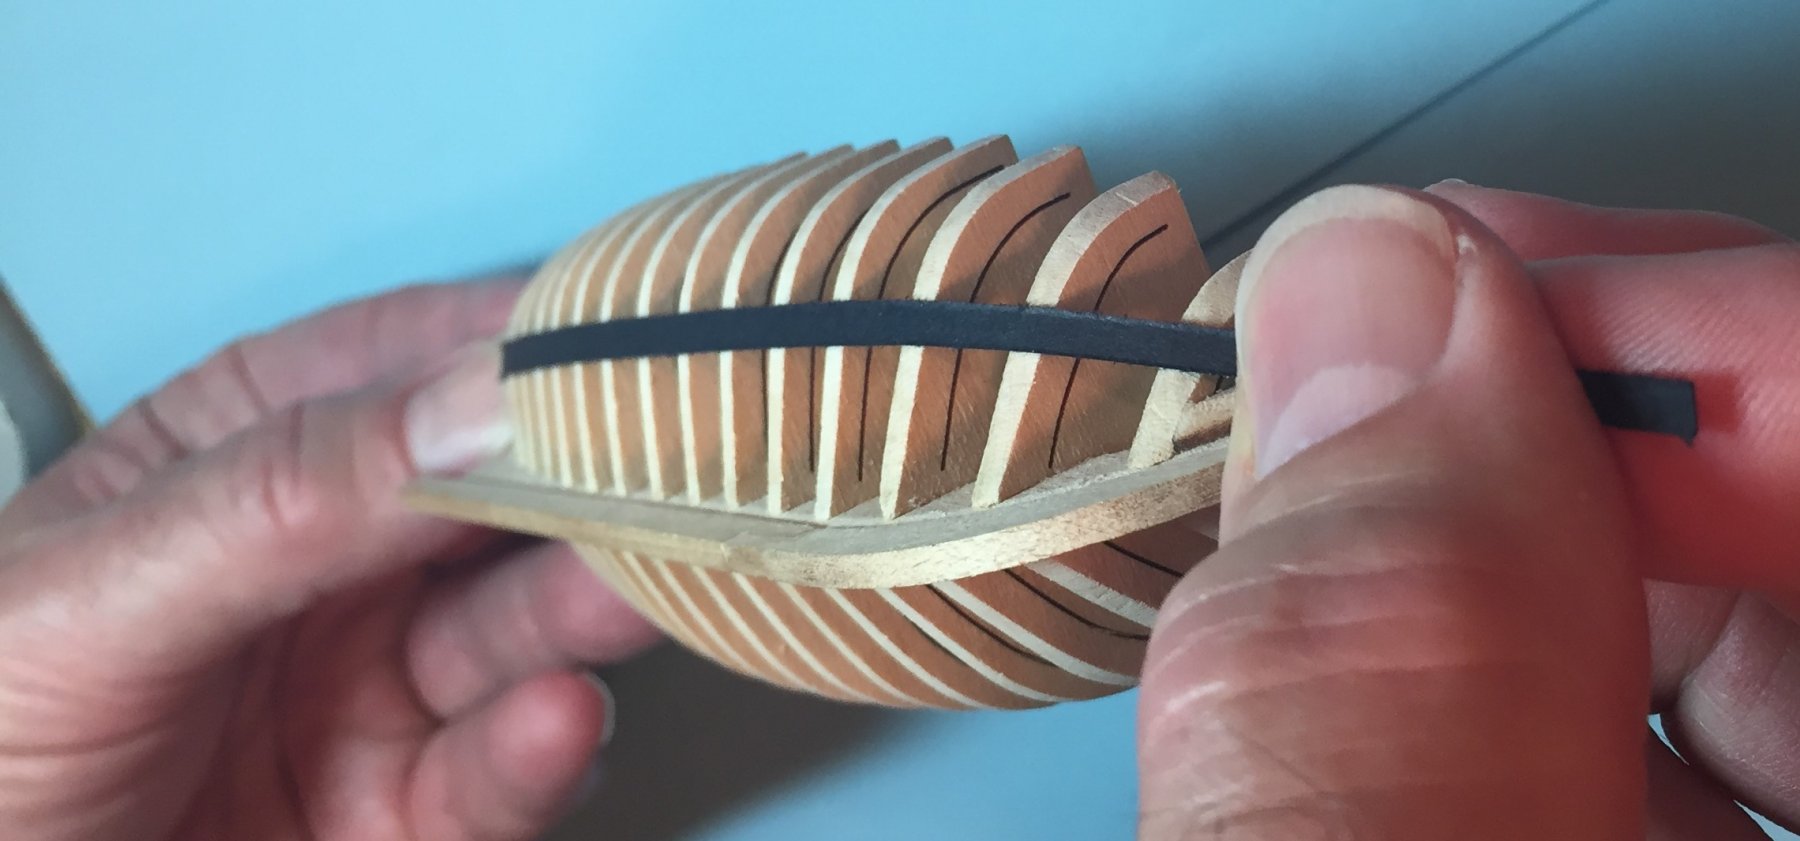
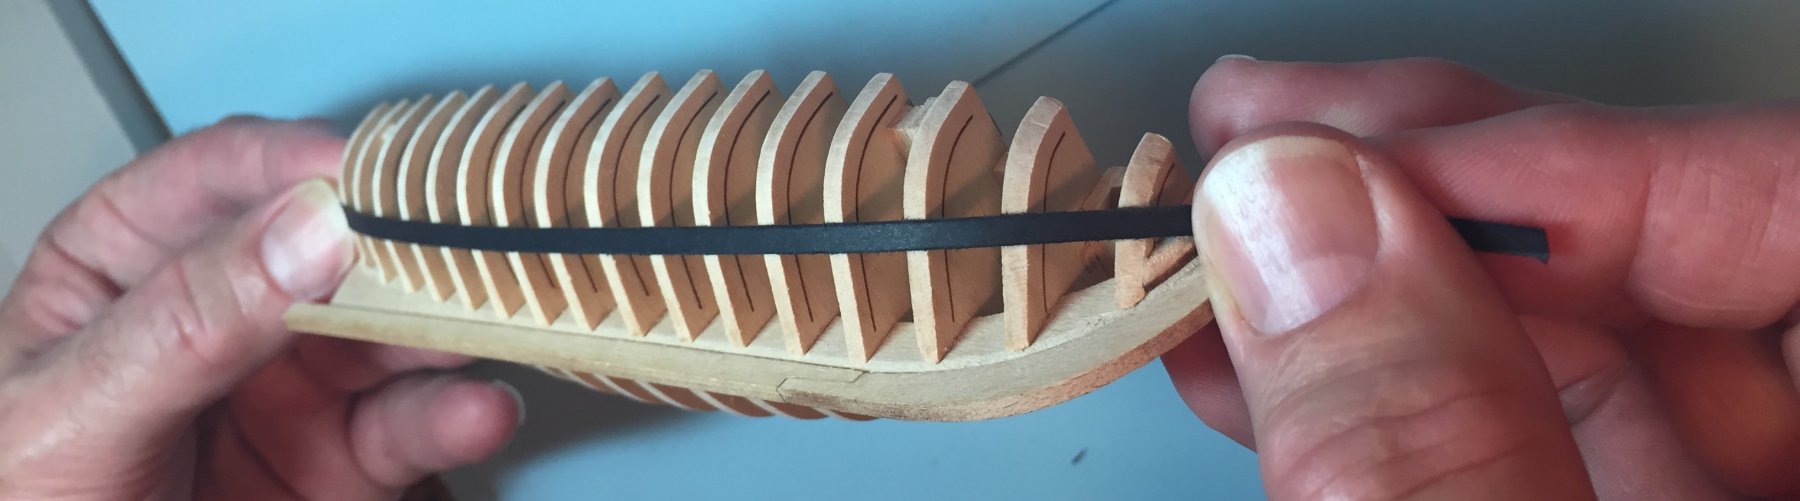
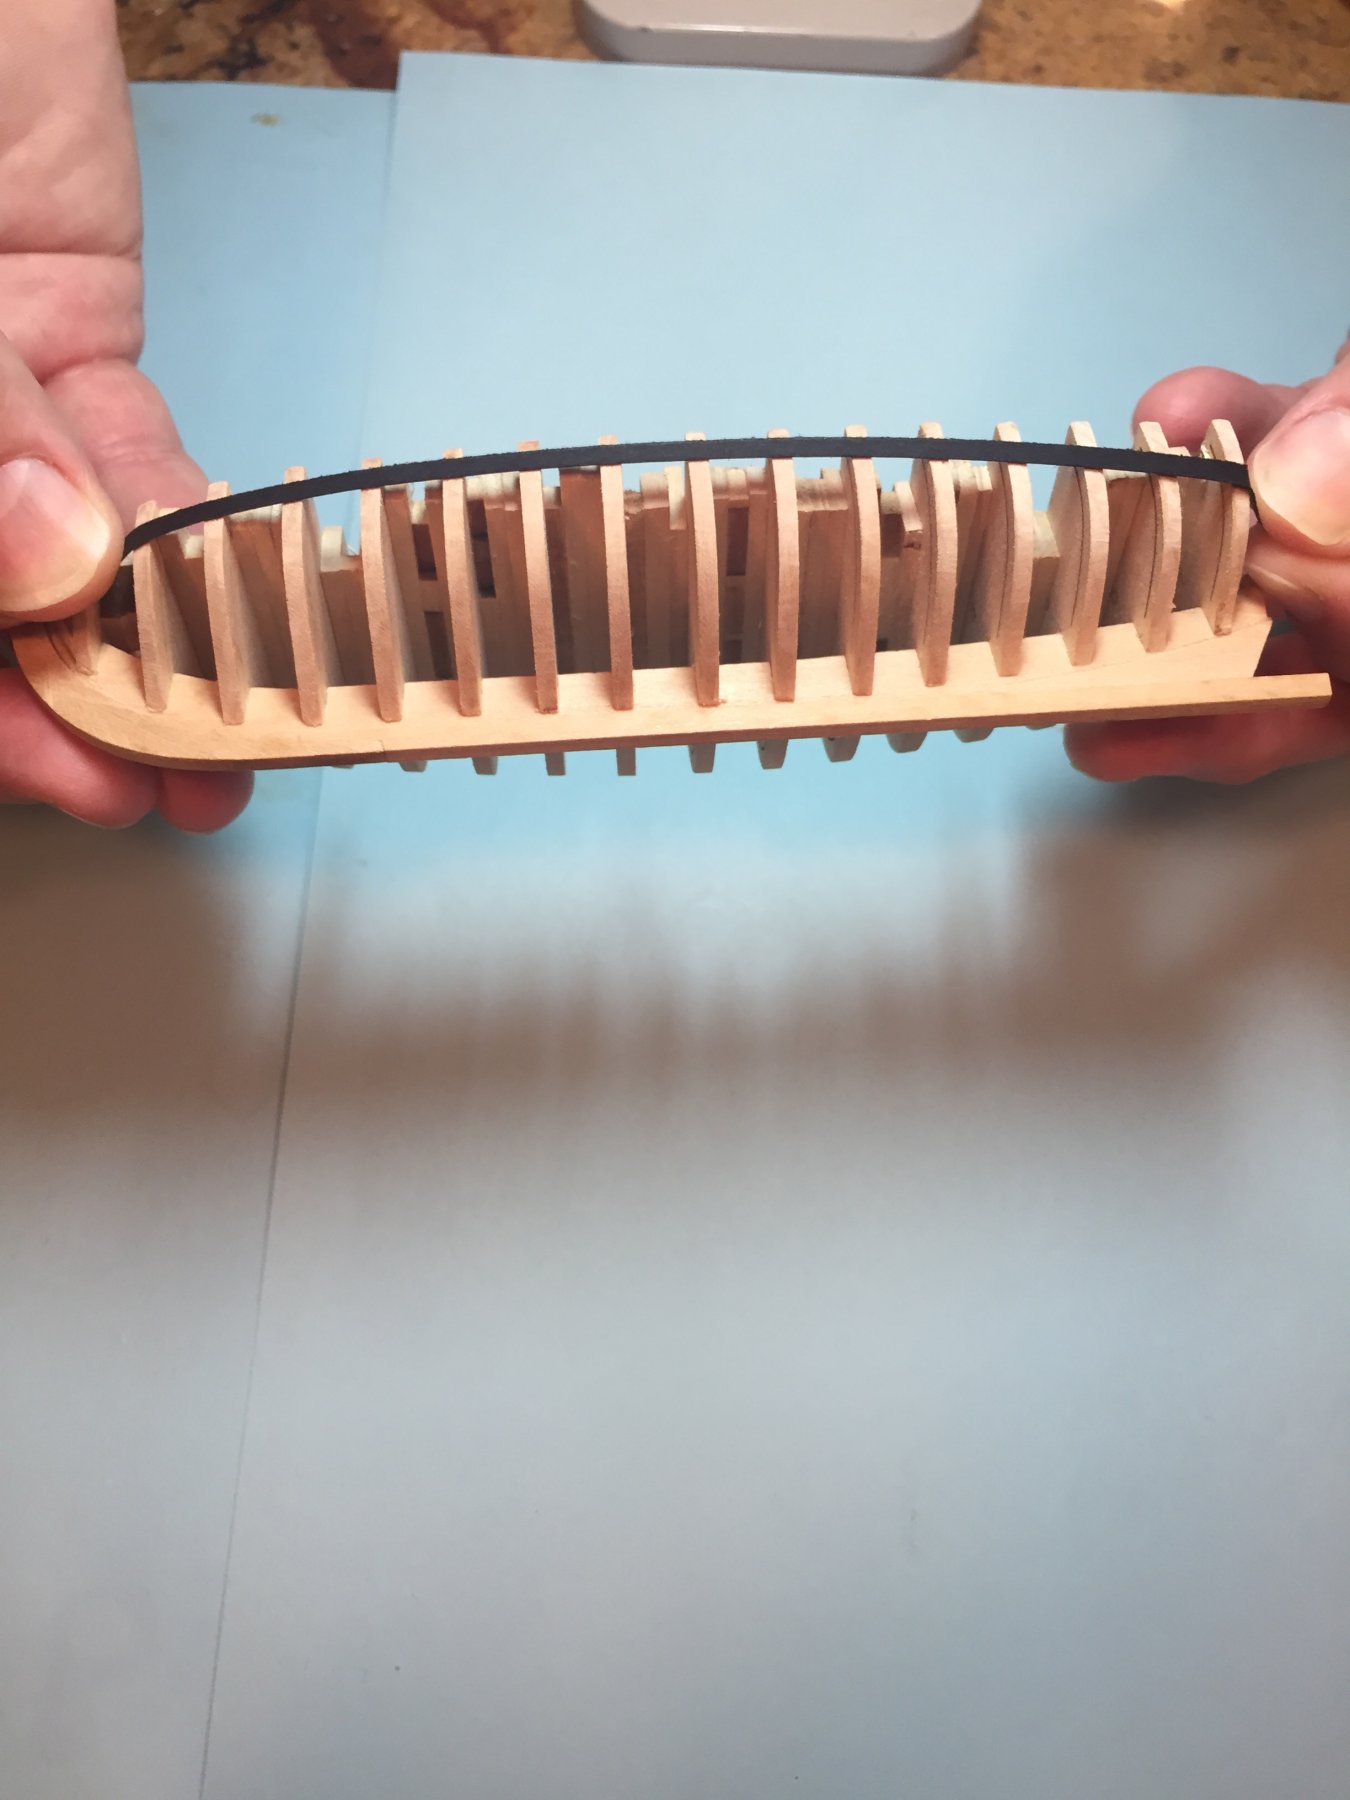
FAIRING THE LONG BOAT HULL--MY RESULT-- CONCLUSION Because the planking batten lacked the flexibility to lie down on the frames from bow to stern to check the fairness of the entire hull, near the end of my efforts I substituted a thin strip of black paper to check for humps and dips. Here are a series of photos to show this. A lot of photos, because its a show me kind of thing.


.thumb.JPG.d9706fabad5824b1f5ce010de91427be.JPG)

-
Steve Thanks for the photo info. The contrast between the model and the black table is stunning.
- 190 replies
-
- 2
-

-
- pinnace
- model shipways
- (and 1 more)
-
Steve A very pretty and elegant model. Well done. The photos of the finished model are exceptional. Would you care to tell us how you did it?
- 190 replies
-
- 1
-
-
- pinnace
- model shipways
- (and 1 more)
-
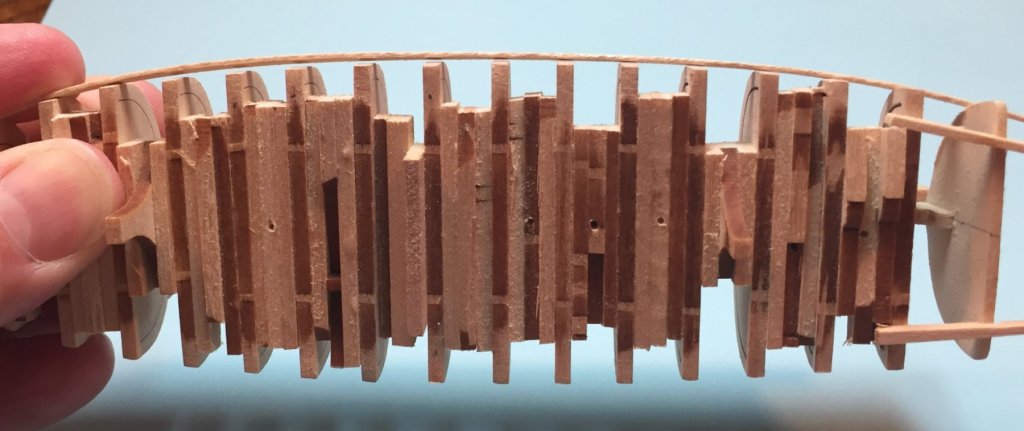
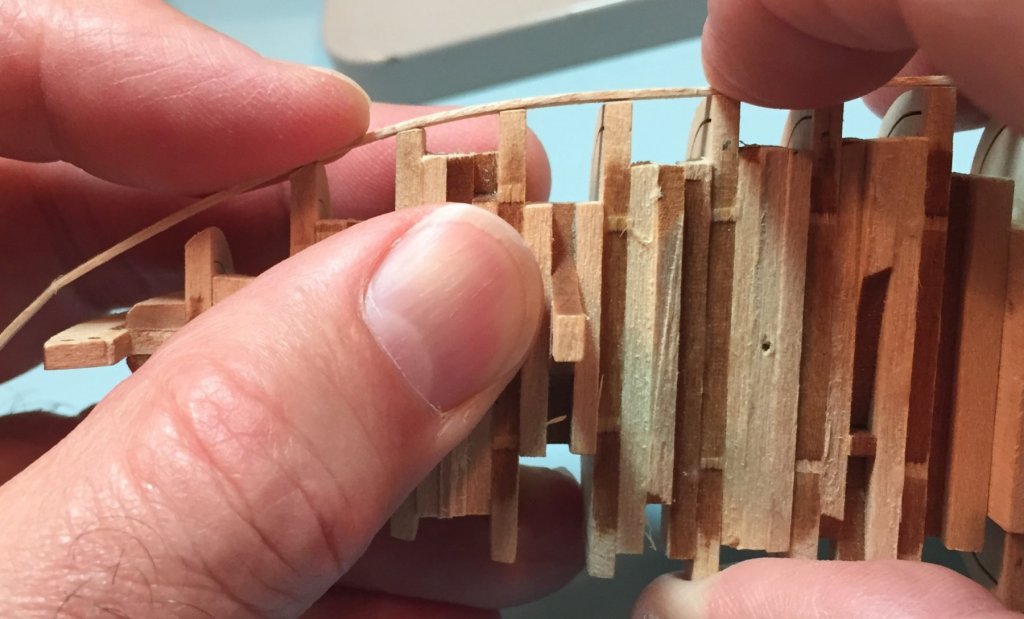
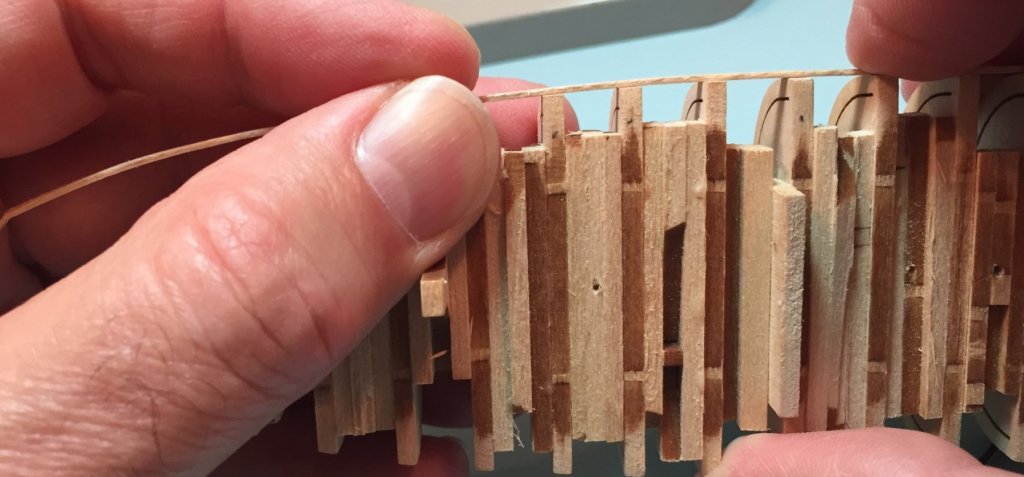
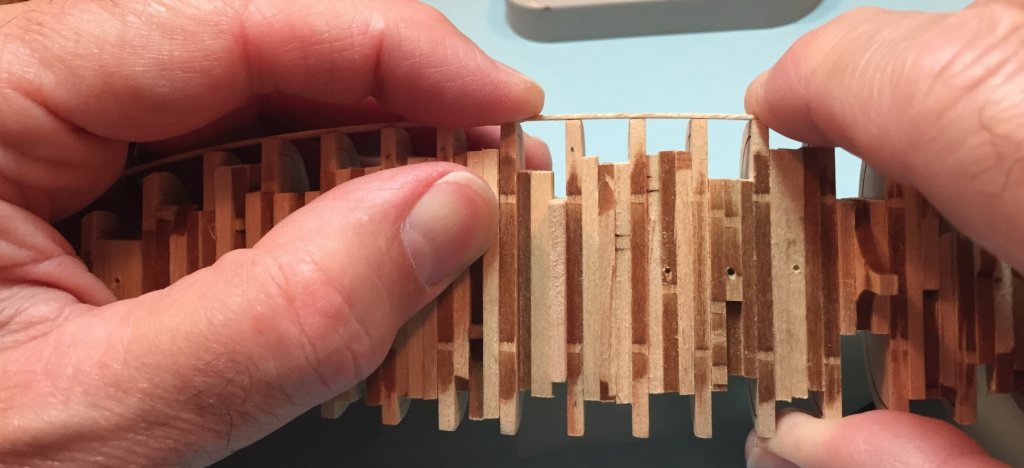
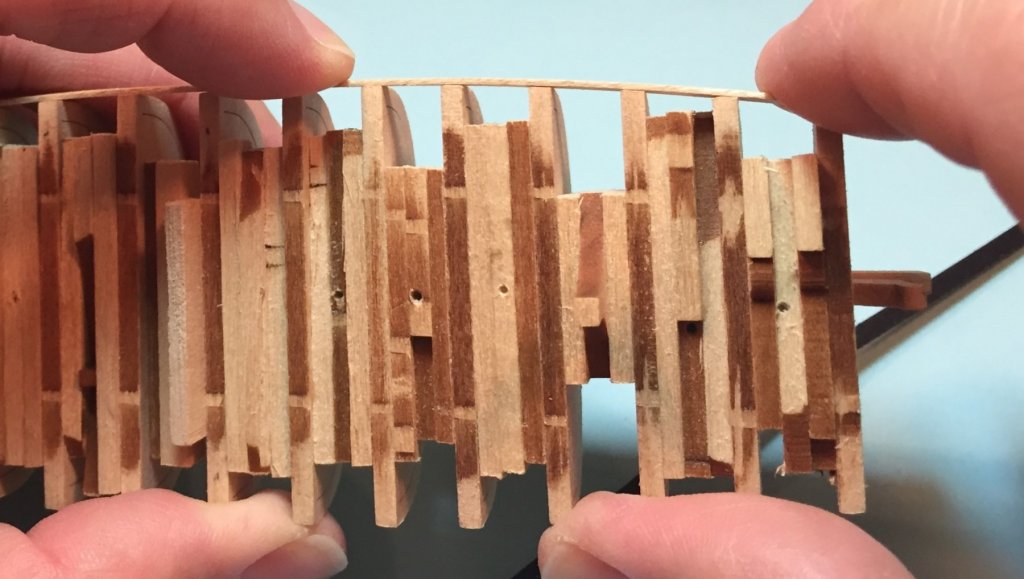
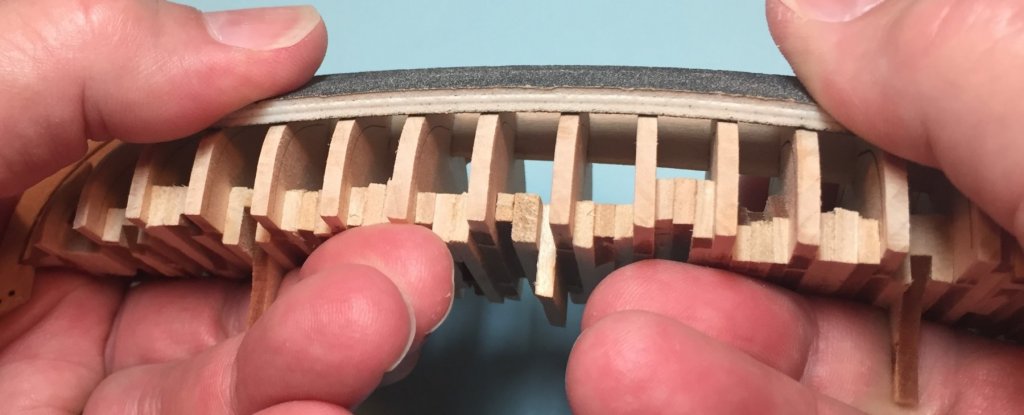
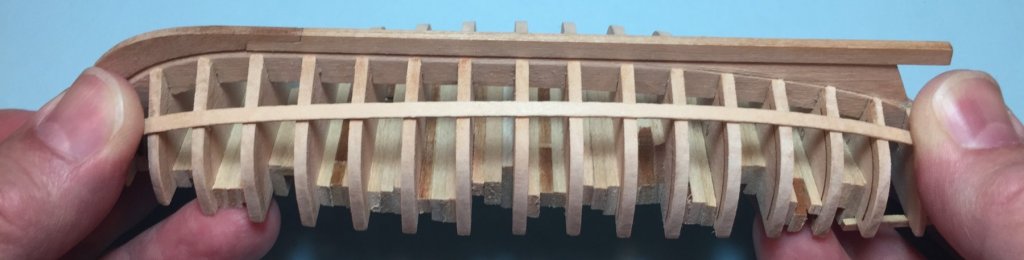
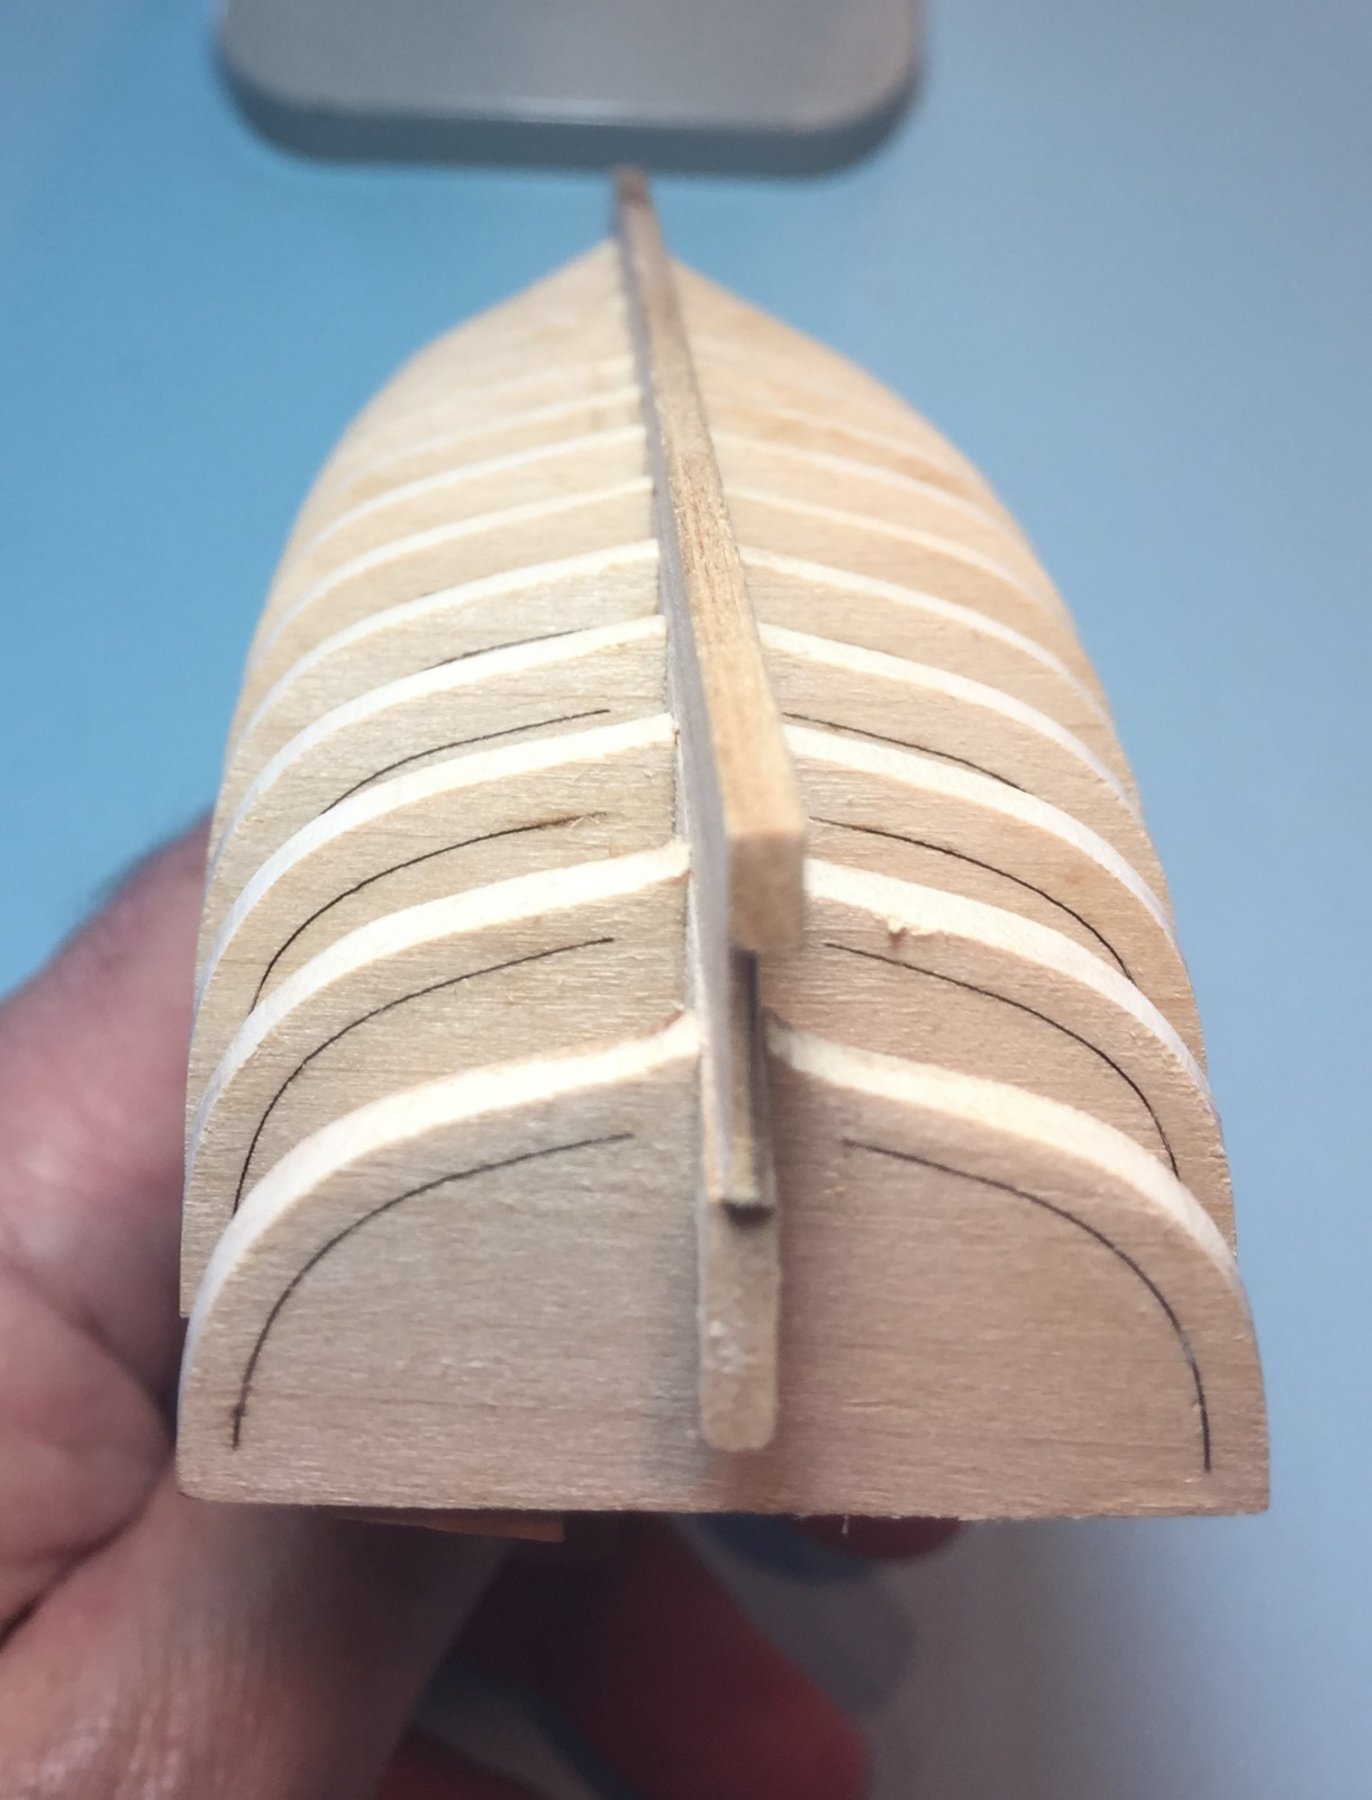
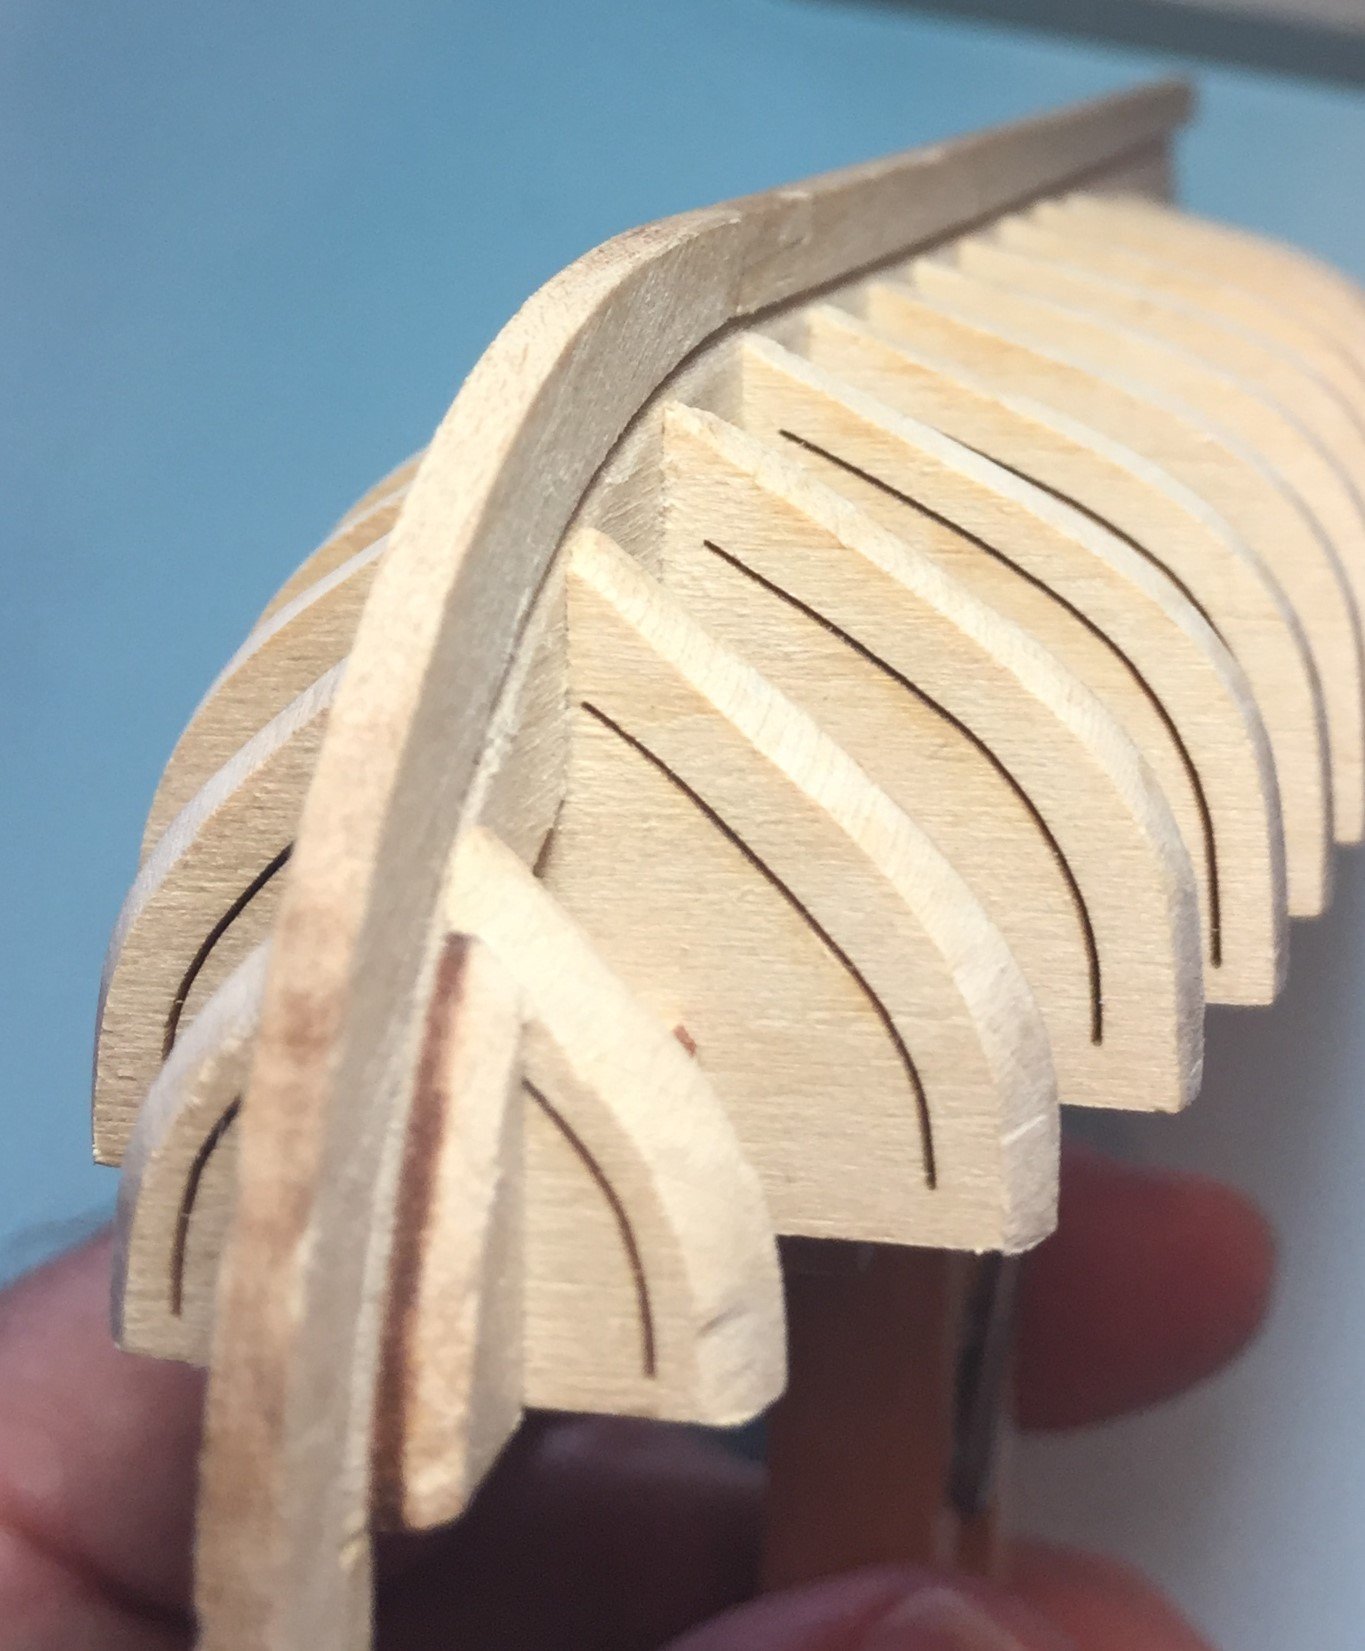
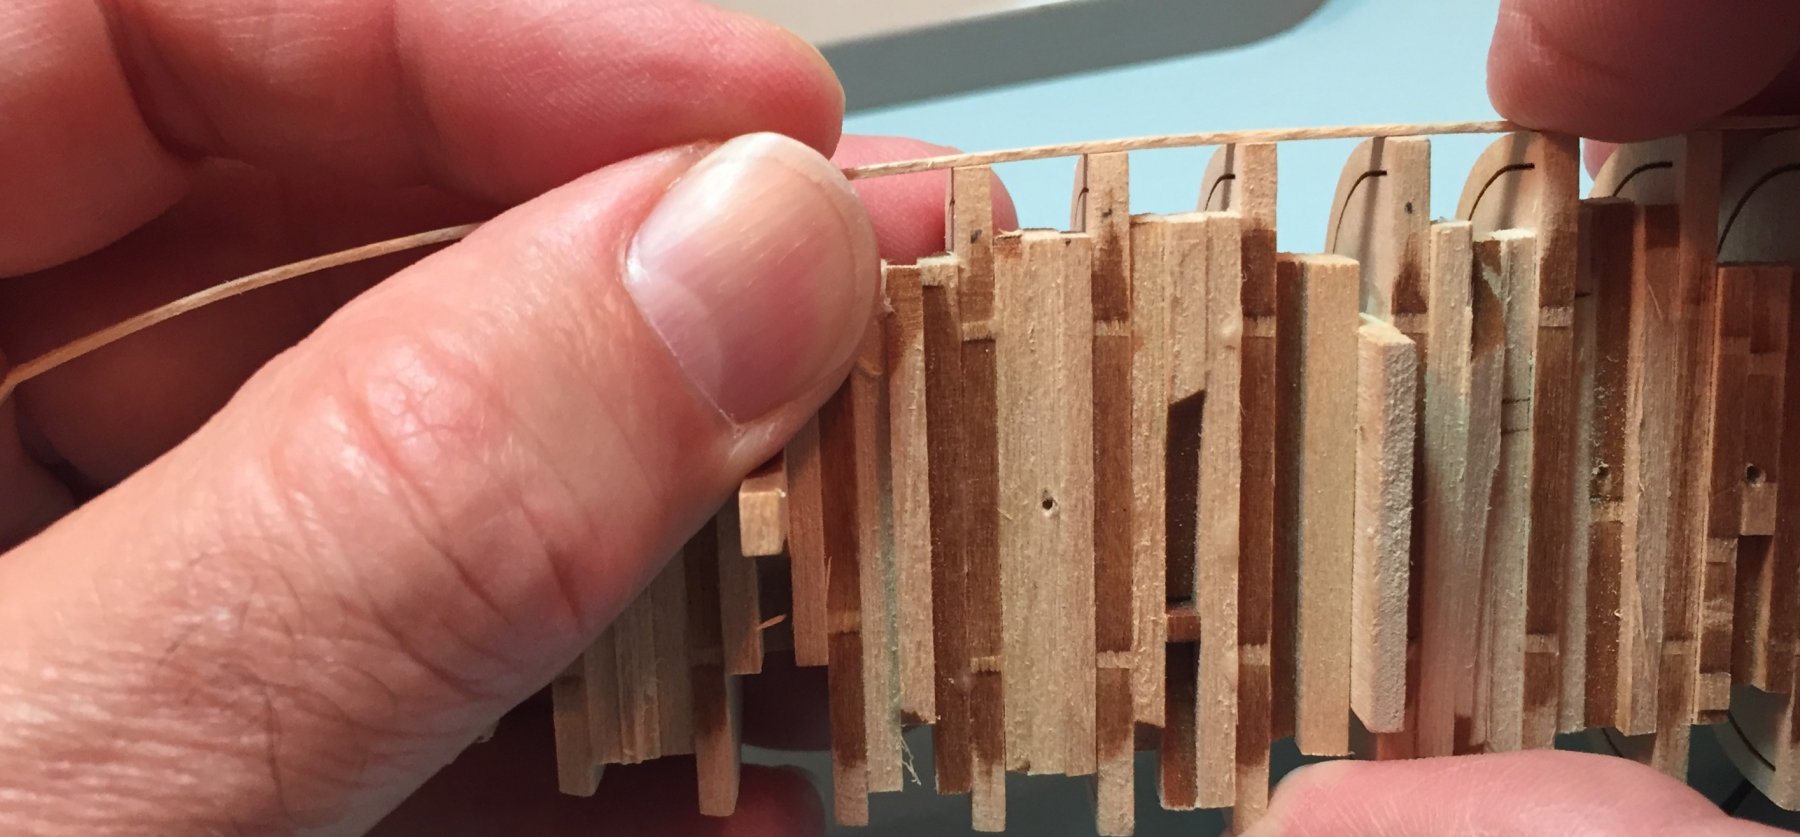
FARING THE HULL--CONT. 9. The planking material used as a planking batten is not flexible enough on this small model. You will get about 90% done and you will begin to notice that no matter how tight you pull it between your thumbs and fingers it will not lie on all the bulkheads. You will get exasperated if you do not realize why this happening you will curse and swear that you previously had that part of the hull fair. It will begin to show gaps between the batten and the bulkheads as illustrated in the diagrams posted from the literature. This is especially true in the bow area within the first 5 bulkheads. The problem is that the Batten Bows out from the fair line of the hull when you put pressure on one end to wrap around the bow. The other reason for the issue is because the plank must curve inward and twist at the bow to take on the shape of the bow to lay flat. This is why in the planking guide posted above, the planking batten is pinned to the hull. I believe this model to be too small and the frames/bulkheads to fragile to pin the batten in place. The planking batten will also attempt to deceive you as to which bulkheads are low and which ones are high. The one in the middle may not be low (in my model this was rarely the case) but either one on each side may be high. Most likely the one closer to the bow going forward from the center line and the one closer to the stern moving aft from the center line. Here is a photo showing the Bowing Problem. Checking fairness over shorter distances. To check the fairing of the bulkhead where the batten bows out, hold the batten at shorter distances, not from end to end of the boat but from 3 to four frames. In the shorter space the batten will lie down so you can see that the fair line of the hull is continued between these fewer frames. Here are a series of four photos taken from the bow to stern showing the planking batten used over shorter distances. The frame above with the gap has been my pesky little problem on this hull. On the lower portions of the frame there is no gap. The two frames forward required the work. HERE ARE A FEW TIPS FOR FAIRING THE LONGBOAT. a. Which bulkhead are you working on? The number of bulkheads/frames in this little model are 16 in a six inch space. Always know and fix in your mind which bulkhead you are working on while you fair it. As you work from port to starboard and sheer to keel you will rotate and re-orient the model several times in just a couple of minutes. Because the bulkheads/frames are so close together it is very easy to loose the one you are working on. Mark them to keep track, and before you register the file on the work surface make sure its the bulkhead you mean to alter. If you do not, you will remove material from the the bulkhead ahead of or behind the one you meant too, causing you to have make further corrections to rectify your error, thus removing more wood than should have been required. b. Do not file or sand a bulkhead for more than ten seconds and count your strokes. c. The same bulkhead may be fair in one location and not fair in another. Work spots, not whole frames. d. For final prep of the bulkhead try a circular motion of the file. I found this very helpful, especially when I was working a pesky spot on one frame. e. The relatively easy portion of the hull to fair is the bottom from the turn of the bulkhead to the keel and from the joint of the keel and stem aft to the last bulkhead. f. The more difficult portion of the hull to fair is from the top down to the turn of the bulkhead and forward from the keel/stem joint to the bow, and the transom. The bow area because of the sharp angle of the bevels and the transom because of it's lightness and precarious position on the hull. Tread lightly on the transom or you will be punished. g. Remember that the hull must remain symmetrical. If you are really working one side to make it fair, make sure the other side matches your efforts. This can happen if you lost the orientation of the model when working one side. (i.e. you blinked and worked the wrong frame). You have to make the same type of corrections on both sides of the model or it will not remain symmetrical. Next: I will post my result with fairing the long boat hull.
-
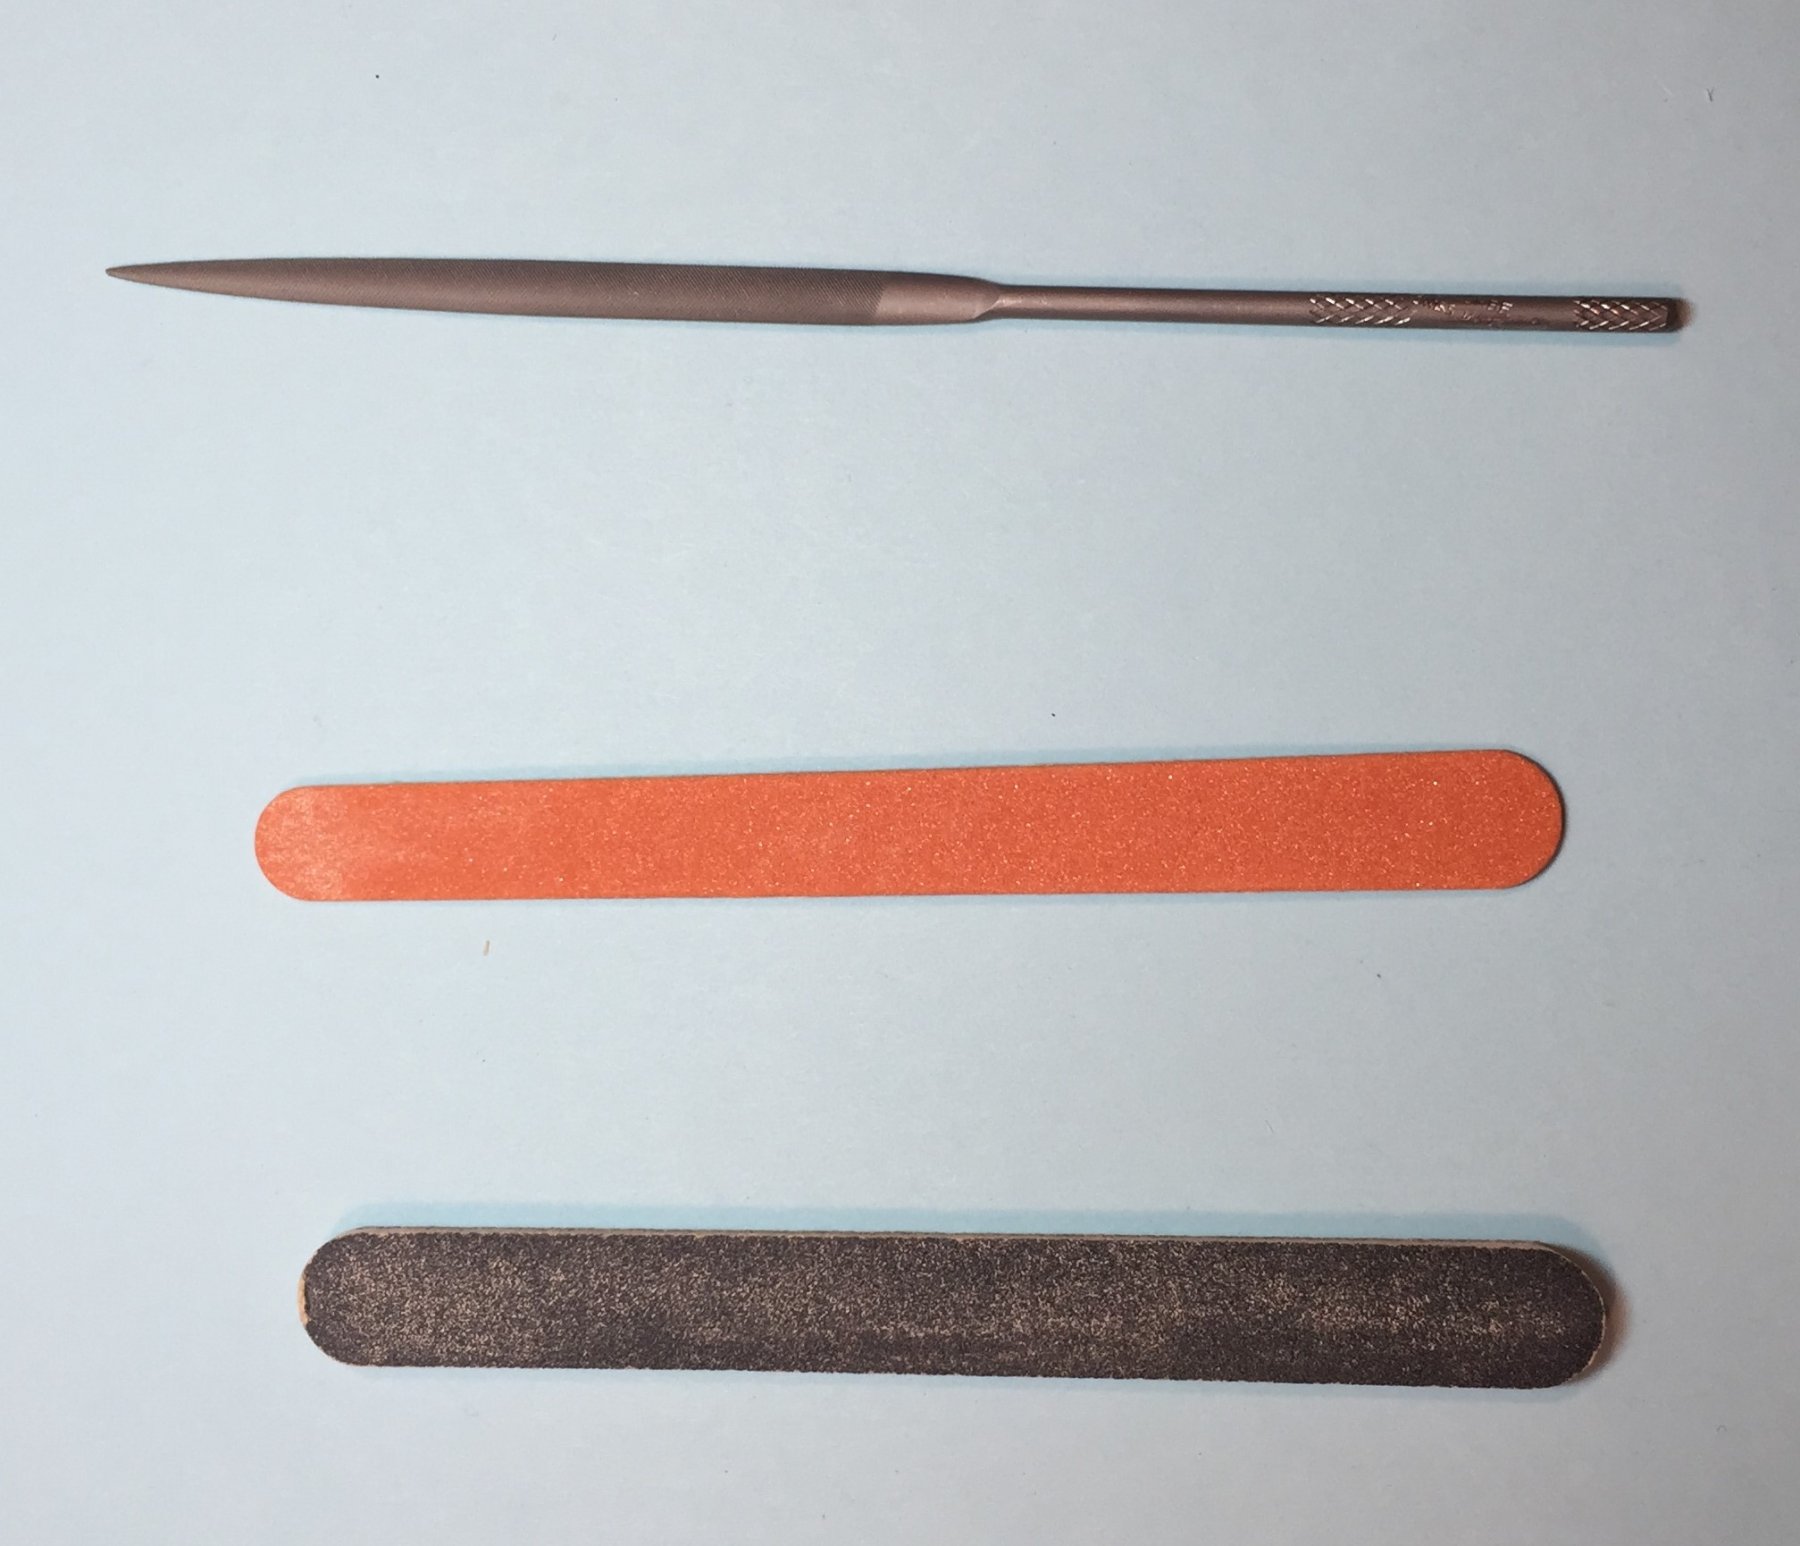
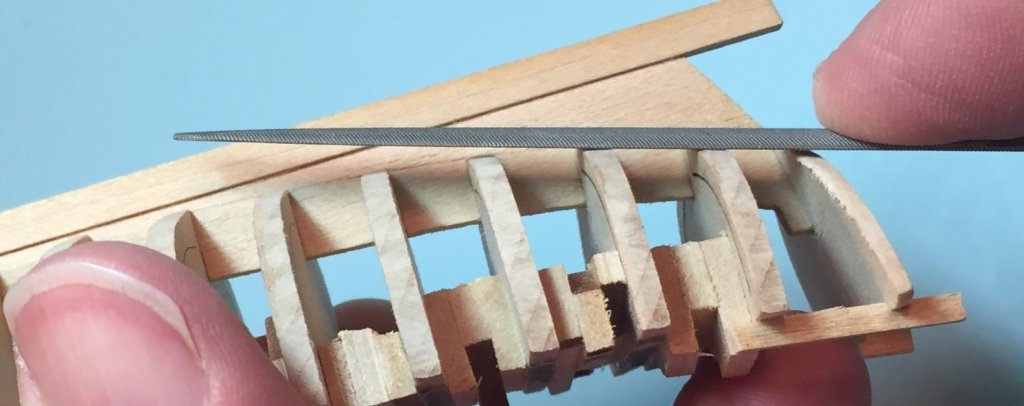
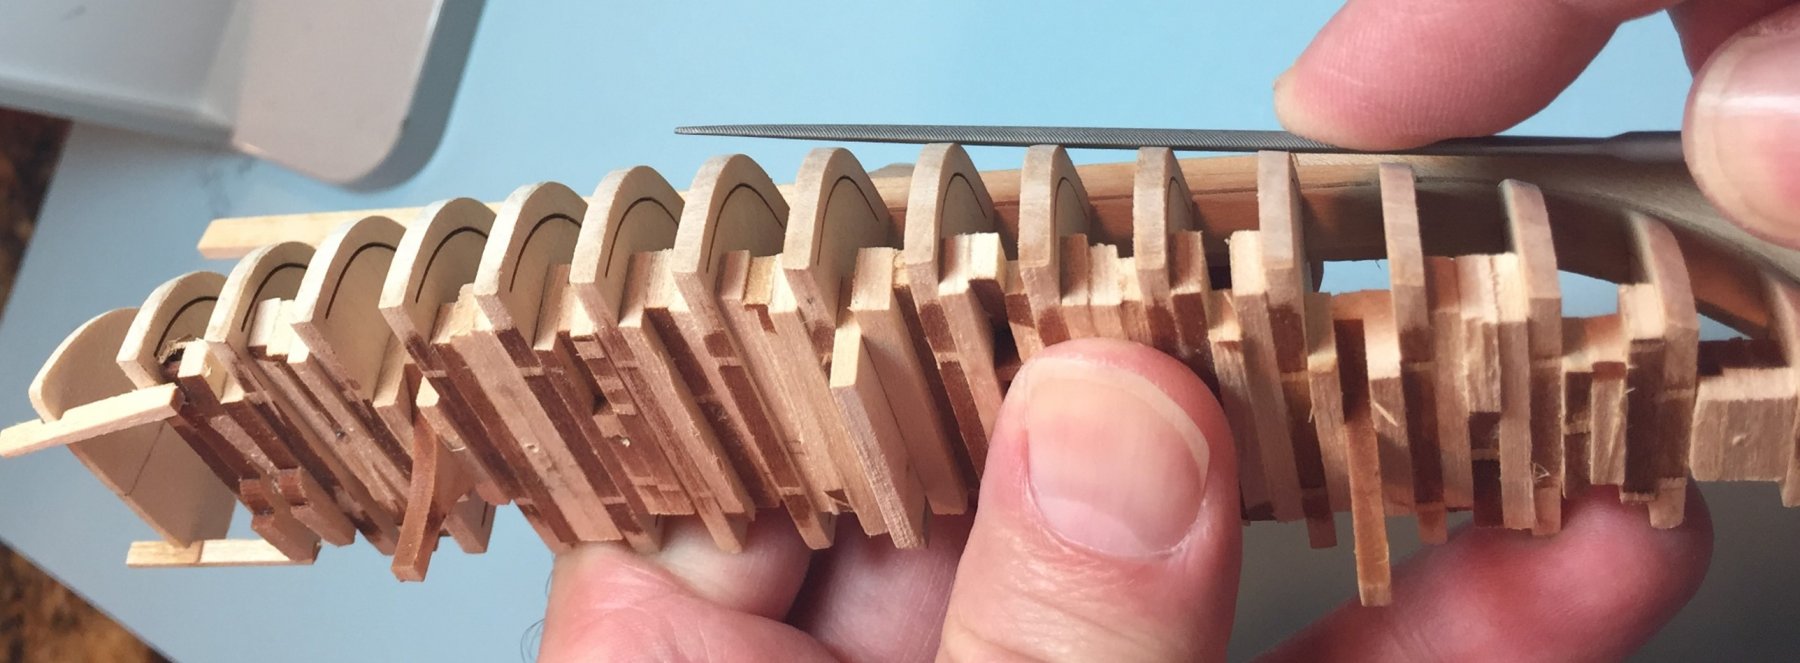
FAIRING THE LONG BOAT HULL---CONT. 7. I next moved to my files. I have several sets of files and in this build I have been choosing between them to accomplish certain tasks to see which works best. They are my 4 inch mini set, 5 1/2 inch set, and 7 inch set. For fairing the hull the 5 1/2 inch set was best suited for the job, as it has been from the beginning of the build. I maintain that you can build this model with only that one file set. The mini files are two narrow for the job and the 7 inch set is just too much muscle for the job. The 5 1/2 inch set is just right for the job being an easy length and width to work with. These files are small enough that the flat file is flexible. It was not as much use here. The half round file and barrette file were the most useful, followed by the square and three sided file. However, the job can be accomplished with only the half round file pictured above. It did at least 95% of the job for me. This file takes the place of the truing block or sand paper covered block described above in the reproduced literature. In some parts of the hull(the bottom) it covers 4 frames well, and in other places it spans 3 frames well. A word on files. I understand that the the file sets marketed to us from the normal model sites are a #2 or medium cut. I have been upgrading my files lately and have learned a thing or two about them. I have compared my new files to my previously purchased sets and have determined that they all appear to be the #2 or medium cut. This cut has worked well on my model during the fairing process. Here are some photos of my process with the files. Working on two bulkheads. Working on three bulkheads. The file spanning four frames on the bottom of the boat. 8. Your are not in a hurry. There is no need to get this job done in one sitting, or one day, or before dinner or any self imposed dead line. If you set a dead line it may cause you to be over aggressive in removing the material from the hull and will cause errors. For this open boat you really wish to avoid using shims to put material back on the hull. They may or may not show on the inside of the boat depending where they are placed. Set the boat aside after you make some progress. You may be surprised what you see the next day when up pick it up again.

-
FAIRING THE LONG BOAT HULL--CONT. Before moving on to files I have a few more photos showing the process of using the emery boards. The first two show how I held the model and the emery board when I was working the emery board from the sheer line to the keel and back moving the emery board along the frame edges rather than perpendicular to them. I left this photo out of last post. I have tried to edit the post but it will not let me. I have tried to delete the last photo in last post and it also will not let me. I suspect the reason is that the post was too long and had too much data in it, or it ended up on the bottom of the page. The photo shows the initial dressing down of the bulkheads/frames in the bow of the boat to establish the sharp bevel. Now on to my files in the next post.
-
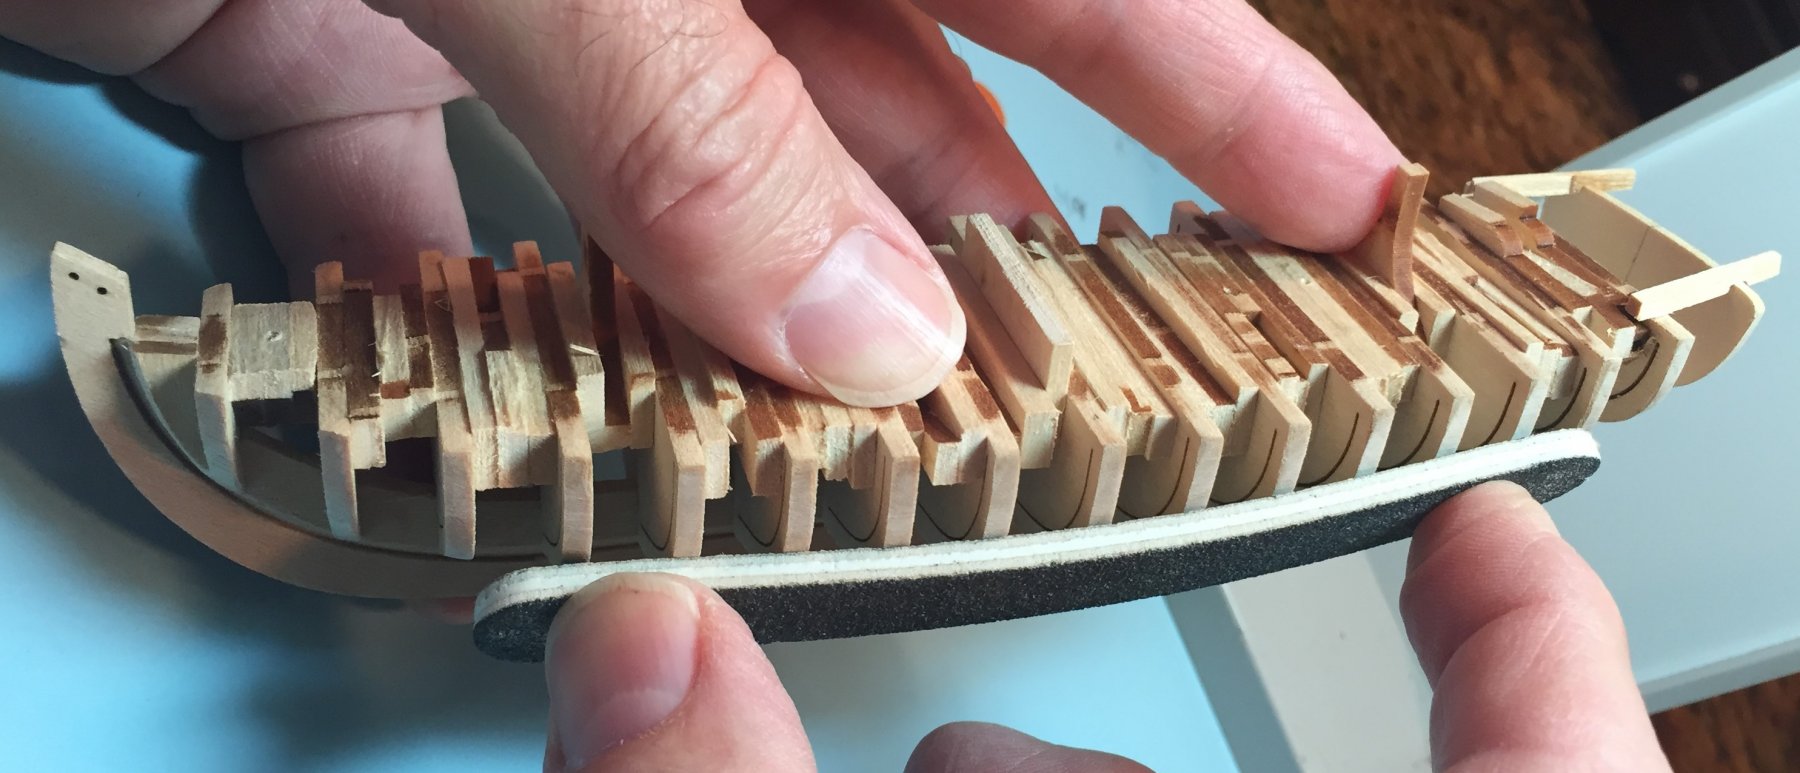
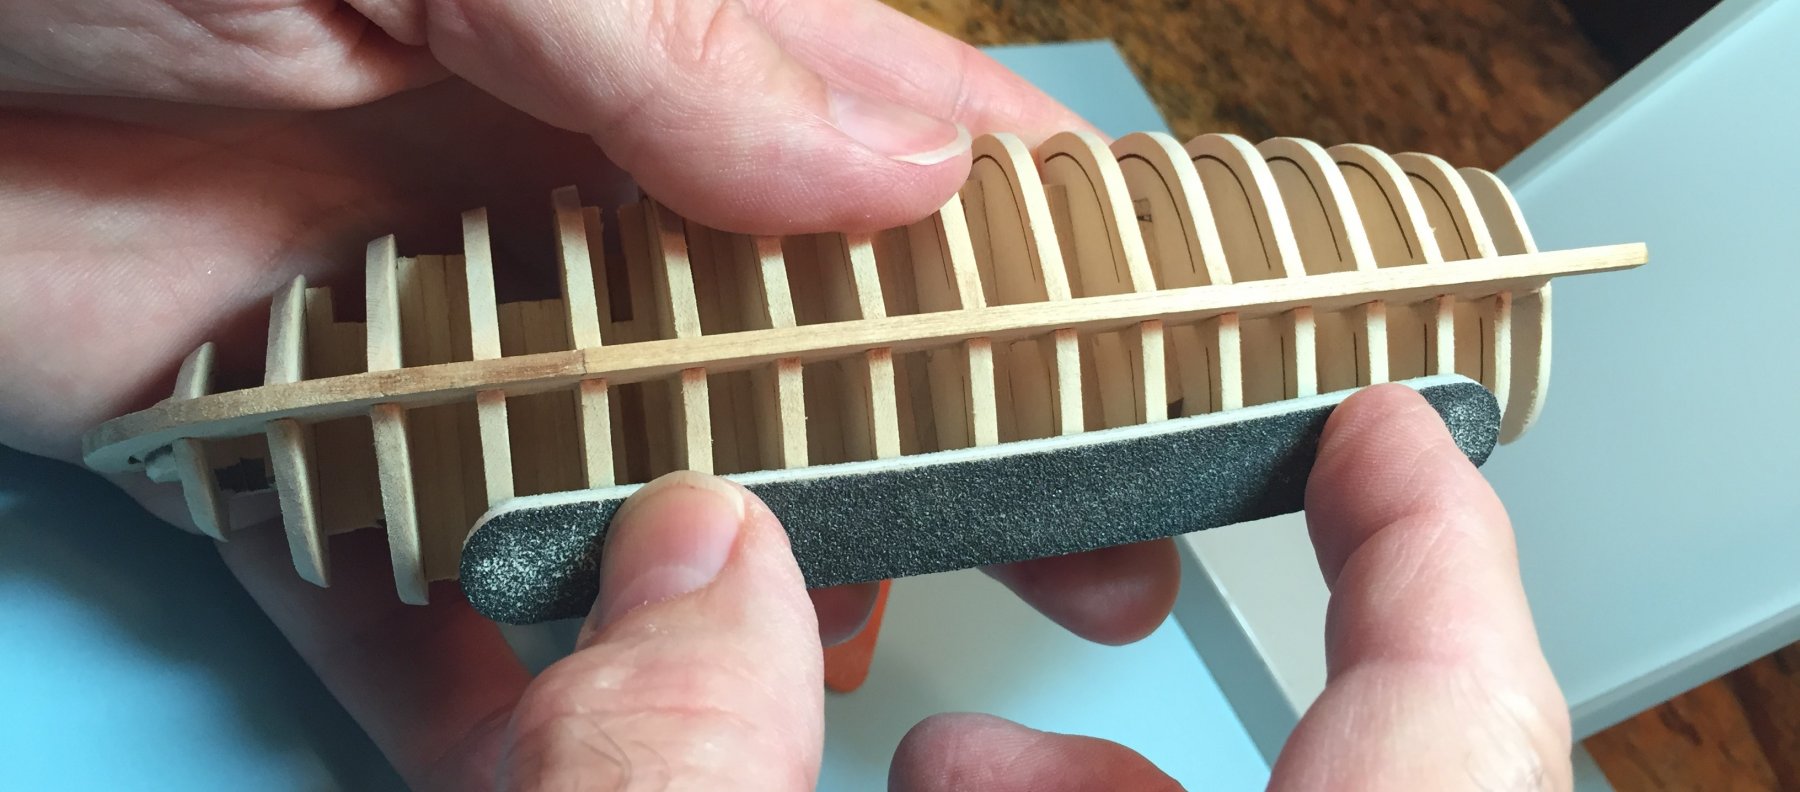
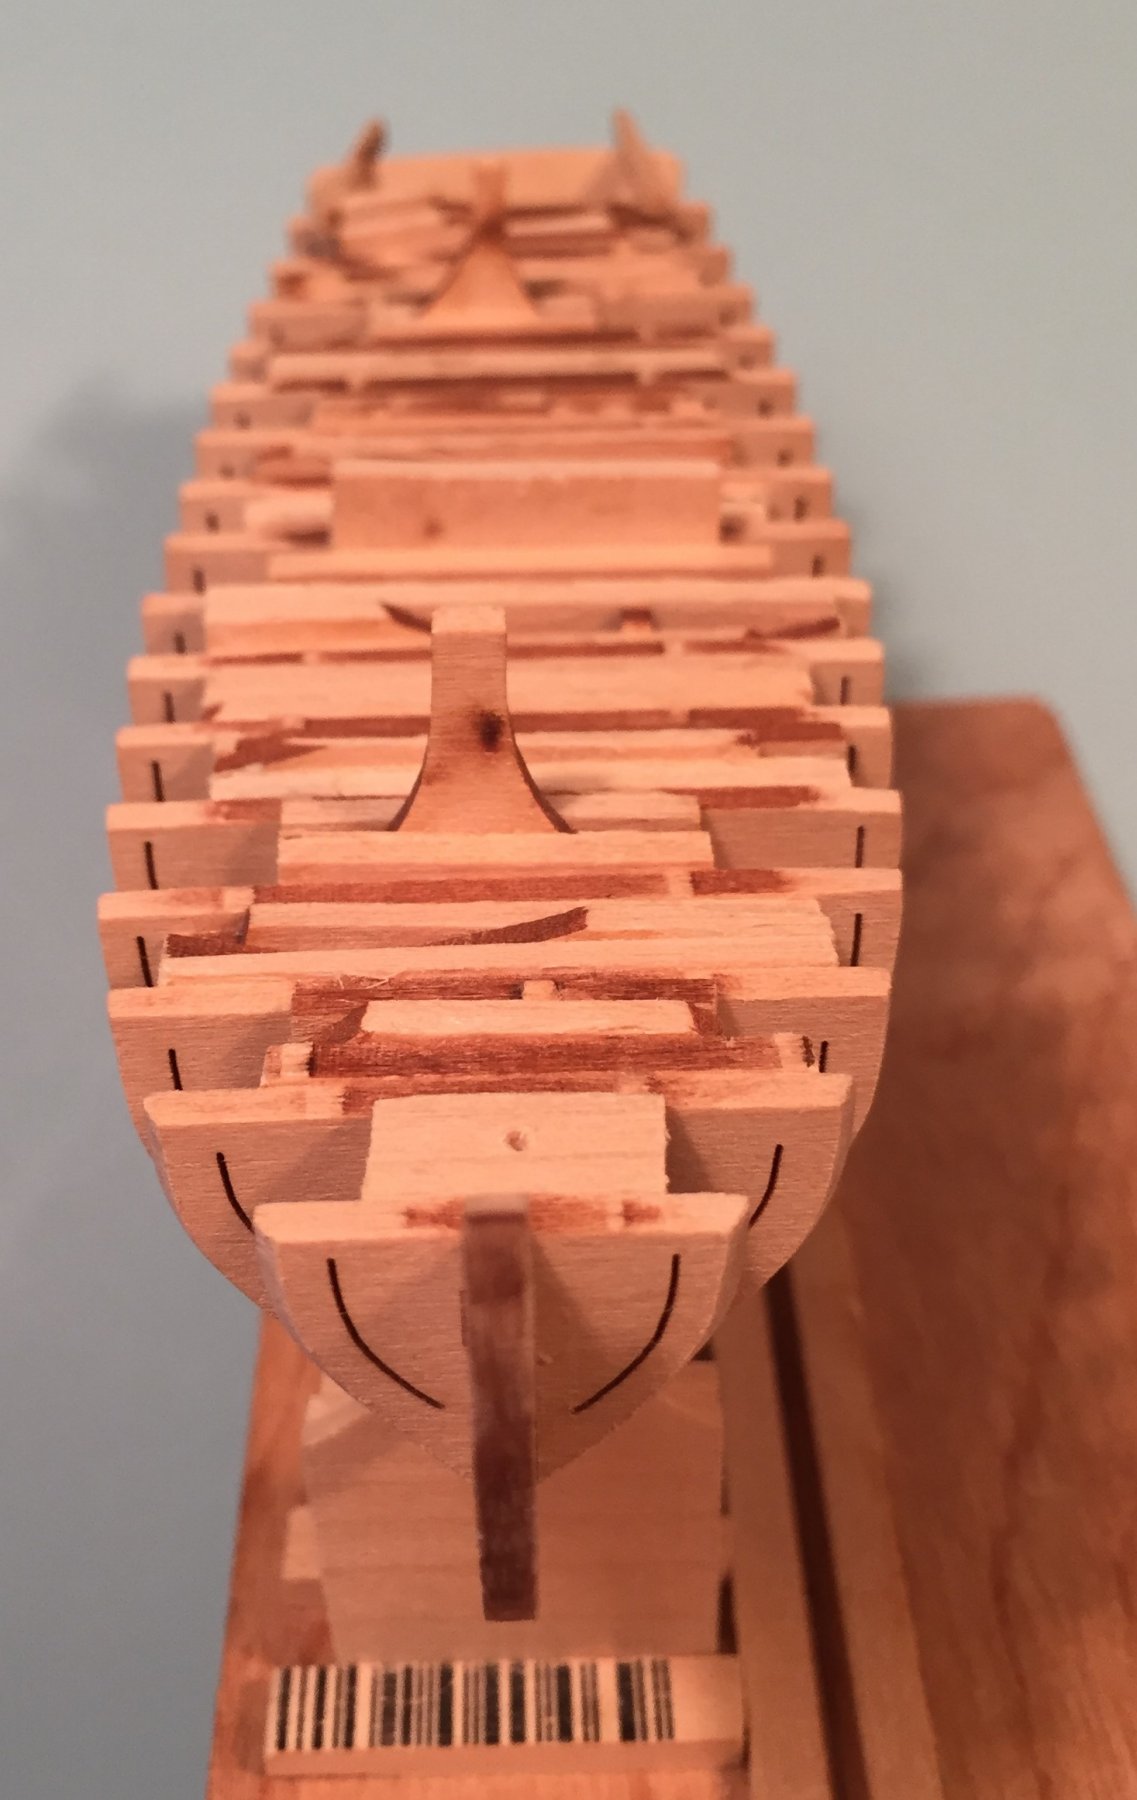
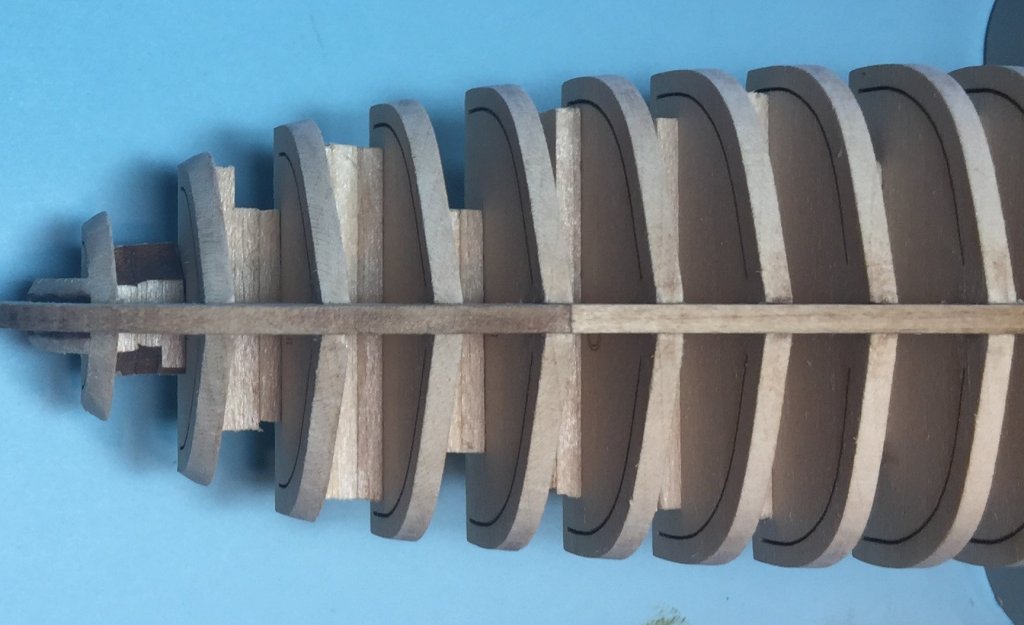
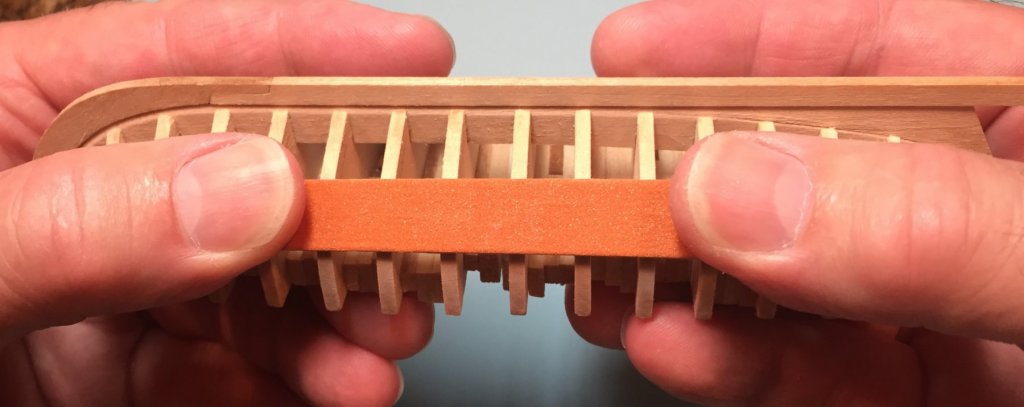
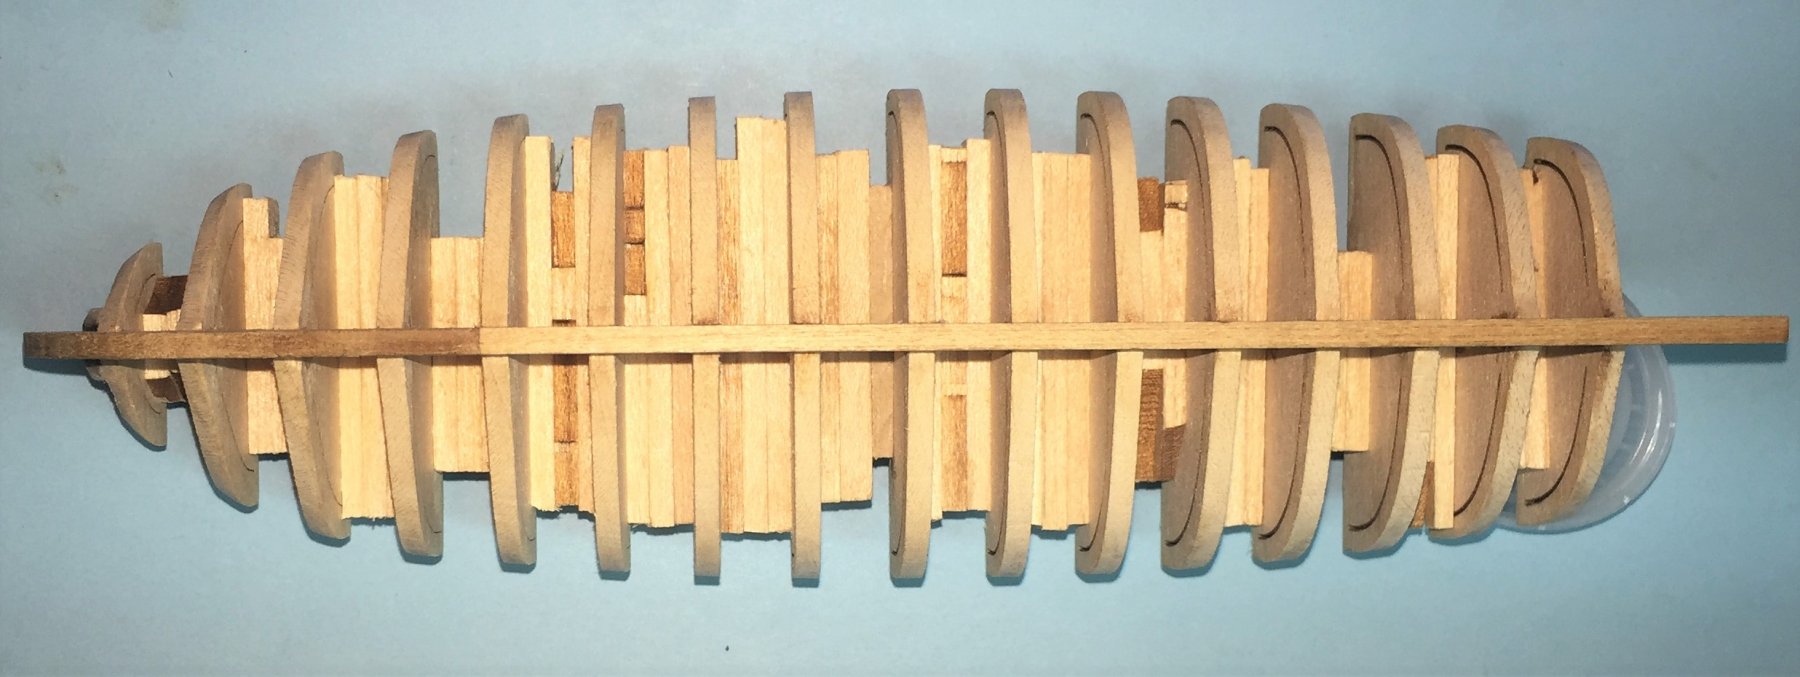
FAIRING THE LONG BOAT HULL After much thought over a two week period, I have come to learn why there are very few or no detailed writings on how to fair a ship model hull. It really is a "show me" kind of thing and a little bit of experience doing it will go a long way. Fairing a ship model hull is something EVERY BEGINNER is faced with and must learn to do. I have re-read the postings from my various books and NRG files above and with the exception of the quote immediately below, I do not think I can define a fair hull, or the process of fairing the hull, any better than the works I have quoted. As part of the process though I wish to add the following excerpt from Mark's (JSSoane) essay Thoughts on Craftsmanship and Precision Model Making ...An Essay Found at that Nautical General Discussion area her of MSW. I would encourage everyone to read it. I quote from it here. "Obtain and use good files. I found it hard to use files at the start. Through a lot of trial and error, I discovered the virtues of using very good files (sharp and consistent); of using coarse, medium and fine files (using too fine a file at the start leads to impatience and sloppiness when it takes so long, while too coarse a file at the end leaves a rough surface and edge); and of learning to “register” the file against the surface before filing, to keep the surface level. It is too, too, easy to round things over with a file because of the slight rocking motion of the hand. Be consciously aware of keeping the file level. I often draw hatch lines on the surface I am filing, so I can check periodically to see that the hatch lines are coming off uniformly and not just one one side or corner. If I need to angle a surface slightly, I watch for the hatch lines to come off evenly at one side. With good file work, you can make just about anything fit extremely precisely. Sand against templates or flat surfaces. Holding a piece of sandpaper in the hand and rubbing against your piece will almost always lead to rounded edges. Far better to glue the sandpaper to a larger sanding surface, and rub the work against the sanding surface...." I will concentrate on my experiences with this particular model. The guidelines and diagrams posted above are very useful instructional tools for the long boat. Although the bulkheads are much more closely spaced than on other and typically larger plank on bulkhead models the principals are the same, and I believe the closer spacing makes it easier. The fact that the bulkheads are made from bass wood rather than harder plywood also makes it easier. The smallness of the model also makes it an easier task as it is easily held in your hand while you work it. Here is my process on this model. 1. Select one piece of the hull planking material to use as a batten to determine the fairness of the hull while you work it. I did not attach it with pins as is suggested in the Simple Planking Techniques booklet posted above. The model is small enough not to do that. The bulkheads/frames are also too small and are made of basswood. You might damage the model if you pin it down. You can hold the planking batten down with your fingers on each end of the model and pull it tight to see what material should be removed or remain on the model. Here is a photo demonstrating this. Unfortunately I did not take as many photos as I should for the simple reason that you can not hold the model with two hands and take a photo at the same time. I did not always have my assistants available to help. So some of the these demonstration photos are taken after much of the fairing had been completed. 2. To demonstrate the fairing issues I re-post below some previous photos to show the squareness of the edges of the bulkheads after they have been placed in the false keel. When compared with later photos its obvious as to the work to be done. A photo of the square bow bulkheads/frames. Unaltered photo of bow to stern of the square bulkheads/frames. Stern to bow. Two from above. 3. I used three types of tools to fair the hull. A regular very inexpensive emery board that has two very fine grits A foam emery board with a medium or coarser grit My files. Although I had complete sets to choose from, a few ended up being better suited to the task. Although I tried them, the two sanding sticks I have been using were too course, narrow and stiff to accomplish the task. Here is the photo of these basic tools. 4. I began with the emery boards. The padded one first and then the thinner one. They have the sand paper on both sides so they grip your fingers. I was able to hold the model in my hand and with my thumb and index finger work the emery board. They were flexible and formed to the contour of the hull and were most useful in taking the high spots or the high edges off of the bulkheads during the initial fairing. The thin one (not padded) was also very useful in the initial dressing down the edges of individual bulkheads at the bow. I was able to use them to remove material in (2) two directions. Both fore and aft and from the shear line down to the keel. The photos below demonstrate this initial process. WARNING!! / CAUTION!! 5. I caution using the emery boards for much beyond the initial removal of material in establishing the basic bevels and fair line of the hull. They are flexible and violate all the rules in the sources cited above. If not careful you will round the edges of the bulkheads and your planks will not have a flat surface to lie upon. 6. Another CAUTION and reminder to read the instructions. Although the instructions are brief, they do caution you to use fine sandpaper. No less that 220 and up to 320 as coarser tools may grab the bulkheads on the sides (edges) and split them. The instructions advise that you should very gently sand the edges. This is not an idle or unimportant instruction. As I began fairing the hull I saw the bulkhead move. This was upsetting to say the least because they were blocked at the top. The movement startled me and I was initially convinced the bond on the false keel came apart. Upon further examination and trial sanding of bulkheads, I discovered the the FRAME PORTION of the bulkhead was flexing or moving. It is only fixed at two points, the top of the bulkhead and the bottom where it mates with the keel. In between is the open space created by the laser burn creating the separation between the bulkhead and frame/rib of the boat. If coarse sand paper, or a file grabs it, if may break and come apart. Be careful and go slowly. I next moved to my files. That will be the next post.
.thumb.JPG.1b6a20a19783e0094af0c74783b887b6.JPG)
.thumb.JPG.70a3f54147b96f9dbc518630b773a74c.JPG)
.thumb.JPG.fd80fcaa00f4875fb730c0f5971787a9.JPG)
.thumb.JPG.bc9d2c9b8d1a66ab3b78c75c315409ab.JPG)
.thumb.JPG.0277b9ca84d540c5091dd3a97029375a.JPG)


-
Jim The blocks are not very deep and the floss is a little more stiff than just plain string, thread or line. It will probably feed over, fall over, thread under the blocks and I should be able to pick it out with tweezers. Passing the floss from underneath to break the bond should work just as well if not better as the leverage necessary should be met by wrapping the line on a pencil or file and twisting the two ends together pulling the floss thru the bond as it is tightened up as it is twisted together. Also, it is not likely the blocks will stay in the model until it is fully planked. The planking should stabilize the hull enough to take them out early in the process so I can clean up the glue. The instructions in the kit seem to advise that this will be the case.
-
Use of alcohol to break bond of blocks. Eric Later in the build I may add more details to the block removal, but to answer your question, I did not have the problem with the alcohol seeping down to the false keel and bulkhead interface. Because I was only removing one block I supported the model at an angle away from the adjoining block so it would not flow into the unintended space. I placed the alcohol with a small brush on top of the blocks only. It did not seep through. Also, remember I only placed three dots of glue; port, starboard and center, so the whole interface between the bulkhead and spacer block was not bonded. As to the amount, the bass wood really soaks it up. After hitting the wood, the alcohol had little chance to run or drip to cause problems. Another issue is that the alcohol will slightly swell the wood. Water does this. This trick is useful for time to time to close pin holes and such or to increase the width, as it did here. For me this turned out to be useful and an added benefit. The reinstalled block fit a bit tighter. Suggestion not to bond the blocks with glue. They have to be glued in. Pressure will not hold them adequately. Although I have not tried it, tape may not work as it will take up too much space and may be squishy or create a somewhat flexible bond. Plus, double sided tape would be an additional purchase for 3 to 5 dollars, and I am saving the tape budget for painting the hull.
-
Jim Thanks for your participation. Just so happens I am in the process of upgrading my files. A really good file is a joy. You can also buy really good files one at time in all sizes. This is in keeping with the adage, When you buy a tool, buy the best you can and you might only have to buy it once. I might expand your one file choice to two because I have found my flat file very useful in this build. Although good files are great to have, I still think that the lower cost mini files will serve the beginner on this model as it is 100 percent basswood. Eric and Jim Thanks for your defense to avoid power tools here. They certainly violate my rules for the build and most are just powerful to use on this boat. Taking Dremel to the blocks or those strips along the tops of the bulkheads that others have used, just brings too much torque to the party. If it catches the model is done for. Also, lets not forget the cost of other bits you must buy for the tool. Also, while we are on the discussion of rotary tools, I do not believe it to be a very useful tool for the beginner. Its too powerful, is always prone to taking off to much material, may damage the model, and I very rarely us my Dremel. My favorite rotary tool I bought from Model Expo on sale, twice. I think it was less than 9 bucks(it may have been $4.99), is re-chargeable, and has very low torque. I use it the most. I bought two because it does not hold its charge very well, but well enough.
-
A response to Chuck Chuck One or two of your points above have been touched on before in this build log. I have already admitted that I tend to overthink things. It is constantly pointed out to me by the members of my club and my two primary mentors. However, what ever I do tends to work for me and historically, I generally end up happy with the results I achieve. As you say, there are over 50 build logs for this little boat on MSW. I have reviewed some of them and continue to review them for their problem solving. I reviewed them before beginning the build log and decided that If I was going to contribute, my log would have to be different. Otherwise it is just another Victory or Constitution. Thus I am writing it for the beginner, and I have previously stated that in my experience beginners like to see it done, not just receive some short instructions like, "...fair the boat". Beginners get frustrated and angry with instructions like this. They put good money into the kit they selected and then purchase tools and materials to build it, only to learn immediately that what they need to complete the kit is not in box. I will continue to defend the block method I have selected to stabilize the hull for fairing and planking for the following reasons; a. The stated goal is to buy as few additional materials and tools as possible, thus, cutting up the scrap for making the blocks and its thickness, (3/32nds) screams use me. See if you can find 9/32nd material in the market place. Would it be easier to just set up my saw and mill it for what I need? Of course it would, and I would have all the material I need in less that 5 minutes. Therefore, for experienced modelers with tools, the block method is not particularly time consuming. b. The bulkhead hull assembly must be aligned correctly and be stable to fair it properly. This is especially true for the beginner. I have reported that I have Zero movement in the hull as a result of blocking it up. Have you noticed that no one has reported that the strip method you advocate and others have used results in zero movement? I disagree with your comment that the strip method works "...best...". It may be adequate but not best. And, you are not quite accurate when you state no one has used the block method on this model. See Toni's post above. c. Why are we in a hurry? Ship modeling is an exercise in patience. The sooner a beginner learns this the better. It is far more important to insure a good result on a first effort than it is to see how fast a beginner can get it done. We all know that beginner's almost all universally balk at planing, reading the instructions front to back first, making a building board, jigs, prototypes, mock ups, special tools like clamps, and similar items because all of those things are not building the model. They think and say; For God's sake, lets just get on with it. All the things I just listed aid precision, and are good lessons for a beginner. d. You are a commercial producer and designer of ship models. Your requirements for speed, short cuts, and no overkill directly dictate how you must do things in the commercial sphere. Knowing you, and seeing your work I know that you bring a high level of Artistry to your work, and I suspect it is in constant conflict with your commercial hat. Especially now in your career, because the prototype models do not have to be surrendered to the manufacturer. A beginner has none of your issues or those of a person building a commission model. Beginners can take all the time in the world. e. The blocks are not going to stay in until the hull is completely planked. They can't for several reasons. First, we must be able to clean the up the glue on the inside of the hull. Second, we must be able to see if the bevels on the planks properly close the gaps on the inside of the hull. Third, on the lower planks(bottom half of the hull) we must see inside to insure the planks are properly seated on the frame. f. For planking the boat I am heeding your advice and installing the shear planks port and starboard, and perhaps the first three per side. I am hopeful that that will stabilize the hull to complete the planking as we will be done filing and sanding the bulkheads. g. Turns out removing the blocks is far easier than anticipated. I do not think beginners will be frustrated removing them. I will continue to count on you support when I run into issues on this model.
-
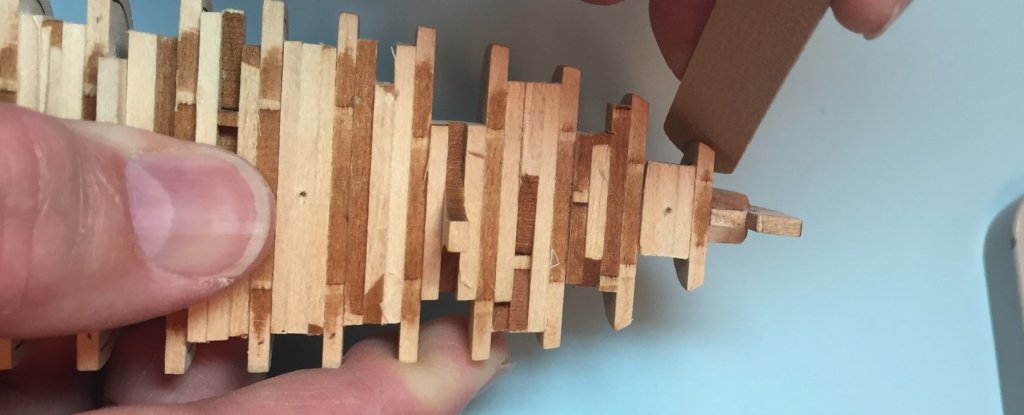
BLOCK REMOVAL--ASTOUNDING RESULT I LOVE WHITE GLUE!!!! WORKED LIKE A CHARM EASIER THAN ANTICIPATED SO EASY A BEGINNER CAN DO IT I can not tell you how pleased I am that it worked as well. All of the above statements are practically understatements. The real key is waiting for the alcohol to work. I flooded the aft side of the block with alcohol and waited about 8 minutes. I flooded the joint again, waited about a minute while I took about a foot of waxed dental floss from the container. Lined it up with the bulkhead and held one end firmly with my thumb on the keel, pulled taught and worked the floss into the corner of the joint across the top and pulled over and down though the bond. It happened so quickly I did a double take. I repeated the steps on the fore side of the block and achieved the same surprising result. With a Q-Tip dipped in alcohol I cleaned up all the white glue remnants on the bulkheads and the block and reinstalled, being careful this time to work more quickly and not pull the alignment of the hull out of wack. It turns out that I did not pull the bulkhead by the poorly installed block, instead I slightly twisted the hull Because I did not have the hull in the building board secured in the keel tracks when I installed it the first time. You can actually see the twist in the photo. Look at the laser cuts for frames in the bulkheads just forward of the high block with the handle. You can see the twist. The laser cuts do not line up. Lesson learned.
-
THINKING AHEAD--HOW THE HECK AM I GOING TO GET THOSE BLOCKS OUT? I am sure I am not the only one wondering how I am going to get those blocks out, especially because of my limited tool use. Other than being confident that the alcohol will dissolve the white glue and make it possible I still have my doubts about the ability of the alcohol to penetrate the wood and the joint. I actually have to remove the last block I put in place at the fore end of the boat in the space I have reserved for the building board. I think I was too slow to install it and the glue grabbed too soon and pulled the bulkhead askew just a tad. I figure this is a good time to practice taking out the blocks. Here is my plan. We can not use to much muscle because the boat is fragile. Therefore no saws or heavy files. See the instructions about removing the bulkheads. It suggests no saws, and to use files only. I will flood the joint from above and below, wait awhile, and then use dental floss (the string type) to break the bond by working it from side to side or from bottom to top. I will let you know how it worked out. Does anyone have another suggestion or a better idea?


.JPG.fd85a1e0817c12958c9f5dcbe4b42a5e.JPG)
.JPG.ed258469f4a0dd2ca68bc40adf398c57.JPG)


.JPG.c25fb23040f63ecfa7955f6f6518e6b6.JPG)


.JPG.263dc0848d72649e2f09c448762f24bb.JPG)
.JPG.ab64db80ad936b12a9b071a59f3ee3a0.JPG)
.JPG.633f3b05db4a42baee9900a26eb2ed8f.JPG)
.JPG.da144ce6e1537311fe02fbf47f8b447f.JPG)
.JPG.54a3f03ed63621df5393344263d8c3f7.JPG)