modelshipwright Posted March 27, 2013 Author Share #31 Posted March 27, 2013 (edited) You will notice that the area above the top two arched windows has dimples carved in the left most panel. I was struggling with the effect I wanted to create and did not keep that presentation. The next photo shows a curved piece of boxwood that has a series of tear drop shaped openings that alternate like theatre seating as the rows expand. This is how these areas were filled in, using one strip and later adding partitions to create panels. In this shot, you can see the two strips in position with partitions placed over them to create the panels. More carvings are added and the windows treatments were added. More to follow........................ Bill Edited March 28, 2013 by modelshipwright garym and cristikc 2 Quote Mediocrity will never do. You are capable of something better.” ― Gordon B. Hinckley Current build: Sovereign of the Seas 1637 My Book: Carving Ornamentation for Ship Models Website: Http://carvingbook.weebly.com/ Link to comment Share on other sites More sharing options...
mtaylor Posted March 27, 2013 Share #32 Posted March 27, 2013 Stunning work, Bill. That's for bringing this back. Your log is a tutorial unto itself. Quote Mark "The shipwright is slow, but the wood is patient." - me Current Build: Past Builds: La Belle Poule 1765 - French Frigate from ANCRE plans - ON HOLD Triton Cross-Section NRG Hallf Hull Planking Kit HMS Sphinx 1775 - Vanguard Models - 1:64 Non-Ship Model: On hold, maybe forever: CH-53 Sikorsky - 1:48 - Revell - Completed Licorne - 1755 from Hahn Plans (Scratch) Version 2.0 (Abandoned) Link to comment Share on other sites More sharing options...
AnobiumPunctatum Posted March 28, 2013 Share #33 Posted March 28, 2013 Welcome back, Bill. I missed your marvelous build log of the Royal Souvereign. Quote Regards Christian Current build: HM Cutter Alert, 1777; HM Sloop Fly, 1776 - 1/36 On the drawing board: English Ship Sloops Fly, 1776, Comet, 1783 and Aetna, 1776; Naval Cutter Alert, 1777 Paused: HMS Triton, 1771 - 1/48 "Have no fear of perfection - you'll never reach it." Salvador Dali Link to comment Share on other sites More sharing options...
modelshipwright Posted March 28, 2013 Author Share #34 Posted March 28, 2013 Thanks everyone. It brings back many memories of my first attempts at carving when I repost this build log. As my skill improves I am often tempted to go back and replace some of the earlier sculptures, but alas, there is not enough time for that. Regards, Bill Quote Mediocrity will never do. You are capable of something better.” ― Gordon B. Hinckley Current build: Sovereign of the Seas 1637 My Book: Carving Ornamentation for Ship Models Website: Http://carvingbook.weebly.com/ Link to comment Share on other sites More sharing options...
modelshipwright Posted March 28, 2013 Author Share #35 Posted March 28, 2013 (edited) You may have noticed the presentation of the leaded glass windows on the stern. I had experimented with black thread soaked in a mild solution of white glue and water and trying to create a grid but this method failed. Finally I fell upon using plastic window screen. I stretched the screen to make the openings in the screen diamond shaped and pinned them to a teflon sheet on a board. I then painted the area with white glue and let them dry overnight. In the morning the pins were removed and the shapes maintained themselves. I cut the appropriate shape and placed it on the hull and laid the boxwood window frame over the grid. It turned out to be an effective method or reoplicating the glass. More to follow........................... Bill Edited March 28, 2013 by modelshipwright garym 1 Quote Mediocrity will never do. You are capable of something better.” ― Gordon B. Hinckley Current build: Sovereign of the Seas 1637 My Book: Carving Ornamentation for Ship Models Website: Http://carvingbook.weebly.com/ Link to comment Share on other sites More sharing options...
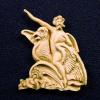
modelshipwright Posted March 28, 2013 Author Share #36 Posted March 28, 2013 (edited) The next two carvings to be added to the stern were Jason holding the golden fleece and Hercules holding a club. Both carvings are standing on pedestals with a decorative motif. As the carving proceeded, I began the central carving of Victory. It was by far the most complicated carving to date and took many hours to get it to where I thought it deserved to be on the stern. This photo shows Victory in progress held against the stern. Note the arch over her head with sculptures of clouds with faces in them. More to follow................. Bill Edited March 28, 2013 by modelshipwright garym and cristikc 2 Quote Mediocrity will never do. You are capable of something better.” ― Gordon B. Hinckley Current build: Sovereign of the Seas 1637 My Book: Carving Ornamentation for Ship Models Website: Http://carvingbook.weebly.com/ Link to comment Share on other sites More sharing options...
modelshipwright Posted March 28, 2013 Author Share #37 Posted March 28, 2013 (edited) As Victory was a major turning point in my carving, I will post a couple of in progress shots of her. The first shot shows her size in relationship to a Canadian dime. The next photo shows the carving compared to a section of the Lely Portrait which was my guide in creating her. And finally, Victory mounted on her pedestal on the stern. More to follow.................... Bill Edited April 20, 2016 by modelshipwright garym 1 Quote Mediocrity will never do. You are capable of something better.” ― Gordon B. Hinckley Current build: Sovereign of the Seas 1637 My Book: Carving Ornamentation for Ship Models Website: Http://carvingbook.weebly.com/ Link to comment Share on other sites More sharing options...
modelshipwright Posted March 28, 2013 Author Share #38 Posted March 28, 2013 (edited) In the next series of photos I am showing the development of Aeolus, God of the Winds. This carving was in a way more complicated than Victory as it involved a bird as well. Ths first shot shows the rough carving compared to a dime. In the next show it shows Aeolus in its finished state. And now in position on the hull. Note that Neptune is also added on the left side of Victory. Additionally, I have added wings to Victory. Note that Victory has rings around each arm. These rings are part of the Victory carving, not added later. By now you have noticed the Bells Scotch bottle in the background. A source of inspiration in my carving. More to folllow............ Bill Edited March 28, 2013 by modelshipwright garym and cristikc 2 Quote Mediocrity will never do. You are capable of something better.” ― Gordon B. Hinckley Current build: Sovereign of the Seas 1637 My Book: Carving Ornamentation for Ship Models Website: Http://carvingbook.weebly.com/ Link to comment Share on other sites More sharing options...
modelshipwright Posted March 28, 2013 Author Share #39 Posted March 28, 2013 Bill, Nice to see your beautiful carvings again! Janos Thanks Janos, Regards, Bill Quote Mediocrity will never do. You are capable of something better.” ― Gordon B. Hinckley Current build: Sovereign of the Seas 1637 My Book: Carving Ornamentation for Ship Models Website: Http://carvingbook.weebly.com/ Link to comment Share on other sites More sharing options...
druxey Posted March 28, 2013 Share #40 Posted March 28, 2013 Thanks for posting this extensive 'paper' on the symbolism of the carved works seen on SOS, Bill. Also the background to the Van de Velde portrait of Pett. Quote Be sure to sign up for an epic Nelson/Trafalgar project if you would like to see it made into a TV series http://trafalgar.tv Link to comment Share on other sites More sharing options...
modelshipwright Posted March 28, 2013 Author Share #41 Posted March 28, 2013 Thanks Druxey, my pleasure. Regards, Bill Quote Mediocrity will never do. You are capable of something better.” ― Gordon B. Hinckley Current build: Sovereign of the Seas 1637 My Book: Carving Ornamentation for Ship Models Website: Http://carvingbook.weebly.com/ Link to comment Share on other sites More sharing options...
modelshipwright Posted March 28, 2013 Author Share #42 Posted March 28, 2013 (edited) The next issue was to carve the ribbons. These ribbons connect the faces in the clouds above Victory's head to her arms. The faces are blowing air which turns into ribbons and they wind down to encircle her arms. Sounds easy, right? After some due consideration, I decided that they had to be carved from the solid. I started with a piece of boxwood about 1.4" thick and cut out the shape of the ribbon on a jig saw. Then I had to create the different levels of the ribbon from front to back. The ribbon in the rough. The finished ribbon on the left side of the stern. Notice the engraving of the word "NAVA" about which Thomas Heywood said "may Victory point to Jason, being figured with his Oare in his hand as being the prime Argonaut, and say Nava, or more plainly, Operam nava;". The corresponding ribbon on the starboard side is engraved "CLAVA" about which Haywood says "Shee pointeth to Hercules on the sinister side, with his club in hand, with his Motto, Clava; as if she should say. O Hercules, be thou as valiant with thy club upon the land, as Jason is industrious with his Oare upon the water." The next photo shows both ribbons in place. More to follow.................... Bill Edited March 28, 2013 by modelshipwright garym 1 Quote Mediocrity will never do. You are capable of something better.” ― Gordon B. Hinckley Current build: Sovereign of the Seas 1637 My Book: Carving Ornamentation for Ship Models Website: Http://carvingbook.weebly.com/ Link to comment Share on other sites More sharing options...
modelshipwright Posted March 28, 2013 Author Share #43 Posted March 28, 2013 (edited) Next comes the Prince of Wales Feathers. As stated on the web site: http://www.princeofwales.gov.uk/the-prince-of-wales/titles-and-heraldry/prince-of-waless-feathers "The badge of The Prince of Wales comprises three silver (or white) feathers rising through a gold coronet of alternate crosses and fleur-de-lys. The motto "Ich Dien" (I serve) is on a dark blue ribbon beneath the coronet. Its use in royal heraldry goes back to the time of Edward Prince of Wales (the Black Prince) in the 14th Century." This was my first in the round carving and posed some difficulties as the feathers curl at the top and some more engraving is needed. The feathers as depicted in an encyclopedia. The carving in progress. The finished carving. The carving mounted on the stern with a couple of caryatids at each side. Edited March 28, 2013 by modelshipwright garym 1 Quote Mediocrity will never do. You are capable of something better.” ― Gordon B. Hinckley Current build: Sovereign of the Seas 1637 My Book: Carving Ornamentation for Ship Models Website: Http://carvingbook.weebly.com/ Link to comment Share on other sites More sharing options...
modelshipwright Posted March 29, 2013 Author Share #44 Posted March 29, 2013 (edited) On either side of the Feathers are gun ports. I carved the gun port surrounds as shown in the next photo. The surrounds mounted on the stern counter. By now, I had abandoned the Proxon engraver tool in favour of a belt driven Emesco Dental Drill to do my carving. The beauty of this drill is that there is no torque on your hand as you find in other rotary tools. The belt is smooth and assures that your hand will not ache from fighting the side torque. The Emesco Dental Drill More to follow.................. Bill Edited March 29, 2013 by modelshipwright garym and cristikc 2 Quote Mediocrity will never do. You are capable of something better.” ― Gordon B. Hinckley Current build: Sovereign of the Seas 1637 My Book: Carving Ornamentation for Ship Models Website: Http://carvingbook.weebly.com/ Link to comment Share on other sites More sharing options...
modelshipwright Posted March 29, 2013 Author Share #45 Posted March 29, 2013 (edited) Now the upper counter is completed with a few other carvings of mythical creatures and I am beginning the work on the lower counter. On the right can be seen a pedestal ready to accept a wreath of angels, the next carving to follow. The following photo shows one of the pedestals in the process of being carved. The port side pedestal is finished and mounted on the lower counter. More to follow.................. Bill Edited March 29, 2013 by modelshipwright Jason and garym 2 Quote Mediocrity will never do. You are capable of something better.” ― Gordon B. Hinckley Current build: Sovereign of the Seas 1637 My Book: Carving Ornamentation for Ship Models Website: Http://carvingbook.weebly.com/ Link to comment Share on other sites More sharing options...
modelshipwright Posted March 29, 2013 Author Share #46 Posted March 29, 2013 (edited) Next in line was a carving of a little fellow squatting and holding a wreath of angels above his head. This was mounted on the previously carved pedestal. A round gun port surround was added as well. Wreath of angels in progress. The same carvings were completed and added to the port side along with three more gun port surrounds. Next was the addition of curved side trims on both the upper and lower counter as shown in this picture. These were most difficult to carve and fit to the curved surface. Curved end trim for counter in progress. More to follow........................... Bill Edited March 29, 2013 by modelshipwright garym 1 Quote Mediocrity will never do. You are capable of something better.” ― Gordon B. Hinckley Current build: Sovereign of the Seas 1637 My Book: Carving Ornamentation for Ship Models Website: Http://carvingbook.weebly.com/ Link to comment Share on other sites More sharing options...
Mioriticul Posted March 29, 2013 Share #47 Posted March 29, 2013 I am simply petrified with astonishment and admiration. I can not believe that you can sculpt in this scale and level of detail. On top of that I understand that this is in fact your first attempt in sculpture (at least the first stages). Wow... I have heard that boxwood is the best wood suitable for carving. May I ask you from which source do you buy it? Thank you. I will follow with the greatest pleasure your build log as it is rewritten. Quote Nelu A The shipbuilder without patience is like the ship without an anchor. Completed build: SAINT JOHN THE BAPTIST by Mioriticul – D’Agostini (AL) – scale 1:50 – first wooden ship model Link to comment Share on other sites More sharing options...
modelshipwright Posted March 29, 2013 Author Share #48 Posted March 29, 2013 (edited) Thanks Mioriticul. Yes, it was a challenge taking on the carvings with little experience but I was determined. I use a 2.5X magnifier to see an enlarged version of what I am doing so that helps. The boxwood came from several sources. A good friend and fellow modeler gave me his entire stock of 30 year old boxwood as he was alergic to the dust. Additionally, I purchased some from Exotic Woods in Burlington Ontario. Regards, Bill Edited March 29, 2013 by modelshipwright Quote Mediocrity will never do. You are capable of something better.” ― Gordon B. Hinckley Current build: Sovereign of the Seas 1637 My Book: Carving Ornamentation for Ship Models Website: Http://carvingbook.weebly.com/ Link to comment Share on other sites More sharing options...
russ Posted March 29, 2013 Share #49 Posted March 29, 2013 Bill: It is good to see this log back on MSW. Thanks for reposting it. The work is just fantastic. Russ Quote T'aint a hobby if you hurry Completed projects Cross section model by Russ 1/48 scale Biloxi schooner model restoration 1/24 scale Biloxi oyster skiff 1/24 scale Biloxi schooner 1/48 scale POB Current project Biloxi lugger Captain Roy 1/48 scale POB Link to comment Share on other sites More sharing options...
modelshipwright Posted March 29, 2013 Author Share #50 Posted March 29, 2013 Thanks Russ. Regards, Bill Quote Mediocrity will never do. You are capable of something better.” ― Gordon B. Hinckley Current build: Sovereign of the Seas 1637 My Book: Carving Ornamentation for Ship Models Website: Http://carvingbook.weebly.com/ Link to comment Share on other sites More sharing options...
archjofo Posted March 29, 2013 Share #51 Posted March 29, 2013 Hello Bill,this is a very interesting technique for carving of ornaments for model ships.Incredible work as always! Quote Best regards Johann Video: La Créole - Scale 1/48, French corvette of 1827 - naval artillery La Créole - Scale 1/48, French corvette - Construction of long boat La Créole - Scale 1/48, French corvette - Construction of the masts La Créole - Scale 1/48, French corvette - 2019 La Créole - Scale 1/48, French corvette - standing rigging - part 1 La Créole - Scale 1/48, French corvette - standing rigging - part 2 La Créole - Scale 1/48, French corvette - standing rigging - part 3 See also our german forum for Sailing Ship Modeling and History: www.segelschiffsmodellbau.com Link to comment Share on other sites More sharing options...
modelshipwright Posted March 29, 2013 Author Share #52 Posted March 29, 2013 Thank you for your comments Johann. Regards, Bill Quote Mediocrity will never do. You are capable of something better.” ― Gordon B. Hinckley Current build: Sovereign of the Seas 1637 My Book: Carving Ornamentation for Ship Models Website: Http://carvingbook.weebly.com/ Link to comment Share on other sites More sharing options...
modelshipwright Posted March 30, 2013 Author Share #53 Posted March 30, 2013 (edited) The next stage in the build was to create a representation of the stern lantern. I wanted to use the Lely Portrait as my guide and decided to build it using a 'plug' form to form the superstructure. The plug in place on the stern for alignment purposes. The next shot shows the framework of the lantern in progress. As the lantern progressed, I needed to create a large domw carving and the next shot shows the rough piece of boxwood in place on the lantern. Another fitting on the stern to chech for alignment etc. You will note that the carving has started on the dome. The next shot shows the partial completion of the windows. I used the same technique as on the stern windows with plastic window screen to create the diamond leaded glass. More to folllow.................. Bill Edited March 30, 2013 by modelshipwright garym, Anja and Jason 3 Quote Mediocrity will never do. You are capable of something better.” ― Gordon B. Hinckley Current build: Sovereign of the Seas 1637 My Book: Carving Ornamentation for Ship Models Website: Http://carvingbook.weebly.com/ Link to comment Share on other sites More sharing options...
modelshipwright Posted March 30, 2013 Author Share #54 Posted March 30, 2013 (edited) On either side of the stern lantern there were decorative panels engraved with " Soli Deo Gloriam" in Latin. It means 'to the sole glory of God' as the ship was dedicated to God. I carved these shapes and engraved them as the following photos show. Just above Victory's head were a crown of feathers. I carved these in Boxwood that had been heated and bent in a curve as the following photo shows. The ball for the top of the lantern being made on my Unimat lathe. The stern with the feathers in place and the stern lantern mounted and completed. More to follow................. Bill Edited April 2, 2013 by modelshipwright Anja, garym and Jason 3 Quote Mediocrity will never do. You are capable of something better.” ― Gordon B. Hinckley Current build: Sovereign of the Seas 1637 My Book: Carving Ornamentation for Ship Models Website: Http://carvingbook.weebly.com/ Link to comment Share on other sites More sharing options...
modelshipwright Posted March 30, 2013 Author Share #55 Posted March 30, 2013 (edited) The next are I addressed was the port side stern gallery. The Payne engraving and the Van de Velde sketch of the port side show that the gallery was deeper than is depicted on the Mantua model. There was an additional section at the bottom of the gallery which I determined I should add to my model. After adding this section, the whole gallery needed to be framed in boxwood strips to create areas for the many carvings needed. Windoes were added as was done on the stern which involved carving individual arches for each window and of course, the leaded glass window itself. In between the windows, caryatids were required in duplicate. In order to create these on mass, I used a straight edge razor blade with the profile cut into it and scraped a section of boxwood with the blade to create a strip of about 4" in length with the profile in it. It remained to cut the individual caryatids on my Preac. In this shot I added the rails covers at the end of the gallery. More to follow................. Bill Edited April 2, 2013 by modelshipwright garym 1 Quote Mediocrity will never do. You are capable of something better.” ― Gordon B. Hinckley Current build: Sovereign of the Seas 1637 My Book: Carving Ornamentation for Ship Models Website: Http://carvingbook.weebly.com/ Link to comment Share on other sites More sharing options...
modelshipwright Posted March 30, 2013 Author Share #56 Posted March 30, 2013 (edited) Now I went forward to the first of three rather ornate and complicated carvings that adorn the top of the port side gallery area. It is a crest like carving with the initials "CR" in it. CR is Carolus Rex or Charles King. In the next photo, the carving has been roughed out to eliminate wood not required. Showing the carving partially completed on the gallery area. The completed carving ready to mount. More to follow..................... Bill Edited March 30, 2013 by modelshipwright garym and Karrex 2 Quote Mediocrity will never do. You are capable of something better.” ― Gordon B. Hinckley Current build: Sovereign of the Seas 1637 My Book: Carving Ornamentation for Ship Models Website: Http://carvingbook.weebly.com/ Link to comment Share on other sites More sharing options...
Keith_W Posted March 30, 2013 Share #57 Posted March 30, 2013 Those carvings are simply superb, Bill. Thank you for sharing them with us. Quote Regards, Keith 2007 (completed): HMS Bounty - Artesania Latina 2013 (completed): Viking Ship Drakkar - Amati 2014 (completed): HMS Bounty Launch - Model Shipways Current: HMS Royal William - Euromodel Link to comment Share on other sites More sharing options...
modelshipwright Posted March 30, 2013 Author Share #58 Posted March 30, 2013 My pleasure.... Regards, Bill Quote Mediocrity will never do. You are capable of something better.” ― Gordon B. Hinckley Current build: Sovereign of the Seas 1637 My Book: Carving Ornamentation for Ship Models Website: Http://carvingbook.weebly.com/ Link to comment Share on other sites More sharing options...
Geoff Matson Posted March 30, 2013 Share #59 Posted March 30, 2013 Thanks for recreating what you could of the build log. The carving part is a tutorial in itself. Great job. Quote Geoff NRG member #2666Current build : USS Constitution Finished builds: Armed Virginia Sloop (in gallery) Link to comment Share on other sites More sharing options...
nat Posted March 30, 2013 Share #60 Posted March 30, 2013 Simply STUNNING. So much attention to detail. This is the sort of build I could look at all day and still be in awe of the skill on show, I have started a version of this build but unfortunately I do not posess a fraction of your skill. But I will certainly treat this build as THE reference for my attempt. Nat Quote Link to comment Share on other sites More sharing options...

Recommended Posts
Join the conversation
You can post now and register later. If you have an account, sign in now to post with your account.