Walter Biles Posted April 15, 2013 Author Share #31 Posted April 15, 2013 (edited) Well, stuff happens. Sorry, I don't have any pictures of my recent work yet. I had all the new bulkheads cut to shape, fitted, and at the last pre-assembly of my hull held by trenails and small screws, everything fit very well. I decided before I started glueing all of it together, I had better put in the rudder sleeve tubing into the frame, and reinforce it before I start to glue all into place. I got the sleeve in place, and cut the 3/4" shaping blocks to go on either side of it, and made the recess for the rudder arm to travel. I SHOULD HAVE HAD THE KEEL LAID OUT OVER THE PLAN WITH WAX PAPER TO PROTECT IT FROM GLUE DROPS AND ONLY APPLIED THE TOP BLOCK TO SET FIRST. I went to epoxy the blocks around the weak spot created by the tubing going through the keel former, and clamped the blocks in place. Nothing looked amiss. However on my re-assembly of the hull parts, the foreward part of the deck once screwed down foreward, no longer met the aft frame deck. the keel frame had sagged within the glue until the aft keel now rides at 1/4" below the deck. I have put the whole project on delay, until I figure out the best way to resolve the issue. I am seriously considering putting shim blocks in the notches under each of the 3 low bulkheads, and building up the keel frame with a 1/4" wedge of filler, and re- trimming the bottom of the keel to match. I don't think the change from square on the bulkheads will be more than 1 or so degrees. The length of the deck will still be right, and I can shift the angle of the two bulkheads foreward enough to keep the mizzen vertical. I just don't have the materials anymore to make a whole new keel and re- install a new rudder pivot. The rudder shaft was in place when I glued the blocks on, so the shaft line is correct, so it must have pivoted right behind the rudder shaft sleeve. I think that this could be my best fix. I will have to cut away the aft former and filler block, and add it back at the end on the right elevation with appropriate bracing blocks. That was the only bulkhead that I had glued into place so far, with epoxy, of course. I have been running this fix over in my head many different ways, and this is the only way I can think of that might work. I am tool restricted or supply limited by anything else I have considered. I am going to make myself a story jig, to lay down to the top of the keel as a reference, so my allignment will be sure. I think this is the only way I can go without buying some new stock, and I have gotten too far to have to do it all over again. This must work. Walt Biles Edited April 16, 2013 by Walter Biles Quote Current: America Schooner https://modelshipworld.com/index.php?/topic/10887-america-schooner-pof-by-walter-biles-radio-pof-scale-148-from-blue-jacket-plan/ Prior: MERIDEA https://modelshipworld.com/index.php?/topic/140-meridea-by-walter-biles-radio-34-scratch-cad-of-boat-at-usn-severn-river-repair-station-ca-1969/ SAMSON First build: Scratch POF Spanish Galleon Link to comment Share on other sites More sharing options...
michael mott Posted April 16, 2013 Share #32 Posted April 16, 2013 Hello Walter, your little problem must have been rather annoying, But it sounds like you have got the situation sorted and on track to get where you want to be. This dance we play of one step forwards and a step or two back seem to come with the territory of model boat building. Good luck with the fix you have outlined. Michael Quote Current builds Bristol Pilot Cutter 1:8; Skipjack 19 foot Launch 1:8; Herreshoff Buzzards Bay 14 1:8 Other projects Pilot Cutter 1:500 ; Maria, 1:2 Now just a memory Future model Gill Smith Catboat Pauline 1:8 Finished projects A Bassett Lowke steamship Albertic 1:100 Anything you can imagine is possible, when you put your mind to it. Link to comment Share on other sites More sharing options...
Walter Biles Posted April 16, 2013 Author Share #33 Posted April 16, 2013 Thank you Michael, I have been working on it since my last post, and actually it went fairly well. I now have all formers but 3 glued in place starting from the bow. I am going to reinforce the hull in the area around the rudder before working the blocking down. In fact I plan on putting 2 stringers inset into the bulkheads to help bridge the weak area. That way it should take some of the stress off it, while I work the blocks down to about fair. I knew from the start that the rudder was a potential weak point, but by putting in the stringers to hold the spacing and putting on a few rows of planking at the top, I think it should hold up until I can get it all planked. The deck alignment is now back on track. Since the whole thing was originally done in fiberglass buildup, they wouldn't have had any such weak point because the whole hull was part of the structure. That was what got me to thinking about adding stringers to support. There is just too much multicurvature in the area of the rudder for a reliable frame. Therefore, I figured improve the shell strength, maybe I can get it to stay together while I work on it. Walt Biles Quote Current: America Schooner https://modelshipworld.com/index.php?/topic/10887-america-schooner-pof-by-walter-biles-radio-pof-scale-148-from-blue-jacket-plan/ Prior: MERIDEA https://modelshipworld.com/index.php?/topic/140-meridea-by-walter-biles-radio-34-scratch-cad-of-boat-at-usn-severn-river-repair-station-ca-1969/ SAMSON First build: Scratch POF Spanish Galleon Link to comment Share on other sites More sharing options...
captainbob Posted April 16, 2013 Share #34 Posted April 16, 2013 Hi Walt, Sorry to hear of your problem, but as Michael said it seems that you have it sorted out now. Bob Quote Every build is a learning experience. Current build: SS_ Mariefred Completed builds: US Coast Guard Pequot Friendship-sloop, Schooner Lettie-G.-Howard, Spray, Grand-Banks-dory, a gaff rigged yawl, HOGA (YT-146), Int'l Dragon Class II, Two Edwardian Launches In the Gallery: Catboat, International-Dragon-Class, Spray Link to comment Share on other sites More sharing options...
Walter Biles Posted April 17, 2013 Author Share #35 Posted April 17, 2013 Thank you Bob, I was shocked when I found it, but I just studied it and it seemed that if those bulkheads could be shimmed up, I could get it mostly back. Other than the one for the transom I had glued, and the potential of the mizzen mis-alignment, I thought it might be okay. I just pondered it for a day, and slept on it. By the next day all the alternatives just did not seem to be any good. Also, I figured out what I could have done that might have prevented it. The only problem was I had cut up my plan with the material when I cut out the parts. One of those "I could have had a V8" moments. Walt Biles Quote Current: America Schooner https://modelshipworld.com/index.php?/topic/10887-america-schooner-pof-by-walter-biles-radio-pof-scale-148-from-blue-jacket-plan/ Prior: MERIDEA https://modelshipworld.com/index.php?/topic/140-meridea-by-walter-biles-radio-34-scratch-cad-of-boat-at-usn-severn-river-repair-station-ca-1969/ SAMSON First build: Scratch POF Spanish Galleon Link to comment Share on other sites More sharing options...
popeye the sailor Posted April 17, 2013 Share #36 Posted April 17, 2013 sorry to hear of the problems your having..........hopefully you will have them ALL sorted out! Quote I yam wot I yam! finished builds: Billings Nordkap 476 / Billings Cux 87 / Billings Mary Ann / Billings AmericA - reissue Billings Regina - bashed into the Susan A / Andrea Gail 1:20 - semi scratch w/ Billing instructions M&M Fun Ship - semi scratch build / Gundalow - scratch build / Jeanne D'Arc - Heller Phylly C & Denny-Zen - the Lobsie twins - bashed & semi scratch dual build Billing T78 Norden in dry dock: Billing's Gothenborg 1:100 / Billing's Boulogne Etaples 1:20 Billing's Half Moon 1:40 - some scratch required Revell U.S.S. United States 1:96 - plastic/ wood modified / Academy Titanic 1:400 Trawler Syborn - semi scratch / Holiday Harbor dual build - semi scratch Link to comment Share on other sites More sharing options...
Walter Biles Posted April 17, 2013 Author Share #37 Posted April 17, 2013 (edited) Hi Popeye,The boat is coming along alright now. I got the deck frame hanging at the right level now, and have started permanent installation of the bulkheads now. I am working on just where I can add some stringers along the sides of the hull, so my rudder mechanism can operate freely. They will help carry the strain on the keel where the rudder pivot bushing went through. The blocking I did was successful for the time and purpose, But I was a bit upset, when I found the parts had shifted within the epoxy. Now that I slipped the aft bulkheads up in their slots, and shimmed them there, they are glued in place. I am trying to find just the right place in the sides of the hull where a reinforcing stringer will work out. I believe I will try to put it in the round bulge above the rudder on both sides. That way the arm can swing clear of it, and it should help keep the frame from further problems. I am also putting a stringer all along just under the deck. That will help my deckline remain true and add to the bracing to prevent another break after I sand the keel blocking down around the rudder area. Due to the shape of the hull and it was originally done in fiberglass in the real boat, the usual framework of a POB hull meets with some complications that just weren't an issue in a fiberglass hull. I am trying to simulate that hull support with the additional stringers. If I inset them into the bulkheads just below the cockpit deckline, then they can run along the side of the bulge back into the stern of the boat. If it works out well, I will change my plans to match. I think things are going to work out fine now.I have the hull faired out fairly well now, and have started thinking about the first layer of planking. On this big of a boat(34.2"), I believe I am going to try 1/8" x 1/4" basswood planking on the first layer, and try to do an overlap of the joints on the second layer. I want a sturdy hull. I may drop it or something, and I don't want to have to repair that part. The masts and cabin will be enough to work on in that instance. I considered glassing it after, but am not sure if my allergy to fiberglass activator will let me do that, although epoxy could be an alternative. I would have to find some of the older slow stuff so I would have time to work it properly, and I am not sure if it would work the same as the glass resin. I did enough of that in the navy to know how it would work, but I never really tried it with epoxy.Thanks for checking in Popeye.Walt Biles Edited May 3, 2013 by Walter Biles Quote Current: America Schooner https://modelshipworld.com/index.php?/topic/10887-america-schooner-pof-by-walter-biles-radio-pof-scale-148-from-blue-jacket-plan/ Prior: MERIDEA https://modelshipworld.com/index.php?/topic/140-meridea-by-walter-biles-radio-34-scratch-cad-of-boat-at-usn-severn-river-repair-station-ca-1969/ SAMSON First build: Scratch POF Spanish Galleon Link to comment Share on other sites More sharing options...
popeye the sailor Posted April 18, 2013 Share #38 Posted April 18, 2013 wouldn't hurt to do a test piece.....sounds like a solid plan you have Quote I yam wot I yam! finished builds: Billings Nordkap 476 / Billings Cux 87 / Billings Mary Ann / Billings AmericA - reissue Billings Regina - bashed into the Susan A / Andrea Gail 1:20 - semi scratch w/ Billing instructions M&M Fun Ship - semi scratch build / Gundalow - scratch build / Jeanne D'Arc - Heller Phylly C & Denny-Zen - the Lobsie twins - bashed & semi scratch dual build Billing T78 Norden in dry dock: Billing's Gothenborg 1:100 / Billing's Boulogne Etaples 1:20 Billing's Half Moon 1:40 - some scratch required Revell U.S.S. United States 1:96 - plastic/ wood modified / Academy Titanic 1:400 Trawler Syborn - semi scratch / Holiday Harbor dual build - semi scratch Link to comment Share on other sites More sharing options...
Walter Biles Posted April 19, 2013 Author Share #39 Posted April 19, 2013 BOAT BUILDING Why am I doing this boat I used to build model airplanes so I could see them fly. I liked anything I built to do what it was supposed to do, and me there to get to see it. Sometimes I built something to fulfill a need. Building a set of Roman war weapons that you could demonstrate how they worked for an ancient history class. I had to quit building models of airplanes, because when I tried to fly, I kept breaking them, because I could not keep my mind out in front of that plane as an RC craft, and I reached a problem with solving how to fix them so much. I finally realized my mind wasn't working the way it used to any more. Then I found out why. Sleep apnea destroyed my mental links. Now that I am becoming better from being treated, I am now doing this hobby as therapy for my mind. I am finding that if I can set down from a problem and imagine how I might do something with it, that eventually I can still find a resolution. In the end, since I am building an RC sailboat, I can play with it and see it do what it should do. I could never hope to do that with RC airplanes now, but boats are much slower, and only work on 1 plane surface of water. Now I hope to have my boat and play with it, too. I'm still a kid at heart, but I have found out that I can work on this boat at my pace, and I now have the patience and the hope of being able to complete it one day. Now my enjoyment is in the building, and I have the patience to wait for the further fulfillment of some day getting to see if I can sail it. Since it will be much slower, I may even be able to enjoy that, too. If I can, then I will eventually build something more, and that means I am achieving my goal of overcoming personal obstacles. If I can still build, I'm alive and I am not defeated. Walt Biles Quote Current: America Schooner https://modelshipworld.com/index.php?/topic/10887-america-schooner-pof-by-walter-biles-radio-pof-scale-148-from-blue-jacket-plan/ Prior: MERIDEA https://modelshipworld.com/index.php?/topic/140-meridea-by-walter-biles-radio-34-scratch-cad-of-boat-at-usn-severn-river-repair-station-ca-1969/ SAMSON First build: Scratch POF Spanish Galleon Link to comment Share on other sites More sharing options...
popeye the sailor Posted April 22, 2013 Share #40 Posted April 22, 2013 sorry to hear that.....glad that your taking care of your illness. there is no speed involved in building.....so take your time, and be happy with what you do. I couldn't agree with you more......building boats is great excercise........ Quote I yam wot I yam! finished builds: Billings Nordkap 476 / Billings Cux 87 / Billings Mary Ann / Billings AmericA - reissue Billings Regina - bashed into the Susan A / Andrea Gail 1:20 - semi scratch w/ Billing instructions M&M Fun Ship - semi scratch build / Gundalow - scratch build / Jeanne D'Arc - Heller Phylly C & Denny-Zen - the Lobsie twins - bashed & semi scratch dual build Billing T78 Norden in dry dock: Billing's Gothenborg 1:100 / Billing's Boulogne Etaples 1:20 Billing's Half Moon 1:40 - some scratch required Revell U.S.S. United States 1:96 - plastic/ wood modified / Academy Titanic 1:400 Trawler Syborn - semi scratch / Holiday Harbor dual build - semi scratch Link to comment Share on other sites More sharing options...
Walter Biles Posted April 22, 2013 Author Share #41 Posted April 22, 2013 (edited) Thanks Popeye, This frame will be the 6th one, the first 3 in cardboard, and the last 3 in wood, but it is finally coming out the way I wanted. I will have an obvious mistake on the inside, but it will show a correction to it, and the boat should work. It is the closest I have come to a fair frame yet. I think I can proceed with this one, finally. Now I need to get pictures to post. Walt Biles Edited April 22, 2013 by Walter Biles Quote Current: America Schooner https://modelshipworld.com/index.php?/topic/10887-america-schooner-pof-by-walter-biles-radio-pof-scale-148-from-blue-jacket-plan/ Prior: MERIDEA https://modelshipworld.com/index.php?/topic/140-meridea-by-walter-biles-radio-34-scratch-cad-of-boat-at-usn-severn-river-repair-station-ca-1969/ SAMSON First build: Scratch POF Spanish Galleon Link to comment Share on other sites More sharing options...
michael mott Posted April 22, 2013 Share #42 Posted April 22, 2013 Glad top hear that you are moving forward Walter. Michael Quote Current builds Bristol Pilot Cutter 1:8; Skipjack 19 foot Launch 1:8; Herreshoff Buzzards Bay 14 1:8 Other projects Pilot Cutter 1:500 ; Maria, 1:2 Now just a memory Future model Gill Smith Catboat Pauline 1:8 Finished projects A Bassett Lowke steamship Albertic 1:100 Anything you can imagine is possible, when you put your mind to it. Link to comment Share on other sites More sharing options...
Walter Biles Posted April 23, 2013 Author Share #43 Posted April 23, 2013 Thank you, Michael. Walt Biles Quote Current: America Schooner https://modelshipworld.com/index.php?/topic/10887-america-schooner-pof-by-walter-biles-radio-pof-scale-148-from-blue-jacket-plan/ Prior: MERIDEA https://modelshipworld.com/index.php?/topic/140-meridea-by-walter-biles-radio-34-scratch-cad-of-boat-at-usn-severn-river-repair-station-ca-1969/ SAMSON First build: Scratch POF Spanish Galleon Link to comment Share on other sites More sharing options...
Walter Biles Posted May 4, 2013 Author Share #44 Posted May 4, 2013 (edited) These are my latest pictures of Meridea. Part 1 Aft balast spaces in keel. Fwd balast spaces in keel. Looking down into cockpit/rudder area. Looking fwd into cabin area of hull. Port side view. Stbd side view. Flash lit aft balast area. Flash lit fwd balast area. Fairly good port side view Edited May 4, 2013 by Walter Biles JerryTodd 1 Quote Current: America Schooner https://modelshipworld.com/index.php?/topic/10887-america-schooner-pof-by-walter-biles-radio-pof-scale-148-from-blue-jacket-plan/ Prior: MERIDEA https://modelshipworld.com/index.php?/topic/140-meridea-by-walter-biles-radio-34-scratch-cad-of-boat-at-usn-severn-river-repair-station-ca-1969/ SAMSON First build: Scratch POF Spanish Galleon Link to comment Share on other sites More sharing options...
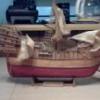
Walter Biles Posted May 4, 2013 Author Share #45 Posted May 4, 2013 (edited) Meridea Latest Pix Part 2 Picture from Bow on. S t e r n picture. This and next picture trying to show gap below the deck from the break at the rudder causing keel to sag. The top of the keel used to be against the deck. I shimmed the bulkheads up until they met the deck again. Then I trimmed the extra off the bottom of the keel where the bottom should be. The better of shot of port showing planking so far. Note: the filler blocks on the side of the keel block. The termites I hired to hollow out the ballast spaces got a bit carried away. After the fill pieces, I epoxied the inside of the hollows to build them back in to thickness. Edited May 13, 2013 by Walter Biles JerryTodd 1 Quote Current: America Schooner https://modelshipworld.com/index.php?/topic/10887-america-schooner-pof-by-walter-biles-radio-pof-scale-148-from-blue-jacket-plan/ Prior: MERIDEA https://modelshipworld.com/index.php?/topic/140-meridea-by-walter-biles-radio-34-scratch-cad-of-boat-at-usn-severn-river-repair-station-ca-1969/ SAMSON First build: Scratch POF Spanish Galleon Link to comment Share on other sites More sharing options...
Walter Biles Posted May 4, 2013 Author Share #46 Posted May 4, 2013 (edited) Meridea Pix Part 3 This is a fair shot of the stringers added to strengthen around the rudder pivot where it sagged. Fair shot of fwd hull showing keel block and some planking. This one showing the 4 stringers for strengthening. Two along deckline, and two on either side of keel running to transom block. Also along the keel you can see the shaping block around the rudder area. The long planks coming from the planking nearer the keel will be a division of planking onto the bottom of the s t e r n. The sides will continue up from there to the deck. The stringers will all be covered up. Walter Biles Edited May 4, 2013 by Walter Biles JerryTodd 1 Quote Current: America Schooner https://modelshipworld.com/index.php?/topic/10887-america-schooner-pof-by-walter-biles-radio-pof-scale-148-from-blue-jacket-plan/ Prior: MERIDEA https://modelshipworld.com/index.php?/topic/140-meridea-by-walter-biles-radio-34-scratch-cad-of-boat-at-usn-severn-river-repair-station-ca-1969/ SAMSON First build: Scratch POF Spanish Galleon Link to comment Share on other sites More sharing options...
michael mott Posted May 4, 2013 Share #47 Posted May 4, 2013 the hull is coming together well now Walter. it wont be long now befor you get the planking finished. Michael Quote Current builds Bristol Pilot Cutter 1:8; Skipjack 19 foot Launch 1:8; Herreshoff Buzzards Bay 14 1:8 Other projects Pilot Cutter 1:500 ; Maria, 1:2 Now just a memory Future model Gill Smith Catboat Pauline 1:8 Finished projects A Bassett Lowke steamship Albertic 1:100 Anything you can imagine is possible, when you put your mind to it. Link to comment Share on other sites More sharing options...
captainbob Posted May 4, 2013 Share #48 Posted May 4, 2013 Good fix on that sagging area. The hull has nice lines, should sail well. Bob Quote Every build is a learning experience. Current build: SS_ Mariefred Completed builds: US Coast Guard Pequot Friendship-sloop, Schooner Lettie-G.-Howard, Spray, Grand-Banks-dory, a gaff rigged yawl, HOGA (YT-146), Int'l Dragon Class II, Two Edwardian Launches In the Gallery: Catboat, International-Dragon-Class, Spray Link to comment Share on other sites More sharing options...
Walter Biles Posted May 4, 2013 Author Share #49 Posted May 4, 2013 (edited) Thank you, Michael and Bob. I finished the first planking behind the rudder to the transom and that finished up all my 1/8" basswood for now. I have an order for more put in, but I am not sure how long it will be. I went ahead and rubbed in yellow glue into the planking up to where I have done, to seal and harden the wood a bit. I also rubbed it into all seams real well, to help bond and seal them together. Then I sanded it down to a relative smooth, and I started the second level of 1/16th" planking around the keel bulb, and began working that up. I have the first layer almost to the waterline, and am cutting all those pieces to fit around the multicurves on the keel. I have the first two strakes up from the bottom of the keel. I am going to wide plank around the flat faces of the keel, until I get into that inner curve. Bob, do you know where I might be able to find some light fiberglass fabric, not too thin. I haven't found that couple of square yards that I used to have. I got stupid when I thought I might never be able to do anything anymore, mind-wise, and I may have tossed it like I did a lot of my things when I moved in 1996. I believe I will use 30 minute epoxy and glass the whole body of the boat after I get it all smoothed out and ballasted. I am going to use the first coating of epoxy as a sealer while I ballast, and then start adding one of those self draining sumps for the cockpit like they had on the real thing. I found out what I can use for the rudder arm. It would be like the ones I used on the front nose wheel steering arm on my planes. I may even have one somewhere. I've been building all night, so I am signing off for now. Walter Biles Edited May 13, 2013 by Walter Biles Quote Current: America Schooner https://modelshipworld.com/index.php?/topic/10887-america-schooner-pof-by-walter-biles-radio-pof-scale-148-from-blue-jacket-plan/ Prior: MERIDEA https://modelshipworld.com/index.php?/topic/140-meridea-by-walter-biles-radio-34-scratch-cad-of-boat-at-usn-severn-river-repair-station-ca-1969/ SAMSON First build: Scratch POF Spanish Galleon Link to comment Share on other sites More sharing options...
captainbob Posted May 5, 2013 Share #50 Posted May 5, 2013 Walter, I'll look around and see if I have any FG. Bob Quote Every build is a learning experience. Current build: SS_ Mariefred Completed builds: US Coast Guard Pequot Friendship-sloop, Schooner Lettie-G.-Howard, Spray, Grand-Banks-dory, a gaff rigged yawl, HOGA (YT-146), Int'l Dragon Class II, Two Edwardian Launches In the Gallery: Catboat, International-Dragon-Class, Spray Link to comment Share on other sites More sharing options...
Walter Biles Posted May 5, 2013 Author Share #51 Posted May 5, 2013 I appreciate that, but was more looking what sort of store in Prc. might carry it. I think I got mine as part of an auto body repair kit. Since that was in the '70s I am not sure if they would even use that anymore. I guess I could try the internet. I tend to forget about that. Walt Quote Current: America Schooner https://modelshipworld.com/index.php?/topic/10887-america-schooner-pof-by-walter-biles-radio-pof-scale-148-from-blue-jacket-plan/ Prior: MERIDEA https://modelshipworld.com/index.php?/topic/140-meridea-by-walter-biles-radio-34-scratch-cad-of-boat-at-usn-severn-river-repair-station-ca-1969/ SAMSON First build: Scratch POF Spanish Galleon Link to comment Share on other sites More sharing options...
popeye the sailor Posted May 8, 2013 Share #52 Posted May 8, 2013 wow!! very nice progress Walter.........going to make for a smart looking ship when planked. Quote I yam wot I yam! finished builds: Billings Nordkap 476 / Billings Cux 87 / Billings Mary Ann / Billings AmericA - reissue Billings Regina - bashed into the Susan A / Andrea Gail 1:20 - semi scratch w/ Billing instructions M&M Fun Ship - semi scratch build / Gundalow - scratch build / Jeanne D'Arc - Heller Phylly C & Denny-Zen - the Lobsie twins - bashed & semi scratch dual build Billing T78 Norden in dry dock: Billing's Gothenborg 1:100 / Billing's Boulogne Etaples 1:20 Billing's Half Moon 1:40 - some scratch required Revell U.S.S. United States 1:96 - plastic/ wood modified / Academy Titanic 1:400 Trawler Syborn - semi scratch / Holiday Harbor dual build - semi scratch Link to comment Share on other sites More sharing options...
michael mott Posted May 8, 2013 Share #53 Posted May 8, 2013 Walter I think that the model airplane folks carry some very light weight Fiberglass. Michael Quote Current builds Bristol Pilot Cutter 1:8; Skipjack 19 foot Launch 1:8; Herreshoff Buzzards Bay 14 1:8 Other projects Pilot Cutter 1:500 ; Maria, 1:2 Now just a memory Future model Gill Smith Catboat Pauline 1:8 Finished projects A Bassett Lowke steamship Albertic 1:100 Anything you can imagine is possible, when you put your mind to it. Link to comment Share on other sites More sharing options...
Walter Biles Posted May 8, 2013 Author Share #54 Posted May 8, 2013 (edited) Thank you Bob, Popeye, and Michael.I appreciate your kind comments. Since I am temporarily out of planking material, I am working on getting the cabin framed up. I have the bulkheads at each end with the cabin walls, I have added 1/4" square uprights from the inside of the bulkheads and cut roof boards, joined by two stringers surrounding the mast from front to back, and a 1/8"x1/4" stringer along each side notched into the uprights. Later, after my planking is done, I can remove the deck plywood one last time, and ballast the boat. Then I will do some adjustments to a couple of the tops of the bulkheads to make the deck lay just right. Then I can start getting the floors installed with backup ply for improved screw hold, and start installing control tubes for rudder and boom lines(It occurs to me that I had better do this control tubing while the planking is still out of the way!).I have a 5/32"x3' wire sharpened as a drill bit that I use to drill to install control tubes. Since it is flexible I can make a shallow curved path through the frames when needed. I hope it will work on my boat. I don't think I will have any problem for battery storeage space in this. I have the roof frame glued together, except where the edges join the side stringers, so I can make the after roof into a cover that can be removed for servo adjustments, leaving the roof from the mainmast foreward for mast bracing. I have an extra roof board in the roof where I can separate them by cutting with a razor saw for the foreward edge of the cover. I'll just need to make appropriate catch and latches for locking the cover on. I have an idea about that.Walt Biles Edited May 14, 2013 by Walter Biles Quote Current: America Schooner https://modelshipworld.com/index.php?/topic/10887-america-schooner-pof-by-walter-biles-radio-pof-scale-148-from-blue-jacket-plan/ Prior: MERIDEA https://modelshipworld.com/index.php?/topic/140-meridea-by-walter-biles-radio-34-scratch-cad-of-boat-at-usn-severn-river-repair-station-ca-1969/ SAMSON First build: Scratch POF Spanish Galleon Link to comment Share on other sites More sharing options...
Walter Biles Posted May 13, 2013 Author Share #55 Posted May 13, 2013 I got the cabin sides cut and the window openings made. I am going to make a thinner outer side with the window openings to sandwich the plastic material between. That will help me get enough thickness to the side walls so there won't be any gaps at the floor, and make it easier to do the windows. All the cabin roof is planked and ready to install at the right time. I am still waiting for my wood for planking. I need to figure out just where the best angle of control line approach will be best to avoid any binding or other untidy mishaps. I am begining to go back to what someone mentioned about a pull - pull connection. I am beginning to think it may be my only way. That rudder down in that hole must have been operated with a set of gears, I'm thinking. Anyway, Pull - pull is the next area for investigation. I think the lady said my planks should arive about This next Thursday. I hope I can get this solved by then. Then I need to get the sail control lines routing tubes figured out before starting more planking. This boat/sail control leaves me a bit puzzled about how to plan it out. It is a whole new way of setting up controls to me. Walter Biles popeye the sailor 1 Quote Current: America Schooner https://modelshipworld.com/index.php?/topic/10887-america-schooner-pof-by-walter-biles-radio-pof-scale-148-from-blue-jacket-plan/ Prior: MERIDEA https://modelshipworld.com/index.php?/topic/140-meridea-by-walter-biles-radio-34-scratch-cad-of-boat-at-usn-severn-river-repair-station-ca-1969/ SAMSON First build: Scratch POF Spanish Galleon Link to comment Share on other sites More sharing options...
Walter Biles Posted May 14, 2013 Author Share #56 Posted May 14, 2013 (edited) Does anyone know where to order some of those small brass pulley sheaves? I will probably need to use some to change the direction of pull to get close in line with the rudder arm. I am not seeing any of them where I have been on the sites so far. Walter Biles Edited May 14, 2013 by Walter Biles Quote Current: America Schooner https://modelshipworld.com/index.php?/topic/10887-america-schooner-pof-by-walter-biles-radio-pof-scale-148-from-blue-jacket-plan/ Prior: MERIDEA https://modelshipworld.com/index.php?/topic/140-meridea-by-walter-biles-radio-34-scratch-cad-of-boat-at-usn-severn-river-repair-station-ca-1969/ SAMSON First build: Scratch POF Spanish Galleon Link to comment Share on other sites More sharing options...
Walter Biles Posted May 15, 2013 Author Share #57 Posted May 15, 2013 (edited) Here are some additional pictures of my recent work. The first 3 art of the Cabin Framework showing the paper pattern prefitted. This next two are of the temporary fitted side walls and the cocpit side shield and cabin roof. Walter Biles Edited May 15, 2013 by Walter Biles JerryTodd, dj.bobo and JerryGreening 3 Quote Current: America Schooner https://modelshipworld.com/index.php?/topic/10887-america-schooner-pof-by-walter-biles-radio-pof-scale-148-from-blue-jacket-plan/ Prior: MERIDEA https://modelshipworld.com/index.php?/topic/140-meridea-by-walter-biles-radio-34-scratch-cad-of-boat-at-usn-severn-river-repair-station-ca-1969/ SAMSON First build: Scratch POF Spanish Galleon Link to comment Share on other sites More sharing options...
Walter Biles Posted May 15, 2013 Author Share #58 Posted May 15, 2013 (edited) Continuing with some aft views. An elevated foreward view. A cabin side view. Edited May 15, 2013 by Walter Biles JerryGreening and dj.bobo 2 Quote Current: America Schooner https://modelshipworld.com/index.php?/topic/10887-america-schooner-pof-by-walter-biles-radio-pof-scale-148-from-blue-jacket-plan/ Prior: MERIDEA https://modelshipworld.com/index.php?/topic/140-meridea-by-walter-biles-radio-34-scratch-cad-of-boat-at-usn-severn-river-repair-station-ca-1969/ SAMSON First build: Scratch POF Spanish Galleon Link to comment Share on other sites More sharing options...
popeye the sailor Posted May 15, 2013 Share #59 Posted May 15, 2013 look'in sweet Walter! Quote I yam wot I yam! finished builds: Billings Nordkap 476 / Billings Cux 87 / Billings Mary Ann / Billings AmericA - reissue Billings Regina - bashed into the Susan A / Andrea Gail 1:20 - semi scratch w/ Billing instructions M&M Fun Ship - semi scratch build / Gundalow - scratch build / Jeanne D'Arc - Heller Phylly C & Denny-Zen - the Lobsie twins - bashed & semi scratch dual build Billing T78 Norden in dry dock: Billing's Gothenborg 1:100 / Billing's Boulogne Etaples 1:20 Billing's Half Moon 1:40 - some scratch required Revell U.S.S. United States 1:96 - plastic/ wood modified / Academy Titanic 1:400 Trawler Syborn - semi scratch / Holiday Harbor dual build - semi scratch Link to comment Share on other sites More sharing options...
Walter Biles Posted May 15, 2013 Author Share #60 Posted May 15, 2013 (edited) Thank You, Popeye. She is beginning to look like the boat I remembered. The cabin roof parts will still come off, as will the floors and cockpit deck, and the main deck. I can still get into the hull to do the control installations, but if that plank material doesn't come soon, I may be stuck for something to do, soon. I have been making dowl pulley sheaves for the rudder operations. I have about decided for double line control pull - pull so I can get something installed. I need to make some sort of sheet line guides for the 3 sails. I am taking Bob's idea and just make the foreward mast stay the hanging point for a single Jib on a stay. That will make me lots of sail, and enough controlable booms to deal with. It should simplify the rigging without the double jibs with an overlap on the foreward one. Anyway, It's my boat, I can change it if I want. Anything to simplify the operation. I can always make the next one closer to scale configuration. At least I'm getting a good education in building the Meridea. Edited January 8, 2015 by Walter Biles Quote Current: America Schooner https://modelshipworld.com/index.php?/topic/10887-america-schooner-pof-by-walter-biles-radio-pof-scale-148-from-blue-jacket-plan/ Prior: MERIDEA https://modelshipworld.com/index.php?/topic/140-meridea-by-walter-biles-radio-34-scratch-cad-of-boat-at-usn-severn-river-repair-station-ca-1969/ SAMSON First build: Scratch POF Spanish Galleon Link to comment Share on other sites More sharing options...

Recommended Posts
Join the conversation
You can post now and register later. If you have an account, sign in now to post with your account.