Walter Biles Posted September 6, 2013 Author Share #91 Posted September 6, 2013 (edited) Thank you very much, Popeye. Man, It took me over an hour just to get the pictures posted and labeled, and I didn't get them in the order I intended. This posting stuff is the hardest for me. . Walter Biles Edited September 6, 2013 by Walter Biles Quote Current: America Schooner https://modelshipworld.com/index.php?/topic/10887-america-schooner-pof-by-walter-biles-radio-pof-scale-148-from-blue-jacket-plan/ Prior: MERIDEA https://modelshipworld.com/index.php?/topic/140-meridea-by-walter-biles-radio-34-scratch-cad-of-boat-at-usn-severn-river-repair-station-ca-1969/ SAMSON First build: Scratch POF Spanish Galleon Link to comment Share on other sites More sharing options...
captainbob Posted September 6, 2013 Share #92 Posted September 6, 2013 She's looking good, Walter. It won't be long before she's in the water. Bob Quote Every build is a learning experience. Current build: SS_ Mariefred Completed builds: US Coast Guard Pequot Friendship-sloop, Schooner Lettie-G.-Howard, Spray, Grand-Banks-dory, a gaff rigged yawl, HOGA (YT-146), Int'l Dragon Class II, Two Edwardian Launches In the Gallery: Catboat, International-Dragon-Class, Spray Link to comment Share on other sites More sharing options...
Walter Biles Posted September 6, 2013 Author Share #93 Posted September 6, 2013 Thank you Bob. I've been fabricating a cockpit assembly. A sloped floor into a sump with seats and the wheel. I may put a deck grate so the water can drop through into the floor and run off into the sump around the rudder shaft. That had a drain down to just above the water line with a check valve on it on most of those small sailboats we had there. I'll have to water proof the sump so the water can't spread out in the hull. Lots of ideas. Walt Quote Current: America Schooner https://modelshipworld.com/index.php?/topic/10887-america-schooner-pof-by-walter-biles-radio-pof-scale-148-from-blue-jacket-plan/ Prior: MERIDEA https://modelshipworld.com/index.php?/topic/140-meridea-by-walter-biles-radio-34-scratch-cad-of-boat-at-usn-severn-river-repair-station-ca-1969/ SAMSON First build: Scratch POF Spanish Galleon Link to comment Share on other sites More sharing options...
Walter Biles Posted September 19, 2013 Author Share #94 Posted September 19, 2013 (edited) Here are my latest picture updates. This first one is the best picture showing the cabin companionway open and the cockpit area with its drain grid and ships wheel. The rest of these were my attempt to get a good detail of the cockpit, the last one with the companionway hatch opened. This next one shows the ships wheel better. I have been trying to get finished assemblies of the deck features. When finished the caprail will go on around the cockpit. I still have quite a bit of interior work to do, and I still need to do the second planking to the top. It is finally beginning to look like a boat, huh? Walter Biles Edited September 19, 2013 by Walter Biles JerryGreening, dj.bobo and popeye the sailor 3 Quote Current: America Schooner https://modelshipworld.com/index.php?/topic/10887-america-schooner-pof-by-walter-biles-radio-pof-scale-148-from-blue-jacket-plan/ Prior: MERIDEA https://modelshipworld.com/index.php?/topic/140-meridea-by-walter-biles-radio-34-scratch-cad-of-boat-at-usn-severn-river-repair-station-ca-1969/ SAMSON First build: Scratch POF Spanish Galleon Link to comment Share on other sites More sharing options...
captainbob Posted September 19, 2013 Share #95 Posted September 19, 2013 Looking good, Walter. You’re just about finished. It will look good in the water. Bob Quote Every build is a learning experience. Current build: SS_ Mariefred Completed builds: US Coast Guard Pequot Friendship-sloop, Schooner Lettie-G.-Howard, Spray, Grand-Banks-dory, a gaff rigged yawl, HOGA (YT-146), Int'l Dragon Class II, Two Edwardian Launches In the Gallery: Catboat, International-Dragon-Class, Spray Link to comment Share on other sites More sharing options...
Walter Biles Posted September 19, 2013 Author Share #96 Posted September 19, 2013 (edited) Thank you Bob, I may have to re-make the mainmast. It has taken a couple of warps. I'll try and straighten it, and if that doesn't work, I think I'll re-do the mast. That plywood I used was bowed, and I tried to straighten it by making the bows oppose each other, which was why I put more filler blocks into it. I do have another sheet that i found which is pretty straight. I didn't put wood seal on it prior to that wet spell awhile back. That wheel was supposed to be metal tubing, but I decided to try a wooden one. Actually, it came out better than I expected. It is just toothpicks, and 3/32" bass wood cut into the 1/6th curves for each side and sanded until they fit together. I put an overlap of the joints on the opposite side from the first and glued them together. When dry, I dremel drilled the holes for the toothpicks to go through, once I had the ring, and put a block in the center. I used a half inch pvc pipe cap and a short nipple of pipe for the post. I couldn't get through the storeage pile to get to my lathe. Anyway, the post is close to the original shape. The original post and wheel were burnished stainless and the wheel had no handles, it just had the 6 spokes in about 1" stainless tube all welded. I figure this will just be my wood version of the assembly. I just glued it in place. Actually the seat is oversize in order to have room for the rudder rigging, but who's to care? Over all I think my cockpit will do to represent my idea of it. I am going to have to put a boom vang on the main boom in order to keep it above the cabin and cockpit, if for no other reason. Walt Biles Edited September 19, 2013 by Walter Biles captainbob 1 Quote Current: America Schooner https://modelshipworld.com/index.php?/topic/10887-america-schooner-pof-by-walter-biles-radio-pof-scale-148-from-blue-jacket-plan/ Prior: MERIDEA https://modelshipworld.com/index.php?/topic/140-meridea-by-walter-biles-radio-34-scratch-cad-of-boat-at-usn-severn-river-repair-station-ca-1969/ SAMSON First build: Scratch POF Spanish Galleon Link to comment Share on other sites More sharing options...
popeye the sailor Posted September 20, 2013 Share #97 Posted September 20, 2013 it sure does Walt! can't wait to see the next update, with all those neat ideas you have Quote I yam wot I yam! finished builds: Billings Nordkap 476 / Billings Cux 87 / Billings Mary Ann / Billings AmericA - reissue Billings Regina - bashed into the Susan A / Andrea Gail 1:20 - semi scratch w/ Billing instructions M&M Fun Ship - semi scratch build / Gundalow - scratch build / Jeanne D'Arc - Heller Phylly C & Denny-Zen - the Lobsie twins - bashed & semi scratch dual build Billing T78 Norden in dry dock: Billing's Gothenborg 1:100 / Billing's Boulogne Etaples 1:20 Billing's Half Moon 1:40 - some scratch required Revell U.S.S. United States 1:96 - plastic/ wood modified / Academy Titanic 1:400 Trawler Syborn - semi scratch / Holiday Harbor dual build - semi scratch Link to comment Share on other sites More sharing options...
Walter Biles Posted September 20, 2013 Author Share #98 Posted September 20, 2013 Thankyou, Popeye Now I just need to get the last of the planking done, and finish the inside work, and it will be ready for the radio. Of course I will still need to do the booms and rigging. Then I need to get busy on my Samson hull for my recovery vessel Bob gave me. I am going to put a boom arm on it to let down into either railing or rigging to drag my Meridea back to shore incase it gets hung up out on a pond. Walt popeye the sailor 1 Quote Current: America Schooner https://modelshipworld.com/index.php?/topic/10887-america-schooner-pof-by-walter-biles-radio-pof-scale-148-from-blue-jacket-plan/ Prior: MERIDEA https://modelshipworld.com/index.php?/topic/140-meridea-by-walter-biles-radio-34-scratch-cad-of-boat-at-usn-severn-river-repair-station-ca-1969/ SAMSON First build: Scratch POF Spanish Galleon Link to comment Share on other sites More sharing options...
Walter Biles Posted January 3, 2014 Author Share #99 Posted January 3, 2014 (edited) I have done a lot on my other boat, the Samson, and other than updating that one, soon, I am back to the Meridea to finish the second planking layer. I got the guide tube for the mizzen boom installed, and a pull line fed through it so I can pull the controls through it when ready, which made it possible finally to install the decking assembly which is now done. I need to take some pictures of the progress on this boat, but have already started to do the second layer of planking from the waterways working back down to where the main keel meets the bilge area, so the planking will be done. Then I should be able to finish the hull so I can ballast it. From there I could finish the internal compartment for the radio controls. Then I may be able to get the cabin walls assembly installed. Then that boat will mostly have to wait for a radio to go into it, so I can figure out the rest of it. Samson is now almost to that point now, also. However, I have two more builds planned for while they wait. I got the special price from Model Expo, so on Christmas day, I used some Christmas gift money from a couple of my siblings and ordered my first ever KIT boat model. (My first POF kit ever,also) The Emma C. Berry is now waiting for that day when I have nothing left to build. I also have enough information and planning to be nearly ready for a full scratch build of the Sea of Galilee boat. Walt Edited January 3, 2014 by Walter Biles popeye the sailor 1 Quote Current: America Schooner https://modelshipworld.com/index.php?/topic/10887-america-schooner-pof-by-walter-biles-radio-pof-scale-148-from-blue-jacket-plan/ Prior: MERIDEA https://modelshipworld.com/index.php?/topic/140-meridea-by-walter-biles-radio-34-scratch-cad-of-boat-at-usn-severn-river-repair-station-ca-1969/ SAMSON First build: Scratch POF Spanish Galleon Link to comment Share on other sites More sharing options...
captainbob Posted January 3, 2014 Share #100 Posted January 3, 2014 I see you are moving right ahead. Good job. Bob popeye the sailor 1 Quote Every build is a learning experience. Current build: SS_ Mariefred Completed builds: US Coast Guard Pequot Friendship-sloop, Schooner Lettie-G.-Howard, Spray, Grand-Banks-dory, a gaff rigged yawl, HOGA (YT-146), Int'l Dragon Class II, Two Edwardian Launches In the Gallery: Catboat, International-Dragon-Class, Spray Link to comment Share on other sites More sharing options...
Walter Biles Posted January 3, 2014 Author Share #101 Posted January 3, 2014 (edited) Thanks Popeye. Thanks Bob, Happy New Year to you and your wife.! Walt Edited January 3, 2014 by Walter Biles Quote Current: America Schooner https://modelshipworld.com/index.php?/topic/10887-america-schooner-pof-by-walter-biles-radio-pof-scale-148-from-blue-jacket-plan/ Prior: MERIDEA https://modelshipworld.com/index.php?/topic/140-meridea-by-walter-biles-radio-34-scratch-cad-of-boat-at-usn-severn-river-repair-station-ca-1969/ SAMSON First build: Scratch POF Spanish Galleon Link to comment Share on other sites More sharing options...
Walter Biles Posted January 21, 2014 Author Share #102 Posted January 21, 2014 (edited) Here are some more recent images of my Meridea Build. Here are the first several planks starting down from the outside of the rail. You can see the drain ports through them in several places Here is where the flash worked on the approximate same view. This shows the line guide tube for the mizzen boom. It is cooler spider tubing. I threaded weed eater line through to the cabin so I can pull the lines through when I am ready. This shows the bow filler around the forestay anchor point. I have been working on this and have planking down to about the halfway point down the bulge, but I still have not gotten pictures of this. I have also been building up the thickness of the bulwark preparing it to hold the drilled mounting points for the stantion rails. I decided to change the mounts that I had previously settled on as they were lacking enough strength. Walter Biles Edited March 16, 2014 by Walter Biles EdT, JerryGreening, mtaylor and 2 others 5 Quote Current: America Schooner https://modelshipworld.com/index.php?/topic/10887-america-schooner-pof-by-walter-biles-radio-pof-scale-148-from-blue-jacket-plan/ Prior: MERIDEA https://modelshipworld.com/index.php?/topic/140-meridea-by-walter-biles-radio-34-scratch-cad-of-boat-at-usn-severn-river-repair-station-ca-1969/ SAMSON First build: Scratch POF Spanish Galleon Link to comment Share on other sites More sharing options...
popeye the sailor Posted January 21, 2014 Share #103 Posted January 21, 2014 spending lots of time in the ship yard........very good! Meridea looks real sweet! that must be your tug in the picture as well Quote I yam wot I yam! finished builds: Billings Nordkap 476 / Billings Cux 87 / Billings Mary Ann / Billings AmericA - reissue Billings Regina - bashed into the Susan A / Andrea Gail 1:20 - semi scratch w/ Billing instructions M&M Fun Ship - semi scratch build / Gundalow - scratch build / Jeanne D'Arc - Heller Phylly C & Denny-Zen - the Lobsie twins - bashed & semi scratch dual build Billing T78 Norden in dry dock: Billing's Gothenborg 1:100 / Billing's Boulogne Etaples 1:20 Billing's Half Moon 1:40 - some scratch required Revell U.S.S. United States 1:96 - plastic/ wood modified / Academy Titanic 1:400 Trawler Syborn - semi scratch / Holiday Harbor dual build - semi scratch Link to comment Share on other sites More sharing options...
captainbob Posted January 21, 2014 Share #104 Posted January 21, 2014 Looking good, Walter. Bob Quote Every build is a learning experience. Current build: SS_ Mariefred Completed builds: US Coast Guard Pequot Friendship-sloop, Schooner Lettie-G.-Howard, Spray, Grand-Banks-dory, a gaff rigged yawl, HOGA (YT-146), Int'l Dragon Class II, Two Edwardian Launches In the Gallery: Catboat, International-Dragon-Class, Spray Link to comment Share on other sites More sharing options...
Walter Biles Posted January 22, 2014 Author Share #105 Posted January 22, 2014 Thanks, Popeye, and Bob. Yes Popeye, one of them had the stern of the tugboat showing. I put the tug pix in the Samson build. Quote Current: America Schooner https://modelshipworld.com/index.php?/topic/10887-america-schooner-pof-by-walter-biles-radio-pof-scale-148-from-blue-jacket-plan/ Prior: MERIDEA https://modelshipworld.com/index.php?/topic/140-meridea-by-walter-biles-radio-34-scratch-cad-of-boat-at-usn-severn-river-repair-station-ca-1969/ SAMSON First build: Scratch POF Spanish Galleon Link to comment Share on other sites More sharing options...
popeye the sailor Posted January 22, 2014 Share #106 Posted January 22, 2014 I'll have to check it out........until you mentioned it, I didn't think you had more than one build going on of course, with the number of builds I have going on.........it all seems rather natural :D Walter Biles 1 Quote I yam wot I yam! finished builds: Billings Nordkap 476 / Billings Cux 87 / Billings Mary Ann / Billings AmericA - reissue Billings Regina - bashed into the Susan A / Andrea Gail 1:20 - semi scratch w/ Billing instructions M&M Fun Ship - semi scratch build / Gundalow - scratch build / Jeanne D'Arc - Heller Phylly C & Denny-Zen - the Lobsie twins - bashed & semi scratch dual build Billing T78 Norden in dry dock: Billing's Gothenborg 1:100 / Billing's Boulogne Etaples 1:20 Billing's Half Moon 1:40 - some scratch required Revell U.S.S. United States 1:96 - plastic/ wood modified / Academy Titanic 1:400 Trawler Syborn - semi scratch / Holiday Harbor dual build - semi scratch Link to comment Share on other sites More sharing options...
Walter Biles Posted February 12, 2014 Author Share #107 Posted February 12, 2014 Well, it's time for some update. I put the drain into the cockpit. I have finally finished all the planking. I have been working on ways of locking down the assemblies while trying to waterproof the openings as much as possible. I am about ready to get the sealer coat on the hull in preparation for painting. After that it is trying to rig the booms and rigging. Pictures as available. Walter Biles popeye the sailor 1 Quote Current: America Schooner https://modelshipworld.com/index.php?/topic/10887-america-schooner-pof-by-walter-biles-radio-pof-scale-148-from-blue-jacket-plan/ Prior: MERIDEA https://modelshipworld.com/index.php?/topic/140-meridea-by-walter-biles-radio-34-scratch-cad-of-boat-at-usn-severn-river-repair-station-ca-1969/ SAMSON First build: Scratch POF Spanish Galleon Link to comment Share on other sites More sharing options...
Walter Biles Posted February 24, 2014 Author Share #108 Posted February 24, 2014 (edited) Here are the most recent pictures of Meridea. I used epoxy to completely seal the drain sump and around the drain outlet. I finished the doubleplanking of the hull and sanded it to almost smooth. I will leave it this way until just before I am ready with the glass coating of the hull. Then the hull can be painted. Once that is accomplished, I can ballast the boat, and prepare it for finishing the rigging. I now have the insides of the rails painted, and the cockpit painted. The deck and cabin roof has been primed and sprayed with clear coat (non-glossy) I have some brass cut for the main mast boom, and the mizzen boom, and the cap for the mast having 4 eyelets for the guy attachments. When I did these, I only could find my thinner brass but I found it too flexible, so I aim to re-make it all from the thicker sheet which turned up later. Full side view. Aft view. Mast cap with attaching rings Cockpit view Fwd deck view showing jib boom to be attached after guy lines attached. Front view I'm sorry about the white being too overexposed. My camera has no adjustment for brightness built in. Edited February 24, 2014 by Walter Biles JerryGreening, mtaylor and kees de mol 3 Quote Current: America Schooner https://modelshipworld.com/index.php?/topic/10887-america-schooner-pof-by-walter-biles-radio-pof-scale-148-from-blue-jacket-plan/ Prior: MERIDEA https://modelshipworld.com/index.php?/topic/140-meridea-by-walter-biles-radio-34-scratch-cad-of-boat-at-usn-severn-river-repair-station-ca-1969/ SAMSON First build: Scratch POF Spanish Galleon Link to comment Share on other sites More sharing options...
Walter Biles Posted February 24, 2014 Author Share #109 Posted February 24, 2014 (edited) My plans for now are to see if I can get some batteries for my old radio, and use it to set up and test the controls until I can get a new 2.4 Ghz system eventually. Walt Biles Edited February 24, 2014 by Walter Biles Quote Current: America Schooner https://modelshipworld.com/index.php?/topic/10887-america-schooner-pof-by-walter-biles-radio-pof-scale-148-from-blue-jacket-plan/ Prior: MERIDEA https://modelshipworld.com/index.php?/topic/140-meridea-by-walter-biles-radio-34-scratch-cad-of-boat-at-usn-severn-river-repair-station-ca-1969/ SAMSON First build: Scratch POF Spanish Galleon Link to comment Share on other sites More sharing options...
captainbob Posted February 24, 2014 Share #110 Posted February 24, 2014 Coming along nicely. Bob Walter Biles 1 Quote Every build is a learning experience. Current build: SS_ Mariefred Completed builds: US Coast Guard Pequot Friendship-sloop, Schooner Lettie-G.-Howard, Spray, Grand-Banks-dory, a gaff rigged yawl, HOGA (YT-146), Int'l Dragon Class II, Two Edwardian Launches In the Gallery: Catboat, International-Dragon-Class, Spray Link to comment Share on other sites More sharing options...
popeye the sailor Posted February 25, 2014 Share #111 Posted February 25, 2014 agreed Bob.....really looking sweet Walter! Quote I yam wot I yam! finished builds: Billings Nordkap 476 / Billings Cux 87 / Billings Mary Ann / Billings AmericA - reissue Billings Regina - bashed into the Susan A / Andrea Gail 1:20 - semi scratch w/ Billing instructions M&M Fun Ship - semi scratch build / Gundalow - scratch build / Jeanne D'Arc - Heller Phylly C & Denny-Zen - the Lobsie twins - bashed & semi scratch dual build Billing T78 Norden in dry dock: Billing's Gothenborg 1:100 / Billing's Boulogne Etaples 1:20 Billing's Half Moon 1:40 - some scratch required Revell U.S.S. United States 1:96 - plastic/ wood modified / Academy Titanic 1:400 Trawler Syborn - semi scratch / Holiday Harbor dual build - semi scratch Link to comment Share on other sites More sharing options...
Walter Biles Posted February 25, 2014 Author Share #112 Posted February 25, 2014 (edited) I just spent the night re-making the mast hardware for the booms, and re-doing the after riser tube for the mizzen boom. I decided that since I have two sails with a foot that is a multiple of 7", that I would extend the aft boom so I can attach the line at the 7" mark also. I removed the up riser, and took it out the back and put another riser at 7 1/2" out from the mast. I think that if I can get the loop from the winch to go 7" movement, the jib and mizzen can work direct attached to the loop, and if I attach a pulley to the loop for the main, I can get double the travel by running the lead through the pulley, and to an anchor point on the middle bulkhead. I believe that would give me the 14" of travel for the main boom. Does that sound right? Walt Biles Edited February 25, 2014 by Walter Biles Quote Current: America Schooner https://modelshipworld.com/index.php?/topic/10887-america-schooner-pof-by-walter-biles-radio-pof-scale-148-from-blue-jacket-plan/ Prior: MERIDEA https://modelshipworld.com/index.php?/topic/140-meridea-by-walter-biles-radio-34-scratch-cad-of-boat-at-usn-severn-river-repair-station-ca-1969/ SAMSON First build: Scratch POF Spanish Galleon Link to comment Share on other sites More sharing options...
captainbob Posted February 25, 2014 Share #113 Posted February 25, 2014 14" sounds right but you need to captivate the line going through the pulley so it doesn't come out if there is slack in the line. Bob Quote Every build is a learning experience. Current build: SS_ Mariefred Completed builds: US Coast Guard Pequot Friendship-sloop, Schooner Lettie-G.-Howard, Spray, Grand-Banks-dory, a gaff rigged yawl, HOGA (YT-146), Int'l Dragon Class II, Two Edwardian Launches In the Gallery: Catboat, International-Dragon-Class, Spray Link to comment Share on other sites More sharing options...
Walter Biles Posted March 4, 2014 Author Share #114 Posted March 4, 2014 (edited) Well, I have dug around trying to find my old radios to see if any of them had any chance of being a test unit to work the bugs out as I installed my sail controls. It appears that the winch servo will turn about 3.6 turns without using the trim, and almost 4 with it. I am going to put 3 full wraps around each part of the spool out around a loop of the cabin. By using 4 permanent pulleys, one with a tension spring on it, I should be able to get almost enough for a full run for the main boom, and I may work a pulley reduction or a separate servo with a sail arm to work them. Then I only need to work out the stiffness in the rudder control. I am going to have to get a smoother travel from the cabin to the rudder. I think the turn entering the rudder well is too tight for an enclosed sleeve and cable. I may try running heavy fishing line or use a 90 degree L to change the direction to the rudder. I had old goldberg cables thru a plastic tube but that is too resistant in the curve I would have to use. I even tried greasing the cable and sleeve. It was only a little better. Not enough for a regular servo to run it IMHO. I ran accross my glass cloth while searching, so I can soon do the seal coat on the hull, and start glassing the hull. I have a little contouring for the top of the rudder to check out for smoother water flow. I have an order in for some turnbuckles for the guy lines to the masts (I know there is a more correct term for those, but it escapes me, Stays? came to mind later.) , and some more miscellanious parts I will need for doing the rigging, like sheaves, so I can make some working pulleys. I already have some brass stock for them, and some brass rod for riviting them into the brackets. I wish they would have given the diameter of the center hole, but the outer diameter should be just right. I should be able to work that out. That is all the news from the Meridea shipyard. Walter Biles Edited March 10, 2014 by Walter Biles popeye the sailor 1 Quote Current: America Schooner https://modelshipworld.com/index.php?/topic/10887-america-schooner-pof-by-walter-biles-radio-pof-scale-148-from-blue-jacket-plan/ Prior: MERIDEA https://modelshipworld.com/index.php?/topic/140-meridea-by-walter-biles-radio-34-scratch-cad-of-boat-at-usn-severn-river-repair-station-ca-1969/ SAMSON First build: Scratch POF Spanish Galleon Link to comment Share on other sites More sharing options...
Walter Biles Posted March 8, 2014 Author Share #115 Posted March 8, 2014 (edited) Yesterday I worked on getting the port side drive cable working on the servo. I then created a mounting for the servo and mounted it on the inside of the hull at such an angle that it would best follow the cable jacket with the arm. Then I tested it out, and it works. I cut off the cable jacket on the Starboard side. I will have to do the rest of the sealing of bulkheads after I get ballasted. Then the cockpit can be sealed up to the frames.I have started making the posterboard patterns for the sails. I am not sure which way the cloths run through the sails. I would like to seam it in the right way. I have picked up some from a video on the How To site. The videos do not run sequentially from layout to cutting to sewing to finishing. It confused the dickens out of me. I picked up some about shaping the airfoil of the sail, but am still not sure about it. I wish I could get a good progressive written with pictures of the procedure somewhere. Anyway I have begun to work on the patterns. It may be some time before I get them fully figured out. I once had to cut out and smooth a bunch of battens for a set of sails, but I did not pay close enough attention to the sail cloth layout while I was up in the sail loft, and knew nothing about shaping the sail. I only learned about how they insert the battens and lock them in with a folded overlap to help the Roach to stand straight. If I can finally get a good handle on the layout and shaping the curve to the sail, I think I will enjoy building those sails. Then comes the rigging, and ultimately getting the winch set up correctly. That will be some trial and error, I am sure.I will be trying to get some pictures as I go. I get so busy, I kind of forget. Sorry. Anyway, pictures to follow as I can.Walt Biles Edited March 10, 2014 by Walter Biles JerryGreening and dj.bobo 2 Quote Current: America Schooner https://modelshipworld.com/index.php?/topic/10887-america-schooner-pof-by-walter-biles-radio-pof-scale-148-from-blue-jacket-plan/ Prior: MERIDEA https://modelshipworld.com/index.php?/topic/140-meridea-by-walter-biles-radio-34-scratch-cad-of-boat-at-usn-severn-river-repair-station-ca-1969/ SAMSON First build: Scratch POF Spanish Galleon Link to comment Share on other sites More sharing options...
Walter Biles Posted March 9, 2014 Author Share #116 Posted March 9, 2014 (edited) This afternoon, I cleared off all unnecessary assemblies off the boat hull and tried putting on the first clear coat of fiberglass resin on the hull. I found however that the amount of activator it took to fully activate the resin was less than the commercial stuff I used in the navy. I used 4 drops in a small amount on a paper plate, and by the time I had all that worked onto the hull, it still had not started gelling. The second mix I put about twice as much into it for the same amount. Then I went back over the original and re-worked it all over with some of the new batch using the brush to mix it into the old stuff. I think it is partly the temperature, but also the activator is not so concentrated. I used to use 3 drops in a third of a 6 oz paper cup, and I was lucky to get it all on before I finished working it. I remember in the wintery months it took 7 drops. So I think it is one or the other of those two causes. I just hope this stuff sets fully by tomorrow. If it does, I may ballast the boat, and then set it out in a container until I can finish the glass job. I will need to sand this coat smooth and add another gel coat or two before I can prime and paint. Then I can get started with finishing up the rigging and sails and radio control servos. Walter Biles Edited March 10, 2014 by Walter Biles Quote Current: America Schooner https://modelshipworld.com/index.php?/topic/10887-america-schooner-pof-by-walter-biles-radio-pof-scale-148-from-blue-jacket-plan/ Prior: MERIDEA https://modelshipworld.com/index.php?/topic/140-meridea-by-walter-biles-radio-34-scratch-cad-of-boat-at-usn-severn-river-repair-station-ca-1969/ SAMSON First build: Scratch POF Spanish Galleon Link to comment Share on other sites More sharing options...
Walter Biles Posted March 10, 2014 Author Share #117 Posted March 10, 2014 (edited) Thanks for the responses, Popeye, and Bob. I did get the boat ballast approximately set, but now have the ingots set aside for use later. I had to scrape all that glass coating off the hull. It was not quite hard set on the outside, but it was gummy underneath. I put down cardboard under the chair out about 4' on two sides. I got it all scraped down about 5:30pm. It took about 3 hours, and a lot of vacuuming when I was done. I'm going to run over it with the orbital sander to smooth it out a bit before I re-glass it probably tomorrow if it is warm enough. I'd prefer it to be above 65 degrees F when I do the glass, because that was what we tried to have back then in the navy (we had steam heat in the shops during the winter). It was only 57 the other day when I put it on, even though the minimum was listed as 50F, and I am not sure what to expect on how much hardener it takes for this brand of resin. At least now I have an idea of how little I should not use. I think that for tonight I might reassemble it and take some pictures of it. I'll see if I can get them up sometime tonight. Walt Biles Edited March 10, 2014 by Walter Biles Quote Current: America Schooner https://modelshipworld.com/index.php?/topic/10887-america-schooner-pof-by-walter-biles-radio-pof-scale-148-from-blue-jacket-plan/ Prior: MERIDEA https://modelshipworld.com/index.php?/topic/140-meridea-by-walter-biles-radio-34-scratch-cad-of-boat-at-usn-severn-river-repair-station-ca-1969/ SAMSON First build: Scratch POF Spanish Galleon Link to comment Share on other sites More sharing options...
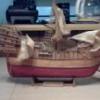
Walter Biles Posted March 10, 2014 Author Share #118 Posted March 10, 2014 (edited) Here are the promised pictures of the most recent developments. Assembling the components of the Boat Part 1 The black tube is the channel for the main mast control line to feed up to the boom. This next picture is the start of putting the cock pit down into place. This one is the cockpit seated into place. This one is a closeup of the recessed grooves allowing the water entering the grate to channel to the sump Preparing to slip the grating down onto the sloped floor. The grating is down. Note that the hand grips are gone off the wheel. With the running line for the boom feeding right over it, I decided to eliminate the potential hangups. The sump under where the seat will set. It is also the rudder well. The front of the seat slips right behind the grating, and the seat lays back against the boom channel upright. The seat is in place. The open cabin showing the roof off and the floor is out. Showing the rudder mount inside the hull planking between the two bulkheads. Note the deep well into the keel where the weight will be distributed for best balance. Also notice the top of the mast foot between the two close bulkheads. The floor being fitted in below the rudder servo. Here I am using my finger to center the mast hole of the floor so it can set down on it's guide pins. The floor is in place. Installing the mast guides: The toe of each one is on each side of the mast foot. The shape of the v in the keel and the angled aft shape of the mast guides keeps them close in to the mast foot. The floor also keeps them tight up against the mast foot. There is a recess in the upper Mast collar to ensure that they can stay in place once the mast is in. They also lock the upper mast collar against the underside of the cabin frame. Installing the upper mast bracing collar. Note the guide ends on the collar at each end. Slipped in at an angle, with the collar guides between each set of bulkheads. Raise one end up toward the top, and make sure both ends are between the bulkheads. Raising it up against the top cabin framework until the guides come up against the top. Before the next step the screws are screwed down through the top of the cabin frame into the foreward side of the mast collar allignment guides. This will be shown in the next posting. Edited March 10, 2014 by Walter Biles mtaylor and JerryGreening 2 Quote Current: America Schooner https://modelshipworld.com/index.php?/topic/10887-america-schooner-pof-by-walter-biles-radio-pof-scale-148-from-blue-jacket-plan/ Prior: MERIDEA https://modelshipworld.com/index.php?/topic/140-meridea-by-walter-biles-radio-34-scratch-cad-of-boat-at-usn-severn-river-repair-station-ca-1969/ SAMSON First build: Scratch POF Spanish Galleon Link to comment Share on other sites More sharing options...
Walter Biles Posted March 10, 2014 Author Share #119 Posted March 10, 2014 Assembling the components of the boat Part 2 The top fwd roof piece is laying upside down to show the groove in it that the ends of the upright mast guides fit into. The roof helps lock them down when it is screwed down. Note the 2 green highlighted areas with the screws. These will help to lock the upper cabin framework into the Mast Collar Guide. Here they are seated. They hold things in line while the roof top is installed. This shows the grooves on the underside of the roof girder getting to slip below the angled roof supports toward the front of the cabin. As it slides foreward it will bring the roof down onto the rubber gasket around the cabin frame at the front. When the roof is fully foreward, let the back of the opening for the mast down over the mast guide uprights. Here you can see that the mast guides are not back in their notches. With a finger I spread the guides so they are now seated. the two screws are ready to pull the roof down and draw the mast collar assembly together. The next two screws are ready to hold the roof edges down on their gasket. You can see the aft roof section with its allignment pins and the gasket on the slip under ledge at the front part of the roof section. the aft roof has entered the pin holes which helped the gasket ledge to slip carefully under the lip of the foreward roof. Pressing foreward and down, to seat the back edge of the aft roof section. The companionway hatch cover may be slid foreward, and the screws at the aft roof corners are ready to go in to hold the roof onto its gasket. After losing two sets of the hatch slide boards, I am in need of making a new set again. This ends this part of the assembly. JerryGreening and mtaylor 2 Quote Current: America Schooner https://modelshipworld.com/index.php?/topic/10887-america-schooner-pof-by-walter-biles-radio-pof-scale-148-from-blue-jacket-plan/ Prior: MERIDEA https://modelshipworld.com/index.php?/topic/140-meridea-by-walter-biles-radio-34-scratch-cad-of-boat-at-usn-severn-river-repair-station-ca-1969/ SAMSON First build: Scratch POF Spanish Galleon Link to comment Share on other sites More sharing options...
captainbob Posted March 10, 2014 Share #120 Posted March 10, 2014 Sorry to hear the glass didn't set. You'll get it next time. Bob Quote Every build is a learning experience. Current build: SS_ Mariefred Completed builds: US Coast Guard Pequot Friendship-sloop, Schooner Lettie-G.-Howard, Spray, Grand-Banks-dory, a gaff rigged yawl, HOGA (YT-146), Int'l Dragon Class II, Two Edwardian Launches In the Gallery: Catboat, International-Dragon-Class, Spray Link to comment Share on other sites More sharing options...

Recommended Posts
Join the conversation
You can post now and register later. If you have an account, sign in now to post with your account.