Blighty Posted March 31, 2017 Author Share #31 Posted March 31, 2017 I have the rear deck and seats sanded and positioned in place but not glued, I am tempted to stain and matt urethane the inside of the boat and go with a painted exterior. Can anyone tell me the material of the coal bunkers please? A couple of pics showing latest status. Len Cathead, Canute, WackoWolf and 5 others 8 Quote Link to comment Share on other sites More sharing options...
Blighty Posted April 1, 2017 Author Share #32 Posted April 1, 2017 Just wrapped up a bit of bashing to fit the modified decks. The bulkheads, 5 & 12, were planked with 1/16" thk planks so I had to trim the same off both ends of the lower deck, also removed some cutouts on the bulkheads so that the second layer I added to the deck will hide the sweeps that are evident on the kit. I've attached a couple of pics showing what needed to be done on the bulkheads. Dropped them back into the blank so change could easily be compared. I should be gluing them in tomorrow. GuntherMT, Cathead, Canute and 2 others 5 Quote Link to comment Share on other sites More sharing options...
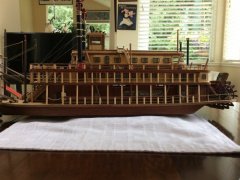
Blighty Posted April 3, 2017 Author Share #33 Posted April 3, 2017 PB1 is coming together, I have cut off the coal bunker to end at #5 bulkhead. With the double curvature of the hull in this area there was very little volume to store anything, also I think it would have been difficult to get your shovel in there. So, with that space now opened up manning the gun and stoking the coals should be more manageable. The stain I went with is Royal Walnut. I have not decided whether to stain or paint the coal bunkers yet. Thanks for following. Len Ryland Craze, GrantGoodale, mtaylor and 8 others 11 Quote Link to comment Share on other sites More sharing options...
Rossi46 Posted April 3, 2017 Share #34 Posted April 3, 2017 Thats really nice tone with that stain. I like it alot. Canute, mtaylor and WackoWolf 3 Quote Link to comment Share on other sites More sharing options...
Blighty Posted April 3, 2017 Author Share #35 Posted April 3, 2017 Cheers Em, that's 2 coats, one more to go. WackoWolf, Canute, Rossi46 and 1 other 4 Quote Link to comment Share on other sites More sharing options...
jct Posted April 3, 2017 Share #36 Posted April 3, 2017 nice...has a rich look to it, elm you say Canute and mtaylor 2 Quote Thx J In process On Hold US Brig Niagara Model Shipways Pinta ...Shipyard, card build; In the Queue HMS Endeavor...Corel; Completed builds Agilis...Steingraeber, Dual build with Popeye USS Hannah...scratch build to something between 1/72 ish and 1/60 ish scale Corel's...Half Moon; USN Picket Boat #1...Model Shipways; Model shipways...18th Century longboat.. Harriet Lane...Model Shipways Henry J Gasser Keeling-and-Clayton-mustang-funny-car Green Elephant Funny car Curtiss Sparrowhawk Link to comment Share on other sites More sharing options...
Blighty Posted April 3, 2017 Author Share #37 Posted April 3, 2017 No J, Em is my eldest son, aka Rossi46, the stain I used is Royal Walnut, Minwax. mtaylor and Canute 2 Quote Link to comment Share on other sites More sharing options...
jct Posted April 4, 2017 Share #38 Posted April 4, 2017 sorry...my apologies to Em mtaylor, Canute and Blighty 3 Quote Thx J In process On Hold US Brig Niagara Model Shipways Pinta ...Shipyard, card build; In the Queue HMS Endeavor...Corel; Completed builds Agilis...Steingraeber, Dual build with Popeye USS Hannah...scratch build to something between 1/72 ish and 1/60 ish scale Corel's...Half Moon; USN Picket Boat #1...Model Shipways; Model shipways...18th Century longboat.. Harriet Lane...Model Shipways Henry J Gasser Keeling-and-Clayton-mustang-funny-car Green Elephant Funny car Curtiss Sparrowhawk Link to comment Share on other sites More sharing options...
Blighty Posted April 5, 2017 Author Share #39 Posted April 5, 2017 I decided to not add planking to the upper frt and rear deck but I was not happy with the lightly scribed lines that are depicted on the model, so I decided to have a go at scoring them in. Hereis how I went about it. First I marked up the current plank pattern on the reverse side of the rear deck by extending the plank lines onto the blank with a pencil so I could easily and accurately scribe them back on the reverse side. Deck flipped and pencilled in, so, if I screw up the scoring I still have a good deck to work with. Next I made a form to add a radius to the rear edge, purely cosmetics Then with the finest tip I have for the dremel, 2 coats of Minwax, (still to be sanded and reapplied): I ended up with this. I think it looks ok with this large scale 1/2' but would not attempt on a smaller scale. I' post a final pic when it's sanded and finished. Cathead, mtaylor, GuntherMT and 5 others 8 Quote Link to comment Share on other sites More sharing options...
kurtvd19 Posted April 5, 2017 Share #40 Posted April 5, 2017 Regarding the hinging of the coal bunkers - the photo attached shows some lids opened. Note that if the hinges were not placed as they were - per the kit - they would block access for loading from a dock. As they are positioned they act as a backstop for shoveling the coal aboard. Not much room to shovel coal from the bunkers to the boiler regardless. Kurt mtaylor, Cathead, coxswain and 5 others 8 Quote Kurt Van Dahm Director NAUTICAL RESEARCH GUILD www.thenrg.org SAY NO TO PIRACY. SUPPORT ORIGINAL IDEAS AND MANUFACTURERS CLUBS Nautical Research & Model Ship Society of Chicago Midwest Model Shipwrights North Shore Deadeyes The Society of Model Shipwrights Butch O'Hare - IPMS Link to comment Share on other sites More sharing options...
Blighty Posted April 5, 2017 Author Share #41 Posted April 5, 2017 I already made some extensive changes to the coal bunkers that made sense to me at the time. This was my thinking. The canon needed to be cleared for a gun crew, I really don't know how many guys are considered normal for manning a single canon but I assumed 3 to 4 guys should have clear access. That said, I removed the flagpole, I am thinking of mounting that on the outside, around mid ship so the crew could use the pole and guy ropes for steadying them selves. Not fullydecided on that yet. I removed the front compartment altogether to increase space around the canon also, with the domplex curvature there is very little space lost to store coal, also scooping it out would be difficult. After thinking about this for some time I applied a little bit of a novel opening just for the front 2 compartments on each side. I think this will allow good access to the coal and the stokers can keep their head down. Looks cool on the model, would love to get your opinion on this. Take a look at the pic and I hope you stay on board Kurt, I enjoy your input. You will see I only intend showing one bunker lid open, the hinges will be mounted on the front face of cours so the front lid swings forward and the second lid swings rearward. I still have to add one grab slot to the lid. Finally the strip scribed is intended to mount the hinges for #2 opening. btw, I flipped these parts over and redid the lid openings on the flip side so I can easily go back to stock if this does not pan out. hexnut, coxswain, Rossi46 and 5 others 8 Quote Link to comment Share on other sites More sharing options...
jct Posted April 5, 2017 Share #42 Posted April 5, 2017 Hey Len, like the way the aft deck turned out mtaylor, Canute and Rossi46 3 Quote Thx J In process On Hold US Brig Niagara Model Shipways Pinta ...Shipyard, card build; In the Queue HMS Endeavor...Corel; Completed builds Agilis...Steingraeber, Dual build with Popeye USS Hannah...scratch build to something between 1/72 ish and 1/60 ish scale Corel's...Half Moon; USN Picket Boat #1...Model Shipways; Model shipways...18th Century longboat.. Harriet Lane...Model Shipways Henry J Gasser Keeling-and-Clayton-mustang-funny-car Green Elephant Funny car Curtiss Sparrowhawk Link to comment Share on other sites More sharing options...
Blighty Posted April 5, 2017 Author Share #43 Posted April 5, 2017 Thx J, someone with a steadier hand would have smoked it. Canute, mtaylor and Rossi46 3 Quote Link to comment Share on other sites More sharing options...
Cathead Posted April 6, 2017 Share #44 Posted April 6, 2017 Quote No J, Em is my eldest son, aka Rossi46, the stain I used is Royal Walnut, Minwax. Well, that's better than using Elm stain and naming your oldest son Minwax. He'd never forgive you. Model looks great so far. mtaylor, Blighty, Rossi46 and 1 other 4 Quote Eric Current builds: scratchbuilt Missouri River steamboat Peerless (1893); 1:1 scale timber-framed outdoor kitchen Nautical builds (kits): USS Cairo; NRG capstan project; NRG half-hull; Viking longship; US revenue cutter; 18th century longboat; Bounty launch Missouri River craft (scratchbuilt): 1853 Missouri River steamboat Arabia; 1865 steamboat Bertrand; Lewis & Clark barge; keelboat; 1876 steamboat Far West Link to comment Share on other sites More sharing options...
Blighty Posted April 6, 2017 Author Share #45 Posted April 6, 2017 Did a little more work on the coal bunkers, I also scored out the front upper deck instead of planking it. This method seams to work ok for me, better than replanking, I would have probably applied this everywhere if I thought about it earlier. Lesson learned. Bunkers are not glued in yet, however they are a tight fit due to the slots having paint in them against the bulkheads so I figured this offered good enough stability and positioning to go ahead and put a couple of planks on the hull. I'll glue them in tomorrow. Unfortunately I stole quite a few pieces of wood from the Picket kit to finish a few extras o the Chaperon, seemed like a good idea at the time!!!! I'll have to rethink that strategy. Couple of pics. Hope you like 'em. mtaylor, coxswain, Cathead and 9 others 12 Quote Link to comment Share on other sites More sharing options...
jct Posted April 7, 2017 Share #46 Posted April 7, 2017 Nice...I especially like the expose fasteners on the bunker fronts, nice touch Blighty, mtaylor and Canute 3 Quote Thx J In process On Hold US Brig Niagara Model Shipways Pinta ...Shipyard, card build; In the Queue HMS Endeavor...Corel; Completed builds Agilis...Steingraeber, Dual build with Popeye USS Hannah...scratch build to something between 1/72 ish and 1/60 ish scale Corel's...Half Moon; USN Picket Boat #1...Model Shipways; Model shipways...18th Century longboat.. Harriet Lane...Model Shipways Henry J Gasser Keeling-and-Clayton-mustang-funny-car Green Elephant Funny car Curtiss Sparrowhawk Link to comment Share on other sites More sharing options...
Blighty Posted April 7, 2017 Author Share #47 Posted April 7, 2017 3 hours ago, jct said: Nice...I especially like the expose fasteners on the bunker fronts, nice touch Thx J, a firm poke with a pointed file, all done! WackoWolf, jct, mtaylor and 1 other 4 Quote Link to comment Share on other sites More sharing options...
jct Posted April 7, 2017 Share #48 Posted April 7, 2017 Too cool, simple is always best... mtaylor and Canute 2 Quote Thx J In process On Hold US Brig Niagara Model Shipways Pinta ...Shipyard, card build; In the Queue HMS Endeavor...Corel; Completed builds Agilis...Steingraeber, Dual build with Popeye USS Hannah...scratch build to something between 1/72 ish and 1/60 ish scale Corel's...Half Moon; USN Picket Boat #1...Model Shipways; Model shipways...18th Century longboat.. Harriet Lane...Model Shipways Henry J Gasser Keeling-and-Clayton-mustang-funny-car Green Elephant Funny car Curtiss Sparrowhawk Link to comment Share on other sites More sharing options...
Blighty Posted April 11, 2017 Author Share #49 Posted April 11, 2017 I've been side tracked a lot this week with prepping the camper, off camping for the weekend, looking forward to that. However I did get to do some modelling, I've started on the planking which is going ok, but a break from that resulted in me working on the boiler. The only thing different I have attempted is to add oversize rivets, (nails) and brass rings round the boiler asm. Not sure if the rivets will stay, they are more a representation than a true reflection of reality, I'll have to see how they look when the boat is more complete. hexnut, coxswain, Canute and 7 others 10 Quote Link to comment Share on other sites More sharing options...
jct Posted April 11, 2017 Share #50 Posted April 11, 2017 I like the rivets/bolts...they will tie in with the steam plant when you get to it, there are exposed fasteners on it as well...looks like you're going for a natural finish throughout? Canute and mtaylor 2 Quote Thx J In process On Hold US Brig Niagara Model Shipways Pinta ...Shipyard, card build; In the Queue HMS Endeavor...Corel; Completed builds Agilis...Steingraeber, Dual build with Popeye USS Hannah...scratch build to something between 1/72 ish and 1/60 ish scale Corel's...Half Moon; USN Picket Boat #1...Model Shipways; Model shipways...18th Century longboat.. Harriet Lane...Model Shipways Henry J Gasser Keeling-and-Clayton-mustang-funny-car Green Elephant Funny car Curtiss Sparrowhawk Link to comment Share on other sites More sharing options...
Blighty Posted April 12, 2017 Author Share #51 Posted April 12, 2017 Thx all for the likes and interest in my build. J, yes the inside will be natural but right now the exterior of the hull is going to be black, if the planking works out ok I may go natural as well but based on past planking attempts I have needed to much filler not to hide the finish under a coat of paint. The rivets idea were 'borrowed' from a spectacular build of the PB1 I found on another forum, the modeller was a guy named 'crazypoet', check it out, shows how it should be done. Special thx to him for the inspiration. I hope to wrap up the boiler today before our camping trip, I'll post a pic later if any progress worth showing. jct, Canute, mtaylor and 3 others 6 Quote Link to comment Share on other sites More sharing options...
Worldway Posted April 12, 2017 Share #52 Posted April 12, 2017 Len, Looks great, very impressive. I especially like the finish. Can't wait to see more. mtaylor, Canute and Blighty 3 Quote Derek If you want to build a ship, don't drum up the men to gather wood, divide the work and give orders. Instead, teach them to yearn for the vast and endless sea Antoine de Saint Exupery Current Builds Bluenose - Model Shipways - 1:64 Scale Fair American - Model Shipways - 1:48 Scale HMS Winchelsea 1764 - Group Build On Deck Guns of History Naval Smoothbore Deck Gun - 1:24 Scale Finished Builds Mare Nostrum - Artesania Latina - 1:35 Scale Guns of History Carronade - Model Shipways - 1:24 Scale Member of the Nautical Research Guild Link to comment Share on other sites More sharing options...
Blighty Posted April 12, 2017 Author Share #53 Posted April 12, 2017 2 hours ago, Worldway said: Len, Looks great, very impressive. I especially like the finish. Can't wait to see more. You're too kind Derek, thx. mtaylor, Jack12477 and Canute 3 Quote Link to comment Share on other sites More sharing options...
Blighty Posted April 12, 2017 Author Share #54 Posted April 12, 2017 2 hours ago, Azzoun said: Len, I'm stepping in a little late but so far. Definitely a unique perspective. I'll be watching the progress going forward. Joshua Welcome aboard Joshua, I have read your log from start to finish, thanks for the inspiration, hope you like the build, your comments will be most welcome. Jack12477, mtaylor and Canute 3 Quote Link to comment Share on other sites More sharing options...
Blighty Posted April 21, 2017 Author Share #55 Posted April 21, 2017 Hi, I'm back from camping and got all my honey do list cleared out so I found time to do some modelling. The hull planking is going about as expected, badly! gone from plan A, stained wood outer to plan B, black hull to hide the filler, more planking practice I reckon. Still it is fairly smooth and likely more realistic with a black paint camo coat. Finished up the boiler except for a light coat of matt varnish but I've gone for a more showy appearance with bright copper as opposed to aged black. Check out the pic. Thx for following. Cathead, Tigersteve, Rossi46 and 6 others 9 Quote Link to comment Share on other sites More sharing options...
Blighty Posted April 22, 2017 Author Share #56 Posted April 22, 2017 I've lowered the condenser mounting plinths so that I can add a step/seat over the top of it. The rear section scaled height is 30" so a step to assist getting in and out is a high possibility, the condenser will be protected under the seat/step. It's not done yet but when there is something to show I'll post a pic. Thx for looking in. GuntherMT, Cathead, Jack12477 and 2 others 5 Quote Link to comment Share on other sites More sharing options...
Blighty Posted April 24, 2017 Author Share #57 Posted April 24, 2017 I've been busy bashing and rebashing my PB1. First of all I made an error with lowering the condenser stands, I forgot about the drive shaft located below the condenser, now I've lowered it the shaft would go straight through it, so condenser is being relocated. But, more interestingly, Roger Pellett brought up an interesting question in GuntherMT's build log. (If you are into the Picket Boat and currently not following GuntherMT's log, you should be, it's an interesting build). Question was why is the stern rounded on the model when most referene pics have a squared off stern. Kurt offered a very feasible and probable answer to the dilemma. I decided another bit of bashing to fix this inaccuracy which turned out surprisingly easy. I cut off the rear most portion of the upper stern deck and glued an across boat plank, that's about the fill extent of it. The rudder is not effected, the mast has to be relocated but I was going to do that anyhow. So, thx to Roger for bringing that issue up, I think it looks ok even if it is not exact to the sketches available. I have also added an additional bench/step in front of the rear deck, it can be seen in one of the pics, not glued in yet. A couple of pics attached. Thx for checking out my log. Ryland Craze, GuntherMT, Tigersteve and 4 others 7 Quote Link to comment Share on other sites More sharing options...
GuntherMT Posted April 25, 2017 Share #58 Posted April 25, 2017 Interesting adjustment to the stern, and it looks just fine in the view from above. My concern with bashing it myself was how to handle the planking, since the drawing I posted in my log shows a curved under transom. I'm interested in seeing how you handled the hull portion. Canute, Ryland Craze, mtaylor and 1 other 4 Quote Brian Mystery project coming soon! Current build - Medway Longboat Complete - Armed Virginia Sloop Complete - Carmen (First Build) Link to comment Share on other sites More sharing options...
Blighty Posted April 25, 2017 Author Share #59 Posted April 25, 2017 3 hours ago, GuntherMT said: Interesting adjustment to the stern, and it looks just fine in the view from above. My concern with bashing it myself was how to handle the planking, since the drawing I posted in my log shows a curved under transom. I'm interested in seeing how you handled the hull portion. Hi Brian, I think the artist took a littlr licence on the pic you posted, to me, the port does not match the starboard side of the transom. What do you think? My mod to make square is intended to be minimum change at this time, feasible to build and operate but not 100% historically accurate, I may look at further changes later on when I have the floor plan worked out a bit better. I will post a couple of pics of underside to show the transom. Thanks for comment. Jack12477, Canute, GuntherMT and 2 others 5 Quote Link to comment Share on other sites More sharing options...
Blighty Posted April 25, 2017 Author Share #60 Posted April 25, 2017 A couple of pics to show transom from underside with squared off stern and a floor pan proposal I'm considering. What I'm trying to do is create more room around the cannon and generally package the power plant more effectively. Excuse the filler, I'm going to mitre the corners at stern, don't know what I was thinking going straight across, easy to trim off I guess! rafine, mtaylor, WackoWolf and 5 others 8 Quote Link to comment Share on other sites More sharing options...

Recommended Posts
Join the conversation
You can post now and register later. If you have an account, sign in now to post with your account.