T_Warris Posted November 20, 2017 Share #1 Posted November 20, 2017 Hi All! After a short break from building my last wood ship model (30 years) I decided it was time to take on a new project. My previous build was The Bluenose II by ARTESANIA LATINA (below) I bought the Bluenose kit in 1987 and built it over a couple years as a Christmas gift to my father. I had naively thought I would give it to him the year I bought it, but building took far longer than I had anticipated. Somehow this model managed to survive 30 years in a house with several cats. Only once did it hit the floor, breaking the bowsprit, which was almost impossible to repair (can be seen in the image above). For my day job I own a company that produces a unique line of tools for model railroaders. Fast Tracks Hobbyworks Inc. so I'm not new to modeling, but probably an "advanced beginner" at best when it comes to ship building. Last year we bought another business that produces scale stripwood, mostly for model railroaders. Over the last several months I have developed a real urge to build something with wood (probably all that sawdust I've been sucking in since we bought a sawmill...). I decided to dive into a ship model to satisfy that craving. Having a shop full of laser cutters and specialized tools to make stripwood will probably come in handy during the project. Mt. Albert Scale Lumber Anyway, on with the build! After hunting around a bit online I settled on this kit, The Corsair by OcCre. Mainly because it is a bit of a "freelance" design and it would provide a good trial run build before I move onto a more advanced model, whatever that will ultimately be. (providing I get through this one...). Also, I just liked the size and lines of this model. Figured it was a good place to start. Bought this online from Amazon before I realized I could have bought it directly from OcCre on their site. I prefer to buy directly from the manufacturer if possible. I am impressed with the kit so far (starting this build log after working on it for several weeks, so I will have to catch up a bit). One thing I didn't realize is that the instructions in the kit I got are in Italian! Not speaking Italian this is a bit of a hurdle. The kit includes lots of pictures and drawings, so far I am getting by OK with those. But I am suspicious that I am missing some documents as the photo instructions seems to end abruptly when the rigging begins. Other than a 1/2 scale drawing for rigging, there is nothing. I've contacted OcCre to see if I can get English instructions and whether or not something is missing. (I've seen in others build videos that they received English instructions, so I know they exist). If anyone has these let me know! -T. GrandpaPhil and zappto 2 Quote Link to comment Share on other sites More sharing options...
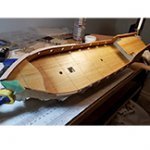
T_Warris Posted November 20, 2017 Author Share #2 Posted November 20, 2017 On to the build! When I started the kit I told myself I wouldn't get too distracted in improving or replacing items in the kit. Having access to laser cutters is very tempting when building models, but as it is also my day job to design and produce stuff on them I thought I would try to not do that all night too. The reason I decided to buy a kit and not scratchbuild was so I didn't have to spend a lot of time back in front of the computer drawing stuff for the laser. Of course that didn't last. I wasn't too impressed with the wood used for the deck planking. Also, to my eye they looked huge, scaling out to about 16"-18" wide. I decided to make some laser cut planks, taking advantage of the laser to add the nail holes and cut them to length. Cut out a pile of them from Basswood, .022" thick. In hindsight, I made them too narrow, a scale 6" wide. But they still look pretty good in place. Gluing in place to the deck. Edges blackened with Pan Pastels. Pan Pastels work pretty good for this, although a bit messy. Wasn't too concerned as I'd be sanding it all down anyway. I've always wanted an excuse to buy one of these little planes! It has not disappointed so far in the build, endlessly useful! Used this to smooth out the deck instead of sanding, left a much smoother surface. Found the colour of basswood a bit too white for a deck, so I stained it with a mixture of Leather Dye and rubbing alcohol (I used this stain extensively on my railroad models). Once dry I added a few coats of a semi-gloss finish. Was pretty happy with the results. Planking done, stained and sealed I glued them all in place to the frame. With that done, on to adding the first layer of planks to the hull.... Fairing completed. A bit of a design flaw in the kit are those pre cut gun ports on the plywood sides. Every build photo I could find online of this kit I can see they plywood cracked right above one of them. Sure enough, it happened to me too. I re-enforced them with some planking, which seemed to hold until the final planking was in place. Can be seen in the image above. I made a bunch of sanding blocks of varying lengths and grits on the laser. These will come in handy when sanding the hull! First couple in place! Progressing through the first layer. Several evenings work so far! Planking on this ship extends all the way to the top, over the laser cut plywood sides. Once the planks were added it provided enough strength to the area that cracked. Smoothed it out as well, barely noticeable. Really enjoying the lines of this model! Breaking up the planking monotony with a few cannons... Boaty McBoatface... That's all for now. Will post another update soon! Thanks for watching, Tim Dog tax Tom E, Rainbow, kier and 4 others 7 Quote Link to comment Share on other sites More sharing options...
T_Warris Posted November 20, 2017 Author Share #3 Posted November 20, 2017 I have no idea how I managed to add all those duplicate and extra images to the post. Can't seem to remove them either, so enjoy! lmagna 1 Quote Link to comment Share on other sites More sharing options...
T_Warris Posted November 21, 2017 Author Share #4 Posted November 21, 2017 Sanded and shaped the hull last evening. Spent the night sneezing! That was a dusty job. Next time, I'll do this job outside. I removed all the nails, that made sanding much easier. Filled all the nail holes with wood filler and will sand that down next. Really happy with the final shape of the hull. There were some very noticeable bulges in the shape of the hull that I corrected while planking. The final sanding took care of the rest. The flow of the ship looks great! OcCre came through with the English instructions! I honestly didn't think they had an English version and that I'd be on my own. Watching some build videos on YouTube I noticed in some of the shots that others seemed to have English documents, so I contacted OcCre on the weekend. Overnight they emailed a PDF with the English version. Got my respect! The kit included some cast windows and doors. To me they look crude and would likely still look crude even after painting, so I decided to made some new ones. I scanned the castings and recreated them in Coreldraw so they could be laser cut. Cut from some .8mm and .4mm ply, once built up they look much better! I'll add some frosted glass to them when installed. Haven't decided whether I'll paint the frames or leave them wood. To break up the monotony of planking I have been piecing together the 16 cannons in the kit. Coloured with Pan Pastels. Like the looks of this. What I didn't like that much are the solid brass turned wheels included with the kit. I prefer the look of wood wheels, so back to the laser! Drew these up in Coreldraw and cut from 2mm and 1.5mm ply. The blue lines are lightly etched to simulate the rivets. Once in place on the cannons I think they look pretty good. Thumb for scale. Next step is the second layer of planking. It's been a while since I have done this and am doing a lot of research on the best way forward. AntonyUK, Heronguy, Tom E and 2 others 5 Quote Link to comment Share on other sites More sharing options...
AntonyUK Posted November 22, 2017 Share #5 Posted November 22, 2017 (edited) Hi Tim. Very nice work with some brilliant scratch bits being put in. Your dog is such a cuitie. Do you have your own laser cutter ?. Gonna follow along with this build...seat booked. Regards Antony. Edited :- I've just read your introduction log.. Yes you do have a laser cutter. Edited November 23, 2017 by AntonyUK Quote Best advice ever given to me."If you don't know ..Just ask. Completed Mayflower Completed Fun build Tail boat Tailboat Completed Build Chinese Junk Chinese Pirate Junk Completed scratch built Korean Turtle ship 1/32 Turtle ship Completed Santa Lucia Sicilian Cargo Boat 1/30 scale Santa Lucia On hold. Bounty Occre 1/45 Completed HMS Victory by DeAgostini modelspace. DeAgostini Victory Cross Section Completed H.M.S. Victory X section by Coral. HMS Victory cross section Completed The Black Pearl fun build Black Queen Completed A large scale Victory cross section 1/36 Victory Cross Section Link to comment Share on other sites More sharing options...
T_Warris Posted November 27, 2017 Author Share #6 Posted November 27, 2017 I finished assembling all the cannons. Haven't decided yet if I will add the rigging to the cannons or not. With the first layer of planking complete, I have started on the second layer. I decided to replace the wood in the kit with some .5mm walnut. I prefer the rich look of walnut and since this model really isn't based on any real ship I figured I have the leeway to do what I want with it. Cutting Black Walnut Stripwood video on YouTube The link above will show how the walnut stripwood was cut. (I can't see any way to embed a YouTube video into a post here...) After starting the first strip of planking I noticed that somehow I got the keel glued on VERY crooked. No idea how that happened, I checked it a bunch of different ways when gluing it on. I used Epoxy to glue it in place, and I suspect it moved while it was curing. I debated leaving it and hoping it wouldn't be that noticeable, but in the end I caved and decided to crack it off and make a new one. I made the new keel from some .190" Black Walnut board I prepared and laser cut it. Had to grind down a few spots to get it to fit correctly. The second time around I got it straight! Much better. Had I left it it would have certainly made me nuts.... Made good progress on the second layer of planking over the weekend. I suspect I'll get it finished up this week. Curious if anyone else uses a hot iron to cure wood glue quickly? The first ship I built several years ago was done at a time when I was flying R/C planes. Having a small iron used to shrink wing coating I used it to quickly cure wood glue. With this build I bought another iron for the same purpose. It only takes a few seconds of heat to cure the glue. Once it cools it is very securely bonded. Works great and also will help press the wood down and into shape. Nice freshly ironed flat planks! zappto, hexnut, Tom E and 4 others 7 Quote Link to comment Share on other sites More sharing options...
zappto Posted November 27, 2017 Share #7 Posted November 27, 2017 Very nice work indeed, i like your planking, keep up good work! T_Warris 1 Quote Current build: Mamoli - La gloire 1778 Finished builds: Mamoli - Friesland 1663 Mamoli - Lexington 1776 Link to comment Share on other sites More sharing options...
T_Warris Posted November 28, 2017 Author Share #8 Posted November 28, 2017 Made good progress last evening, all but 5 rows to go! I suspect I should be able to finish it up tonight. I suspect this isn't quite the way it should have been done, but it's been a good learning experience and I'm looking forward to the next project and doing it again. (once this one is done...) Tom E, hexnut, Rainbow and 1 other 4 Quote Link to comment Share on other sites More sharing options...
donrobinson Posted November 29, 2017 Share #9 Posted November 29, 2017 Very nice start, looking forward to seeing more. What kind of glue are you using that cures with heat? Quote Completed: MS-AVS, Amati Trabaccolo, Dusek ship's boat, AL-Mayflower, Batelina - MarisStella, MarisStella-Trabakul Liburnian Novilara - MarisStella, 17th Century Battle Station, Ragusian Galley-MarisStella Current: Barque Stefano - MarisStella, On Hold: Amati Pegasus Link to comment Share on other sites More sharing options...
T_Warris Posted November 29, 2017 Author Share #10 Posted November 29, 2017 Noting special, all wood glues cure with heat. Quote Link to comment Share on other sites More sharing options...
T_Warris Posted November 29, 2017 Author Share #11 Posted November 29, 2017 Long day at the day job left only an hour or so for the shipyard. Slow going on the last few planks, but getting closer! AntonyUK, kier and modlerbob 3 Quote Link to comment Share on other sites More sharing options...
AntonyUK Posted November 29, 2017 Share #12 Posted November 29, 2017 Hi Tim. Nice work on the planking. Make a nice soft cradle to protect your planking. It's gonna get trashed if you leave it on your current cradle. Never used heat to cure wood glue before... might just give that a go on my next build. Regards Antony. Quote Best advice ever given to me."If you don't know ..Just ask. Completed Mayflower Completed Fun build Tail boat Tailboat Completed Build Chinese Junk Chinese Pirate Junk Completed scratch built Korean Turtle ship 1/32 Turtle ship Completed Santa Lucia Sicilian Cargo Boat 1/30 scale Santa Lucia On hold. Bounty Occre 1/45 Completed HMS Victory by DeAgostini modelspace. DeAgostini Victory Cross Section Completed H.M.S. Victory X section by Coral. HMS Victory cross section Completed The Black Pearl fun build Black Queen Completed A large scale Victory cross section 1/36 Victory Cross Section Link to comment Share on other sites More sharing options...
T_Warris Posted November 29, 2017 Author Share #13 Posted November 29, 2017 Good point about the cradle. I quickly made that one up on the laser. Hard to see in the images, but the inside edges of the cradle are covered with foam. Heating the wood while planking works extremely well, while pressing the plank in place with the small iron it completely cures the glue. 5 seconds is the same as 24 hours with a clamp. Can't be removed. I've been using this technique for other wood models for years with great results. Sort of like iron on planks... AntonyUK 1 Quote Link to comment Share on other sites More sharing options...
Heronguy Posted November 29, 2017 Share #14 Posted November 29, 2017 11 minutes ago, T_Warris said: Heating the wood while planking works extremely well, while pressing the plank in place with the small iron it completely cures the glue. 5 seconds is the same as 24 hours with a clamp. Can't be removed. I've been using this technique for other wood models for years with great results. Sort of like iron on planks... I can see this working for 2nd planking using .5mm thick planks - do you also do this for 1st planking? If you do, does it work as well and do you glue along the edges of the planks as well as at the bulkheads? Your planking looks really good. Good save on the stem! Quote Doug Current Builds: Bluenose II - AL / Krabbenkutter / Prince de Neufchatel / Essex Cross-section / Syren / Barque Stefano / Winchelsea / Half Hull / Maria HF31 - Dusek / Bandirma - Turkmodel On the Shelf: Santisima Trinidad and Cross Section / HMS Cutter Alert / Tender AVOS / Confederacy Suspended Build: Bluenose II - Billing Boats Nr 600 Link to comment Share on other sites More sharing options...
T_Warris Posted November 29, 2017 Author Share #15 Posted November 29, 2017 Only suitable on pretty thin wood. Works great for deck planking and second planking, but on heavier wood it is hard to get the heat to transfer through. Heronguy 1 Quote Link to comment Share on other sites More sharing options...
Heronguy Posted November 29, 2017 Share #16 Posted November 29, 2017 4 hours ago, T_Warris said: Only suitable on pretty thin wood. Works great for deck planking and second planking, but on heavier wood it is hard to get the heat to transfer through. Makes sense. Thanks for the info Quote Doug Current Builds: Bluenose II - AL / Krabbenkutter / Prince de Neufchatel / Essex Cross-section / Syren / Barque Stefano / Winchelsea / Half Hull / Maria HF31 - Dusek / Bandirma - Turkmodel On the Shelf: Santisima Trinidad and Cross Section / HMS Cutter Alert / Tender AVOS / Confederacy Suspended Build: Bluenose II - Billing Boats Nr 600 Link to comment Share on other sites More sharing options...
T_Warris Posted November 30, 2017 Author Share #17 Posted November 30, 2017 One side of the hull finished! kier, Heronguy, AntonyUK and 1 other 4 Quote Link to comment Share on other sites More sharing options...
T_Warris Posted December 2, 2017 Author Share #18 Posted December 2, 2017 The second layer of planking is complete! Went a lot quicker than I had expected, done in about 4 evenings, perhaps 8 hours in total. The ironing technique speeds things up quite a bit, basically iron on planks.... I quite enjoyed the zen like process of planking. I suspect there are some inaccuracies in how I did it, that will improve on the next model. The final little strip of plank pressed in place. Still have not sanded it down yet, will take it into my shop to do that. It was dusty enough last time doing the first layer of planks in the house! Pile-o-cannon await! On to the next phase of the build! Tom E 1 Quote Link to comment Share on other sites More sharing options...
T_Warris Posted December 5, 2017 Author Share #19 Posted December 5, 2017 A bit more progress tonight. Hard to believe fitting these few boards took an entire evening! lmagna, AntonyUK and kier 3 Quote Link to comment Share on other sites More sharing options...
T_Warris Posted December 18, 2017 Author Share #20 Posted December 18, 2017 Hi, Lots accomplished since my last post! Hull completed and most of the trim added... Final sanding complete. A quick coat of antique oil really makes the black walnut planking look great! Fitting this around the stern was a bit of a challenge, but got it after a few tries. Most of the hull trim added and rubbed down with antique oil. I made up some laser cut frames to go around the gunports, looks a bit better then just the planking and hides a few bad cuts. Starting to come together! Placed the cannons on the deck to get a feel for what it will look like. Tom E, Altduck, Rainbow and 1 other 4 Quote Link to comment Share on other sites More sharing options...
T_Warris Posted December 19, 2017 Author Share #21 Posted December 19, 2017 Fit the rudder hinges in place last evening. This went a lot easier than I had anticipated. Still a bit of a challenge, but turned out pretty good. Later in the build I will airbrush these, not happy with that shiny brass look... Heronguy, Magellan1520, AntonyUK and 1 other 4 Quote Link to comment Share on other sites More sharing options...
Jim Rogers Posted December 19, 2017 Share #22 Posted December 19, 2017 Looks great. Love the laser cut trenails. Quote Regards, Jim Rogers Damn the Torpedoes , Full speed ahead. Adm David Farragut. Link to comment Share on other sites More sharing options...
Snow Posted January 19, 2018 Share #23 Posted January 19, 2018 Nice work I'm about to start the occre diana 1/85 scale. Interested to see how this one looks cheers Quote Link to comment Share on other sites More sharing options...
T_Warris Posted September 15, 2019 Author Share #24 Posted September 15, 2019 It's been some time since an update. Over the last month or so I've returned to the project after a long break triggered by the death of my little dog and friend. After that I just didn't feel like working on the project without him sitting at my feet. But, now I'm back at the project and thought I'd post a progress update. I bought a kit online (where escapes me at the moment) to replace the crude metal cast launch included in the kit. This proved to be a very challenging build! But worth the effort once done. It turned out quite well. Like a lot of the casting in the kit I wasn't satisfied with their quality. Having a shop full of laser cutters available I reworked the windows on the stern of the ship with finer looking laser cut wood. Again, this was worth the effort as they look much better when installed in place. Figuring out how to tie the various knots needed... Still lots to learn. Saying goodbye to my friend. I designed and built a motorized serving machine which seems to work well! Haven't used it a lot as yet, but anticipate getting lots of use of it shortly. Foremast almost complete and ready to put in place. Deadeyes installed. I realized after that I had these inverted and have since fixed them... BenD, american, GrandpaPhil and 1 other 4 Quote Link to comment Share on other sites More sharing options...

Recommended Posts
Join the conversation
You can post now and register later. If you have an account, sign in now to post with your account.