josh44 Posted March 30, 2019 Share #1 Posted March 30, 2019 I needed a few weeks to get clean from my addiction to build logs for MSW. But now its time to feed the monkey on my back.. I'm going to make another gift - this time for my nephew Max, also for his Bar Mitzvah. Like many boys his age, Fortnite is a way of life. (If any of you dont know what Fortnite is, then I would surmise that you probably dont have a 9-19 year old human boy in your your life's orbit.) I am choosing the Fortnite Pirate Ship for him. This Ship is rather boxy, with lots of straight lines, and basically no rigging except for shrouds ratlines. Dont ask me how it is sailed, or even how anyone gets up to the crow's nest: It's a computer game ship, and Fortnite knows best! Since it is animated and fictional, it is liberated from certain restraints of physics and reality. This can be a good thing for the SIB builder: fewer rigging lines to tangle, and simpler sails (Yay!!). But it can also get a little fanciful and tricky: I mean, look at the railing, and all the detail on the hull; and the octopus on the bow! This japanes whiskey bottle is just boxy enough!! The plans and hull blank from bass wood. Will add the top of the sterncastle later on! druxey, Omega1234, CDW and 5 others 8 Quote My Scratch-built models are: Schooner Annie - BOTTLE (FINISHED) Sloop of War Alaska - BOTTLE (FINISHED) Flying Dutchman - BOTTLE (FINISHED) Fortnite Pirate Ship - BOTTLE (FINISHED) Gulet Princess Lila - BOTTLE (FINISHED) Schooner Caroline - BOTTLE (FINISHED) Whaling Ship Jeroboam - BOTTLE (FINISHED) Endicott Pond Boat - BOTTLE - (FINISHED) Parsifal III Ketch Sail Yacht - BOTTLE (FINISHED) Shohei Maru Japanese Warship - BOTTLE (FINISHED) Santa Maria - RESTORATION (FINISHED) Link to comment Share on other sites More sharing options...
josh44 Posted April 2, 2019 Author Share #2 Posted April 2, 2019 (edited) I keep 1/16" dowels as the masts. Brass eyelets do just fine. No hinges for this baby! I think these are 3/32" dowels - the smallest I have found. Fine for small yards. I really struggled with the crow's nest. Many botched attempts with bass wood, balsa, and card. Ship is painted with primer. Burnt Sienna, and scratched / etched on planking. I figure the planking on the "real" ship is animated, so its ok for me to animate it as well. 1/32" cherry strips will do much of the side ribbing. ANYONE KNOW WHAT THAT SIDE RIBBING ON A SHIP IS PROPERLY CALLED? Oh yeah - and that blob of clay will eventually become the octupus on the bow! Crow's nest: A hybrid of balsa base, brass rods, and card top. Too thick? It'll do for now. The sterncastle is made separately. I will do all the trimmings and decorations as one piece; but fully loaded, this ship won't fit into a bottle which sports only a 17mm aperture. I have a new plan to help me better assemple the ship inside the bottle, without the messy glue. Next: Railing, stairs, and sails... maybe Edited April 2, 2019 by josh44 forgot about the clay :) mtaylor, CaptainSteve, IgorSky and 3 others 6 Quote My Scratch-built models are: Schooner Annie - BOTTLE (FINISHED) Sloop of War Alaska - BOTTLE (FINISHED) Flying Dutchman - BOTTLE (FINISHED) Fortnite Pirate Ship - BOTTLE (FINISHED) Gulet Princess Lila - BOTTLE (FINISHED) Schooner Caroline - BOTTLE (FINISHED) Whaling Ship Jeroboam - BOTTLE (FINISHED) Endicott Pond Boat - BOTTLE - (FINISHED) Parsifal III Ketch Sail Yacht - BOTTLE (FINISHED) Shohei Maru Japanese Warship - BOTTLE (FINISHED) Santa Maria - RESTORATION (FINISHED) Link to comment Share on other sites More sharing options...
josh44 Posted April 12, 2019 Author Share #3 Posted April 12, 2019 So for this ship, I needed to figure out how to raise masts without the use of rigging as pulleys; and also how to build a taller and wider ship than the bottle neck of only 17mm. The answer is arriving in the form of tiny magnets! 7/16 x 1/10" disc magnets to hold the sterncastle to the quarterdeck! snaps right on! Will make assemly inside the bottle much easier! Miniature details are not my bag, but it'll have to do. An initial attempt, with railing and the octopus at the bow. I couldnt mimic alls the teensy tiny rails, so I chose instead for the illusion of beautiful rails, by using woodens strips painted with iridescent bronze. For the mizzen shrouds here , I decided to attach them via tiny 1/16 x 1/16" magnets to the quarter deck. For the main deck shrouds: the same 1/16" magnets sunk into the main deck. These are the corresponding magnet planks that will be attached to the Main Mast Shrouds. Here they are - waiting for another magetic match! They snap right down into place! Where we are so far. The idea is to make as much assembly inside the bottle as easy as possible, without all the glue and such. Yards (with sails) will be glued to the masts, once the latter are fixed in the bottle. IgorSky, GrandpaPhil, CDW and 3 others 6 Quote My Scratch-built models are: Schooner Annie - BOTTLE (FINISHED) Sloop of War Alaska - BOTTLE (FINISHED) Flying Dutchman - BOTTLE (FINISHED) Fortnite Pirate Ship - BOTTLE (FINISHED) Gulet Princess Lila - BOTTLE (FINISHED) Schooner Caroline - BOTTLE (FINISHED) Whaling Ship Jeroboam - BOTTLE (FINISHED) Endicott Pond Boat - BOTTLE - (FINISHED) Parsifal III Ketch Sail Yacht - BOTTLE (FINISHED) Shohei Maru Japanese Warship - BOTTLE (FINISHED) Santa Maria - RESTORATION (FINISHED) Link to comment Share on other sites More sharing options...
josh44 Posted April 19, 2019 Author Share #4 Posted April 19, 2019 After a seven day hiatus - which feels like 18 months for this impatient builder - I am ready to proceed and approach the launch. As mentioned, the absence of rigging makes the ships construction simpler, but also challenging in a novel sort of way. I planned to make well-designed prefabricated parts, and hopefully assemble them all convincingly, once the ship was inside the bottle. I was really stuck on how to make the octopus figurehead. I started with clay, but was really struggling with the arms: This speaks for itself. Then I had the idea to use small brass rods for the arms. I was considering painting the brass arms brown to match the "real" ship from Fortnite. Instead, I took poetic license - which is often a SIB prerogative - and painted the whole figrehead bronze. Instead of mounting the always-confounding rods to raise the ship the proper height, I simply plastic welded a block of wood, painted the approximate color of the forthcoming ocean. At this point I was very happy with my magnets for the main and mizzen masts and shrouds. But having run out of said magnets, I decided the lightly glue the fore shroud planks for the construction, then lovingly rip them off. The ship passed easily through, and was CA'd to the mounting block. And here she sits, with most pieces at the ready. Next and Lastly: I will insert the pieces from aft to fore, and attach masts with sails as I go. Hopefully the figurehead will slide right on... IgorSky, CaptainSteve, GrandpaPhil and 3 others 6 Quote My Scratch-built models are: Schooner Annie - BOTTLE (FINISHED) Sloop of War Alaska - BOTTLE (FINISHED) Flying Dutchman - BOTTLE (FINISHED) Fortnite Pirate Ship - BOTTLE (FINISHED) Gulet Princess Lila - BOTTLE (FINISHED) Schooner Caroline - BOTTLE (FINISHED) Whaling Ship Jeroboam - BOTTLE (FINISHED) Endicott Pond Boat - BOTTLE - (FINISHED) Parsifal III Ketch Sail Yacht - BOTTLE (FINISHED) Shohei Maru Japanese Warship - BOTTLE (FINISHED) Santa Maria - RESTORATION (FINISHED) Link to comment Share on other sites More sharing options...
Omega1234 Posted April 21, 2019 Share #5 Posted April 21, 2019 Hi Josh I think you’re having too much fun with this ship! I don’t blame you, either, because it looks great. Gotta love the octopus. Cheers Patrick mtaylor, IgorSky and CaptainSteve 3 Quote MY SCRATCH BUILT MODELS ARE: Splendid Mega Yacht https://modelshipworld.com/topic/28576-splendid-by-omega1234-scale-1500-mega-yacht/ Majestic Mega Yacht https://modelshipworld.com/topic/28483-mega-yacht-majestic-by-omega1234-miniature/ Sapphire Mega yacht https://modelshipworld.com/topic/21088-sapphire-by-omega1234-1388-scale-mega-yacht-66m-8-inch-hull-length/?tab=comments#comment-639898 Genesis - Supersports Mega Yacht https://modelshipworld.com/topic/18168-genesis-by-omega1234-1300-49m-mega-yacht-8-inches-long-finished/?tab=comments#comment-559026http://modelshipworld.com/index.php/topic/14141-shadow-by-omega1234-scale-1300-luxury-60m-mega-yacht-8-inches-long/ SHADOW Luxury Motor Yacht http://modelshipworld.com/index.php/topic/11384-majellan-by-omega1234-luxury-37-metre-motor-yacht-miniature-7-inches-approx/ Majellan Luxury Motor Yacht http://modelshipworld.com/index.php/topic/9261Rainbow-j-class-racing-yacht/?p=273543 Rainbow J Class Racing Yacht Mystic Classic Motor Cruiser Symphony Ingomar Schooner: Scratch build Dorade Schooner: <p> Lennox Restoration Warship http://modelshipworld.com/index.php/topic/9577-pandora-cutaway-dockyard-style-miniature/?hl=pandora Link to comment Share on other sites More sharing options...
IgorSky Posted April 21, 2019 Share #6 Posted April 21, 2019 Hi, Josh! Interesting project! I look forward to continuing. Good luck! Igor. CaptainSteve and Omega1234 2 Quote My models in PROGRESS: Three-mast schooner ATLANTIC - BOTTLE - 1/600 Scale , Captain Jack Sparrow arrives in Port Royal - BOTTLE - Scale 1/72 My COMPLETED models: Boat with pirates - 1/72 scale - BOTTLE, Pilot cutter Jolie Brise - BOTTLE - Scale 1/240, Yacht J-class - BOTTLE - Scale 1/300 , Mini SIB - Yacht Jolie Brise and Lighthouse Fastnet Rock – BOTTLE – Scale 1/3000 , Schooner AMERICA - BOTTLE - scale ̴ 1/800 , Mini SIB - J-class Yacht - BOTTLE - scale 1/1000 , The Old Man and The Sea - BOTTLE - Scale 1/72 , Steam schooner LENA - BOTTLE - scale 1/290 , Koch - Russian polar ship - BOTTLE - 1/1000 , Typical boat of Mediterranean Sea - BOTTLE - Scale 1/200 , Lifeboat RS1 Colin Archer - BOTTLE - scale 1/230 , Yacht Spray of Captain Joshua Slocum - BOTTLE - 1/350 Scale , Two-mast yacht - BOTTLE - 1/1000 Scale My GALLERIES: Noname yacht-in-bottle, Two-mast yacht in bottle 1/1000 Scale, Yacht Spray of Captain Joshua Slocum - BOTTLE - 1/350 Scale, Mini SIB 001 - BOTTLE, Mini SIB 002 Catalan Ship - BOTTLE, Mini SiB 003 Typical boat of Mediterranean Sea 1/200 - BOTTLE, Koch - Russian polar ship - BOTTLE - 1/1000, Mini SIB 004 - 3 mast schooner Link to comment Share on other sites More sharing options...
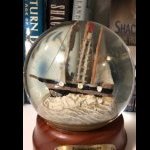
josh44 Posted April 21, 2019 Author Share #7 Posted April 21, 2019 (edited) The Home Stretch! So I definitely hit a few snags with the in bottle work - Shocker, I know!! But first I can show that the little magnets workes just as planned: First the sterncastle snapping right on! IMG_8271.MOV Then the Mizzen mast with the magnetic shroud planks - also finding their mates. IMG_8273.TRIM.MOV Looks like this. What I did not plan well enough was how to attach the yards to the masts. I anticipated simple glueing, but the yards didnt really stick to the masts as I had thoughtl and they fell dozens of times. And since my Silicone Sea was still a bit wet, the yards, sails, and sometimes masts, kept falling into the liquid rubber ooze, until everything on the ship was coated in a thin patina of goo. It did give it a salt sprayed look I suppose... Fianlly after far more hours than I cared to spend, I figured out to drill a few small posts to support the yards. I was going for a drill-free buils, but it was not to be. I added the pendants. But - the octopus figurehead didnt go on so easily and eventually after too many attempts, fell apart!!! <Very sad Bitmoji, indeed!> Eventually I figured out to attahc the larger half, and then glue the other. But my original octopus really did mimic the fortnite ship; now, it resembles a giant, golden meatball with spaghetti!! The spaghetti and meatball octopus figurehead!! My nephew is gonna love it! Thanks for reading! Edited April 21, 2019 by josh44 duplicated pics GrandpaPhil, CDW, mtaylor and 4 others 7 Quote My Scratch-built models are: Schooner Annie - BOTTLE (FINISHED) Sloop of War Alaska - BOTTLE (FINISHED) Flying Dutchman - BOTTLE (FINISHED) Fortnite Pirate Ship - BOTTLE (FINISHED) Gulet Princess Lila - BOTTLE (FINISHED) Schooner Caroline - BOTTLE (FINISHED) Whaling Ship Jeroboam - BOTTLE (FINISHED) Endicott Pond Boat - BOTTLE - (FINISHED) Parsifal III Ketch Sail Yacht - BOTTLE (FINISHED) Shohei Maru Japanese Warship - BOTTLE (FINISHED) Santa Maria - RESTORATION (FINISHED) Link to comment Share on other sites More sharing options...
mtaylor Posted April 22, 2019 Share #8 Posted April 22, 2019 I think he will love it. Just don't tell him it's spaghetti and meatballs instead of an octopus. CaptainSteve and Omega1234 2 Quote Mark "The shipwright is slow, but the wood is patient." - me Current Build: Past Builds: La Belle Poule 1765 - French Frigate from ANCRE plans - ON HOLD Triton Cross-Section NRG Hallf Hull Planking Kit HMS Sphinx 1775 - Vanguard Models - 1:64 Non-Ship Model: On hold, maybe forever: CH-53 Sikorsky - 1:48 - Revell - Completed Licorne - 1755 from Hahn Plans (Scratch) Version 2.0 (Abandoned) Link to comment Share on other sites More sharing options...
CaptainSteve Posted April 22, 2019 Share #9 Posted April 22, 2019 Awesome !! What a fun build. Please make sure you upload some photos of when you present it to your nephew. Omega1234 and mtaylor 2 Quote CaptainSteve Current Build: HM Granado Bomb Vessel (Caldercraft) My BathTub: Queen Anne Barge (Syren Ship Models) Log: Queen Anne Barge (an build log) Bounty Launch (Model Shipways) Log: Bounty Launch by CaptainSteve Apostol Felipe (OcCre) HMS Victory (Constructo) Check It Out: The Kit-Basher's Guide to The Galaxy Website: The Life & Boats of CaptainSteve Link to comment Share on other sites More sharing options...
josh44 Posted April 22, 2019 Author Share #10 Posted April 22, 2019 On 4/21/2019 at 4:32 AM, Omega1234 said: Hi Josh I think you’re having too much fun with this ship! I don’t blame you, either, because it looks great. Gotta love the octopus. Cheers Patrick thanks, Patrick! It was a fun build - until the octopus exploded. looking forward to more of your builds. CaptainSteve, mtaylor and Omega1234 3 Quote My Scratch-built models are: Schooner Annie - BOTTLE (FINISHED) Sloop of War Alaska - BOTTLE (FINISHED) Flying Dutchman - BOTTLE (FINISHED) Fortnite Pirate Ship - BOTTLE (FINISHED) Gulet Princess Lila - BOTTLE (FINISHED) Schooner Caroline - BOTTLE (FINISHED) Whaling Ship Jeroboam - BOTTLE (FINISHED) Endicott Pond Boat - BOTTLE - (FINISHED) Parsifal III Ketch Sail Yacht - BOTTLE (FINISHED) Shohei Maru Japanese Warship - BOTTLE (FINISHED) Santa Maria - RESTORATION (FINISHED) Link to comment Share on other sites More sharing options...
josh44 Posted April 22, 2019 Author Share #11 Posted April 22, 2019 11 hours ago, CaptainSteve said: Awesome !! What a fun build. Please make sure you upload some photos of when you present it to your nephew. Thank you, Steve! I will try to capture the moment, but as you all may know, we probably shouldn't over estimate how civilians feel about our builds... <insert whaddayagonnado emoji here!> CaptainSteve, mtaylor and Omega1234 3 Quote My Scratch-built models are: Schooner Annie - BOTTLE (FINISHED) Sloop of War Alaska - BOTTLE (FINISHED) Flying Dutchman - BOTTLE (FINISHED) Fortnite Pirate Ship - BOTTLE (FINISHED) Gulet Princess Lila - BOTTLE (FINISHED) Schooner Caroline - BOTTLE (FINISHED) Whaling Ship Jeroboam - BOTTLE (FINISHED) Endicott Pond Boat - BOTTLE - (FINISHED) Parsifal III Ketch Sail Yacht - BOTTLE (FINISHED) Shohei Maru Japanese Warship - BOTTLE (FINISHED) Santa Maria - RESTORATION (FINISHED) Link to comment Share on other sites More sharing options...
josh44 Posted April 22, 2019 Author Share #12 Posted April 22, 2019 12 hours ago, mtaylor said: I think he will love it. Just don't tell him it's spaghetti and meatballs instead of an octopus. Thanks Mark, that's a good call - in the world of fortnite, i think the crazier the better! mtaylor, CaptainSteve and Omega1234 3 Quote My Scratch-built models are: Schooner Annie - BOTTLE (FINISHED) Sloop of War Alaska - BOTTLE (FINISHED) Flying Dutchman - BOTTLE (FINISHED) Fortnite Pirate Ship - BOTTLE (FINISHED) Gulet Princess Lila - BOTTLE (FINISHED) Schooner Caroline - BOTTLE (FINISHED) Whaling Ship Jeroboam - BOTTLE (FINISHED) Endicott Pond Boat - BOTTLE - (FINISHED) Parsifal III Ketch Sail Yacht - BOTTLE (FINISHED) Shohei Maru Japanese Warship - BOTTLE (FINISHED) Santa Maria - RESTORATION (FINISHED) Link to comment Share on other sites More sharing options...

Recommended Posts
Join the conversation
You can post now and register later. If you have an account, sign in now to post with your account.