josh44 Posted April 29, 2019 Share #1 Posted April 29, 2019 Hello All, After the last SIB built wihtout any running lines, I really began to miss the the hinges and the rigging. This next build will be a Bat Mitzva gift for my niece Lila (twin to Max - he of the FORTNITE Pirate Ship), and will the last in this particular series of gifts! I found a gulet called the Princess Lila, a luxury yacht, available for charter in Turkey and Croatia. A gulet is a traditional design of a two-masted or three-masted wooden sailing vessel from the southwestern coast of Turkey. I believe that this is a ketch. I also saw the Gulet Queen Lila, but the family here liked the looks of the Princess better. As is typical for SIB building, I pick the inspiration (or recipient), then the ship, and then the bottle to match. I really like this old Kessler's whisky bottle, with the fancified diamond glasswork! I typically remove the back label, but try to leave on the front and any other labels to demonstrate the bottle's heritage or provenance. That was my plan here. The Boss, well, she did not approve of me keeping on any such ratty things for our niece, and admonished me thusly, "She's a 13-year old girl, not a 50-year old man! Take off all the labels. And make sure that thing is crystal clear!" She's right, of course. Although I made saggitical slices for the USS Alaska, that was really roughshod. This time I planned them out a bit more properly. Still a bit rushed but not too bad for this impatient SIB maker. These saggital cuts are what are used in the italian and japanese kits, the latter being my favorite. The american kits just hull blanks for whittling and sanding. I had been doing the blanks, but I think after this Gulet, I have been converted to the slices. It allows for a more finessed hull shape during the sanding phase. Next: Hull and deck fabrication GrandpaPhil, ccoyle, Omega1234 and 1 other 4 Quote My Scratch-built models are: Schooner Annie - BOTTLE (FINISHED) Sloop of War Alaska - BOTTLE (FINISHED) Flying Dutchman - BOTTLE (FINISHED) Fortnite Pirate Ship - BOTTLE (FINISHED) Gulet Princess Lila - BOTTLE (FINISHED) Schooner Caroline - BOTTLE (FINISHED) Whaling Ship Jeroboam - BOTTLE (FINISHED) Endicott Pond Boat - BOTTLE - (FINISHED) Parsifal III Ketch Sail Yacht - BOTTLE (FINISHED) Shohei Maru Japanese Warship - BOTTLE (FINISHED) Santa Maria - RESTORATION (FINISHED) Link to comment Share on other sites More sharing options...
josh44 Posted May 9, 2019 Author Share #2 Posted May 9, 2019 The fore and main masts were made with brass rods and cord ends, painted white. Hinges for the masts as in the Annie, Alaska, and Flying Dutchman. I didnt like the distressed, grayed hull on the real Lila, and I kept trying to find a good color Man, did I struggle. Still do. I laid down a mahogany strip deck - not too fancy at all. Found a bunch of great photo etched rails online. Once again I tip my cap to Igorsky for the idea. teensy tinsy magnets at the stern railingWill magnetically attach the sun roof - but only AFTER the ship is launched in the bottle, and AFTER the sails are lifted! Like so: IMG_0043.MOV Now, the rigging on this I found to be fairly hard to plan. You wouldnt think with the simple design. But with the sparse, clean sail plan, I needed to reconfigure the rigging a bit more than I typically do. First I needed to make and attach the stern's little motor boat and gangplank; this came out better than most of my miniatures. I also embellished the sun roof with a design that will complement the sails. Struggling with another color, but I think it'll do. Because the masts are 1.19mm brass - and I havent yet figured how to drill top dead center in them - I eschewed the typical drill holes for rigging and yards. Instead I glued or plastic welded bead ends and cord ends as pass through and tie holes. Add a bow plank sprit, some more photo etched rails to the stern plank, and here we are. Ok... Its still looking more like a tug boat than a Turkish Yacht, but for the first time, I am feeling optimistic about this taking shape!! mtaylor, GrandpaPhil and Omega1234 3 Quote My Scratch-built models are: Schooner Annie - BOTTLE (FINISHED) Sloop of War Alaska - BOTTLE (FINISHED) Flying Dutchman - BOTTLE (FINISHED) Fortnite Pirate Ship - BOTTLE (FINISHED) Gulet Princess Lila - BOTTLE (FINISHED) Schooner Caroline - BOTTLE (FINISHED) Whaling Ship Jeroboam - BOTTLE (FINISHED) Endicott Pond Boat - BOTTLE - (FINISHED) Parsifal III Ketch Sail Yacht - BOTTLE (FINISHED) Shohei Maru Japanese Warship - BOTTLE (FINISHED) Santa Maria - RESTORATION (FINISHED) Link to comment Share on other sites More sharing options...
josh44 Posted May 11, 2019 Author Share #3 Posted May 11, 2019 After being completely awed by a post by Fried Clams on his Stonington Dragger, I decided to scrape down the acrylic paint on the hull and try some india ink. Being an impatient SIB builder, evrything is a bit rushed. Still some of the original acrylic and latex Im afraid. I mixed brown and black. I like the color and authentic feel, but still too rough and splotchy. Next time ill apply it miixed with alchohol and NOT AFTER i scrape off 5 layers of paint and varnish! The sails came out better than expected. These are what will make the ship Pop. I started with silk for the running rigging, in case i needed to glue the sails on. For the standing rigging i use wireline, which does not take glue so well. In retrospect, i could have used the nylon fireline for everything. Maybe Ill change it later.. With some 1/700 Photo etched railing on the port side. and on the starboard side. And because i cant leave well enough alone I attached some mahogany strips as ribbing. These are 3/64'; i wish i has used my 1/32" strips. Oh well - "NEXT TIME": the most useful expression in SIB building! Next post I expect to have the Launch and finishing touches. Thanks! GrandpaPhil, mtaylor and Omega1234 3 Quote My Scratch-built models are: Schooner Annie - BOTTLE (FINISHED) Sloop of War Alaska - BOTTLE (FINISHED) Flying Dutchman - BOTTLE (FINISHED) Fortnite Pirate Ship - BOTTLE (FINISHED) Gulet Princess Lila - BOTTLE (FINISHED) Schooner Caroline - BOTTLE (FINISHED) Whaling Ship Jeroboam - BOTTLE (FINISHED) Endicott Pond Boat - BOTTLE - (FINISHED) Parsifal III Ketch Sail Yacht - BOTTLE (FINISHED) Shohei Maru Japanese Warship - BOTTLE (FINISHED) Santa Maria - RESTORATION (FINISHED) Link to comment Share on other sites More sharing options...
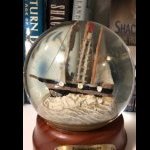
josh44 Posted May 17, 2019 Author Share #4 Posted May 17, 2019 (edited) Getting ready for the launch: I cleaned the bottle till it sparkled (but still never comes out good enough). I played with a wood base, easier than rods, painted the color of the sea. This would come back to haunt me in the end! The ship folded down easily, as she was designed to do so. Here is a clip of her going into the bottle. Some people find this fascinating. Looks like a moth to me. IMG_0104.MOV After she gets glued to the based, and rigging is glued in place. Silicone sea a la Igorsky. Just, not as dramatic as his. Also I was really hoping for the block base to disappear in the deep blue. Not so!!! (My kids asked me if that is the titanic at the bottom of the bottle ) Anyway, what do they know! I didnt want to fuss with spars, or shrouds or more standing rigging - I wanted to keep this one clean. The cabin rooves were attached with magnets in the bottle, and after the masts were glued - the masts had to fold down for bottle insertion first. I havent stained the stand, or placed the brass plate yet. I will give The Princess Lila to the real Lila after that. Thanks for reading! Edited May 17, 2019 by josh44 inseted hyperlink to a rereferenced builder GrandpaPhil, prutser, Omega1234 and 1 other 4 Quote My Scratch-built models are: Schooner Annie - BOTTLE (FINISHED) Sloop of War Alaska - BOTTLE (FINISHED) Flying Dutchman - BOTTLE (FINISHED) Fortnite Pirate Ship - BOTTLE (FINISHED) Gulet Princess Lila - BOTTLE (FINISHED) Schooner Caroline - BOTTLE (FINISHED) Whaling Ship Jeroboam - BOTTLE (FINISHED) Endicott Pond Boat - BOTTLE - (FINISHED) Parsifal III Ketch Sail Yacht - BOTTLE (FINISHED) Shohei Maru Japanese Warship - BOTTLE (FINISHED) Santa Maria - RESTORATION (FINISHED) Link to comment Share on other sites More sharing options...
Omega1234 Posted May 17, 2019 Share #5 Posted May 17, 2019 Hi Josh Nice job! I especially like the sails and how they make the whole boat ‘pop’. The use of magnets on the superstructure is also a really nifty idea. I might just pinch that idea for my models one day, too. I hope your niece liked the boat. All the best! Cheers. Patrick mtaylor 1 Quote MY SCRATCH BUILT MODELS ARE: Splendid Mega Yacht https://modelshipworld.com/topic/28576-splendid-by-omega1234-scale-1500-mega-yacht/ Majestic Mega Yacht https://modelshipworld.com/topic/28483-mega-yacht-majestic-by-omega1234-miniature/ Sapphire Mega yacht https://modelshipworld.com/topic/21088-sapphire-by-omega1234-1388-scale-mega-yacht-66m-8-inch-hull-length/?tab=comments#comment-639898 Genesis - Supersports Mega Yacht https://modelshipworld.com/topic/18168-genesis-by-omega1234-1300-49m-mega-yacht-8-inches-long-finished/?tab=comments#comment-559026http://modelshipworld.com/index.php/topic/14141-shadow-by-omega1234-scale-1300-luxury-60m-mega-yacht-8-inches-long/ SHADOW Luxury Motor Yacht http://modelshipworld.com/index.php/topic/11384-majellan-by-omega1234-luxury-37-metre-motor-yacht-miniature-7-inches-approx/ Majellan Luxury Motor Yacht http://modelshipworld.com/index.php/topic/9261Rainbow-j-class-racing-yacht/?p=273543 Rainbow J Class Racing Yacht Mystic Classic Motor Cruiser Symphony Ingomar Schooner: Scratch build Dorade Schooner: <p> Lennox Restoration Warship http://modelshipworld.com/index.php/topic/9577-pandora-cutaway-dockyard-style-miniature/?hl=pandora Link to comment Share on other sites More sharing options...
josh44 Posted May 17, 2019 Author Share #6 Posted May 17, 2019 2 hours ago, Omega1234 said: Hi Josh Nice job! I especially like the sails and how they make the whole boat ‘pop’. The use of magnets on the superstructure is also a really nifty idea. I might just pinch that idea for my models one day, too. I hope your niece liked the boat. All the best! Cheers. Patrick Thanks Patrick! The tiny magnets are fun to play with. Also the Bondic plastic welding helps a bunch, and less messy than the CA. The “share-ware” mentality of this site is tremendous! That will be my last luxury yacht for a while - I will leave that to you! Omega1234 and mtaylor 2 Quote My Scratch-built models are: Schooner Annie - BOTTLE (FINISHED) Sloop of War Alaska - BOTTLE (FINISHED) Flying Dutchman - BOTTLE (FINISHED) Fortnite Pirate Ship - BOTTLE (FINISHED) Gulet Princess Lila - BOTTLE (FINISHED) Schooner Caroline - BOTTLE (FINISHED) Whaling Ship Jeroboam - BOTTLE (FINISHED) Endicott Pond Boat - BOTTLE - (FINISHED) Parsifal III Ketch Sail Yacht - BOTTLE (FINISHED) Shohei Maru Japanese Warship - BOTTLE (FINISHED) Santa Maria - RESTORATION (FINISHED) Link to comment Share on other sites More sharing options...
Omega1234 Posted May 17, 2019 Share #7 Posted May 17, 2019 48 minutes ago, josh44 said: Thanks Patrick! The tiny magnets are fun to play with. Also the Bondic plastic welding helps a bunch, and less messy than the CA. The “share-ware” mentality of this site is tremendous! That will be my last luxury yacht for a while - I will leave that to you! Thanks Josh. Your last luxury yacht???? Never say never, they say. Once you’ve done, there’ll be another, then another, then another....😀 Enjoy your weekend. Cheers. Patrick mtaylor and josh44 2 Quote MY SCRATCH BUILT MODELS ARE: Splendid Mega Yacht https://modelshipworld.com/topic/28576-splendid-by-omega1234-scale-1500-mega-yacht/ Majestic Mega Yacht https://modelshipworld.com/topic/28483-mega-yacht-majestic-by-omega1234-miniature/ Sapphire Mega yacht https://modelshipworld.com/topic/21088-sapphire-by-omega1234-1388-scale-mega-yacht-66m-8-inch-hull-length/?tab=comments#comment-639898 Genesis - Supersports Mega Yacht https://modelshipworld.com/topic/18168-genesis-by-omega1234-1300-49m-mega-yacht-8-inches-long-finished/?tab=comments#comment-559026http://modelshipworld.com/index.php/topic/14141-shadow-by-omega1234-scale-1300-luxury-60m-mega-yacht-8-inches-long/ SHADOW Luxury Motor Yacht http://modelshipworld.com/index.php/topic/11384-majellan-by-omega1234-luxury-37-metre-motor-yacht-miniature-7-inches-approx/ Majellan Luxury Motor Yacht http://modelshipworld.com/index.php/topic/9261Rainbow-j-class-racing-yacht/?p=273543 Rainbow J Class Racing Yacht Mystic Classic Motor Cruiser Symphony Ingomar Schooner: Scratch build Dorade Schooner: <p> Lennox Restoration Warship http://modelshipworld.com/index.php/topic/9577-pandora-cutaway-dockyard-style-miniature/?hl=pandora Link to comment Share on other sites More sharing options...

Recommended Posts
Join the conversation
You can post now and register later. If you have an account, sign in now to post with your account.