Sheerline Posted March 17, 2020 Share #1 Posted March 17, 2020 Hi folks! Well, I've read and thought I understood all the tutorials but am still struggling to fit the garboard plank. So far I've tried a template and the masking tape method but things still don't look right. The first photo shows the curve produced by overlaying tape on the strake - still gappy. When I reverse the plank it seems much better. (Photo 2). I put another piece of plank alongside to get another impression. Should I therefore spile the second plank to obtain the parallel line with the keel bottom and the flat reference along the hull? Confused.com!🥴 GrandpaPhil 1 Link to comment Share on other sites More sharing options...
druxey Posted March 17, 2020 Share #2 Posted March 17, 2020 One, you are correct in not letting the garboard creep up the stem. Two, you seem to have a good fit to the rabbet in picture two. I recommend that the curve on the edge that abuts the second strake be make more gradual before spiling and fitting the second strake. Starting the curve as far back as the right edge of the photo should be about right. allanyed and mtaylor 2 Be sure to sign up for an epic Nelson/Trafalgar project if you would like to see it made into a TV series http://trafalgar.tv Link to comment Share on other sites More sharing options...
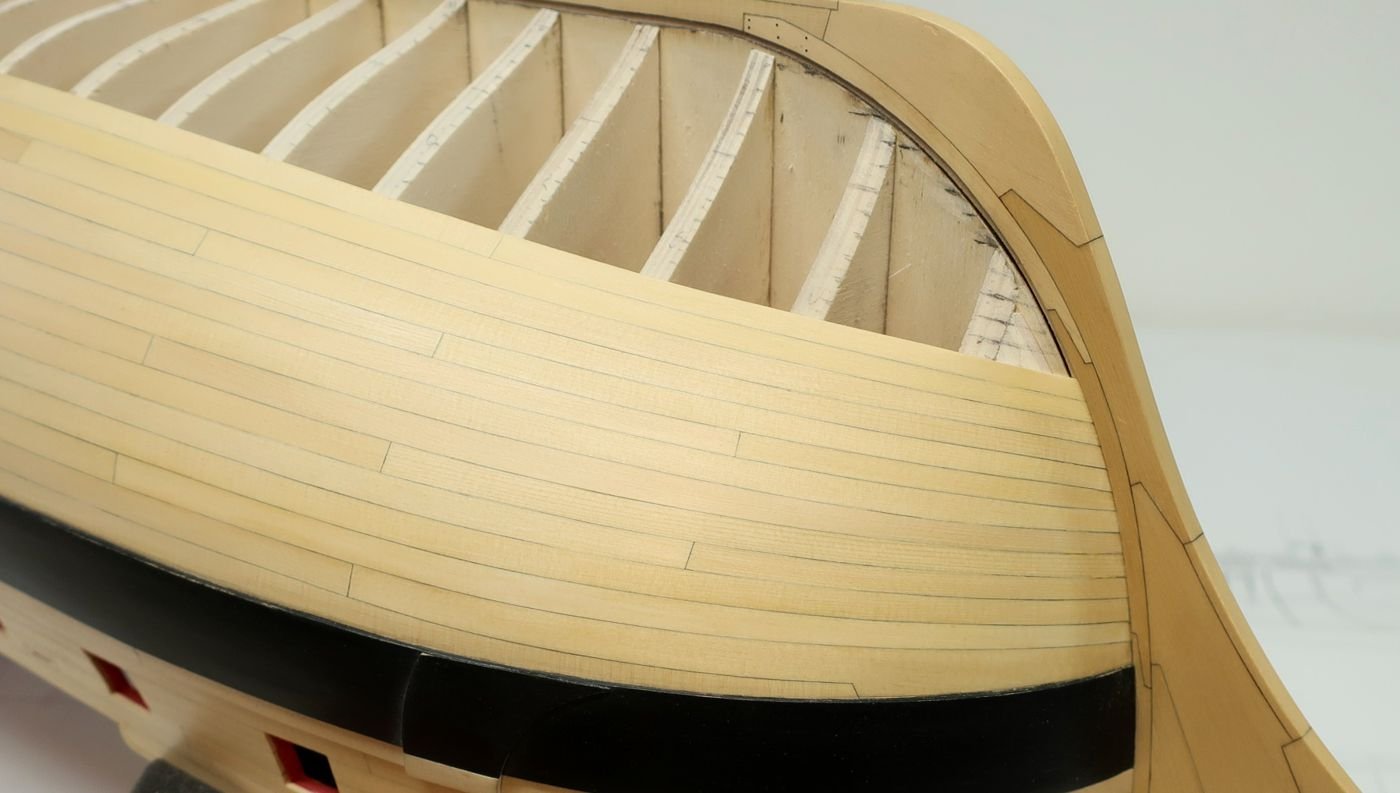
Sheerline Posted March 17, 2020 Author Share #3 Posted March 17, 2020 Thank you for this advice - much appreciated. My feeling now is that I should be aiming to replicate the planking as per the longboat photo elsewhere on the site. Those planks look magnificent! Hopefully I will get a better grasp of the idea once I get going and the second plank is spiled and fitted. 😀🤞 mtaylor 1 Link to comment Share on other sites More sharing options...
Sheerline Posted March 18, 2020 Author Share #4 Posted March 18, 2020 OMG. Back to the drawing board... Time to start cutting more templates to get my eye in. I'm just going outside, I may be some time.....🥴 mtaylor 1 Link to comment Share on other sites More sharing options...
Sheerline Posted March 18, 2020 Author Share #5 Posted March 18, 2020 Decided to cut plank as per photo. Not as easy as I thought and it took a bit of tweaking. I lengthened the curved cut a little further back to start with otherwise it would not sit in the rabbet and appeared permanently gapped at the point. I also chamfered the back corner of the plank so it sat better in the rabbet. Then I soaked the tip and curved it to follow BH2 and to touch BH1. It's pinned in place now to dry out thoroughly with a piece of scrap to hold it over. I expect to have to do more tapering at the bow which was necessary elsewhere. Midships I have 85mm to fill and at frame 1 there is 52mm to fill. I anticipate being able to taper the planks above the minimum width. 🤞 mtaylor 1 Link to comment Share on other sites More sharing options...
Jaager Posted March 19, 2020 Share #6 Posted March 19, 2020 If this is a double planked hull, how ever you do the runs of planking for the under layer can be messy and no harm is done. As a representation of how an actual garboard is placed, SpyGlass was pointing the way. I foresee a lot of frustration in the future with the way you have begun this. A proposition: The keel is part of a vertical system/structure, The bottom planking is part of a different semi-horizontal system. The join of these two systems is subject conflicting stress and potential movement. This is the rabbet. If a garboard was bent thru its width axis - against its natural tendency - to fit, an unnecessary additional force would be added that would reduce the effectiveness and tightness of the caulking at the rabbet. The solution: lay the rectangular garboard plank on the frames and push it against the keel. Where the rabbet is a horizontal line, no spilling is necessary. Aft, this usually goes all the way to the rabbet in the sternpost. At the fore end, the rabbet starts to curve up. To fit the garboard, wood is removed at the edge hitting the rabbet. he outer edge stays straight all the way. This is the defining limit for the rest of the planking at the bottom. The wale is the other defining limit. The whole wale is placed when the garboard is fitted. It is the space between the garboard and the wale where the planking is subject to spilling. For vessels larger than a boat, it is probably best if this space is divided into zones of 8 or so runs of planking. a narrow batten can be used to adjust at the stem and stern to get an attractive and natural run at the border of each zone. This reduces the effect of error creep compounding too much. I may have misremembered that the outer edge being straight being so in carvel as well as clinker planking, or maybe this as well as every clinker plank being done this way. The actual stress and movement at the rabbet is about a floating vessel. The effect of humidity changes and variation in ambient temp on a model is probably a couple of magnitudes less. mtaylor and Sheerline 2 NRG member 45 years Current: HMS Centurion 1732 - 60-gun 4th rate - Navall Timber framing HMS Beagle 1831 refiit 10-gun brig with a small mizzen - Navall (ish) Timber framing The U.S. Ex. Ex. 1838-1842 Flying Fish 1838 pilot schooner - framed - ready for stern timbers Porpose II 1836 brigantine/brig - framed - ready for hawse and stern timbers Vincennes 1825 Sloop-of-War - timbers assembled, need shaping Peacock 1828 Sloop-of -War - timbers ready for assembly Sea Gull 1838 pilot schooner - timbers ready for assembly Relief 1835 ship - timbers ready for assembly Other Portsmouth 1843 Sloop-of-War - timbers ready for assembly Le Commerce de Marseilles 1788 118 cannons - framed La Renommee 1744 Frigate - framed - ready for hawse and stern timbers Link to comment Share on other sites More sharing options...
Dr PR Posted March 19, 2020 Share #7 Posted March 19, 2020 Along the straight part of the rabbet in the keel the garboard plank (strake) does not need trimming, so both sides of the plank are parallel. Where the rabbet starts curving up the stem you should start trimming the garboard plank on the rabbet side. Keep the edge of the plank opposite the rabbet straight (don't trim it). Just let it bend up naturally along the forward curved surface of the hull. Take off a little bit at a time on the rabbet side and test the fit after each cut until the garboard plank tapers to a point and fits tightly into the rabbet. You will need to taper each plank near the bow, again starting where the hull surface transitions from relatively flat to the bow curve (about the same place along the hull length you started trimming the garboard plank). Phil mtaylor and Sheerline 2 Phil Current build: https://modelshipworld.com/index.php?/topic/19611-albatros-by-dr-pr-mantua-scale-140-about-1815/&tab=comments#comment-601276 Previous build: https://modelshipworld.com/index.php?/topic/19321-uss-oklahoma-city-clg-5-1971-3d-cad-model/ Link to comment Share on other sites More sharing options...
Sheerline Posted March 19, 2020 Author Share #8 Posted March 19, 2020 Wow! Thanks for the input - very comprehensive. I've dry fitted the plank now with pins and clamps. It looks quite reasonable to my eyes anyway! I hope the photo does it justice. I can build on this now with more certainty. Generally speaking I did get off to a shakey start you're right. My start planks half way up the hull slipped and I had descrepencies both sides. I learned to spile very early on from info on the downloads to rescue the situation. It doesn't look pretty but it's solid. I'm covering the hull and learning a lot in the process. Hopefully the veneer will go a lot better. The last two photos are of the fore and aft extreme spiling which is in one piece. Thank you all again.😀 Knocklouder and mtaylor 2 Link to comment Share on other sites More sharing options...
Sheerline Posted March 19, 2020 Author Share #9 Posted March 19, 2020 Thanks Spyglass but they're already fitted.🥴 It would cause untold damage to the rabbet if I attempted now to remove them. The kit is Corel SM 23 1:98 and my first build. I'm edge gluing all the planks and brushing glue inside the hull as I go to stiffen things up more. I started a build log some time ago if you wish to take a peek. There have been a few challenges along the way as the instructions are a bit thin. I heard a rumour that the later kits have updated instructions but on contacting Corel found this is not the case. Steady as she goes... mtaylor 1 Link to comment Share on other sites More sharing options...


Recommended Posts