FriedClams Posted May 25, 2020 Share #31 Posted May 25, 2020 That's a sharp looking sharpie Jim - very nice tight work. It would be hard to tell it apart from a full sized version were it not for the clamps, ducks and other such items in the photos as a size reference. Splining the joinery for center board and rudder is a real craftsman's touch. Beautiful work. Gary thibaultron and mtaylor 2 Quote Current Build Pelican Eastern-Rig Dragger Completed Scratch Builds Rangeley Guide Boat New England Stonington Dragger 1940 Auto Repair Shop Mack FK Shadowbox Link to comment Share on other sites More sharing options...
Jim Cricket Posted May 25, 2020 Author Share #32 Posted May 25, 2020 Thanks Gary! The centerboard turned out to be relatively easy to shape, and I worked a nice foil on it. Not as sharp a trailing edge as in real life, but not as fragile either, and not bad for a 90 year old boat! I wanted the construction to show up, so to that end I etched lines along the joinery, and faked in a lead insert. My intention was to let some dark paint run into the seams, to show them up. I also had to decide how far down, and how far up to show the board in the model, so I could use bottom paint below the hull, and white above the trunk. I don’t want to see the junction of the two colors in the finished model. On the hull bottom, I etched in some seams as well, hoping for a little depth and color variation in the finish. I taped off the board, and the waterline on the hull, and mixed up a deep red. The hull took four coats to cover well, over the white primer. I ended up mixing some matte medium and retarder into the acrylic, and sanded with 1000 abranet between coats. worked reasonably well. On the next model, I may experiment with milk paint, which is dead flat. I’ve used it on furniture, to good effect. I used matte varnish on the centerboard, and that knocks the sheen down well. For the seam lines, I took an ink pen, and drew the lines in black, then wiped some of it away, and painted in some dark dilute acrylic, and fiddled around with it. The effect is okay, but I think my color is darker than it should be, particularly since the bottom is in shadow. I may go back later, and lighten the red selectively with a dry brush. I’ll varnish the hull and deck at the end, after all painting is done. I’m ready to glue the floorboards in now, and then move onto the deck framing. Progress. Thanks for tuning in. GrandpaPhil, mtaylor, Colin B and 6 others 9 Quote Link to comment Share on other sites More sharing options...
thibaultron Posted May 26, 2020 Share #33 Posted May 26, 2020 Very nice work! I like your seam treatment! mtaylor and FriedClams 2 Quote Ron Thibault Shipjack Carrie Price from Pyro kit, with upgraded detailing and history. Going From A 2D Drawing To A 3D Printed Part Tutorial Link to comment Share on other sites More sharing options...
davec Posted May 26, 2020 Share #34 Posted May 26, 2020 Like what you did with the seams, and I really like the color scheme and shade of red. It might be darker than you planned, but still looks like a great color. Beautiful work! FriedClams, thibaultron and mtaylor 3 Quote Current builds: Wingnut Wings AMC DH9 Model Shipways 1/48 Longboat Model Shipways 1/24 Grand Banks Dory Soon to start: Fully framed Echo Completed builds: East Coast Oyster Sharpie Echo Cross Section 1/48 Scratchbuilt Hannah from Hahn plans 1/64 Kitbashed Rattlesnake from Bob Hunt practicum 1/64 Brig Supply Link to comment Share on other sites More sharing options...
Jim Cricket Posted May 26, 2020 Author Share #35 Posted May 26, 2020 Thanks gents. Dave, I like the hue, but the value is a tad dark. With the Golden acrylic colors, I used a Pyrole Red base, then added Raw Umber, Carbon Black, Permanent Green Light, and Titanium White. Some people I've heard use Rustoleum Red Metal Primer, in a spray can. I'm trying to avoid the spray cans, if I can, though that would be easy if planned for. mtaylor, FriedClams and thibaultron 3 Quote Link to comment Share on other sites More sharing options...
Jim Cricket Posted May 27, 2020 Author Share #36 Posted May 27, 2020 Quick post before moving on. Floorboards are painted, and installed. Deck framing is next! Colin B, KeithAug, aechmea and 7 others 10 Quote Link to comment Share on other sites More sharing options...
Jim Cricket Posted June 3, 2020 Author Share #37 Posted June 3, 2020 Deck Framing- I thought I would post my progress on the deck framing. I’m not done with it yet, but it’s moving along well. One thing that has to be done which I forgot about until now, is to fabricate and install the mast step! Before the forward deck framing is complete, I’ll have to stop and do that fussy little thing. But for now, I need to see some cosmetic progress, at least. I approach the deck framing similarly to the side and floor framing, with an oversize piece fitted to the sheer first, and then the top and bottom camber marked out and cut. I used the deck curve template/sander again to mark the camber, just pinching it to the raw frame by hand and marking it out, which worked well. The completed beam was the glued to the frame heads. My approach for fitting the short, partial washboard framing (side decks in sharpie parlance) is a little unorthodox, and would be wasteful of timber in a full size boat. I made and glued in an entire athwartship beam at 3 locations (where the angled deck bracing occurs), then sprung in a batten to lay out the cockpit opening curve, marked for the cuts, and fitted the angle braces. This assured that my inboard heights remained true, and that the beams would remain square to the hull. Also, I had to sand a little paint off of the side frames for good bonding before gluing in the braces. After the braces were glued in, I cut the beams at the marked location and correct angle. Chapelle shows a plumb cut on the frame ends, but I like a little outward sloping angle to the finished coaming. That angle requires a wider piece of timber for the coaming to be cut out of, but it’s usually worth it, in my experience with actual boats. Once the beam ends were cut, I fitted and glued in the carlins. I departed from Chapelle’s drawings again, and sprung in a continuous carlin, rather than sawing out multiple short pieces fit between the beams. I think that better assures fairness, in the long run. Doesn’t matter, once the decking is on, at any rate. Either way, there is a lot of end grain to long grain gluing, so the entire deck structure will be well braced with blocking, as Chapelle shows as well. At the extreme ends of the carlins, I fit a temporary brace to land the carlin on, and a prop underneath the beam to keep the carlin in plane. These I wrapped with scotch tape to keep the glue from sticking. I still have a bit of fitting and gluing to do, but I can’t get back to it for a day or two. Stay tuned! KeithAug, thibaultron, davec and 4 others 7 Quote Link to comment Share on other sites More sharing options...
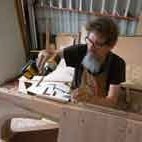
Jim Cricket Posted June 21, 2020 Author Share #38 Posted June 21, 2020 Well, I had to go back to work, so progress on the boat has nearly frozen. I did manage to finish the deck framing today. I made a mast step from poplar. It is wedge shaped, with the mast perpendicular to the raking top face of the step. To drill the step correctly, I made a similar wedge to jack up the step to the correct angle, and bored for the mast tenon on the drill press. The table tilts, but it’s easier on a small scale to just cut the wedge. I simulated the bolts that fasten the step to keelson, with some tooth picks, glued into little holes in the top of the step. You’ll never see it, but I also cut limbers from the center of the tenon mortise out to the edges to drain water from under the mast. In the pic below, the step is as yet unsanded. It looks better in the boat! The partner was bored out on a similar wedge. I made it a little oversize, and I’ll either drill an exact hole down through the finished deck, or I’ll drill that oversize as well and leather it, or wedge it. Not sure yet which. Various corner blocks of pine were also made a fitted, and all of the diagonal bracing in the cockpit was fitted. There are braces at the mast, under the washboards, and under the thwart to brace the centerboard trunk. These and the step were all primed and painted, so I believe we are ready for decking! That's it for now. Thanks for looking! ccoyle, aechmea, Roger Pellett and 8 others 11 Quote Link to comment Share on other sites More sharing options...
Moab Posted June 22, 2020 Share #39 Posted June 22, 2020 Looking excellent!...Moab FriedClams, thibaultron and mtaylor 3 Quote Completed Builds: Virginia Armed Sloop...Model Shipways Ranger...Corel Louise Steam Launch...Constructo Hansa Kogge...Dusek Yankee Hero...BlueJacket Spray...BlueJacket 26’ Long Boat...Model Shipways Under Construction: Emma C. Berry...Model Shipways Link to comment Share on other sites More sharing options...
davec Posted June 22, 2020 Share #40 Posted June 22, 2020 Jim - really beautiful work!! - Dave mtaylor, thibaultron and FriedClams 3 Quote Current builds: Wingnut Wings AMC DH9 Model Shipways 1/48 Longboat Model Shipways 1/24 Grand Banks Dory Soon to start: Fully framed Echo Completed builds: East Coast Oyster Sharpie Echo Cross Section 1/48 Scratchbuilt Hannah from Hahn plans 1/64 Kitbashed Rattlesnake from Bob Hunt practicum 1/64 Brig Supply Link to comment Share on other sites More sharing options...
KeithAug Posted June 22, 2020 Share #41 Posted June 22, 2020 Jim - very interesting build of an elegantly simple boat. FriedClams and thibaultron 2 Quote Keith Current Build:- Cangarda (Steam Yacht) - Scale 1:24 Previous Builds:- Schooner Germania (Nova) - Scale 1:36 https://modelshipworld.com/topic/19848-schooner-germania-nova-by-keithaug-scale-136-1908-2011/ Schooner Altair by KeithAug - Scale 1:32 - 1931 http://modelshipworld.com/index.php/topic/12515-schooner-altair-by-keithaug-scale-132-1931/?p=378702 J Class Endeavour by KeithAug - Amati - Scale 1:35 - 1989 after restoration. http://modelshipworld.com/index.php/topic/10752-j-class-endeavour-by-keithaug-amati-scale-135-1989-after-restoration/?p=325029 Other Topics Nautical Adventures http://modelshipworld.com/index.php/topic/13727-nautical-adventures/?p=422846 Link to comment Share on other sites More sharing options...
michael mott Posted June 23, 2020 Share #42 Posted June 23, 2020 Just found your build Jim wonderful simply wonderful! I shall follow along now. Michael Moab, FriedClams, thibaultron and 1 other 4 Quote Current builds Bristol Pilot Cutter 1:8; Skipjack 19 foot Launch 1:8; Herreshoff Buzzards Bay 14 1:8 Other projects Pilot Cutter 1:500 ; Maria, 1:2 Now just a memory Future model Gill Smith Catboat Pauline 1:8 Finished projects A Bassett Lowke steamship Albertic 1:100 Anything you can imagine is possible, when you put your mind to it. Link to comment Share on other sites More sharing options...
Jim Cricket Posted June 23, 2020 Author Share #43 Posted June 23, 2020 Lots of nice comments, thank you all! It's a fight for time on the bench these days. Jim Moab, thibaultron and mtaylor 3 Quote Link to comment Share on other sites More sharing options...
Mark Bjorge Posted November 20, 2020 Share #44 Posted November 20, 2020 This is amazing. Very impressive level of detail and craft. Thank you for sharing! mtaylor and thibaultron 2 Quote Link to comment Share on other sites More sharing options...
Mike Mulderig Posted November 22, 2020 Share #45 Posted November 22, 2020 Very nice job. For a V-bottom boat it has strikingly beautiful lines. And the large rakish rig compliments it perfectly. It is this stunning harmony of hull and rig as laid down by Howard Chapelle that drew me to build the boat to nearly furniture standards back in 1987. It was a challenging and satisfying endeavor, but in the end not the best choice for our often boisterous waters here I Far Northern California. We christened her the Qualawaloo, thinking at the time it was the local indigenous Wiki people’s name for Humboldt Bay. Later two woman ask about they name and informed me that it actually meant “that big body of water over there” and was misunderstood by the white explorers. We primarily sailed it on Humboldt Bay and Big Lagoon as well as a couple of trips to Lake Tahoe. Recently I reviewed other rigs of other similar designs and discovered that this rig seems to be 40 to 60% larger than other boats. This is a big factor in why she is so fast in in light airs. When the wind pipes up it is a very demanding boat to keep upright and swamps when you fail to do so. Reefing safely requires beaching and a handy beach is not always available. I think on the Chesapeake this is a summer rig. It is for this reason I have been drawing up a low aspect fanned junk rig which with it’s nearly instant reefing might make me want to sail the boat now that I am selling my Vertue. I was going to insert a photo of her gliding along on Big Lagoon in light airs but I don’t know how to do that. Mike thibaultron and mtaylor 2 Quote Link to comment Share on other sites More sharing options...

Recommended Posts
Join the conversation
You can post now and register later. If you have an account, sign in now to post with your account.