Larry Cowden Posted January 18, 2021 Share #121 Posted January 18, 2021 On 7/9/2020 at 1:55 PM, Jonathan_219 said: Picture of the bow planking at the bottom. The bow planking has certainly been the most difficult to get right. Adding to this difficulty was that the plank did not reach all the way to the keel on my first second plank (lower wale plank). I decided not to try and splice but to add a couple of pieces at a 90° angle to the planking, I thought I had seen something similar to this somewhere but I'm not too sure about it after it's all done. I haven't trimmed these pieces yet as I'm not sure exactly where they'll stop since I probably need to add a piece to cover up a small gap between the deck planking and the hull. I think I'm too far in now to change much now but hopefully the rest will fall in place as I work to the bottom. As you can see from the picture the second planking is going ok. It's not as perfect as I'd like but I think when I do a final sand and stain it'll be acceptable. There are still times when as I'm adding the plank I just can't get it to completely butt against the previous plank leaving a slight space between the planks. I've been gluing the first 15-20 mm at the bow starting where the plank touches the keel and then working back to the stern in 100mm or so sections. I built a small rig to try and help cut the tapers on the planks as trying to cut smoothly just hand holding a ruler was pretty much impossible for me. I used some of the wood from the kit to create a channel that the plank would lay in to keep it from moving side to side and then I clamp the plank strip and the ruler. I also added a couple stops for the ruler to rest against to create the same taper on each piece. I calculated the taper by measuring the distance between the top and bottom areas of planking at the widest spot and several spots moving to the bow. Even with the rig cutting a smooth taper is not easy and I'm sure some of the issues I'm having with meeting the previous plank perfectly are from imperfect cuts. I do try to sand any waves out of the cut and trim and sand the back corners to help get that tight fit of each plank. The instructions say to carefully fill any spots before painting as painting is a lot less forgiving than staining and I hope that's true since I'm planning on staining and I'm sure there will be some spots that have tiny gaps even after final sanding. At this point I'm continuing to work on finishing the second planking on the hull and then work up to all the parts I can do for now. Did you ever consider using a heated plank bender? Quote Link to comment Share on other sites More sharing options...
Larry Cowden Posted January 18, 2021 Share #122 Posted January 18, 2021 On 7/31/2020 at 11:06 AM, Bill Morrison said: Stunning work! The Amati kit seems exceptional! Bill Bill. Are you retired Navy? I lived in NL from 78'-2000'. Quote Link to comment Share on other sites More sharing options...
Larry Cowden Posted January 18, 2021 Share #123 Posted January 18, 2021 On 10/17/2020 at 9:45 PM, Jonathan_219 said: Finishing Cannons and Gunports: All the cannons are in place and rigged, lots of tiny pieces in those but it all came out fine. I just need to finish one side gunports and I'll be ready for the channels. I found some barrels in the kit and couldn't find any mention of them in the kit so I'm assuming they're there if I want to use them and I like that. I decided to make them gunpowder barrels and place them around the cannons. I stained them dark brown and I simulated coops (I think that's the word) on the barrels using thread and just CA glued black thread in two grooves that already existed on the barrels, and then painted the tops of the barrels black to give them some definition. I believe everything that goes on the deck is there now exception masts and rope of course. Some of it is still just hand placed and not glued but I'll probably get to the point of gluing the rest soon. Nice job on the barrels. But I believe you may be a bit misguided in labeling them as gunpowder. The last thing a gun crew would want next to their cannons when fighting is a barrel of gunpowder that could accidentally be exploded by sparks from their cannons or an enemy ship. These barrels would have been stored deep in the ship's hold away from any chance of explosion. More likely they could contain water for swabbing the barrels between shots to extinguish any burning embers before loading the next charge of black powder. I was a member of a cannon crew and have experience running a cannon during historical reenactments and live fire target competitions. Quote Link to comment Share on other sites More sharing options...
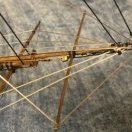
Larry Cowden Posted January 18, 2021 Share #124 Posted January 18, 2021 On 10/27/2020 at 4:08 PM, Jonathan_219 said: Masts Staring Mainmast and Bowsprit: I shaped and added the cheeks on the mainmast and as I starting looking at the main topmast I realized it has a pretty complex shape with a lot of wood to remove and I thought I wanted to get a little practice with something simpler first so after looking at all the masts I decided to tackle the bowsprit next. I picked it because the shape was pretty simple and it only had one piece so just simpler all around. I still found shaping the bowsprit challenging, not so much because of the difficulty but just because it took so much time to take off so little wood. I have tried using my exacto knife, sanding with the Dremel, and hand sanding. All of these methods have their challenges. The knife would be the quickest and seems to work well for blocking out small areas but if I try to do longer sections I'm constantly getting caught in the grain and taking out a bigger chunk that I want. Even if the chunk is going to be removed by subsequent actions it still prevents further knife work in that area which threatens to get me off center. I'm going to continue to experiment as some of the pieces have so much wood to be removed that sanding even with the Dremel would take a really really long time. I don't really have a place to set up a drill or a drill that would be able to hold a 10mm piece of wood. I think the masts are just going to be a lot of Dremel and hand sanding. Everything I've looked up for shaping the masts I've either tried or isn't practical in my setup. Once shaped, the bowsprit was pretty easy to configure with cleats and blocks. I did end up cutting out the cleats that the instructions say to use 1x 1mm wood strip for out of 1 x 2 strip and just cutting to the correct size. My clumsy hands kept splitting the 1 x 1 wood. I wasn't sure how the blocks are attached to the masts (and yards later) but it seem they're just seized on the mast. I found an interesting video showing how to use one seize to create the loop for both the block and mast but for this mast at least I seized the block first and then seized the lines right next to the seizing for the block after wrapping the two arms of rope around the mast once. The results in a little more stand off from the mast and two ropes around the mast, but I don't see an issue with that for now, hope I don't find it later. Here's a picture of the bowsprit just hand placed in the ship to see how it's looking. Am I seeing this right? The bow sprit looks off center to the centerline of the keel. Quote Link to comment Share on other sites More sharing options...
Jonathan_219 Posted January 18, 2021 Author Share #125 Posted January 18, 2021 Quote Did you ever consider using a heated plank bender? I have considered that and when I start my next kit I will probably get one. I'd also like to get some clamps specifically for the hull planking but will need to look into what's available and which ones would work best for me. Quote Completed Build: Revenge 1577 - Amati Models - 1/64 Current Build: San Felipe - Mantua Panart - 1:75 Link to comment Share on other sites More sharing options...
Jonathan_219 Posted January 18, 2021 Author Share #126 Posted January 18, 2021 Quote Nice job on the barrels. But I believe you may be a bit misguided in labeling them as gunpowder. The last thing a gun crew would want next to their cannons when fighting is a barrel of gunpowder that could accidentally be exploded by sparks from their cannons or an enemy ship. These barrels would have been stored deep in the ship's hold away from any chance of explosion. More likely they could contain water for swabbing the barrels between shots to extinguish any burning embers before loading the next charge of black powder. I was a member of a cannon crew and have experience running a cannon during historical reenactments and live fire target competitions. That's good to know and makes perfect sense. Thanks. Quote Completed Build: Revenge 1577 - Amati Models - 1/64 Current Build: San Felipe - Mantua Panart - 1:75 Link to comment Share on other sites More sharing options...
Jonathan_219 Posted January 18, 2021 Author Share #127 Posted January 18, 2021 Quote Am I seeing this right? The bow sprit looks off center to the centerline of the keel. The bowsprit is off center. Since it passes by the foremast my assumption is that it had to be. Thought that was an interesting detail as well. Baker 1 Quote Completed Build: Revenge 1577 - Amati Models - 1/64 Current Build: San Felipe - Mantua Panart - 1:75 Link to comment Share on other sites More sharing options...
Jonathan_219 Posted January 22, 2021 Author Share #128 Posted January 22, 2021 Starting Ratlines: All my shrouds are in and I added some of the mast stays just to be sure everything was firmly in place and I'm ready to start the ratlines. I read several forum threads about the color of the ratlines trying to decide between the natural and black and finely decided that neither was what I wanted and that I needed to color the natural thread a bit darker and see how that looked. I tried several things to stain the thread but nothing really worked like I wanted it to until I tried using a Prismacolor marker. I took a Light Umber marker and the best method I found was to take the broad tip and place it against the top of my table with the thread in between the marker tip and the table and slowly pull the thread through. I've taken that thread and tied one ratline with no glue to see how it looks and I think I'm happy with it. Now I need to decide what glue I'll use to fix the knots, I don't think I want to use CA glue as it leaves a shine and the wood glue I use is too thick so will have to do some experimenting to see what will work there. Hopefully the picture will show the color of the black, natural and my stained thread. GrandpaPhil, J11, chris watton and 2 others 5 Quote Completed Build: Revenge 1577 - Amati Models - 1/64 Current Build: San Felipe - Mantua Panart - 1:75 Link to comment Share on other sites More sharing options...
Baker Posted January 23, 2021 Share #129 Posted January 23, 2021 8 hours ago, Jonathan_219 said: the wood glue I use is too thick so will have to do some experimenting Nice work. Try thinned wood glue. Quote Regards, Patrick Finished : Soleil Royal Heller 1/100 Wasa Billing Boats Bounty Revell 1/110 plastic (semi scratch) Pelican / Golden Hind 1/45 scratch Current build : Mary Rose 1/50 scratch Gallery : Revell Bounty Pelican/Golden hind 1/45 scratch To do : Prins Willem Corel, Le Tonnant Corel, Yacht d'Oro Corel, Thermopylae Sergal Shore leave, non ship models build logs : ADGZ M35 funkwagen 1/72 Einhets Pkw. Kfz.2 and 4 1/72 Autoblinda AB40 1/72 122mm A-19 & 152mm ML-20 & 12.8cm Pak.44 {K8 1/2} 1/72 10.5cm Howitzer 16 on Mark. VI(e) Centurion Mk.1 conversion M29 Weasel 1/72 SAM6 1/72 T26 Finland T26 TN 1/72 Autoprotetto S37 1/72 Opel Blitz buses 1/72 Boxer and MAN trucks 1/72 Hetzer38(t) Starr 1/72 Si vis pacem, para bellum Link to comment Share on other sites More sharing options...
kirill4 Posted January 23, 2021 Share #130 Posted January 23, 2021 (edited) Good day, Dear Jonathan I used CA gel ... applied toch drop by tooth pick ,just to fix knot but need to be applied in such way that it doesn't cover hitch appears/configure itself... strange, should 't be shine here,why..?. but if it happened it could be recovered by paint affected area and applied matt varnish if shining after CA occured... Just Private opinion- if You will stain ratlines more intensive , almost same color as shrouds it would look much,much better!!! by the way, deadeyes lanyards need to be "tared" color as well :))) all, ratlines,shrouds and deadeyes lanyards need to be more or less same dark color... *too bright colors could destroy in some grade visual model appearance *as I know, this parts of the riggind used to be tared in reality,so couldn't be too bright color as some of the modern ship models demonstrate Edited January 23, 2021 by kirill4 J11, WalrusGuy and GrandpaPhil 3 Quote Current Build: Spanish Galleon, Lee, 1:100 https://modelshipworld.com/index.php?/topic/6262-spanish-galleon-1607-by-kirill4-lee-plastic-1100/& https://karopka.ru/forum/forum190/topic10341/ Dutch 16-17 Arts Sailing Vessels in details https://www.rijksmuseum.nl/en/rijksstudio/1845326--kirill-shabanov/collections/arts Link to comment Share on other sites More sharing options...
kirill4 Posted January 23, 2021 Share #131 Posted January 23, 2021 seems You need to find or make your self thinner trad for ratlines as You use now... on the foto it looks too thick in diameter compare to deadeyes lanyards and shrouds Quote Current Build: Spanish Galleon, Lee, 1:100 https://modelshipworld.com/index.php?/topic/6262-spanish-galleon-1607-by-kirill4-lee-plastic-1100/& https://karopka.ru/forum/forum190/topic10341/ Dutch 16-17 Arts Sailing Vessels in details https://www.rijksmuseum.nl/en/rijksstudio/1845326--kirill-shabanov/collections/arts Link to comment Share on other sites More sharing options...
kirill4 Posted January 23, 2021 Share #132 Posted January 23, 2021 treads sizes could be find in Anderson book as well, if You need digital copy of this book for private use let me know by email there are some examples of rigging done by RC Anderson for famous private collection J11 and GrandpaPhil 2 Quote Current Build: Spanish Galleon, Lee, 1:100 https://modelshipworld.com/index.php?/topic/6262-spanish-galleon-1607-by-kirill4-lee-plastic-1100/& https://karopka.ru/forum/forum190/topic10341/ Dutch 16-17 Arts Sailing Vessels in details https://www.rijksmuseum.nl/en/rijksstudio/1845326--kirill-shabanov/collections/arts Link to comment Share on other sites More sharing options...
Jonathan_219 Posted January 24, 2021 Author Share #133 Posted January 24, 2021 After posting a thread on the Rigging forum and getting some ideas for the knots on the ends of the ratlines I decided to use a taught line hitch on the ends and of course the clove hitch on the middle shrouds. I think I'll continue to use the thread supplied in the kit for the ratlines even though it might not be the perfect size. Just working through and getting all of them done now. BobG, J11, Cathead and 2 others 5 Quote Completed Build: Revenge 1577 - Amati Models - 1/64 Current Build: San Felipe - Mantua Panart - 1:75 Link to comment Share on other sites More sharing options...
kirill4 Posted January 24, 2021 Share #134 Posted January 24, 2021 (edited) Visualy they Look very good ! Maybe everything good with ratlines thickness as well...at least on this foto ratlines look not far from proper size? Alarm! - I saw on the picture some of the ratlines end knots look like are going to be undone/unseizing by itself... Edited January 24, 2021 by kirill4 Quote Current Build: Spanish Galleon, Lee, 1:100 https://modelshipworld.com/index.php?/topic/6262-spanish-galleon-1607-by-kirill4-lee-plastic-1100/& https://karopka.ru/forum/forum190/topic10341/ Dutch 16-17 Arts Sailing Vessels in details https://www.rijksmuseum.nl/en/rijksstudio/1845326--kirill-shabanov/collections/arts Link to comment Share on other sites More sharing options...
Jonathan_219 Posted January 24, 2021 Author Share #135 Posted January 24, 2021 Quote Maybe everything good with ratlines thickness as well...at least on this foto ratlines look not far from proper size? Alarm! - I saw on the picture some of the ratlines end knots look like are going to be undone/unseizing by itself... Thanks, I think the first picture was so close up that I think it may have made the ratlines look bigger than they really are, and the knots did look like they were going to come apart which led to my looking for another way to do that and came up with the taught line hitch for the ends. Quote Completed Build: Revenge 1577 - Amati Models - 1/64 Current Build: San Felipe - Mantua Panart - 1:75 Link to comment Share on other sites More sharing options...
Jonathan_219 Posted February 12, 2021 Author Share #136 Posted February 12, 2021 Ratlines are done! Finished up the ratlines. I had stated earlier that I was using a taught line hitch on the end shrouds but as I was going and looking at the diagram of a taught line hitch I realized that I wasn't tying it properly, at least I don't think I was. Done correctly the last part reverses direction and the end of the line would come out pointing back to the center of the shrouds so I started doing it that was thinking it would be better to have the last bit of line coming out inside instead of outside. As I progressed on the ratlines using the correct taught line hitch I felt like the knot just didn't work well, it didn't stay tight well and I found I was relying on the glue to keep the knot held tight which I didn't think was good in the long run so I went back to my original knot which I think is just a modified clove hitch with a doubling of the first loop around the shroud. This puts the end of the line pointing out but I felt that this was better than having the knots come undone. It may have had something to do with the thread I was using or how I stained it with a marker, it's just what worked best for me. Other than that the ratlines went pretty well, don't know if they're the hardest part of the rigging but probably one of the most time consuming parts and I felt a bit sad as I was tying the last one, I sort of enjoyed this part once I settled on the knot and staining procedure. The tricky part is getting consistency with the placement and tension, or lack of, between each know and sometimes I'd be really good at it and sometimes it just seemed like I was all thumbs. I've also started putting in some of the next steps of the rigging when I just needed a break from ratlines for a while. Cathead, Cirdan, Baker and 6 others 9 Quote Completed Build: Revenge 1577 - Amati Models - 1/64 Current Build: San Felipe - Mantua Panart - 1:75 Link to comment Share on other sites More sharing options...
kirill4 Posted February 12, 2021 Share #137 Posted February 12, 2021 VERY WELL DONE!!! Quote Current Build: Spanish Galleon, Lee, 1:100 https://modelshipworld.com/index.php?/topic/6262-spanish-galleon-1607-by-kirill4-lee-plastic-1100/& https://karopka.ru/forum/forum190/topic10341/ Dutch 16-17 Arts Sailing Vessels in details https://www.rijksmuseum.nl/en/rijksstudio/1845326--kirill-shabanov/collections/arts Link to comment Share on other sites More sharing options...
kirill4 Posted February 12, 2021 Share #138 Posted February 12, 2021 (edited) Fore top mast stay tuckle running end would be better to secure on the bowsprit's cleat Edited February 12, 2021 by kirill4 Quote Current Build: Spanish Galleon, Lee, 1:100 https://modelshipworld.com/index.php?/topic/6262-spanish-galleon-1607-by-kirill4-lee-plastic-1100/& https://karopka.ru/forum/forum190/topic10341/ Dutch 16-17 Arts Sailing Vessels in details https://www.rijksmuseum.nl/en/rijksstudio/1845326--kirill-shabanov/collections/arts Link to comment Share on other sites More sharing options...
Jonathan_219 Posted February 20, 2021 Author Share #139 Posted February 20, 2021 Finishing Mast Stays and Mast Stays Tackle: Finished up the rest of the mast stays, the mizzen mast stay has the rope fans that attach to the shrouds which I wasn't sure how I would do but they turned out to be fairly straightforward. I just seized three lines on the shroud and then working from inside to outside threaded the threads through the piece that holds them and then seized them in place on the shroud. Tying the seizings less than full tightness let me adjust the tension on each one to try and get that as even as possible. I would have liked to put a little more tension on them but that would have pulled the shroud out of place, there's a tiny bit not but not bad. The mast stays tackle was easy and I did my first rope coil expiriment which can be seen in the pictures below. I'll have to do a bunch of these as I continue. As I look forward to the next steps it calls for installing the yard ties for all the spars including the bowsprit and I can't seem to find anything that shows how the bowsprit spar should be attached, I'll start doing some research and if I'm still not sure I may have to start another thread in the rigging forum. J11, Cirdan, Cathead and 5 others 8 Quote Completed Build: Revenge 1577 - Amati Models - 1/64 Current Build: San Felipe - Mantua Panart - 1:75 Link to comment Share on other sites More sharing options...
kirill4 Posted February 20, 2021 Share #140 Posted February 20, 2021 On 2/12/2021 at 7:01 PM, kirill4 said: Fore top mast stay tuckle running end would be better to secure on the bowsprit's cleat Good day, Dear Jonathan Fwrd Mast stay tackle running end securing... as advised in the Anderson book and others as well chris watton, GrandpaPhil and J11 3 Quote Current Build: Spanish Galleon, Lee, 1:100 https://modelshipworld.com/index.php?/topic/6262-spanish-galleon-1607-by-kirill4-lee-plastic-1100/& https://karopka.ru/forum/forum190/topic10341/ Dutch 16-17 Arts Sailing Vessels in details https://www.rijksmuseum.nl/en/rijksstudio/1845326--kirill-shabanov/collections/arts Link to comment Share on other sites More sharing options...
kirill4 Posted February 20, 2021 Share #141 Posted February 20, 2021 Here You could see good idea how to rigg spritsail - in that time spritsail yard often stored at the base of bowsprit when it was not used Cathead, GrandpaPhil, J11 and 2 others 5 Quote Current Build: Spanish Galleon, Lee, 1:100 https://modelshipworld.com/index.php?/topic/6262-spanish-galleon-1607-by-kirill4-lee-plastic-1100/& https://karopka.ru/forum/forum190/topic10341/ Dutch 16-17 Arts Sailing Vessels in details https://www.rijksmuseum.nl/en/rijksstudio/1845326--kirill-shabanov/collections/arts Link to comment Share on other sites More sharing options...
kirill4 Posted February 20, 2021 Share #142 Posted February 20, 2021 Or more usual arrangement could be used, with parrels Cirdan, GrandpaPhil and J11 3 Quote Current Build: Spanish Galleon, Lee, 1:100 https://modelshipworld.com/index.php?/topic/6262-spanish-galleon-1607-by-kirill4-lee-plastic-1100/& https://karopka.ru/forum/forum190/topic10341/ Dutch 16-17 Arts Sailing Vessels in details https://www.rijksmuseum.nl/en/rijksstudio/1845326--kirill-shabanov/collections/arts Link to comment Share on other sites More sharing options...
kirill4 Posted February 20, 2021 Share #143 Posted February 20, 2021 (edited) When making "crowfeet " I would reccomend to use needle as alternative... *just pull each leg of crowfeet trough rigging line or other rope with needle, *adjust ness-ry tension with small weight, *than use very liquid CA apply on each legs to make them hard and strait , *use CA to secure tread where it passes trough main line * to cut excessive part and make imitation of seizing *to make final painting Here You could find pictures of the process I meant Started from post 49 Edited February 20, 2021 by kirill4 Cirdan and J11 2 Quote Current Build: Spanish Galleon, Lee, 1:100 https://modelshipworld.com/index.php?/topic/6262-spanish-galleon-1607-by-kirill4-lee-plastic-1100/& https://karopka.ru/forum/forum190/topic10341/ Dutch 16-17 Arts Sailing Vessels in details https://www.rijksmuseum.nl/en/rijksstudio/1845326--kirill-shabanov/collections/arts Link to comment Share on other sites More sharing options...
Jonathan_219 Posted February 20, 2021 Author Share #144 Posted February 20, 2021 Kirill4, thanks for the great information as always. I've seen the needle technique before but I like the look of the seized threads to the shroud, again the picture makes it look much bigger than it is in real life and it's pretty subtle when you view the real model, it works for me at least. For the bowsprit spar I just decided to lash it to the bowsprit. I can see from the picture you included that it's probably not historically accurate and something I'll improve on the next model I do. For this kit I'm not going to go too far away from the plans. J11, Blackreed, GrandpaPhil and 1 other 4 Quote Completed Build: Revenge 1577 - Amati Models - 1/64 Current Build: San Felipe - Mantua Panart - 1:75 Link to comment Share on other sites More sharing options...
kirill4 Posted February 20, 2021 Share #145 Posted February 20, 2021 (edited) Oh , I see ... by the way, just some thoughts... spritsail yard attaches to the bowsprit in the same way as yards attached to the masts... consider it logicaly if You rigging yards on the mast with tie and parrals ,but not just permanently lashing :))), than why spritsail yard You want to attach to the bowsprit in this strange way ,with lashing...? :))) But if You like rope parral, You could try to make it in a little bit different way, like on this drawing of GH reconstruction Edited February 20, 2021 by kirill4 J11, GrandpaPhil and Ondras71 3 Quote Current Build: Spanish Galleon, Lee, 1:100 https://modelshipworld.com/index.php?/topic/6262-spanish-galleon-1607-by-kirill4-lee-plastic-1100/& https://karopka.ru/forum/forum190/topic10341/ Dutch 16-17 Arts Sailing Vessels in details https://www.rijksmuseum.nl/en/rijksstudio/1845326--kirill-shabanov/collections/arts Link to comment Share on other sites More sharing options...
md1400cs Posted February 21, 2021 Share #146 Posted February 21, 2021 On 2/19/2021 at 8:54 PM, kirill4 said: Or more usual arrangement could be used, with parrels Interesting - I had never seen parrels used in this way before. Cirdan 1 Quote Michael Current build : Sovereign of the Seas 1/78 Sergal Under the table: Golden Hind - C Mamoli Oseberg - Billings 720 - Drakkar - Amati Completed: Santa Maria-Mantua -- Vasa-Corel - Santisima Trinidad cross section OcCre 1/90th Gallery : Santa Maria - Vasa - Link to comment Share on other sites More sharing options...
kirill4 Posted February 21, 2021 Share #147 Posted February 21, 2021 (edited) Good day, There are many other pictures of 17thvcentury vessels/galleons? Where we could see the same arrangements of spritsail yard - with parrels -please see my signature with link to the famous Dutch Artists of17th century... And ,there is another,one more way how spritsail could be attached to the bowsprit- with tackles/ and looks like without slings...which also often used in that time... Edited February 21, 2021 by kirill4 J11, Ondras71 and GrandpaPhil 3 Quote Current Build: Spanish Galleon, Lee, 1:100 https://modelshipworld.com/index.php?/topic/6262-spanish-galleon-1607-by-kirill4-lee-plastic-1100/& https://karopka.ru/forum/forum190/topic10341/ Dutch 16-17 Arts Sailing Vessels in details https://www.rijksmuseum.nl/en/rijksstudio/1845326--kirill-shabanov/collections/arts Link to comment Share on other sites More sharing options...
Jonathan_219 Posted March 15, 2021 Author Share #148 Posted March 15, 2021 Plugging along on the rigging: Lots of rigging going in, it's hard to describe what's happening. Almost everything seems to be going by the book and plans with a few exceptions. I'm almost through page 17 of the plans which I believe is the next to last rigging plan when you're not adding sails. I had to add something to counteract the pull of the mainmast stays on the mizzen and bonadventure yards. There was just no way to get any tension to pull all the threads somewhat straight so I added backstays on those yards. I believe I've seen at least one other log where that was done. I've been using a jig which is just a flat piece of scrap with some different size dowels glued to it to make rope coils and falls and that's working out pretty well. I just coil the thread around the dowel and then use some 50% white glue/50% water solution to wet it down and then when dry just slowly work the coil up and off the dowel. Then I'll use some CA glue on the bottom if it needs a little holding together and trim and glue in place on the ship. Rigging is both easier and harder than I expected. Understanding what I need to do and getting thread and blocks in place is easier than I expected, helped immensely by the quality of the instructions. Tying ropes off is where it's extremely challenging. Getting the thread over and around pins and getting the correct twists in is something I'm having to learn. I'm trying different techniques but I suspect that no one technique will work in every situation and sometimes it's just a matter of getting lucky and pulling it in place as quickly as possible. Looking forward to getting the last bits of rigging done and then putting on the finishing touches. Cathead, WalrusGuy, Tomasz B and 8 others 11 Quote Completed Build: Revenge 1577 - Amati Models - 1/64 Current Build: San Felipe - Mantua Panart - 1:75 Link to comment Share on other sites More sharing options...
Jonathan_219 Posted March 22, 2021 Author Share #149 Posted March 22, 2021 Rigging Finished: All the ropes are in, just need to finish up some details and some final clean-up and touch-up work and I'll be finished. The anchors are made just need to put them on as part of the final details. Still debating the flags, comtemplating attaching them to a rope and then threading that in place, seems like it would look better and give some flexibility. J11, chris watton, GrandpaPhil and 6 others 9 Quote Completed Build: Revenge 1577 - Amati Models - 1/64 Current Build: San Felipe - Mantua Panart - 1:75 Link to comment Share on other sites More sharing options...
Jonathan_219 Posted March 26, 2021 Author Share #150 Posted March 26, 2021 (edited) Finished ! I've added the anchors and flags and believe I'm going to call it finished. There is some minor detail work that I may come back to later but right now I think I'm going to leave it be and see how I like the way it looks. I've ordered a display case and will post one more set of pictures when I have it placed in that. Couple comments looking back on this build. Firstly the quality of the kit and honestly I don't think you could ask for more. The quality of the materials and instructions is first rate and is something that someone who hadn't completed a build previously can tackle and get great results, so I'm going to rate that a 10/10. As for my build there is some good, some bad and probably hundreds of mistakes that experienced builder will spot immediately but I'm ok with that and am just considering it part of the learning experience which will be applied to my next build (already out of the closet and the box is sitting on my table staring at me) so I'll rate my build as a 6/10, I'm happy with the final product but it could be made even more beautiful if one desired. Speaking of mistakes I'd really like to thank the people that have been so helpful with information, I may not have gone back and corrected all of them but at least I know now what I did wrong and can improve in the future. This has been an incredibly enjoyable process and I'm excited to start the next kit. One of the things I really enjoy about the hobby is that it's so varied, just when it seems like you've done a ton of something then something completely different will come along and you'll be doing that for a while. It's also given me even more appreciation of the amazing work I see here on the build logs and I'm so thankful that people share their experiences and help beginners like me tackle the more challenging part without having to invent the wheel from scratch. Edited March 26, 2021 by Jonathan_219 ccoyle, md1400cs, BobG and 14 others 14 1 2 Quote Completed Build: Revenge 1577 - Amati Models - 1/64 Current Build: San Felipe - Mantua Panart - 1:75 Link to comment Share on other sites More sharing options...

Recommended Posts
Join the conversation
You can post now and register later. If you have an account, sign in now to post with your account.