LucienL Posted August 1, 2020 Share #1 Posted August 1, 2020 (edited) Hi there everyone, complete novice here but thought I'd post a log for this model kit. Back in probably 2011, my Dad and I were interested in building scale models, so we figured we'd start with a simple ship and work our way towards more difficult models. I was still in primary school at the time so when I say we, I really mean my Dad, while I watched and helped with simpler tasks. We made some decent progress with the Bounty's launch, but got as far as frames before my Dad's patience with the hobby ran out and the model sat on a shelf for the next 9 years. Pictured below is close to how the model was left. However, due to a COVID extended university holiday, I finally decided to give the thing another go and make some progress. The model is close to complete now (just masts sails and rigging to go) and I think I've made almost every mistake that you could possibly make. I'm still reasonably happy with the outcome. I'll try and outline the process with as many photos I have available. Edited April 17, 2021 by LucienL Quote Previous builds: HMS Bounty's Launch (Model Shipways), USS Albatros (OcCre) Current build: HMS Beagle (OcCre) Future builds: HMB Endeavour (Caldercraft), De Zeven Provinciën (Kolderstok), HMS Victory (Caldercraft/De Agostini/Artesania Latina/Corel) Link to comment Share on other sites More sharing options...
LucienL Posted August 1, 2020 Author Share #2 Posted August 1, 2020 The planking went relatively smoothly. I soaked each plank entirely in boiling water for around a minute before bending to shape on the frames using the modified bulldog clamps suggested by the instructions. I had some problems with the shutter plank (as it seems like most other build logs for this model did). It was somewhat overstated by the instructions how much wider the shutter plank had been laser cut and as a result it left some nasty gaps in the middle. Some posts on this forum suggested using sawdust mixed with wood glue to fill the gaps. I tried that and it worked pretty well, but some glue globs came through the other side, so I'd have to be more careful in future. I also used some wood filler on the outside to make a smoother surface for painting and fill some of the gaps a bit better. For one of the shutter planks, I wasn't confident that it would hold to its neighbouring planks (due to the gap) so a brushed the whole inside with glue to ensure that it stuck to the frames. It was only after the glue had dried that I realised my mistake. It'll be clear in the photos of the staining that this caused some problems and I damaged the inside of the plank with my knife trying to scrape the glue off. Oh well... The hull did NOT come smoothly of the jig. I pretty much had to break the whole thing inside in an attempt to free my hull. The instructions suggested using some beeswax to prevent glue from running onto the jig. I think we did do this... nine years ago, so I doubt that helped very much. I think to avoid this, I should have used a smaller brush for the glue and used smaller amounts I also shaped some oars as seen in the above photo. This was done by hand and took a long time. It was shortly after this that I rediscovered the Dremel tool that was originally bought for this model. Quote Previous builds: HMS Bounty's Launch (Model Shipways), USS Albatros (OcCre) Current build: HMS Beagle (OcCre) Future builds: HMB Endeavour (Caldercraft), De Zeven Provinciën (Kolderstok), HMS Victory (Caldercraft/De Agostini/Artesania Latina/Corel) Link to comment Share on other sites More sharing options...
LucienL Posted August 1, 2020 Author Share #3 Posted August 1, 2020 To bend the tween frames, I salvaged the broken parts from the jig and bent them to shape using those. This was moderately successful, but some frames weren't evenly spaced. This is a point where I probably should have redone a couple of the frames, but I figured that it would be barely visible and I was honestly sick of steam bending frames. Next step was floorboards, which went pretty well. I used the same method for the internal boards as I did for the external planks and soaked them in boiling water for a minute before holding them place with some fairly elaborate techniques (I don't have any photos, but I just used random things from around the house to hold them down). The quarter deck also went pretty well. I assembled the deck while the frames were already in the boat. I see in some other logs that this could have been assembled separately and the glued in, but I did not have enough faith in my own abilities to get that right. It was at this point that I realised that the staining should really have been done before the internal planking. Whoops, but that is the order the steps were listed in the instructions. I also shaped the thwarts and dry fitted them. Like many of the other logs for this model, I found that the planking had spilled out too much and the hull was now too wide for the thwarts. I could have cut new ones, but this would cause issues for the gunwales. I did not have enough material to cut new gunwales and it was only a small amount of compression that was needed to hold the thing in place. I figured that if I used a strong enough glue the thwarts and gunwales would be able to hold the hull in place. Pictured below is my attempt at a clamping system to achieve this. Quote Previous builds: HMS Bounty's Launch (Model Shipways), USS Albatros (OcCre) Current build: HMS Beagle (OcCre) Future builds: HMB Endeavour (Caldercraft), De Zeven Provinciën (Kolderstok), HMS Victory (Caldercraft/De Agostini/Artesania Latina/Corel) Link to comment Share on other sites More sharing options...
LucienL Posted August 1, 2020 Author Share #4 Posted August 1, 2020 For staining, I used an oak stain on the inside and a walnut stain for the thwarts on an oak stained base. The instructions suggest a cherry stain, but finding that in Australia is somewhat difficult. The parts were finished using a clear wood varnish. Painting was done using a zinsser stainblocking primer (metho based) and a paint scheme consisting of the colours Natural white, Dragonstone (Taubmans) and Yukon Gold (Taubmans). See if you can spot the mutilated plank in the final photo. To draw the waterline, I stuck a pencil through a piece of polystyrene packaging material and ran that around the boat Quote Previous builds: HMS Bounty's Launch (Model Shipways), USS Albatros (OcCre) Current build: HMS Beagle (OcCre) Future builds: HMB Endeavour (Caldercraft), De Zeven Provinciën (Kolderstok), HMS Victory (Caldercraft/De Agostini/Artesania Latina/Corel) Link to comment Share on other sites More sharing options...
LucienL Posted August 1, 2020 Author Share #5 Posted August 1, 2020 Holding the boat in shape overnight using my clamping setup really helped. The boat was much more willing to be held in place after that. After holding down most of the thwarts and using a strong slow-drying polyurethane glue, I felt that the hull had much more rigidity to it. I left the boat in the setup while I worked on the mast helpers. Apparently, over in the states, you guys can get brass blackening solution at gun shops. As an Australian, it is not so easy. I'm not sure if I wasn't looking hard enough, but I could not find a place to buy a brass blackening solution. Online, I found a recipe that consisted of copper carbonate and household ammonia. Ammonia is easy, but copper carbonate isn't really sold anywhere. However, I figured that as a chemistry minor I should be able to put something together. The copper carbonate was made by mixing copper sulfate (used as a plant supplement and is commercially available at gardening stores) and bicarb soda (which is sodium hydrogen carbonate). The precipitate formed is copper carbonate which can easily be filtered out using a paper towel and a funnel setup. Scoop out the copper carbonate using a spoon and you're good to go (6 g yield, and some left over for future projects) I used a ratio of 1 g of wet copper carbonate to 20 mL of household ammonia to give the blue blackening solution below. After that, I made sure the brass was clean by sanding with a fine grit paper and soaking in vinegar. I left the brass in for a relatively short amount of time (around 10 mins) to give the colour seen below. I found in some later pieces (cheek plates) that leaving them in for longer (1 hour plus) results in a browner colour rather than the black seen below. grsjax and iMustBeCrazy 2 Quote Previous builds: HMS Bounty's Launch (Model Shipways), USS Albatros (OcCre) Current build: HMS Beagle (OcCre) Future builds: HMB Endeavour (Caldercraft), De Zeven Provinciën (Kolderstok), HMS Victory (Caldercraft/De Agostini/Artesania Latina/Corel) Link to comment Share on other sites More sharing options...
LucienL Posted August 1, 2020 Author Share #6 Posted August 1, 2020 Once the thwarts containing mast helpers and the bow grate were glued in, the hull felt very stable and I removed it from the clamping setup to add the gunwales. This step caused the most frustration as one of the gunwales snapped at the tip while being held down preventing a neat joint at the bow. I think I probably weakened the piece when I glued on the breast hook and fiddled with it a bit. I then probably didn't cut enough material from the gunwales to fit the keel through the two pieces. I guess this is just something I have to live with, but it is a bit frustrating. I also probably didn't sand the frames and filler blocks enough so a few gaps were left between the planks and the gunwale, particularly at the bow. To hold the gunwales down a used bamboo skewers across the top with an elastic band running underneath the hull at the ends of the skewer to pull the gunwale to the hull. I added the remaining parts of the hull (backrest, quarter knees, stern gunwale, belaying pins and thole pins), and also stained the oars (straight walnut stain this time), which I am pretty happy with, although they are not perfect. I'll use leftover string from rigging to give them some handles. Then it was on to the pintles and gudgeons... Yikes! Quote Previous builds: HMS Bounty's Launch (Model Shipways), USS Albatros (OcCre) Current build: HMS Beagle (OcCre) Future builds: HMB Endeavour (Caldercraft), De Zeven Provinciën (Kolderstok), HMS Victory (Caldercraft/De Agostini/Artesania Latina/Corel) Link to comment Share on other sites More sharing options...
LucienL Posted August 1, 2020 Author Share #7 Posted August 1, 2020 This part was tricky and required material not supplied in the kit. I had to buy some tiny brass tubes (3 mm diameter and 2 mm diameter) to form the hinges of the pintles and gudgeons. After shaping these pieces from the brass provided in the kit, I used some flux on the joints and held the tubes in place with some pliers. I dropped a bit of solder on the joints and heated the thing with a soldering torch. The solder moved pretty neatly into the joints and formed a pretty strong bond. After sanding and soaking in vinegar, the pieces were ready to be blackened. I could have done this part a little better, the hinges don't quite align, so there is a bit of resistance when the rudder is turned. It shouldn't really be fiddled with too much so I didn't try to fix it. I pushed the pins through the rudder/keel and nipped the nail off at the other end. I then bent the ends of the nails to hold them in place. And that's the hull done now, hopefully some more updates coming... grsjax 1 Quote Previous builds: HMS Bounty's Launch (Model Shipways), USS Albatros (OcCre) Current build: HMS Beagle (OcCre) Future builds: HMB Endeavour (Caldercraft), De Zeven Provinciën (Kolderstok), HMS Victory (Caldercraft/De Agostini/Artesania Latina/Corel) Link to comment Share on other sites More sharing options...
iMustBeCrazy Posted August 1, 2020 Share #8 Posted August 1, 2020 G'day Lucien, good job, you've left me for dead. I keep getting stuck on making it right and therefore not making it at all since there is no actual information of what right is. I've come to the conclusion that this model is based on the replica 'Child of Bounty' built for the documentary 'The Voyage of Bounty's Child (1984)' even though the manual suggests it's based on the drawing on page 3. And your information on the blackening solution is priceless. Quote Craig. I do know, that I don't know, a whole lot more, than I do know. Current Build: 1:16 Bounty Launch Scratch build. 1:16 Kitty -18 Foot Racing Sloop 1:50 Le Renard HM Cutter Lapwing 1816 Lapwing Drawings Completed....: 1:16 16' Cutter Scratch build. Discussion....: Bounty Boats Facts Link to comment Share on other sites More sharing options...
LucienL Posted August 9, 2020 Author Share #9 Posted August 9, 2020 Hi Craig, glad you found the blackening solution helpful. Gee you can really see how small the boat was when it's full scale. Crazy to think they managed to fit 19 people in there Quote Previous builds: HMS Bounty's Launch (Model Shipways), USS Albatros (OcCre) Current build: HMS Beagle (OcCre) Future builds: HMB Endeavour (Caldercraft), De Zeven Provinciën (Kolderstok), HMS Victory (Caldercraft/De Agostini/Artesania Latina/Corel) Link to comment Share on other sites More sharing options...
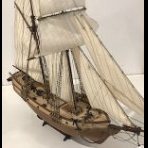
LucienL Posted August 9, 2020 Author Share #10 Posted August 9, 2020 Okay, I managed to finish the masts, sails and rigging over the past week and I think I am ready to declare this ship finished. I do have to say, of all the tasks involved in this project, the sails and rigging collectively were some of the most difficult. I think I did get the hang of it eventually, but I do prefer the wood work. The masts were fairly simple just some tapering and sanding, adding the cleats was a bit fiddly but not too difficult. The stain I used was an oak, followed by a baltic with a very light walnut stain on top. The dowels were not very receptive to the stain and the spars came out a little uneven, but were okay. Then it was time for some of the initial rigging including the shrouds and the blocks. The knots for the shrouds were a bit tricky at first and I kept getting too much slack. I think I even re-did them after taking this photo to get them right. These blocks were also re-done as they were too tight. To form the rope for the blocks I held the line in a loop and melted the two pieces together with a lighter. There is probably a prettier way to achieve this, but it worked fine. I then used some sewing thread for the seizing with a bit of fray-lock to hold it in place. I also spent some time fiddling with barrels. The plans outline a much more detailed barrel than what is provided in the kit and I did attempt to replicate this. After cutting the plank grooves the raw wood was revealed and didn't look all that great, so I stained the barrel with some walnut stain. I was not happy with this stain so I sanded it back. I tried again with various mixtures of baltic, oak and walnut stains but couldn't really find something I was happy with. By the time I reached an acceptable colour, I had sanded the barrel so much that the barrel hoops were gone. I didn't really like this look either so I sacrificed this barrel and left all the others mostly untouched, my boat only has 5 small barrels now, oh well... Quote Previous builds: HMS Bounty's Launch (Model Shipways), USS Albatros (OcCre) Current build: HMS Beagle (OcCre) Future builds: HMB Endeavour (Caldercraft), De Zeven Provinciën (Kolderstok), HMS Victory (Caldercraft/De Agostini/Artesania Latina/Corel) Link to comment Share on other sites More sharing options...
LucienL Posted August 9, 2020 Author Share #11 Posted August 9, 2020 After a few lessons from my Mum about how to use the sewing machine, I was ready to give sail-making a go. My stitching was not very neat but good enough for the level of quality I was going for. I stitched the sails to the spars and spent an evening rigging the ship and it was finally complete. My philosophy while building this boat was to throw myself into a new skill without trying too hard to achieve something perfect. I think I do have a stubborn perfectionist streak, but I figured that for my first boat, I would have to let a few things go in favour of learning a new skill and hopefully make something better next time. With that said, I am still quite pleased with how this boat turned out and I have really enjoyed the entire process. Hopefully some other newbies might come across this log and find something useful here. A lot of the other logs I've seen for this kit have been from quite experienced modellers (the main ones I looked at were from 'Captain Steve' and 'usedtosail'), but I think this is probably a great kit for a beginner. iMustBeCrazy, Sea Hoss and AJohnson 3 Quote Previous builds: HMS Bounty's Launch (Model Shipways), USS Albatros (OcCre) Current build: HMS Beagle (OcCre) Future builds: HMB Endeavour (Caldercraft), De Zeven Provinciën (Kolderstok), HMS Victory (Caldercraft/De Agostini/Artesania Latina/Corel) Link to comment Share on other sites More sharing options...
iMustBeCrazy Posted August 9, 2020 Share #12 Posted August 9, 2020 49 minutes ago, LucienL said: Crazy to think they managed to fit 19 people in there Originally Bligh was going to be sent 'ashore' in the 'small cutter' with two or three others but it was 'wormed' or 'stove in' and couldn't be kept afloat (what sort of ship was Bligh running?). So then the large cutter was to be used but that was changed to the Launch. So all three boats were aboard for the voyage. The large cutter and the launch seem to have been stowed with all thwarts removed and the 'knees and bolts' kept in the carpenters and carpenters mates chests. This comes from the trial transcripts at https://www.famous-trials.com/bounty/399-transcript Bligh didn't say much about the launch in his log except 'In the afternoon I got fitted a pair of shrouds for each mast and contrived a canvass weather cloth round the boat, and raised the quarters about nine inches, by nailing on the seats of the stern sheets, which proved of great benefit to us.' which may imply that no shrouds were normally fitted (therefore no deadeyes) and with the short masts that may be true. Quote Craig. I do know, that I don't know, a whole lot more, than I do know. Current Build: 1:16 Bounty Launch Scratch build. 1:16 Kitty -18 Foot Racing Sloop 1:50 Le Renard HM Cutter Lapwing 1816 Lapwing Drawings Completed....: 1:16 16' Cutter Scratch build. Discussion....: Bounty Boats Facts Link to comment Share on other sites More sharing options...
iMustBeCrazy Posted August 9, 2020 Share #13 Posted August 9, 2020 14 minutes ago, LucienL said: I am still quite pleased with how this boat turned out Well done! Quote Craig. I do know, that I don't know, a whole lot more, than I do know. Current Build: 1:16 Bounty Launch Scratch build. 1:16 Kitty -18 Foot Racing Sloop 1:50 Le Renard HM Cutter Lapwing 1816 Lapwing Drawings Completed....: 1:16 16' Cutter Scratch build. Discussion....: Bounty Boats Facts Link to comment Share on other sites More sharing options...
Keith S Posted April 21, 2021 Share #14 Posted April 21, 2021 (edited) OK, this is the best thing on the internet today, for several reasons. Being in Canada, I have some of the same frustrations finding items that are common in America, like blackening solution. It's probably more common here, but still not all that common. So, I order mine from "E bay". After seeing this, whenever I start feeling a bit sorry for myself because my model ship is giving me some difficulty, I will remind myself of the Australian lad who MADE HIS OWN blackening solution. Also, picking up the project nine years after it was abandoned and finishing it: also a great message for the rest of us in these dissipated times. I am more than impressed, and I hope this model gets pride of place in your house. Edit: also, NOT a beginner's kit, in my book. Extra points for the planking job and soldering your own gudgeons and pintles. Edited April 21, 2021 by Keith S Quote Link to comment Share on other sites More sharing options...
LucienL Posted April 21, 2021 Author Share #15 Posted April 21, 2021 20 hours ago, Keith S said: OK, this is the best thing on the internet today, for several reasons. Being in Canada, I have some of the same frustrations finding items that are common in America, like blackening solution. It's probably more common here, but still not all that common. So, I order mine from "E bay". After seeing this, whenever I start feeling a bit sorry for myself because my model ship is giving me some difficulty, I will remind myself of the Australian lad who MADE HIS OWN blackening solution. Also, picking up the project nine years after it was abandoned and finishing it: also a great message for the rest of us in these dissipated times. I am more than impressed, and I hope this model gets pride of place in your house. Edit: also, NOT a beginner's kit, in my book. Extra points for the planking job and soldering your own gudgeons and pintles. Hi Keith, thank you for your very kind comments, it means a lot Quote Previous builds: HMS Bounty's Launch (Model Shipways), USS Albatros (OcCre) Current build: HMS Beagle (OcCre) Future builds: HMB Endeavour (Caldercraft), De Zeven Provinciën (Kolderstok), HMS Victory (Caldercraft/De Agostini/Artesania Latina/Corel) Link to comment Share on other sites More sharing options...

Recommended Posts
Join the conversation
You can post now and register later. If you have an account, sign in now to post with your account.