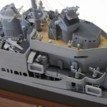
alross2 Posted January 27, 2022 Author Share #31 Posted January 27, 2022 (edited) Finished planking the deck today. There are about one hundred fifty 16" square x 24" basswood planks, plus ten 1/16" x 3/32" x 24" basswood mast partners. If a modeler is ambitious and wants to do scale length planks (let's say 40' as one member suggested), it will take about 700 of them. I wiped on and steel-wooled a couple coats of shellac, then added the laser-cut waterways. Tomorrow, I'll finish fairing the hull and maybe put on the keel, stem, and rudder post. The waterways actually fit the hull with just a tiny bit of tweaking! After this photo was taken, the transom was shaped to match the curve of the waterway. Edited January 27, 2022 by alross2 robdurant, BobG, thibaultron and 8 others 11 Link to comment Share on other sites More sharing options...
alross2 Posted February 15, 2022 Author Share #32 Posted February 15, 2022 (edited) Hull is fully decked and has the waterways added. Transom is shaped with integral "fashion pieces", and the hull now has its third coat of primer. . Deck planking. I used about one hundred fifty 1/16" sq. x 24" basswood strips for the deck. Transom fitted. Deck planks inside the waterways are masked. Third coat of automotive rattle can primer. That's a 12" ruler on the hull bottom to give you an idea of scale. Edited February 15, 2022 by alross2 Archi, BobG, Ryland Craze and 9 others 12 Link to comment Share on other sites More sharing options...
alross2 Posted February 17, 2022 Author Share #33 Posted February 17, 2022 (edited) In a rare moment of weakness, I felt bad for the modeler having to drill 250 evenly-spaced holes in the chock rail for the stanchions. The chock rails are now four pieces of laser-cut 1/8" basswood with the holes already there. And, they actually fit the hull... Chock rails are not yet glued down. Edited February 17, 2022 by alross2 thibaultron, Beef Wellington, John Ruy and 8 others 9 2 Link to comment Share on other sites More sharing options...
alross2 Posted February 17, 2022 Author Share #34 Posted February 17, 2022 (edited) The chock rails are now glued down and I've added a spacer forward. It's 3/16" at the bow tapering to 1/8" about six inches aft. A few minutes with a block sander will fair it. The brass pins are just to align the holes. Edited February 17, 2022 by alross2 ccoyle, John Ruy, BobG and 7 others 10 Link to comment Share on other sites More sharing options...
alross2 Posted February 22, 2022 Author Share #35 Posted February 22, 2022 This weekend, I was looking at the chock rail photos and something didn't look right. I finally figured out that I had put them too far inboard. Duh! I redrew them on Sunday and had Shane recut them this morning. It only took a couple minutes to strip off the old ones and install the new ones. Much happier now. 11 Seen by 8 Like Comment Share Guyuti, markjay, mtaylor and 10 others 13 Link to comment Share on other sites More sharing options...
alross2 Posted February 24, 2022 Author Share #36 Posted February 24, 2022 (edited) Black primer on this morning, along with the anchor chafing plate and hawse lip. Chafing plate is laser-cut .015". laser board Edited February 24, 2022 by alross2 GrandpaPhil, Canute, BobG and 8 others 11 Link to comment Share on other sites More sharing options...
alross2 Posted March 1, 2022 Author Share #37 Posted March 1, 2022 Did a little experimenting. Photoetch is becoming increasingly expensive, so I'm seeking alternatives for items which do not require the strength of metal. Previously, small detail items that weren't feasible to make from 1/64 ply were photo-etched. Now that we're using laserboard, things are different. Here are some items cut today from .015" laserboard. The spreader is two pieces laminated together with thin CA and is amazingly strong. The other items are a window frame, a ladder, and the facia for a companion. Bill Morrison, Ryland Craze, Canute and 4 others 7 Link to comment Share on other sites More sharing options...
ccoyle Posted March 1, 2022 Share #38 Posted March 1, 2022 1 hour ago, alross2 said: we're using laserboard You know that's encroaching on card model territory, right? 😉 alross2, Canute, Bill Morrison and 3 others 2 4 Chris Coyle Greer, South Carolina When you have to shoot, shoot. Don't talk. - Tuco Current builds: Brigantine Phoenix, Hawker Hurricane Link to comment Share on other sites More sharing options...
alross2 Posted March 1, 2022 Author Share #39 Posted March 1, 2022 If it works, use it....😈 thibaultron, ccoyle, Canute and 1 other 4 Link to comment Share on other sites More sharing options...
alross2 Posted March 1, 2022 Author Share #40 Posted March 1, 2022 (edited) Here's a little surprise I didn't tell you about. This is a side project I've been working on while also doing WYOMING and OREGON. This is an HO scale waterline kit of a generic centerboard schooner. It is based on MATTIE/GRACE BAILEY and is named ELLIE MARA after Nic's daughter. The hull is cast resin with laser-cut details and the usual britannia fittings. Overall length is about 14". It should be in production in a few weeks. Contact BJ for details. Edited March 1, 2022 by alross2 Canute, MrBlueJacket, Keith Black and 8 others 10 1 Link to comment Share on other sites More sharing options...
alross2 Posted March 2, 2022 Author Share #41 Posted March 2, 2022 Here are the laser drawings for some of the items I changed over from photoetch to laser. The red lines are cut lines while the black lines are only etched into the surface. These are companions for the deck houses and the scrollwork for the gammon knee. mtaylor, Bill Morrison, Canute and 6 others 9 Link to comment Share on other sites More sharing options...
alross2 Posted March 4, 2022 Author Share #42 Posted March 4, 2022 Got the bottom paint on this morning. It's regular red oxide automotive primer and is redder than it appears in these photos. In an hour or so, I'll remask and do the white sheer rail, chock rail and waterway. Canute, John Ruy, Bill Morrison and 7 others 9 1 Link to comment Share on other sites More sharing options...
alross2 Posted March 4, 2022 Author Share #43 Posted March 4, 2022 (edited) Some of the deck furniture and sticks placed on the hull to get a sense of what it will look like. I still have to fit the houses to the deck camber. Edited March 4, 2022 by alross2 John Ruy, ccoyle, Bill Morrison and 7 others 9 1 Link to comment Share on other sites More sharing options...
alross2 Posted March 16, 2022 Author Share #44 Posted March 16, 2022 Test fitted the mast components today. Assembling the trestle trees is a bit fiddly, but everything fits snugly. Still have to drill the hole in the topmast for the fid. GrandpaPhil, John Ruy, thibaultron and 4 others 7 Link to comment Share on other sites More sharing options...
alross2 Posted March 18, 2022 Author Share #45 Posted March 18, 2022 (edited) Experimenting with the mast. The bands are black construction paper that will be cut from lasered strips. They are closer to scale thickness than britannia and look like wrought iron, so you don't have to paint them. The items between the blue tape and the doubling are 24 sail hoops lasered from .015" laserboard. The T shaped object is the laser-cut glut. Once that is attached, a black paper strap ("barn door") will finish it off. The boom jaw rest is five pieces of lasered 1/32" ply with a copper tape chafing plate. Edited March 18, 2022 by alross2 John Ruy, mtaylor, Canute and 5 others 8 Link to comment Share on other sites More sharing options...
Beef Wellington Posted March 20, 2022 Share #46 Posted March 20, 2022 Looking great. I have nothing to point to, but the red ochre 'waterline' looks awkwardly low on the hull. Curious what pointed you in the direction of doing it so low. Canute, thibaultron and mtaylor 3 Cheers, Jason "Which it will be ready when it is ready!" In the shipyard: HMS Jason (c.1794: Artois Class 38 gun frigate) Queen Anne Royal Barge (c.1700) Finished: HMS Snake (c.1797: Cruizer Class, ship rigged sloop) Link to comment Share on other sites More sharing options...
alross2 Posted March 20, 2022 Author Share #47 Posted March 20, 2022 Plans show it as the light load waterline and it seems consistent with this photo. John Ruy, Canute, ccoyle and 4 others 7 Link to comment Share on other sites More sharing options...
alross2 Posted March 30, 2022 Author Share #48 Posted March 30, 2022 Dontcha just love laser? .015" laserboard, one piece. Ryland Craze, Canute, Bill Morrison and 8 others 10 1 Link to comment Share on other sites More sharing options...
alross2 Posted April 1, 2022 Author Share #49 Posted April 1, 2022 (edited) Admin · 6m · Been busy making sticks this week. Still have to add eyepins and blocks to the short booms and gaffs. The blue tape on the masts is just to keep the sail rings from sliding off before i add the boom jaw rests. Edited April 1, 2022 by alross2 BobG, thibaultron, Bill Morrison and 5 others 8 Link to comment Share on other sites More sharing options...
alross2 Posted April 6, 2022 Author Share #50 Posted April 6, 2022 Finishing the masts today. The boom jaw rests have locaters etched on their underside to make it easier to align the four brackets. GrandpaPhil, John Ruy, Canute and 7 others 10 Link to comment Share on other sites More sharing options...
alross2 Posted April 7, 2022 Author Share #51 Posted April 7, 2022 Working on the channels this morning They're laser-cut with the chain plate slots included. They're easy to set up as the second slot aligns with the center of the mast holes in the deck. The chain plates will be cut to length and a template will be provided to set them at the proper angle. The turnbuckles will attach directly to the chain plates. Ryland Craze, BobG, Canute and 6 others 9 Link to comment Share on other sites More sharing options...
alross2 Posted April 7, 2022 Author Share #52 Posted April 7, 2022 (edited) Hatches, covered and open showing coal. The closed hatches have laser-cut battens, as well. Edited April 7, 2022 by alross2 Canute, robdurant, mtaylor and 6 others 9 Link to comment Share on other sites More sharing options...
alross2 Posted April 8, 2022 Author Share #53 Posted April 8, 2022 A momentous occasion - the first rail stanchion has been glued to the chock rail!🙂 Only 249 more to go...😱 John Ruy, BobG, Bill Morrison and 6 others 9 Link to comment Share on other sites More sharing options...
thibaultron Posted April 8, 2022 Share #54 Posted April 8, 2022 249! "Doctor My Eyes"! Canute, John Ruy, mtaylor and 1 other 1 3 Ron Thibault Shipjack Carrie Price from Pyro kit, with upgraded detailing and history. Going From A 2D Drawing To A 3D Printed Part Tutorial Link to comment Share on other sites More sharing options...
rshousha Posted April 8, 2022 Share #55 Posted April 8, 2022 Great idea with the Laser-board. Well done! Also much easier on the environment. thibaultron, mtaylor and Canute 3 Rick Shousha Montreal Link to comment Share on other sites More sharing options...
alross2 Posted April 12, 2022 Author Share #56 Posted April 12, 2022 Test fitting the stanchions and cap rail. Don't wan't to stick all 250 stanchions into the chock rail and not have them line up correctly!! John Ruy, ccoyle, Bill Morrison and 5 others 8 Link to comment Share on other sites More sharing options...
alross2 Posted April 12, 2022 Author Share #57 Posted April 12, 2022 Starboard aft rail with all stanchions in place. Each stanchion has a slight inboard cant to it, so it's best to simply place but not glue then into their holes, then align them one by one with the top rail taped in place, The pegs on the stanchions will be snipped off flush with the top of the rail and will be covered with a .015" laser board cap rail. John Ruy, thibaultron, GrandpaPhil and 5 others 8 Link to comment Share on other sites More sharing options...
alross2 Posted April 12, 2022 Author Share #58 Posted April 12, 2022 And, the cap rail in place. BobG, mtaylor, Canute and 7 others 10 Link to comment Share on other sites More sharing options...
alross2 Posted April 13, 2022 Author Share #59 Posted April 13, 2022 Starboard rail is done. Only 125 more stanchions to go... Once both rails are complete, I'll mask off the deck and paint the rails and channels white. robdurant, Ryland Craze, chris watton and 8 others 11 Link to comment Share on other sites More sharing options...
alross2 Posted April 14, 2022 Author Share #60 Posted April 14, 2022 Railings are complete and painted. Have to do a little touchup, but it came out well. GrandpaPhil, Bill Morrison, rshousha and 15 others 15 3 Link to comment Share on other sites More sharing options...

Recommended Posts