josh44 Posted March 6, 2021 Share #1 Posted March 6, 2021 It was time for me to make a Ship in a Bottle for dear ol' dad. He's been through quite a bit recently, and I think a gift like this will do some good! Dad always liked a Japanese asthetic; when I was a boy, he designed and built a Japanese tea house in our garden in Connecticut , and his yards always feature a Japanesse Rock Garden. After a few fore and aft SIBs, I wanted to return to the square rigged ships, to see if I can improve upon my technique. Fore and aft SIBs are easier because you only have to worry about one plane of folding, ie the masts. The square rigged ships have the added challenge of all the spars folding or twisitng on the masts. It seems a perfect pairing to try a Japanese Warship from the 19th Century. According to my not-so-very-extensive research on Wikipedia, the Shōhei Maru " (昇平丸) was a sailing frigate constructed on orders of the Tokugawa shogunate of Bakumatsu period Japan by Satsuma Domain in response to the Perry Expedition and increasing incursions of foreign warships into Japanese territorial waters. She was built from 1853 to 1854 at Sakurajima in what is now Kagoshima Prefecture. Shōhei Maru should not be confused with the World War II passenger/cargo vessel of the same name, sunk by the submarine USS Spadefish off of Korea." "The Shōhei Maru was a three-masted barque-rigged sailing vessel, with an overall length of 31.0 m (101 ft 8 in), beam of 7.3 m (23 ft 11 in), and displacement of 370 tons. Of wooden construction, she was depicted in contemporary artwork as being armed with five cannon on each beam. Her sails had black bands, characteristic of Tokugawa naval vessels. She was depicted in an 1855 print as flying the rising sun flag. " The pictures above are the only representations I could find of Shohei Maru, but there were other similar Japanese Warships commissione during the same period of the Tokugawa Shogunate. These include Asahi Maru, and Hoo Maru, whose image was my true muse for this project. I really like these Japanese Nikka Whiskey bottles! Perfect for the job! To start, I decided to fashion and use a plank a working board. This is used in some American SIB kits, and should give me tighter control of the masts and sails as I make her. Landlubber Mike, mtaylor, ccoyle and 1 other 4 Quote My Scratch-built models are: Schooner Annie - BOTTLE (FINISHED) Sloop of War Alaska - BOTTLE (FINISHED) Flying Dutchman - BOTTLE (FINISHED) Fortnite Pirate Ship - BOTTLE (FINISHED) Gulet Princess Lila - BOTTLE (FINISHED) Schooner Caroline - BOTTLE (FINISHED) Whaling Ship Jeroboam - BOTTLE (FINISHED) Endicott Pond Boat - BOTTLE - (FINISHED) Parsifal III Ketch Sail Yacht - BOTTLE (FINISHED) Shohei Maru Japanese Warship - BOTTLE (FINISHED) Santa Maria - RESTORATION (FINISHED) Link to comment Share on other sites More sharing options...
josh44 Posted March 7, 2021 Author Share #2 Posted March 7, 2021 Part II - Hull, rigging, and bottle prep. The Lower hull on the working plank Upper and lower I decided to have the masts fold aft on a hinge rod running athwart the upper hull. I drilled out space in the hull for the masts and rigging to fold back, scooped out - not unlike - how the Missus likes her Subway sandwich bread! The Mizzen mast is fore and aft rigged with two gaff rigged masts. Main mast up, and Fore mast up. I tried to keep the rigging simple, leaving the yards alone, and attaching running rigging as beckets on the lower corners. Also no channels, dead-eayes of belaying pins for me; with my crude skill set, any attempts at those features would just be more ways for me to junk it all up. Instead, I drill some holes aft of each mast and uses them as pull-throughs. As for the bottle prep, I wanted to try something new for me: Drilling through the base, and inserting brass eyelets to secure the hull posts. The holes will be in the same configuration as on the working plank I exprimented on thos bottle of Calverts Special. Needed a bit for glass drilling, low speed, and lubricant for the bit. it worked well. Taping or having a label over the hole helps as well. In go the eyelets, CA'd. All part of the plan to create a firm base for the ship, for when I want to tighten the rigging after launch. Sturdy dowels are filed to fit into the eyelets, resembling a belaying pin! After much filing and cajoling, they are CA'd in as well. And finally, the lower hull snuggly sits upon the well-secured posts! Next: The launch Baltic_submariner, GrandpaPhil, Landlubber Mike and 1 other 4 Quote My Scratch-built models are: Schooner Annie - BOTTLE (FINISHED) Sloop of War Alaska - BOTTLE (FINISHED) Flying Dutchman - BOTTLE (FINISHED) Fortnite Pirate Ship - BOTTLE (FINISHED) Gulet Princess Lila - BOTTLE (FINISHED) Schooner Caroline - BOTTLE (FINISHED) Whaling Ship Jeroboam - BOTTLE (FINISHED) Endicott Pond Boat - BOTTLE - (FINISHED) Parsifal III Ketch Sail Yacht - BOTTLE (FINISHED) Shohei Maru Japanese Warship - BOTTLE (FINISHED) Santa Maria - RESTORATION (FINISHED) Link to comment Share on other sites More sharing options...
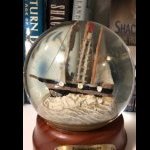
josh44 Posted March 21, 2021 Author Share #3 Posted March 21, 2021 Part III: Launch, Repairs, and Finish She folds nicely - a good start! Even better! The Stern was too wide for the bottle neck, so I had to grind it down a bit. No snaps or cracks - music to my ears. Secured by CA onto the 2 posts drilled up from the bottle bottom. The next part - the fixing and finishing of the yards and rigging - is the where I experience the highs and lows of these projects. Inevitably, and despite my sometimes careful planning, there are major repairs. Some of these repairs ar a result from the folding, and some from the insertion: I always fix from stern to stem, so some damage is foreward from my attempt to fix aft in the bottle. Below, in red the major damage came from folding and squeezing into the bottle. Three sails, the main-lower , fore-lower , and for-upper topsails, all came off during insertion. This was probably because the knots I made in the fishing line were too small, and got pulled through the holes I drilled in the yards. I think I simply glued these yards to the masts. The more elegeant option of rethreading inside the bottle with hartmanns clamps was proving too time consuming and unnecessary. Here the mizzen is up, and the main mast is set and glued, but the bowsprit has inadvertantly been torn from the hull during the repairs. Because many of the rigging lines passed through the bowsprit, I had to get it reaffixed before I completed the Foremast. Many hours later, all is completed. I decided not to take pictures of the model in various states of repair and frustration. A proper custom base. My new thing is laying felt down tohave its color picked up and reflected, as if it were the ocean. I kept the whiskey label on the bottom of the bottle. I might choose to remove it to improve the optics of the feaux-cean. The Jibs look better from this - the windward - side. Can't wait to give it to Dad! He will Love it! Thanks for reading! Harvey Golden, Snug Harbor Johnny, mtaylor and 7 others 9 1 Quote My Scratch-built models are: Schooner Annie - BOTTLE (FINISHED) Sloop of War Alaska - BOTTLE (FINISHED) Flying Dutchman - BOTTLE (FINISHED) Fortnite Pirate Ship - BOTTLE (FINISHED) Gulet Princess Lila - BOTTLE (FINISHED) Schooner Caroline - BOTTLE (FINISHED) Whaling Ship Jeroboam - BOTTLE (FINISHED) Endicott Pond Boat - BOTTLE - (FINISHED) Parsifal III Ketch Sail Yacht - BOTTLE (FINISHED) Shohei Maru Japanese Warship - BOTTLE (FINISHED) Santa Maria - RESTORATION (FINISHED) Link to comment Share on other sites More sharing options...
GrandpaPhil Posted April 22, 2021 Share #4 Posted April 22, 2021 Very cool! Well done! mtaylor 1 Quote Building: 1:64 HMS Revenge (Victory Models plans) 1:64 Cat Esther (17th Century Dutch Merchant Ships) On the building slip: 1:72 French Ironclad Magenta (original shipyard plans) On hold: 1:98 Mantua HMS Victory (kit bash), 1:96 Shipyard HMS Mercury Favorite finished builds: 1:60 Sampang Good Fortune (Amati plans), 1:200 Orel Ironclad Solferino, 1:72 Schooner Hannah (Hahn plans), 1:72 Privateer Prince de Neufchatel (Chapelle plans), Model Shipways Sultana, Heller La Reale, Encore USS Olympia Goal: Become better than I was yesterday "The hardest part is deciding to try." - me Link to comment Share on other sites More sharing options...
Landlubber Mike Posted April 22, 2021 Share #5 Posted April 22, 2021 Josh, sorry to have missed this one before. What a fantastic SIB and gift for your dad. Hope he liked it! Quote Mike Current Wooden builds: Amati/Victory Pegasus MS Charles W. Morgan Euromodel La Renommèe Plastic builds: SB2U-1 Vindicator 1/48 Five Star Yaeyama 1/700 Pit Road Asashio and Akashi 1/700 diorama Walrus 1/48 and Albatross 1/700 Special Hobby Buffalo 1/32 Eduard Sikorsky JRS-1 1/72 IJN Notoro 1/700 Akitsu Maru 1/700 Completed builds : Caldercraft Brig Badger Amati Hannah - Ship in Bottle Pit Road Hatsuzakura 1/700 Hasegawa Shimakaze 1:350 F4B-4 and P-6E 1/72 Accurate Miniatures F3F-1/F3F-2 1/48 Tamiya F4F-4 Wildcat built as FM-1 1/48 Special Hobby Buffalo 1/48 Citroen 2CV 1/24 - Airfix and Tamiya Entex Morgan 3-wheeler 1/16 Terminated build: HMS Lyme (based on Corel Unicorn) On the shelf: Euromodel Friedrich Wilhelm zu Pferde; Caldercraft Victory; too many plastic ship, plane and car kits Future potential scratch builds: HMS Lyme (from NMM plans); Le Gros Ventre (from Ancre monographs), Dutch ship from Ab Hoving book, HMS Sussex from McCardle book, Philadelphia gunboat (Smithsonian plans) Link to comment Share on other sites More sharing options...
Omega1234 Posted April 22, 2021 Share #6 Posted April 22, 2021 Hi Josh Lovely job and a great gift for your father! Cheers Patrick mtaylor 1 Quote MY SCRATCH BUILT MODELS ARE: Splendid Mega Yacht https://modelshipworld.com/topic/28576-splendid-by-omega1234-scale-1500-mega-yacht/ Majestic Mega Yacht https://modelshipworld.com/topic/28483-mega-yacht-majestic-by-omega1234-miniature/ Sapphire Mega yacht https://modelshipworld.com/topic/21088-sapphire-by-omega1234-1388-scale-mega-yacht-66m-8-inch-hull-length/?tab=comments#comment-639898 Genesis - Supersports Mega Yacht https://modelshipworld.com/topic/18168-genesis-by-omega1234-1300-49m-mega-yacht-8-inches-long-finished/?tab=comments#comment-559026http://modelshipworld.com/index.php/topic/14141-shadow-by-omega1234-scale-1300-luxury-60m-mega-yacht-8-inches-long/ SHADOW Luxury Motor Yacht http://modelshipworld.com/index.php/topic/11384-majellan-by-omega1234-luxury-37-metre-motor-yacht-miniature-7-inches-approx/ Majellan Luxury Motor Yacht http://modelshipworld.com/index.php/topic/9261Rainbow-j-class-racing-yacht/?p=273543 Rainbow J Class Racing Yacht Mystic Classic Motor Cruiser Symphony Ingomar Schooner: Scratch build Dorade Schooner: <p> Lennox Restoration Warship http://modelshipworld.com/index.php/topic/9577-pandora-cutaway-dockyard-style-miniature/?hl=pandora Link to comment Share on other sites More sharing options...
josh44 Posted April 30, 2021 Author Share #7 Posted April 30, 2021 On 4/22/2021 at 11:26 AM, GrandpaPhil said: Very cool! Well done! Thank you, Phil! mtaylor 1 Quote My Scratch-built models are: Schooner Annie - BOTTLE (FINISHED) Sloop of War Alaska - BOTTLE (FINISHED) Flying Dutchman - BOTTLE (FINISHED) Fortnite Pirate Ship - BOTTLE (FINISHED) Gulet Princess Lila - BOTTLE (FINISHED) Schooner Caroline - BOTTLE (FINISHED) Whaling Ship Jeroboam - BOTTLE (FINISHED) Endicott Pond Boat - BOTTLE - (FINISHED) Parsifal III Ketch Sail Yacht - BOTTLE (FINISHED) Shohei Maru Japanese Warship - BOTTLE (FINISHED) Santa Maria - RESTORATION (FINISHED) Link to comment Share on other sites More sharing options...
josh44 Posted April 30, 2021 Author Share #8 Posted April 30, 2021 On 4/22/2021 at 1:26 PM, Omega1234 said: Hi Josh Lovely job and a great gift for your father! Cheers Patrick Thanks, Patrick! So glad to see your new luxury yacht in the works. By the way, when I made Parsifal for my MIL I remembered your haunting words: Once you make a luxury yacht, you'll never be able to stop! (or something like that! 😁) Omega1234 and mtaylor 2 Quote My Scratch-built models are: Schooner Annie - BOTTLE (FINISHED) Sloop of War Alaska - BOTTLE (FINISHED) Flying Dutchman - BOTTLE (FINISHED) Fortnite Pirate Ship - BOTTLE (FINISHED) Gulet Princess Lila - BOTTLE (FINISHED) Schooner Caroline - BOTTLE (FINISHED) Whaling Ship Jeroboam - BOTTLE (FINISHED) Endicott Pond Boat - BOTTLE - (FINISHED) Parsifal III Ketch Sail Yacht - BOTTLE (FINISHED) Shohei Maru Japanese Warship - BOTTLE (FINISHED) Santa Maria - RESTORATION (FINISHED) Link to comment Share on other sites More sharing options...
josh44 Posted April 30, 2021 Author Share #9 Posted April 30, 2021 On 4/22/2021 at 11:33 AM, Landlubber Mike said: Josh, sorry to have missed this one before. What a fantastic SIB and gift for your dad. Hope he liked it! Thanks, Mike! Yes , he was very touched! Landlubber Mike and mtaylor 2 Quote My Scratch-built models are: Schooner Annie - BOTTLE (FINISHED) Sloop of War Alaska - BOTTLE (FINISHED) Flying Dutchman - BOTTLE (FINISHED) Fortnite Pirate Ship - BOTTLE (FINISHED) Gulet Princess Lila - BOTTLE (FINISHED) Schooner Caroline - BOTTLE (FINISHED) Whaling Ship Jeroboam - BOTTLE (FINISHED) Endicott Pond Boat - BOTTLE - (FINISHED) Parsifal III Ketch Sail Yacht - BOTTLE (FINISHED) Shohei Maru Japanese Warship - BOTTLE (FINISHED) Santa Maria - RESTORATION (FINISHED) Link to comment Share on other sites More sharing options...
Omega1234 Posted April 30, 2021 Share #10 Posted April 30, 2021 5 hours ago, josh44 said: Thanks, Patrick! So glad to see your new luxury yacht in the works. By the way, when I made Parsifal for my MIL I remembered your haunting words: Once you make a luxury yacht, you'll never be able to stop! (or something like that! 😁) Thanks Josh! I’m just going to check out your Parsifal now! All the best. Patrick Quote MY SCRATCH BUILT MODELS ARE: Splendid Mega Yacht https://modelshipworld.com/topic/28576-splendid-by-omega1234-scale-1500-mega-yacht/ Majestic Mega Yacht https://modelshipworld.com/topic/28483-mega-yacht-majestic-by-omega1234-miniature/ Sapphire Mega yacht https://modelshipworld.com/topic/21088-sapphire-by-omega1234-1388-scale-mega-yacht-66m-8-inch-hull-length/?tab=comments#comment-639898 Genesis - Supersports Mega Yacht https://modelshipworld.com/topic/18168-genesis-by-omega1234-1300-49m-mega-yacht-8-inches-long-finished/?tab=comments#comment-559026http://modelshipworld.com/index.php/topic/14141-shadow-by-omega1234-scale-1300-luxury-60m-mega-yacht-8-inches-long/ SHADOW Luxury Motor Yacht http://modelshipworld.com/index.php/topic/11384-majellan-by-omega1234-luxury-37-metre-motor-yacht-miniature-7-inches-approx/ Majellan Luxury Motor Yacht http://modelshipworld.com/index.php/topic/9261Rainbow-j-class-racing-yacht/?p=273543 Rainbow J Class Racing Yacht Mystic Classic Motor Cruiser Symphony Ingomar Schooner: Scratch build Dorade Schooner: <p> Lennox Restoration Warship http://modelshipworld.com/index.php/topic/9577-pandora-cutaway-dockyard-style-miniature/?hl=pandora Link to comment Share on other sites More sharing options...

Recommended Posts
Join the conversation
You can post now and register later. If you have an account, sign in now to post with your account.