DonSangria Posted July 29, 2021 Share #61 Posted July 29, 2021 Nice to have you back! 😃 Looking forward to your posts. My Beagle will have to wait for 3 months, since I'm travelling. She has now all 3 masts completed and all the yards and booms except for the main mast. So I'm in for some rigging after my travels. Robp1025 1 Quote Current build: HMS Sphinx 1:64 (Vanguard Models) Finished: HMS Beagle 1:60 (Occre) Link to comment Share on other sites More sharing options...
Robp1025 Posted July 29, 2021 Share #62 Posted July 29, 2021 Hey welcome back friend!! Yea my progress has been slow on mine because life went crazy on me but it's better now Quote Link to comment Share on other sites More sharing options...
LucienL Posted August 8, 2021 Author Share #63 Posted August 8, 2021 Thanks for the comments Rob and Don. So for the forecastle details the first step was to blacken the chain. I have outlined how I made my home-made blackening solution in my bounty’s launch build log but it basically involves using copper sulfate and bicarb soda to make copper carbonate which can then be added to ammonia to give the blackening solution. I was still using the same batch from my Bounty’s launch, and I think it is much weaker now as some of the ammonia has evaporated. It took over 5 hours to produce the colour seen here where it was achieving the same results in 10 minutes a year ago. I guess the container must not be particularly airtight. Also, on a few other Beagle threads, it's been mentioned how crowded the belaying pins at the foremast are. Anatomy of the Ship indicates that there should be some eyebolts around the base of the foremast to possibly ease this. It's pretty clear why OcCre has not suggested this, as it is going to be a pain in the **** to tie off ropes here once the mast is in, but why are we here if not to suffer? I'll probably tie off the threads to these eyebolts before adding the mast, which might make things a bit easier. Painting the windlass was fun. The beige I used for the pins didn’t look quite right on the windlass as a whole, so I added a tiny bit of brown. Painting in the lines was a challenge that took a few goes to get right. I also made the carronade. The top ring in my kit was very poorly cut and one edge was thinner than the other side and it broke as soon as I cut it out. I had to bend some 1 x 3 strips to give two half rings to make up a new one. I did also add some gun tackle using 2 mm blocks. The hatchway was also fun to make. I added some hinges to the hatches with some off cuts from the eyebolts. I also made up some chain stoppers. I’m not really sure if they’re quite right but I think they get the idea across. And finally, the two binnacles have been added. There’s a bit of a story as to why I have two. From anatomy of the ship, it’s clear that two binnacles were onboard, while the kit only has one. I noticed this months ago and emailed OcCre asking to pay for an additional binnacle as well as shipping. They may have misunderstood me as they assumed I had a missing part. They sent over a bunch, so I have way too many now, but I could at least install the correct amount. But as many other people have mentioned, OcCre definitely has top notch customer service, which I guess is something to keep in mind for any of their kits. Anyway, I'm having a lot of fun with the little details, it's definitely one of the most rewarding parts of the build. The thought of building the boats is a bit daunting as I think I've set myself a few challenges there and I'm not really sure how it's going to turn out. The next few updates shouldn't be too far off though. Techtonic, Robp1025, uncarina and 3 others 6 Quote Previous builds: HMS Bounty's Launch (Model Shipways), USS Albatros (OcCre) Current build: HMS Beagle (OcCre) Future builds: HMB Endeavour (Caldercraft), De Zeven Provinciën (Kolderstok), HMS Victory (Caldercraft/De Agostini/Artesania Latina/Corel) Link to comment Share on other sites More sharing options...
LucienL Posted December 4, 2021 Author Share #64 Posted December 4, 2021 Hey everyone, I’ve been quiet for a while but have a couple of posts that have been ready for a while now. It’s been slow going for the past couple of months, but significant progress has been made since the last update and I have a few posts I can do now. First up is all the details around the main mast. The hatchway was mostly straightforward to make. I had a bit of trouble with the number of eyebolts around the main mast. I settled on 6 around the mast and one in front (changed after this photo). I did also need to order some more cleats as I think the rigging in the OcCre guide is not quite accurate. I’ve forgotten the specificities of what each of the eyebolts are for, but I’ll get into that later. The winch was a little tricky. I added some gears by cutting a thin wheel off of a dowel and cutting in some grooves to mimic the effect, which I think works. I also had to make the posts a little longer as it clashed with the belaying pins Bilge pumps were fiddly, but mostly straightforward, getting them to align symmetrically took a bit of trial and error but turned out okay. The sounding winch was also fun. For ages I could not figure out what this thing was for. This was apparently used to lower ropes to the sea surface in order to gauge the depth of the sea floor, which is pretty cool. Then it was either cannons or skylights. I had planned some pretty major deviations for both of these and both seemed a bit daunting. In the end, I decided to do sky lights first to get all the stuff that is actually fixed to the deck done first. Robp1025, Cathead, Fernando E and 1 other 3 1 Quote Previous builds: HMS Bounty's Launch (Model Shipways), USS Albatros (OcCre) Current build: HMS Beagle (OcCre) Future builds: HMB Endeavour (Caldercraft), De Zeven Provinciën (Kolderstok), HMS Victory (Caldercraft/De Agostini/Artesania Latina/Corel) Link to comment Share on other sites More sharing options...
LucienL Posted December 4, 2021 Author Share #65 Posted December 4, 2021 Similar to how I did the cabin windows, I wanted to cut holes in the wood and place a mirror behind it to give the illusion of depth. This proved quite difficult with the pre-cut parts as cutting out the holes was extremely painful and they ended up being too small. So instead, I decided to scratch build them using some of the limewood pieces. This gave some ugly little skeletons here (I think the main one is wrong here, I fixed it later but the slope on the roof should go the other way) They looked a bit better with the sycamore lining and the roofs I had to also make the bars from scratch, which was a long night cutting 1mm brass rods (I ended up buying some spare stuff in the end) I really did not feel like priming all of these and then painting them multiple times, so I decided to blacken them instead, which turned out okay Then I glued in the mirrors to give this effect, which is quite difficult to take photos of Then I fixed them to the boat, and the deck was starting to come together There was a bit of trouble on the poop deck as the sounding winch did clash a little with the larger sky light and I had to rebuild it with shorter wire and shift it a bit so that there was enough clearance (I think this piece is a little too large for scale, but I still like it) Anyway, cannons next. Cathead, Fernando E, Robp1025 and 4 others 7 Quote Previous builds: HMS Bounty's Launch (Model Shipways), USS Albatros (OcCre) Current build: HMS Beagle (OcCre) Future builds: HMB Endeavour (Caldercraft), De Zeven Provinciën (Kolderstok), HMS Victory (Caldercraft/De Agostini/Artesania Latina/Corel) Link to comment Share on other sites More sharing options...
LucienL Posted December 10, 2021 Author Share #66 Posted December 10, 2021 Cannons were also a fairly significant deviation from the kit instructions. Instead of using the laser cut parts which did not look right to me, I only cut off the top ridged bit of the side pieces and used that. The bottom section of the side piece was then glued to that to give a groove. I made up the quoin using the previously purchased brass belaying pins Then I could add the actual cannon barrel (yay) The main body of the cannon was finished off with wheels, eyebolts (from 0.5 mm wire) and cannon hinges. This all had multiple steps that took quite a while with 6 cannons. I can’t even imagine doing 100 for something like the Victory, but I would definitely want to do a big battle ship like that eventually. I also rigged them with some 0.5 mm thread. I now need to add the blocks and tie them down to the deck. I think I will also add eyebolts to each of the gunports where the cannons are supposed to go. Anyway, here are some more pictures. Techtonic, uncarina, GrandpaPhil and 6 others 9 Quote Previous builds: HMS Bounty's Launch (Model Shipways), USS Albatros (OcCre) Current build: HMS Beagle (OcCre) Future builds: HMB Endeavour (Caldercraft), De Zeven Provinciën (Kolderstok), HMS Victory (Caldercraft/De Agostini/Artesania Latina/Corel) Link to comment Share on other sites More sharing options...
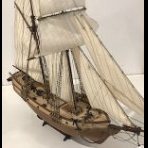
LucienL Posted August 22, 2022 Author Share #67 Posted August 22, 2022 (edited) Hey everyone, so long time since my last post. I haven’t had a lot of time this year to work on the boat much, but I’ve been slowly working away at a few things. Part of it is time, but I also haven’t been able to give the proper head-space to the boat all that much. I've been very busy with my final year of uni, which is a research project that has been occupying a similar place in my brain that was previously occupied by the boat. Last post was about the cannons, they were tied down using some tiny blocks, but that I think look okay. I also painted the figurehead and did the prow details with some blackened chain Then it was finally time to actually do the hammocks. It took some trouble shooting, but eventually I did end up with a method that worked. Then it was just a slow process of repeating it 100 times. They are a bit random and rough, but I don’t mind that, as my key frustrations with the kit hammocks were the regularity, the missing fold lines and the fact that they were completely the wrong material. This was one of the three biggest changes I had been planning from the start of the build and been most apprehensive about so I’m really glad that this is done. Coppering was the first. The third big change is what has been causing considerably more difficulty, which is to scratch build all seven of the survey boats. At the moment, I am working on a jig for the frames and planking. I think I will post when that is done even if it is not very exciting Edited August 22, 2022 by LucienL DonSangria, The Gimps Chimp, Techtonic and 3 others 5 1 Quote Previous builds: HMS Bounty's Launch (Model Shipways), USS Albatros (OcCre) Current build: HMS Beagle (OcCre) Future builds: HMB Endeavour (Caldercraft), De Zeven Provinciën (Kolderstok), HMS Victory (Caldercraft/De Agostini/Artesania Latina/Corel) Link to comment Share on other sites More sharing options...
LucienL Posted December 29, 2022 Author Share #68 Posted December 29, 2022 Hey everyone, so I have finally gotten around to planking the first boat, which is the 26 ft Yawl that sits in the centre of the main deck. I’ve used the anatomy of the ship to construct the jig. This involved printing out the body lines and using these as template to cut each piece of the jig out of 1.5 mm plywood. These were all fitted into a false keel and the space between them filled with balsa. I sanded them down to give a jig that closely approximates the body lines in anatomy of the ship. Then I used the jig to bend 1 mm sticks to shape to form the frames, I stained each of these with a dark oak stain. I glued each of these at the top with a spacer piece (I think it was 5 mm length and 0.5 mm thick). I hoped that this would prevent them from sticking to the jig, but in hindsight, I should have covered the jig in plastic to really prevent this. After fitting all the frames, I added another layer of the keel to hold them all in place, the planks would then meet the keel at this height. I also fitted the transom and sternpost and then did some fairing I figured I would lay the sheer plank first to get an idea of how much space I was working with. It was very difficult to measure these things accurately as the boat is so small and my equipment is not really precise enough. I ended up eyeballing a lot of it and hoping things were the correct length. I think I am extremely lucky that it worked out as well as it did. I did my planking from the garboard up. The logic was that if there were problems at the top, I could simply re-adjust the sheer plank to make it all nice. Fortunately, this was not necessary (it is such a little thing!) Then filling and sanding to give a nice finish (this will be painted white). This hull would have been double diagonal planked on the real ship. I was tempted to give this a try, however I figured that it would be a good idea to get practice planking on this one as I would want to hide much of the planks in the finish anyway (because it is inaccurate already). This would help me later when I try and do the remaining 6 boats, 5 of which are clinker planked. I guess we’ll see whether it comes off the jig... Cathead, DonSangria, The Gimps Chimp and 3 others 5 1 Quote Previous builds: HMS Bounty's Launch (Model Shipways), USS Albatros (OcCre) Current build: HMS Beagle (OcCre) Future builds: HMB Endeavour (Caldercraft), De Zeven Provinciën (Kolderstok), HMS Victory (Caldercraft/De Agostini/Artesania Latina/Corel) Link to comment Share on other sites More sharing options...
LucienL Posted December 29, 2022 Author Share #69 Posted December 29, 2022 Just a quick update here, I fitted the final layer of the keel over the planked hull and started painting it. I got a little excited and tried to get the hull off the jig. I still have painting to do, but I was a little worried and wanted to see how it would go. It did not come out of the jig easily, definitely glad wrap it next time, I’m amazed nothing broke. The remnants of the jig are also attached. Robp1025, Techtonic, Prowler901 and 3 others 5 1 Quote Previous builds: HMS Bounty's Launch (Model Shipways), USS Albatros (OcCre) Current build: HMS Beagle (OcCre) Future builds: HMB Endeavour (Caldercraft), De Zeven Provinciën (Kolderstok), HMS Victory (Caldercraft/De Agostini/Artesania Latina/Corel) Link to comment Share on other sites More sharing options...
Robp1025 Posted December 30, 2022 Share #70 Posted December 30, 2022 On 12/29/2022 at 7:08 AM, LucienL said: Just a quick update here, I fitted the final layer of the keel over the planked hull and started painting it. I got a little excited and tried to get the hull off the jig. I still have painting to do, but I was a little worried and wanted to see how it would go. It did not come out of the jig easily, definitely glad wrap it next time, I’m amazed nothing broke. The remnants of the jig are also attached. Looks like it held on for dear life there!! really nice way to handle this because i struggled with the size of the life boats and trying to get those right. Quote Link to comment Share on other sites More sharing options...
LucienL Posted January 2, 2023 Author Share #71 Posted January 2, 2023 Hi Rob, yeah it was definitely close! I’m not sure if this is the best way to go about it, I’ve seen other people use laser cut frames which might be a bit easier. This works for me though, even if it is pretty time consuming. The Gimps Chimp 1 Quote Previous builds: HMS Bounty's Launch (Model Shipways), USS Albatros (OcCre) Current build: HMS Beagle (OcCre) Future builds: HMB Endeavour (Caldercraft), De Zeven Provinciën (Kolderstok), HMS Victory (Caldercraft/De Agostini/Artesania Latina/Corel) Link to comment Share on other sites More sharing options...
LucienL Posted January 4, 2023 Author Share #72 Posted January 4, 2023 Hey everyone, I’ve been working on fitting out the hull of the yawl and making it look nice. I painted it and fit the sheer clamps to give it some more rigidity. I was a bit worried about it spilling out at the sides, as this happened on my first build the Bounty’s launch After fitting the gunwales it was much more sturdy. I cut these from a piece of ply after tracing the outline from the remnants of the jig. I cut them wider than they should be to start (around 4-5 mm width), and then sanded them down to fit the hull as best as possible to around 2-3 mm. They should be mirror images, but I did have to bend them a bit while gluing. Then some other bits and the deck planks (varnish is not quite dry yet. It was a bit fiddly to get the bow looking right I think the sheer clamp got a bit grubby by this stage, will try to clean it a bit. Really enjoying making this little guy and getting into it. I think I’ve gotten over the main barriers which were bending frames, planking and fitting the gunwales. Should be much easier to do boat number 2 (and 3-7) now. Prowler901, Cathead, The Gimps Chimp and 1 other 4 Quote Previous builds: HMS Bounty's Launch (Model Shipways), USS Albatros (OcCre) Current build: HMS Beagle (OcCre) Future builds: HMB Endeavour (Caldercraft), De Zeven Provinciën (Kolderstok), HMS Victory (Caldercraft/De Agostini/Artesania Latina/Corel) Link to comment Share on other sites More sharing options...
LucienL Posted January 11, 2023 Author Share #73 Posted January 11, 2023 Another smallish update but has taken some time. I fitted the stern-sheet bench and back, which took ages to make from scratch and sand to fit properly. I also added a few thwarts, the third one is the mast thwart and is only dry fit. The mast helpers are made from 1 mm wide brass strips and painted back. I’ve used the kit nails to fit them in, they’re probably a bit too big but add some nice detail. Also made the windlass holders. I think I will make up a full windlass and strap that to the deck as part of the boat kit. I’ll probably also make up some oars, a grapnel, the rudder, masts and sails and chuck in a barrel. I’m drawing a lot from my experience on my first build: The Bounty’s Launch to make these little boats. I think my sheer clamp and thwart raisers are too wide, but I can live with them. And finally, with all the thwarts in. No pennies in Australia, but our 2-dollar coin is around the same size (I think) Next steps are to make the grating for the quarter deck, do the mast steps, tholes and the thwart stanchions. Then I should be able to move on to fitting it into the main boat and building the 23 ft cutter. Feeling motivated and keen at the moment, so should be able to keep making progress (unless the gratings kill me). shipman, Capella, Cathead and 4 others 5 1 1 Quote Previous builds: HMS Bounty's Launch (Model Shipways), USS Albatros (OcCre) Current build: HMS Beagle (OcCre) Future builds: HMB Endeavour (Caldercraft), De Zeven Provinciën (Kolderstok), HMS Victory (Caldercraft/De Agostini/Artesania Latina/Corel) Link to comment Share on other sites More sharing options...
Capella Posted January 11, 2023 Share #74 Posted January 11, 2023 Looks great, Lucien! Personally, I'm kind of dreading building those launches mainly because they're so darned small and look like they'll be difficult to work with due to the size. But everyone else's Beagle launches have turned out well, so I'm hoping they just look difficult, but won't be once I get started. (Crossing my fingers that I'm right! 😉) Mr Whippy 1 Quote First build: US Ranger - Corel Second build: HMS Beagle - OcCre Link to comment Share on other sites More sharing options...
LucienL Posted January 11, 2023 Author Share #75 Posted January 11, 2023 (edited) In the wise words of Samwise Gamgee "It's the job that's never started as takes longest to finish". I'm sure your boats will look great! I was also dreading this a bit and it did turn out to be much easier than I expected. Edited January 12, 2023 by LucienL Capella and Mr Whippy 1 1 Quote Previous builds: HMS Bounty's Launch (Model Shipways), USS Albatros (OcCre) Current build: HMS Beagle (OcCre) Future builds: HMB Endeavour (Caldercraft), De Zeven Provinciën (Kolderstok), HMS Victory (Caldercraft/De Agostini/Artesania Latina/Corel) Link to comment Share on other sites More sharing options...
Capella Posted January 11, 2023 Share #76 Posted January 11, 2023 How could I go against good, loyal Sam?! Patrick B and LucienL 2 Quote First build: US Ranger - Corel Second build: HMS Beagle - OcCre Link to comment Share on other sites More sharing options...
LucienL Posted January 26, 2023 Author Share #77 Posted January 26, 2023 Been finishing up some of the last details on the yawl. The big one was the grating that makes up the quarter deck. I glued some 1 x 1 mm sticks to a 3 x 1 mm stick using some 1 mm spacers. Then I cut them in half to double the amount of grating made, which could then be glued together. In only had a small amount to make, so this relatively inefficient process was still effective. I’ve also done the thwart stanchions, mast steps and the tholes, which means that this one is basically done aside from boat gear, which I might combine with some of the other boats a bit later. RobTBay, ccoyle, Techtonic and 6 others 7 1 1 Quote Previous builds: HMS Bounty's Launch (Model Shipways), USS Albatros (OcCre) Current build: HMS Beagle (OcCre) Future builds: HMB Endeavour (Caldercraft), De Zeven Provinciën (Kolderstok), HMS Victory (Caldercraft/De Agostini/Artesania Latina/Corel) Link to comment Share on other sites More sharing options...
Capella Posted January 26, 2023 Share #78 Posted January 26, 2023 Looks great, Lucien! LucienL 1 Quote First build: US Ranger - Corel Second build: HMS Beagle - OcCre Link to comment Share on other sites More sharing options...
allanyed Posted January 28, 2023 Share #79 Posted January 28, 2023 (edited) Lucien Yours is definitely the best ship's boat for the Beagle I have seen here at MSW. The method you used is similar to that published by Frolich in The Art of Ship Modeling and variations can be seen in several scratch build logs 1751-1800 regarding a launch. I have used plugs similar to yours for a dozen boats over the past years and have saved all of them so I was surprised to see you had to destroy yours. Was there a reason you did not save it? You may find the following interesting as there are similarities. Allan https://modelshipworld.com/topic/33539-23-foot-launch-by-allanyed-bounty-late-18th-century/ Edited January 28, 2023 by allanyed LucienL 1 Quote PLEASE take 30 SECONDS and sign up for the epic Nelson/Trafalgar project if you would like to see it made into a TV series. Click on http://trafalgar.tv There is no cost other than the 30 seconds of your time. THANK YOU Link to comment Share on other sites More sharing options...
Snug Harbor Johnny Posted January 28, 2023 Share #80 Posted January 28, 2023 Such a nice method ... and a great outcome for the boat ! This is something that anyone learning from MSW logs can benefit from. Sure, its a lot more trouble than just building them as provided by OcCre - but you are going to significant lengths to make the entire Beagle build far better than an 'out of the box' exercise. I tip my hat to you! allanyed and LucienL 1 1 Quote Completed builds: Khufu Solar Barge - 1:72 Woody Joe Current project(s): Gorch Fock restoration 1:100, Billing Wasa (bust) - 1:100 Billings, Great Harry (bust) 1:88 ex. Sergal 1:65 Link to comment Share on other sites More sharing options...
Capella Posted January 28, 2023 Share #81 Posted January 28, 2023 @LucienL What color stain did you use for the boats? Quote First build: US Ranger - Corel Second build: HMS Beagle - OcCre Link to comment Share on other sites More sharing options...
LucienL Posted January 29, 2023 Author Share #82 Posted January 29, 2023 Thank you for the kind words everyone. @allanyed I think the trouble came when I tried to glue the spacer pieces that sit between the frames. I think some of the glue stuck to the jig, which meant that it would be impossible to remove in one piece. I think that next time I will wrap the jig in some cling wrap and that should allow the boat to lift off the jig easily if I do it the same way. Thank you for the link, I actually did come across your log towards the end of this process. The Bounty's launch from the Model Shipways kit was my first build, so I'm interested to see you tackle it. @Capella The darker bits were stained using an oak stain. This is much darker than other oak stains I have seen and I think that this stain is meant to be diluted before use with a colour reducer that is sold separately. I liked the colour that came from the undiluted stain, so that's what I have been working with. I also rub in a small amount of walnut filler into the grain before staining to give a more even colour and hide some of the grain. I have used some paulownia wood for some pieces, which doesn't stain the same way as the limewood and has a very large grain. Adding the filling putty is necessary to get all the bits the same colour. The pale bits are just the raw limewood sealed with a matt varnish. Cathead and Capella 2 Quote Previous builds: HMS Bounty's Launch (Model Shipways), USS Albatros (OcCre) Current build: HMS Beagle (OcCre) Future builds: HMB Endeavour (Caldercraft), De Zeven Provinciën (Kolderstok), HMS Victory (Caldercraft/De Agostini/Artesania Latina/Corel) Link to comment Share on other sites More sharing options...
allanyed Posted January 30, 2023 Share #83 Posted January 30, 2023 3 hours ago, LucienL said: The Bounty's launch from the Model Shipways kit was my first build, so I'm interested to see you tackle it. Hi Lucien The build log I referenced is a scratch build at 1:48 scale and is based on the contemporary plans at RMG, scantlings from Steel, and notes from Bligh's papers which does not seem to be the case with the kit you mention. Allan Quote PLEASE take 30 SECONDS and sign up for the epic Nelson/Trafalgar project if you would like to see it made into a TV series. Click on http://trafalgar.tv There is no cost other than the 30 seconds of your time. THANK YOU Link to comment Share on other sites More sharing options...

Recommended Posts
Join the conversation
You can post now and register later. If you have an account, sign in now to post with your account.