zappto Posted September 22, 2021 Share #31 Posted September 22, 2021 i like this work, promising start. looks great. Quote Current build: Mamoli - La gloire 1778 Finished builds: Mamoli - Friesland 1663 Mamoli - Lexington 1776 Link to comment Share on other sites More sharing options...
Jonathan_219 Posted October 27, 2021 Author Share #32 Posted October 27, 2021 (edited) Stern and some deck fixtures: I've been mostly working on the stern and breaking that up with some deck fixtures that don't need to be glued in place for a change of pace. Things have been going pretty slowly as it seems that almost every piece of the stern has to be worked and in some places completely remade to fit properly. Since several of the pieces are brass that has meant a lot of hand filing and shaping. Fitting the cannons in the four gunports proved especially challenging since there wasn't a convenient piece to attach them to, I suspect that I placed those gunports lower than planned but any higher and the opening would have been almost completely facing down horizontal which didn't seem like a very likely arrangement for cannons unless they wanted to shoot fish. This required me to file away some of the nearest bulkhead to the stern and do it through the gunport without damaging the gunport, tricky for clumsy me. I have also added the back gunport lids and worked out a system for the eyebolts included in each lid. The instruction call for eyebolts to be pushed through and then bent into another eyebolt on the back side but I didn't think that I could make that look good and I also felt like the included eyebolts were too big, for my eye at least, so I ordered 400 eyebolts (62 lids X 4 each with some spare I hope) and I'm using those. I've tried using the Brass Black on the eyebolts and lid hinges but the result isn't that great. It seem very powdery and easy to come off and I'm assuming that's due to the material used to make those components since it seems to work pretty well on cannons. My only other alternative is to paint them but I wanted to try the Brass Black and see how it worked on smaller pieces, jury is still out on that. I'm going to take a deep breath soon and start working on the cannons. I expect this to be a fairly big job but I don't want to start full bore on the deck details until they're all in place so I don't have to work around anything that I don't have to. Edited October 27, 2021 by Jonathan_219 GrandpaPhil, jenikstav, catopower and 4 others 7 Quote Completed Build: Revenge 1577 - Amati Models - 1/64 Current Build: San Felipe - Mantua Panart - 1:75 Link to comment Share on other sites More sharing options...
Jonathan_219 Posted November 25, 2021 Author Share #33 Posted November 25, 2021 Bow Railings and Dummy Cannons: Installing the dummy cannons turned out to be a bit more involved than I anticipated. The blocks that hold the cannons aren't really at the proper distance from the gunports to give me the amount of cannon I wanted sticking out and I'm not sure if that would ever be possible even if I had planned it better since the blocks are straight and the hull is curved. The only solution I could come up with was to drill a hole big enough to let the entire cannon barrel go through and not just the finger that seems is designed to be inserted into the hole and that turned out to be nearly exactly a 1/4" hole which gives just a little play for the cannon to be adjusted to a chosen position. I wanted to use the Dremel to drill but my 1/4" drill bit won't fit in the Dremel but I did find a Dremel drill set with a 1/4" drill and a smaller bit that would fit in the Dremel which allowed me to drill 1/4" holes with the Dremel. Using a heavier hand drill would have been possible but that seemed a lot more unwieldly to me so I was happy the Dremel bit existed. Went outside to do the drilling as my work space has enough sawdust and dirt already. I've also had a bit of an issue blackening the cannons, I'm using Brass Black and cleaning each cannon before I blacken it as best I can with alcohol and rubbing with a clean rag but I'm still getting mottled and uneven results. I don't know if it's the material, my cleaning or what but the result is not exactly what I was looking for but it did get a worn used effect so it's something I can live with. You can see in the picture how much variance there is. I was timing how long I left them in the solution and then add some if they were lighter but still couldn't get a consistent result. I then made a small jig to fit into a gunport and drilled a 1/8" hole in it at the position and angle I wanted to drill a pilot hole for each cannon and then with back with the 1/4" to finish out the hole. There are some places where the block didn't go far down enough to encompass the entire 1/4" hole but I think I have enough to glue the cannon on, I just have to fix it in place while the glue dries. So far I have one row down and nothing to difficult so far putting the cannons in and adjusting as the glue dries. Also finished the front railings, I had to scratch build several of the pieces for this, the included pieces just weren't long enough and left a significant gap in the railings which I just couldn't have. Not hard just time consuming, but enjoyable. Will continue to finish the cannons and gunport covers on this side and then it's on to repeat everything on the other side. scrubbyj427, chris watton, GrandpaPhil and 4 others 7 Quote Completed Build: Revenge 1577 - Amati Models - 1/64 Current Build: San Felipe - Mantua Panart - 1:75 Link to comment Share on other sites More sharing options...
Bryantes Posted November 28, 2021 Share #34 Posted November 28, 2021 Amazing job 😮 Quote Hello from Slovakia My projects Current: Silent Mary - Mellpapa 1:98 Finished: Golden Star - Mantua 1:150 (kit) Link to comment Share on other sites More sharing options...
GrandpaPhil Posted December 2, 2021 Share #35 Posted December 2, 2021 Looking good! Quote Building: 1:64 HMS Revenge (Victory Models plans) 1:64 Cat Esther (17th Century Dutch Merchant Ships) On the building slip: 1:72 French Ironclad Magenta (original shipyard plans) On hold: 1:98 Mantua HMS Victory (kit bash), 1:96 Shipyard HMS Mercury Favorite finished builds: 1:60 Sampang Good Fortune (Amati plans), 1:200 Orel Ironclad Solferino, 1:72 Schooner Hannah (Hahn plans), 1:72 Privateer Prince de Neufchatel (Chapelle plans), Model Shipways Sultana, Heller La Reale, Encore USS Olympia Goal: Become better than I was yesterday "The hardest part is deciding to try." - me Link to comment Share on other sites More sharing options...
Jonathan_219 Posted December 3, 2021 Author Share #36 Posted December 3, 2021 First Spiral Staircase and Railings: Slowly adding some deck details , started with the small cannons and after a discussion and some very helpful advice in the Metal Work forum decided not to force things and continue to try and bend these small cannon tails up like the instructions indicated. My first attempts didn't budge anything and with the info from the forum decided it would be best not to keep attempting to bend it and end up ruining them. I think they look fine straight so will have to stay with that. I did have better luck with blackening them as I tried a different method of using about 50% blackening solution and 50% distilled water. I hooked a small thread around the barrel and then made sure to keep the cannon constantly in motion in the solution and that does seem to give me a more uniform appearance. I used a very small amount of candle wax, tried beeswax but candlewax was softer, and polished the cannons with a cloth to remove any powdery look. This lightens the color some but still give a nice look, anything is better than the bright untreated brass. Couldn't stand the look of the deck edges so I found some 1x3mm walnut strip left over from another build and finished out the edges, I'll need to do that on every deck edge but it looks so much better than the raw ply edge. The railings were pretty straightforward except I wondered what to do with the edges of them since they're made out of multi-ply stock so when staining they're going to be striped no matter what I do. After a test stain I decided the stripes were a feature not a bug and that they looked ok, or at least better than painting them a wood color. Considered briefly painting them blue or red as part of the color scheme but decided that I'm in danger of, or maybe past the point of having too much accent color and wanted them as natural as possible. The finished spiral staircase in the instructions was just ugly. The other two positions have covering pieces but these two were left bare with some railings added and just didn't like the look of it. So I took some inspiration from the Testazyk build log and added my own outside covering and details. I'm happy with the way it turned out. Now on to making 5 more! Thanks Testazyk for the idea. The deck details are one of my favorite parts of this build so far, since it's a decorative build and there's not a definitive right or wrong with the details I'm able to just do whatever I think will look good without worrying too much. It looks a bit gaudy to me but I'm hoping all the rigging and hardware will tone that down a bit in the final product. Don't want to veer from what might have been possible but I don't have to be a stickler for accuracy either. I plan to go opposite way with my next build and try the historical accuracy route to see how I like that approach. GrandpaPhil, Bill Morrison, Nirvana and 3 others 6 Quote Completed Build: Revenge 1577 - Amati Models - 1/64 Current Build: San Felipe - Mantua Panart - 1:75 Link to comment Share on other sites More sharing options...
jenikstav Posted January 18, 2022 Share #37 Posted January 18, 2022 Приветсвую вас из холодной России! Тоже начал собирать модель San Felipe от фирмы Mantua! Очень огорчен ужасной инструкцией и не соответсвием чертежей цветным иллюстрациям... хуже инструкции еще не видел( Хотя до этого собрал Santisima Trinidad от Occre и Harvey. Вопрос к вам, может есть у вас дополнительные фото постройки этой модели или только те, что выложены на данном сайте? Greetings from cold Russia! I also started to assemble the San Felipe model from Mantua! I am very upset by the terrible instructions and the discrepancy between the drawings and the color illustrations... I haven't seen worse instructions yet( Although before that I collected Santisima Trinidad from Occre and Harvey. Question to you, do you have additional photos of the construction of this model or only those that are posted on this site? Quote Link to comment Share on other sites More sharing options...
Jonathan_219 Posted January 25, 2022 Author Share #38 Posted January 25, 2022 I think I've posted everything I've taken. I feel a little bit bad about disparaging this kit all the time but it's just terrible. In addition to the bad instructions several pieces are just the wrong size to even fit, I'm continually frustrated and having to scratch build some pieces. The weird thing is that it eventually makes a nice looking model. My advice is read through the entire instructions several times and them spend some time with the drawings that show details on the large plan sheets. Sometimes either the instructions or details just won't work but between the two I'd figure out something to make things fit. I've been bouncing all over the instructions not really doing things in the order they're presented in the book. I'm a little afraid when I get to rigging as that's less intuitive to me to figure out what will work and in what order to do things. There are several build logs here much better than mine and I've learned much about the pitfalls that are up ahead by studying them. Good luck, it seems like so far I've been about to find a solution for everything that's popped up. scrubbyj427, Bill Morrison, Ryland Craze and 1 other 4 Quote Completed Build: Revenge 1577 - Amati Models - 1/64 Current Build: San Felipe - Mantua Panart - 1:75 Link to comment Share on other sites More sharing options...
Nirvana Posted January 25, 2022 Share #39 Posted January 25, 2022 Jonathan, I will certainly pay attention to the pitfalls you are mentioning when it's time for me to get going with my SF. Yours look real good. Ryland Craze 1 Quote Please, visit our Facebook page! Respectfully Per aka Dr. Per@Therapy for Shipaholics Finished: T37, BB Marie Jeanne - located on a shelf in Sweden, 18th Century Longboat, Winchelsea Capstan Current: America by Constructo, Solö Ruff, USS Syren by MS, Bluenose by MS Viking funeral: Harley almost a Harvey Nautical Research Guild Member - 'Taint a hobby if you gotta hurry Link to comment Share on other sites More sharing options...
Jonathan_219 Posted February 1, 2022 Author Share #40 Posted February 1, 2022 Deck Details and Cannons: Just continuing to work on the decks, and cannons, both the deck cannons and the false cannons. The instructions don't have any rigging on the cannons and that just makes them look funny to me. I had to decide between doing a full rig or just installing the restraining ropes and decided to just do the restraining ropes. The way pieces are positioned on the deck I just though that a full rigging would make things look too crowded. I still have the second side deck cannons to go and a few dummy cannons but soon they will all be done. The lanterns were a bit of a problem because they're supposed to have two end caps which screw down on a central shaft to hold the grate in place but even when the two end caps are screwed completely down it still left the lamp grating loose in the grooves so I decided to put a couple of spare brass 3mm o-rings on the shaft before installing the lower end cap. That pushed the lower end cap up enough that everything screwed down night and tight. I then filled that gap with the mounting wire so that all worked out ok. I'm also debating on whether I should install the gunport lids now or wait till the rigging is done. On my last build I had a tendency to catch my hand on the lids and accidentally tear them up. I'll just have to weigh the extra work adding them later vs. the risk of tearing a couple up. Robp1025, Barbossa, Bill Morrison and 5 others 8 Quote Completed Build: Revenge 1577 - Amati Models - 1/64 Current Build: San Felipe - Mantua Panart - 1:75 Link to comment Share on other sites More sharing options...
Jonathan_219 Posted February 14, 2022 Author Share #41 Posted February 14, 2022 More deck details: Just working through all the cannons and deck details. Finished the last of the spiral staircases, I had to scratch build the banister for all of them I just couldn't make the included ones look right. Just have 5 more cannons to go and the last of the detail is done I think. Everything has gone pretty smoothly for these details. Will be able to start the rigging fairly soon now, looking forward to it. Bill Morrison, GrandpaPhil, ccoyle and 4 others 7 Quote Completed Build: Revenge 1577 - Amati Models - 1/64 Current Build: San Felipe - Mantua Panart - 1:75 Link to comment Share on other sites More sharing options...
allanyed Posted February 14, 2022 Share #42 Posted February 14, 2022 (edited) Your workmanship looks really nice Jonathan. I am not very familiar with Mantua kits. Am I correct in assuming the kit called for belaying pins? The reason I asked is that they would not have been found the San Felipe or any other ship until about 1745 and then only on pin racks lashed to the shrouds for a number of years. There is an interesting article on this model and the ship, which may never have even existed. https://www.modelships.de/San_Felipe_1690_authenticity/San_Felipe_1690_authenticity.htm Allan Edited February 14, 2022 by allanyed Quote PLEASE take 30 SECONDS and sign up for the epic Nelson/Trafalgar project if you would like to see it made into a TV series. Click on http://trafalgar.tv There is no cost other than the 30 seconds of your time. THANK YOU Link to comment Share on other sites More sharing options...
Jonathan_219 Posted February 14, 2022 Author Share #43 Posted February 14, 2022 Allan, interesting point on the belaying pins, I was not aware of the timeframe of their introduction and that's great to know, what you see is exactly the parts and position of the kit. I was aware that the San Felipe in this kit was pretty much fantasy and had seen that link before I purchased and I've made some build decisions (mostly colors) based on this being a decorative build and I was ok with that when I started and will finish this out with that in mind, but I have decided to go historical accuracy with my next build. I don't think there's anything wrong with either approach, I built this for myself after all, but it's a different type of "fun" with one being "what color would look good here" and the other "this is how it looked, how can I make it like that" and I'm interested to give the accuracy approach a try so I have the Caldercraft Victory waiting for me when this is finished. This is the only Mantua kit I've built and it's a mess IMHO, looking around on the web before purchasing that seems to be well known but I plowed ahead anyway. Jeff T 1 Quote Completed Build: Revenge 1577 - Amati Models - 1/64 Current Build: San Felipe - Mantua Panart - 1:75 Link to comment Share on other sites More sharing options...
allanyed Posted February 15, 2022 Share #44 Posted February 15, 2022 Hi Jonathan, Regarding the pins, I assumed this was a kit thing as Mantua is not well regarded for doing a lot of research before designing their kits. I look forward to your build log on Victory. Having a copy of Longridge's Anatomy of Nelson's Ships will be a great help as well as the Caldercraft Victory build log here on MSW by Robert29. Allan Quote PLEASE take 30 SECONDS and sign up for the epic Nelson/Trafalgar project if you would like to see it made into a TV series. Click on http://trafalgar.tv There is no cost other than the 30 seconds of your time. THANK YOU Link to comment Share on other sites More sharing options...
Jonathan_219 Posted February 17, 2022 Author Share #45 Posted February 17, 2022 Eureka! I haven't posted a lot of my actual work process in this log because most of the time I'm just trying to figure out things and have no idea if they're the best way to do things but I had a bit of an aha moment today with a problem that's plagued me on both my builds. This problem is when attaching multiple pieces of hardware on a mast or spar that should be in a line on one side getting them positioned correctly. I've honestly tried to do this by eye and the results have not been as good as I would have liked them but I thought of just stretching a thread down the side of the spar or mast where the objects would be centered and using that as a position and straight line guide. I've started on the bowsprit and there's a line of 5 chocks (I think they're chocks) on each side so I tried this technique and it seems to have worked pretty well, certainly much better than just eyeballing things. I used hardware on one end of the thread and painters tape on the other to attach the thread. I used it as a center guide but it could also be edge guide if everything is the same width. Putting the thread on gave me a chance to eyeball where things would be and adjust the thread till I was satisfied and then glue pieces in place. This may be a common technique but I don't remember running across it in any of the build logs I've been through so thought I'd share. allanyed, Nirvana and chris watton 3 Quote Completed Build: Revenge 1577 - Amati Models - 1/64 Current Build: San Felipe - Mantua Panart - 1:75 Link to comment Share on other sites More sharing options...
allanyed Posted February 19, 2022 Share #46 Posted February 19, 2022 Simple yet effective!!! Great post on how you did this. Thanks Allan Quote PLEASE take 30 SECONDS and sign up for the epic Nelson/Trafalgar project if you would like to see it made into a TV series. Click on http://trafalgar.tv There is no cost other than the 30 seconds of your time. THANK YOU Link to comment Share on other sites More sharing options...
Jonathan_219 Posted February 21, 2022 Author Share #47 Posted February 21, 2022 Deck Details Finished: Finished up the last of the deck cannons and the other assorted deck details. One thing stuck out to me which is the instructions don't seem to show any tie downs for the lifeboats which just would make them look really odd to me so I added four eyebolts for each boat, two near each of the end columns so they wouldn't interfere with passage in that deck area and I've already added the roap to one of those which I'll put in basically an X shape across each boat then back through the starting eyebolt and tied off on one of the pins on the lower main mast rack. I looked through the instructions and I couldn't find any other ropes that tie off on that lower rack so I'm hoping that I don't find something later that I missed that will need that pin. I just rolled up the two ropes for that and put some painters tape on them so hopefully they'll stay out of the way while I'm doing the other rigging. I felt that if I put the boats on the rack now that they would be very much in the way as I rig so I will hold off on including those for as long as possible. The bowsprit isn't permanently attached yet but I'm hoping that I don't need to remove it again but don't see any point to making it permanent till I have to. Really looking forward to getting to the masting and rigging, seems like that's a part that many of us really enjoy and it feels like a bit of a milestone to get to this point. Barbossa, jenikstav, GrandpaPhil and 2 others 5 Quote Completed Build: Revenge 1577 - Amati Models - 1/64 Current Build: San Felipe - Mantua Panart - 1:75 Link to comment Share on other sites More sharing options...
allanyed Posted February 24, 2022 Share #48 Posted February 24, 2022 Hi Jonathan, The tops of the bitt pins around the fore mast would usually be about 42" +/- above the deck (14mm at 1:75) and the cross piece about 28"-30" (9mm-10mm at 1:75) The ones in the photo look to be much higher, but it may just be the photo. If you look at some of the high resolution contemporary inboard profile drawings on the Wiki Commons site you can see what I mean. While these are different ships, the contemporary drawings would be closer to the actual dimensions. For one of a number of examples go to https://commons.wikimedia.org/wiki/Category:Ship_plans_of_the_Royal_Museums_Greenwich and scroll down to Essex 1741 RMG 3912.png Allan Quote PLEASE take 30 SECONDS and sign up for the epic Nelson/Trafalgar project if you would like to see it made into a TV series. Click on http://trafalgar.tv There is no cost other than the 30 seconds of your time. THANK YOU Link to comment Share on other sites More sharing options...
Jonathan_219 Posted March 5, 2022 Author Share #49 Posted March 5, 2022 Allan, the cross piece for the bit pins did seem very high to me as well, I've just gone ahead with what the kit instructs. So many things on the deck look completely off scale to my eyes. I'm still at the point in my learning that I don't catch a lot of these things until after it's all together and looks wrong. I especially appreciate the plans resource as I need to learn how to dig into details like that as I progress though builds. jenikstav 1 Quote Completed Build: Revenge 1577 - Amati Models - 1/64 Current Build: San Felipe - Mantua Panart - 1:75 Link to comment Share on other sites More sharing options...
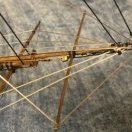
Jonathan_219 Posted March 5, 2022 Author Share #50 Posted March 5, 2022 (edited) Bowsprit and rigging: I've finally been able to start on the rigging, for some reason I really enjoy the look and work on the bowsprit. I've made some very minor changes like adding rings to give an anchor point for ropes attached to the bowsprit and using some small beads from the local hobby store as parrel beads. The are several things that the instructions and plans don't agree on so I'm just trying to find what will work best. The first set of deadeyes is in and I decided to use a dark brown thread for the deadeye rigging. I've seen that somewhere, don't remember where, and really like the look and since it's decorative anyway just went with it. Bowsprit yard is loose on the bowsprit and I'm hoping I can position it and hold it in place with the rigging, I've used a pin previously. I'm working with the threads now to see at what point I want to tie things down. I'm hoping I can leave it where I would have the ability to adjust as things get further down the line but I'm not sure how that will work out yet. Edited March 5, 2022 by Jonathan_219 jenikstav, Robp1025, Barbossa and 2 others 5 Quote Completed Build: Revenge 1577 - Amati Models - 1/64 Current Build: San Felipe - Mantua Panart - 1:75 Link to comment Share on other sites More sharing options...
Jonathan_219 Posted April 13, 2022 Author Share #51 Posted April 13, 2022 (edited) Things have been a bit slow lately, just working on the gunport lids and the structure on the lower deadeye assemblies with the chains etc. so decided to take a break and do the lifeboats. Not thrilled about the plastic hulls but decided to just go ahead with them and see if I could get a decent looking finished product. Planned ahead and put the tie down ropes in place along with the hardware so it was easy to tie in place on the boat was finished. Almost done with the second one and will tie it in when I'm done. Edited April 13, 2022 by Jonathan_219 Robp1025, chris watton, GrandpaPhil and 3 others 6 Quote Completed Build: Revenge 1577 - Amati Models - 1/64 Current Build: San Felipe - Mantua Panart - 1:75 Link to comment Share on other sites More sharing options...
Jonathan_219 Posted May 17, 2022 Author Share #52 Posted May 17, 2022 Chainplates: I have really struggled with the chainplates, from the positioning, the soldering and assembly it's been a serious challenge. I've had to just spend days looking at the instructions and ship trying to figure out what to do, try things and fail and come up with different approaches, but I think I've finally got something that works. The first issue was the positioning, I thought I had placed the side boards that hold the deadeyes in the correct place according to the plans and instructions but several of the holes for the chainplates were right above the center of a gunport requiring the chainplate to come out a a very ugly (to me of course) angle to not block the cannon. The plans show several of the chainplates coming out at very odd angles and mine would have been even more awkward and I just didn't like the way it would look so I made a decision to eliminate the chainplate on deadeyes that were directly over a gunport. If the hole was more to the side then I'd install a chainplace and angle it away from a straight line with where the shroud will be as little as possible. For these deadeyes with no chainplate I wrapped the copper wire around it and then just bent both legs back on the underside of the board hole to hold it in place. Not ideal but better to me than having a chainplate at a wonky angle. My next issue was soldering the loops. I tried several methods and while I could sometimes get a solder that seemed good as soon as I put any pressure on the link installing the wire loops they almost always broke. I watched several silver soldering videos in the metal forum here and on YouTube but decided that was more than I wanted to get into for this one small part of the project. I went to the local hardware store and found some metal epoxy and it seems to be working pretty well. It hardens in a very short time, only a couple of minutes, so I mix up a very tiny amount and do 6 at a time and let them cure overnight before installing. It seems like the epoxy has a slight bit of flex where my solder joints pop the second any sideways force get put on them, which is pretty inevitable when installing. I also had a minor issue where the supplied nails for the bottom of the chainplate had heads that were smaller than the holes in the bottom section so they just fell off. Another trip to the hardware store found me some small brass nails but the diameter of the shaft was slightly bigger than the hole so I had to do a small bit of filing on each lower chainplate piece to allow the nail to pass through. The last issue was just the installation of the plate, getting the wire that wraps around the deadeye to have the U-turn in the right place to get some tension on the chainplate but not be so tight as to pull down the side board with the deadeyes was very trickey, a very small difference in the position of the U-turn makes a huge difference in how tight or loose the chainplate would be. I would wrap the wire around the deadeye with one long leg and place it in position. I would then install the lower part of the chainplate, nail and all and then use tweezers to hold it in place and then mark the wire where it needed to bend, pull the lower part of the chainplate off and test install and if it was good then finish putting the nail in and if not then take the lower piece off, adjust and try again till it fit. I got better at guessing were to put the U-turn in the wire and by the end was getting most of them first time. I painted the wires and chainplates before installation but of course of bending and grabbing with pliars some will come off so just touched up the paint after it was all in. This has been by far the most difficult part of this ship so far and I'm just glad I have something that is semi-decent. One side of the ship is done and it's time to work on the other side now. chris watton, GrandpaPhil, Barbossa and 1 other 4 Quote Completed Build: Revenge 1577 - Amati Models - 1/64 Current Build: San Felipe - Mantua Panart - 1:75 Link to comment Share on other sites More sharing options...
Jonathan_219 Posted July 26, 2022 Author Share #53 Posted July 26, 2022 (edited) Frist Stays: Finally finished the second side of deadeyes and chainplates, probably my least favorite part of the build so far but at least now I'm ready to get into the rigging in earnest. After looking at lots of build logs and finished ships I wanted to serve the stays and shrouds, I just really like the look once they're served and it can be done with a hand machine so I got the Syren Serv-o-Matic and started practicing. I had some initial issues with fuzz on the practice bits I did and posted on the Masting, Rigging and Sails section, thread here: https://modelshipworld.com/topic/32544-thread-for-serving-rigging/ and by ordering a different thread, Guntermann Mara, and using a candle to melt off the fuzz I was able to get really good results so I've gone ahead and served by first two stays. One of the ideas in the discussion on serving thread was to use a very dark brown instead of black and I ordered both so I could try them and see which one looked best and I've decided to go with the dark brown on the San Felipe. Very happy with the way the serving looks and glad I decided to do that. Now just a zillion shrouds to serve. I'm looking at constructing as much of the masts and yards as I can off the ship and then adding them as the rigging goes in place, this is a little different than how I constructed my Revenge and I'll see how it goes. It seems like the order here is about what works for me and I just have to try some slightly different things to know how they work for me. I'm also trying not to permanently tie anything off and leave some spare hanging so I can go back and adjust as things move slightly. I'm a bit afraid that things will get really untidy and it will be hard to determine which piece of thread comes from where as the number of loose threads build up but we'll see and if I need to I can go back and finish off areas where any movement should be over. Foremast shrouds are next. Edited July 26, 2022 by Jonathan_219 jenikstav, AiDi, Robp1025 and 4 others 7 Quote Completed Build: Revenge 1577 - Amati Models - 1/64 Current Build: San Felipe - Mantua Panart - 1:75 Link to comment Share on other sites More sharing options...
Jonathan_219 Posted August 11, 2022 Author Share #54 Posted August 11, 2022 One of the things that's the hardest for me to do is to tear out something that I've finished, especially if I think it's pretty well done but I had to do that. After serving the stays with Gutermann Mara 696 (Dark Brown) I decided that I would order some dark brown rope from Syren to do the shrouds and as I read what I could find about how much of the shroud to serve I decided, at least to try, serving the first shroud all the way and only serving the other shrouds a little down past the futtock. When I received the rope from Syren (beautiful rope BTW) it was a little darker than the Gutermann 696 I had been using to serve and Chuck suggested I try Gutermann 682 (Darker Brown) so I ordered some of that and it's perfect match for the Syren dark brown rope so I can serve and stop without a color change. But that left my two completed foremast stays served in the 696 and after much foot dragging I went ahead and took them out. I guess when you're learning that tearing out something is just something that happens in the process. Replacing the stays turned out to be less work than I thought and I don't think I could have ever gotten used to having different colors on the serving in different parts of the ship. So now the foremast stays are back in, and I've loose rigged the rest of the bowsprit rigging and the foremast crowsfoot. I'm going to put in the mainmast stays next and I'm still trying to decide if I'm going to attach the main foremast spar first or do the foremast shrouds first. Either way something is in the way when you do the other thing but on Revenge I attached all the spars and had all their attachments done first and it seemed to work out pretty well. I'm also working on the footropes and seeing what I can do with them to make them lay in a way that looks natural. I'm trying thin gauge wire based on something I found online and stopped that for a while to work on the stays and bowsprit rigging. It seems everything I learn leads to even more questions as now I'm wondering since the stays and shrouds are dark brown, simulating the tar used I believe, why wouldn't the ropes that wrap the masts be dark brown too? My foremast is wrapped in black and so far I don't think I'm willing to go back that far but things like this are things I need to figure out before my next build. Barbossa and scrubbyj427 2 Quote Completed Build: Revenge 1577 - Amati Models - 1/64 Current Build: San Felipe - Mantua Panart - 1:75 Link to comment Share on other sites More sharing options...
Jonathan_219 Posted August 31, 2022 Author Share #55 Posted August 31, 2022 (edited) Foremast Shrouds and Deadeyes: I served the entire first shroud on each side and then only served down to where the futtock will be on the other shrouds. I used the wire spacer technique for the deadeyes on each shroud with a little variation. Since the upper part of the foremast weren't glued yet I was able to remove the shrouds even with the loop served at the top so I would put on the shroud, attach the wire spacer to the lower and upper deadeyes and then pull the shroud around the upper deadeye and then use a clip to hold the shroud in place around the deadeye. I could then remove the shroud from the mast and work on serving the three areas around the shroud to affix it to the deadeye and then repeat the process for the second shroud of the pair. Once I had all the deadeyes attached on both sides I added the ropes to the deadeyes and started tightening everything up slowly. Some minor adjustments in the deadeye position could be made by adding more or less tension which pulls it down or lets it up slightly. One thing I noticed as I tightened was the tendency of the upper deadeyes to twist as tension was added so I started each deadeye pair by putting the rope through the first hole in the upper deadeye and and then pulling the rope to about the tension I thought would be on the shroud when in place. This pulling would spin the deadeye a couple of times and I'd hold the deadeye in this position when threading the rope through each deadeye. The deadeyes would start out pointing fore or aft with no tension but as tension was added the deadeye tried to spin back into the correct position so I was able to get most of them to point correctly without additional tweaking. I've tied off the deadeyes but still left the remaining rope in case I need to adjust later. One of my biggest issues on my first rigging attempt was getting a rope in place and perfect and putting a knot in it that pretty much prevented me for adjusting it later so this time I'm trying to leave everything possible adjustable. This results in a lot of thread everywhere but I'm pretty confident that I'll be able to find the correct thread if I want to adjust later and I'm not really sure when I'll start putting in more permanent knots and cleaning up all the loose thread. I believe I'm going to do the mainmast stays next, for some reason I find the stays and deadeyes really enjoyable. Edited August 31, 2022 by Jonathan_219 scrubbyj427 1 Quote Completed Build: Revenge 1577 - Amati Models - 1/64 Current Build: San Felipe - Mantua Panart - 1:75 Link to comment Share on other sites More sharing options...
Jonathan_219 Posted November 25, 2022 Author Share #56 Posted November 25, 2022 Lower Stays and Shrouds: Finished the lower and futtock shrouds plus a few miscellaneous pieces of rigging to break things up some. Will do the upper shrouds next and will continue only serving the forward most shroud to protect it from sails rubbing. Will probably do the ratlines once all the shrouds are in place. Still trying not to tie off lines as long as possible to make any adjustments easier but I think I'll need to tie off the bowsprit rigging pretty soon just to tidy things up for rigging the foremast. Started reading "Rigging of Ships in the Days of the Spritsail Topmast" by R C Anderson and I probably should have started this book with the kit just to give myself time to digest all the information in it but I'll try to focus on the areas in the book that correspond to what I'm working on and try to rig as authentically as possible. There's still a lot of guesswork involved but can always fall back on the plans (for better or worse) if needed. scrubbyj427, ccoyle, Nirvana and 1 other 4 Quote Completed Build: Revenge 1577 - Amati Models - 1/64 Current Build: San Felipe - Mantua Panart - 1:75 Link to comment Share on other sites More sharing options...
jenikstav Posted December 25, 2022 Share #57 Posted December 25, 2022 On 11/25/2022 at 11:45 PM, Jonathan_219 said: Lower Stays and Shrouds: Finished the lower and futtock shrouds plus a few miscellaneous pieces of rigging to break things up some. Will do the upper shrouds next and will continue only serving the forward most shroud to protect it from sails rubbing. Will probably do the ratlines once all the shrouds are in place. Still trying not to tie off lines as long as possible to make any adjustments easier but I think I'll need to tie off the bowsprit rigging pretty soon just to tidy things up for rigging the foremast. Started reading "Rigging of Ships in the Days of the Spritsail Topmast" by R C Anderson and I probably should have started this book with the kit just to give myself time to digest all the information in it but I'll try to focus on the areas in the book that correspond to what I'm working on and try to rig as authentically as possible. There's still a lot of guesswork involved but can always fall back on the plans (for better or worse) if needed. Очень здорово у вас все получается! По вашим фотографиям я больше ориентируюсь при строительстве своей модели корабля, чем по оригинальной инструкции. Жду следующих фотографий!! Привет из России) Quote Link to comment Share on other sites More sharing options...
Jonathan_219 Posted December 25, 2022 Author Share #58 Posted December 25, 2022 (edited) Quote Очень здорово у вас все получается! По вашим фотографиям я больше ориентируюсь при строительстве своей модели корабля, чем по оригинальной инструкции. Жду следующих фотографий!! Привет из России) Thanks, I've learned so much as I've been doing this ship. I wish I could go back and fix the mistakes. Edited December 25, 2022 by Jonathan_219 jenikstav 1 Quote Completed Build: Revenge 1577 - Amati Models - 1/64 Current Build: San Felipe - Mantua Panart - 1:75 Link to comment Share on other sites More sharing options...
jenikstav Posted January 6, 2023 Share #59 Posted January 6, 2023 (edited) Do you know how I improve my ships now!? Setting up the backlight! It turns out, it seems to me, well! San Felipe is my second ship where I have implemented backlighting. Before that, my first experience was Santisima Trinidad, where I installed 10 LEDs. It turned out just like the first photo. San Felipe will eventually have 19 LEDs installed. Took into account the errors of different models. What was and how it turns out now is shown in the next and next photo. P.S. Sorry for blogging with your photos... Edited January 6, 2023 by jenikstav DARIVS ARCHITECTVS and Robp1025 2 Quote Link to comment Share on other sites More sharing options...
ccoyle Posted January 6, 2023 Share #60 Posted January 6, 2023 Jenik, The site policy referring to language, can be read here: Online translating sites, such as Google, do a very good job of producing legible English. Thanks! С политикой сайта можно ознакомиться здесь: Сайты онлайн-переводчиков, такие как Google, очень хорошо справляются с разборчивым английским языком. Спасибо! Quote Chris Coyle Greer, South Carolina When you have to shoot, shoot. Don't talk. - Tuco Current builds: Brigantine Phoenix, Hawker Hurricane Link to comment Share on other sites More sharing options...

Recommended Posts
Join the conversation
You can post now and register later. If you have an account, sign in now to post with your account.