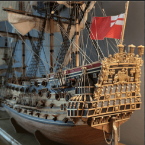
Iseaz Posted September 23, 2022 Share #1 Posted September 23, 2022 Hello everyone! Here is my HMS Prince (constructo 1/61), started in June 2021 and finished in June 2022, after 1 year and 10 days of work. This is my third model after the Polaris and La Candelaria de Occre, and by far the most difficult to make. It's a beautiful model but not without its flaws, like the guns that were not drilled, some mistakes in the plans and not enough rope. This adventure was exceptional, I didn't think it would last this long, but it wasn't boring. Brief history: she is a first rank ship of the line built in 1670 in England, based on the plans of Phineas Pett. Her artillery is composed of 100 guns spread over 3 decks. Her length is 50m. Flagship of the English fleet during the Third Anglo-Dutch War, she fought De Ruyter's flagship De Zeven Provinciën. In 1692, she was rebuilt and renamed HMS Royal William until her dismantling in 1813. As for the model, I chose it because it was one of the cheapest ships of the line and its decorations are magnificent. In this log, I will post the pictures of each month of the construction detailing the problems encountered, the solutions, the mistakes and the many improvements I added. I hope it will be useful for beginners like me who encounter the same problems! IMPORTANT NOTE: This model is a balance between feasibility, aesthetics and historical reality. This is my version of the ship, which I have slightly customized to my taste. Zarkon, AiDi, AJohnson and 10 others 13 Quote Link to comment Share on other sites More sharing options...
HardeeHarHar Posted September 23, 2022 Share #2 Posted September 23, 2022 Nice work indeed! Looks great on display. You completed her very quickly it would seem. Iseaz and Ian_Grant 2 Quote Brian Current Builds: HMBV Granado 1/64 Caldercraft; HMS Sphinx 1775 by HardeeHarHar - Vanguard Models 1:64-V2 Completed Build: HMS Bounty's Jolly Boat 1/25 Artesania Latina; Master Korabel - 1:36 Yefin Nikonov's Secret Vessel On the Shelf: HMBV Granado 1/48 CAF Model Link to comment Share on other sites More sharing options...
Iseaz Posted September 30, 2022 Author Share #3 Posted September 30, 2022 MONTH 1: JUNE 2021 The adventure began. I received the box on June 4, very excited to finally have a model ship of the line. It's a beautiful box, inside, everything was nicely arranged. I obviously started by making the bulkheads, checking the perpendicularity with Lego blocks. The pieces were well cut, thick, rigid and fit together very well. Then I installed the false walls for the dummy guns, which were long wooden strips to be inserted through all the bulkheads. As it didn't fit properly, the holes had to be enlarged and big hammer hits had to be used. This could have been risky for the installation of the guns if the walls were too high or too low in comparison to the gunports... Then comes the planking. A second sapelli plank is available just in case, but the kit is made for simple planking. It was a challenge for me, but I did it quite well! Be careful though, one or two bulkheads were not wide enough, to avoid a hollow in the hull, I added 2 layers of 0.6 mm planks on the sides to make them wider. Another remark, the guns were awful, I had made a post about it here... EricWilliamMarshall, GrandpaPhil, yvesvidal and 1 other 4 Quote Link to comment Share on other sites More sharing options...
Iseaz Posted October 16, 2022 Author Share #4 Posted October 16, 2022 MONTH 2: July 2021 The work continued with the drilling of the gunports. This was done with a rotary tool through a lot of small holes on the sides, then I sanded them. A small wooden guide allowed me to see if the gunports had the right dimensions. In the middle of the guide, I put a pencil lead to place the drilling point on the false wall for the dummy guns. I saw several problems afterwards: the 2 artillery decks in the hull are a few millimetres too low, my reference lines were not at the same place as on the plan... Also, despite the wooden guide, there were a few mistakes, ports that were too wide or too tall... These details were obvious during construction, but on the finished model, thanks to the other details, you don't notice anything! The drilling and sanding of the more than 100 ports in addition to the installation of the mantelets was a very repetitive and boring task so I also started building the bowsprit, bow and stern. EricWilliamMarshall, Bill Morrison, yvesvidal and 1 other 4 Quote Link to comment Share on other sites More sharing options...
Iseaz Posted November 1, 2022 Author Share #5 Posted November 1, 2022 (edited) MONTH 3: August 2021 At the start of the month I finished drilling all the gun ports and planking the hull. It seems that there is a mistake in the plan, it says to add a 2x4 walnut strip instead of 2x6, to have the right height in the middle of the deck, but the wall was too low on the poop deck. I then added a remaining 2x2 rod from another model. Note that some ports were more complex to open because of the bulkheads that went through the same place. A better design of the model could have made this step easier... Another very difficult step was the bottle at the stern. I had to cut and glue many small pieces of wood to make the complex shape, with a not very precise guide. To fill the holes, I used wood glue and then sanded around it to make a thin layer of wood dust. The painted result is quite good compared to the raw shape without paint. On the bow, the elements are not pre-cut, which took a lot of time to adjust. An electric bender was very useful to bend the larger piece under the figurehead. I also enlarged the space for the anchor rope holes from 4 mm to 6 mm high, as it seemed too small. The grating was tricky to cut because of the slightly rounded shape of the deck. I tried to make a relief effect on the side of the railings with a nail in a guide made from pieces of wood. The result is not very clean, because of the average quality of this wood, there was a lot of residue that I could not get out. Of course it would have been easier if I had managed to find a micro profiler from artesania latina Finally, I added nail marks on vertical lines between the ports with a pencil. Edited November 9, 2022 by Iseaz Bill Morrison, Dave_E, Heimdahl and 3 others 6 Quote Link to comment Share on other sites More sharing options...
Bill Morrison Posted November 1, 2022 Share #6 Posted November 1, 2022 Wow! I am most impressed! You have inspired me to start mine . . . Bill Morrison Iseaz and Dave_E 2 Quote Link to comment Share on other sites More sharing options...
Iseaz Posted November 14, 2022 Author Share #7 Posted November 14, 2022 Thanks a lot, I hope this thread will help you avoid some mistakes, if it's the same model! MONTH 4 : September 2021 The first decorations are installed, the gold paint was a nightmare to paint with a paintbrush... A first small improvement was the orientation of the "legs" on the bow, for a more realistic look even if the design of the bow remains very simplified. The most impressive part is the stern, with a large amount of miniature. I improved the model by slightly bending the grid (horizontal lines) to follow the decks. You can also see the final stage of the bottle, with lots of bits of wood to form the dome. yvesvidal, Prowler901, Bill Morrison and 3 others 5 1 Quote Link to comment Share on other sites More sharing options...
Bill Morrison Posted November 14, 2022 Share #8 Posted November 14, 2022 Mine is the Constructo kit that came out just a few years ago, so it looks like the same kit you are building. I hope mine looks as good as yours! Bill Morrison. Iseaz 1 Quote Link to comment Share on other sites More sharing options...
Iseaz Posted December 2, 2022 Author Share #9 Posted December 2, 2022 MONTH 5 : October 2021 The beautiful stern was finished this month. To align the grid, I made a small plan on sketchup, to know all the dimensions. Then I had to make the windows: the kit provided a very thin mesh, not very practical to cut and not very pretty. I did a first test with brass rods, but it was not convincing. Finally I tried to print a pattern on paper, and to my surprise, the result is very good! In the meantime, the bottles were built, filled and painted and the many decorations were put up. I started to think about the shroud holders: the kit provides a 1cm wide board, but when testing a wire, you realise that it touches the top of the hull (on the railings). Indeed, the particularity of this ship is that the shroud doors are at the level of the 2nd gun deck (and not the 3rd). I therefore enlarged them by 6mm and sanded them to adapt to the curve of the hull. A varnish from OCCRE was applied under the hull, which brings out nicely the wood grain. Prowler901, GrandpaPhil, EricWilliamMarshall and 4 others 5 2 Quote Link to comment Share on other sites More sharing options...
Keith_W Posted December 2, 2022 Share #10 Posted December 2, 2022 That is simply gorgeous. Another option you could consider is home-made photo-etch. It looks simple enough: youtube link. I haven't tried it, but I am considering buying a kit and making my own parts when I come to the stern of my Royal William. Same ship as yours, only it's been rebuilt Quote Regards, Keith 2007 (completed): HMS Bounty - Artesania Latina 2013 (completed): Viking Ship Drakkar - Amati 2014 (completed): HMS Bounty Launch - Model Shipways Current: HMS Royal William - Euromodel Link to comment Share on other sites More sharing options...
Bill Morrison Posted December 2, 2022 Share #11 Posted December 2, 2022 Beautiful job on the Prince!!! Well done! Keith, I can't wait to see your Royal William. Bill Morrison Quote Link to comment Share on other sites More sharing options...
Iseaz Posted December 15, 2022 Author Share #12 Posted December 15, 2022 Thanks a lot! Keith, this Royal William is on a whole other level, amazing, can't wait to see more! MONTH 6 : November 2021 Work progressed everywhere, especially on the deck and the lower part of the stern, the kit provided only 2 gunports, instead of 4 on the original design. As I knew I had some gunport parts left, I simply added 2, on a black background. On the deck, there were some problems with the stairs and landings that didn't look like the instructions. In fact, they were too short to pass over some of the cannons properly. I fixed this problem by adding steps between the landing and the upper deck. The solid railings had to be bent to follow the walls, which was impossible without an electric plank bender. In the end, the curve was different from the railings (made of pre-cut wood). So I had to trim them, refine them to correct their curve. The masts are also beginning to take on more detail, with the foremast jib. EricWilliamMarshall, ccoyle, Prowler901 and 4 others 5 2 Quote Link to comment Share on other sites More sharing options...
Iseaz Posted January 17, 2023 Author Share #13 Posted January 17, 2023 MONTH 7 : December 2021 As the bow is very simplified and boring, I decided to paint abstract patterns in the black parts. It was a very long and complex job, hand painted in 2 layers. The result is surreal but I think it is beautiful. Also, I wasn't a fan of the white color of the wood, after much thinking I opted for the yellowish pine color, to look like this illustration. During the Christmas vacations, a lot of work was done on the details and the masts. I also took a break for a few days to work on a 1/72 plastic model, which is quite a change of scale! ccoyle, Prowler901, GrandpaPhil and 1 other 4 Quote Link to comment Share on other sites More sharing options...
Iseaz Posted February 22, 2023 Author Share #14 Posted February 22, 2023 MONTH 8: January 2022 The cannons were finally all drilled with a dremel, with many failures. Constructo sent me back the 16 visible cannons, but not the dummy cannons. Many of the cannons were lost because it was very difficult to drill into the brass while remaining in the centre. The result is that only one side of the ship can have all its cannons visible. On the other side, the ports are semi-closed. On the deck, I improvised a loose rigging on the supports, adding some occre rings to attach. To paint the guns, I mixed a black colour with a metallic colour, to give texture and reflection. Finally I was able to start the definitive rigging of the masts, starting with the bowsprit and following the indications of the plan. Tests were done on the foremast to check the inclination of the yards in the wind. Prowler901, ccoyle, Jack-in-the-Blue and 1 other 4 Quote Link to comment Share on other sites More sharing options...

Recommended Posts
Join the conversation
You can post now and register later. If you have an account, sign in now to post with your account.