alross2 Posted May 16, 2023 Share #1 Posted May 16, 2023 Now that I'm finished with the OREGON and WYOMING, I've started on the 1/64 scale 82' WPB kit. This will be a typical BJ solid hull kit with laser, resin, britannia, and photo-etched parts. Hull length is 15.5". The intent is to create a kit that will allow the builder to replicate any of the 79 boats built. The focus will be 82301, the first boat in the group, but will include additional basic details to modify it to later boats. This will include different radar, towing gear, and deck details, plus stuff to do the boats in Viet Nam. The hull master is done and Randy carved me a couple hulls with which to experiment. I've templated one and added the skeg so far. This is the basic kit configuration - WPB82301. That below, WPB82347 POINT BONITA, is one of the later boats. A third general arrangement drawing will show a Viet Nam configuration. BLACK VIKING, Ryland Craze, ccoyle and 7 others 10 Link to comment Share on other sites More sharing options...
BobG Posted May 17, 2023 Share #2 Posted May 17, 2023 As a Coast Guard veteran, I remember these 82 footers very well. It's great to see you developing this model especially since Coast Guard models are few and far between. BLACK VIKING, thibaultron, Canute and 2 others 5 Bob Garcia "Measure once, cuss twice!" Current Builds: Hms Brig-Sloop Flirt 1782 - Vanguard Models Pen Duick - Artesania Latina 1:28 Completed: Medway Longboat 1742 - Syren Ship Model Co. Member of the Nautical Research Guild Link to comment Share on other sites More sharing options...
alross2 Posted May 18, 2023 Author Share #3 Posted May 18, 2023 The superstructure base will be cast resin with a facia of laser-cut laserboard. The pilot house will be molded up to the bottom of the windows and include the consoles. This is the master which I just put into the silicone. The mold will be ready tomorrow for a test cast. GrandpaPhil, BobG, mtaylor and 2 others 5 Link to comment Share on other sites More sharing options...
alross2 Posted May 18, 2023 Author Share #4 Posted May 18, 2023 Third coat of primer on the hull. thibaultron, Canute, GrandpaPhil and 2 others 5 Link to comment Share on other sites More sharing options...
alross2 Posted May 22, 2023 Author Share #5 Posted May 22, 2023 Cast base for the superstructure is done and fitted to the deck camber. Brass master for the rudders is done, rudder post tubes installed, and the propshaft/strut assembly has been fitted. thibaultron, Canute, GrandpaPhil and 2 others 5 Link to comment Share on other sites More sharing options...
alross2 Posted May 25, 2023 Author Share #6 Posted May 25, 2023 Started fitting the initial laser-cut parts to the superstructure. They need some adjustment but are generally a good fit. I'll modify them and Shane will cut me another round to apply. BobG, GrandpaPhil, Jack12477 and 4 others 7 Link to comment Share on other sites More sharing options...
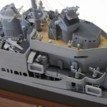
alross2 Posted May 30, 2023 Author Share #7 Posted May 30, 2023 (edited) Today was rather productive. Put together the revised superstructure, made the vents, and assembled the reel. Tomorrow, I'll make the recessed bow lights and glue on the aft bulwarks. Like Comment Share Lasered vents. Upper vent has flange glued in place. Small holes on the reel need to be moved inboard just a bit., Superstructure placed on but not glued to the deck. Edited May 30, 2023 by alross2 BobG, mtaylor, Roger Pellett and 4 others 7 Link to comment Share on other sites More sharing options...
alross2 Posted May 31, 2023 Author Share #8 Posted May 31, 2023 Inset the bow lights, finished the bulwarks, and added the half-round mouldings. Like Comment Share Canute, Jack12477, GrandpaPhil and 3 others 6 Link to comment Share on other sites More sharing options...
alross2 Posted June 2, 2023 Author Share #9 Posted June 2, 2023 Today, made up several casting masters including a 55-gallon drum, flagstaff, radar base, and the front section of the mast. The mast is soldered 1/16" brass and needs a bit of cleanup. Painted the hull and superstructure white, as well. BobG, Jack12477, thibaultron and 3 others 6 Link to comment Share on other sites More sharing options...
alross2 Posted June 6, 2023 Author Share #10 Posted June 6, 2023 Deck has first coat of gray. Some of the casting masters to date: From top right - blue light, radar base, flag staff, 55 gallon drum, life raft cannister. Canute, Jack12477, GrandpaPhil and 2 others 5 Link to comment Share on other sites More sharing options...
alross2 Posted June 8, 2023 Author Share #11 Posted June 8, 2023 Got the hull and a bunch of details painted today. thibaultron, Jack12477, GrandpaPhil and 5 others 8 Link to comment Share on other sites More sharing options...
alross2 Posted June 13, 2023 Author Share #12 Posted June 13, 2023 Starting to put on some of the deck furniture. BobG, GrandpaPhil, thibaultron and 2 others 5 Link to comment Share on other sites More sharing options...
alross2 Posted June 20, 2023 Author Share #13 Posted June 20, 2023 Was not happy with the first cabin, so I revised the master, made a new mould, recast the base and am assembling it. Paint is still wet in this shot. Also redid the master for the life raft cannisters and made new ones for the throttle body and the binnacle. ccoyle, BobG, thibaultron and 4 others 7 Link to comment Share on other sites More sharing options...
alross2 Posted July 14, 2023 Author Share #14 Posted July 14, 2023 Started some of the construction drawings for the kit. Still have more material to add to these two. BobG, mtaylor, GrandpaPhil and 2 others 5 Link to comment Share on other sites More sharing options...
alross2 Posted July 19, 2023 Author Share #15 Posted July 19, 2023 (edited) Today is a drawing day. This one shows the steps in attaching the laser-cut pilot house/cabin sides to the resin casting. Edited July 20, 2023 by alross2 mtaylor, GrandpaPhil, thibaultron and 2 others 5 Link to comment Share on other sites More sharing options...
alross2 Posted July 21, 2023 Author Share #16 Posted July 21, 2023 Added the .040" half-round moulding to the shield. GrandpaPhil, Roger Pellett, Canute and 3 others 6 Link to comment Share on other sites More sharing options...
alross2 Posted August 8, 2023 Author Share #17 Posted August 8, 2023 Finally got the windshield frame figured out. There are ten pieces to the frame - two sets of five laminated. The window openings in the back pieces are slightly smaller than those in the front pieces, providing a lip upon which the laser-cut clear windows will sit. Once laminated, the frame will be pieced together with tape on the back, inserted into the pilot house shield, and glued in place. The tape will be removed and any gaps will be filled. The windows won't be attached until everything is painted. mtaylor, Roger Pellett, Canute and 4 others 7 Link to comment Share on other sites More sharing options...
alross2 Posted August 10, 2023 Author Share #18 Posted August 10, 2023 Put on the windshield frame and gave the pilot house/cabin its first coat of white. It's just sitting on the hull in these photos. thibaultron, GrandpaPhil, mtaylor and 2 others 5 Link to comment Share on other sites More sharing options...
alross2 Posted September 7, 2023 Author Share #19 Posted September 7, 2023 Been working on casting masters for a bit. Have made 20 so far. These are the most recent - boom winch and escape scuttle. thibaultron, BobG and mtaylor 3 Link to comment Share on other sites More sharing options...
alross2 Posted September 8, 2023 Author Share #20 Posted September 8, 2023 As of today, these are the brass and aluminum masters for the fittings specific to the 82' WPB kit. mtaylor, Canute, BobG and 1 other 4 Link to comment Share on other sites More sharing options...
alross2 Posted September 14, 2023 Author Share #21 Posted September 14, 2023 Experimenting with this template. All of the black areas are deck fittings and will be cutouts on the template. The modeler just places the template on the deck and marks the openings with a pencil. This eliminates the tedious measuring of the location of each part from the plans. I'll probably add the part numbers for each on the template, too. Canute, mtaylor, BobG and 1 other 3 1 Link to comment Share on other sites More sharing options...
BobG Posted September 14, 2023 Share #22 Posted September 14, 2023 That's a great idea, Al! thibaultron, mtaylor and Canute 3 Bob Garcia "Measure once, cuss twice!" Current Builds: Hms Brig-Sloop Flirt 1782 - Vanguard Models Pen Duick - Artesania Latina 1:28 Completed: Medway Longboat 1742 - Syren Ship Model Co. Member of the Nautical Research Guild Link to comment Share on other sites More sharing options...
alross2 Posted September 20, 2023 Author Share #23 Posted September 20, 2023 (edited) This is the fixture that will be included in the kit for bending and drilling the aft railing. Edited September 20, 2023 by alross2 BobG, mtaylor, Roger Pellett and 2 others 5 Link to comment Share on other sites More sharing options...

Recommended Posts