vulcanbomber Posted June 11, 2013 Author Share #61 Posted June 11, 2013 Thanks everyone for the birthday wishes. It's good to know I have so many friends from all around the world. Quote First Completed Build: San Francisco (Original Version) Current build: Victory Models HMS Pegasus Cross Stitch Project (Finished): Battle Of Agamemnon and Ca Ira Cross Stitch Project : Victory & Temeraire Link to comment Share on other sites More sharing options...
runner63 Posted June 11, 2013 Share #62 Posted June 11, 2013 And a very Happy birthday from me also, Caroline runner63 Quote Link to comment Share on other sites More sharing options...
st george Posted June 11, 2013 Share #63 Posted June 11, 2013 Happy Birthday from me Caroline. Many more to come. Quote David Current Build : HMAV Bounty - Amati Next Build : 18th Century Longboat Link to comment Share on other sites More sharing options...
vulcanbomber Posted June 11, 2013 Author Share #64 Posted June 11, 2013 Thanks guys. I've had a lovely day. Quote First Completed Build: San Francisco (Original Version) Current build: Victory Models HMS Pegasus Cross Stitch Project (Finished): Battle Of Agamemnon and Ca Ira Cross Stitch Project : Victory & Temeraire Link to comment Share on other sites More sharing options...
Sjors Posted June 12, 2013 Share #65 Posted June 12, 2013 Where is my piece of cake????????? Quote Currend builds: USS Constitution by Sjors - Model Shipways - Scale 1:76 HMS Victory by Sjors - Jotika - Scale 1:72 On hold: VOC Reconnaisance yacht Duyfken by Sjors - Kolderstok - Scale 1:50 Finished builds: HMS Snake (1797) by Sjors - Caldercraft - Scale 1:64 Nuestra Señora del Pilar by Sjors & Anja - OcCre - Scale 1:64 H.M. Brig-Sloop Flirt 1782 by Sjors - Vanguard Models - Scale 1:64 HMS Agamemnon by Sjors - Caldercraft / Jotika - 1:64 San Ildefonso - OcCre Le Mirage - Corel Smit Rotterdam (sea tug) - Billing Boats - 1:75 Sovereign of the seas - De Agostini Spirit of Mississippi - OcCre Santissima Trinidad - OcCre Corsair - OcCre Link to comment Share on other sites More sharing options...
vulcanbomber Posted June 13, 2013 Author Share #66 Posted June 13, 2013 Hi Sjors, unfortunately, I only received one cake.... and that had a man appearing out of it!!!! Quote First Completed Build: San Francisco (Original Version) Current build: Victory Models HMS Pegasus Cross Stitch Project (Finished): Battle Of Agamemnon and Ca Ira Cross Stitch Project : Victory & Temeraire Link to comment Share on other sites More sharing options...
Sjors Posted June 14, 2013 Share #67 Posted June 14, 2013 That's my mis-fortune again. A piece of cake with a guy in it…. Nice copy . Quote Currend builds: USS Constitution by Sjors - Model Shipways - Scale 1:76 HMS Victory by Sjors - Jotika - Scale 1:72 On hold: VOC Reconnaisance yacht Duyfken by Sjors - Kolderstok - Scale 1:50 Finished builds: HMS Snake (1797) by Sjors - Caldercraft - Scale 1:64 Nuestra Señora del Pilar by Sjors & Anja - OcCre - Scale 1:64 H.M. Brig-Sloop Flirt 1782 by Sjors - Vanguard Models - Scale 1:64 HMS Agamemnon by Sjors - Caldercraft / Jotika - 1:64 San Ildefonso - OcCre Le Mirage - Corel Smit Rotterdam (sea tug) - Billing Boats - 1:75 Sovereign of the seas - De Agostini Spirit of Mississippi - OcCre Santissima Trinidad - OcCre Corsair - OcCre Link to comment Share on other sites More sharing options...
vulcanbomber Posted June 14, 2013 Author Share #68 Posted June 14, 2013 Hi Sjors, never mind, there's always next year! by the way, I like the signature, I may have to pinch that! Quote First Completed Build: San Francisco (Original Version) Current build: Victory Models HMS Pegasus Cross Stitch Project (Finished): Battle Of Agamemnon and Ca Ira Cross Stitch Project : Victory & Temeraire Link to comment Share on other sites More sharing options...
Sjors Posted June 14, 2013 Share #69 Posted June 14, 2013 (edited) You van pinch that Caroline. That's why I posted it. There where a few more on the site http://www.picgifs.com. That's the English version of the smileys I'm using….. Edited June 14, 2013 by Sjors Quote Currend builds: USS Constitution by Sjors - Model Shipways - Scale 1:76 HMS Victory by Sjors - Jotika - Scale 1:72 On hold: VOC Reconnaisance yacht Duyfken by Sjors - Kolderstok - Scale 1:50 Finished builds: HMS Snake (1797) by Sjors - Caldercraft - Scale 1:64 Nuestra Señora del Pilar by Sjors & Anja - OcCre - Scale 1:64 H.M. Brig-Sloop Flirt 1782 by Sjors - Vanguard Models - Scale 1:64 HMS Agamemnon by Sjors - Caldercraft / Jotika - 1:64 San Ildefonso - OcCre Le Mirage - Corel Smit Rotterdam (sea tug) - Billing Boats - 1:75 Sovereign of the seas - De Agostini Spirit of Mississippi - OcCre Santissima Trinidad - OcCre Corsair - OcCre Link to comment Share on other sites More sharing options...
DesertWolf Posted July 11, 2013 Share #70 Posted July 11, 2013 (edited) Hi Caroline Am I mistaken, or did your original build log on MSW1 include more details of your rigging process? I remember photos with colourful arrows that showed how you adapted the rigging to suit the period better. I got a copy of R.C Anderson's book, and although he explains everything in detail, your original build log was just a lot easier to follow! If you ever find the time to upload some more photos and details, disciples like me following your original log will greatly appreciate it. Edited July 11, 2013 by DesertWolf Quote Wolf Current build : San Francisco II (AL) Link to comment Share on other sites More sharing options...
vulcanbomber Posted July 12, 2013 Author Share #71 Posted July 12, 2013 Hello Wolf. Yes, my log on mSW1 did have more detail on the rigging. I'm slowly trying to recreate the log, but have lost a lot of the photos I had, (though I've just recently found a whole bunch of ones I'd forgotten on our old PC, that our son is now using, and will have a look through them). I will try to get the same level of detail, but you'll need to be patient, especially as I'm building Pegasus too! Quote First Completed Build: San Francisco (Original Version) Current build: Victory Models HMS Pegasus Cross Stitch Project (Finished): Battle Of Agamemnon and Ca Ira Cross Stitch Project : Victory & Temeraire Link to comment Share on other sites More sharing options...
DesertWolf Posted July 13, 2013 Share #72 Posted July 13, 2013 Thanks Caroline! I truly appreciate all the effort. Quote Wolf Current build : San Francisco II (AL) Link to comment Share on other sites More sharing options...
vulcanbomber Posted July 14, 2013 Author Share #73 Posted July 14, 2013 I've found some of my lost photos on our son's PC, so even though it's going back a bit in time, I still think they'll be useful. I replaced the nasty metal grating with a wooden one made from the extra grating material left over. The post in place at the tip of the beak and the trim and rings installed: The bowsprit with blocks and yard attached; In the next post I'll describe how I attached the blocks. mtaylor, msberkman and Sjors 3 Quote First Completed Build: San Francisco (Original Version) Current build: Victory Models HMS Pegasus Cross Stitch Project (Finished): Battle Of Agamemnon and Ca Ira Cross Stitch Project : Victory & Temeraire Link to comment Share on other sites More sharing options...
vulcanbomber Posted July 14, 2013 Author Share #74 Posted July 14, 2013 This is how I made the blocks that have a long strop and are attached to the bowsprit by an eye. First I took a length of the wire provided in the kit, a single block and an eye: Taking the eye, I wrapped the middle of the wire around it to make the loop at the top of the block: Next I placed the block under the 'loop' Take the ends of the wire and place one on each side of the block and twist the together once to lock the block in place; Next take a second eye and thread one wire end through it: Leave a short length and bend the end back up towards the block: Keep this end up towards the block and bend the other wire end down towards the eye: Now twist the eye around so the wires twist together: Finally trim the ends and remove the eye from the loop: tkay11, mtaylor, DesertWolf and 2 others 5 Quote First Completed Build: San Francisco (Original Version) Current build: Victory Models HMS Pegasus Cross Stitch Project (Finished): Battle Of Agamemnon and Ca Ira Cross Stitch Project : Victory & Temeraire Link to comment Share on other sites More sharing options...
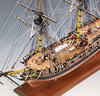
vulcanbomber Posted July 14, 2013 Author Share #75 Posted July 14, 2013 Main mast, main top mast, bowsprit and their yards: Main masts in place: Main mast and yard: Main mast crows nest and it's blocks: Front Rear Bowsprit in place; Sjors and mtaylor 2 Quote First Completed Build: San Francisco (Original Version) Current build: Victory Models HMS Pegasus Cross Stitch Project (Finished): Battle Of Agamemnon and Ca Ira Cross Stitch Project : Victory & Temeraire Link to comment Share on other sites More sharing options...
vulcanbomber Posted July 14, 2013 Author Share #76 Posted July 14, 2013 All masts in place; mtbediz, msberkman, mtaylor and 2 others 5 Quote First Completed Build: San Francisco (Original Version) Current build: Victory Models HMS Pegasus Cross Stitch Project (Finished): Battle Of Agamemnon and Ca Ira Cross Stitch Project : Victory & Temeraire Link to comment Share on other sites More sharing options...
Sjors Posted July 14, 2013 Share #77 Posted July 14, 2013 Did I missed all that????????? Great to see it now then vulcanbomber 1 Quote Currend builds: USS Constitution by Sjors - Model Shipways - Scale 1:76 HMS Victory by Sjors - Jotika - Scale 1:72 On hold: VOC Reconnaisance yacht Duyfken by Sjors - Kolderstok - Scale 1:50 Finished builds: HMS Snake (1797) by Sjors - Caldercraft - Scale 1:64 Nuestra Señora del Pilar by Sjors & Anja - OcCre - Scale 1:64 H.M. Brig-Sloop Flirt 1782 by Sjors - Vanguard Models - Scale 1:64 HMS Agamemnon by Sjors - Caldercraft / Jotika - 1:64 San Ildefonso - OcCre Le Mirage - Corel Smit Rotterdam (sea tug) - Billing Boats - 1:75 Sovereign of the seas - De Agostini Spirit of Mississippi - OcCre Santissima Trinidad - OcCre Corsair - OcCre Link to comment Share on other sites More sharing options...
vulcanbomber Posted July 14, 2013 Author Share #78 Posted July 14, 2013 Next is how I made the braces (the long bits at the ends of the yard, used to rotate the yard around the mast); First I took a length of cord just under three times the length of the brace and a block: I wanted the brace to twist so it held the block: To do this I stretched out the cord between my hands and twisted the length, making sure to twist it the right way so it wouldn't unravel, then when I brought the two ends together the cord would twist around itself and hold the block in place when placed in the middle of the cord, a dab of cyano (superglue) ensures the block is secured to the cord: Next I placed the yard on the plans and attached the brace to the end by slipping the yard through one of the twists, adjusting it until it was the length indicated on the plan: Once happy again a dab of cyano held is securely onto the yard, once dry it was easy to trim; Next is how I attached a block directly to a yard with the wire provided in the kit. First I scored a slight grove into the yard where the block was to go, this would help keep it in the correct place. Next i took a block (in this case a double) and a length of wire, wrapping the wire around the block, and twisting the ends together once, at the bottom of the block to secure it: Next take the yard and place the block and wire in the grove: Wrap one end of the wire clockwise around the yard and the other end anti-clockwise, bringing both end up alongside the block: Now, take one end and pass it between the block and yard so it end up on the opposite side. do the same with the second end: view on end so you can see the crossover just made: Now taking the block and the two ends firmly, and very carefully (it breaks easily) twist the block around twice so it is locked onto the yard, then trim the ends. tkay11, DesertWolf, mtaylor and 1 other 4 Quote First Completed Build: San Francisco (Original Version) Current build: Victory Models HMS Pegasus Cross Stitch Project (Finished): Battle Of Agamemnon and Ca Ira Cross Stitch Project : Victory & Temeraire Link to comment Share on other sites More sharing options...
vulcanbomber Posted July 14, 2013 Author Share #79 Posted July 14, 2013 Hi Sjors, It's really surprised me just how much was in my original log! Quote First Completed Build: San Francisco (Original Version) Current build: Victory Models HMS Pegasus Cross Stitch Project (Finished): Battle Of Agamemnon and Ca Ira Cross Stitch Project : Victory & Temeraire Link to comment Share on other sites More sharing options...
vulcanbomber Posted July 14, 2013 Author Share #80 Posted July 14, 2013 The gammoning: I'm repeating myself slightly here, but since I've found some of my missing pic's I can explain how I installed my shrouds in more detail. I first mentioned them and how I make the pendants and tackles here. The pendants are placed first, they are spliced together: To keep the mast straight, I temporarily fitted a stay. Next was fitting the shrouds, as mentioned earlier in this log, they are put on in pairs, one pair to the left, the next pair to the right and so on. The last shroud on the port was spliced to the last one to the starboard as they were both singles. On the main mast the first two pairs on both sides were put through the front hole in the crow's nest, the pendant and last shrouds through the back hole; A lot of builders use a jig for getting the shroud's deadeyes all the same distance, it usually consists of a piece of wood with pins set at both ends, one end would fit into the deadeyes on the channels and the other end for the deadeye on the shrouds, it would be held in position while the shroud was attached to it. I found it got in the way and found it easier to do it without one. The first one was attached to the spliced shroud and the others were attached and leveled by eye; First deadeye seized to a shroud; Deadeyes in place on the foremast, all leveled by eye, they will get evened out more by the lanyards DesertWolf, Sjors, mtaylor and 2 others 5 Quote First Completed Build: San Francisco (Original Version) Current build: Victory Models HMS Pegasus Cross Stitch Project (Finished): Battle Of Agamemnon and Ca Ira Cross Stitch Project : Victory & Temeraire Link to comment Share on other sites More sharing options...
vulcanbomber Posted July 14, 2013 Author Share #81 Posted July 14, 2013 Now to attach the lanyards. These ones are on the foremast. First, make sure the deadeyes are the correct way up! The holes are in a 'triangle', the top of the triangle should point down for the deadeyes on the channels and on the shrouds it should point up. Next, take a length of thread and knot the end. Make sure it's big enough not to get pulled through the hole, but small enough not to be noticed. From the back of the shroud (Top) deadeye, thread it through the bottom left hole (Note this pic is the BACK of the deadeye): The thread now goes through the front of the top left hole in the channel (bottom) deadeye: Now take it up and thread it through the back of the top hole in the shroud deadeye: Now through the front of the bottom hole on the channel deadeye: Next through the back of the bottom right hole in the shroud deadeye: Lastly through the front of the top right hole in the channel deadeye: Gently tension the lanyards so the deadeyes are all level: Shrouds and lanyards on the main mast: DO NOT TIE THEM OFF YET, they will still need tensioning when the standing rigging is complete. Piet, maddog33, mtaylor and 3 others 6 Quote First Completed Build: San Francisco (Original Version) Current build: Victory Models HMS Pegasus Cross Stitch Project (Finished): Battle Of Agamemnon and Ca Ira Cross Stitch Project : Victory & Temeraire Link to comment Share on other sites More sharing options...
Sjors Posted July 15, 2013 Share #82 Posted July 15, 2013 Hi Caroline, Early in the morning and all ready a question... You are ending the lanyard at the bottom of the deadeye and not at the top????? And how do you "closed" it then? I know that the lanyard are at the top deadeye and then seizing on the shroud…... Maybe you find another way? Or is it still to early for me and I don't see it right…. Quote Currend builds: USS Constitution by Sjors - Model Shipways - Scale 1:76 HMS Victory by Sjors - Jotika - Scale 1:72 On hold: VOC Reconnaisance yacht Duyfken by Sjors - Kolderstok - Scale 1:50 Finished builds: HMS Snake (1797) by Sjors - Caldercraft - Scale 1:64 Nuestra Señora del Pilar by Sjors & Anja - OcCre - Scale 1:64 H.M. Brig-Sloop Flirt 1782 by Sjors - Vanguard Models - Scale 1:64 HMS Agamemnon by Sjors - Caldercraft / Jotika - 1:64 San Ildefonso - OcCre Le Mirage - Corel Smit Rotterdam (sea tug) - Billing Boats - 1:75 Sovereign of the seas - De Agostini Spirit of Mississippi - OcCre Santissima Trinidad - OcCre Corsair - OcCre Link to comment Share on other sites More sharing options...
vulcanbomber Posted July 15, 2013 Author Share #83 Posted July 15, 2013 Hi Sjors, that's correct the lanyard ends on the bottom deadeye and then is taken up to the shroud. I hitch it onto the shroud with a clove hitch to hold it in place and then seize it, but that shouldn't be done until all the standing rigging is completed. Sjors 1 Quote First Completed Build: San Francisco (Original Version) Current build: Victory Models HMS Pegasus Cross Stitch Project (Finished): Battle Of Agamemnon and Ca Ira Cross Stitch Project : Victory & Temeraire Link to comment Share on other sites More sharing options...
DesertWolf Posted July 16, 2013 Share #84 Posted July 16, 2013 Caroline, Thank you for all the detail and going through all this trouble to recreate your SF log. Your SF is an absolute masterpiece! I'm looking forward to seeing more pics. vulcanbomber 1 Quote Wolf Current build : San Francisco II (AL) Link to comment Share on other sites More sharing options...
vulcanbomber Posted July 18, 2013 Author Share #85 Posted July 18, 2013 Hi Arthur, I started in the bottom left hole in the top deadeye, the one attached to the shroud. )I called it the shroud deadeye, thinking it would be clearer, maybe using upper deadeye and lower deadeye would be better?) I made a typo, and said right hole, I've corrected it now. The second pic is a bit misleading, I hadn't noticed that before, I'd moved the top deadeye out the way when I was threading the lanyard through the bottom deadeye in the second move. That's a good pic, Arthur, and shows the order quite well. I agree with you on the second one, I would have thought the end should have passed over the others. Quote First Completed Build: San Francisco (Original Version) Current build: Victory Models HMS Pegasus Cross Stitch Project (Finished): Battle Of Agamemnon and Ca Ira Cross Stitch Project : Victory & Temeraire Link to comment Share on other sites More sharing options...
vulcanbomber Posted July 19, 2013 Author Share #86 Posted July 19, 2013 Thanks Arthur! I think it happens to all of us, the times I've read something and then gone on auto pilot without reading the rest properly, then wonder why things haven't turned out as expected. Quote First Completed Build: San Francisco (Original Version) Current build: Victory Models HMS Pegasus Cross Stitch Project (Finished): Battle Of Agamemnon and Ca Ira Cross Stitch Project : Victory & Temeraire Link to comment Share on other sites More sharing options...
Sjors Posted July 22, 2013 Share #87 Posted July 22, 2013 Doesn't matter Arthur, Most of the time they are thinking what I'm talking about Quote Currend builds: USS Constitution by Sjors - Model Shipways - Scale 1:76 HMS Victory by Sjors - Jotika - Scale 1:72 On hold: VOC Reconnaisance yacht Duyfken by Sjors - Kolderstok - Scale 1:50 Finished builds: HMS Snake (1797) by Sjors - Caldercraft - Scale 1:64 Nuestra Señora del Pilar by Sjors & Anja - OcCre - Scale 1:64 H.M. Brig-Sloop Flirt 1782 by Sjors - Vanguard Models - Scale 1:64 HMS Agamemnon by Sjors - Caldercraft / Jotika - 1:64 San Ildefonso - OcCre Le Mirage - Corel Smit Rotterdam (sea tug) - Billing Boats - 1:75 Sovereign of the seas - De Agostini Spirit of Mississippi - OcCre Santissima Trinidad - OcCre Corsair - OcCre Link to comment Share on other sites More sharing options...
vulcanbomber Posted July 22, 2013 Author Share #88 Posted July 22, 2013 I say let them wonder! They'll probably get the gist of it all by reading the posts. For those that don't: I made a typing error in my lanyard instructions, it was spotted by my trusty followers, who I'd confused slightly and they were trying to establish if I'd gone wrong, but when reading through it again, found it was a typing/reading error. I have now corrected it so it reads better. Howz zat????!!! :D Sjors 1 Quote First Completed Build: San Francisco (Original Version) Current build: Victory Models HMS Pegasus Cross Stitch Project (Finished): Battle Of Agamemnon and Ca Ira Cross Stitch Project : Victory & Temeraire Link to comment Share on other sites More sharing options...
michael mott Posted July 23, 2013 Share #89 Posted July 23, 2013 Just checking in the ship looks great, The pictures of the attaching methods for the block were interesting, how will you colour the silver wire? Michael Quote Current builds Bristol Pilot Cutter 1:8; Skipjack 19 foot Launch 1:8; Herreshoff Buzzards Bay 14 1:8 Other projects Pilot Cutter 1:500 ; Maria, 1:2 Now just a memory Future model Gill Smith Catboat Pauline 1:8 Finished projects A Bassett Lowke steamship Albertic 1:100 Anything you can imagine is possible, when you put your mind to it. Link to comment Share on other sites More sharing options...
Sjors Posted July 23, 2013 Share #90 Posted July 23, 2013 Thank you !!!!!!! I have read it again and ok. Was that the purpose of that miss understanding? So everybody comes again???? No need to…..I'm still coming Quote Currend builds: USS Constitution by Sjors - Model Shipways - Scale 1:76 HMS Victory by Sjors - Jotika - Scale 1:72 On hold: VOC Reconnaisance yacht Duyfken by Sjors - Kolderstok - Scale 1:50 Finished builds: HMS Snake (1797) by Sjors - Caldercraft - Scale 1:64 Nuestra Señora del Pilar by Sjors & Anja - OcCre - Scale 1:64 H.M. Brig-Sloop Flirt 1782 by Sjors - Vanguard Models - Scale 1:64 HMS Agamemnon by Sjors - Caldercraft / Jotika - 1:64 San Ildefonso - OcCre Le Mirage - Corel Smit Rotterdam (sea tug) - Billing Boats - 1:75 Sovereign of the seas - De Agostini Spirit of Mississippi - OcCre Santissima Trinidad - OcCre Corsair - OcCre Link to comment Share on other sites More sharing options...

Recommended Posts
Join the conversation
You can post now and register later. If you have an account, sign in now to post with your account.