vulcanbomber Posted July 23, 2013 Author Share #91 Posted July 23, 2013 (edited) Hi Michael, thanks for looking in. I didn't colour the wire, I quite liked it silver. Hi Sjors, glad it's understandable now and I know you're always around, I have the tea and biscuits on hand always (rum is securely locked away)! . Edited March 11, 2019 by vulcanbomber hamilton, Lee Hutchinson and Sjors 3 Quote First Completed Build: San Francisco (Original Version) Current build: Victory Models HMS Pegasus Cross Stitch Project (Finished): Battle Of Agamemnon and Ca Ira Cross Stitch Project : Victory & Temeraire Link to comment Share on other sites More sharing options...
texxn5 Posted September 3, 2013 Share #92 Posted September 3, 2013 Nice build, I admire the Spanish ships, and this one is a beauty Quote John Current Current Builds: US Brig Niagara on my website FINISHED BUILD LOGS: New Bedford Whaleboat - page on my Morgan Website: http://www.charleswmorganmodel.com/whaleboat-build-log-by-john-fleming.html C.W. Morgan - Model Shipways 1:64 http://modelshipworld.com/index.php?/topic/1785-cw-morgan-by-texxn5-johnf-ms-164-kit/ USS Constitution - Revell 1:96 http://modelshipworld.com/index.php?/topic/1796-uss-constitution-by-texxn5-johnf-revell-196-kit/ website US Brig Niagara Model http://www.niagaramodel.com website Charles W Morgan Model http://www.charleswmorganmodel.com website PROXXON DISCOUNT TOOL STORE http://proxxontoolsdiscount.com Link to comment Share on other sites More sharing options...
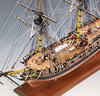
vulcanbomber Posted April 4, 2015 Author Share #93 Posted April 4, 2015 Finally getting round to finishing this build log! The last few pages went back over how I'd attached blocks to the spars and the lanyards on the shrouds, these were slightly out of sync with where I'd been in the reposting the build log as I hadn't found the images for them. Now I'm returning back to where I'd left off attaching the stays and shrouds to the mizzen masts and the top masts. Stay and shrouds attached to the mizzen mast. View of all three masts with their stays and shrouds. Attaching the deadeyes to the rim of the crows nest. A small hole was drilled and a shortened eyebolt was glued with a touch of cyano. Once dry, a deadeye was attached with a length of thread, a touch of cyano was used to ensure it wouldn't come loose. Spar and shrouds attached to main topmast. Note: the stay is only temporary at this time. It will be fitted properly at later stage. Griffon, Mirabell61, src and 3 others 6 Quote First Completed Build: San Francisco (Original Version) Current build: Victory Models HMS Pegasus Cross Stitch Project (Finished): Battle Of Agamemnon and Ca Ira Cross Stitch Project : Victory & Temeraire Link to comment Share on other sites More sharing options...
vulcanbomber Posted April 4, 2015 Author Share #94 Posted April 4, 2015 Once I attached the lanyards to the shrouds, I installed the stay properly. A block was stropped to the top stay about halfway, similar to the main stay below it. The fore top mast with stay and shrouds attached. View of all three masts and topmasts with stays and shrouds. Mirabell61, src, CaptainSteve and 2 others 5 Quote First Completed Build: San Francisco (Original Version) Current build: Victory Models HMS Pegasus Cross Stitch Project (Finished): Battle Of Agamemnon and Ca Ira Cross Stitch Project : Victory & Temeraire Link to comment Share on other sites More sharing options...
vulcanbomber Posted April 4, 2015 Author Share #95 Posted April 4, 2015 Next the lanyards were tensioned and siezed to each shroud. A touch of cyano ensured they would not unravel. All ready for tying the ratines. I realise I've put how I tied the ratlines too early in this log. my description can be found here. The first ratlines done on the foremast. Ratlines completed. msberkman, Piet, mtaylor and 2 others 5 Quote First Completed Build: San Francisco (Original Version) Current build: Victory Models HMS Pegasus Cross Stitch Project (Finished): Battle Of Agamemnon and Ca Ira Cross Stitch Project : Victory & Temeraire Link to comment Share on other sites More sharing options...
vulcanbomber Posted April 4, 2015 Author Share #96 Posted April 4, 2015 Next I attached the halyards to the main mast and main top mast spars. The halyard on the main lower mast was started by siezing a length of thread to the small loop at the bottom of the double block attached to the underside of the crows nest. the thread was taken down to the back of the right hand hole in the double block attached to the yard, then up to the front of the right hand hole in the double block attached to the crows nest, next repeat with the left hand holes in the blocks. Repeat in a similar way for the halyard on the top mast. The halyards were then tied of to belaying pins on the main fife rail. Halyards on the foremast and foretop mast. mtbediz, src, Piet and 3 others 6 Quote First Completed Build: San Francisco (Original Version) Current build: Victory Models HMS Pegasus Cross Stitch Project (Finished): Battle Of Agamemnon and Ca Ira Cross Stitch Project : Victory & Temeraire Link to comment Share on other sites More sharing options...
src Posted April 4, 2015 Share #97 Posted April 4, 2015 Caroline, great to see you building again! Sam vulcanbomber 1 Quote Current Build Constructo Enterprise Link to comment Share on other sites More sharing options...
vulcanbomber Posted April 4, 2015 Author Share #98 Posted April 4, 2015 I had a break from the rigging and turned my attantion to the sails. I didn't like the sails provided with the kit, so I found an old cotton sheet which was perfect. Is was very soft and supple and quite a fine weave. I used the kit sails as a template and cut new ones. I hand stitched lines down the sails and hemmed them all around, attaching a cord all around the edge to represent the boltrope. The paler one is my sail; the darker lower one, the kit provided sail. Piet, mtaylor, src and 2 others 5 Quote First Completed Build: San Francisco (Original Version) Current build: Victory Models HMS Pegasus Cross Stitch Project (Finished): Battle Of Agamemnon and Ca Ira Cross Stitch Project : Victory & Temeraire Link to comment Share on other sites More sharing options...
Mirabell61 Posted April 4, 2015 Share #99 Posted April 4, 2015 Hi Caroline, very nice looking masting and Standing rigging........, also hope your Pegasus will be further under steam... Nils Piet and vulcanbomber 2 Quote Current builds -Lightship Elbe 1 Completed - Steamship Ergenstrasse ex Laker Corsicana 1918- scale 1:87 scratchbuild - "Zeesboot" heritage wooden fishing small craft around 1870, POB clinker scratch build scale 1:24 - Pilot Schooner # 5 ELBE ex Wanderbird, scale 1:50 scratchbuild - Mississippi Sterwheelsteamer built as christmapresent for grandson modified kit build - Chebec "Eagle of Algier" 1753--scale 1:48-POB-(scratchbuild) "SS Kaiser Wilhelm der Grosse" four stacker passenger liner of 1897, blue ribbond awarded, 1:144 (scratchbuild) "HMS Pegasus" , 16 gun sloop, Swan-Class 1776-1777 scale 1:64 from Amati plan -"Pamir" 4-mast barque, P-liner, 1:96 (scratchbuild) -"Gorch Fock 2" German Navy cadet training 3-mast barque, 1:95 (scratchbuild) "Heinrich Kayser" heritage Merchant Steamship, 1:96 (scratchbuild) original was my grandfathers ship -"Bohuslän" , heritage ,live Swedish museum passenger steamer (Billings kit), 1:50 "Lorbas", river tug, steam driven for RC, fictive design (scratchbuild), scale appr. 1:32 under restoration / restoration finished "Hjejlen" steam paddlewheeler, 1861, Billings Boats rare old kit, scale 1:50 Link to comment Share on other sites More sharing options...
vulcanbomber Posted April 4, 2015 Author Share #100 Posted April 4, 2015 Next I attached the braces to the yards. They were all started by: 1. hitching the middle of a length of thread to the stays infront of the siezed double blocks, 2. threading the ends through the blocks on the long strops attached to the ends of the yards, then 3. passing them through the double blocks siezed to the stays and belaying them to the pinrails as indicated by the kit plans. All the braces fitted. . msberkman, Salty Sea Dog, Mirabell61 and 3 others 6 Quote First Completed Build: San Francisco (Original Version) Current build: Victory Models HMS Pegasus Cross Stitch Project (Finished): Battle Of Agamemnon and Ca Ira Cross Stitch Project : Victory & Temeraire Link to comment Share on other sites More sharing options...
vulcanbomber Posted April 4, 2015 Author Share #101 Posted April 4, 2015 Hi Sam and Nils, thought it was about time I did some more updating to San Fran, it's long overdue! After I fitted the braces, I didn't like the position the kit plans said to belay them. it would interfear too much with the sails when fitted. So I altered them slightly to position theme they they wouldn't be so much of a hinderence. The yellow lines show the original route of the braces, the blue line shows my altered route of the fore braces, and the red line shows my route for the top fore braces. Another part of the rigging I wanted to add that wasn't in the kit plans were the tacks. The tacks for the foresail passed under the stem. so I created a small curved piece of timber to fit the stem to create a hole for the tacks to pass through. ccoyle, Mirabell61, mtaylor and 2 others 5 Quote First Completed Build: San Francisco (Original Version) Current build: Victory Models HMS Pegasus Cross Stitch Project (Finished): Battle Of Agamemnon and Ca Ira Cross Stitch Project : Victory & Temeraire Link to comment Share on other sites More sharing options...
Jim Lad Posted April 4, 2015 Share #102 Posted April 4, 2015 Great to see the extensive update, Caroline! John vulcanbomber 1 Quote Link to comment Share on other sites More sharing options...
vulcanbomber Posted April 4, 2015 Author Share #103 Posted April 4, 2015 Thanks John, it's been a long time coming! Think I'll stop here for a while (hopefully not as long as before!), next I'll show how I made the 'Martnets' for the main sail and foresail, these were not in the original kit plns either, but were a complicated bit if rigging to help furl the sails. Piet, mtaylor, Mirabell61 and 1 other 4 Quote First Completed Build: San Francisco (Original Version) Current build: Victory Models HMS Pegasus Cross Stitch Project (Finished): Battle Of Agamemnon and Ca Ira Cross Stitch Project : Victory & Temeraire Link to comment Share on other sites More sharing options...
Sjors Posted April 5, 2015 Share #104 Posted April 5, 2015 Hello stranger...... I'm happy to see that you find the safe port again Don't stay away this long anymore....please ? You have make great progress and it looks terrific ! How goes the stitch project ???? Sjors vulcanbomber 1 Quote Currend builds: USS Constitution by Sjors - Model Shipways - Scale 1:76 HMS Victory by Sjors - Jotika - Scale 1:72 On hold: VOC Reconnaisance yacht Duyfken by Sjors - Kolderstok - Scale 1:50 Finished builds: HMS Snake (1797) by Sjors - Caldercraft - Scale 1:64 Nuestra Señora del Pilar by Sjors & Anja - OcCre - Scale 1:64 H.M. Brig-Sloop Flirt 1782 by Sjors - Vanguard Models - Scale 1:64 HMS Agamemnon by Sjors - Caldercraft / Jotika - 1:64 San Ildefonso - OcCre Le Mirage - Corel Smit Rotterdam (sea tug) - Billing Boats - 1:75 Sovereign of the seas - De Agostini Spirit of Mississippi - OcCre Santissima Trinidad - OcCre Corsair - OcCre Link to comment Share on other sites More sharing options...
vulcanbomber Posted April 5, 2015 Author Share #105 Posted April 5, 2015 Hello Sjors, I'll try not to stay away for so long again, but I can't promise! It's hard to remember how I did everything to San Fran, It's so long since I completed her now, and I'm struggling to remember what was in the kit plans and what wasn't. Maybe a glass of wine will help me remember?!! msberkman, mtaylor and src 3 Quote First Completed Build: San Francisco (Original Version) Current build: Victory Models HMS Pegasus Cross Stitch Project (Finished): Battle Of Agamemnon and Ca Ira Cross Stitch Project : Victory & Temeraire Link to comment Share on other sites More sharing options...
Sjors Posted April 5, 2015 Share #106 Posted April 5, 2015 Give it a go Caroline I will join you ! Sjors mtaylor 1 Quote Currend builds: USS Constitution by Sjors - Model Shipways - Scale 1:76 HMS Victory by Sjors - Jotika - Scale 1:72 On hold: VOC Reconnaisance yacht Duyfken by Sjors - Kolderstok - Scale 1:50 Finished builds: HMS Snake (1797) by Sjors - Caldercraft - Scale 1:64 Nuestra Señora del Pilar by Sjors & Anja - OcCre - Scale 1:64 H.M. Brig-Sloop Flirt 1782 by Sjors - Vanguard Models - Scale 1:64 HMS Agamemnon by Sjors - Caldercraft / Jotika - 1:64 San Ildefonso - OcCre Le Mirage - Corel Smit Rotterdam (sea tug) - Billing Boats - 1:75 Sovereign of the seas - De Agostini Spirit of Mississippi - OcCre Santissima Trinidad - OcCre Corsair - OcCre Link to comment Share on other sites More sharing options...
vulcanbomber Posted April 11, 2015 Author Share #107 Posted April 11, 2015 Continuing with the running rigging... The clew lines were attached as per the kit plans and were quite straight forward. The next thing I tackled were the martnets. I put them on both the foresail and mainsail. For each martnet two deadeyes are needed, one violin block, and one single block. The following is how I added the martnets to the Port side of the yard and sail: Take one deadeye and a length of thread. Sieze one end of the thread around the deadeye, pass the free end through the hole in the wide end of the violin block and sieze it to the second deadeye. Next, working at the back of the sail, a length of thread is attached to the side, about a half inch below the yard, then taken through a hole in the dead eye, back to the sail edge and fastened off about quarter inch below where the thread started (shown in black on the image). Repeat with two more lengths of thread and the last two holes of the deadeye. (shown in red and blue on the image. Repeat this with the deadeye on the front of the sail. It should look something like this when completed. The last two steps need to be repeated for the starboard side of the yard and sail. Next was to add the rigging to the martnets. I took a length of thread and folded it in half to get the centrepoint. I threaded it behind the tip of the topmast until the middle of the thread was behind it. I then siezed the thread to form a loop around the topmast tip. On each end of the thread I siezed a single block. To complete the martnets the fall was added. One end of a length of thread was siezed to the single block hanging from the topmast, the other end was threaded through the top hole of the violin block, back up and threaded through the hole in the single block and then down to the deck. (see above picture) I displayed the martnets pulled up in preparation to furling the sail on the main, but left in the 'down' position on the fore ad belayed the end to a pinrail. Piet, msberkman and Sjors 3 Quote First Completed Build: San Francisco (Original Version) Current build: Victory Models HMS Pegasus Cross Stitch Project (Finished): Battle Of Agamemnon and Ca Ira Cross Stitch Project : Victory & Temeraire Link to comment Share on other sites More sharing options...
vulcanbomber Posted April 11, 2015 Author Share #108 Posted April 11, 2015 Next were the sheet lines, these were on the kit plans, but the tack lines were not, which I added myself. A fairlead needed to be drilled in the side of the hull to accommodate the tack line for the mainsail, as was a pinrail, neither of which were in the kit plans.. mtaylor, msberkman, Sjors and 1 other 4 Quote First Completed Build: San Francisco (Original Version) Current build: Victory Models HMS Pegasus Cross Stitch Project (Finished): Battle Of Agamemnon and Ca Ira Cross Stitch Project : Victory & Temeraire Link to comment Share on other sites More sharing options...
vulcanbomber Posted April 11, 2015 Author Share #109 Posted April 11, 2015 I added the buntlines, can't remember if these were in the kit plans or not. They were attached to the bottom of the sail and ran up the front to a block and the fall went behind the sail and down to the deck. They are in the raised position on my mainsail, bringing the sail up to the yard. The white lines seen coming from the front of the sails, near the bottom are the bridles and bowlines, these, again, are not in the kit plans and I added them myself. I will explain how I did them next. mtaylor, Griffon, Piet and 4 others 7 Quote First Completed Build: San Francisco (Original Version) Current build: Victory Models HMS Pegasus Cross Stitch Project (Finished): Battle Of Agamemnon and Ca Ira Cross Stitch Project : Victory & Temeraire Link to comment Share on other sites More sharing options...
Sjors Posted April 14, 2015 Share #110 Posted April 14, 2015 You still know where everything goes.......amazing !!!! Keep on going with those little tutorials Just love it !!! Sjors Quote Currend builds: USS Constitution by Sjors - Model Shipways - Scale 1:76 HMS Victory by Sjors - Jotika - Scale 1:72 On hold: VOC Reconnaisance yacht Duyfken by Sjors - Kolderstok - Scale 1:50 Finished builds: HMS Snake (1797) by Sjors - Caldercraft - Scale 1:64 Nuestra Señora del Pilar by Sjors & Anja - OcCre - Scale 1:64 H.M. Brig-Sloop Flirt 1782 by Sjors - Vanguard Models - Scale 1:64 HMS Agamemnon by Sjors - Caldercraft / Jotika - 1:64 San Ildefonso - OcCre Le Mirage - Corel Smit Rotterdam (sea tug) - Billing Boats - 1:75 Sovereign of the seas - De Agostini Spirit of Mississippi - OcCre Santissima Trinidad - OcCre Corsair - OcCre Link to comment Share on other sites More sharing options...
Jim Lad Posted April 14, 2015 Share #111 Posted April 14, 2015 Great job on that rigging, Caroline! John Quote Link to comment Share on other sites More sharing options...
tuciship Posted April 14, 2015 Share #112 Posted April 14, 2015 it's wonderful,perfect. I like very much Quote Link to comment Share on other sites More sharing options...
tuciship Posted April 18, 2015 Share #113 Posted April 18, 2015 It looks great. superrrr Quote Link to comment Share on other sites More sharing options...
vulcanbomber Posted April 19, 2015 Author Share #114 Posted April 19, 2015 Sjors, I glass of wine or two helps my memory, plus I have had to dig out my trusty book on rigging!!! Thanks for looking in John, I have made it my mission to complete this log - it is well overdue! Tuciship, welcome to MSW and thank you for looking through my build. It was my first wooden ship model and I learned a lot constructing it. Sjors 1 Quote First Completed Build: San Francisco (Original Version) Current build: Victory Models HMS Pegasus Cross Stitch Project (Finished): Battle Of Agamemnon and Ca Ira Cross Stitch Project : Victory & Temeraire Link to comment Share on other sites More sharing options...
webo1967 Posted September 6, 2015 Share #115 Posted September 6, 2015 Hi Caroline, I am into my first week of extensive research as I start my first ever wooden ship build on the SF2. I have read a lot of build logs in preparation for my start, however I was very impressed with your build log. You mentioned you later found out that your decking pattern was not accurate. I was planning a 3-step pattern, based on 78 mm planks, stepped every 26 mm. Is this appropriate, or based on what you subsequently learned, would you recommend a different pattern. Kind Regards, Chris Quote Link to comment Share on other sites More sharing options...
vulcanbomber Posted September 25, 2015 Author Share #116 Posted September 25, 2015 Hi Chris, sorry for the late reply. The pattern you have planned sounds fine to me. The size and lengths of my planks were fine, it was the pattern that was wrong. If you look closely, they are just laid in a normal diagonal pattern, At the time I didn't know about the staggering pattern. Good luck with your build. I thoroughly enjoyed building the San Fran and she is an excellent ship to learn on, Not too simple, jusy enough of a challenge to make it enjoyable. If you have any questions, please don't hesitate to ask, I will always do my best to answer. I may even find some time to finish explaining how I rigged her! mtaylor and Piet 2 Quote First Completed Build: San Francisco (Original Version) Current build: Victory Models HMS Pegasus Cross Stitch Project (Finished): Battle Of Agamemnon and Ca Ira Cross Stitch Project : Victory & Temeraire Link to comment Share on other sites More sharing options...
webo1967 Posted October 11, 2015 Share #117 Posted October 11, 2015 Dear Caroline, Many thanks for responding. The deck is now complete and sanded ready for first two coats of thinned varnish. I'm quite happy with the outcome and used cocktail sticks for the tree nails. A little bit of run from the pencilling to achieve the caulking effect, but sanding has helped minimize the appearance. Now I'm just getting ready to apply the bulwarks, which seem a little out of alignment at the moment so have been working the sanding block to ensure as best fit as possible. Have really enjoyed the build to date and am already thinking about my next build. This forum has been absolutely awesome however for helping this novice get this far and I feel as well prepared as I can be to start the planking, which actually I'm really looking forward to! Many thanks again for your feedback. Cheers, Chris mtaylor 1 Quote Link to comment Share on other sites More sharing options...
Dewey Posted May 1, 2017 Share #118 Posted May 1, 2017 Caroline, Looks great! I found this kit at a flea market about 10 years ago and decided to give it a go. I had never done a ship and had no idea what I was getting into. I screwed up the planking and was so disgusted I put it aside till this past December. I've made a lot of progress and I am getting ready to do the shrouds but I was stuck on the Fore mast. I couldn't figure out where the 5th line went. Your instructions showed me everything I needed to know. I still know nothing about ships and I've made a ton of mistakes but I find I actually love doing this and with help from people like you I know I will get better. Thank you for your hard work and sharing it with us! PS I've actually bought 2 new ships. The Artesania Latina Swift Virginia PILOT BOAT 1805 so I can learn planking on a smaller boat and the Latina San Francisco II because I'm a glutton for punishment. Quote Link to comment Share on other sites More sharing options...
sawdust Posted May 1, 2017 Share #119 Posted May 1, 2017 Hello Caroline, Thanks for reposting your San Fran. It revived memories of your excellent first build and your determination to overcome problems and inaccuracies in the kit. Kip Quote Link to comment Share on other sites More sharing options...
vulcanbomber Posted May 5, 2017 Author Share #120 Posted May 5, 2017 Hello Dewey, thanks for your comments, I'm glad you found some help in my log. It is only through others help that I managed to get a pleasing result with my San Fran. Hello Kip, Yes, I remember almost giving up with it right back then, but with yours and others' encouragement, I overcame the problems and learned a lot along the way. How is your modelling going? I really must get back to my Pegasus sometime. Sjors 1 Quote First Completed Build: San Francisco (Original Version) Current build: Victory Models HMS Pegasus Cross Stitch Project (Finished): Battle Of Agamemnon and Ca Ira Cross Stitch Project : Victory & Temeraire Link to comment Share on other sites More sharing options...

Recommended Posts
Join the conversation
You can post now and register later. If you have an account, sign in now to post with your account.