shihawk Posted March 9, 2015 Share #31 Posted March 9, 2015 (edited) Good to know your still building and the planking looks spot on to me ,it would be a shame to copper over it .It,s a big ship and doing it properly will take a long time ,but it will be worth it !! Edited March 9, 2015 by shihawk Quote HMS Victory by Shihawk. Billing 1-75 wood finish Link to comment Share on other sites More sharing options...
Heinz6672 Posted March 10, 2015 Author Share #32 Posted March 10, 2015 I didn't think you posted it but is the lower deck planked in walnut ? Hello Carimb, yes, Ive planked it with walnut 4x1 mm. Then I´ve stamped spaces in the planks using an old little screwdriver and a hammer and filled them with black wood filler. This make the wood look old and point out the single planks (I hope you understand me...) Good to know your still building and the planking looks spot on to me ,it would be a shame to copper over it .It,s a big ship and doing it properly will take a long time ,but it will be worth it !! Yes, shilhawk, I am still building my victory. But beside my work and my sport it goes sooo slowly. But the result make me forget the time. And I am really glad that experienced people like you like my work. Thank you so much! Quote HMS Victory by Heinz746 Link to comment Share on other sites More sharing options...
seamymcnally Posted March 25, 2015 Share #33 Posted March 25, 2015 Hello heinz,really good workmanship on your hull.when you start the other side could you post some pictures of the way you do your planking .thanks seamy Quote Link to comment Share on other sites More sharing options...
Shipyard sid Posted March 25, 2015 Share #34 Posted March 25, 2015 Greetings Heinz Welcome back with more progress. And very impressive at that. If you intend not to add the coppering to the hull, will you also be leaving all other areas such as the galleries plain wood ? Well done Heinz. DAVID Quote Link to comment Share on other sites More sharing options...
Heinz6672 Posted March 25, 2015 Author Share #35 Posted March 25, 2015 Once again, many thanks for the nice words. @seamy: this pictures are for you . I wouldn´t have posted new pictures at this time. @david: yes, I want to build it without painting the wood. I will also try to work with different kind of wood to get the same results. Winlich, seamymcnally, shihawk and 3 others 6 Quote HMS Victory by Heinz746 Link to comment Share on other sites More sharing options...
historyguysteve Posted March 27, 2015 Share #36 Posted March 27, 2015 Guten Tag Heinz! Vielen Dank fur euer post! That's about the extent of my german, though I must say I tried to translate all of your posts in german, it was great practice.- So thanks for posting in english and I think I speak for everyone when I say I appreciate your effort. Great post and terrific job on the ship - like many others I am really interested in the use of differing wood rather than painting over the wood. How will you handle the copper bottom on the hull?? Super progress and I'm learning a lot. thanks again Steve Quote Link to comment Share on other sites More sharing options...
Heinz6672 Posted March 27, 2015 Author Share #37 Posted March 27, 2015 Hello Steve, I will not use the copper. I want to build it only with wood. Otherwise there would be no need for this eleborate work. And - as shihawk wrote - it wood be a shame to copper over it :-). However my decision has the consequence, that my Victory is not historically correct. Her hull was covered with copper plates. I have taken a long time to think about this problem. On the one hand I would like to build it as correct as possible. On the other hand there is the fact, that I am not an expert in modelship building. That means that my skills and tools are not outstanding like Alexandru´s are (look at his Victory at this forum and you know what I mean) and I don´t have the knowledge about shipping at this age. I have some books - amongst other "the anatomy of Nelson´s ships" from Nepean Longridge. But this book is written in english and very hard to understand for me. What I want to say: I´ve realized very soon that I have to make compromises. In case of doubt I will make it the way I like the most. And I don´t like the copper plates in my kit! I had the same problem wit the yellow stipes on the hull. I know they don´t follow the planks. I have to make the decision if I want to paint them correctly or use yellow wood. I prefer the yellow wood, knowing that the stripes are not historical correct now... Steve, if you are searching for another practise to improve your german... you could translate "the anatomy...". This would be a very welcome help for me . I am just joking... Thank you so much for your compliments and interest in my topic!!! - Heinz - Quote HMS Victory by Heinz746 Link to comment Share on other sites More sharing options...
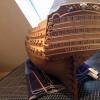
Heinz6672 Posted June 7, 2015 Author Share #38 Posted June 7, 2015 Hello community! Another update from me. I´ve just finished the planking of the hull. On the first pictures you can see how I sketch the way of the future planks before I cut and build them. I tried to build this side similar to the first one. That means I look for every single plank and try to copy it. That does´t work in every situation. So if you search for mistakes, you will find some :-). But after all I am quite happy with the result. I hope you like it too! Now I´ve started with the stern. I don´t want to use the pre-built parts of the kid. There are some reasons for this: first of all: as you already know, I don´t want to paint my model. So it would not look well to use the sheet parts. I prefer to make them for myself using different kind of wood to imitate the colour. The second reason is: I like to do this. Even if that means that the result isn´t as perfect as the original parts. We will see how this works. I keep on searching for your build-logs to get ideas and to see what is possible to do. (special thanks to shihawk: even if I didn´t wrote in your topic... I am a big fan of your work!!!) On the last picture you can see that I just have started to build new frames on the windows. - Heinz - Seventynet, oscarmate, Winlich and 3 others 6 Quote HMS Victory by Heinz746 Link to comment Share on other sites More sharing options...
Gundorph Posted June 7, 2015 Share #39 Posted June 7, 2015 Very very good planking skills you have... Quote Current Build: U.S. Brig Syren Link to comment Share on other sites More sharing options...
shihawk Posted June 7, 2015 Share #40 Posted June 7, 2015 I have to agree your planking skills are impressive , It is very liberating when you decide not to paint , and although it causes problems in that you have to scratch a lot of the smaller parts i believe in the end it is worth it .I,m delighted to have at least 1 fan !!!!!! Heinz6672 1 Quote HMS Victory by Shihawk. Billing 1-75 wood finish Link to comment Share on other sites More sharing options...
Heinz6672 Posted June 7, 2015 Author Share #41 Posted June 7, 2015 Very very good planking skills you have... Thank you Gundorph, but my skills in photography are even better. You can´t see my mistakes on my pictures . Quote HMS Victory by Heinz746 Link to comment Share on other sites More sharing options...
teloo Posted June 12, 2015 Share #42 Posted June 12, 2015 Very very nice and clean work! here you have a second fan from germany, so you are not the only one using a dictionary Quote best regards Ludger current build: occre corsair http://modelshipworld.com/index.php/topic/7793-corsair-by-teloo-occre-scale-180-first-build/?p=231036 Link to comment Share on other sites More sharing options...
Heinz6672 Posted June 22, 2015 Author Share #43 Posted June 22, 2015 Another fast update from me: On the last photos you could see that I already started with the stern of my victory. The first step was to build new frames on the windows. I finished this and start to continue with the yellow border below the windows. I don´t know how to name them correctly. For myself I call them the balcony. I really did not know how to build them. I was thinking about it for several days. The only thing I was sure about was to use my elderberry wood for these yellow parts. Last weekend I started a try with two yellow strips. I was really surprised about the first result. It looks good (look at the first 2 pictures). So I continued with the next two strips on the bottom. Then I realized that the angle of the upper strip don´t matches to the one I had to build on the left and right side. I want to build them looking like a "one-piece" balcony running around the stern. (I really hope you understand me :-) ). I decide to put it all off and make it new. This time I took care about the angle oft the upper strip and combined it with the first balcony of the left side of my victory. I really really like it. I like it so much, that I stopped building and start to write this posting . Please don´t laugh about me, but I could not wait to see how it looks when I fill the spaces with the dark walnut wood. What do you think??? I wish you all a wonderful evening!!! - Heinz - Dimitris71, seamymcnally, msberkman and 5 others 8 Quote HMS Victory by Heinz746 Link to comment Share on other sites More sharing options...
Waister Posted June 22, 2015 Share #44 Posted June 22, 2015 Looks fantastic Heinz, love the colour of the hull strakes, don't copper it...!! John. seamymcnally 1 Quote Current Build - HMC Sherbourne - Caldercraft - 1:64 - First Build Link to comment Share on other sites More sharing options...
Heinz6672 Posted June 23, 2015 Author Share #45 Posted June 23, 2015 Looks fantastic Heinz, love the colour of the hull strakes, don't copper it...!! John. never ever :-) Thank you much, John! Quote HMS Victory by Heinz746 Link to comment Share on other sites More sharing options...
teloo Posted June 25, 2015 Share #46 Posted June 25, 2015 no words... very nice what you are able to create from wood. please no coppering and painting! seamymcnally 1 Quote best regards Ludger current build: occre corsair http://modelshipworld.com/index.php/topic/7793-corsair-by-teloo-occre-scale-180-first-build/?p=231036 Link to comment Share on other sites More sharing options...
Heinz6672 Posted June 28, 2015 Author Share #47 Posted June 28, 2015 Thank you Ludger, but I think this is a little bit exaggerated. But it feels good to hear . Here are a few more pictures from this weekend.... oscarmate, seamymcnally, Shipyard sid and 7 others 10 Quote HMS Victory by Heinz746 Link to comment Share on other sites More sharing options...
Heinz6672 Posted July 3, 2015 Author Share #48 Posted July 3, 2015 Good evening from Germany :-)))) building the stern is really fun. That´ s why I have to post 2 new photos. I filled the spaces between the windows on the lower gallery. As usual I use two different woods to imitate the colour. Kind regards - Heinz - Winlich, seamymcnally, shihawk and 3 others 6 Quote HMS Victory by Heinz746 Link to comment Share on other sites More sharing options...
Jerry Posted July 6, 2015 Share #49 Posted July 6, 2015 Hello Heinz.. I just found your site and was very happy and excited to see the way you are constructing the same model that I completed last November. Although I followed convention and built the ship according to scale and plans, I think what you are doing is very exciting and fresh. I absolutely love your ideas so far and am very impressed with your workmanship. Coppering took quite some time but the walnut exposure of your hull is absolutely beautiful. I particularly like the way you have interlocked some of the planking which i have never seen on a hull before but rather on decking. I hope you won't mind my watching your progress and I welcome you wholeheartedly into the realm of HMS Victory buuilders. Best, Jerry Quote Cutty Sark - Billings- Scale:1:64 HMS Victory - Caldercraft - Scale 1:72 https://modelshipworld.com/index.php?/topic/1951-hms-victory-by-jerry-finished-caldercraft-scale-172-1805-version-wood/ HMS Bounty - Amati - Scale 1:60 https://modelshipworld.com/index.php?/topic/10200-hms-bounty-by-jerrys-admiral-finished-amati-scale-160/&hl= hms bounty jerry#39;s admiral Viking Ship - Amati- Scale - 1:60 https://modelshipworld.com/index.php?/topic/10415-viking-ship-drakkar-by-jerry-finished-amati-scale-150/ Half Moon - Corel - Scale 1:50 https://modelshipworld.com/index.php?/topic/9065-half-moon-by-jerry-finished-corel-scale-150/&hl=%2Bhalf%2B%2Bmoon%2B%2Bcorel%2B%2Bjerry Bluenose- Model Shipways - Scale: 1:64 https://modelshipworld.com/index.php?/topic/13649-bluenose-by-jerry-model-shipways-scale-164/&hl=bluenose La Nina - Artesania Latina - Scale 1:65 COMPLETED...7-8-2017 Link to comment Share on other sites More sharing options...
Heinz6672 Posted July 6, 2015 Author Share #50 Posted July 6, 2015 Thank you Jerry, it´s nice to get so much positive feedback from experienced builders like you are. This really means much to me! Of course you are welcome to watching my progress. And I am happy about every tipp you can give me. As I already told in former posts, I´ve never been at this point before. I´ve tried two models but never finished the hull. That means from now on I walk on unknown territory :-) Some books, some pictures and your logs are my most important tools!!! Greetings - Heinz - msberkman 1 Quote HMS Victory by Heinz746 Link to comment Share on other sites More sharing options...
Kevin Posted July 6, 2015 Share #51 Posted July 6, 2015 Very nice - i like the way you have completed the gun port lids - perhaps that's the way i should have done mine I look forward to watching you progress from now on, at this rate you will over take me in a couple of months Quote Its all part of Kev's journey, bit like going to the dark side, but with the lights on All the best Kevin SAY NO TO PIRACY. SUPPORT ORIGINAL IDEAS AND MANUFACTURERS. KEEP IT REAL! ------------------------------------------------------------------------------------------------------------------------------------------------------ On the build table HMS Indefatigable 1794 by Kevin - Vanguard Models - 1:64 - Feb 2023 HMHS Britannic by Kevin SD 14 - Marcle Models - 1/70 - March 2022 - Bluebell - Flower Class - Revel - 1/72 U552 German U Boat - Trumpeter - 1/48 Amerigo Vespucci 1/84 - Panart- HMS Enterprise -CAF - 1/48 Finished St-Nectan-Mountfleet-models-steam-trawler-1/32 - Completed June 2020 HMS Victory - Caldercraft/Jotika - 1/72 - Finished Dorade renamed Dora by Kevin - Amati - 1/20 - Completed March 2021 Stage Coach 1848 - Artesania Latina - 1/10 -Finished Lady Eleanor by Kevin - FINISHED - Vanguard Models - 1/64 - Fifie fishing boat Link to comment Share on other sites More sharing options...
Heinz6672 Posted July 13, 2015 Author Share #52 Posted July 13, 2015 another update with the newest pictures ... It´s so much work... and so much fun :-) seamymcnally, shihawk, Kevin and 7 others 10 Quote HMS Victory by Heinz746 Link to comment Share on other sites More sharing options...
Shipyard sid Posted July 13, 2015 Share #53 Posted July 13, 2015 Greetings Heinz Excellent work throughout your build, and lots more fun ahead Heinz. You are producing something special. Regards DAVID Quote Link to comment Share on other sites More sharing options...
teloo Posted July 13, 2015 Share #54 Posted July 13, 2015 she is growing nicely. keep it coming. it will become a beauty. regards ludger Quote best regards Ludger current build: occre corsair http://modelshipworld.com/index.php/topic/7793-corsair-by-teloo-occre-scale-180-first-build/?p=231036 Link to comment Share on other sites More sharing options...
Heinz6672 Posted August 2, 2015 Author Share #55 Posted August 2, 2015 Hello friends, please look at my newest update. I wish you a wonderful sunday evening!!! Greetings - heinz - GuntherMT, Kevin, Dfell and 5 others 8 Quote HMS Victory by Heinz746 Link to comment Share on other sites More sharing options...
Shipyard sid Posted August 2, 2015 Share #56 Posted August 2, 2015 Greetings Heinz Excellent progress.The work on the stern is very impressive, as has your work been throughout your build. Just keep enjoying it Heinz . DAVID Quote Link to comment Share on other sites More sharing options...
Heinz6672 Posted August 2, 2015 Author Share #57 Posted August 2, 2015 Thank you so much, David! Yeah, it´s much fun to see her growing. In a few days I have my holidays. 3 weeks of nonstop building :-). Let´s see what happens in this time... - Heinz - Shipyard sid 1 Quote HMS Victory by Heinz746 Link to comment Share on other sites More sharing options...
Jerry Posted August 2, 2015 Share #58 Posted August 2, 2015 Hello Heinz.. Beautiful workmanship..You are creating a beauty. Best, Jerry mort stoll 1 Quote Cutty Sark - Billings- Scale:1:64 HMS Victory - Caldercraft - Scale 1:72 https://modelshipworld.com/index.php?/topic/1951-hms-victory-by-jerry-finished-caldercraft-scale-172-1805-version-wood/ HMS Bounty - Amati - Scale 1:60 https://modelshipworld.com/index.php?/topic/10200-hms-bounty-by-jerrys-admiral-finished-amati-scale-160/&hl= hms bounty jerry#39;s admiral Viking Ship - Amati- Scale - 1:60 https://modelshipworld.com/index.php?/topic/10415-viking-ship-drakkar-by-jerry-finished-amati-scale-150/ Half Moon - Corel - Scale 1:50 https://modelshipworld.com/index.php?/topic/9065-half-moon-by-jerry-finished-corel-scale-150/&hl=%2Bhalf%2B%2Bmoon%2B%2Bcorel%2B%2Bjerry Bluenose- Model Shipways - Scale: 1:64 https://modelshipworld.com/index.php?/topic/13649-bluenose-by-jerry-model-shipways-scale-164/&hl=bluenose La Nina - Artesania Latina - Scale 1:65 COMPLETED...7-8-2017 Link to comment Share on other sites More sharing options...
Heinz6672 Posted August 10, 2015 Author Share #59 Posted August 10, 2015 Good morning, friends! I used the last days to start with the decoration that looks like a balustrade. I did not know how to create them. The only thing I was sure about was the fact that I don´t want to use the ugly sheet metal things from the kit. I decided to start and look what will happen... The first things I created were the 2 strips that should build a frame for the balustrade. That wasn´t so easy as I thought it would be. I couldn´t work with pinboard tacks to fix them, cause I don´t wanted to damage the ground. So I had to curve them as good as possible and and hold the strips on place until the glue hold it. The problem was that at the same time I had to hold 6 or 7 little wooden pieces on place which I used as spacer. Why do we only have 2 hands??? Then I started with the pillars (is this the right word for it?) between the two strips. I build several of them in a different way to decide what will look the best for me. I put one of them on the left side and one on the right side. I thought this was a good idea because I can put them in a perfect line with the windows below and above. I started to calculate how many pillars I need and the width of the spaces between them. I realized that I will get a problem. How should I place the pillars with a space of exactly 2,03 mm for example? And can I be sure that every pillar is equally thick? The second problem was as I realized I will not be able to build all the pillars looking the same. For that I would need a lathe. No chance with my tools. So I made them in a different and easier way and start in the middle of the stern working towards both sides. And this is what you can see on my last 2 pictures. And I have to say: I like the result :-) And I hope you will like it too!!! Greetings - Heinz - shihawk, paulb, Dimitris71 and 3 others 6 Quote HMS Victory by Heinz746 Link to comment Share on other sites More sharing options...
Jparsley Posted August 10, 2015 Share #60 Posted August 10, 2015 hienz i would never laugh at you or your work she is beautiful the use of the diffrent woods and the care you are using is turning a beautiful ship into an even more lovely a thing in my opinion she is one of the nicer looking ships ive seen good luck on her Heinz6672 and Shipyard sid 2 Quote USF Constellation 1/85 AL Jparsley Link to comment Share on other sites More sharing options...

Recommended Posts
Join the conversation
You can post now and register later. If you have an account, sign in now to post with your account.