Guest Tim I. Posted October 10, 2014 Share #31 Posted October 10, 2014 Reading this thread is making me want to order one of these more and more. Now to convince my wife I "need" one. - Tim Quote Link to comment Share on other sites More sharing options...
nobotch Posted October 12, 2014 Author Share #32 Posted October 12, 2014 Well Tim, convincing one's wife of the eminent importance of a less than cheap tool we "need" is normally not a mission impossible, but certainly easier to achieve if embedded into a generic long-term endeavor regarding tool-and-toy acquisitions. While getting familiar with THE saw, I noted that when adjusting blade height for non cut-through tasks it lowered by almost 1 mm when locking it in with the long Allen key. It turned out that the underside of the Allen screw head scratches and therefor catches the washer between the screw and the aluminum bar the blade (its axle and bearing, that is) is mounted on. So I added two thin washers with the smooth and burr-less faces against each other. Even if this unwanted movement when tightening the screw is not completely eliminated, it is now at least limited to about 0.1 mm (0.004") after rising the blade (tightening the locking screw after lowering the blade will always add quite a bit due to the play of the adjusting threaded rod to this difference, which is normal). I left the original thick washer in place because my smooth washers are somewhat too thin that I would feel sure they protect enough the aluminum part. Then there is my latest small addition which makes it a bit easier to raise or lower the blade by more than just a bit. I added a brass crank to the adjusting knob. It is screwed into a threaded hole I tapped in the knob, and secured by a bit of epoxy on the threads and a counter nut. I really don't want to get it loose because the threads in the aluminum know would be shredded quickly I guess. Cheers, Markus themadchemist, WackoWolf, Mike Y and 1 other 4 Quote - Markus Link to comment Share on other sites More sharing options...
nobotch Posted October 13, 2014 Author Share #33 Posted October 13, 2014 Length stop for the miter gage. The cam clamp mechanism in the second picture fixes it to the miter extension. Cheers, Markus AntonyUK, GuntherMT, cristikc and 6 others 9 Quote - Markus Link to comment Share on other sites More sharing options...
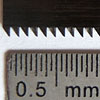
nobotch Posted October 19, 2014 Author Share #34 Posted October 19, 2014 It's nothing new that the Byrnes saw is ready to use out of the box, ready to do precision cuts. No doubt about that, and I honestly have to say that I was as impressed as many other before me were. And yet, I wanted to know how precise it is. "Very precise" is one thing, and attaching some numbers that describe the precision is another one. So I thought I would use the classical approach for measuring parallelism between the blade and the miter slots (measure the distance of the same blade tooth at the same height above the table at the rear (rising) and front position, see first attached picture). Well, this is easier said than done because it turned out that the measuring device by itself interferes, so that I made as many measurements until a clear majority of the results coincided. The numbers I got are approximately 0.0075 millimeters (that is 3/4 of 1/100 mm) deviation over a distance of 60 mm, which is the same as 0.125 mm (1.25 tenth) over 1 meter, which translates to an angle of 0.0072° off perfectly parallel. I find it pretty hard to imagine such a shallow angle, and I can't help thinking that this "error" has very few if any impact at all on real cutting action when using the saw. For example, any slightly uneven pressure from the push sticks will create an error that is easily about ten times bigger than the blade alignment tolerance I have measured. In the following pictures you can further see my newest addition to the saw, which is a sandpaper lined wooden frame that pops into precise position over the miter extension, which helps to avoid that the work piece moves while (or before) being cut. Of course I could have glued the sandpaper directly onto the miter extension, but sometimes it may be necessary to lay a finished surface against the miter extension and in this case having the latter one lined with sandpaper would be less than ideal. Of course I also made a length stop which fits the "sandpaper-frame". Thanks for reading and watching. - Markus mtaylor, Archi, GuntherMT and 1 other 4 Quote - Markus Link to comment Share on other sites More sharing options...
jud Posted October 19, 2014 Share #35 Posted October 19, 2014 Sounds to me like it needs adjusting 0.0072° = 0°00'26", just using the old rifleman's formula, that's almost a half inch at a 100 yards. My total station measures to one second, I can accept a 5' difference between direct and reversed, 26" would indicate the gun needed to be sent in for cleaning and adjustment. That saw has more precision than I would expect, blade distortion because of heat would be greater. Nice dial indicator you have there. Thanks for using it to measure and report on the precision of that saw. Impresses me. jud mtaylor, themadchemist and nobotch 3 Quote Link to comment Share on other sites More sharing options...
Perls Posted October 19, 2014 Share #36 Posted October 19, 2014 Hi Markus, I've read about your modifications/improvements to a tool which is pretty universally accepted (at least in this community) as the "best in class". But I'm starting to wonder about your motivation in what is beginning to me to appear as a witch hunt to find fault! How accurate is accurate?????? How many angels can dance on the head of of a pin?????????????????? The levels of fault you're reporting are far less than would occur through simple user error in an entire host of operations we all do in model building. In the immortal words of Sargent Hulka in Stripes, " Lighten up Francis" Steve davyboy, mtaylor, WackoWolf and 1 other 4 Quote Link to comment Share on other sites More sharing options...
jud Posted October 19, 2014 Share #37 Posted October 19, 2014 (edited) The ad var, the measurements taken and the tools indicate that Francis is a machinist. a tool maker or something along those lines. Don't think he is looking for faults, he's having fun using his interests, knowledge and abilities to explore a machine that he admires. Keep it up Francis, I'm enjoying and learning from your journey through a good machine while making it do what you want as you go. So far I see no damage to the machine that arrived at you house not long ago. jud Edited October 19, 2014 by jud themadchemist and nobotch 2 Quote Link to comment Share on other sites More sharing options...
nobotch Posted October 19, 2014 Author Share #38 Posted October 19, 2014 Hi Markus, I've read about your modifications/improvements to a tool which is pretty universally accepted (at least in this community) as the "best in class". But I'm starting to wonder about your motivation in what is beginning to me to appear as a witch hunt to find fault! Hi Steve, I am not trying to find a fault, but everything in mechanical industry is machined to tolerances, not to "perfection". This is because perfection is a term in relativity. Knowing the magnitude of the tolerances the Byrnes saw is made to may or may not be in your interest, but it is in mine, and probably in other's too. Even if Jud's reply to your post (curiosity is part of my motivation to measure tolerances) is spot on with part of my answer. Inquiring minds want to know, and without this attitude (which is very typical to manhood) we most probably still would shave with a sharp stone which would be prefectly possible as an avid "youtuber" shows here. But for me, there is more to it. As Jeff from Hobbymill states here it is necessary to use a 0.040" blade for doing precise cuts on stock thicker than 4.5 mm. Now I want to cut 6.5 mm and I would love to use a 0.020" blade to cut evenly thin strips of 1.0 mm, one meter long. Yes, I want to push the limits. Needless to say that this is hardly achieveable by feeding the stock manually, but that will be a task which requires to know the variables, one of them being manufacturing tolerance of parallelism of the blade, another one being stock feed rate, and so on, you get the picture. Now you may ask why I would want to cut such long strips to this accuracy, and you would be correct assuming that it will not be for planking, and maybe not even for ship modelling. I need this accuracy for making herringbone pattern strips used in musical instrument building (see attached picture). When making herringbone strips accuracy is critical for several reasons, one being that an error in thickness will double and a strip sitting in a groove that is 0.2 mm wider than the strip will be plain ugly hence unacceptable. If the saw blade can not constantly "eat away" the error as stock is fed there will be an error of 0.1 mm over the length of a guitar side and this strip would be ready to be binned. Up to now I have thicknessed the strips like it has been done ages ago, using a handplane. But this method takes a high toll regarding waste (shavings) produced. Using a precision saw (0.040" blade) instead of thicknessing strips with a handplane or a thickness sander reduces waste by about 50%. If I can use a 0.020" blade instead of a 0.040" blade I can reduce waste by another 50% (when cutting 1 mm strips for 2 mm herringbones) which would be great because the material to be cut is not just wood but rather a laborious glue-up of many veneers (similar to plywood, obliquely cut and again glued together). So waste is an issue. I'm sorry that the driving force behind my tolerance measurments is not directly shipmodel related, but all this is really not a question about how many angels can dance on the head of of a pin. Archi, themadchemist and michael mott 3 Quote - Markus Link to comment Share on other sites More sharing options...
nobotch Posted October 19, 2014 Author Share #39 Posted October 19, 2014 Maybe the following is more useful for most of you than precision measurments on a precision saw. Of course, it is not confined to the Byrnes saw, hence a bit off-topic. I usuallyy cut such tiny pieces using a chisel (a mirror sheen on its flat side makes cutting 90° and 45° angles really easy). But when the Byrnes saw is already on the bench and in use it is very tempting doing such cuts with the new toy... Hence, using "hinged chopsticks" instead of chopping off a fingertip may be a good idea (you may want to click on the pictures to enlarge). Or simply use a chisel. Cheers, Markus cristikc, themadchemist, Remcohe and 3 others 6 Quote - Markus Link to comment Share on other sites More sharing options...
michael mott Posted October 19, 2014 Share #40 Posted October 19, 2014 Markus I like the chopsticks device. however I would use a sled rather than the mitre gauge. I realize that you are using a very small saw. and understand the waste issue with regard to production methods. I find that sometimes we follow along a line of thinking that boxes us in, I have done this many times where because I have used a particular tool or method, I seem to be locked into that tool or method and attempt to do the next job or task using it instead of thinking about what the big picture actually requires. As you pointed out using the chisel with the mirrored surface give a perfectly clean 90 degree cut exactly illustrates what I am saying. I am fortunate to have a large number of good tools that I have acquired over many years, and like yourself they are used for much more than model ship building. It has been my personal preference to use larger tools that are capable of cutting small sizes to good tolerances that to attempt to use small tools that are pushed to their limit cutting large stock. All that said I am enjoying seeing your innovative attachments and ideas for this very high quality small machine. Michael Stuntflyer, jud, Perls and 2 others 5 Quote Current builds Bristol Pilot Cutter 1:8; Skipjack 19 foot Launch 1:8; Herreshoff Buzzards Bay 14 1:8 Other projects Pilot Cutter 1:500 ; Maria, 1:2 Now just a memory Future model Gill Smith Catboat Pauline 1:8 Finished projects A Bassett Lowke steamship Albertic 1:100 Anything you can imagine is possible, when you put your mind to it. Link to comment Share on other sites More sharing options...

Recommended Posts
Join the conversation
You can post now and register later. If you have an account, sign in now to post with your account.