Mark Pearse Posted January 30, 2016 Author Share #91 Posted January 30, 2016 (edited) Michael, interesting thoughts - and I did get the idea for this building frame from your skipjack frame. The high moulds did allow manual access, but they did need to be braced a bit as the thin ply was quite flexible. It could be braced in a more thoughtful way than I did it, perhaps tensile bracing... On the planks, they are to scale & tapered based on the set out I did for the hull, & I didn't need to spile them in the way I read about in the planking primers - I think because the Huon Pine is so supple it allowed me to get the wood to the shape of the last plank. When a little twist or lateral bend was needed, I - like I see you did - used a heat gun & clamped the other end of the plank to a bench. There are a few wobbles if you look along the planks, & when painted I think that you will see some evidence of the lines of the planks through the paint, but you won't see enough to pick up the wobbles. A long rambling way to say that the stealers were based on the stealers in the full sized 24 footers. I'd like to do a model with an interior, there's a lot of pleasure in seeing a traditional boat hull interior - to model scale or full scale. Edited January 30, 2016 by Mark Pearse mtaylor, michael mott and Omega1234 3 Quote completed 1:12 28' Ranger type yacht, scratch build - COMPLETED 1:12 20' 1930 open sailing boat, half model, scratch built - COMPLETED 1:12 24' Ranger type yacht, scratch build Link to comment Share on other sites More sharing options...
Mark Pearse Posted February 21, 2016 Author Share #92 Posted February 21, 2016 (edited) I've been sanding the hull, there's still some detail sanding to do but it's now almost done. I may paint the hull while it's still on the frame, it will be easier to do the boot top lines this way. It would mean that I can use a builder's self-levelling laser to get a horizontal line, tracing it with a pencil by hand, & then adjusting by eye to suit the right curve. Sanding the inside edge of planking ends at the transom is especially delicate, & needs to be to accurate to give the impression of scale. I have done some of this sanding, but a few more hours of careful work required there. I did have to splice in a strip of planking where the garboard was down too low. In any case I need to place the mast, & the drawing son the design do not include any information on mast setout, spar sizes etc. I've sketched the sail plan below, which is based on the sailplan of the 24 footers, plus just my eye - for better or for worse.... I've noticed that there's a lot of different ideas about the gaff angle - this high peaked angle is typical here, you almost never see a low peaked gaff that seems to be popular in America. I believe that sail twist would be greater with a lower peak angle & especially with cotton sails, so I wonder if they used gaff vang lines from the peak of the gaff spar to the quarters - to control the twist...but that's another conversation. I also had another go at the line of the sponsons - the lower gunwales - & I've put more bounce into it. See the brown lines on the drawing. I probably rushed into a detail drawing before when a broader view was still needed. I'll sit on that one, & will do temporary ones when the time comes, to see how they look. Edited February 21, 2016 by Mark Pearse JerryTodd, KORTES, pete48 and 8 others 11 Quote completed 1:12 28' Ranger type yacht, scratch build - COMPLETED 1:12 20' 1930 open sailing boat, half model, scratch built - COMPLETED 1:12 24' Ranger type yacht, scratch build Link to comment Share on other sites More sharing options...
Omega1234 Posted February 22, 2016 Share #93 Posted February 22, 2016 Hi Mark She's looking absolutely lovely and you must be pretty chuffed with her. I agree with you, too, about the painting. Better to do it whilst she's still on the building board, rather than after separation, because it'll save you a lot of time and energy. Nice job, so far! Cheers Patrick mtaylor 1 Quote MY SCRATCH BUILT MODELS ARE: Splendid Mega Yacht https://modelshipworld.com/topic/28576-splendid-by-omega1234-scale-1500-mega-yacht/ Majestic Mega Yacht https://modelshipworld.com/topic/28483-mega-yacht-majestic-by-omega1234-miniature/ Sapphire Mega yacht https://modelshipworld.com/topic/21088-sapphire-by-omega1234-1388-scale-mega-yacht-66m-8-inch-hull-length/?tab=comments#comment-639898 Genesis - Supersports Mega Yacht https://modelshipworld.com/topic/18168-genesis-by-omega1234-1300-49m-mega-yacht-8-inches-long-finished/?tab=comments#comment-559026http://modelshipworld.com/index.php/topic/14141-shadow-by-omega1234-scale-1300-luxury-60m-mega-yacht-8-inches-long/ SHADOW Luxury Motor Yacht http://modelshipworld.com/index.php/topic/11384-majellan-by-omega1234-luxury-37-metre-motor-yacht-miniature-7-inches-approx/ Majellan Luxury Motor Yacht http://modelshipworld.com/index.php/topic/9261Rainbow-j-class-racing-yacht/?p=273543 Rainbow J Class Racing Yacht Mystic Classic Motor Cruiser Symphony Ingomar Schooner: Scratch build Dorade Schooner: <p> Lennox Restoration Warship http://modelshipworld.com/index.php/topic/9577-pandora-cutaway-dockyard-style-miniature/?hl=pandora Link to comment Share on other sites More sharing options...
Mark Pearse Posted March 16, 2016 Author Share #94 Posted March 16, 2016 I've undercoated the hull & set up the boot top line, using a laser level to get the waterline & then adjusting the model height & angle to get the boot top lines. I marked the waterline in 6H pencil, added 50mm (scale) height slightly aft of the middle for the lowest point of the boot top line, which is increased to 100mm at the bow & 65mm at the stern. The boot top line width is 30mm scale width at its narrowest, 50 at the bow & 40 at the stern. I like the way lines added on to a hull shape improve its appearance - or maybe its truer to say that they explain or show off the shape. The artist Christo had the same idea: a curve is hard to see, but put a line on it & your eye looks at the curve of the line. I'm hoping to do some colours in the next week. One minor issue has been that the Titebond glue resists sanding more than timber does, so when you have an internal corner with dried glue in it, it's difficult to sand cleanly. On the hull sanding, I am accepting some visible joints in the timbers, especially in the keel. I think it's consistent with the probable construction standard of the yacht - if she had been built in the 1930's or 40's. I will fill some of them a bit, but I'm not planning to make the model look perfect. thanks all, bye for now MP painted & sanded waterline waterline the waterline & boot top lines in pencil Omega1234, JerryTodd, dgbot and 5 others 8 Quote completed 1:12 28' Ranger type yacht, scratch build - COMPLETED 1:12 20' 1930 open sailing boat, half model, scratch built - COMPLETED 1:12 24' Ranger type yacht, scratch build Link to comment Share on other sites More sharing options...
Omega1234 Posted March 18, 2016 Share #95 Posted March 18, 2016 Hi Mark I like it. What a difference a coat of paint makes! Cheers Patrick mtaylor 1 Quote MY SCRATCH BUILT MODELS ARE: Splendid Mega Yacht https://modelshipworld.com/topic/28576-splendid-by-omega1234-scale-1500-mega-yacht/ Majestic Mega Yacht https://modelshipworld.com/topic/28483-mega-yacht-majestic-by-omega1234-miniature/ Sapphire Mega yacht https://modelshipworld.com/topic/21088-sapphire-by-omega1234-1388-scale-mega-yacht-66m-8-inch-hull-length/?tab=comments#comment-639898 Genesis - Supersports Mega Yacht https://modelshipworld.com/topic/18168-genesis-by-omega1234-1300-49m-mega-yacht-8-inches-long-finished/?tab=comments#comment-559026http://modelshipworld.com/index.php/topic/14141-shadow-by-omega1234-scale-1300-luxury-60m-mega-yacht-8-inches-long/ SHADOW Luxury Motor Yacht http://modelshipworld.com/index.php/topic/11384-majellan-by-omega1234-luxury-37-metre-motor-yacht-miniature-7-inches-approx/ Majellan Luxury Motor Yacht http://modelshipworld.com/index.php/topic/9261Rainbow-j-class-racing-yacht/?p=273543 Rainbow J Class Racing Yacht Mystic Classic Motor Cruiser Symphony Ingomar Schooner: Scratch build Dorade Schooner: <p> Lennox Restoration Warship http://modelshipworld.com/index.php/topic/9577-pandora-cutaway-dockyard-style-miniature/?hl=pandora Link to comment Share on other sites More sharing options...
Mark Pearse Posted March 21, 2016 Author Share #96 Posted March 21, 2016 g'day Patrick, I've done some topcoats - no photos yet though. It's amazing how the painting is making sense of the hull shape. I've used Humbrol enamel & it's taking a long time to dry...it's nice paint to use & the finish is good, & I know my 'workshop' is actually a damp cave that would make Gollum feel cold & lonely, but it's been about 4 days & it's still tacky. Mark mtaylor and Omega1234 2 Quote completed 1:12 28' Ranger type yacht, scratch build - COMPLETED 1:12 20' 1930 open sailing boat, half model, scratch built - COMPLETED 1:12 24' Ranger type yacht, scratch build Link to comment Share on other sites More sharing options...
Omega1234 Posted March 21, 2016 Share #97 Posted March 21, 2016 Hi Mark Four DAYS!!!! I'd be panicking by now. Could you put the hull in the sunshine or in front of a hot fan, perhaps? Cheers Patrick mtaylor 1 Quote MY SCRATCH BUILT MODELS ARE: Splendid Mega Yacht https://modelshipworld.com/topic/28576-splendid-by-omega1234-scale-1500-mega-yacht/ Majestic Mega Yacht https://modelshipworld.com/topic/28483-mega-yacht-majestic-by-omega1234-miniature/ Sapphire Mega yacht https://modelshipworld.com/topic/21088-sapphire-by-omega1234-1388-scale-mega-yacht-66m-8-inch-hull-length/?tab=comments#comment-639898 Genesis - Supersports Mega Yacht https://modelshipworld.com/topic/18168-genesis-by-omega1234-1300-49m-mega-yacht-8-inches-long-finished/?tab=comments#comment-559026http://modelshipworld.com/index.php/topic/14141-shadow-by-omega1234-scale-1300-luxury-60m-mega-yacht-8-inches-long/ SHADOW Luxury Motor Yacht http://modelshipworld.com/index.php/topic/11384-majellan-by-omega1234-luxury-37-metre-motor-yacht-miniature-7-inches-approx/ Majellan Luxury Motor Yacht http://modelshipworld.com/index.php/topic/9261Rainbow-j-class-racing-yacht/?p=273543 Rainbow J Class Racing Yacht Mystic Classic Motor Cruiser Symphony Ingomar Schooner: Scratch build Dorade Schooner: <p> Lennox Restoration Warship http://modelshipworld.com/index.php/topic/9577-pandora-cutaway-dockyard-style-miniature/?hl=pandora Link to comment Share on other sites More sharing options...
Mark Pearse Posted March 22, 2016 Author Share #98 Posted March 22, 2016 Hi Patrick, I've been doing something similar: two 100w linear halogen work lights for about an hour yesterday & today, they give off a gentle warmth & the paint is close to dry now. thanks Mark Omega1234, mtaylor and cog 3 Quote completed 1:12 28' Ranger type yacht, scratch build - COMPLETED 1:12 20' 1930 open sailing boat, half model, scratch built - COMPLETED 1:12 24' Ranger type yacht, scratch build Link to comment Share on other sites More sharing options...
Omega1234 Posted March 22, 2016 Share #99 Posted March 22, 2016 Hi Patrick, I've been doing something similar: two 100w linear halogen work lights for about an hour yesterday & today, they give off a gentle warmth & the paint is close to dry now. thanks Mark Phew! Sounds good Mark. Hope all's good from this point on. mtaylor 1 Quote MY SCRATCH BUILT MODELS ARE: Splendid Mega Yacht https://modelshipworld.com/topic/28576-splendid-by-omega1234-scale-1500-mega-yacht/ Majestic Mega Yacht https://modelshipworld.com/topic/28483-mega-yacht-majestic-by-omega1234-miniature/ Sapphire Mega yacht https://modelshipworld.com/topic/21088-sapphire-by-omega1234-1388-scale-mega-yacht-66m-8-inch-hull-length/?tab=comments#comment-639898 Genesis - Supersports Mega Yacht https://modelshipworld.com/topic/18168-genesis-by-omega1234-1300-49m-mega-yacht-8-inches-long-finished/?tab=comments#comment-559026http://modelshipworld.com/index.php/topic/14141-shadow-by-omega1234-scale-1300-luxury-60m-mega-yacht-8-inches-long/ SHADOW Luxury Motor Yacht http://modelshipworld.com/index.php/topic/11384-majellan-by-omega1234-luxury-37-metre-motor-yacht-miniature-7-inches-approx/ Majellan Luxury Motor Yacht http://modelshipworld.com/index.php/topic/9261Rainbow-j-class-racing-yacht/?p=273543 Rainbow J Class Racing Yacht Mystic Classic Motor Cruiser Symphony Ingomar Schooner: Scratch build Dorade Schooner: <p> Lennox Restoration Warship http://modelshipworld.com/index.php/topic/9577-pandora-cutaway-dockyard-style-miniature/?hl=pandora Link to comment Share on other sites More sharing options...
Mark Pearse Posted March 23, 2016 Author Share #100 Posted March 23, 2016 first coat of paint, I want the topsides to be more cream, & the antifouling a bit greyer rather than blue/grey; otherwise I'm happy as a pig in mud I like the way you can see a few planking joints, appropriately the garboard seam is quite visible, considering how much grief this seam gives the boating world The new & old broken gooseneck pin for our 24' foot boat is visible - it's extraordinary what effect a 1:12 scale change has, this fitting would also suit this boat transom (used to be called the tuck in Sydney) the sponsons - or lower gunwales, shaped from native Rosewood, I' considering shellac as a finish bye for now, thanks mtaylor, cog, dj.bobo and 2 others 5 Quote completed 1:12 28' Ranger type yacht, scratch build - COMPLETED 1:12 20' 1930 open sailing boat, half model, scratch built - COMPLETED 1:12 24' Ranger type yacht, scratch build Link to comment Share on other sites More sharing options...
Omega1234 Posted March 23, 2016 Share #101 Posted March 23, 2016 Hi Mark Shapely, lovely and shiny. I reckon the "pig deserves to be happy in the mud"! Nice work. Cheers Patrick Mark Pearse, mtaylor and cog 3 Quote MY SCRATCH BUILT MODELS ARE: Splendid Mega Yacht https://modelshipworld.com/topic/28576-splendid-by-omega1234-scale-1500-mega-yacht/ Majestic Mega Yacht https://modelshipworld.com/topic/28483-mega-yacht-majestic-by-omega1234-miniature/ Sapphire Mega yacht https://modelshipworld.com/topic/21088-sapphire-by-omega1234-1388-scale-mega-yacht-66m-8-inch-hull-length/?tab=comments#comment-639898 Genesis - Supersports Mega Yacht https://modelshipworld.com/topic/18168-genesis-by-omega1234-1300-49m-mega-yacht-8-inches-long-finished/?tab=comments#comment-559026http://modelshipworld.com/index.php/topic/14141-shadow-by-omega1234-scale-1300-luxury-60m-mega-yacht-8-inches-long/ SHADOW Luxury Motor Yacht http://modelshipworld.com/index.php/topic/11384-majellan-by-omega1234-luxury-37-metre-motor-yacht-miniature-7-inches-approx/ Majellan Luxury Motor Yacht http://modelshipworld.com/index.php/topic/9261Rainbow-j-class-racing-yacht/?p=273543 Rainbow J Class Racing Yacht Mystic Classic Motor Cruiser Symphony Ingomar Schooner: Scratch build Dorade Schooner: <p> Lennox Restoration Warship http://modelshipworld.com/index.php/topic/9577-pandora-cutaway-dockyard-style-miniature/?hl=pandora Link to comment Share on other sites More sharing options...
Mark Pearse Posted April 4, 2016 Author Share #102 Posted April 4, 2016 A minor update: some more painting with colours closer to what I had in mind: cream topsides with a white / pale grey antifouling. The boot top line hasn't been done but I have some coppery colours for that. White antifouling isn't true to the period of the boat, but neither will the winches be that I am going to indicate. I just like the effect of the antifouling being a similar colour to the topsides, you can see the continuity of the hull shape more clearly as it goes down into the water, or when a boat is heeled. The issues with paint drying I think were to do with not stirring the paint enough before I decanted it into another jar - which I did to make a mix of colours. Thanks to those in the painting forum that helped out. You can see below that the matt paint that I've used for the antifouling is more uneven in finish than the gloss. If it's still uneven after another I'll investigate spraying the matt paint, blotchiness in finish will make a smooth shape look uneven I will probably do one more coat to each before removing the model from the base. Some very fine splits between planks are showing through the paint, as joints with insufficient glue are moving. It's not so different to a real planked hull, so the sort of 'defect' that is true to a real boat of this sort of construction standard is being accepted. Anyway, here they are: the model with the original designer's half model of Ranger, the half model must be getting close to 100 years old now again, showing the half model off the half model, the 28 footer, plus Ranger herself through the window Thanks all, MP hexnut, egen, robin b and 6 others 9 Quote completed 1:12 28' Ranger type yacht, scratch build - COMPLETED 1:12 20' 1930 open sailing boat, half model, scratch built - COMPLETED 1:12 24' Ranger type yacht, scratch build Link to comment Share on other sites More sharing options...
Omega1234 Posted April 4, 2016 Share #103 Posted April 4, 2016 Hi Mark Looking great, especially the anti-fouling colour. The original half model looks interesting as well. It also looks like you were at some sort of function room/restaurant. I'm curious as to whether it had something to do with the half hull model being on display? Cheers and keep the updates flowing. Cheers Patrick mtaylor and robin b 2 Quote MY SCRATCH BUILT MODELS ARE: Splendid Mega Yacht https://modelshipworld.com/topic/28576-splendid-by-omega1234-scale-1500-mega-yacht/ Majestic Mega Yacht https://modelshipworld.com/topic/28483-mega-yacht-majestic-by-omega1234-miniature/ Sapphire Mega yacht https://modelshipworld.com/topic/21088-sapphire-by-omega1234-1388-scale-mega-yacht-66m-8-inch-hull-length/?tab=comments#comment-639898 Genesis - Supersports Mega Yacht https://modelshipworld.com/topic/18168-genesis-by-omega1234-1300-49m-mega-yacht-8-inches-long-finished/?tab=comments#comment-559026http://modelshipworld.com/index.php/topic/14141-shadow-by-omega1234-scale-1300-luxury-60m-mega-yacht-8-inches-long/ SHADOW Luxury Motor Yacht http://modelshipworld.com/index.php/topic/11384-majellan-by-omega1234-luxury-37-metre-motor-yacht-miniature-7-inches-approx/ Majellan Luxury Motor Yacht http://modelshipworld.com/index.php/topic/9261Rainbow-j-class-racing-yacht/?p=273543 Rainbow J Class Racing Yacht Mystic Classic Motor Cruiser Symphony Ingomar Schooner: Scratch build Dorade Schooner: <p> Lennox Restoration Warship http://modelshipworld.com/index.php/topic/9577-pandora-cutaway-dockyard-style-miniature/?hl=pandora Link to comment Share on other sites More sharing options...
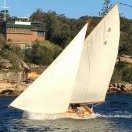
Mark Pearse Posted April 5, 2016 Author Share #104 Posted April 5, 2016 Hi Patrick thank you, I'm glad you like the colour, I'm happy with the direction. The photos are at the Sydney Amateur Sailing Club, where the half-model lives - last Sunday there was a race day for some of the Ranger yachts plus a couple of Couta boats & it was a good day to show the shape to people that are familiar with the smaller 24 footers. I decided today that the bottom profile of the keel line seen from side on looks a bit ugly, but I believe it's what they would have built. I gave the bottom of the keel a long flat horizontal base that would suit going on to an old style tray cradle that rolls up tracks out of the water. However it looks pretty ordinary & in this case I don't think it's worth persisting with a fairly obscure detail that detracts. I'm going to give it a long slow curve instead. Omega1234, cog and mtaylor 3 Quote completed 1:12 28' Ranger type yacht, scratch build - COMPLETED 1:12 20' 1930 open sailing boat, half model, scratch built - COMPLETED 1:12 24' Ranger type yacht, scratch build Link to comment Share on other sites More sharing options...
Omega1234 Posted April 5, 2016 Share #105 Posted April 5, 2016 Hi Mark Thanks and I think your decision to change the keel would definitely enhance the overall design; not that it's current appearance is not good. But, you've got to do what you feel is right and makes you feel good. Al the best! Cheers Patrick mtaylor 1 Quote MY SCRATCH BUILT MODELS ARE: Splendid Mega Yacht https://modelshipworld.com/topic/28576-splendid-by-omega1234-scale-1500-mega-yacht/ Majestic Mega Yacht https://modelshipworld.com/topic/28483-mega-yacht-majestic-by-omega1234-miniature/ Sapphire Mega yacht https://modelshipworld.com/topic/21088-sapphire-by-omega1234-1388-scale-mega-yacht-66m-8-inch-hull-length/?tab=comments#comment-639898 Genesis - Supersports Mega Yacht https://modelshipworld.com/topic/18168-genesis-by-omega1234-1300-49m-mega-yacht-8-inches-long-finished/?tab=comments#comment-559026http://modelshipworld.com/index.php/topic/14141-shadow-by-omega1234-scale-1300-luxury-60m-mega-yacht-8-inches-long/ SHADOW Luxury Motor Yacht http://modelshipworld.com/index.php/topic/11384-majellan-by-omega1234-luxury-37-metre-motor-yacht-miniature-7-inches-approx/ Majellan Luxury Motor Yacht http://modelshipworld.com/index.php/topic/9261Rainbow-j-class-racing-yacht/?p=273543 Rainbow J Class Racing Yacht Mystic Classic Motor Cruiser Symphony Ingomar Schooner: Scratch build Dorade Schooner: <p> Lennox Restoration Warship http://modelshipworld.com/index.php/topic/9577-pandora-cutaway-dockyard-style-miniature/?hl=pandora Link to comment Share on other sites More sharing options...
Mark Pearse Posted May 1, 2016 Author Share #106 Posted May 1, 2016 I reshaped the profile of the keel line to a smooth curve - it is probably not what would have been built, but it looks nice & does reflect the drawings. The painting has been redone, & is probably not over yet; I'm sure there will be some damage, & the topsides might be too cream but it's hard to tell at the moment. The paints are all mixed, gloss enamel for the topsides & matt acrylic for the underwater parts. The boot top is a mixture of an opaque enamel with some metallic added, the colour will make sense when the gunwales & sponsons (lower gunwales) are added. The antifouling colour in enamel wasn't working out well, it wasn't matt enough & the colour was blue rather than pale grey. When the hull shape on a boat doesn't change shape dramatically near the waterline, I like an underwater colour that isn't a huge contrast to the topsides, so that you can see the shape into the water as an extension of the above-water shape, hence the pale grey. The boot top line masking bled a bit, & the transom part seems to be off a bit, so some touching up required. Also, it might not be obvious in the photos but the line itself is not as good as I'd hoped, but when you realise that it's actually only a very small deviation from a the curve, it might not be practical to amend it by such a small amount as the change might not look so good. As you can see, the right-way-up support frame is made & she was cut off the build frame - it's very nice to see the lines - it is hard to appreciate the lines upside down, we are probably so used to seeing them one way. The next steps, I think, will be to cut the profiles as the hull steps down from the raised deck. Also deck beams & mock up the deck & cockpit area in 2mm plywood. At the bottom is the start of a deck plan, at the moment it just shows the basic shapes that would be in ply - the cockpit seating & edge of the raised deck etc. The cockpit seats are solid, not hollow under. I will shape it all in ply & add timber & veneer sheets as required. I have some Queensland Maple veneer & some timber as well. Thanks for looking, MP mtaylor, hexnut, druxey and 9 others 12 Quote completed 1:12 28' Ranger type yacht, scratch build - COMPLETED 1:12 20' 1930 open sailing boat, half model, scratch built - COMPLETED 1:12 24' Ranger type yacht, scratch build Link to comment Share on other sites More sharing options...
Jim Lad Posted May 1, 2016 Share #107 Posted May 1, 2016 She's really looking first class, Mark. John mtaylor 1 Quote Link to comment Share on other sites More sharing options...
Mark Pearse Posted May 8, 2016 Author Share #108 Posted May 8, 2016 HI everyone, thanks for the interest. The hull profile has been cut down, & I've started to put in the deck beams & cockpit area supports. The cockpit area has a series of different heights: a scuppers area that is the same as the top of the transom; a bit lower is the seat tops, with a slightly higher curved-top thwart at the front of the cockpit, & lowest the cockpit sole height which is just a little above the waterline. The framing & beams are glue-laminated curved & straight beams, all in Spotted Gum. The sizes are not meant to be to scale but they are probably not far off. It will be lined in 2mm plywood & painted, with clear finished details. I've added a photo that helps show the final layout. One nice detail is the removable timber panels either side of the hatch. Omega1234, hexnut, dgbot and 10 others 13 Quote completed 1:12 28' Ranger type yacht, scratch build - COMPLETED 1:12 20' 1930 open sailing boat, half model, scratch built - COMPLETED 1:12 24' Ranger type yacht, scratch build Link to comment Share on other sites More sharing options...
Jim Lad Posted May 9, 2016 Share #109 Posted May 9, 2016 Don't know wether I like the look of the model or the real thing better, Mark! John dgbot, Mark Pearse, mtaylor and 1 other 4 Quote Link to comment Share on other sites More sharing options...
Mark Pearse Posted May 9, 2016 Author Share #110 Posted May 9, 2016 Many thanks, it's very encouraging. MP Omega1234 and mtaylor 2 Quote completed 1:12 28' Ranger type yacht, scratch build - COMPLETED 1:12 20' 1930 open sailing boat, half model, scratch built - COMPLETED 1:12 24' Ranger type yacht, scratch build Link to comment Share on other sites More sharing options...
Bedford Posted May 9, 2016 Share #111 Posted May 9, 2016 just.....WOW Mark Pearse, mtaylor and Omega1234 3 Quote Ships built :- Schooner for Port Jackson Thermoplylae Bluenose II Full size Tammie Norrie dinghy 1:8 scale Miss Caroline, model of the full size boat I built Under construction :- Royal Caroline, this one is special as it is in memory of my 13 year old daughter, Caroline who passed away in 2005 Miane three masted schooner R/C, scratch build (on hold) Charles W Morgan (on hold) Scratch designed and built R/C Mahogany and Walnut speedboat (on hold) In the que :- S.T. Waratah, maybe! Link to comment Share on other sites More sharing options...
Omega1234 Posted May 9, 2016 Share #112 Posted May 9, 2016 (edited) Hi Mark I think I've lost count of how many times I've looked at your hull and thought ..."damn, that's a top paint job on a sweetly curved hull!". A real pleasure to enjoy. Cheers Patrick Edited May 9, 2016 by Omega1234 Mark Pearse and mtaylor 2 Quote MY SCRATCH BUILT MODELS ARE: Splendid Mega Yacht https://modelshipworld.com/topic/28576-splendid-by-omega1234-scale-1500-mega-yacht/ Majestic Mega Yacht https://modelshipworld.com/topic/28483-mega-yacht-majestic-by-omega1234-miniature/ Sapphire Mega yacht https://modelshipworld.com/topic/21088-sapphire-by-omega1234-1388-scale-mega-yacht-66m-8-inch-hull-length/?tab=comments#comment-639898 Genesis - Supersports Mega Yacht https://modelshipworld.com/topic/18168-genesis-by-omega1234-1300-49m-mega-yacht-8-inches-long-finished/?tab=comments#comment-559026http://modelshipworld.com/index.php/topic/14141-shadow-by-omega1234-scale-1300-luxury-60m-mega-yacht-8-inches-long/ SHADOW Luxury Motor Yacht http://modelshipworld.com/index.php/topic/11384-majellan-by-omega1234-luxury-37-metre-motor-yacht-miniature-7-inches-approx/ Majellan Luxury Motor Yacht http://modelshipworld.com/index.php/topic/9261Rainbow-j-class-racing-yacht/?p=273543 Rainbow J Class Racing Yacht Mystic Classic Motor Cruiser Symphony Ingomar Schooner: Scratch build Dorade Schooner: <p> Lennox Restoration Warship http://modelshipworld.com/index.php/topic/9577-pandora-cutaway-dockyard-style-miniature/?hl=pandora Link to comment Share on other sites More sharing options...
Mark Pearse Posted June 5, 2016 Author Share #113 Posted June 5, 2016 thanks all, I've lined off the cockpit area in some lovely Finnish 2mm ply, it will all be painted. The varnished timber details will be added after painting, & haven't been made yet. The deck beams are in, spaced to suit the model not a real yacht, the interior will be enclosed & not visible. The V beam you can see is because the mast position would intersect that beam, & the rake is sufficient for the base of the mast to miss the lower part of the V. It will ensure that the hull width doesn't move while I'm making it. You can see that I had to sand the thwart that is immediately aft of the raised deck, after massing it up I realised that it would have had a step in the underside edge varnished seat backrest, which wouldn't look so good. The deck will go on soon, the deck fittings won't need backing as they won't be functional. thanks dj.bobo, cog, michael mott and 8 others 11 Quote completed 1:12 28' Ranger type yacht, scratch build - COMPLETED 1:12 20' 1930 open sailing boat, half model, scratch built - COMPLETED 1:12 24' Ranger type yacht, scratch build Link to comment Share on other sites More sharing options...
Omega1234 Posted June 5, 2016 Share #114 Posted June 5, 2016 (edited) Hi Mark Nice progress. I like it! In fact, seeing the empty hull, just emphasises how cavernous the hull is. Are you going to do any of the internal accommodation? Cheers Patrick Edited June 5, 2016 by Omega1234 mtaylor 1 Quote MY SCRATCH BUILT MODELS ARE: Splendid Mega Yacht https://modelshipworld.com/topic/28576-splendid-by-omega1234-scale-1500-mega-yacht/ Majestic Mega Yacht https://modelshipworld.com/topic/28483-mega-yacht-majestic-by-omega1234-miniature/ Sapphire Mega yacht https://modelshipworld.com/topic/21088-sapphire-by-omega1234-1388-scale-mega-yacht-66m-8-inch-hull-length/?tab=comments#comment-639898 Genesis - Supersports Mega Yacht https://modelshipworld.com/topic/18168-genesis-by-omega1234-1300-49m-mega-yacht-8-inches-long-finished/?tab=comments#comment-559026http://modelshipworld.com/index.php/topic/14141-shadow-by-omega1234-scale-1300-luxury-60m-mega-yacht-8-inches-long/ SHADOW Luxury Motor Yacht http://modelshipworld.com/index.php/topic/11384-majellan-by-omega1234-luxury-37-metre-motor-yacht-miniature-7-inches-approx/ Majellan Luxury Motor Yacht http://modelshipworld.com/index.php/topic/9261Rainbow-j-class-racing-yacht/?p=273543 Rainbow J Class Racing Yacht Mystic Classic Motor Cruiser Symphony Ingomar Schooner: Scratch build Dorade Schooner: <p> Lennox Restoration Warship http://modelshipworld.com/index.php/topic/9577-pandora-cutaway-dockyard-style-miniature/?hl=pandora Link to comment Share on other sites More sharing options...
Mirabell61 Posted June 5, 2016 Share #115 Posted June 5, 2016 a very pretty boat Mark !! The hull kooks wonderful.... Nils mtaylor and Omega1234 2 Quote Current builds -Lightship Elbe 1 Completed - Steamship Ergenstrasse ex Laker Corsicana 1918- scale 1:87 scratchbuild - "Zeesboot" heritage wooden fishing small craft around 1870, POB clinker scratch build scale 1:24 - Pilot Schooner # 5 ELBE ex Wanderbird, scale 1:50 scratchbuild - Mississippi Sterwheelsteamer built as christmapresent for grandson modified kit build - Chebec "Eagle of Algier" 1753--scale 1:48-POB-(scratchbuild) "SS Kaiser Wilhelm der Grosse" four stacker passenger liner of 1897, blue ribbond awarded, 1:144 (scratchbuild) "HMS Pegasus" , 16 gun sloop, Swan-Class 1776-1777 scale 1:64 from Amati plan -"Pamir" 4-mast barque, P-liner, 1:96 (scratchbuild) -"Gorch Fock 2" German Navy cadet training 3-mast barque, 1:95 (scratchbuild) "Heinrich Kayser" heritage Merchant Steamship, 1:96 (scratchbuild) original was my grandfathers ship -"Bohuslän" , heritage ,live Swedish museum passenger steamer (Billings kit), 1:50 "Lorbas", river tug, steam driven for RC, fictive design (scratchbuild), scale appr. 1:32 under restoration / restoration finished "Hjejlen" steam paddlewheeler, 1861, Billings Boats rare old kit, scale 1:50 Link to comment Share on other sites More sharing options...
michael mott Posted June 5, 2016 Share #116 Posted June 5, 2016 Mark your workmanship is showing what a graceful hull this is, I look forward to the fitting out of the deck and cockpit details. Michael mtaylor and Omega1234 2 Quote Current builds Bristol Pilot Cutter 1:8; Skipjack 19 foot Launch 1:8; Herreshoff Buzzards Bay 14 1:8 Other projects Pilot Cutter 1:500 ; Maria, 1:2 Now just a memory Future model Gill Smith Catboat Pauline 1:8 Finished projects A Bassett Lowke steamship Albertic 1:100 Anything you can imagine is possible, when you put your mind to it. Link to comment Share on other sites More sharing options...
Mark Pearse Posted June 6, 2016 Author Share #117 Posted June 6, 2016 thank you Patrick I wasn't planning to do the interior fitout, & I say that somewhat sheepishly having seen the detailed interior fitouts that you do. But I have planned the interior in my head - 2 full bunks forward, with a 4' zone with a wet locker or heads one side & a 4' galley the other side, then 2 full bunks that doubles as a saloon. Nils & Michael, thanks. I am always interested in how the subtle details change the way a boat's hull looks. In this case having multiple curved horizontal lines, working in balance will be even more interesting. The same hull can look very different with fairly minor visual differences. Omega1234 and mtaylor 2 Quote completed 1:12 28' Ranger type yacht, scratch build - COMPLETED 1:12 20' 1930 open sailing boat, half model, scratch built - COMPLETED 1:12 24' Ranger type yacht, scratch build Link to comment Share on other sites More sharing options...
druxey Posted June 7, 2016 Share #118 Posted June 7, 2016 Just stumbled across your log, Mark. That's a lovely job you are doing on her. Omega1234 and mtaylor 2 Quote Be sure to sign up for an epic Nelson/Trafalgar project if you would like to see it made into a TV series http://trafalgar.tv Link to comment Share on other sites More sharing options...
Mark Pearse Posted June 20, 2016 Author Share #119 Posted June 20, 2016 I've cut the deck & in the photos it is temporarily fitted with small screws. The screw heads will be filled over, but the 2-way deck curve needs more than just a little clamping. Some of the deck parts have been pencilled on, but there's still some thinking to do: review the mast position again. It's not going to have to sail, but if the mast setout looks wrong it'll really bug me, it's looking a little too far forward, but the bowsprit isn't on yet. A long bowsprit looks nice, but I'm assuming a hanked jib luff, so it puts some emphasis on actually being able to reach the forestay without drama. Sometimes they put a wide rectangular bowsprit so that stepping on it was easier, & it also meant that whisker stays were not necessary, which makes using an anchor a bit simpler. If I put on whisker stays I will good to put the whisker chain plates on before the deck. I'm thinking to deck step the mast, it doesn't really make sense to put it to the keel step it now. What's next: mast / whisker chainplates, finish setting out the decks, glue the deck & fit the gunwales & sponsons. thanks for the interest cog, Omega1234, KORTES and 3 others 6 Quote completed 1:12 28' Ranger type yacht, scratch build - COMPLETED 1:12 20' 1930 open sailing boat, half model, scratch built - COMPLETED 1:12 24' Ranger type yacht, scratch build Link to comment Share on other sites More sharing options...
Omega1234 Posted June 20, 2016 Share #120 Posted June 20, 2016 (edited) Hi Mark You're certainly pushing ahead now. One milestone (the hull) is over and now you can move onto the deck and cabin. Looking great! Cheers Patrick Edited June 20, 2016 by Omega1234 cog and mtaylor 2 Quote MY SCRATCH BUILT MODELS ARE: Splendid Mega Yacht https://modelshipworld.com/topic/28576-splendid-by-omega1234-scale-1500-mega-yacht/ Majestic Mega Yacht https://modelshipworld.com/topic/28483-mega-yacht-majestic-by-omega1234-miniature/ Sapphire Mega yacht https://modelshipworld.com/topic/21088-sapphire-by-omega1234-1388-scale-mega-yacht-66m-8-inch-hull-length/?tab=comments#comment-639898 Genesis - Supersports Mega Yacht https://modelshipworld.com/topic/18168-genesis-by-omega1234-1300-49m-mega-yacht-8-inches-long-finished/?tab=comments#comment-559026http://modelshipworld.com/index.php/topic/14141-shadow-by-omega1234-scale-1300-luxury-60m-mega-yacht-8-inches-long/ SHADOW Luxury Motor Yacht http://modelshipworld.com/index.php/topic/11384-majellan-by-omega1234-luxury-37-metre-motor-yacht-miniature-7-inches-approx/ Majellan Luxury Motor Yacht http://modelshipworld.com/index.php/topic/9261Rainbow-j-class-racing-yacht/?p=273543 Rainbow J Class Racing Yacht Mystic Classic Motor Cruiser Symphony Ingomar Schooner: Scratch build Dorade Schooner: <p> Lennox Restoration Warship http://modelshipworld.com/index.php/topic/9577-pandora-cutaway-dockyard-style-miniature/?hl=pandora Link to comment Share on other sites More sharing options...

Recommended Posts
Join the conversation
You can post now and register later. If you have an account, sign in now to post with your account.