Search the Community
Showing results for tags 'double end'.
Found 1 result
-
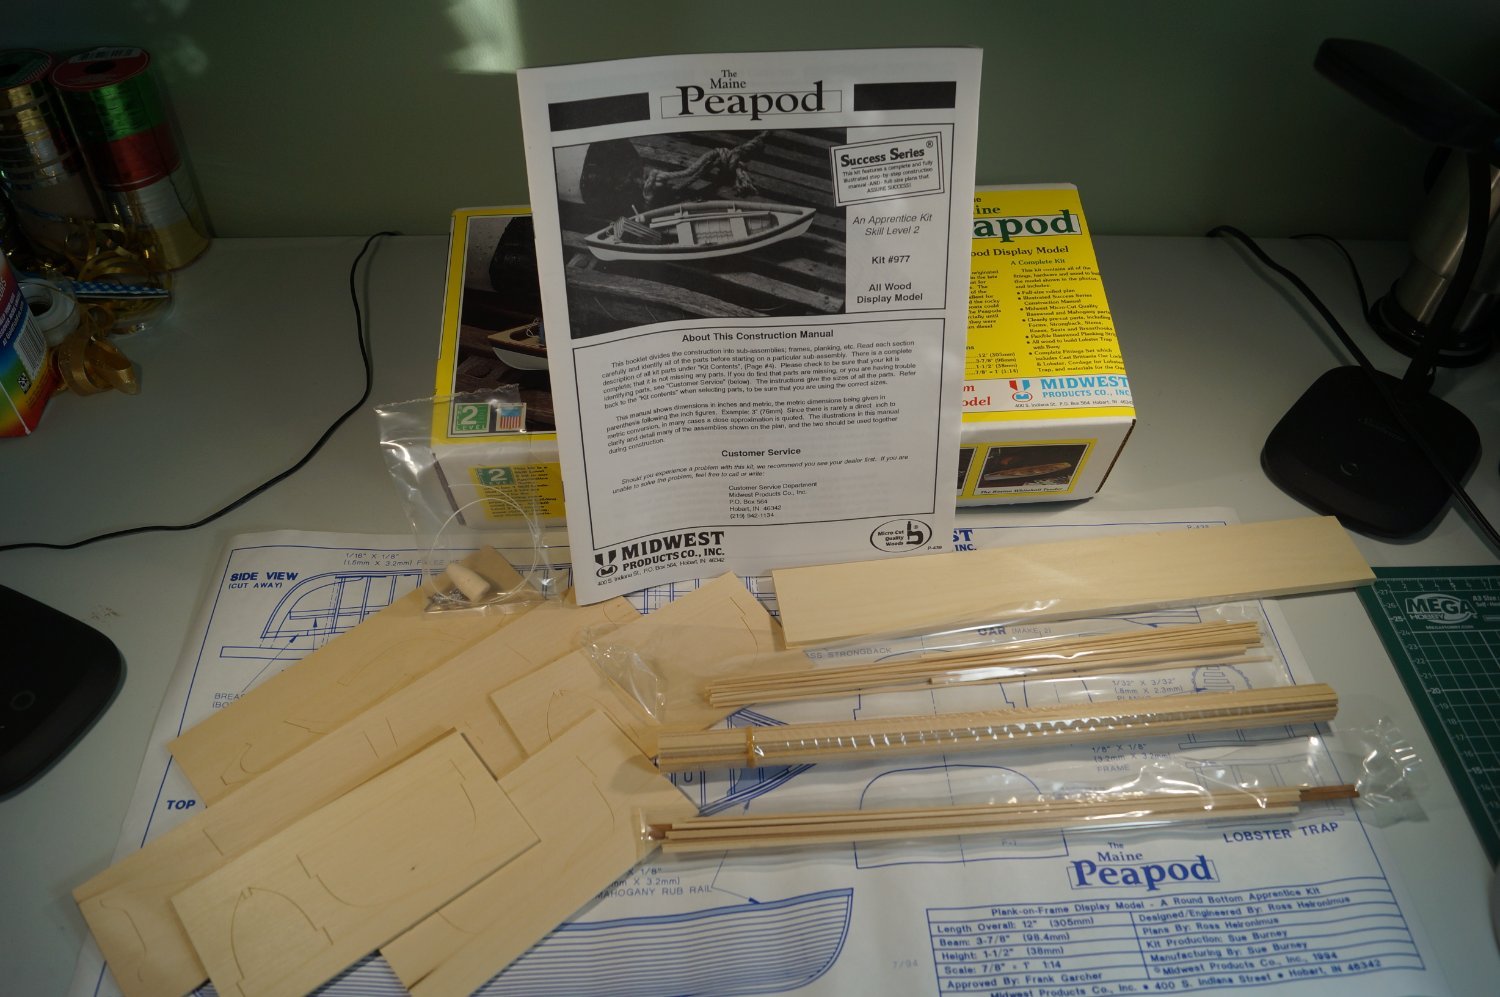
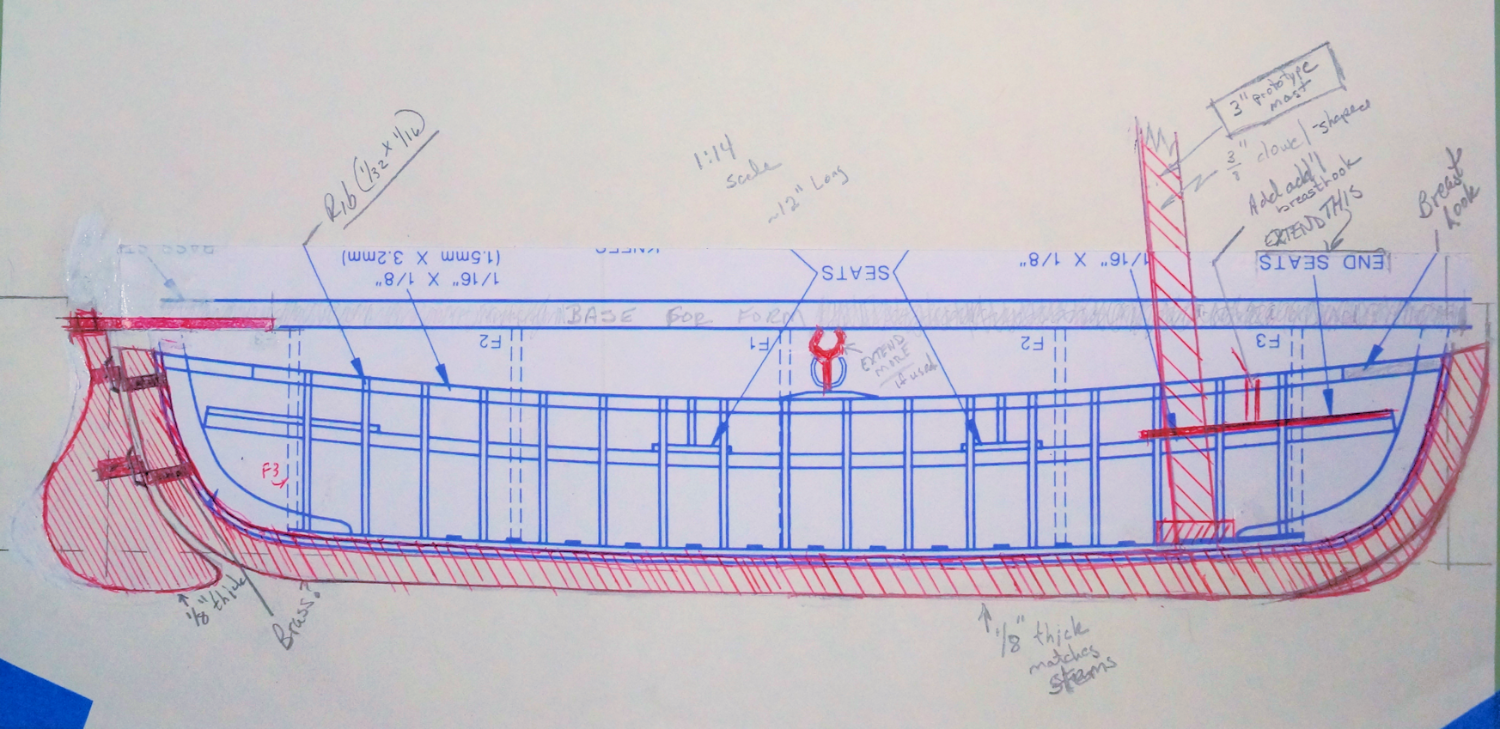
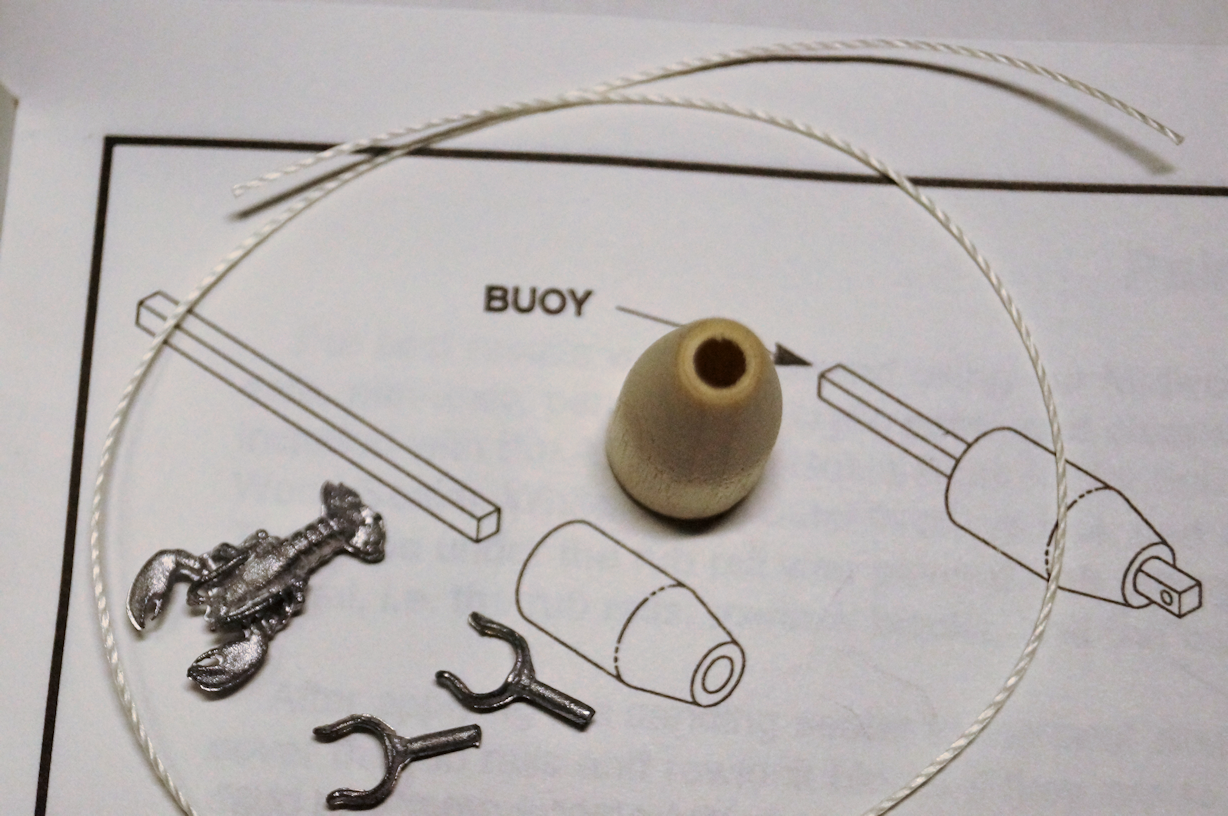
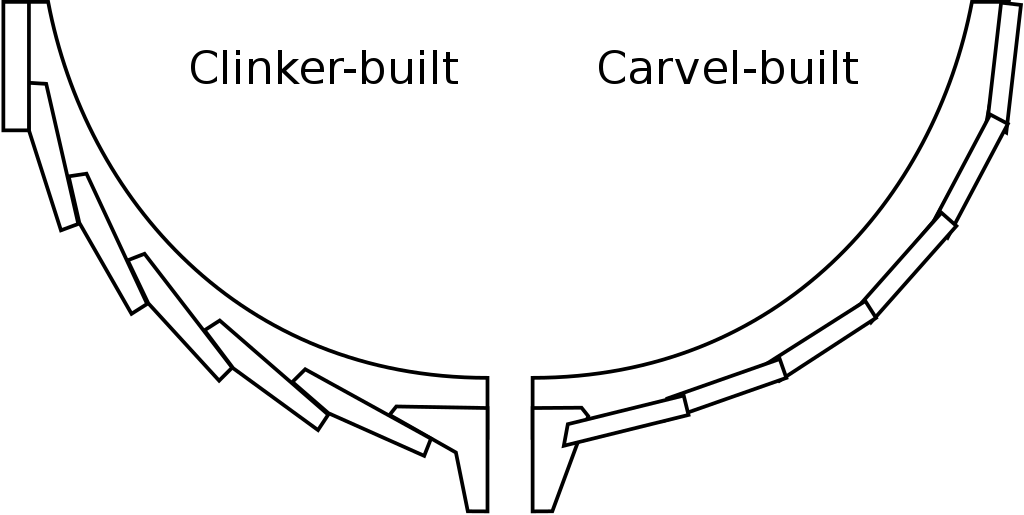
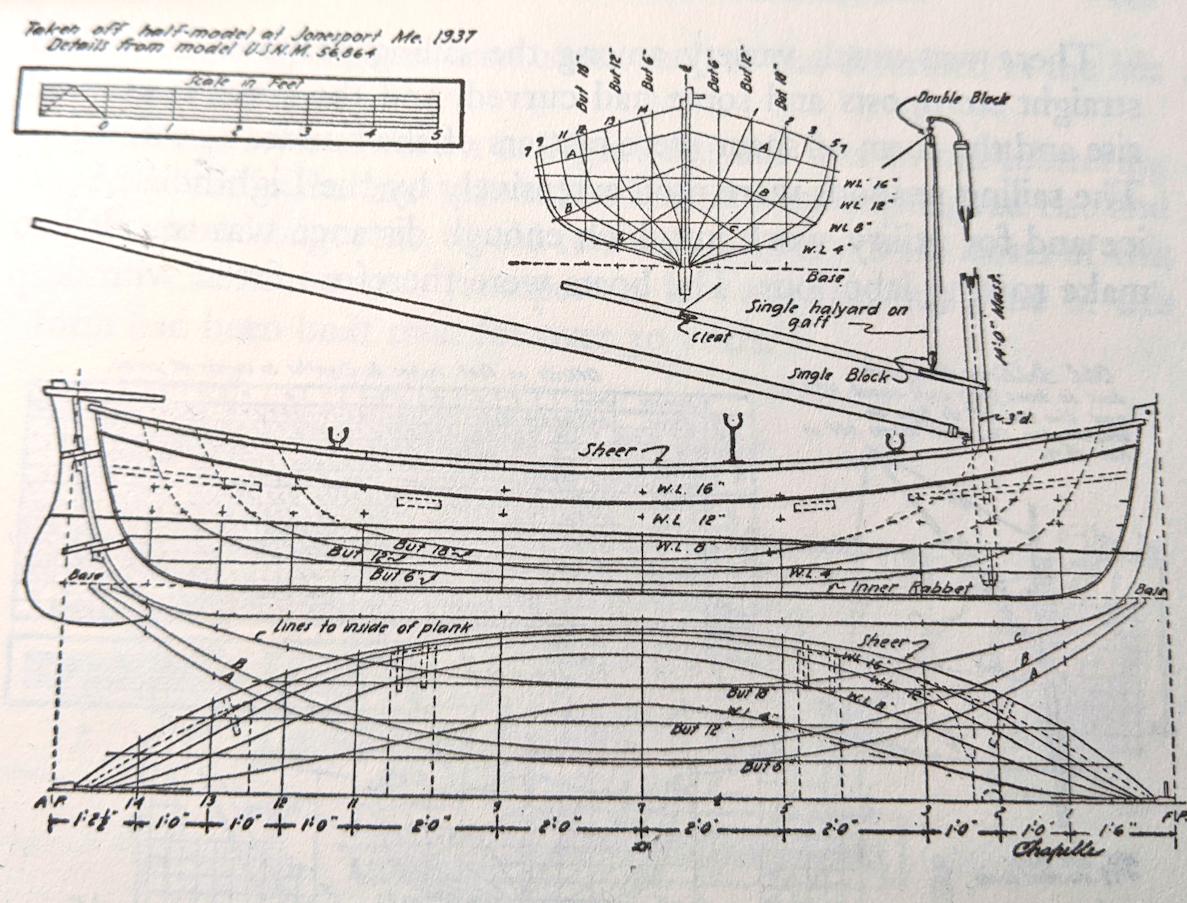
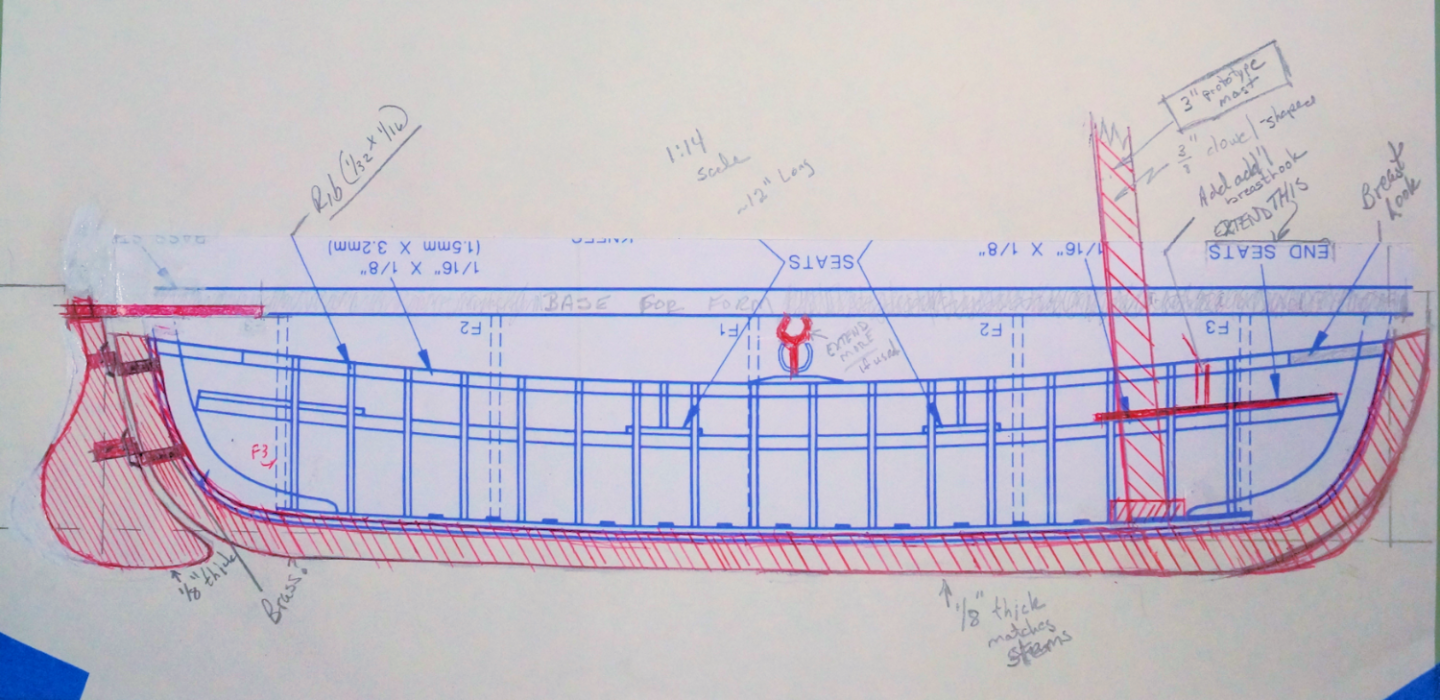
 Preface I’m about ready to start my next build. Ready as in: it’s on the work bench, research done, and building process outlined, at least mentally. I got into the habit with in my previous build of, well, doing a build log. I think I have now established a discipline to continue that process. While this boat could correctly go into different launch dates, I chose this sub-forum since the version I am building has a 1937 date on the plans (see below). For this log, I want to post some information prior to starting the actual work on the model. As I pondered the build, I did what I think all modelers do at some level: research. The unusual aspect comes from the subject of a workboat which from my perusal of threads isn't a typical research subject. This research pointed a direction to take for the build. I started with the “Construction Manual” (instruction sheet) which, I think, is where most modelers begin when building a kit. Kit information Speaking of kit, here’s my thoughts on the kit itself. I’ve had this kit in my stash for years. I decided it was a good reentry into a wood model as I previously built a Midwest Model’s kit (The Dinghy). Additionally, I think I can do more than just “follow the instructions.” I wanted to look at upping my game by modifying this kit and build. If all goes per plan, I will have added some ‘scratch build’ skills to my toolbox. The kit is a Skill Level 2: intended for the person having “some prior experience building wooden boats.” I find that an interesting turn of phrase since in all likelihood most of us haven’t built a wooden boat. Boat models, yes. But not actual boats. (I know there are a few exceptions out there of people who have built a boat or two.) The kit has the necessary components to build a nice-looking model using basic skills of “cutting, fitting, and shaping wood.” As a side note, Midwest Models at some point in time quit producing these models. I am not sure when. Maybe someone can add a date to the thread. Recently, Model Expo reintroduced the kits from Midwest Models, including this kit. It appears that they kept the kit in its original form with die-cut pieces and strips for planking. While other kits for beginners and novices exist, this kit provides a good introduction to wooden boat/ship modeling. For those who choose to build this model, I hope this build log will prove useful. The kit has basswood die-cut pieces, strip wood for planking, and some mahogany pieces for the oarlocks and rub rail. It also includes material for oars, oarlocks, a lobster trap and buoy (more on these when I assemble those parts), and even a model of a lobster in cast metal. The instructions are clear enough to follow. I would suggest that some areas of the construction steps need a bit of research around beveling and bending wood. Nothing major, but if you haven’t done it before, look up some ‘how to’ information for techniques. The instructions include a couple of tidbits of data that got me to thinking about the build and raised questions about the boat. Like many modelers, I researched the boat. What I discovered pointed out ways I could modify the model for this build. Here’s what the instruction sheet (and box cover) has for background on peapods, particularly as related to lobster fishing. Being a double-ender (pointed at both ends), the workboat fits a unique set of requirements for those fishing for (well, trapping) lobsters. The boat can be easily rowed in either direction. This workboat design makes it suited for working around rocky shorelines. People rowed the boat while standing and added sails for getting to and from their traps and for use as lighthouse tenders. You find these in use around New England. They showed up in the late 1870s through the 1930s when diesel powered became the predominant lobster fishing boat. The concept of having sails and rowing while standing suggested some potential areas for modifying the kit. Beyond the instruction sheet history, background, and additional research In case there are some who don’t know the details of the boat, here’s some information you may find useful and gave me an insight into building this model. I found more than one type of ‘peapod’ during my digging around the Internet. This article shows detailed variations of lines for peapods and has some charts evaluating their performance, WoodenBoat link: Gallery of Peapod lines) I found the information interesting, particularly the range in sizes (13 to 16 feet) for the length of these boats. This 14-foot scaled model fits within that range. Like so many workboats, the exact origin cannot be specifically pointed out with 100% certainty. Several sources do point to North Haven Island, Maine, and Penobscot Bay as the birthplace. That is pertinent to this build since, by using the lines in the above ‘gallery’, I found this model fits the North Haven (Whitmore) lines. For a bit more details on peapod history, I suggest this link: North Haven Maine Historical Society: Peapod. I found a lot of differences in the various sources describing peapods. For example, the design likely started as lapstrake, or clinker built, with the planks overlapping. At some point, the construction changed or included carvel; planks butting against each other. The image below comes from a Wikipedia article about Clinker Boat Building . No other attribution noted. I think it does a good job showing the difference in the styles. This model uses carvel build. This drawing of the carvel does show the general need to bevel the planks for a boat. The amount of work depends, of course, on the actual lines of a ship or boat. Another area of difference exists around the sailing rigs. These boats were often used as lighthouse tenders. Howard Chapelle’s American Small Sailing Craft (Pg. 217-222) points out that peapods had a gaff mainsail or spritsail with a few having a jib tacked stem. A more contemporary set up includes a single lug sail or as a lug rigged cat yawl. If you want to take your model making to a new scale; say 1:1, you might want to visit Chesapeake Light Craft and their Lighthouse Tender Peapod. Building this full scale versions gives the experience of actually building a boat and not just a model. (Or you could say you built a 1:1 scale model?) They also include some details about peapods and their choice in sails for their boat kit. Some peapods were rowed (while standing) out to the lobster grounds and then sailed home at the end of the workday. It seems that these boats were not altered much for this dual duty. The sails were stored while working traps and stepped for the trip home. I did find a reference that an oar was used as a rudder which eliminates the need to manhandle the rudder. (About that standing up and rowing, you’ll have to wait until step 56 of the manual.) If one intends to use the boats mainly as tenders or supply boats, having a keel and rudder makes sense. These additions make a boat easier to maneuver with wind power. Again, I referred to Chapelle’s book for details. The plans there showed examples where the false keel is extended. The keel in this book ranges from 3” to 5”. (In Boat Modeling with Dynamite Payson, he shows a sailing keel of about 10 inches in the version he uses as a reference.) While adding a centerboard keel could be an option, from what I found in my research, that option apparently did not get used often, if ever. What this means for my build. I went over these details to give some insight on my thought processes and explain the changes I will make to this build. I plan on adding a sail rig. To do so I need to settle on a plan and determine how to add the keel, rudder, and rigging. Using Chapelle’s book (pg. 219 Fig 83), this 1937 version from Jonesport, ME will be my main guide. Using the kit’s drawing (blue lines) and adding the keel and rudder (red lines) I came up with this as my model’s plan. This keel works out to be 5 inches on the prototype which, I think, is a good compromise in the range of keels in the various sources. I will have to refine parts of the drawing when the time comes like the final shape of the rudder and tiller. However, I feel this will work well for my goals. I do have a general plan in mind for working all these changes into the model. I will cover those details at the appropriate points in the build. But as a preview, a couple of other changes requires modification to the (now bow) seat that will help support the mast along with a mast step. I haven’t looked at all the details for a boom, gaff, the ‘iron crane’ that sits on top of the mast, and the rigging. I do have a good idea on what these will look like. For the sail, my plan is to add a silk span sail. I intend to have the sail furled. (Hopefully that will hide any ‘newbie’ mistakes as I have never scratch made a sail nor worked with silk span.) I will be reviewing Tom Lauria’s video “Making sails for Ship Models from Silkspan” (Link to Part 3) for guidance. And somewhere in my notes is a link that indicates a method to cut the sail to make the task easier to model a furled sail. For this method you don't make the whole sail. A part of the sail in the aft lower corner is cut off to simplify the furl. Ready to start the physical work. I hope you learned something from my efforts so far. After all, a big part of the hobby and these websites comes from sharing information we discover as we progress. While it may not be 100% historically accurate, the model should be a good representation of a Maine Peapod rigged for sailing.
- 25 replies
-
- 6
-

-
- maine peapod
- peapod
- (and 4 more)