


MintGum
-
Posts
40 -
Joined
-
Last visited
Content Type
Profiles
Forums
Gallery
Events
Everything posted by MintGum
-
This class of tool is called a "brad pusher". Searching for the term "brad pusher" will bring up numerous tools from various manufacturers. These tools are made to push wire brads into picture frames, moldings and finish woodwork. The various tools have different shaped handles that make them more or less comfortable and (more or less) easy to use depending on what you are doing with them. Some suggestions: 1.) Try the Occre pin pusher tool. It is shorter and has a round bulb on the end which might make it easier to use. 2.) If your planks are breaking they are too dry. Soak them for 20 minutes then dry them with a kitchen towel. 3.) Search the internet for a brad pusher that is comfortable for you to use. 4.) Get a small hammer and nail set punch. After starting the pin (either with the hammer or brad pusher) use the hammer to pound it in further and the nail set punch to set it below the surface of the plank. 5.) Using brad pusher tools with such small pins does have a knack to it as the pin will wobble a bit until it gets started and is pushed further into the plank and frame. The tool bore is too large and the pin initially sticks out too far enabling this wobble. This is most probably driven by having to account for the pin head size in the bore. 6.) Amati makes "ultra fine" pins - 0.5 mm diameter that are smaller in diameter than Occre and AL 0.7mm diameter. They might be easier for you to push in. 7.) Try the pin pliers as previously mentioned above. 8.) Finding a brad pusher that allows the pin to stick out less (initially) and has a smaller diameter bore to hold the pin tighter would help. I'm not aware of any but perhaps those reading this know of one. Again, the head size of the pin must be accounted for. 9.) Try another planking method. Tick Strips or Spiling are two of the other methods and tend to produce a smoothly planked hull. Tick strips will work with the planks in the kit whereas spiling normally requires purchasing additional materials. 10.) Predrilling a hole - requires the right size wire drill bit... this can be a bit touch and go as the tiny drill bit might also snap and their is a knack at using the jewelers or push drill to make the hole. I've found this to be unnecessary with sharp, well placed pins (not too close to the edges of the plank, etc...) I have successfully used pins and their respective pushers though it does require developing a knack for their use and then following with a hammer and nail set to drive the pin below the surface. An alternative is to cut the pin off at the surface and drive the remaining wire below the surface of the plank.
-
Hull Planking Calculator
MintGum replied to MintGum's topic in Modeling tools and Workshop Equipment
Version 1.4.0.0 is live and can be downloaded from the link in the first post. 1/21/2026 Updated DXF export for compatibility with a greater number of applications. Fixed field tab order. Updated documentation. Comments: Feedback is always welcome. -
Hull Planking Calculator
MintGum replied to MintGum's topic in Modeling tools and Workshop Equipment
Version 1.3.0.0 is live and can be downloaded from the link in the first post. 1/18/2026 Added support for exporting CSV files - exports both metric and standard - calculated tick strip widths for each frame Added support for exporting DXF files - exports a DXF file of the plank for use in CAD/CAM software and CNC/Laser milling operations Updated documentation. Comments: You'll find the export buttons on the print preview screen at the top: Feedback is always welcome.
-
Cutters, Choppers, Guillotines, Slicers
MintGum replied to MintGum's topic in Modeling tools and Workshop Equipment
I'm surprised Ultimation doesn't publish limits or at least guidelines for both soft and hard woods. They do have videos showing the slicing of fairly thick what appears to be a softer wood using the squaring technique. -
Cutters, Choppers, Guillotines, Slicers
MintGum replied to MintGum's topic in Modeling tools and Workshop Equipment
Agreed, though the KG50 doesn't appear to be available in the US. Do you use a circular saw (chop or table) for thicker materials? Which model? Not sure if the Ultimation Slicer would be capable of square ends in thicker hardwoods. Haven't seen any evidence confirming or denying it. Any members willing to try their slicer on thicker (1/8 in - 1/4 in +) hardwood (pear, boxwood, rosewood, etc...)? -
Wood Plank Benders - Rounding
MintGum replied to MintGum's topic in Modeling tools and Workshop Equipment
This is also a nice setup. The crescent shape would need to be custom machined or just cut a brass disc in half. Brass rod of the appropriate diameter for the soldering iron would be enough. Riveting the two together... would need to machine an end onto the brass rod and drill an offset hole in the crescent. Very doable for those with a mill. Might even be able to do this with hand tools. Machine shops are expensive though, need to get myself a mill... 😁 -
Wood Plank Benders - Rounding
MintGum replied to MintGum's topic in Modeling tools and Workshop Equipment
Definitely a viable option. Thank you for pointing this out. -
Wood Plank Benders - Rounding
MintGum replied to MintGum's topic in Modeling tools and Workshop Equipment
It doesn't have to be 100W. I was using that figure as it is what the soldering iron that comes with the ebay bender/shovel was advertised at. -
Wood Plank Benders - Rounding
MintGum replied to MintGum's topic in Modeling tools and Workshop Equipment
After communicating with several of the various Ebay sellers of this bender, the included soldering iron is a 220V model with a China electrical plug. What that means is that when it is operated @ 220V it will output 100W but when plugged into a US outlet (with an adapater if necessary) @ 110V it will only output 25W. If it's the 60W model it will only operate @ 15W in the US. The suggestion was that the bender and mini shovel be purchased separate and that the US buyer obtain a soldering iron with 100W output on US 110V. Has anyone purchased this bender/shovel and/or successfully found a compatible soldering iron that outputs @ 100W on US 110V? -
Cutters, Choppers, Guillotines, Slicers
MintGum replied to MintGum's topic in Modeling tools and Workshop Equipment
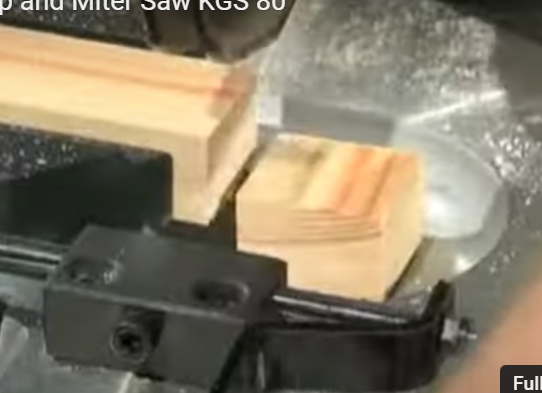
For those who own the mini chop saws, does the hump in the clamp affect what or how you cut? It seems that it would work well for solid pieces but if cutting a stack of thin planks it would allow them to flex - especially when nearing the end of the stack. Also, the work piece would be susceptible to wobbling. It appears that even the high end Proxxon KG50 is designed this way. Though the KG50 doesn't appear to be available in the US. The higher end Proxxon KGS80 doesn't have the "hump" but instead it has a bowl shape underneath the blade. Not sure why these aren't designed with a simple slot in the table for the blade to pass through with the vice clamp level with the table... maybe it adds more cost.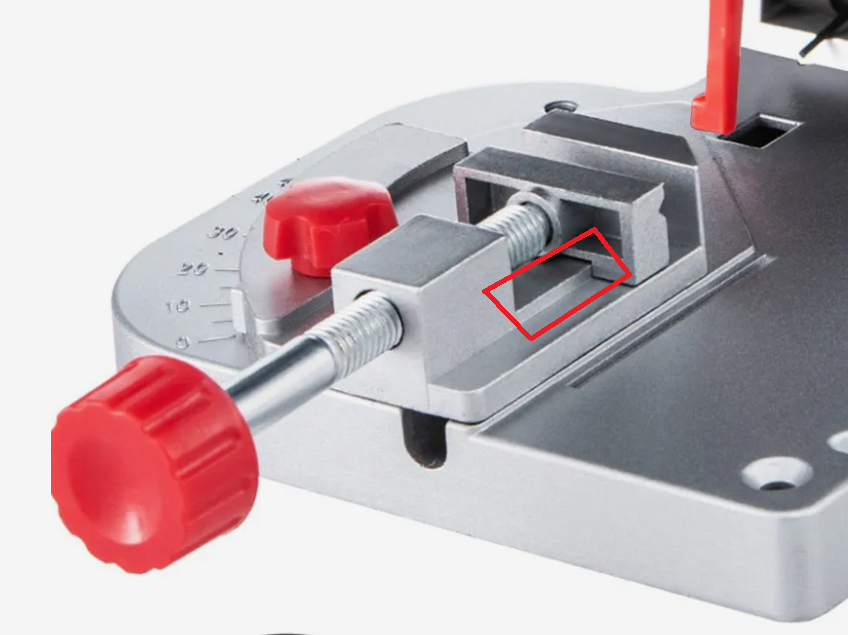
-
Cutters, Choppers, Guillotines, Slicers
MintGum replied to MintGum's topic in Modeling tools and Workshop Equipment
Will do. Stop back anytime! Good luck and Happy New Year! -
Cutters, Choppers, Guillotines, Slicers
MintGum replied to MintGum's topic in Modeling tools and Workshop Equipment
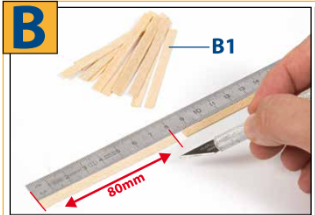
#28 is where you commented on cutting 1/32" planks. Thanks! Was the saw kerf an issue in efficiently utilizing the material provided in the kit? IOW, were you able to get reasonably close to 5 - 80mm planks from a 400mm? -
Cutters, Choppers, Guillotines, Slicers
MintGum replied to MintGum's topic in Modeling tools and Workshop Equipment
You are correct, I started a thread asking for OEM and experience concerning the various choppers and slicers on the market. I interpreted the various question mark symbols (?) in your response as being questions that I responded to. OEM? Who cares? I care about OEM's as their design and manufacturing tend to be original and superior than those of non-licensed after market manufacturers. Do you use your mini chop/cut-off saw to cut deck planking? Have you used it on the thin planks of Occre or Artesania Latina kits? How did it perform? -
Cutters, Choppers, Guillotines, Slicers
MintGum replied to MintGum's topic in Modeling tools and Workshop Equipment
OEM's generally produce higher quality products at an increased cost. Find the OEM and quality/cost comparisons are possible vs the plethora of copies. -
Cutters, Choppers, Guillotines, Slicers
MintGum replied to MintGum's topic in Modeling tools and Workshop Equipment
While outside the realm of this thread, these machines all look like copies of each other, rebranded and marketed under different names. As is often the question, what was the OEM(s)? Amazon, Vevor, Harbor Freight, Micro Mark, etc... all appear to be copies of which OEM? -
Cutters, Choppers, Guillotines, Slicers
MintGum replied to MintGum's topic in Modeling tools and Workshop Equipment
These don't fall in the knife blade driven chopper/slicer category. They are basically cut-off or chop saws. Reviews on these cheap units indicate weak motors, distorted blades and other anamolies. The one you posted is ~$29 on Amazon, a Proxxon is $329. Price might make a difference in quality in this category. Please post a picture of your 20 year old unit. You do mention using it on thicker stock but using a unit like this on ultra thin stock, like what the chopper/slicers were made for, would most likely yield unsatisfactory results. -
Cutters, Choppers, Guillotines, Slicers
MintGum replied to MintGum's topic in Modeling tools and Workshop Equipment
Stock type, Stock thickness, blade thickness, knife edge style and blade speed are all factors. In addition, the shearing properties of the material being cut need to be considered. A thin piece of stock doesn't travel far up the V (or half V) shaped edge of the knife blade thus won't get "pushed or separated" by the slant knife edges as much as a thick piece of stock. A thick piece of stock travels farther up the V (or half V) shaped edge, sometimes even to the blade thickness and will be "pushed or separated (i.e. sheared)" by the knife much more than a thin piece of stock. Of course it's impossible to have a knife without a V or half V edge shape, the alternative is a saw which removes the thickness of the blade altogether. Shearing properties of wood: -
Wood Plank Benders - Edge Bending
MintGum replied to MintGum's topic in Modeling tools and Workshop Equipment
Agreed. Heat should be applied at some point - before, during and/or after bending. At what stages is heat application most beneficial? If the plank is wetted, jigged, dried, removed and heated would that cause warping or shrinking (as opposed to being heated in the jig)? The answers are mostly that it depends on various factors, plank thickness, how the heat is being applied, what type of heat application device is being used, etc... (i.e. Pressing the entire strip with an iron, running a plank bender along the strip, etc...) -
Cutters, Choppers, Guillotines, Slicers
MintGum replied to MintGum's topic in Modeling tools and Workshop Equipment
Just by reading the online kit instructions and observing the tools sold by the kit manufacturers one can gather their intent and the market that their tools are made for.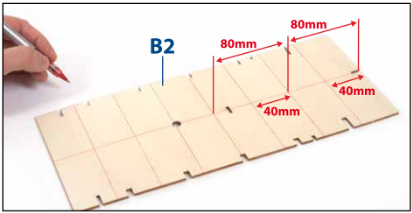
-
Cutters, Choppers, Guillotines, Slicers
MintGum replied to MintGum's topic in Modeling tools and Workshop Equipment
Thank you for posting this. I had previously read this review and regard the Ultimation Slicer and Sander as high quality tools. My previous question #7 hasn't received a response but from what I gather if the planking is thin enough then squaring the opposite end isn't necessary. Anyone with experience in this area might consider this question: Given 0.6 mm x 6mm x 400mm planking that needs to be cut into 80 mm lengths (a typical Occre or Artesania Latina kit) would each piece need to be squared? If the square cut is necessary then only 4 - 80 mm pieces would be had per 400 mm length included in the kit. Now take the same 0.6 mm x 6mm x 400mm planking and cut it on a razor blade slicer. One should be able to achieve 5 - 80 mm planks or close to it. Of course kit manufacturers might start including an extra 5mm... 🙄 -
Wood Plank Benders - Edge Bending
MintGum replied to MintGum's topic in Modeling tools and Workshop Equipment
Though not a purpose built jig, I've seen similar done with 1" x 6" x 8-12" pine boards, The thin metal of your base seems to allow reasonable sized clamps to be employed. Making the curve "flow" (i.e. not wavy) with this type of setup can sometimes be tricky. -
Wood Plank Benders - Edge Bending
MintGum replied to MintGum's topic in Modeling tools and Workshop Equipment
I would agree that there are no commercial versions. A nicely machined wood/aluminum version, of the style in the video I linked, optionally with screw clamps and x,y grooves for adjusting the center and outer formers, different size formers, etc... would be welcomed for those who don't own their own milling machine to make one. A laser cut plywood version would probably work as well and be cheaper to manufacture. One that used the four base parts and the end user's clamps might be made cheaply enough that several could be owned and employed at the same time. A jig like this would also solve several issues for modelers who don't have a nice work surface to clamp onto. (i.e. They are not building on a workbench but on a folding table, etc...) -
Wood Plank Benders - Edge Bending
MintGum replied to MintGum's topic in Modeling tools and Workshop Equipment
It appears that he's using 3 or 4 nails in the work surface as the jig. Edge bending jigs are used in many industries. While nails, clamps and peg boards will suffice a well engineered jig may be appreciated by some. -
Wood Plank Benders - Edge Bending
MintGum replied to MintGum's topic in Modeling tools and Workshop Equipment
Thank you for the Amazon link to this. I listed it under the rounding plank benders but it also appears capable of edge bending with the addition of some weights. -
Wood Plank Benders - Edge Bending
MintGum replied to MintGum's topic in Modeling tools and Workshop Equipment
I'm looking for a commercially made and marketed jig similar to the home-made ones that you and I have linked to. I don't necessarily need to know how to do the bending.
