Search the Community
Showing results for tags 'Flickering'.
Found 1 result
-
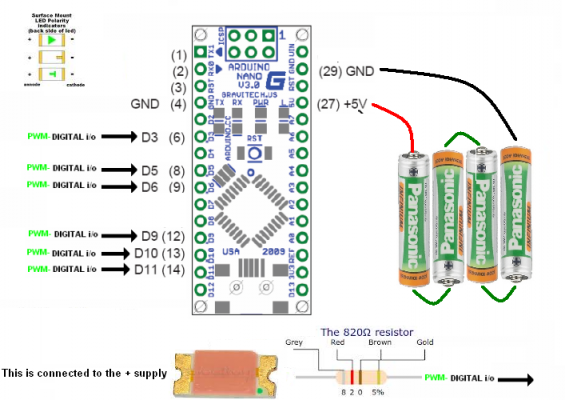
Hi. Having seen a few people on this site put LED's into there models I thought it would be nice to have a flickering candle lamp for the period ship. Its cost is low and the effect is real. The brightness and the duration of the flickering are randon on each candle. I found this on the Arduino page and its is freeware IE no lisence to use. I used surface mount LED's as they are very small and easy to put into almost any scale of model. Step by Step instructions below. Equipment needed :- 1 Arduino nano chip. Source Ebay 261232492487 Very thin wire (Copper will hold its shape after bending). Insulated or un insulated will do. 6 SMT 1206 White LED’s . Source Ebay 121077374673 or you could use 3mm LED’s (much bigger). 6 Resisters 820 Ohms. Grey, Red, Brown. 1 Battery holder for 4 AAA batteries. 4 Batteries AAA Rechargeable. 1 Simple On/Off switch. 1 orange shopping bag. For the colour. Computer with USB. Total cost £18 Step 1 Download the Arduino software from :- http://www.arduino.cc/ Second Tab click the Download. A little way down the page click on Windows Installer and it will install the Environment. Now click the Getting started to the Right of the Windows Installer. Agree with the download (varies with Windows version) and click to install. It will ask if you want to install the drivers Yes install. Next click the Chip you are using ”Arduino Nano”. There are two types check the type you have. Run the Arduino software and use the information on selecting the Arduino Nano. A small box area will appear. Copy and paste the Code below into the white area. Next plug in the Arduino Nano into the USB and the computer will find the Arduino Nano. Now under File in the Arduino Environment select File in the Top left corner move down to Upload and click. The Arduino should flicker when uploading. And the Arduino Environment will display any messages relating to the uploading. You may need to change the COM port to get a successful upload. That’s the programming Done. Step 2. The Arduino Nano Chip Has no Headers soldered in place. This makes it easy for us to connect the LED and Power. Refer to picture. Connect the + on the battery box to the Switch Connect the + from the switch to Pin No 27 Connect the Ground from the battery Box to Pin No 29 Now solder a resister into Pin’s numbers. 6.8.9.12.13. and 14. Next you solder the SMT LED’s to the Wire. You can test each one as you complete the soldering by connecting the Anode to the 5 volt power supply. And the cathode to the Unconnected en of a resister. With the battery on the connected LED should flicker. Repeat the same for all 6 LED’s. Next we tear off strips of the Orange bag and wrap it around the LED. Do not buy Orange LED as the effect is not the same. Mount the LED inside lanterns around the ship. Careful planning will hide all the wires. The Anode of each resister can be connected to the same wire. Common Power. The LED’s and wire can be built into the model as it’s rare for a Led to fail. The Arduino Nano and the Battery box can be hidden in the base. Code Below this line. ****************************************************** /*http://forum.arduino.cc/index.php/topic,7115.0.html * randomly flickering LEDs */ int ledPin[] = { 3,5, 6, 9, 10, 11}; // pwm pins only int ledState[6]; // last state of each led long randNumber; void setup() { pinMode(ledPin[0], OUTPUT); // Just tells the Arduino that this is a output pinMode(ledPin[1], OUTPUT); pinMode(ledPin[2], OUTPUT); pinMode(ledPin[3], OUTPUT); pinMode(ledPin[4], OUTPUT); pinMode(ledPin[5], OUTPUT); randomSeed(analogRead(0)); // seed the random generator with noise from unused pin ledState[0] = random(20, 201); ledState[1] = random(20, 201); ledState[2] = random(20, 201); ledState[3] = random(20, 201); ledState[4] = random(20, 201); ledState[5] = random(20, 201); } void loop(){ analogWrite(ledPin, ledState); // set the pwm value of that pin determined previously randNumber = random(-70, 71); // generate new random number and add that to the current value-40,41 ledState += randNumber; // that range can be tweaked to change the intensity of the flickering if (ledState > 200) { // clamp the limits of the pwm values so it remains within ledState = 200; // a pleasing range as well as the pwm range } if (ledState < 10) { ledState = 10; } } delay(100); // the delay between changes } Any questions ..PLease ASK. Regards Antony.