Jon219
-
Posts
52 -
Joined
-
Last visited
Content Type
Profiles
Forums
Gallery
Events
Everything posted by Jon219
-
 Thanks JS, I do plan to paint this model. It's good to know that gives me more leeway for mistakes as I'm sure there will be plenty of them. I do like the look of the all natural wood model but thought I'd get this on under my belt before considering trying that.
 -
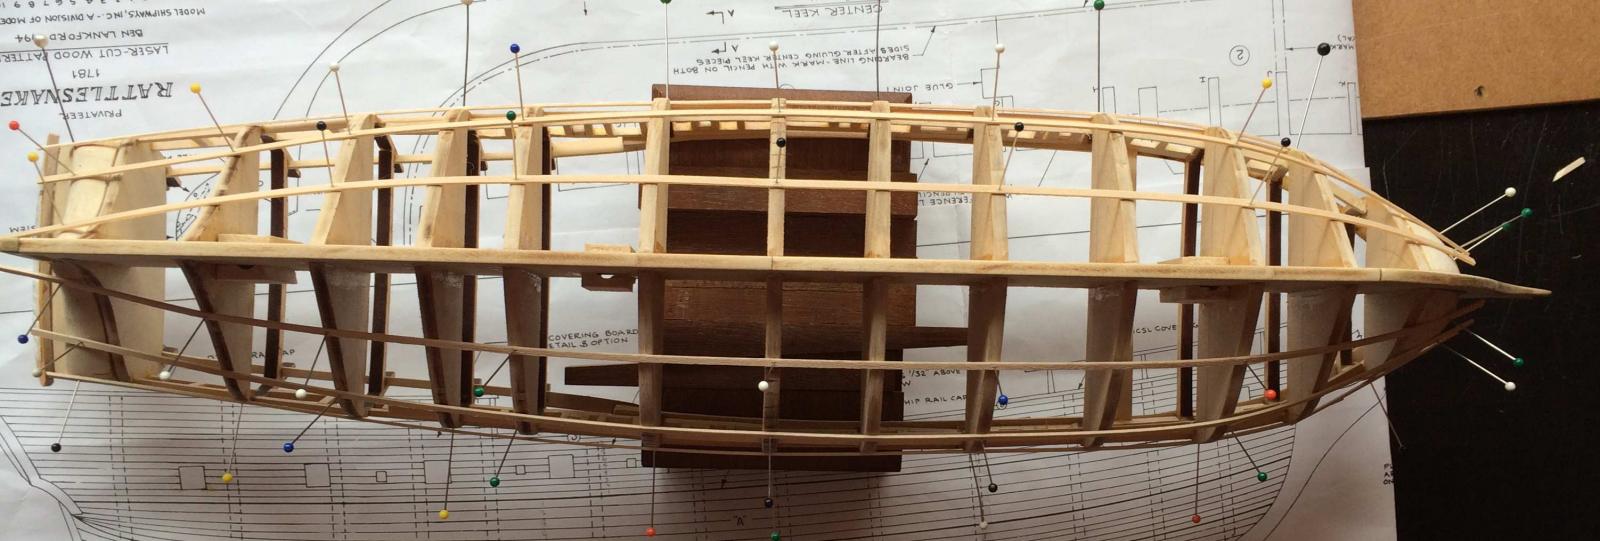
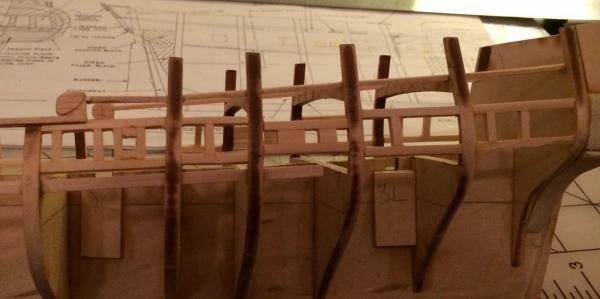
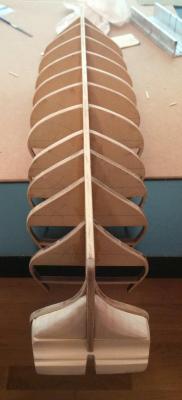
Temp Batten Strips I've been reading everything I can on planking and I'm just getting a bit overwhelmed with it so I thought it would be best to at least start on the things that will be easy to undo if I mess them up. So I've tried to lay out the plank belts using temp battens. I have three belts with 6 planks each which is what the Rattlesnake instructions give. I broke a couple of the 1/32" strips I was using while bending so I decided to soak the strips first to get a little more give to them. I printed the planking fan and it's turning out to be a tremendous help. In addition to eyeballing the battens I've been using it to compare spacing across the battens, much easier that a rigid metal ruler. The spacing isn't perfect across the two sides but I think I have it about as close as I can get considering that they're not exactly the same. Seemed that when I put the temp battens on I would also find out how well I've done on fairing and so far I haven't seen anything that I need to go back and fix. If I understand this all correctly then once I'm satisfied with the positions of the battens then I'll use the planking fan and mark each plank on each bulkhead. Once all that is marked then I can remove the battens and proceed with planking.

- 131 replies
-
- 1
-

-
- rattlesnake
- model shipways
- (and 1 more)
-
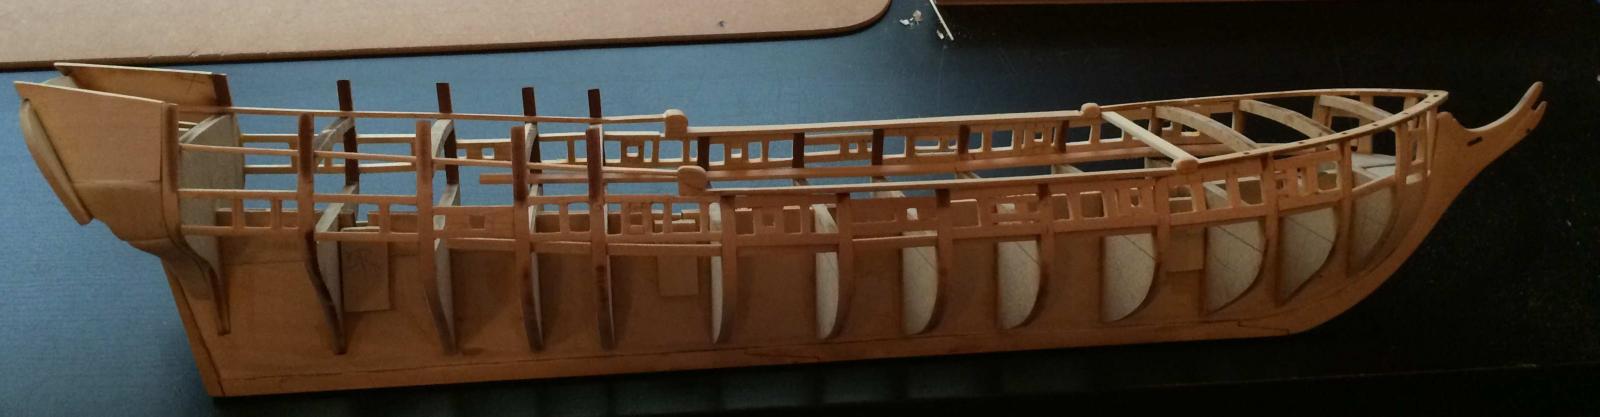
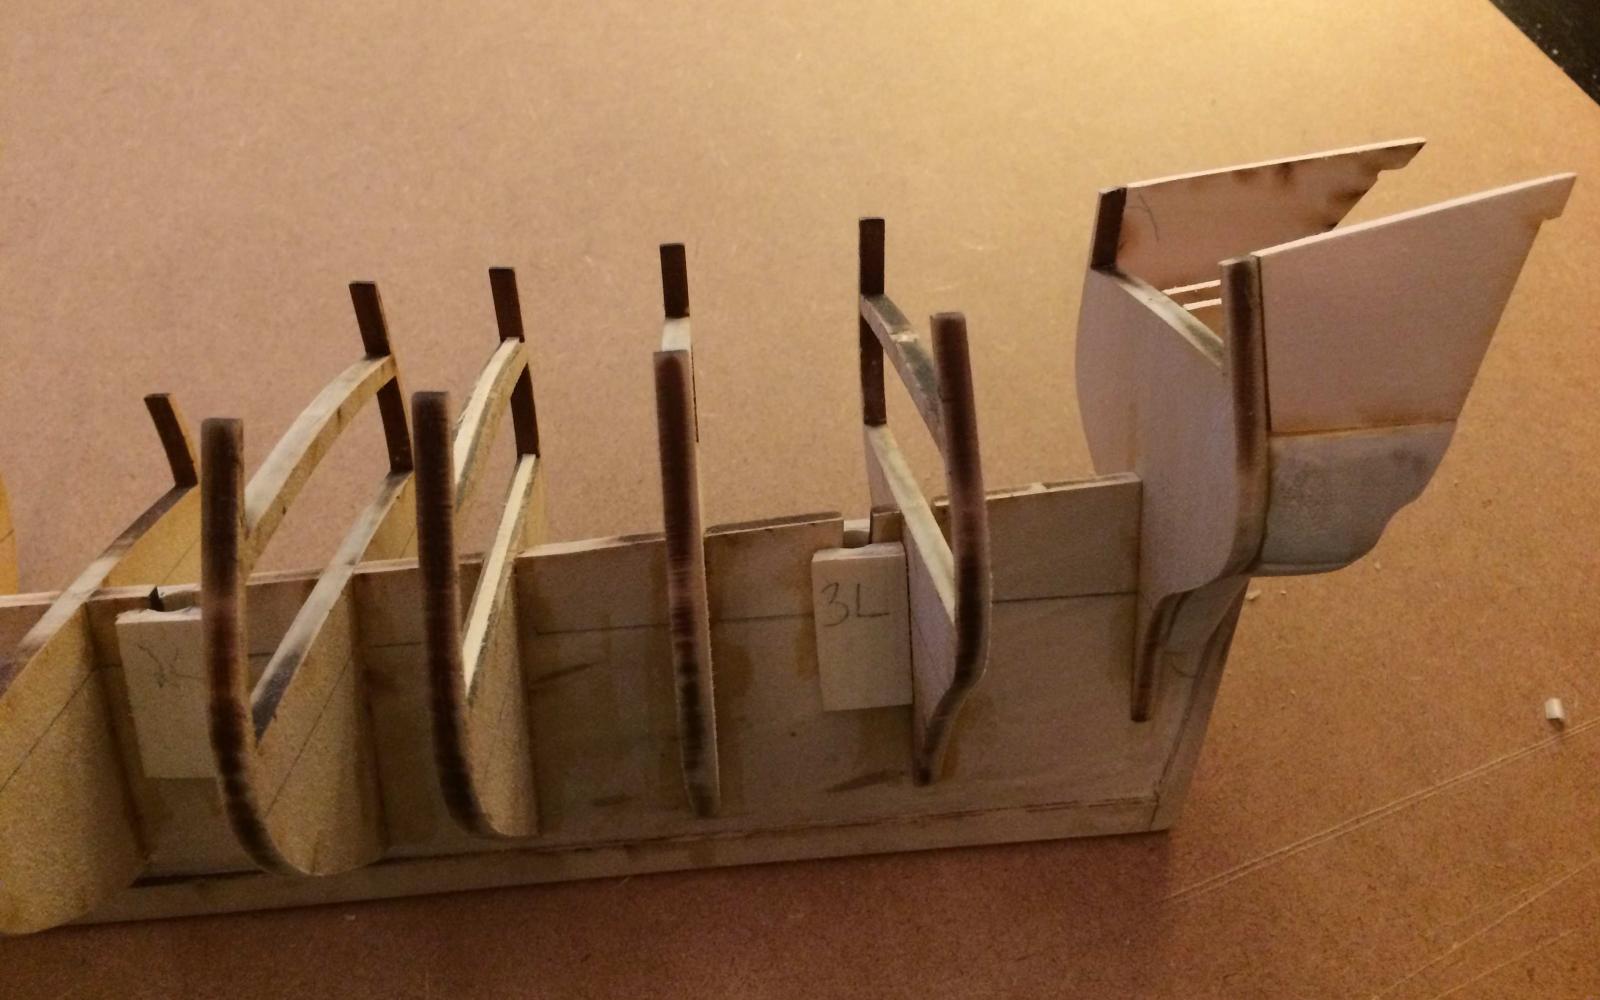
Gun/Oar Port Framing and Thoughts I've finished the wood for the gun and oar ports, I still have some sanding and detail work to finish up. It's easy to see where I switched from the wood that Model Shipways sent with the model and the wood that I purchased at Hobby Loby which is slightly bigger. While the wood from Model Shipways is the correct width for the pieces to go from the hull to the interior planks I found that I prefer the slightly thicker wood for the framing. This is because while the hull and interior planking are curved the framing pieces are straight. This seems to cause some issues, especially at the ends of the ship where the curve is more pronounced. In some places it's nearly impossible to get the four contact points of the framing sections to attach to the bulkhead without sticking out on one corner. If it's sticking out on one side that means it's not flush with the other side and there will be a gap between the frame and planking when it's done. By using the thicker wood for the framing pieces I found that it gave me more leeway and then I can just trim with a knife and sand the excess wood where it protrudes past the bulkhead lines. Most of the time I was able to put the excess on the outside where it's much easier to trim and sand but every once in a while it had to be on the interior. Installing the port framing also gave me an indication where I was on fairing the bulkheads and for the most part it wasn't too bad but there were a few places where I made bulkhead adjustments before putting in the framing. Plan now is to finalize the fairing and then tackle planking the hull. I've been reading all the different tutorials and like a lot of things for me I think they'll make more sense after I've started and see how it goes. I'm still planning on waiting on the railings till after the hull and deck planking are done, They look pretty fragile and I'm just afraid I'll break them.

- 131 replies
-
- 2
-
-
- rattlesnake
- model shipways
- (and 1 more)
-
Here's what I have on the gun ports so far. As you can see the ports all suffer from bad angles and inconsistent size. I'm hoping I can use a knife on the ports and even things out since the holes are the most critical piece.
-
I'm using an exacto knife to cut, I've tried a couple different blades. Before the stop in the picture above I was just measuring, checking against the plans and the cutting, always allowing a little length that could be sanded down. My results with that method have been less than what I was hoping for so I'm trying to improve that method. Using the stop and miter box, they are better, but still not as square and consistent as I'd like.
-
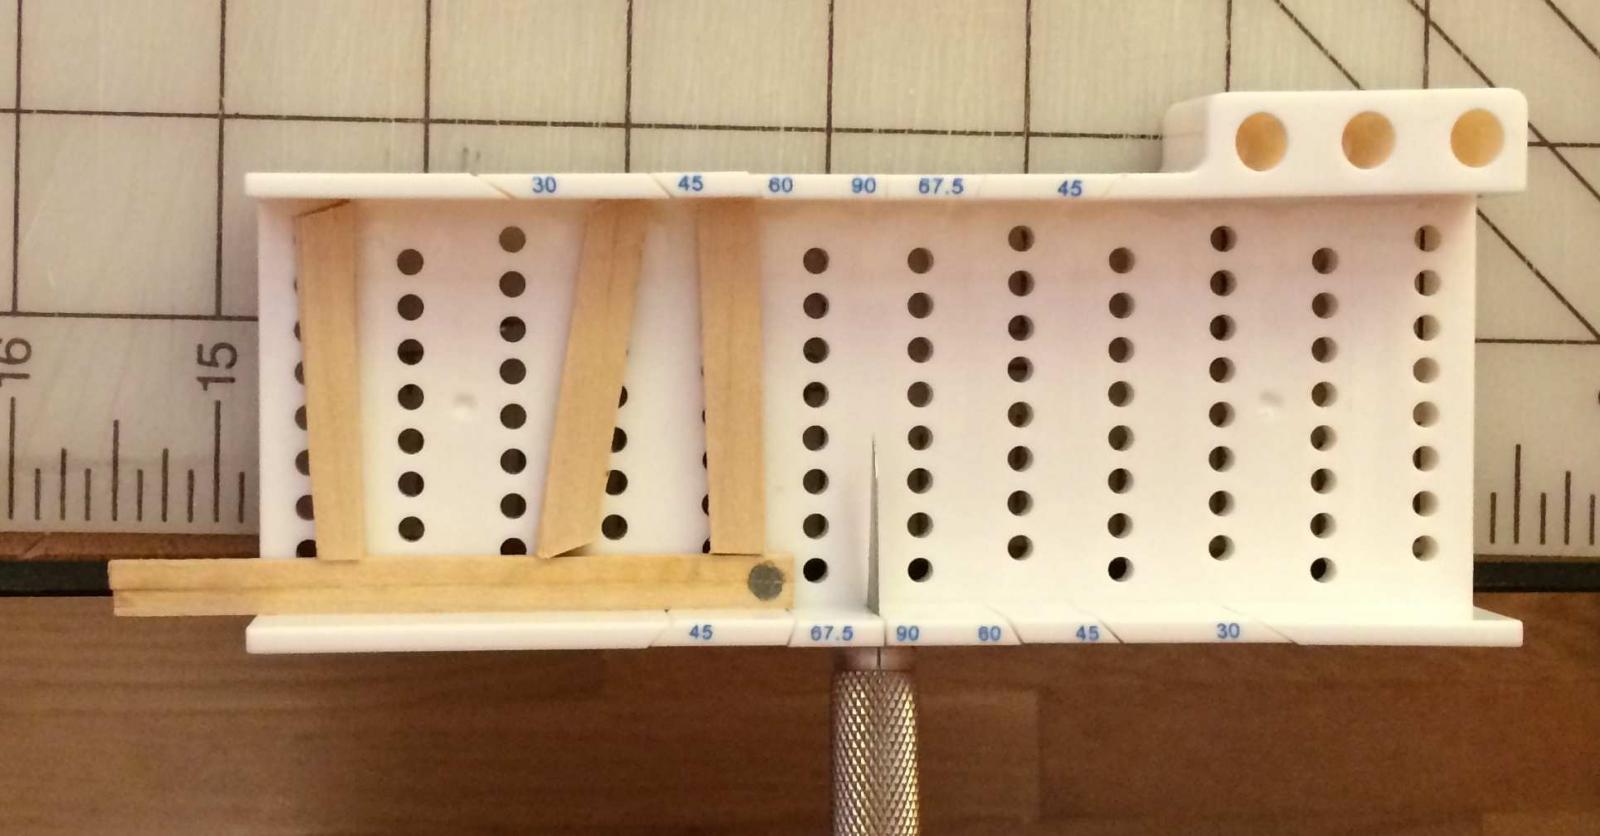
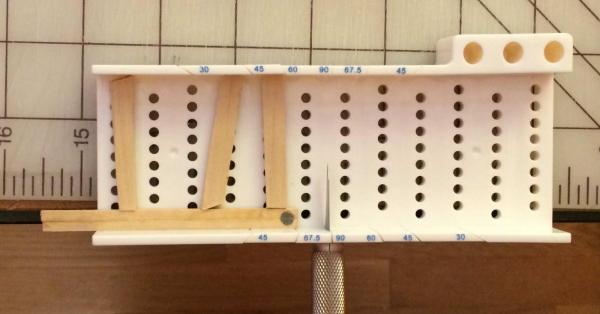
I've been working on the gun port and oar port framing and it's been made much more difficult by my inablilty to make square and equal length cuts in the 1/16' x 1/16" strips used to do the framing. I've thrown away more than I've used so I went to my local Hobby Lobby to get some more wood (I saw that they had basswood strips earlier when shopping for paint). I bought some 1/16" square and 1/8" square strips just to have some extra as I worked. When I got home and compared them to the strips that came in the kit they're a slightly different size than the Model Shipways wood. When comparing against each other the Model Shipways wood seems to be slightly oversized ( the 1/16" square is almost 3/32") and the Hobby Lobby wood seems to be very slightly undersized. I don't think this is a show stopper since it's framing and will be covered up by planking and sanding the Hobby Lobby 1/8" will put me at the MS 1/16", but I'm not crazy about having different wood and if it was something that showed it would be a problem. I guess the lesson here is that if I need to match something exactly then I should get it from the same source. Was also looking for something that would help me make my cuts more square and I found this little plastic miter box from Midwest for about $7. I've glued together a couple of the strips to make a stop and then cut three pieces from scrap wood to make wedges to hold the stop in place. I'll see if I can cut more square and consistent length using this. It also came with some small pegs to use to hold the wood while it's cut and I'm thinking that this might even be useful for forming shorter planking strips but I'm not there yet.
- 131 replies
-
- 1
-
-
- rattlesnake
- model shipways
- (and 1 more)
-
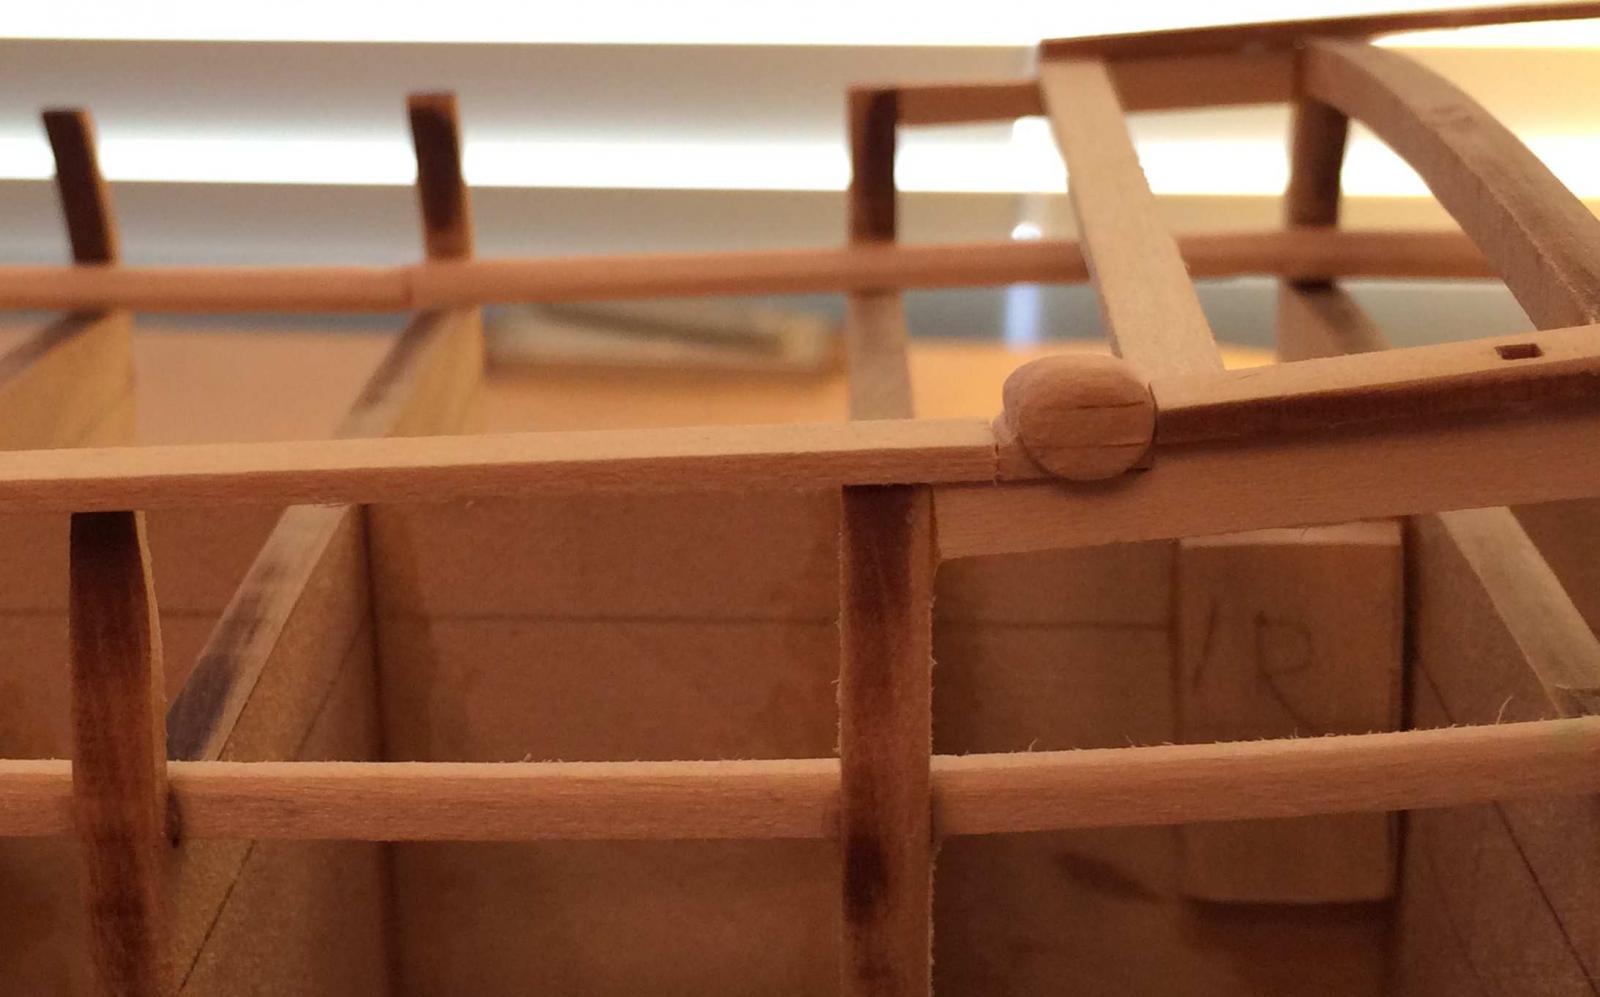
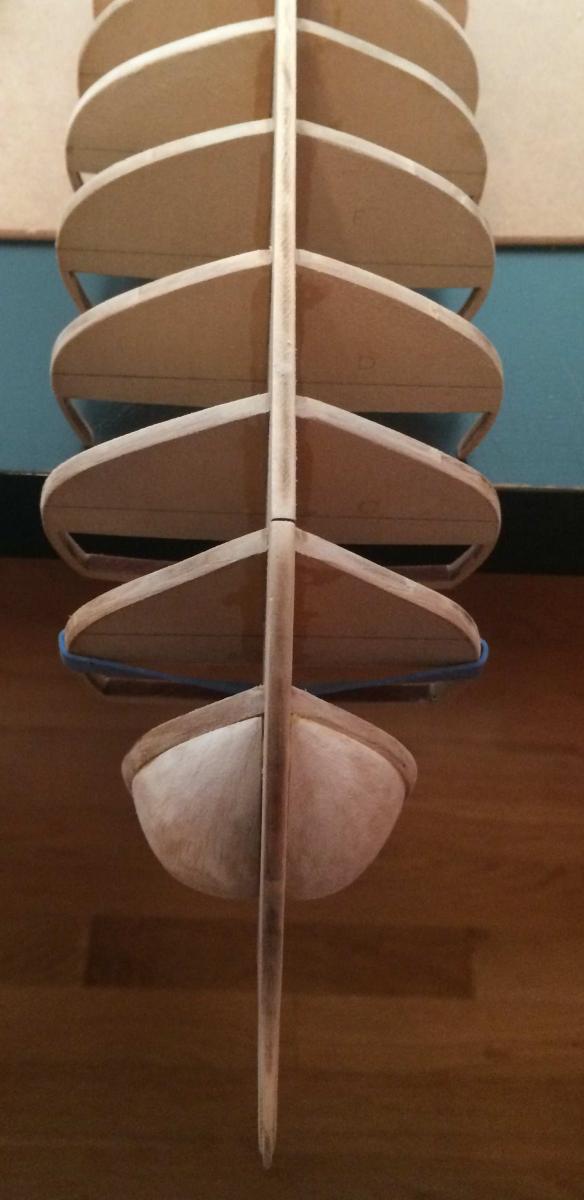
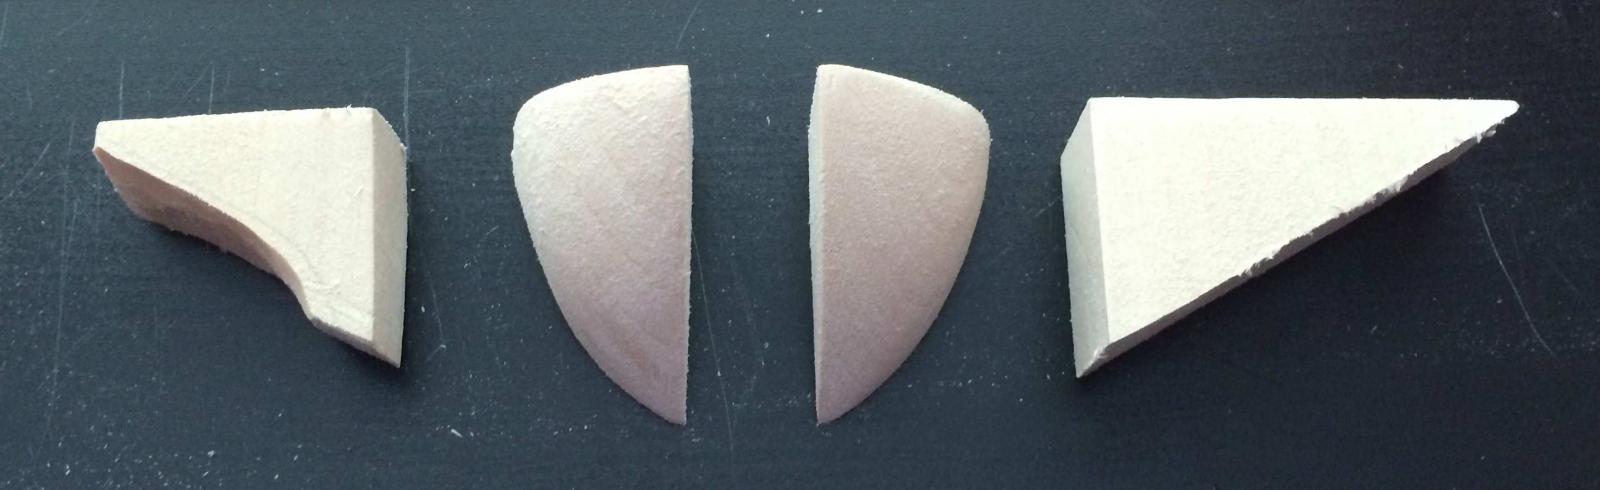
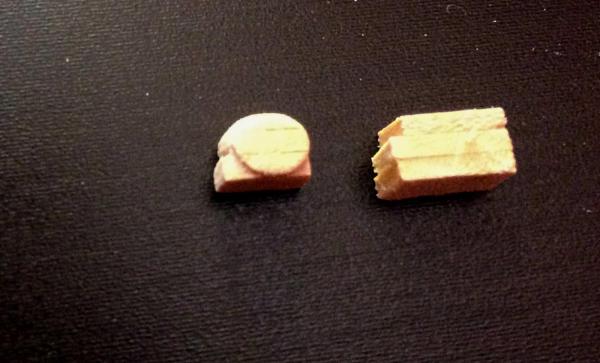
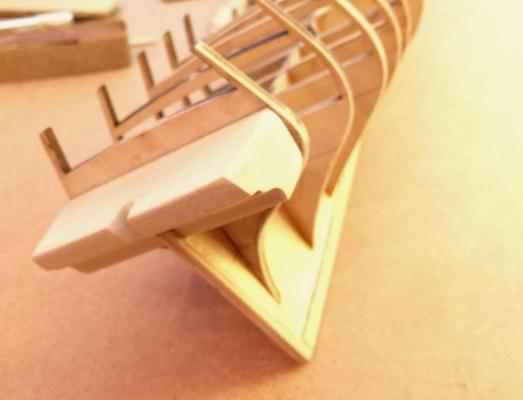
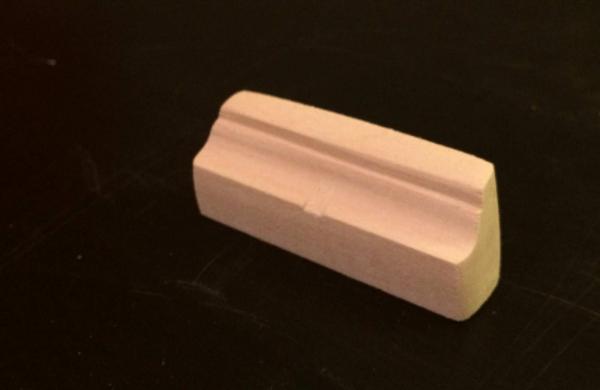
I've been trying to come up with something that works for the scrolls and after several attempts at what's described in the instructions that all looked horrible I've decided to try a slightly different direction and it's the best I've come up with so far. I made another block by stacking planks and squared it up. Then I put it on the ship and marked on the sides where the two rails would hit, knowing that everything below those lines had to be flat to fit into the existing boards. Then I sanded and filed the top into a half round shape and then made the bottom half of the round by filing the top corners off. Not easy to see in this picture and I have some more finishing work to do on it but I think this will work. I can paint the round section to accent if I want. Here is what it looks like just sitting on the ship.

- 131 replies
-
- 2
-
-
- rattlesnake
- model shipways
- (and 1 more)
-
Well I just realized that I had the quarter deck covering boards too short so off they came and I'm preparing to re-do them. I'm pretty sure this is typical of ship kits plans,but it's odd that the information for a piece will be in so many different places in the plans. The length will be in one spot, width in another and the positioning in another. I looked and looked to see where the covering boards ended and just didn't find it until after I had done it. No major harm done but I realized that i had glued them on quite well and they were a pain to get off. Started trying to carve the scrolls and I began by gluing several short pieces of planking on top of each other to make a small block. 3 for the forecastle deck transition and 4 for the one to the quarter deck. Different places in the plans show slightly different amount of transition on the quarter deck but it looks like there will be more than one rail width difference at this transition. Hopefully when I get the quarter deck rails back on correctly I'll be able to tell how much transition I'll have.
-
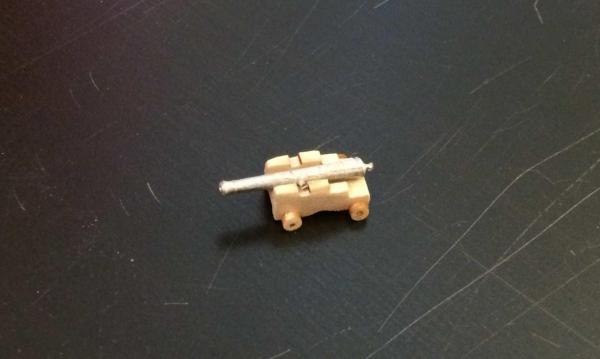
Thanks for all the encouragement and tips. There is so much information and great builds on this site that a pointer to things that apply to what's is coming up is greatly appreciated. Some vacation time this week so been at it a lot. I've added the upper deck covering boards, the forecastle and quarter deck breast beams, glued the transom on the frame, and started installing the gunport framing. Looking ahead I'm uncertain as to why I'd install the main, forecastle and quarter deck rails before doing the decking and planking. It seems like they would be easy to damage as I do the planking and decking. The instructions say to do them first but I can't see anything it will hurt by delaying this till the planking and decking is done (if this is a bad idea please let me know). I made one of the cannons to help check the height of the gunport openings and then set some decking down on the bulkheads with one of the gunport framing sitting in place and the cannon on top to get a feel for where I think they should go. I measured the distance from the top of the bulkhead to the bottom of the gunport frame and it was a tiny bit over 6mm. Checked that on the plans and got the same thing so I think that's right. It's always nice when the wood and the plans actually agree. Just continuing to work on the gunport framing and preparing to do the main deck rails and carving the scrolls for the transitions. Wow do those scrolls look tiny!
- 131 replies
-
- 1
-
-
- rattlesnake
- model shipways
- (and 1 more)
-
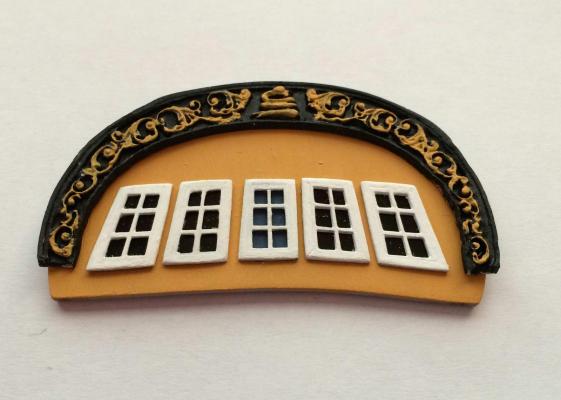
I'm finally getting around to trying some paint schemes on the transom and here's what I got. Nothing glued down at this time. I couldn't find an orange that suited me in the paints I was using so I did some mixing to get this color, but I think I like it. Did a couple of coats and smoothed with very fine steel wool between coats. For the 4 true windows I found some flat clear plastic from some packaging and cut it up to the size of the 4 openings so they wouldn't push the frame out away from the transom. For the fake window I ended up gluing the original wood cut out from that window back in the opening and painting it a fairly dark blue. The instructions said light blue but I wanted something a little more subtle. You can see the difference in this picture but just barely and I think I'm OK with that. At some angles the plastic does give a reflection like real glass would. For the transom decoration I painted the entire thing black and then used a Q-tip to dab the orange paint I used on the transom onto the high spots. After that I had to touch up some of the black and the only thing I could find that was tiny enough to get into the crevices was a splinter of wood, so I cut a needle of wood and dipped it in the black to touch things up. I've sanded some wood to the half round for the molding that goes below the window frames, but since there will be a very slight curve to the transom when it's glued on I think I should wait till after it's glued on to put those on. I think I'll paint them white. I've been reading what others have done for the lettering and I'm still trying to work out how I'll do that. I wish I had fantastic paint skill and could hand letter them but I know that's way beyond anything I can do.
- 131 replies
-
- 3
-
-
- rattlesnake
- model shipways
- (and 1 more)
-
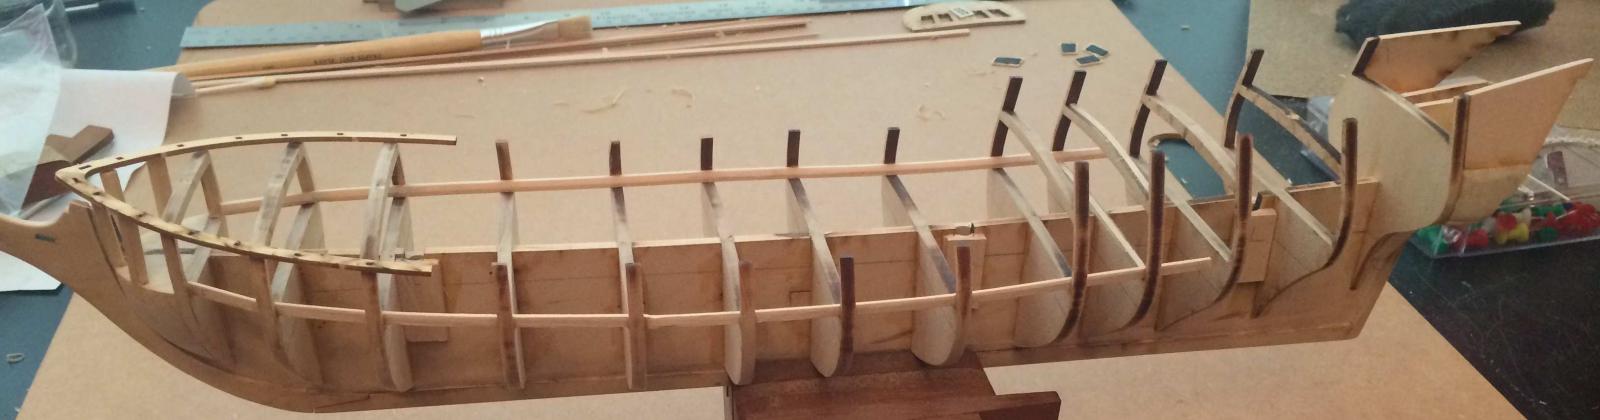
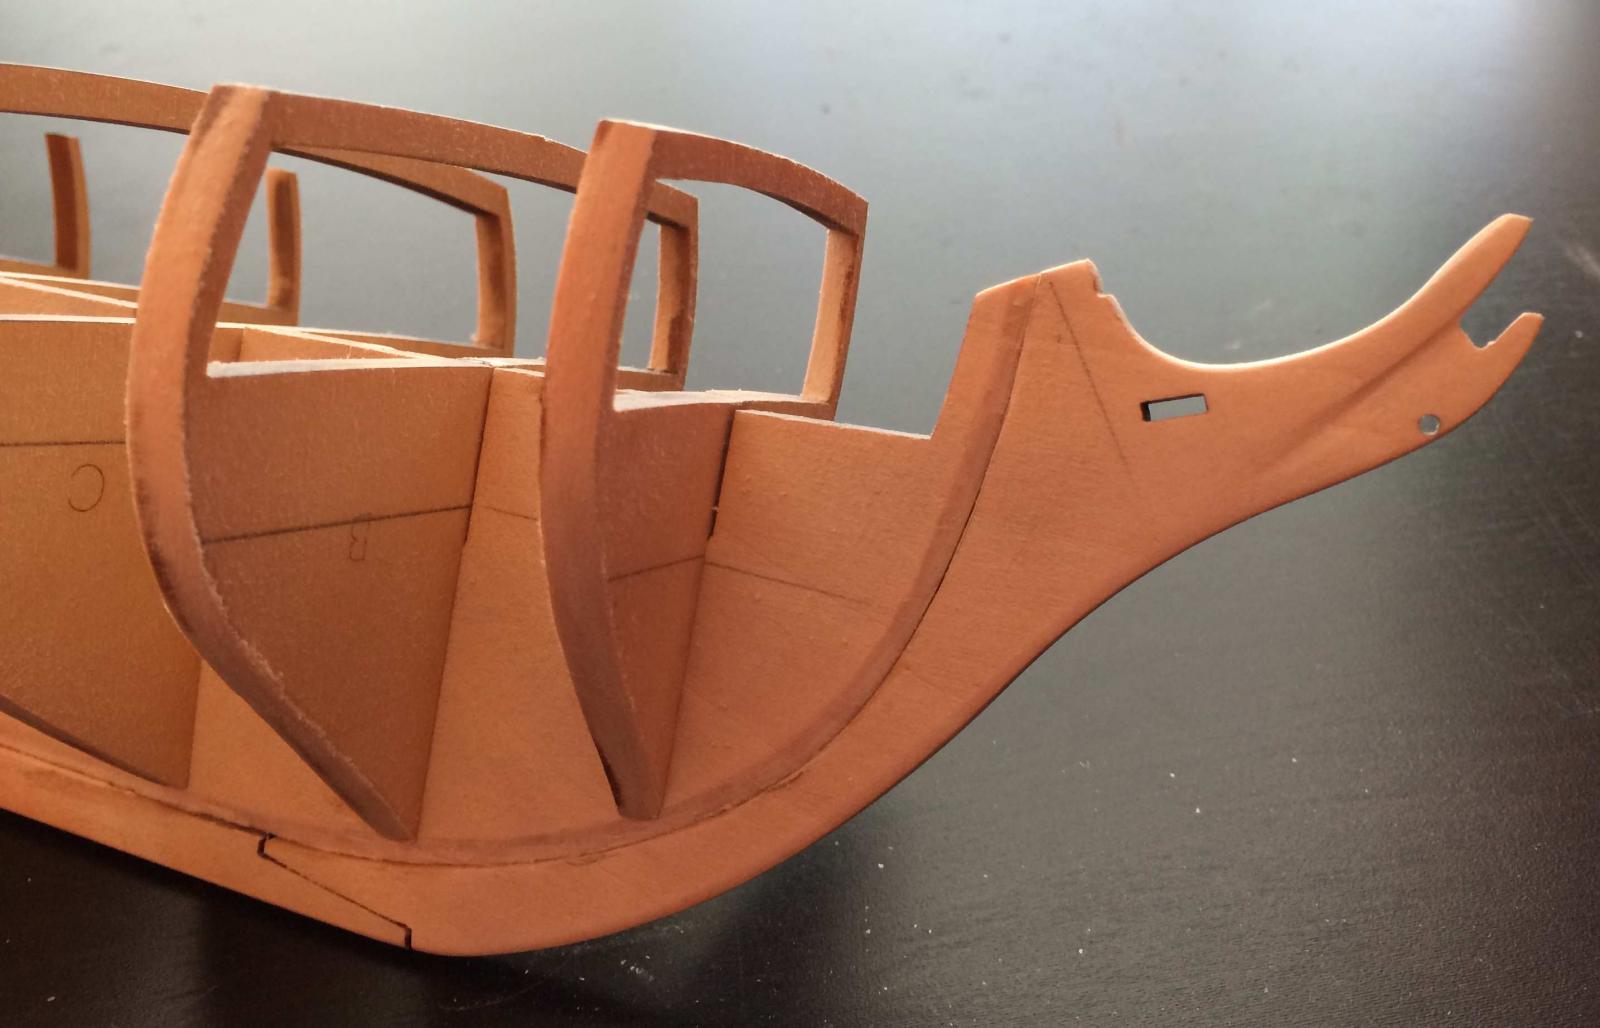
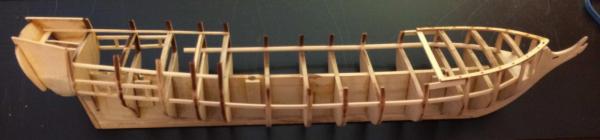
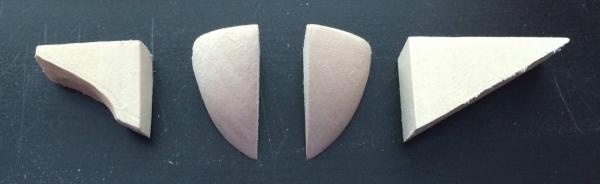
I've added the knightheads and timberheads and while test fitting the forecastle deck covering boards decided that I'd be better off cutting the knighthead off at the deck covering board. I read in Scott'a build log where he had done this and it looked to be the best decision for me as well. I half cut and half sanded the waterways angle and that seemed pretty easy. As I mentioned earlier there wasn't enough wood to go the entire length of the bulkheads and since the instructions say they're not needed in the cabin area I just decdied to cut the wood into two approximately equal lengths and go with where it stopped. I do like the idea of making it complete that JSGearson suggested, but in the end I decided to use what I had thinking that if it starts to bug me I can add that last bit later, at least till I start planking. I soaked the waterways in water for a couple hours and then I used twisty ties to pull the piece against the inside of the bulkheads to give it the correct shape. The twisty tie idea was nice because I could move from one bulkhead to another slowly pulling the waterway tight and into the correct positions without putting too much strain on any one area first. The twisty tie idea was bad in that it left a bit of a mark on the waterway at one bulkhead where it was wet, although I was able to sand that out pretty well. The wire had dug into the wood there and if I do this again anywhere I'll need to find something to pad the wood where the wire is pushing against it so it doesn't leave a mark. I also thought I'd try super glue on the waterways since there was still a few spots where the wood would need to be pulled into position. I used the Gorilla Super Glue thicker formula and it seems to work well. The spots where the waterboard still needed to be pushed into position I just put a drop or two where it was going and then held in place for about a minute and it would stay in place. Super Glue seems like a pretty good solution where the wood is naturally trying to pull away from the joint and the area holding it in place is pretty tiny. I glued the two pieces of the forecastle deck covering board together thinking that it would be easier to get everything in position that way (we'll see). The instructions on the aft cover board took me a while to decipher but I think I understand them and will start on that next. This picture shows the waterboards glued and the upper deck covering board just sitting on the model. It's funny, I see so many defects in the picture that I don't see when I'm working on it that I'm wondering if I should take more pictures and check my work using the pictures, but I'm also wondering if the camera perspective doesn't play tricks with angles.

- 131 replies
-
- 3
-
-
- rattlesnake
- model shipways
- (and 1 more)
-
Oops yes, waterways. The kit doesn't supply enough wood to go from the tip of the bow back through the cabins. I'm trying to visualize what can and can't be seen along the area where it goes. It seems to be a cosmetic piece (not structrual) so it would seem that it's only critical where it will be seen.
-
Question ? I'm at the place in the instructions where it's time to install the waterboards. but I'm unclear where they start and stop. The instructions say I can omit the waterboard in the officers quarters (there's not enough 1/8" to do the whole length of the ship) and I'm assuming that's the area behind bulkhead I, but I'm not really sure. The bigger question is how for forward do the waterboards go? Does it go all the way to bulkhead A? If it does that is a big curve in the wood and since it's a square (although with one corner shaved off) instead of a plank, it doesn't want to seem to bend enough between Bulkhead B and A. Would I steam the waterboard to get it around this curve without breaking? I've gone over every place I can find in the plans and nothing seems to indicate the start and stop points for the waterboard. Any ideas would be greatly appreciated.
-
Lots going on but not much to see. I'm continuing to work of fairing the hull while doing side projects. The hull fairing looks different to me every time I look at it. Sometimes I think I'm there and other times I see bulkheads that still need some work. I did end up taking a pair of pliars to the metal transom decoration piece and got it where it fits much better than before. It's surpisingly pliable metal which is good and bad. This is the only piece of the kit so far where I feel the quality is much less than optimal. One end is very different than the other in width and feel, and there's only so much you can do with the curves withouth destroying it. I've started thinking about color scheme and I recieved The History of American Sailing Ships and it's a great book but was a bit disappointed that there weren't any color illustrations. I was very interested to see how the colors were depicted by contemporary artists but there must not be any examples that survive. With that in mind I went on a Google hunt to see if I could find illustrations of other similar ships from the same period just to get an idea what they looked like. I found a Wikipedia article on the Lady Washington and although it has one less mast there seems to be a lot of structural similarities and there are several nice picures of a 20th century replica that looks like it's still sailing. A couple of the pictures of the 20th century replica are fairly high resolution and it has a color scheme similar to what the instructions gave so I'll probably use these pictures as inspiration. http://en.wikipedia.org/wiki/Lady_washington Added the coverings for the mast slots and made the groove in them with a rough file and sandpaper. I added the structal pieces for the transom and they came a bit above the lines so I've sanded them off. It seems that pretty much every piece has to be custom fit, checking and adjusting it till it fits, and that's something I find I really enjoy about the process. I've cut the knighthead and timberhead out of scrap wood and when I found the plan with the top view of the bow filler block it was obvious that I had left too much wood so I've been working the bow blocks to get them into shape and cut the slots for them.

- 131 replies
-
- 3
-
-
- rattlesnake
- model shipways
- (and 1 more)
-
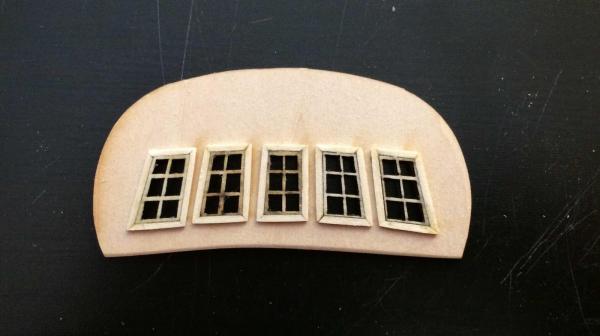
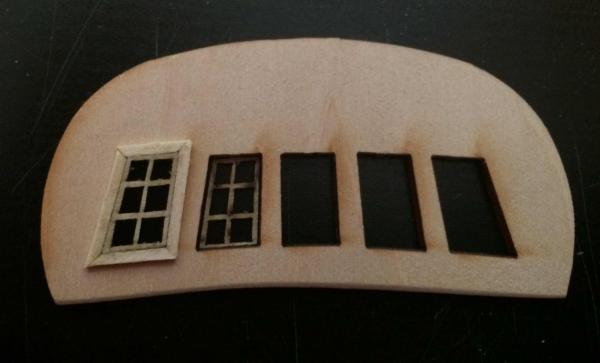
I went ahead and did the other windows this way to see how they'd all look together. I need to do a little more sanding though to even things up. Windows are just sitting on the openings right now till I decide if I'll keep the look. Even then I should probably wait till I have the curve done and the transom in place,
- 131 replies
-
- 3
-
-
- rattlesnake
- model shipways
- (and 1 more)
-
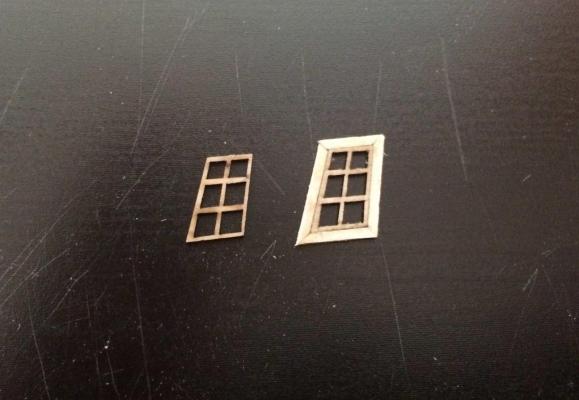
I got the stern and bow filler blocks close enough that I felt I could gule them on and continue fairing, taking the filler blocks into account. I still believe they'll need some more shaping, especially the bow blocks as once they're on the ship they look like they're too rounded and will need to lose some more of the curve. Transom Windows - I didn't like the way the transom windows look when they're inserted into the window hole in the transom so I decided to see what I could do about that. My first thought is to add a bit of frame so I tried that on one window to see how it looks. I took the tiniest piece of wood in the kit and made a frame. Had to hand cut the angles since they're not really 45 degrees with the window slanted. I like the look of this much better, and I think once it was sanded and painted it would look great, but this makes another issue worse. Since the metal transom decoration piece is already smaller than the windows making them bigger with this framing just makes that worse. I saw where Zev stretched out his metal piece to make it wider and I'm considering something like that but I don't have a vise to do that like he did so I'm trying to work out how I might do that. If anyone has an idea how I might MacGyver something to stretch this out I'd be very appreciative.

- 131 replies
-
- 4
-
-
- rattlesnake
- model shipways
- (and 1 more)
-
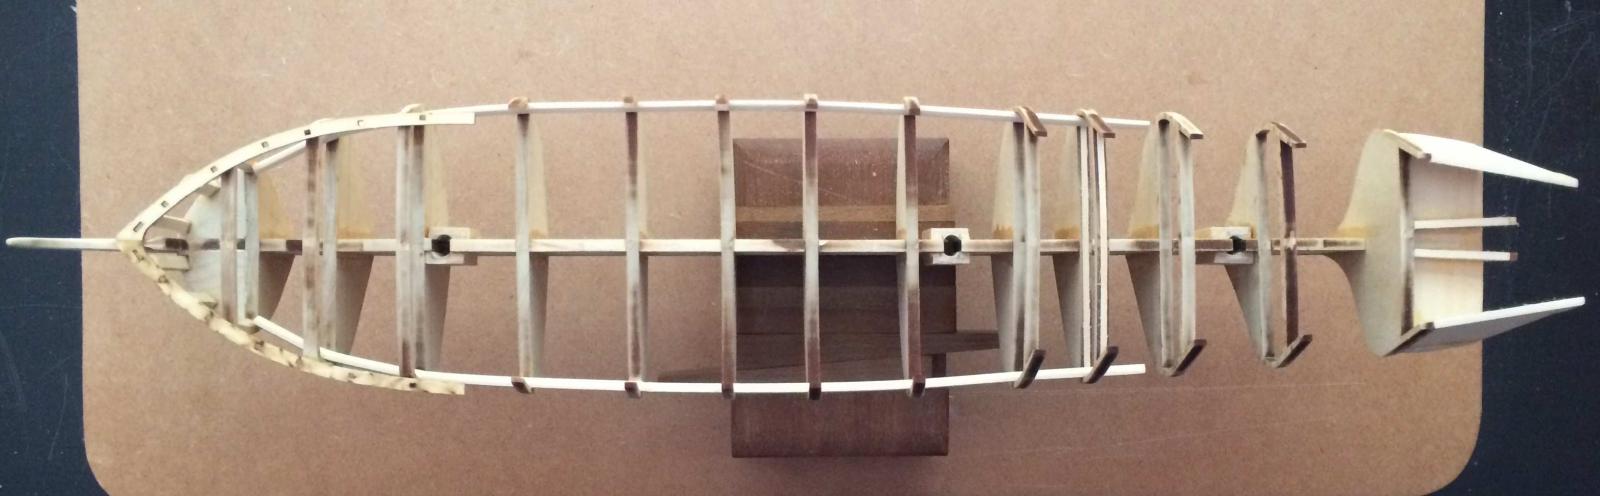
Continuing to work on fairing the bulkheads and thought I work in shaping the bow and stern filler blocks while I was doing that. Installing and shaping these seems to fall right in line with fairing anyway. I've gotten the bow filler blocks close but they still need some more shaping to fit the lines that I think the hull will take there. I think they still need less outward curve, it looks to me like they'll push the hull too far out in the center. Stern filler blocks are just getting started. For the exact contours of the curves on these blocks, I'm just fitting them in place and trying to imagine the hull and where they'll be too high (nothing too low yet) and sanding the high spots into position. The one thing I can't decide yet is whether I want to be satisfied with the shapes before I gule them in place or if I need to glue them in place to do the last bits of the shaping. Waiting to see how close I can get them without gluing them down.
-
Continuing to work on fairing the bulkheads. Most of the problems seem to come from Bulkheads F and H which appear to be too high. Bulkhead G is between those two of course, and at first I thought I'd need to shim G but after lots of sighting down the lines of the bulkheads and testing with a planking strip, lowering F and H seemed like it would keep the curves of the ship better than raising G. After working those two bulkheads out I should be able to fine tune. . Also continuing to work on the counter block and despite trying to be sure it didn't end up too narrow, it did. It looks like I'll need to add some filler to get the bulkhead curve to continue smoothly.
- 131 replies
-
- 4
-
-
- rattlesnake
- model shipways
- (and 1 more)
-
Bulkhead Fairing Questions
Jon219 replied to Jon219's topic in Building, Framing, Planking and plating a ships hull and deck
Thanks, I need to be brave, it's just a bit intimidating. It seems like so much of how well this build proceeds depends on how well I fair the hull. -
I'm working on fairing my first build and a have a couple questions. I've looked through the forums and if this information already exists I didn't find it. What wood do people usually use for the shims? I would assume that the shim needs to be exactly as wide as the bulkhead but I'm not sure about this. I have the wood in the kit for the planking and leftover wood from the laser cut pieces, could I use either of these or should I purchase something specifically for shims? Should the shim be a consistent thickness and sanded down where necessary or can a taper be cut that will match where the most and least shim is needed? If the shim goes through a significant curve on the bulkhead, will I need to steam the shim to get it to follow the curve without breaking? Thanks for any advice or ideas you have.
-
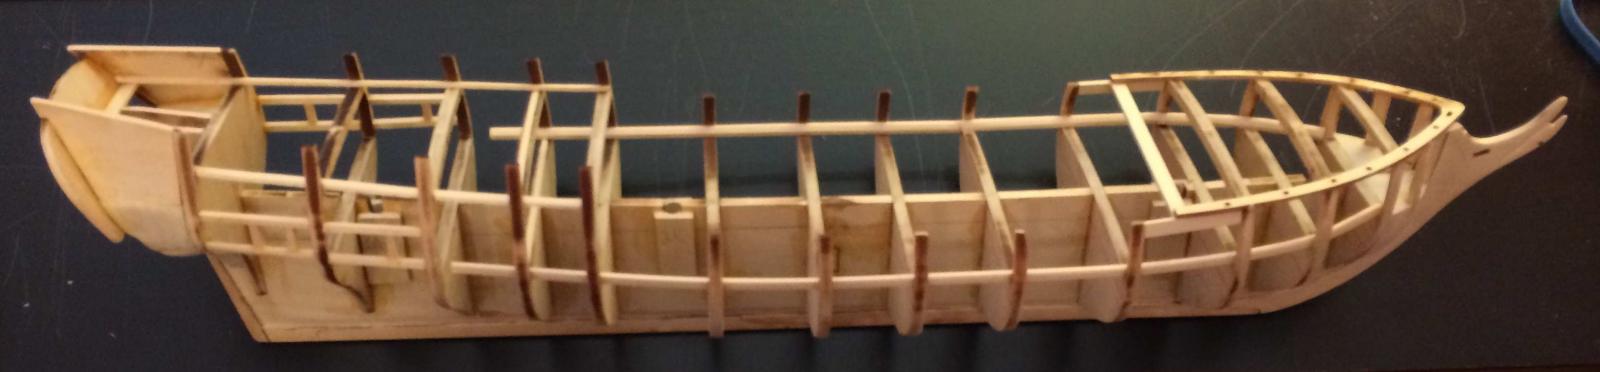
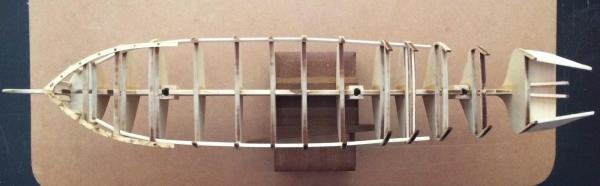
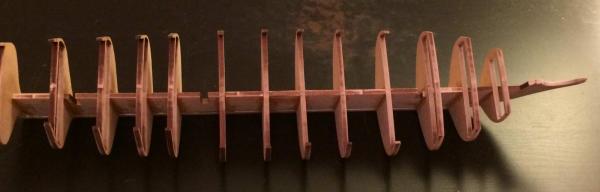
I individually checked the fit of each each bulkhead for waterline, deck flush and bevel at the rabbit and adjusted each one for what I hope is the proper fit. Sometimes the waterline and top of the bulkhead just didn't agree and I ended up going for the deck most of the time. Bulkheads H and I went very deep into the rabbit extending quite a bit below the other bulkheads so I trimmed off the bottom to match the others and tried to smooth out the curve of the bulkhead to match. Once that was done I tried to check the fairness of the bulkheads but there just wasn't a way to hold everything together so I went ahead and glued the bulkheads in place checking for and adjusting to square side to side and top to bottom. Next project on the bulkheads will be fairing everythng up. I can sight down the sides and see that I have some work to do there but nothing that looks crazy. Needed a change of pace from the bulkhead work so I decided to start on the counter block. I've carved and sanded to a rough fit but have more work to do on it. While I was sanding a line develped in the underside curve and I liked the way it looked so I decided to sand to emphasize it right now. I think I can always sand it out later if it causes a problem or I don't like the way it's looking. I also filed a tiny notch to see how much more sanding I need to do to get it to fit into place. I used a piece of sandpaper wrapped around a knife handle to sand the underside curve but I still have a bit to go. Looking ahead, the instructions for installing the transom are confusing me. Some places in the plans it looks like it sits on top of the counter block and in some places it seems like it's attached to the edge of the counter block. Right now I think it sits on top of the counter block but hopefully this will become clear once I start test fitting all the pieces of the transom.
- 131 replies
-
- 2
-
-
- rattlesnake
- model shipways
- (and 1 more)
-
Thanks Scott. I've been focused on the rabbit and beveling and only placing the bulkheads on to check how those were looking. Should I be looking at that top alignment as well? My plan had been to get the rabbit and bevels fairly close and then start working on the bulkhead alignment, but maybe I need to be doing all that together. If the waterlines are lining up should I take wood off the top of the bulkhead to make it line up with the keel?
-
Still working on the rabbit and bulkhead beveling. I've noticed that with the laser cut pieces the cuts aren't exactly perpendicular and I've tried to place the bulkheads where I'm working with that instead of against it on the beveling. I've also started disliking the burnt edge but I'm afraid to completely remove it while I'm working on aligning the bulkheads for fear that I'll need that wood later. I'm hoping I can eventualy sand it all off. It seems to me that glue won't be as effective on that burnt edge as it would be on a clean edge. Picture of the rabbit and bevels in progress. I've noticed that everyone seems to have done something slightly different on the stem carving for the figurehead so you can see how I've handled that. No idea if this is correct, I just went for something that the figurehead would fit on and looked decent.

- 131 replies
-
- 3
-
-
- rattlesnake
- model shipways
- (and 1 more)
-
Jason, thanks, found the book for 7$ used, been wondering where I could find some pictures of Rattlesnake.
- 131 replies
-
- 1
-
-
- rattlesnake
- model shipways
- (and 1 more)
-
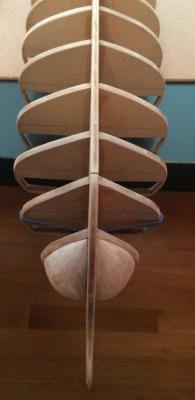
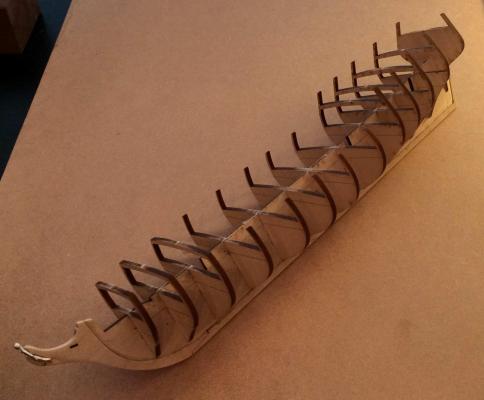
I've carved the Stem so the figurehead fits on, cut the rabbit (which I fear is still too shallow) and practice fit the bulkheads on the Center Keel. It took a lot of sanding to be able to get the bulkheads where they would fit on the center keel. I am thinking I'll test the depth of the rabbit with some of the planking and see how much more depth I need to add. Next up is beveling and fitting the the bulkheads.
- 131 replies
-
- 2
-
-
- rattlesnake
- model shipways
- (and 1 more)