

rebekb
-
Posts
40 -
Joined
-
Last visited
Content Type
Profiles
Forums
Gallery
Events
Posts posted by rebekb
-
-
Very nice! I do have to say, that's a lot of hemostats... :Q
-
Hi David, good luck on your first build! Rebecca
-
-
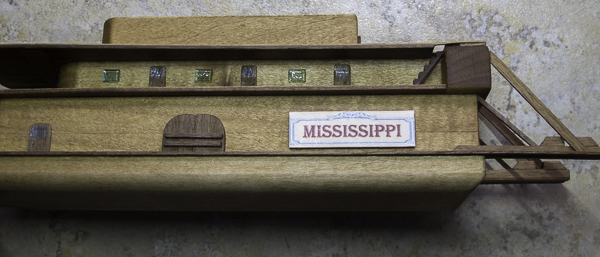
So I'm to the point in the build where something turns out "BLAH" and has to be redone!
The picture just above shows that the third deck had developed a warp/slump (at least on the port side, the starboard side is straight) - in part because the support system for this deck in the design of the model is so poor - and being a first-time builder I wasn't quite smart enough to realize that. I finished adding pillars and rails on the port side 2nd deck and then realized how really not-straight the roof was - and I'd made it worse by making the pillars very snug.
Not being able to "live with it," I'm now in the process of fixing it. I added a filler piece just above & to the right of the little stair in the photo above (where there is a void), topped up the stern pillar with a wood slip, and then popped out all the rest of the pillars (most of the rails came with as well). Now, I'm in the process of recutting/refitting the pillars while clamping down on the deck as each dries in place, hopefully this will straighten the portside out enough to be passable.
 Pictures to follow when it's finally done...
Rebecca
-
Thanks Sarah, the capstan for the riverboats is much simpler - Frank & John pm'd me with some ideas, and I'll post the results here when I get to it. I decided to work on the pillars & railings on the sides first, while there is still nothing to "break off" and do the bow fittings last.
-
It's odd, but I've always loved tools. My father is extremely handy, and when I was a kid I was the one who helped him in the shop. Even now, I love wandering around Home Depot. I already had a ton of tools for book binding, buildng models has been an excuse to add more. ;Q And of course, I have to use those new tools!
-
It's looking terrific John! And thanks for the info on the capstan. Rebecca
-
I'm allergic to everything - so I sympathize - the reason I've avoided CA thus far, afraid it will trigger an asthma attack. The various wood glues (titebond/gorilla) have no odor and have found both a fast set and a slow set. Plus there are no odor craft glues that will work on most other parts.
Good luck! Rebecca
-
I've been making some progress -- I added the kit windows to the second deck using the testor's clear/windowmaker - I also put the testor's on the top part of the doors (plus a bit of blue pencil), and filled the window frames with it to get more shine. Could have been neater, but it's my first try
I didn't like the name plate that came with the kit (the brown one) - I designed my own in powerpoint, printed it on to photo card, and glued it to a wood backing. I coated the paper with Renaissance Wax, also known as British Museum Wax - it's micro-crystalline and can be used on virtually anything to clean & seal (I use it particularly on cloth books).

And then I found my "least favorite part" of the build - adding the pillars. The plans (see first photo in thread) call for pillars to go from the first to third deck, which I thought looked ugly, so I split them in two. I put pencil dots for spacing on the bottom of the 2nd deck, these also marked where to put glue. I used titebond translucent as it turned out I needed extra set time to get them straight. I also started fitting the pillars for the second deck but have had enough pillaring for one night, particularly as it will take tweezers to do all the second deck pillars. I am going to complete one side, then do the other side. I'm glad I haven't yet glued on the fourth deck cabin - the model is still stable upside down, which is helpful when working on the pillars.
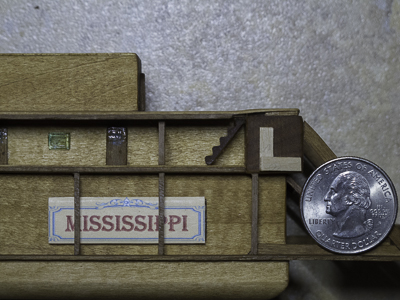
The light wood "L" in the picture is my homemade square for straightening the pillars...
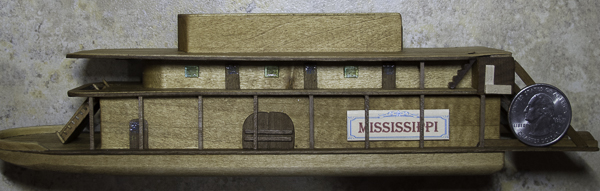
Rebecca
-
Thanks Sjors, and thanks Captain Bob for the stain stick idea.
I've added the bow rail, built the gangways, all the other parts are cut (except still figuring out the capstan), and thanks to the "woolding" thread I've managed to rope my smokestacks. I also colored the smokestacks using an alcohol-based aniline dye - I have loads of the stuff for use in book conservation.
I'm up to the point that it's time to add the windows, and then do all the pillars and railings for the sides, which will be oh so fiddly. I made myself a 1 cm "square" to make sure the pillars are straight but I realized I also need a faster glue for the pillars than the wood glue I use. Yesterday I finally turned up something billed as a non-toxic, water-based super glue. We'll see if that actually works!
Rebecca
-
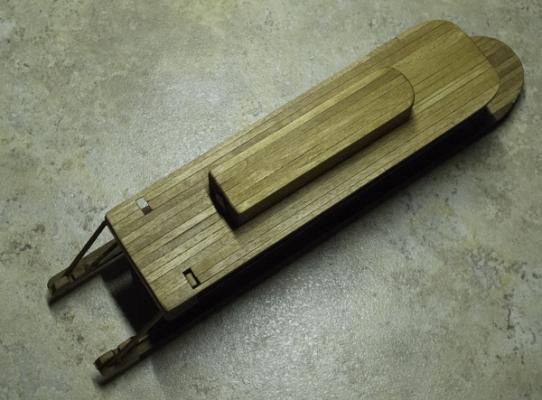
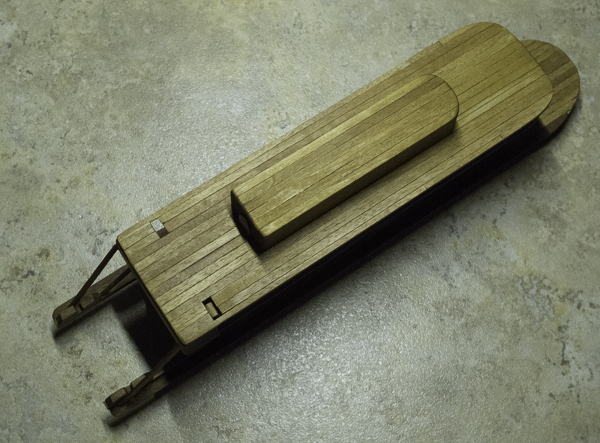
I need to build a capstan for my mini-mamoli riverboat (1:206) - the information in the plans is insufficient (and what they show doesn't look at all right). It would be tiny but it should be there!
Three things:
- Some of the larger models of paddlewheelers show the capstan bars flat against the deck, and I don't quite understand how that works.
- I am not sure about scale (how long would the capstain bars normally be, how big the capstan in "real life").
-Some old photos show a rope around the capstan, but not what the other end might be connected to...
Thanks for any help! Rebecca
-
Very nice! Cutting the gunports must have been a good deal of work. Look forward to seeing more, I've always liked bomb and mortart vessels. Rebecca
-
Thanks Keith! And appreciate the link to the Disney models - those are cool!
-
Thanks John - it is fun and relaxing!
-
Finally, after quite a wait, I got my planking material in (the kit did not have nearly enough) and so was able to finish planking the third deck, and plank the fourth deck. I also fitted the sleepers to the stern.
I also made various doors, which took a few tries, as the wood was not cooperating (crumbling, in fact). The plans call for nothing but plastic windows, which I thought looked rather boring, so I added some simple doors.
I gave the new additions a coat of coffee stain, did more sanding, then gave the whole model to-date a a good soaking of Howard's Feed-n-Wax, which gave it a rich color (and helped with the dryness/brittleness of the wood).
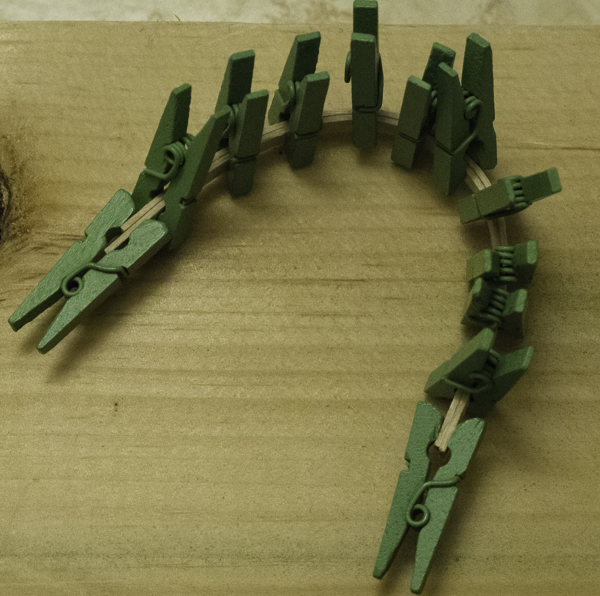
I've also been building sub-assemblies, like the grand stairway and the fourth deck cabin, and got to figure out plank bending - built a jig and glued together the bent planks to form a bow rail (mini-clothespins are handy).
Rebecca

-
Looks very nice! I haven't done a POB as yet (working on some solid hull minis), but these"first POB" logs are an inspiration and will be a good reference for when I finally get there
Rebecca
-
I'm looking at this one ATM rebecca. One of the other SF builders recommended it.
http://www.amazon.com/Hobbico-Veneer-Edge-Banding-Iron/dp/B000X4PWTM
That looks useful alchemist - it's very close to what a quilting iron looks like!
-
She is a beauty Derik!
-
Another type of iron that might be useful for these tasks would be a quilting iron - they have a very small triangular head (about 2" on a side), as they are designed to get into corners, and so they are much less unwieldy than a regular iron, with variabl heat and often quite cheap at craft stores.
Rebecca
-
Can't wait to see the finished wheelhouse!
-
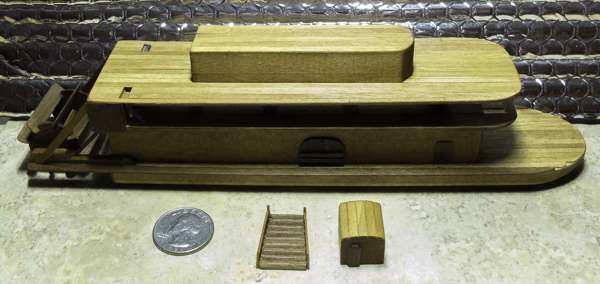
Thanks Tophog - I'm working on cutting the teeny tiny doors (5 mm across) and waiting on planking material I ordered (since kit did not supply nearly enough). I don't really like the plastic windows in the kit (see first picture), but at such a tiny size, I doubt I can do better. I am going to rearrange them to be more "aesthetic" to my eye, and based on looking at the big steamboat builds (although this will be a far cry from those!).
Still, it's good cutting and shaping practice & I think for a mini will turn out okay. I have another mini on the shelf but I find it difficult to start a new project until the old one is finished. Working on a mini, though, I'm beginning to understand why people build much larger ships
Rebecca
-
Hi David - thanks, I know about water-based stains, I just haven't been able to locate any locally as yet in small sized containers, I'm not ready to invest in stain a quart at a time...
I did however see some water-based wood paint markers today at Michael's, which might be useful when I get to a model I want to paint. And I found a couple bottles of copper and bronze finish (also water-based) on sale, to try out for small parts.
Rebecca
-
Sjors, no varnish - the stain is all natural - strong coffee!
-
Thanks Sarah! Alchemist, I remember picking black walnuts when I was a kid, and the sheer work of getting to the walnut in the middle...

King of the Mississippi by john46 - FINISHED - Artesania Latina - scale 1:80
in - Kit build logs for subjects built from 1851 - 1900
Posted
It's looking terrific John! I'm waiting to see how the pillars look
I've had to take a break from my mini-steamboat, (having problems with my hands -- flares up from time to time), but your build log is very inspiring!
Rebecca