Beck
-
Posts
18 -
Joined
-
Last visited
Content Type
Profiles
Forums
Gallery
Events
Everything posted by Beck
-
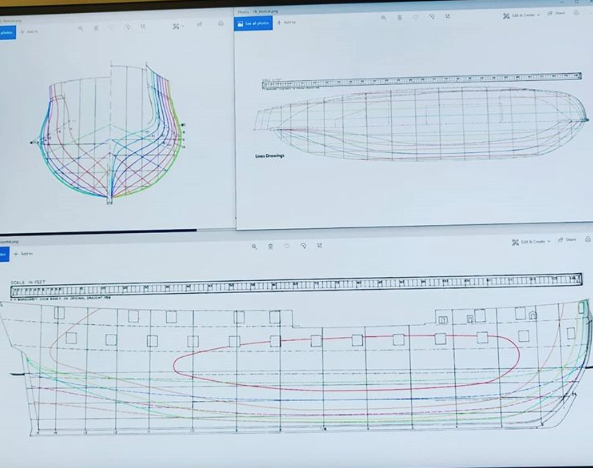
Hi all, Apologies for the lack of updates. Obviously life has been hectic the world over coupling that with moving house and decorating I have not had chance to work on Surprise recently. However, I'm finding I'm having the itch to work on her a lot and I also have some free time again so I'm raring to go. She currently has the entirety of the outside of the hull modeled to a point where I'm happy to move on for now. However, last time I tried to work on her and I tried to model the interior of the hull (the inner walls) I realised I didn't know how they should look. It appears the interior walls, or hull thickness is not shown on the plans that I have. I'll repost them below: Please correct me if I'm wrong, but I can't see any lines which show the interior walls or thickness of the hull. Were these ever shown on plans? Does anybody have any good reference as to where I could find some or at least a similar ships interior? How did everyone else tackle this, did you just give the entire hull one thickness and merge parts that overlapped? Any help would be greatly apprecitated, many thanks!
-
Thank you Malachy. I had totally forgot about latices and looks like a great way to bend elements of the ship like you've shown. Great tip!
-
Hey all, Apologies for my lack of updates recently, been very busy with work and even a trip to USS Constitution (Which was regrettably closed!) but I'm back on track and been doing some work over the past week or so. First up since the shell of the hull was done I went ahead and added the decks (at the start of the gif below you can also see some basic masts)... These were pretty simple to add as the plans cover them very well. They slightly poke out the side of the hull right now but I'll fix that later when I actually give the hull some depth. My thought process behind adding the decks so soon was that it may help when I come to model the stern and quarter gallery. Boy was I wrong! I'm finding the quarter gallery particularly hard to model. I'm using the same method I used for the rest of the hull (I'll model the windows and other details later on) and it's working for the most part. Where I'm struggling is connecting this to the hull. It seems the plans I have don't show the quarter gallery at all and don't even seem to take it into account. I take it back then part of the stern was removed to add the quarter gallery on later? Anyway, my progress can be seen below in another gif... As you can see the bottom of this section extends out further than the hull does in this area. Now I admittedly I don't know what to do next here. How do I connect this to the hull? Does the hull need adjusting to meet the bottom of the quarter gallery or is it the other way around? I've been looking at pictures of other ships and the replica ship in the US and it seems the hull is adjusted to meet the quarter gallery. Anyway, to get this right I think I'm going to cut the stern off of my model and do the entire stern separately. It gave me much better results doing this with the bow so I think it would be beneficial to do this with the stern too. If anything it will give me less lines on the screen to make it that bit easier to read. Any insight into this area of the ship will be massively appreciated. I'm going to be delving into some books too. Thanks all!
-
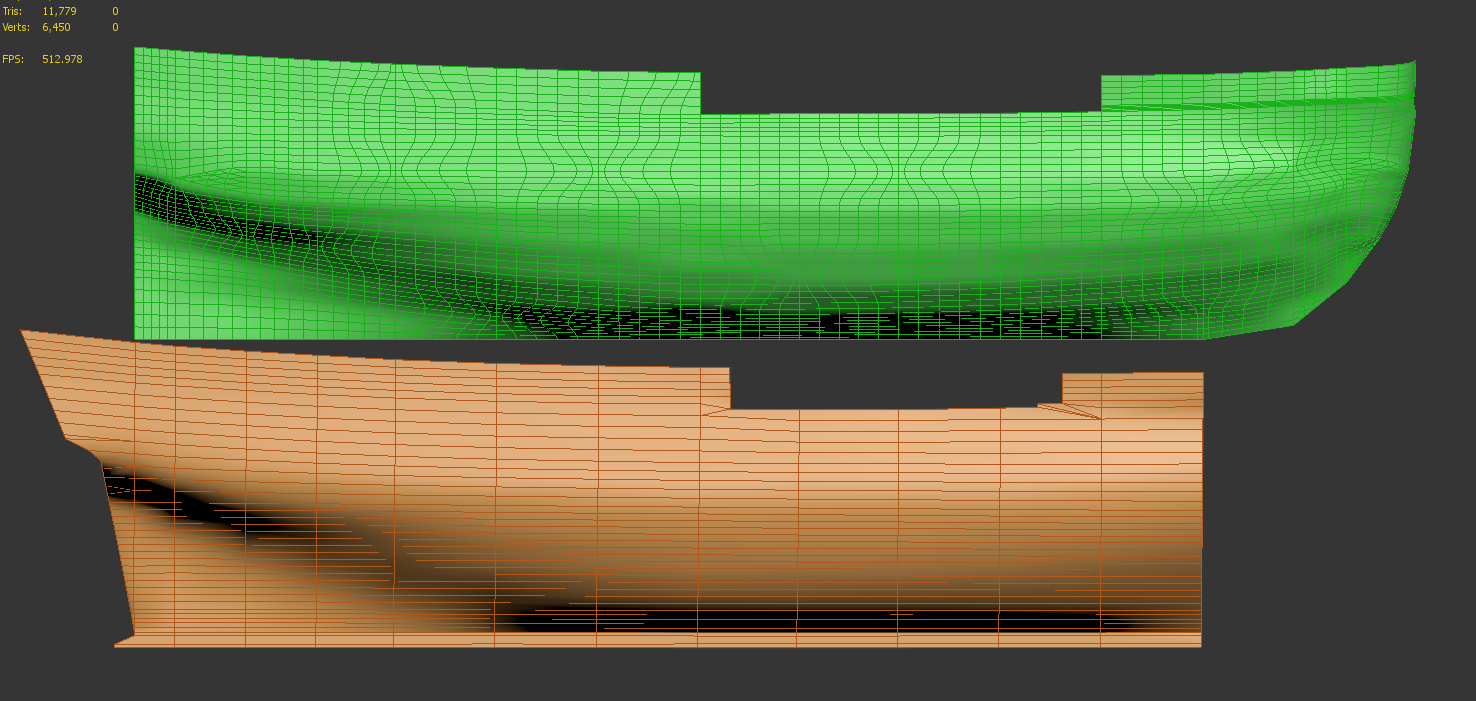
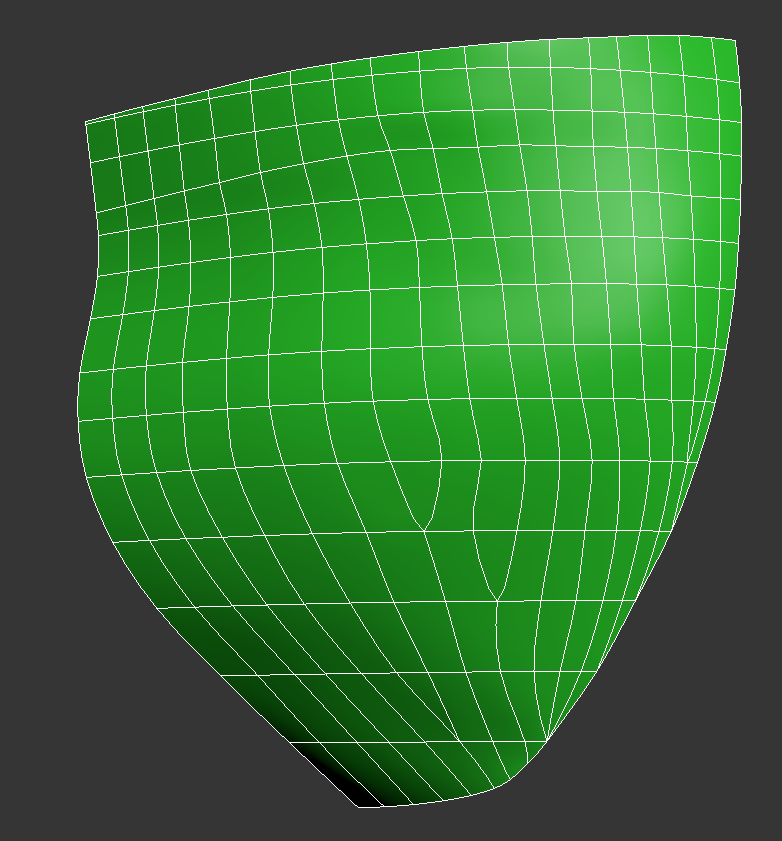
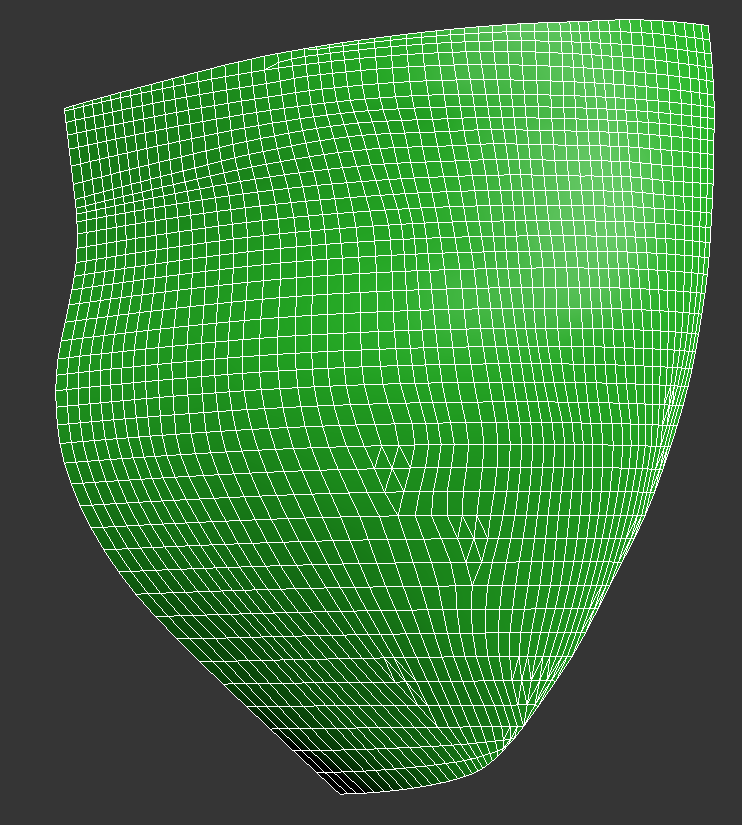
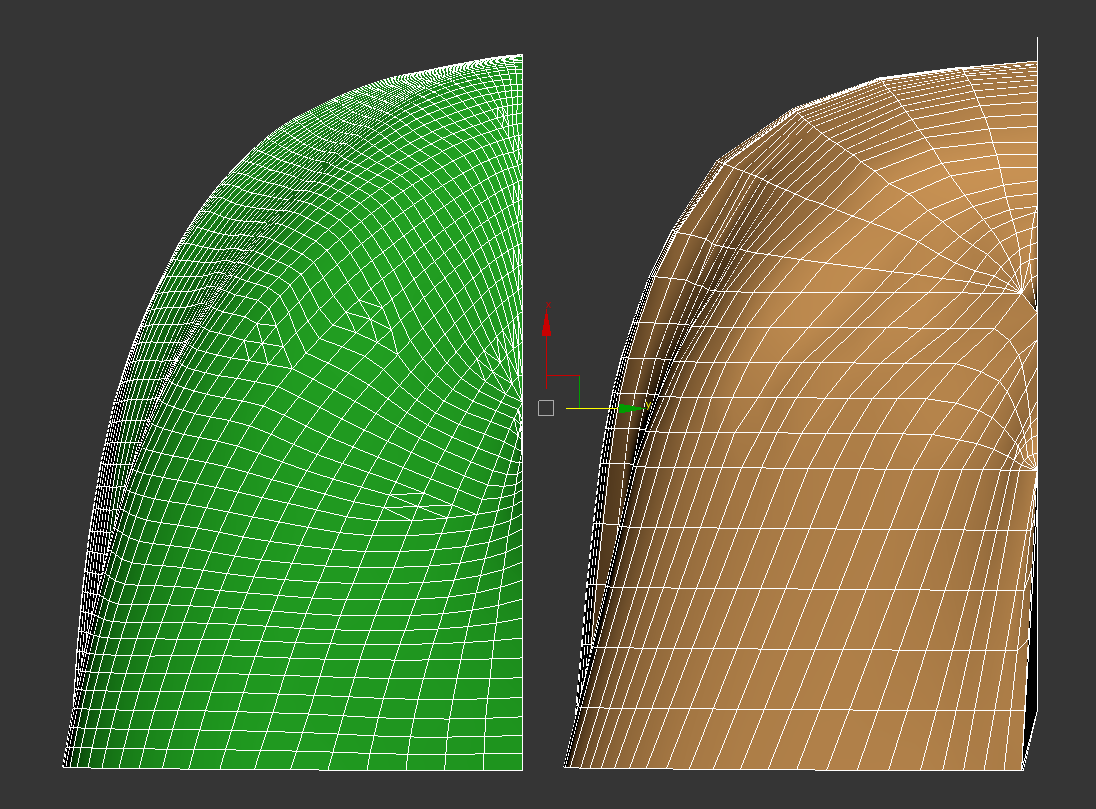
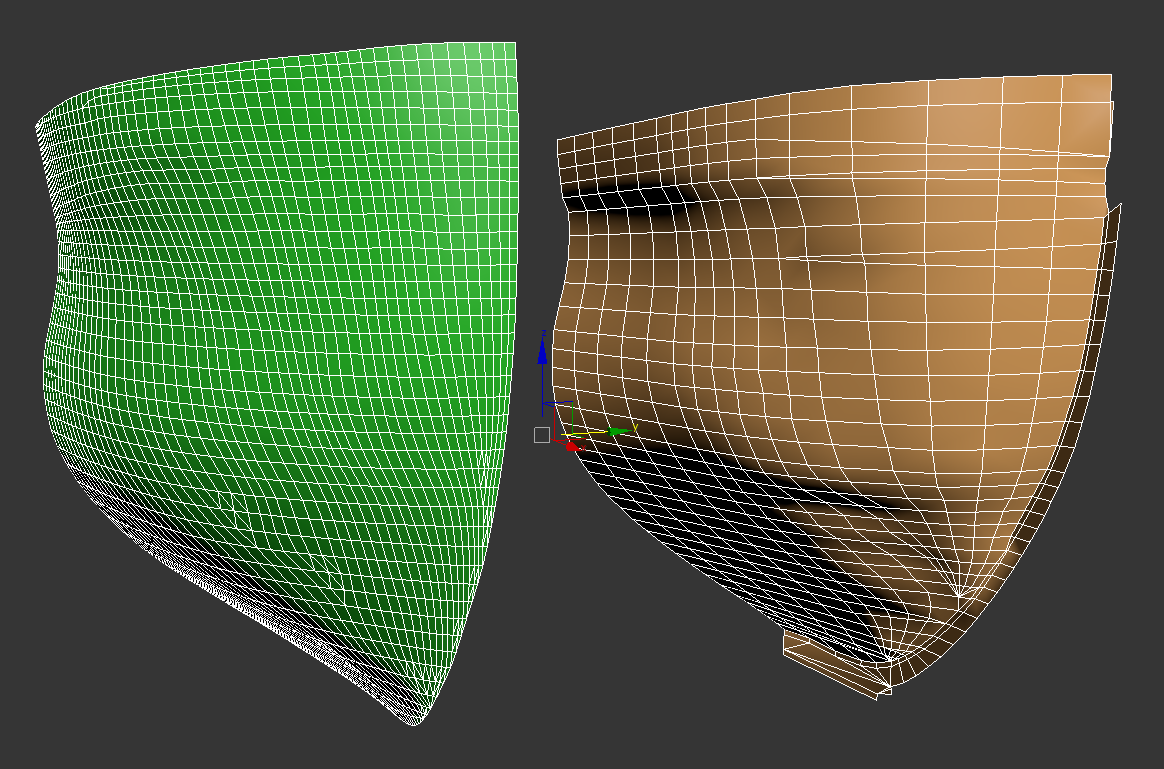
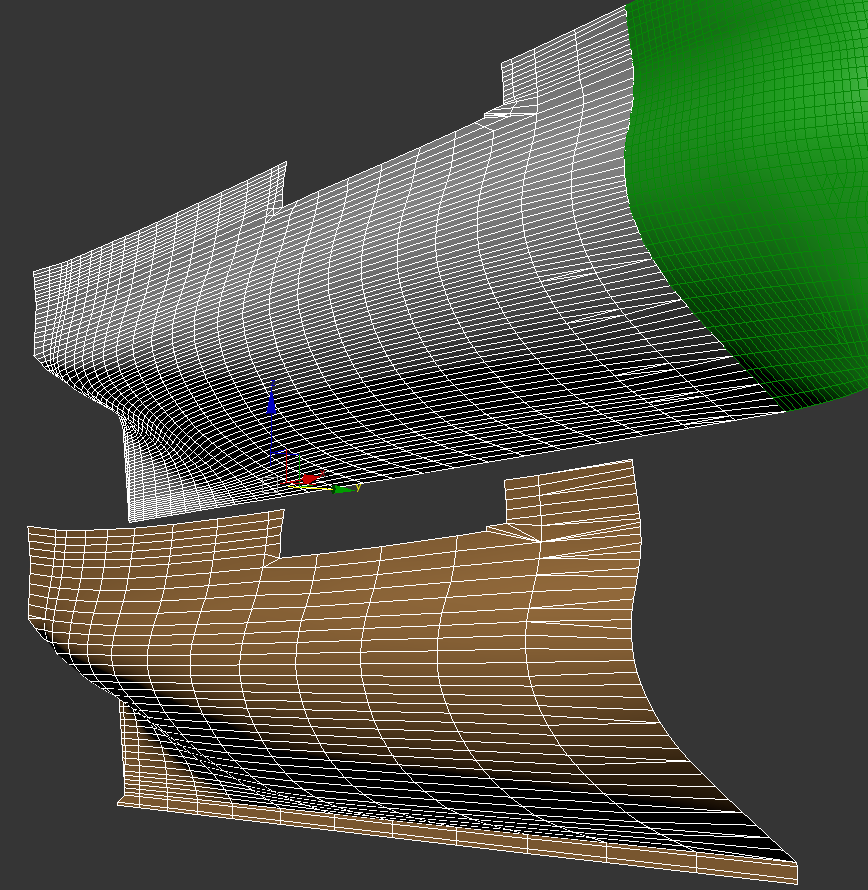
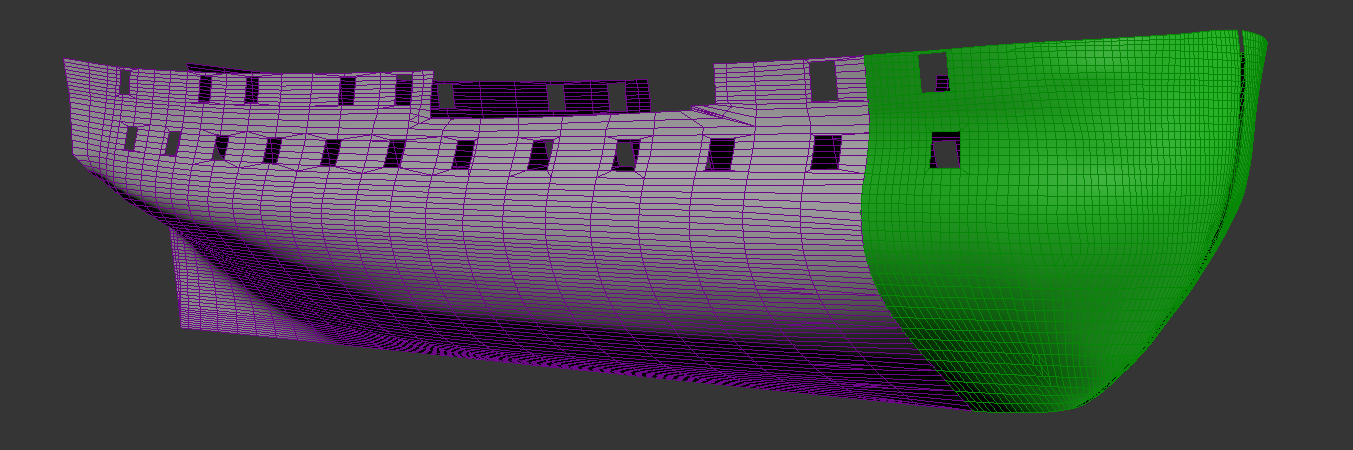
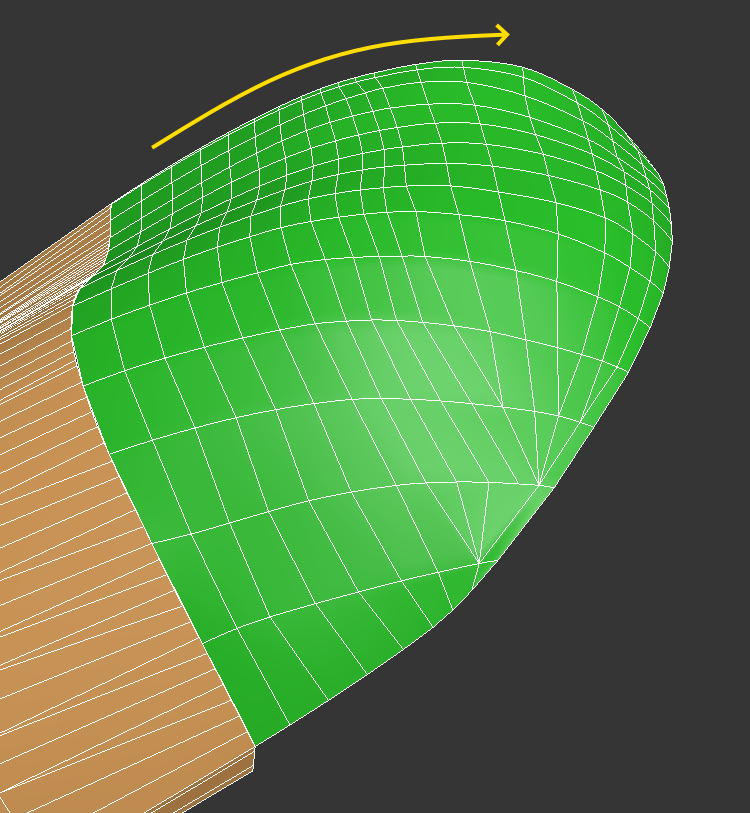
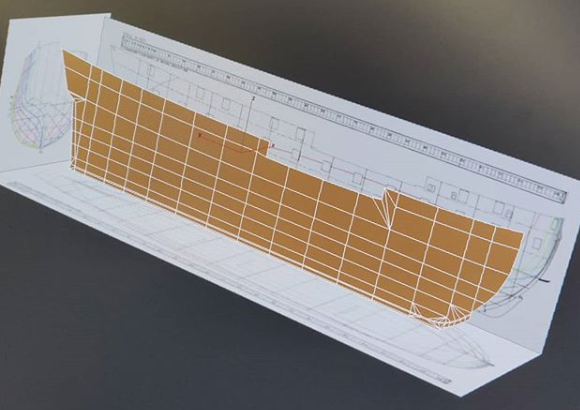
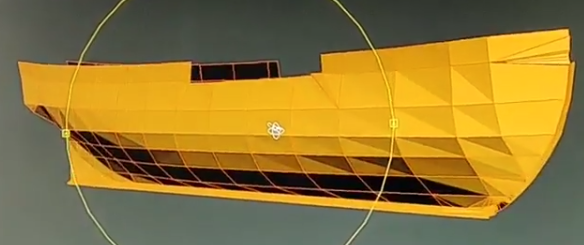
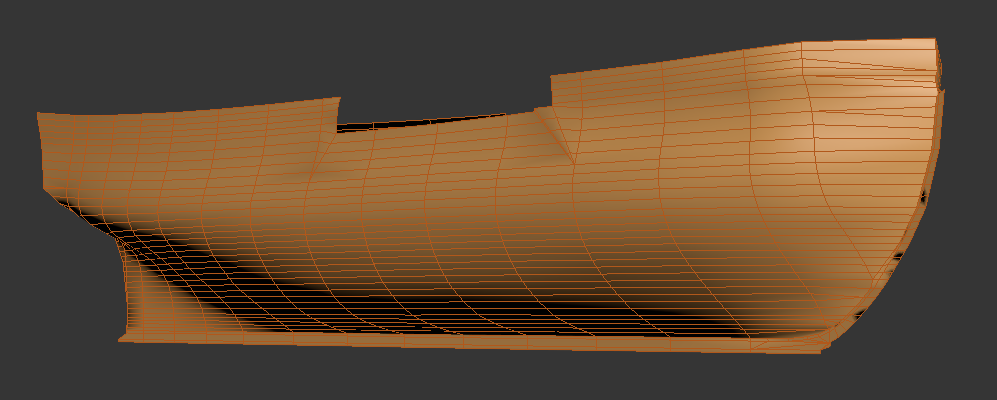
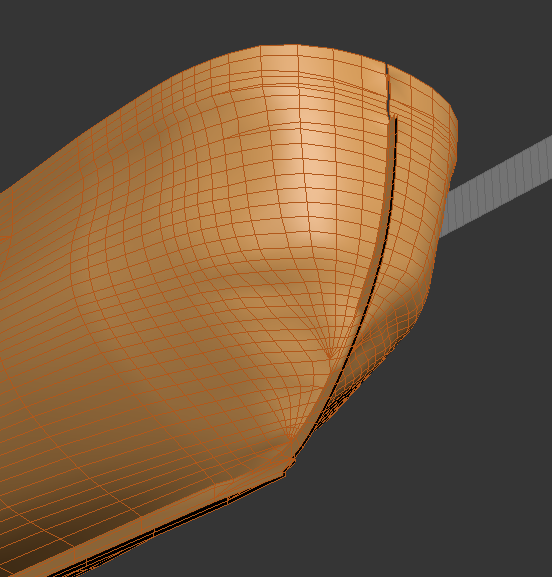
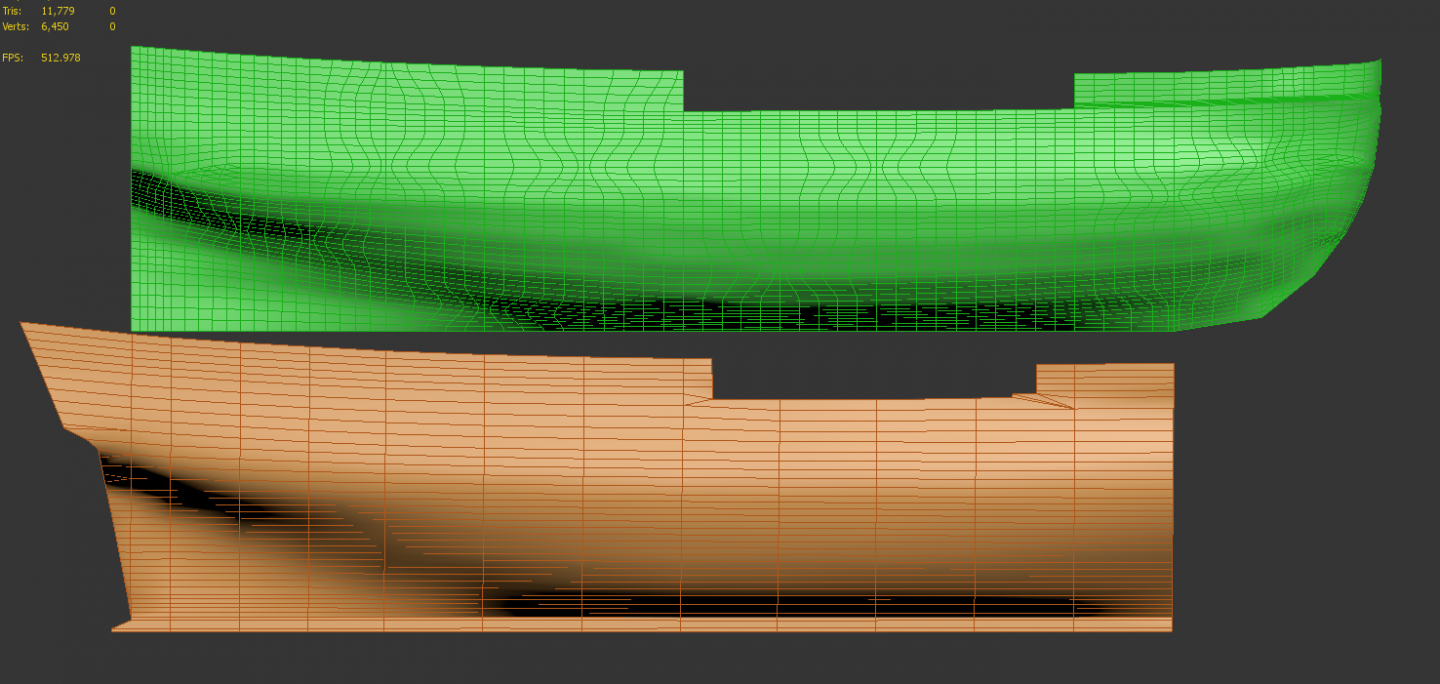
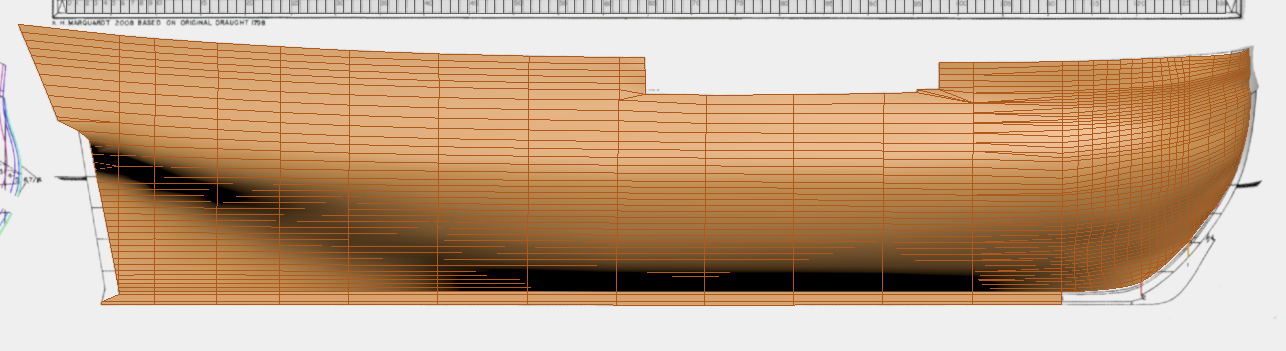
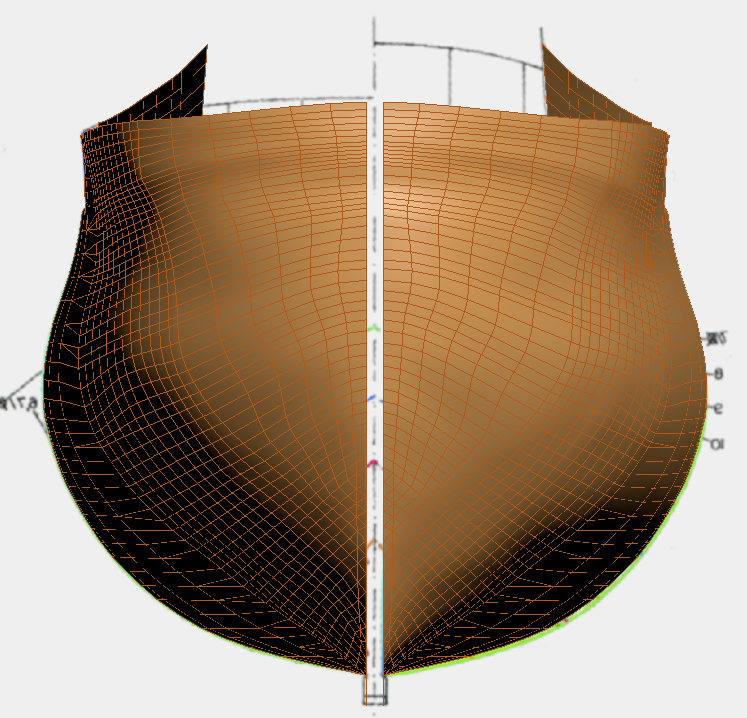
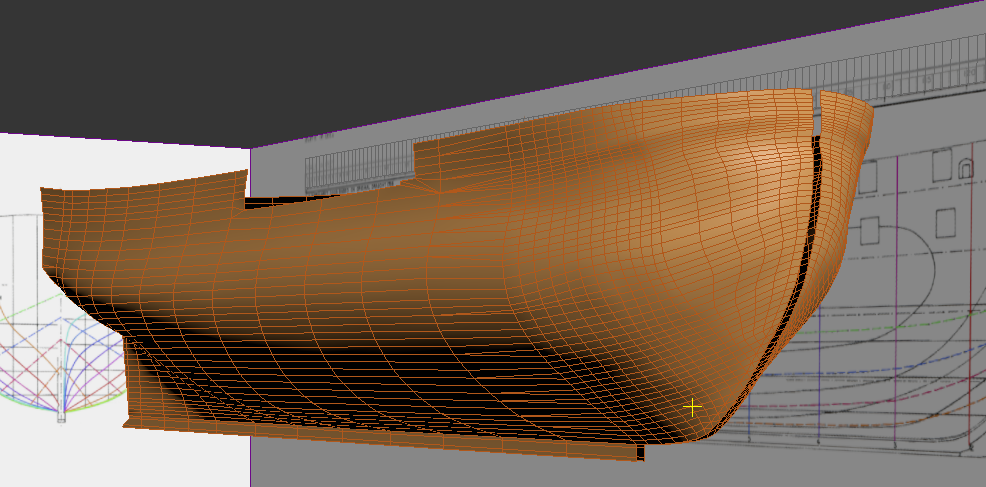
Hey all, Sorry for the lack of updates. I've managed to find time to work on my model most nights this week and didn't want to spam this post with updates each night. Felt it would be better to group it up into one post. Unless people prefer to see more frequent but smaller updates? So to begin with I created a new spline mesh over the bow with a much more uniform topology. I also took the time to check the spline mesh over the previous mesh I had made to find any more bumps I could take out. I think the results are much better than the previous ones: With the topology much more uniform and being overall happy with the shape of the bow I created a duplicate of this spline mesh so if I ever need to go back and make any changes in the future I have a copy to adjust and work from. I collapsed this down to an editable poly mesh which, in 3DS Max, gives me many more tools to use when modeling. The mesh is quite dense but I don't think it's too for what I potentially plan to use it for so I'm happy with it. Below you can see a couple of before and afters (Orange mesh is the before) and I think you can agree there's a big difference. DR PR, I have to thank you again! Since the method gave me such great results on the bow I wanted to give the rest of the hull the same treatment. I drew splines in the same way across the entire hull. This gave me a mesh of similar density to the bow... Unfortunately, in my excitement, I forgot to create a copy of spline mesh I had created for the rest of the hull so I can't go back and make adjustments. I'm going to create another one anyway because it'll be very helpful to have in case I do need to make any changes in the future, and the next mesh should be better anyway as I may spot some imperfections. I can optimise this new mesh too as it has too many horizontal (going fore and aft) lines which aren't really needed so I can sort that during this process too. The stern definitely needs a bit more work so I may chop that off like I did with the bow and work on it in isolation. Although, all of this may get hidden by the stern quarter galleries. Would you agree? Anyway, I didn't get too much time to work on her tonight so I cut out her gun ports as that's a nice quick and easy task. I still need to do the fore-most gun ports but since they're at an angle in the plans I wanted to spend a bit more time to ensure they're in the correct locations. So that's everything I've managed to get done this week. It feels great to see some progress and posting here and over at my instagram (https://www.instagram.com/hms_surprise_/ - I post here every time I work on her, so feel free to follow if you'd like more regular updates) is really motivating. I'd love to hear any comments, critique or hints you guys may have. Thank you.
-
Hey Martes, Yeah that was very similar to my process so far. I haven't really touched the stern too much yet so your post will be helpful no doubt when I finally get around to working there. Thanks for the post!
-
Dr PR, No problem! I love documenting my progress and after seeing the results your method could give I had to capture it so other could see it too. I know it's hard to show these things in an image. If you want me to grab any more gifs/videos of this process just shout and I can whip some up for a guide or something. I'm sure it'd be helpful on these forums for other members. Yeah, I understand your caution. I can still see imperfections on my latest mesh and I do plan on working them out as best as I can and tidying up the topology as mentioned. I'm not going for 100% accuracy, but enough accuracy that it could potentially be used for learning. I plan on importing my finished ship into Unreal Engine 4 and allowing people to walk around and explore her. Along with functioning things like cannons and sails. We'll see about all that, I'm just focusing on the model right now. Again, thank you. It's really helped and really motivated me to work on this as much as possible.
-
Exploring FreeCAD for ship modeling
Beck replied to TonyM's topic in CAD and 3D Modelling/Drafting Plans with Software
Hey all, I'm using 3DS Max to create my model but I guess the process is pretty similar in FreeCAD. I stream my model making so if you want to see the process I followed you can watch the VOD of last night stream here: https://www.twitch.tv/videos/539217455?t=00h26m37s I think they stay available for about 2 months on Twitch, but if anyone would like this saved for longer I can cut this up a little bit and stick it on YouTube for safe keeping. Full props on the method should go to Dr PR though! I seriously recommend this method if you need to tidy up any curves! -
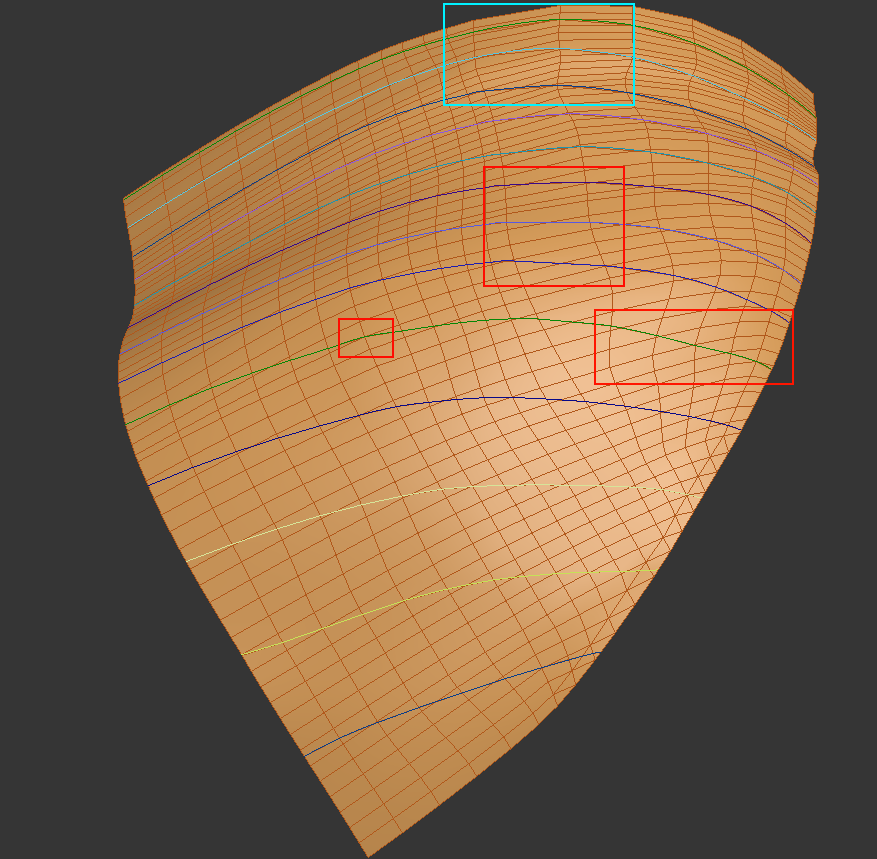
@Dr PR - Thanks for linking your post. It really helped me out. I spent some time tonight cutting some contour lines across the entire ship and after isolating them so I could see them on a black background I could instantly see what you meant. The imperfections stand out like a sore thumb. So the main bulk of the ship is pretty good, overall I'm happy with what I've achieved there. The stern of the ship is definitely in need of some more detail but I knew that already. I'll tackle all of that when I create the quarter galleries. I'm focusing on the bow right now and I could see a number of bumps which the contour lines really highlighted. The red boxes above show some of the imperfections, some lines are too straight, are slightly pushed in or out. The blue box shows where the contour lines have given me much nicer lines to work from where my topology is off thanks to the surface modifier I used previously. You can see the contours a little better in this gif: I've tidied these up a little but they still need some more work. I also want to fix the topology so I'll be doing that next... As you can see I have more polygons aft. I'll be spreading these out towards the front of the bow to give a much more even topology which will also help immensely with the overall shape of the bow. Again, Dr PR, thank you so much!
-
I read the post you linked to and I think I understand what you mean. Basically, create planes cutting through the hull, and where the two meshes intersect create splines. Then hiding the meshes look down the splines for bumps and imperfections. Create a new spline snapping to the good points on the intersecting spline and leave the bad points out, the program (3DS Max in my case) will interpolate between the two and probably sort out the imperfections. You can then use the spline as a new guide for your original/new mesh that you update/create? Thanks for the reply though. You've done some amazing work so it's really good to get your input.
-
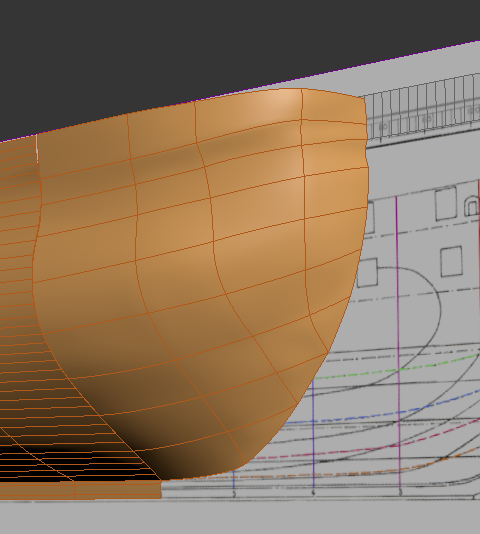
Hi all, Decided it's time for me to make my own build log as I've got a bit more time on my hands and managed to make some good progress recently after a number of different attempts at the modeling the main hull. I'll start at the beginning. So to begin with a found some nice drawings and ship plans in a book about HMS Surprise from the Aubrey Maturin series of books. I recently finished listening to all the books on my commute to work and fell in love with the ship just as Jack Aubrey did. Luckily I work at a studio with a publishing department and they had some excellent scanners and they kindly provided me with some nice high res scans from the book. I took these scans and began colour coding the lines on the draught plans to make them a little easier to read. Following this I began modeling the ships hull... I started in just one perspective as you can see, I then switched over to another perspective and moved out what I had already modeled to match the draught plans in that view, giving me a 3D shape... I then subdivided this mesh to give me more detail and to smooth out the hull. It was quite a long task but I was really happy with the results overall. From here I had to tackle the bow. This is when I realised the draught plans were all slightly out in each view. I made a topic elsewhere on the forums asking for advice and the overall consensus was these plans are never 100% accurate and it's going to involve me using my initiative to overcome this. Honestly, I lost a bit of motivation and confidence here. Ships aren't simple shapes, and I could never seem to get the bow looking quite right. The above was modeled by hand and I was never truly happy with it. It was a bit bumpy and I didn't feel the shape was quite right. You can see it a little better in motion in this video on my Instagram account. So I tried another method to hopefully give me better results. Using splines I built a "cage" in the shape of the bow and then turned it into a mesh. The results were pretty good, not perfect, but better than what I had before. After some tweaks I was a lot happier. I wondered what the rest of the ship might look like using this method so I also remade the rest of the hull this way. The results weren't as good with some bad topology and bumpiness across the sides of the hull. So I thought it'd be best to build the bow using splines as I can control the shape much easier using the splines but keep the rest of the hull hand-modelled. This is where I'm at right now. I'm quite happy with what I have so far but I can still see some room for improvement on the bow. I think with a few tweaks though it could be much improved. I'd love to hear comments and critique for you all. I'll be posting updates as and when I work on this here as well as on the Instagram account I posted above. Thanks all!
-
Thank you. I live in Birmingham, England. Lived in the UK all my life I wasn't so much contemplating building one as I have zero experience building something like this. I was more admiring the HMS Vanguard model by Amati (https://store.amatimodel.com/en/box-mounting-victory-by-amati/amati-models-hms-vanguard.html) It's beautiful and I wondered how the kit looked and saw a review/unboxing here. Looks great, maybe when I'm old and have more free time I can work myself up to a model of that scale
-
Eventually I'd probably 3D model it and do some other different projects with it. It's going to be predominantly a 3D model first and foremost though so I guess it makes sense in the CAD section.
-
Thanks for the welcomes! Matt, that's awesome, thank you. I'm learning things as I go too. I have almost 10 years experience with 3DS Max but I'm not an artist (I create levels and the artists will generally make them look nice) but I know my way around the software. Be nice to get feedback from people though so I'm looking forward to creating a progress thread. Would it be best to post my progress thread in the CAD section or the Scratch build section? Thanks!
-
Hi all, Came across this forum when I saw a review for a model kit I was looking at. Seems like a great place to share progress and get help so had to sign up. I've been fascinated with the old age of sail war ships since I was a kid after playing an educational game called Stowaway! (I recorded a playthrough here: https://www.youtube.com/watch?v=3Rtjujfhfcc) and obviously with movies like Master and Commander and video games like Sid Meier's Pirates! Since then I've become a video game developer and gained skills in 3D software such as 3DS Max and Maya. I recently finished the Aubrey-Maturin series of books by Patrick O'Brian and fell in love with HMS Surprise like I bet a lot of people did who read those books. I decided to try and create a 3D model of her and potentially put her into a game engine so people can sail her and walk around her. That's all obviously a long way off but it'd be a nice goal to achieve. My current progress can be seen here: I hope it's ok to post links here. If not please feel free to remove them. I'll create a progress thread down in the CAD section and no doubt be poking you guys for help soon enough. Any questions feel free to ask Thanks all!