rturcic72
-
Posts
40 -
Joined
-
Last visited
Content Type
Profiles
Forums
Gallery
Events
Everything posted by rturcic72
-
 It's been a while since I gave an update...I'm still here...Anyway, I've been moving slowly still rigging the carronades. I've had to concentrate on getting a new government contract since the one I was on had ended and the customer had changed the rules for business size.. so, I've been doing my side gig to make up for any temporary losses in net income until I pick up another contract. It usually takes about 2-3 months, especially around the start of the new Fiscal Year.
 -
I haven't forgotten to keep up with the build. Rigging the carronades is definitely time consuming because of the how small things are to work with.Having new thread come in, makes thinks much more manageable to work with and looks much better than the previous photos. Also, my normal day job is a Government Contractor and I just finished one contract and working on getting onto another. Being a single father, I dont have yhe luxury of relocating, but I've made it through these storms before, but it takes up time sending resumes and doing interviews since the new Fiscal Year brings in new contracts.
-
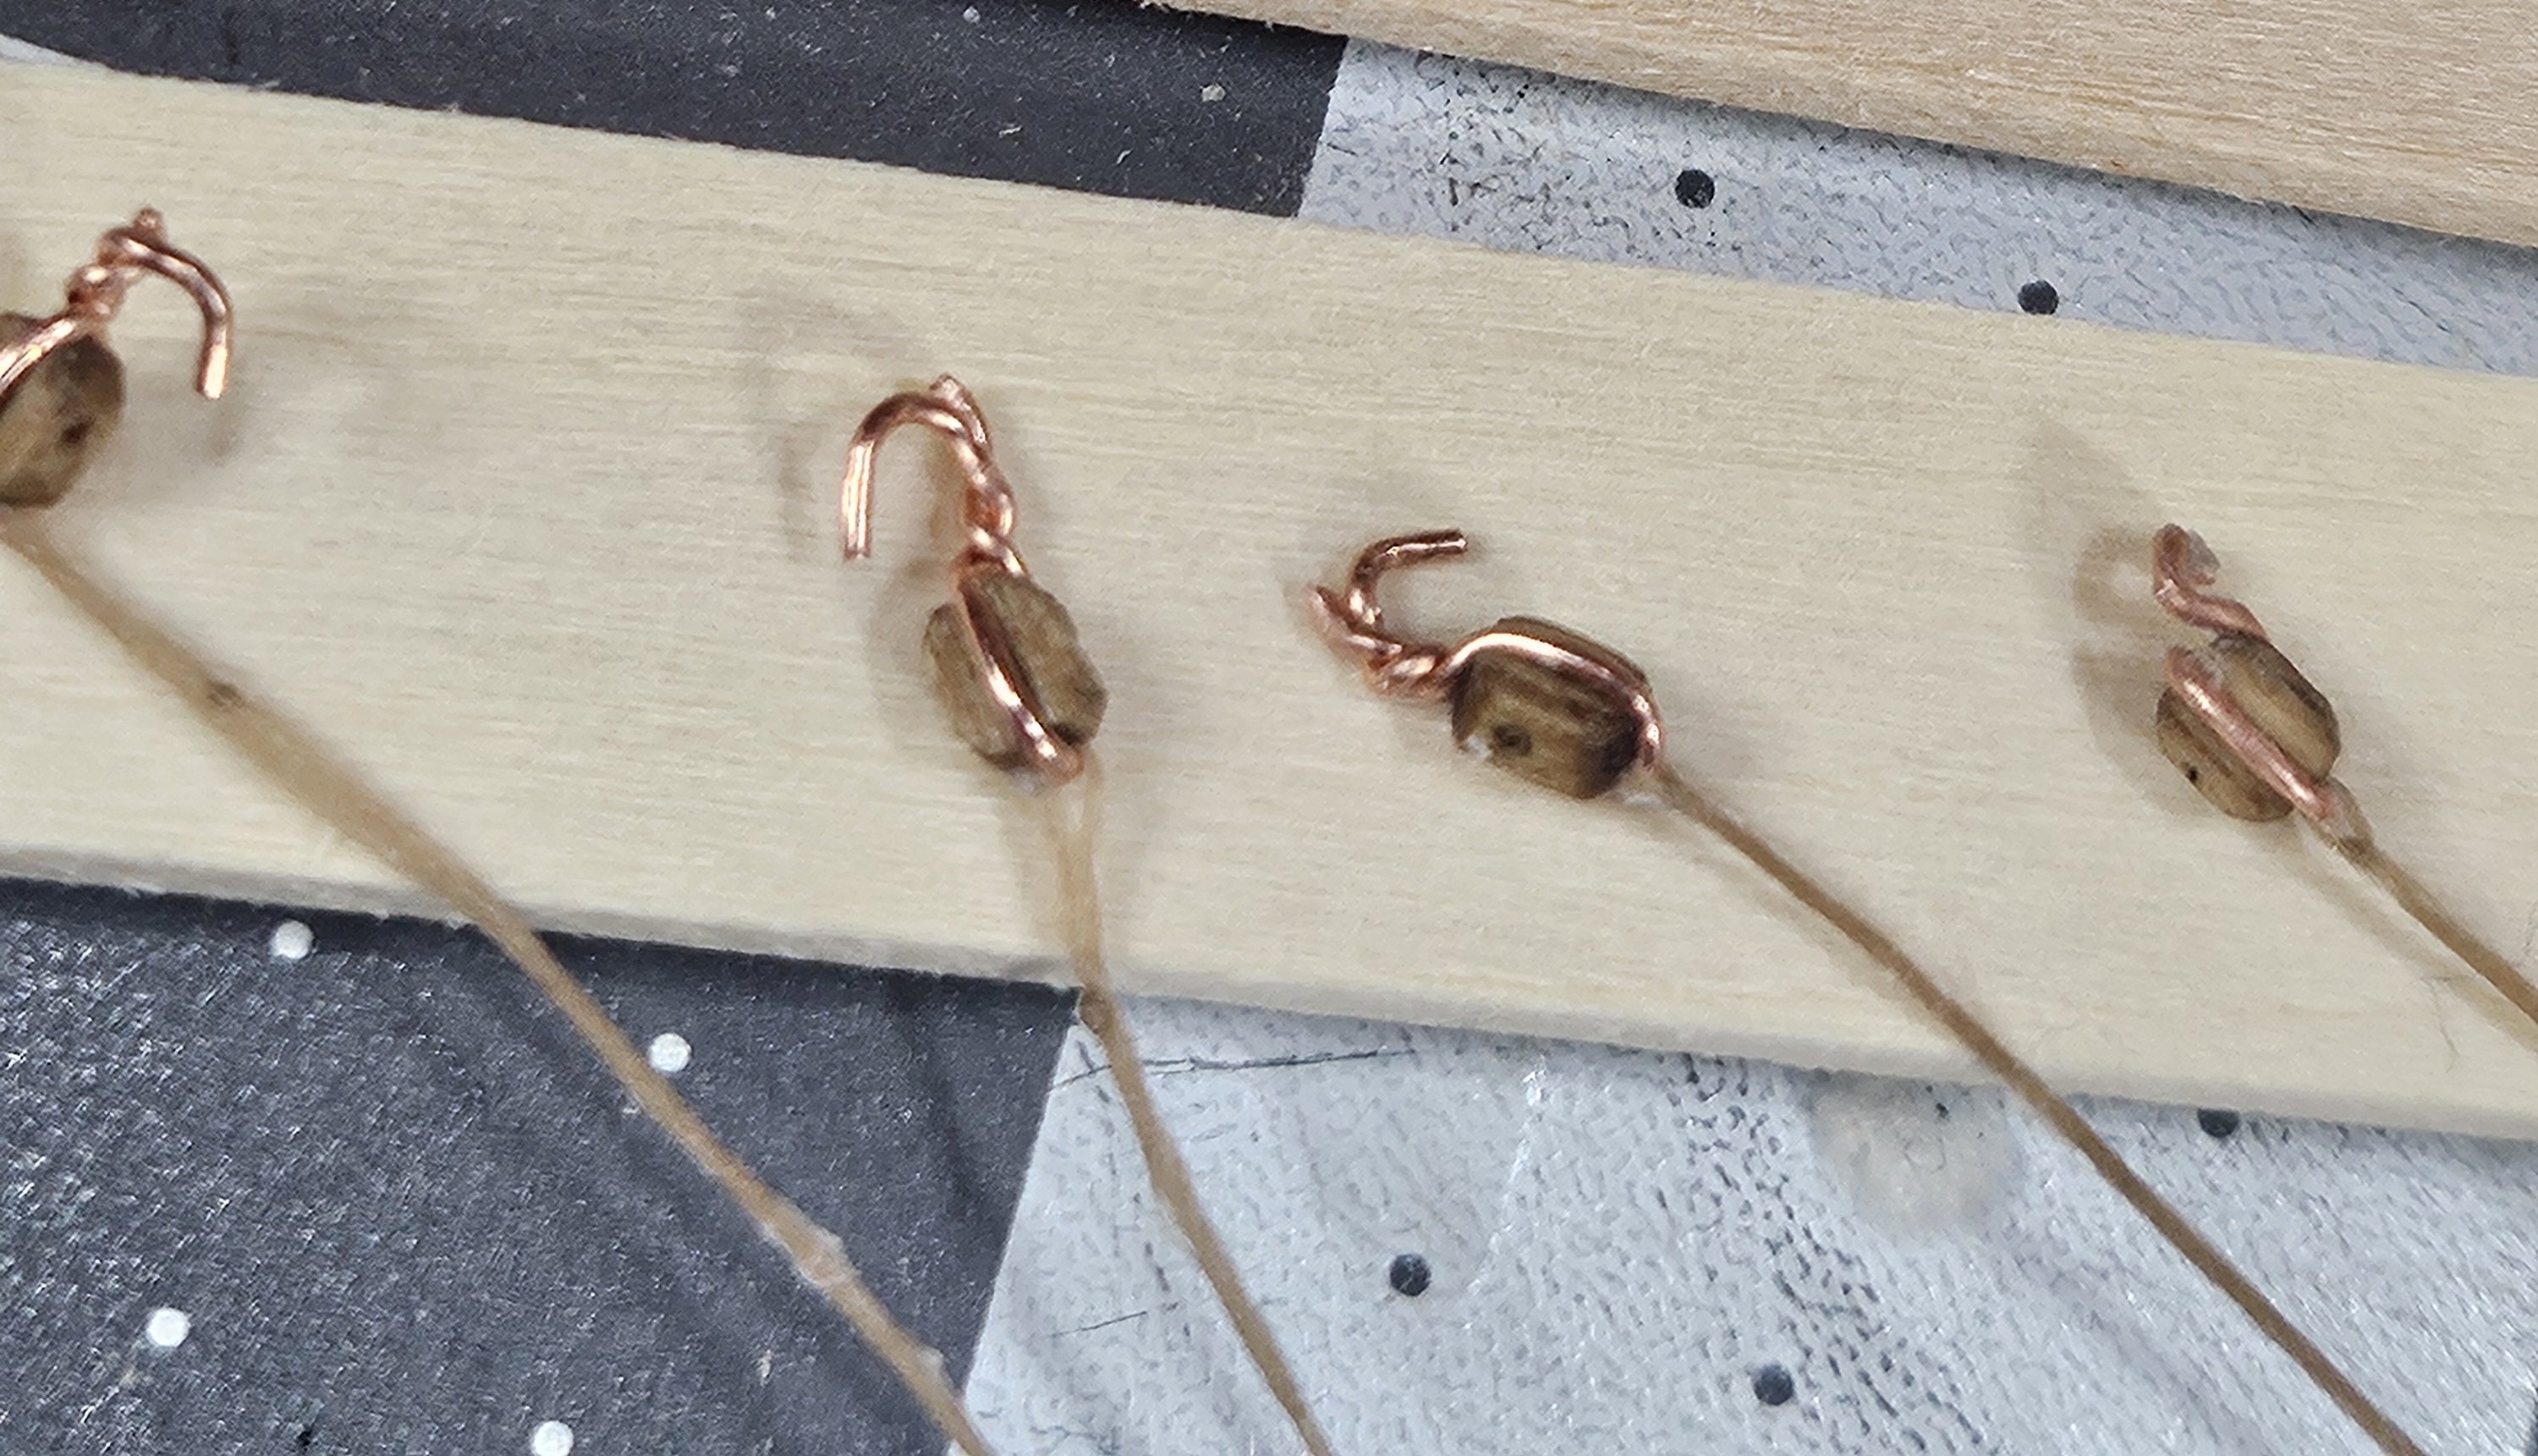
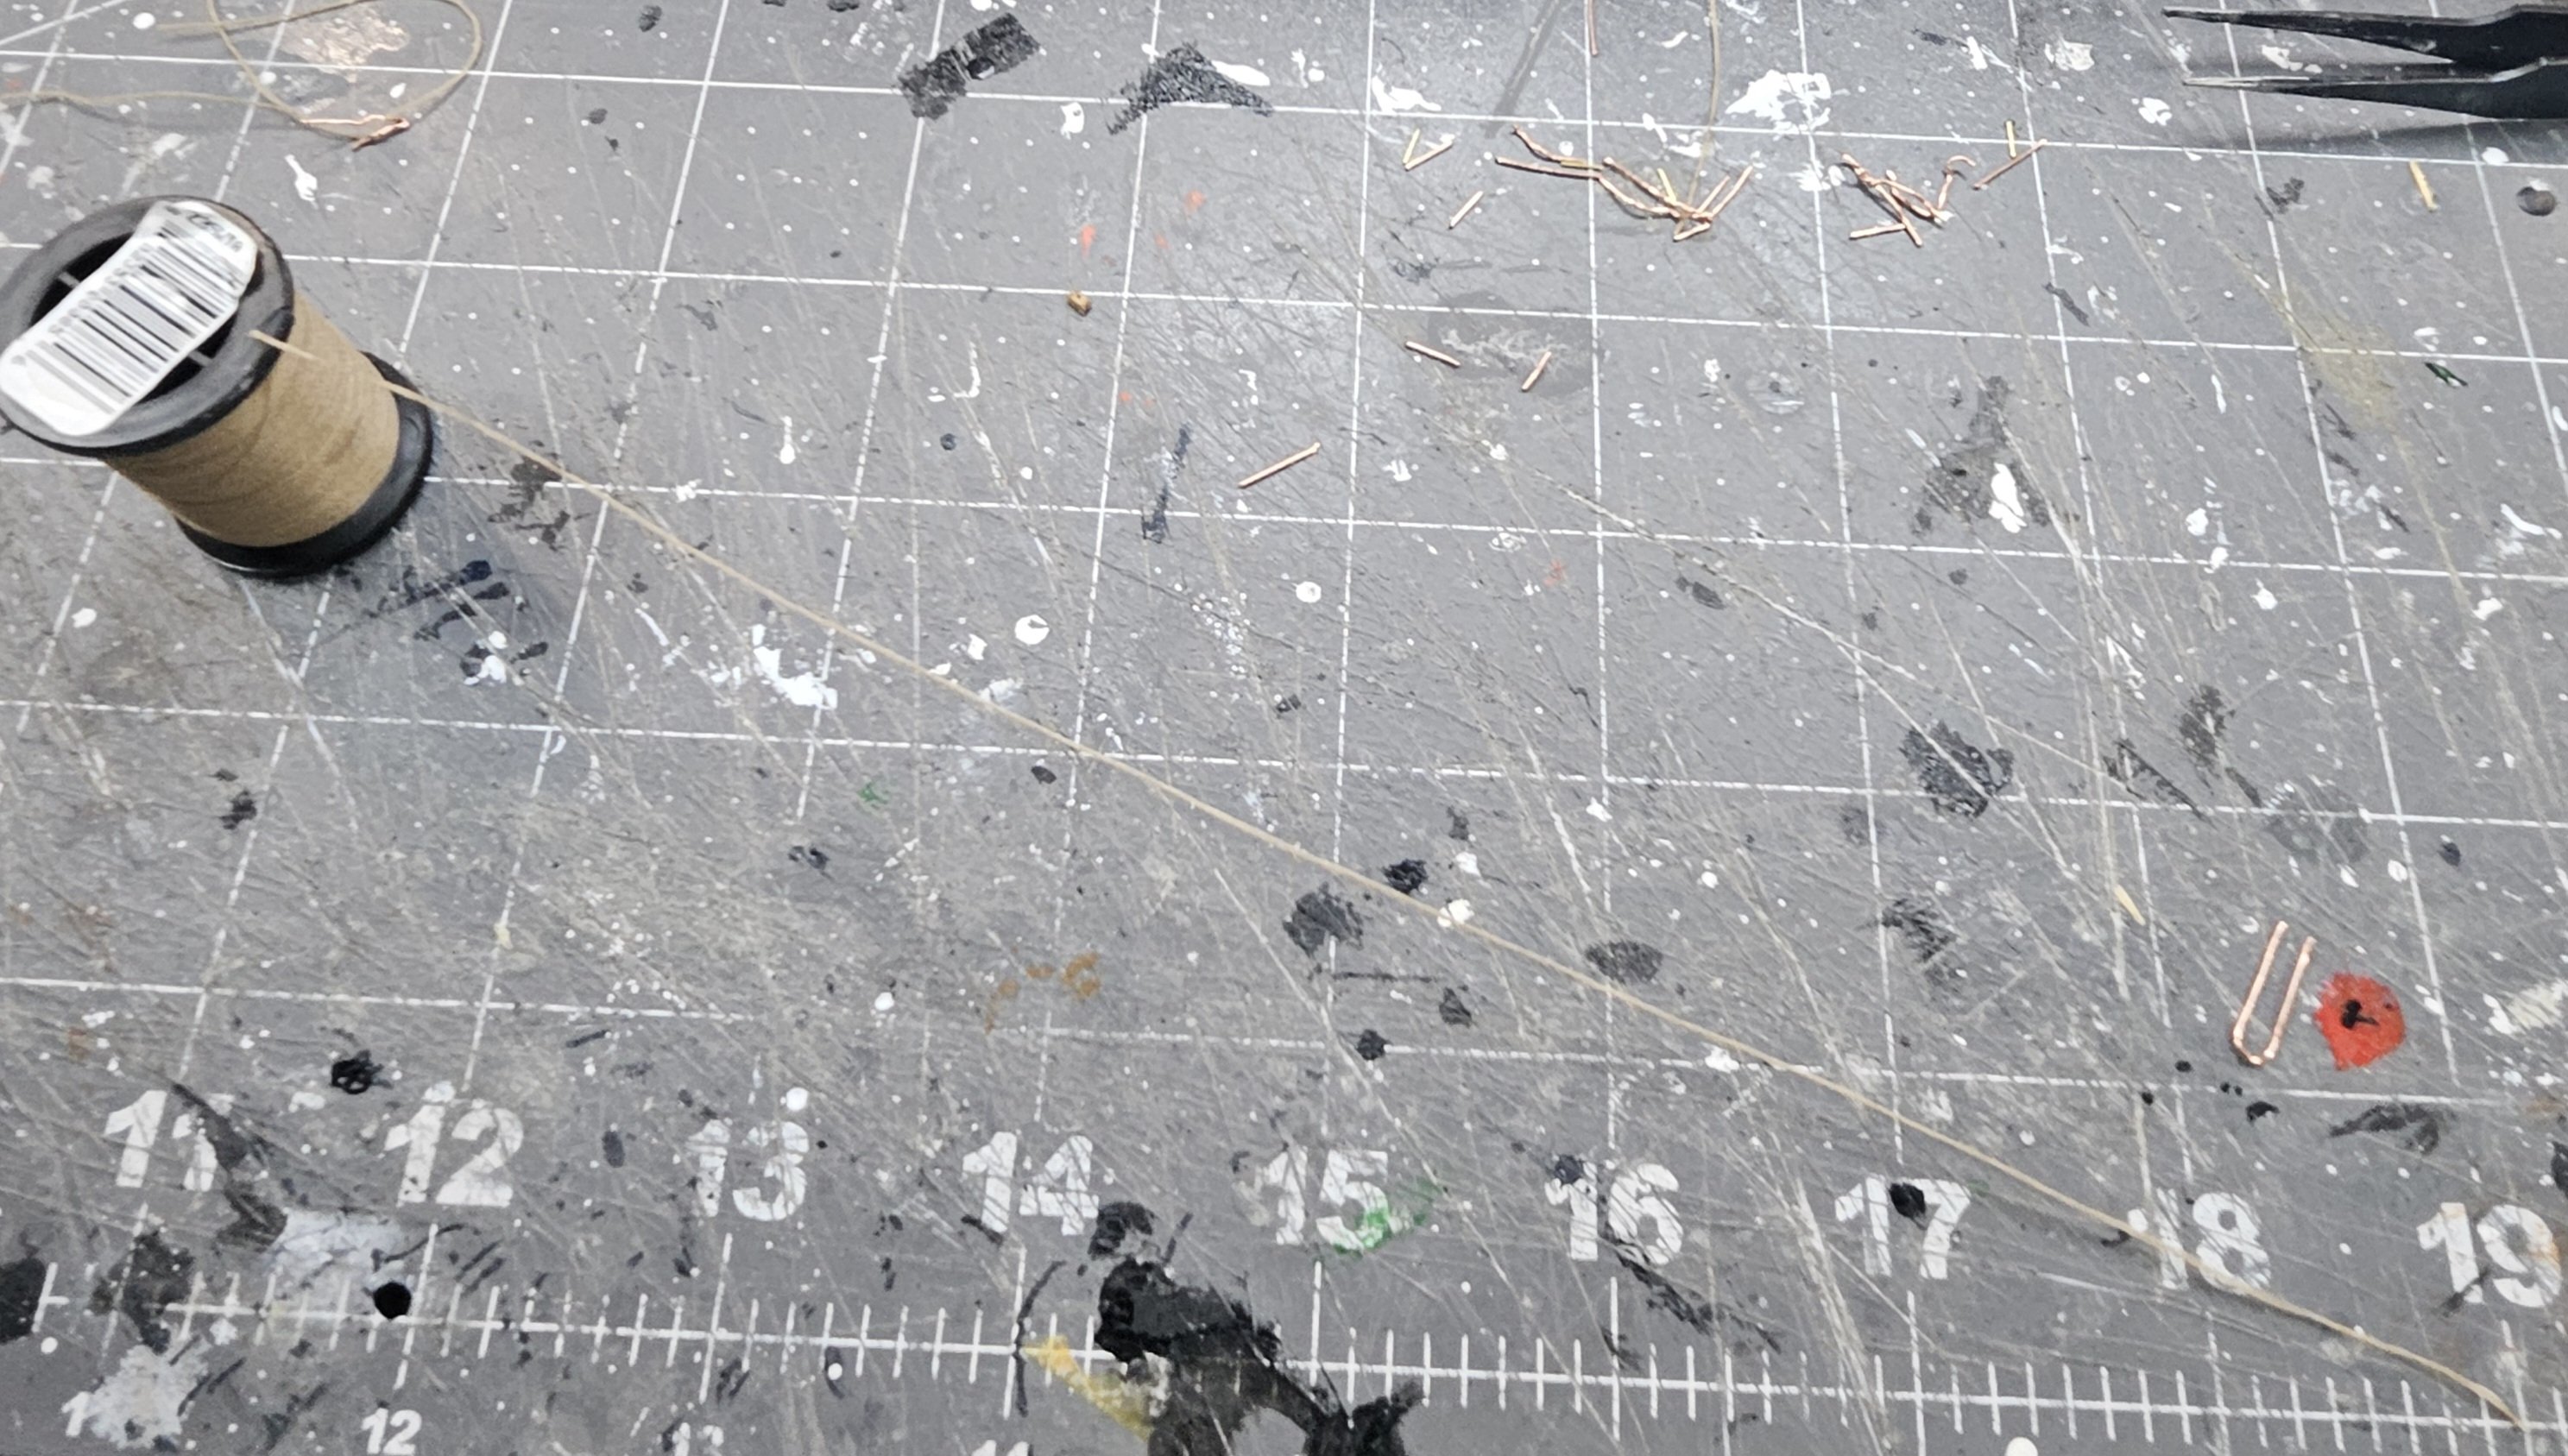
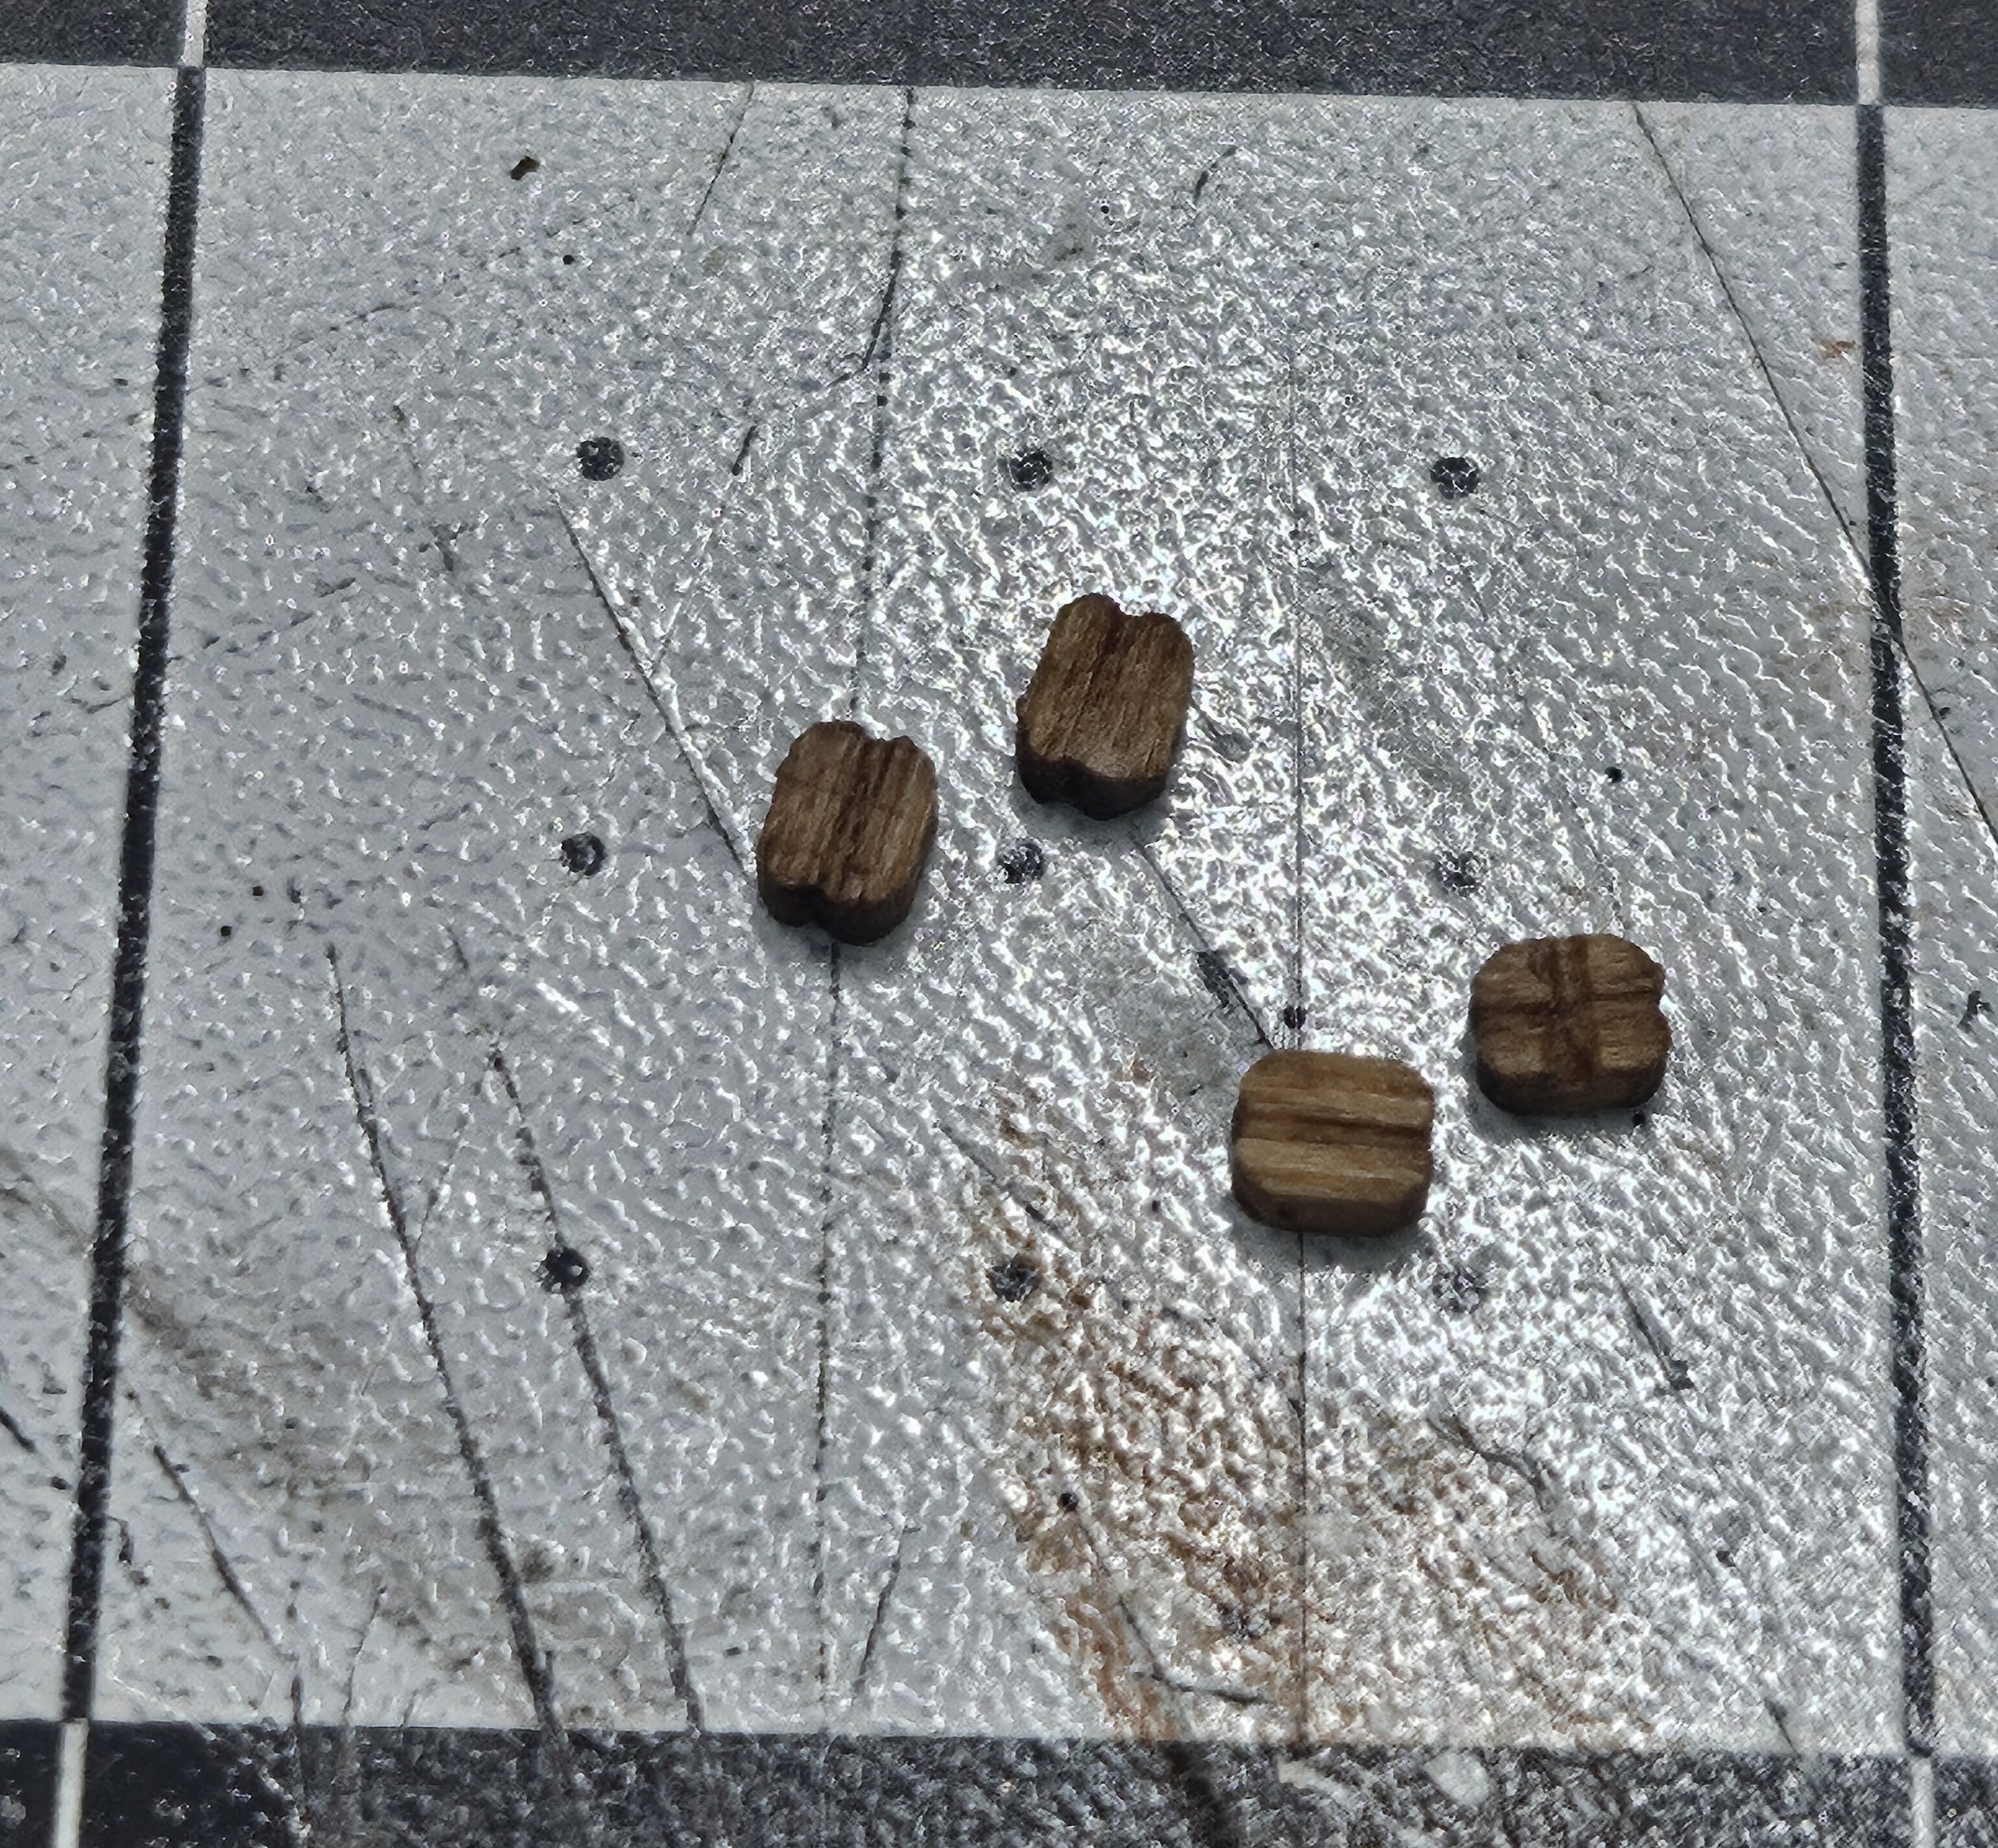
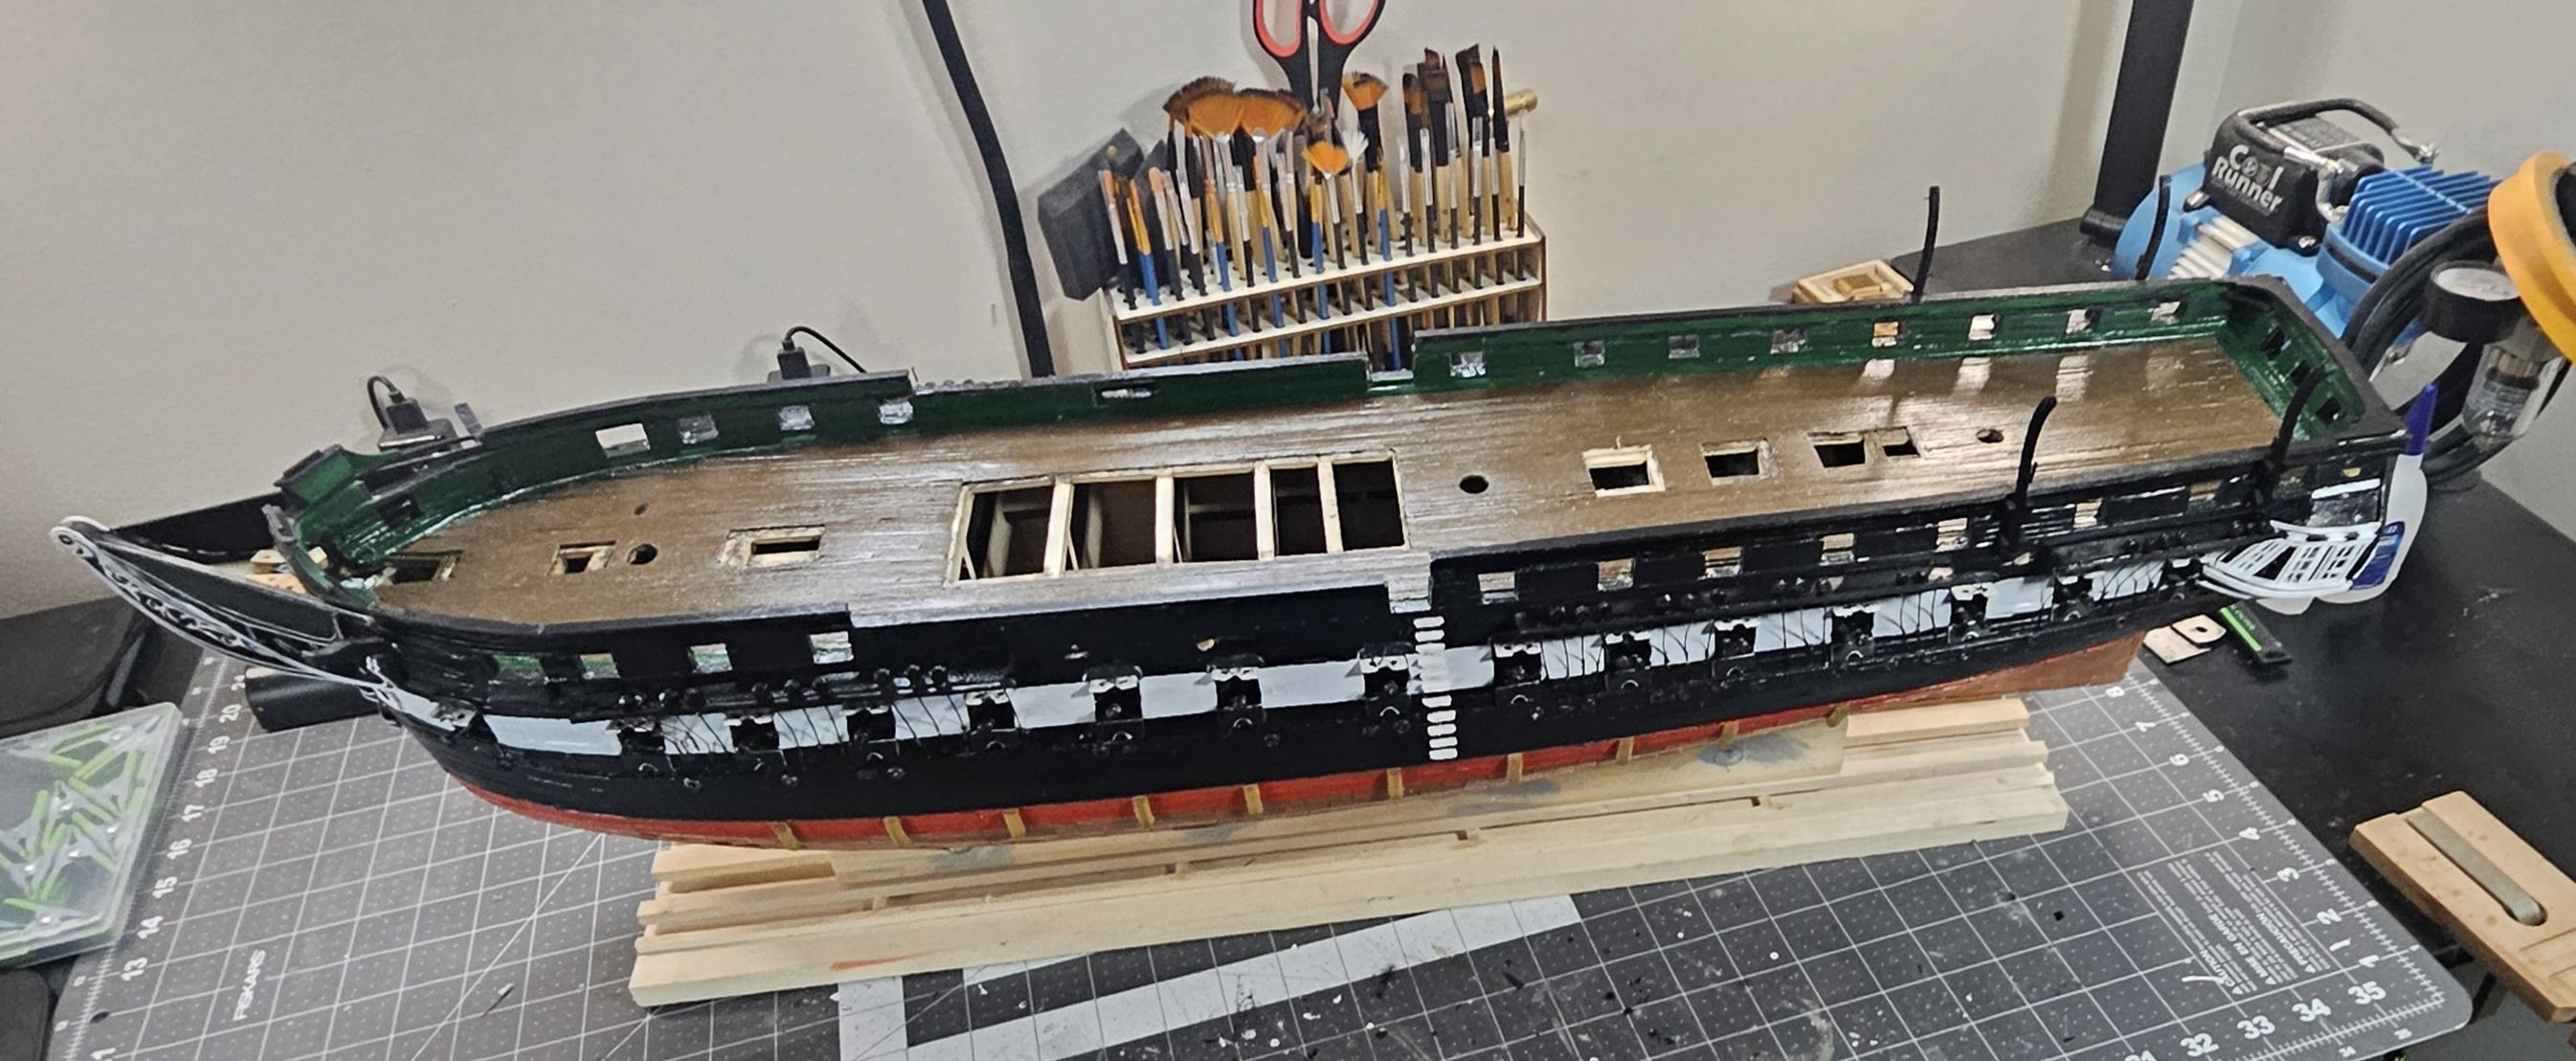
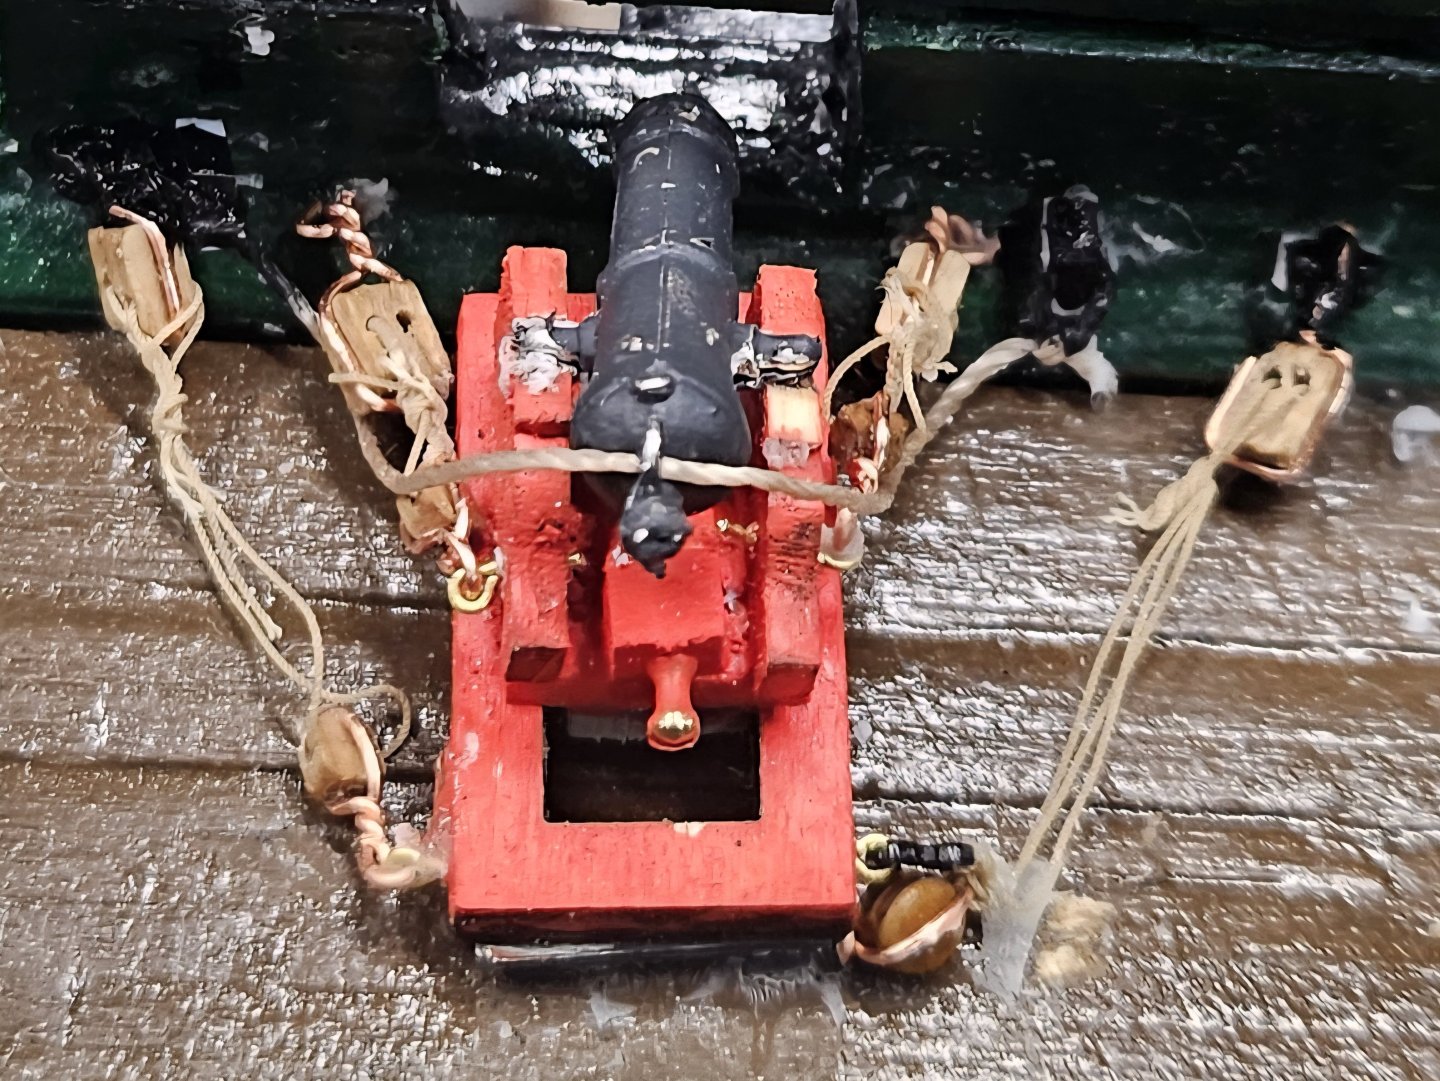
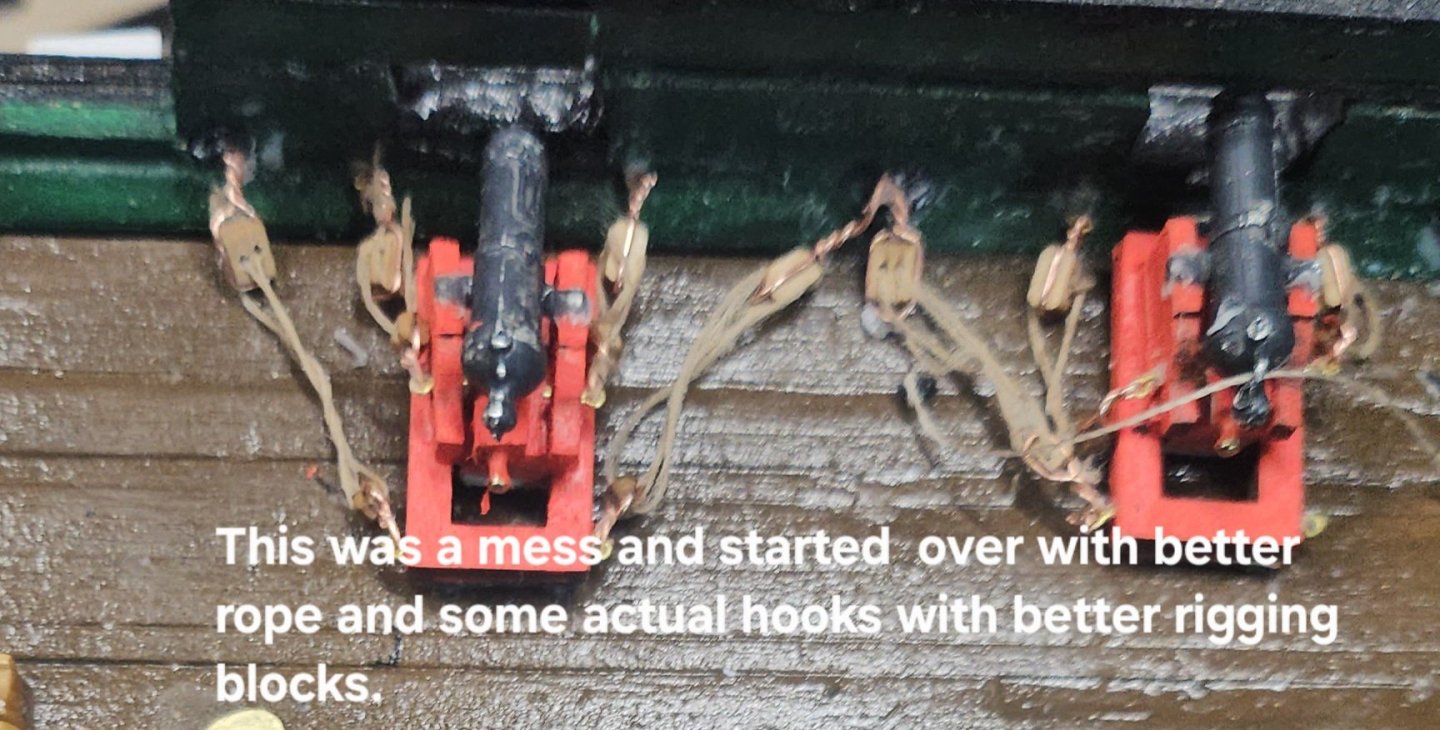
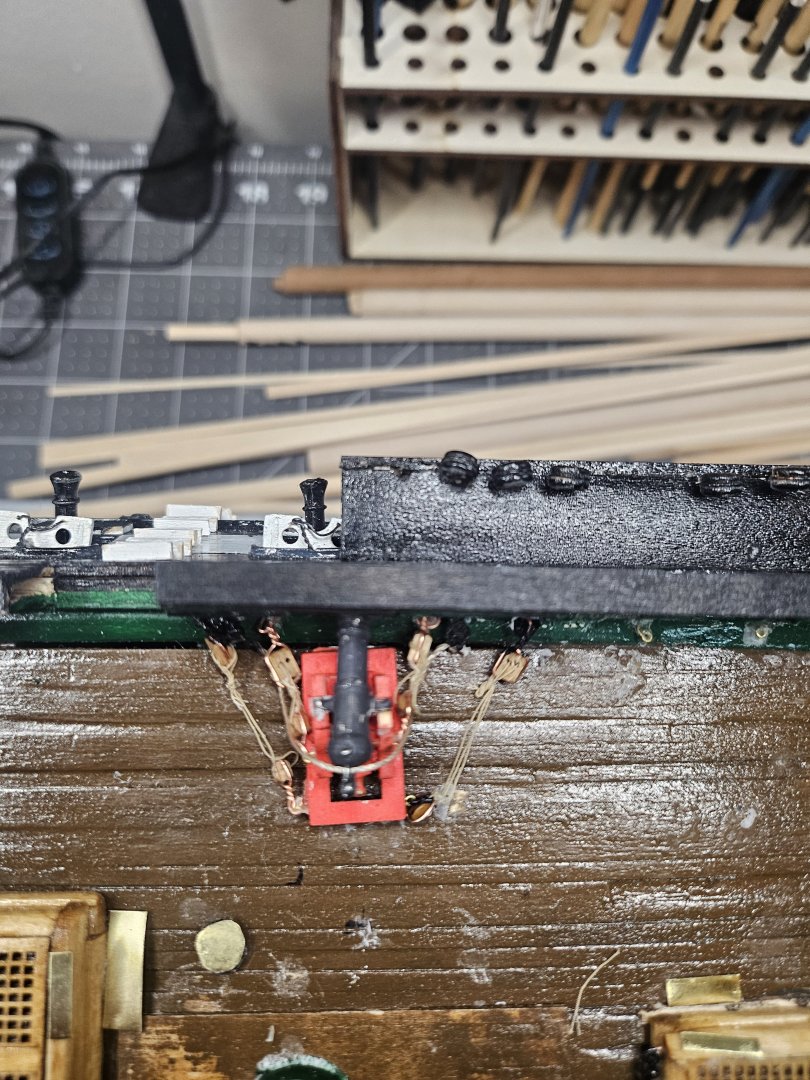
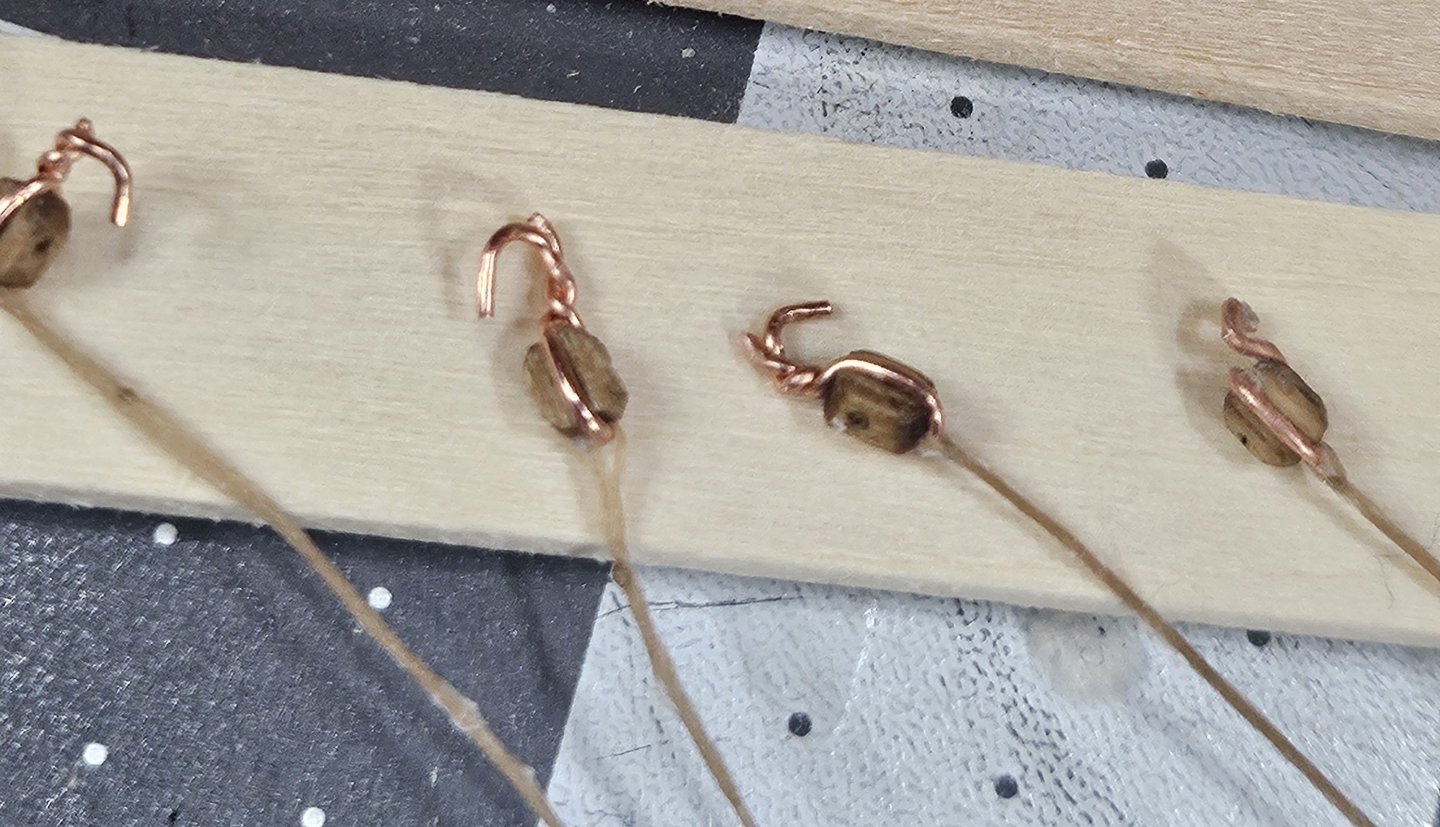
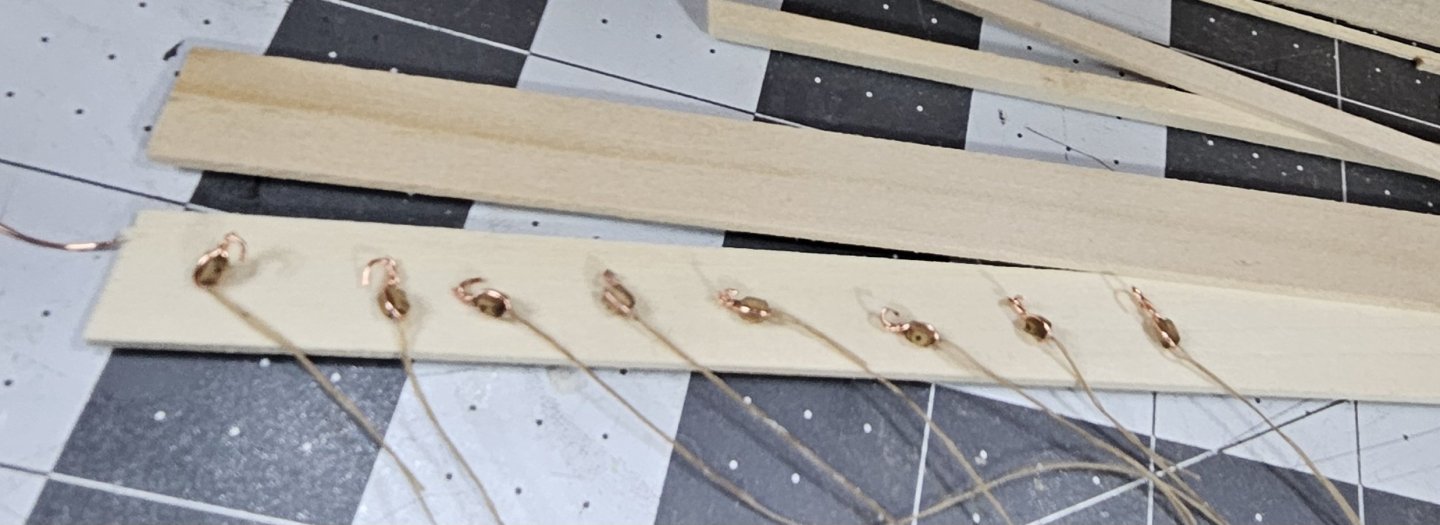
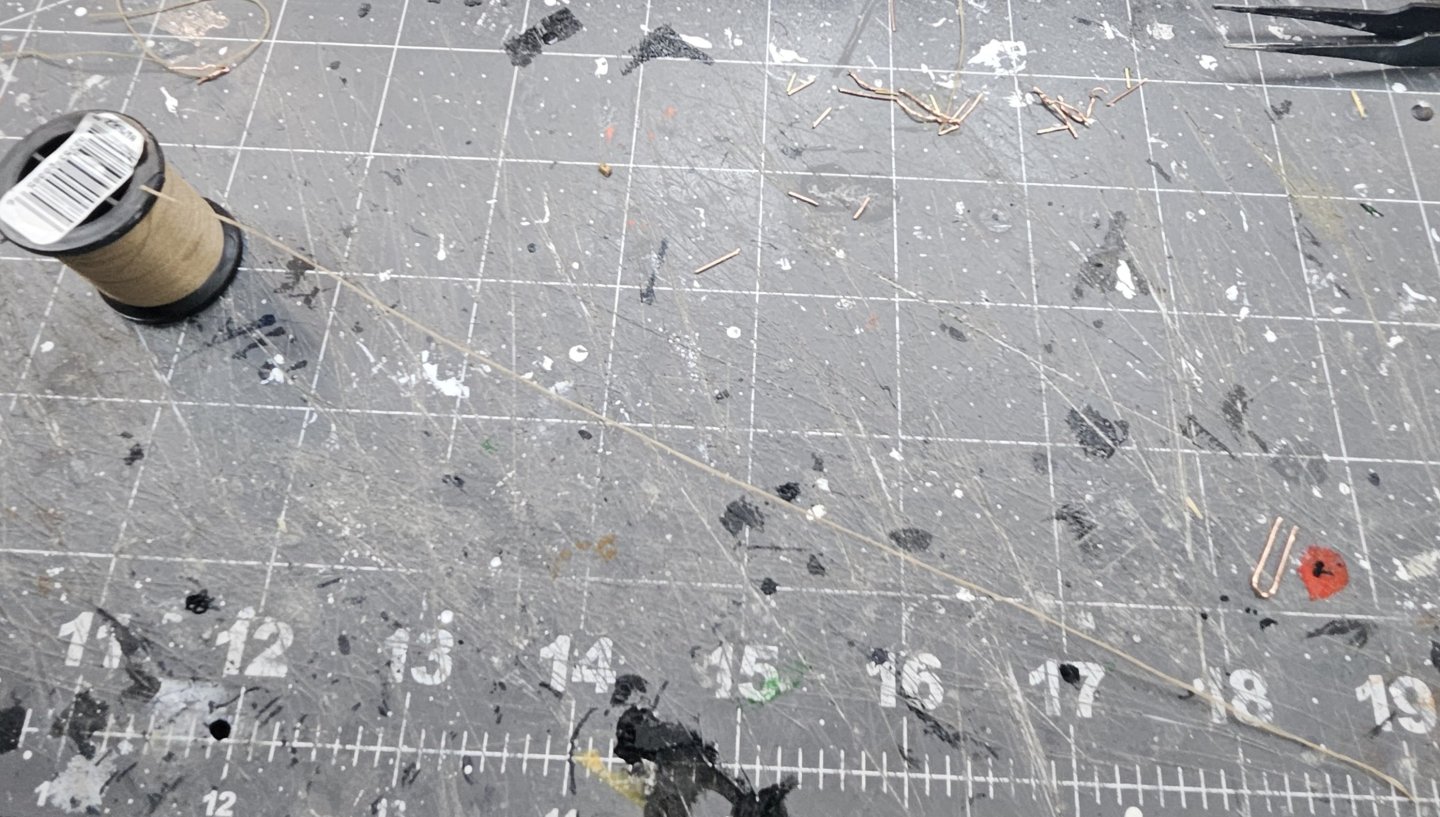
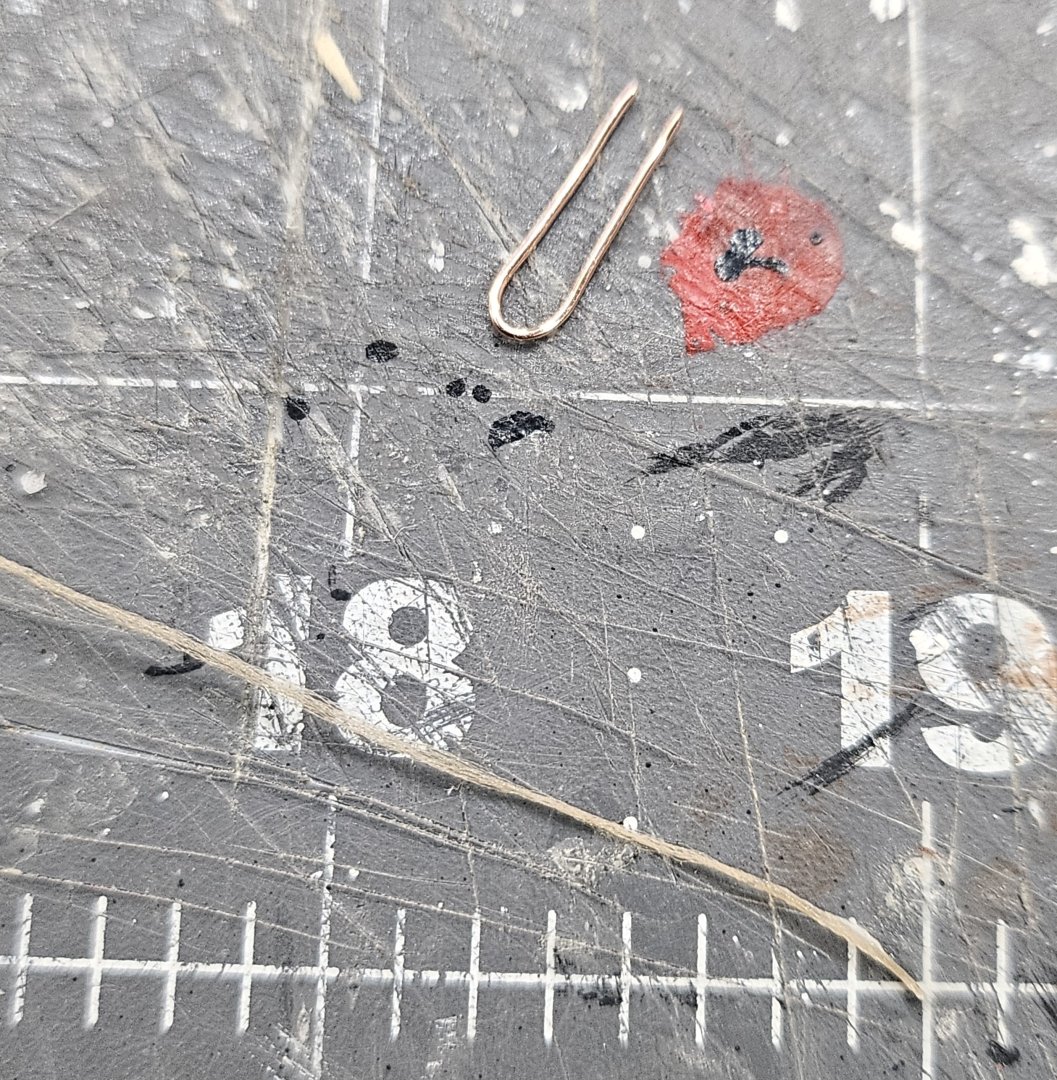
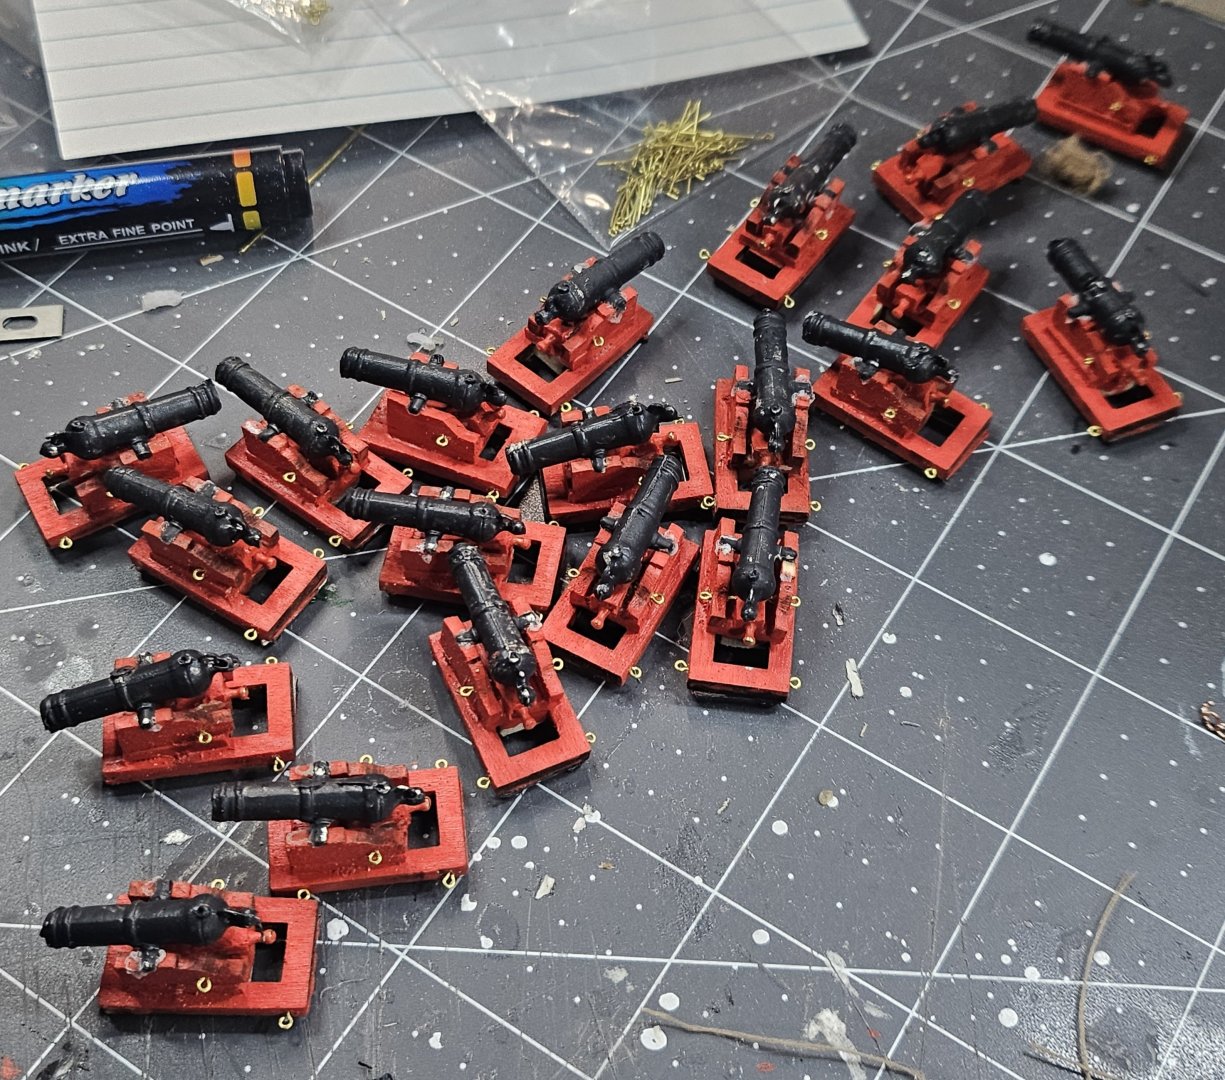
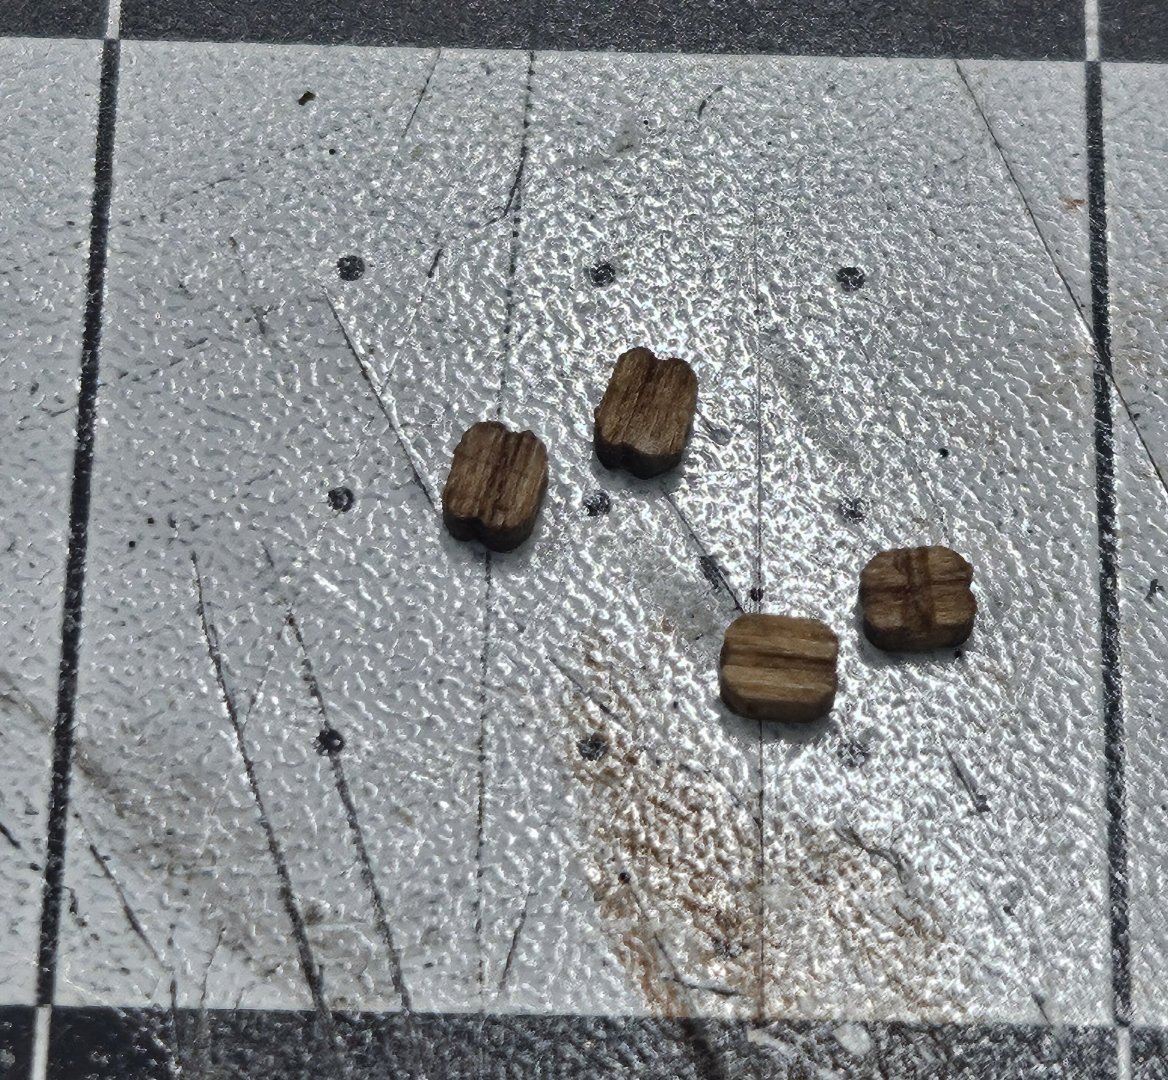
This is just a quick update that is being broken up in chunks because it involves manufacturing several wooden parts that are time consuming which is really an understatement, lol. I would have thought that the ship's wheel and capstan and initial deck work would have been the most challenging but turns out that those turned out pretty well. But I spoke too soon and then found out the hard way that the carronades and rigging, more so the rigging to me is more of a nightmare than I expected, not that it is hard to do, but because of the tiny scale you have to work with along with inadequate size/type of tan thread given in the kit, so I've had to improvise building the 80 to 160 blocks with hooks and seized rope. So, here is what I've had to deal with and I'm almost sure I'm not the only one to have any of the similar issues to solve. So, I built the carronades and put them in the "Cannon Coral." Altogether you have 20 carronades each one is made up of 15 parts. this took several days to make because of the need to paint them and work with parts that require the assistance of fleas to help, These blocks are the smallest in the kit and the most painful to deal with. I put four of these at 3/32 inside of a 1-inch square on my mat. Yes, these are very tiny and required a hook and thread be added. The 1/8 double block is easier to work with and small but only required the hook. In the practicum, Bob mentioned that he originally started with hooks and blocks he ordered from a hobby shop and then realized there wasn't enough to cover half of the carronades, so he switched over to the materials provided in the kit. This required building a hook by wrapping what I think is 36-gauge silver wire around the side with the groove and bending the end for the hook. He does not use the thread in the kit because it was inadequate in size and not made out of nylon. He uses his own line or thread from other ships he has built, so of course when seizing a line, it's not bad because the thread will fall into place and not curl up backwards on you. Yes, he recommends buying a specific wire and thread, but I improvised here because I have wire close enough to the gauge used and ended up using the thread in the kit that was not fun to work with because it truly is inadequate and frays very easily. It was difficult to control and nearly impossible to seize it properly without it fraying, trying to keep the lines in place held together by hand of a clip of some kind. The copper wire I had used before in the kit is what I used for the hooks and of course it can be painted black just like the silver ones. I had disintegrated several of the tiny, microscopic single block trying to get the copper wire and the thread onto it. Doing this 80 times is probably like solitary confinement in prison. So, to improvise the seizing, I would rub CA glue on both ends of the thread to minimize fraying on the ends and most of them were about 4 inches long to give enough slack to wrap around the double block to attach to the ship and the carronades for the rigging. I did this by cutting the copper wire into 1-inch pieces and then folding them in half creating a small semi-loop so I could get the tiny block inside with the groove on top and bottom to capture the copper wire. I would take one end of the thread and tie it around the copper wire with one knot to hold it in place with about an inch of slack to later on simulate a seized line. Whether you seize it or do it the way I did it, you can barely notice any difference because the seizing is primarily on the inside of the line. Once I tied on the thread, I would get my tweezers and move the tiny block right in between the copper loop and thread and squeeze hard to hold everything together and use the needle nose pliers to twist the wire on a couple turns, then trim and curl the tip which was roughly 1/16. I later started using forceps clamps like scissors then to hold everything because my fingertips started killing me because of the death grip I had to put onto the block, the thread, and the wire which turned out to make things a bit easier.one I trimmed the hook, I would spin the end with the hook and the thread several time and spread out about an inch and then use the CA glue and run it up and down that one inch piece and it would not only stay together, but also was flexible to do work like a real rope. The double thread twisted together gives the same appearance as though the thread was seized. Had we been given the correct thread in the kit, sure I would have seized it, but why waste time and money doing the same thing a different way...? It took me about a week to make the first 40 and I still have 40 more to go, plus 80 hooks on the double block, not to mention at least 40 eyebolts, 40 double holed fitting you have to cut from polystyrene, and another 20 polystyrene fitting, and all of this has to be attached to the ship before rigging all of the lines to the carronades. I can only imagine when I get to the actual masting and rigging of the ship, that that will be more traumatizing...this is just a taste, lol.
-
USS Constitution by mtbediz - 1:76
rturcic72 replied to mtbediz's topic in - Build logs for subjects built 1751 - 1800
Wow, you really have an incredible talent to being a true scratch builder. -
USS Constitution by mtbediz - 1:76
rturcic72 replied to mtbediz's topic in - Build logs for subjects built 1751 - 1800
Mustafa, what size are your eyebolts? -
USS Constitution by mtbediz - 1:76
rturcic72 replied to mtbediz's topic in - Build logs for subjects built 1751 - 1800
Does anyone recommend a specific size for the hooks used with rigging the carronades. I Imagine a larger eyebolt size as well... -
USS Constitution by mtbediz - 1:76
rturcic72 replied to mtbediz's topic in - Build logs for subjects built 1751 - 1800
Gregg, thanks for the valuable advice. I definitely want better blocks and deadeyes, etc. I feel the quality needs to be there if you want the ship to look good. I also want hooks instead of making them from wire. They should have included the hooks in the kit. When you make them from wire, they tend to be larger or bulkier. Trying to figure out how much rope you need so there isn't too much slack is the hardest part for me. I had to install 2 eyebolts, 2 horizontal fittings with 2 drilled holes, and the 2 vertical fittings with one drilled hole for the breech and onto the planksheer. The pain with this is that there's not a enough space to work with and since 2/3s of the fittings are polystyrene, you have to make sure the CA glue secures it well, otherwise when you try to hook the rigging and it falls off, then you have to start over again and hopefully none of the holes are blocked with the CA glue. I understand Bob Hunt's quest to make this look like the real thing, but I think good eyebolts are a much better solution. For Mustafa, I would love to come and visit. Last time I was in Turkiye was 2009. I was part of the US Naval Exercise for Baltic Operations 2009 and Turkiye hosted our Guided Missile Destroyer that I was on at the time as a Senior Lieutenant. We pulled into Constantinople and going through the Turkish Straits it was the most beautiful place I've ever seen along with the Grand Mosques that are truly amazing. I was the Officer of the Deck and drove the ship through the straights. I've been around the world 6 times in my 30-year Navy career, and that is the number one country that sticks out that I want to visit again on my bucket list. So, when I think I'm ready, I will definitely drop a line to plan a trip. there is so much to see and do in what is considered a crossroads in the world because of the Ottoman Empire. My entire family emigrated to the US from Croatia. My last name is Turcic which is a derivative of King George Turcin during the Ottoman Empire, so there is some odd connection with my family origin and it's likely a very miniscule piece because I'm not from Turkiye. Anyway, I'm going to try t order some of the rope, and I also think some of the rope might be a bit too small, so I'm open to size recommendations that seem to work since it appears half of the rope in the kit is nt the correct size anyway accoring to the practicum. -
USS Constitution by mtbediz - 1:76
rturcic72 replied to mtbediz's topic in - Build logs for subjects built 1751 - 1800
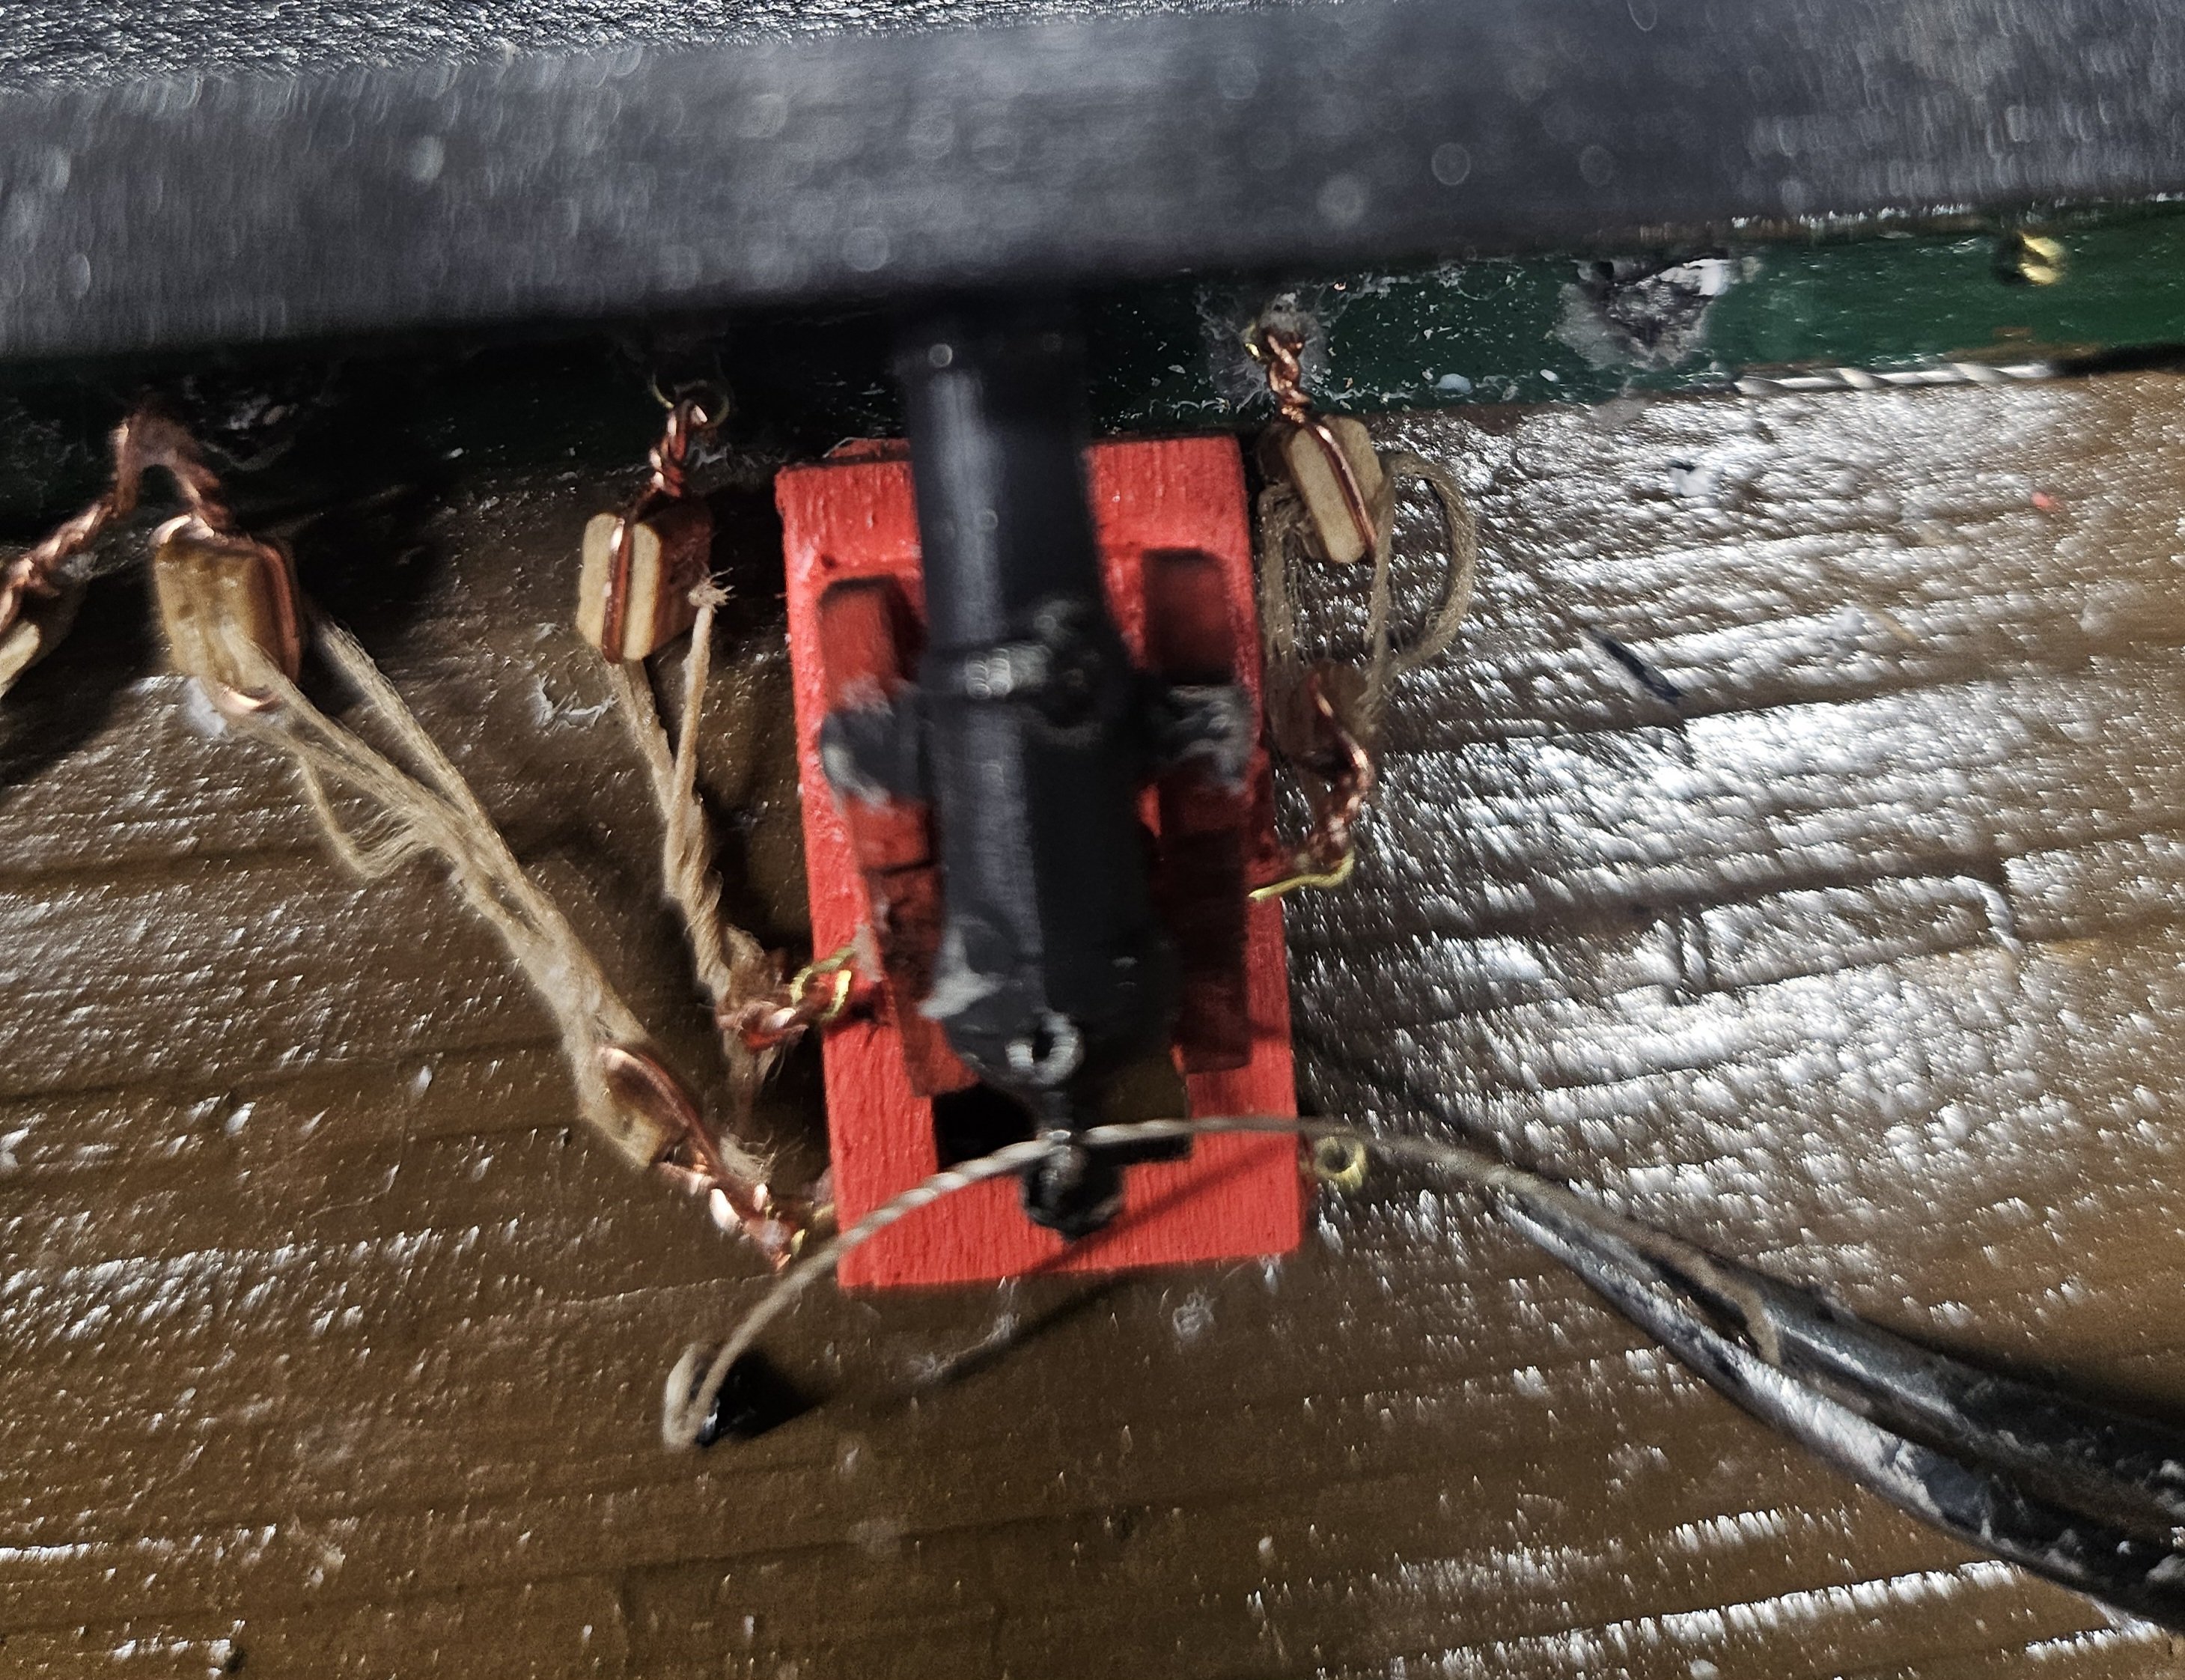
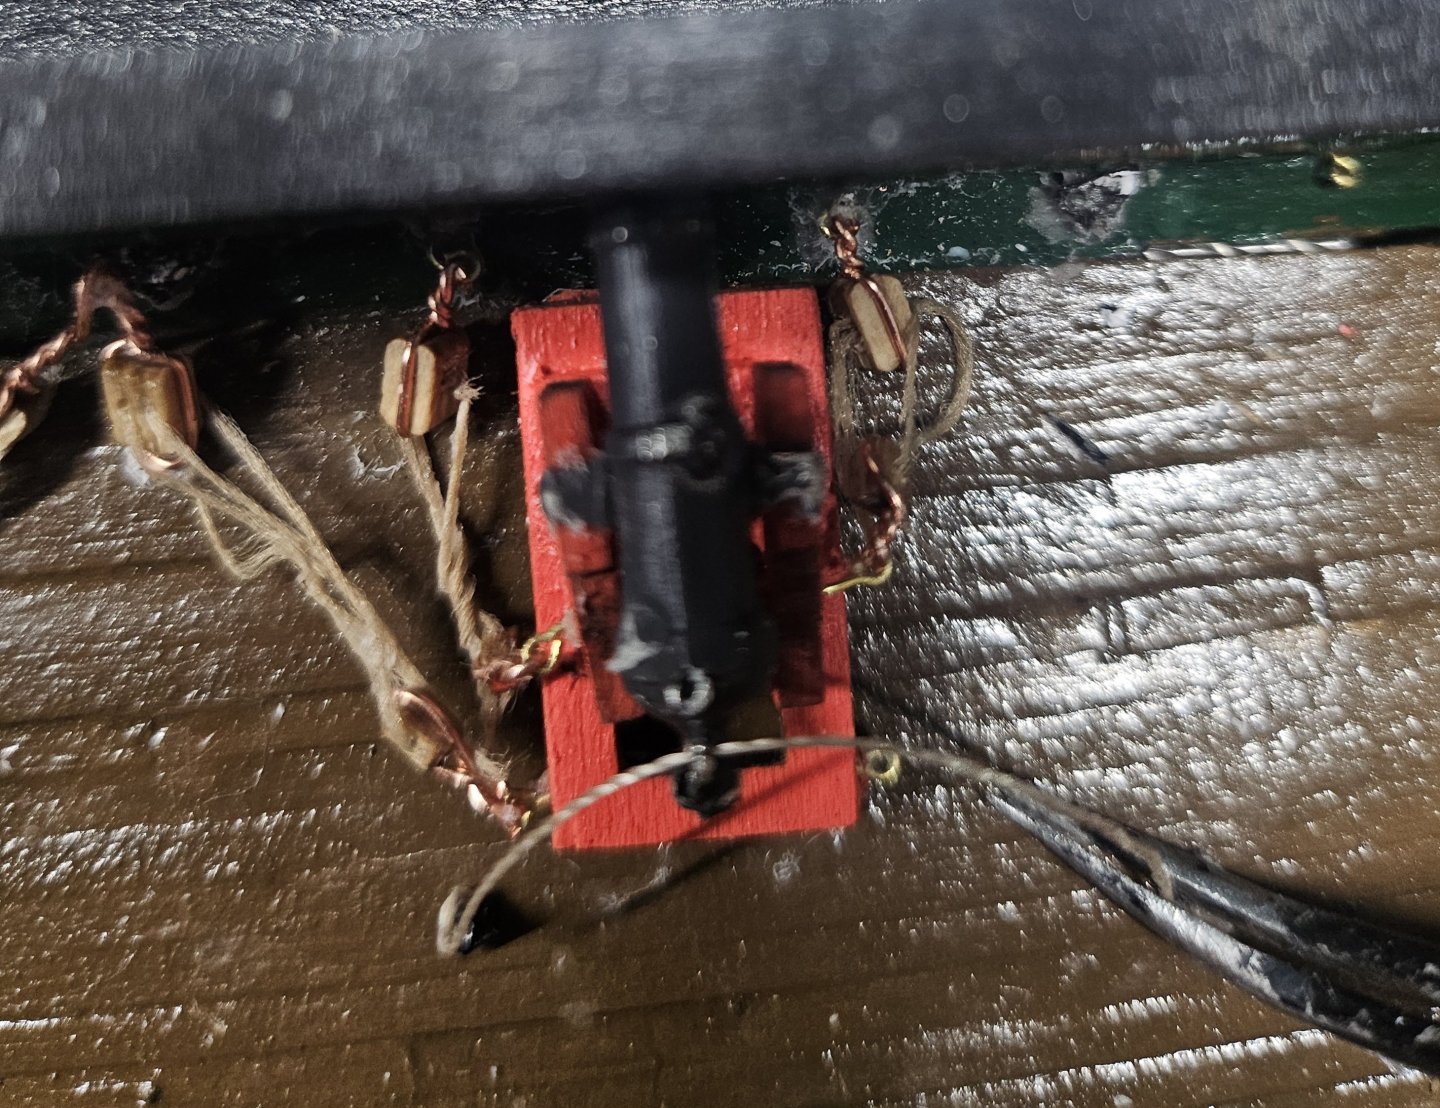
You did an amazing job with the chain plates. Also you carronades are incredible. The thread in the kit is definitely not high quality like yours. You got actual hooks and that was not part of the kit so I had to make those, but yours is so much better and really clean. None of the thread in the kit looks as nice as what you have and we're stuck with it because the holes in the blocks are not large enough for the good stuff. I like that you use eye bolts and think that's a better way to go, unfortunatelywe only get so many in the kit and 4 eyebolts areinstalled on the carriage, 2 in the back where the wheels are, and 2 in the middle wall structure supporting the cannon barrel. The we had to install 2 eye bolts, 1 on each side of the gunport opening, then we had to make these tiny fittings from polystyrene with 2 holes in it and those were glued in the center between every gunport horizontally. Then we had another fitting shaped in a rectangle with a one hole. These were glued between each eyebolt and the fitting with the 2 holes vertically. after those were painted black and glued, you had 2 lines connected from the eyebolt in the middle of the carronade to the eye bolts near the gunport openings. Then you had to rig 2 more lines that were longer connecting the eyebolts on the back of the carronade to 1 hole in the fitting that has 2 holes. The 2nd hole is for the next carronade next to the 1 you're working on. The final thread or rope is for the breech. That rigging line connects to the vertical fitting with the single hole and those are tied in one knot with a drop of glue and then routed through the hole on the breech of the cannon and then tied to the last vertical fitting with 1 knot and glue. So, there are 5 rigging lines for each carronade. You have to glue one of the hooks either on the carronade or the fitting otherwise they will keep popping off because you are manipulating the cannon and then trying to get the hook into the last eyebolt.So this is the challenge I have to deal with for the kit. Sure doing this by hand brings out a unique type of authenticity, but really, it's a pain in the A$$ because it takes a long while to make sure the lines are long enough and that can change for each carronade. Getting the right rope size is what's killing me right now. -
USS Constitution by mtbediz - 1:76
rturcic72 replied to mtbediz's topic in - Build logs for subjects built 1751 - 1800
Jon, you're absolutely right. The glue does help, and the thread is still flexible. The challenge is making the size adjustments between the fittings on the ship to the carronades. So far, it has taken me two days to rig two carronades. The first one came out pretty decent, but not perfect because this is my first time working with very tiny parts. The second one was a little tough because I made them a couple millimeters longer than they should be, so I've been working around that. I also used the original thread for tying the breech. After seeing the first one, I decided to use a thicker thread instead. The original thread was already known to be inadequate. I use the original thread for rigging the carronades and the thicker thread that is fray resistant for the breeches. -
USS Constitution by mtbediz - 1:76
rturcic72 replied to mtbediz's topic in - Build logs for subjects built 1751 - 1800
You definitely make it look perfect. I started rigging the carronades on the deck and that has been a painful and time-consuming process. Trying to push thread through such tiny holes is just something else and lots of trial and error figuring out how long to make the lines so that when they connect the carronade to the fitting on the ship it looks tight and neat...none that I have accomplished yet, lol. I really don't know any easier way, but to move at a snail's pace and do it really slowly. -
I almost feel as if some parts are missing on purpose because at certain points in the practicum, you've learned some skills that would be used in those missing areas. So, maybe there was no mistake, but it's still a gap. It would be great if I had some of the big tools for woodworking. The best tool I have is by beloved 1000W Laser engraver and cutter that can go through 1/4-1/2 of wood. At least if I did my first scratch build, I could still do it by hand, but I would be able to laser cut my own wood and parts using the plans provided the plans are reliable. The only power tools I have are a good Dremel tool with all attachments, a small table saw, a small wood lathe, and a small grinder and belt sander machine. I've only used the wood saw and grinder and sanding belt once. And I think that's only because half of my free time is at night and when everyone is sleeping, I don't like to make a whole lot of noise. I don't think my small table saw could cut or mill wooden strips, or at least I'm not sure how to do it, what attachment or blades and sizes of blades to make my own strips for decks and/or planking. I could probably find how to do this on You-tube. Anyway, thanks for the compliment and knowing that it's been mainly by hand, makes me feel more valued for an accomplishment like this as well as knowing this is not only my first build, but also told by many experienced builders one of the most difficult to do and then recommended I start with the 3-boat kit as a precursor. I guess what motivated me was that in one of the forums it said that it was rare for a new person to finish their wooden ship, especially the Conny, and there have been only a couple rare instances of someone new able to pull this off successfully. I was drawn towards the challenge of doing it, as well as challenging myself and abilities that I may not have discovered before. I find it very relaxing doing this but also feel the same frustrations as others in certain areas of the plans and practicum, even though I have to give credit to the practicum at getting me this far. I'm very happy being part of this group of like-minded folks in a somewhat rare type of model building/assembling compared to plastic models that most of us started with.
-
USS Constitution by mtbediz - 1:76
rturcic72 replied to mtbediz's topic in - Build logs for subjects built 1751 - 1800
Literally amazing and impressive! -
USS Constitution by mtbediz - 1:76
rturcic72 replied to mtbediz's topic in - Build logs for subjects built 1751 - 1800
Wow, I'm impressed with the craftsmanship...definitely first rate! And this is what separates the scratch builders from kit builders. We had to take the deadeyes and wrap wire around the deadeye and then solder that to the brass strips they placed in the kit. This makes me wonder when someone sees the perfect scratch builder Conny versus kit builders, mostly using hand tools and imperfect, which one would appeal more to someone if they were in a museum and view both versions? I personally would lean towards the scratch build because it's still based on plans that are in scale just like kit builders. Making it as clean as yours brings in a lot of appeal. The flip side to this I think is that there a folks out there that like the imperfect hand build because the real Conny is not symmetrically perfect and you can tell everything is still handmade on the ship to preserve its look. I've had friends tell me how the ship looks awesome, but I always say none of it is perfect and point out the flaws in what I've done. There are several areas I had to reconstruct or modify to make it work and make sure it looks like it's supposed to based on the plans. I had to improvise a little recently because of the hooks and rigging for the carronades, but essentially accomplishes the task at hand. -
USS Constitution by mtbediz - 1:76
rturcic72 replied to mtbediz's topic in - Build logs for subjects built 1751 - 1800
I'm sure your deadeyes are much better quality than what they give in the kit. I disintegrated several of them along the way, lol. -
USS Constitution by mtbediz - 1:76
rturcic72 replied to mtbediz's topic in - Build logs for subjects built 1751 - 1800
Mustafa, are you planning on rigging? -
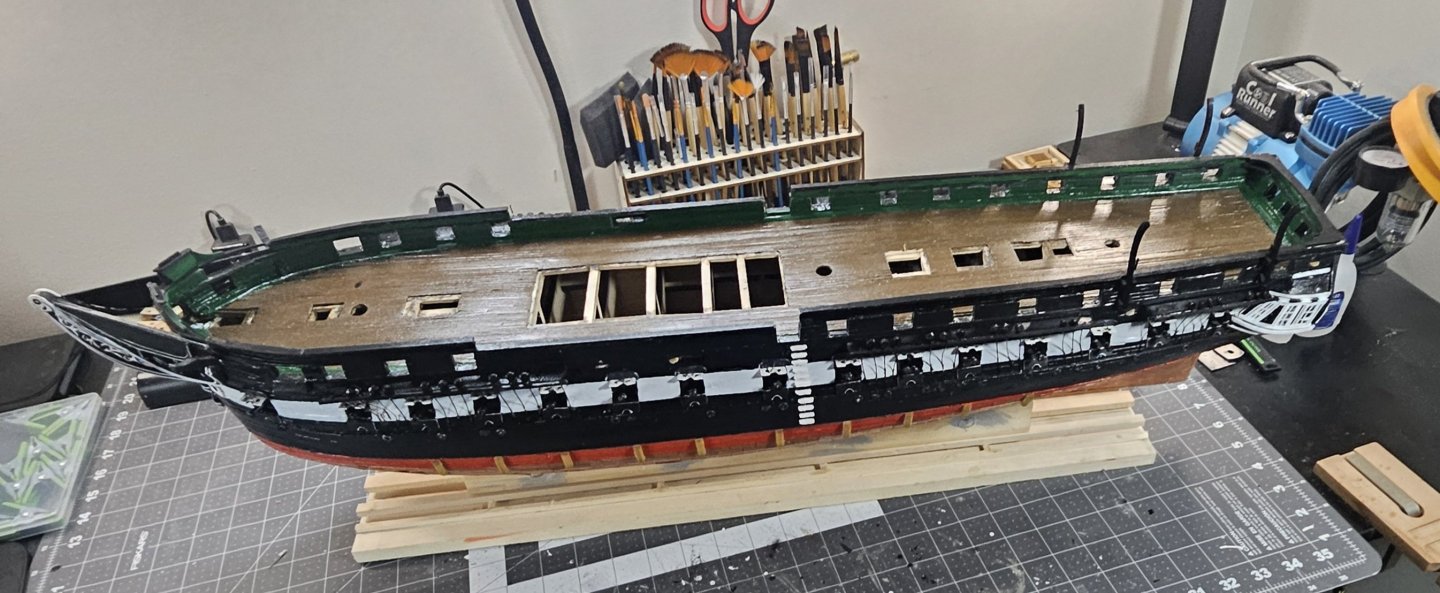
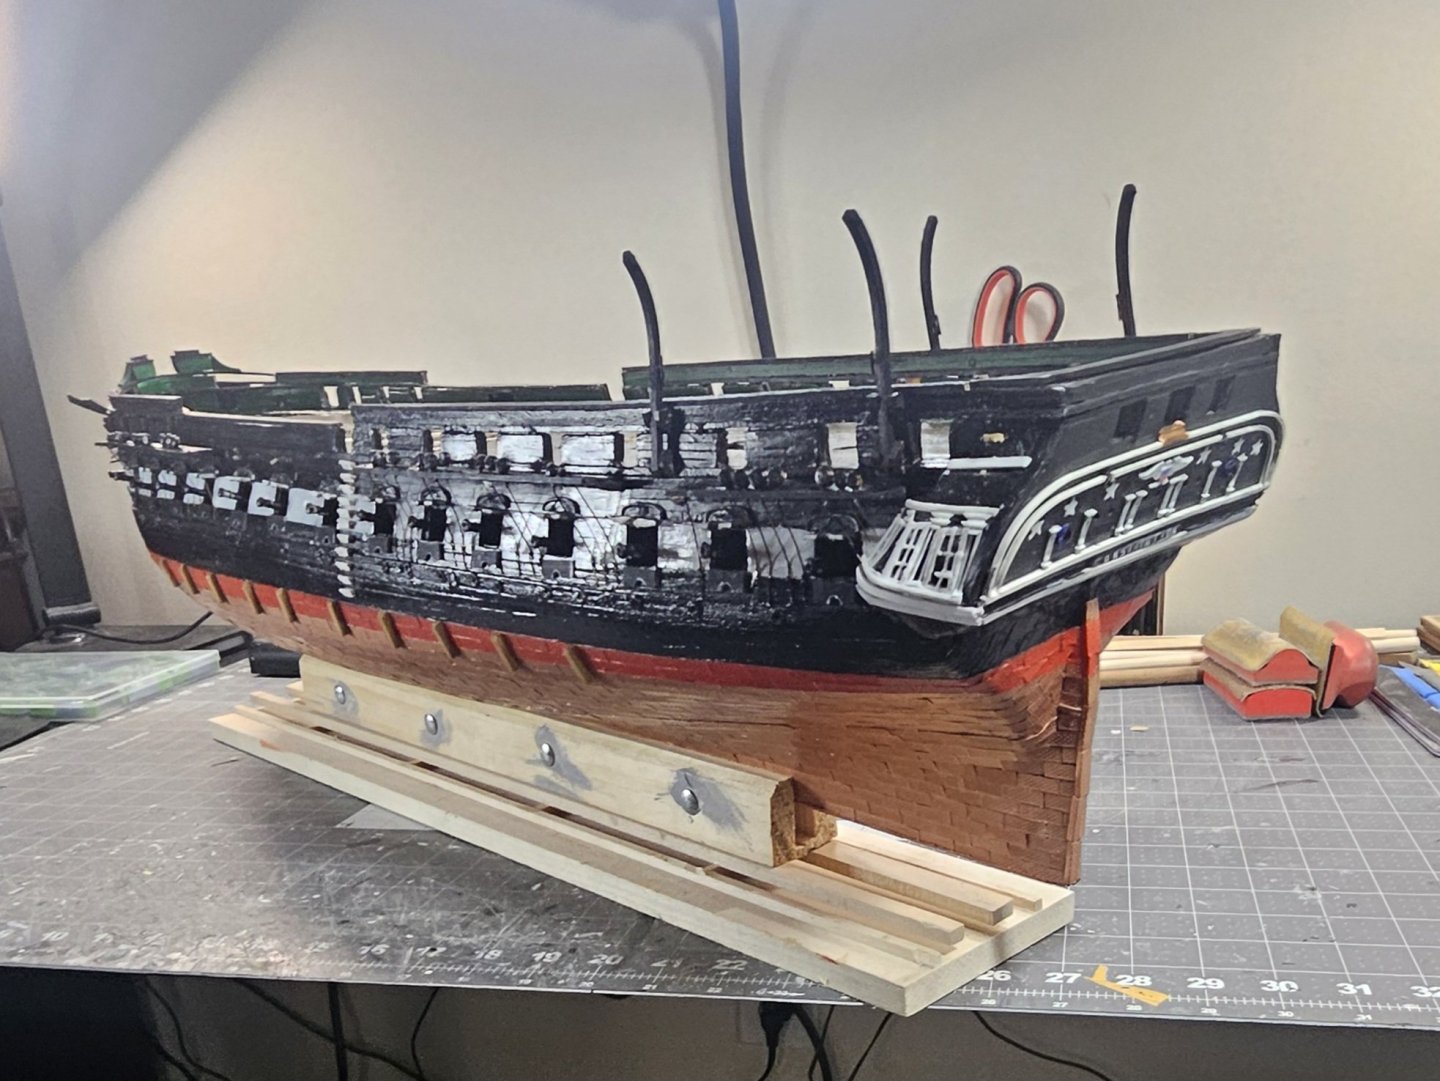
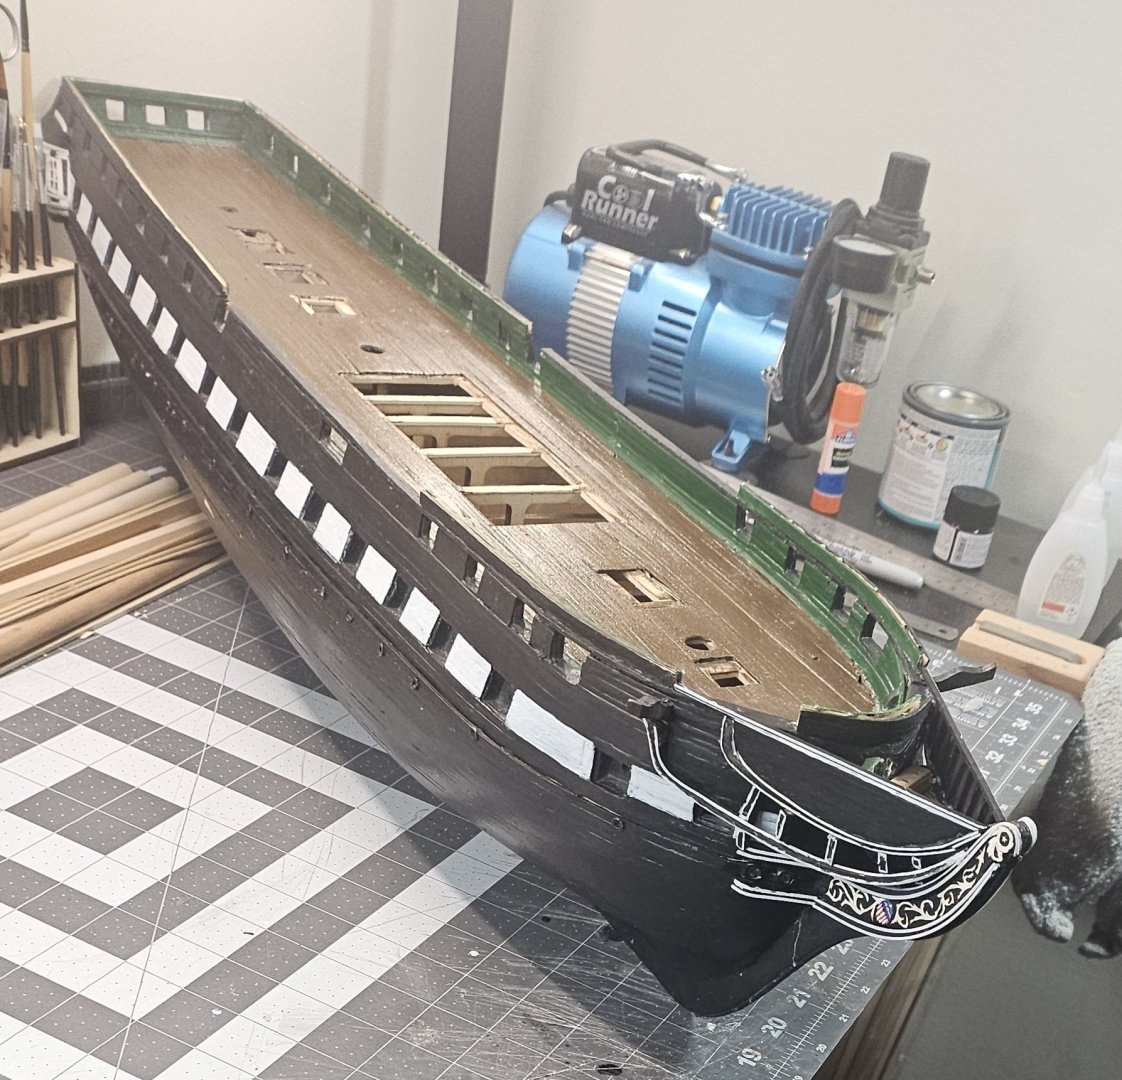
Alright, Chapter 10 ia now complete with all of the hull work. It was more detail than I expected and eventually made it through that milestone, but also getting used to constantly fabricating parts for the Conny. I'm not sure if it is like this with most wooden ship model kits. Fabricating tiny pieces is certainly a test of one sanity for sure. It took me a while to do the davits at the stern of the ship. Drilling like a million holes to cover rigging, several eyeballs, 5 wooden pieces per each of the 4 davits. Anyway, I was relieved when that was over and finished up the top gallant rail and a part of the main rail at the bow with a couple pieces in the front. Maybe I'm losing my mind, but I don't recall seeing any instructions in the practicum on that, and went through the practicum again and it talks about them, but then it would be followed up by Bob stating we'll worry about that later. We'll that later never came, lol...but I went back into the plans, and then looked at pictures in the forum and finished them that way. Now I get to go back to the deck and build that out before entering into the realm of rigging.


-
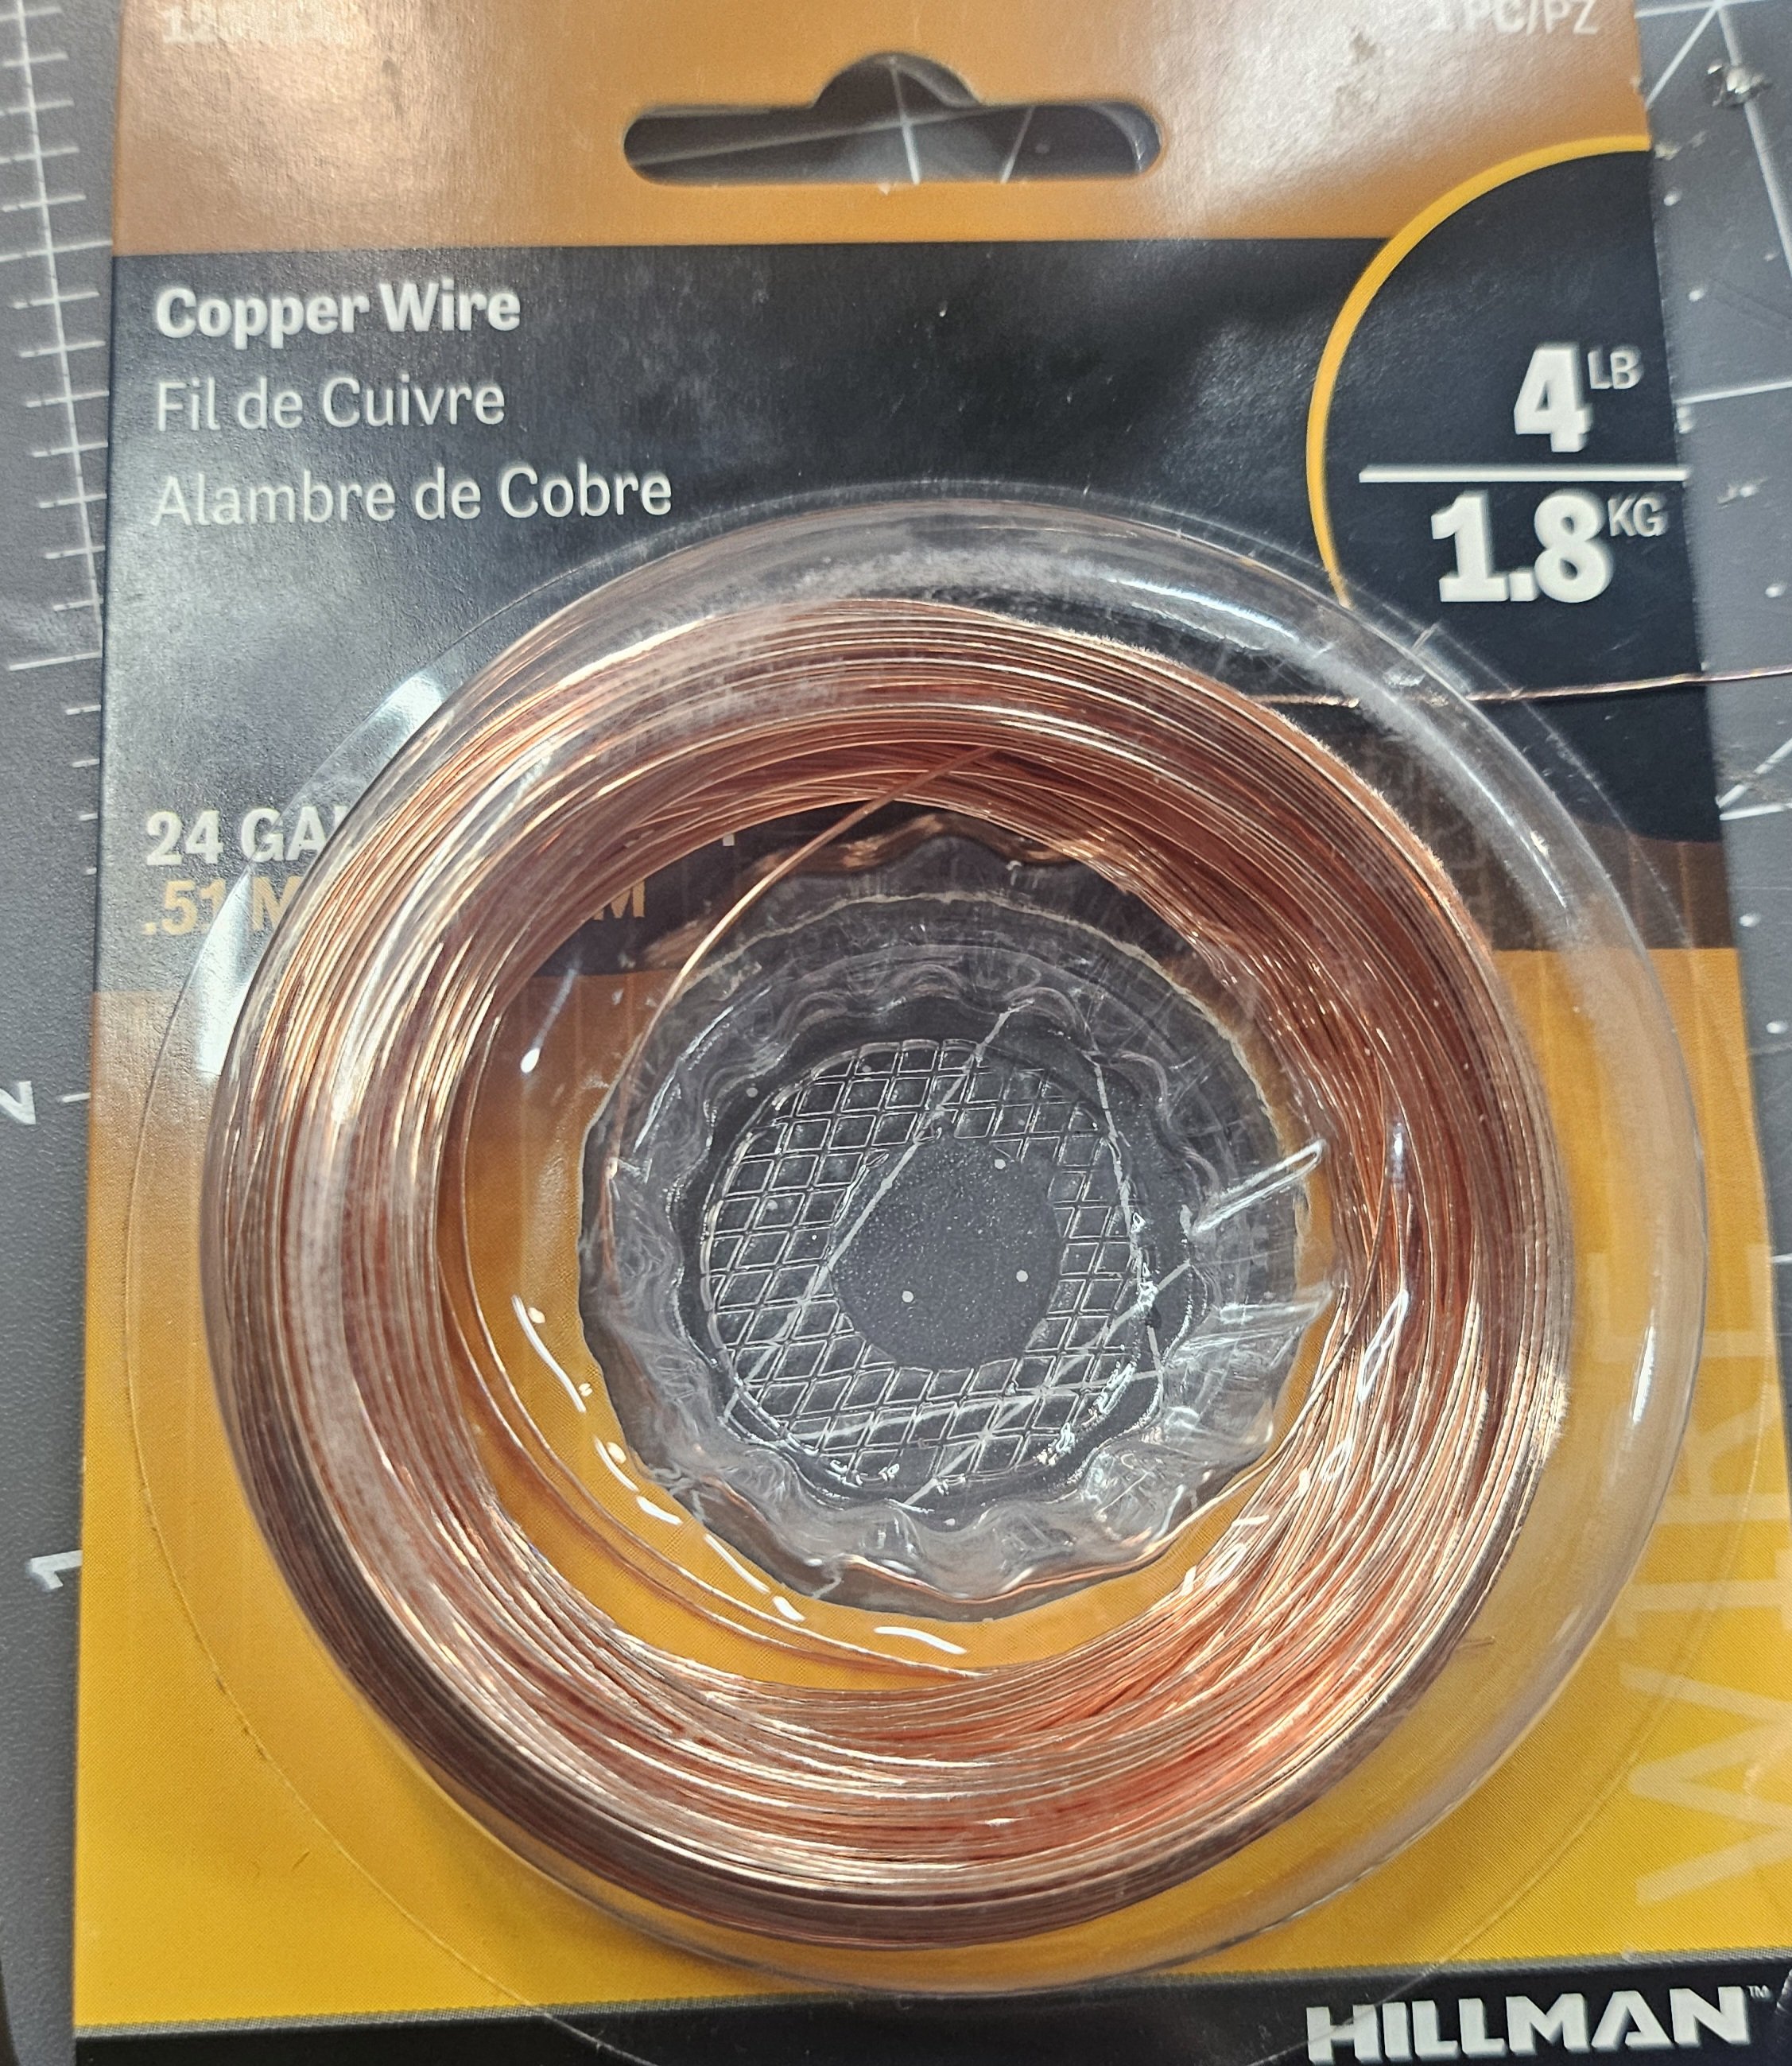
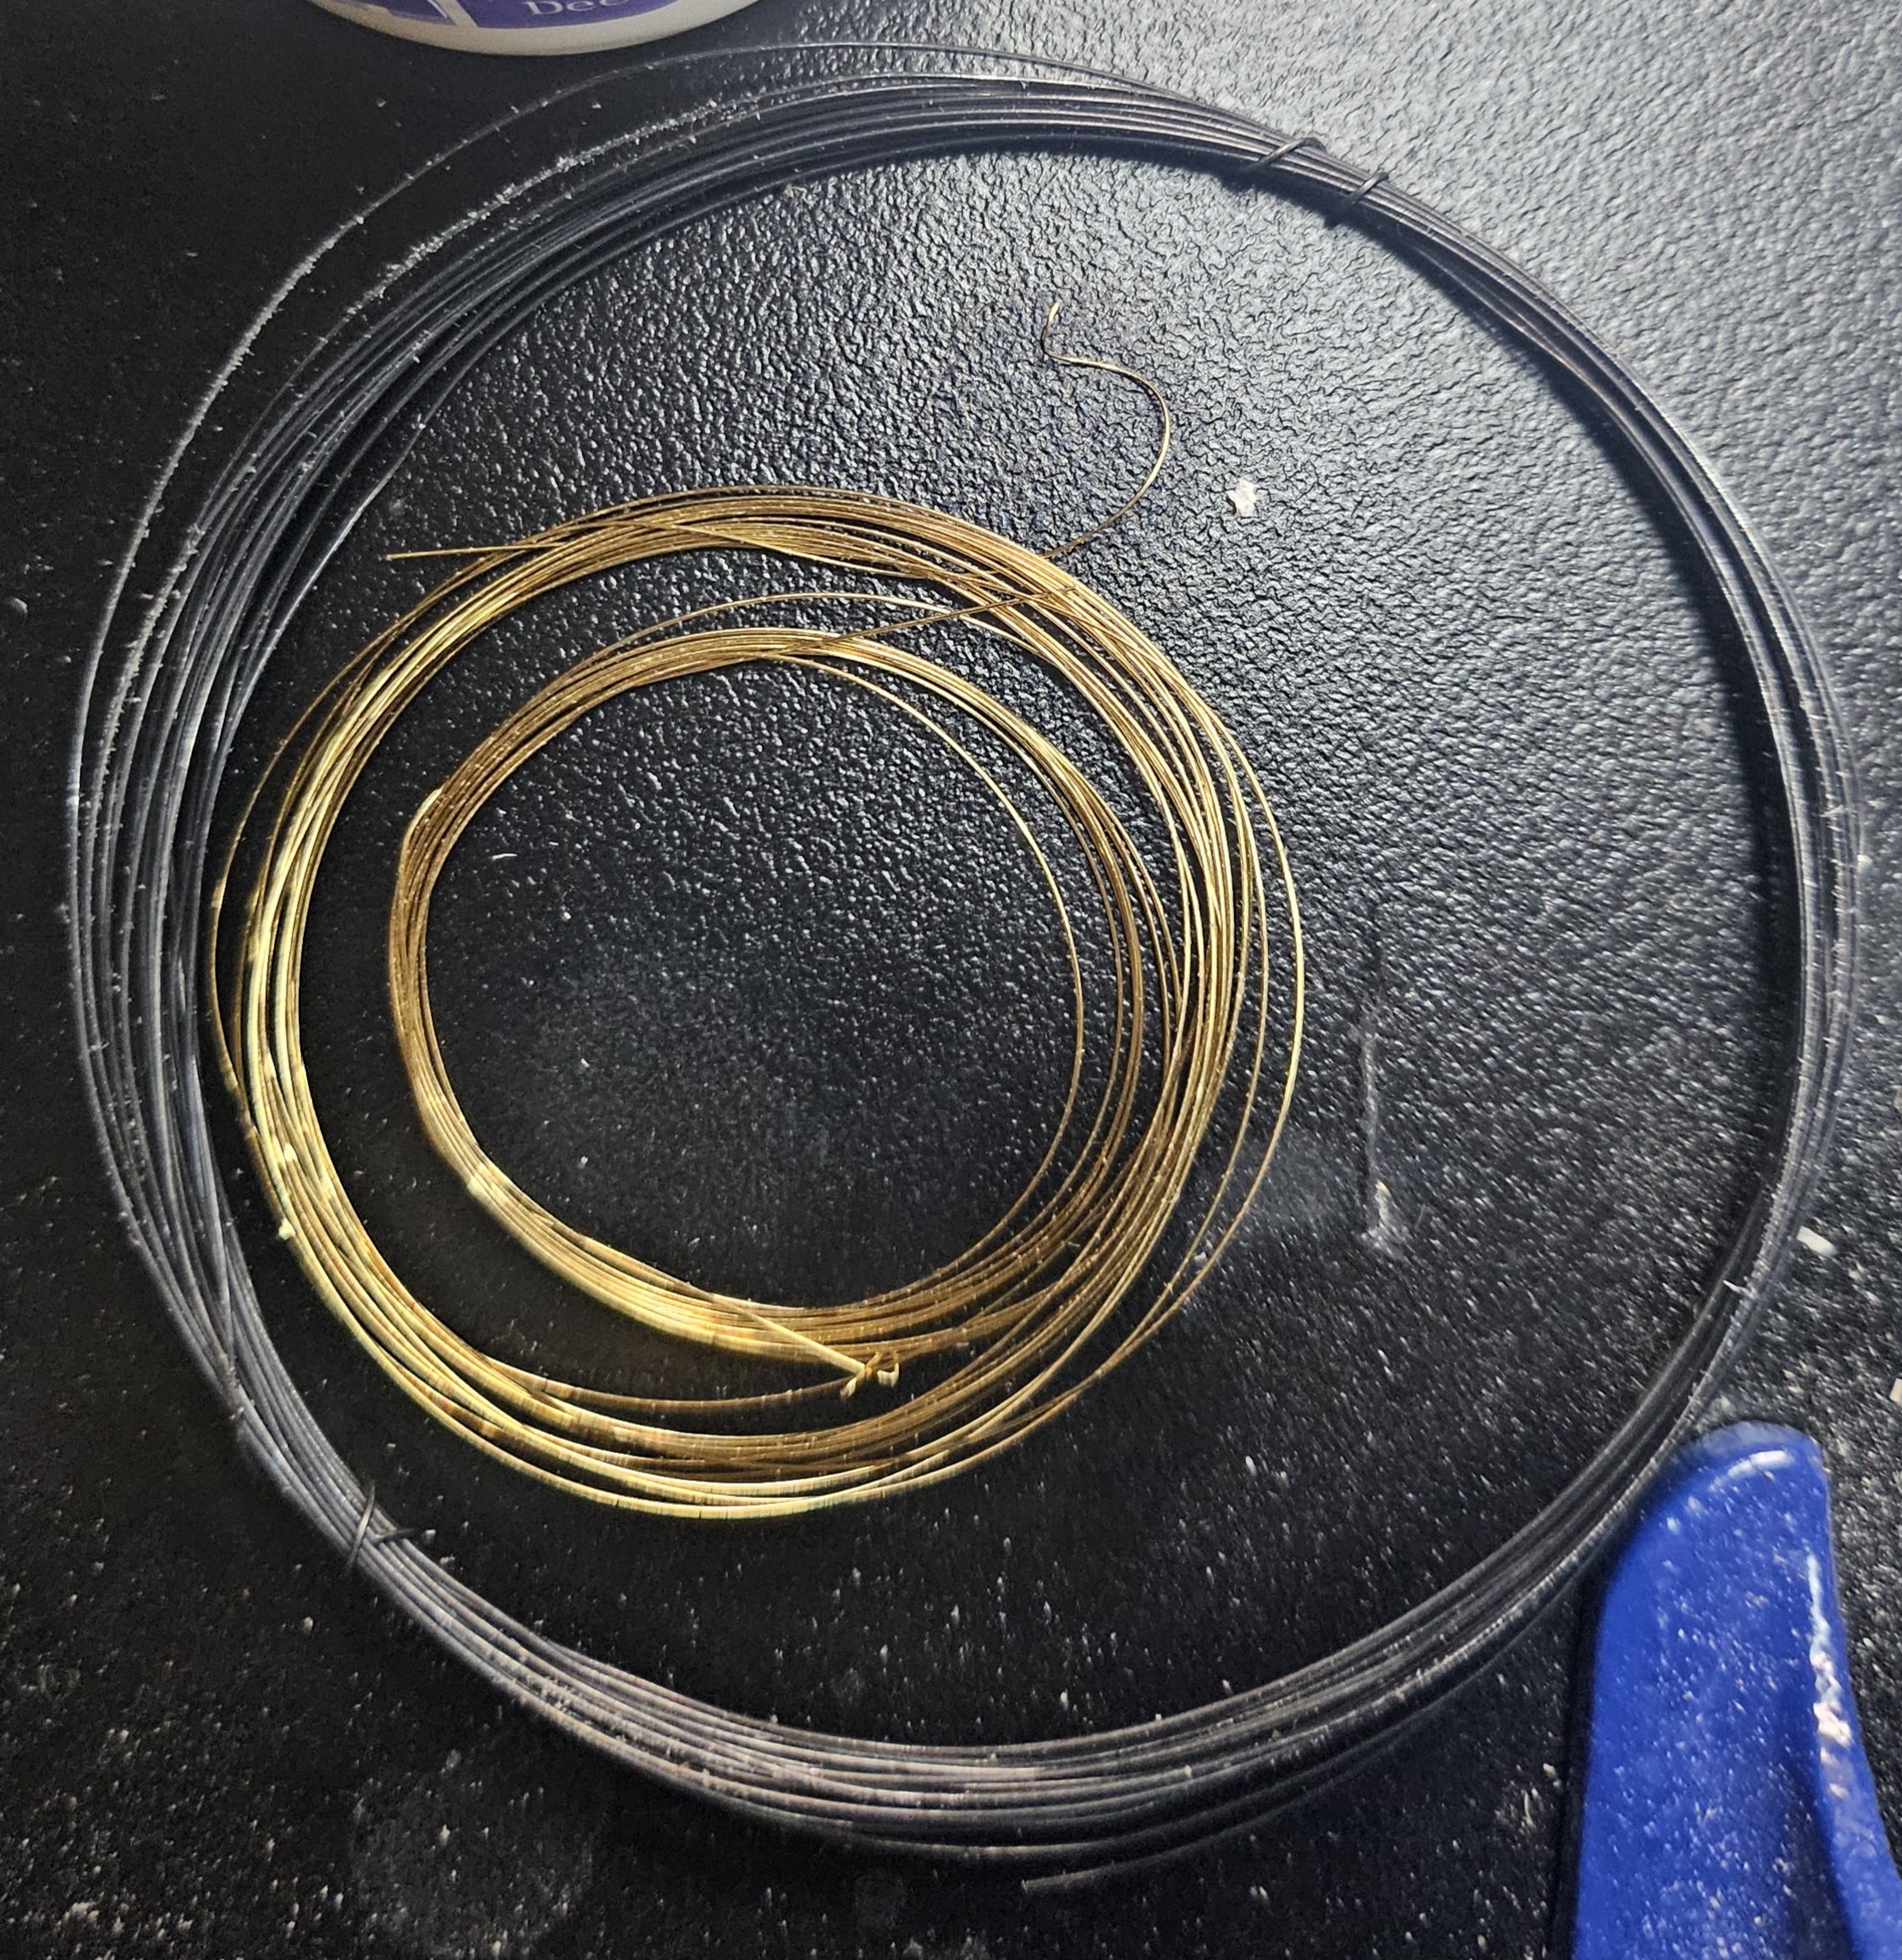
The copper wire was definitely more stable than the brass. If I were to attempt to double loop it, it would be hard to hold together in my opinion and probably break again. I was very surprised with how easy brass wire that gauge breaks, but the copper wire was perfect and filled in the groove in the deadeye. But once you paint everything black and being that tiny, you could never see if they are double wrapped or not, but the picture you show is actually a really good shot.
-
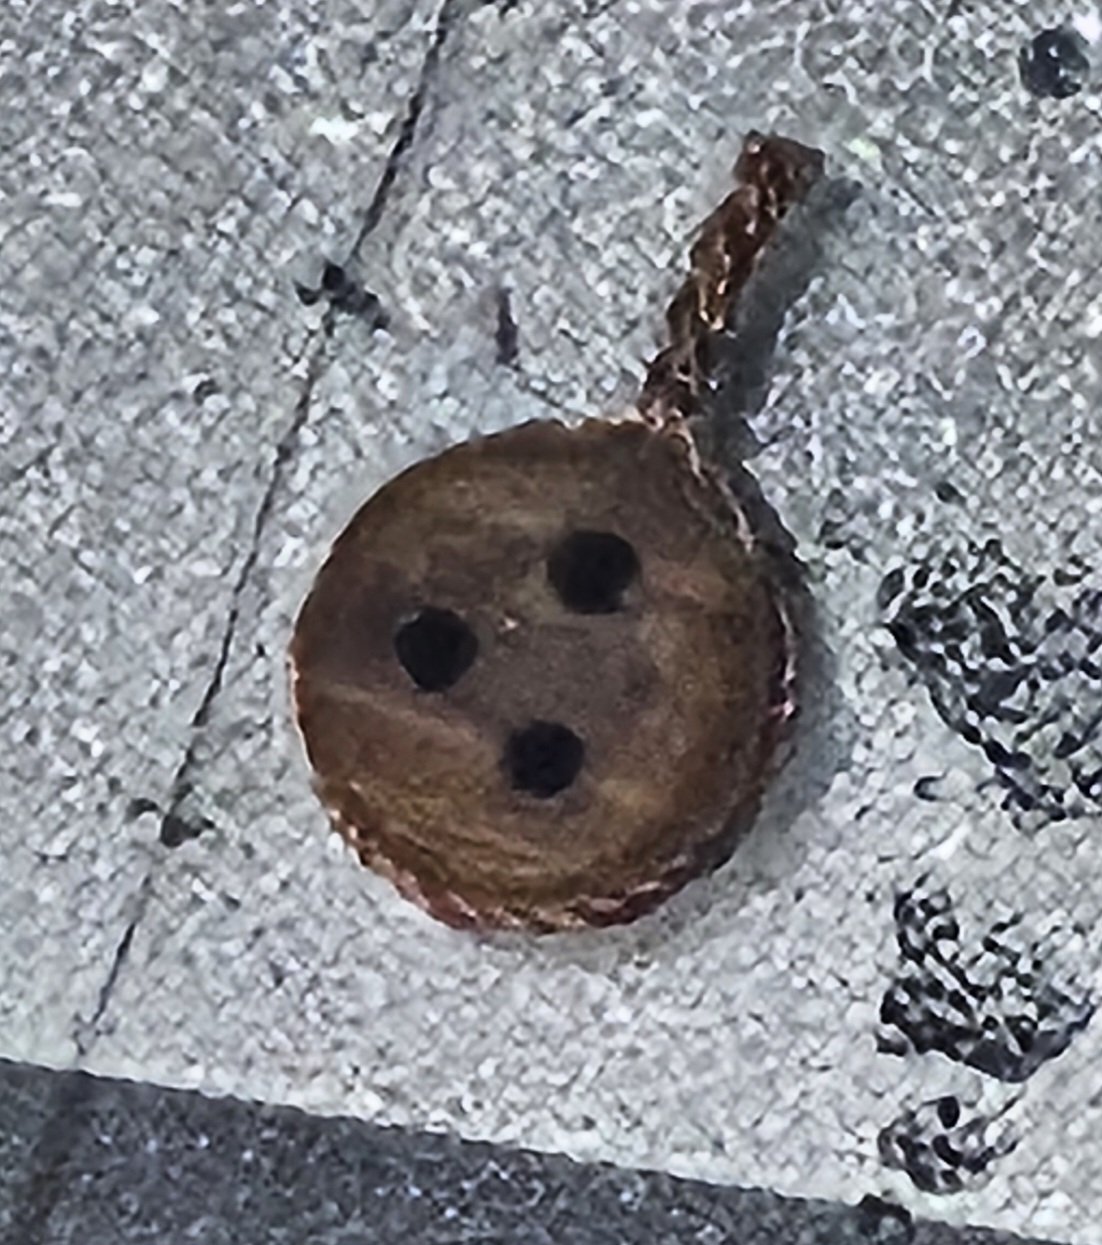
Everyone, my apologies for not releasing my post, somehow, I got sidetracked and forgot the send button. Anyway, here is the latest somewhat... While I'm working on the channels, deadeyes, and eye chains, etc. There are definitely some things I wish I knew before this part of the build. The practicum seems somewhat incomplete, but I think Bob Hunt expected us to figure this out based on what we've learned thus far throughout the course of the practicum. I read a lot, but if the reading gets very complicated to understand, if you show me a picture what it should look like, it will click in, and I can certainly get it done that way. The ship's plans also get complicated because some things seem to be off or missing altogether. Most builders can solder well or make a mess doing it. I can for the most part do well because before I became a Navy Officer, I started off Enlisted and flew as an Aircrewman and Rescue Swimmer, but also an Aviation Electrician's Mate. So, we fixed what we flew. Some areas that would have helped before I started, but I'm hoping new assembler/builder would know about this particular Conny kit, so they can make their own decision on what approach they want to take. For starters, choosing brass wire for the deadeyes was clearly not a very good idea, particularly the gauge of the wire. The wire does not twist well and breaks very easily. It does not conduct the soldering iron temperature very well and you find yourself taking forever to heat it up, let alone soldering the strip which is also bass. In other words, the choice of this to include in the kit totally sucks and was a poor choice. The wire is kept breaking on me as I tried to twist it onto the eyebolt. Solder does not adhere to brass very well at all, so trying to solder the brass wire around the eyebolt to the brass strip was a complete waste of time. My solution was to get some copper wire that was a slight gauge thicker than the brass. The copper wire was perfectly strong and easier to twist on and keep it there and finish it off with a pair of needle nose pliers to tighten it up against the deadeye and none of them broke. To solder the deadeye to the eyebolt strips, I used my magnifying stand that had clips and arms to hold each piece separately. you can tin each piece before soldering them together, however, tinning the strip being brass was just a waste of time and copper took to it immediately. The easiest way and the fastest way without making a mess and using as little of the surface area was to position the brass strip on top of the deadeye copper wire that was trimmed down to 3/32 and then place the soldering iron needle under the copper wire and use the flux core solder from the top. it would be instantaneous and no waiting to hear up like the brass wire. Doing it this way makes the smallest possible amount of solder to adhere to joining both pieces quickly because the solder immediately goes to the copper wire first and enough to cover it, and the strip of brass gets caught in the melting action and when you remove the soldering iron you'll find that the strip did connect and notice it isn't globby from the solder. This makes it ideal to fit in the grooves you created in the channel. This then leads into the channel portion and the grooves you created for the eyebolts and deadeyes, these need to at least 1/16 wide and deep for the copper wire and strip to sit in the groove comfortably before using the 1/16x1/16strip of wood across the channel over the eyebolts covering the soldered areas and enclose nicely. I recommend getting the eyebolts on the channel, closing it up and then painting them before gluing the channel onto the hull. Bob had given measurements for each of the eyebolt strips, and I found those as really unnecessary. Everything seemed to be the same distance and more even than making a couple of them vary in length. I also am not sure how those rivets even fit inside the eyebolt because it is just ridiculously tiny, and my hand is certainly not steady to try to go through the strips into the hull. I end up simulating to bolt top with globs of paint, however, even if I used the rivets and survived that ordeal, you can barely notice them unless you have your face up to the hull. It seems a bit unrealistic with .035 rivets to fit in like that. simulating them much easier, but barely noticeable to the naked eye. This is my take on this specific part of the build. I'll include pictures later today of at least one side that was completed. so, preparing the deadeyes and soldering them to the eyebolt strip began as like 2-3 per hour to 10-12 per hour...major difference here.
-
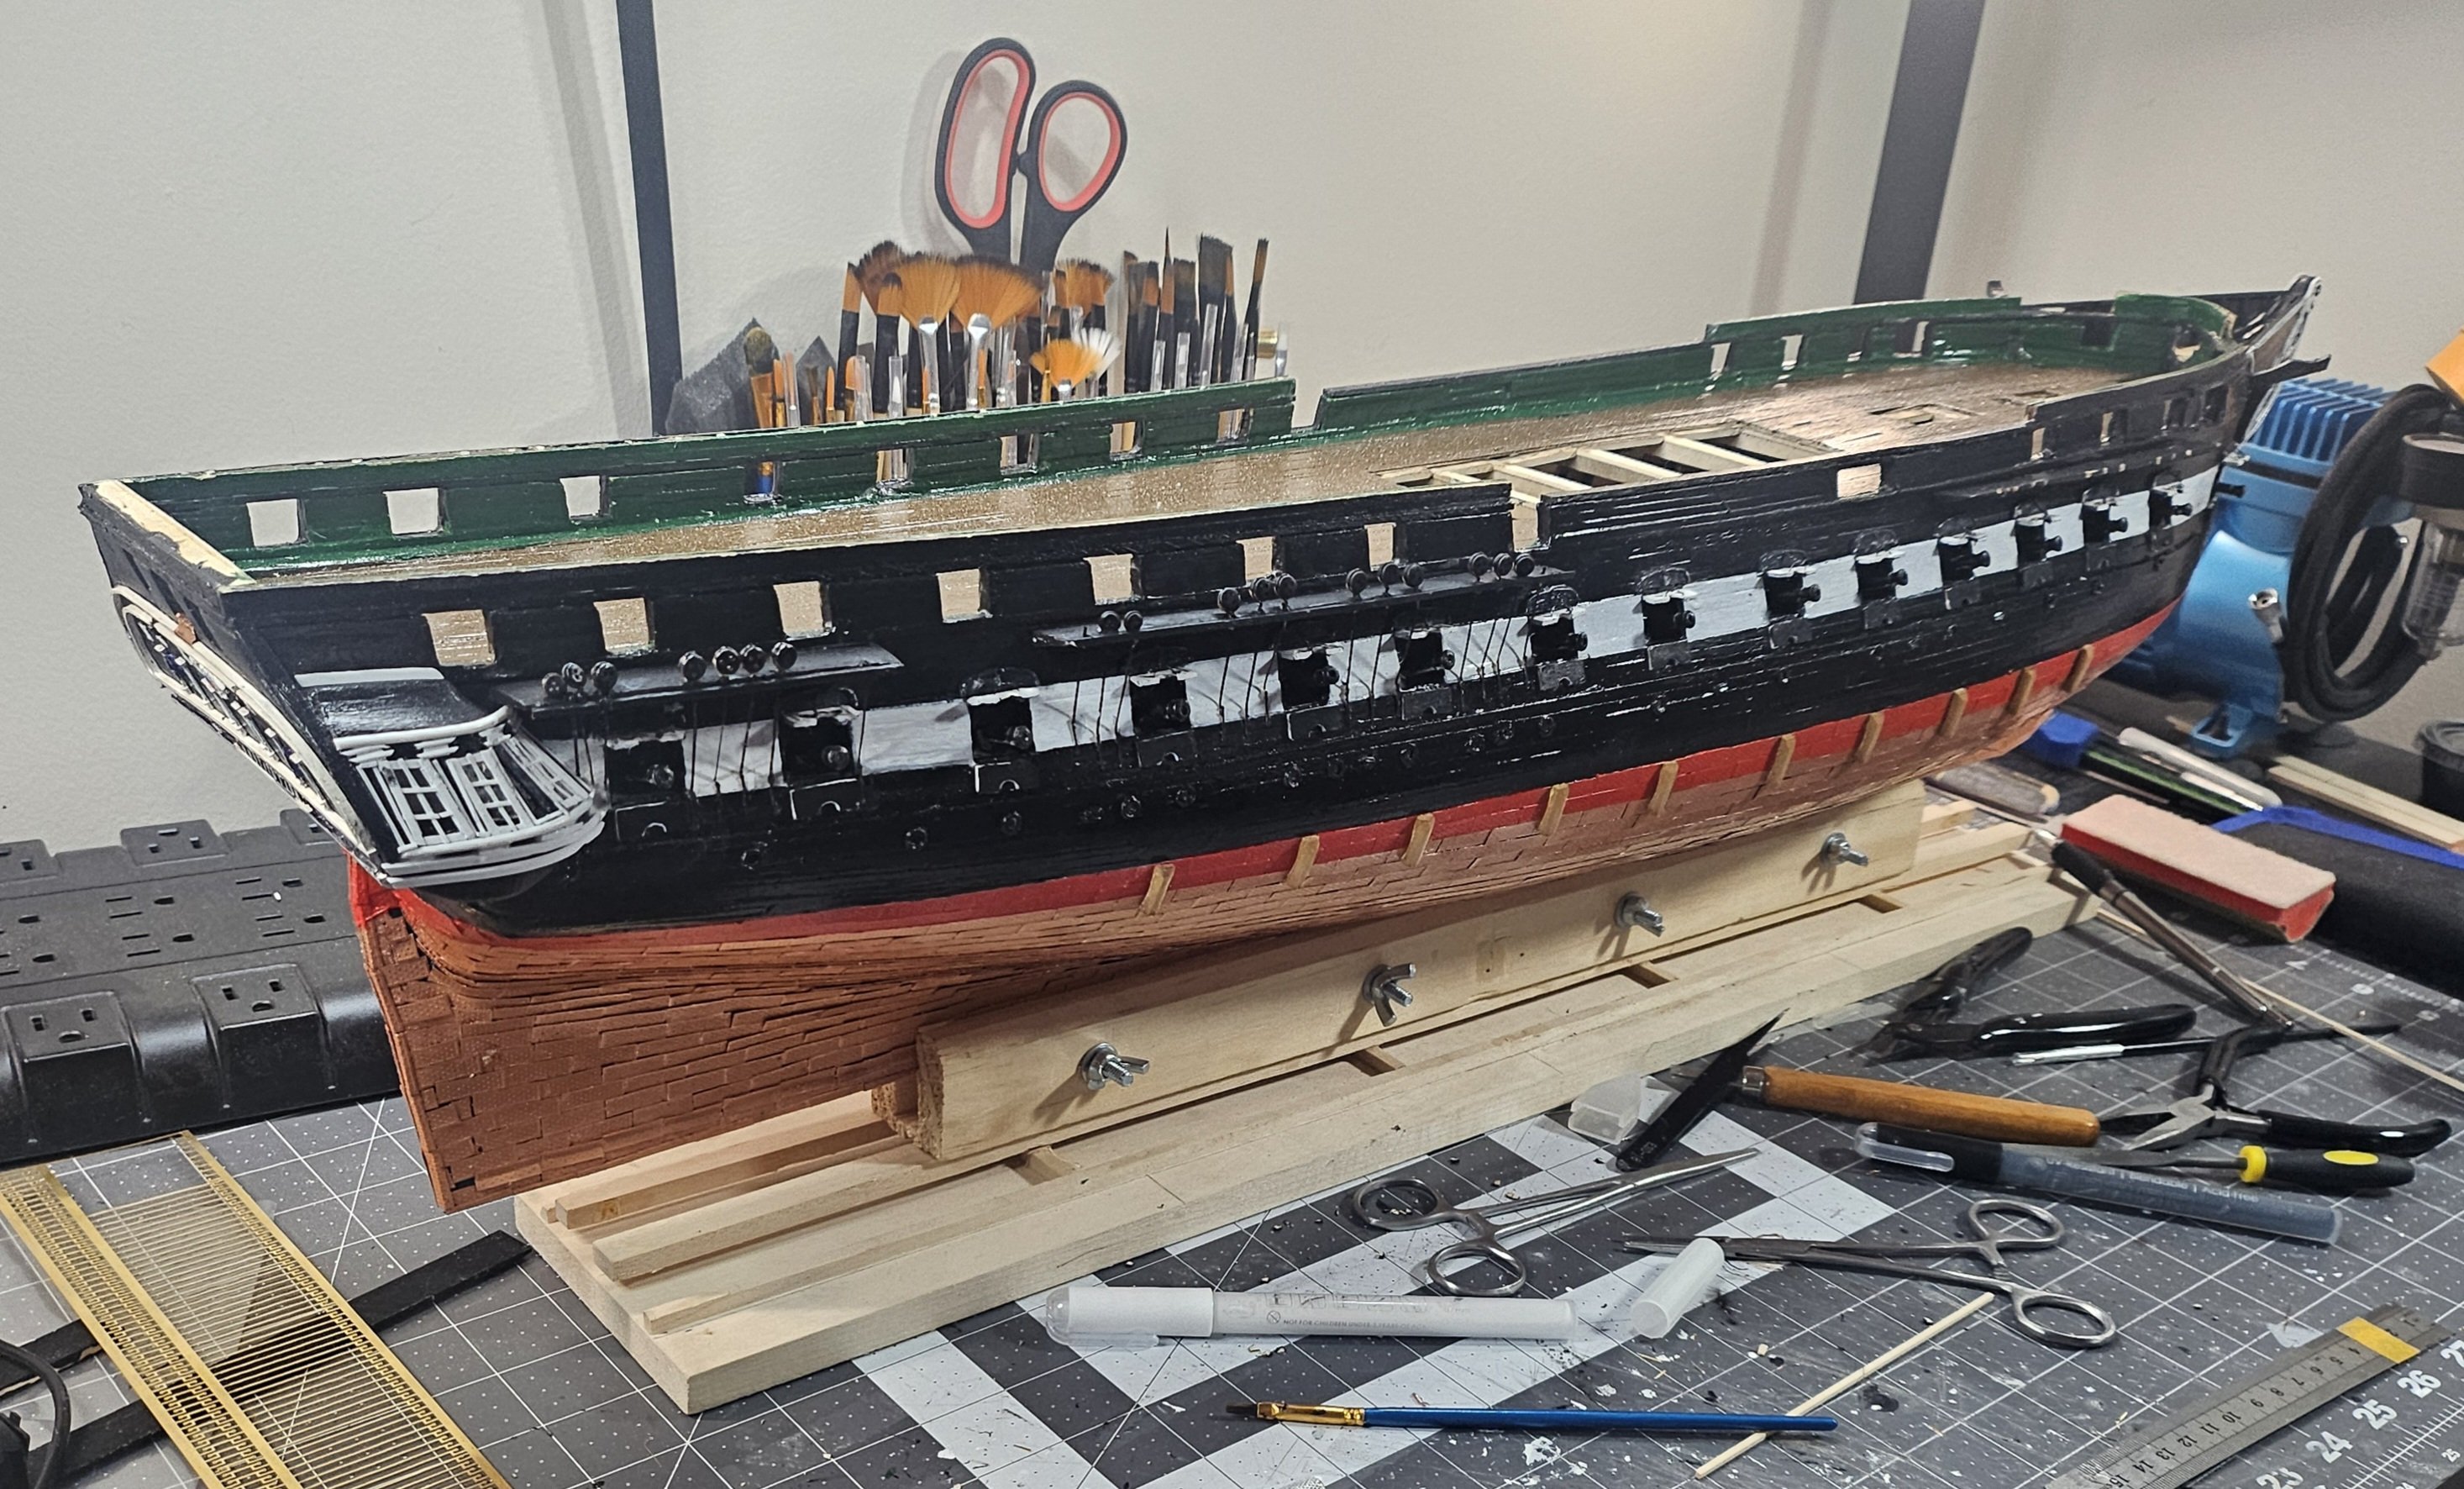
Moving along with the cannons, gunports, and outer hull and deck work. Cannons, curtains, and lower gunport doors were easy to work with, although it felt somewhat time consuming because you are working with 30 gunports. The pain really is dealing with the upper gunports because you have to create a micro miniature rope-like object connecting the upper gunport after you drill 2 holes using a #77 drill bit which is super tiny in itself and very easy to break. I'm on my fourth one now. My kit came with black annealed wire to simulate what would have been rope connected to the upper gun port to its respective top curtain. You definitely want to make sure that hole in the curtain is free and clear because that is one of three areas connecting the door. The two holes you drilled in the gunport door are the other two areas. As much as I enjoy seeing how nicely this is created in the practicum, creating something this tiny and trying to bend the wire into the holes is not so easy and certainly not as perfect in the pictures. In fact, it is so small that you never really see it unless you're right up staring at the gunports near your face. I finished slightly over half of them on the port side and touched up the white paint on the gun port doors as well.


-
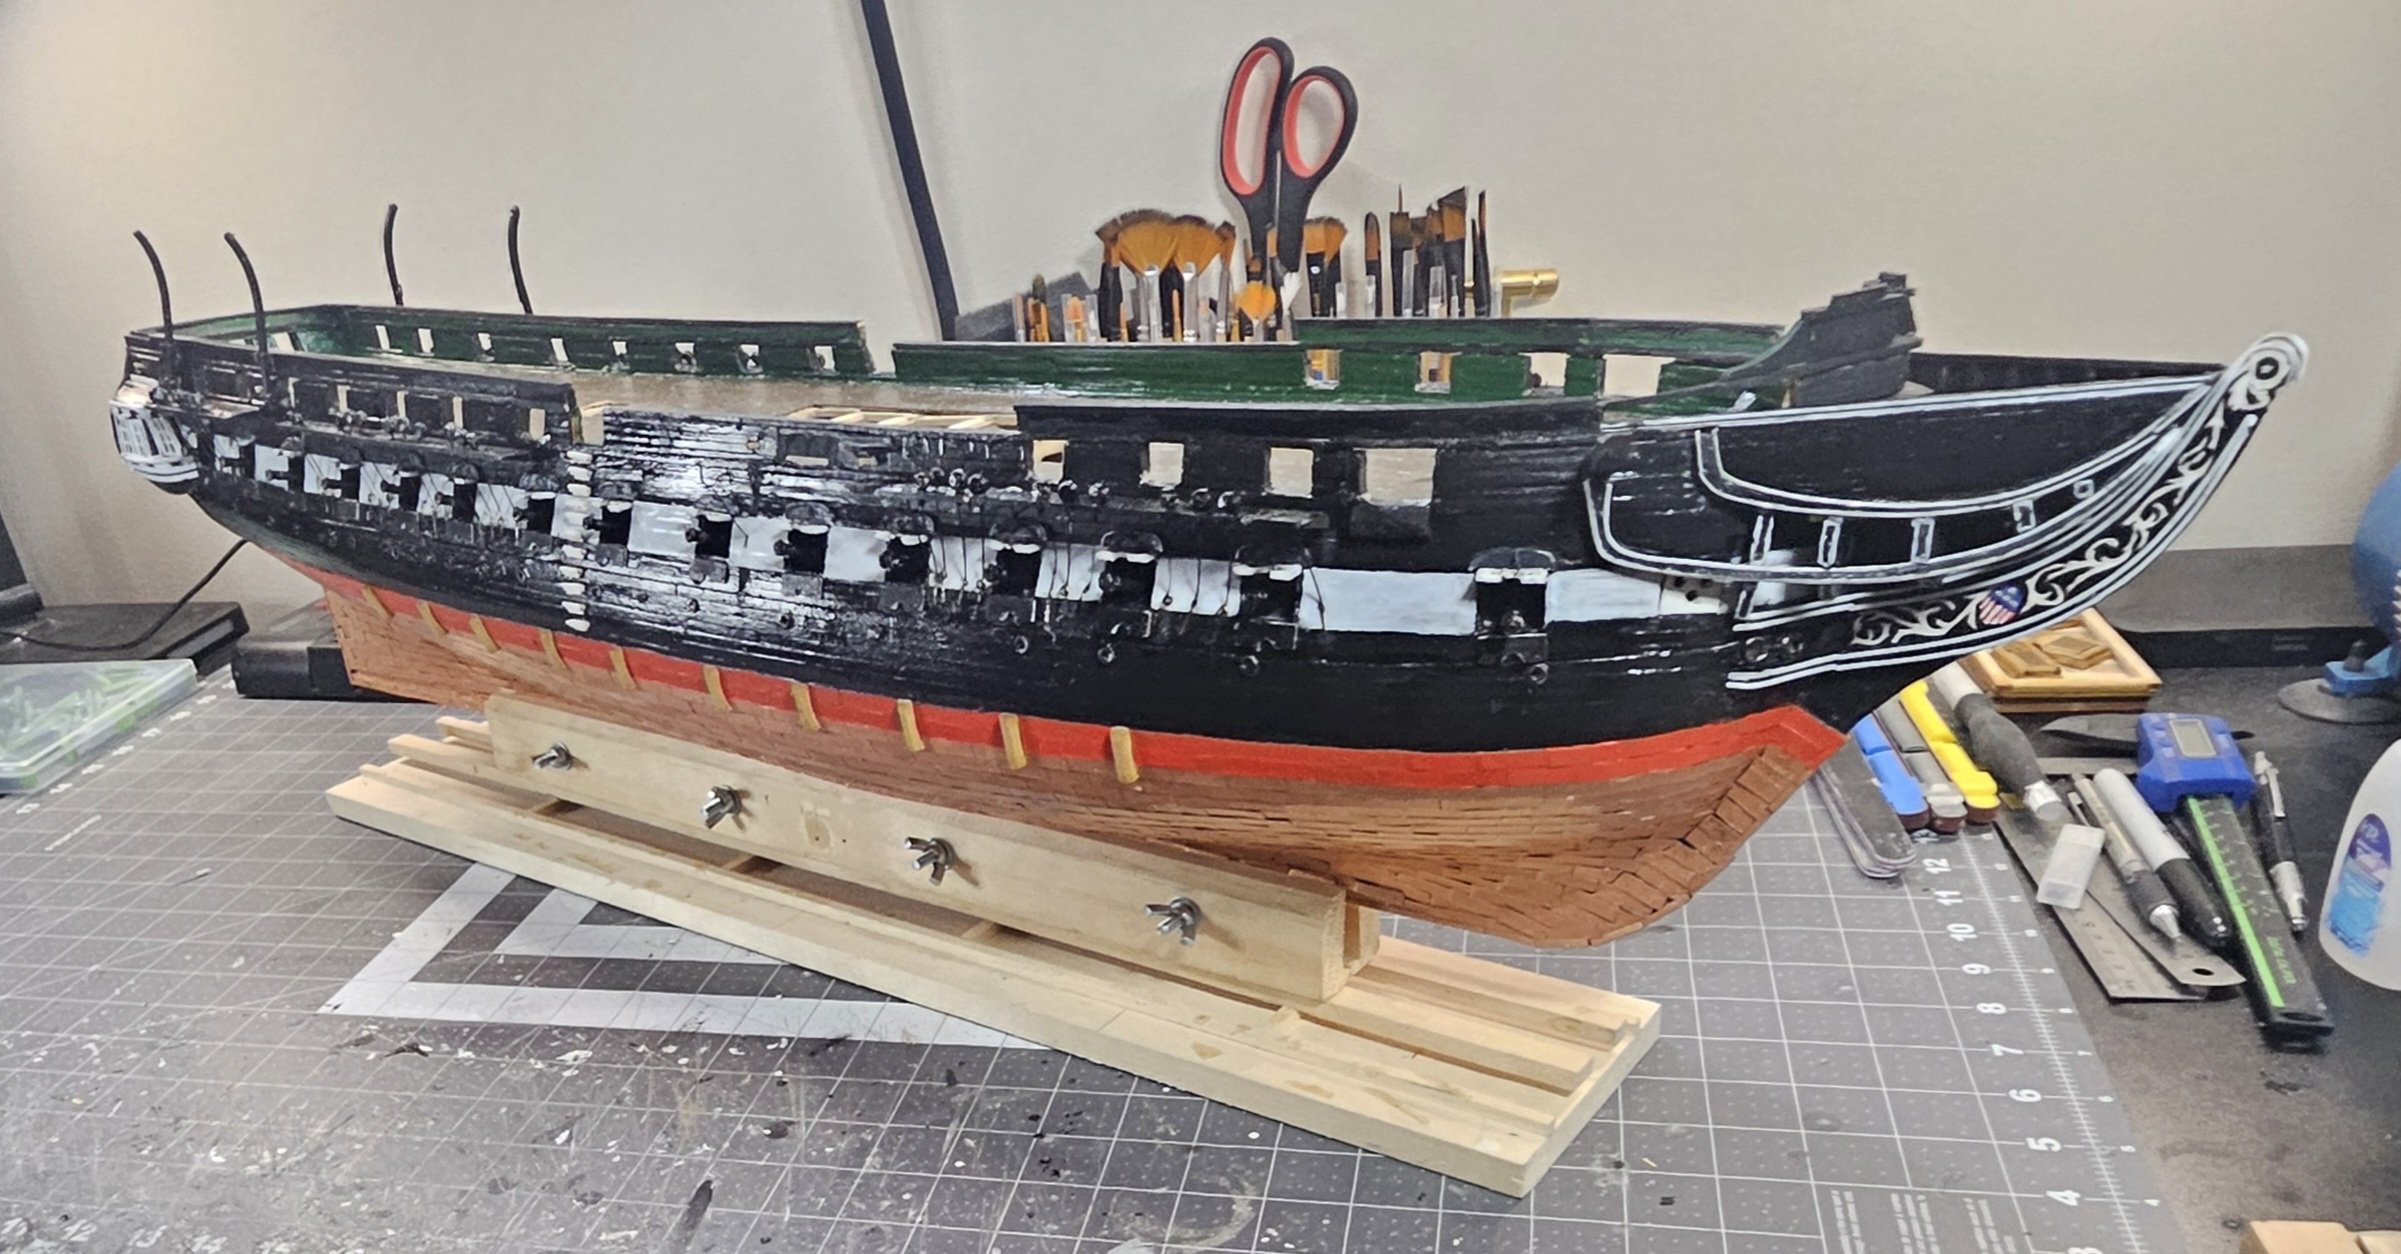
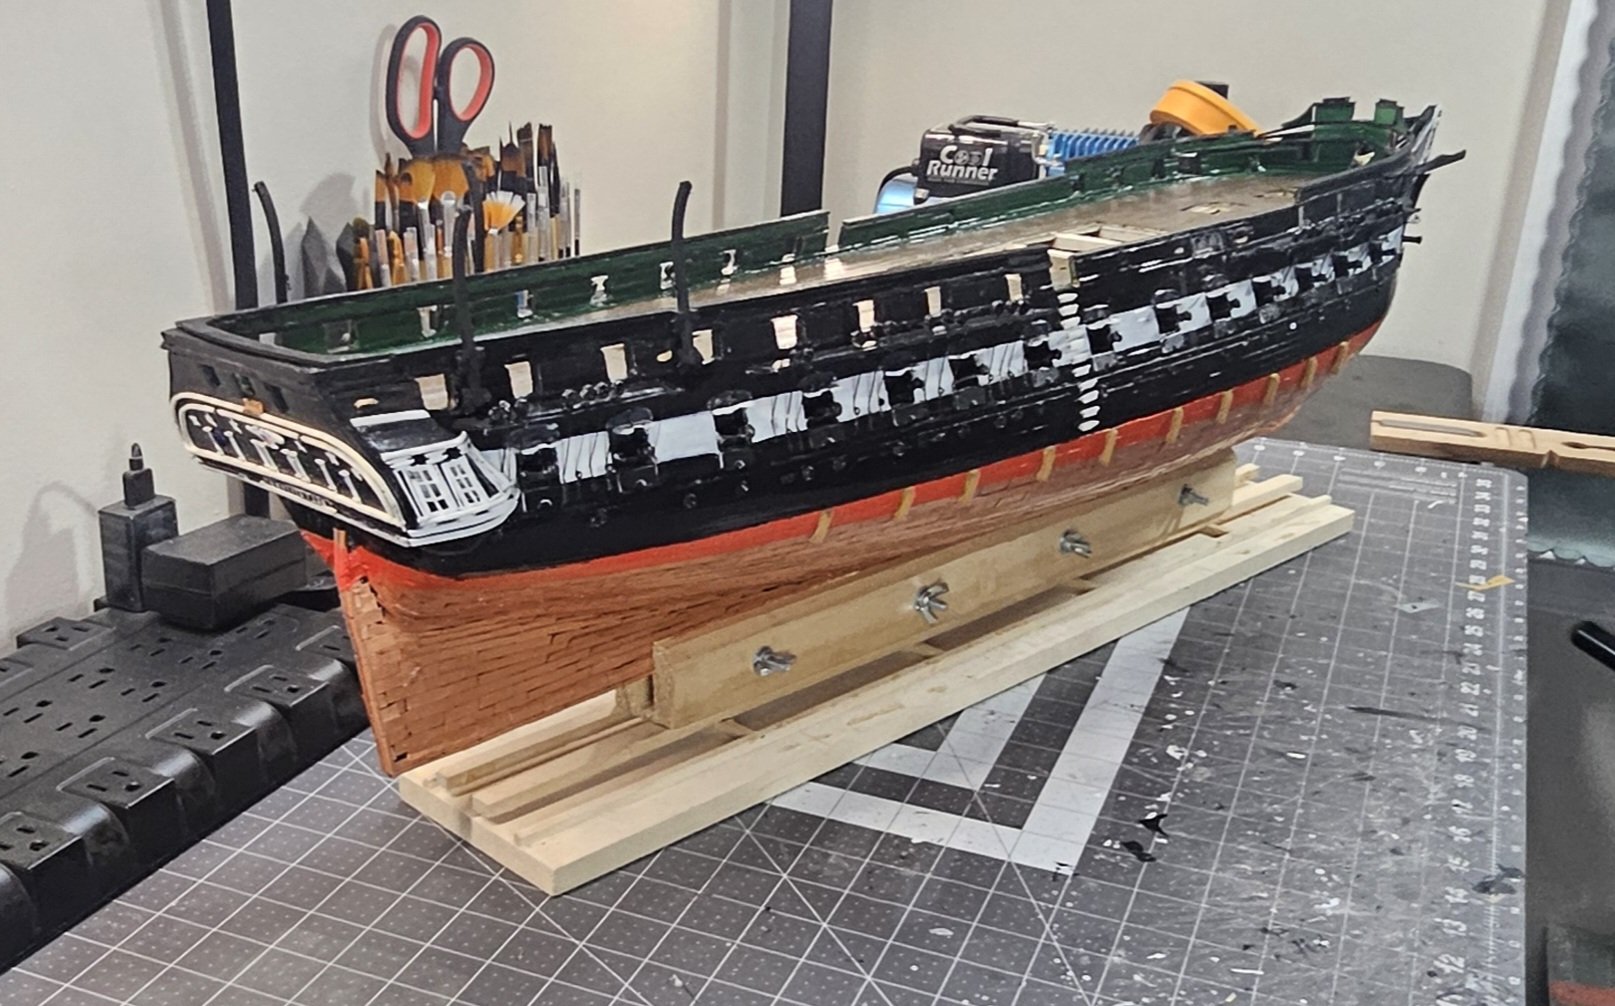
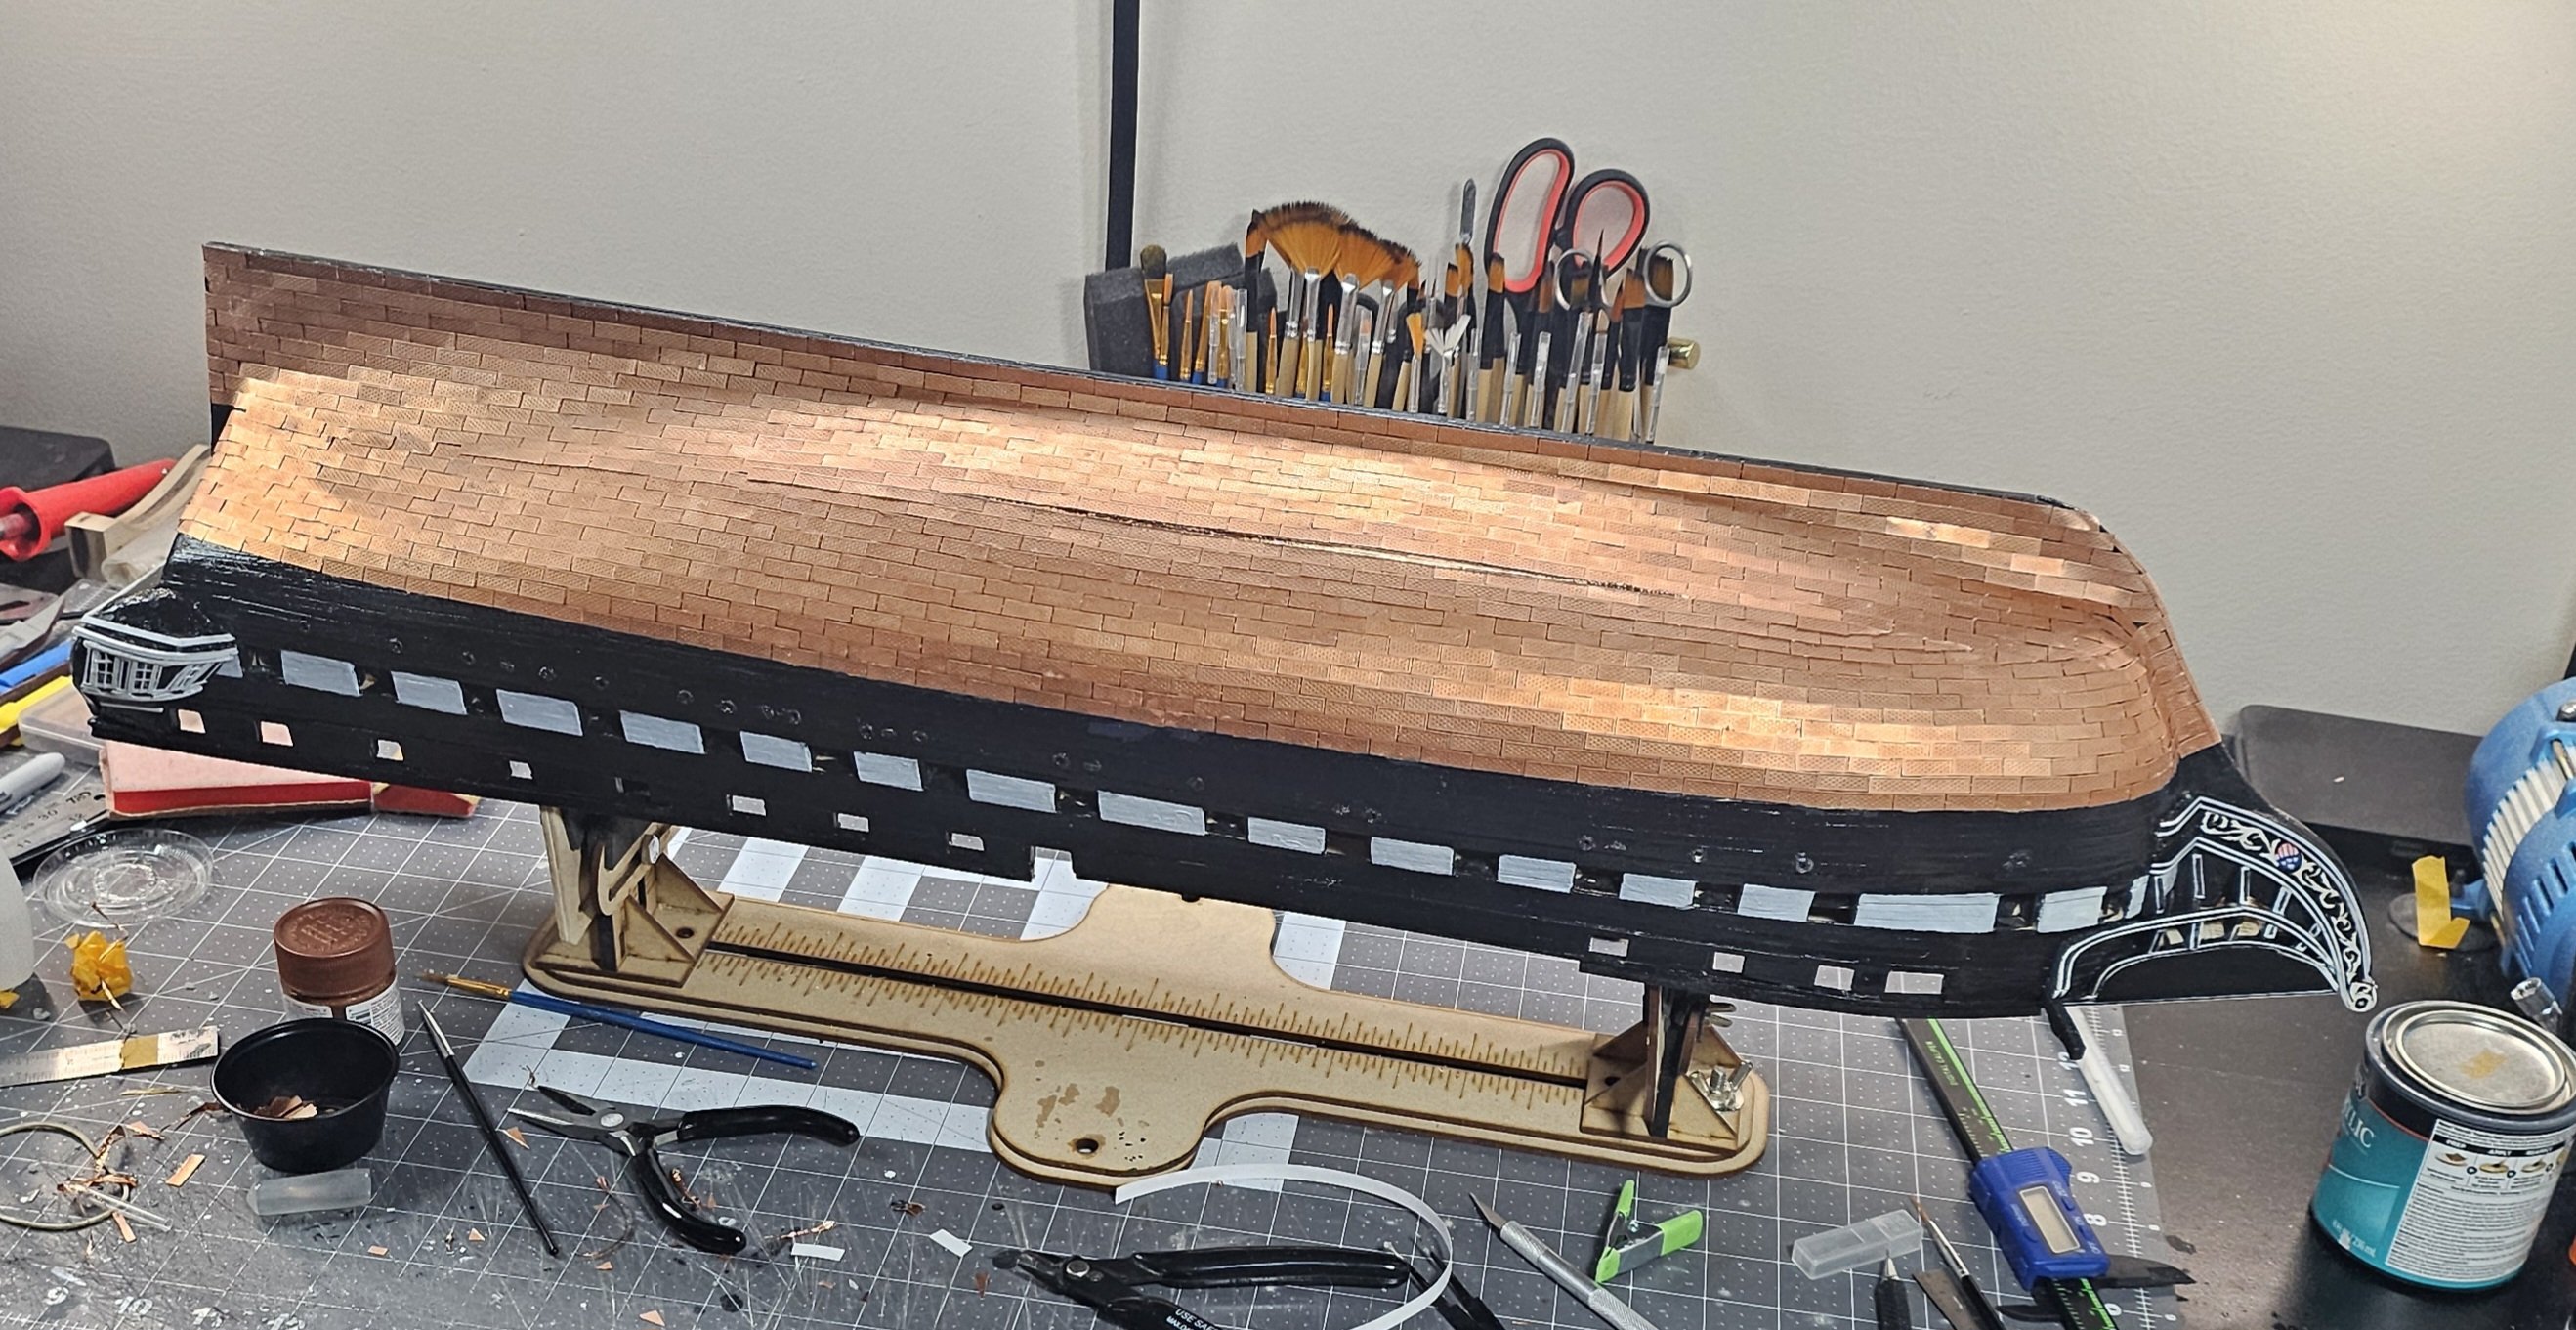
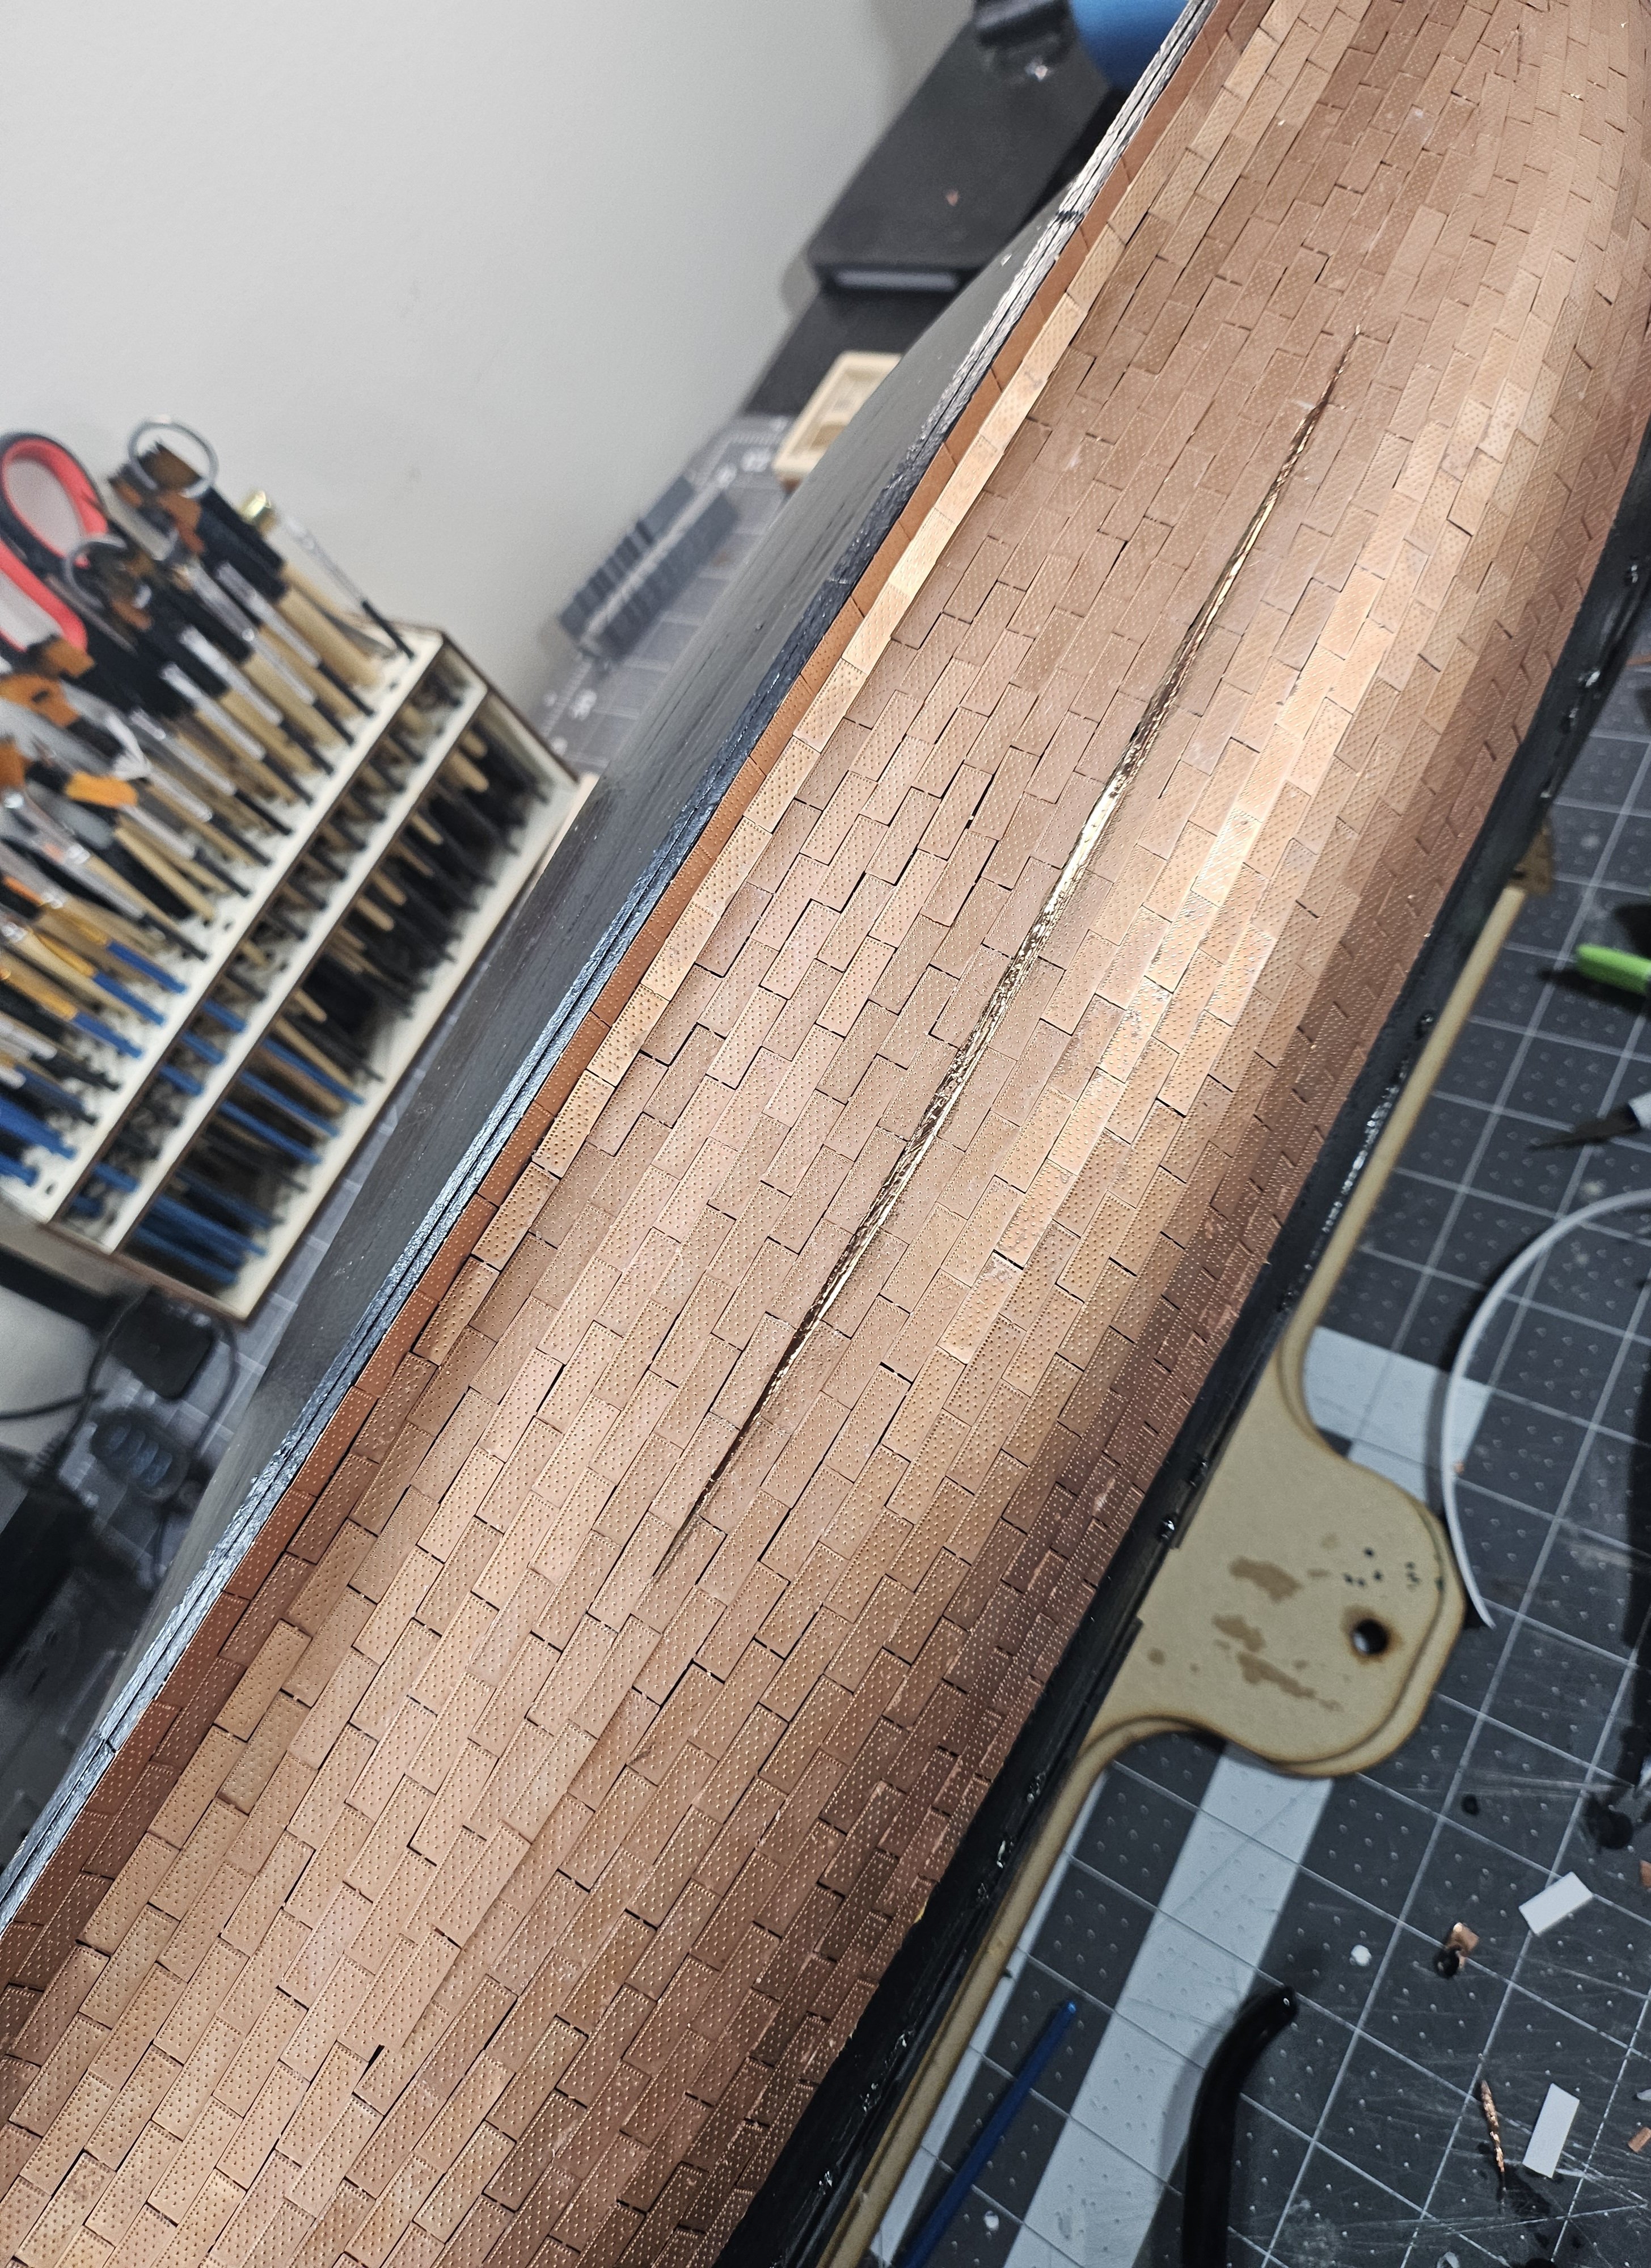
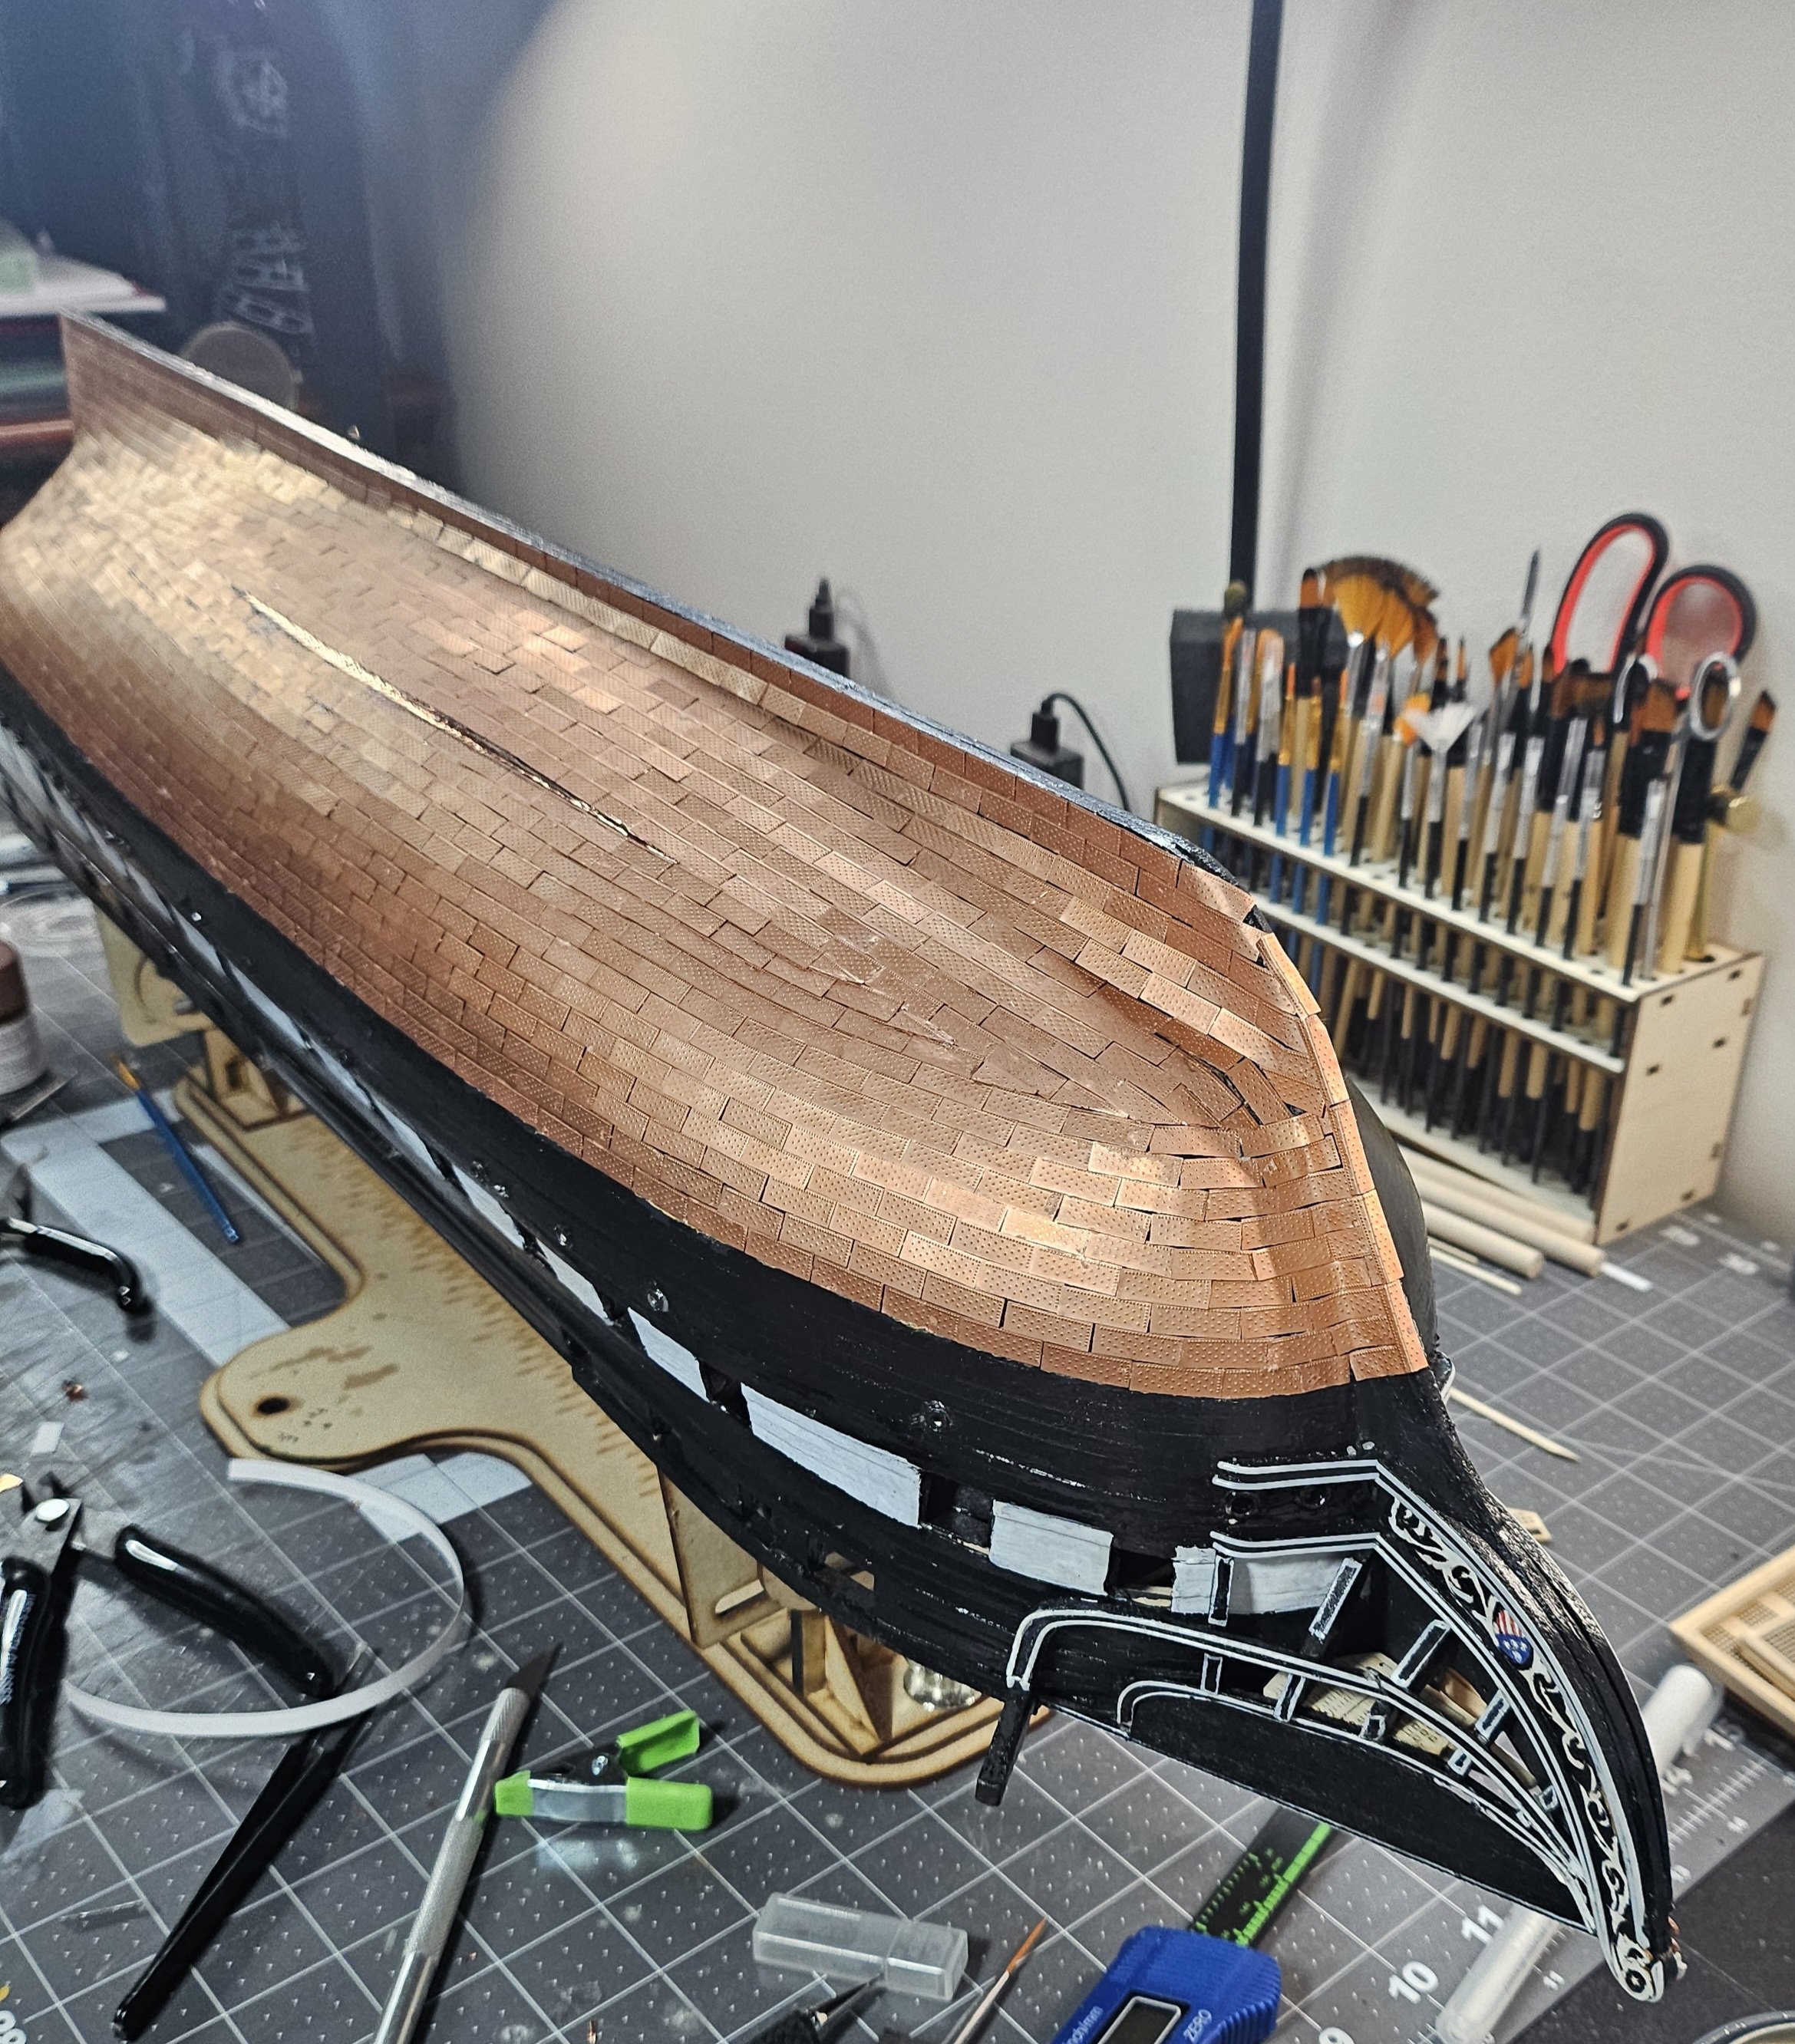
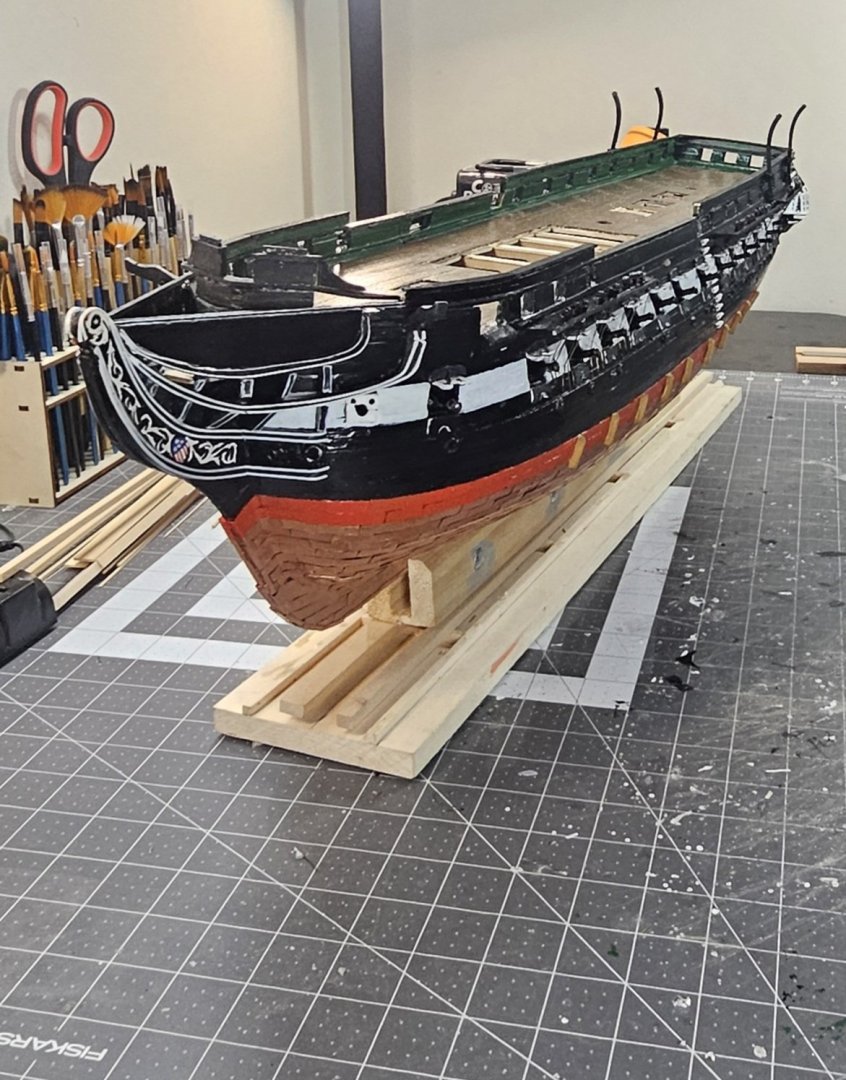
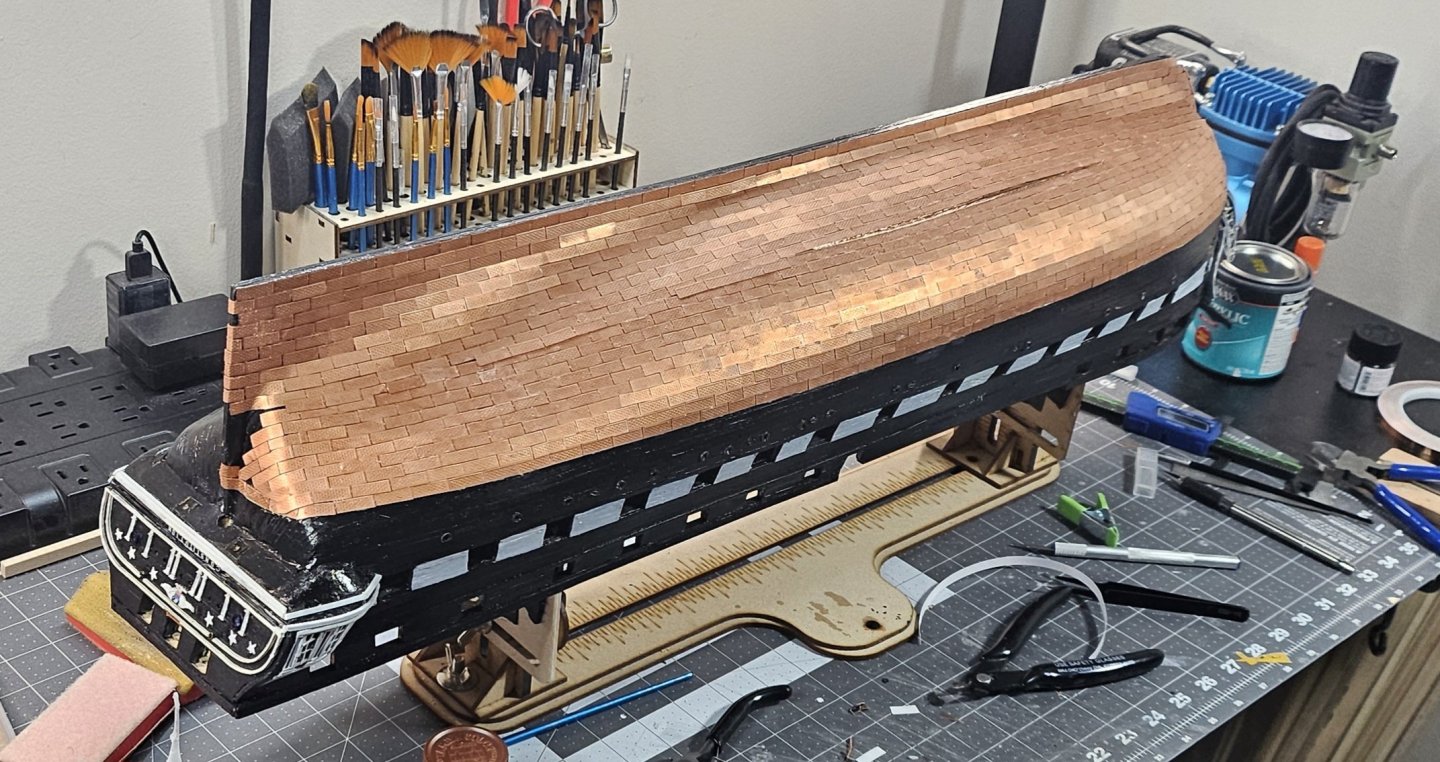
Copper plating the hull was a lot more challenging than expected because I chose the plates over the copper tape. Several builders had choices, and from what I saw, did a pretty nice job with both choices, as well as dealing with size variations between copper tape, and different copper plates with sizes either on scale or very close to it. I found this to be very tedious as well, and learned soon that when cutting the plates, which is each individual plate, that you have to go back to each individual and make sure any existing left-over metal on each side has to be trimmed or cut off, otherwise you might be left with tiny gaps that are noticeable up close. When it came to the bow and stern, I found that to be quite the challenge because it is not like bending planks. I found myself having to cut or trim the copper plate to get into making my way to the bow and stern. I also had a chance to do a little experiment as well. I started with Hunt's Practicum and then followed what my gut told me halfway through. Going back to the variations in your choice of hull coppering material, one cannot be sure that if you follow the pattern in the practicum that it would work for all of the copper materials which I found out to be true. Because everyone's Conny might vary slightly after they had planked the ship, or based on the different copper plating sizes, etc. I was left with a very small gap that I would need to fill in. I could trim the plates to use them as if it were a filler like we did during planking, but I found that to be tough because if you cannot cut it the correct size, it will not look good and you might waste plates and not have enough to complete each side and each side takes ~1,024 plates for total of 2,048. You should be left with a very small amount of left-over plates. You may need to use plates to overlap the left-over areas to be covered so that it looks decent. If done correctly, any gaps you have should be towards the underside of the boat and there will be some at the bow and stern mainly because of the sharp turns. For copper tape users, it's easier to cut to fit. Ok, back to the experiment...what I did was initially try to cut the plates to try to fit inside the gap. I found that to be too hard because the plates are hard, and you need a knife or something to cut and trimming can be tougher because you now need to work with something much smaller. Anyway, I laid the tape over the area with the gap and then pressed it nice and hard where the rivets from the other plates could be seen through the copper tape. I then let it sit for an hour and then trimmed copper tape with an Exacto knife inside the gap. This actually worked out nice and made it look very neat and clean. Since the plates are not shiny, the copper tape is, so you can see a shiny line halfway under the hull. Now I'm debating whether to get a matte polyacrylic which would dull out the line to match it next to the copper plates around it, or a semi-gloss polyacrylic and apply it to the hull where the copper plating is which can act as a protectant on the plates as it did on the rest of the wooden parts of the ship. Does anyone know if brushing polyacrylic on the copper is a good or bad idea after the hull is complete? The pictures show that the portside is almost complete and progress thus far, and let folks know I'm still alive, lol. https://us-east-2-029060369-view.menlosecurity.com/c/0/i/aHR0cHM6Ly9zaGlwc29mc2NhbGUuY29tL3Nvc2ZvcnVtcy9hdHRhY2htZW50cy8yMDI1MDgwN18wNjEwNDYtMS1qcGcuNTM2NTcwLz9oYXNoPWFkZDY2ZWU3NTFmNGNjZjBjNDhkMWRlM2FiMmQ4NDAzhttps://us-east-2-029060369-view.menlosecurity.com/c/0/i/aHR0cHM6Ly9zaGlwc29mc2NhbGUuY29tL3Nvc2ZvcnVtcy9hdHRhY2htZW50cy8yMDI1MDgwN18wNjEwNTctMS1qcGcuNTM2NTcxLz9oYXNoPWFkZDY2ZWU3NTFmNGNjZjBjNDhkMWRlM2FiMmQ4NDAzhttps://us-east-2-029060369-view.menlosecurity.com/c/0/i/aHR0cHM6Ly9zaGlwc29mc2NhbGUuY29tL3Nvc2ZvcnVtcy9hdHRhY2htZW50cy8yMDI1MDgwN18wNjExMTItMS1qcGcuNTM2NTcyLz9oYXNoPWFkZDY2ZWU3NTFmNGNjZjBjNDhkMWRlM2FiMmQ4NDAz


-
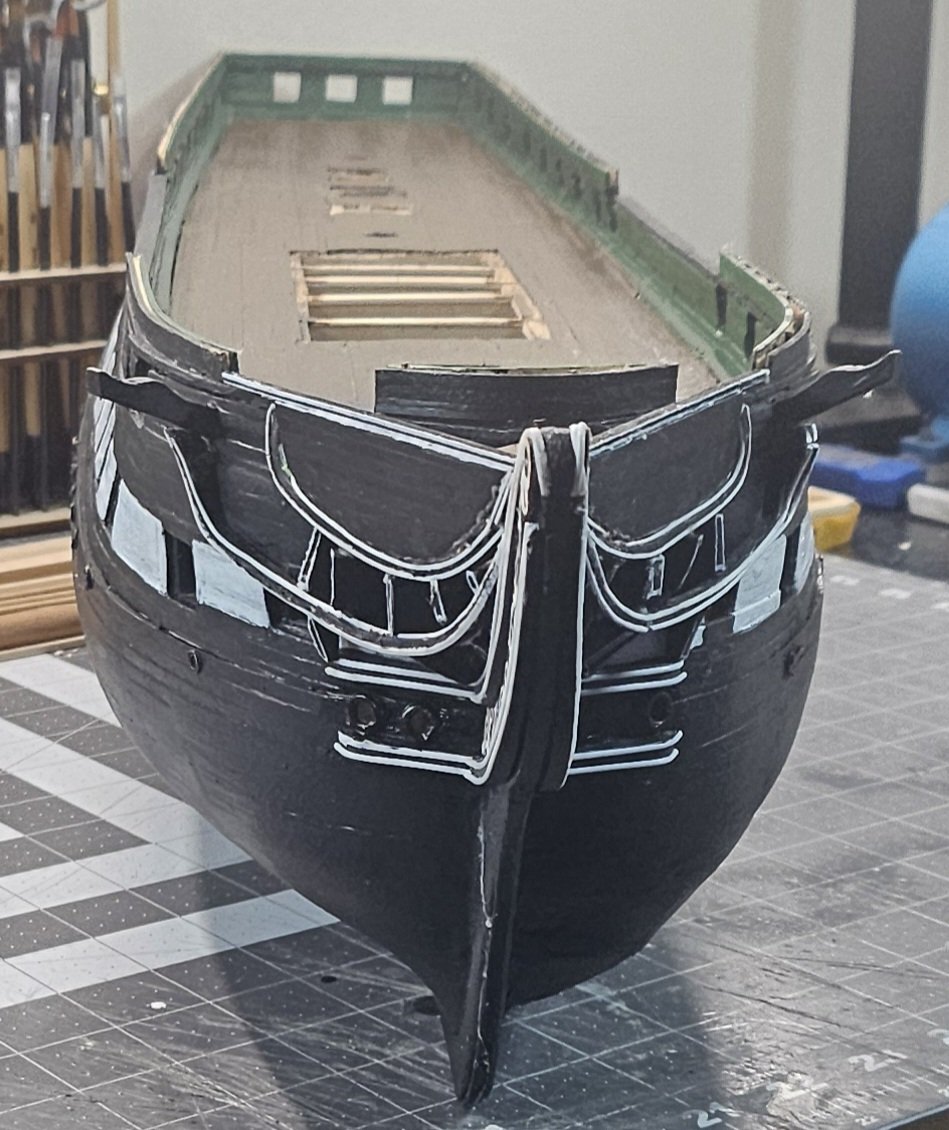
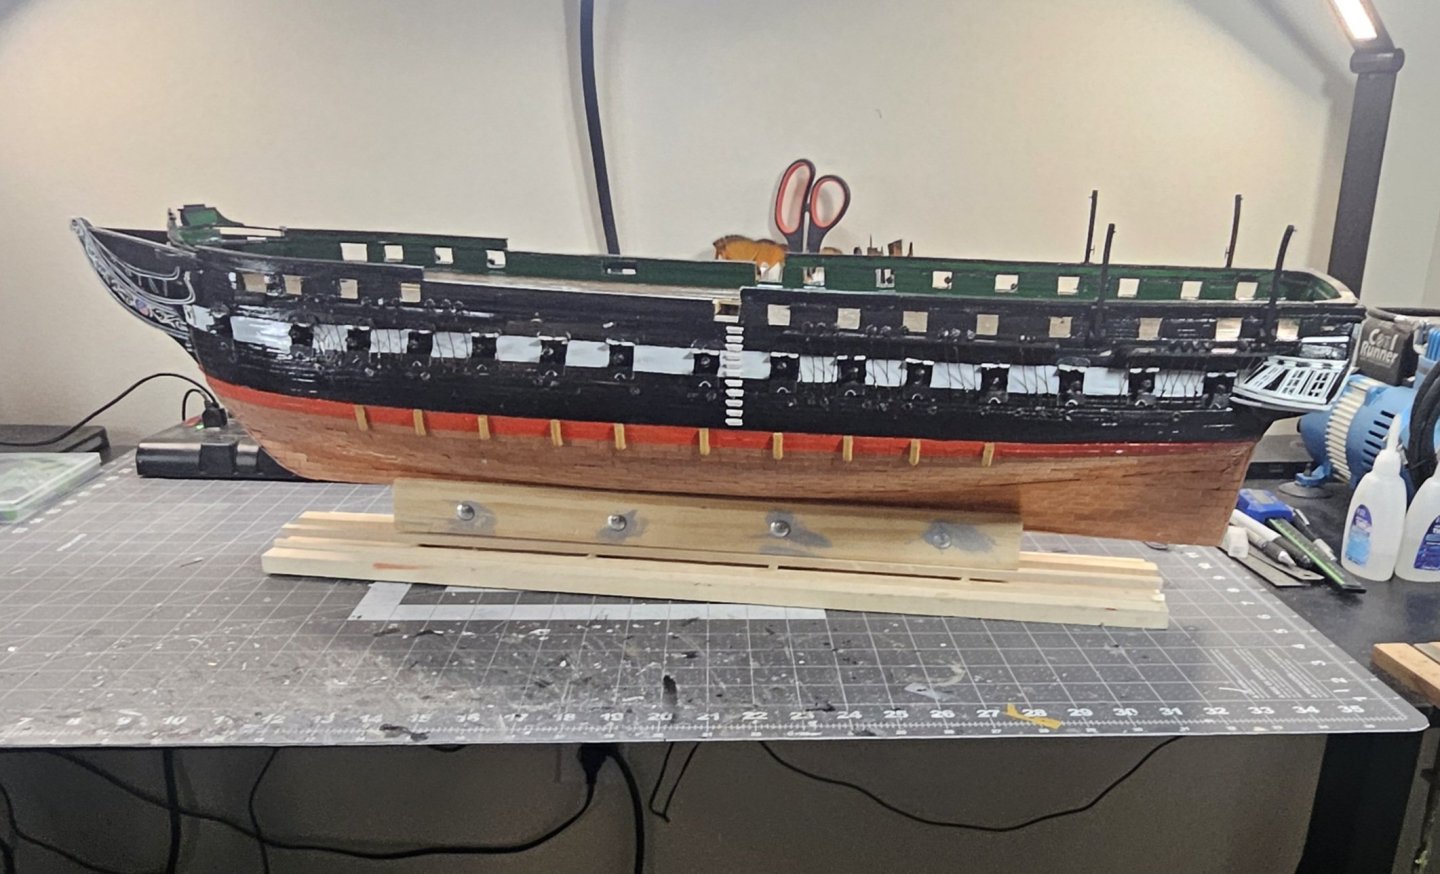
Finally finished the cheek knees, rails, head rails, crew head, and planking the main head rail to the 2nd rail. Once again, the fine pen paint marks were extremely useful. I painted the head rail on the side all white and then after it dried, I used a small metal ruler and put it on the edge using the planks for support and uaes the fine pen black marker and ran the line straight down, and it not only looked straight, but actually looked good. Again, I think using fine tip marker paint pens are the way to go instead of the sticky glue and finger mess trying to get extremely small half round white polystyrene strips. Now I'm cleaning everything with a damp cloth and preparing to copper the hull and choo;se not to use t tape. In my opinion, there are only a few assemblers and builders that can make the ,, mm I tape look great but hands down the plates look much better and they come with a rivet scheme that is consistent for port and starboard side. I am adding polycrylic to the hull which will help with the adhesion of the copper plates. This past of the build may take me a couple weeks because there are a lot of copper plates. And last, but not least, the hawse pipes. I did notice that some folks cut little boards and glued them inside of the cheek knees and then drilled holes to insert the hawse pipes.

-
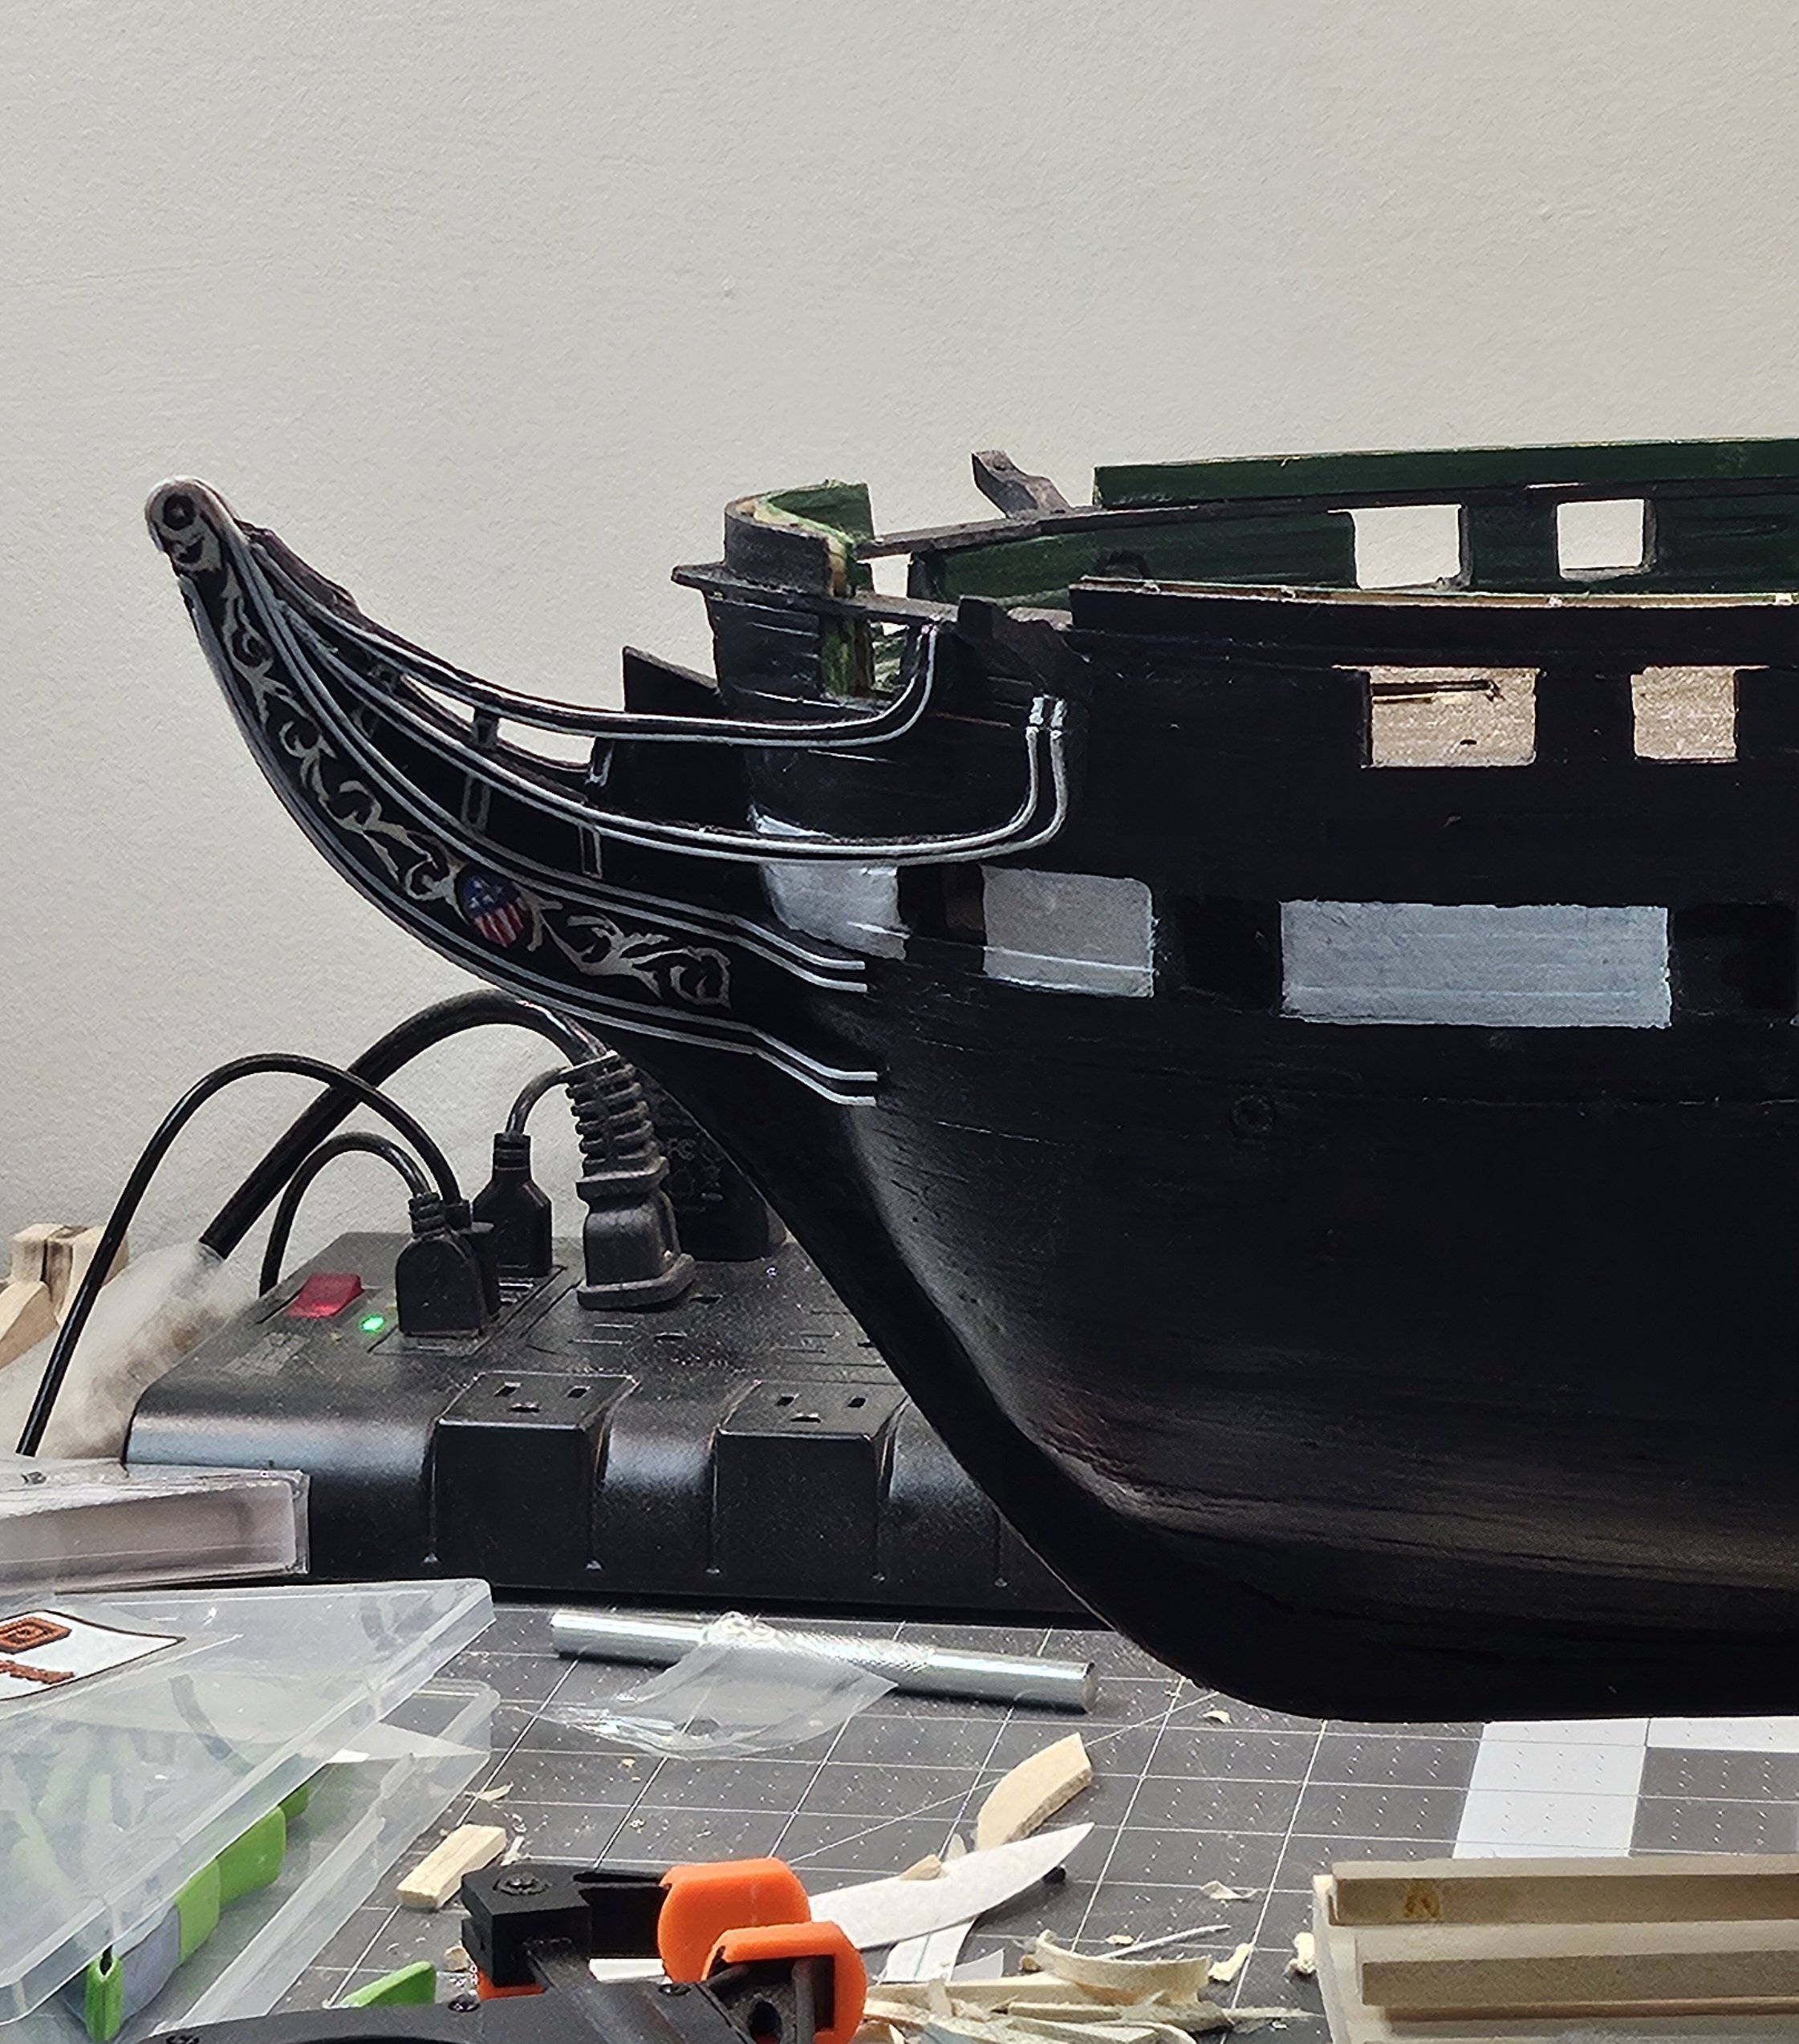
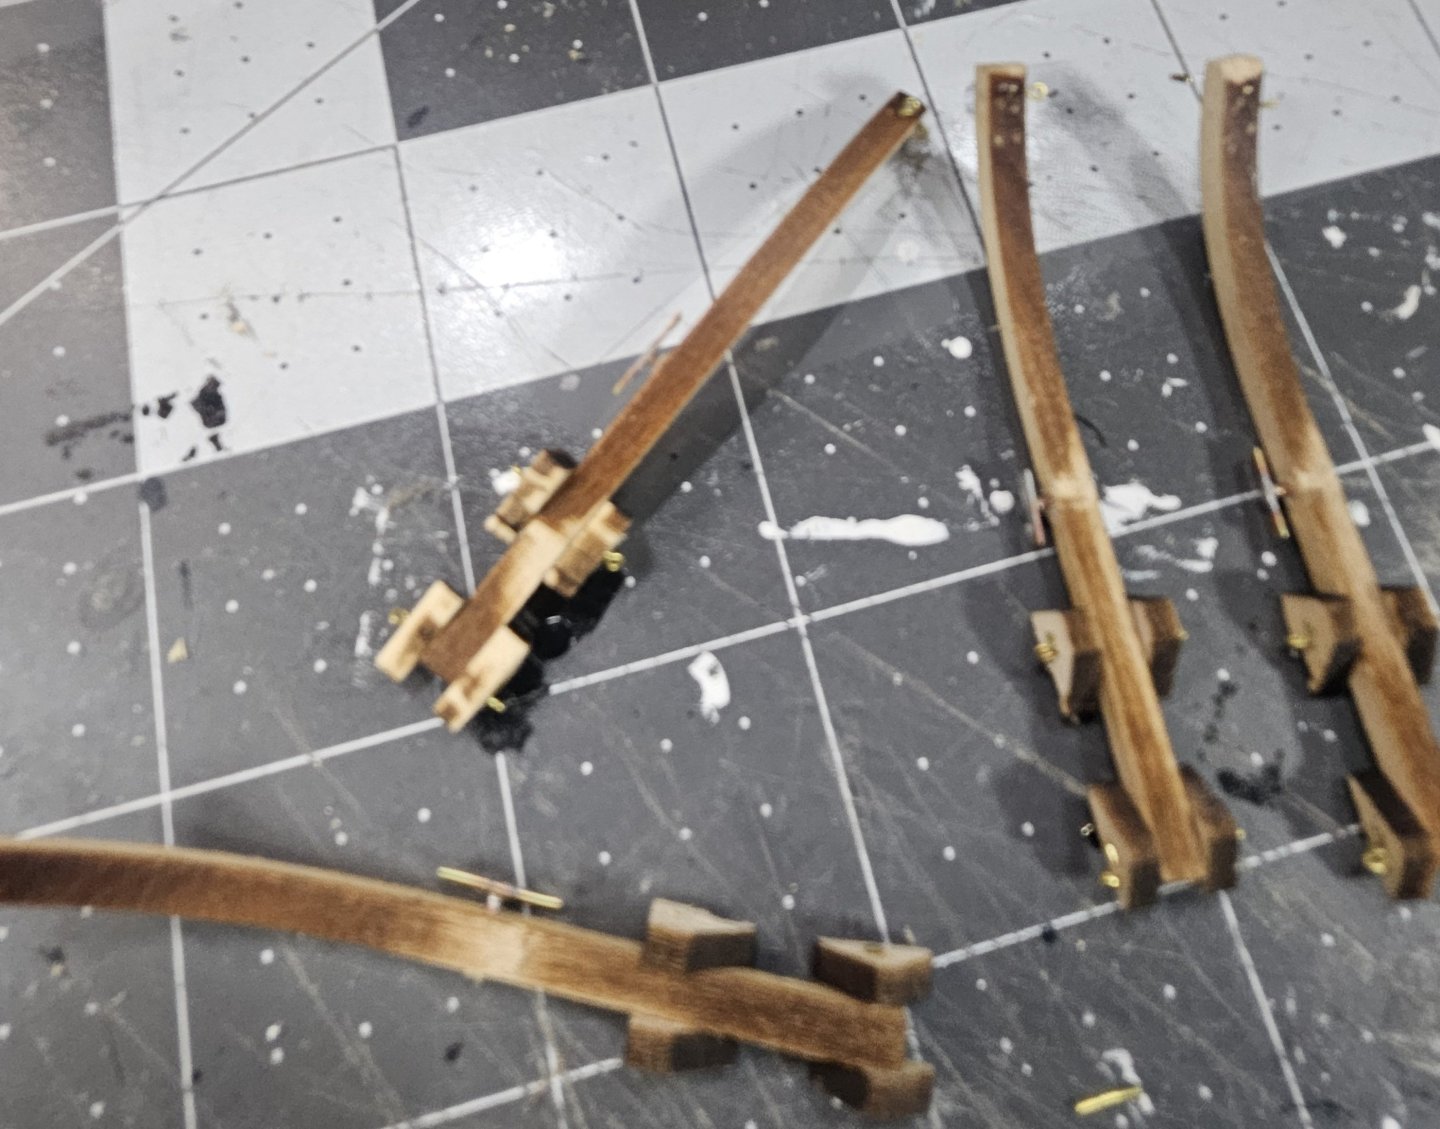
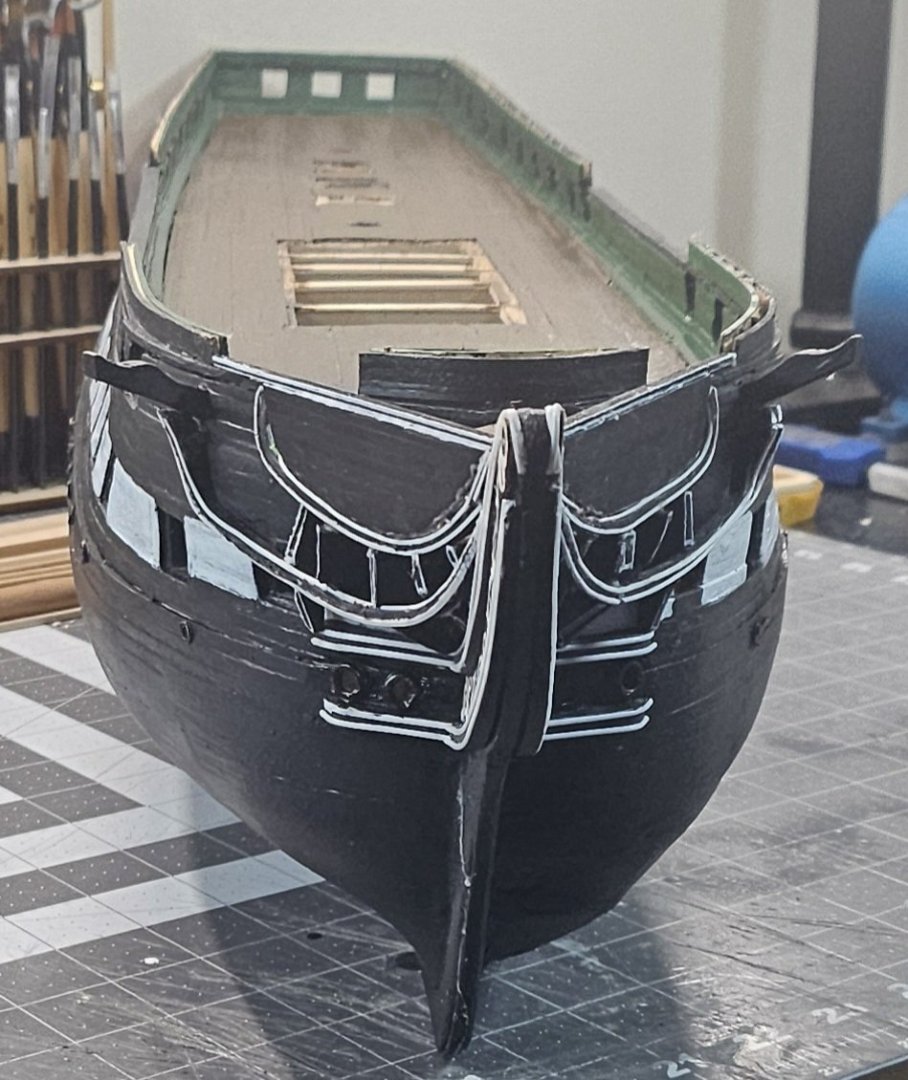
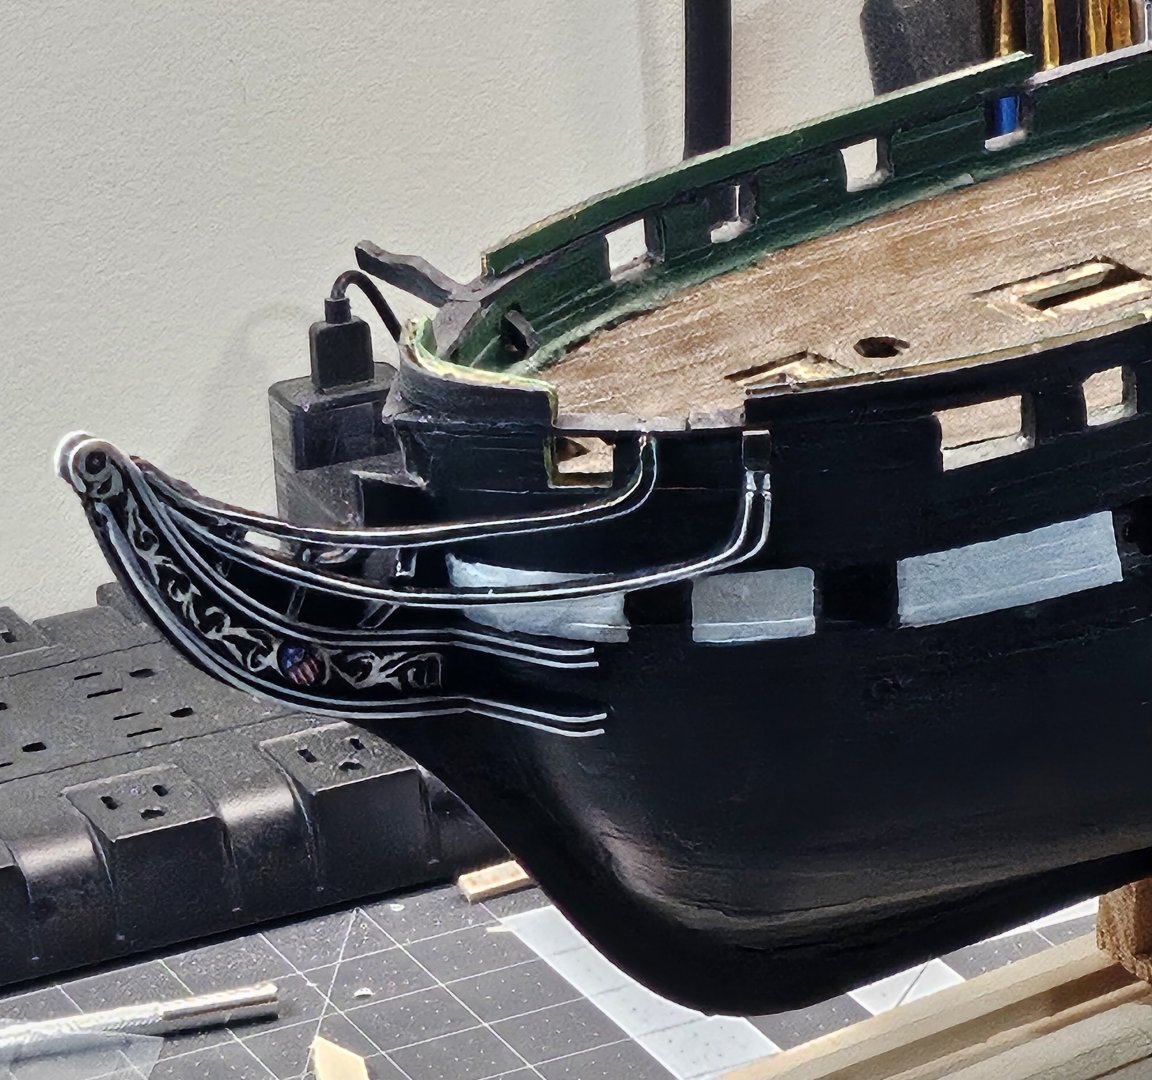
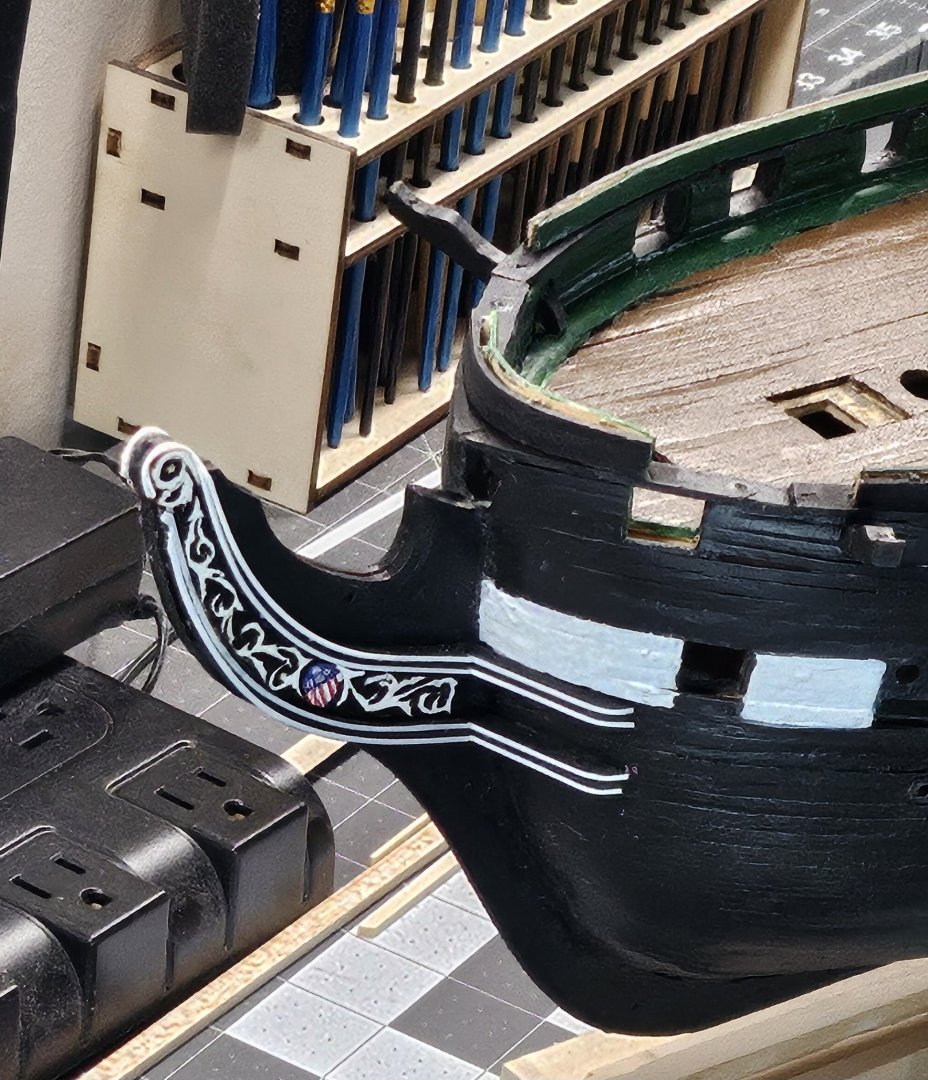
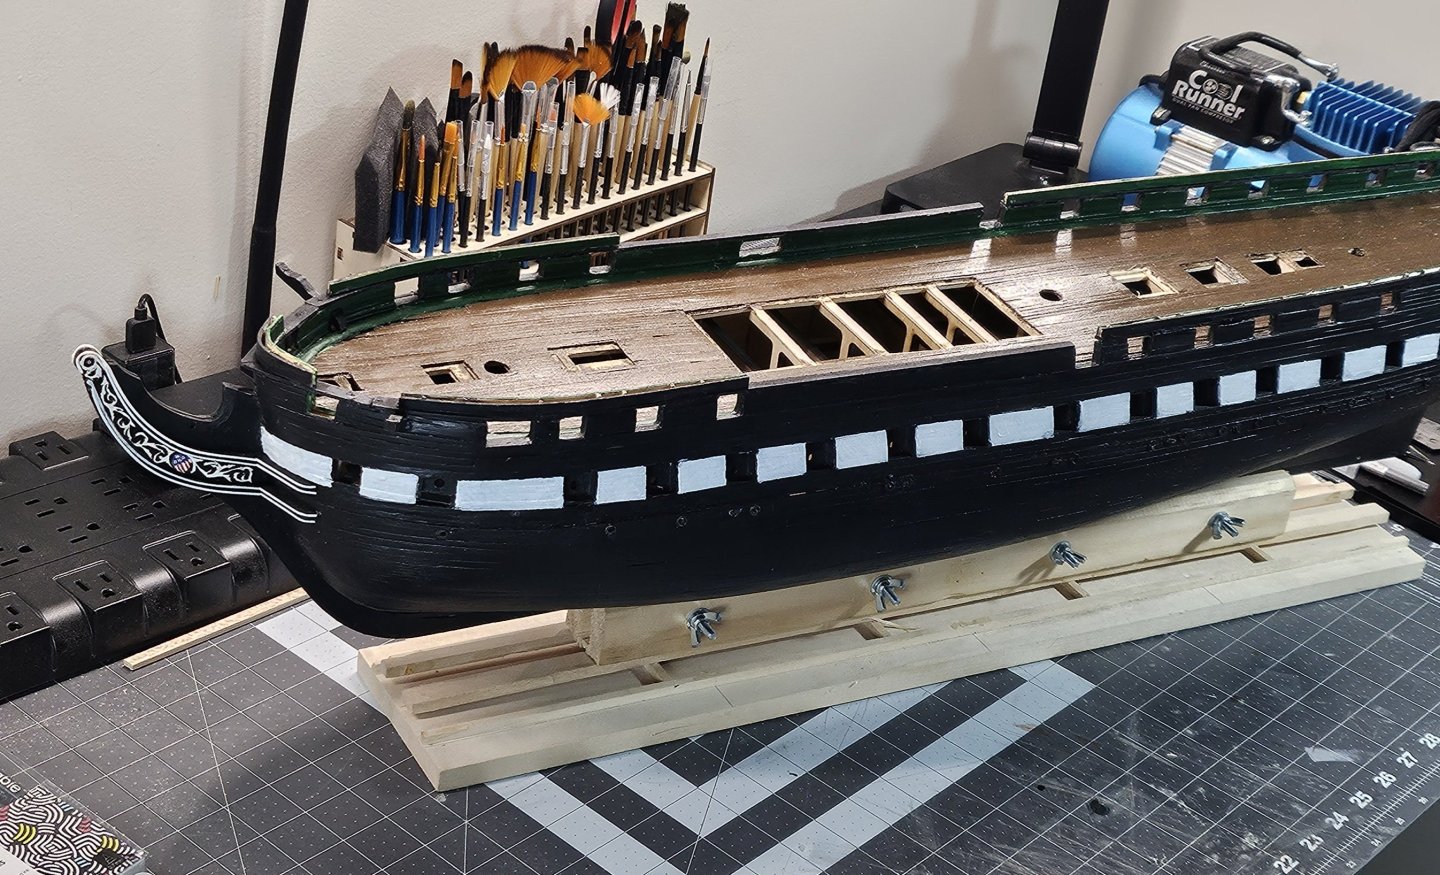
I guess I now understand fully why the cheeks knees and rails are painful for everyone. In Hunt's practicum, Bob states that although the plans show how the rails should or could be constructed with the timbers, they were found not be accurate and likely because everyone's bow may not be the same exact size or dimensions when compared to other Conny modeler/assembler. Personally, I found that I've had to make my timbers larger than what are in the plans and went through lots of pieces of wood to try to make the right fit in all dimensions for the 2nd and 3rd rails and the timbers. I'm finishing up timbers 4 and 5 on the port side and one I so that, then I'll complete the starboard side. I had made near duplicates of the timbers from the port side to closely match for the starboard side. I also made them larger that way I can trim it to that side because everyone will have variances in curvature of the rails. This has also been very time consuming because of trying to make a nice fit with the timbers because the "head" area with the grates and box like setup have to properly fit down the centerline on both sides on top of the timers on the inside of the rails. I did something different regarding the molding you find on the timbers. The practicum only offer that polystyrene is cut to border the shape like the rails themselves. I found an easier way instead of making a mess with the glue when building the 3rd and 2nd rail, by actually painting lines bordering the timbers. I recently found fine and ultra fine tip white paint pens. If you run the tip nice and easy, if you have a steady hand, it looks like you had used molding instead. You might see timbers 1,2, and 3 with the white lines painted on them. I found it much easier to do this without the mess and having black fine tip paint markers work well if you have to touchup a spot because you got out of the lines you were creating. I just about swear by these fine tip paint markers. That's how I was able to do all the fancy scroll work on the stem...

-
emeblers on the forum about using fine tip paint markers/pens. I took my time and it actually came out better than expected. What helped was the laser cut carving of the design that helped keep the paint between the lines. The printout of the flag to cut and paste onto the trailboard didn't work as advertised practicum. I took my time and managed to paint the flags on the trailboard...I can't remember the last time I had a steady hand to pull something like this off, lol. Anyway, the cheek knees worked out and along with the white striping using 0.80 half round polystyrene. It wasn't as painful as I initially thought, but nevertheless it worked out and feel it actually looks pretty good. Now it's off to the next set of rails.

-
My disappointment with the cheek knees and rails grows each day as I realize how flawed the plans and practicum are. Anything remotely close to being a template you can use for cutting the rails from woods are utterly useless and do not match in size and dimensions. It might be close, but not close enough...for sure... So, my strategy is using sheets of wood and drawing the design using a flexible measurement tape to measure the angles on the hull of my Conny and check them against the plans. I am following the builders that finished their builds and what their pieces look and then if they did it in multiple pieces then I will follow that because they all look good and a matter of preference for the technique used. If I have any disappointments on my journey so far, it will have to be the unclear and ambiguous instructions in the practicum related to the rails and the measurement inaccuracies when bounced against the plans. The rails on the plans are so narrowly cut that it is impossible to get the white striping with the .40 half round polystyrene strips or even using wire to do it because there is no room on the rail. A part of me is compelled to possibly build a thread for just this part of the Conny build from Model Shipways MS2040 kit. Getting the builders that survived this piece and having them add their advice and pictures, which most would be cut, and paste would be very helpful and beneficial with a one-stop-shop for tackling this nightmare for future builders on the forum.