MichaelGW
-
Posts
18 -
Joined
-
Last visited
Content Type
Profiles
Forums
Gallery
Events
Everything posted by MichaelGW
-
Good morning all, The good news was to have been that I had finally completed the planking of the hull. Sad to say though, there is only bad news! In the process of moving house, the ship was badly damaged and is completely beyond repair. Certainly at this stage I am not considering starting all over again, but I would like to thank you all for the advice and encouragement you have given me over the past eight months. Kind regards, Michael
-
Hi Keith, Thanks very much for that information. I have found it very helpful, and it has given me plenty of food for thought. For now, I've decided to put my build on hold for a short while and have ordered from Amazon a copy of the book you recommended . With this, and the photos of your build - which to me looks terrific - I intend to look again at all the planking I have completed below the lower gun decks and possibly decide to remove this and start again. One other thing you (or perhaps other watchers) might be able to help me with is to ask if you know where, if at all, I can get spares of the hull planking, just in case I end up needing some? In the past, I have sent emails to the Billings Boats marketing operation in the States and their production unit in Denmark asking about spare parts and never received a reply. Thanks again, Michael
-
Good morning Shihawk and Clearway, and thanks again for the advice. I have found the pictures in Clearway's build very helpful. Being new to shipbuilding though, please could either of you give me a link to where I can find descriptions of what are strakes, stealers and wales? The reference book I'm using is Milton Roth's "Ship Modeling from Stem to Stern" but I cannot find any reference to these in the book's index. Thanks. Michael
-
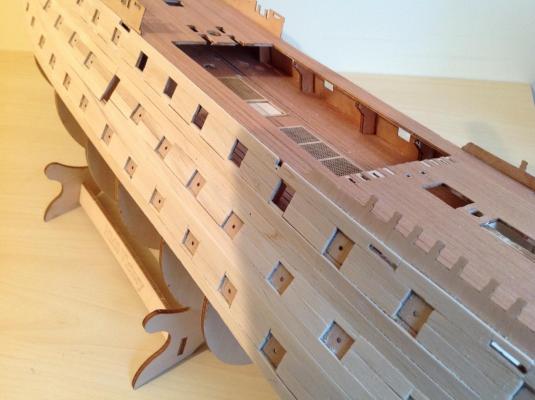
To bring all my watchers up to date ..... Please bear with me as things are moving rather slowly, and not least because I've been having a few problems completing the hull planking for the bow and stern sections. I got down to the sixth level of planking below the lower gun deck and was just not happy with how things were looking. The result was that I removed those layers from the bow and stern and I am now in the process of fitting new planking, but more carefully than I did in my first attempt so as to get a much better shaping to the planks. Doing this is taking longer than I intended because I am only working on small sections at a time. For a change though, between working on these sections, I have spent time - with my son's help - in building the signal flag storage, ladders, gun ports, canons, binnacles and belfries. When the hull planking is complete, and the stern windows fitted, I will update my progress and include a couple of pictures. Regards, Michael
-
Hello Keith, Thanks very much for your offer of help with any questions I may have. A Billing Victory Support Group sounds like a good idea - how would this be set up? Michael
-
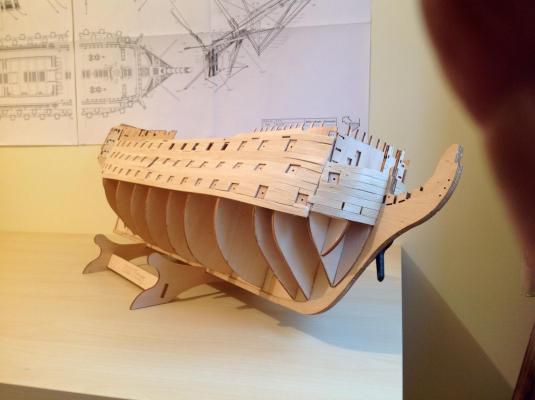
Good morning all - and, Shihawk, I have no problem with you interrupting my log. Attached are 3 photos showing where I have got to so far - that is about half way through fitting the hull planking and hope to complete this by the end of next week. I have had a few problems in bending the planks and tried a few of the ideas recommended by others, online and in various books. Eventually though I have settled for using a strip bender and this seems to work OK for me. As you will see in photo Victory 3, I had difficulty bending the hull planking strips to fit the stern section so have decided to complete this as a separate task before a final wood filling and sanding exercise. When I've done this, I will bring you all up to date. By then, I also intend having the stern windows fitted. Regards, Michael

- 47 replies
-
- 2
-

-
- victory
- billing boats
- (and 1 more)
-
Good Morning Shihawk, Thanks again for your very helpful advice which I will certainly follow, and not try to do too much at a time - probably no more than 2 bulkhead trimmings in each sitting. With help from my son, whose eyesight and steady hands are better than mine, we have already started the build of the cannons and steps. I plan to let people have my next update when I have finished planking, filling and sanding the hull and at that time I will include pictures of the work on the cannons and steps. Regards, Michael
- 47 replies
-
- 1
-
-
- victory
- billing boats
- (and 1 more)
-
At the outset, I remember telling everyone that I intended letting you have a weekly or fortnightly update on my progress. I now realise that this was a very optimistic, to say the least, and I am beginning to see why people with much more experience that me have taken so long to complete their build. For me, completing the planking of the hull is proving to be the most time consuming task so far. I have completed down to the level of the lower gun deck and begun shaping the lower bulkheads as per Fig 8C at the stern. I then plan to do the same at the bow. There is no drawing for this page showing which forward bulkhead edges to trim but I am assuming it is the three foremost as at the stern. I will then go on to fit the remaining planks; apply wood filler across the whole of the hull area - where needed, and then sand that down before moving on to Fig 10 in the Building Instructions - probably in a couple of weeks time. Regards to all, Michael
-
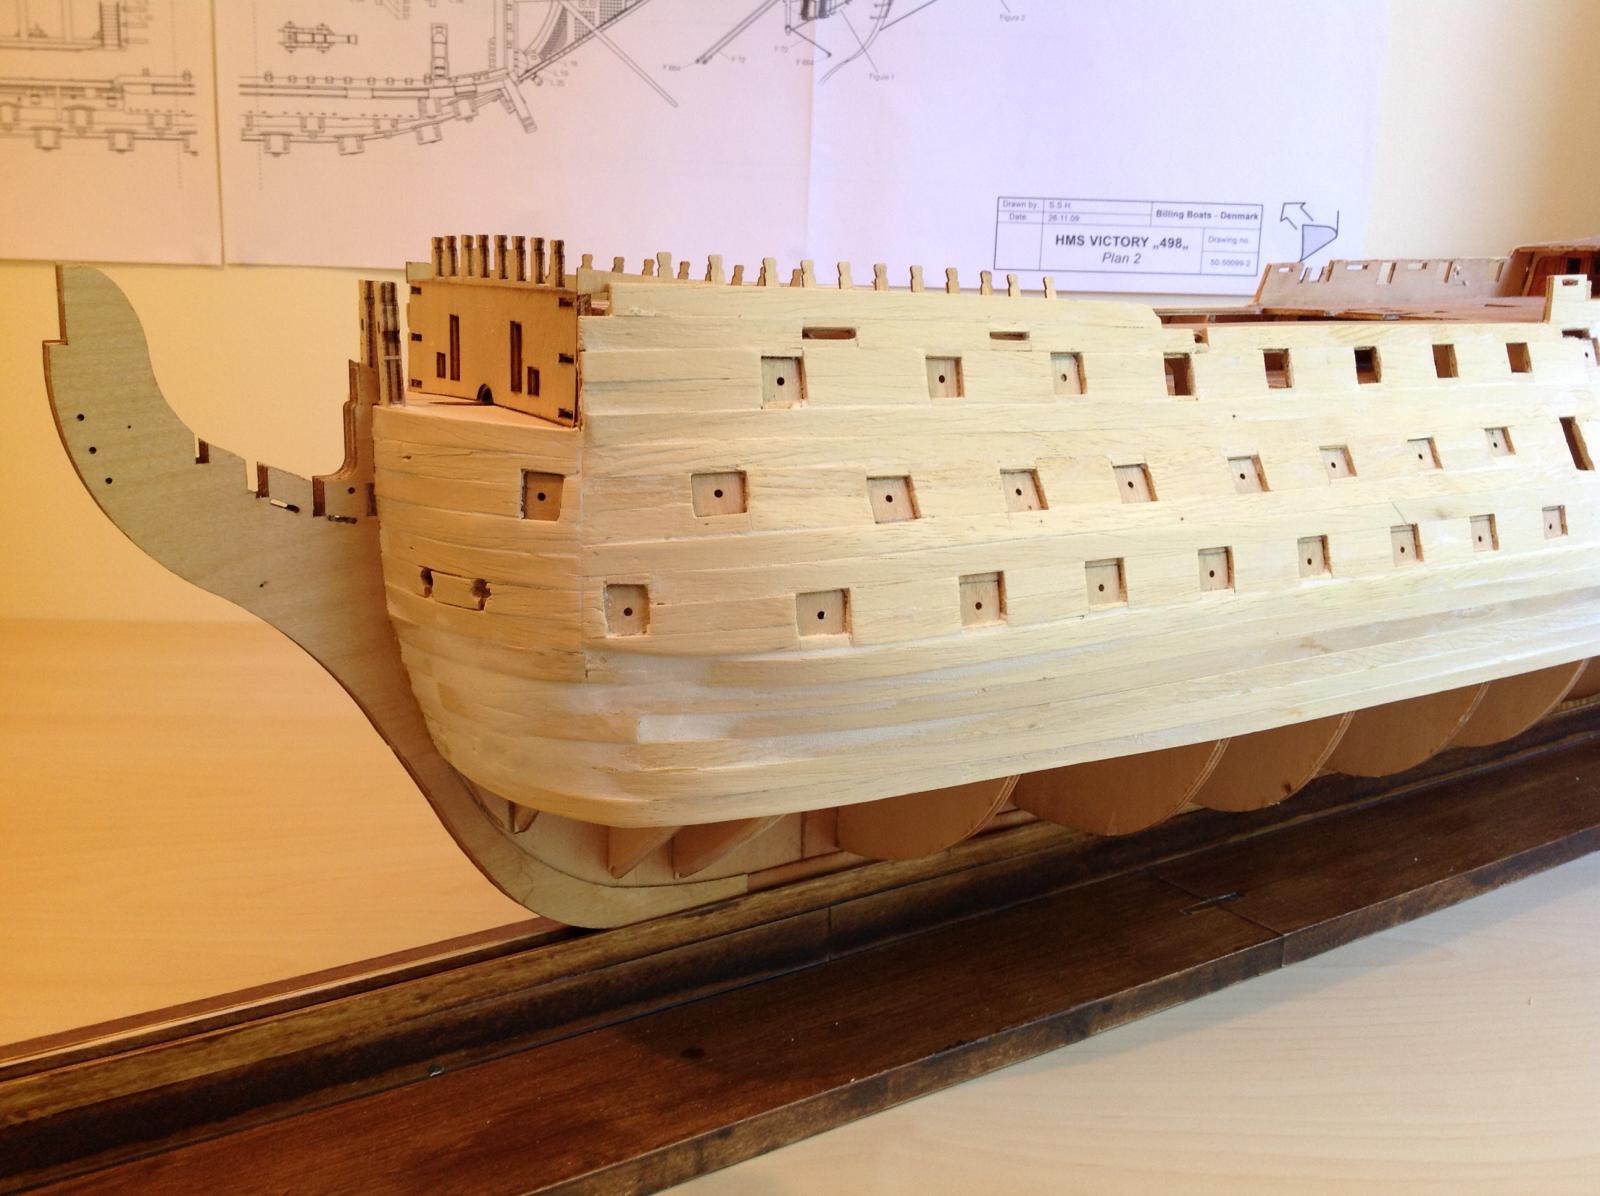
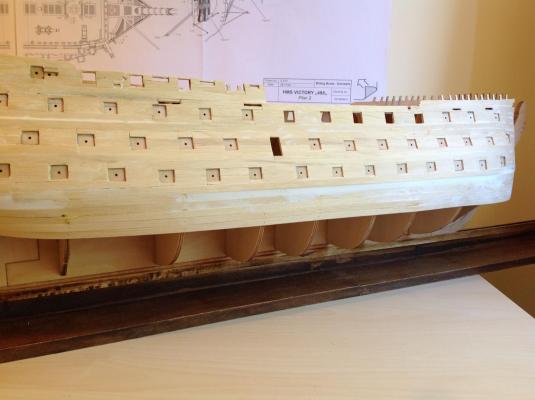
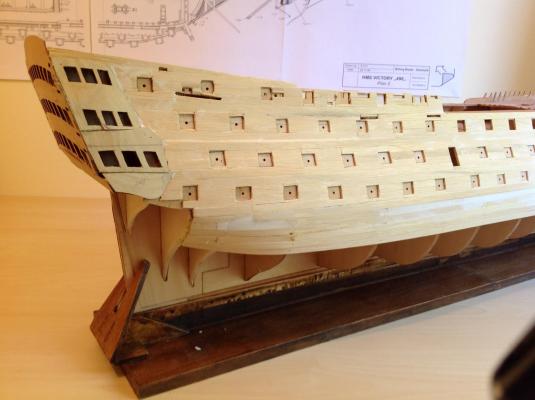
Hi there Shihawk, To let you see where I have got to, the 3 photos below is as things stand today - just the planking of the hull for the starboard upper decks and the bow. Just getting this far has proved very fiddly and time consuming and, as you can see, I have needed to be somewhat creative in cutting and fitting the planks, particularly around the gun ports. My next steps are to first finish gluing in the small missing areas of planking; then to apply wood filler to all the remaining gaps and completely sand all the planking. Like you, I find bending the planking quite a challenge and have tried a couple of different ways of softening up the wood. The one that seems to work best for me is to soak them in very hot water for at least half an hour and then pin them to the hull to shape and dry them out first before gluing. I have also purchased a Strip Bender from Cornwall Model Boats Ltd which has proved to be very useful, particularly in shaping the smaller pieces of planking like those I have used on the bow section. In the longer term, it is my intention to paint the ship in the colours of the completely renovated Victory, as she stands in Portsmouth today and is shown in the "Haynes Owners' Workshop Manual". Hopefully, this should cover up most of my construction errors - at least I hope it will!! I'm thoroughly enjoying the build but, when finished, I'm not sure about us being called "experts" - that's going to depend very much on "how well" we finish it. If and when I do, I think my next boat's going to be a rowing boat!! Kind regards, Michael

- 47 replies
-
- 2
-
-
- victory
- billing boats
- (and 1 more)
-
Hi Glennard and Shihawk, Thank you both for your comments after my update yesterday, and I will certainly be following each of your builds. Clearly, my first big mistake was not to dryfit as far ahead as I should have done and I shall certainly do so in the future. From your update Shihawk, you clearly have considerable experience with previous boats and probably will be using the BB Build Instructions only as a guide. Without any previous experience with boats, I will need to follow the instructions as closely as I can and also feed off your and other people's build logs. Looking ahead, I was interested to read in your log, Shihawk, how you were handling the gun ports by cutting them out and deepening them. This is not something I am keen to try. In looking through the Building Instructions, and particularly at Figs 19B and 19C, I notice that the upper deck gun ports are cut out but those in the lower decks are not. What I intend doing therefore is to assume that the gun ports are marked as a guide for the planking and for the fitting of the doors over each of the ports, and to carefully fit the planking around each of these. Watch this space!! Michael
-
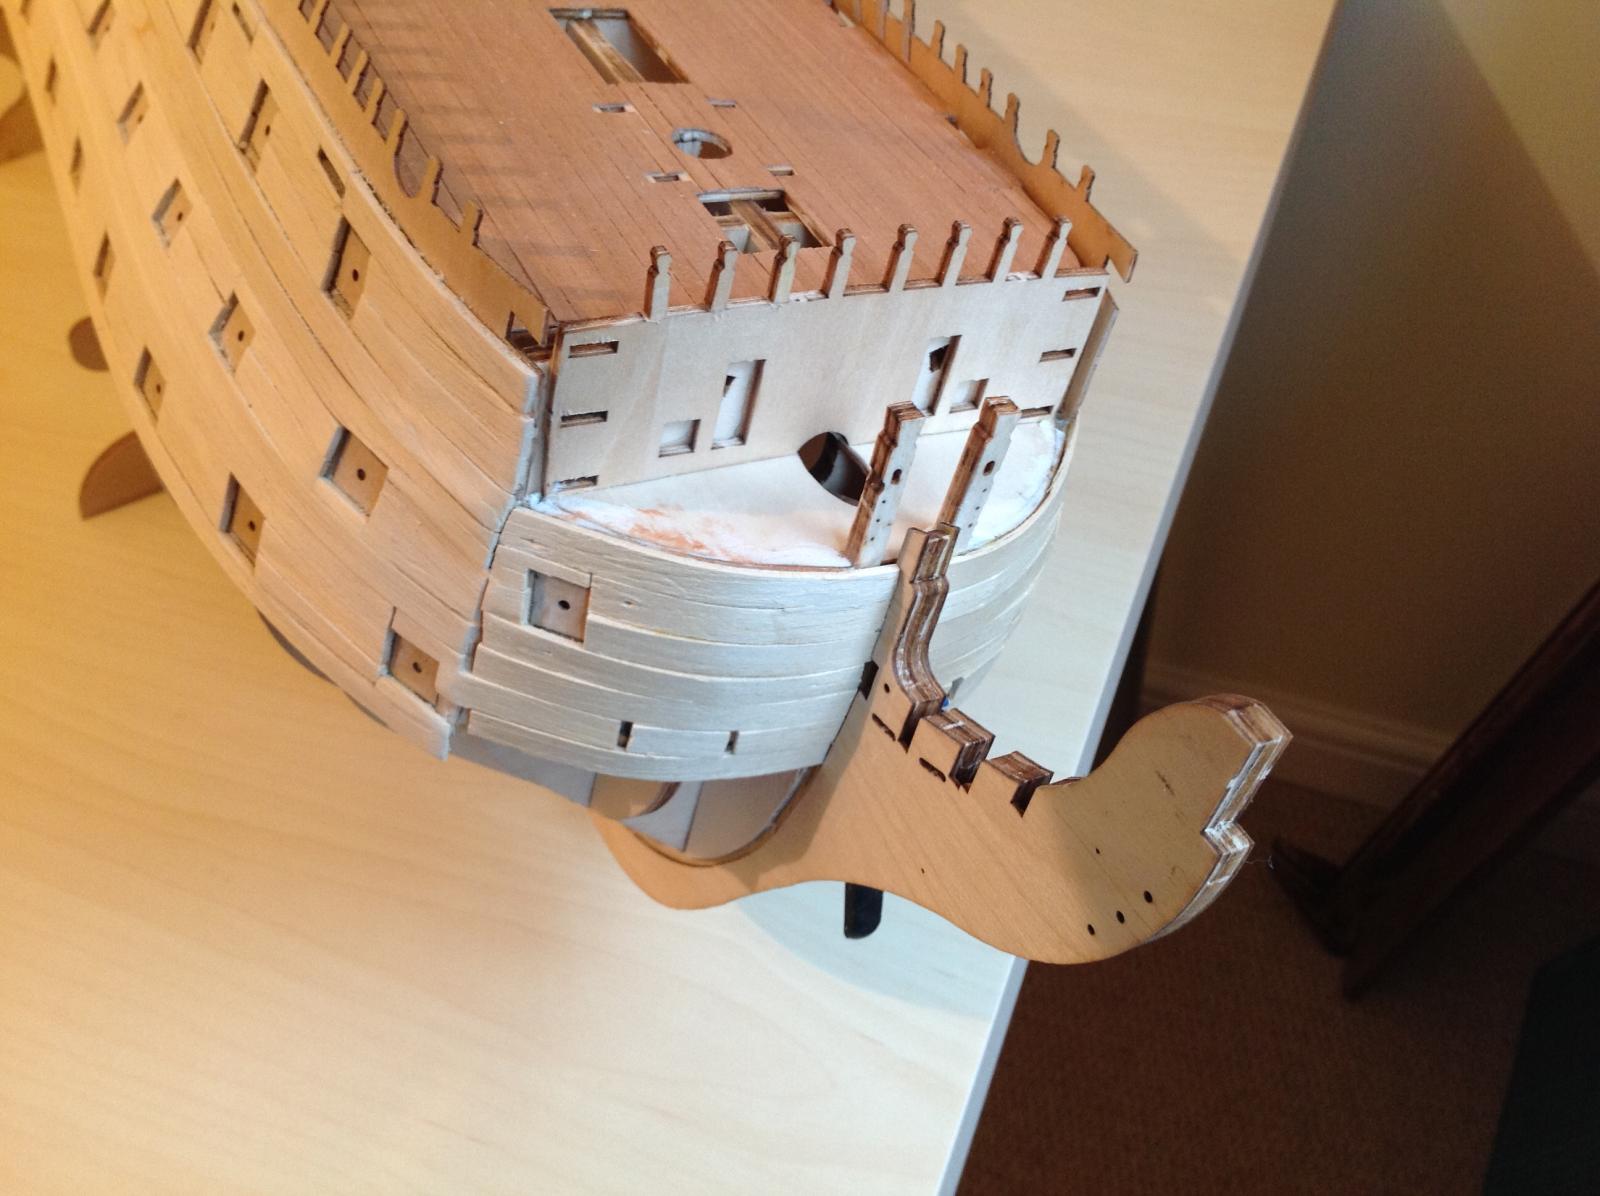
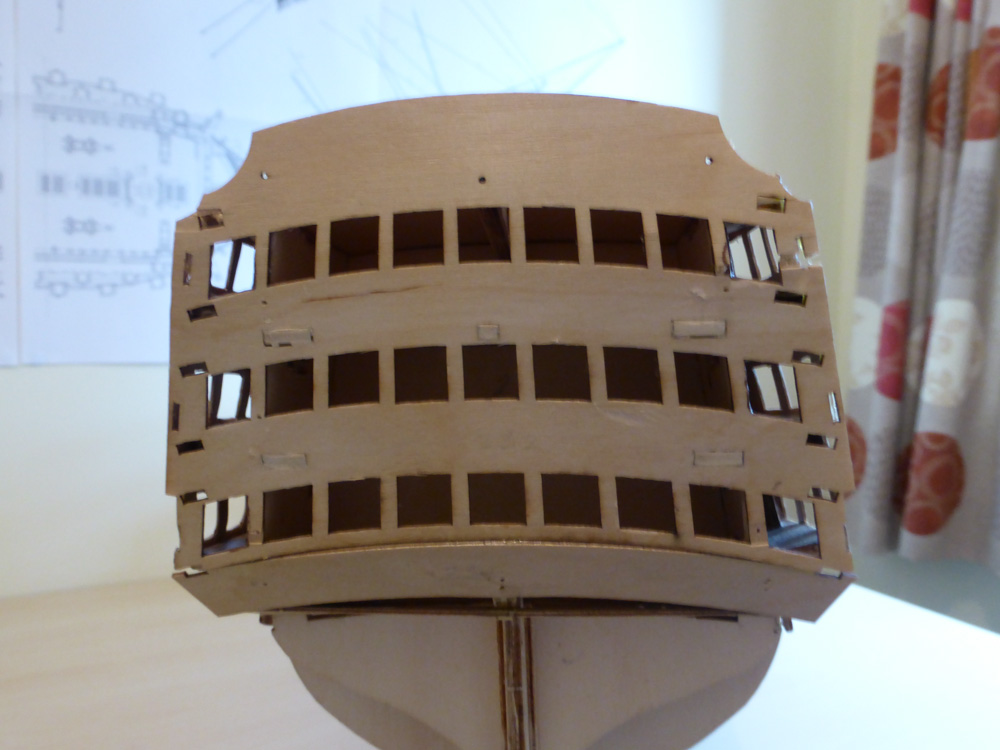
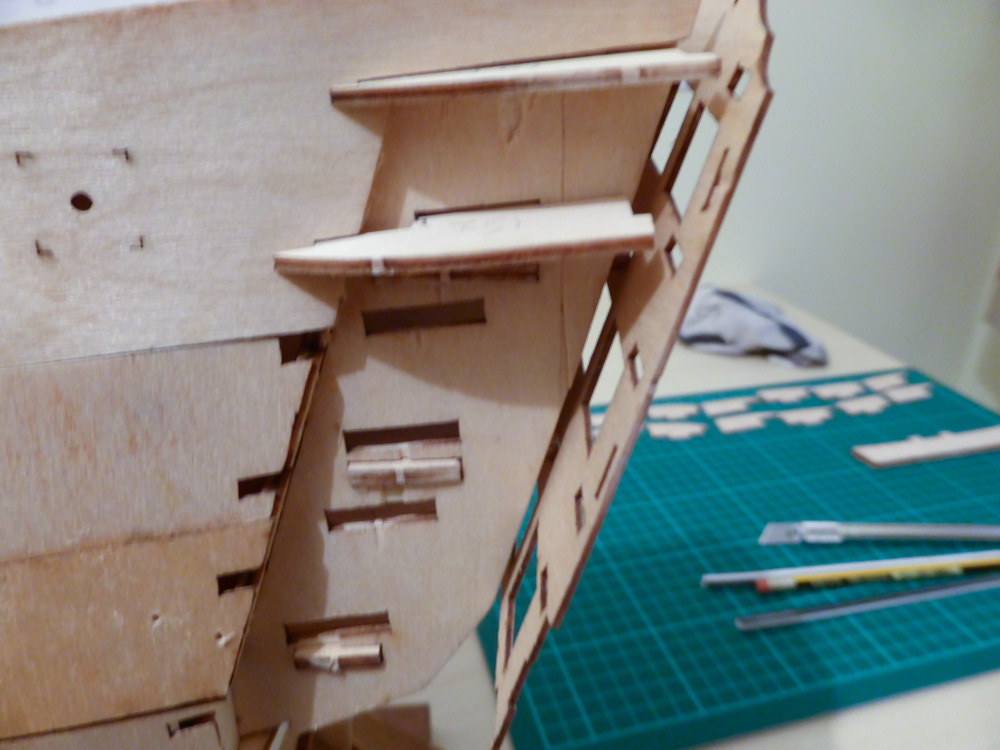
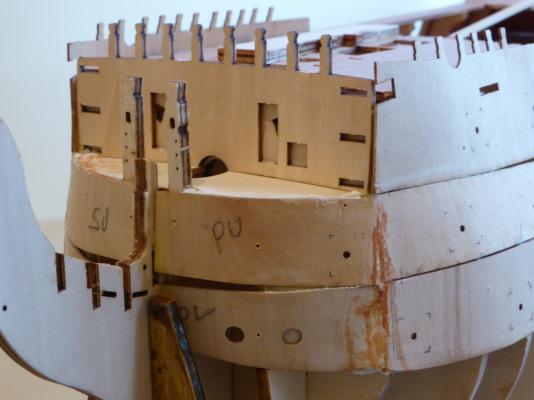
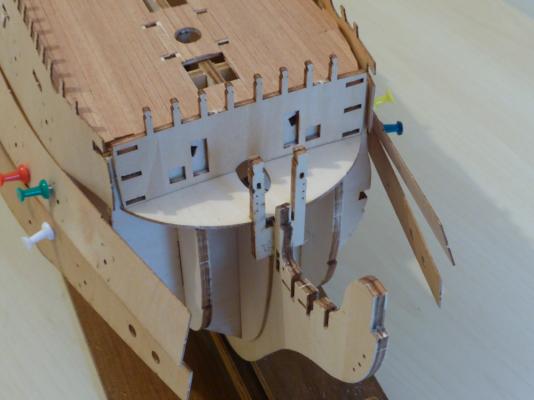
6 March 2014 As of today, I have got as far as completing Fig 8C in the Building Instructions, except for attaching the two pieces 247. After attaching these two, I will be moving on to Fig 9 and the planking of the hull. Getting where I am today has not been straightforward though, mostly my fault of course but not helped by the lack of more user friendly instructions from Billing Boats. Also a lack of any reply to emails I have sent to the Company asking for information and/or advice. Below are five pictures covering my somewhat slow progress over the past few weeks. The photo of the Starboard Stern 1 is where my problem started because I had not appreciated that the "wing" pieces shown in Fig 8A were not supposed to fit squarely into pieces 81 (Fig 2B). They needed to be glued in with a slight downward angle so as to ensure that the tabs to the rear fitted into the holes in the Stern Panel, piece 232 (Fig 8C). The result was that I had to be extremely creative in cleaning out some of the glue and bending the "wings" downward so that they could not be seen through the side stern windows. In working through this, and in trying to match the rear tabs of the "wings" to the main stern panel, I also managed to damage a couple of the pieces making up the side stern windows. My solution was to buy in a sheet of 0.8mm plywood and, using the damaged pieces as templates, make replacements. The end result is shown in the photo Starboard Stern 2. The outer layer of the rear and side stern panels (Fig 10) are slightly longer than the first layer so I am expecting/hoping that this will go someway to cover my mistake. In the photo of the Port Bow you will see what my solution was to make sure that the bow ends of the hull side panels fitted round to the bow as in Fig 7. Essentially, what I have done is to cut off the ends of the panels; fit these to pieces 24, 98 and 274 (using small blocks of balsa wood to provide a backing to which I was able to glue the ends of the panels), and then to use wood filler to close the resulting gaps. More tidying up will be necessary before I begin planking the hull. The photo of the Starboard Panels shows the slightly uneven surface across the panels which will need to be smoothed out before planking. I intend doing this by using strips of 0.4mm plywood which I have bought in to glue along and to the rear of the panels and hold these in place with clamps. I'll let you know how things go with the planking but I will try and avoid any more stupid mistakes on my part. To achieve this end, I intend making haste slowly. In the next phase I hope to move through to complete up to Fig 10. Regards, Michael


- 47 replies
-
- 3
-
-
- victory
- billing boats
- (and 1 more)
-
Hi there Shihawk, Thanks very much for your comments, and your views with which I completely agree. In the absence of any worthwhile instructions from Billing Boats, I think that we 3 builders should be able to help each other overcome some of the problems we meet. With this in mind, I am going to follow this message with an update on where I have got to so far, and the problems I have met. I am being helped in my build by one of my sons who has quite a bit of modelling experience, mostly of aircraft though, but I welcome advice from anyone who thinks they can help me overcome problems or offer suggestions as to how I might do things differently. Regards, Michael
-
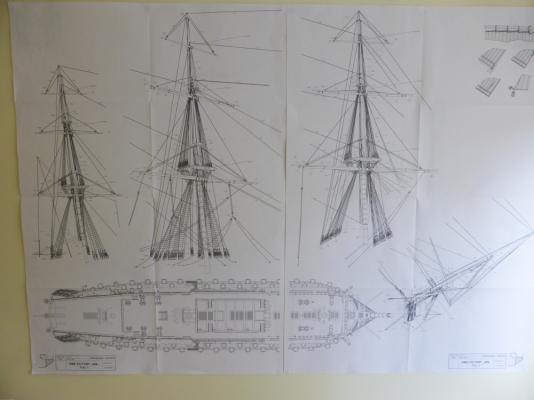
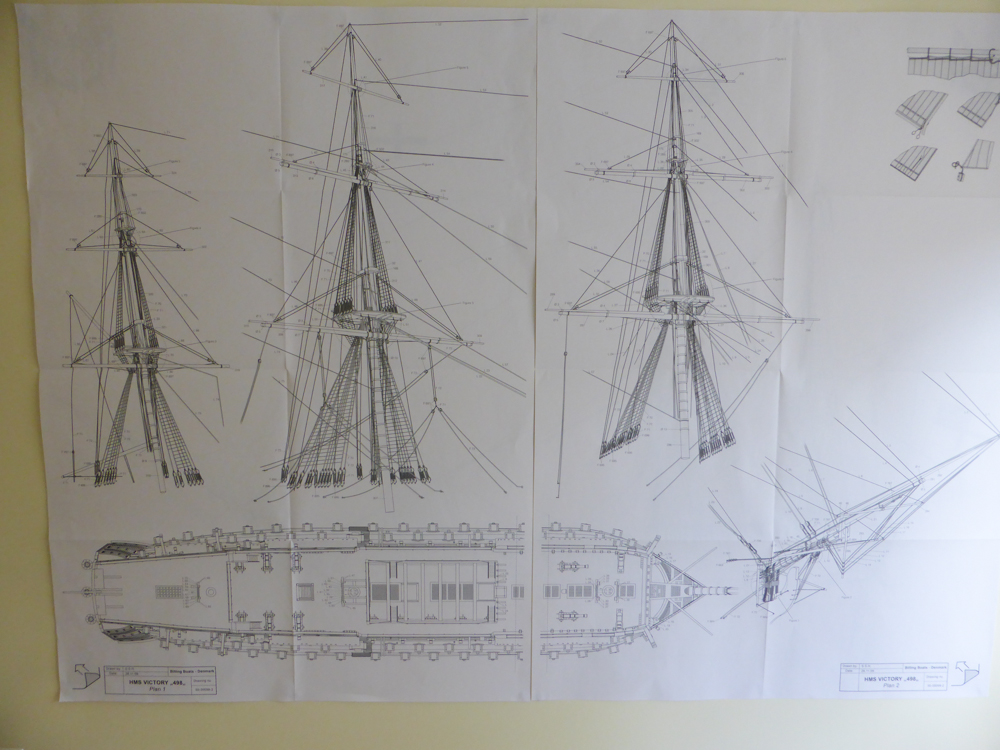
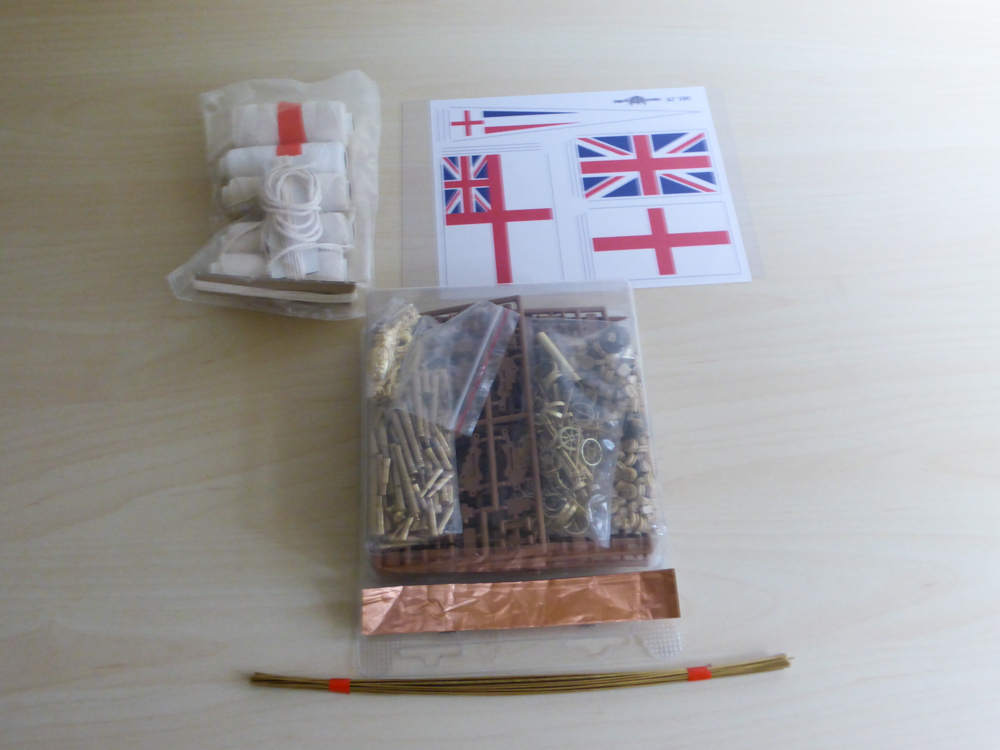
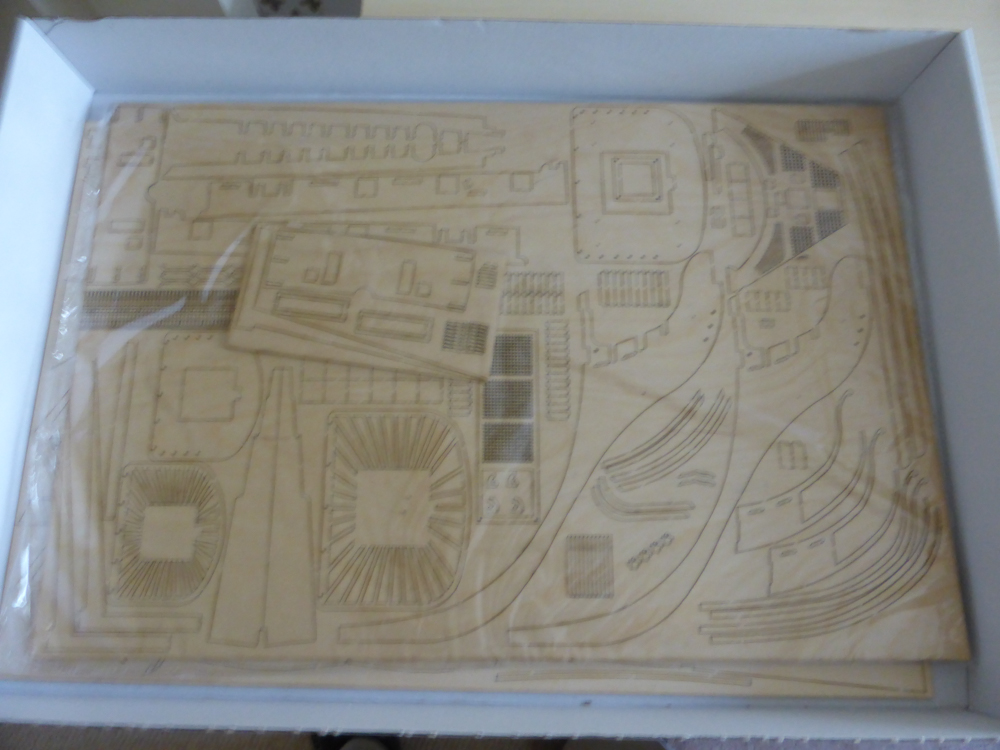
Hi Jeff, To try and answer your questions, but without previous BB experience, they would seem to have come a long way since the Wasa kit. With the exception of the many small brass fittings and a sheet of acetate, all the Victory kit is made of wood. The deck planking is 0.7 x 4mm and the hull planking is 1.8 x 7mm. Both are what I would call single planking. All the deck gratings are made of wood, as are the rigging fittings, but there are also some brass fittings within the rigging. As for the stern windows, there is no photo-etch. My intention here is to cut to size and glue the acetate to the stern and side window panels and then, using a very fine marker pen, mark the 9 small panes for each window - very carefully!! This I imagine is going to be a time consuming process. In considering a future build of the Victory, you might find most of the information you need, particularly regarding the kit content, in the BB Building Instructions. These can be downloaded from their website. The actual instructions though consist only of drawings and do not provide any help with troubleshooting. My best experience so far when I meet a problem has been to search the Web to find out what other builders are doing. This lack of detailed instructions from BB has caused me quite a few problems, and I will try to share my experiences, good and bad, as I go along. Hope this helps, Michael
-
Hello All, I recently began building the Billing Boats HMS Victory and am having some difficulty understanding the Building Instructions. I wondered if anyone who is also building or has completed a build has met this issue? Any help/advice would be greatly appreciated. In Fig 8A, the stern panel is shown as being straight across (as it also does in Figs 8B, 9, 10, and 18A), but what looks like curved in Figs 17 and 17A. If the panel should be curved, as it is shown in real life in the Haynes Owners' Manual, which I have found to be a very useful reference, then it could not be glued to parts 23, 81, 82 and 83 in Fig 2B. Am I missing something? With thanks in advance, Michael
-
10 January 2014 I'm now beginning to work on the stern section and I'm having a bit of a problem - again - understanding the Building Instructions. I wondered if anyone else had met/solved what might well be a problem? In Fig 8A, the stern panel is shown as being straight across (as it also does in Figs 8B, 9, 10, and 18A), but what looks like curved in Figs 17 and 17A. If the panel should be curved, as it is shown in real life in the Haynes Owners' Manual, then it could not be glued to parts 23, 81, 82 and 83 in Fig 2B. Thanks for any thoughts/guidance Michael
-
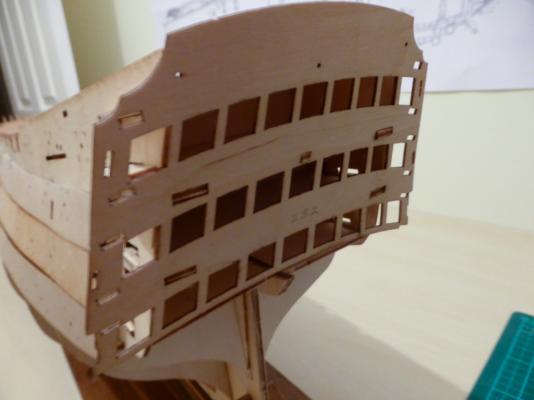
First of all, a thanks for all the encouraging comments. Attached are four pictures showing how much further my build has progressed over the past three weeks. The first picture shows the complete ship with the decking finished and with the four side panels (174, 177, 178 & 179), almost completely fitted. As you will see, the lower two panels (174 & 177) have still to be glued to the bow section but this is where I have come up against my first significant problem. With each panel I started from the stern where I had to match the cut-outs with the slots in the stern section. Getting this right didn't help much because, by the time I reached the bow section, that end of the panels did not match up - even after I had trimmed and sanded them they are still not a snug fit. My guess is that moulding the panel ends to the bow, as per the drawings in th Building Instructions, Fig 7, will need some real creativity!! The second picture shows a close up of the bow section. One option I am considering, based on ideas I have read about in forums, is to trim each of the side panels at the forward bulkhead; backfill the space at the front of that bulkhead with balsawood and then glue the cut-offs over the balsawood and around the curve of the bow. The third picture (a little out of focus I'm afraid) shows the stern panel (232) loosely in position but, as can be seen, it fits perfectly onto the five bulkhead connection points. However, the fourth picture shows the problem I have now met in fitting each of the pieces, 151 to 158, into the slots and the stern panel - they do not match up, even though the stern panel fits exactly, as do the ends of the two side panels (174 & 177). What I think I must now do is to reshape these to get some form of fit - watch this space!! The greatest difficulty I have is understanding the Building Instructions which, for me, are nowhere near as clear as I would like, leaving me to use trial and error in some cases, and not always ending up with what I consider to be the best result. I have to say that I fully support many of the comments of other builders in various forums expressing surprise and concern that, for such a relatively expensive kit, the Instructions leave much to be desired. Nevertheless, I shall soldier (or should it be sailor?) on and try to produce the best end result I can. On a general note, when in doubt, particularly as regards decking, hull construction and painting, I have found the information and pictures in the "Haynes HMS Victory Owners' Workshop Manual" very helpful. The latest version was published in 2012 and shows Victory as she is today in Portsmouth after a complete restoration. I think that's all for now but will try to keep you informed - both regarding my successes and mistakes. Regards, Michael


-
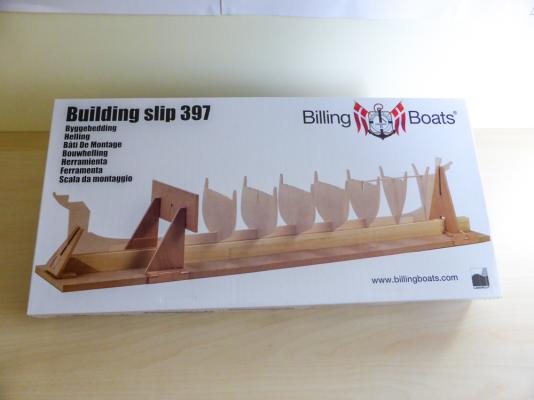
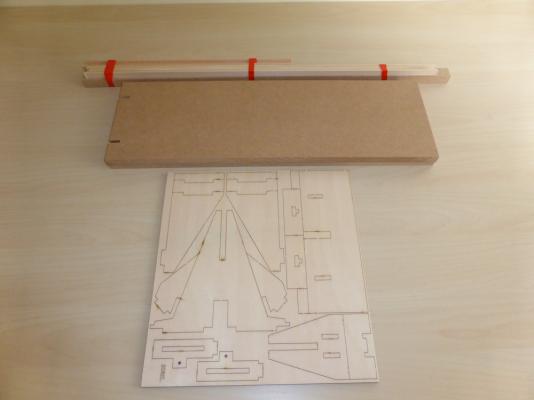
After just one week, I have got somewhat further than I had planned. I first constructed the Building Slip, making just a couple of mistakes because I failed to read the instructions carefully. This included making a bit of a botch up in varnishing it, which wasn't necessary. It works very well though and, although somewhat expensive, it does make the building of the boat that much easier. Also of course, it can be used in building other boats in the future. Attached are two pictures showing where I have got to so far which is the installing of the bulkheads and part of the stern, and the first deck. My next task is to install the deck planking which I expect to be quite time consuming, and very detailed work. In looking ahead to this, my son has given me a book which I have found very useful in developing my knowledge of on all aspects of ship modelling and which I have no hesitation in thoroughly recommending. This is "Ship Modeling from Stem to Stern by Milton Roth and published by TAB Books. Will keep you informed as things move on. Michael


- 47 replies
-
- 1
-
-
- victory
- billing boats
- (and 1 more)
-
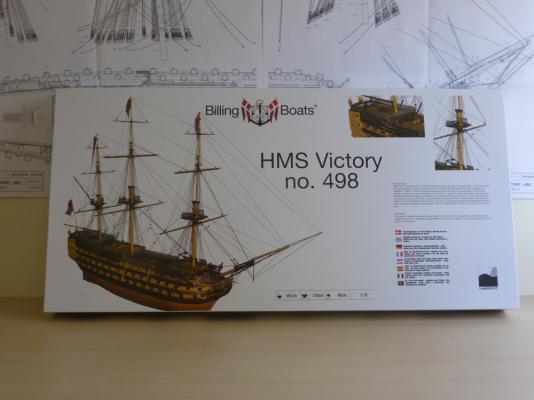
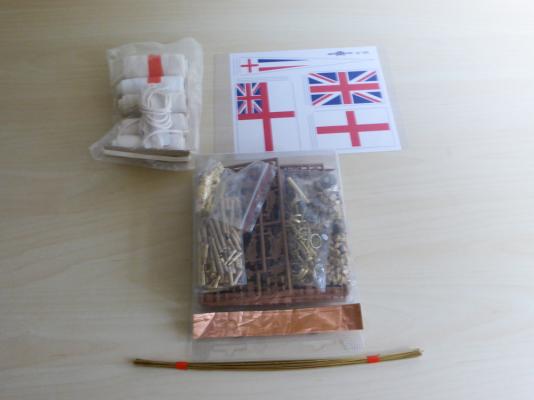
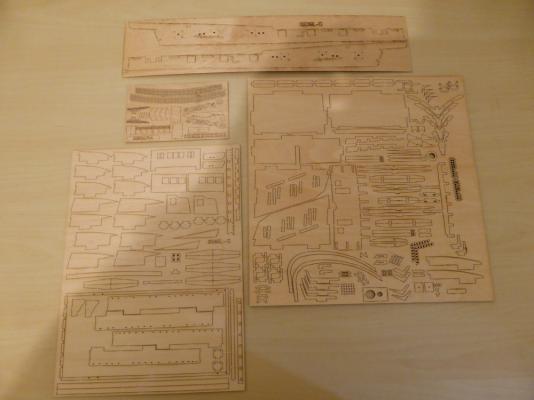
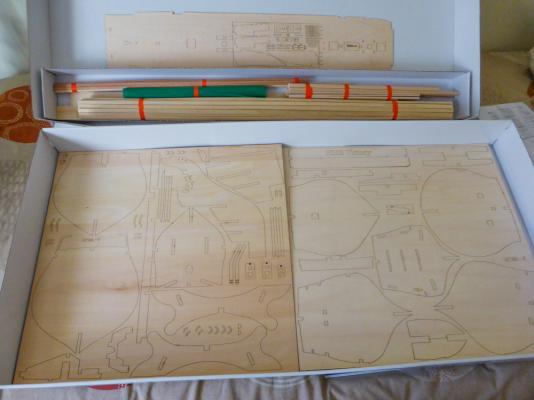
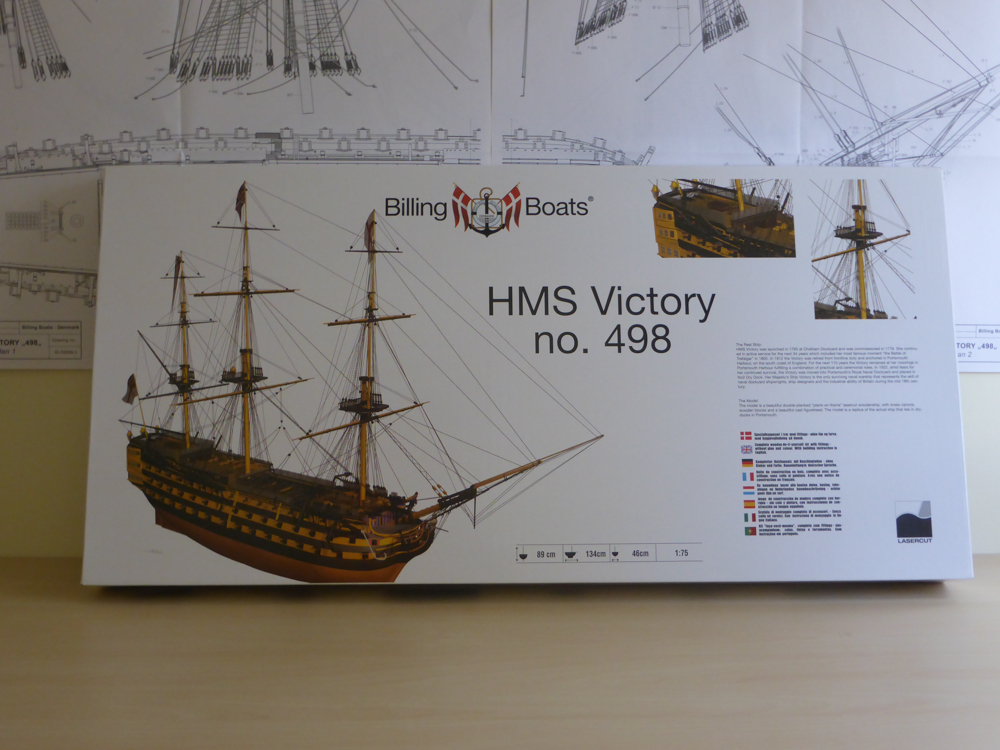
11 January 2014 Hello All, Having at last got together the two kits; the various tools and paints, and what looks like some excellent recommended reading, my target over the next one or two weeks is to first spend time reading up on the basics, and then complete the construction of the Billing Boats Building Slip. My previous modelling experience has been limited to aircraft - and that was a good few years ago - but I am fortunate to have a son who has considerable modelling experience and who has offered to be my modelling mentor. As things progress, I will try to provide a weekly or fortnightly update on my progress. I do realise of course that I'm going to make mistakes - hopefully not too many - so I am more than happy to receive advice from others, and will certainly not be afraid to ask for advice when I think I need it. My reasons for choosing HMS Victory to build (and I do realise that this is going to me a challenging task) are twofold. The first is having memories of being shown around her in 1967 when I was an officer cadet in the Royal Air Force and had the opportunity, with a few other cadets, of being shown around the ship by a Corporal of Marines who gave us the full and "unrestricted & uncensored" servicemen's tour". The second reason stems from that visit and the years of subsequent reading of naval history and novels covering the period of the Napoleonic wars. Attached are a few pictures of the two kits I will be working with which I hope will give people an idea of where I am starting from. Michael