

etubino
-
Posts
128 -
Joined
-
Last visited
Reputation Activity
-

 etubino reacted to dunnock in HMS Diana by dunnock - FINISHED - Caldercraft - 1:64
Thanks to everyone for the likes
I have replaced the ropes from the kit that I used with those from Ropes of Scale, so the foremast rigging is completed for the moment. I have left off the brace falls to maintain a clear space amidships for as long as possible.
I had fitted the brace pendants according to the plans supplied but they have never looked right to me. Checking with Lees and Steele’s tables, I realised that they were too short so these have been replaced with pendants that are 1/3 the length of the yard and with beefed-up ropes.
But before replacing the brace pendants, I have added the yard tackles to the fore course. I have left them hooked to the futtock shrouds and with a reasonable amount of catenation like they are shown in Lees.
The blocks for the fore topsail bunt lines are not shown on the plans. It was a bit awkward to the add them as they are tied to the tye block. I also had to add the pendant blocks to the crosstrees.
It’s now a case of repeat for the main mast with the added interest of trying to thread the sheet and clew lines through the sheaves in the main jeer bitts.
David
-
etubino reacted to dunnock in HMS Diana by dunnock - FINISHED - Caldercraft - 1:64
Thanks everyone for the likes.
Topgallants are now all fitted. The parral beads that I have are all too big for topgallant yards and in any case, would have been too fiddly to fit, so I’ve attached them with truss parrals as a valid alternative according to Lees. Ties and lifts are also added.
I now return to the fore yards to add clues, tacks, buntlines and leechlines.
The clue block and sheet block are are joined together and the tack threaded through and held by a tack knot. The tack knot I approximated with a figure-of-eight with an extra turn. The clueline is tied to the yard just outboard of the block on the yard with a timber hitch, runs through the clue block up to the yard block and then is taken through the fore and aft inner blocks under the top and down to the middle sheave on the fore bitts. I’ve found a potential problem with the blocks under the top The only double block I placed was the inner block with the other two being singles. It would be quite difficult to replace the blocks now so I hope that it won’t cause me problems later on. The tack will run down to a block on the boomkin but for the moment I have loosely tied them off to the cathead. I will also add the sheet later to keep the midships area free.
clue block, sheet block and tack tied together
clue garnets tied off to fore bitts
tack lines temporarily tied off to catheads
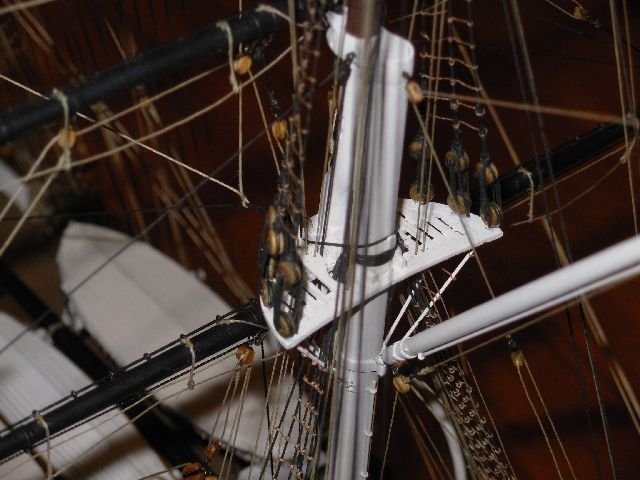
Buntlines caused me to stop and think for a while. I found Lees descriptions of buntline legs and falls difficult to follow. I wasn’t sure if buntline falls were required In the end I went for two blocks stropped together for the falls. The buntline legs are tied with a toggle to stop them running through the block on the yard and then lead through the forward blocks under the lower top down to the fall block, back up through the afterward block under the top and end at the second yard block. One end of the falls is tied to the forecastle rail runs through the lower fall block and back to the rail.
The leechline a toggle prevents it running through the block on the yard it roves through the outer block under the lower top and a block is seized in the lower end. A whip is tied to the forecastle rail, passes through the block in the end of the leechline and runs back to the rail.
I ran out of 0.25 and 0.35 ropes from Ropes of Scale for the buntlines and leechlines so used the kit-supplied thread but standing back, the contrast between the two (perhaps not obvious in the photo below) is not acceptable so I have sent off to Canada for further supplies to replace them.
Thanks for looking in
-
etubino reacted to DaveBaxt in HMS Diana by dunnock - FINISHED - Caldercraft - 1:64
David I think Vanguard sell longer wood oars . They are longer than the supplied brass ones and better in my view.Good luck.
-
etubino reacted to aydingocer in HMS Sphinx 1775 by aydingocer - Vanguard Models - 1:64 - Revision #2
Build day 87: 2 hr / Total 198,5 hours
Photos 655-657: Lantern construction. Refer to plans for preparing the rods and final positioning of the lanterns on the stern.
Photo 658: Lanterns in place.
That's all for now. Thanks for watching!
-
etubino reacted to aydingocer in HMS Sphinx 1775 by aydingocer - Vanguard Models - 1:64 - Revision #2
Photo 620: Coming up Next! Ship's boats. This is the most intimidating part of the build for me. I had tried to build the life boat once and failed in one of my earlier models. Ever since I always chose the easier option and went with the ready plastic hulls. This time I want to give them a try. Let's see how well I will achieve.
That's all for today. Thanks for watching!
-
etubino reacted to aydingocer in HMS Sphinx 1775 by aydingocer - Vanguard Models - 1:64 - Revision #2
Catheads.
Photo 627: Parts that form two Catheads... and some more (See next photo)
Photo 628: I figured I removed two end mouldings too many (those square ends). I taped them back to the sheet so they won't get lost. I don't know yet if I need them later or if they are just spares. But they are just safely there in case.
Photo 629: First you glue two parts back to back like this...
Photo 630: ... then glue the short and long patterns on their respective matching sides...
Photo 631: ... and glue the end mouldings.
Photo 632: ... and sand the sides to level.
That's all for today. Thanks for watching!
-
etubino reacted to aydingocer in HMS Sphinx 1775 by aydingocer - Vanguard Models - 1:64 - Revision #2
Build Day 58: 3,5 hrs / Total 137 hours
Continued with the Forecastle, Quarter and Gangway deck installation. I am posting a bunch of photos here showing the progress and some details.
Overall everything went without surprises and with only slight trims and adjustments.
Gangway patterns are composed of two layers glued one on top of another. I clamped them on a piece of wood to prevent from bending while the glue dries. Their installation is a bit tricky to figure out from the photos in the instruction manual however you'll need to follow together with the plans. You'll need to take some measures and trim off parts where it will align with the with the gunwale. For that I would recommend to follow a slightly different order; first gluing the gangway support knees (those red parts) in place and then resting the gangway patterns on them to take the measurements.
Photo 589-604: 16 photos showing the progress:
-
etubino reacted to aydingocer in HMS Sphinx 1775 by aydingocer - Vanguard Models - 1:64 - Revision #2
Photos 576-580: I decided to install the optional Quarter Deck Hanging Knees. After all they are included in price 😁. Follow the plan to correct positioning. Those resting on the red walls will be painted in red, the rest in natural.
-
etubino reacted to aydingocer in HMS Sphinx 1775 by aydingocer - Vanguard Models - 1:64 - Revision #2
Build Day 56: 3 hrs / Total 129,5 hours
3 hours of work covering the completion of cannon carriages, including gun port painting, which I noticed I forgot to do, almost too late.
Photo 569: Gun ports painted in red. I should have done it earlier and it was a bit tricky to reach some parts with brush after all the other details around, but I survived.
Photo 570: All cannons in place. I decided not to rig them at all. They will be barely visible in the end.
-
etubino reacted to aydingocer in HMS Sphinx 1775 by aydingocer - Vanguard Models - 1:64 - Revision #2
Photo 566: All 20 carriages before installing the wheels and eyebolts (and possible rigging).
-
etubino reacted to aydingocer in HMS Sphinx 1775 by aydingocer - Vanguard Models - 1:64 - Revision #2
Photo 556: One of the carriage side piece will be glued after the gun has been inserted. However it is used now for correct alignment of the other 3 parts. Note the two sides are not parallel, they are a bit further apart at the back.
Photo 557: 3-piece constructions are ready.
Photos 558-562: Painting . Wheels will stay as they are. All parts are applied one layer of varnish before applying paint.
Photo 563: Tip: For painting the cap square details I use this pen with permanent black ink. Works better than any paint brush.
Photo 564: A detail showing the cannon carriage cross bar (going underneath the gun).
Photo 565: My pin pusher comes in handy here, too. It allows to push it in small increments, making it possible to get the cross bar across the two holes without bending.
-
etubino reacted to aydingocer in HMS Sphinx 1775 by aydingocer - Vanguard Models - 1:64 - Revision #2
Now the cannon carriage build starts. There will be altogether 20 of them.
Photos 552-553: It took me 1.5 hours to remove the 180 pieces and clean the sprues off them. I think this is where I stop for the Christmas.
-
etubino reacted to aydingocer in HMS Sphinx 1775 by aydingocer - Vanguard Models - 1:64 - Revision #2
Build Day 52: 3 hrs / Total 120 hours
Below a sequence of photos showing the stove construction and installation.
I used a mixture of two red and one rust color in my paint stock to get the floor brick colour under the stove. The actual color looks a bit different than in the photo, and I am happy with the result.
For the stove, after painting matt black with airbrush, I gently applied steel color by barely touching with an almost dry brush. This gave the stove the metal and used look I wanted.
Photos 528-536
-
etubino reacted to aydingocer in HMS Sphinx 1775 by aydingocer - Vanguard Models - 1:64 - Revision #2
Next is the construction of hand pumps.
Photo 516: These are the parts. Wood from 4mm dowel. Visible area varnished.
Photo 517: This is the positioning of PE parts, before gluing together.
Photo 518: Glued together. The excess pin tips will be trimmed. I had to use a 0.6mm hand drill very gently to open the holes just a little in order to avoid the risk of bending the parts accidentally by having to push the pins too hard.
Photo 519: I use this "micro" marker to mark the drill spot, in this case to mark the center of the tip of the dowel...
Photo 520: ... like this.
Photo 521: The top cap glued, another hole on the side after some measurements.
Photo 522 - 523: The pumps installed on the dowel.
Photo 524: .. .and installed in place. Follow the plan to ensure correct orientation.
-
etubino reacted to aydingocer in HMS Sphinx 1775 by aydingocer - Vanguard Models - 1:64 - Revision #2
Photo 478: First chainplates nailed in place. I will touch the nails with black paint once all deadeyes are complete.
-
etubino reacted to aydingocer in HMS Sphinx 1775 by aydingocer - Vanguard Models - 1:64 - Revision #2
Photo 477: Here is a look at the black lower stern.
-
etubino reacted to aydingocer in HMS Sphinx 1775 by aydingocer - Vanguard Models - 1:64 - Revision #2
Photo 476: Deadeyes on the starboard fore channel. Chainplates hanging freely at the moment. They'll be fixed to the hull as next step.
-
etubino reacted to aydingocer in HMS Sphinx 1775 by aydingocer - Vanguard Models - 1:64 - Revision #2
Photo 469: I wasn't able to avoid these glue stains on the stern. I tried sanding them away slightly but didn't help much, as looks like the glue stain penetrated deeper than just on the surface and I don't want to ruin the engravings. I am considering to paint that rectangular area to black, so that it would look as an extension of the black wales, this way at least covering the disturbing glue stains. @James H or others, does it sound like a reasonable idea or you have any suggestion?
-
etubino reacted to aydingocer in HMS Sphinx 1775 by aydingocer - Vanguard Models - 1:64 - Revision #2
Photos 467-468: In the mean time painting the necessary parts for my next task: deadeye installation
-
etubino reacted to aydingocer in HMS Sphinx 1775 by aydingocer - Vanguard Models - 1:64 - Revision #2
Build Day 45: 1 hour / Total 97 hours
Football World Cup is going on with less busy schedule, allowing me to resume my Sphinx build slowly.
Photo 466: First Gun Port Hinges. It has a tiny rigging with 0.1mm natural thread.
-
etubino reacted to aydingocer in HMS Sphinx 1775 by aydingocer - Vanguard Models - 1:64 - Revision #2
Photos 452-455: Hull side steps prepared, glued and painted. It is essential to refer to the plan sheet for accurate and correct positioning of these.
-
etubino reacted to aydingocer in HMS Sphinx 1775 by aydingocer - Vanguard Models - 1:64 - Revision #2
Photos 447-448: Two photos showing the current state. This is only the right side at the moment.
-
etubino reacted to aydingocer in HMS Sphinx 1775 by aydingocer - Vanguard Models - 1:64 - Revision #2
Photo 446: So many similar shaped parts, I thought it would be wise to mark the progress on the plan with a marker in order to avoid wrong placements.
-
etubino reacted to aydingocer in HMS Sphinx 1775 by aydingocer - Vanguard Models - 1:64 - Revision #2
Photo 445: I am using normal and thin superglue with thin nozzles for this purpose and so far it is going well. In more detailed areas I also use this "superglue applicator" from DSPIAE. It allows applying tiny amount of glue.
-
etubino reacted to aydingocer in HMS Sphinx 1775 by aydingocer - Vanguard Models - 1:64 - Revision #2
Build day 42: 2 hr / Total 93 hours
Photo 441: All stern decorations in place and with the name plates installed, now my ship is officially SPHINX! . I will need to rest my eyes for a while after this tiring work. But after all I can confidently say the result was worth it.