Dlowder
-
Posts
41 -
Joined
-
Last visited
Content Type
Profiles
Forums
Gallery
Events
Everything posted by Dlowder
-
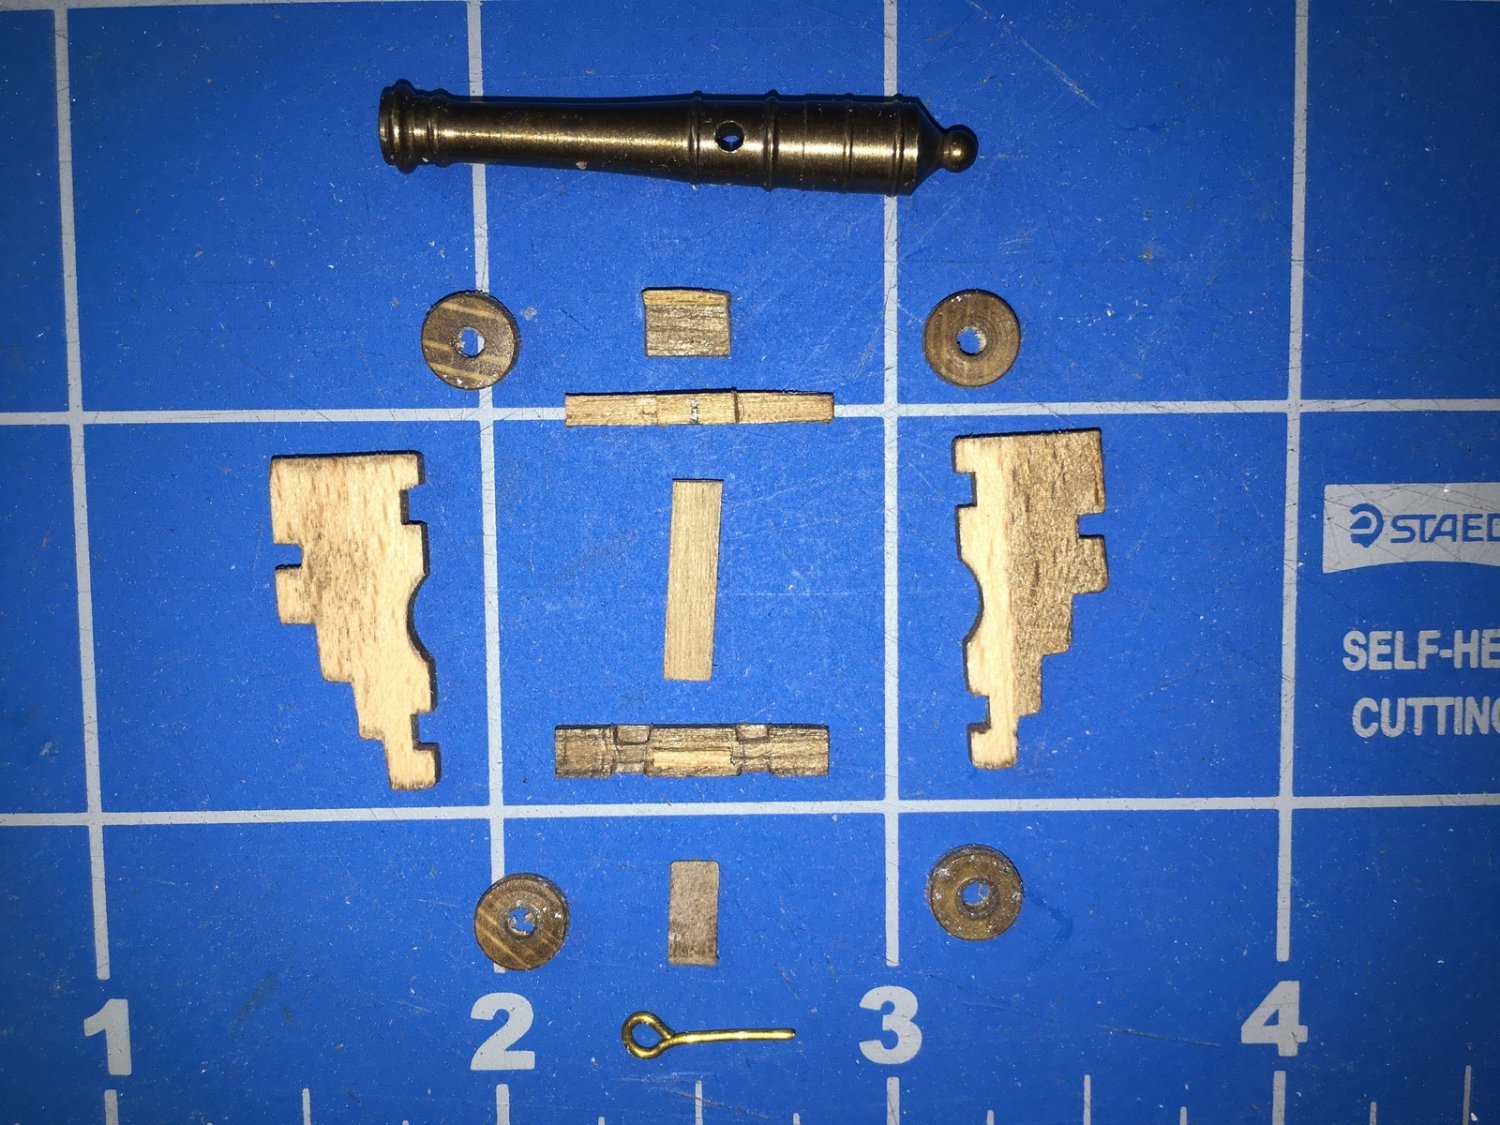
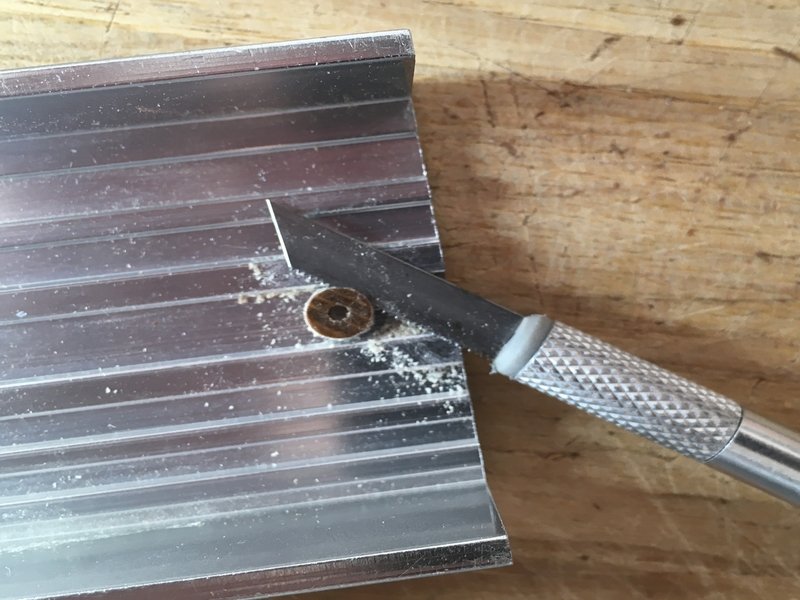
 Thank Allan! The kit guns are pretty basic as shown below. The 12 pounders are too small but I may be able to use the 24 pounders in place of them. Because of the way the kit is aligned, I don't have full gun ports on the middle deck. That decision is down the road. Right now I have only built up the 32 pounders. I cut the carriages apart so I could use the sides since they seemed adequate. The trucks were too thick so I sliced them in half as shown below. That was a pain to do. The rest I built from scratch. They are the same front and back in the kit and I just stuck those on to measure the height. I will use smaller ones when I get ready to rig and install them. For now I'm only going to install the deck hardware.
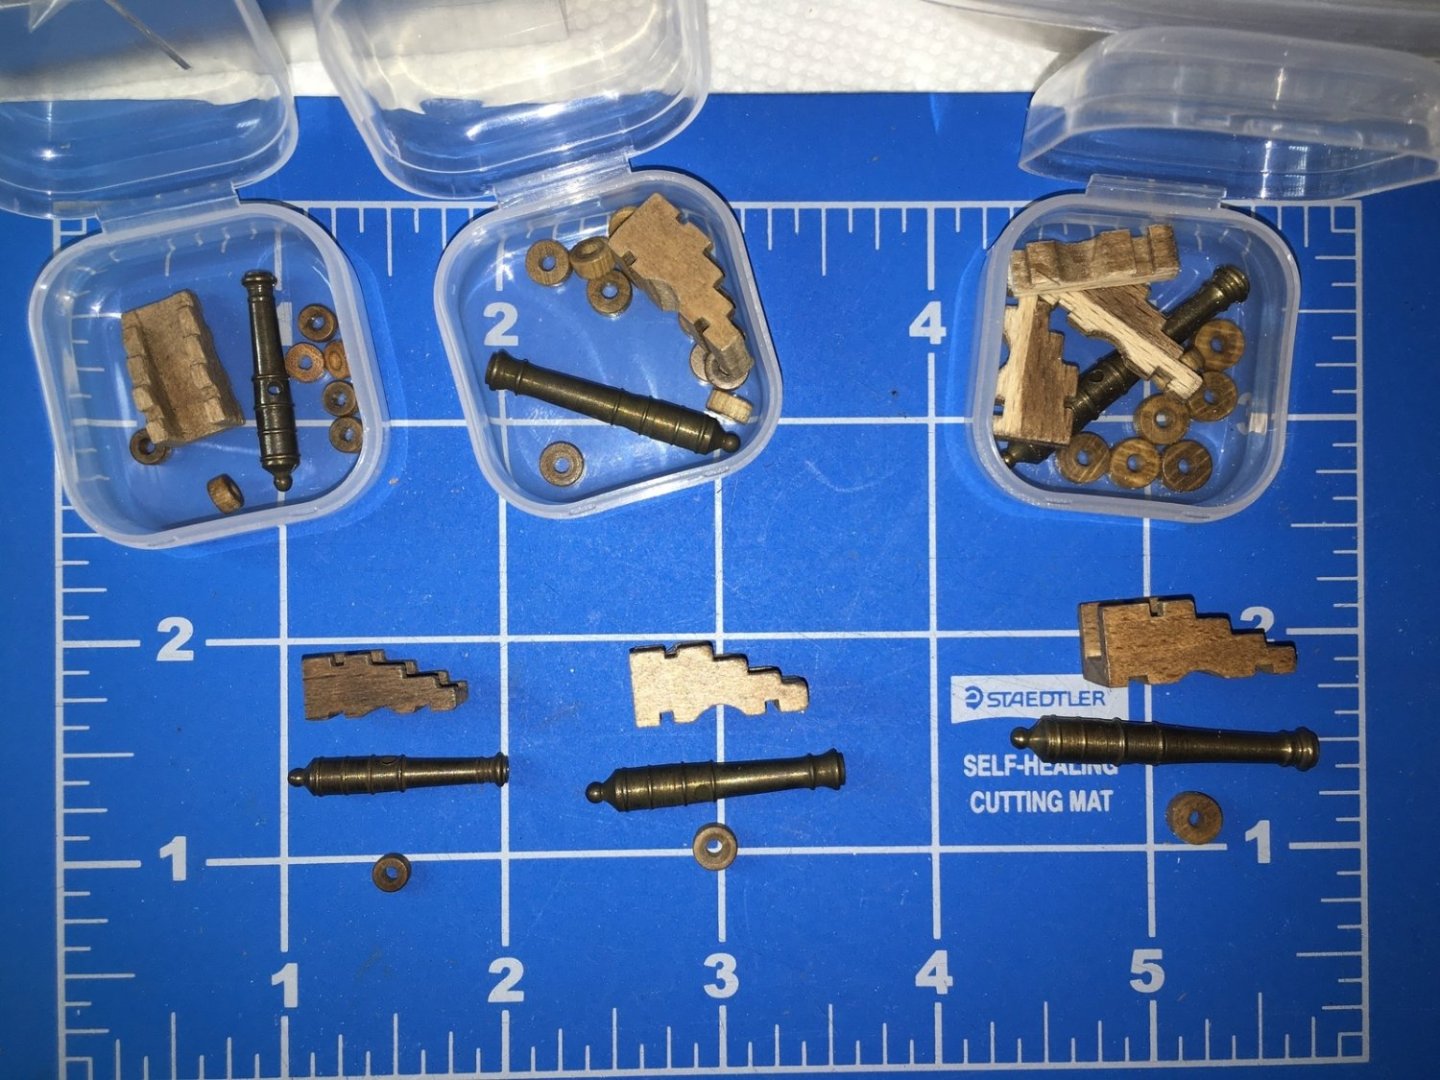
-
Thanks Rob! David
-
Hello to North Georgia from South Georgia. David
-
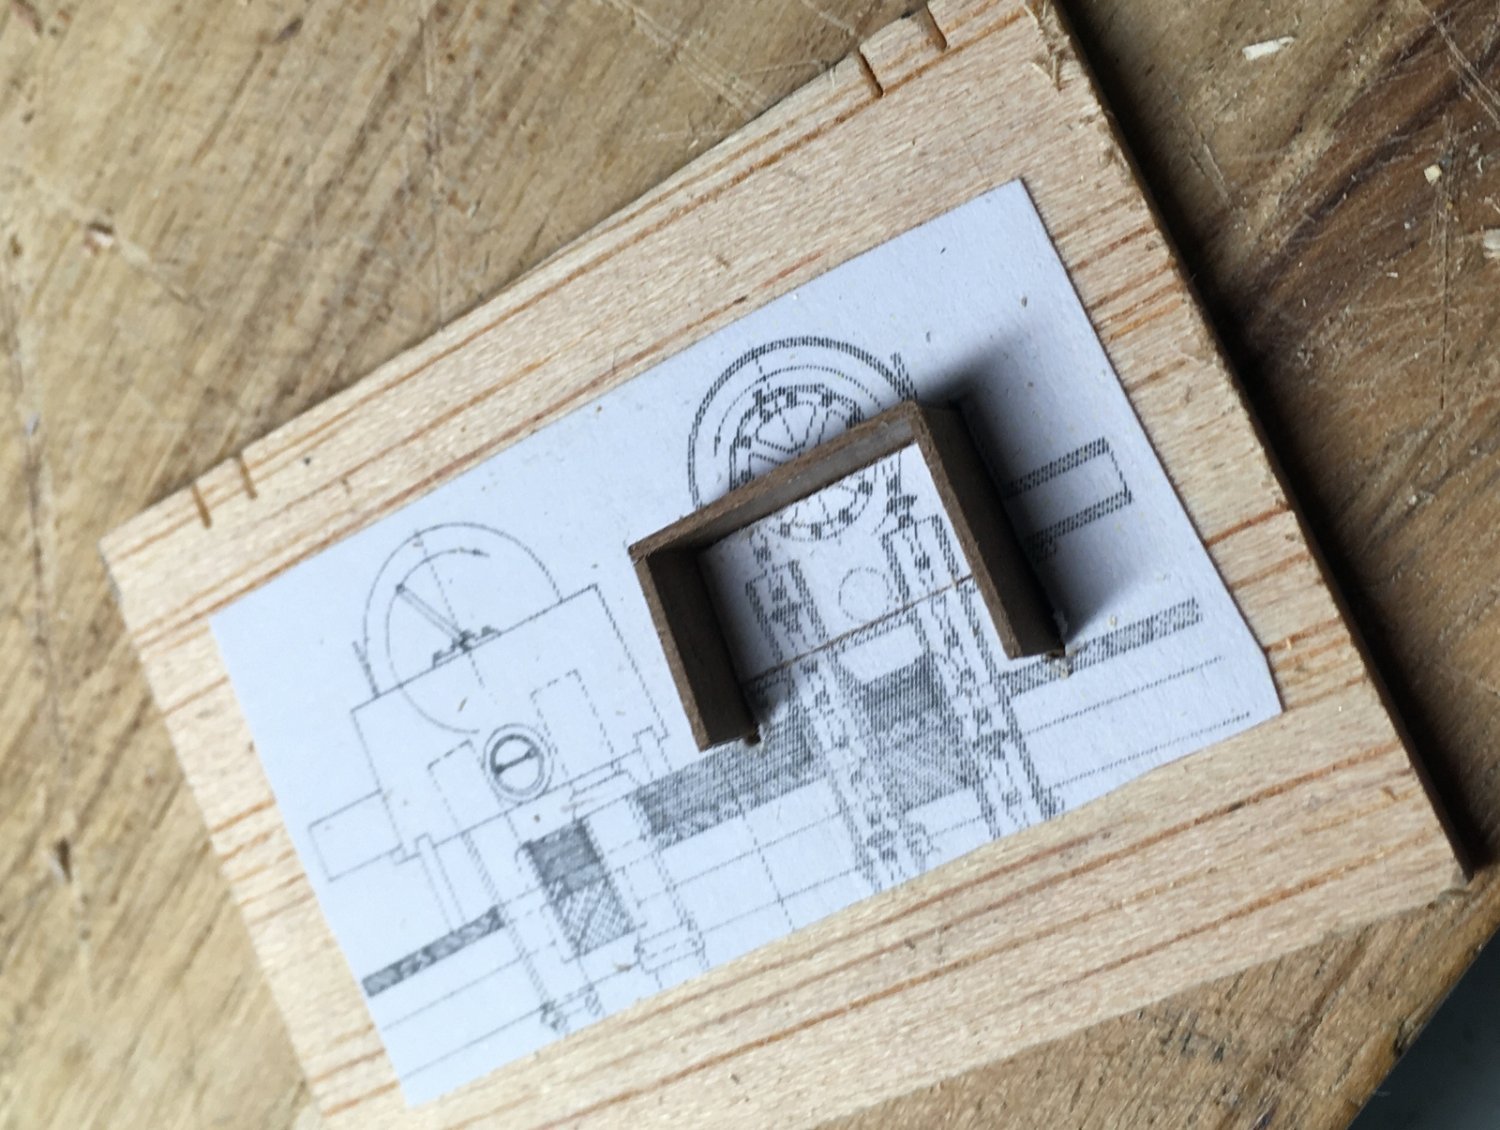
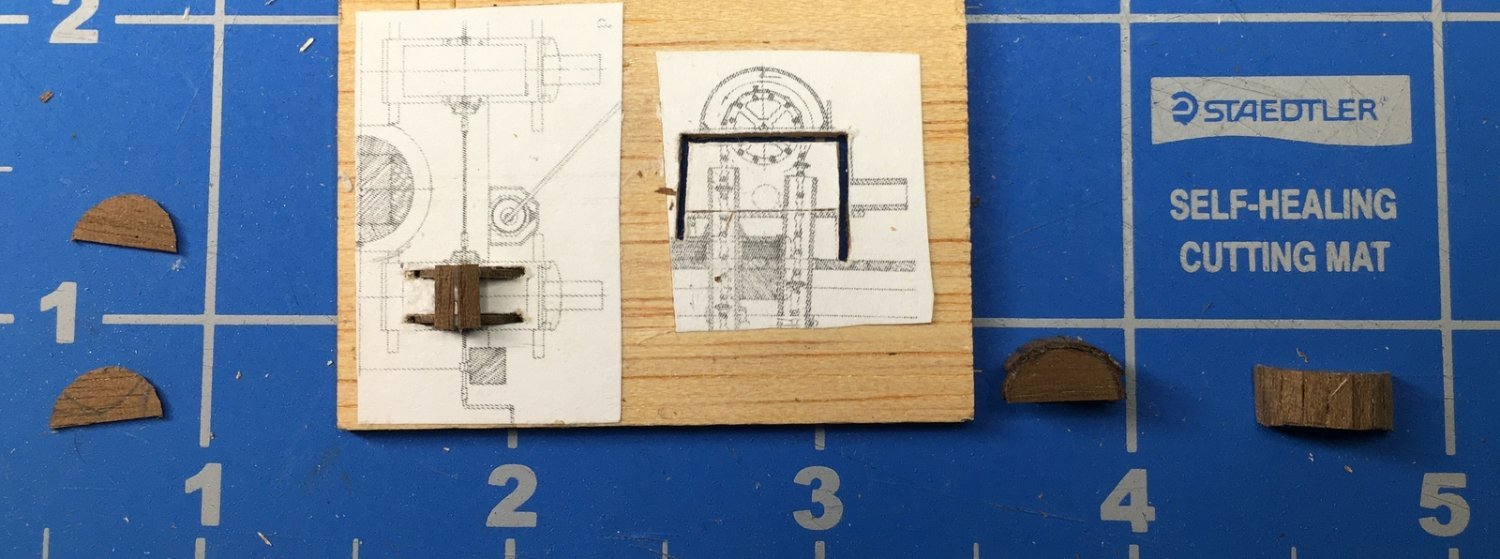
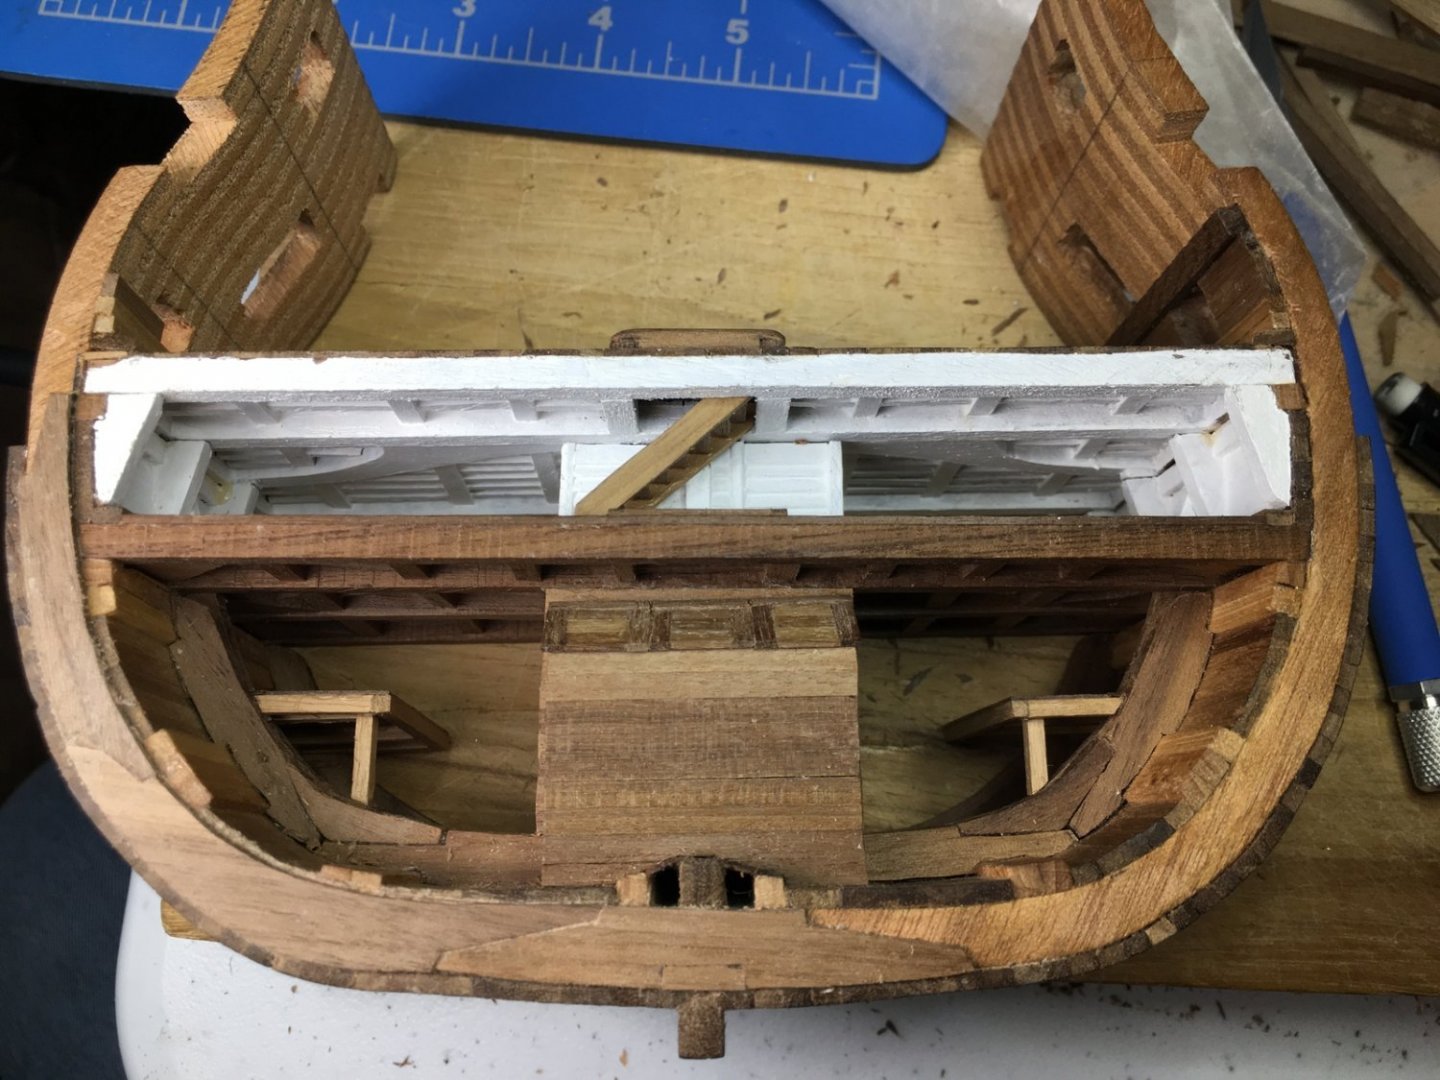
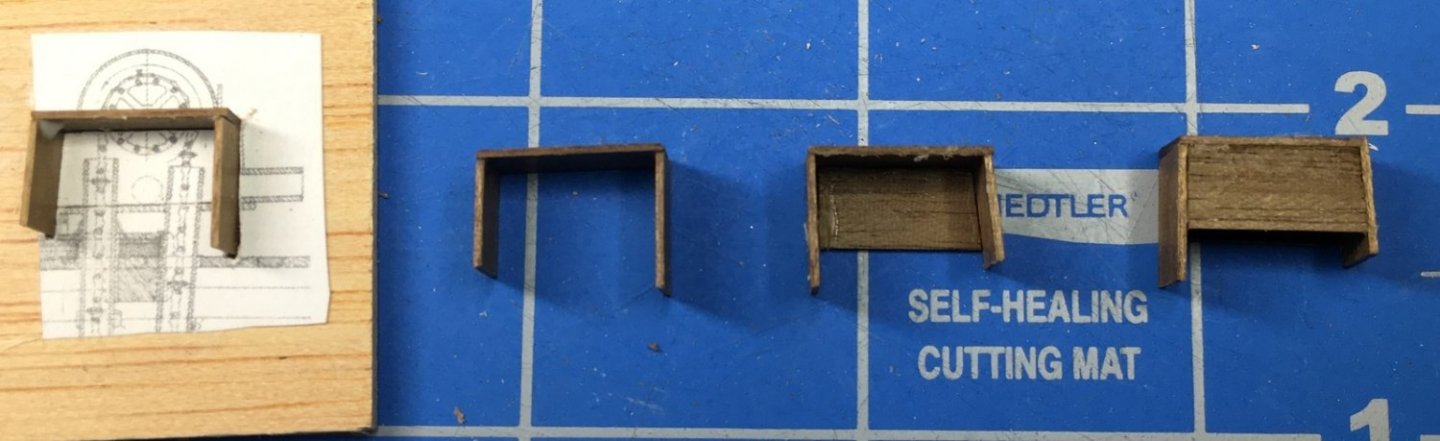
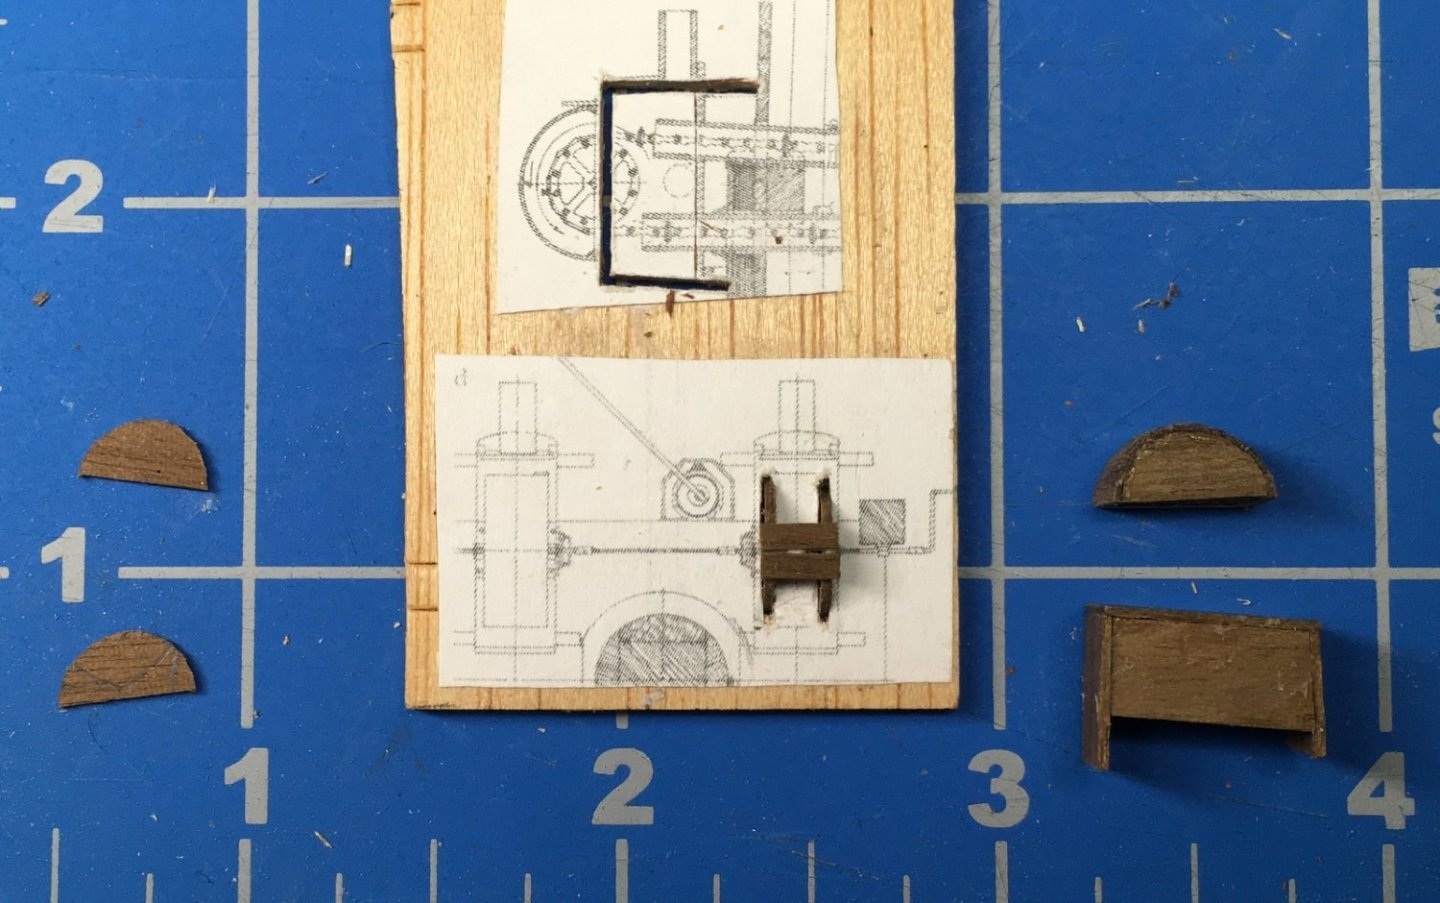
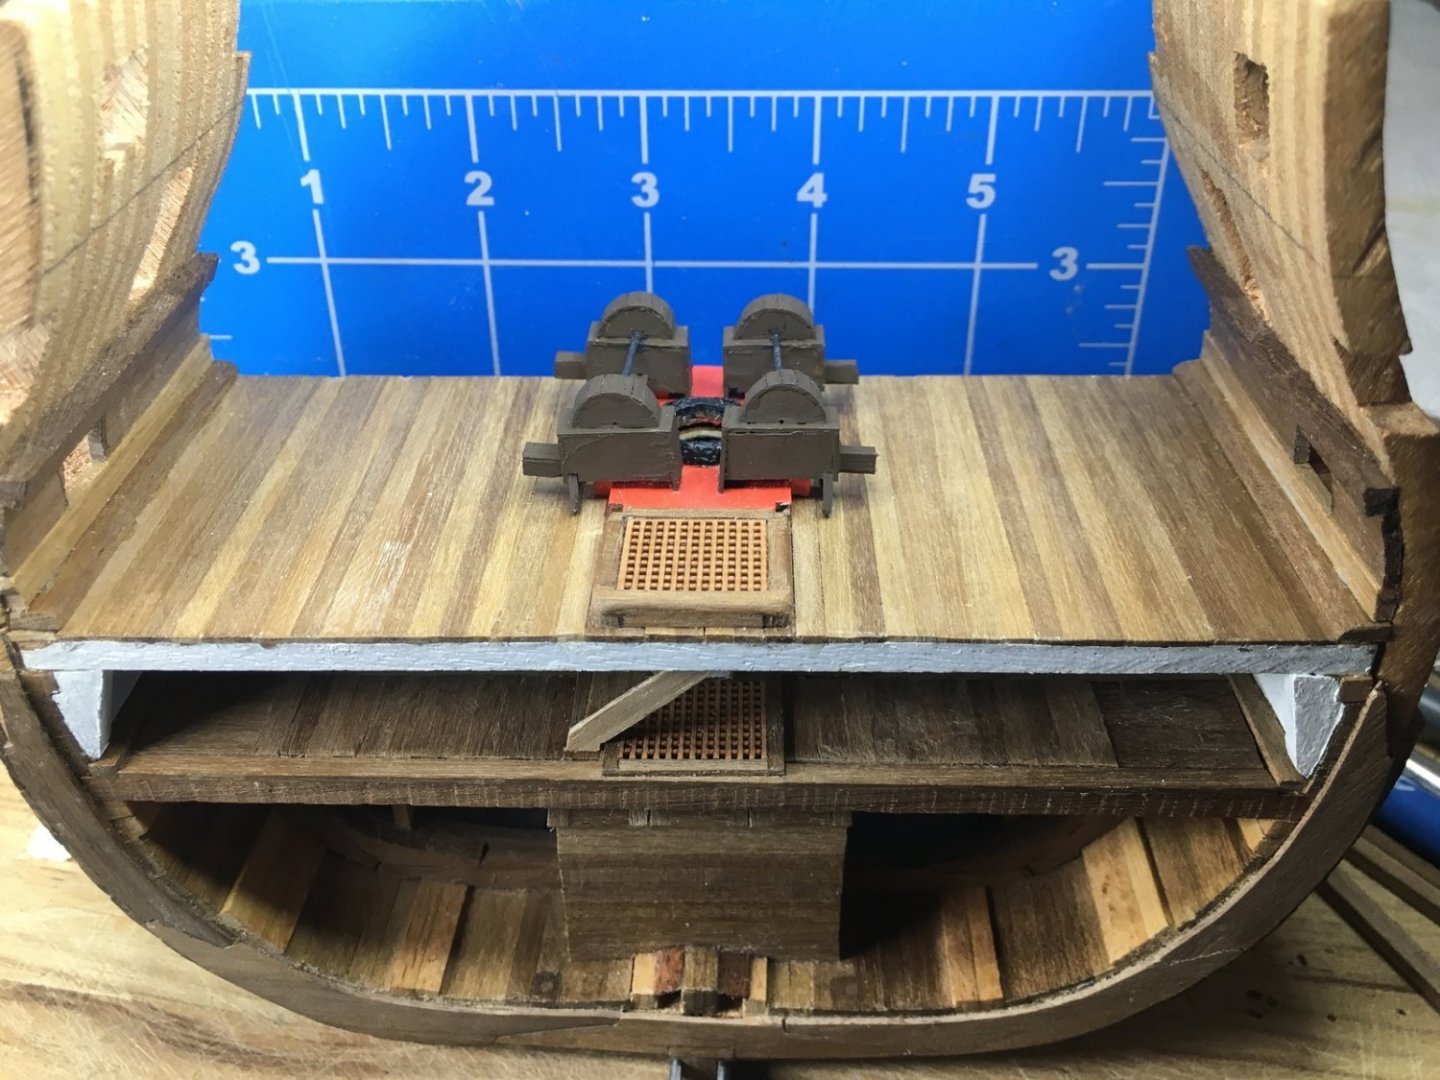
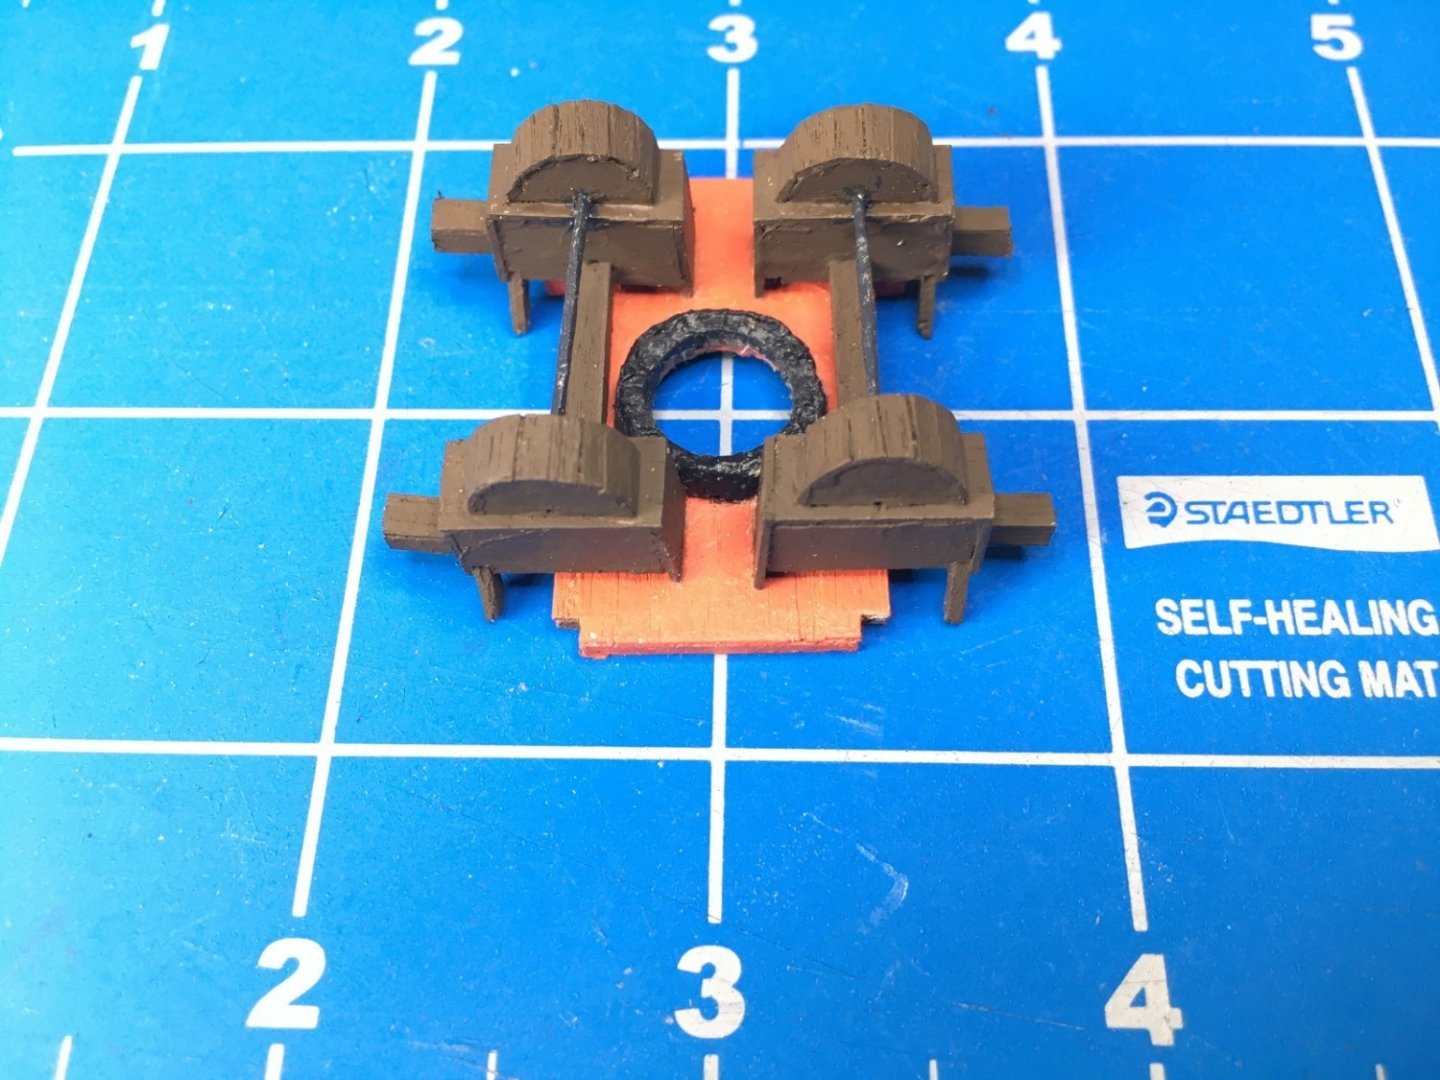
I’ve been slowly working on this. The material used in the kit for the frames looks pretty rough. It flakes off it in places and I didn’t think that even sealing and painting it would not do. I set the model on my scanner and printed 1:1 templates to cut strips from a thin sheet of walnut, paying attention to the direction the grain runs, and covered the kit parts. Next, I started working on the pumps. I read that the existing pumps on Victory are not original but I used photos of them along with print sources. One thing to be cautious about is that McKay uses simplified versions in his deck plans. Other sources show more detailed views with fancy curved feet. I tried to create those but they kept breaking. Photos of Victory seem to show that they are just straight in the reconstruction so I decided to go with that. I printed out scaled drawings of the pumps from McGowan and used them to make guides for construction. After I got these assembled, I decided to retry the curved feet. I took very thin strips and laminated in two layers with the grain at cross directions to make them stronger. I rough cut them and then used sandpaper wrapped around a dowel to shape them. I cut off the squared front legs and cut notches to hold the new legs and it looked pretty good. I left the back legs alone. I connected the pumps in pairs with a channel since that was an option on the real pumps and because it helped stabilize the structure. I also connected them with a piece of copper wire. I built little hollow boxes and attached them to the front of each pump. The pumps sit on a raised platform. I left notches in the corners for posts which will be added latter and cut a hole for the mast. I surrounded the hole with a number of wooden wedges and then covered them with tissue and white glue. I painted this assembly rather than keeping it natural. Currently Victory photos seem to show a red platform with brown pumps. The brown makes since to me since the pumps handle water and if it was me, I’d waterproof them. I don’t know about authenticity of the red color but it looks cool and they had red paint on hand. I made the pumps as an assembly that I can just slide in later since I thought there would be too much risk of damage as I work on decks and planking. They look okay… if you look from about ten feet away… and with one eye closed… I will probably consider these to be a first draft and make some better ones later.


-
Welcome to MSW. I started the Billings Mayflower back in 1999 and it sounds like I got about as far as the one you have. I stopped when I got to the point of needing to bend planks around the bow. I'm not going to get back to it until I finish some other projects. Don't look at the dust! David

-
Lots of ship building books to dispose of
Dlowder replied to LizTSM's topic in New member Introductions
As a retired librarian I have to suggest the possibility of donating them to your local library. That's one way that many people can enjoy them.- 5 replies
-
- 10
-

-
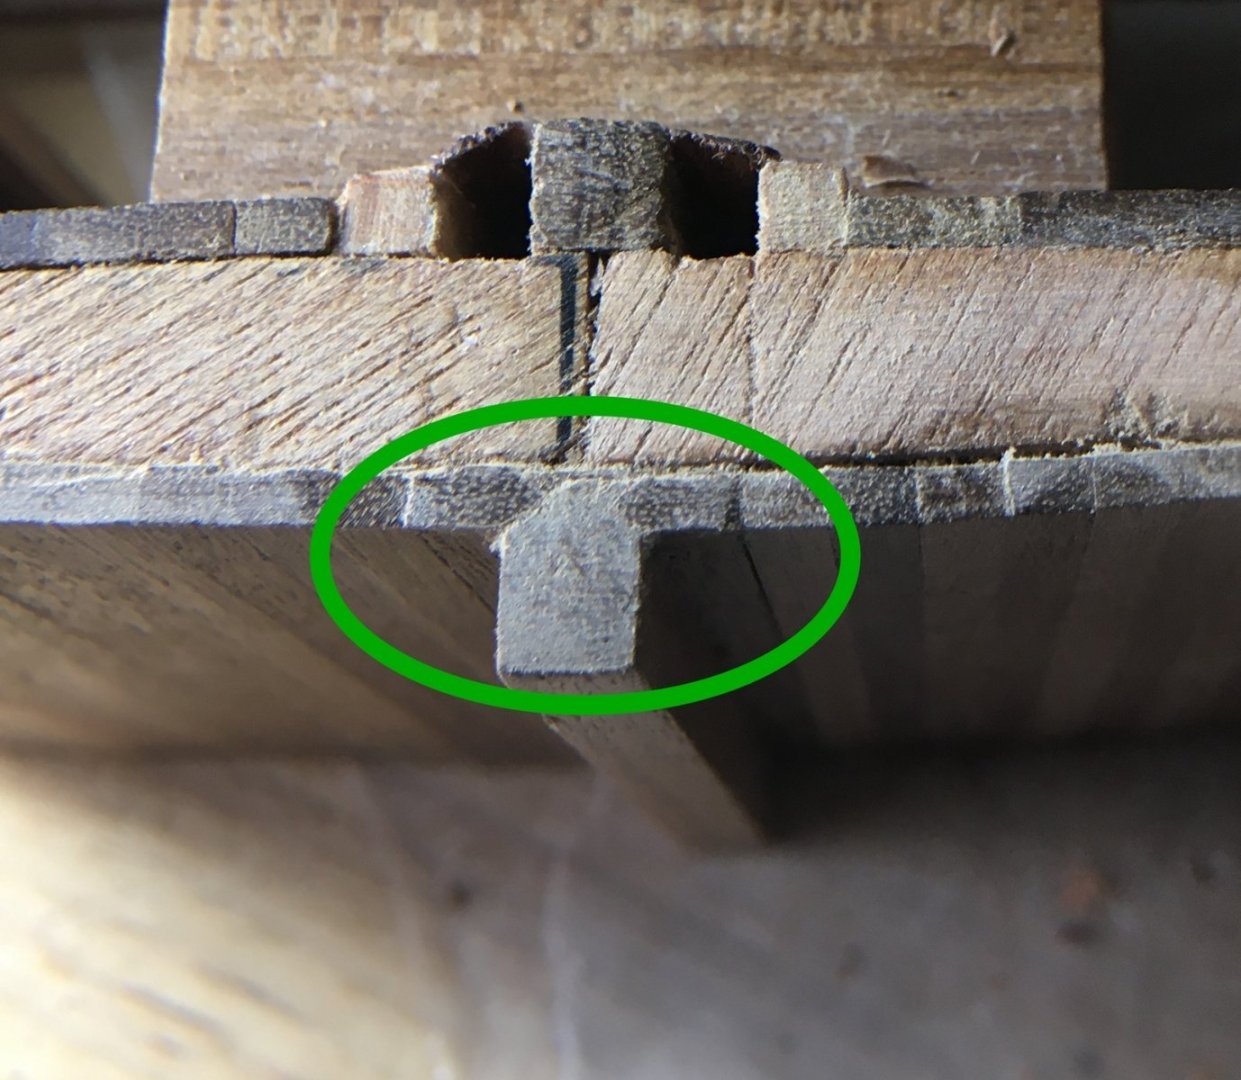
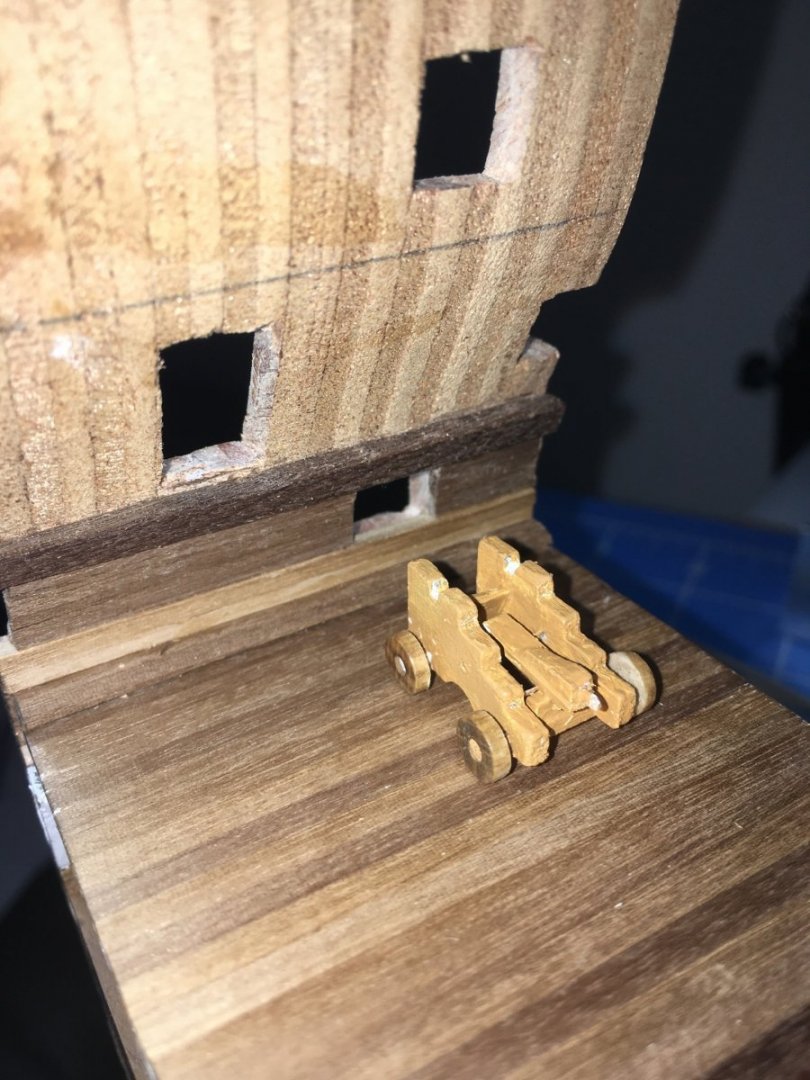
I've been doing a bit more reading and planning so haven't done much on this. One nit picky thing I did will probably only be noticed by me. The kit instructions don't call for cutting the rabbet into the keel so I didn't do it at first. Now I went back and faked one. I sliced a small piece off of each of the garboard strakes and then made shallow cuts into the keel. I shaped two end pieces of walnut, so I would have exposed end grain, and basically made inlays. Since I will be coppering the hull later, the cuts on the strakes shouldn't show. I have started on the lower gun deck sides. I had originally made the cuts for the ports since I was afraid if I waited, I'd be too rough and might shake something loose. Turns out the material is soft enough to work with a hobby knife. Good thing since I have had to make some adjustments. In order to check the size I needed to prepare one of the 32 pounders. The guns for this aren't perfect but good enough for my needs. The barrels measure out okay except that the trunnions are in the wrong place. I'm debating about trying to move them since I might make a mess. The carriages need work however. The profile works but there is a solid base connecting the two sides. I cut off the sides and built the rest using various illustrations I had found. The trucks seemed to be too thick so I cut them down also. Now back to the books!

-
Thanks to you both. Allan, I used the terminology on McKay's plans for the decks and tried measuring from them. I've located a copy of Steel and will check it out.
-
I'll follow this since I'm building one also. I agree about the veneer improving it. I just got in some really thin walnut I plan to do the same thing with.
-
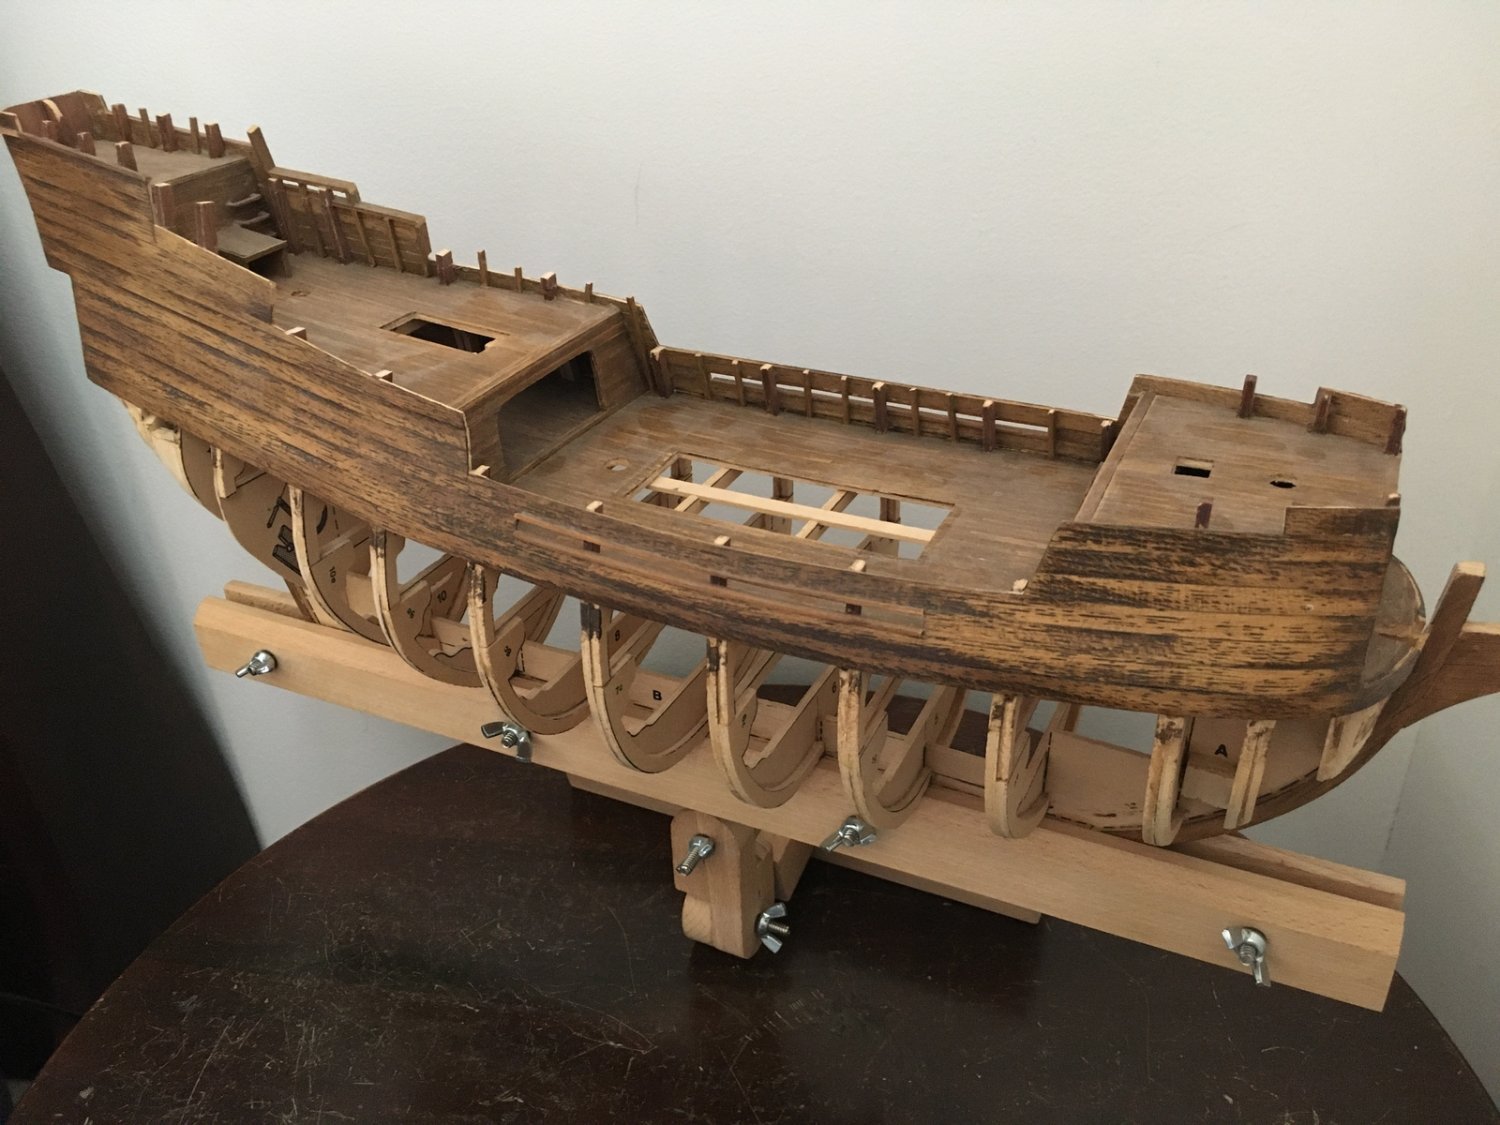
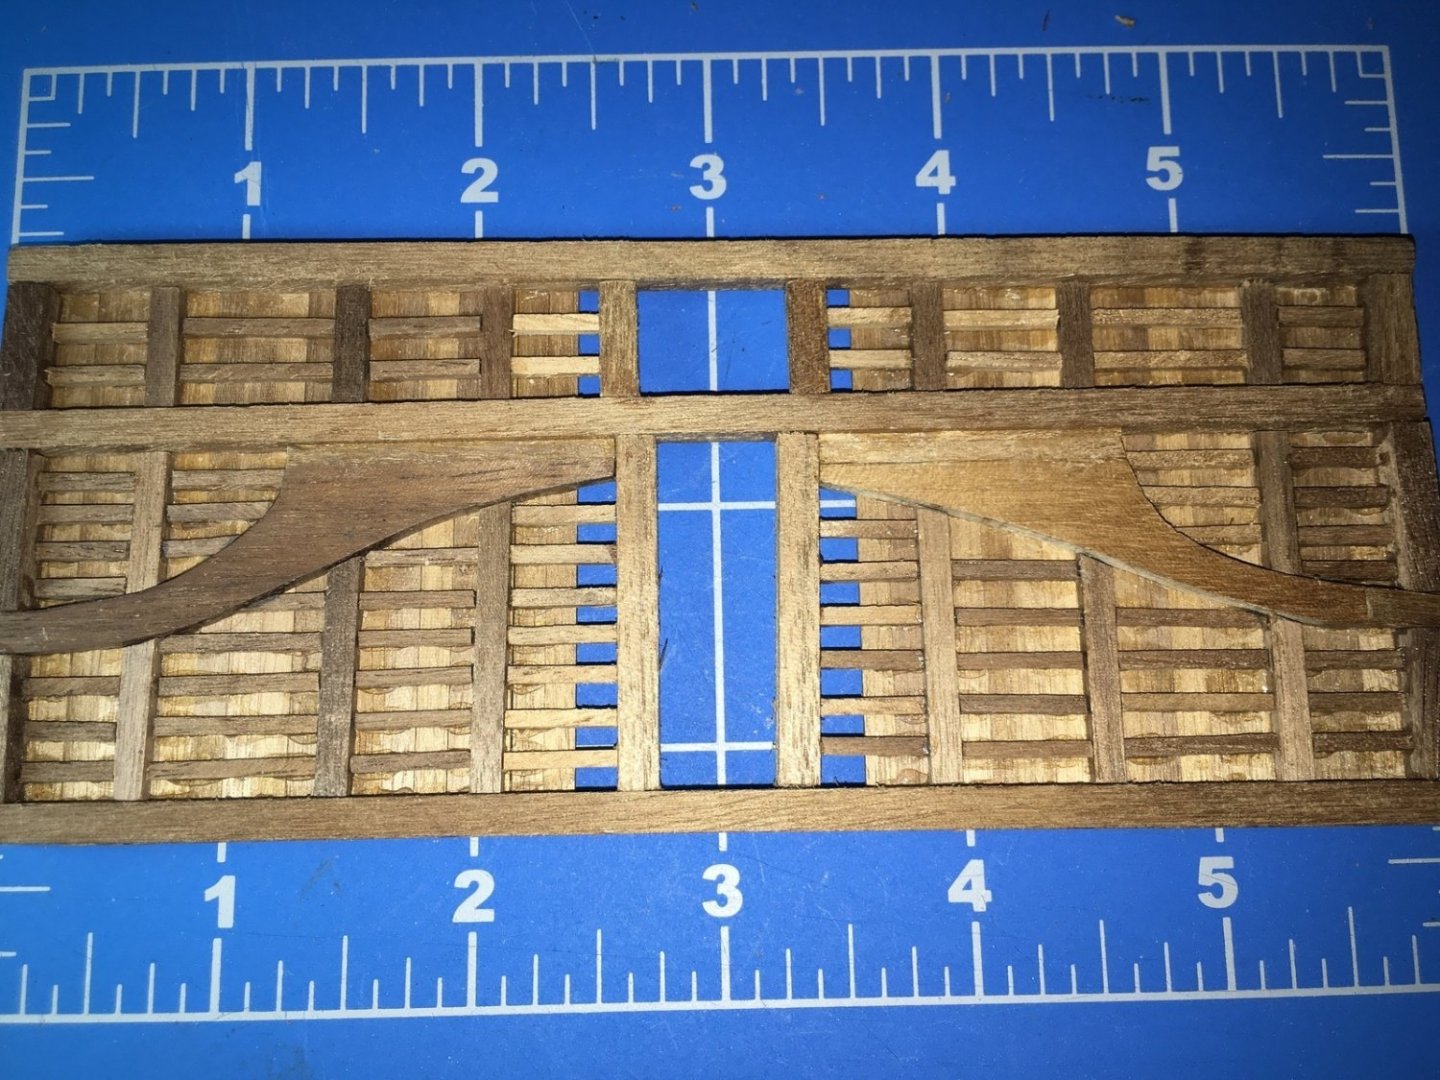
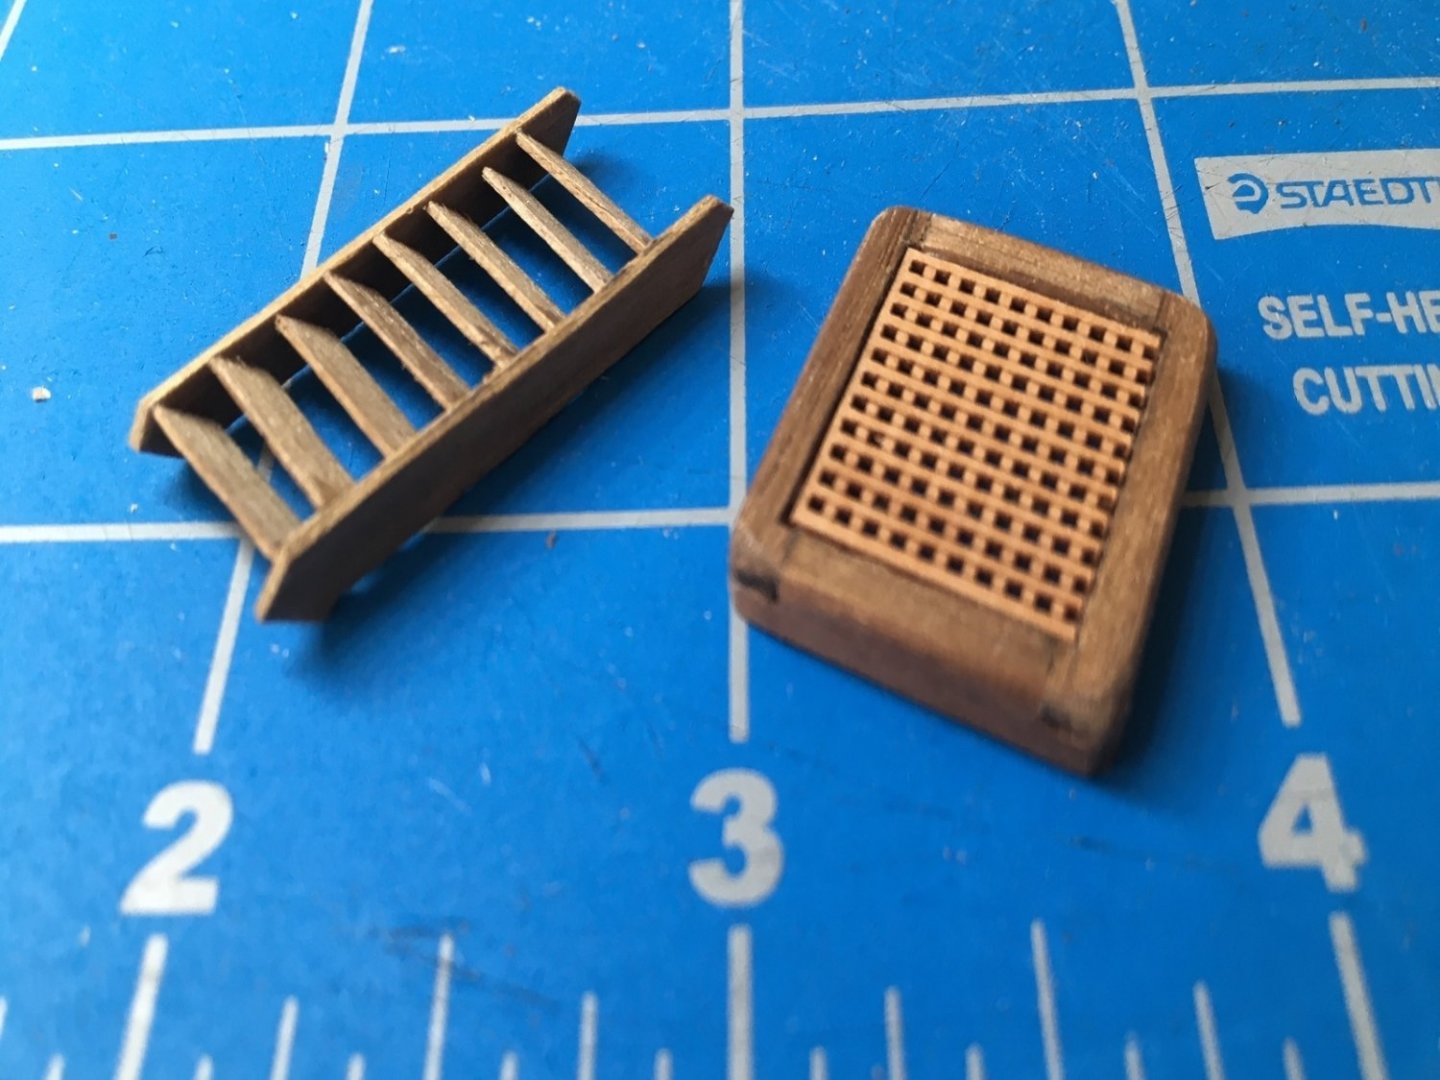
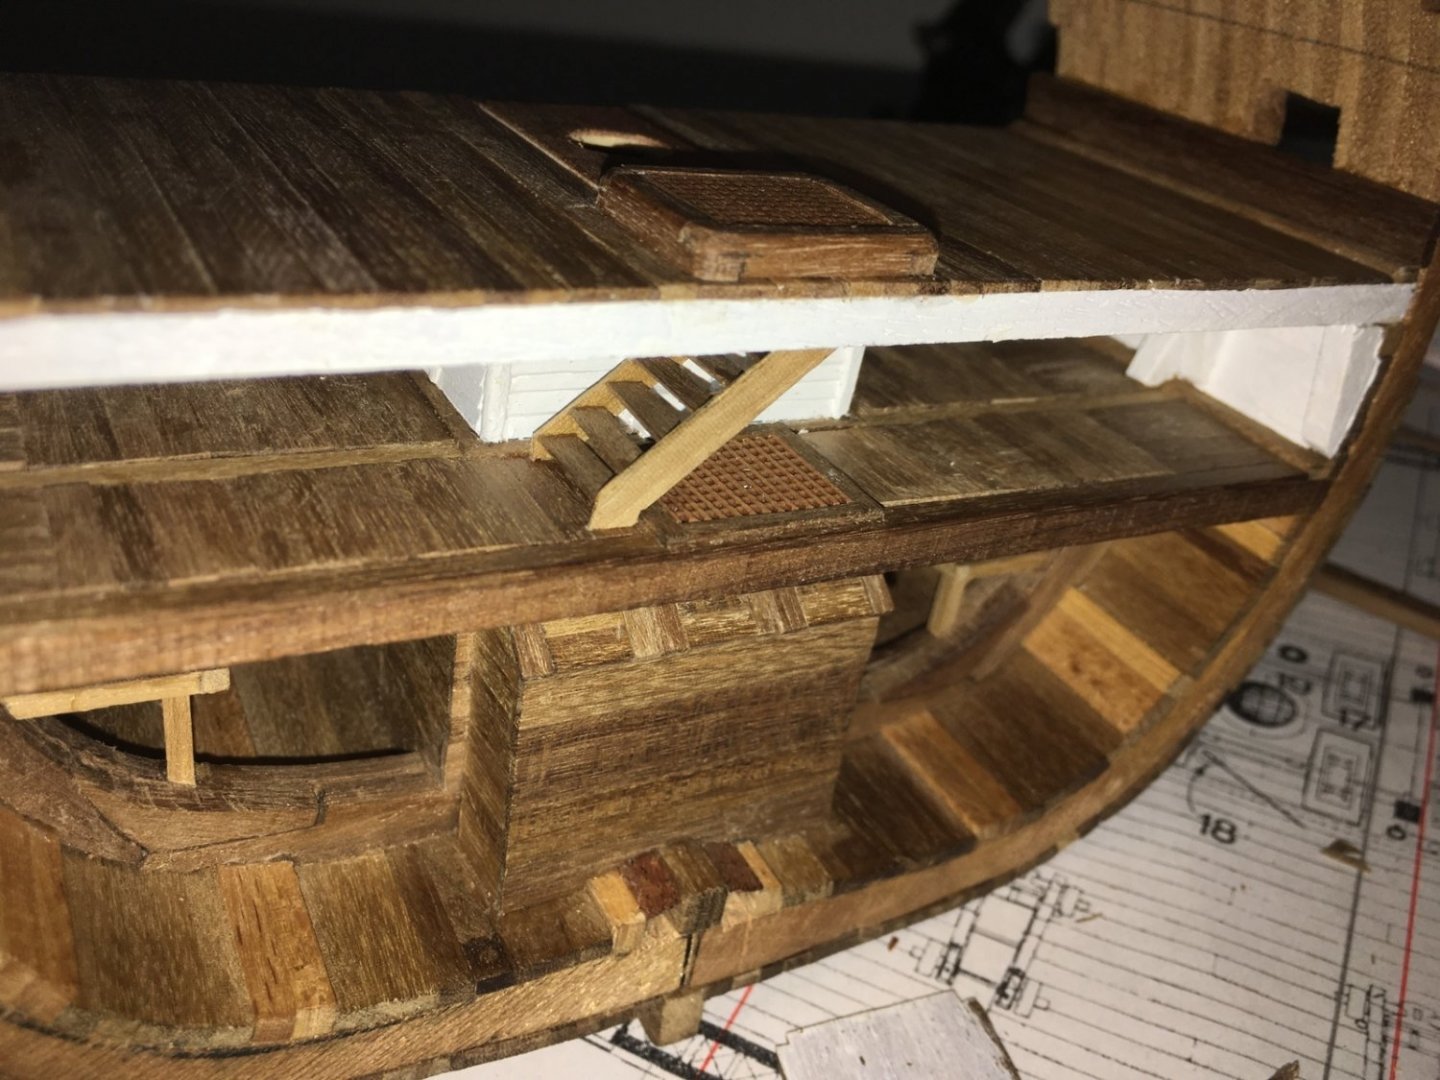
Lower Gun Deck This deck should be pitched up in the center by 1.5mm but I didn’t want to attempt that. I used 4mm x 4mm walnut strips for the straight beams and used 2.5mm x 2.5mm strips for the fore and aft carlings. The athwartship carlings are 1.5mm x 1.5mm. The curved beams were cut from 1/8” walnut sheet. Should have been thicker but it’s what I had available. I goofed on the measurements and had to add spacers. I cut the beams to the correct length and then planked them with 1mm x 3mm strips leaving a gap in the center for the grate and the main mast. At both edges I used 2mm x 5mm strips for the waterways. I flipped the deck over and installed the curved beams and cut the carlings to size. I didn’t try to do notches for a more authentic look. I painted the underside white before sliding the whole thing into place and gluing it down. I built the coaming using 3mm x 3mm strip and I used more of the better grate. The kit ladder seemed oversize so I made a new one from 1mm x 5mm and 0.6mm x 3mm. This is a figure from the Revell 1:96 Constitution. He's a little bit off scale for this but it helped me get an idea of the proper sizes of things like the grates. The mast support is from the kit and will be covered by the pumps.

-
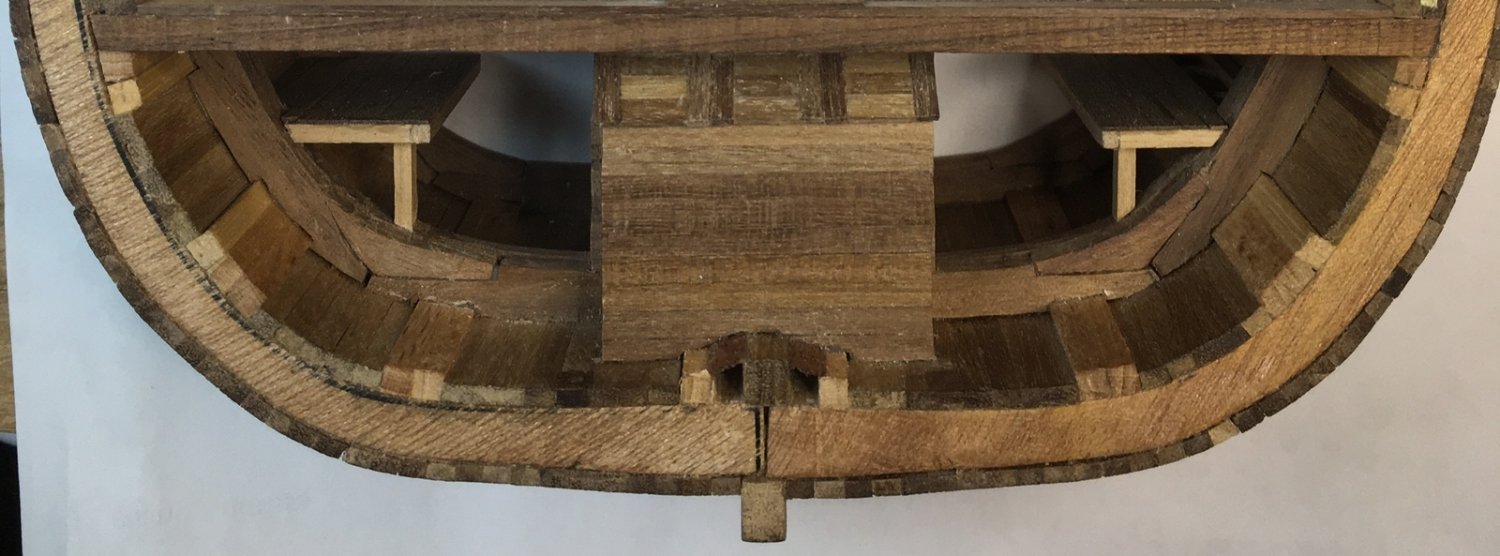
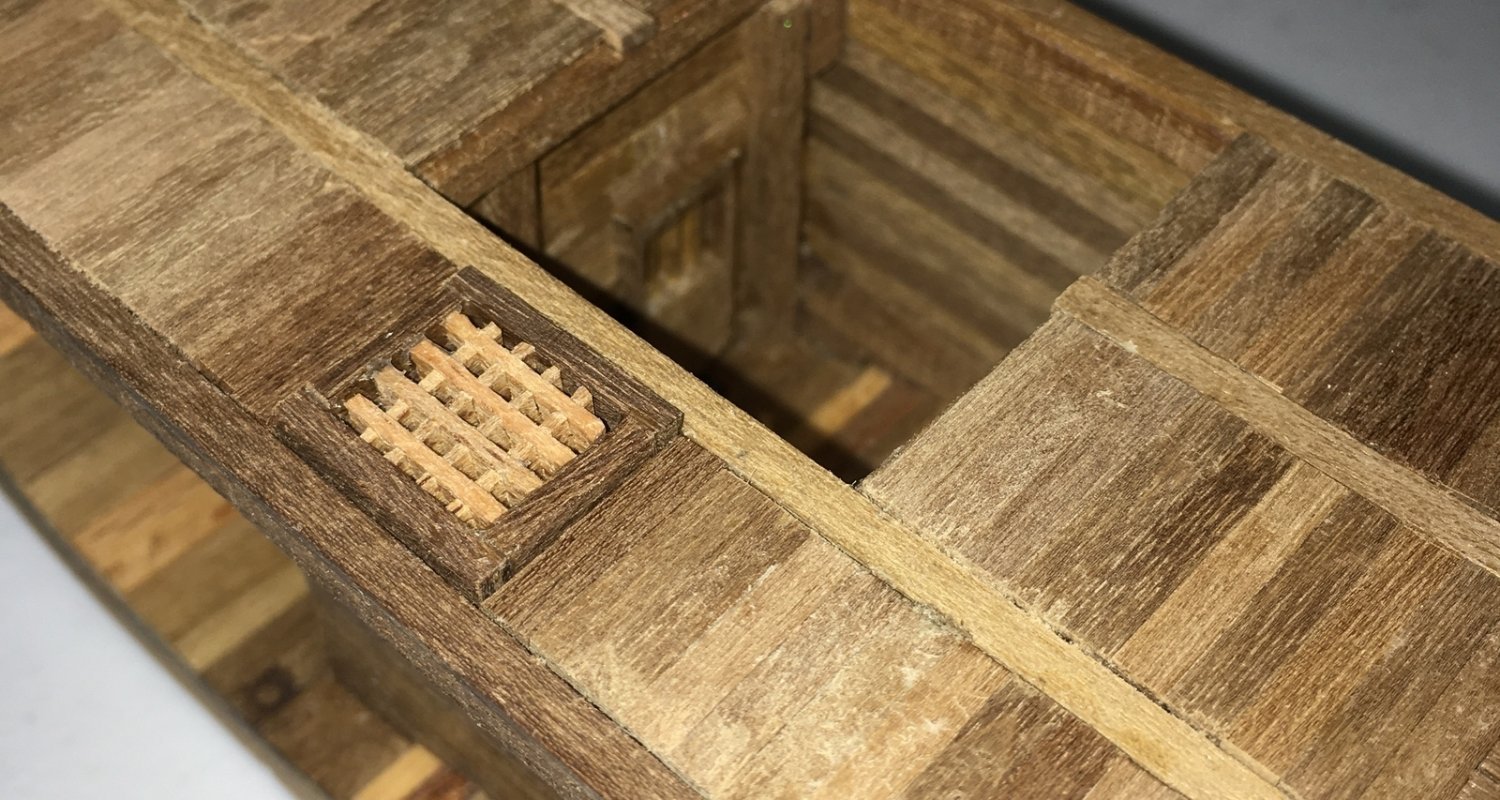
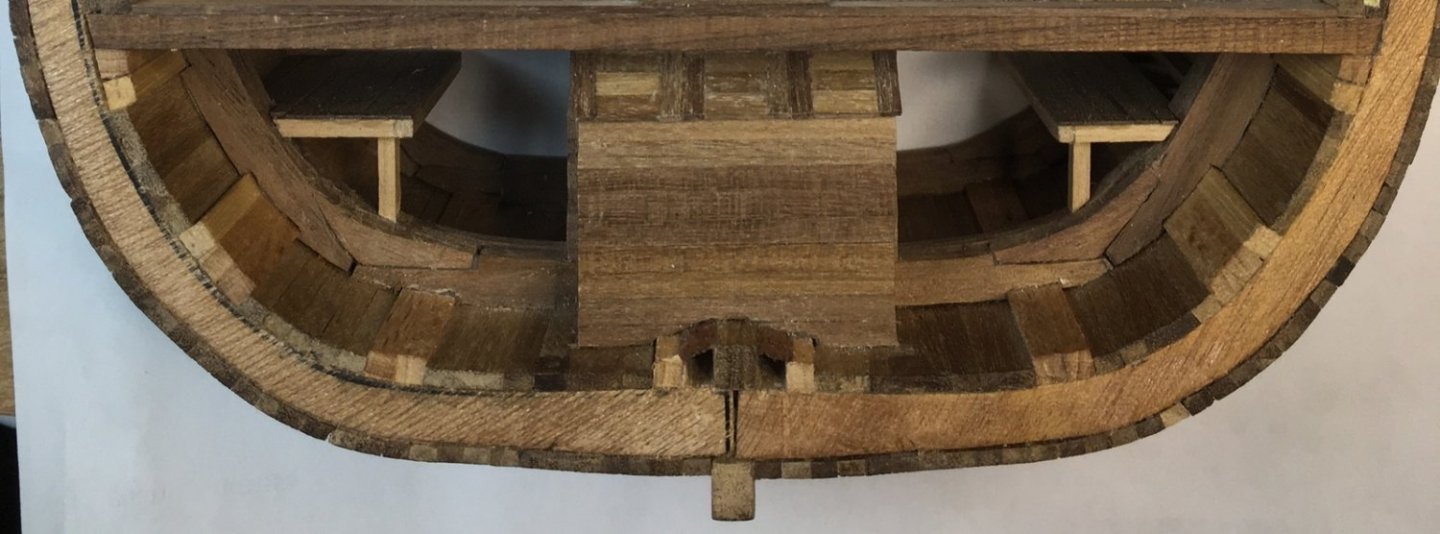
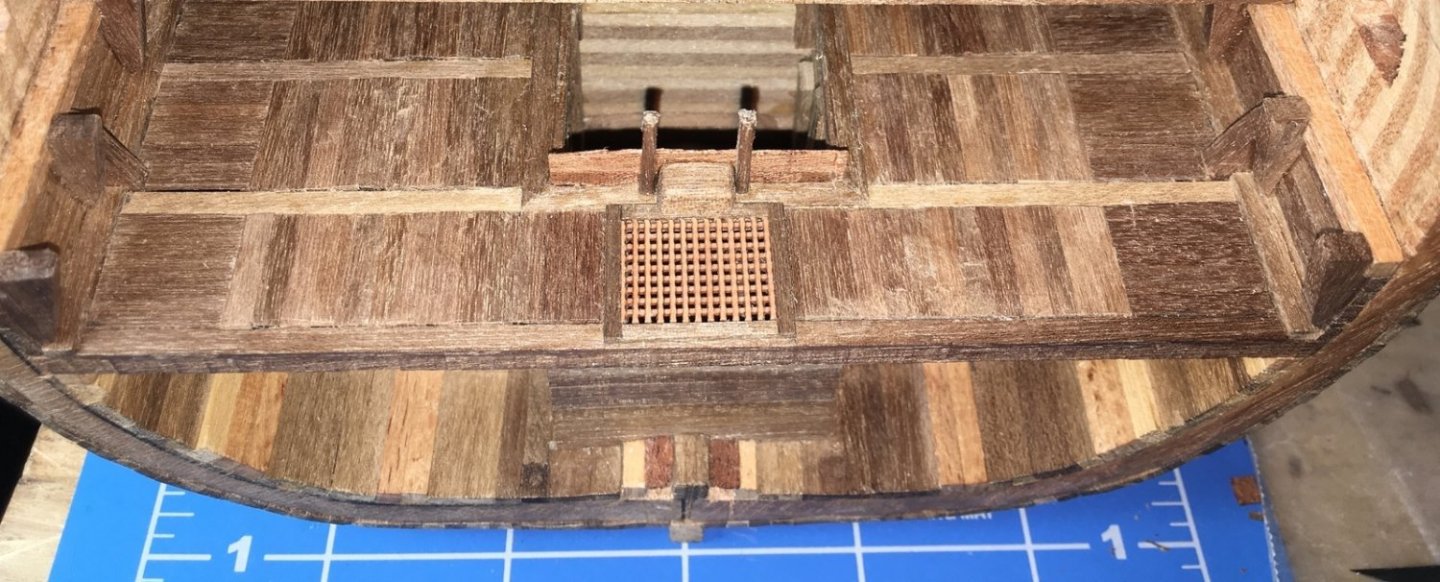
Hi. David here. I thought I could start a build log in mid progress it that’s okay. I don’t have any photos of my previous work on this, but I’ll start now. I probably should say that this might be more of a “how to avoid mistakes that I made” rather than a “see how good a job I did.” This is going to be a skill building project for me. I know that Victory changed over time so I’m not trying to be perfect but to follow the sources and use my judgement when they disagree or are missing details. I want to make it… well if not completely accurate then at least plausible. And something nice to go on the wall! I also didn’t want to spend a fortune on upgrading it. I grabbed up this kit back in 2007 and set it aside for a while. Eventually I got around to working on it. I followed the instructions in the beginning. I joined the two half frame units, attached the keel and keelson, planked the hold, and added the orlop deck. I then decided it was not very accurate. I put it aside for a time. Around 2019, as I was heading towards retirement, I started getting serious about redoing it and I started my research. Main print sources used so far: · McGowan, Alan P. HMS Victory: Her Construction, Career, and Restoration. Naval Institute Press, 1999. · Bugler, Arthur R. H.M.S. Victory: Building, Restoration & Repair. Her Majesty's Stationary Office, 1966. · McKay, John. The 100-Gun Ship Victory (Anatomy of the Ship). Naval Institute Press, 2000. · Longridge, C. Nepean. The Anatomy of Nelson’s Ships. Percival Marshal & Co., Ltd, 1955. · Goodwin, Peter. The Construction and Fitting of the English Man of War: 1650 – 1850. Naval Institute Press, 1987. · Lavery, Brian. The Arming and Fitting of English Ships of War, 1600 – 1815. Naval Institute Press, 1987 · Peter G. Goodwin (2013) The Application and Scheme of Paintworks in British Men-of-War in the Late Eighteenth and Early Nineteenth Centuries, The Mariner's Mirror, 99:3, 287-300, DOI: 10.1080/00253359.2013.815993 I also did a lot of searching on the web for photographs and YouTube has several good video tours that helped with a few areas that don’t show well in the plans or in any photographs I had seen. I decided to have the forward edge of the model end with the forward wall of the pump room. I didn’t want to try to open the room to show the pumps. The other edge would end at the orlop deck beam aft of the shot locker. On the McKay plans this would be from about station 1? to about station 8? I will say that the McKay plans scale easily to 1:96 but this model is listed as 1:98. I felt the difference was small enough to work around. I bought some additional walnut wood strips and sheets to supplement what came with the kit since I needed different sizes. Sizes I mention in this are how they were listed by the seller in my order, but the actual materials vary a little bit. I don’t have any power tools other than a Dremel tool with a shaper/router table and a Rockwell Bladerunner for home repairs. They are okay for rough cutting and shaping but not for the fine stuff. The hold. The first thing that I did was remove my previous orlop deck entirely. Next, I removed one plank on either side of the keelson to create the limber passages and covered them with thin limber boards. I traced out templates and used the Bladerunner to rough cut some riders from a 1/8” walnut sheet and shaped them with the Dremel. They are not as tight a fit as I would like. If I had something thicker, I probably would have used it. I built the pump house from 1mm x 3mm strips. I put in a door on the port side even though I couldn't get a good view anywhere to see what it looked like. The platforms are 2mm x 2mm with 2mm wide strips. I’ll detail later with hinges for the shot locker lids along with iron and shingle ballast. I planked the exterior up to the level of the orlop using the kit supplied strips. Orlop Deck I used 4mm x 4mm walnut strips for the orlop deck beams, 2.5mm x 2.5mm for the fore and aft carlings and 1.5mm x 1mm for the athwartship carlings. I tried adding the carlings with the beams in place and leaving room for the deck boards to recess. I used 2mm x 5mm strips for the waterways. It ended up uneven in places. I should have built the deck as one unit before installing it. I didn’t paint the underside of the deck but I probably should have. Probably too late now. I cut knees from the 1/8” sheet. For the pump house on the orlop I used 2mm x 2mm uprights with 0.6mm x 3mm strips. I arranged the strips in a louvered pattern. I wasn’t able to leave a gap between each strip for ventilation so just pretend that they are there. I felt the kit grate was too bulky, so I purchased a grate with 0.6mm holes and cut a piece to size. If my math is right the openings scale to 2.35 inches at 1:98. I framed it with 1mm x2mm strips. Kit grate. Pearwood grate. I painted the sides of this deck and the pump house white.


-
I've been meaning to do this for a while now, but I keep saying, "Just let me read a few more posts first..." and the next thing you know it's bedtime. I am a recently retired college librarian in a small town in South Georgia. The state not the country. Like most people I built models a lot when I was younger but slowly life started getting in the way. I tinkered a bit off and on but never had a time or space to do much. I acquired numerous kits over the years and since I retired this summer I can start working on my cache. I think I may have waited too long to have time to build them all. I've always loved ships, so I have sailing ships, steel ships, one airship and some space ships - real space and SF. I'm a sucker for a good sale. The only airplane I have is a B-24J since my dad was in the Signal Corps in the Army Air Force and handled Azon bombs in the CBI theater in WWII. They were early radio guided smart bombs. My last wood model was a 1/100 scale Constructo Santa Maria. I didn't think it looked correct for the period but it was small enough to work on in the space that I had. I work on a 2ft. x 4ft. folding table in the spare bedroom with hand tools. I have workshop envy. I started on the Corel HMS Victory Cross Section. I quickly found out it needed a lot of improvement, so I've spent some time researching. I stripped it back down and started back but stopped again to do more research. Luckily, I still have privileges at my old library. Interlibrary loan is fantastic. I've got an old Billing Boats Mayflower kit that I started about 20 years and need to get back to. I'm at the stage where I need to start bending planks. I have joined the Nautical Research Guild and I’m thinking about doing the Half Hull project before I get back to this one. Last year I picked up the Model Shipways Confederacy since it was a the best price I had seen in a very long time. A few years ago my wife ran across an old yellow box Model Shipways Essex kit in an antique shop and surprised me with it. I sure hope she didn't spend too much! I am looking forward to doing something "old school" though. I was able to borrow and take notes from a copy of "Modeling the Salem Frigate Essex, 1799." by Jim Roberts from the library at the San Francisco Maritime National Historical Park so that should help. It was published by Model Shipways in 1984.