
Archie
-
Posts
26 -
Joined
-
Last visited
Content Type
Profiles
Forums
Gallery
Events
Everything posted by Archie
-
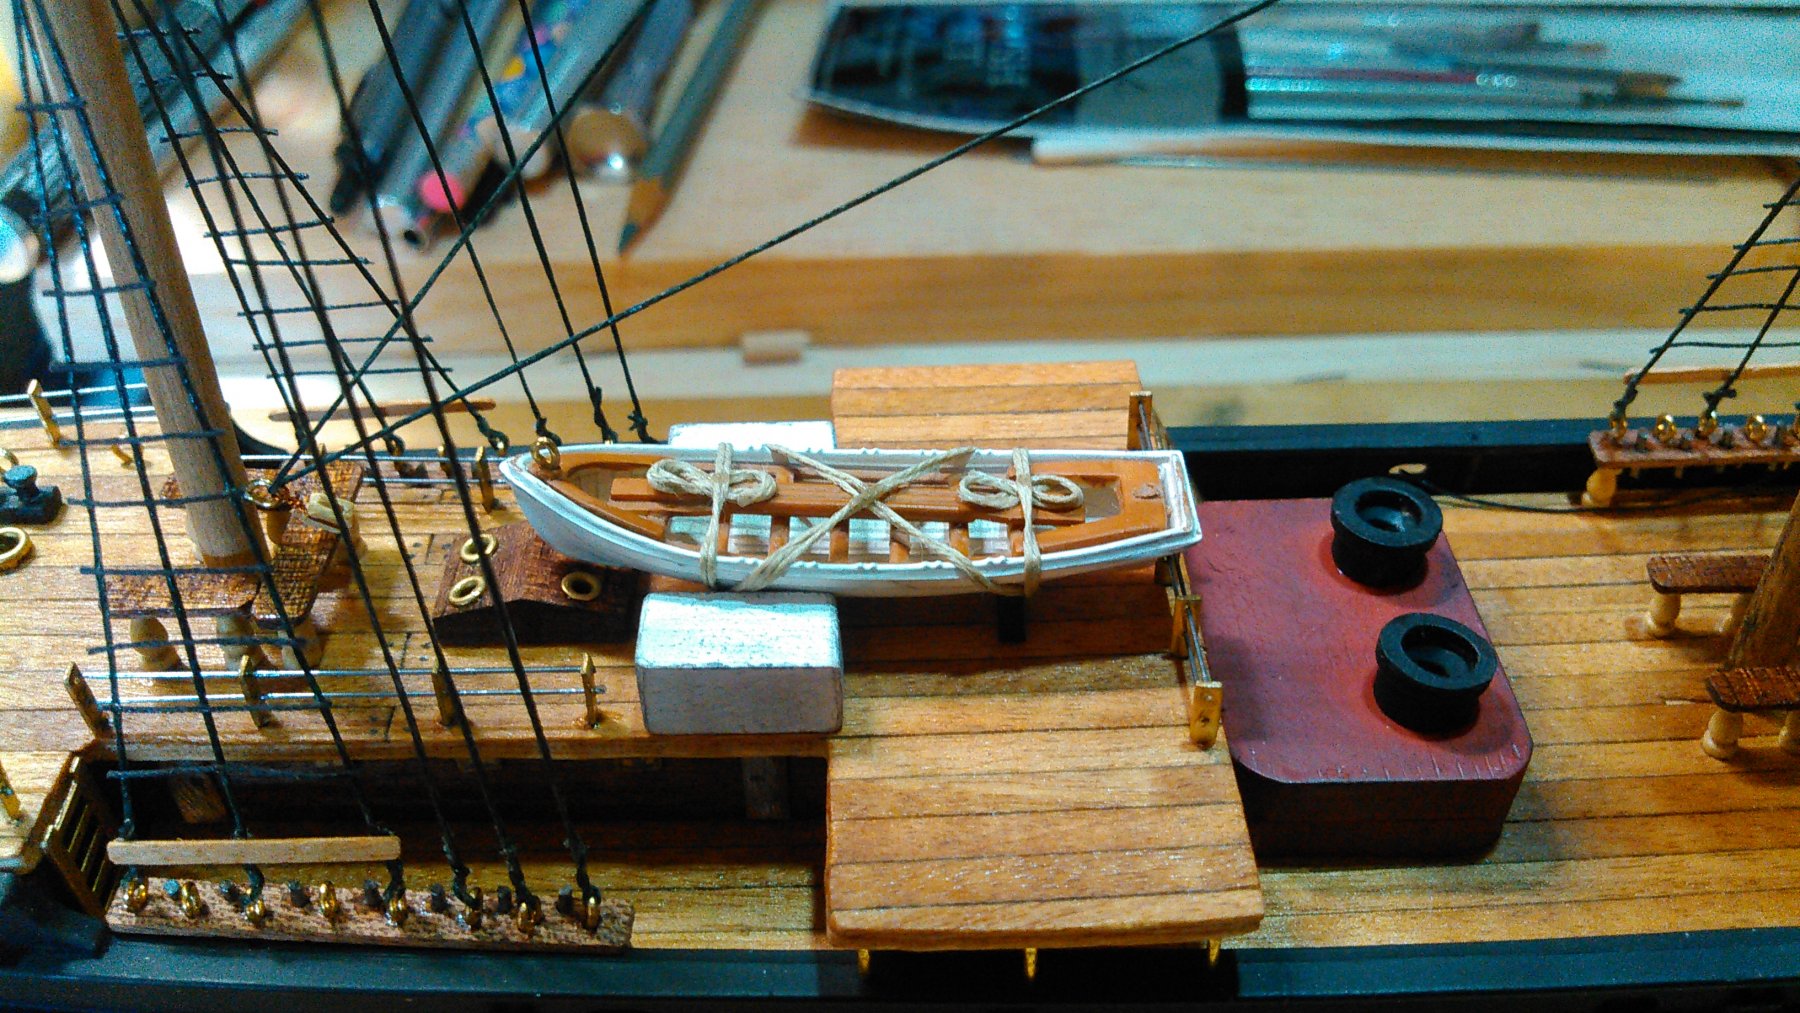
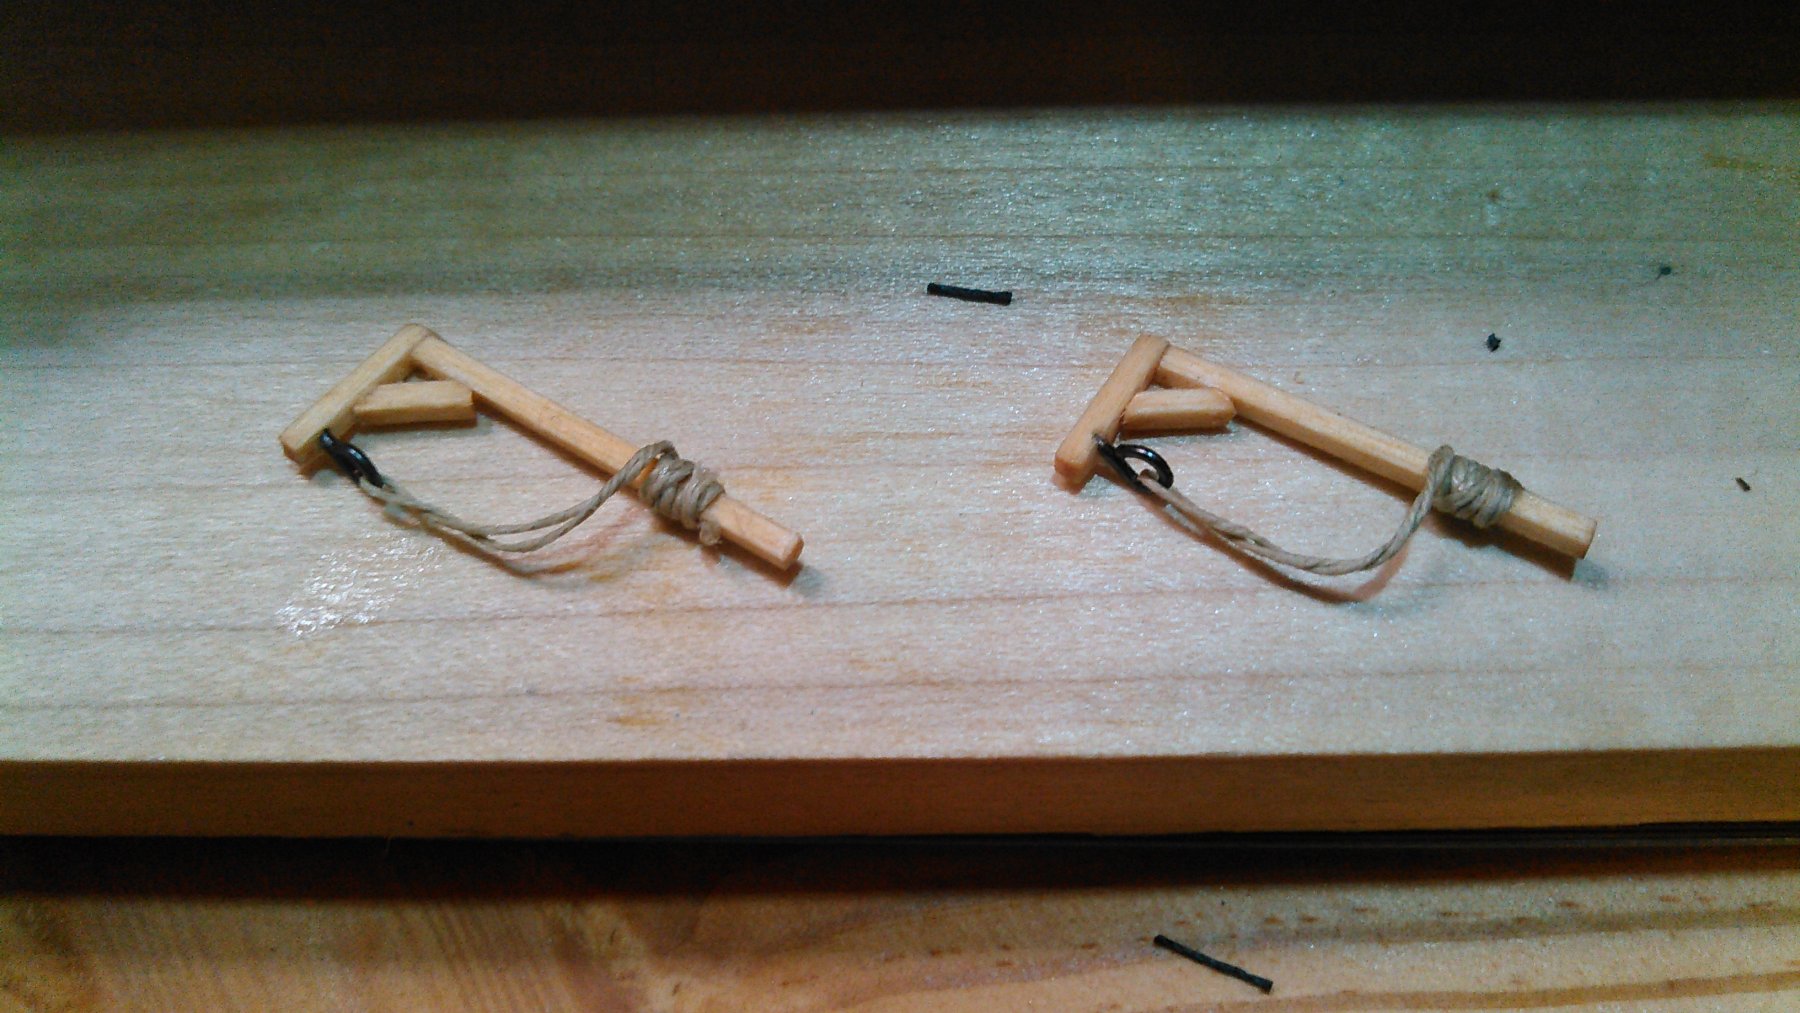
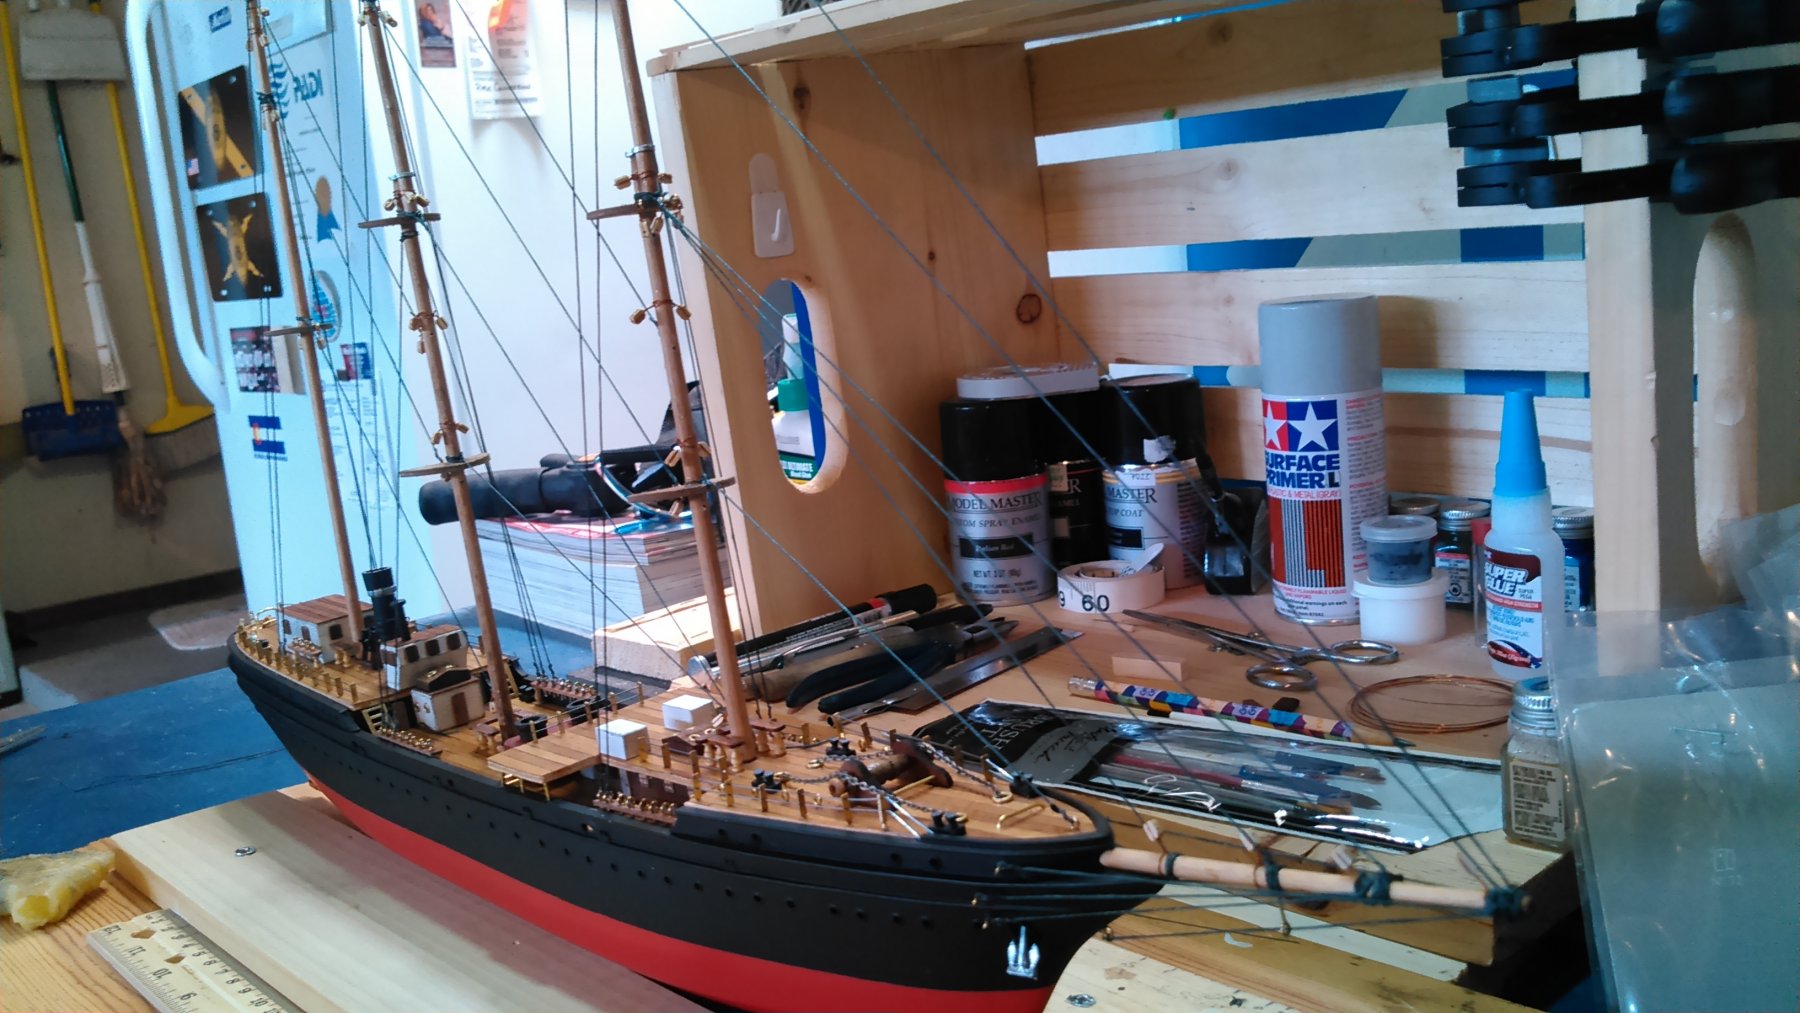
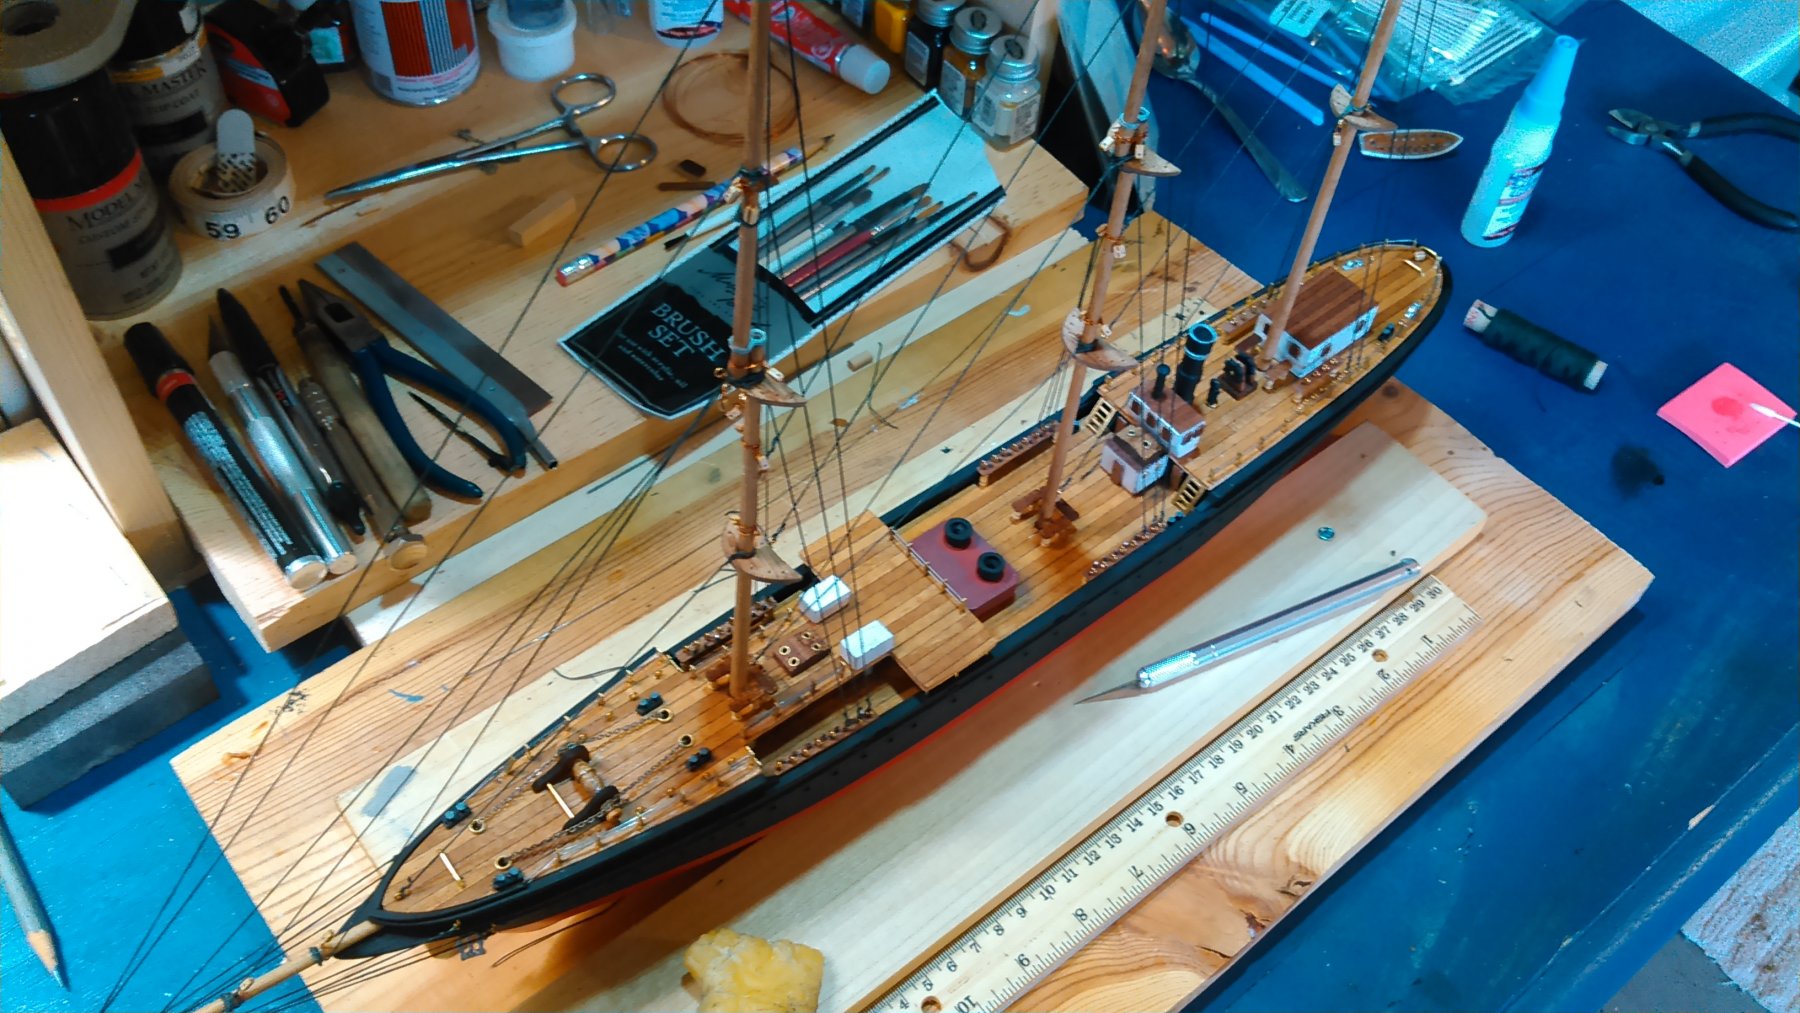
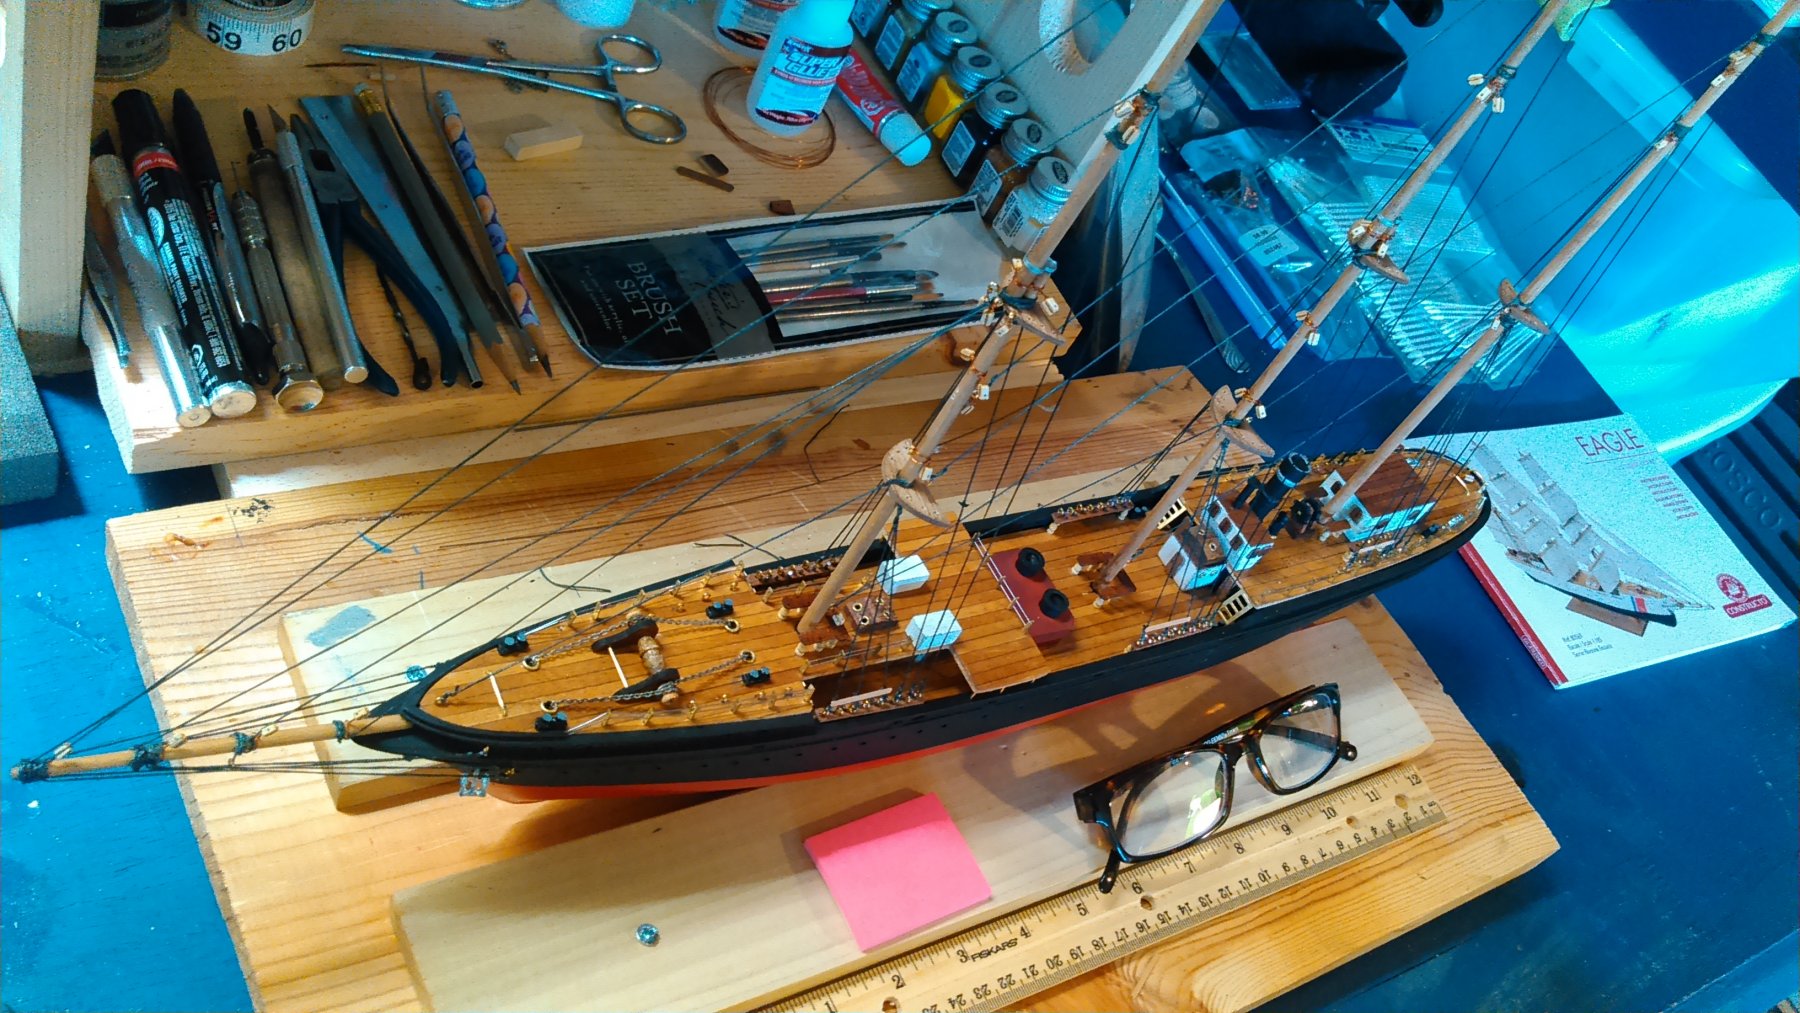
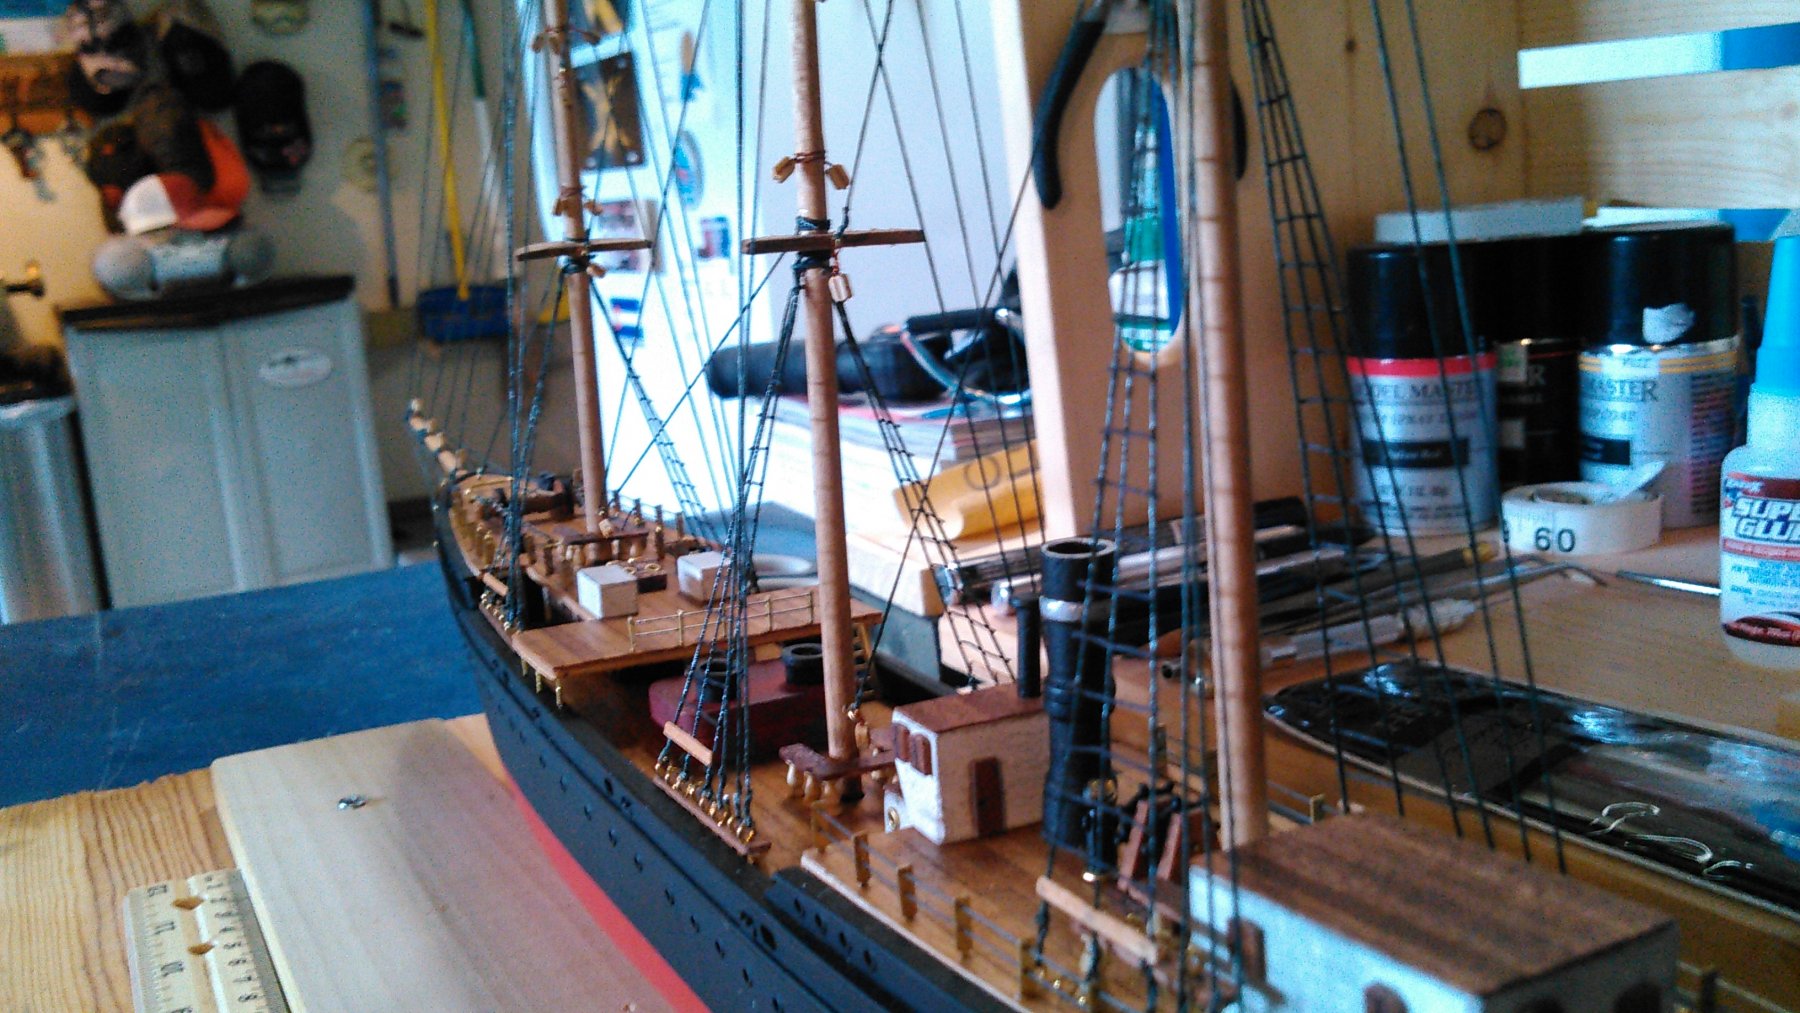
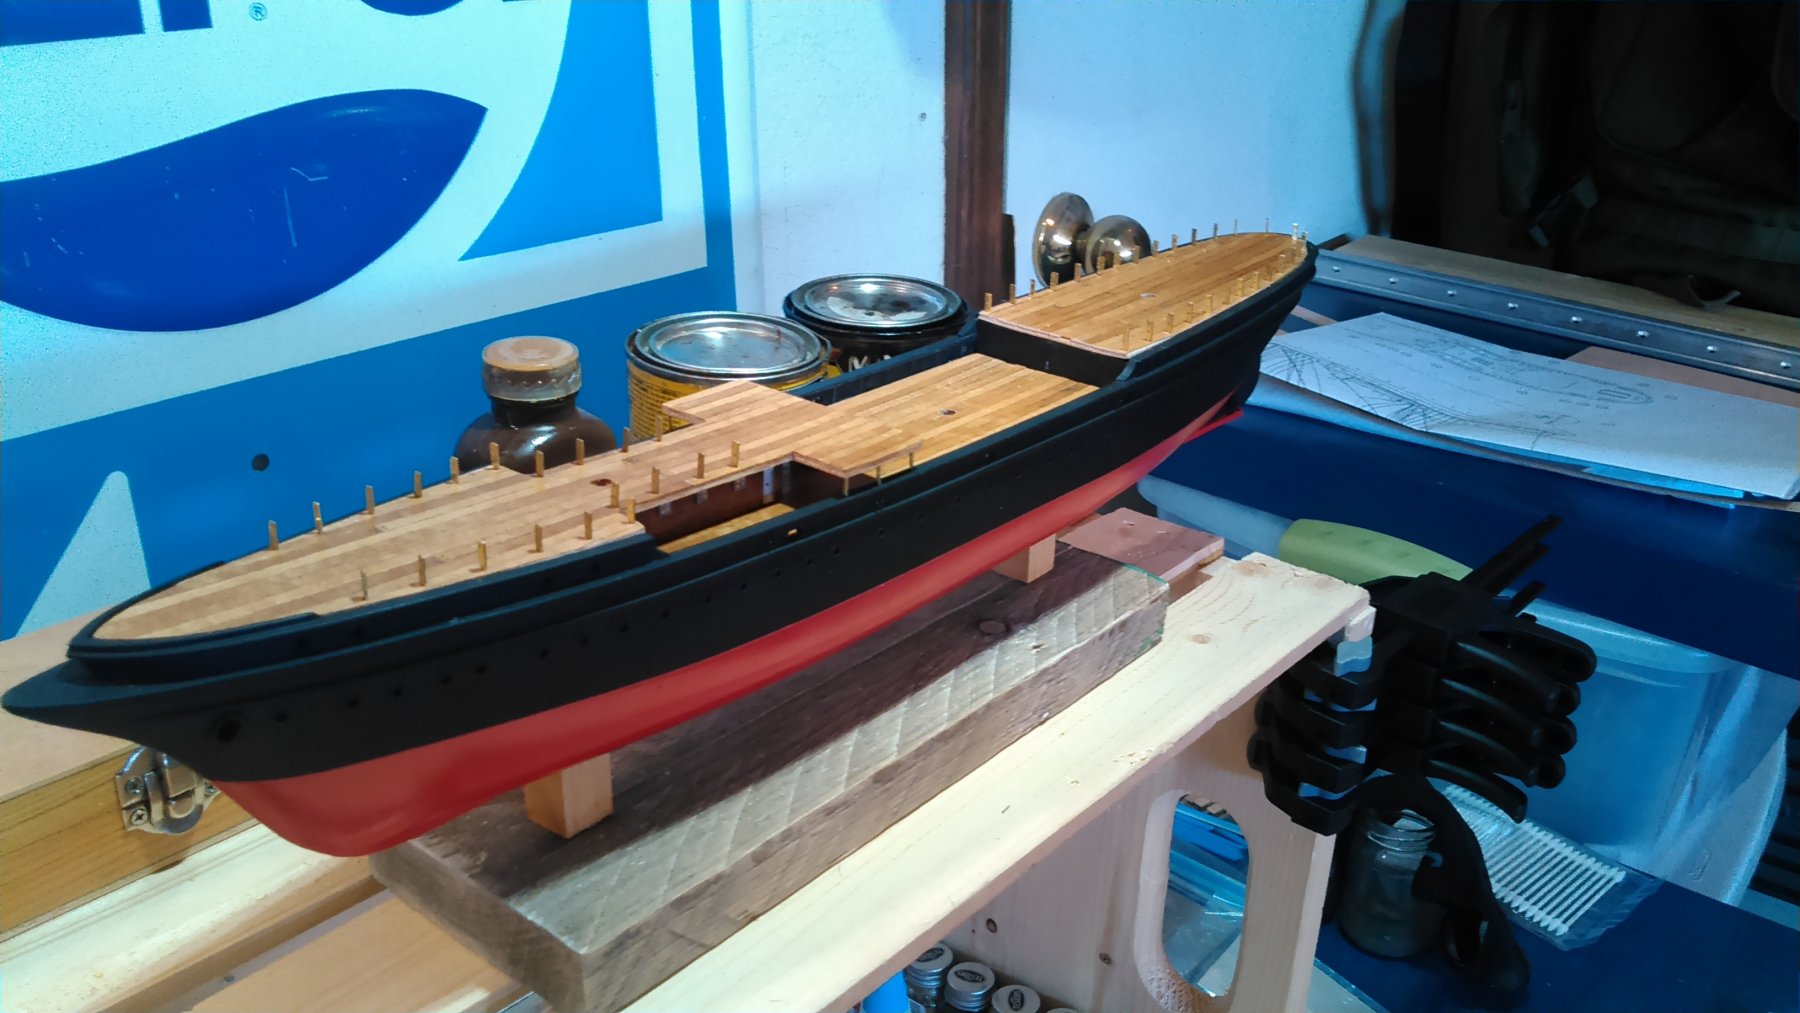
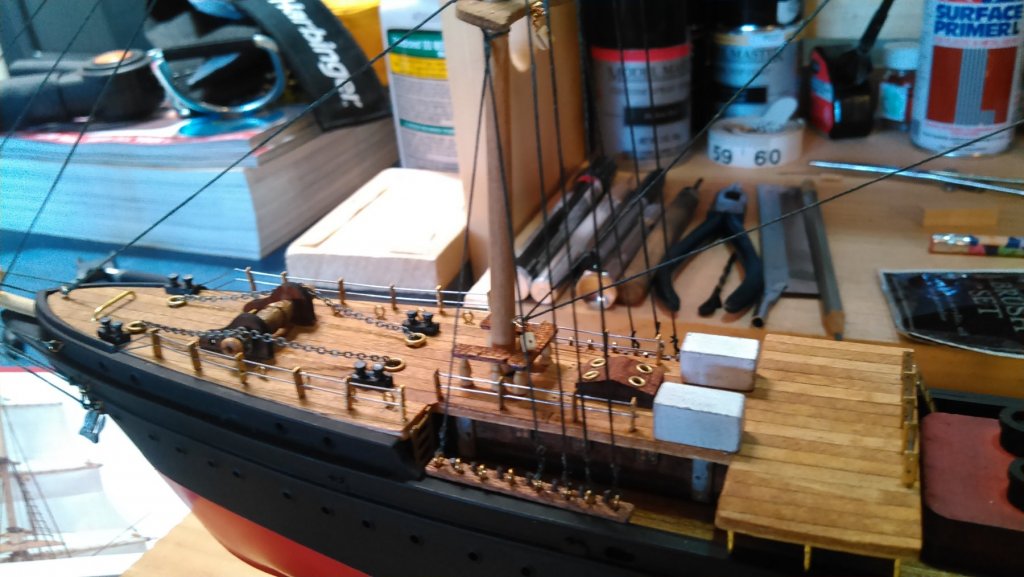
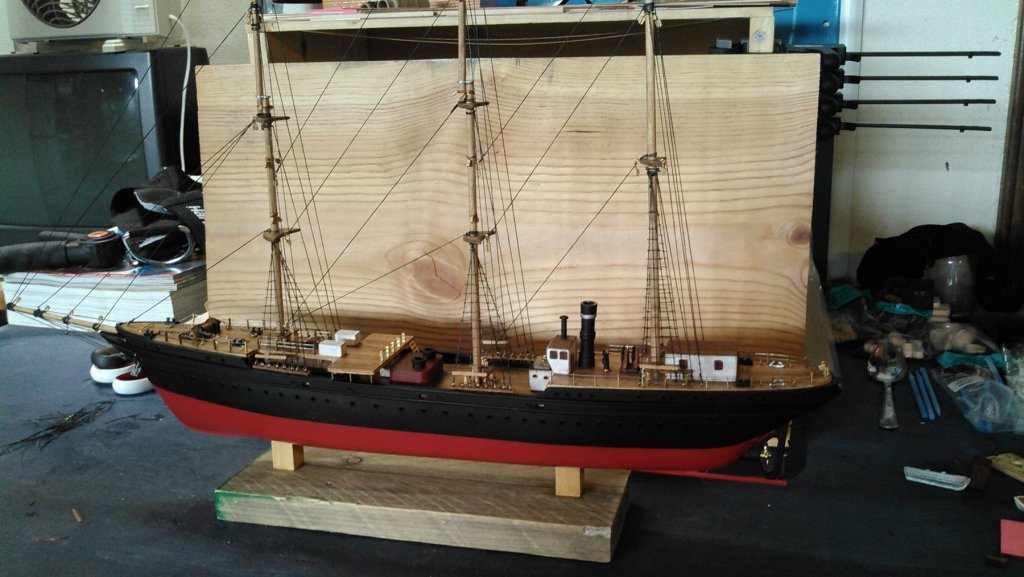
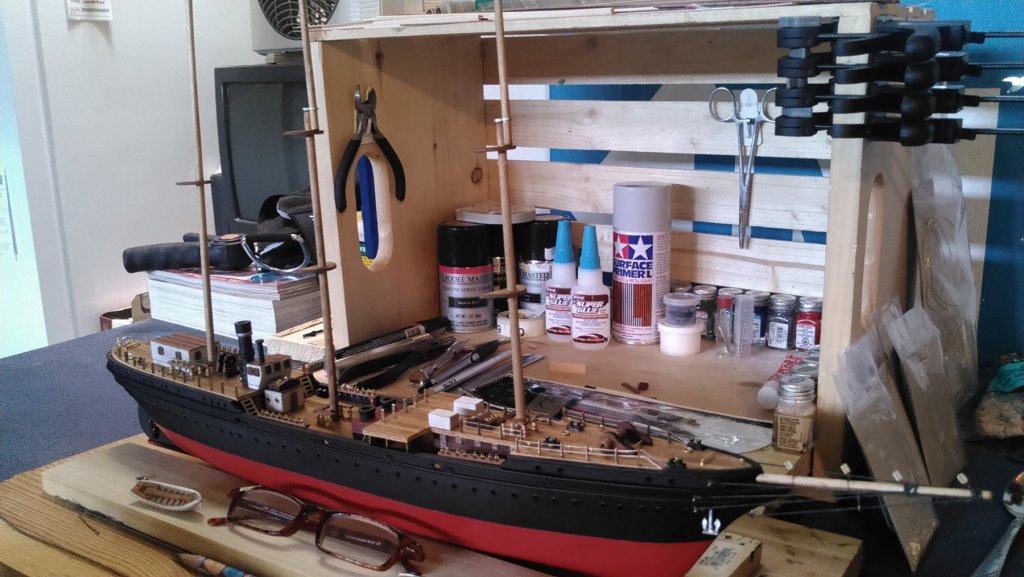
 I've been busy with life and dogs and yard care and bluegrass guitar and watching the builds come to life on the site... but have been picking away a bit at a time on the whaler. I've finished the standing rigging. This was time consuming, and I have much room for improvement. But it is done, and now I know what I'm in for on the next one.... I added a spare & lashed whale boat to the foredeck, and scratch built my first two davits. I will have one set each on the starboard and port sides of the flying fo'c'sle just aft of the lashed spare - which will mean relocation of one of the ladders - as well as one set on the starboard side of the aft quarterdeck. The port side aft will be taken up with a lifeboat/launch, unless I can fit it on top of the deckhouse aft, which is where I had envisioned it. But that will have to wait until the spanker booms are up to see if there is sufficient clearance. So, next up will be finishing the remaining two davit sets, and then I'll get started on the spars and running rigging. I've decided to furl sails so that will be another learning curve.... Until next time. Cheers.
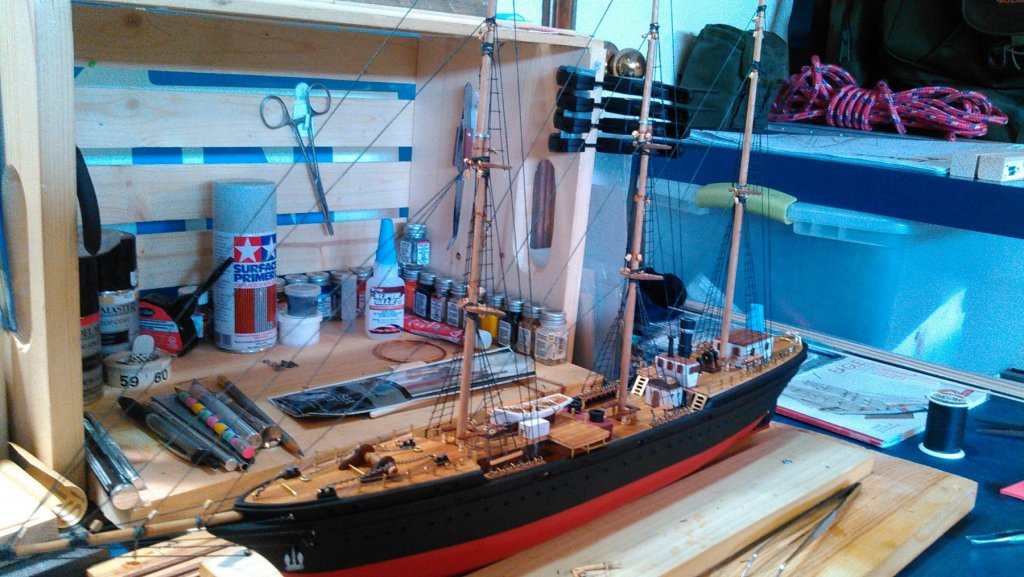


- 37 replies
-
- 3
-

-
- eagle
- constructo
- (and 1 more)
-
By the way, if someone could explain to me why it is that a bunch of photos that I uploaded but did not manually insert into my narrative keep showing up at the end of my posts, that would be swell. Because I can't seem to delete them no matter what.... Cheers. Archie
- 37 replies
-
- 1
-
-
- eagle
- constructo
- (and 1 more)
-
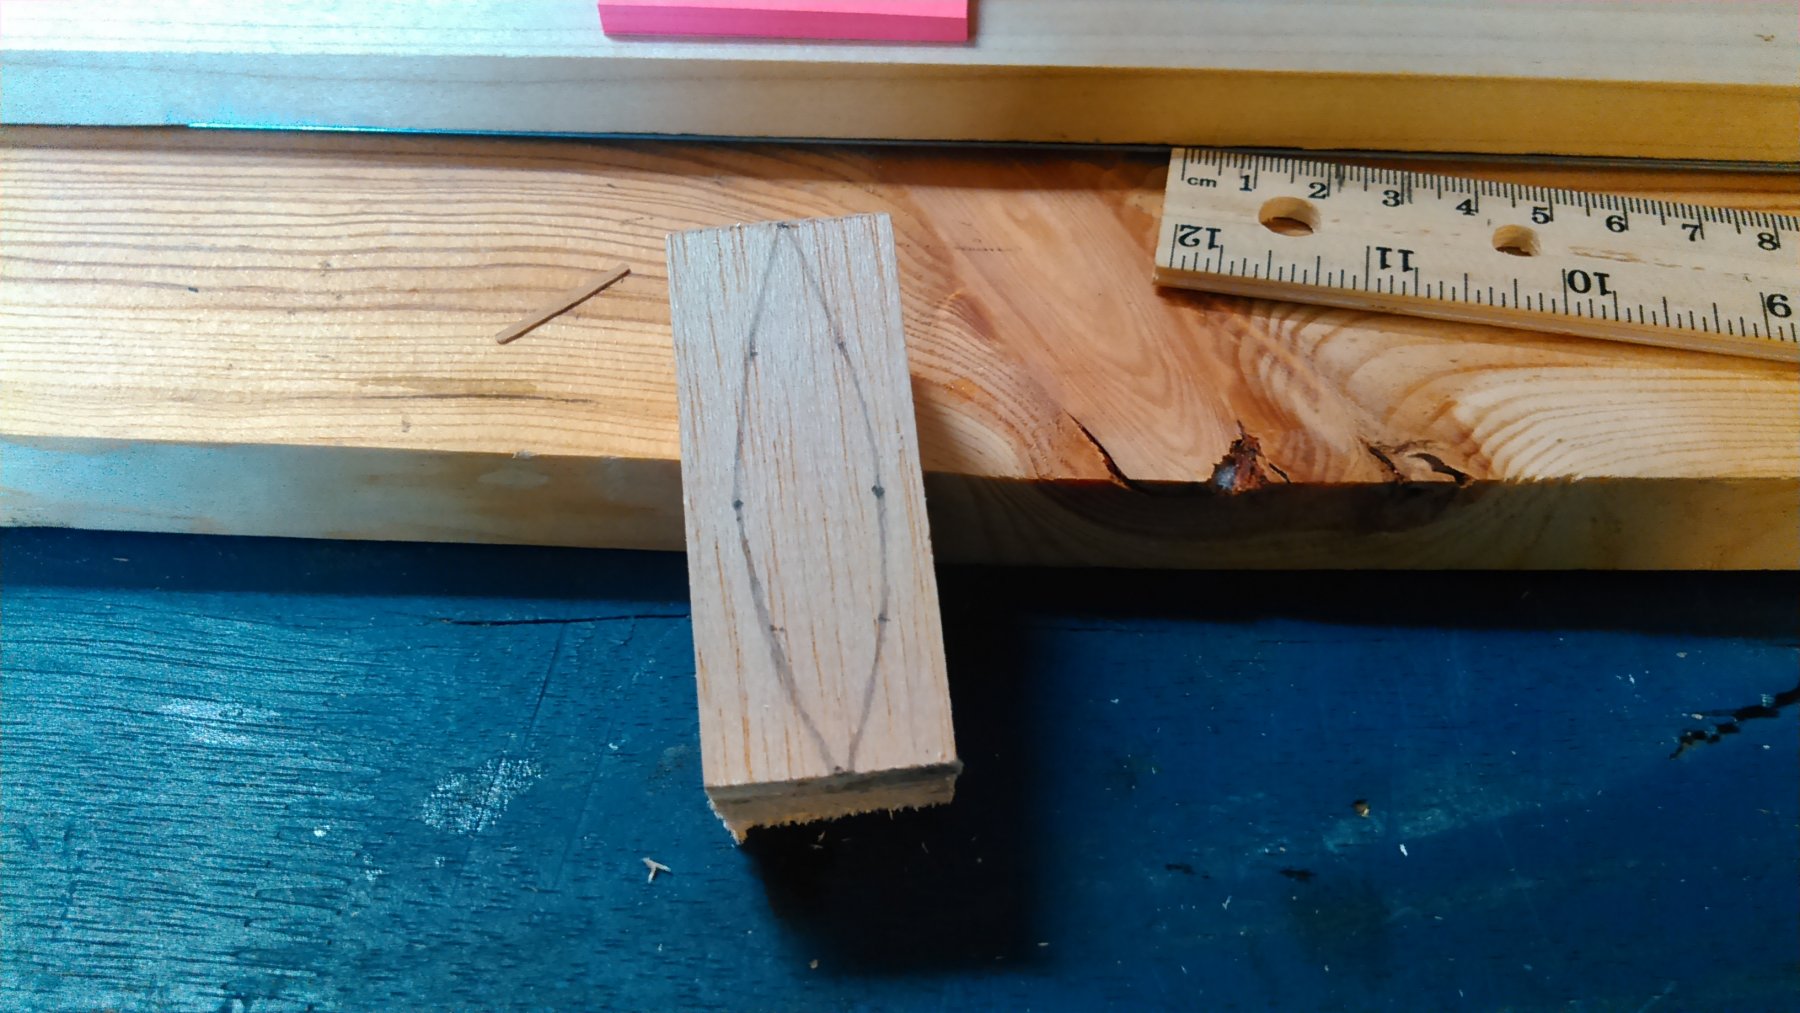
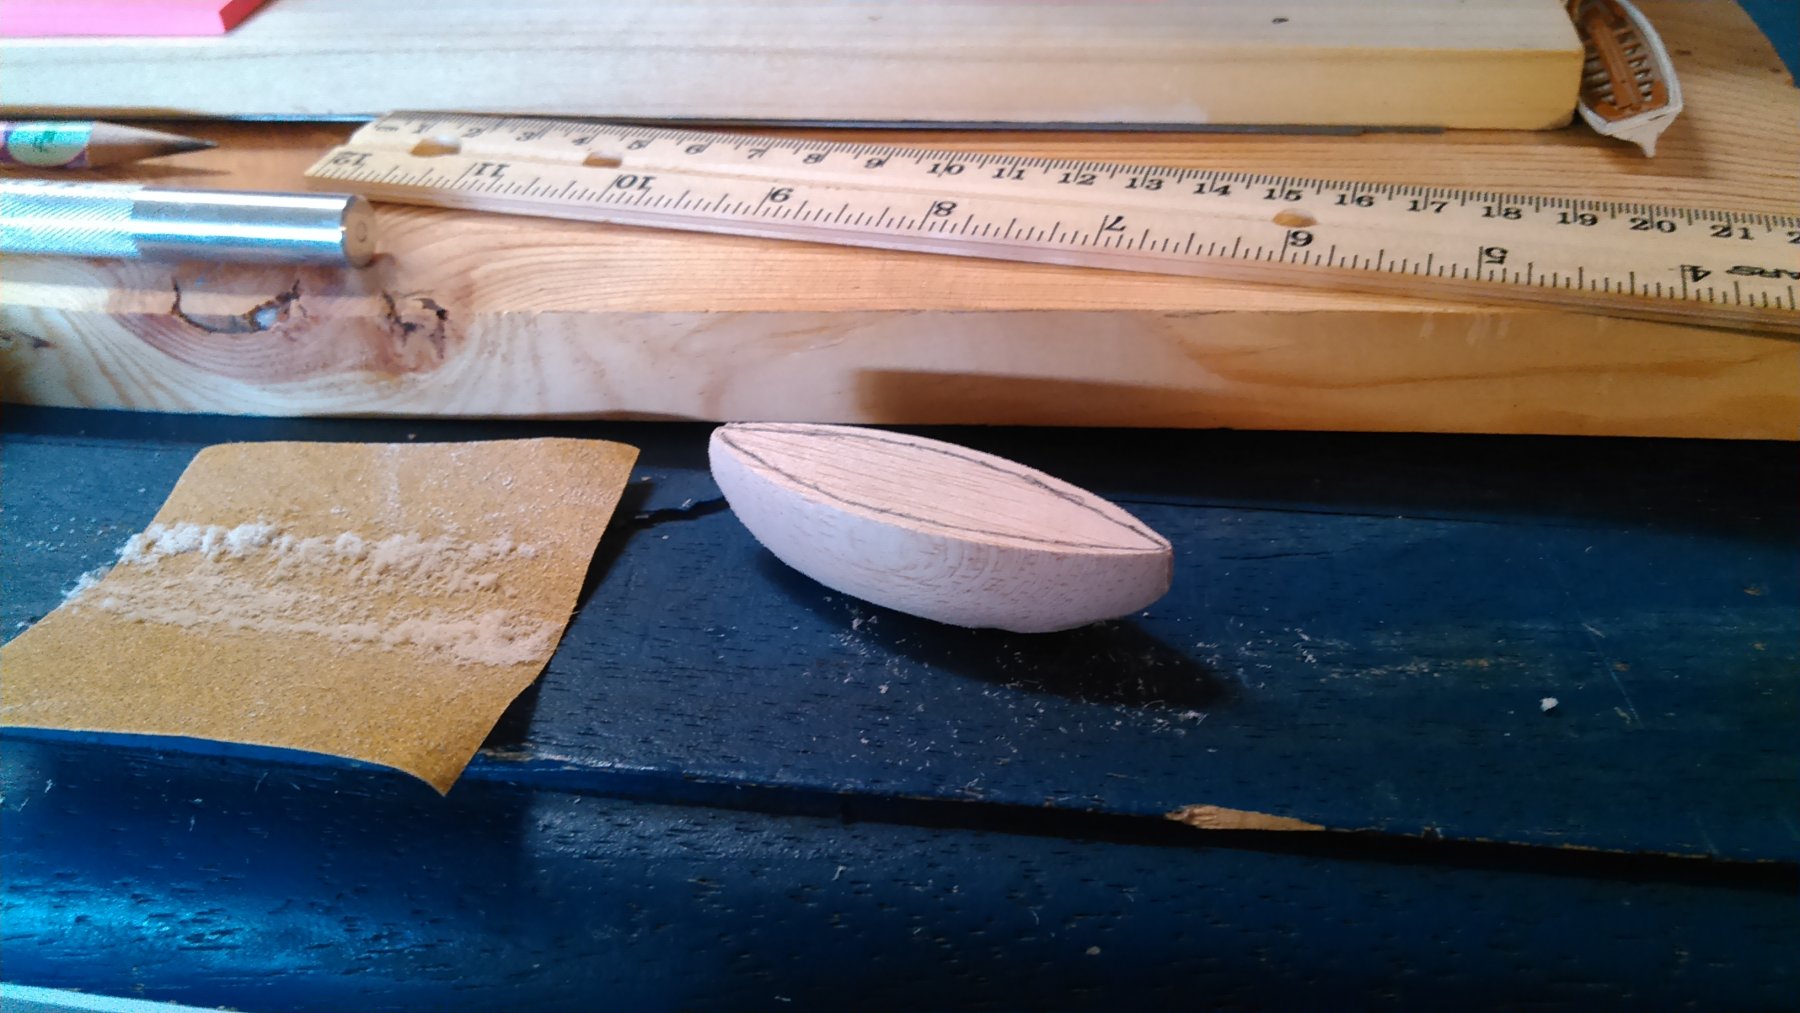
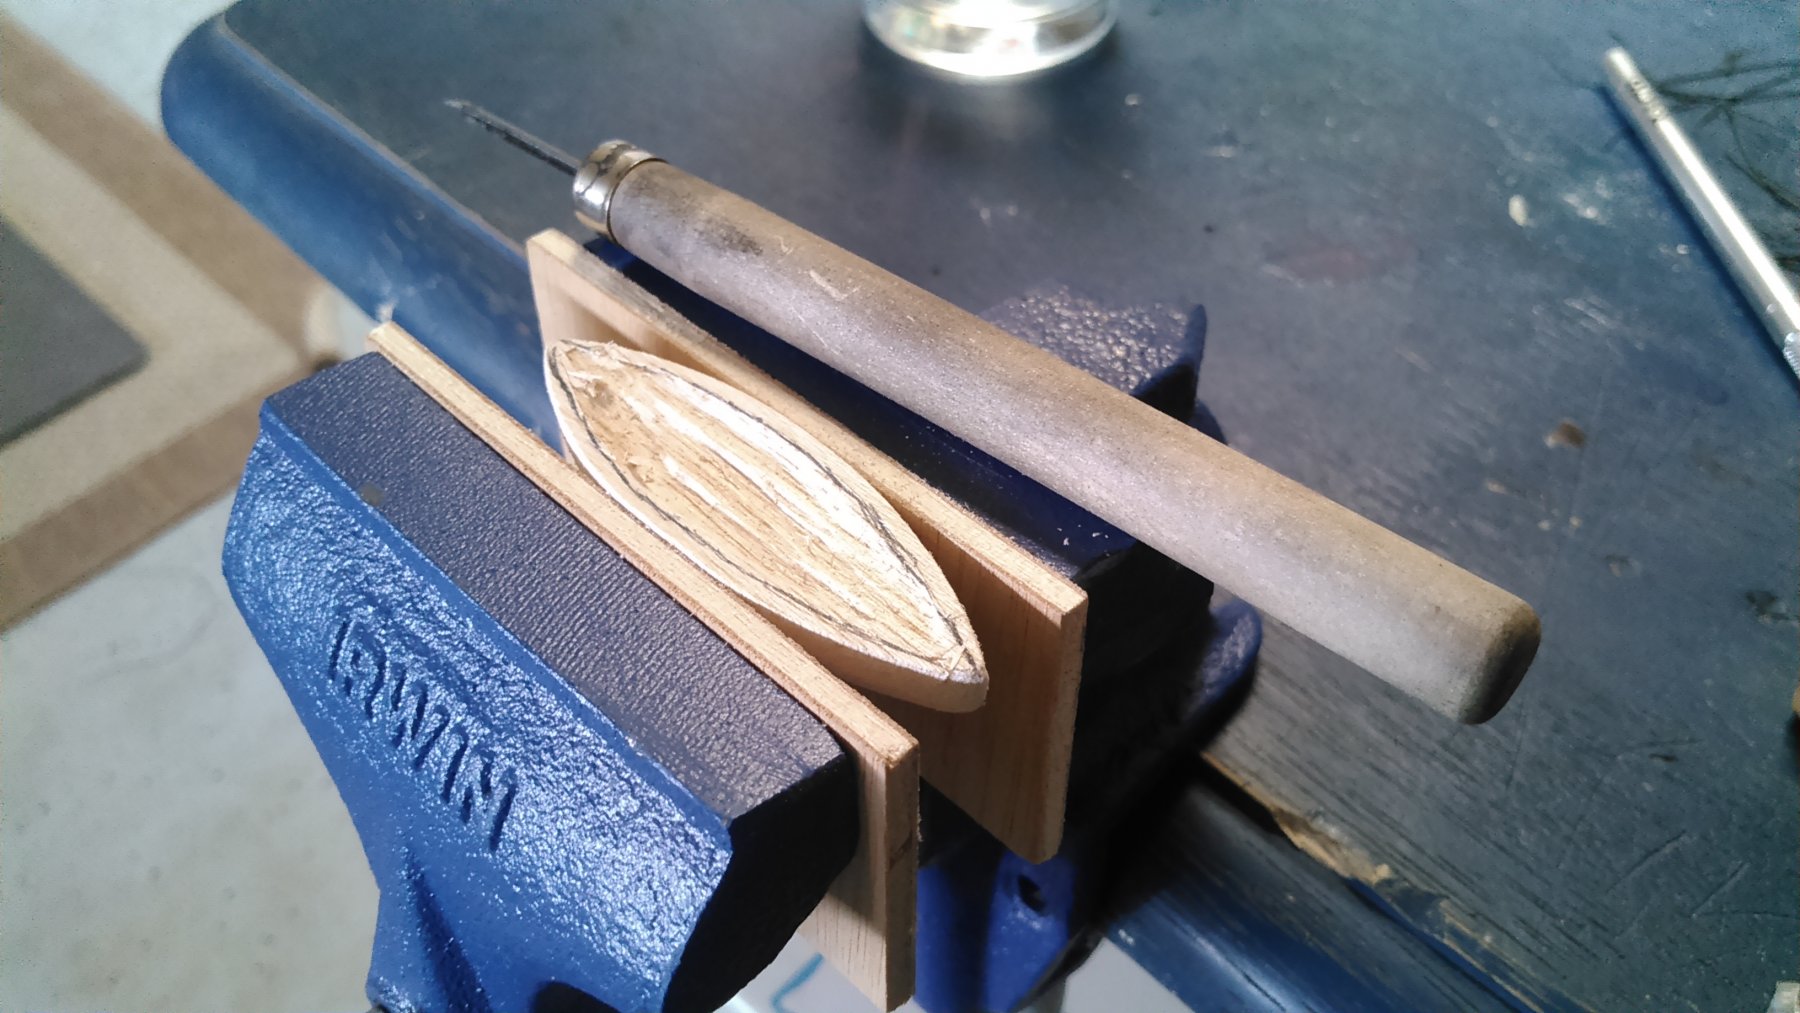
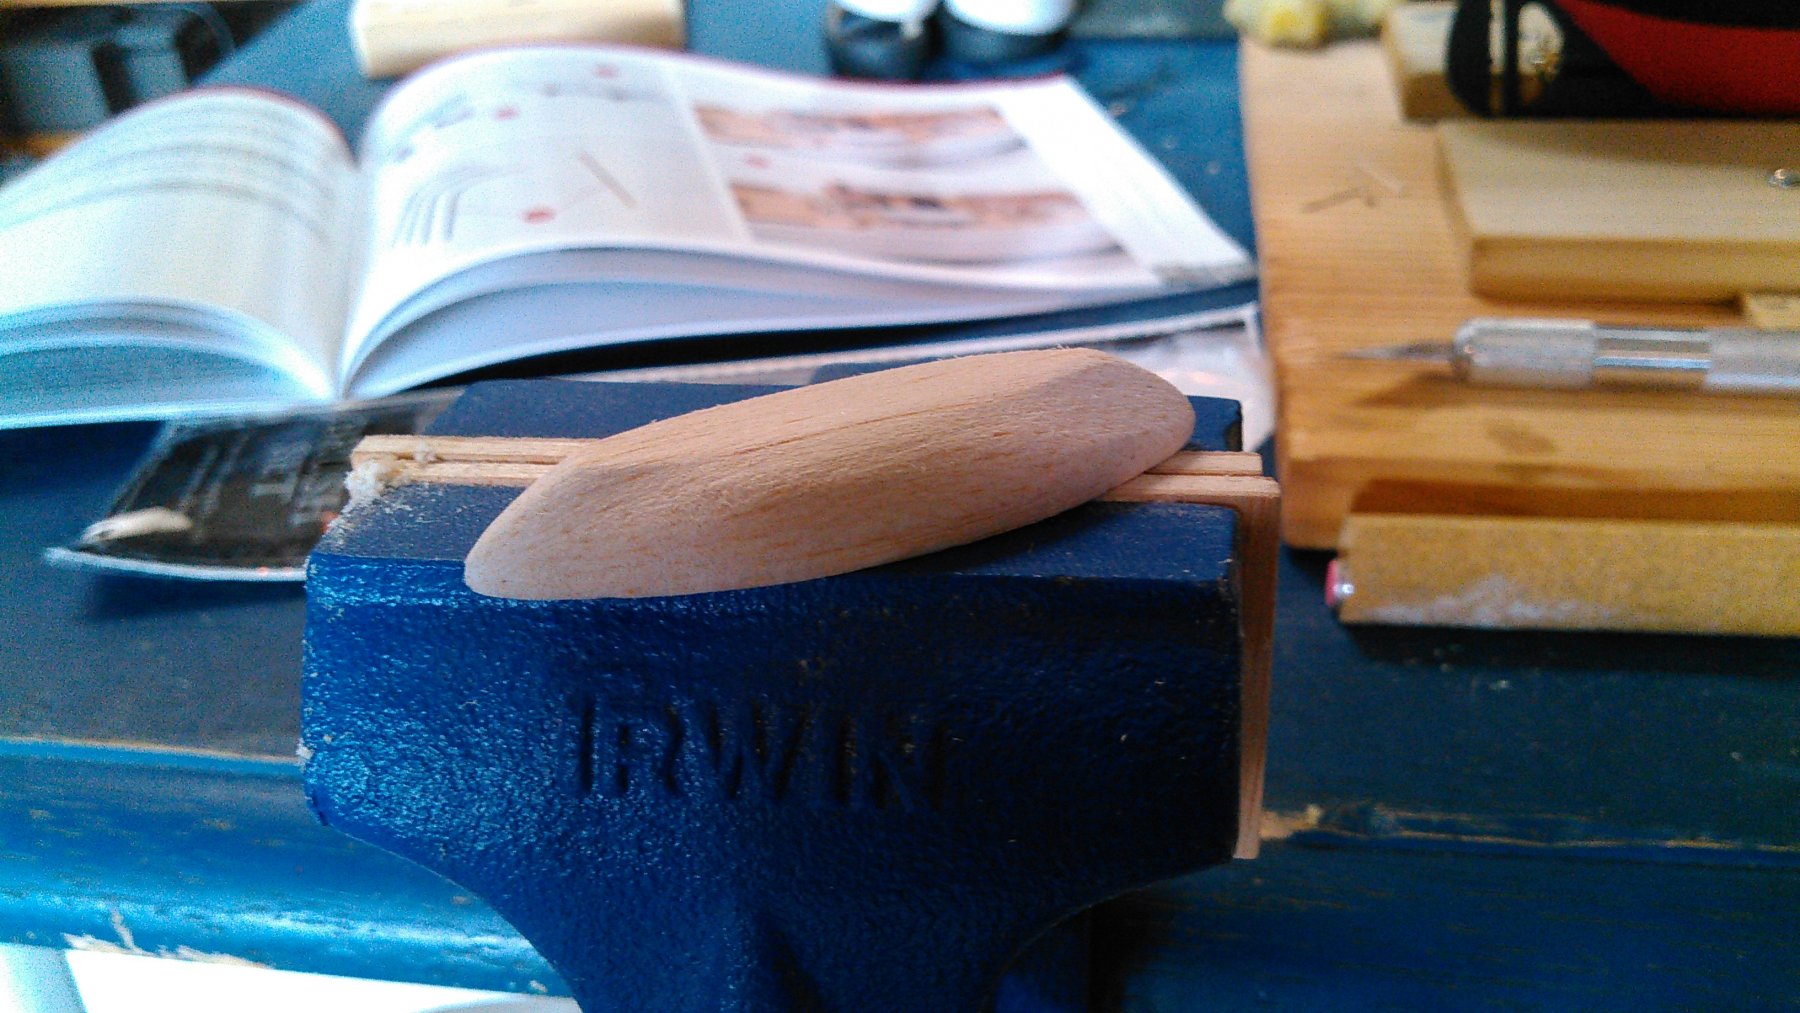
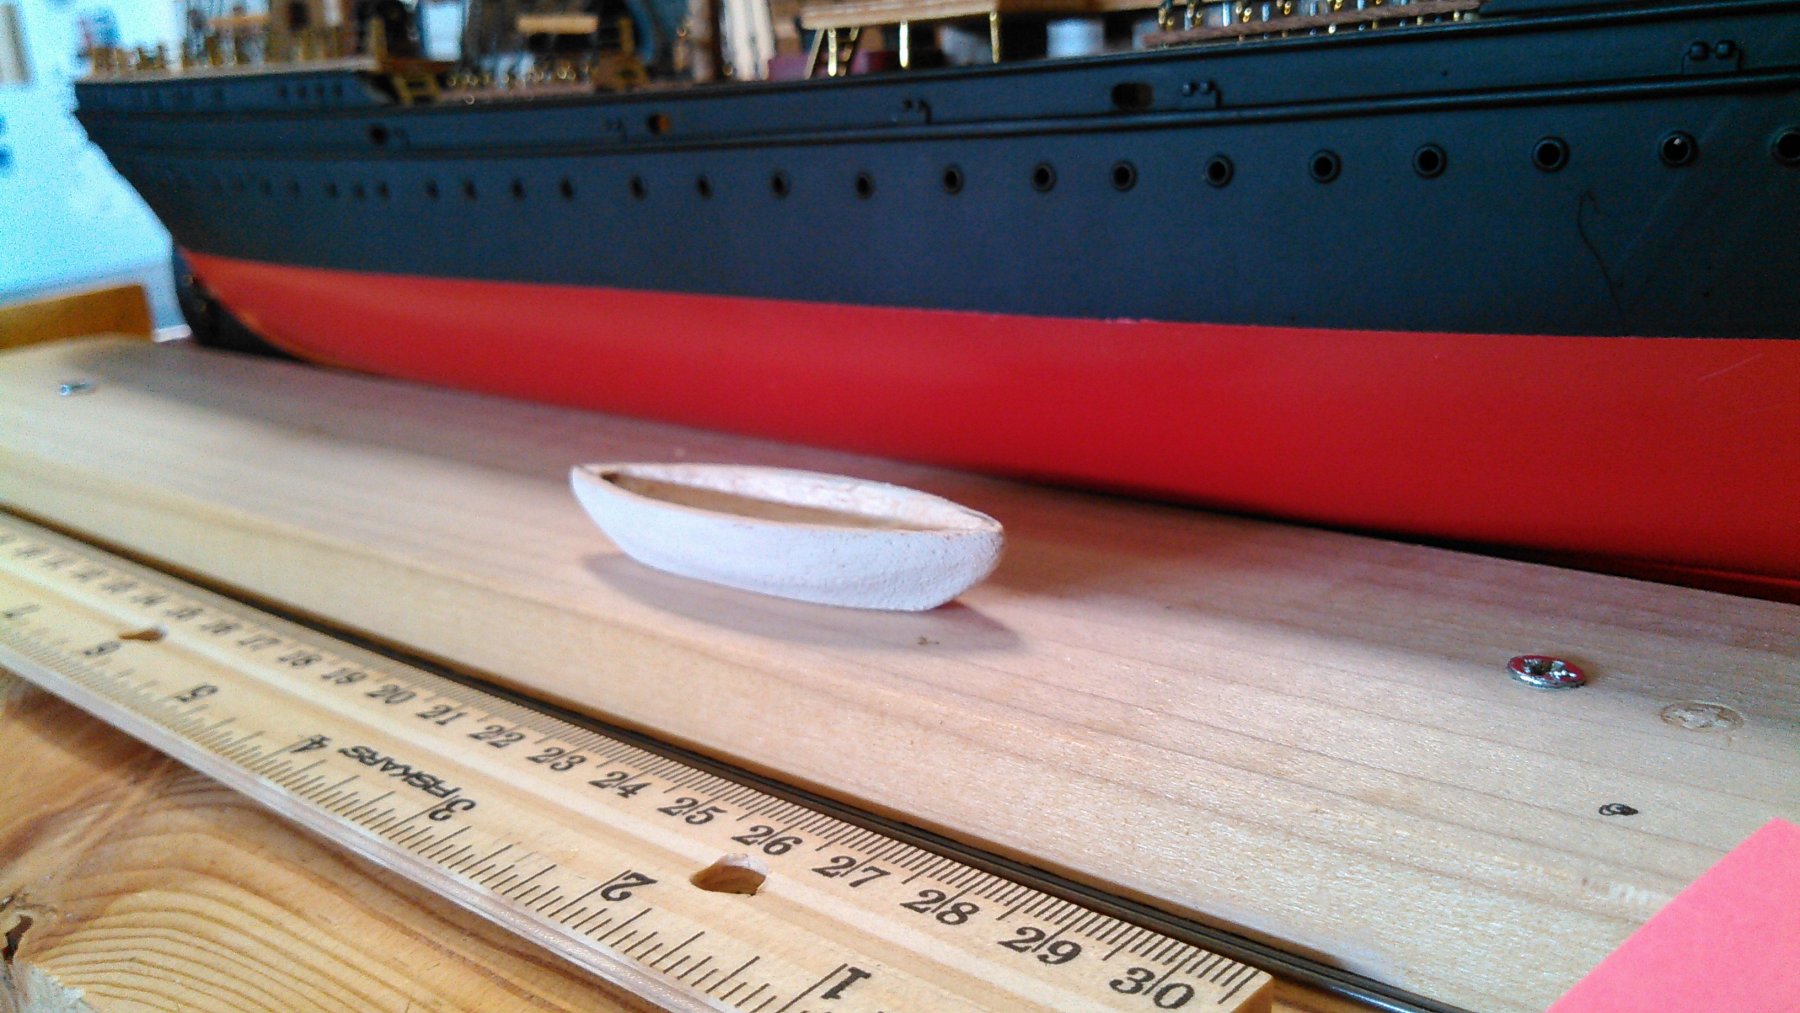
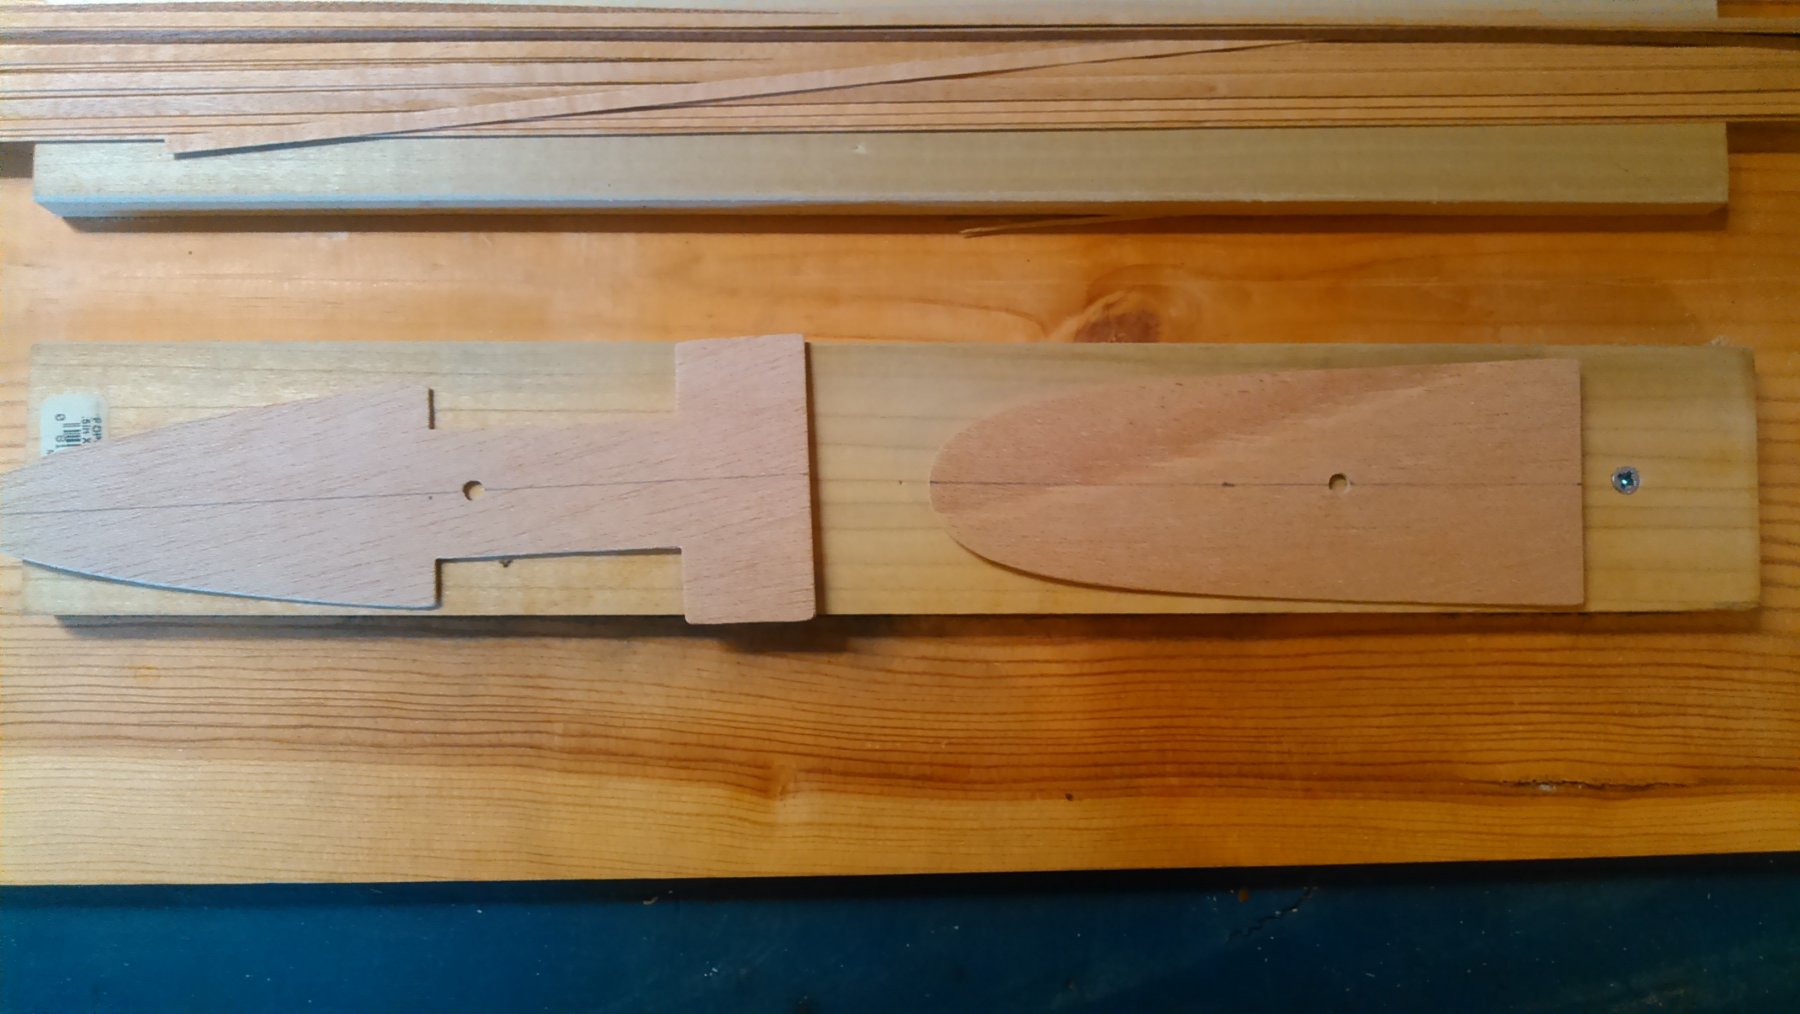
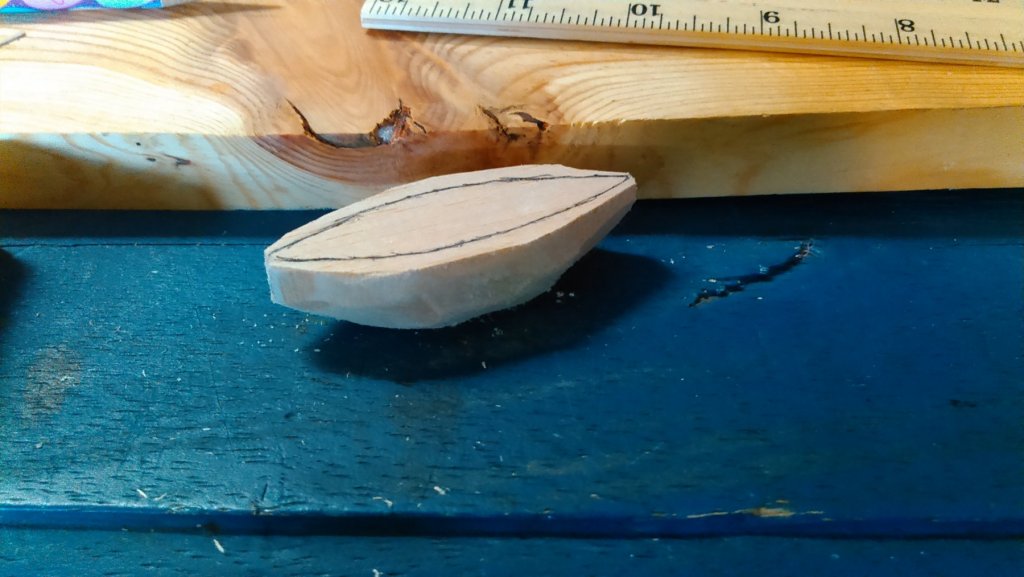
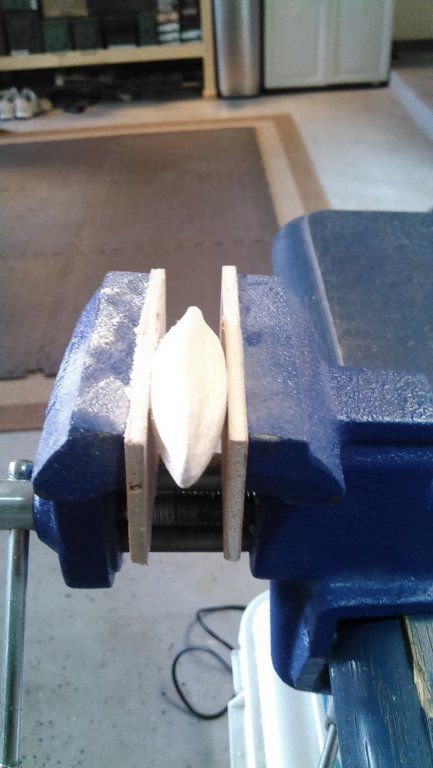
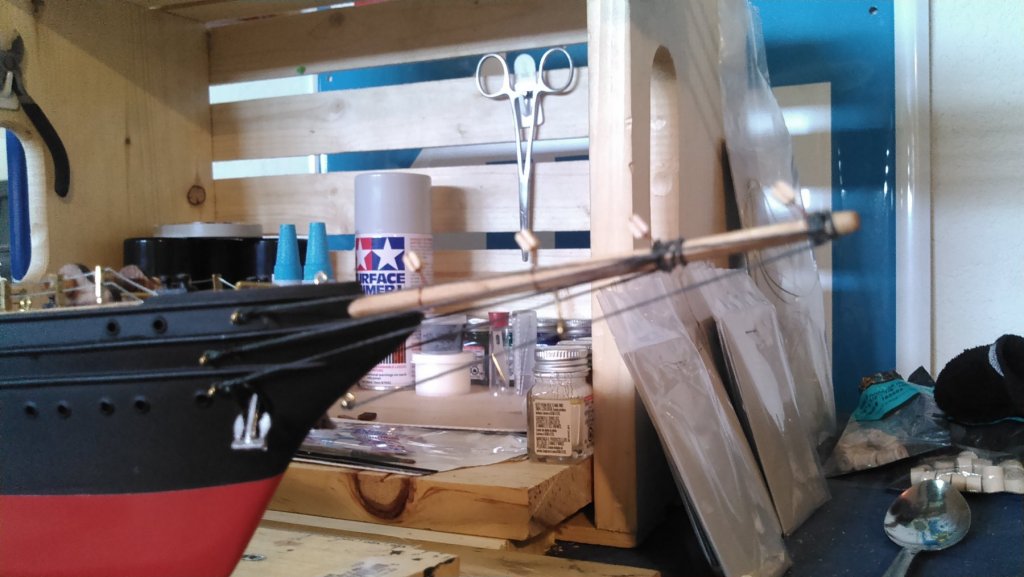
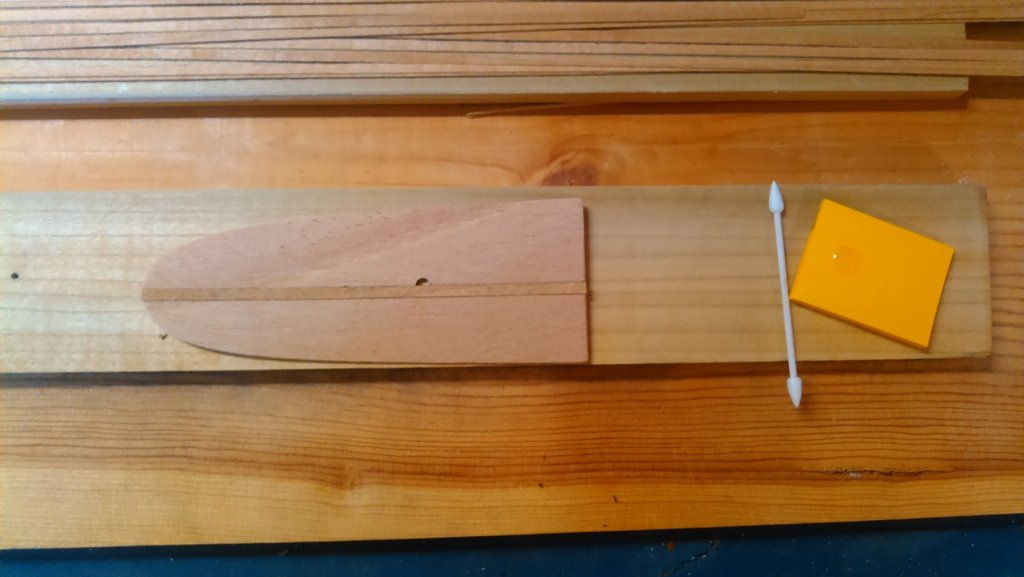
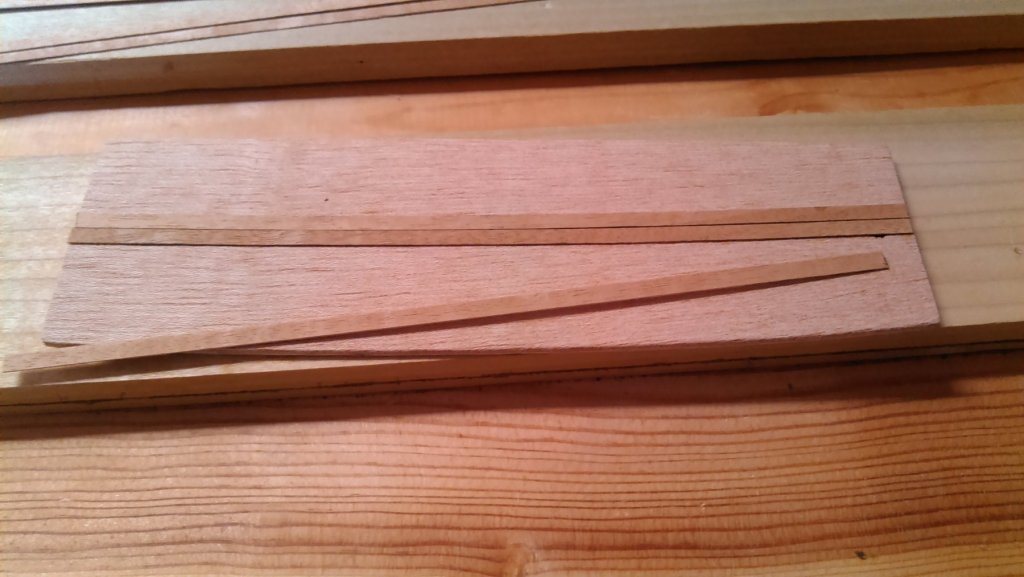
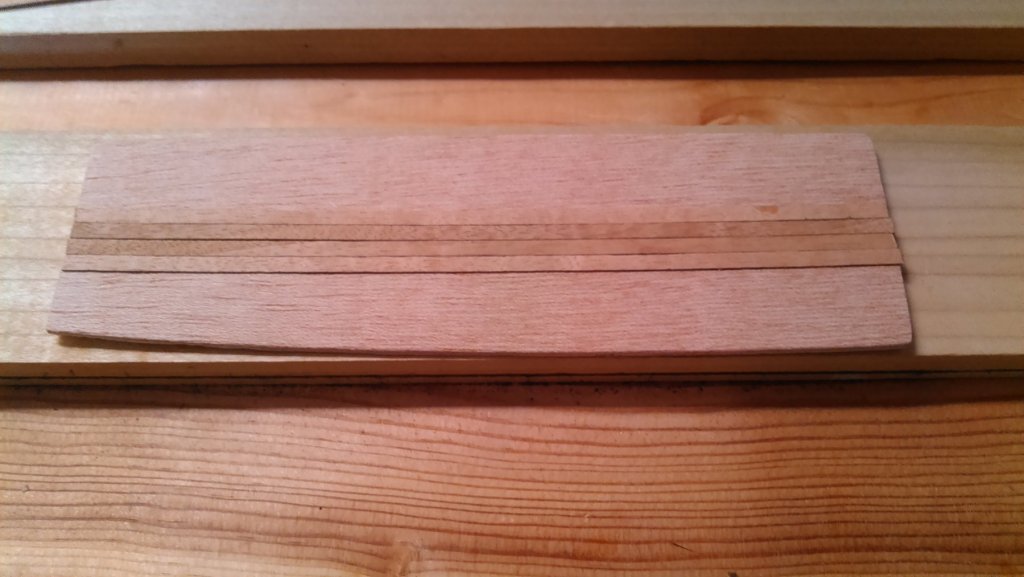
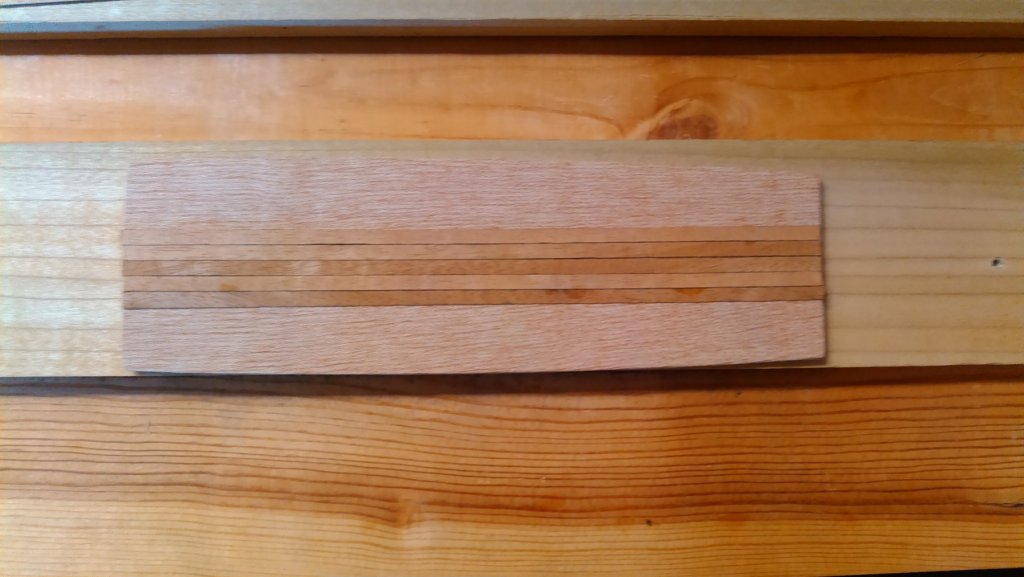
Well it's been a while since I posted.... I've been taking my time and chipping away at the standing rigging, learning as I go. So for the past few days, I've been running standing rigging and beginning the shrouds and ratlines.... This is a first for me, and it is very slow going, especially considering I will have eight sets of them by the time I'm done, before starting the running rig. Then I'd take a break..... a little G&T.... Once the standard rigging and backstays were set, I began on the shrouds and ratlines..... (and am still working on them). At times I would stop and start thinking about whaleboat scratch building. I started this one out of some Hobby Lobby balsa, and after sanding, routing and sanding, and routing and sanding and shaping, I have a little more work to do on it. According to the scale, these are 30 feet stem to stern and a beam of 7 feet.... I'll post more once I have some more detail, paint and appointments put into it. Then I'll decide whether to make more of them, or try something else... Like I said, lots of work to do on it, but we'll see how it turns out.... Until next time. Cheers.


- 37 replies
-
- 4
-
-
- eagle
- constructo
- (and 1 more)
-
Hey Popeye. Yes, I will try that with the anchor chains.... Didn't think of it, and the plans had them out on the drums so I never gave it a second thought. But yes I think that will look much better. Love the way it looks on your Cutty. That is very nice! And yes the rigging plans are the same on the Eagle - they separated the standing and running rigging. Standing first, and then running, from what I can see. In fact, the clipper plans are very similar to this barque - including the halyards and clews.... I think the only big difference I can see is backstays. Not much to speak of on this barque. Thanks for the compliment! Archie
- 37 replies
-
- 2
-
-
- eagle
- constructo
- (and 1 more)
-
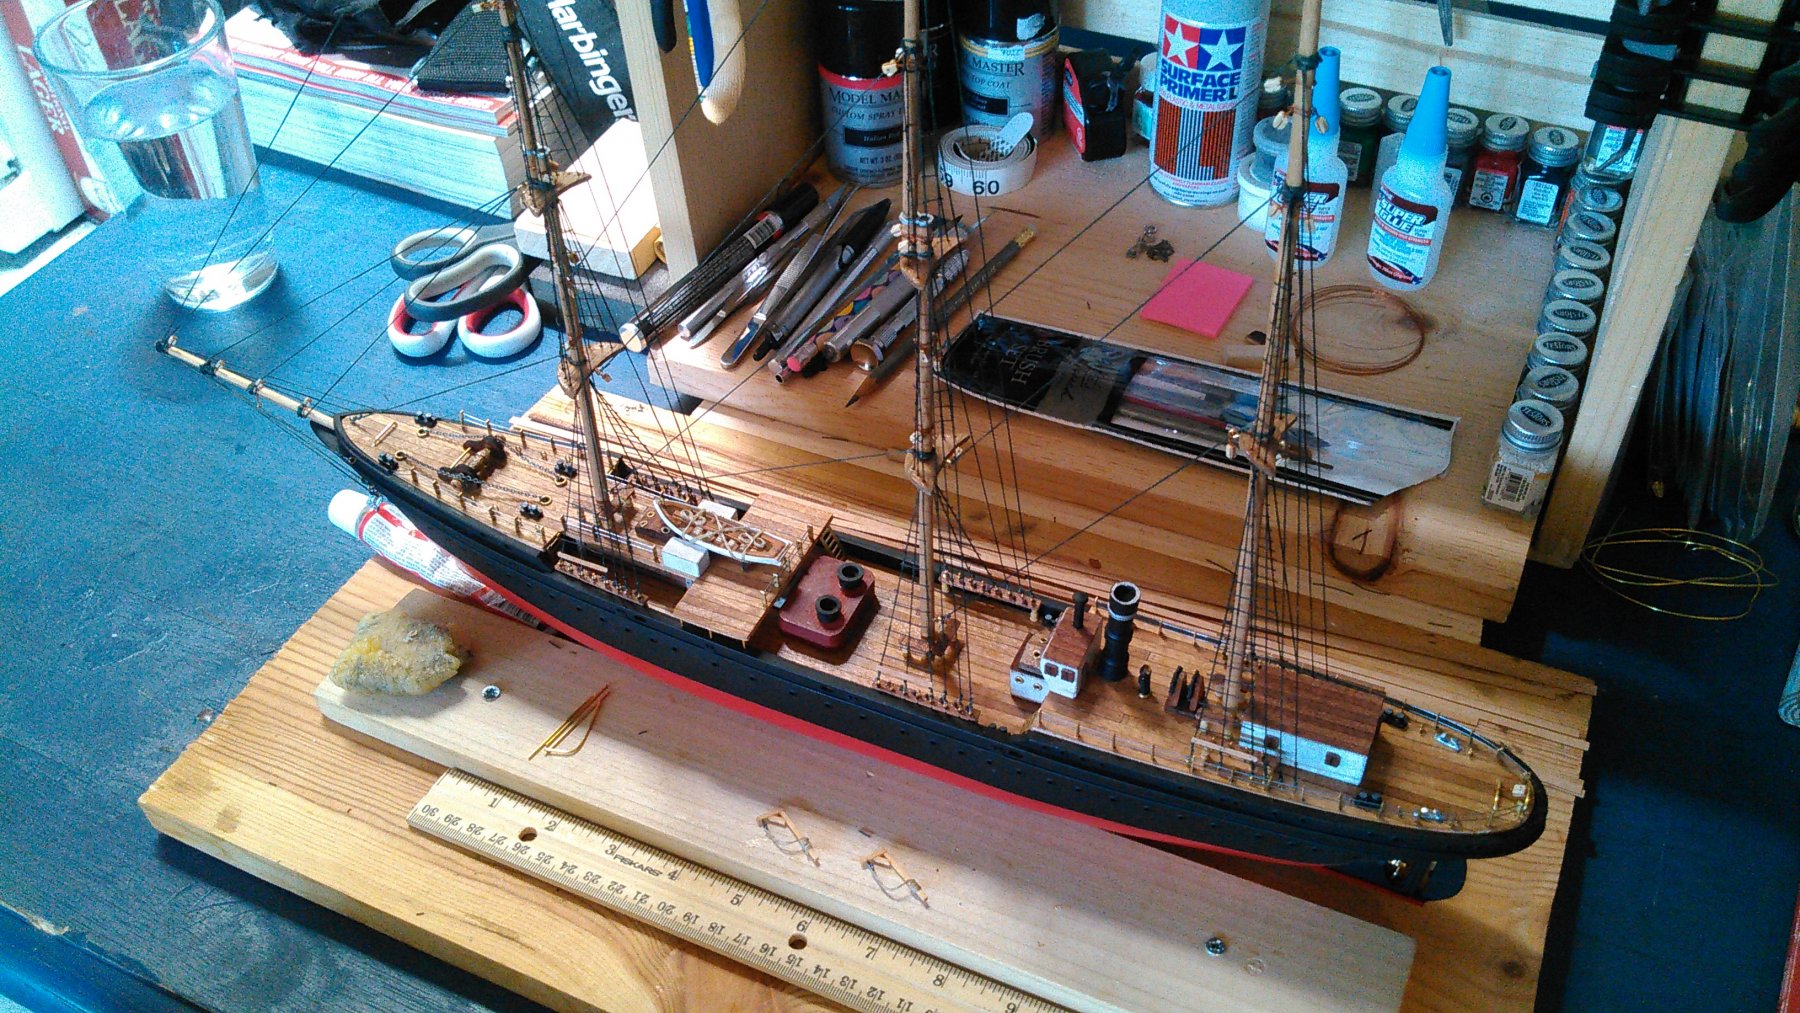
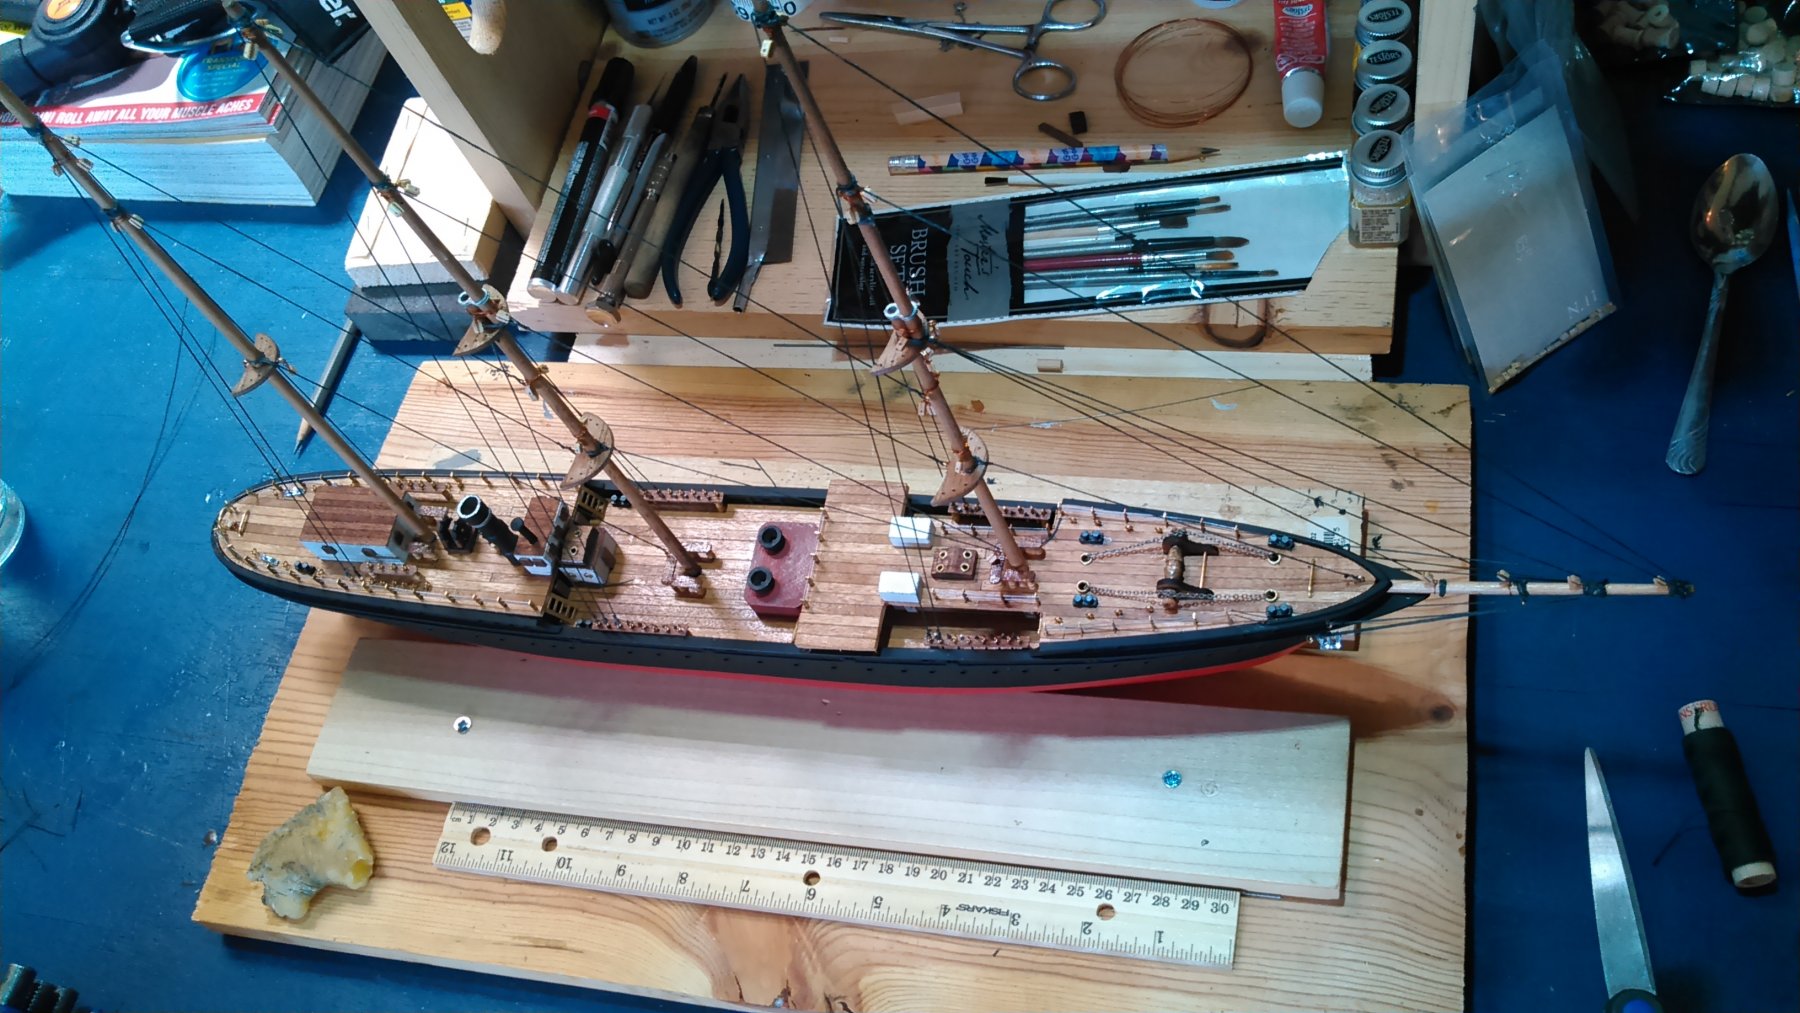
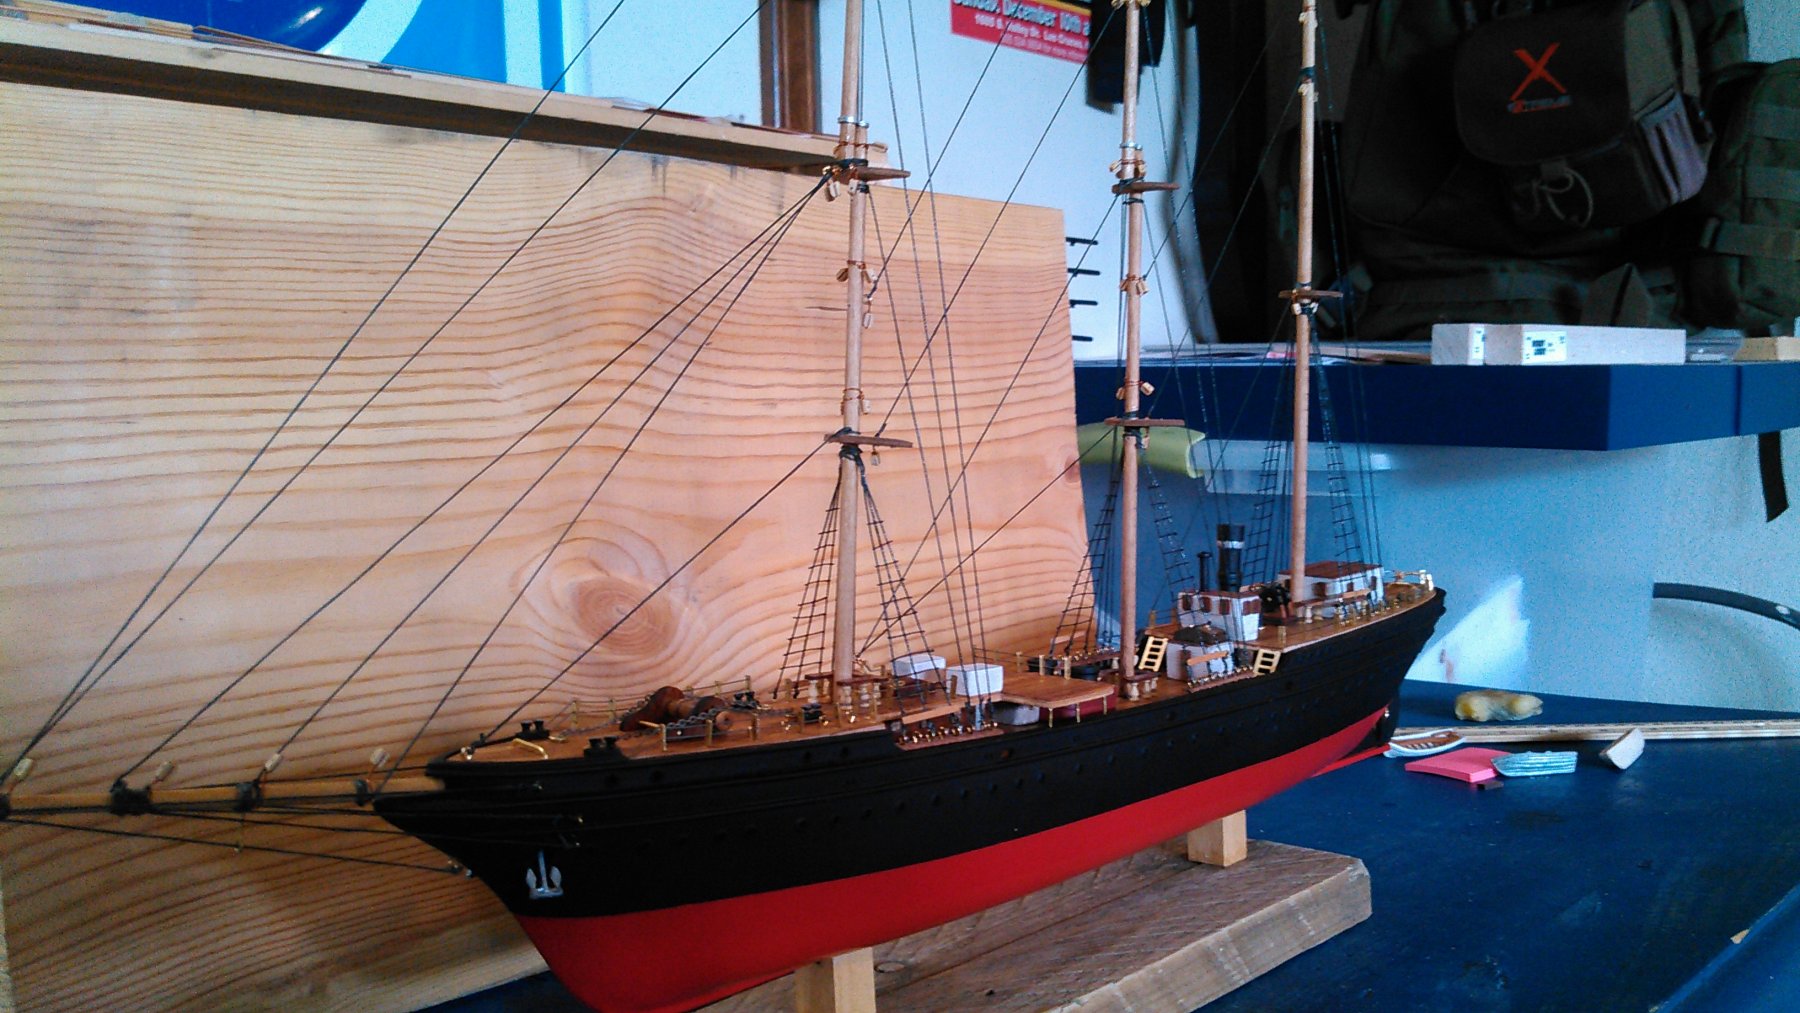
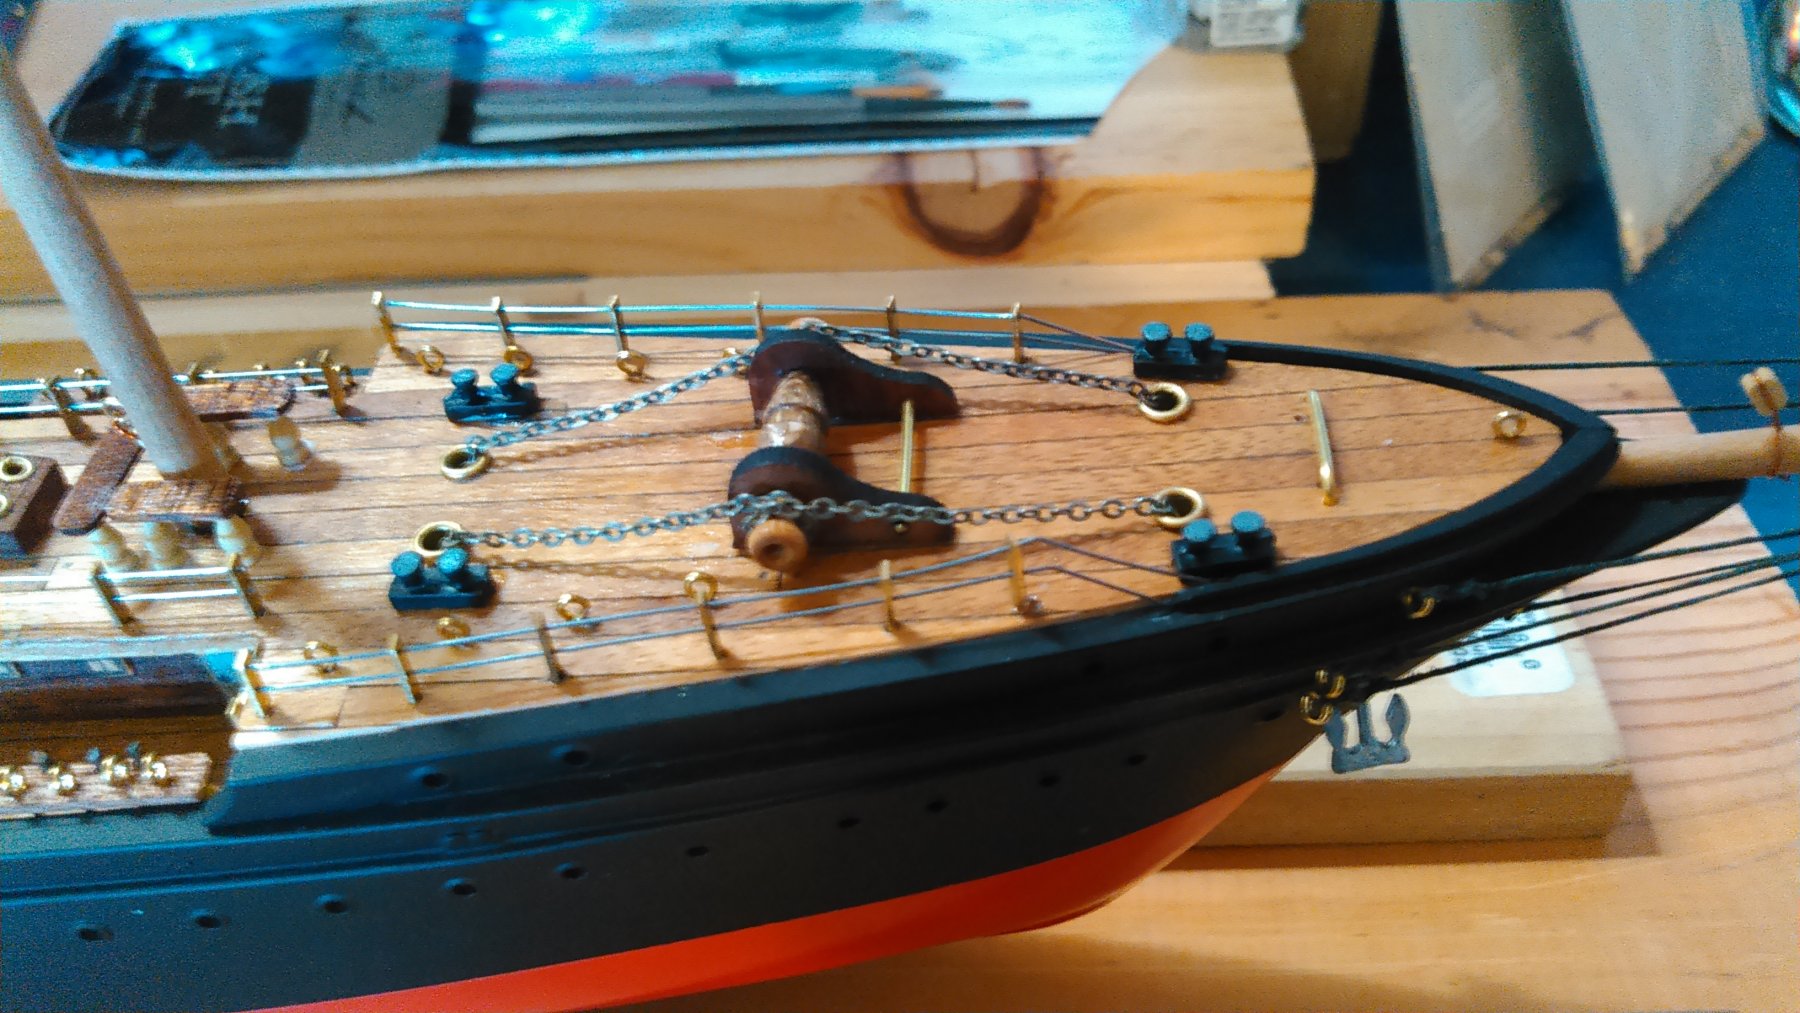
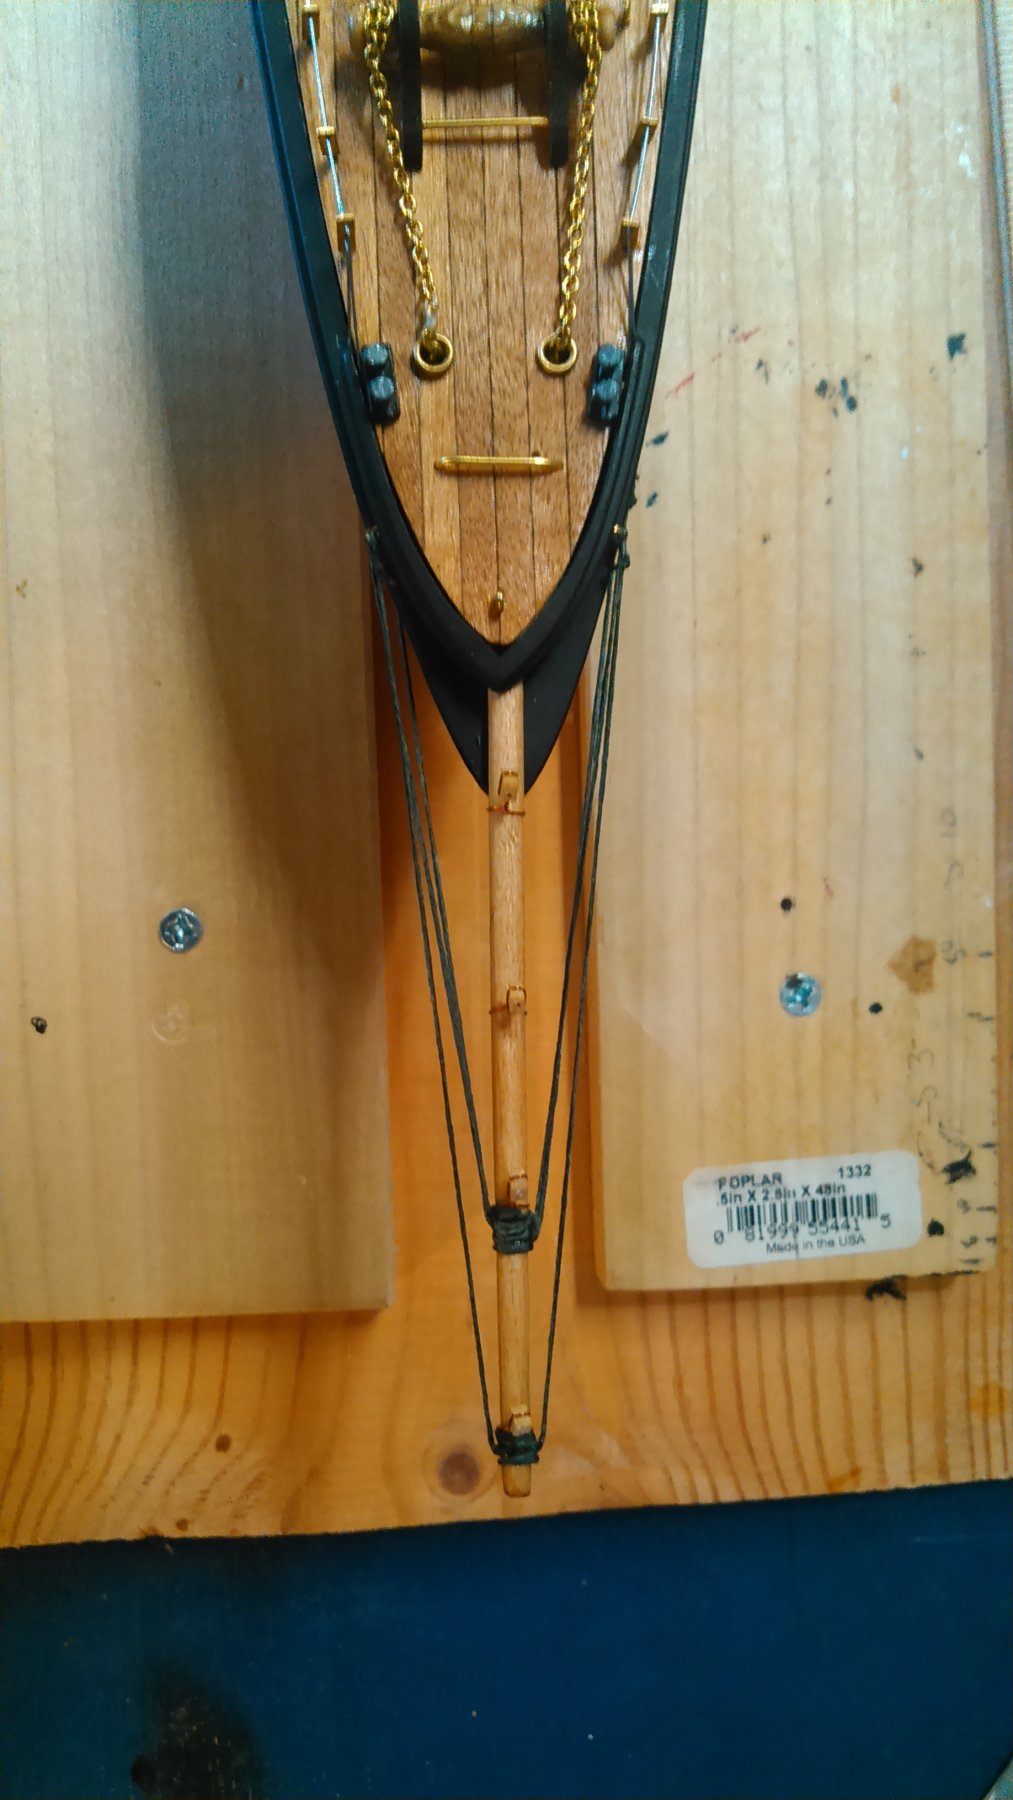
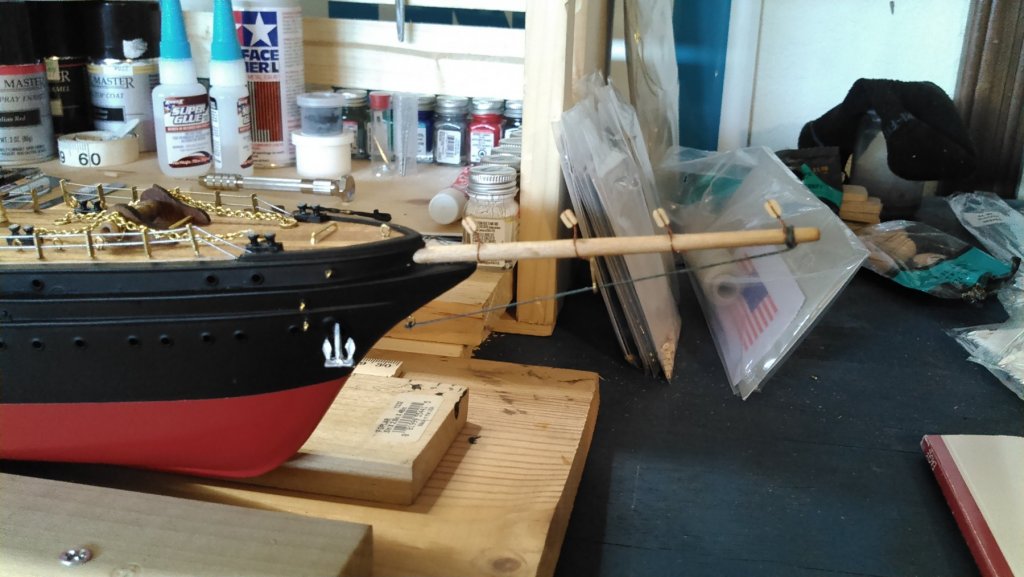
Over the last couple days I took my time reviewing rigging plans and got my masts and tops drilled, blocked and permanently set. This is another first for me, and it is immediately apparent that not paying attention to rigging plans down the road can get you pretty jammed up pretty fast.... To do this, I used the scale plans for measurements and gear placement, and the manual for photo orientation.... I'm very pleased with the appearance of the masts. In the bottom photo you can see I added a little bit of trywork smoke stain to the fore side of the mainmast below the first top. (The mast is upside down in the vice) While doing this, I noticed how little I liked the kit-provided anchor chains, and so I took some old chain that I had, soaked it in Plumb Brown (a gunmetal reagent), and then replaced the bright, shiny chain from the kit, trying to keep the "working ship" motif in mind.... Once all these things were done and dried, I began the standing rigging at the bow. Another first... What I found tricky was keeping tension on all of the lines. The first line I ran was the bottommost on the foremast, and I immediately noticed that the tension on each would lessen as I went up. So, I removed it, started at the foremast top and worked my way down the mast. I ran my lines through beeswax, and used light touches of CA glue to hold lines while I lashed and took up tension. I'm still learning how to do this, and frankly when I look at the plans and photos my hands sweat looking at the amount of rigging in front of me. But I'm taking it one line at a time, and watching it slowly come together.... Until next time.... Archie

- 37 replies
-
- 4
-
-
- eagle
- constructo
- (and 1 more)
-
Thanks Popeye. I appreciate that. I'm going cross-eyed trying to figure this rigging out. Lol.... Archie
- 37 replies
-
- 2
-
-
- eagle
- constructo
- (and 1 more)
-
Hello Christian. I very much enjoy following your build. You do excellent work! My choice would be the second photo in the post above. It is an interesting design, and the more muted colors seem to work well. Regards, Archie
-
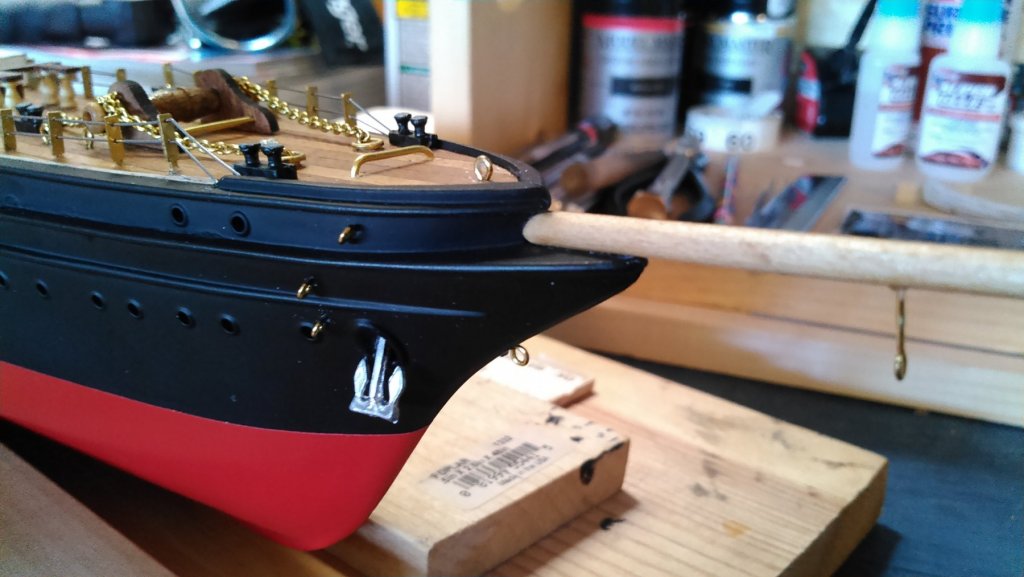
Well I couldn't help myself and did a little work today..... I've been studying the standing rigging plans, and looking forward a bit to running rigging as well, trying to decide if I'll be able to add my davits and whaleboats (once they're done) afterwards. It looks like that will be possible, so I will be working on the rigging while I'm getting my scratch stuff together for the whaleboats.... More on that later. So today's task was pretty straightforward. Get the masts and bowsprit ready. This consisted mainly of comparing measurements from the instruction booklet with the scale plan sheet, cutting, sanding for taper, and staining. I chose an American Walnut stain, applied lightly with some thinner added, to mimic worn white pine. I stepped the masts and added the tops, then drilled them per the plans for some of the standing rigging and running rigging blocks. So the first rigging I tacked on this ship was the bowsprit. After a nice taper and flattened aft, and adding the martingale, I glued it to the bow and let it dry. Then I added the bowsprit blocks. As everything dried, I drilled the hull per the plans, added eyebolts, and then ran my rigging lines. I ran the line through beeswax, and used small drops of glue to help secure them and the lashing.... Once the bowsprit was done, I put the masts in place (not permanently), in order to help make sense of the rigging plans and start planning on adding my blocks and eyebolts for it. Plus it was nice to see things starting to come together.... Until next time... Cheers.

- 37 replies
-
- 3
-
-
- eagle
- constructo
- (and 1 more)
-
I thank ya sir. Though I am disappointed about the lack of deadeyes, I think, considering that this model is built around the eyebolts, that I will stick with it. However, on the next one, there will be deadeyes galore I suspect. I may not post for a few days, as I am studying standing and running rigging, and trying to gird my less-than-talented self for the drilling and placing of mast blocks, of which there are a generous helping, as well as the running rigging, of which there is more than I care to consider, and whether I will be sticking with furled sails (which was the original plan), and, of course, coming up with scratch plans for whaleboats.... So. I will see you soon and appreciate the support more than you know. Until next time.
- 37 replies
-
- 2
-
-
- eagle
- constructo
- (and 1 more)
-
Thanks Popeye! I appreciate the compliment. It's a ton of detail work, and as a rookie I am learning to take my time, but I really enjoy it. Including the research, which is eye opening and I really enjoy it. The more challenging it is, the more I look forward to a step up in builds..... Actually, this model didn't come with deadeyes, which was a surprise to me. I was actually kind of looking forward to working with them, having seen them on so many builds... All that came with this kit were the eyebolts (and belay pins, which I cut out of music wire) in the pinrails and they are all I have to tie the shrouds and the rigging to.... The instructions don't call for any deadeyes at all. I'm thinking as a beginner's kit, they cut some difficulty corners where they could. Archie
- 37 replies
-
- 2
-
-
- eagle
- constructo
- (and 1 more)
-
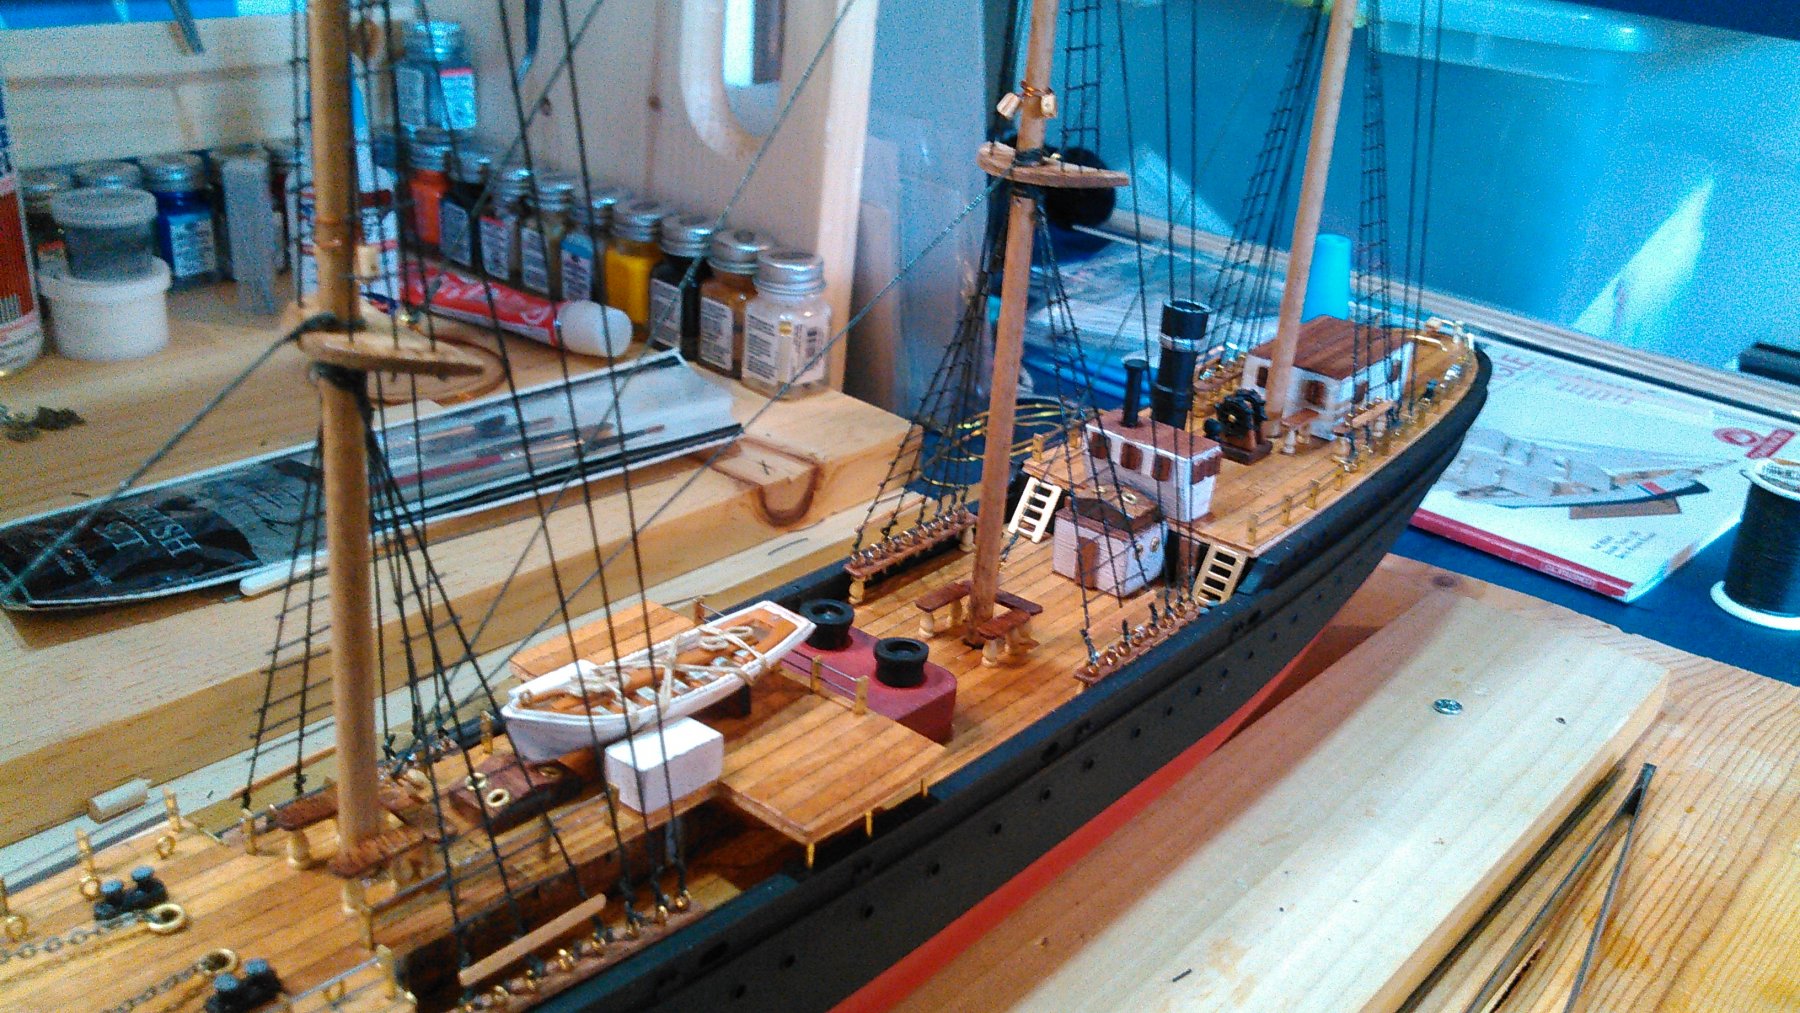
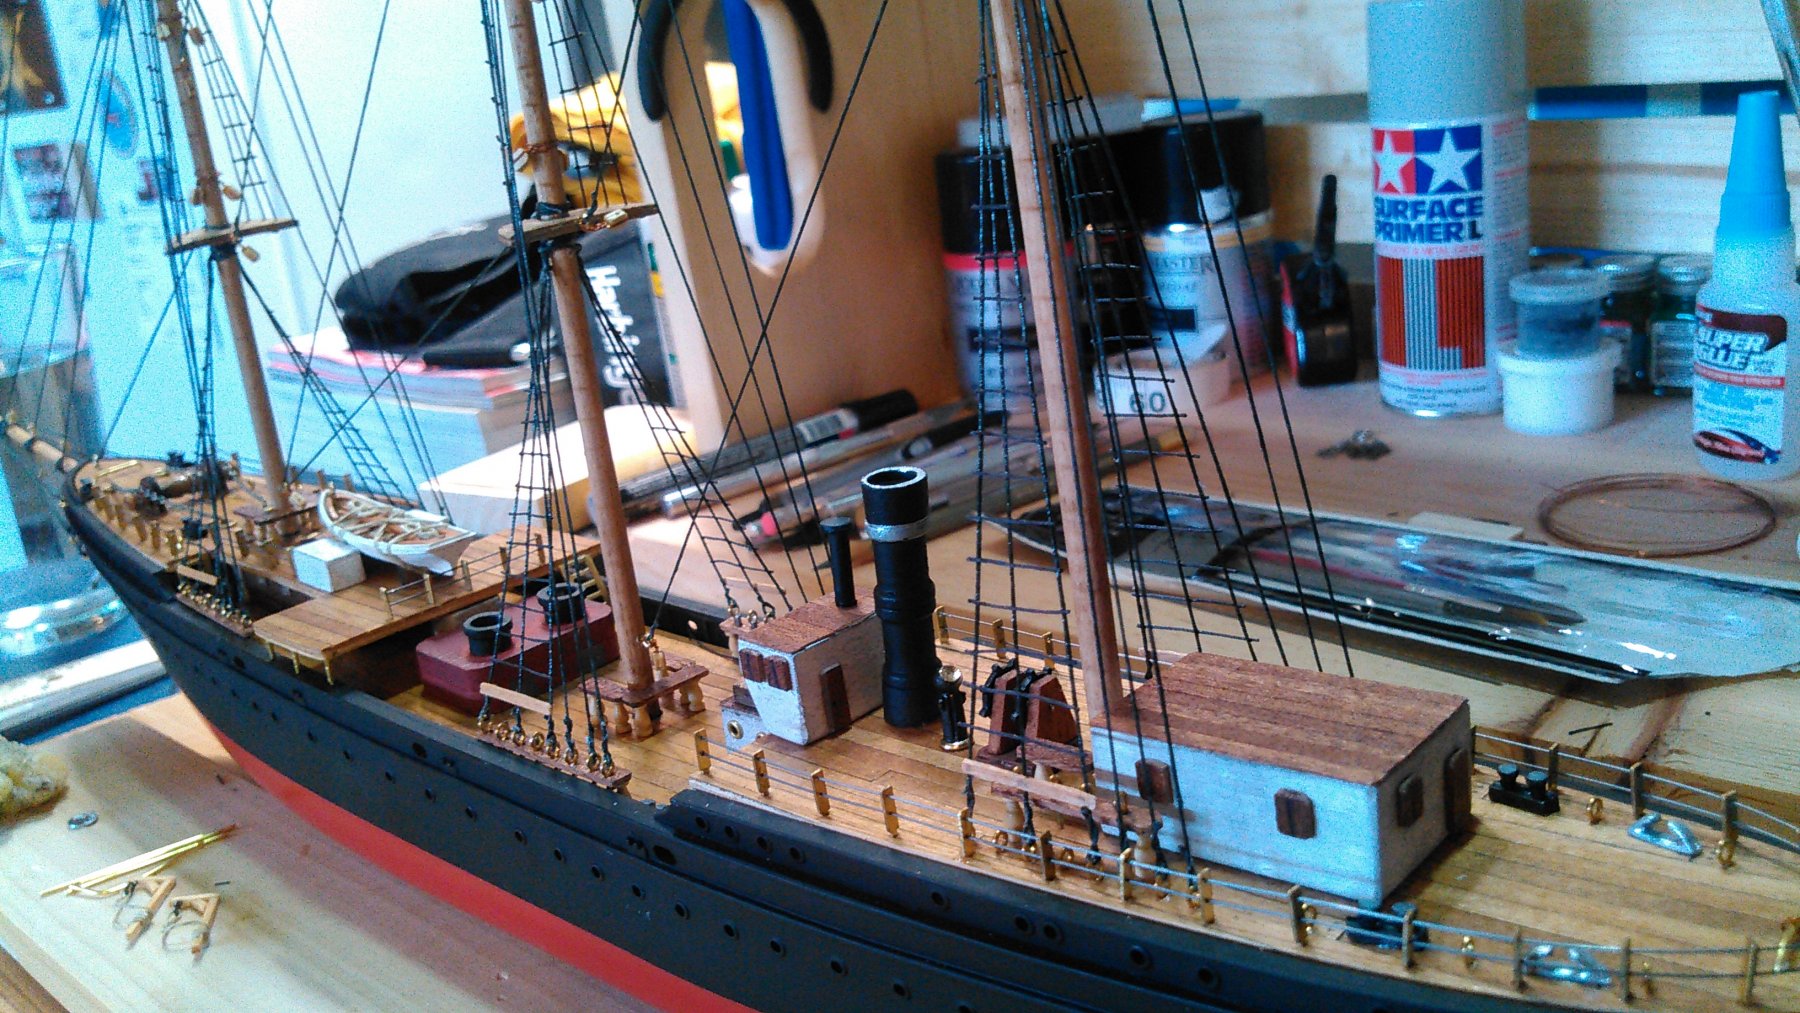
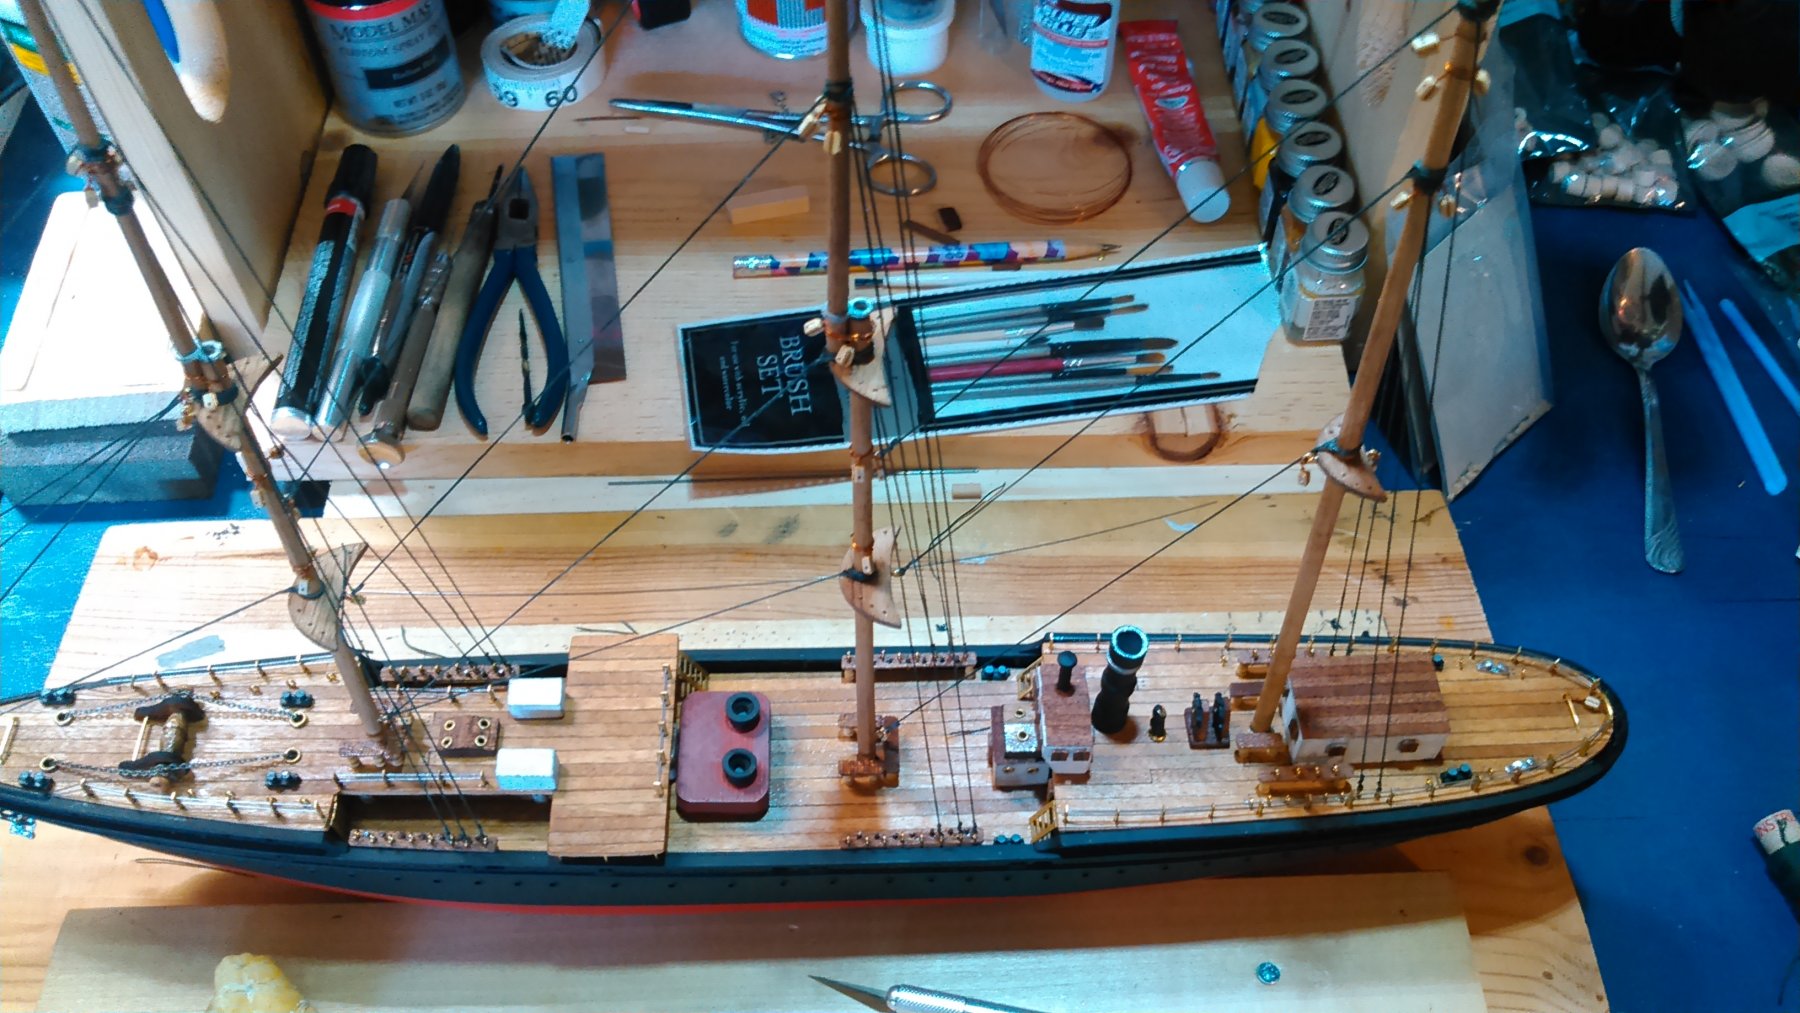
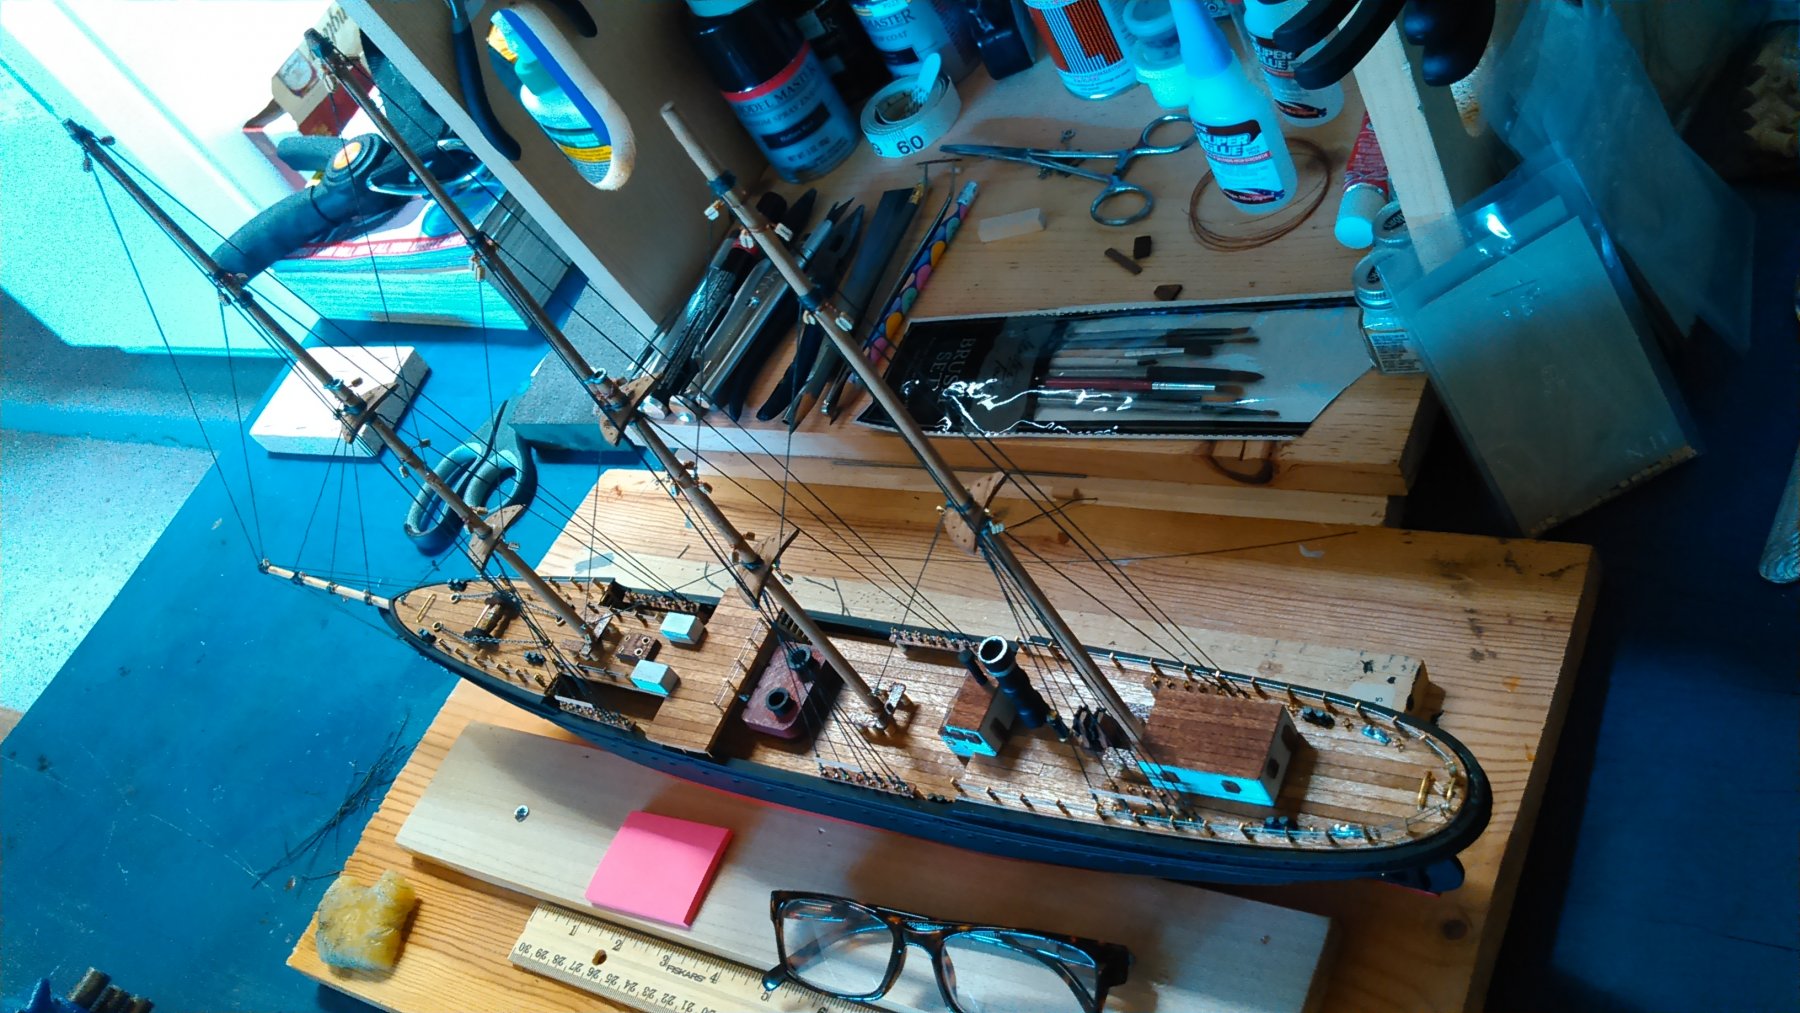
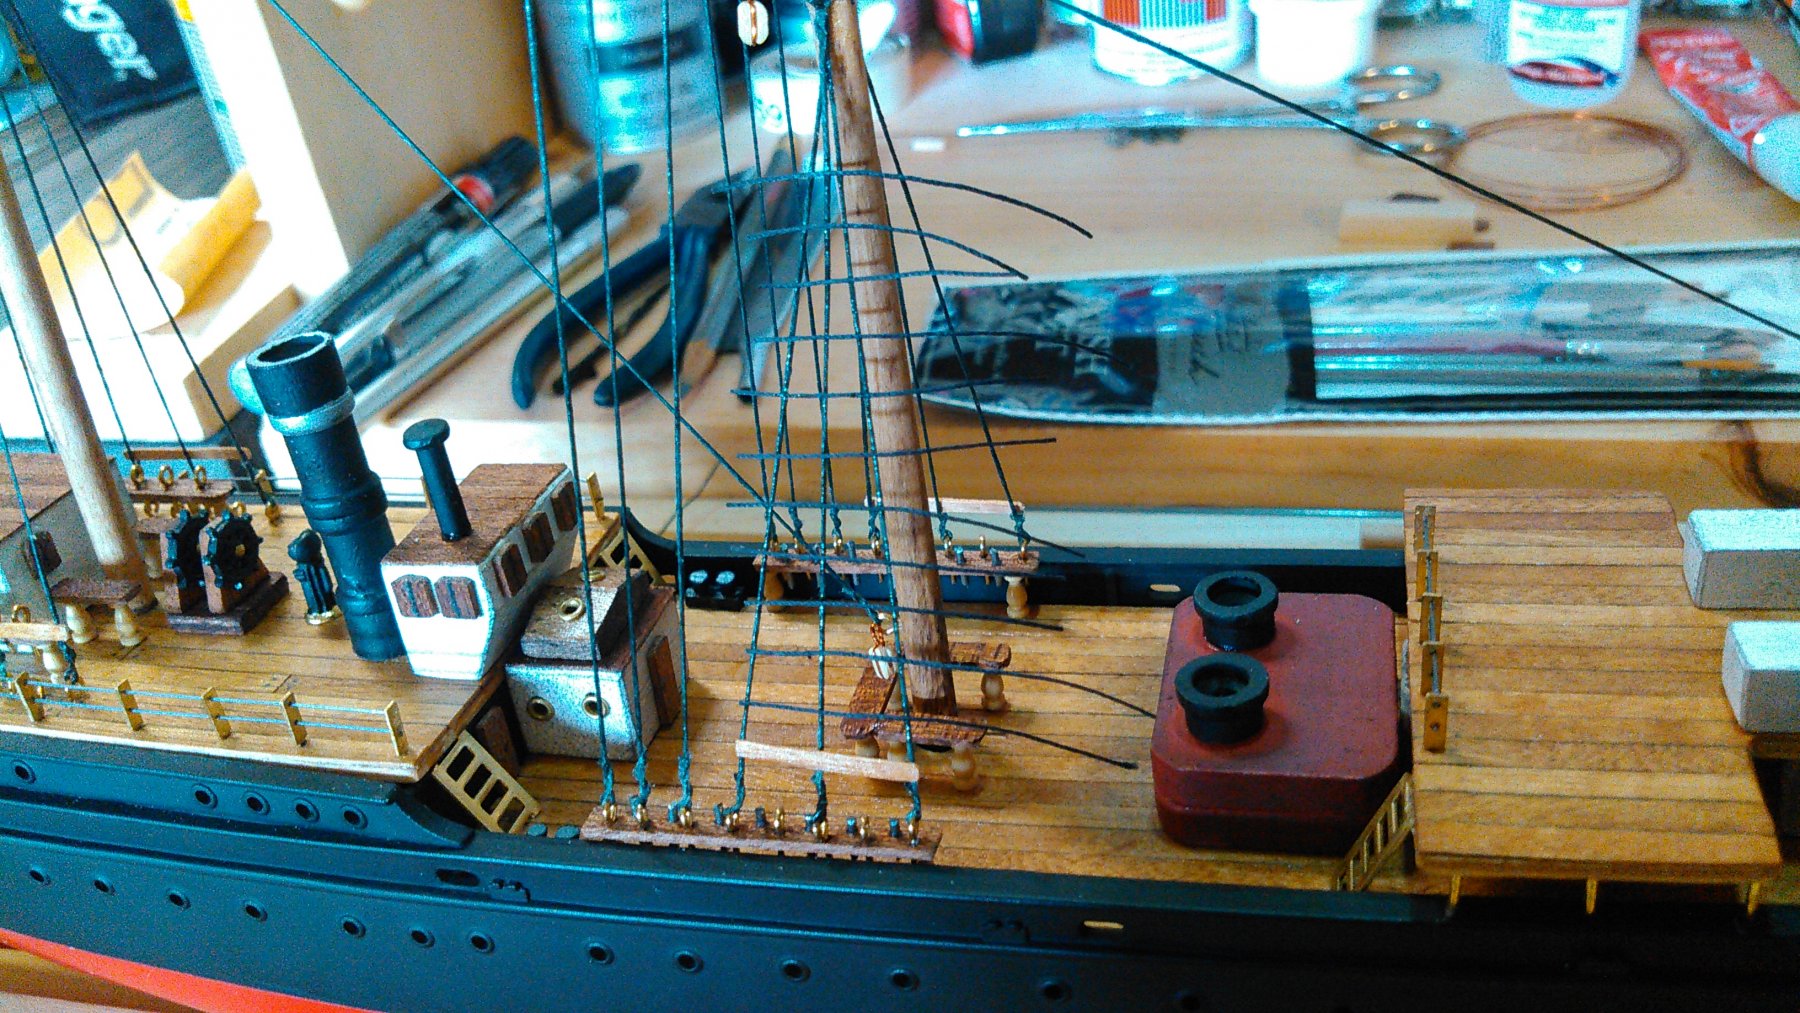
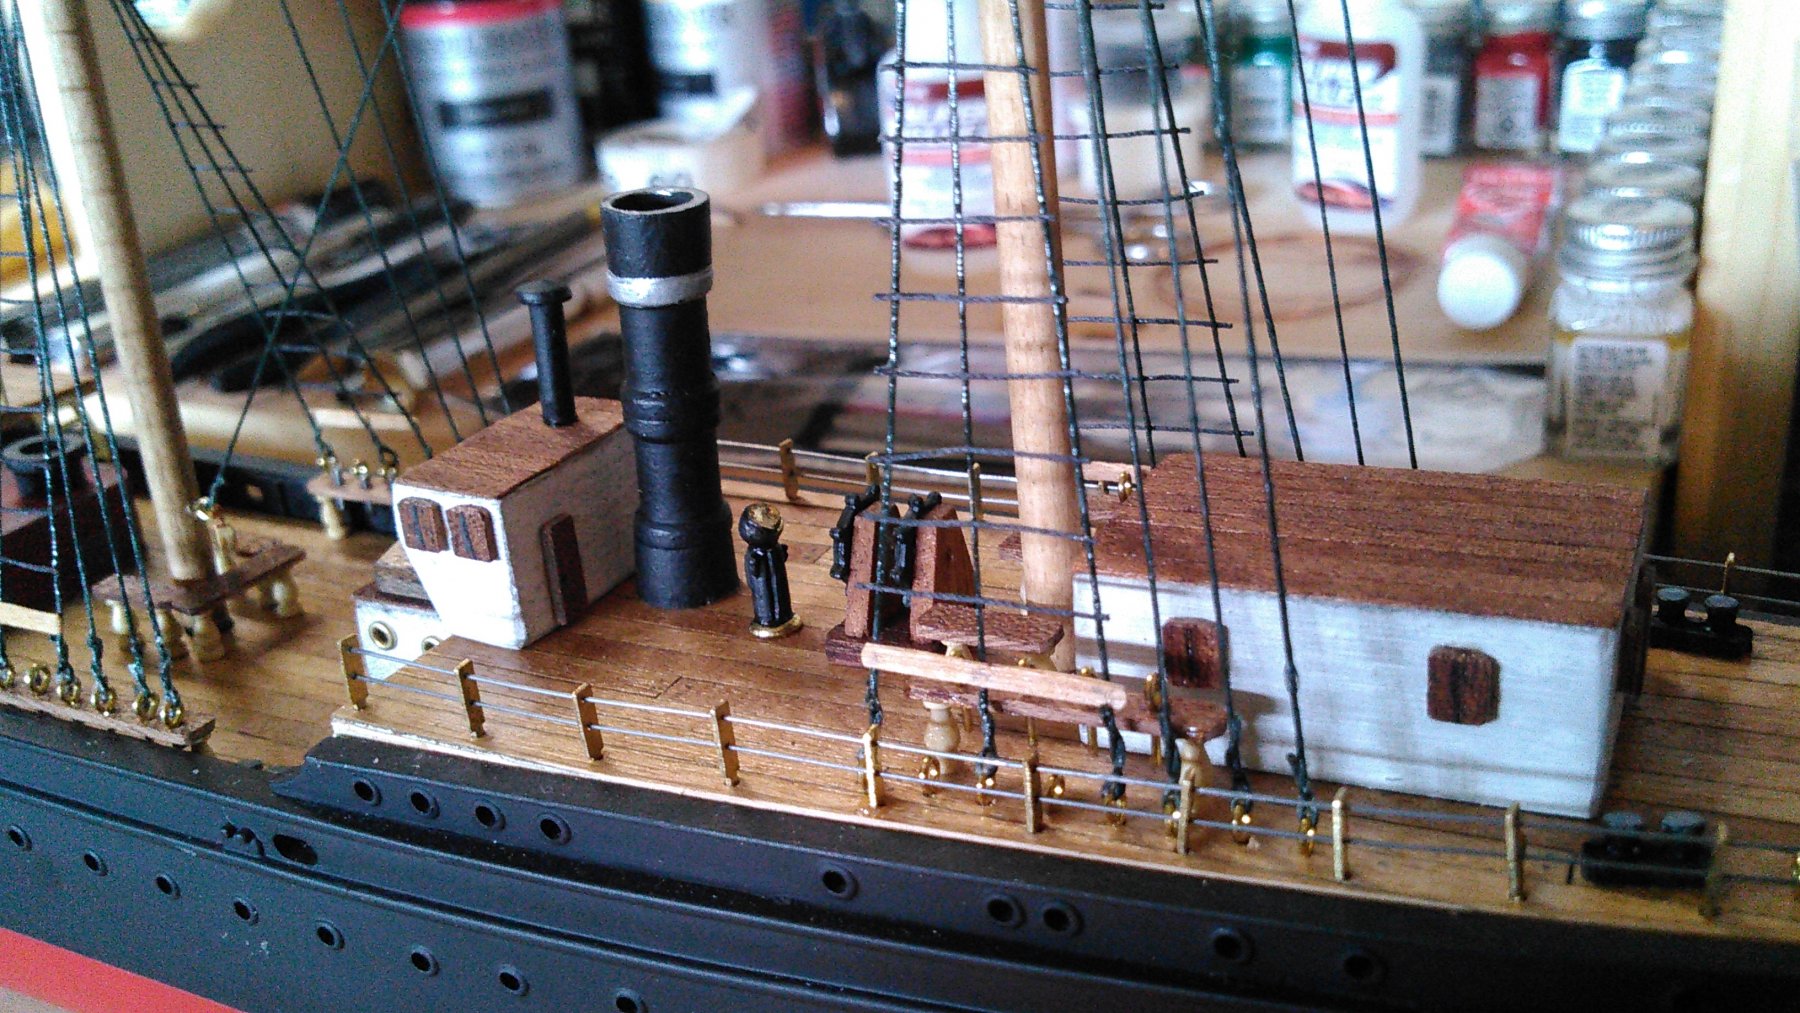
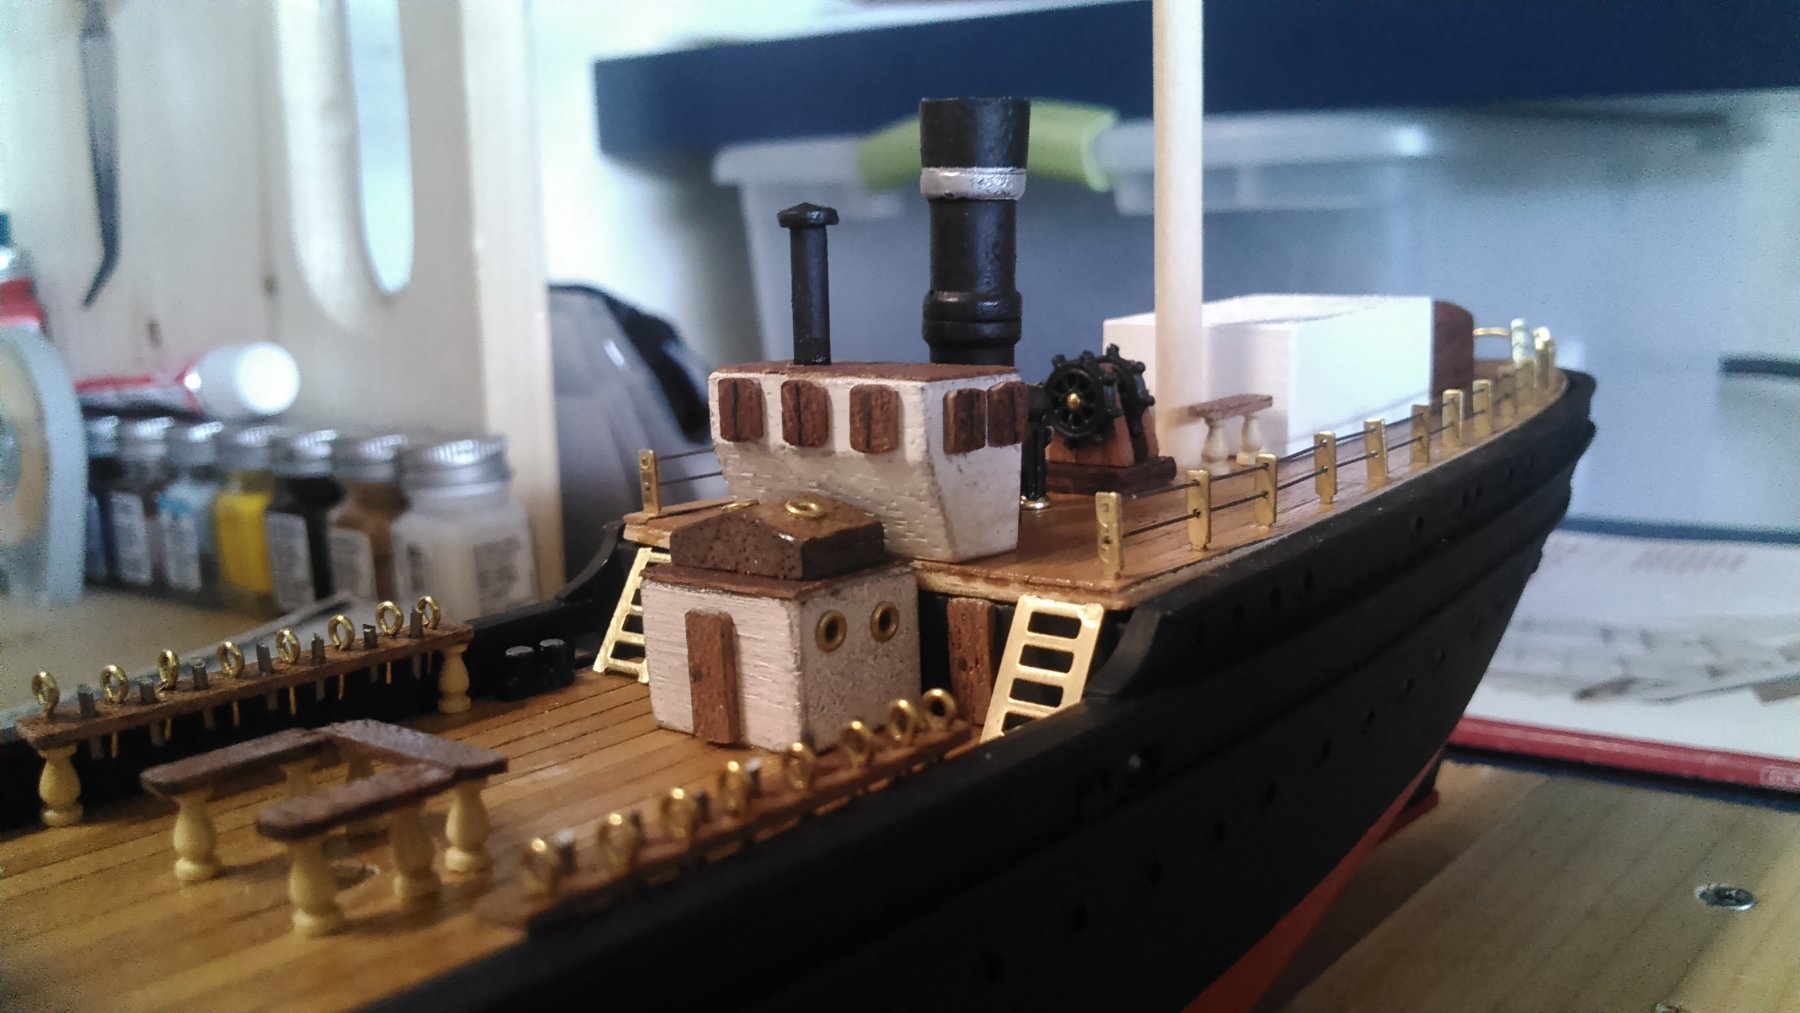
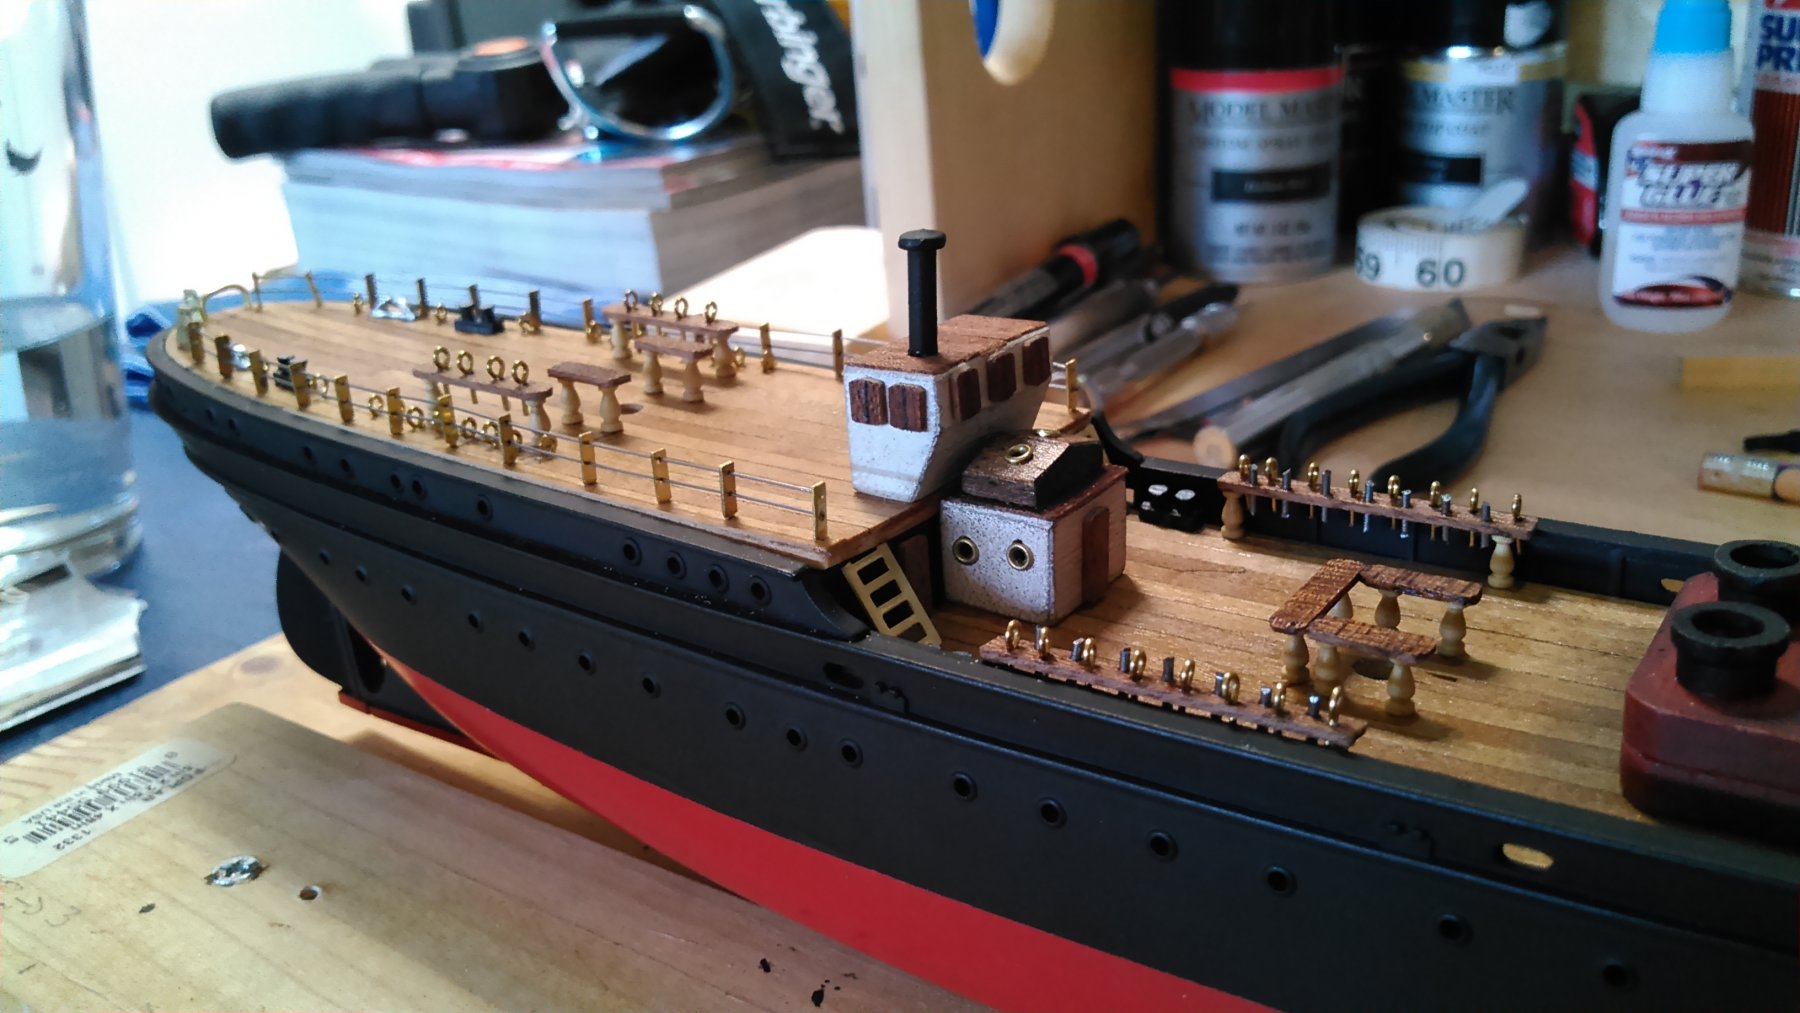
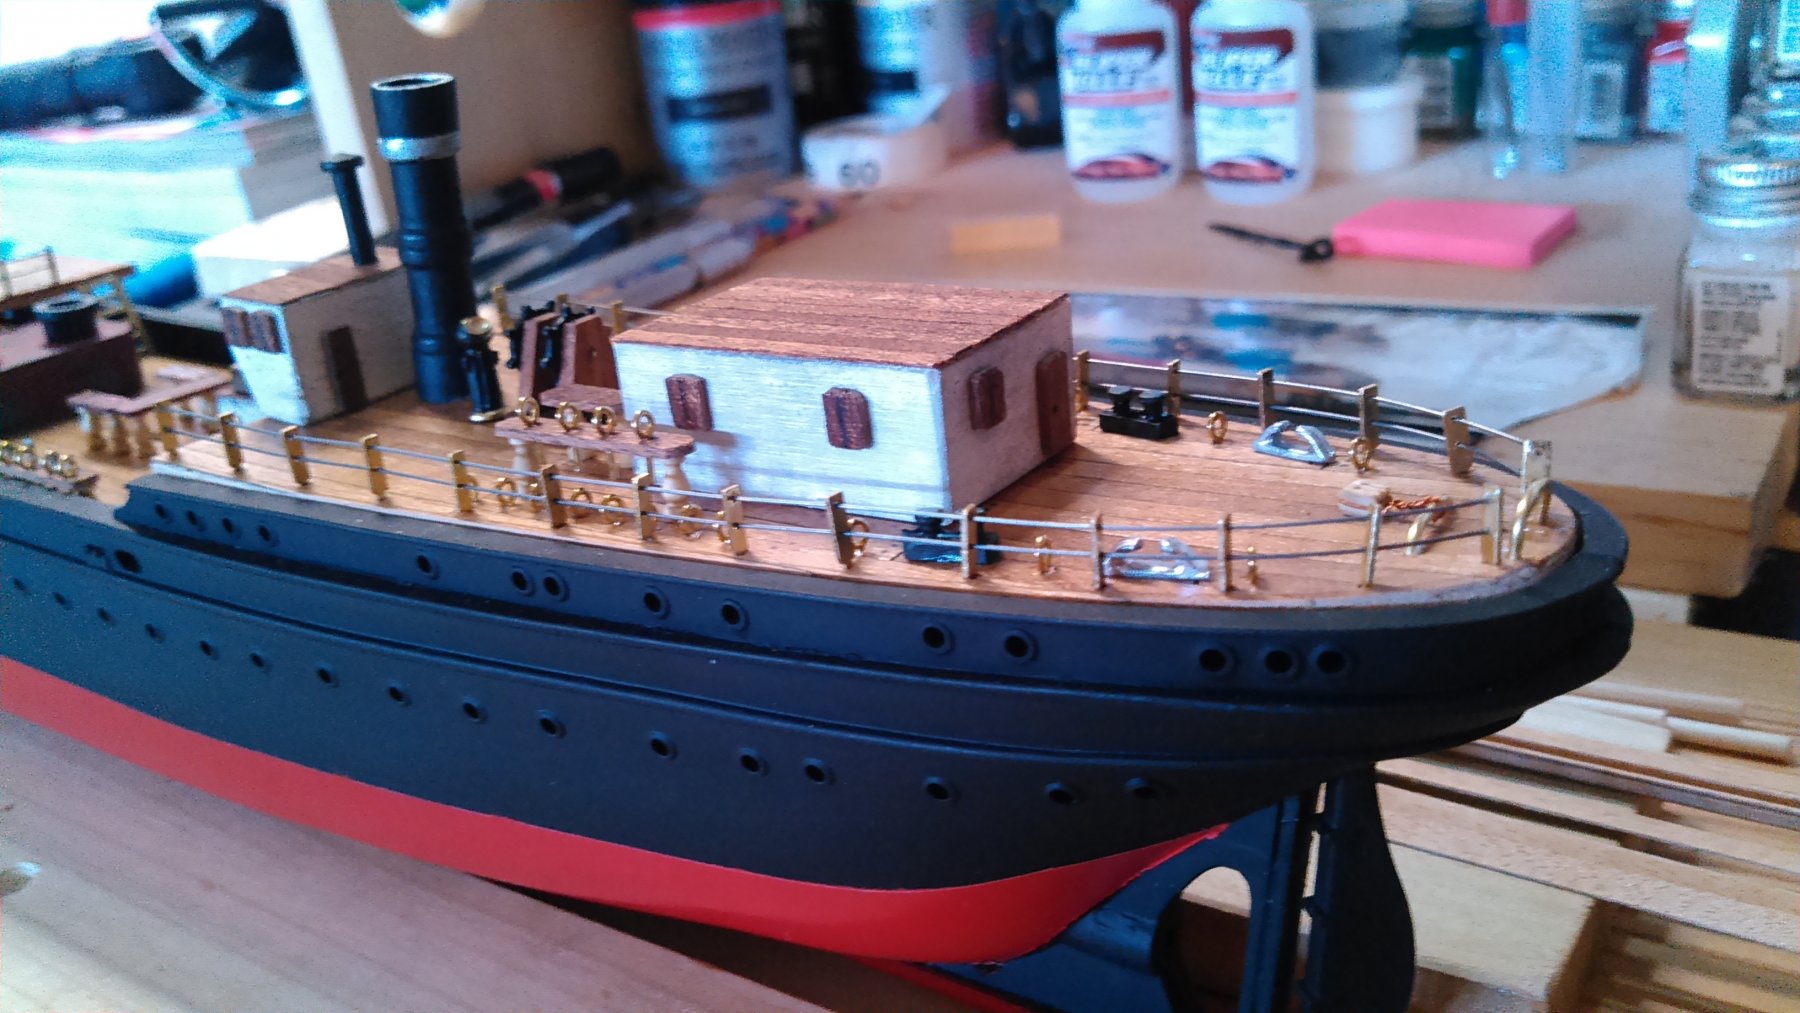
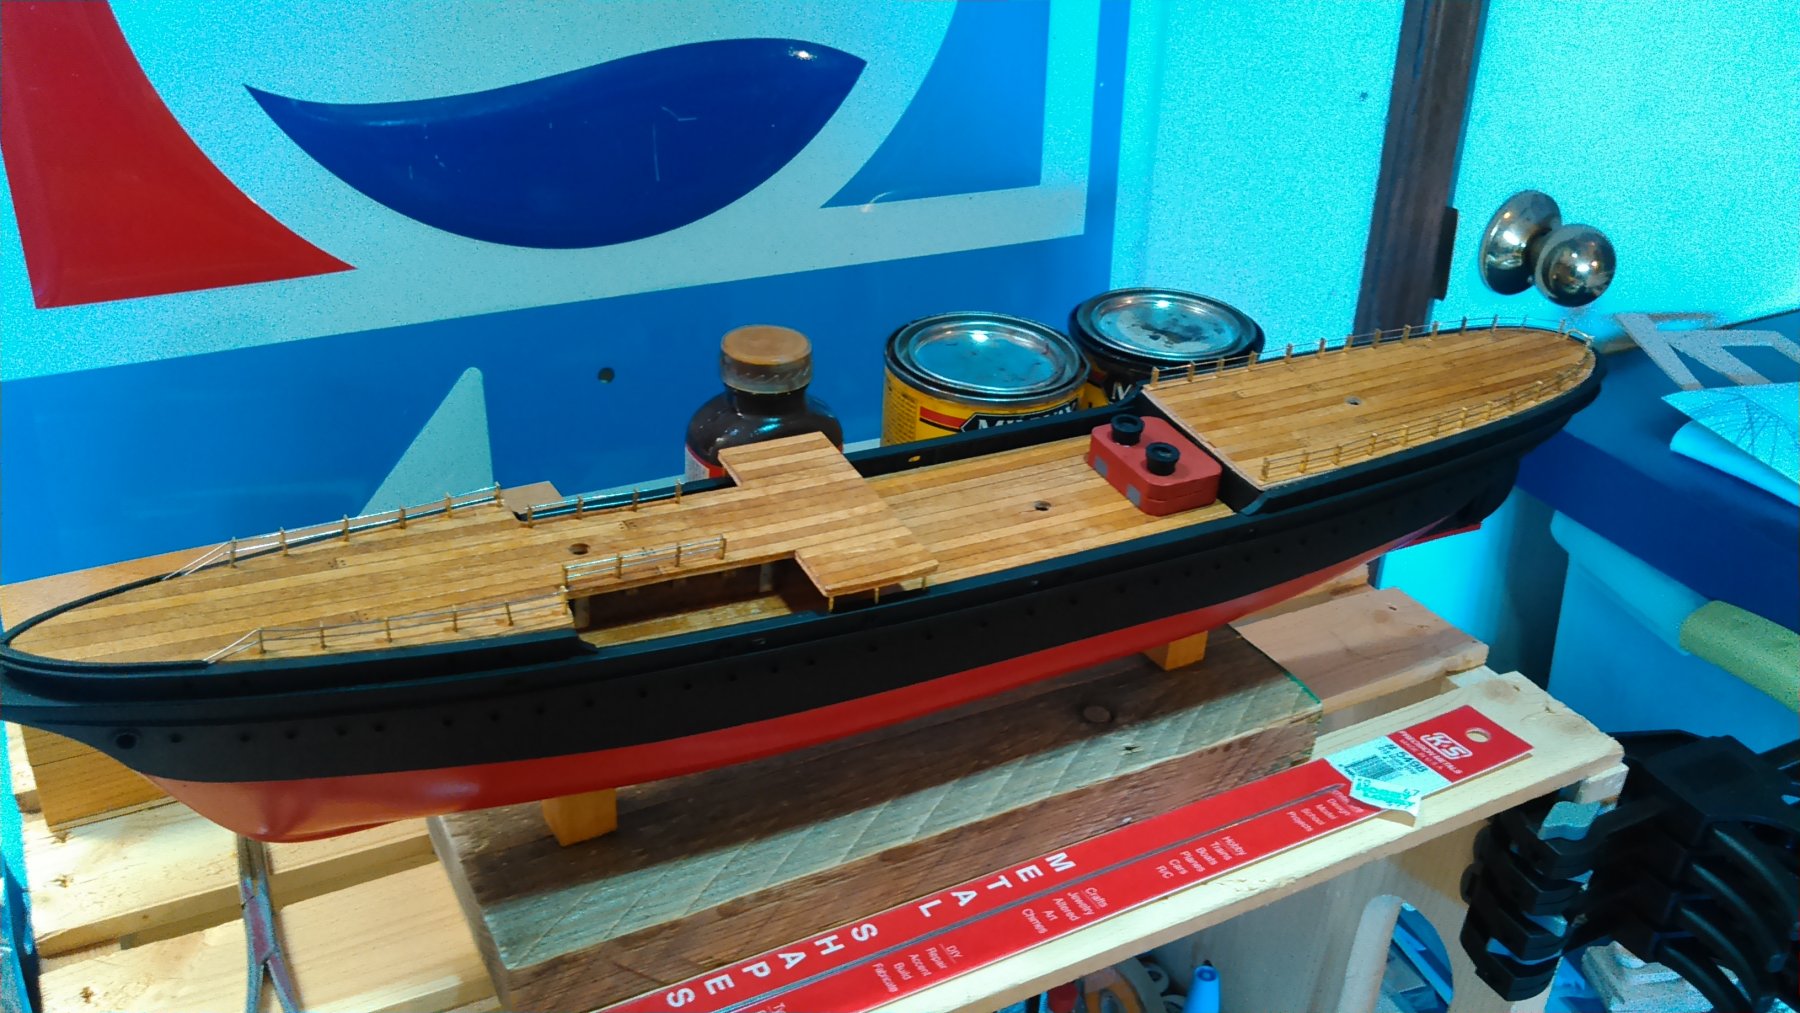
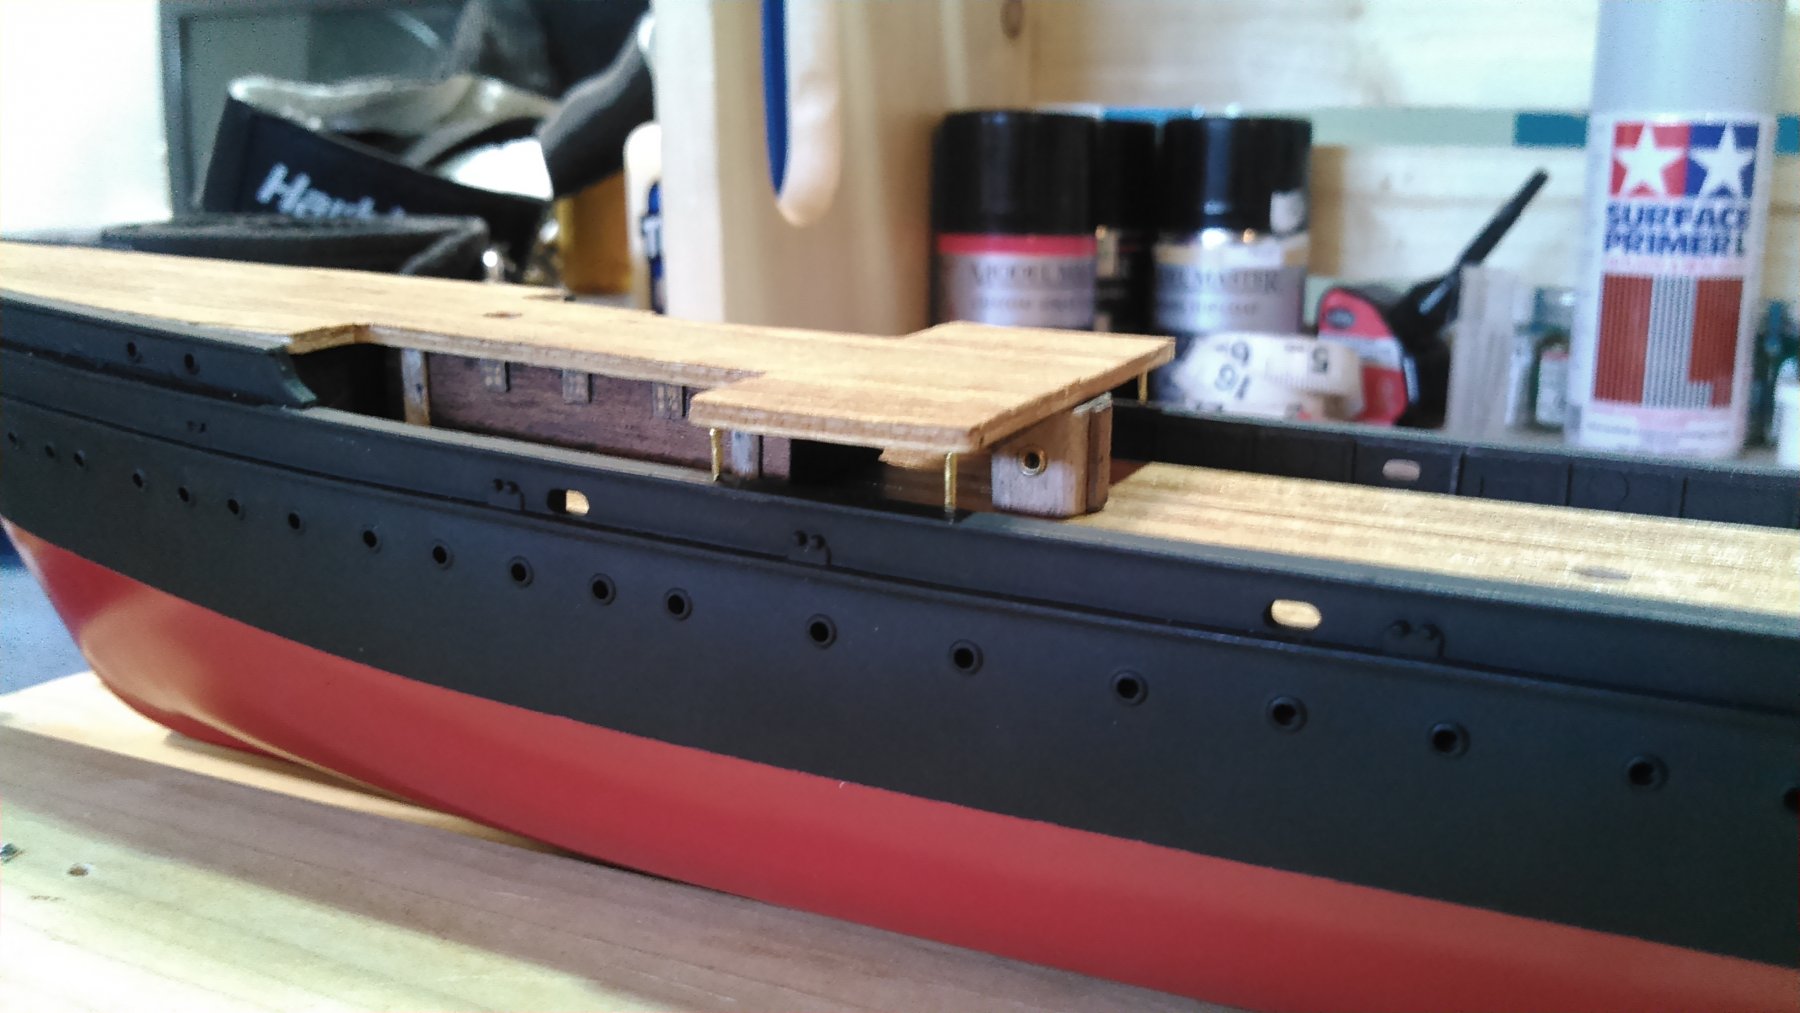
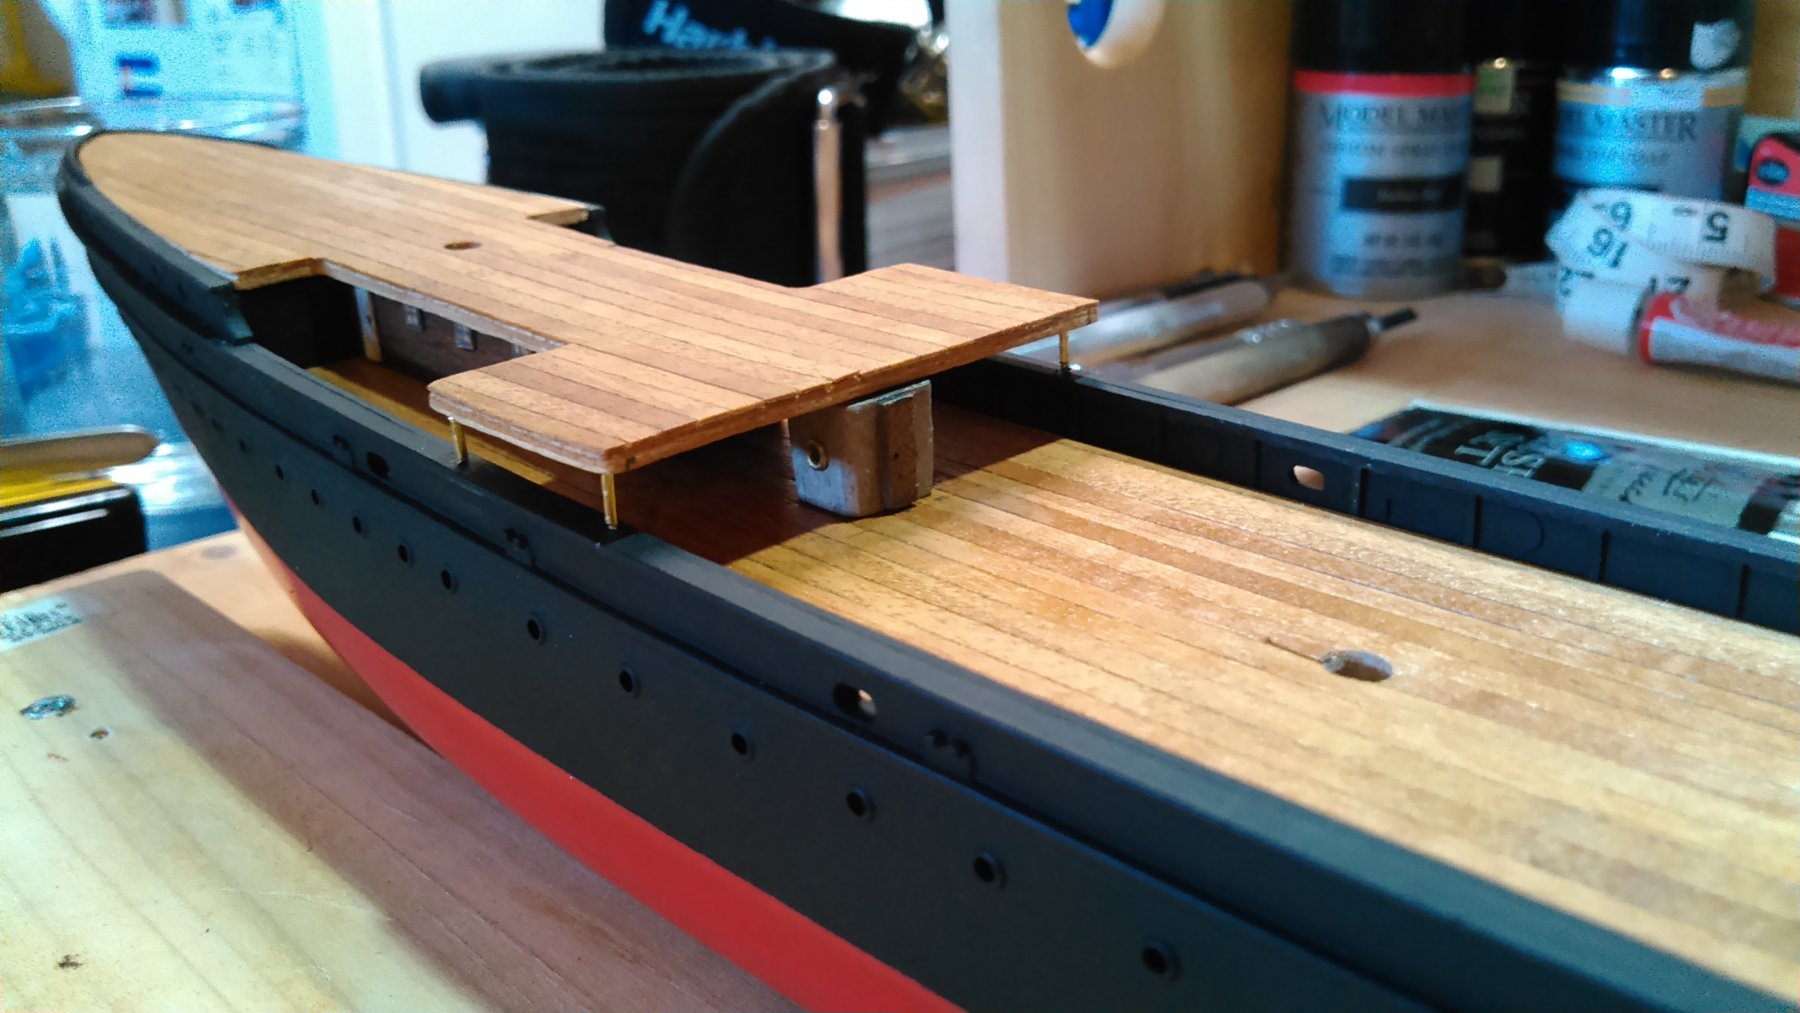
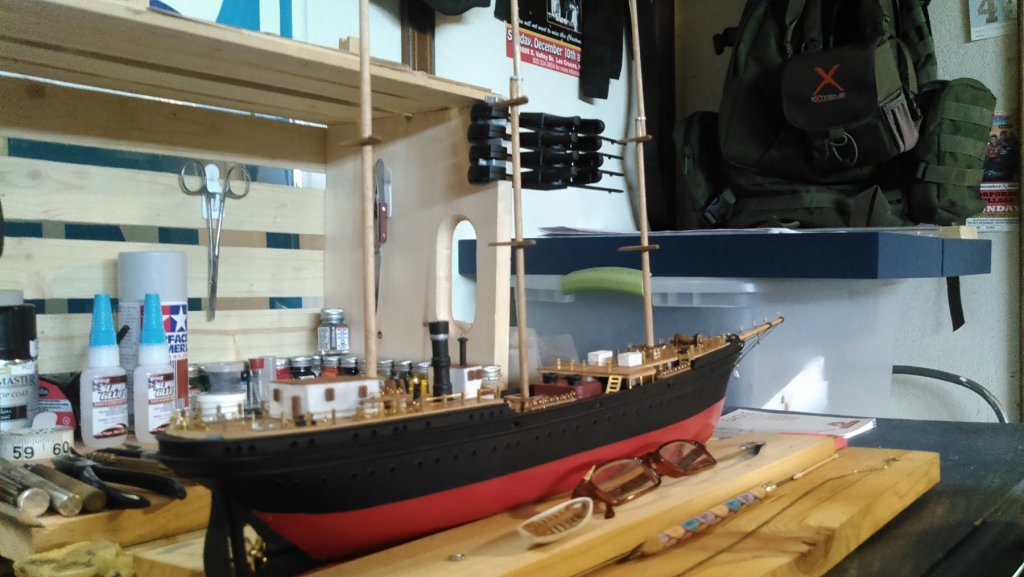
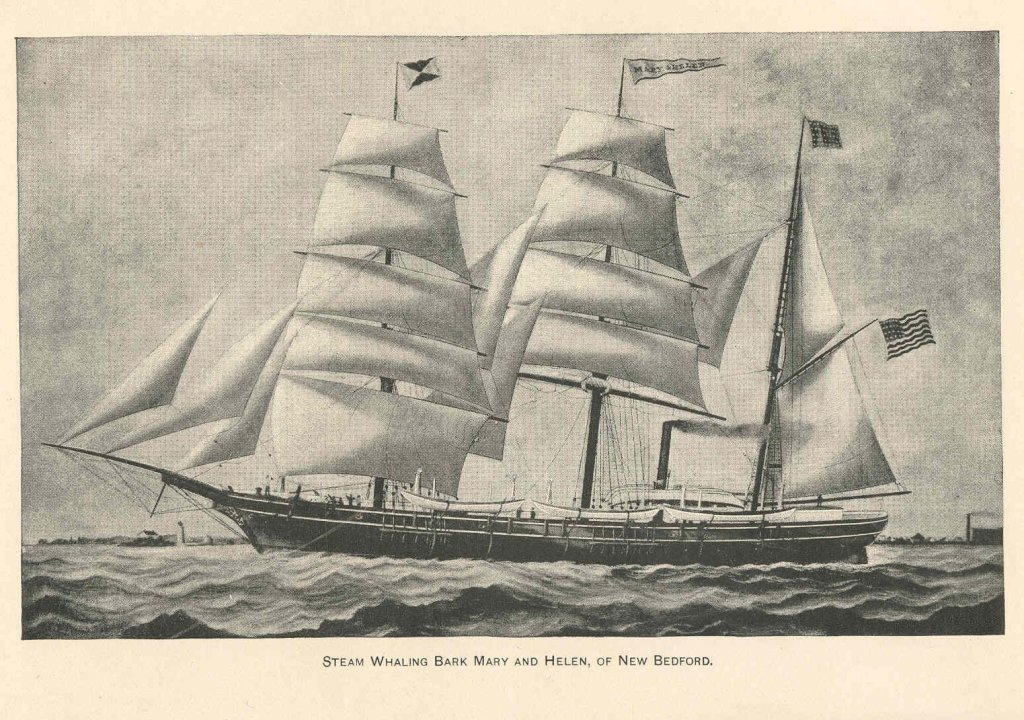
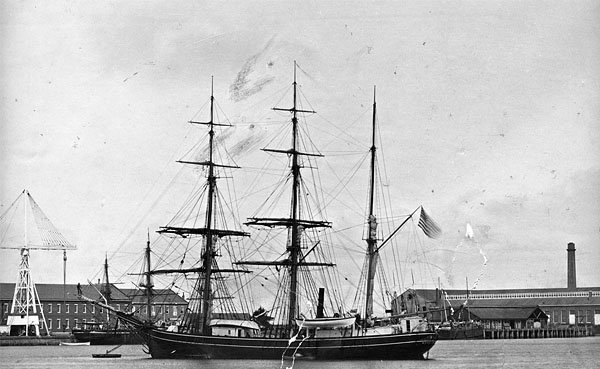
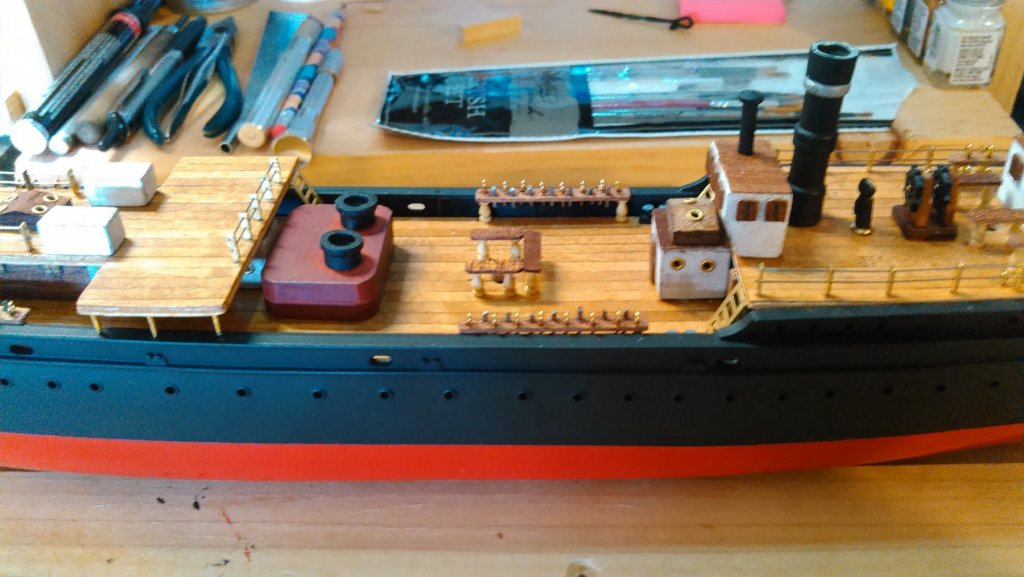
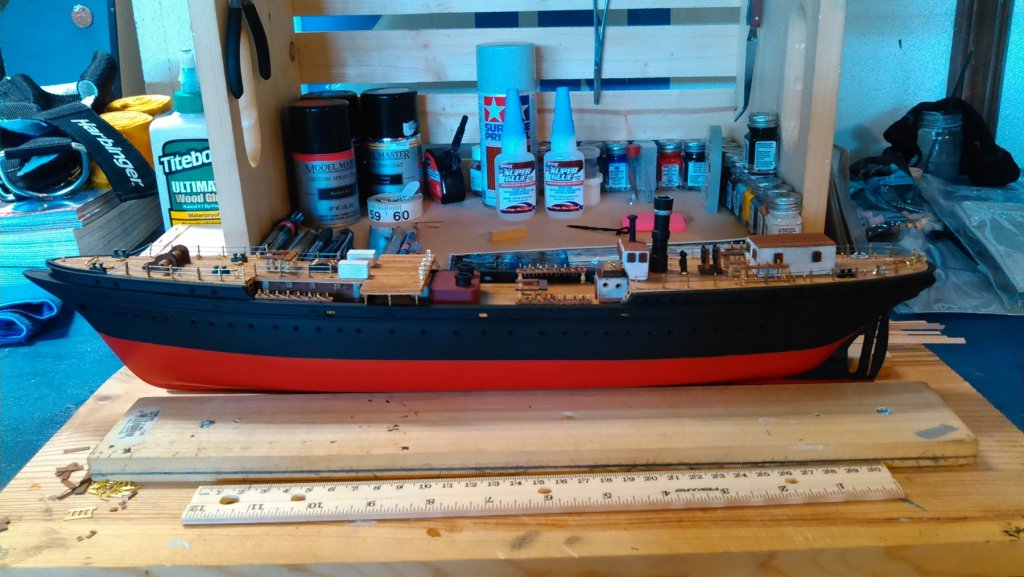
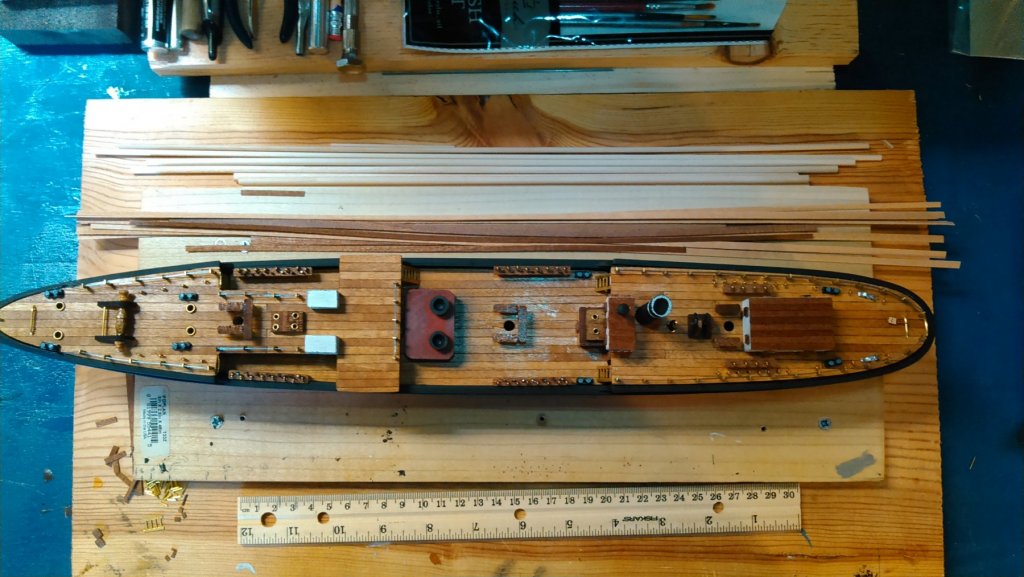
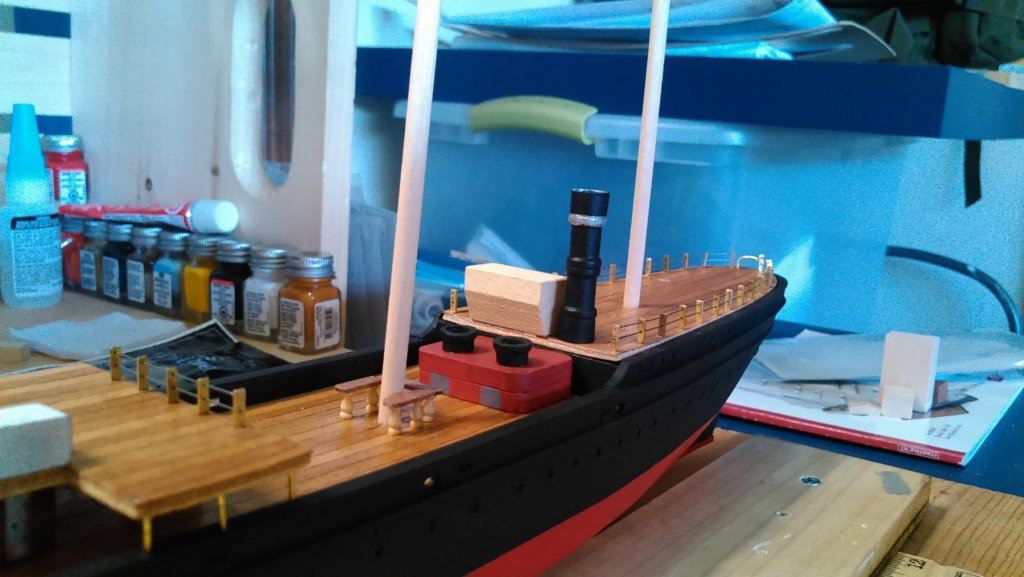
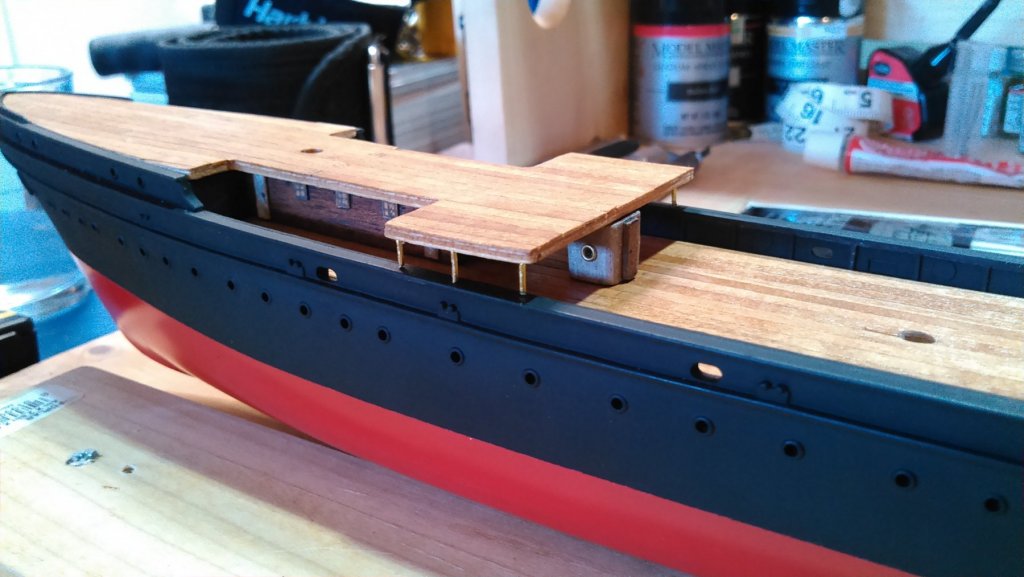
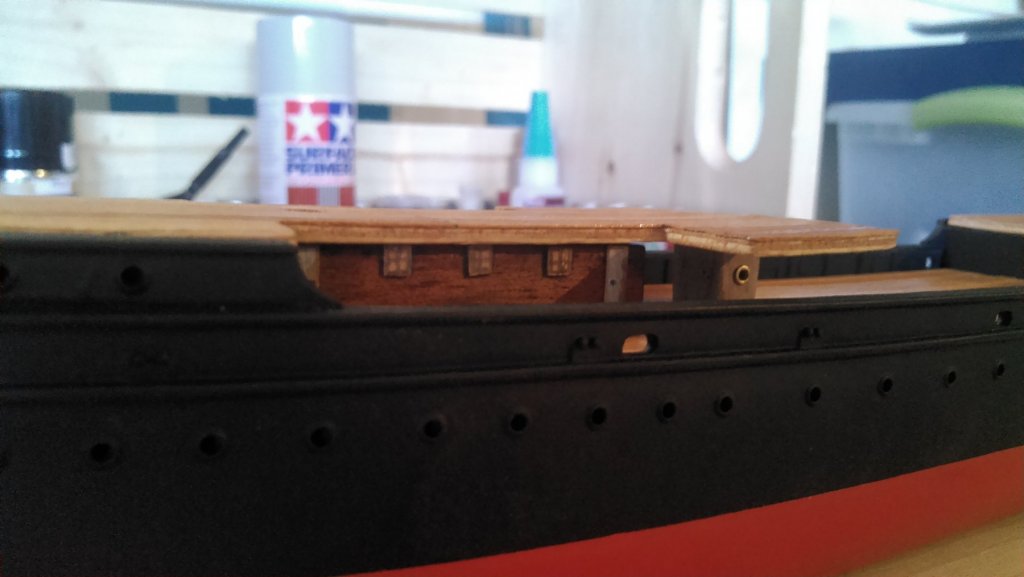
So I spent a couple days doing yardwork, and also doing some research in the evenings on the deck configuration. The only image of the Mary and Helen/USS Rodgers that I could find and verify as not just internet trash was this image of the Mary and Helen which shows a stack placement that appears to be on the aft quarterdeck.... There are two images of the USS Rodgers, which shows it maintained the same basic configuration, after acquisition by the US Navy. I also found an interesting photo of a model of a Pacific steam whaler, the Orca, circa 1894, which shows the same basic engine/stack configuration: As does the layout of the Eclipse, circa 1867: And as she actually appeared: There will be some obvious differences in scale and deck layout and whaleboat positioning, but I am pressing ahead in the spirit of a steam barque whaler, though not an exact duplication of a particular vessel. With that in mind, I spent the last two days on deckwork. I completed the fo'c'sle and central deck pinrails, the central deckhouse with skylight, and the ladders and bitts (shown below with other aft deck appointments sitting unglued while I figured out my deck plan). I then moved onto the aft quarterdeck. I completed the pilothouse with its stove funnel, got the mizzen pinrails in place, as well as the bitts and rope/cable guides and the deck eyebolts. Once this was done, it was commitment time..... My decision was to complete the aft deckhouse and place it directly aft of the mizzen, per the plans. Once this was done, I referred to the rigging plans and made some measurements and adjustments until I could place the ship's wheel, the binnacle and the stack aft of the pilothouse and as amidships as possible so as to avoid interfering with supports and rigging. Once all of this was placed, I could place the aft spanker rack and (my first ever!) block (I hope I got that right - both the name and the block, lol). I also decided to forego the aftermost wheel, as there would be no need for it on a barque whaler... I got kinda into this as I went along and neglected to take regular photos. But here is what I have so far. Next up will be boats and then...… rigging. Until next time.
.jpg.ef21dc77fa96502eba3cae5f42314493.jpg)


.jpg.c504240aeee45a5185258467c57fd4e4.jpg)
- 37 replies
-
- 3
-
-
- eagle
- constructo
- (and 1 more)
-
If any of you vets with much more knowledge than me have suggestions about placement of the stack, tryworks, etc. by all means chime in. All the abbreviated plans I've seen of steam sails have the stack located within 1/3 ships length of the screw, and generally amidships, but I'm open to suggestions or direction. Cheers.
- 37 replies
-
- 1
-
-
- eagle
- constructo
- (and 1 more)
-
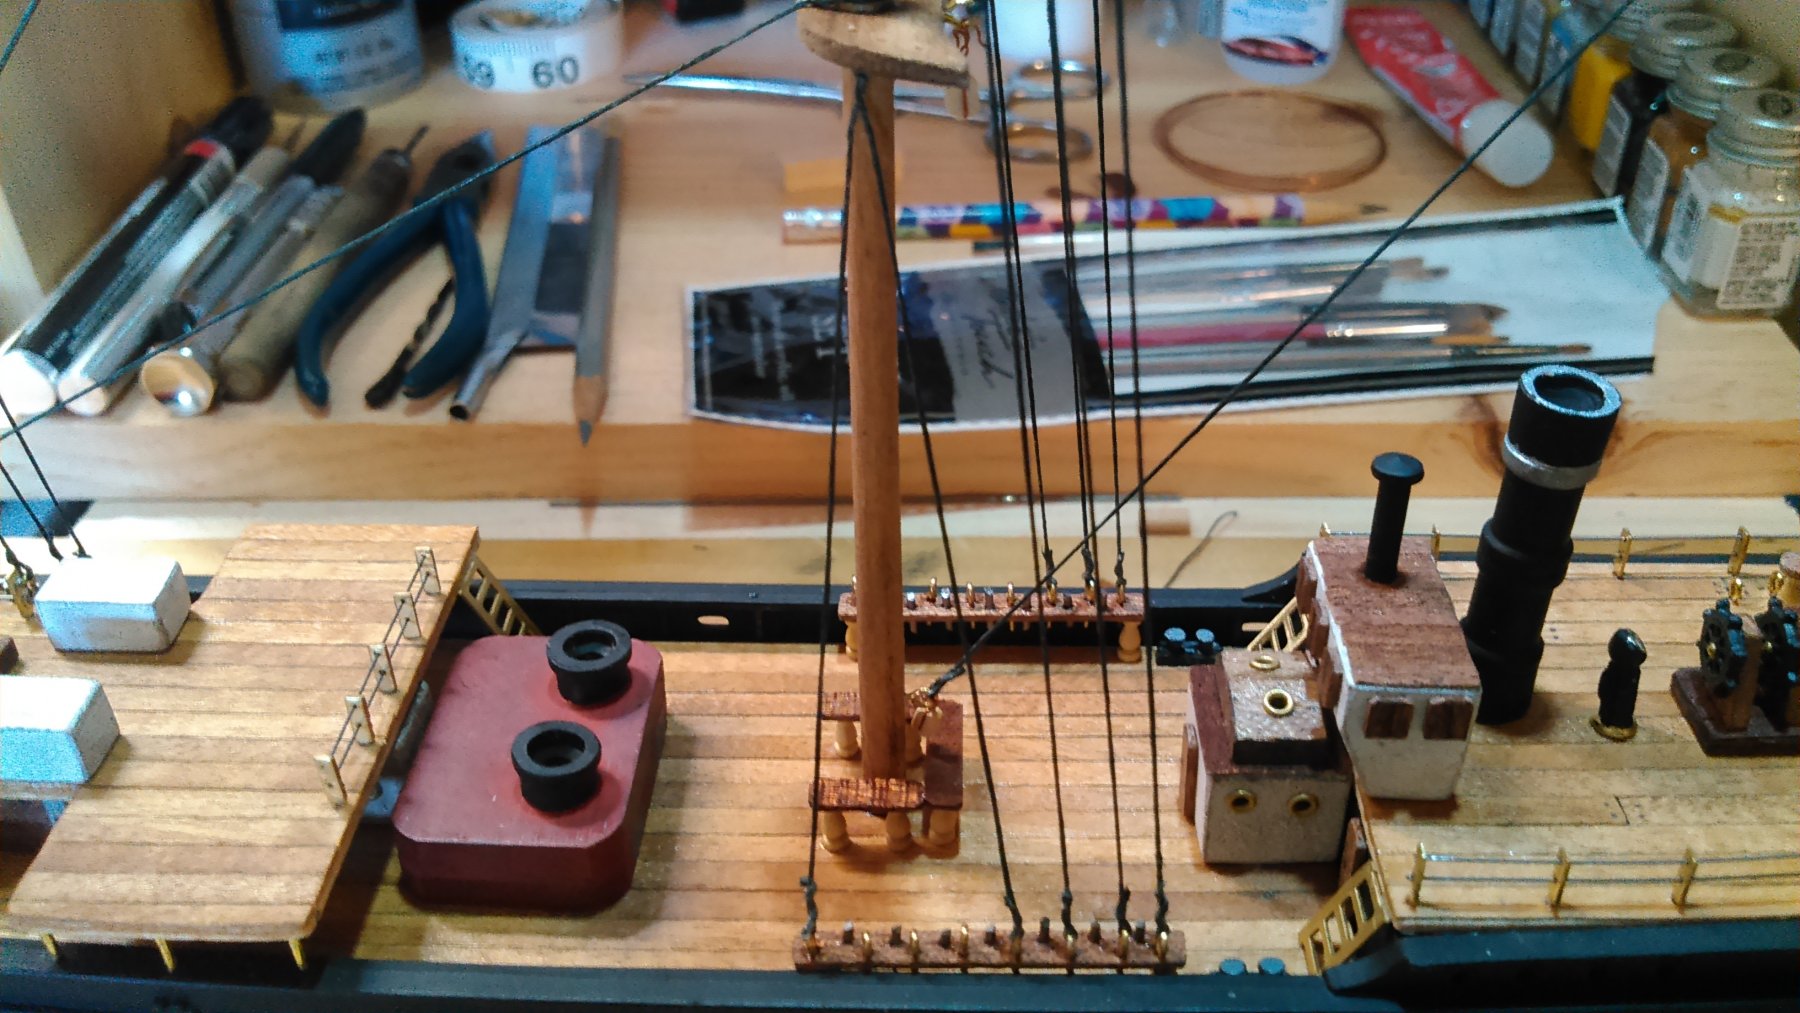
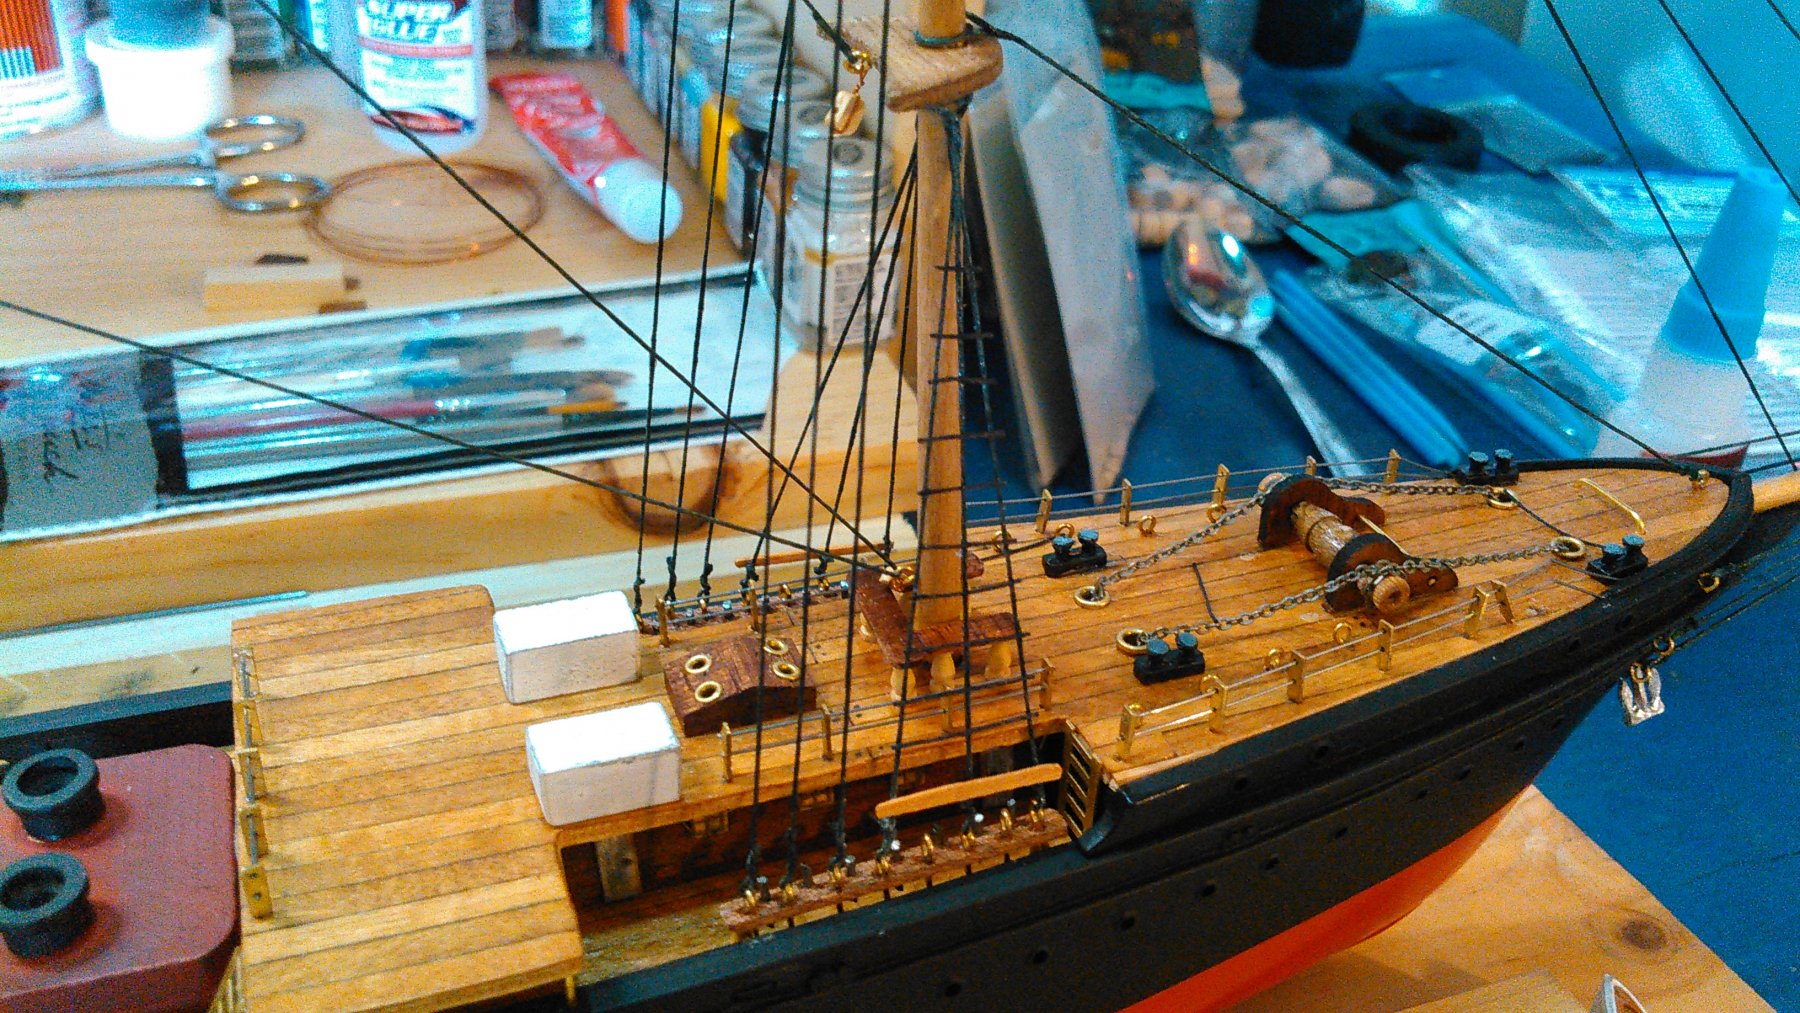
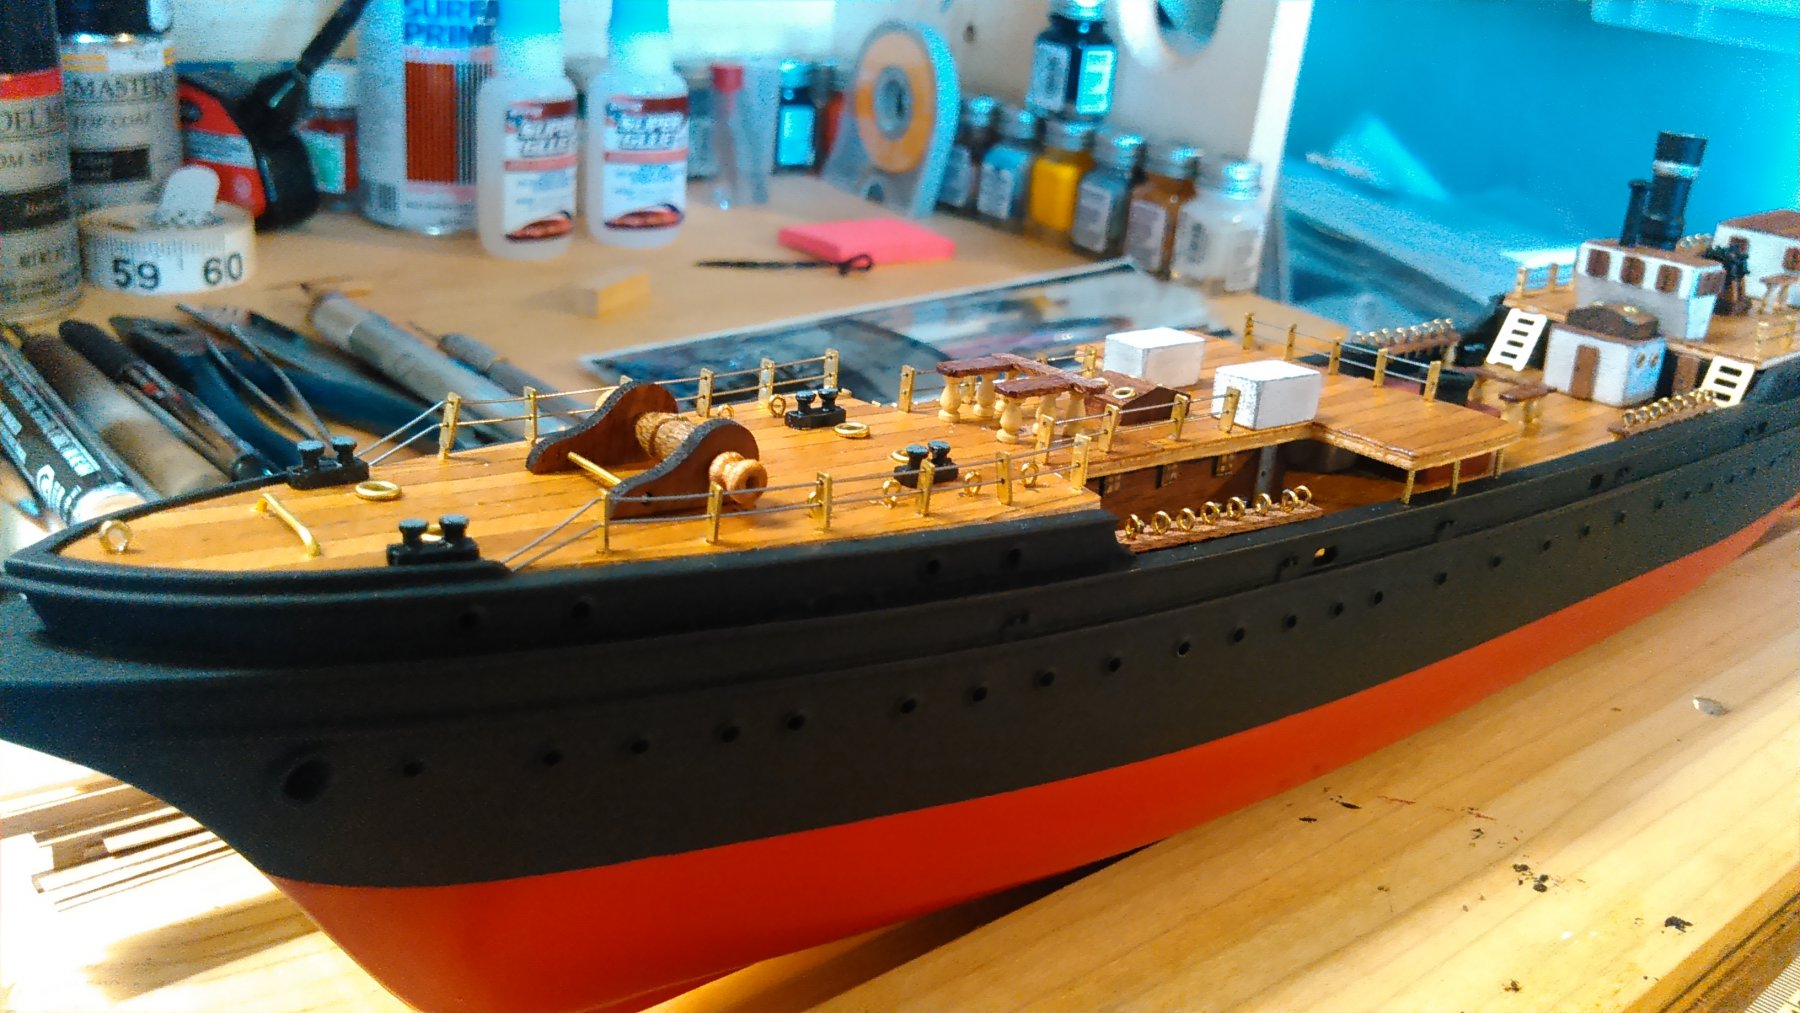
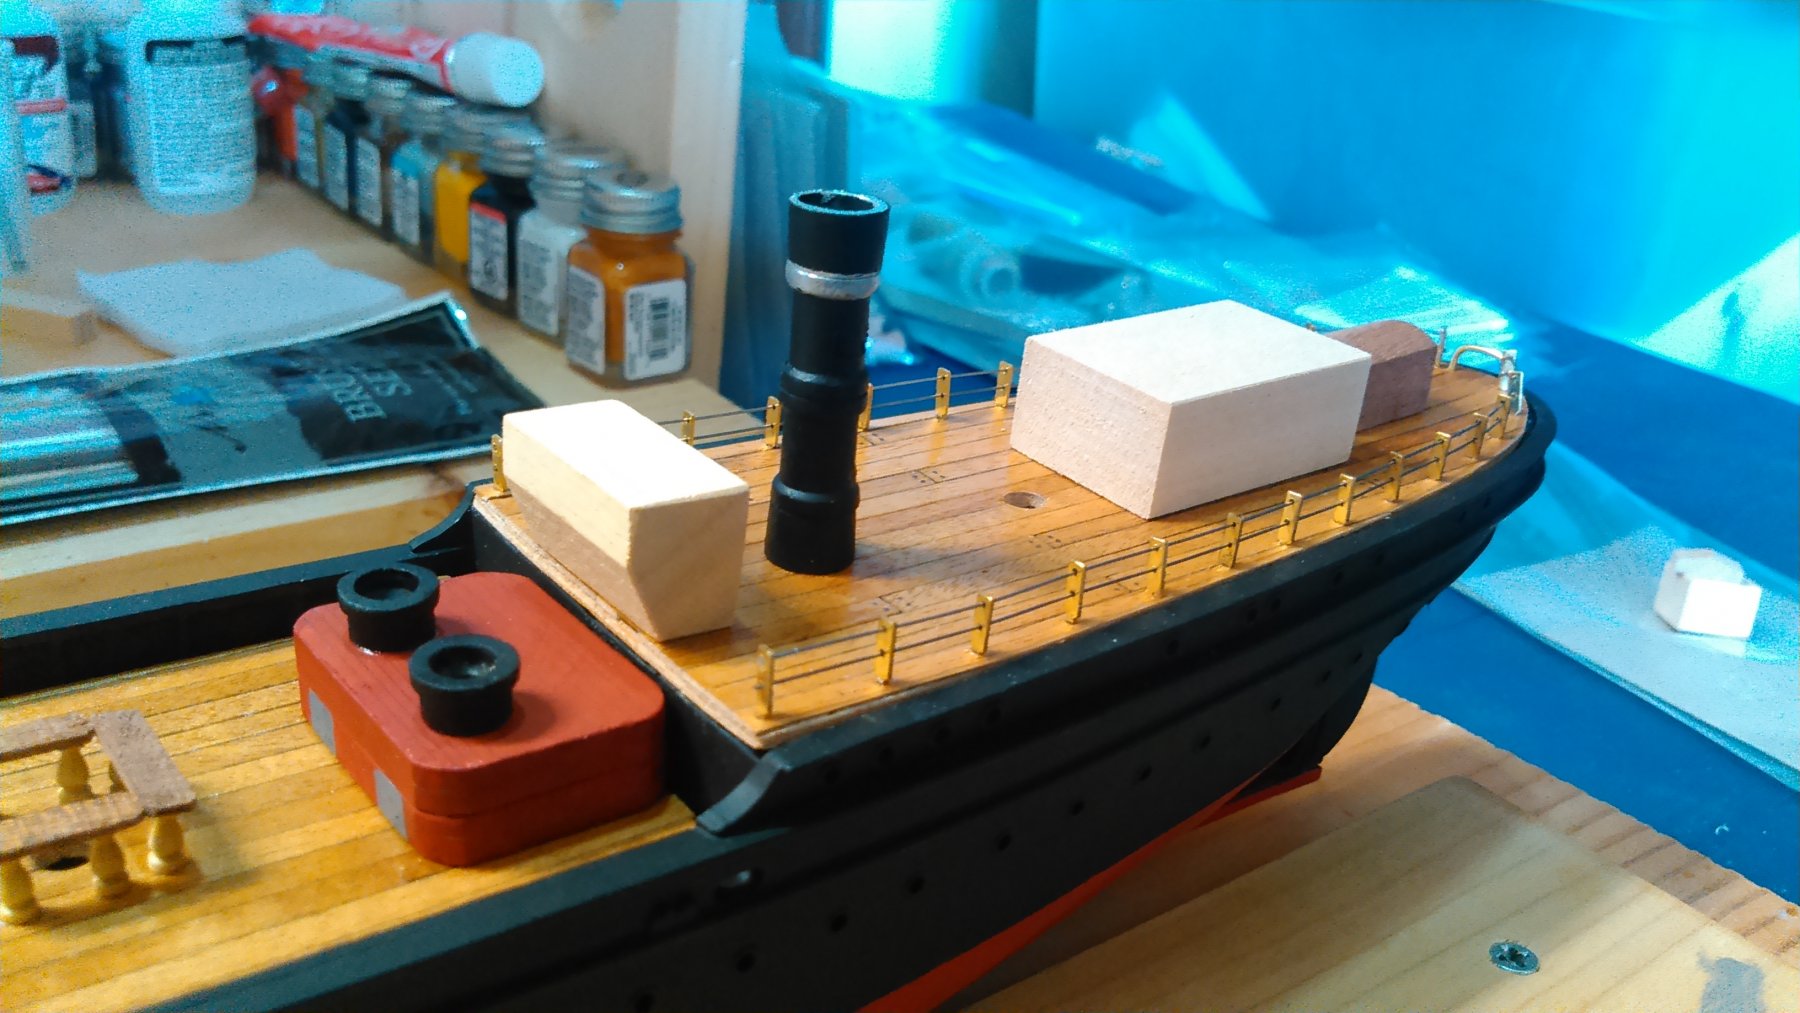
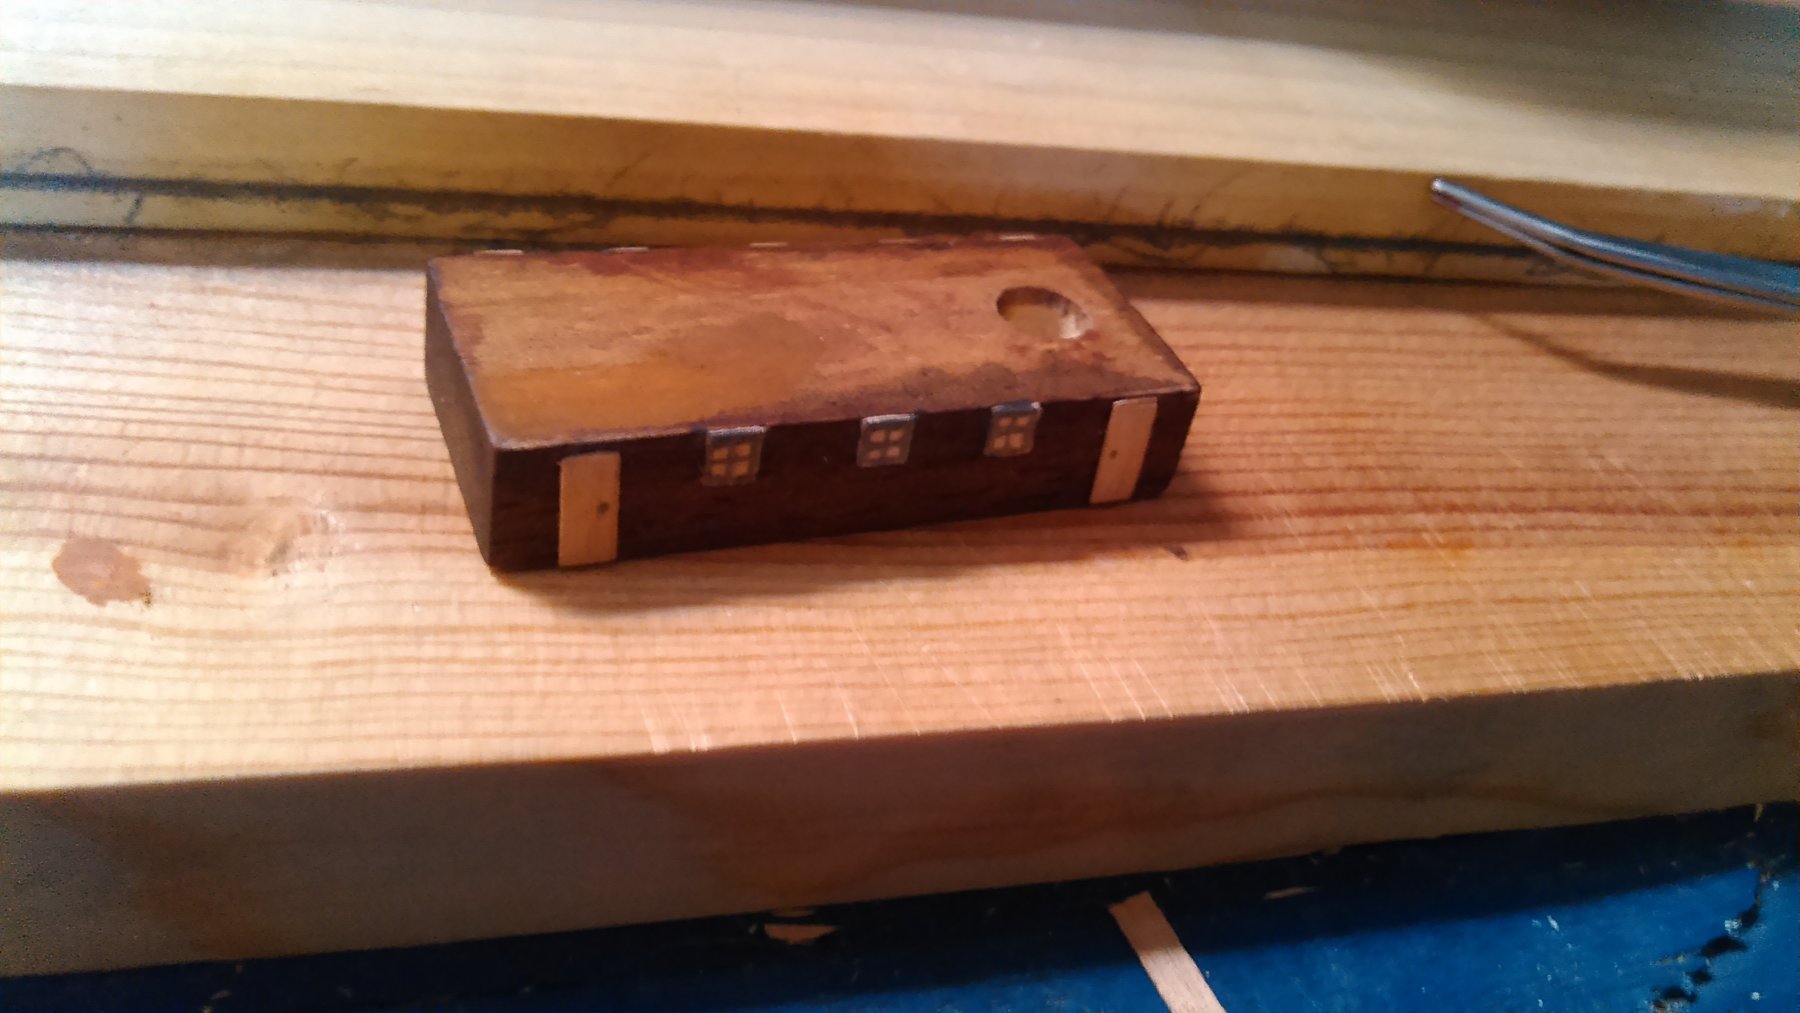
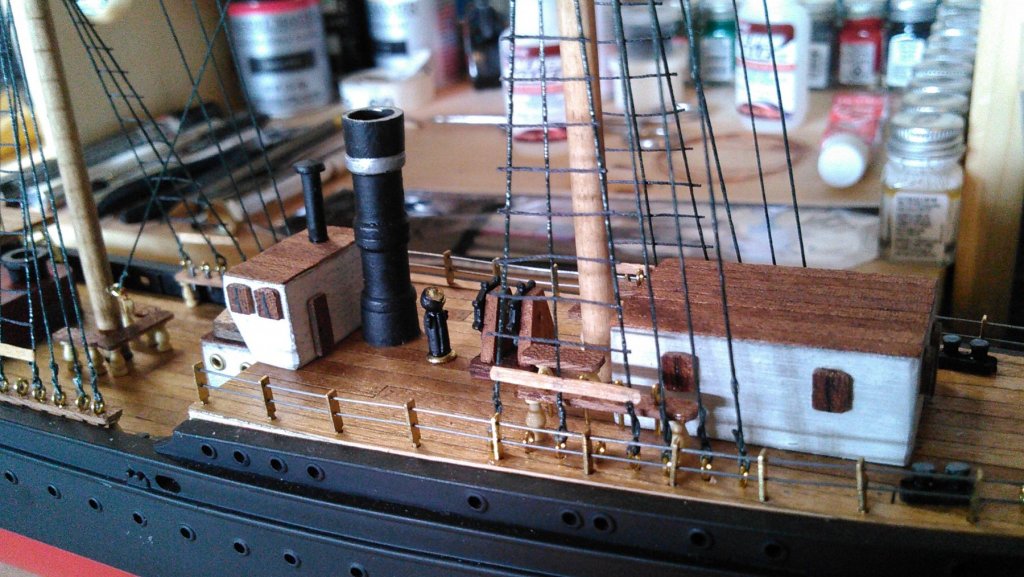
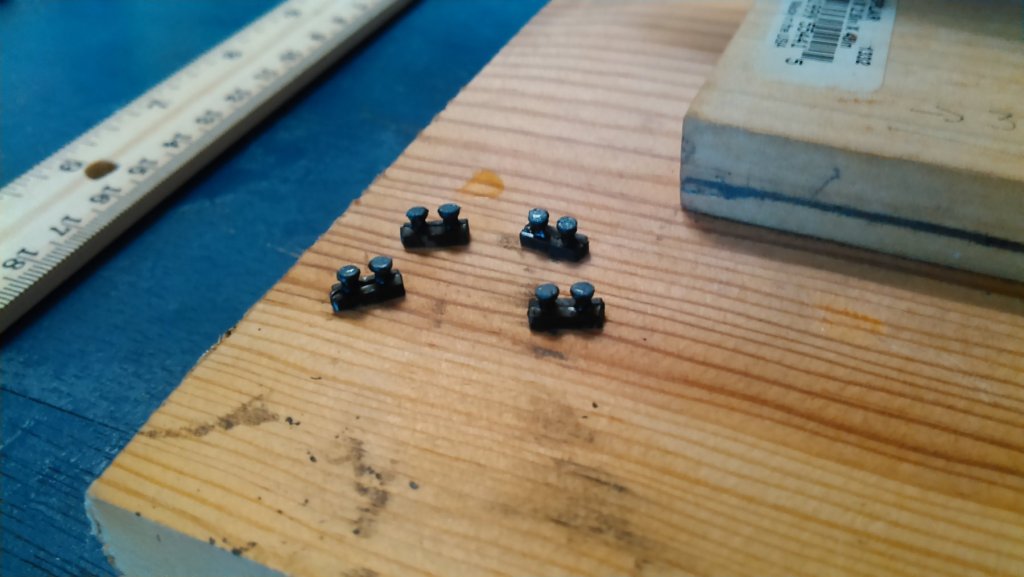
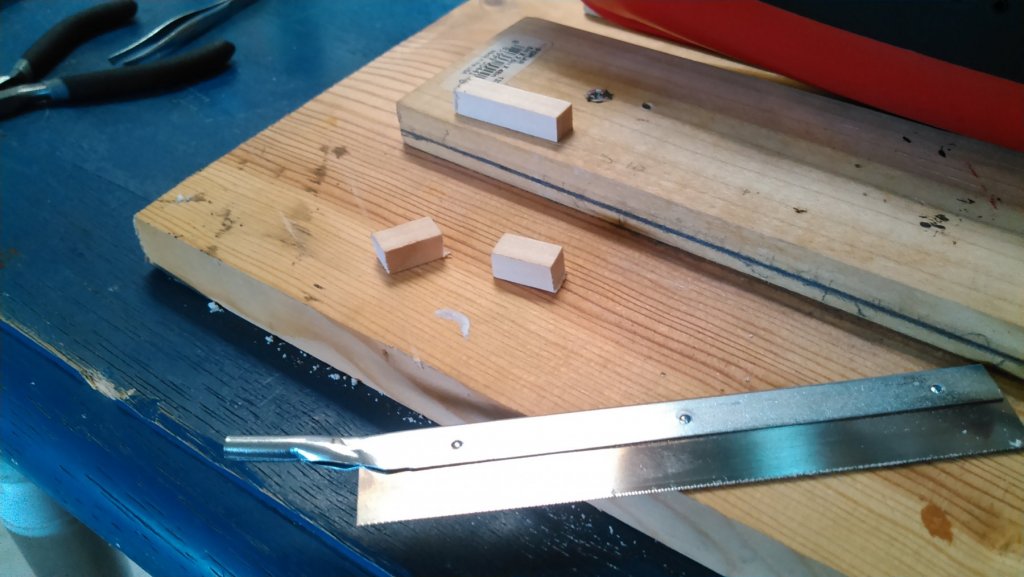
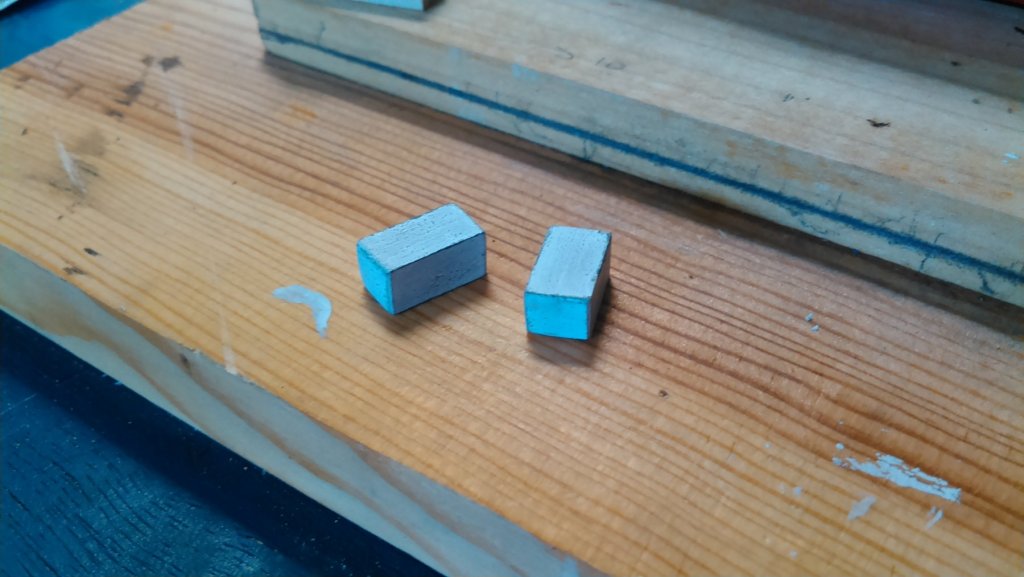
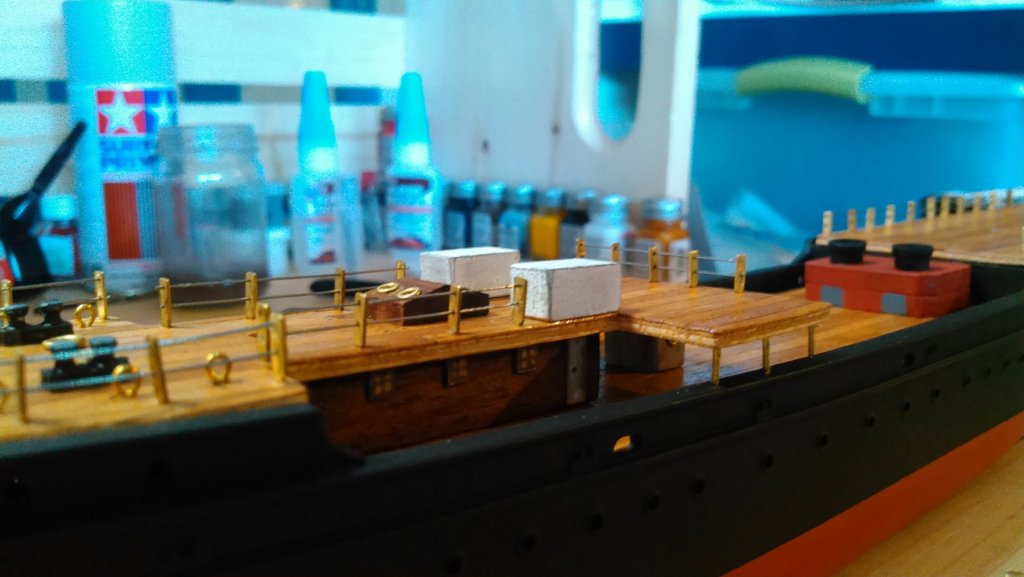
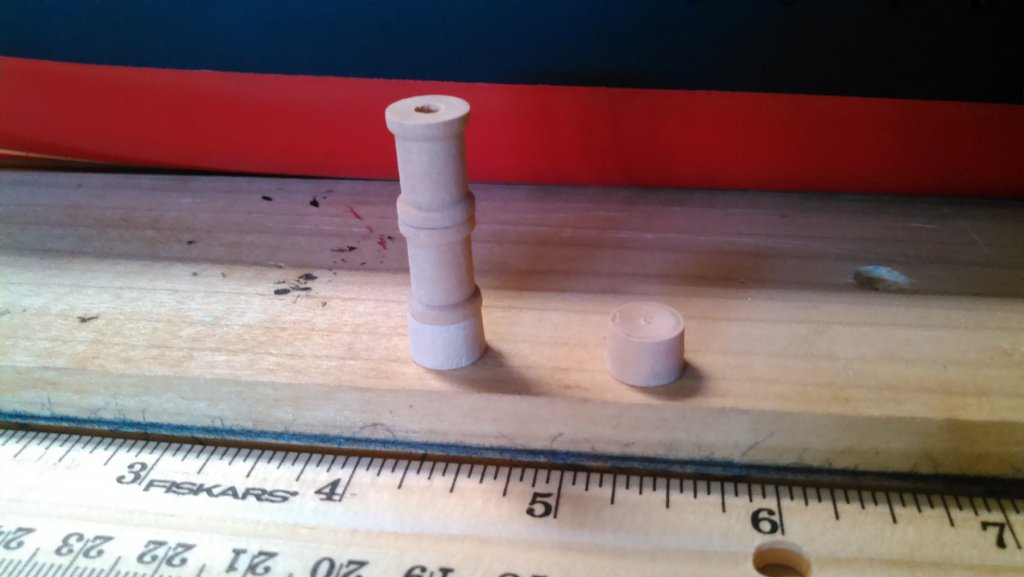
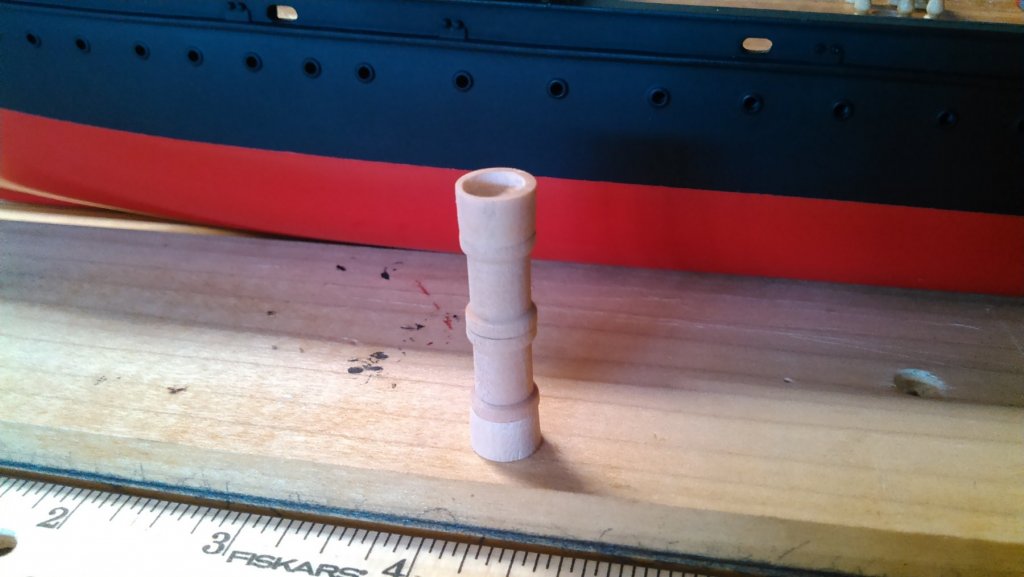
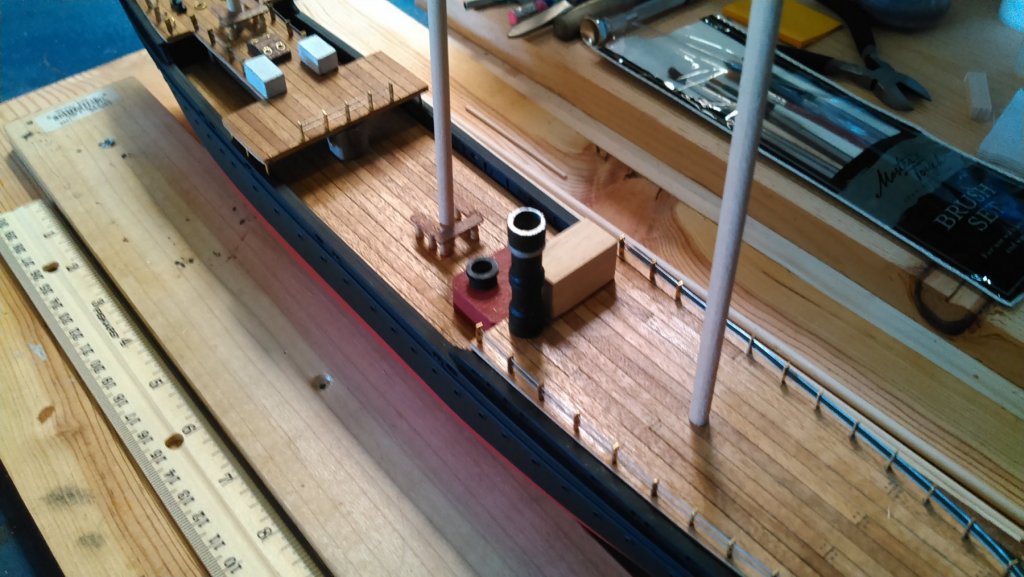
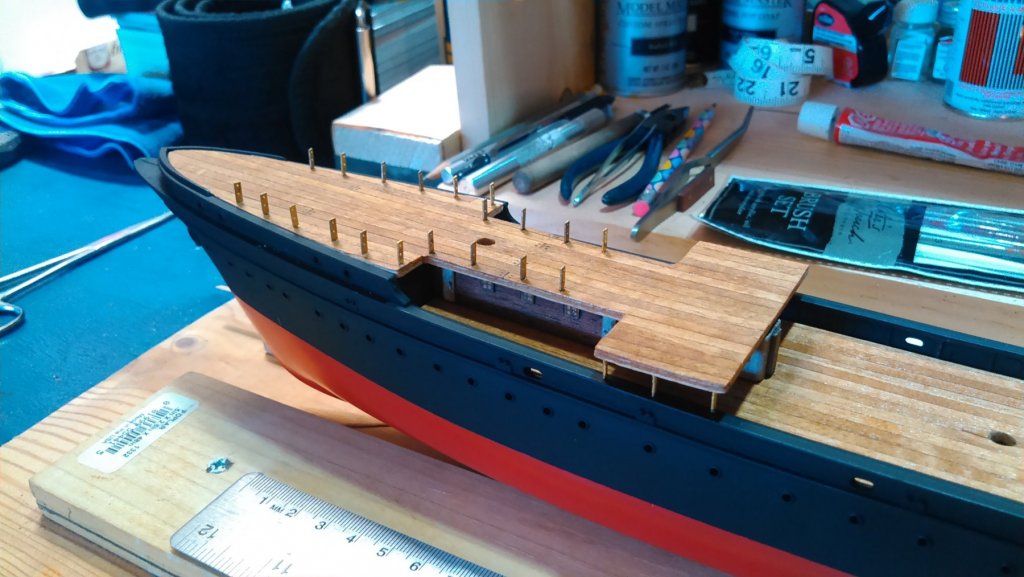
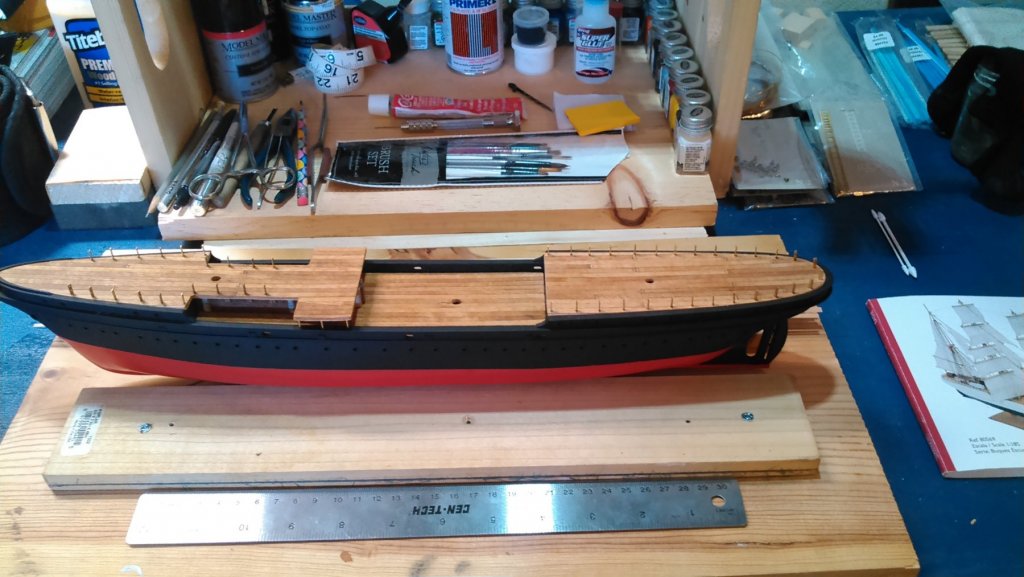
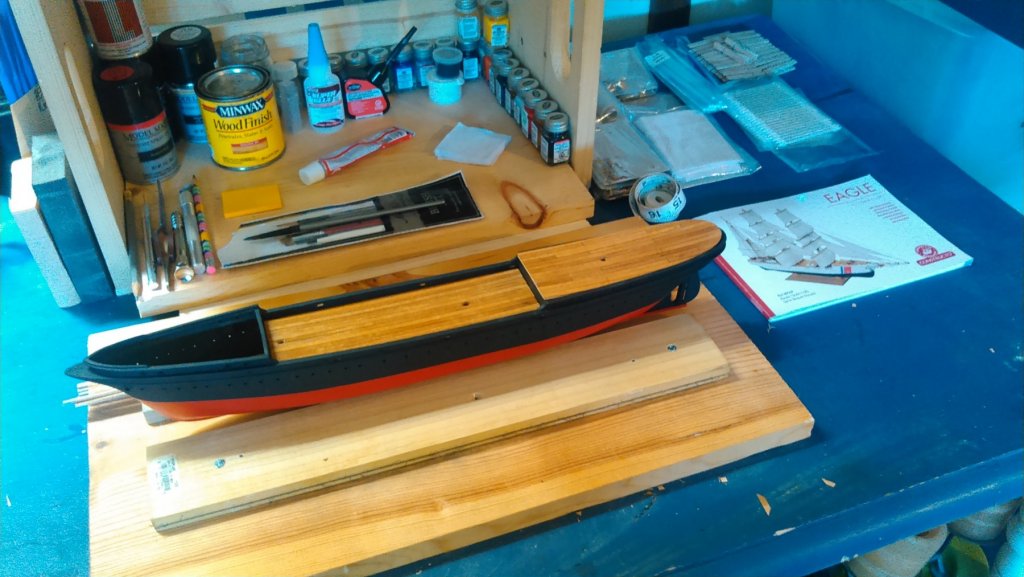
This morning was some deck appointments, as well as some experimenting for the modification.... Firstly, I sanded, stained and built the windlass per instructions (other than the stain, which I varied and mixed in order to continue with the "worn but clean" motif). As it dried, I prepared the four (4) fore double bitts. The sprues on the castings were pretty gnarly, so it took some sanding and a good paint to make them presentable. Once the windlass and bitts were in place, I sanded, stained and drilled the skylight over the deckhouse, and added portholes to it, as well as adding the aft foredeck's stanchions and railings. Once those were in, I cut a 15 mil block in half, sanded the two halves, painted them white and then rubbed them with my fingers with a thin film of pencil lead to age them a bit - especially around the edges - and placed them on the mid-foredeck as housings. Once all this was done, and after eyeing my little spools and small furniture plugs from Hobby Lobby, I had an inspiration for a smokestack for this steam barque... After a little gluing, sanding and drilling..... Then painting.... Now I just have to figure out how best (and most accurately) to move around and/or modify my quarterdeck appointments (placed unfinished here just to give you an idea of how things should be arranged) in order to fit it in there. I'd like to have it amidships of the fore end of the quarterdeck, right behind the pilot house, but I also need to fit in a binnacle and wheel somehow.... I also placed it to the larboard of the pilothouse, which is interesting and certainly would make all the other placements straightforward, but I have no research that would support such a placement. My only other option may be to move the tryworks forward on the central deck, just underneath the aftmost part of the foredeck, facing aft. Then I could place the stack on the central deck (basically where the tryworks is in the above photo), and keep the quarterdeck plans as instructed.... Choices, choices..... So to end the day I built my mainmast and foremast pinracks and put them in place. You can see the mainmast pinrack above, and both of them in the photo below. Then called it a day. Next up will be side pinracks and ladders, and more bitts, and then we'll start on the aft deck and see what we come up with. Until next time. Cheers.


- 37 replies
-
- 3
-
-
- eagle
- constructo
- (and 1 more)
-
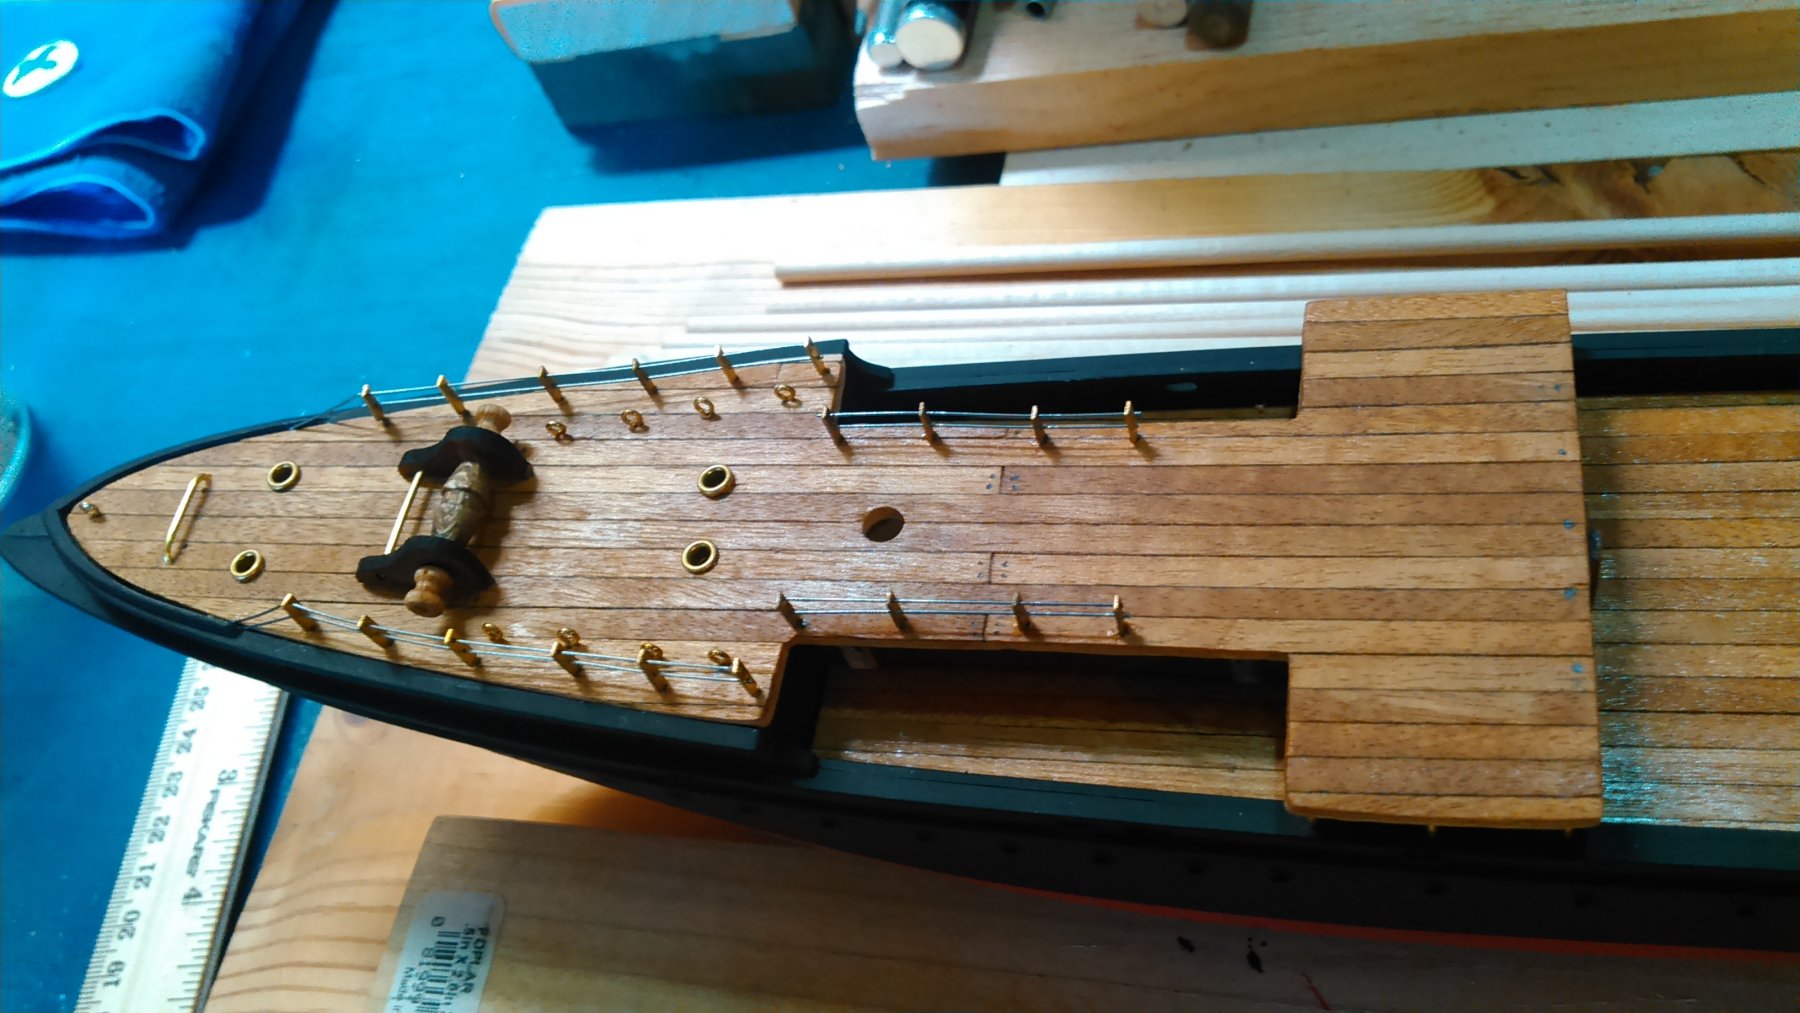
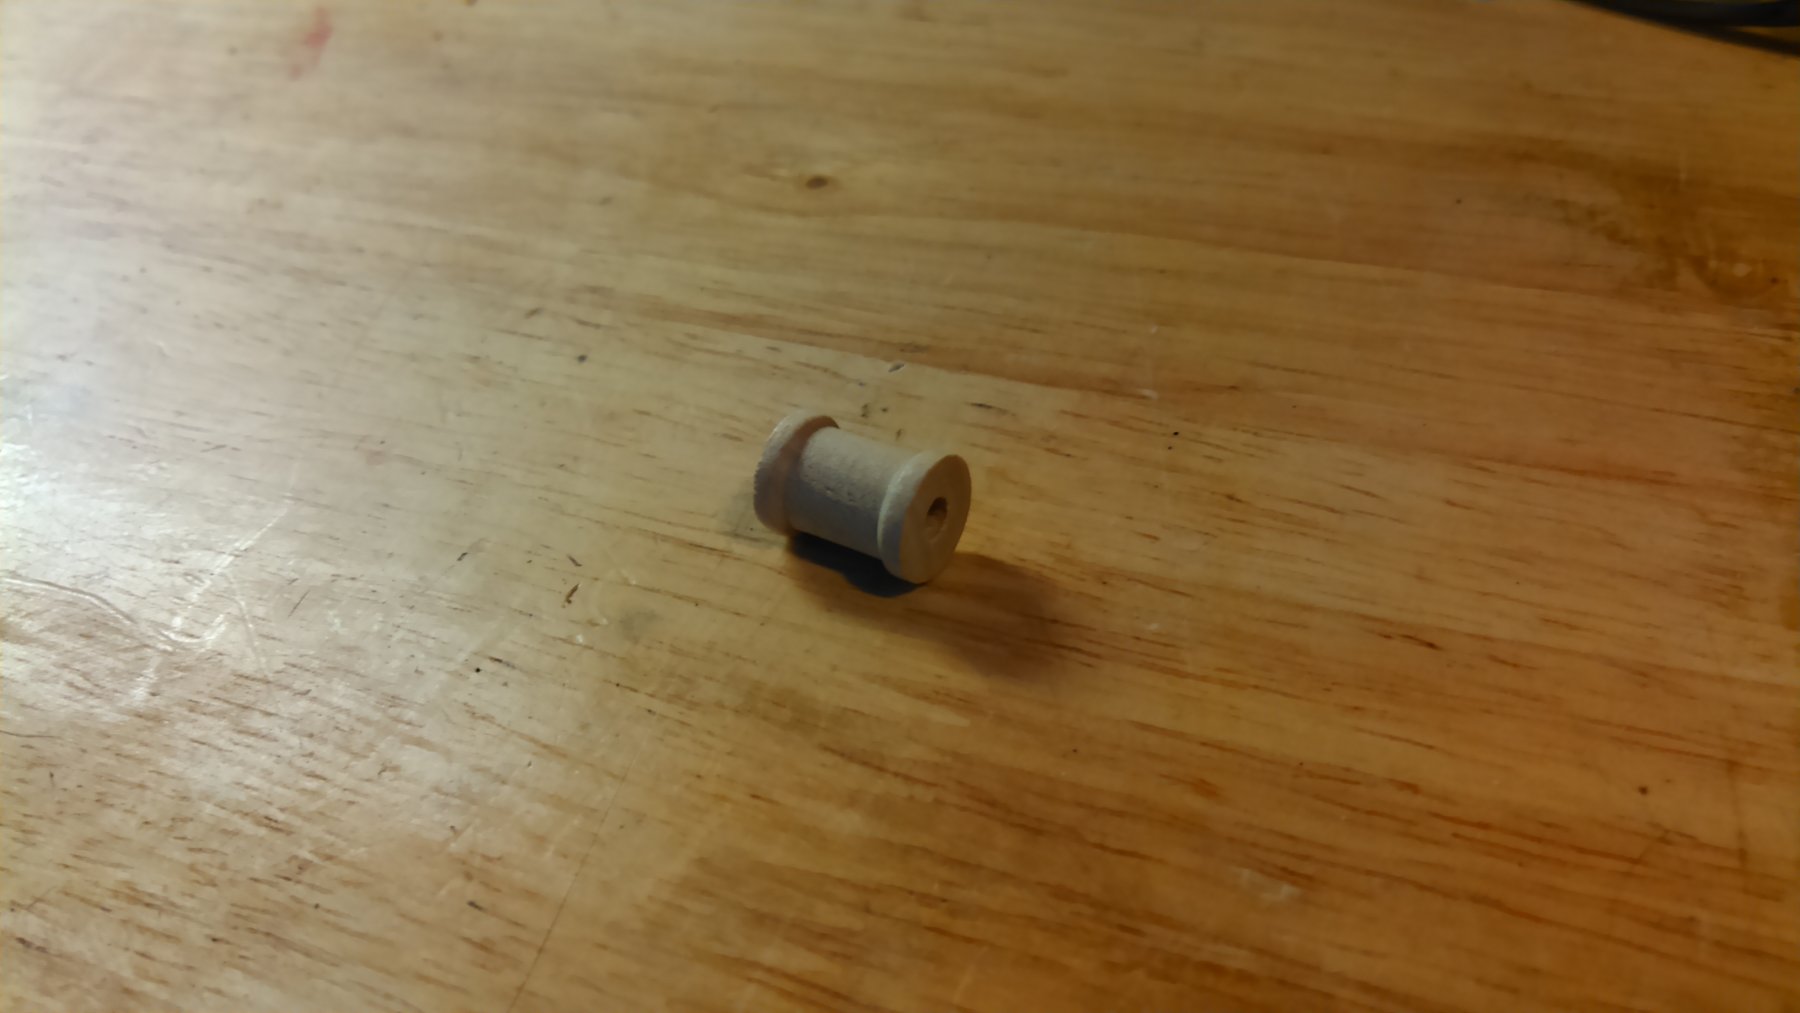
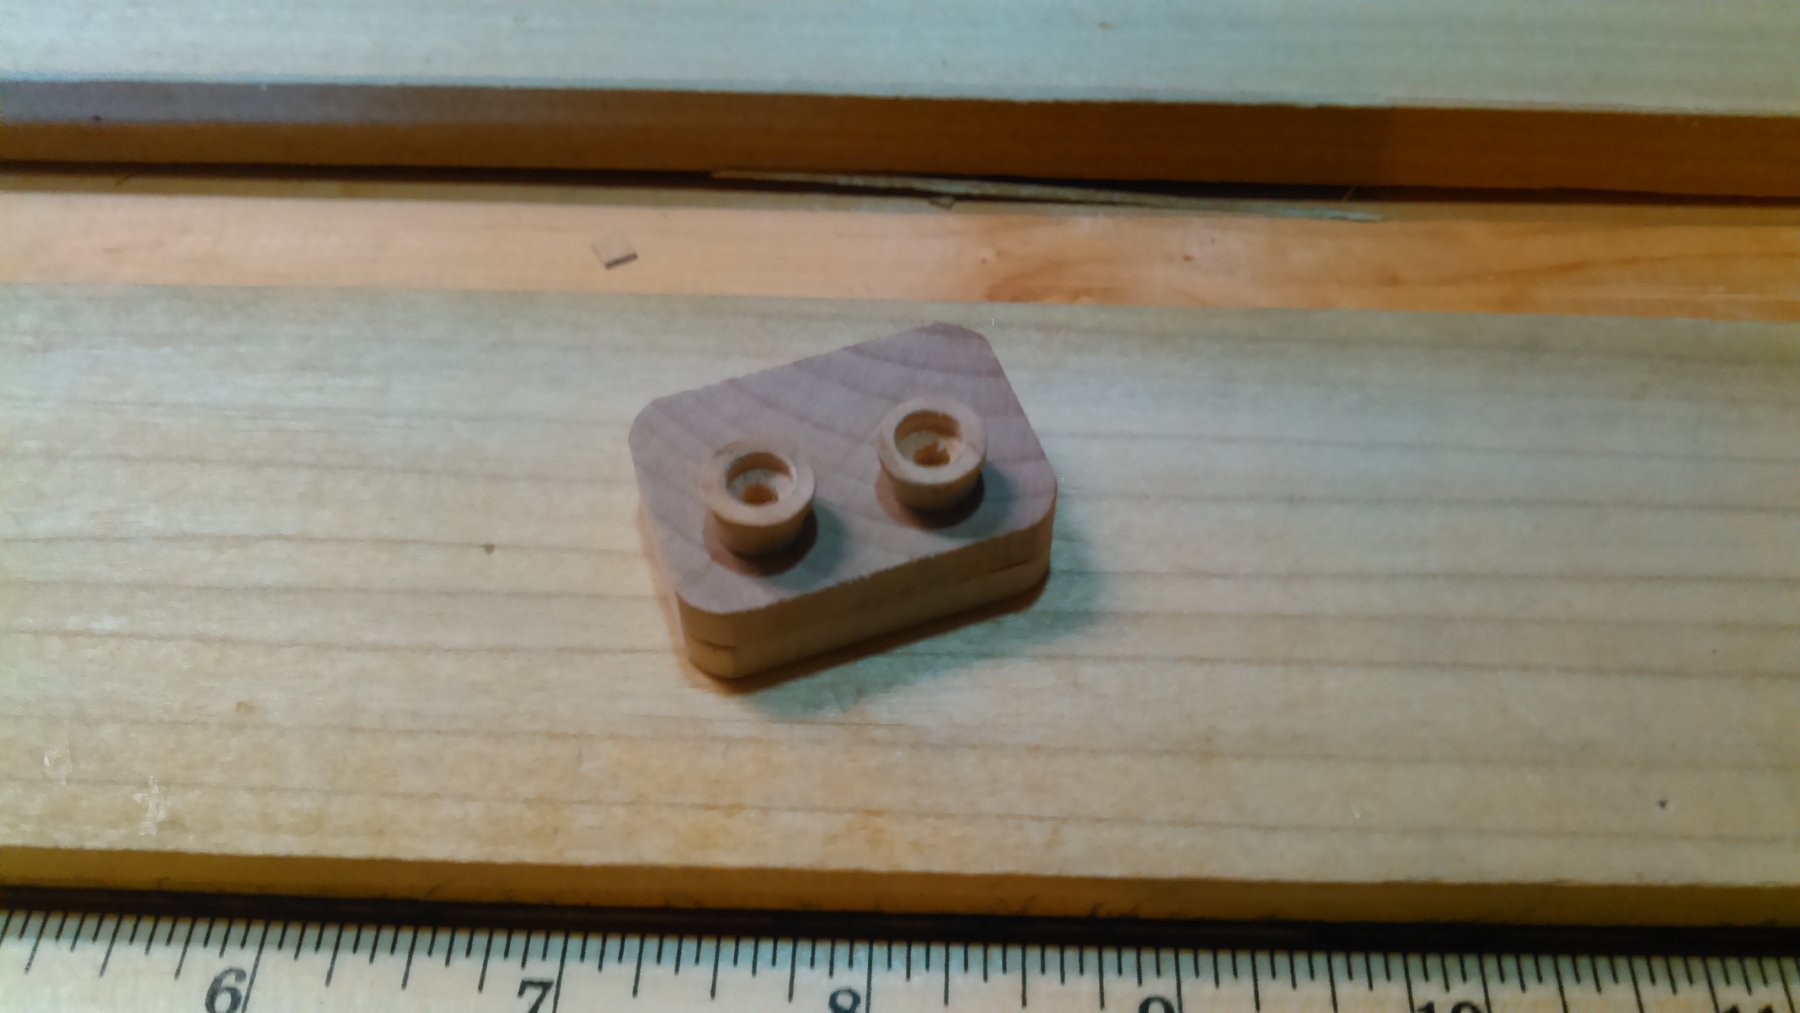
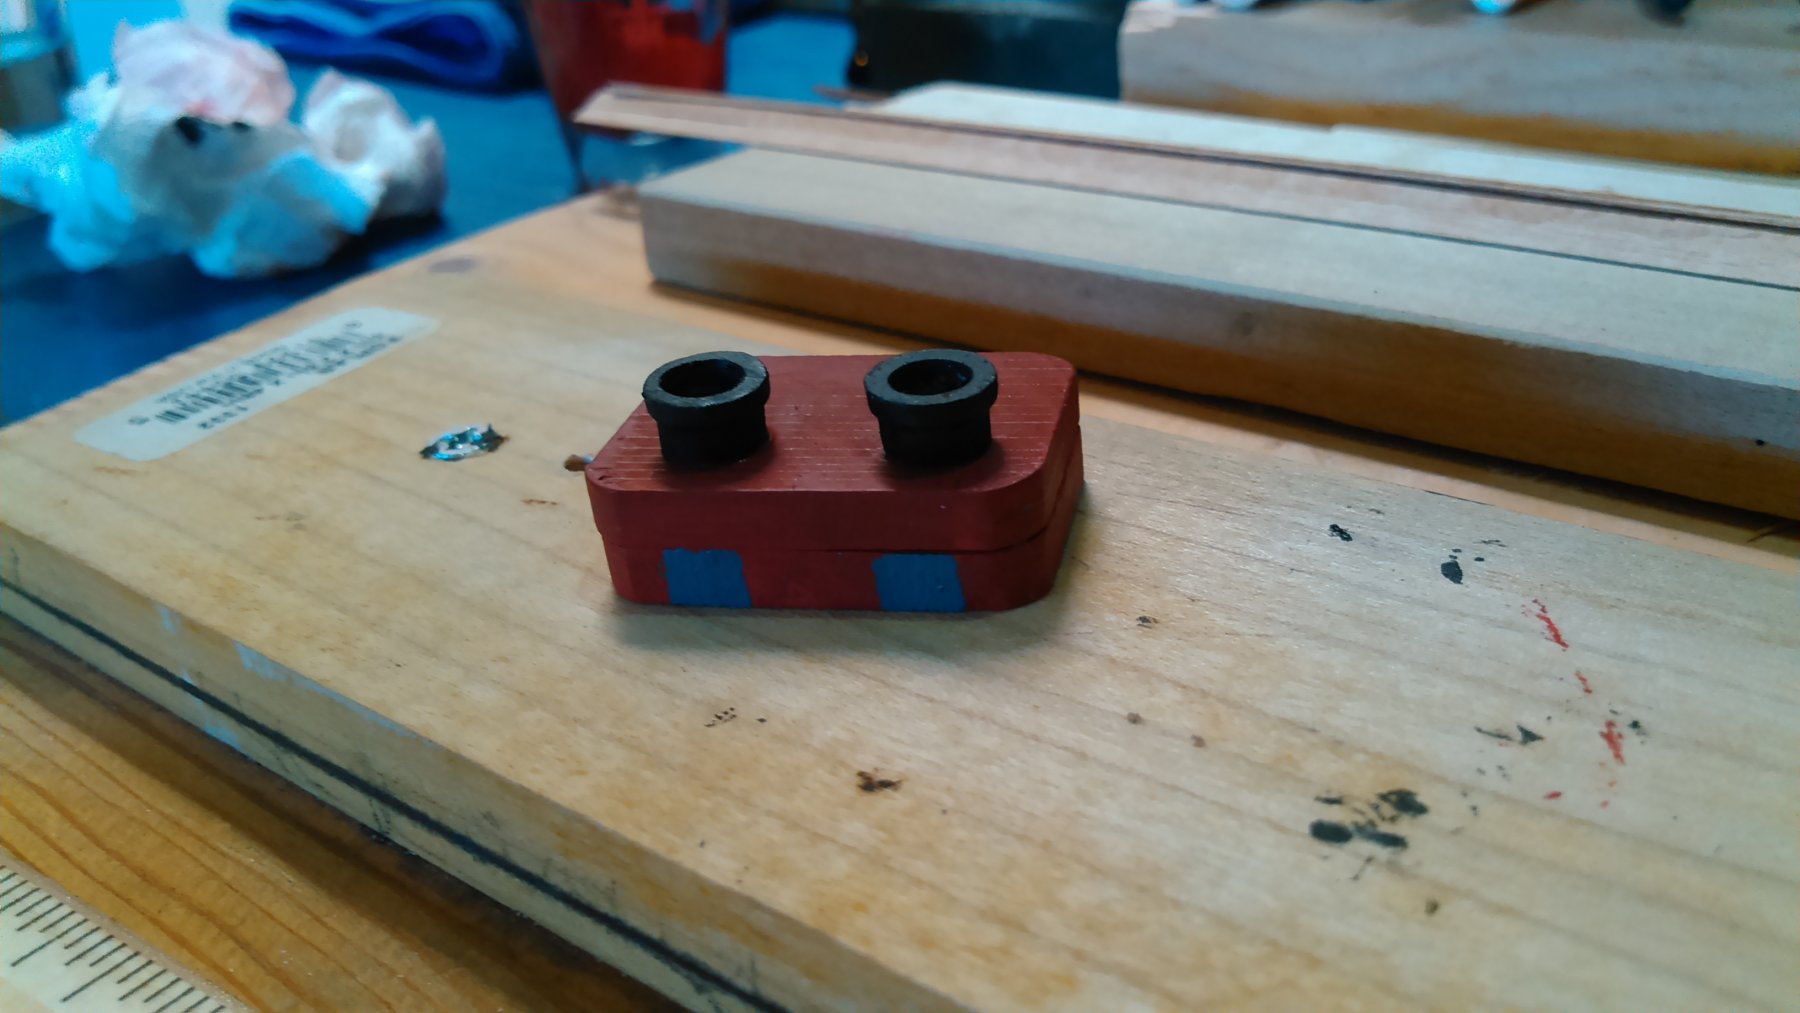
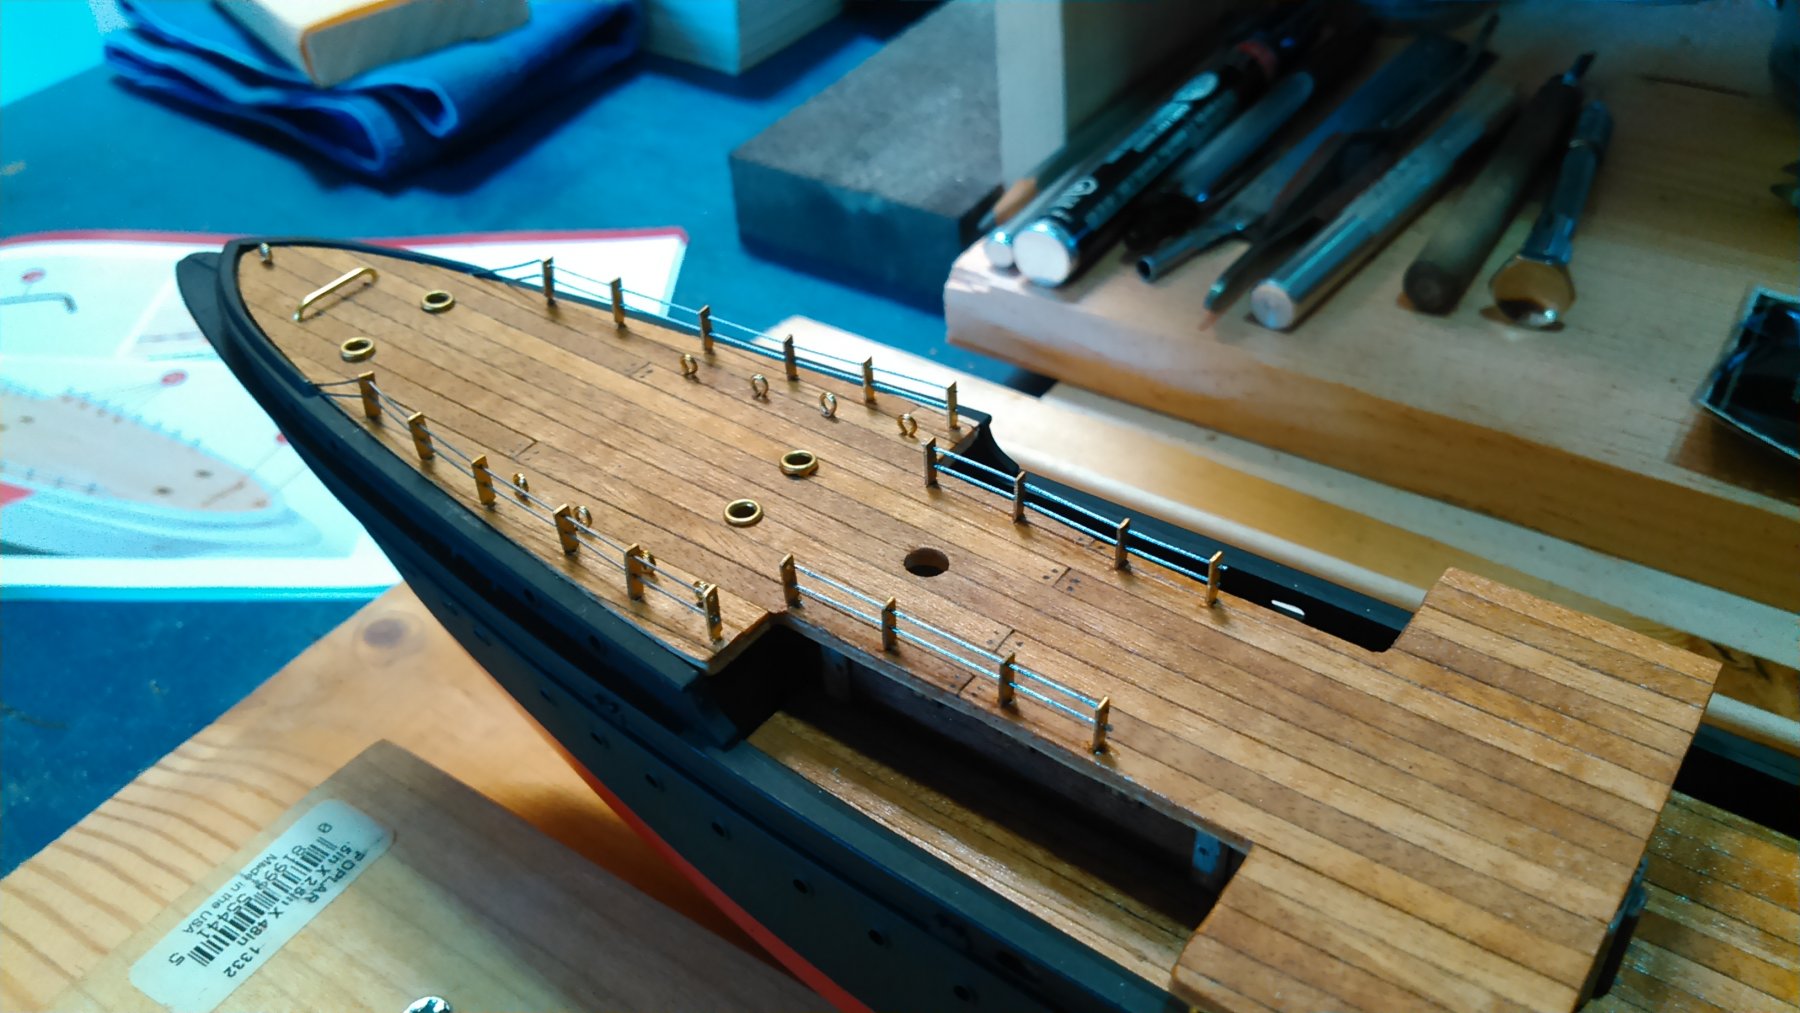
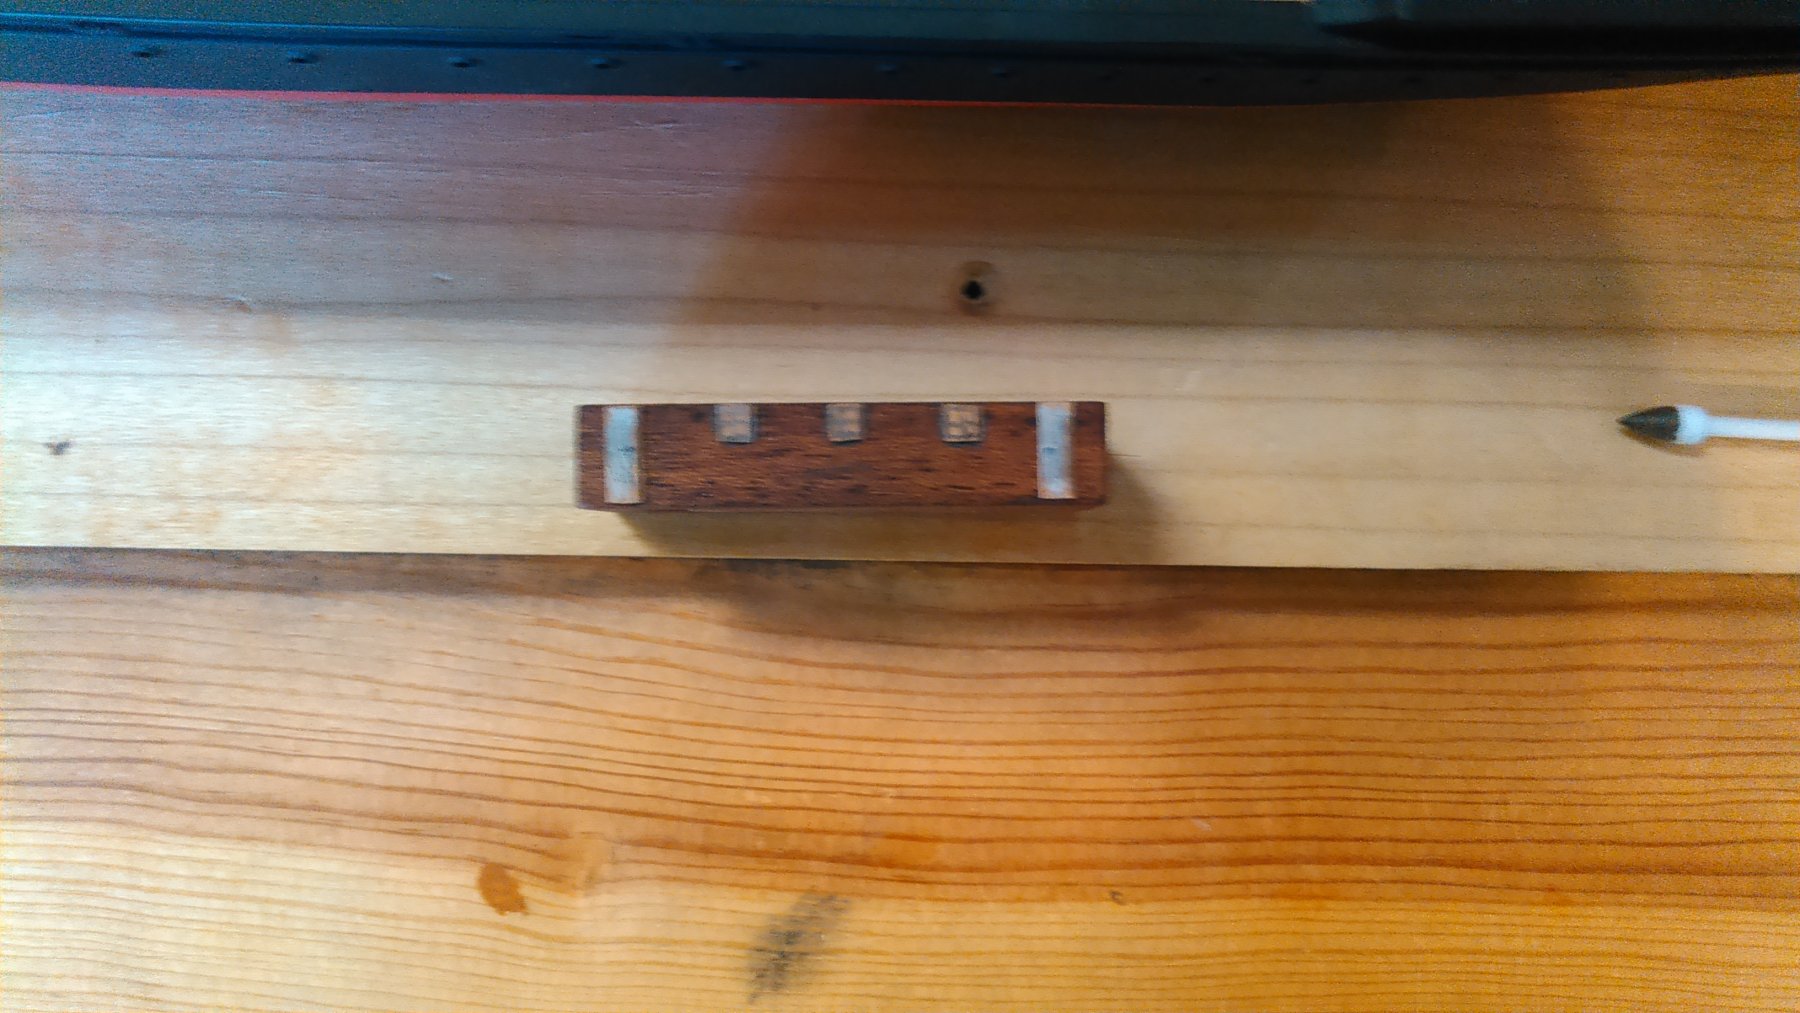
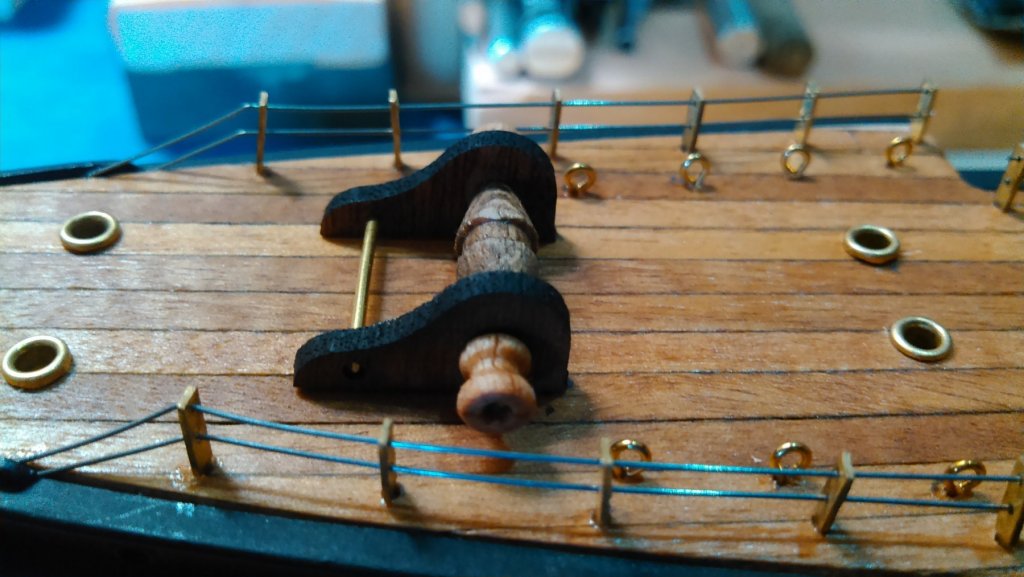
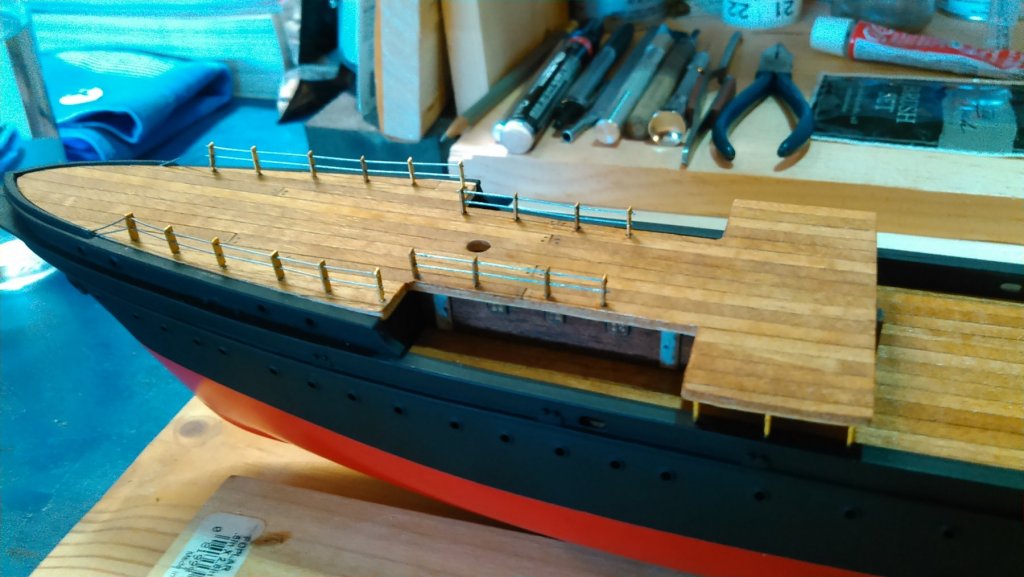
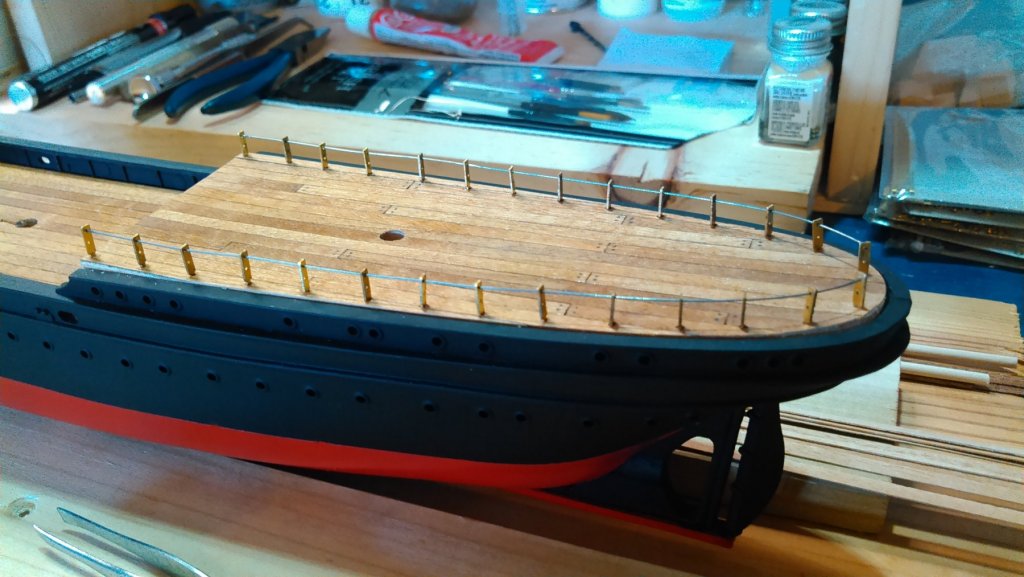
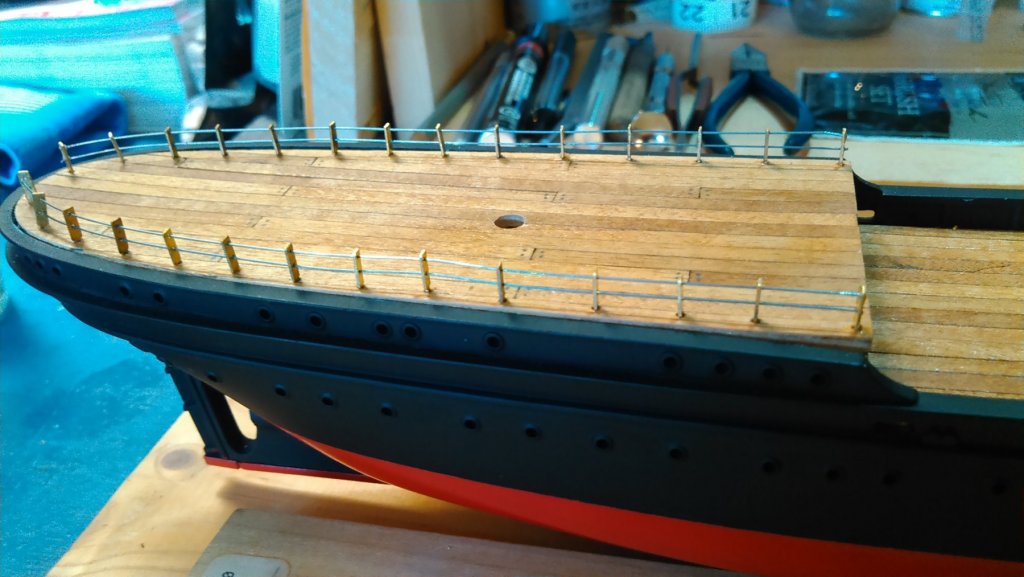
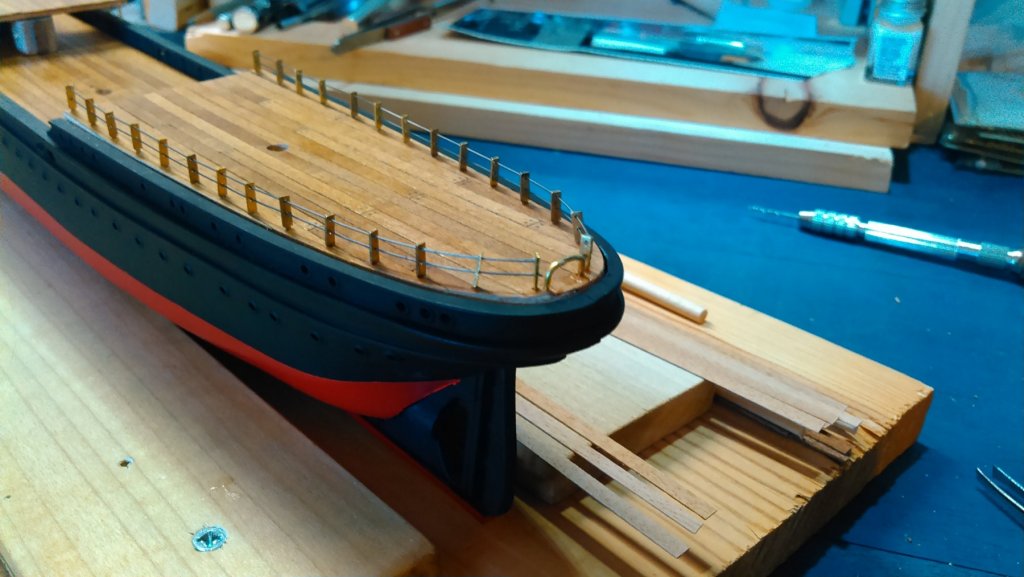
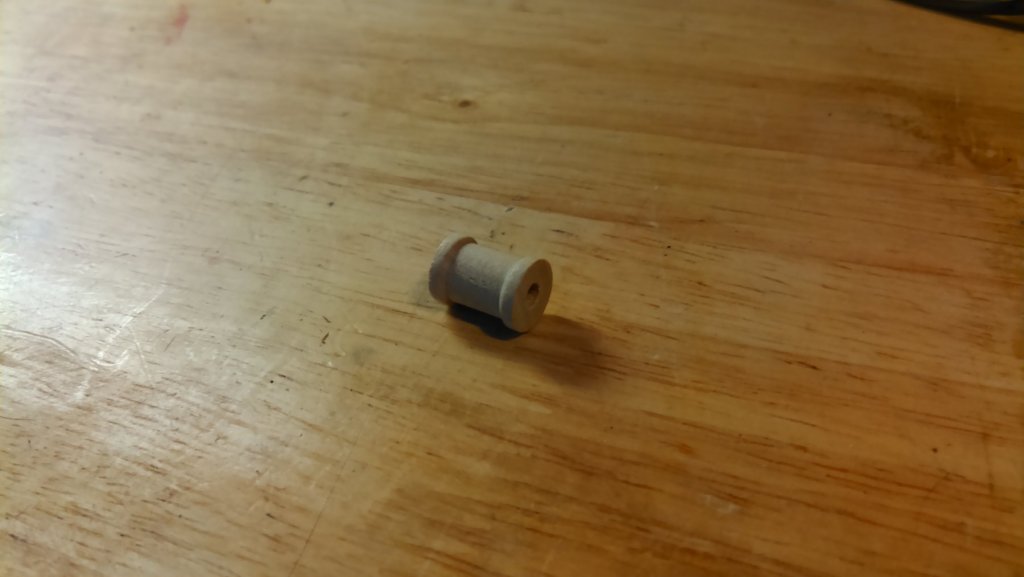
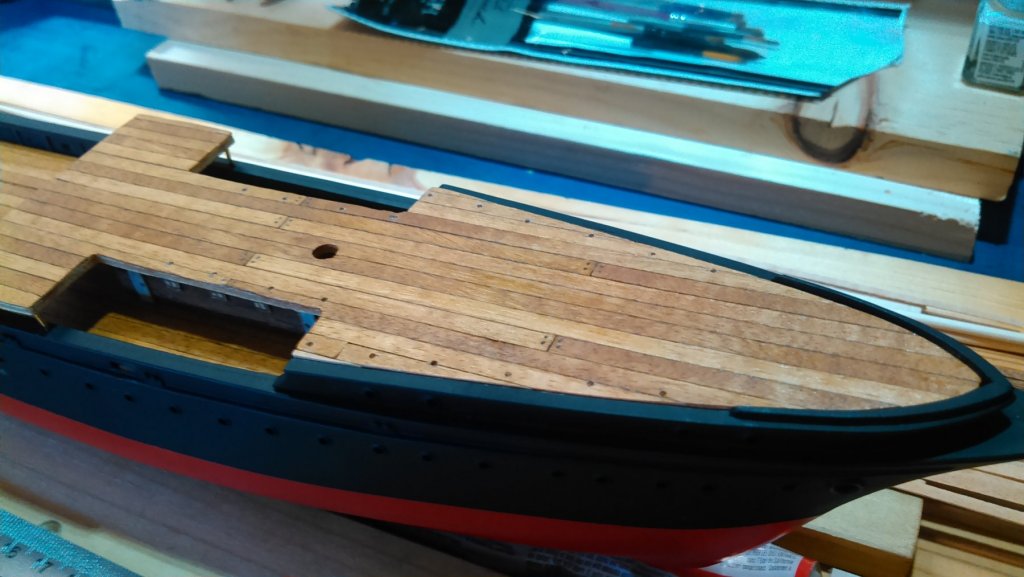
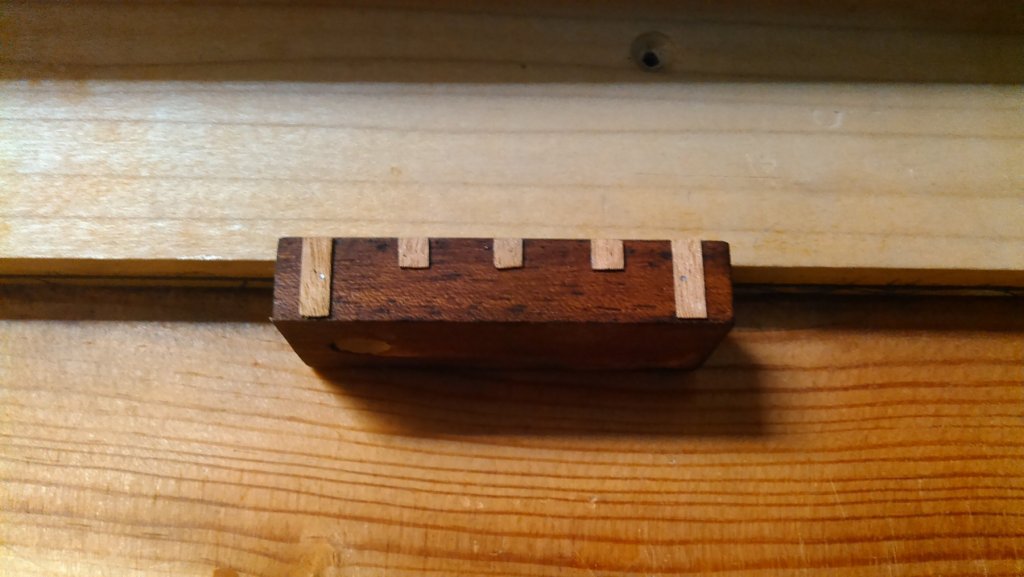
Today was railing day for the most part, with some added fun. The first thing I did was replace the bright brass wire that comes with the kit with some .015 gauge steel music wire from Hobby Lobby. I didn't like the shiny look of the brass. It looks fine on a spiffy Coast Guard training vessel, but didn't seem to suit a more blue collar whaler. So I ran the wire on the fo'c'sle, the flying deck walkway and the aft/quarterdeck. This was an exercise in patience for me, and quite a learning experience. At the taffrail I ran into a bit of an issue. Regardless of the fineness of the wire I could not get it to make the turn all the way around without continually dislodging stanchions. Another lesson learned. So, in lieu of removing a bunch of stanchions and having to wait another day to finish, I added a brass rail between the aftermost stanchions, and will add a piece of wire above it at some later date. After these photos were taken, I adjusted, straightened and secured all the stanchions that had become loosened by the wire tension. Once the railings were finished, I went back to my Hobby Lobby bag. While I was there a few small woodcraft items caught my attention. I've been thinking about how to scratch build a tryworks, and came across these small spools: I took a couple small wood scraps that I had handy, glued them together, then cut this little spool in half. After some drilling to open up the tops, lots and lots of sanding, I had something I think will work. So, after a little more sanding, some painting, and scoring in some brickwork lines, I had this: After looking ahead at some of the plans, my best bet is that it will fit in somewhere in this vicinity... But we'll see. I still have to figure out where my smokestack will be going as well as whaleboat davits, so.... So after this little experiment, I finished up for the day by placing and securing the foredeck eyebolts, as well as the chocks and pinrail. So that's it for today. Until next time...


- 37 replies
-
- 3
-
-
- eagle
- constructo
- (and 1 more)
-
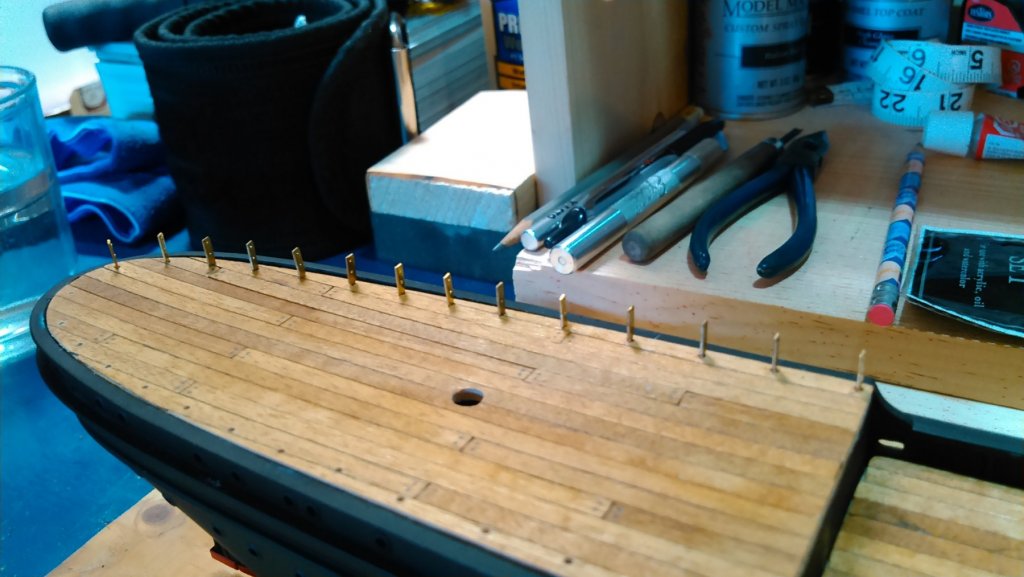
So, today was a day I've been trying to avoid.... Deck supports and stanchions. This is definitely a first for me, and I am continually aware of my propensity to screw something up royally. Lol. Anyway, the first thing I did today was permanently set the fore/fo'c'sle deck. This sounded easy enough, but then I realized I have to somehow fit three pieces of brass wire as deck supports between the underneath of the flying deck and the bulwarks... It did not seem possible to do all of this at once, so I set the deck, glued it in place, and then cut my deck supports out of the provided wire, and fitted, sanded and fitted and sanded. I then glued to the underside of the deck, but not to the bulwark, as I did not want glue showing there. I wanted them to look inserted.. I had to trim and sand just so, so they were solidly in place. I tried to take my time with this, as these brass supports will definitely stand out.... Now all the decks are secured in place, and the mastholes line up. Next up was the stanchions. The plans call for a very large number of them - especially on the aft/quarterdeck. I spaced them out, marked their locations, drilled with a .75mm bit, and then slowly glued them into place. Once the aft/quarterdeck was done, there were stanchions to set on the fo'c'sle and its aft flying portion. This is probably very simple stuff for all of you, but it took me about 2 hours to get all of this done today - including the deck supports. Lol. Good thing I'm retired. I'll let these stanchions dry well overnight, and the next step will be running the railing wire and then start on the foredeck appointments. Until next time....


- 37 replies
-
- 3
-
-
- eagle
- constructo
- (and 1 more)
-
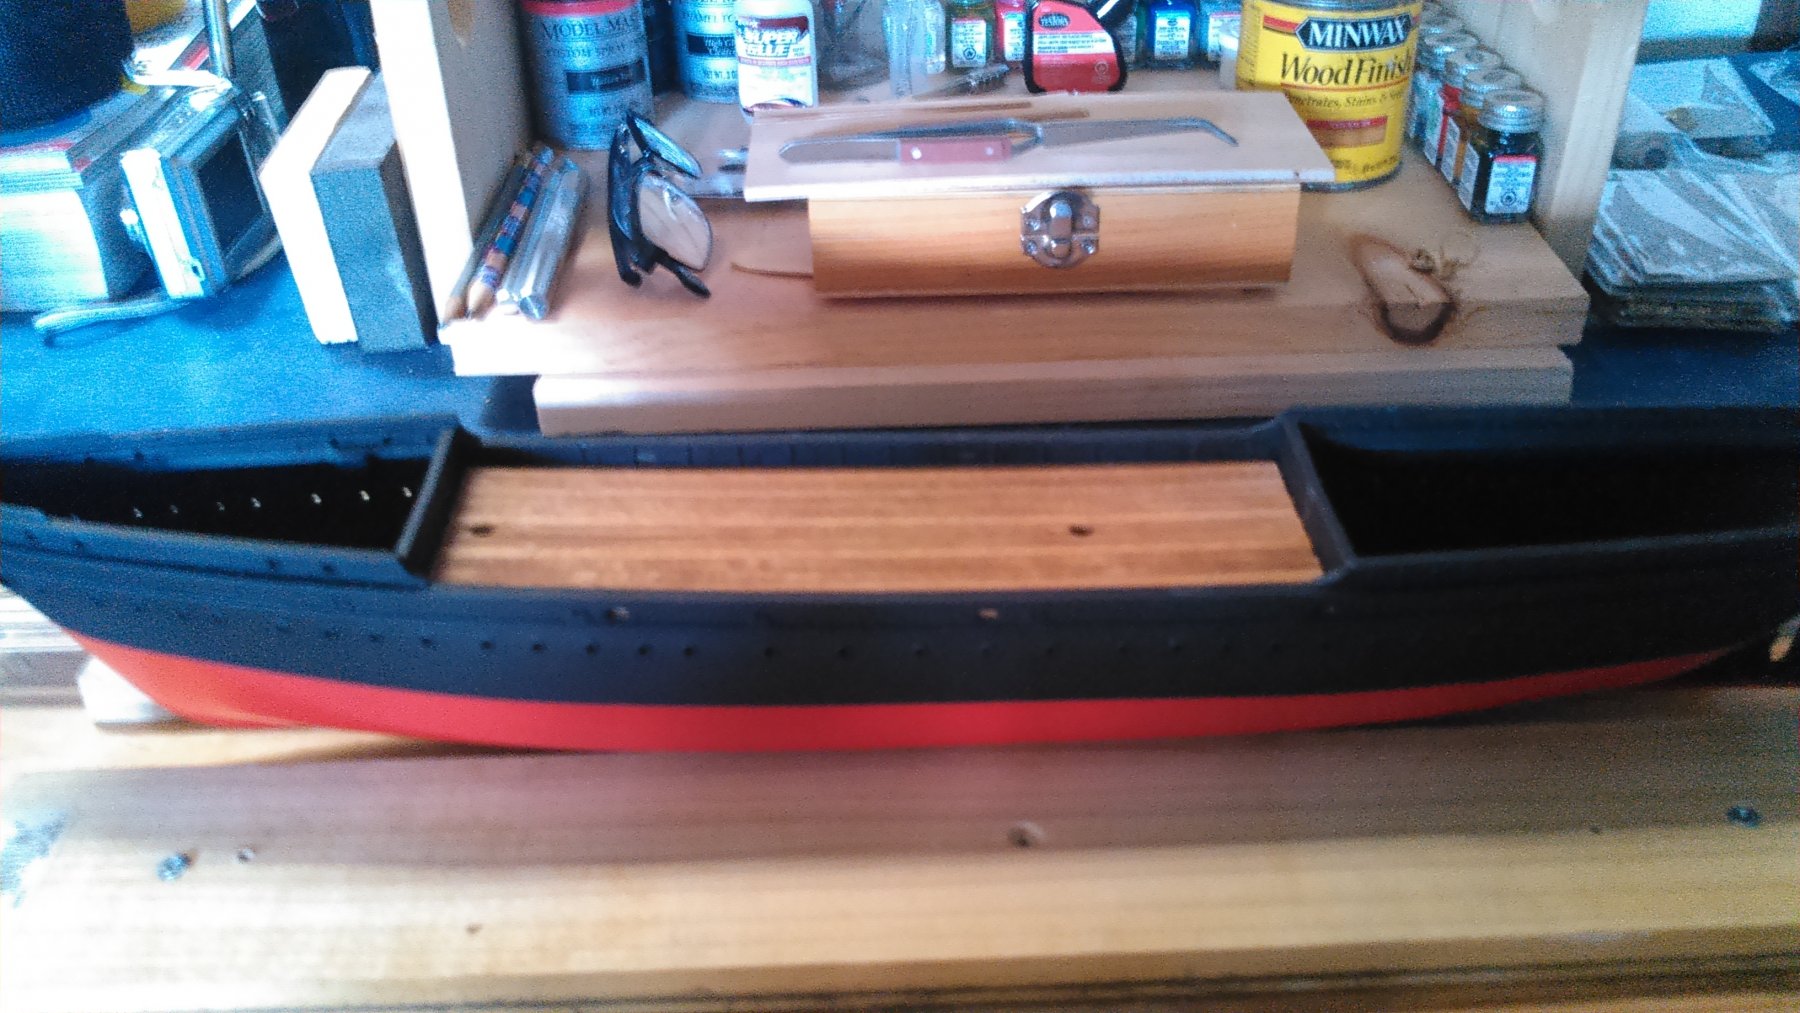
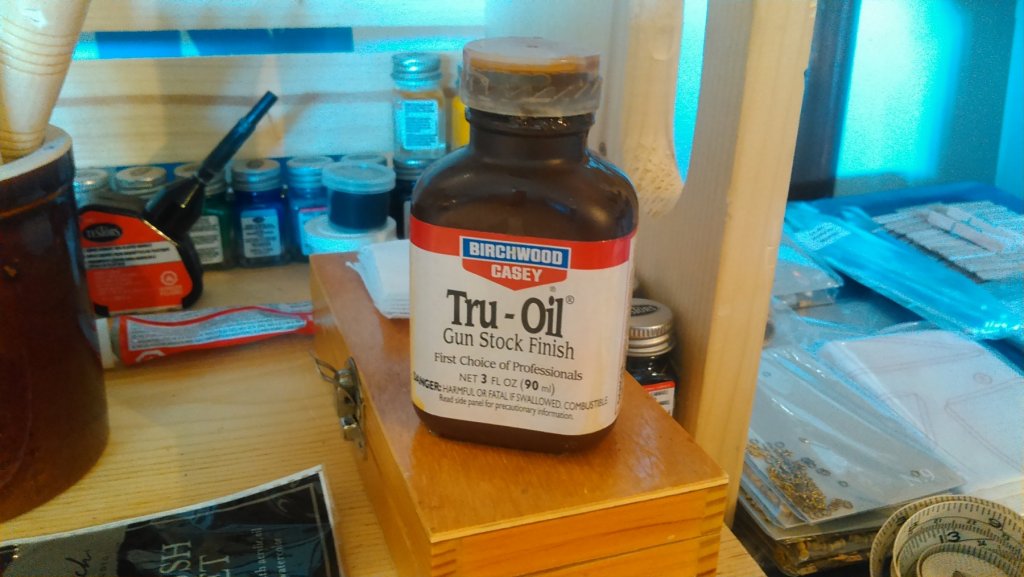
Well, back from the sheep hunt, which was quite a workout.... Barbary sheep do not like to be found and live in the most physically challenging country I've yet seen... Here's our friendly guide admiring the White Sands National Monument, from about twenty miles away.... And yes that's a straight bluff ahead of us. So once I was back, I took a fresh look at the whaler.... I left all my decking and orlop under clamps while I was gone, and was able to fix them in place, making sure my masts lined up with the pre-drilled holes. Then I glued in the central and quarterdecks. The next thing I did was plank my forward (fo'c'sle) deck. I used the same butting scheme that I used on the quarterdeck. After looking at them for a bit, I went ahead and added some faux plank nails with a No2 pencil for a little added detail. I also washed the decks again in a finger rub of TruOil to give it a little more aged shine. Next up was the midcastle and deckhouse. The plans called for them to be painted bright white with dark wood trim for doors and windows. Very plain. I chose to wash the deckhouse in Dark American Walnut stain, rubbed with a little bit of pencil lead. Once it was dried, I cut out two doors and three windows for both the larboard and starboard sides, and two windows aft. I used my limited talent to draw in window frames, and then aged the doors with a mix of wet stain over wet white paint, rubbed to a worn wood gray. I did the same with the midcastle, adding a porthole on each side and a darker door facing aft. My goal here is not to have brilliant shiny deck appointments, but used and worn and shipshape. So the next step will be a real challenge to me. The plans call for the larboard and starboard edges of the after fo'c'sle to be pinned to the plastic hull with 3 pieces of 1mm wire simultaneously with the deck being permanently glued into place, to simulate the deck supports. I have marked out the lines on the underside to make slight drill indents to glue in the 8mm pieces of wire, and will have to do the same on the bulwarks.... So I left it for today to meet that challenge tomorrow. Until next time.


- 37 replies
-
- 3
-
-
- eagle
- constructo
- (and 1 more)
-
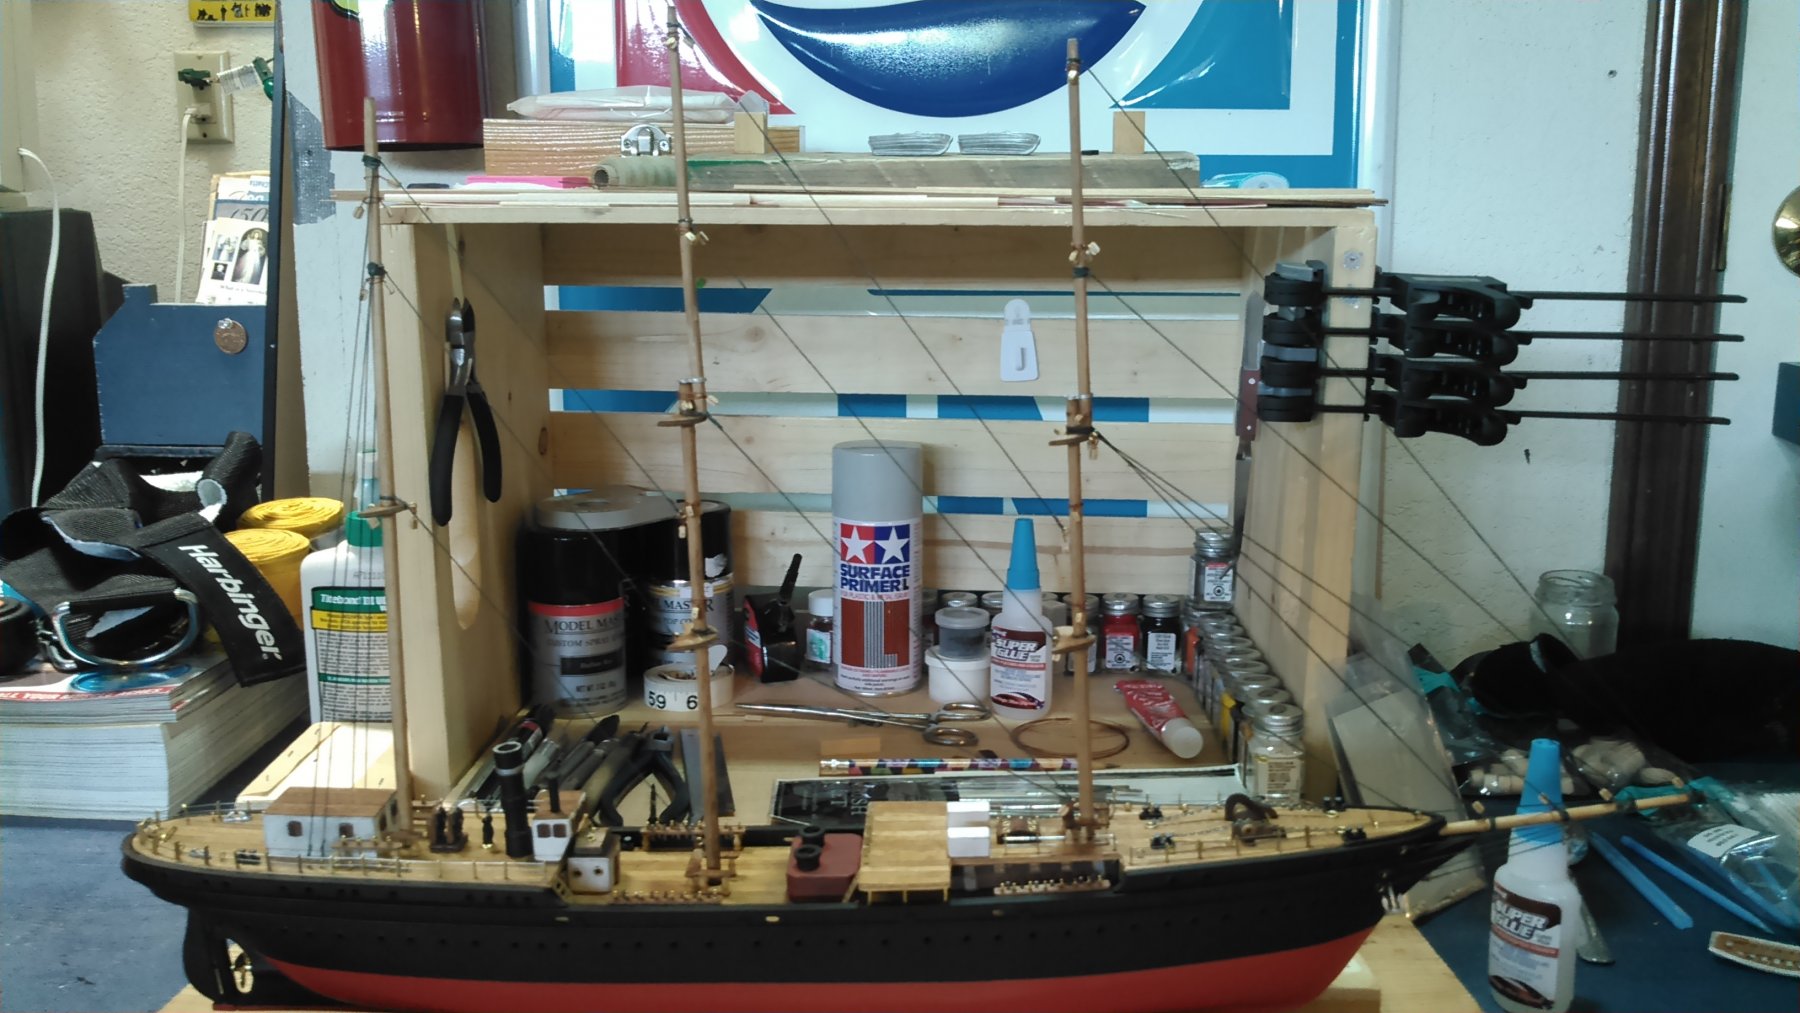
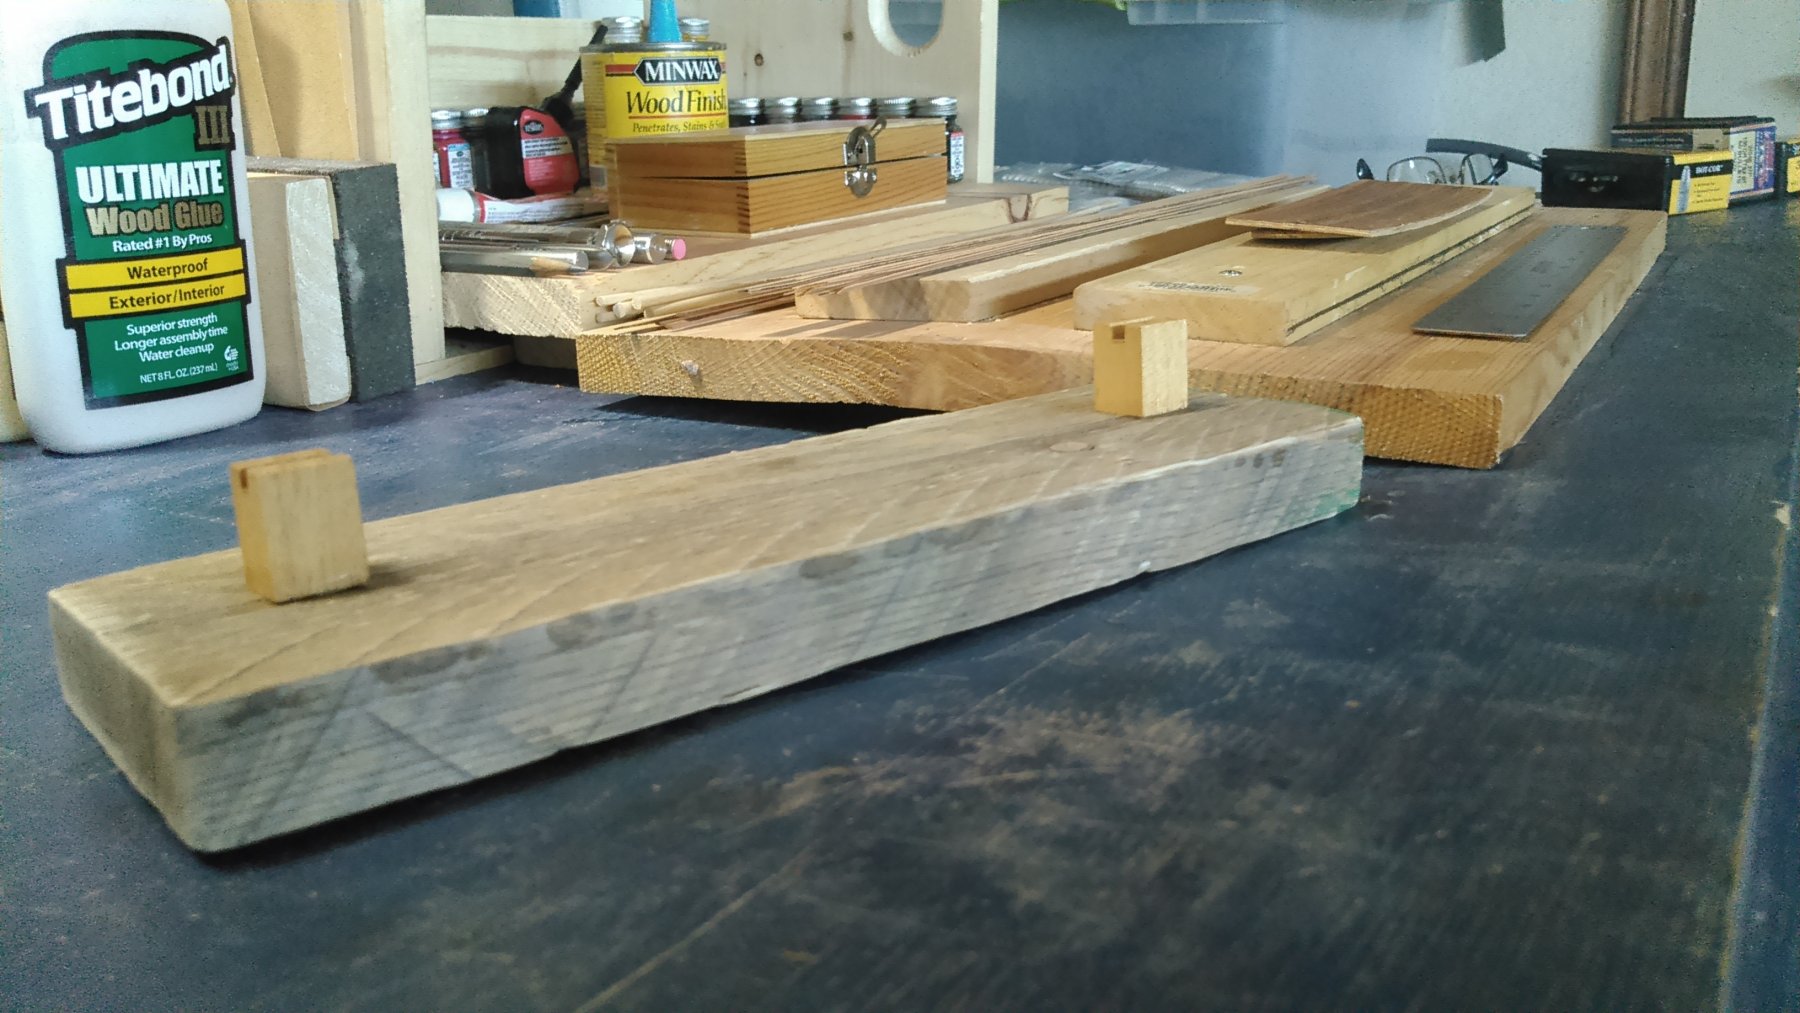
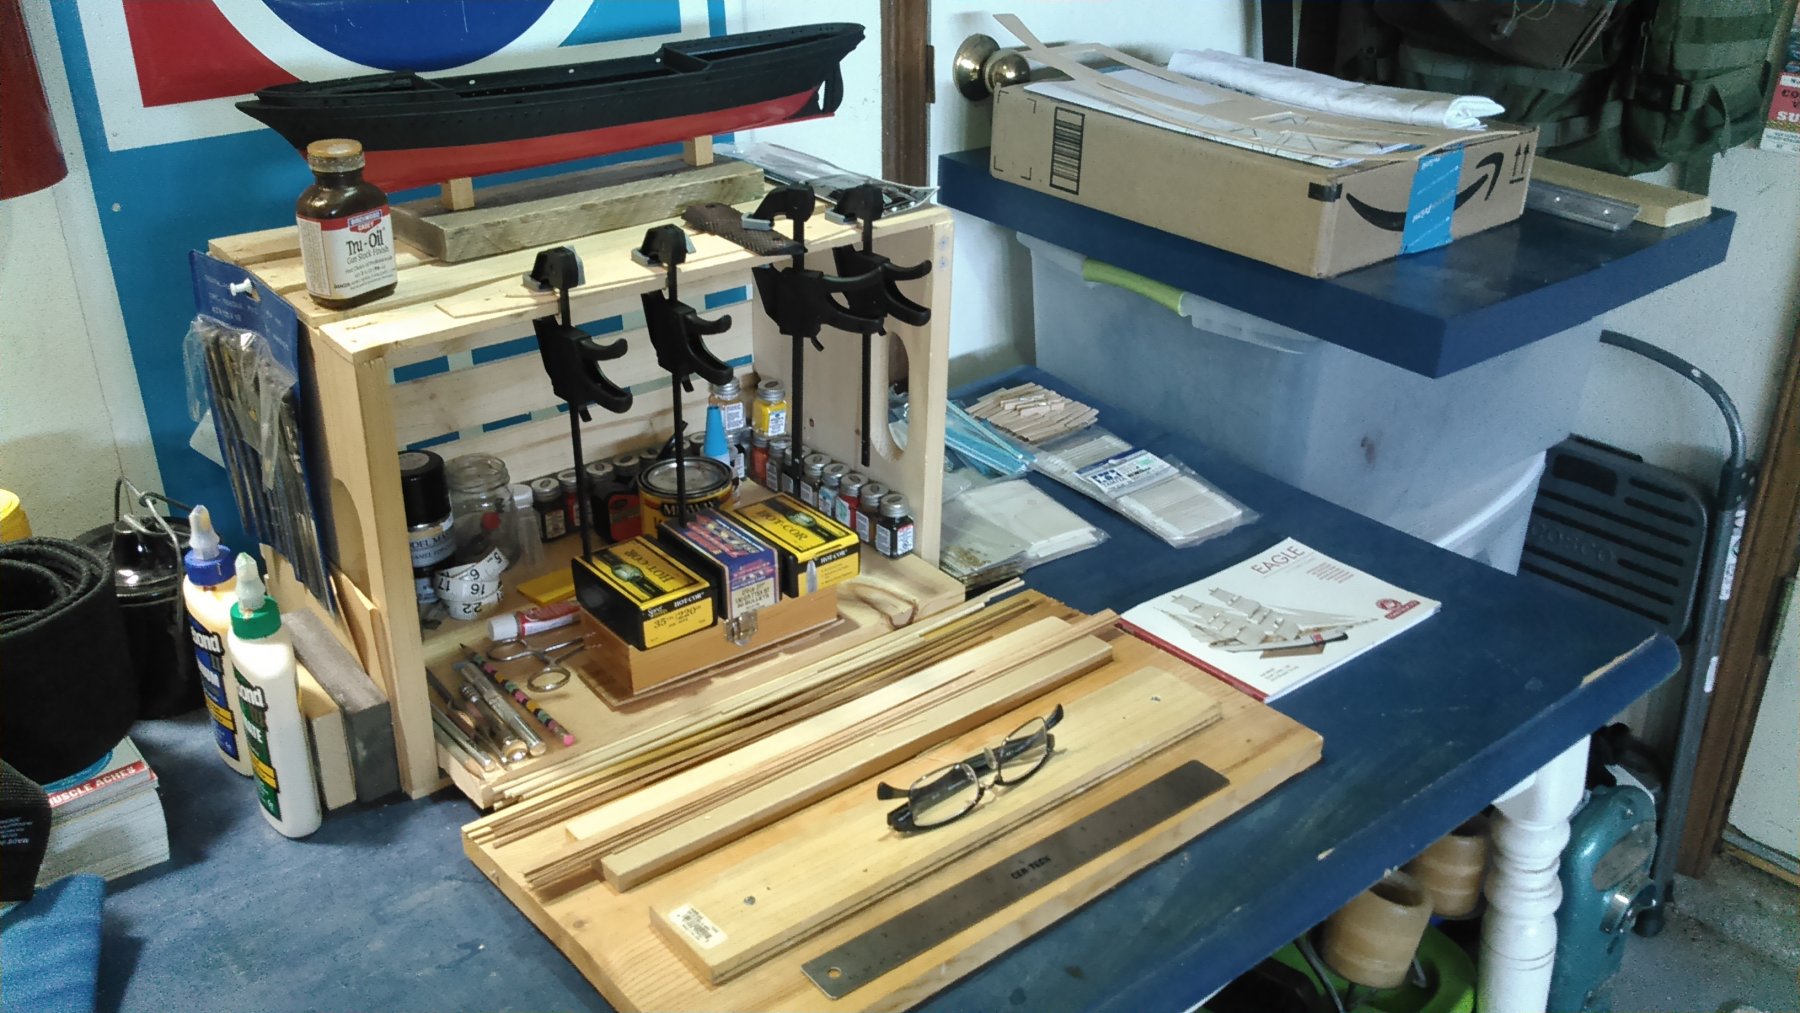
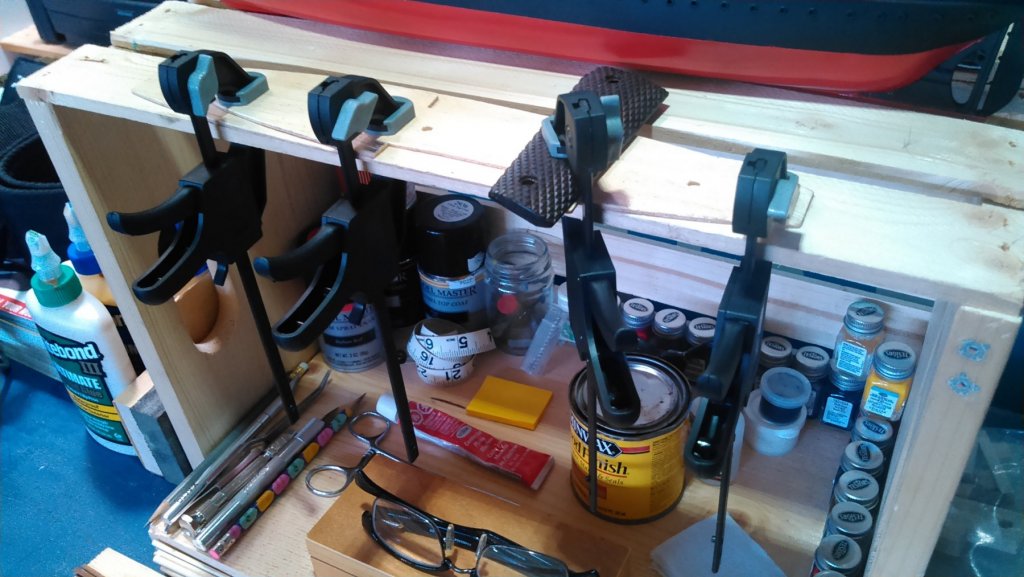
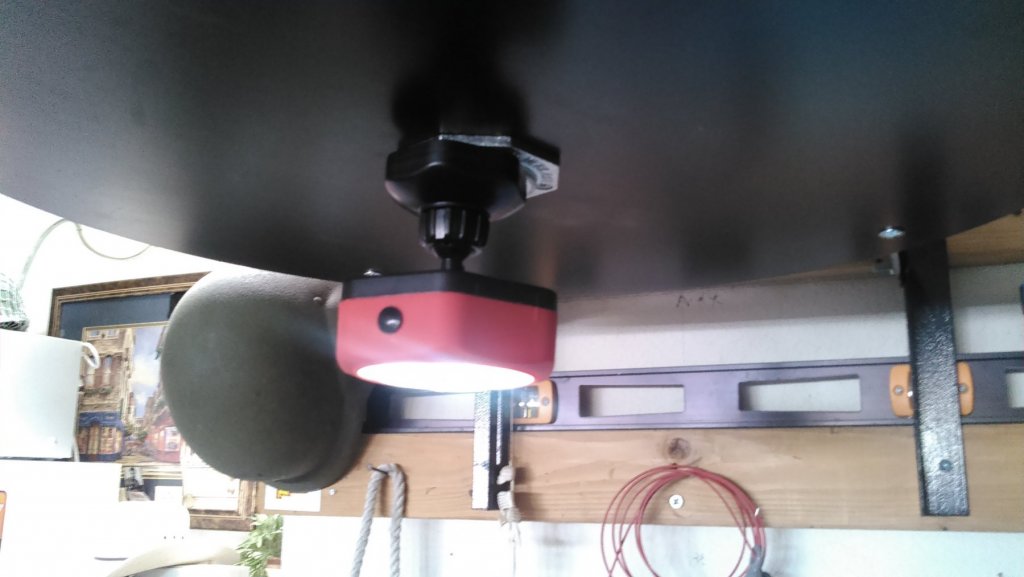
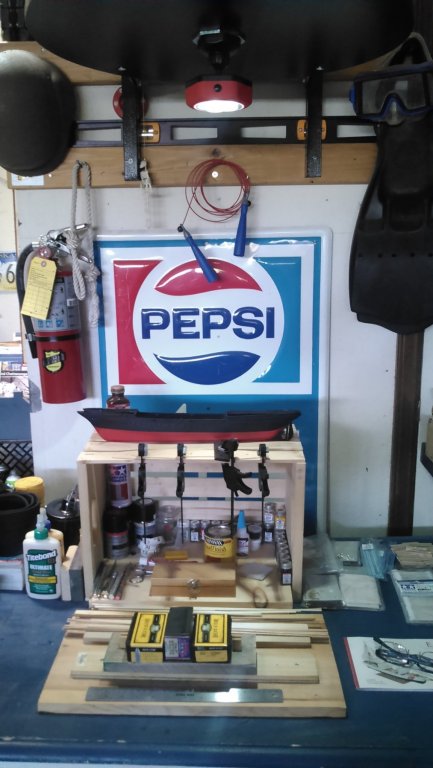
Well, I will be taking a short hiatus from the build for a three-day Barbary Sheep hunt up in the Sacramento Mountains. But before I packed up camp, I did some minor work to help with the next stages.... Firstly, these decks are still bowed. Especially the orlop, which even though hidden in the hull is critical to place correctly and securely to anchor the masts. The foredeck also has some bow, and the already planked central and quarterdeck also are showing just a little. I've soaked and bent them (before planking), then pressured them with weight, and no sooner than they are taken off the bow reappears - especially the pesky orlop, which is basically a weak letter "C". So, I made a trip to Harbor Freight and picked up some things that will be helpful with this build and with future, more complex ones, from what I've seen.... and added some home items to help. I bought a bunch of small wood clamps (for a whopping $1.50 each), then soaked and clamped the orlop and the foredeck on the ledge of my little work crate. Because the foredeck has an interesting aft extension, I placed an old Colt 1911 grip over it and clamped it to make sure it pressures evenly. Since the central and quarterdecks are not bowed much, and are already planked, I placed them underneath my exacto box with some boxes of hunting bullets on top of it to keep them honest while I'm gone. I also picked up a handy magnetic LED light (for a whopping $4.00), which fastens nicely to my old speedbag mount that now sits over my worktable. It is bright, but diffuse and works very well. I also picked up a nice little hemostat and a good metal draft ruler with metric and imperial measures. My total from Harbor Freight was about $15. So I wanted to do something today, but did not want to get in over my head before leaving. So next up was the stand, to give me a stable work platform for the hull.... Constructo's stand is a bit flimsy and (of course) slightly bowed. I didn't like the look of it for an old whaler. It's basically a rectangular piece of sandwiched balsa that is to be trimmed with some very nice lime tree edgings (which are much darker than the planking, which is mukaly I believe) and mounted with simple wooden blocks. So I trimmed down an old piece of pallet scrap that I had from a pallet patio bar I made, a pile of which had been sitting outside by my shed for a couple years. I went through them and found one with a nice weathered look which I thought simulated old deck planking well. So I cleaned it up, sanded it very lightly to add to the weathered look, and mounted the stand blocks with Titebond. After a bunch of sanding and leveling, I stained the blocks a little, and I think I came up with a salty stand that suits an old whaling workhorse. At least to my eye. It's a little thing, but I think it works, and gave me a sense of accomplishment for the day. Lol. So I am getting this little workspace squared away, and hopefully all my bowed decking will be better behaved and ready for the next steps when I come back on Sunday... Until next time. Cheers.


- 37 replies
-
- 3
-
-
- eagle
- constructo
- (and 1 more)
-
This is great info Popeye. Thanks! I will put that to use. Another great reason to be on this forum. Cheers.
- 37 replies
-
- 1
-
-
- eagle
- constructo
- (and 1 more)
-
Thanks Popeye. I appreciate that. Yeah I thought the same thing as soon as I saw them together in place and almost went ahead on a central deck redo! But I figure if I follow through with the whaler modification (which I am 99% sure I will) most of what is not covered with the midcastle and deckhouse will be taken up with a tryworks and a couple mid-ship davits for whaleboats. If I really don't like it I can always pencil in some butts. Now there's a sentence I never anticipated I would type. Lol. I sent an email to the New Bedford Whaling Museum where the Mary and Helen was built in 1879 on the off chance somebody there may have some info on her deck appointments or even maybe available plans. We'll see what happens. Cheers and thanks for the compliment.
- 37 replies
-
- 2
-
-
- eagle
- constructo
- (and 1 more)
-
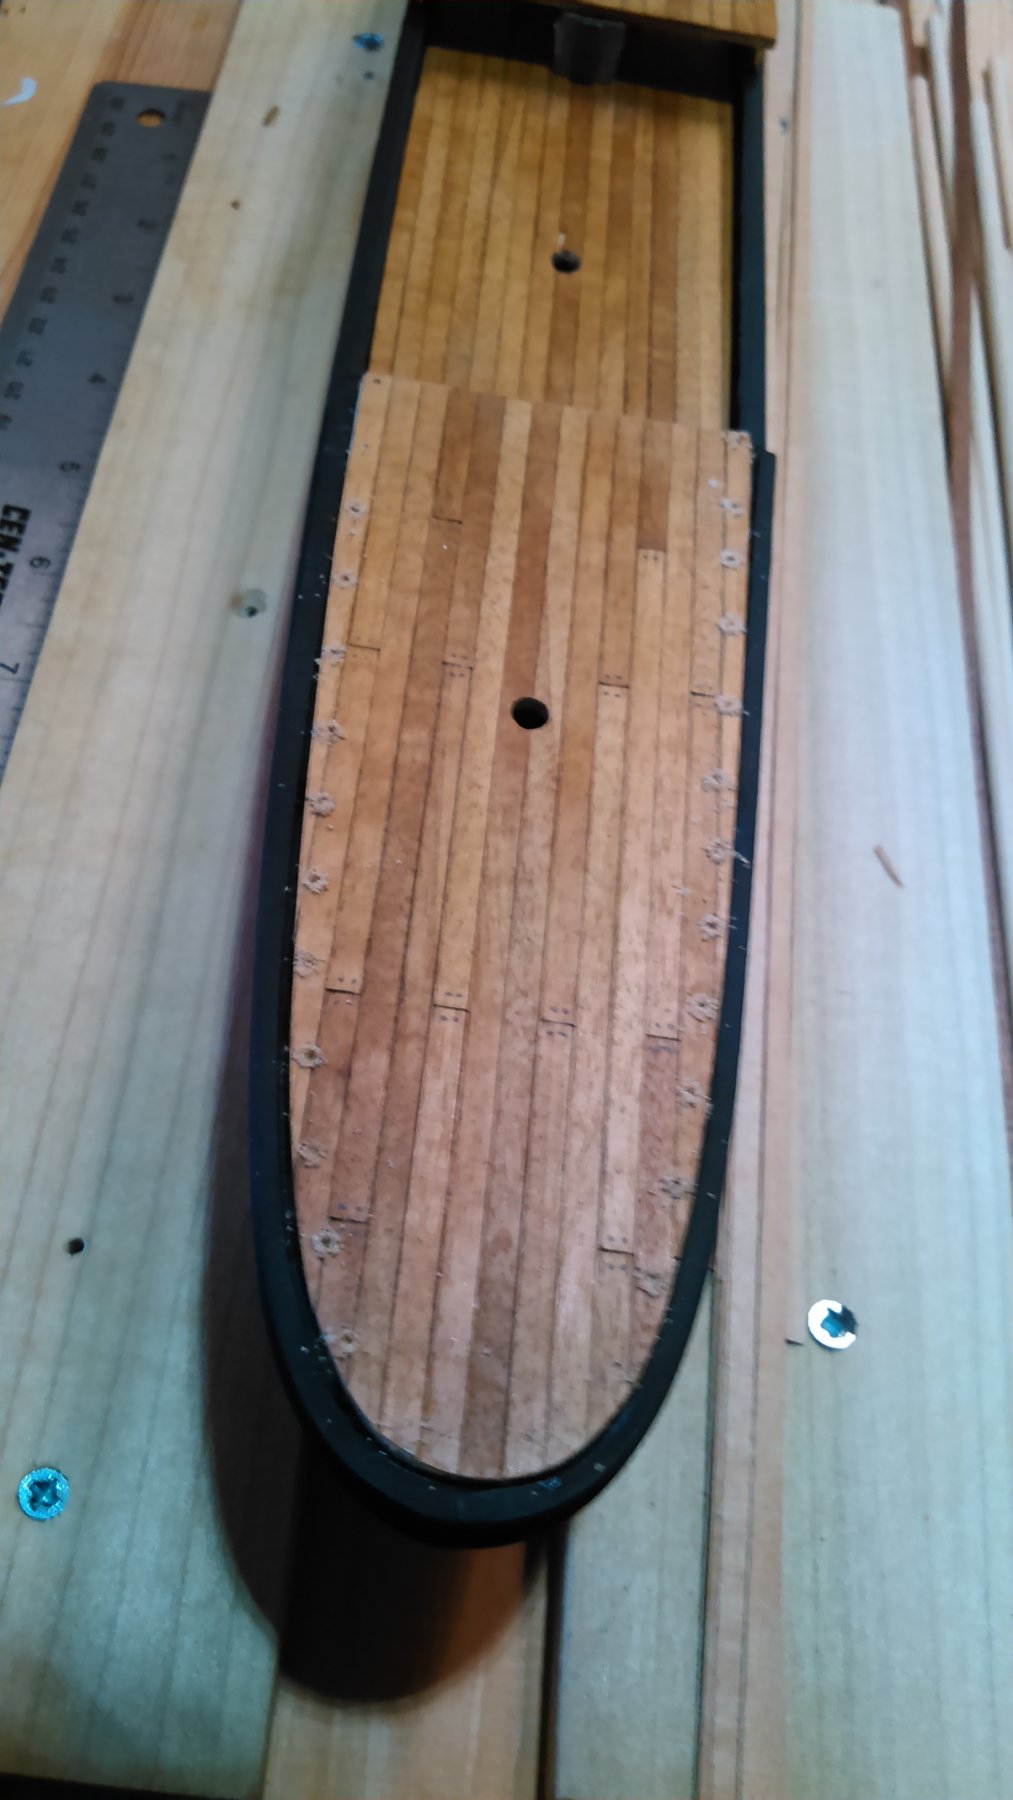
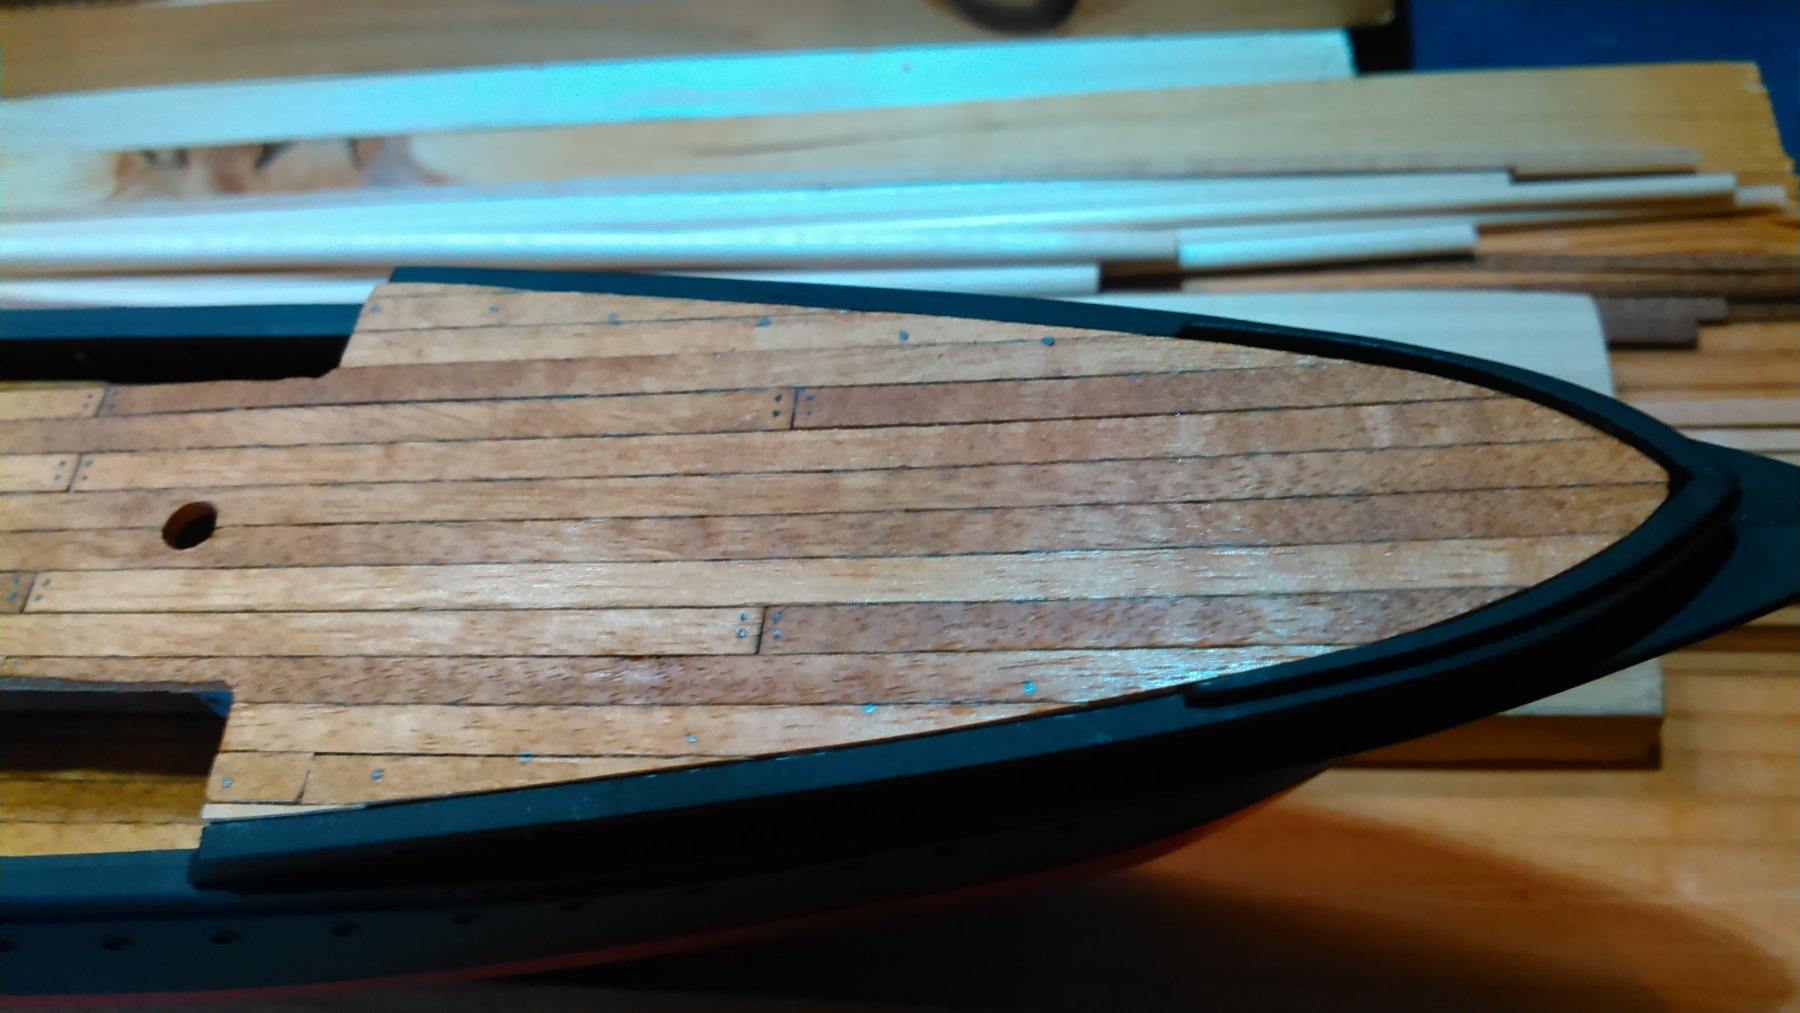
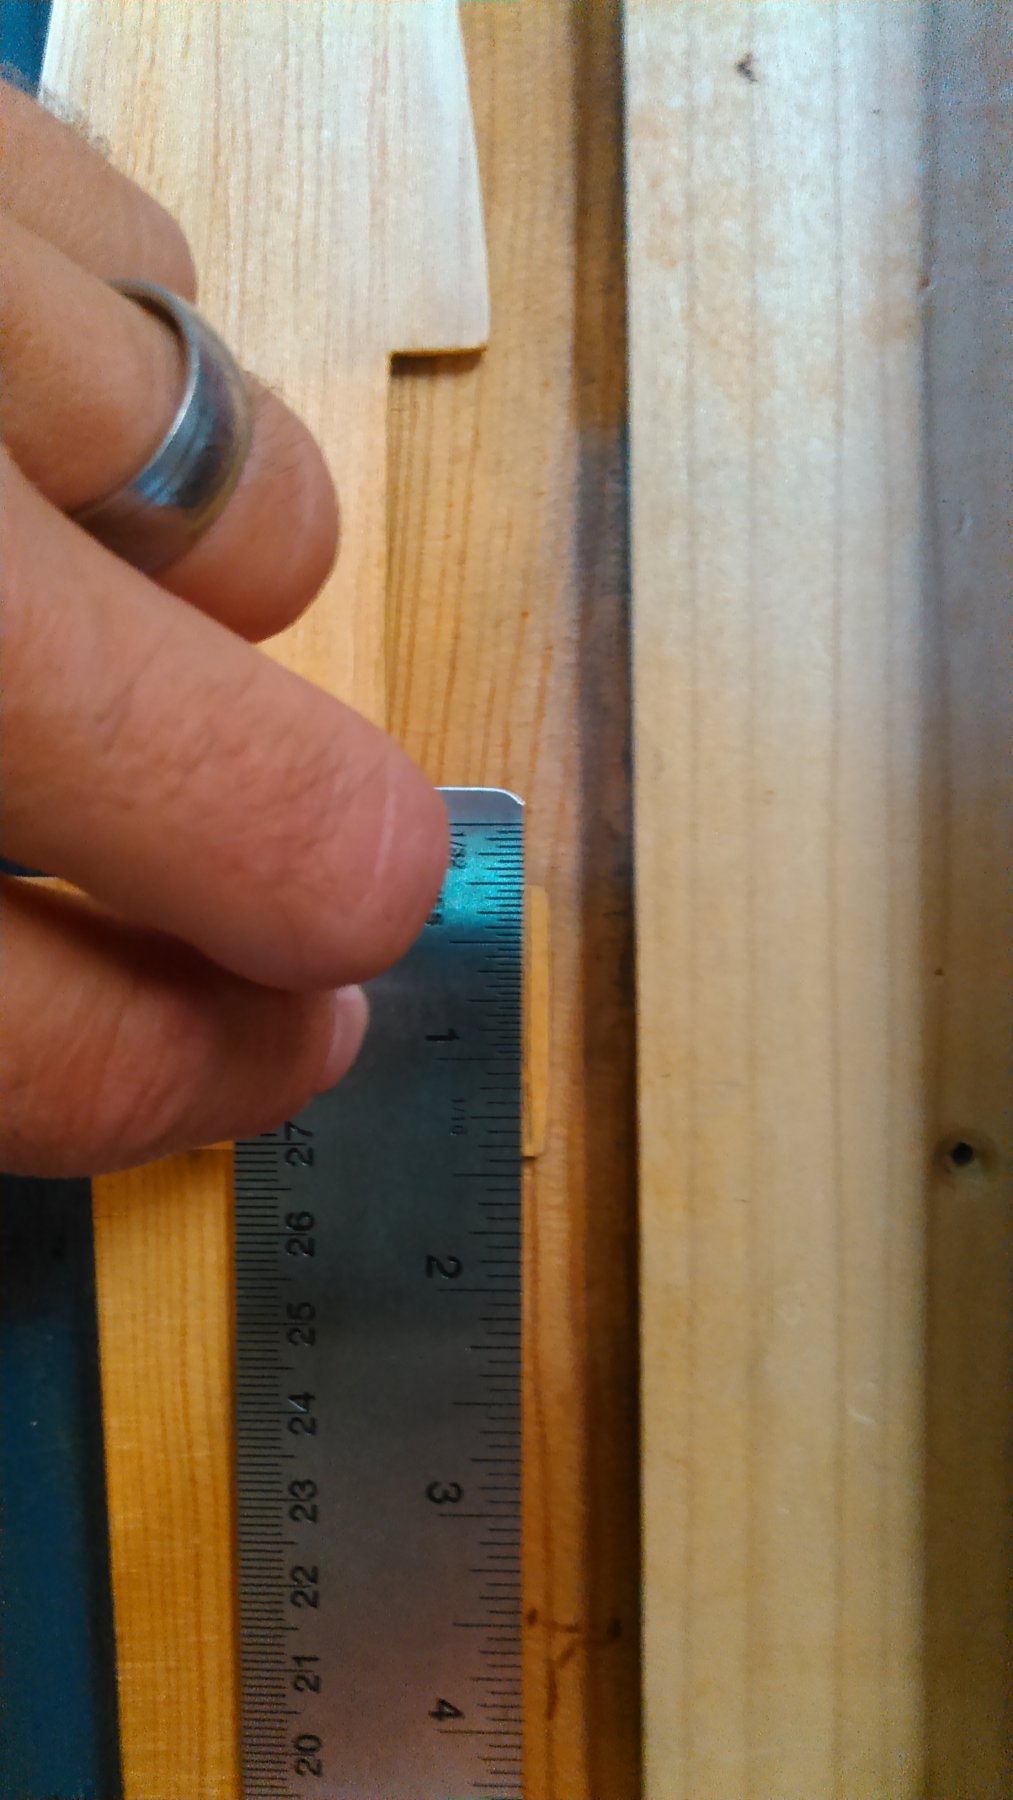
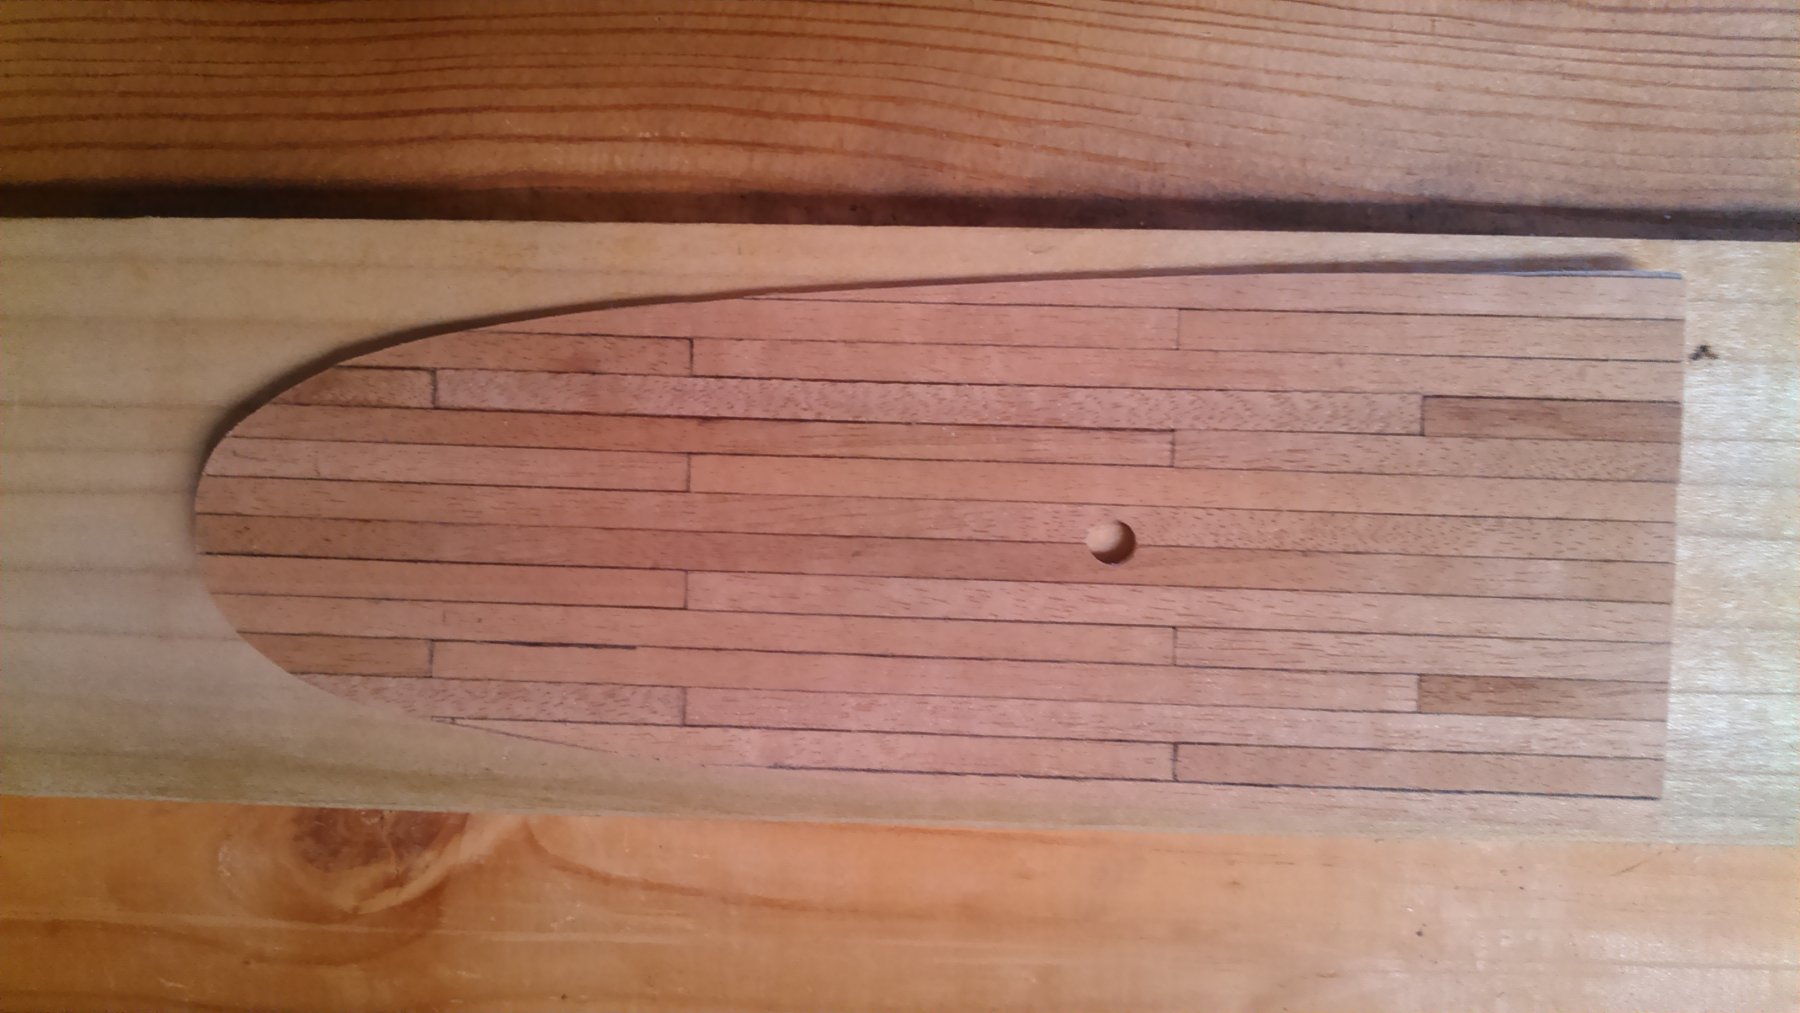
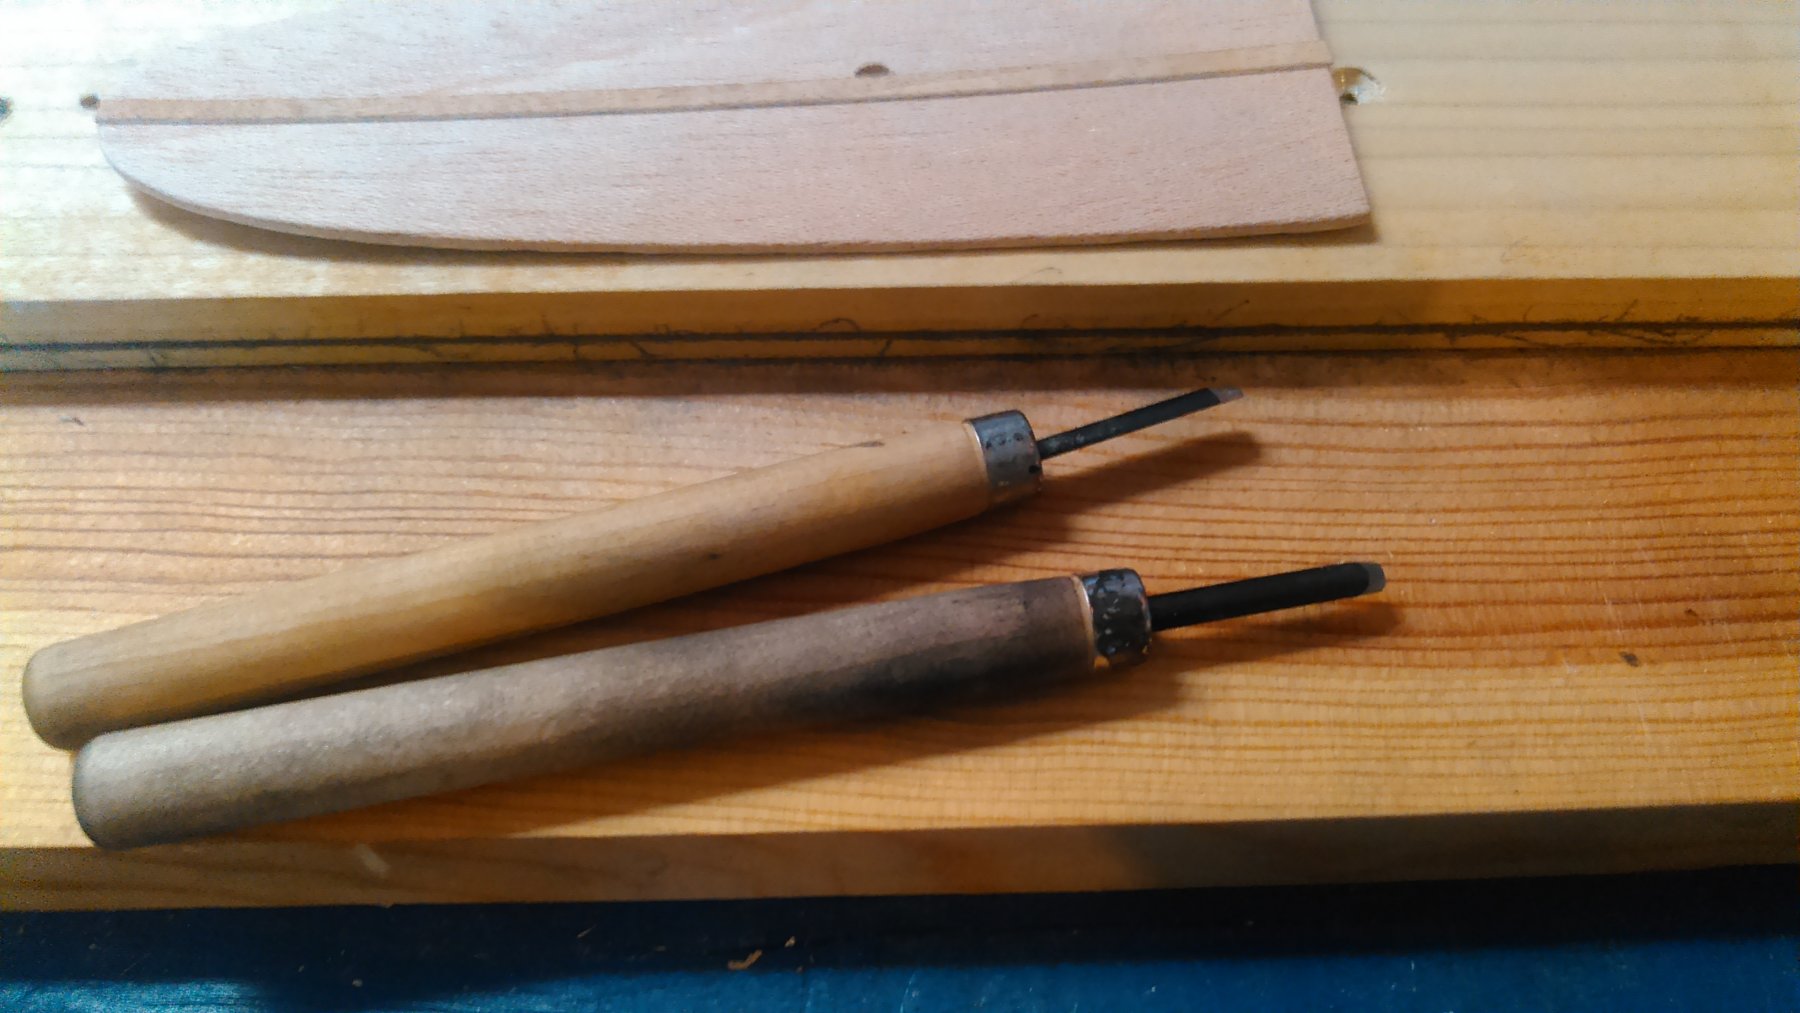
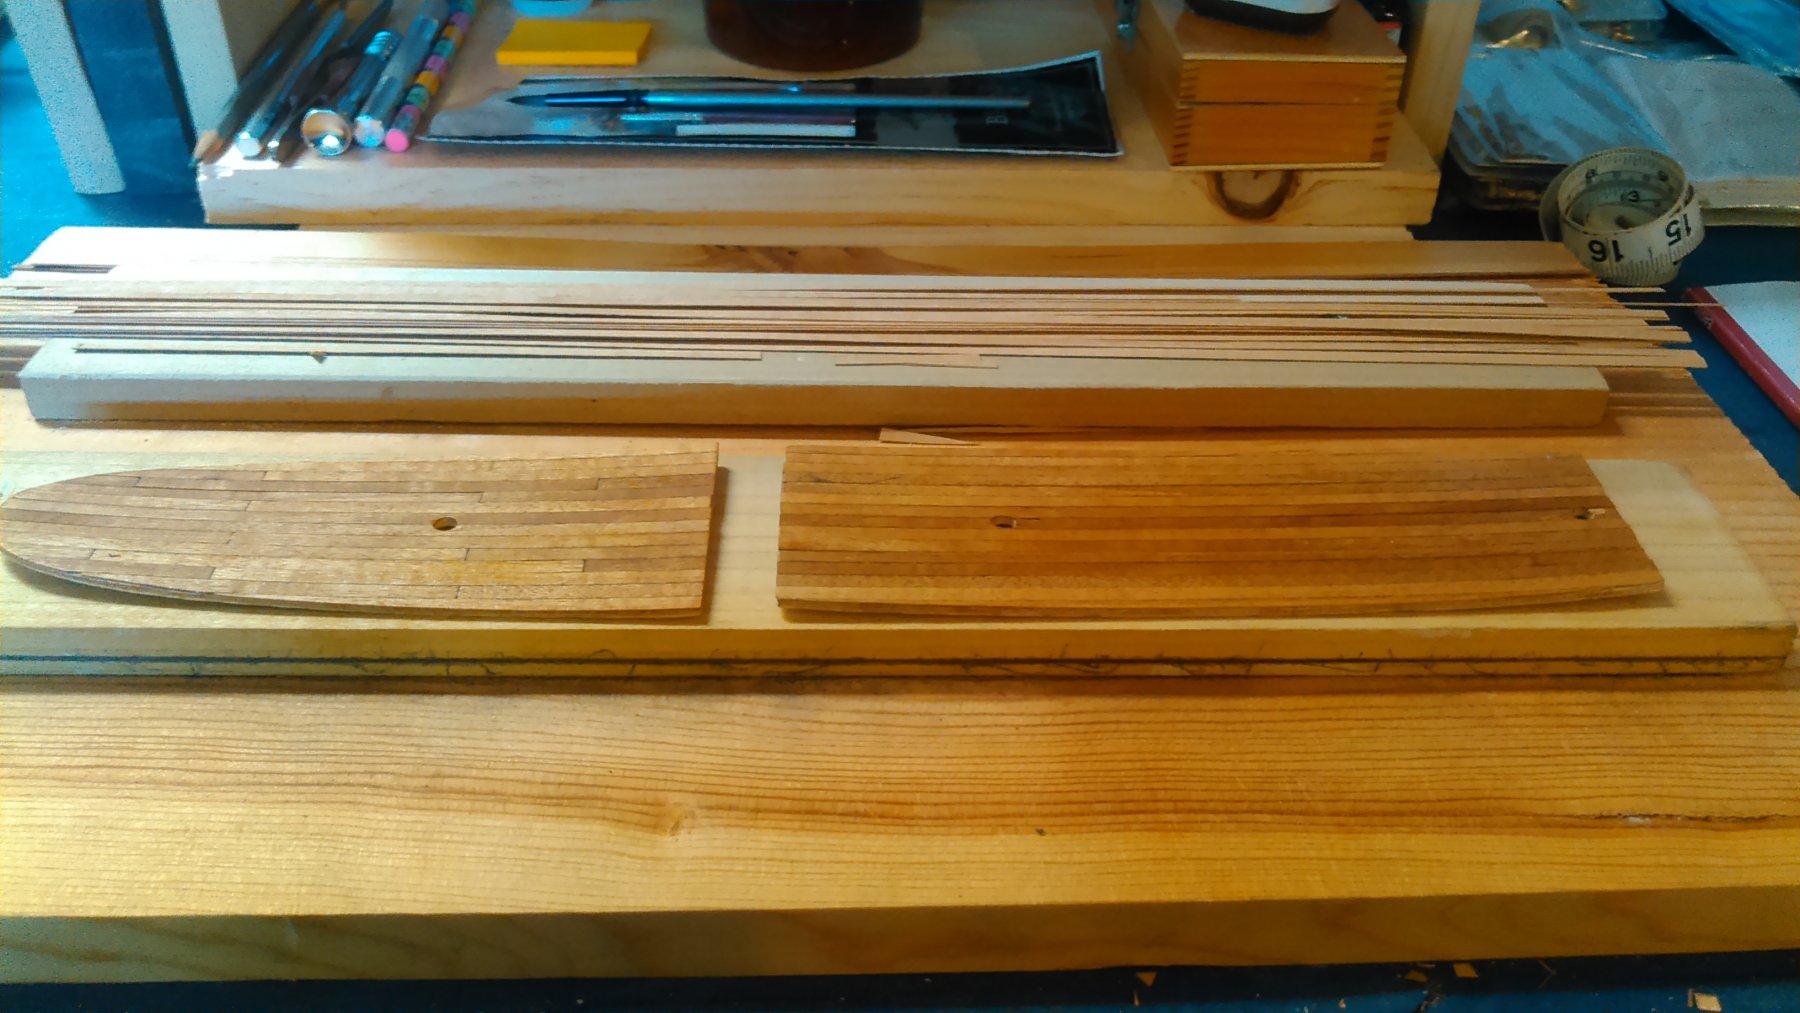
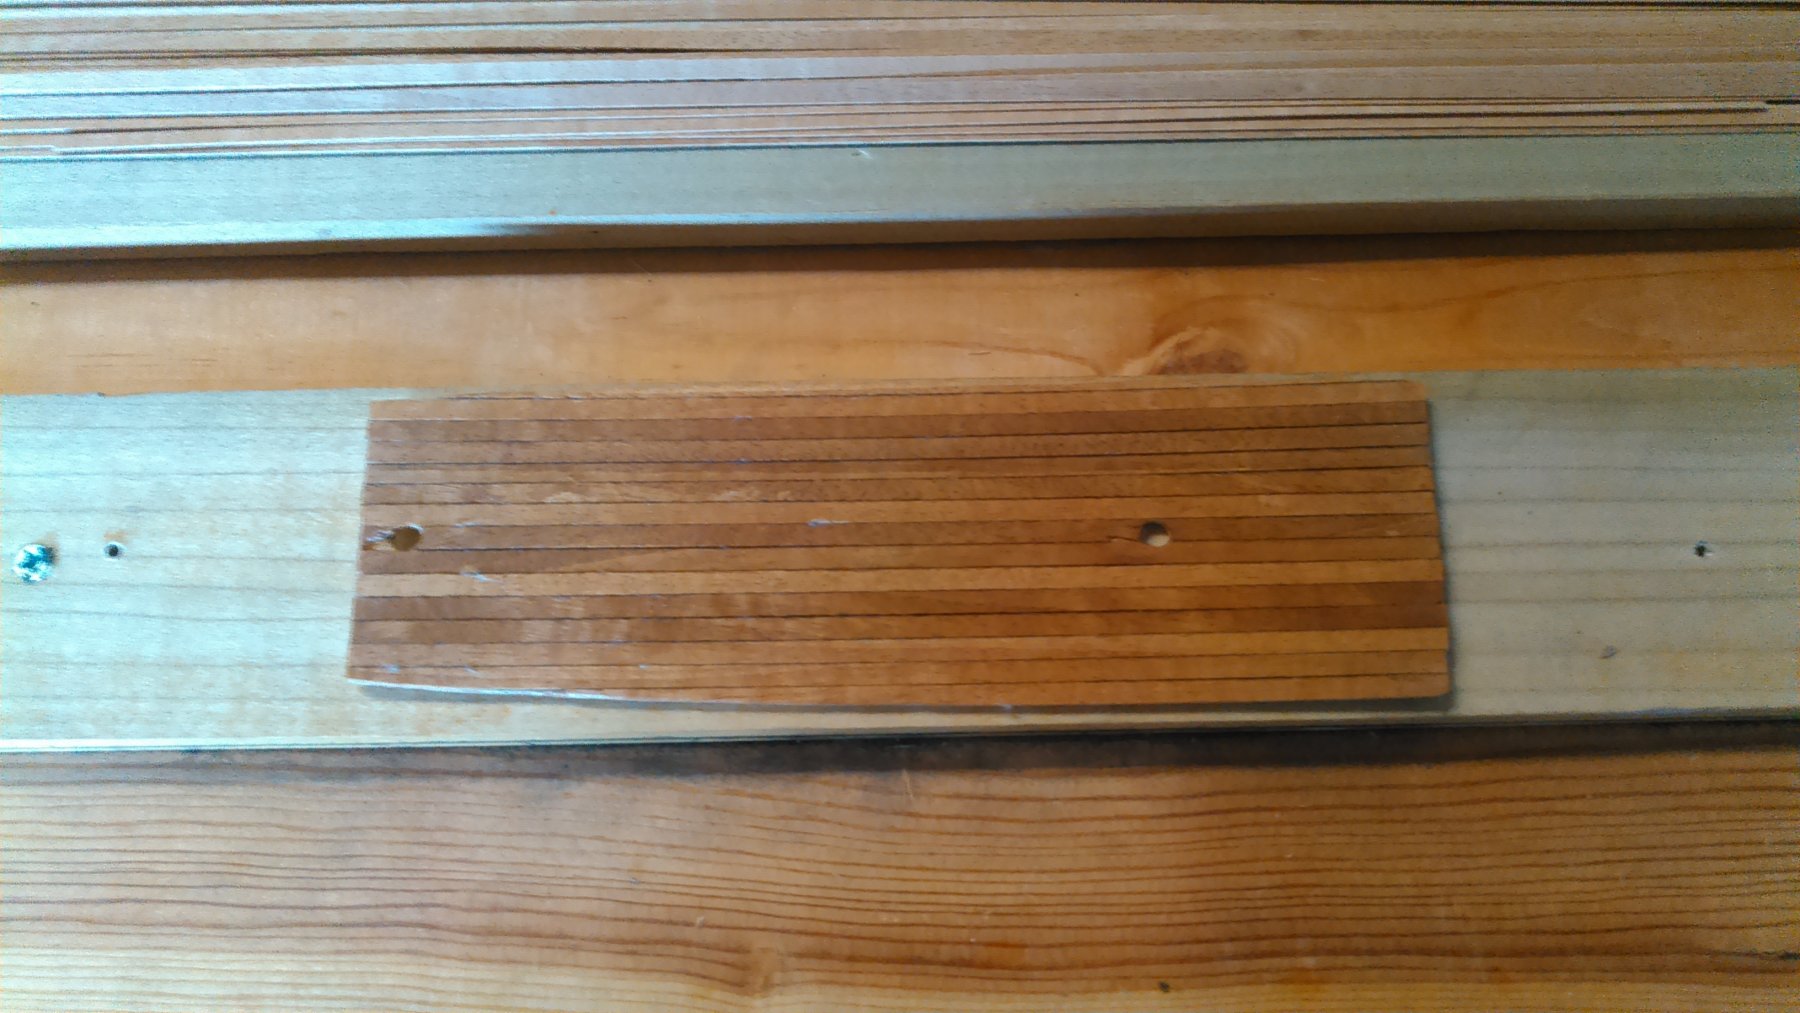
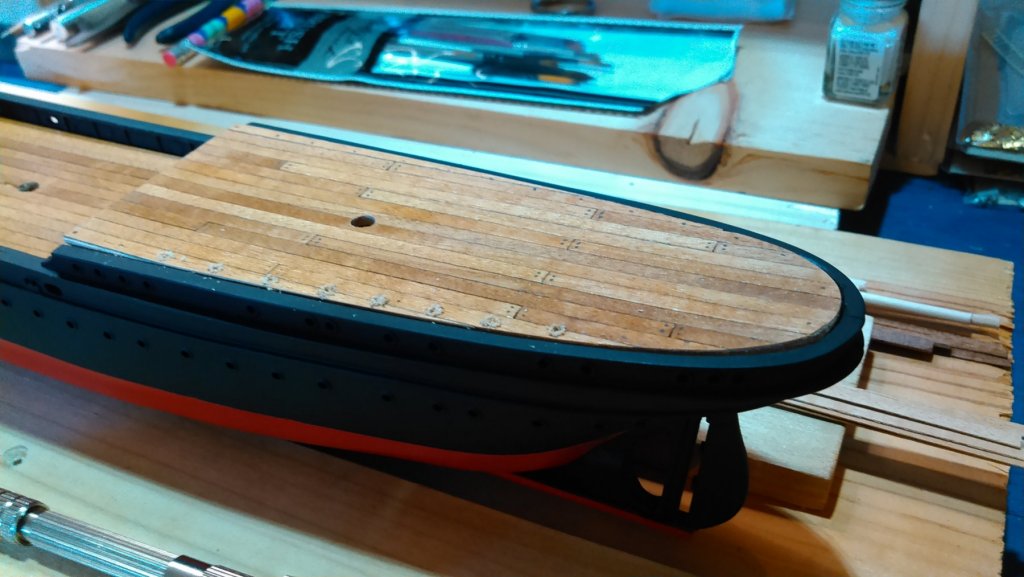
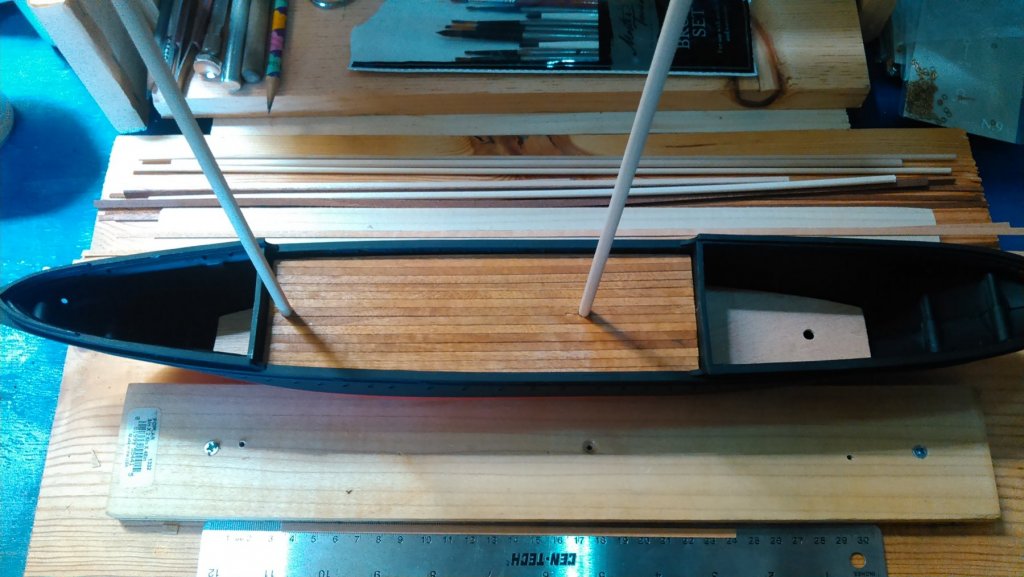
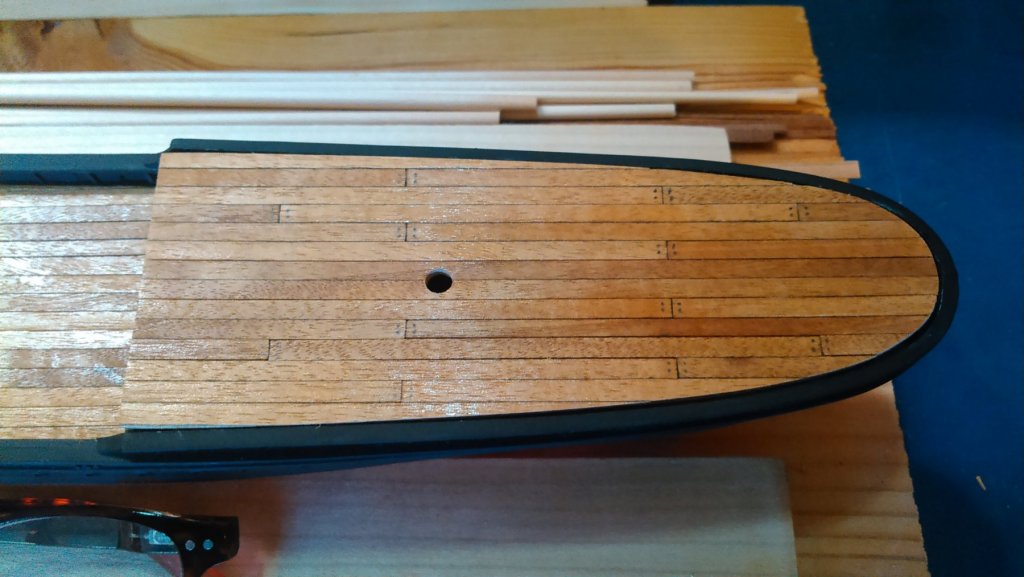
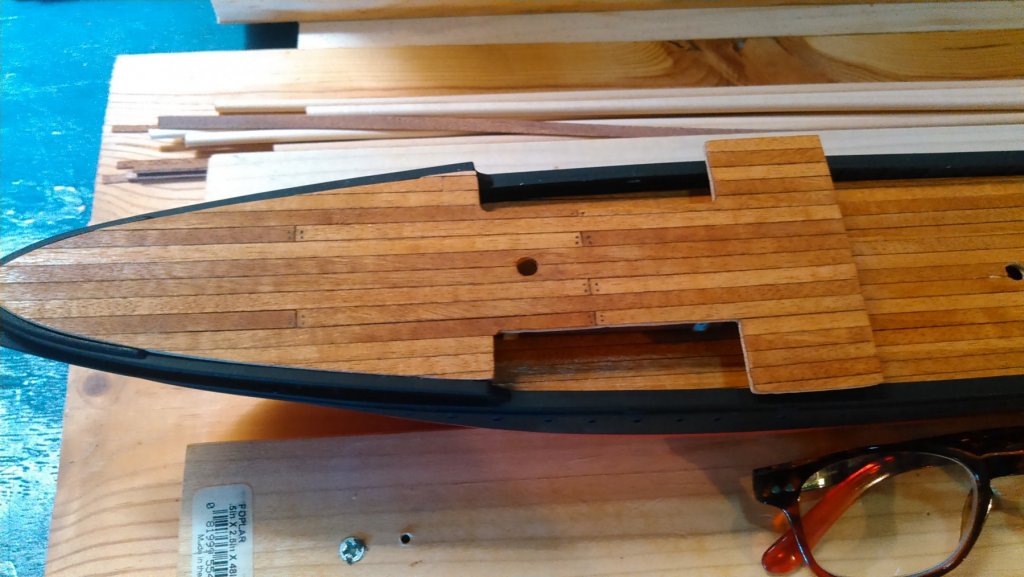
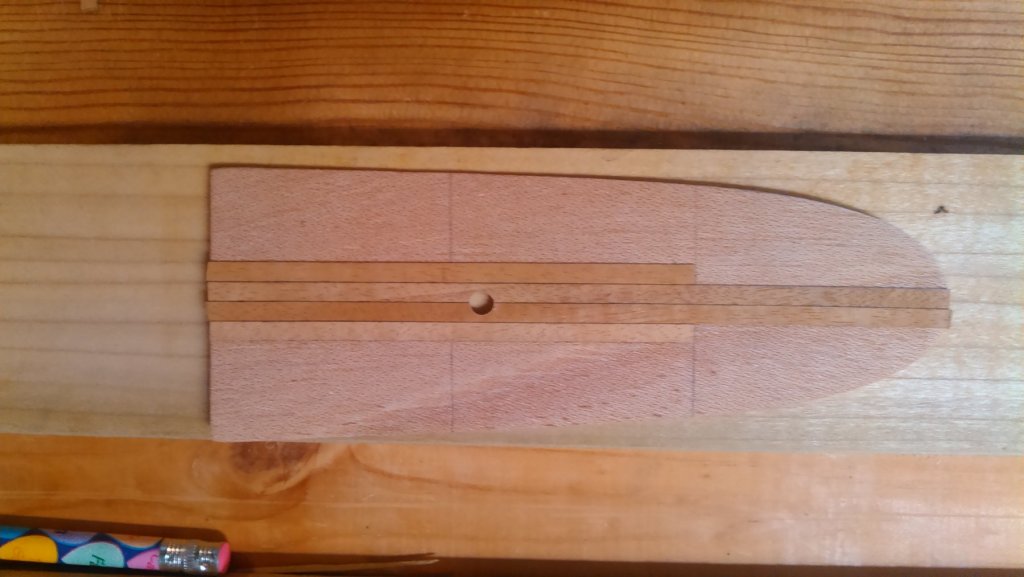
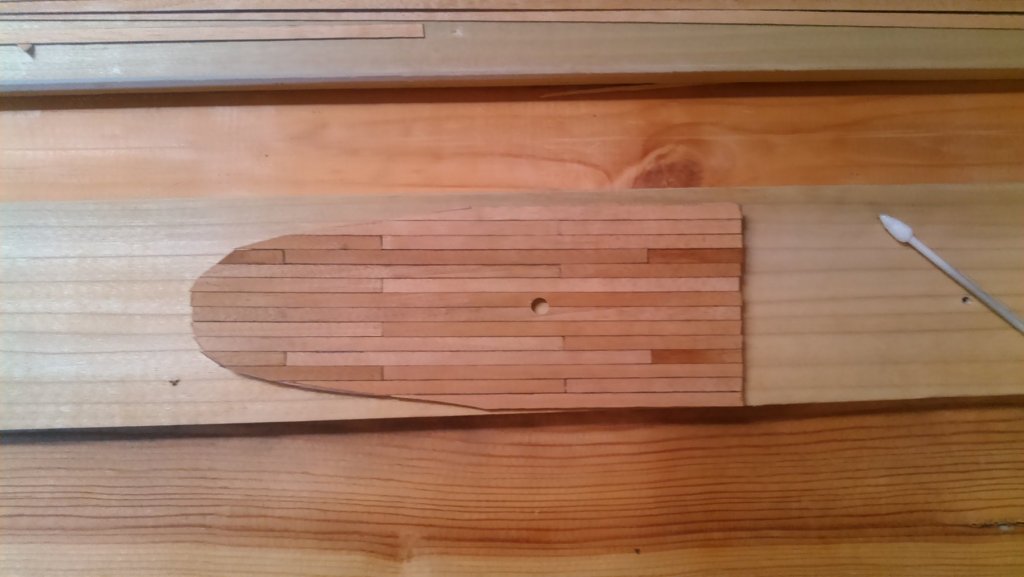
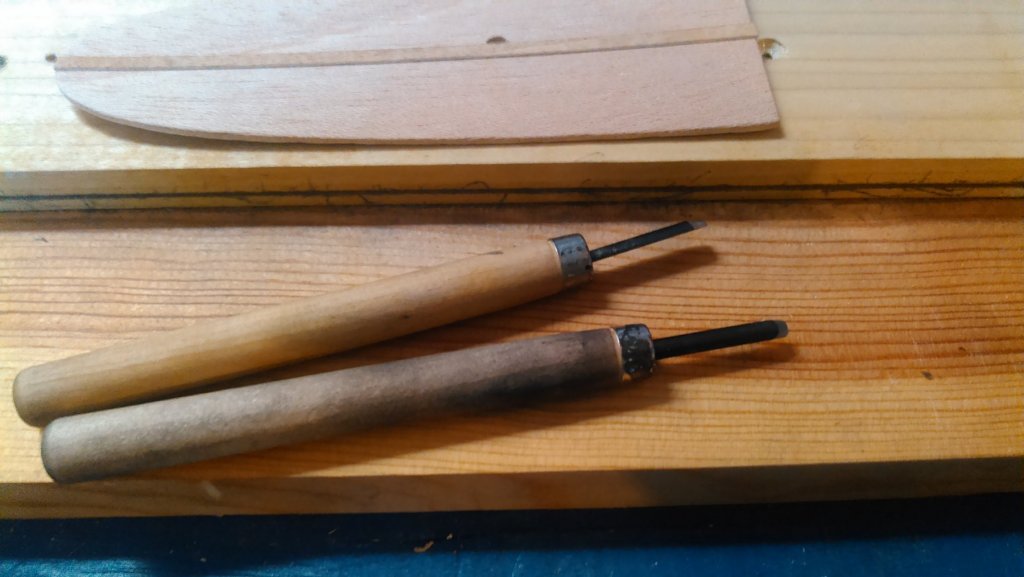
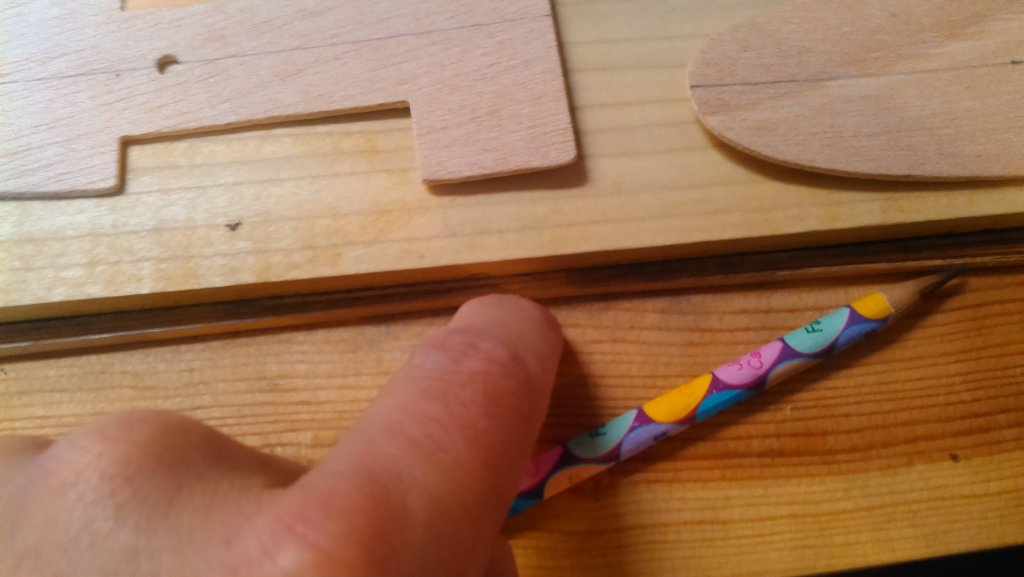
Today I decided to try out a deck planking method. Since I am a kinesthetic learner (which, as I understand it, roughly translates to "not smart"), I chose the quarterdeck to start with. I took my time and basically spent today just working on it. I forgot to mention yesterday, that I use a trick I found here for the caulking appearance. I use a #2 pencil. What seems to be working for me is to press a group of planks together and run the pencil over each of the sides. Then, once I have a plank cut to length, I'll go over it again and do the butt ends as well. So I scribed my center lines (on both the fore and quarterdecks). Once I had my center, I laid my first plank. As opposed to the central weather deck, with these I decided to split the first two planks on the center. According to the measurements, this would evenly fit planks to the bulwark and gunwales, as opposed to having to split planks to get a fit there. Also, it is much easier to trim out the masthole, as I learned yesterday.... To do this I used a needle sander and some small carving tools I used once on a gunstock project: I laid two central planks, then took the length of the deck and divided it by three, and marked those lines off as butt markers for the planking. I then began my planking pattern.... I'm pretty sure I got this wrong, but I did like the results so I pressed ahead. I ran one standard length plank on each side of my center planks (standard being the length that covers two butt lines), with one on the end. The next run I did the reverse, and the third run I centered my standard length plank on the deck and added on each end. So, it looked like this at the beginning: And finished it looked like this... I got a little into it and forgot to photo.... Remember. Kinesthetic. Lol. So, running the two center planks definitely helped on the outboard edges. Those planks, though they would need trimmed, had a lot of meat to glue to. The next step was trimming and sanding. Once it was trimmed and sanded to fit, I stained with Minwax Natural Finish stain, and then, once dry, I coated both decks with some gunstock finish to give the decks a little worn shine: So next up will be planking the foredeck. And then building and placing the midcastle and deckhouse and then placing the decks... Until next time.


- 37 replies
-
- 2
-
-
- eagle
- constructo
- (and 1 more)
-
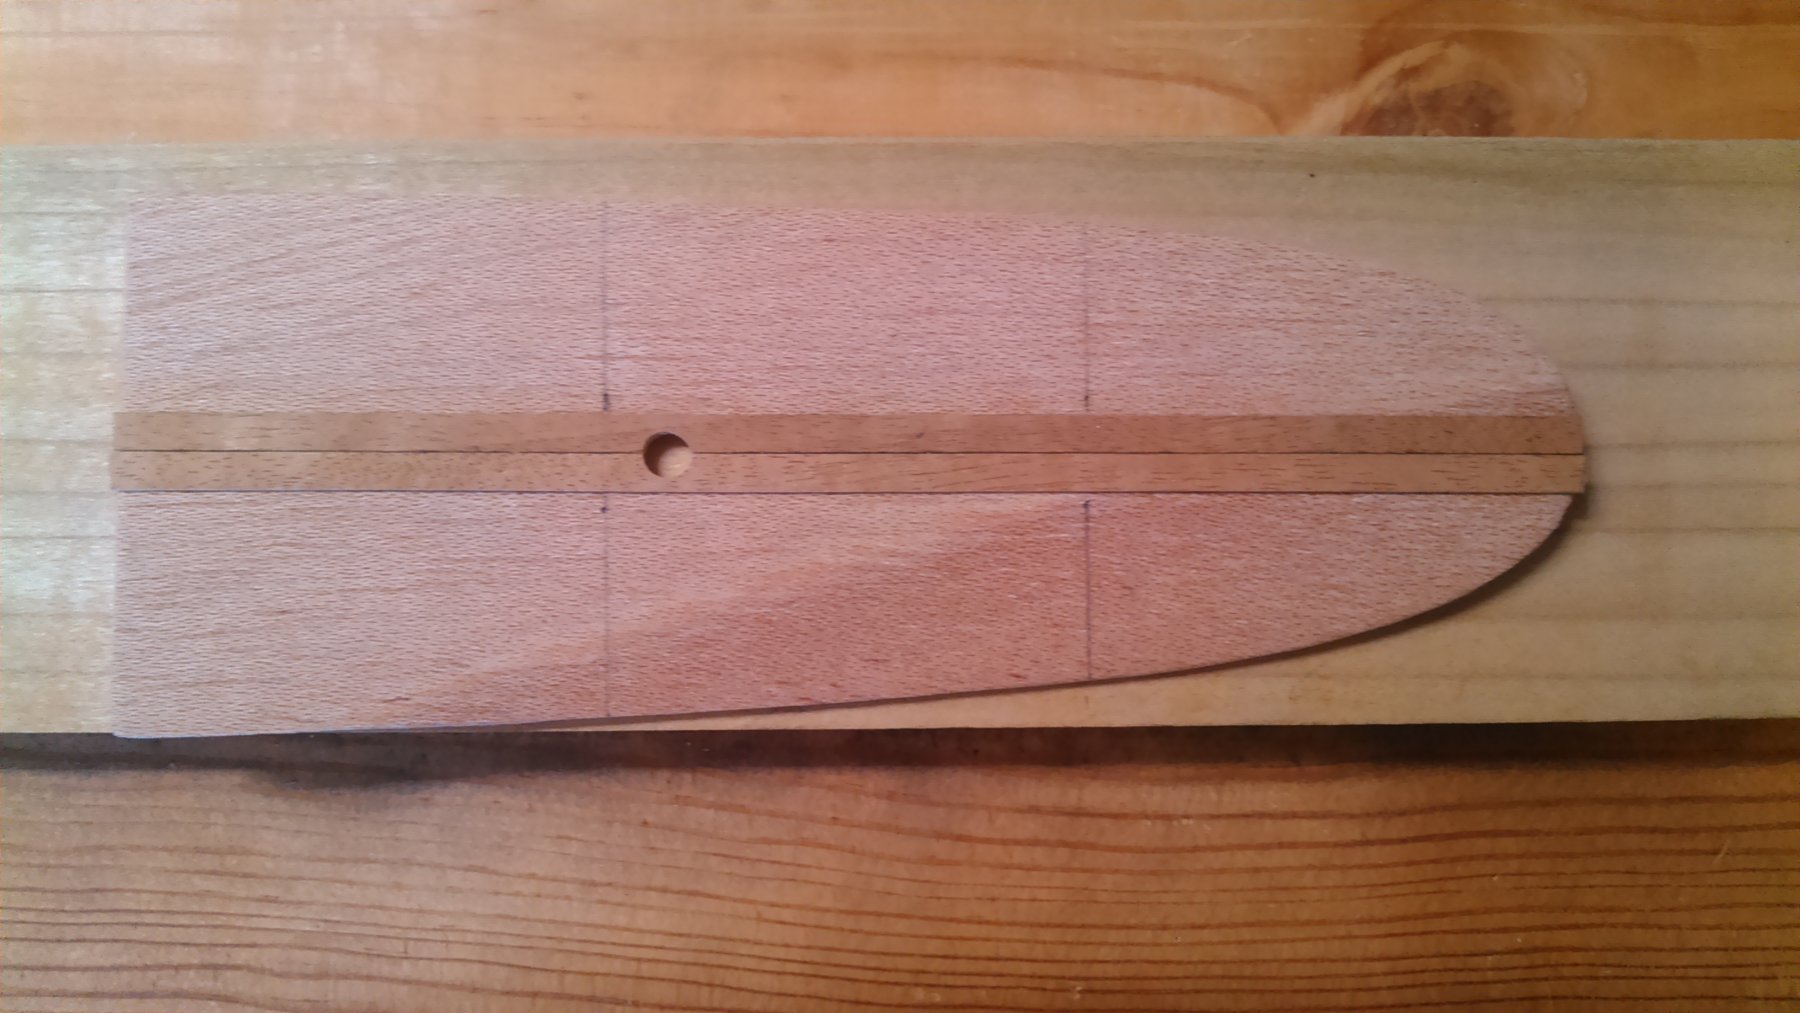
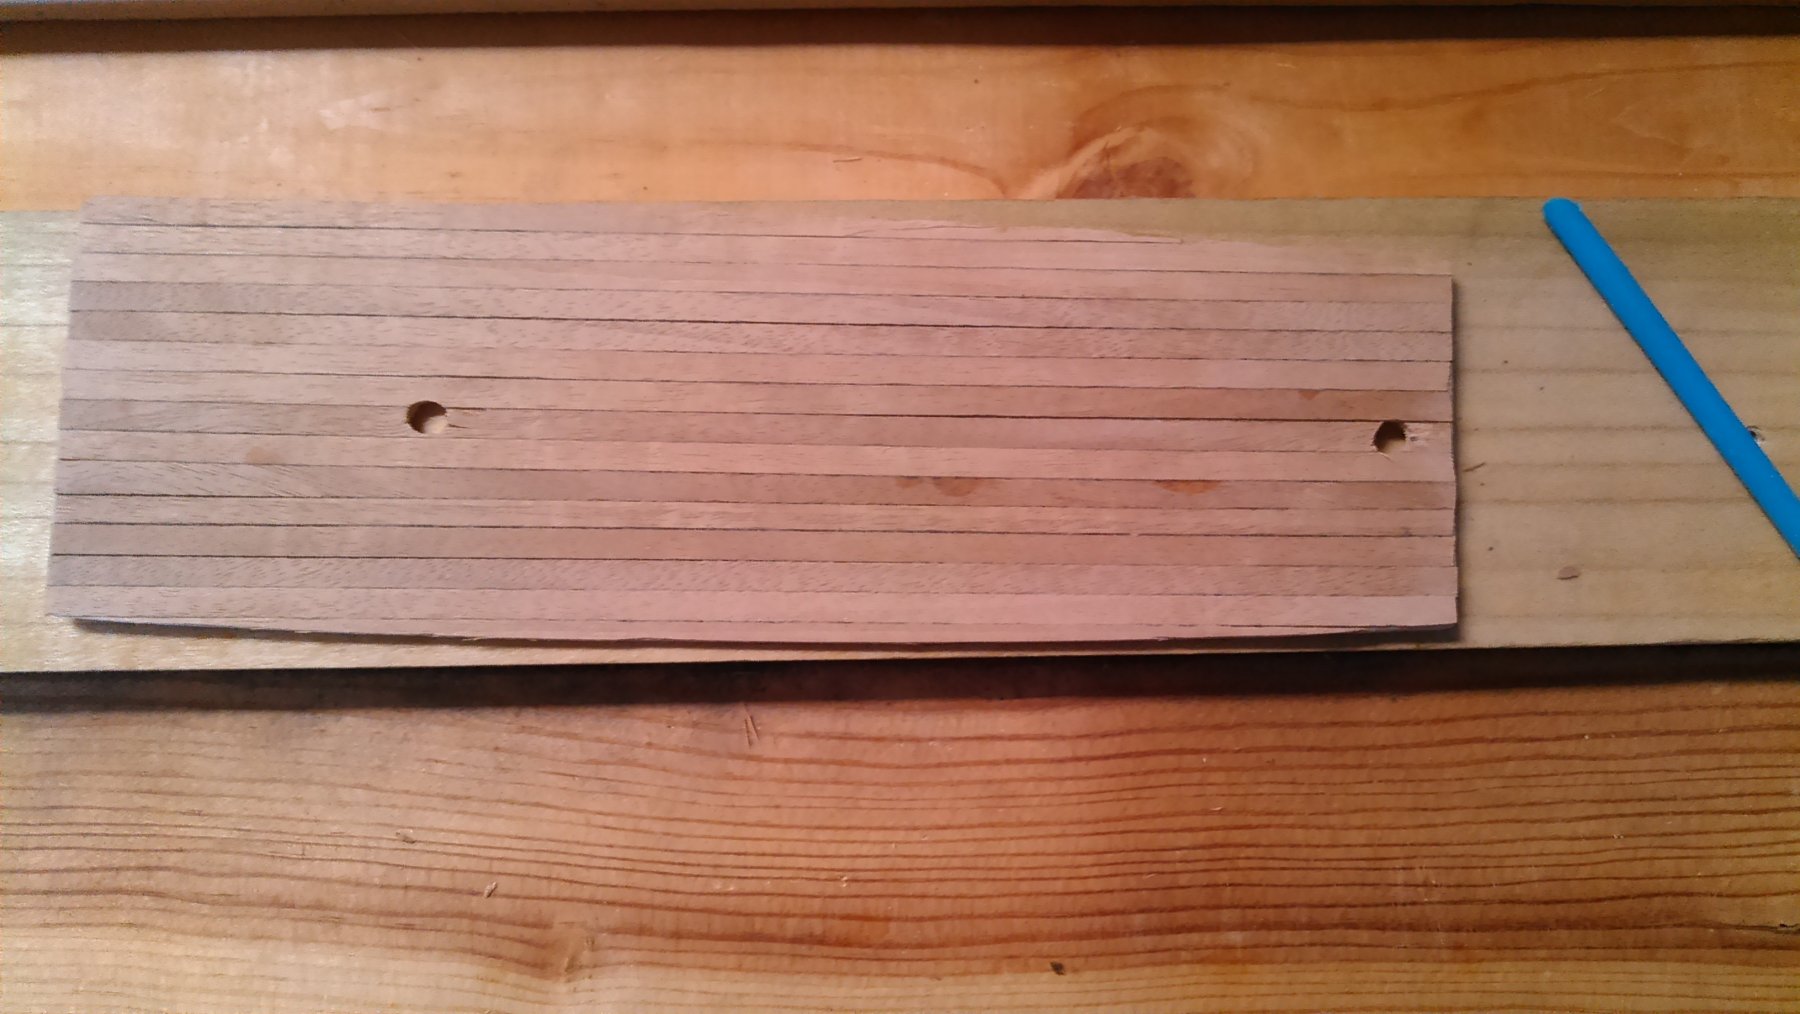
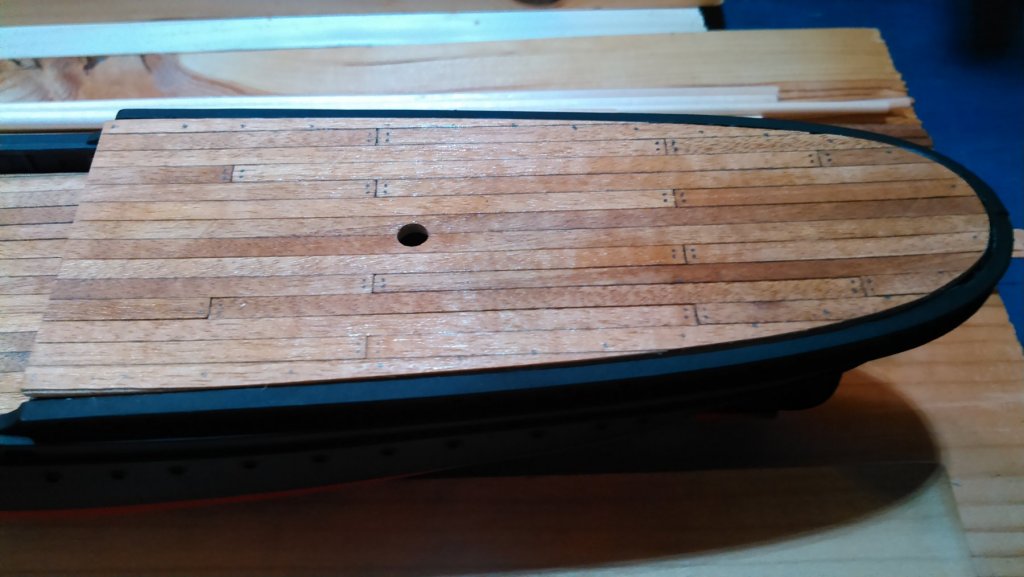
Today I had a few spare hours, and decided to take the plunge and try my first attempt at deck planking. I selected the central weather deck, as it will be a little more obscured from normal view in case I run out of talent quickly. One thing that I had to do before starting any deckwork was to straighten out all of the deck pieces. They were all pretty warped. I soaked each of them yesterday, gently ran them over a straight pipe as an English wheel kind of bender to loosen up the grain a little, then stacked them underneath a flat board with a little weight on it, and let them all dry overnight and until this afternoon. Though you can't see it in the photos (because I got all in and forgot to document) is my centerline measurement. I'll be sure to show them on the forecastle and quarterdeck. I measured each end with a center mark, then center with a center mark, and scribed a pencil line down them. Because of the sanding required to get it to fit into the central deck well, the center line was slightly off - judging by where it lined up with the mast holes. I adjusted as best I could, but still learned a lesson as you will see. Anyway, I started my first plank centered right on top of my centerline, as that was what the directions showed. It shows planks on either side of center for the other decks, but not this one. I then ran opposing sides back and forth with straight full planking. I wanted to start off with a 3-butt system, but I decided to wait for the other two decks to try it, as this was my first time doing this. KISS seemed to apply well. I ran all the planks out, cutting them to full-length size, then penciling the sides for caulking, then gluing with fast-dry while butting them against the next plank over. As I approached each edge I could see the problem I'd created, but I was committed, so I plowed ahead. I ended up with vastly different last planks - one was the entire length but very thin forward, and the opposite side only traveled approximately 5/8 of the way forward before petering out. I glued these well, then let everything dry very well for an hour. Since I'm in New Mexico, things tend to dry very quickly comparatively. Once dried, I put the deck deck-side down, and then carefully trimmed the excess off around each side with a new blade on the Exacto. These are .5mm planks, so they trim easily. Once trimmed, I then opened up the mast-holes as carefully as I could with a pin drill and exacto. And learned another lesson: Mast holes are much easier if you butt the planks at the hole and trim, or split the holes with the planks and trim, as opposed to having to drill out a mass of center plank and then trim. So I have some slight splits and chipping around the mast holes, which I will fix later with sawdust glue (or cover with rigging).... Once this was done, I sanded everything down with 220 grit, and worked out the mast holes with needle sanders. When it was where I wanted it, I applied a light coat of natural stain to darken it a bit and hopefully bring out the caulking. Once it was done I sanded around the sides until I had a good fit into the central well (and picked out the lint from the stain cloth, which is what you see in the stained deck photo...). Next step will be planking the fore and quarterdecks and starting on the deckhouse and midcastle. I'm hoping to use the 3-butt method for these two decks, so I have some studying to do.... Until next time.


- 37 replies
-
- 2
-
-
- eagle
- constructo
- (and 1 more)
-
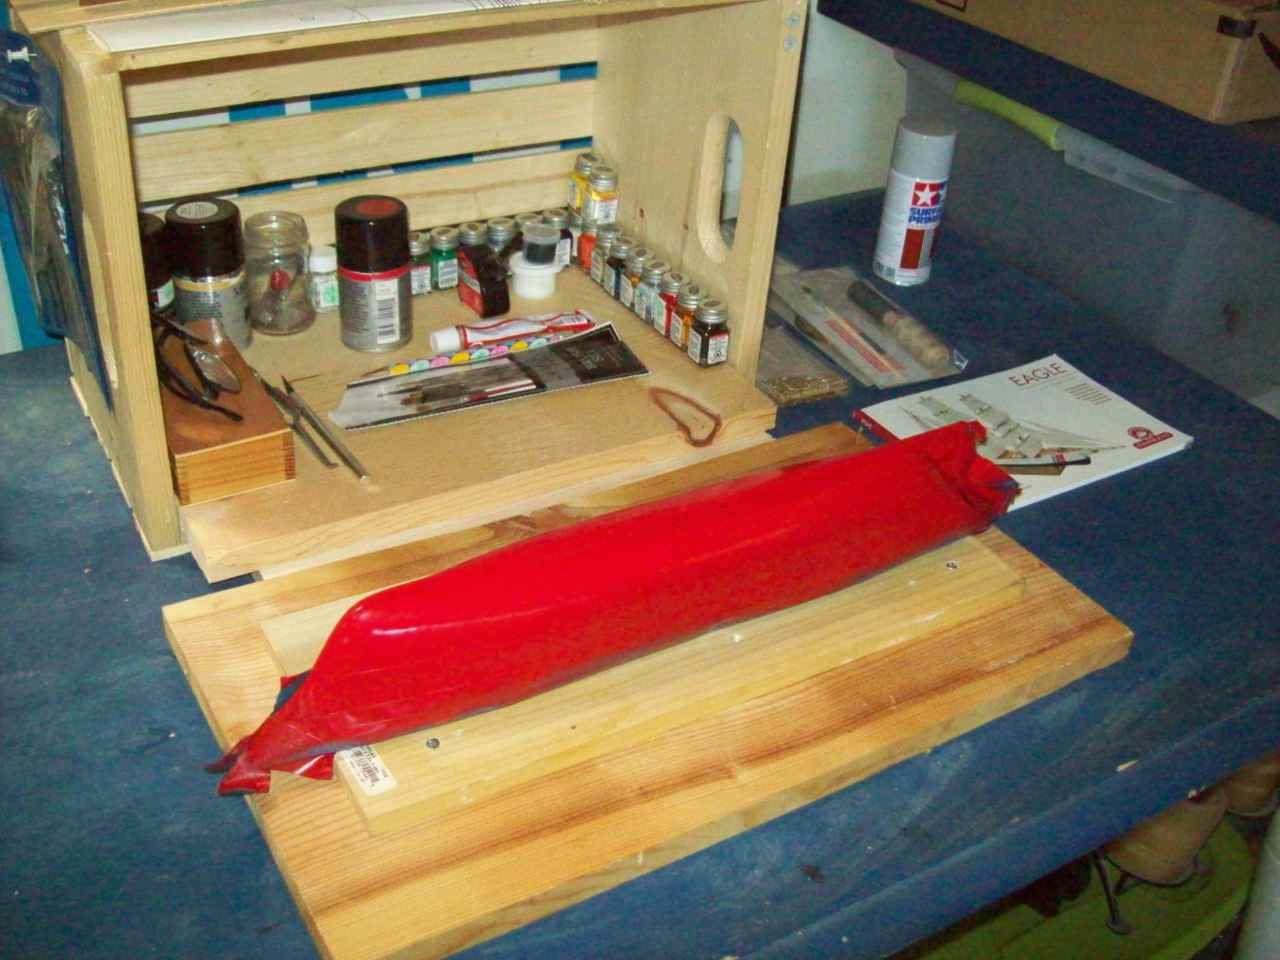
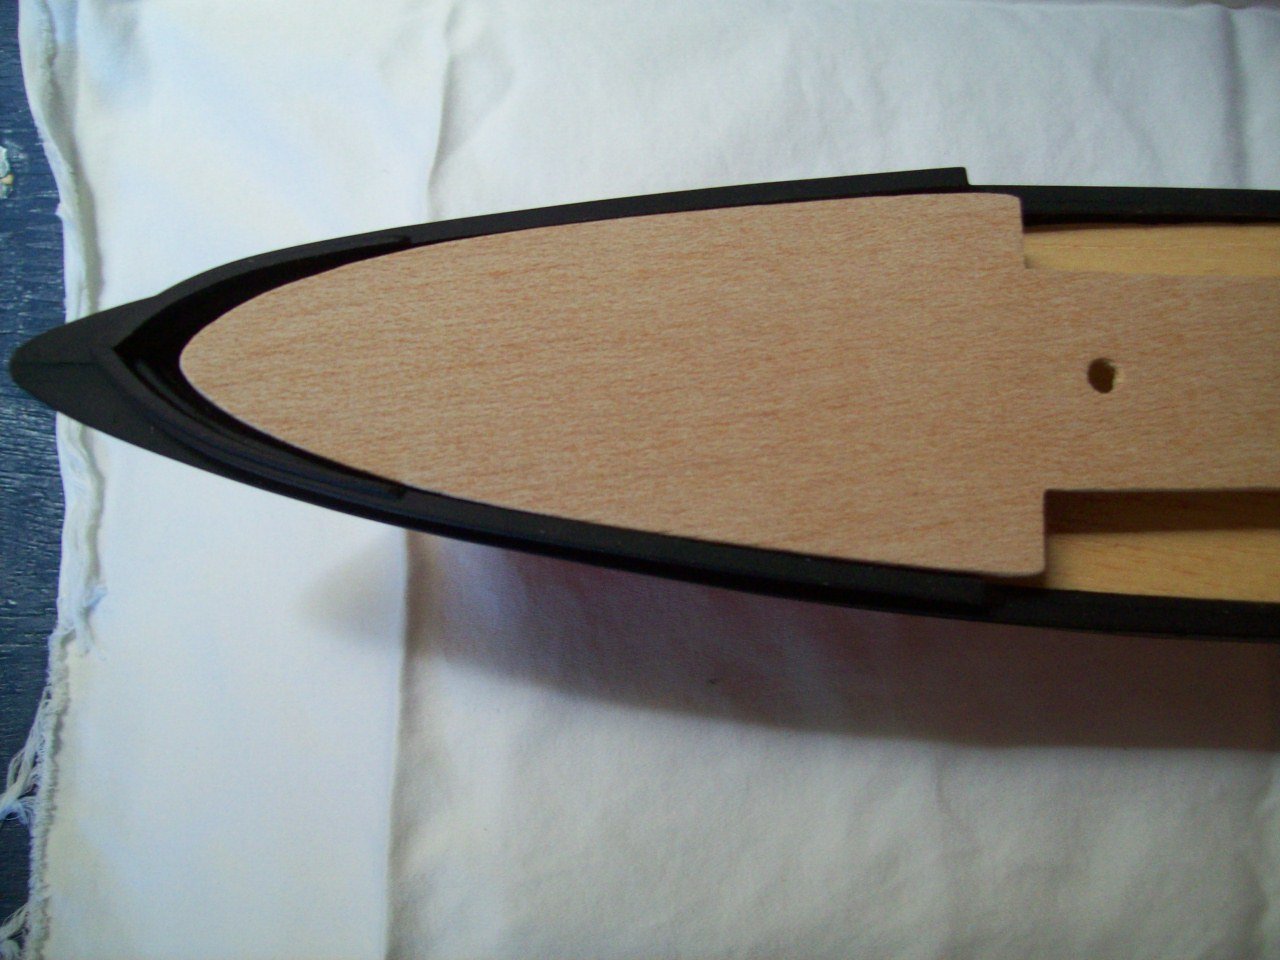
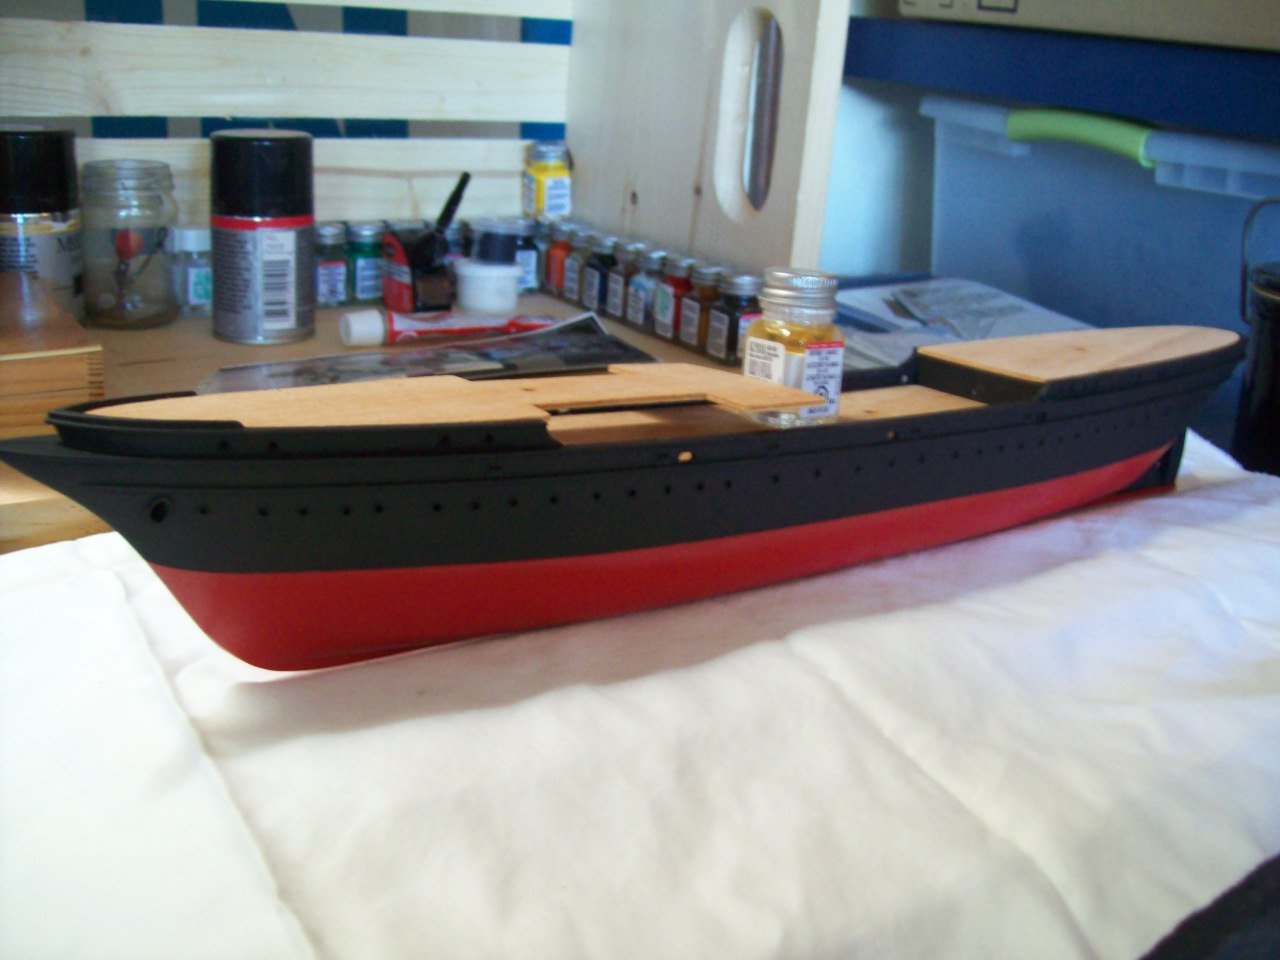
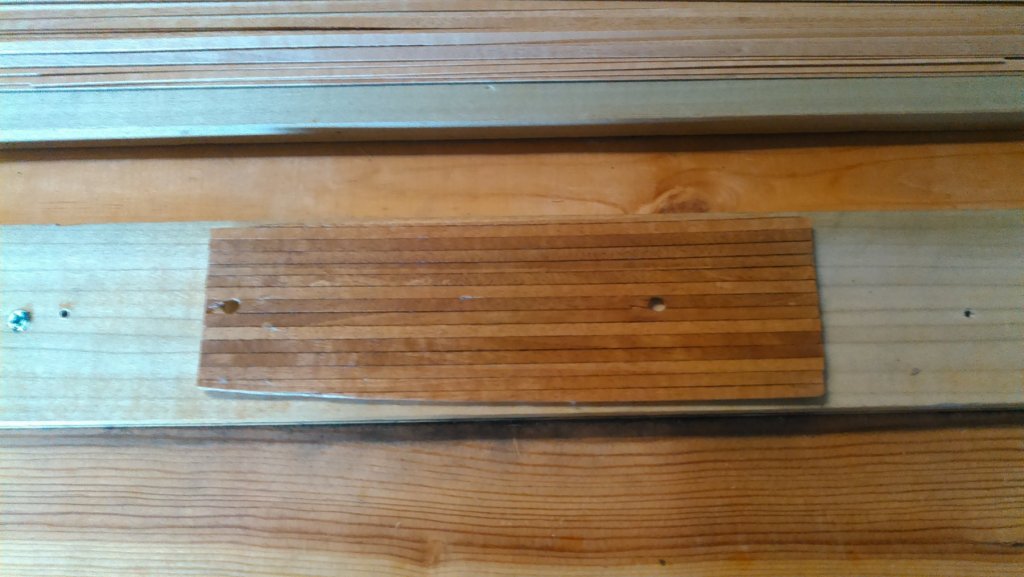
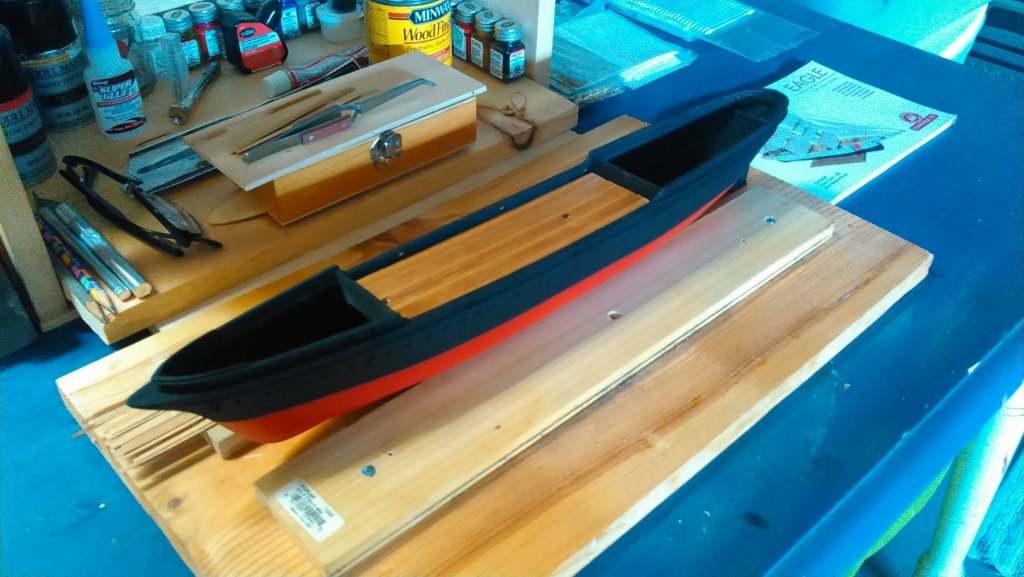
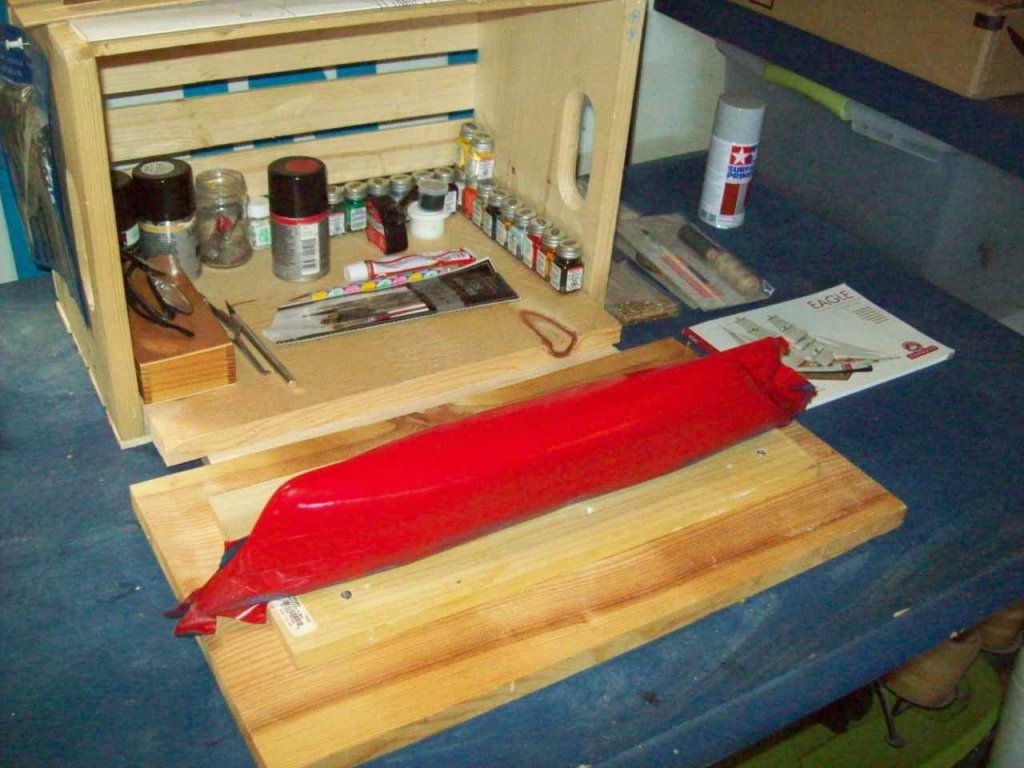
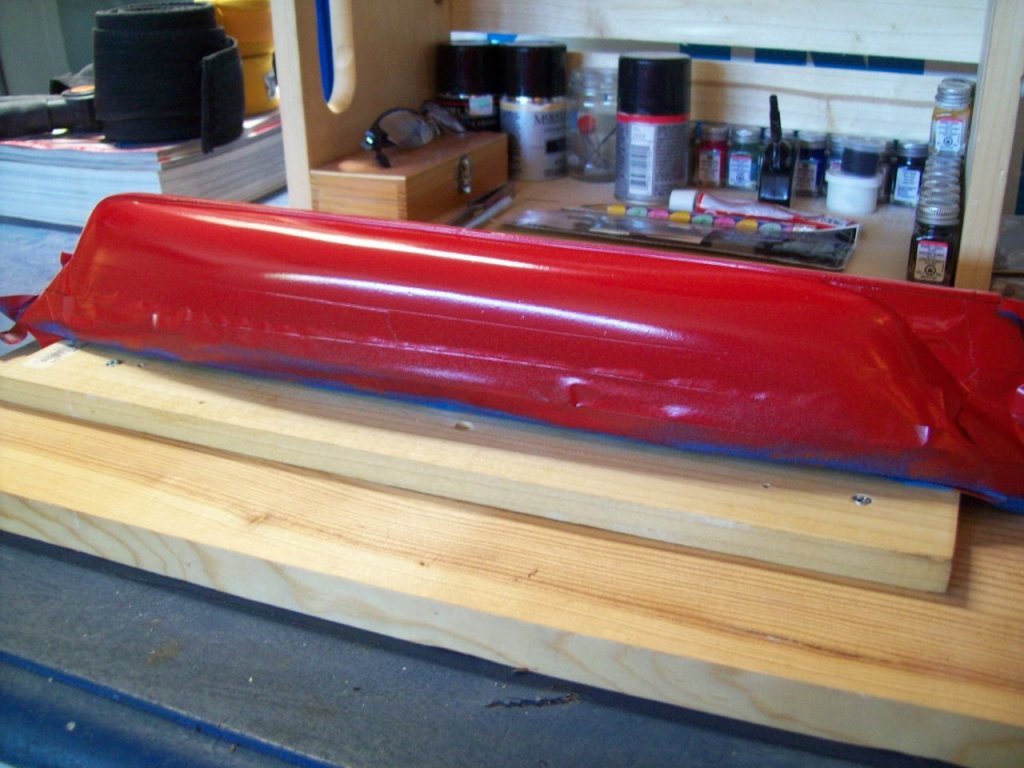
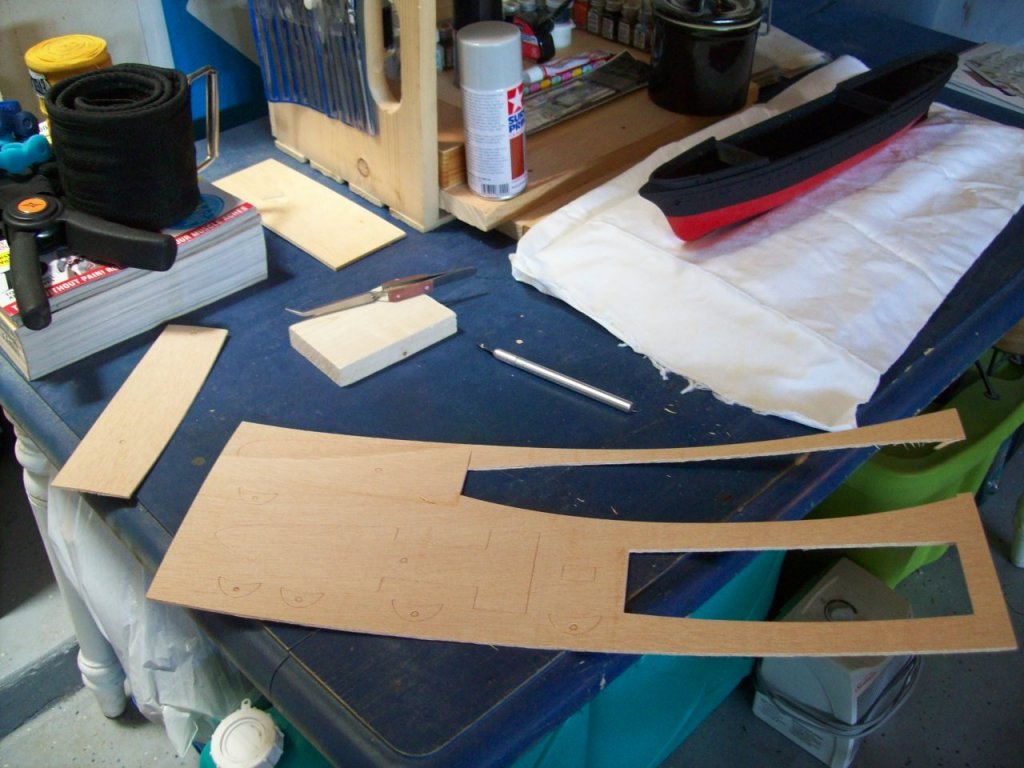
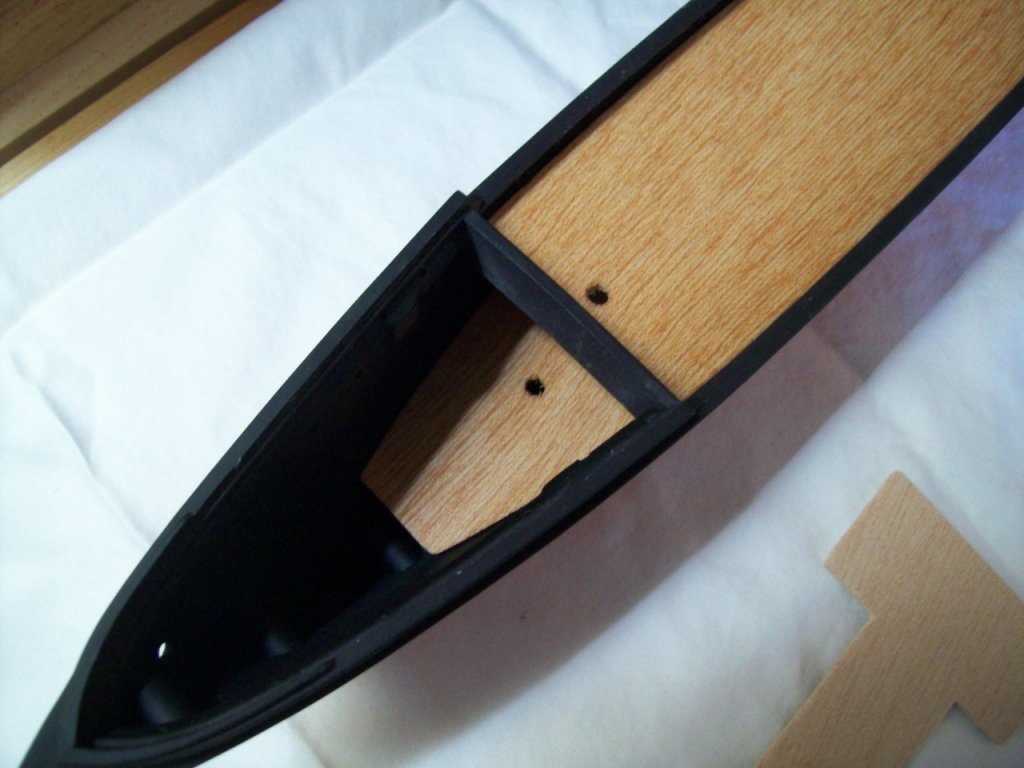
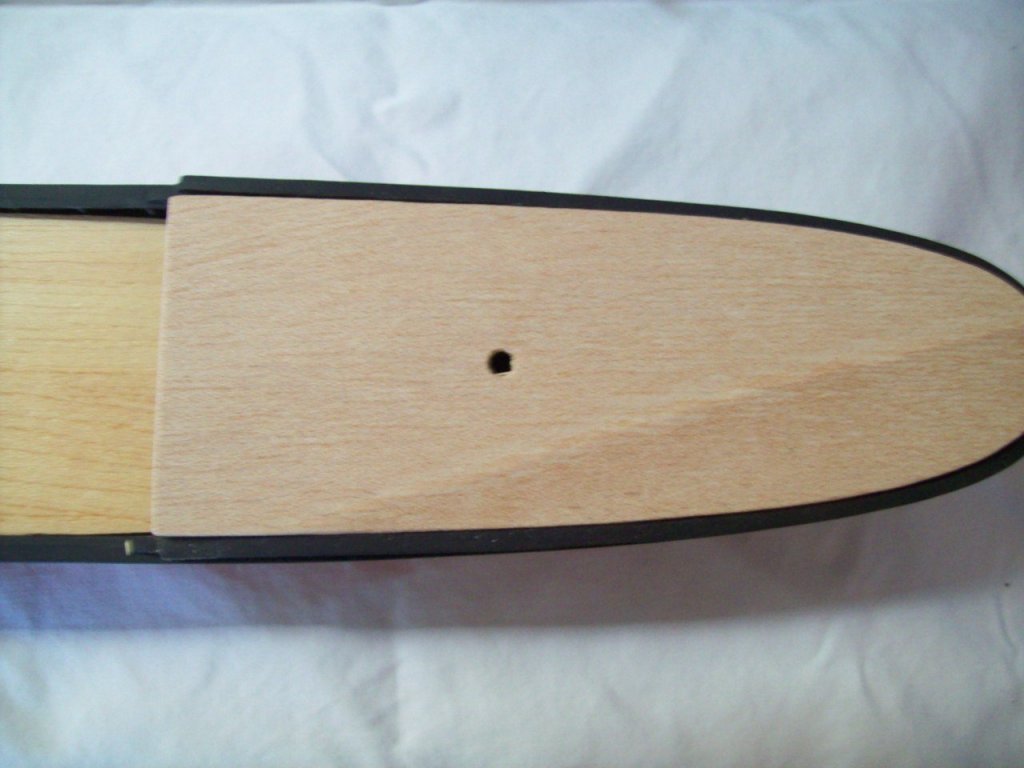
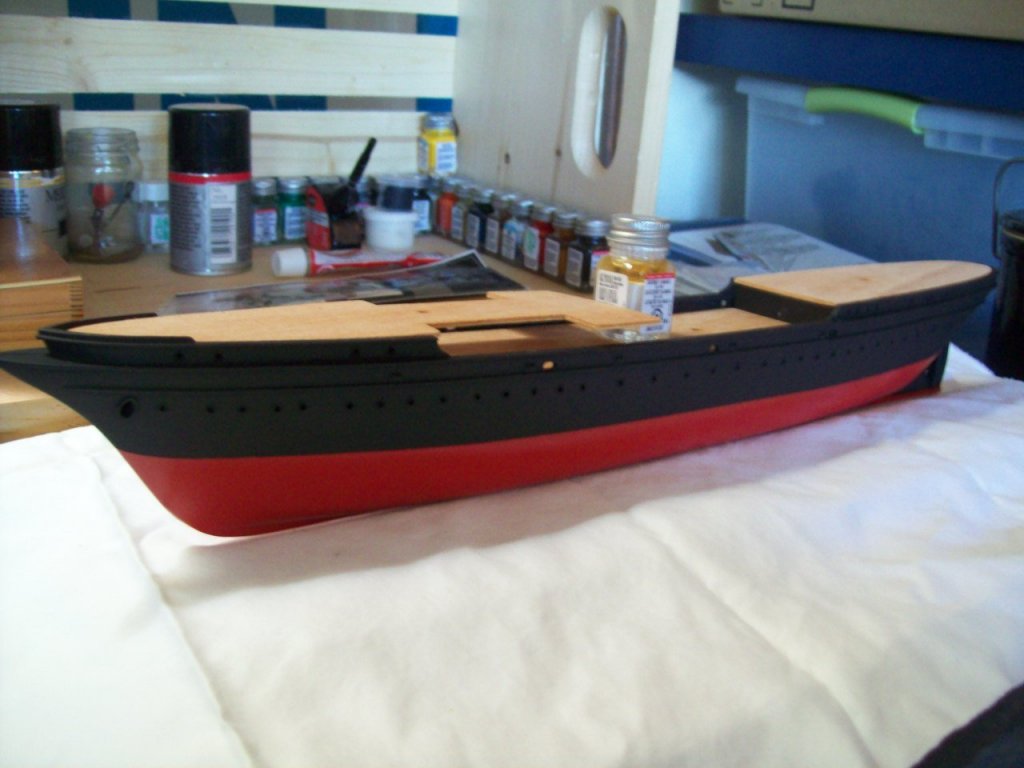
Diving right into modifying, my first step was to shoot the hull with two coats of Tamiya Surface Primer. Once dried, I then shot it with three coats of Model Master Flat Black, including the interior surfaces. Once dried, I masked off the waterline (following the injection molding) and shot it with two coats of Model Master Guards Red. I then let all of it dry for a full 24 hours to cure and dry well. The directions next call for fitting of the orlop deck inside the hull, followed by planking and fitting the three weather decks (forecastle, central and quarterdeck). For the build, the central deck has to be fitted first with the deckhouse and midcastle added. Then the forecastle deck can be fitted, as it's aft extension sits on the roof of both of them on the central deck. What I decided to do was go ahead and cut out, sand, bend and fit the decks all into place first to ensure a good fit, then they can be planked and construction can move ahead. I will have three prepared decks. Cutting out the decks was straightforward, though the laser cuts are very shallow and it took some time to exacto around them to break them out cleanly - as well as the mast holes, which had to be slightly bored out in order to fit the masts. I figured better to do this now than to try and jam them in later.... Once out, thee had to be sanded and fitted, sanded and fitted, and sanded and fitted. I used a simple sponge sander and a sanding stick, both at 220 grit, for all of this and just repeated the process over and over, being careful not to remove too much material. The central deck was not too bad, but both the fore and poop decks needed quite a bit of work on the rounded edges to fit the hull properly. In one photo below you can see the middle of the process of fitting the fore deck. Once they were fitted, I ran them under warm water for several minutes, flattened them out, and then dry fit them. They will stay there until the next step, which will be planking the decks. I'll take better pictures. Until next time..... Archie


- 37 replies
-
- 3
-
-
- eagle
- constructo
- (and 1 more)
-
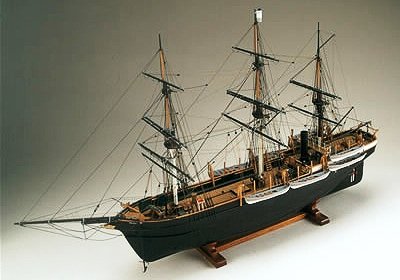
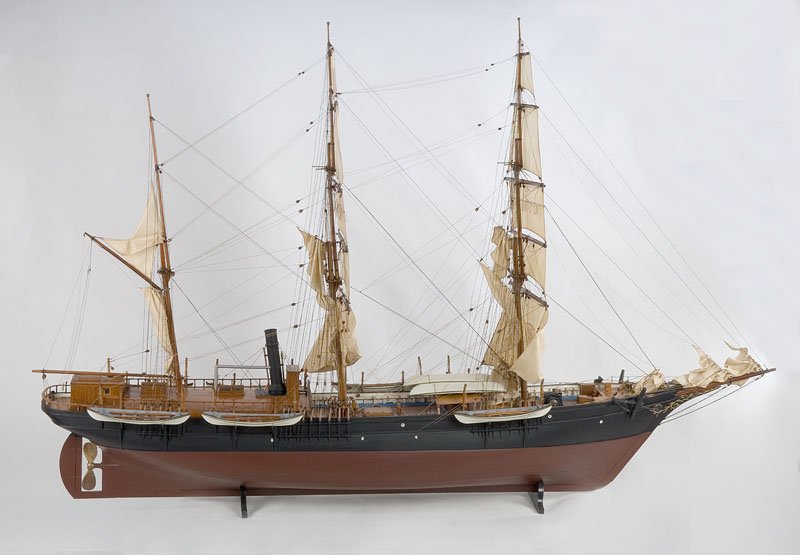
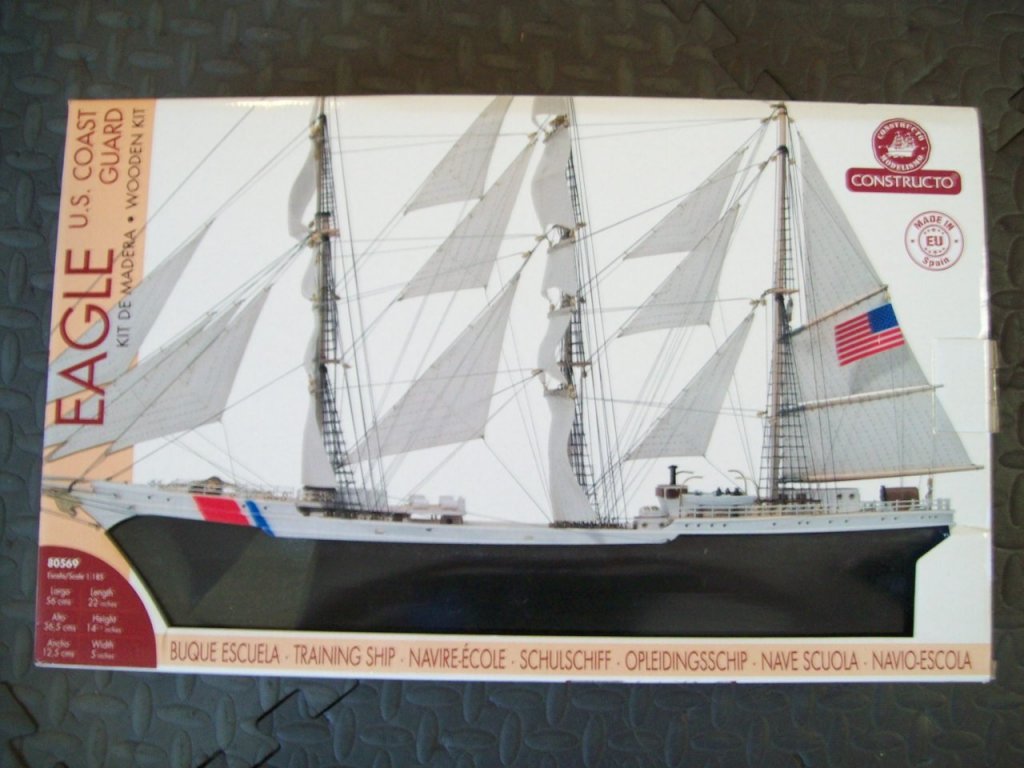
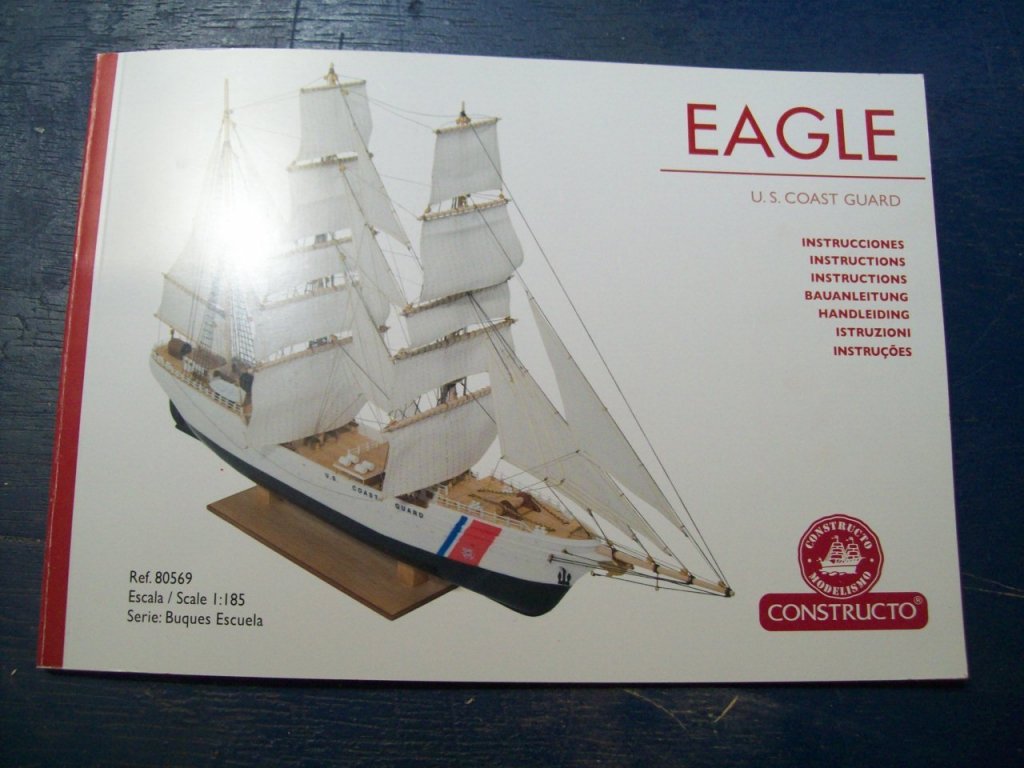
Well, my semester is over and my grades are submitted, so this build begins. I have been anticipating it for a couple weeks, but didn't have the time to really dig in, and I didn't want to chip away. So, since I'm a rank rookie, I spent that time reviewing the parts, reading the manual, stalking the site for tips and builds in progress, and doing some novice planning.... Also, spent a good deal of time on YouTube watching builds, though there was nothing available for the model I chose, and setting up a small modeling workspace in my garage/gym/reloading space/man cave. I chose Constructor's USCG Eagle for my first build. For a couple reasons: Firstly, I like her lines. Secondly, it is a beginning level model and doesn't require plank on bulkhead construction. There is plenty of deck planking to do and certainly plenty of rigging, sanding, fitting, painting, staining, etc., so I thought this would be a good starting point and a litmus test for my ability and patience with building these kinds of models. The only drawback is she has a hard plastic hull, but I figured for a first build this was not necessarily a bad thing. With regards to the Constructo kit, it was exactly what I expected after scouring around searching for my first build. The manual, which is in six languages, is short and to the point; the instructions are generalized; and it obviously assumes some knowledge of wood ship model building. I think if this were a blind build with no experience it would take some serious figuring out. It could be done, but luckily this site and the internet in general is very helpful with the process. All of the parts and pieces were intact inside the (nice) box, and well stored in plastic bags with cardboard item descriptors inside. The sail material is nice and already lined, and there appears to be plenty of line and wire. They are a little skimpy with the deck planking, and one of the thin topmast poles was broken, but it is easily replaced. The main deck laser cutout board (and, hence, the decks) was very bowed but I expected to be doing some soaking and shaping, so this was not a big deal. The main complaint I had was the quality of the plastic hull. The hull itself is thick and sturdy, and has great integrity and details for a piece of injection molded plastic; however, the graphics and colors were very much a disappointment. The CG stripes were dim and faded in color with blurred edges, instead of a nice bright and sharp orange and blue shown on the box and adverts. A small cheap CG sticker was in the middle of it and this really stood out to me. There were several shipping and/or manufacturing marks along the hull, and it's finish just looked shiny and cheap. So, to the point: I have already decided to modify this build.... I decided, after some research while waiting to start, to construct a generic American steam barque - maybe eventually a whaler. It will be patterned from the Mary and Helen of New Bedford (which became the USS Rodgers), though there are obvious differences - namely, in length and beam. However, if it evolves into a whaler it should be a good challenge with regards to scratch building try pots and a few whaleboats and davits..... So, anyway, on with the build.....
- 37 replies
-
- 2
-
-
- eagle
- constructo
- (and 1 more)