FoxtrotHotel
-
Posts
46 -
Joined
-
Last visited
-
 SUBaron reacted to a post in a topic:
Which Brand of Wooden ship model kit is better or worse.....? Take a poll and answer a few multiple choice questions.
SUBaron reacted to a post in a topic:
Which Brand of Wooden ship model kit is better or worse.....? Take a poll and answer a few multiple choice questions.
-
Deperdussin1910 reacted to a post in a topic:
Spray by FoxtrotHotel - 1:30 - RADIO
-
GrandpaPhil reacted to a post in a topic:
Spray by FoxtrotHotel - 1:30 - RADIO
-
GrandpaPhil reacted to a post in a topic:
Spray by FoxtrotHotel - 1:30 - RADIO
-
Harvey Golden reacted to a post in a topic:
Spray by FoxtrotHotel - 1:30 - RADIO
-
Harvey Golden reacted to a post in a topic:
Spray by FoxtrotHotel - 1:30 - RADIO
-
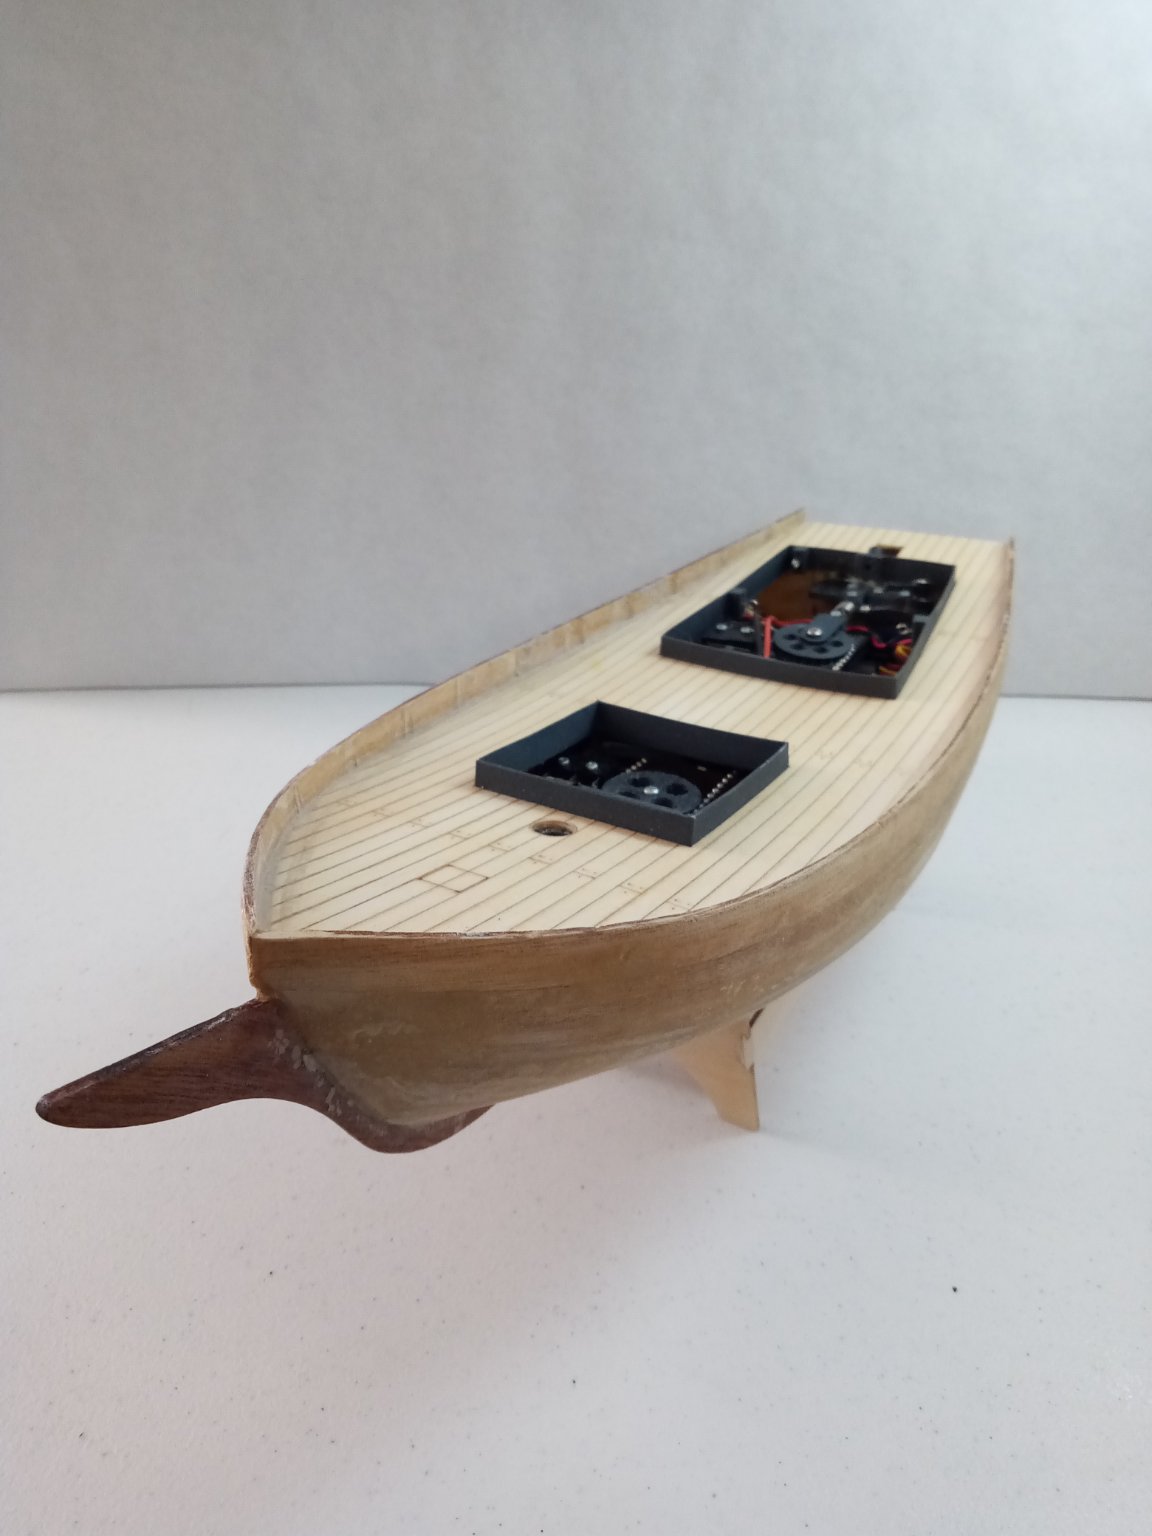
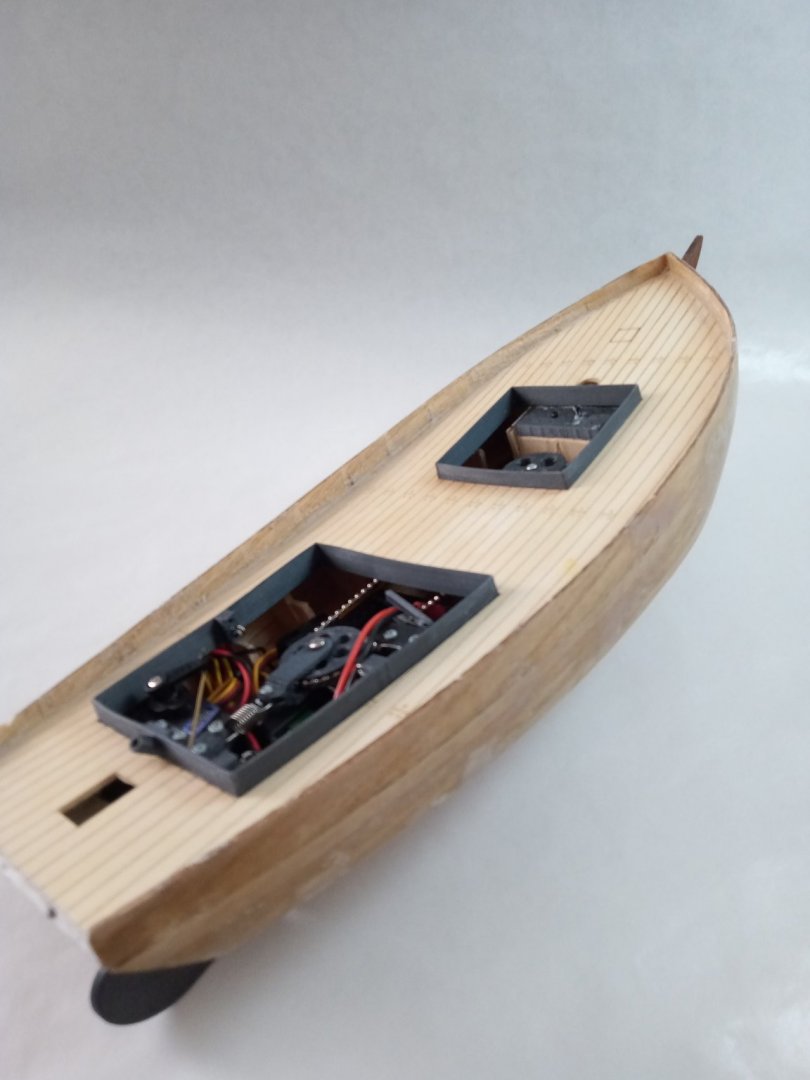
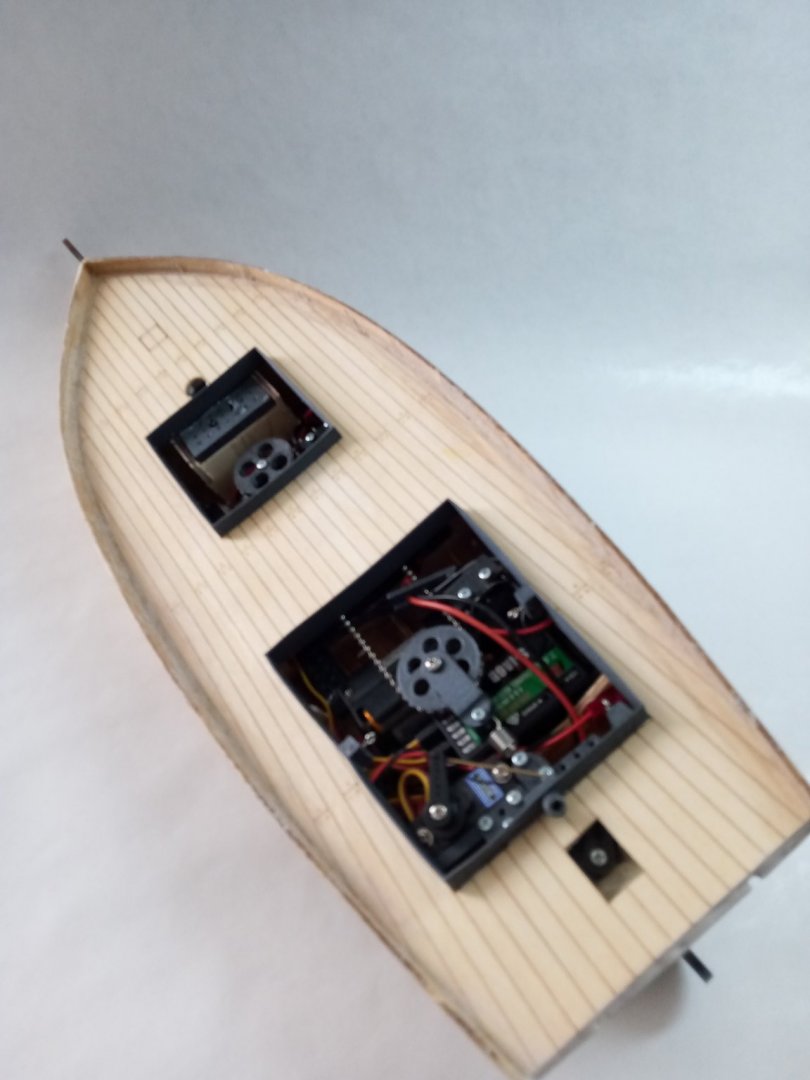
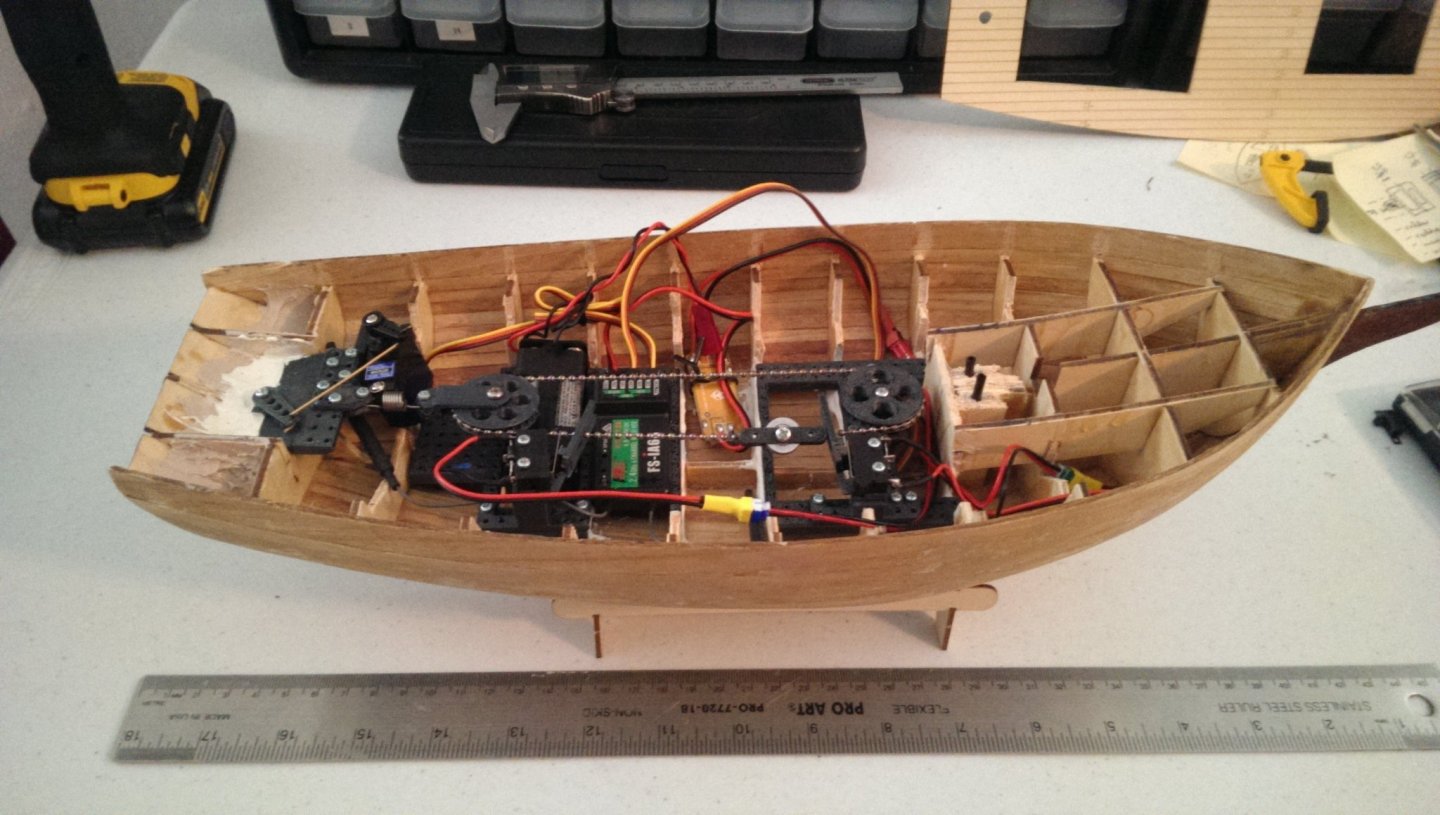
I finalized most of the internal electronics and mechanics, and epoxied on the deck. I used a two part marine epoxy to attach the deck to the ribs, and then a waterproof epoxy putty to fill in the gaps between the deck the and hull. The first three hollow areas, which will be inaccessible once the deck is attached, I filled with expanding foam spray used to insulate windows, to help further guard against any water seepage. My planking of the hull wasn't the best, and some of my boards were a little warped and uneven, even after heavy sanding, so I had to fill in some sections with bondo and wood filler. I wasn't able to get the planking to completely meet the transom either, so I ended up using a lot of bondo to fill in the gaps. All the 3D printed parts were made with carbon fiber PLA. If I could do it again, I would have used ASA instead. PLA is easy to print and work with, but it gets very soft with even light heat. For example, putting a model in your car on a warm summer day will warp a lot of parts, which would make transporting this a bit difficult. ASA is a lot more robust and has better heat tolerance.

-
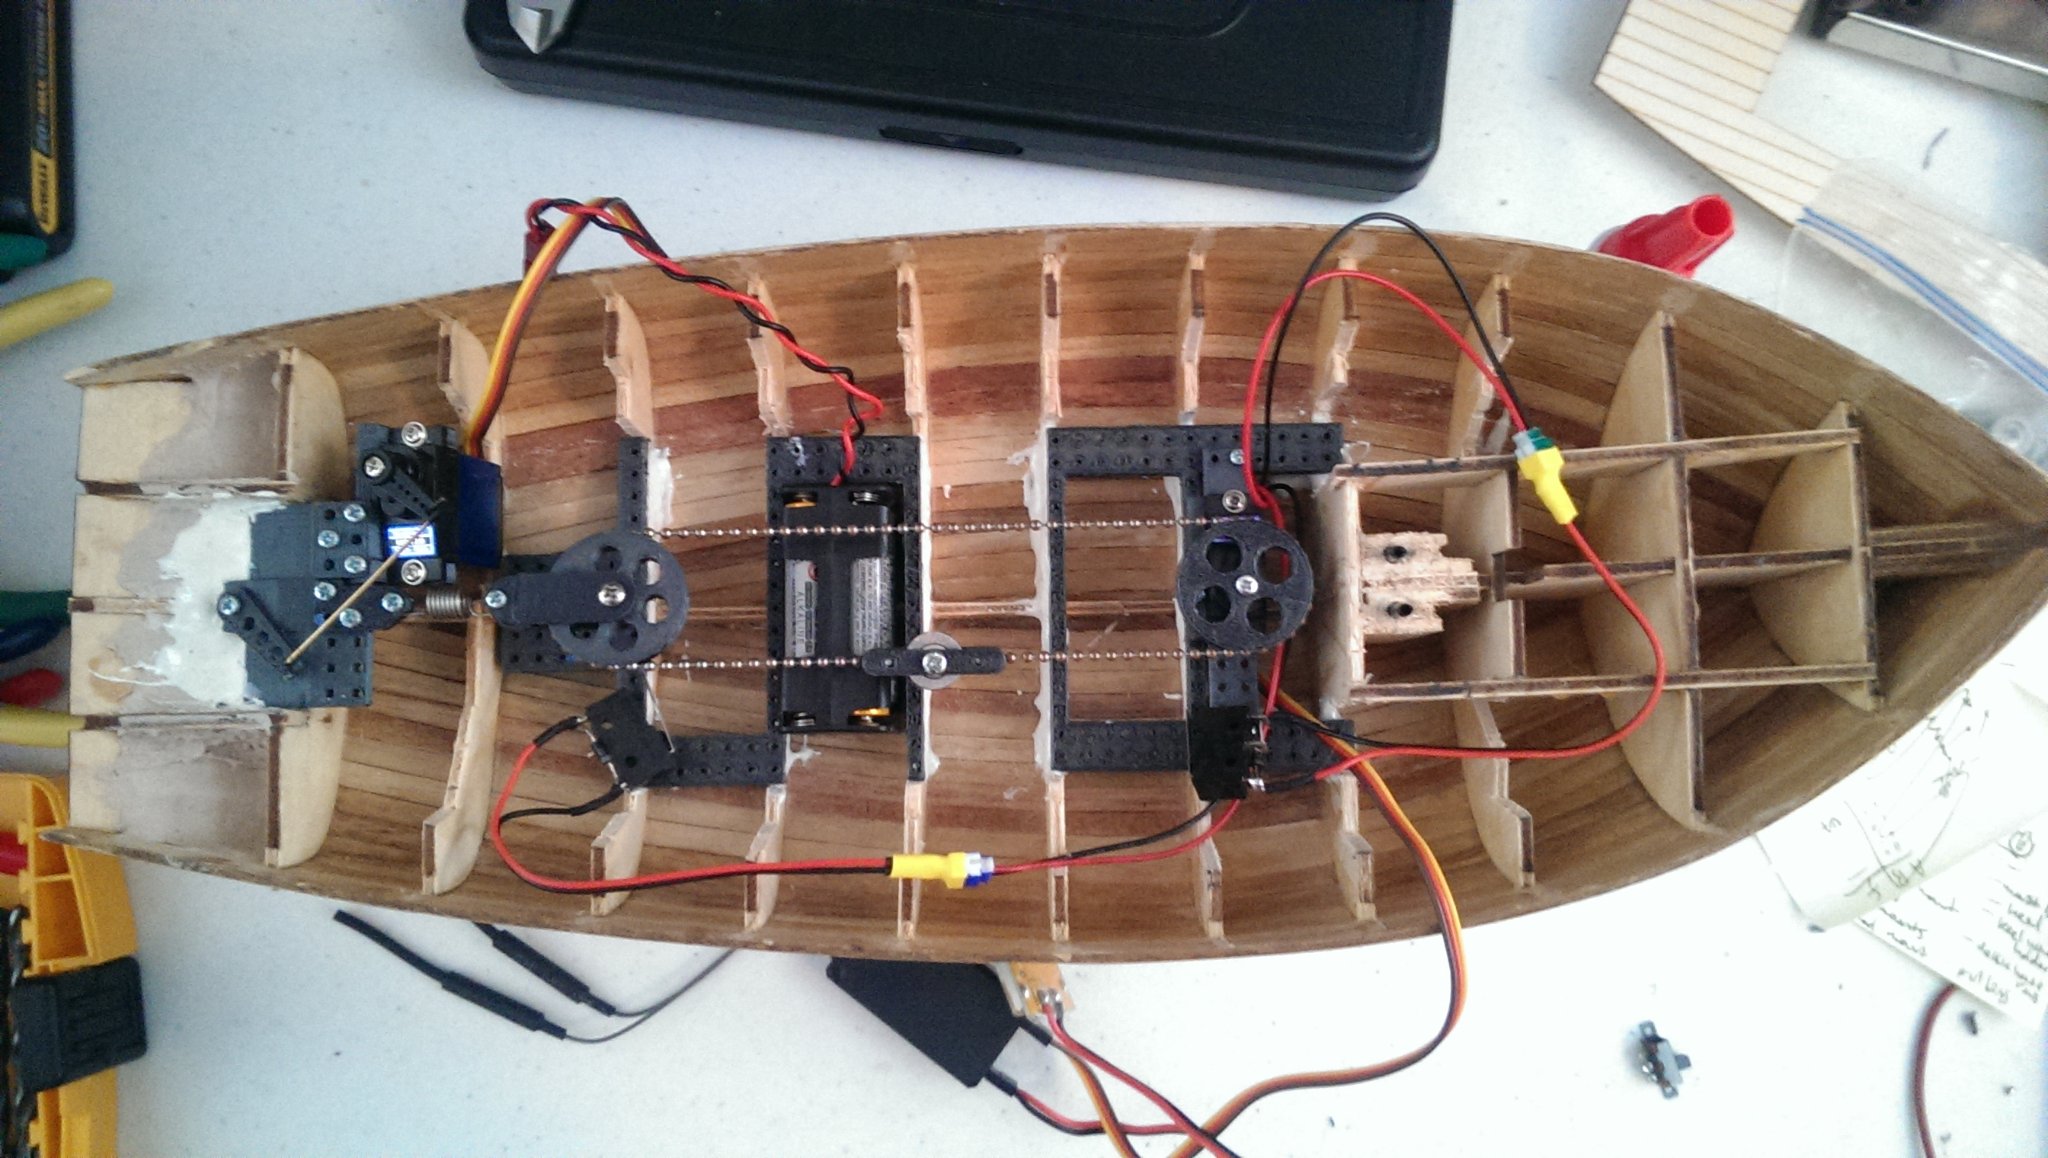
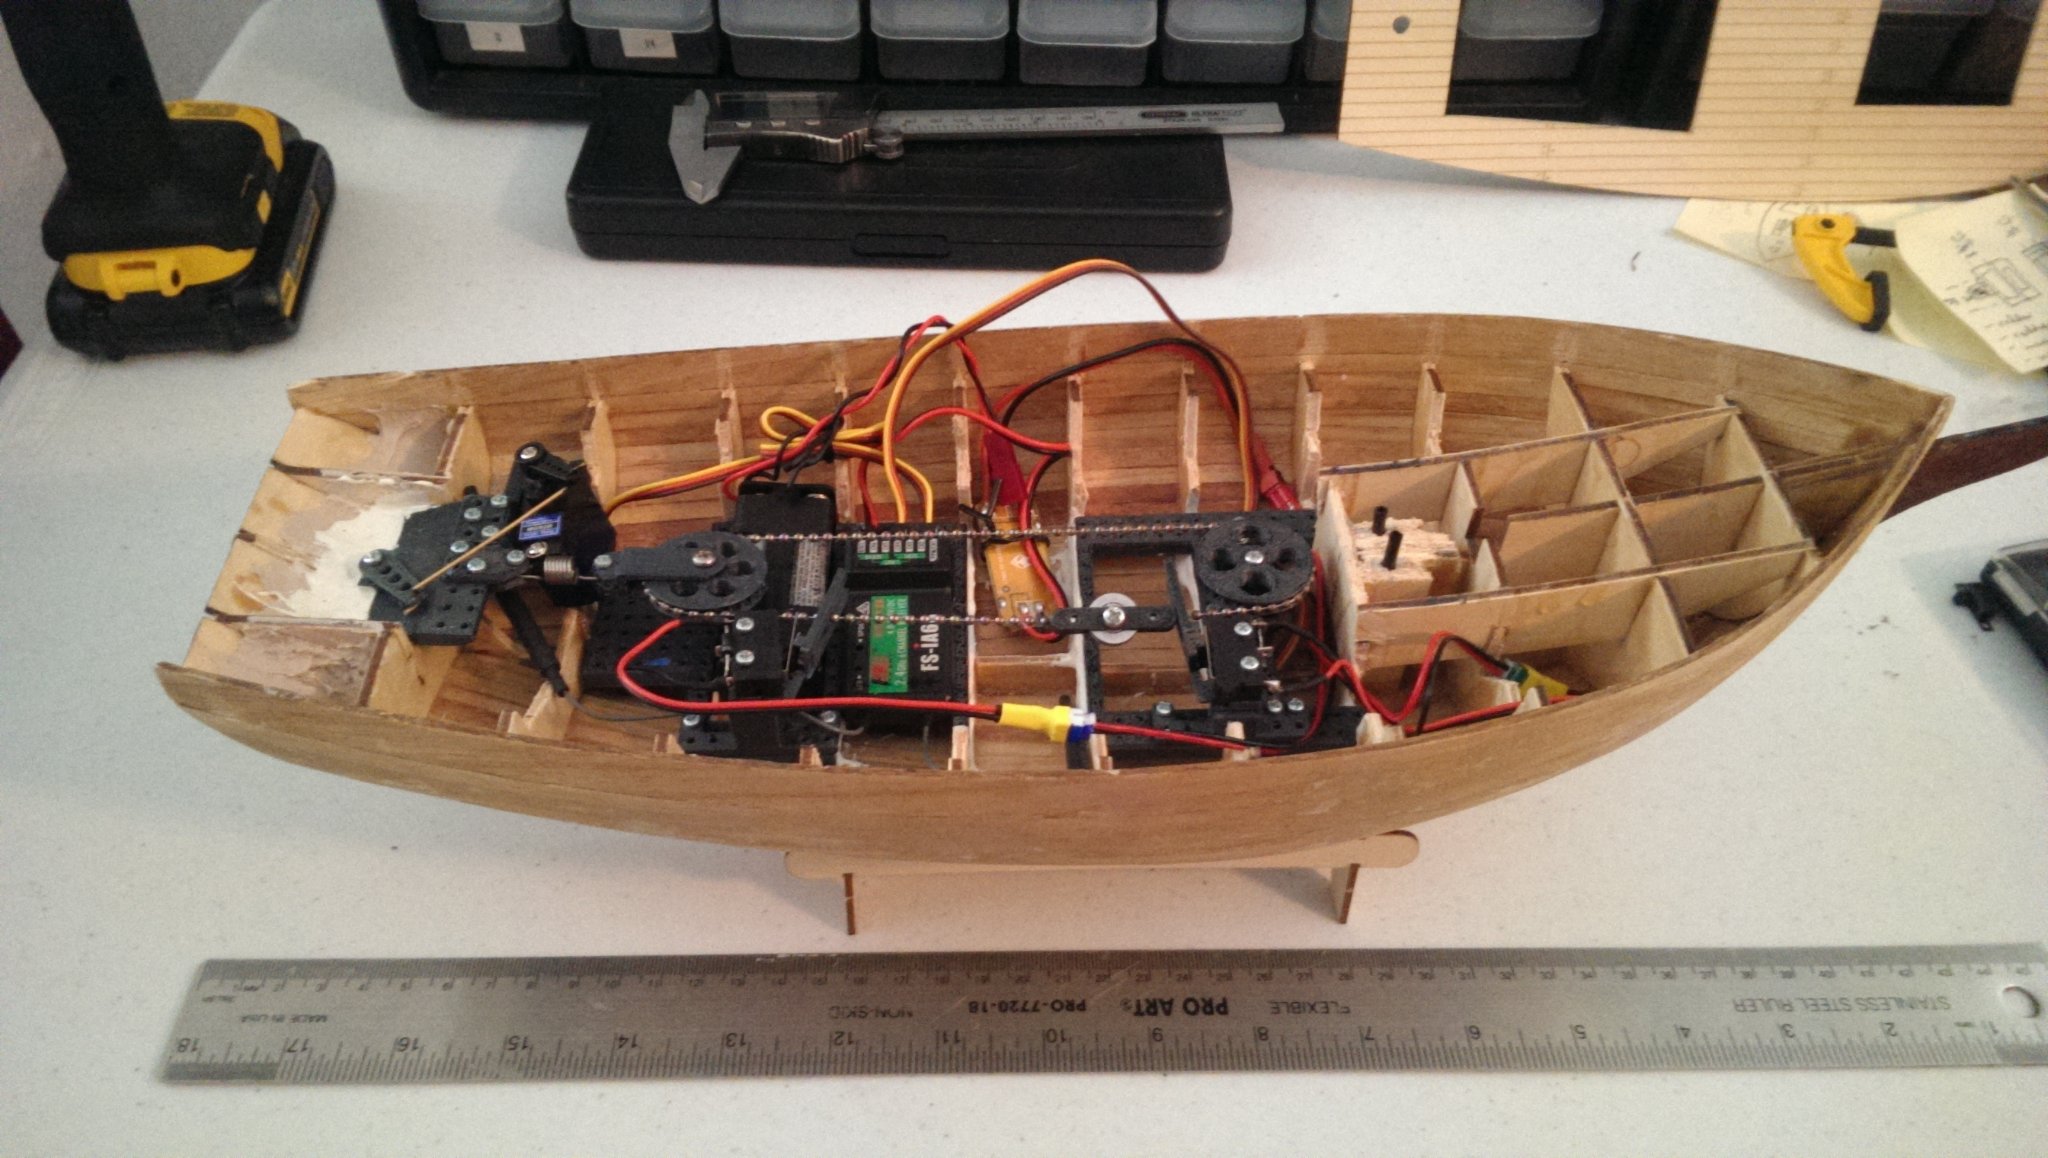
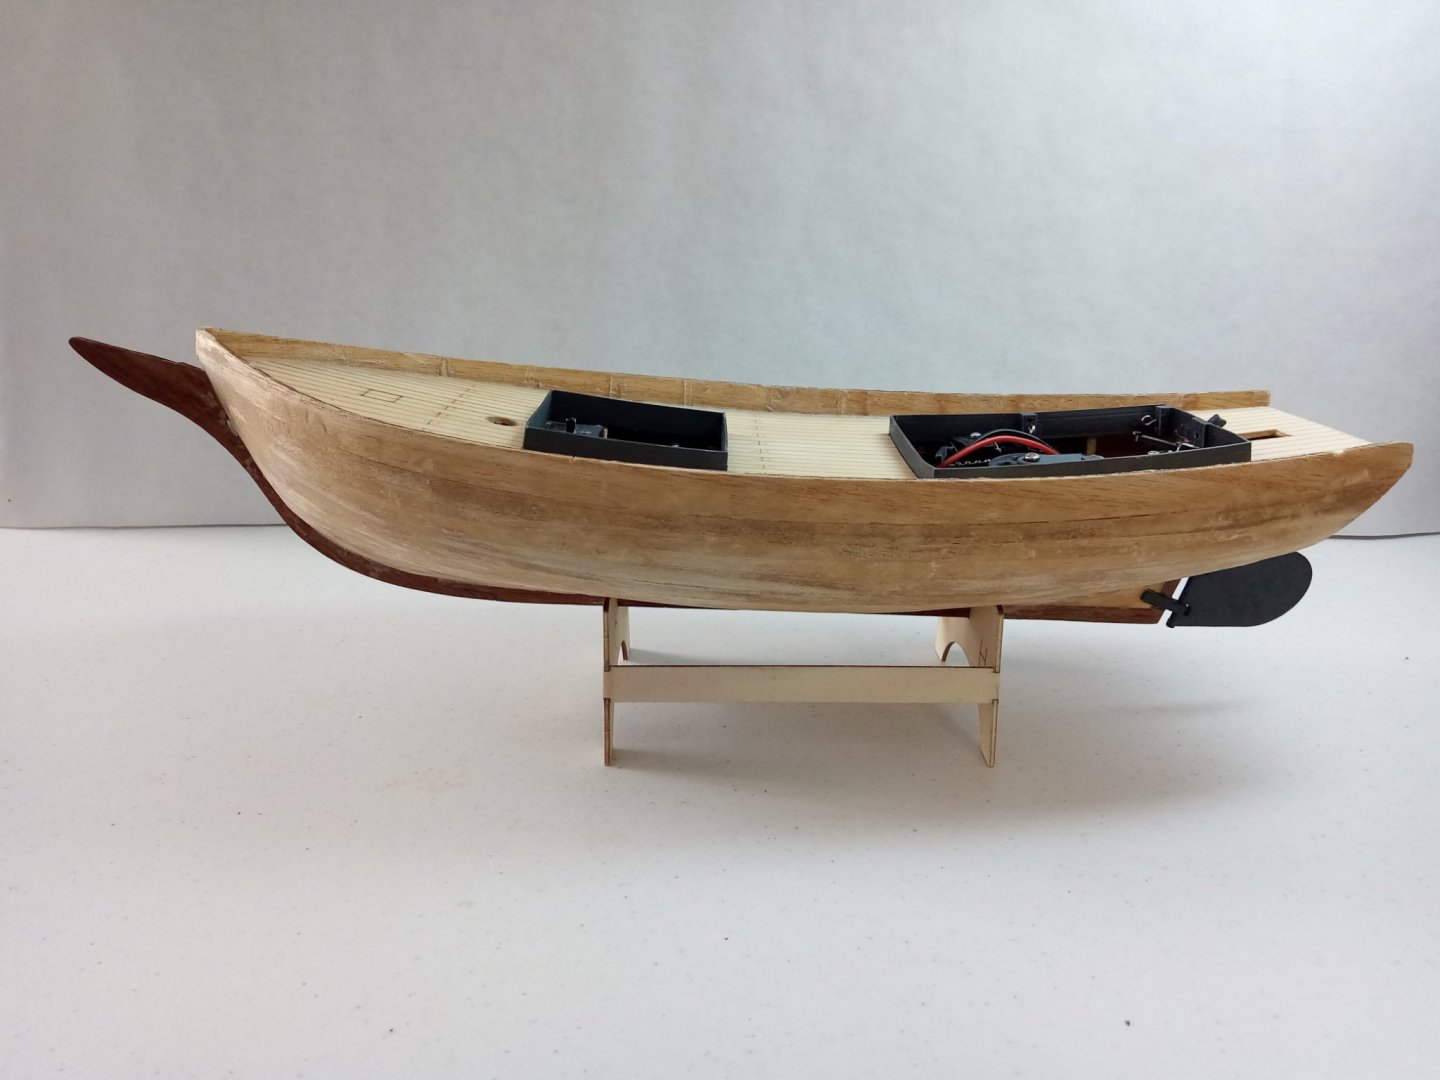
This is a shot of the planked hull, with the basic RC components mounted. This is a small enough model that I might have been able to use a simple servo arm to pull the rigging in, but I saw some models online using a closed chain around drum and pulley, as well as a schematic in Phillip Williams book, Scale Sailing Models, and I wanted to try out a similar design.

-
I'll be posting updates on my build of Joshua Slocum's Spray circa ~1895. It's based on plans I bought online, and I had a friend with a laser cutter make some parts for me, like the hull ribs, keel, and deck planking. However, I'm not following the plans exactly, and I'm converting it to RC, so I'm having to make quite a few modifications. Unfortunately, I didn't think to start a build log from the very beginning, and I've already completed the basic hull without having taken too many progress pictures. I took a break from this project for about a year, but now that I'm getting back into it, I'll try to post more updates. The build uses mostly wood, although the internal mechanics for the RC rigging are custom 3D printed parts in carbon fiber PLA. I'm pretty new to model ship building, so I'm posting this log to hopefully get some advice and feedback. I wish I was as talented as a lot of the people who post here.
-
Who makes the Chapman Sloop kit?
FoxtrotHotel replied to FoxtrotHotel's topic in Wood ship model kits
That's it! Searching "Chapman's water hoy" finds a ton of results. Thanks Chuck! It's good to know who to attribute it to. -
Who makes the Chapman Sloop kit?
FoxtrotHotel replied to FoxtrotHotel's topic in Wood ship model kits
Any idea what this style of boat is called or what its more formal name is and what its real-world history is? Google only shows the Chinese company calling it a "Chapman" or "aquatic merchant", which I imagine is almost certainly wrong. Maybe that's derived from the original designer's name? I'm no expert, but it looks like some sort of medieval cargo ship used in the Mediterranean or somewhere else in Europe. However, I'm not finding anything remotely close to it in Google's image search. -
Does anyone know a legit company that makes the 1/50 Chapman Sloop kit? (link removed by moderator) This kit caught my eye, but all the vendors seem to be sleazy Chinese companies who probably pirated the kit, which is probably why it's only being sold on Ebay. However, I can't find any real company selling it. Who makes this? I'd like to buy it, but I don't want my money going to scammers or thieves.
-
Resin not curing?
FoxtrotHotel replied to FoxtrotHotel's topic in Painting, finishing and weathering products and techniques
It's brand new Bondo resin I bought last week at a local hardware store. I'm pretty sure I just didn't mix thoroughly. I also used it to coat the inside of my hull and that cured perfectly. -
Resin not curing?
FoxtrotHotel replied to FoxtrotHotel's topic in Painting, finishing and weathering products and techniques
Yeah, that seems to have mostly done it. Although a side effect seems to be it caused gas or water vapor to be emitted from the wood underneath, and that caused a lot of bubbling and even some detachment of filler between the wood and the resin, so I'm likely going to have to sand off most of the resin and re-fill. -
I coated my hull with polyester resin. The container said it should completely cure and be dry to the touch in 2 hours, but after 2 days it still has wet/tacky spots, although most is completely dry. The instructions said 1 ounce of resin for every 10 drops of hardener, and I followed that explicitly, but I guess I didn't mix it well enough. What can I do to fix this and get everything dry? I still need to do a little sanding, and can't do that if it's still gunky. Should I wash it with acetone to dissolve the uncured resin, or wash it with hardener to try and cure the remaining unmixed portion?
-
I'm preparing to seal up the exterior hull for a wooden kit that I'm building as an RC model. I've heard some people coat the exterior hull in Bondo's fiberglass resin, which despite the name isn't resin mixed with fiberglass, but resin applied to a fiberglass mat that's then afixed to a surface. I bought some, but the fiberglass mat is 0.2mm thick, which is far too bulky. Does anyone just apply the resin without the fiberglass? My hull is only about 16 inches long, so it's fairly small, and probably doesn't need the extra reinforcement that the fiberglass provides. Is the plain resin too brittle and weak or will it work just fine without the fiberglass?
-
Finding sheaves for small functional blocks?
FoxtrotHotel replied to FoxtrotHotel's topic in Masting, rigging and sails
So I ordered some sheaves from Cast Your Anchor, in Toronto. The whole experience reaffirms why I hate buying from small shops, especially outside the US. Their website is a trainwreck, but I managed to place the order. Yet two weeks later, no order confirmation, no shipping confirmation. Doesn't respond to emails. This is why Amazon's eating everyone's lunch. They're the only ones who have figured out how to properly communicate and ship products to customers efficiently. -
Finding sheaves for small functional blocks?
FoxtrotHotel replied to FoxtrotHotel's topic in Masting, rigging and sails
Interesting. That thought crossed my mine, but I didn't think anything like that was sold, much less what it's name would be. I found this on Amazon, but it doesn't explicitly mention any diameters. It just says it's for clocks "0.2 MM Upto 4.0 MM". Is that the outside or inside diameter? -
Finding sheaves for small functional blocks?
FoxtrotHotel replied to FoxtrotHotel's topic in Masting, rigging and sails
That's an interesting idea. You're right, clamping the pre-cut rod would be a lot easier than clamping a tiny sliver. -
Finding sheaves for small functional blocks?
FoxtrotHotel replied to FoxtrotHotel's topic in Masting, rigging and sails
I tried something very similar to this, but the problem is the sheave just spins when I try to drill the hole. The cutout in the stock keeps it centered, but the sheave isn't actually clamped, and it's too small to get a clamp securely on it. -
Finding sheaves for small functional blocks?
FoxtrotHotel replied to FoxtrotHotel's topic in Masting, rigging and sails
I just did this yesterday, based on wefalck's similar advice. It came out ok and functional. The biggest problem I had was both clamping and centering the sheave for drilling the hole. I have no clamp that can hold it well nor get proper purchase, as well as keep the drill bit perfectly centered. I have one of those small desk vices, that I just tilted at 90 degrees and carefully positioned under my Dremel drill press. The result was my hole came out slightly off centered and at a tiny angle. It's barely enough to be noticeable, but it's enough to stop the sheave from freely turning. However, even stationary, it's still far less friction than a plain wooden kit block. Does anyone know how I could reliably drill better centered holes on such a small scale?