


ronald305
-
Posts
314 -
Joined
-
Last visited
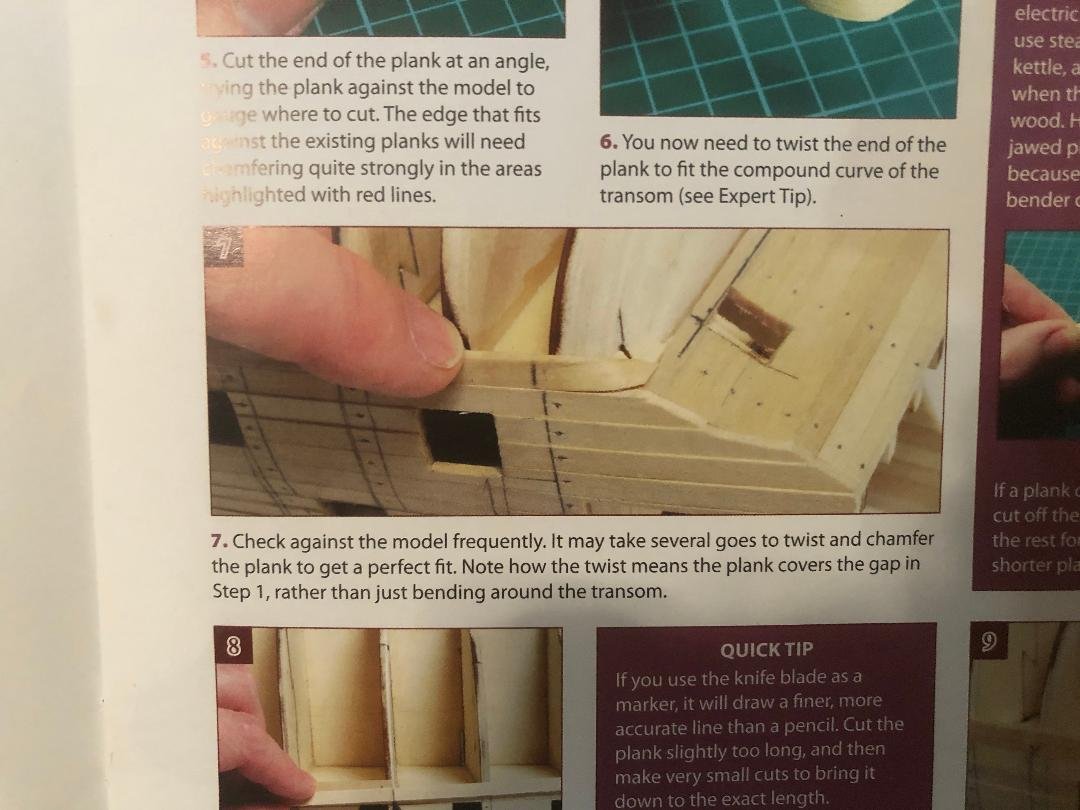
Content Type
Profiles
Forums
Gallery
Events
Everything posted by ronald305
-
 thanks OC I do have the blocks that came with the iron but isn't the blocks a little wide for the bend I need to make, plus the iron head is also wide I have been using the narrow part of the iron and sometime a soldering iron shaft part and gently pushing down on the plank after they have been soaked for 12 hours over the hot part of the iron and have been using the block inverted to support the iron. I have ordered a steamer to help with the twist part of the bend but would like to solve the sharp bend problem first Ronald
 -
Hello there can someone help me with a issue I am having regarding bending a tight radius for the stern planks yes you read it right I am still having trouble making the tight turns on the planks no matter how many videos I watch on how to bend planks they still seem to want to split at the turns on the visible side of the bend, I tried soaking them in how water for 12 hours but of course everyone knows the water is not going to stay hot for 12 hours, anyway I tried using the crimpers along with the iron, I did notice I do get a better crimp if I use the blade side instead of the blunt side, I don't what else to do and I am running out of planks and the one I will be getting from model space will be awhile before they even show up any new ideas will be most welcomed and appreciated. thank you Ronald
-
what is the best hand plank crimper
ronald305 replied to ronald305's topic in Modeling tools and Workshop Equipment
the other side of the crimper blade is a wedge shape edge like a blade sort of and the opposite side of the crimper is flat -
what is the best hand plank crimper
ronald305 replied to ronald305's topic in Modeling tools and Workshop Equipment
maybe a small piece of pipe like 3/8 maybe smalle,r I have been using the middle part of my soldering iron to make the bend even after it has been soaking for a while but it keeps on splitting I'm doing something wrong for the plank to split like that Ronald -
what is the best hand plank crimper
ronald305 replied to ronald305's topic in Modeling tools and Workshop Equipment
I understand it's not the video you are talking about but wow if he is able to bend a piece of wood like to a U shape you would think I would be able to make the sharp turn that I need right Ronald -
what is the best hand plank crimper
ronald305 replied to ronald305's topic in Modeling tools and Workshop Equipment
thanks Toni but what if I need a tighter turn such as the first plank around the stern like the photo in the cycle Ronald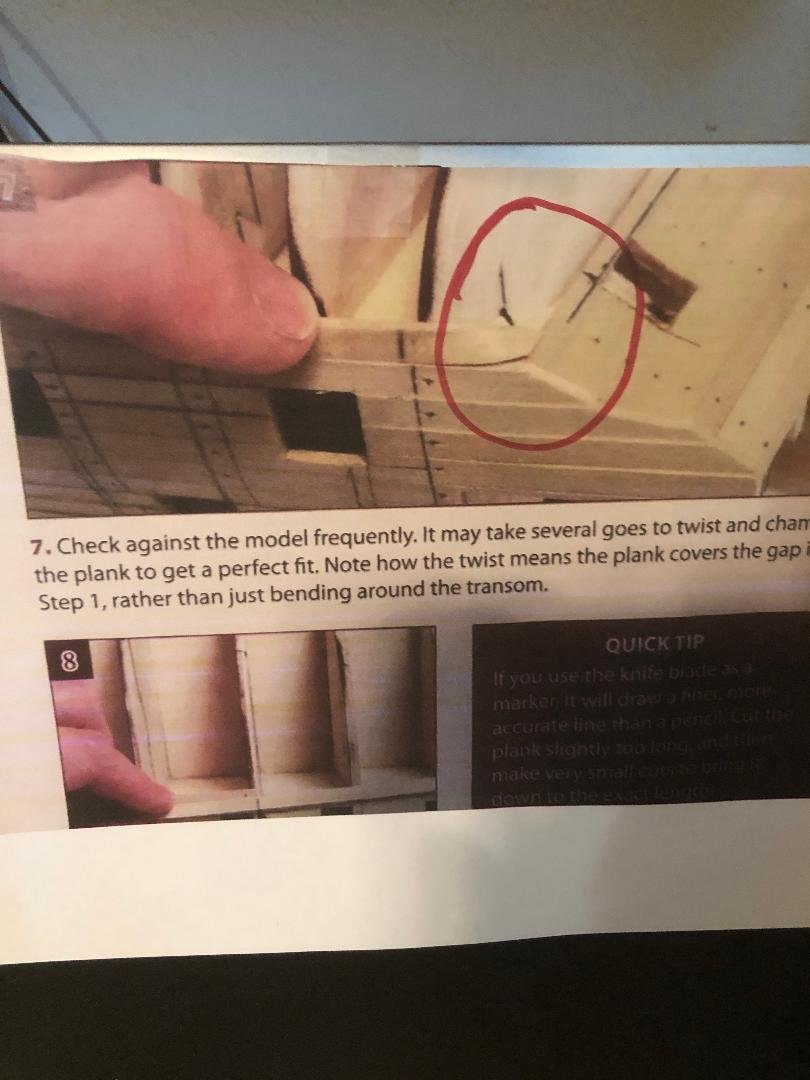
-
what is the best hand plank crimper
ronald305 replied to ronald305's topic in Modeling tools and Workshop Equipment
Ok everyone My Amati crimper arrived yesterday but before I try to use the new ones would like to know which side of the blade is the best even thought I think the chisel side makes a better crimp then the blunt side but I was told by someone from another site to us the blunt side, I tried the blunt side as told but I can't see how the blunt side is any better, because before my other crimpers broke I was using the blunt side and found it didn't crimp that great and the planks were soaked in hot water before using, I will try it again today, also I do not have any source for steaming the planks all I can do is put the planks in hit water for 12 hours as recommended by the same person from the same site as mentioned earlier in fact he recommends using the iron first then the crimpers. so I'm open to any suggestions that might help me make tight turns using either or both the iron and crimper or just the iron thank you Ronald -
what is the best hand plank crimper
ronald305 replied to ronald305's topic in Modeling tools and Workshop Equipment
when mine arrives I will try it again along with using steam to soften the wood Ronald -
what is the best hand plank crimper
ronald305 replied to ronald305's topic in Modeling tools and Workshop Equipment
I didn't pay attention on the brand that broke but I did buy a Amati's brand this time Ronald -
what is the best hand plank crimper
ronald305 replied to ronald305's topic in Modeling tools and Workshop Equipment
yes I know but I needed one anyway so I just ordered one a minute ago Ronald -
what is the best hand plank crimper
ronald305 replied to ronald305's topic in Modeling tools and Workshop Equipment
ok thanks I have to get a new one now as I ,mention in my last post it had a crack in so I tried to glue it when the crack was but somehow glue got in the pivot area and it would not close -
what is the best hand plank crimper
ronald305 replied to ronald305's topic in Modeling tools and Workshop Equipment
same here I guess I thinking it's the crimper being cheap Mine got a crack right where it pivots Ronald -
what is the best hand plank crimper
ronald305 replied to ronald305's topic in Modeling tools and Workshop Equipment
I'm starting to believe both of you gentleman about the crimpers, I have read that and saw it curling irons in action actuarily I only saw photos o this site of someone using a curling iron, thank you Ronald -
Hello there besides using steam or hot water to use with them. can anyone recommend a good hand plank crimper and not the flimsy plastic kind that comes in model space free tools set they break easy, reason I'm asking is I am having a hard time making a tight turn on the plank for the stern area especially the first plank, I have a plank iron but the part that gets hot is not narrow enough and the crimpers beak when applying pressure on the plank thank you Ronald
-
also you never answered my first 2 questions I ask: 1) HOW DID YOU MEASURE FOR THAT MARK 2) HOW DID YOU COME ACROSS THE INFORMATION FOR THAT Ronald
-
ok thanks Andre my last and main questions then, is How do I get that mark on the front of the stern the instructions do not tell you anything on how to put it there it just says mark the front of the frame/rib, I was hoping Alan would have responded to my question about that since that first plank helps with the rest of them, Mark from Admin locked my thread on that post, so I can't get help from Alan any more for that post unless I PM which I did several times Ronald
-
I understand about the 25mm piece of planking sticking out from the inside of rib 30 to the end of the plank, but you lost me when you said the mark that is on the front of the stern is used as a starting point three questions for you 1) how do you mark off the area on the stern as in part 3 and shown in part 7, 2) where did you find that information, 3) the mark that is on the stern is that a reference point for the bottom of the angle that to be cut like it looks on part 7 it looks that way there is no front view to go by Ronald
-
Hi Andre do you remember me asking you for help with my model space victory well I still need help with the stern planking problem, I am at the point of bending the ends to almost match the curvature of the stern, and hopefully trim the angle and twist at the ends any way could you explain part 3 near the bottom near end it says to mark the front of frame 30 or as we would call it rib 30 it is also seen in part 7 is that mark used to help cut the angle if so how do I get that mark meaning how do I measure for it, it only says to leave a generous amount about 25mm from the inside of rib 30 to end of the planks I can not ask any more for help because Mark from Admin ended the thread if you can shed some ;light on this matter I would appreciate it thank you Ronald
confuseingsteps.jpg.ef89da1e47b5a884665d0fe073d2f5df.jpg)
-
thanks Andre ' I was able to find you in the US version as well Ronald
-
I found your username in the model space forum but what is the post name under Ronald
-
are you on the UK version of the model space or the US forum because I do not belong to the UK version
-
yes you right there is a 31 but it is glued to rib 30 right
-
Hi Andre I was thinking since you to worked on the Victory from model space when you started planking the stern would you happen to know if the last rib 30 was almost close to the height of rib 29 and are there any type of measurements I can maybe use to get the fairing right, because that may be the cause of my problem planking the stern I may faired it to much and have to add filler, the first planks is under the floor appear to be only one that is ok but the rest are coming out right any suggestions. thank you Ronald
-
thanks Andre no one from the Model space community hasn't responded to my request for help except Alan but all he told me was his victory had 8 planks in the stern area that is why I came here to this site Ronald
-
Hi Andre I'm guessing that they were leveled before I removed them and decided to start over the # 5 plank you see in the first photo was the beginning of the next 8 layer of planks before I notice the unevenness of the planks, but like you mentioned I will be coppering the hull did you paint the hull a copper color it looks like you did because I can see that your planks are even from the lines, but anyway back to mine even thought they will be covered I will feel better knowing that the planks are even all the way to the false keel PS nice job on your model before and after the paint job Ronald
