Mjohn
-
Posts
39 -
Joined
-
Last visited
Content Type
Profiles
Forums
Gallery
Events
Everything posted by Mjohn
-
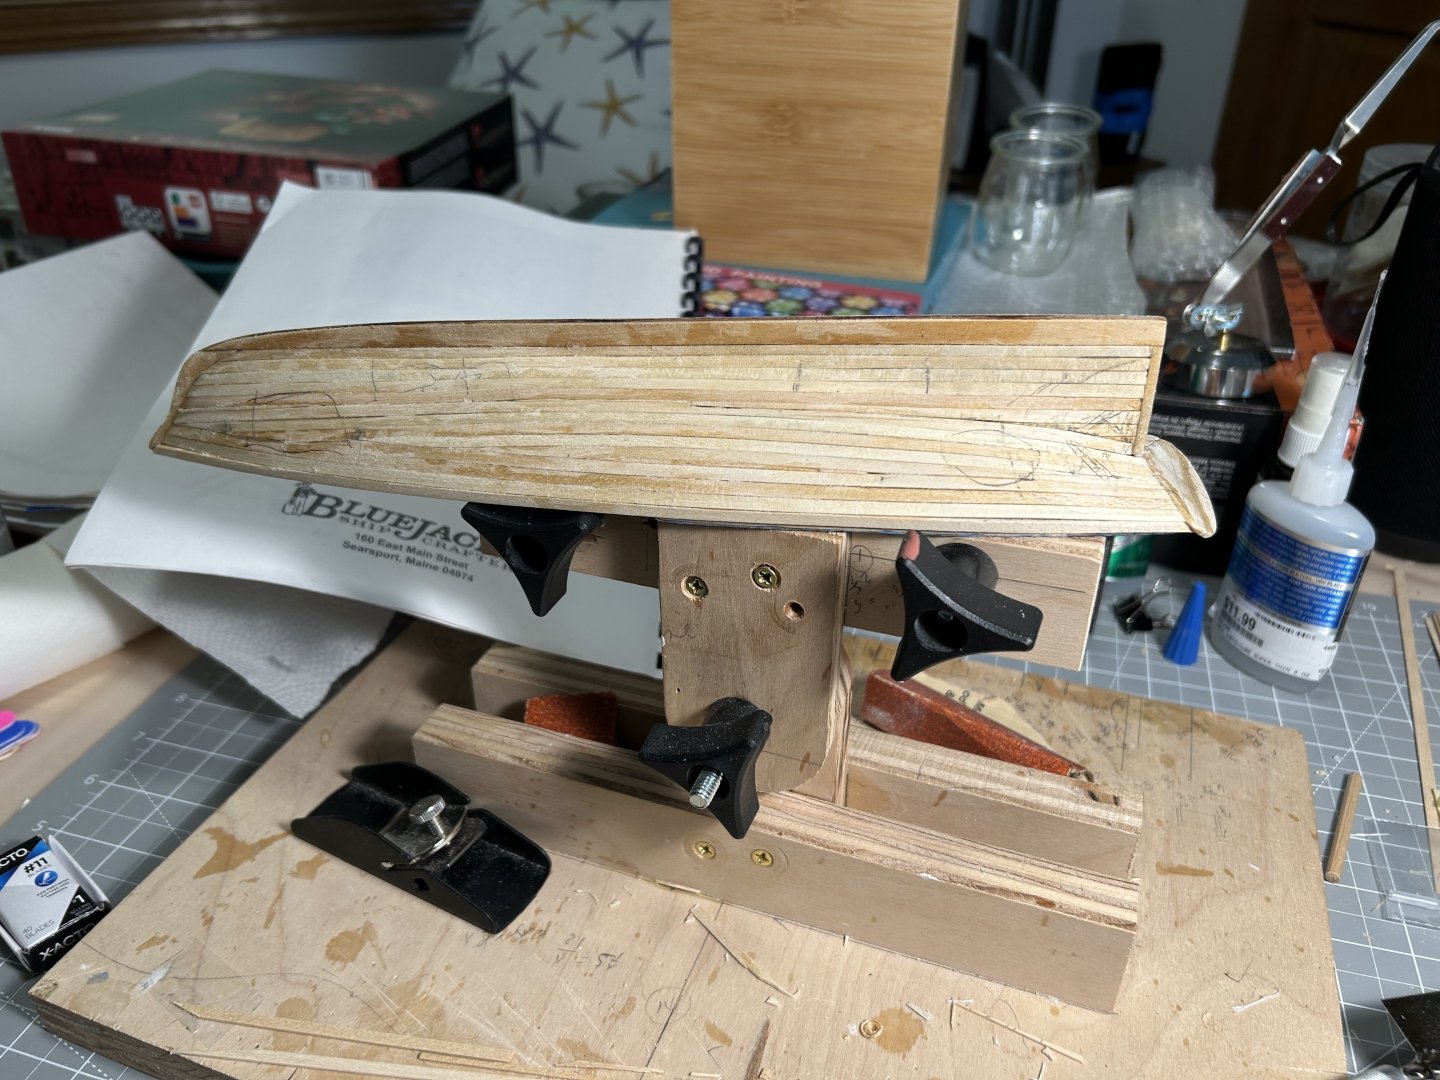
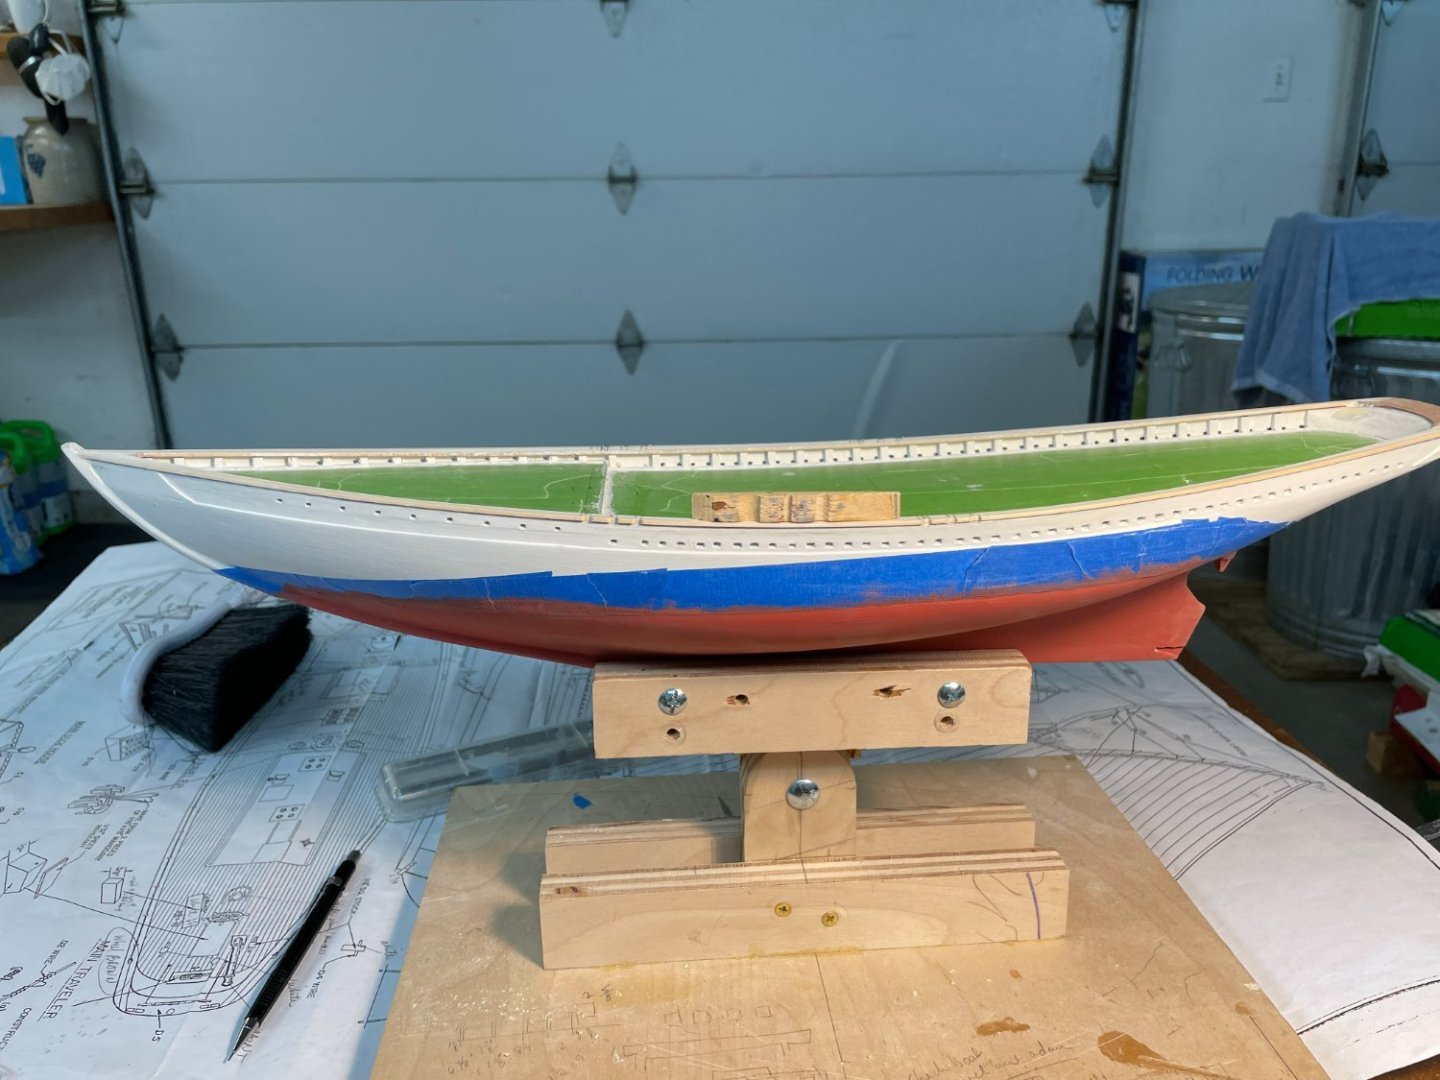
Other progress has been the sanding and shaping of the spars and beginning of building the deck furniture. I'm going to coat the spar with amber shellac and then paint them white where appropriate over the shellac. Next significant task is fairing the hull. There is one place on the boat I may want to fill with a little putty, but basically the plan is sand, fill with MH spackle paste, sand, repeat until fair. Eventually I'll put a coat of primer on the hull to look for unfair spots. Fairing is the place I am most concerned about working at this scale because the planks are only 1/32 thick, which won't leave much wood to sand off to fair the hull. Won't know til I try.
-
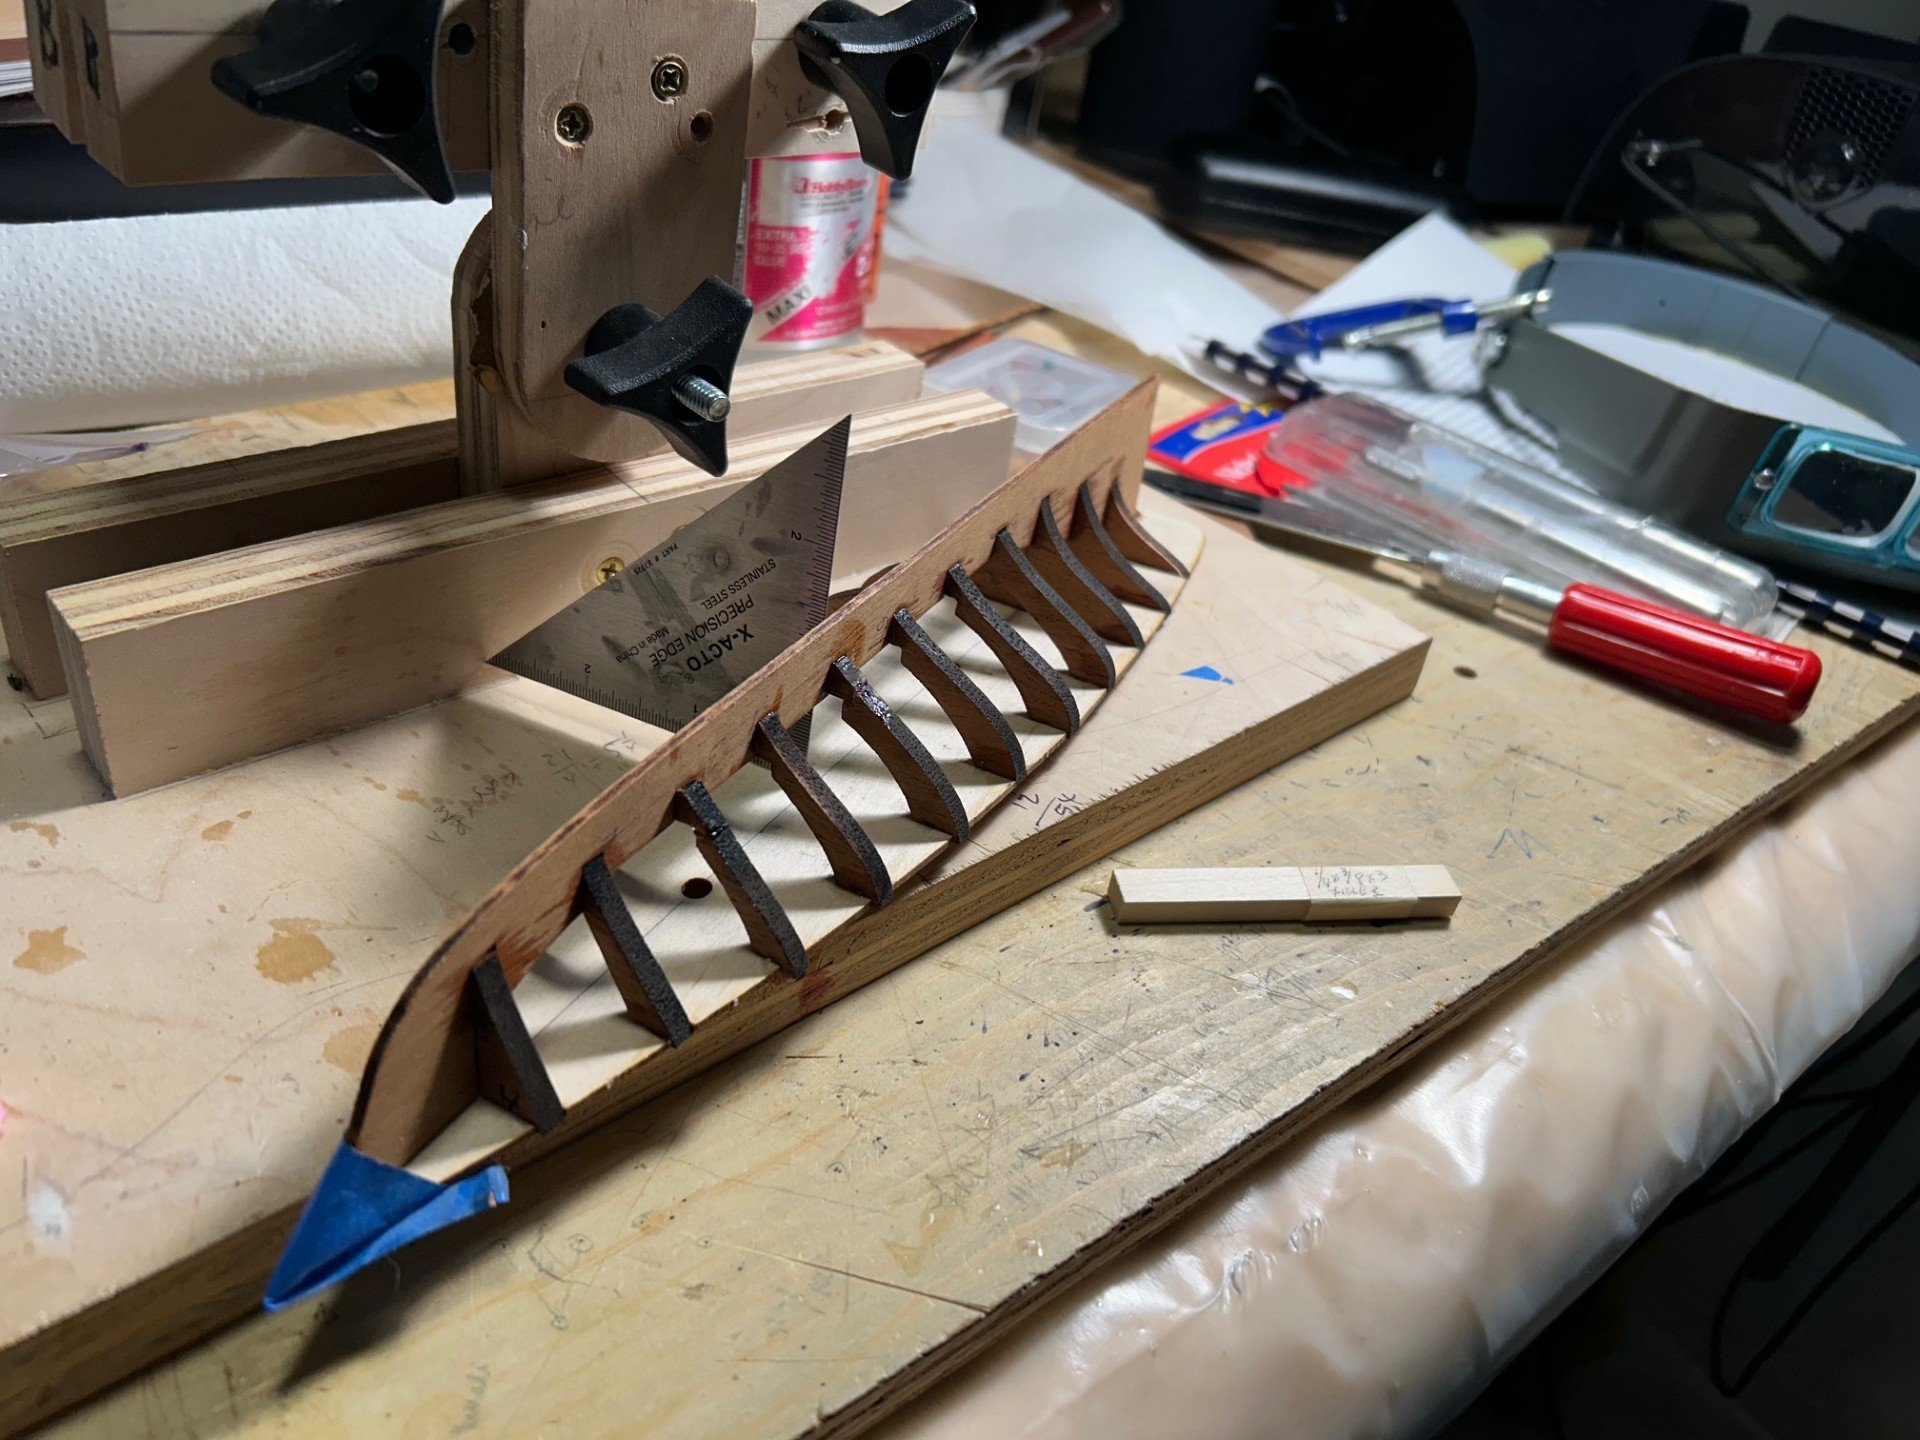
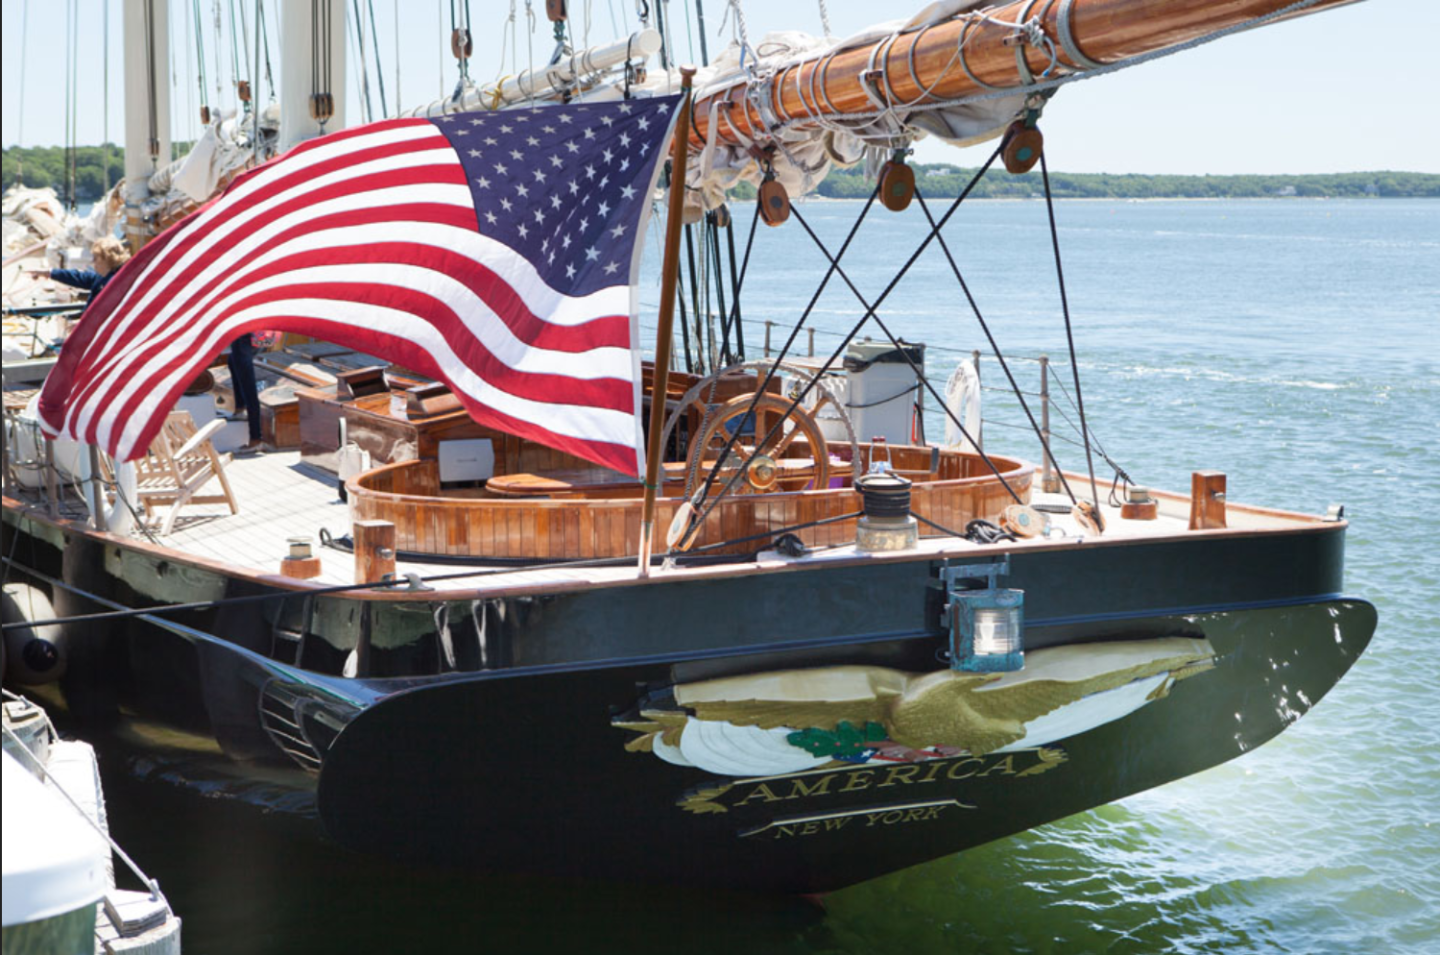
Planking is now complete. I used a "magic plank" method I once read about (but I can't find the reference) in which I tried to position a starter plank right at the point at the turn of the bilge which would allow me to maximize the number of mostly straight planks. I then fit planks down from the sheer, up from the keel, and up and down from the magic plank. I had some luck with this method in that most of the plank fitting I had to do turned into fitting one flat side of a new plank to a flat side of a prior plank above or below and only having to fit the other side of the new plank to one curved edge. Below is the aft end of the boat and transom I am trying to duplicate. I have tried and failed at this before, but maybe this time I have the process thought through
-
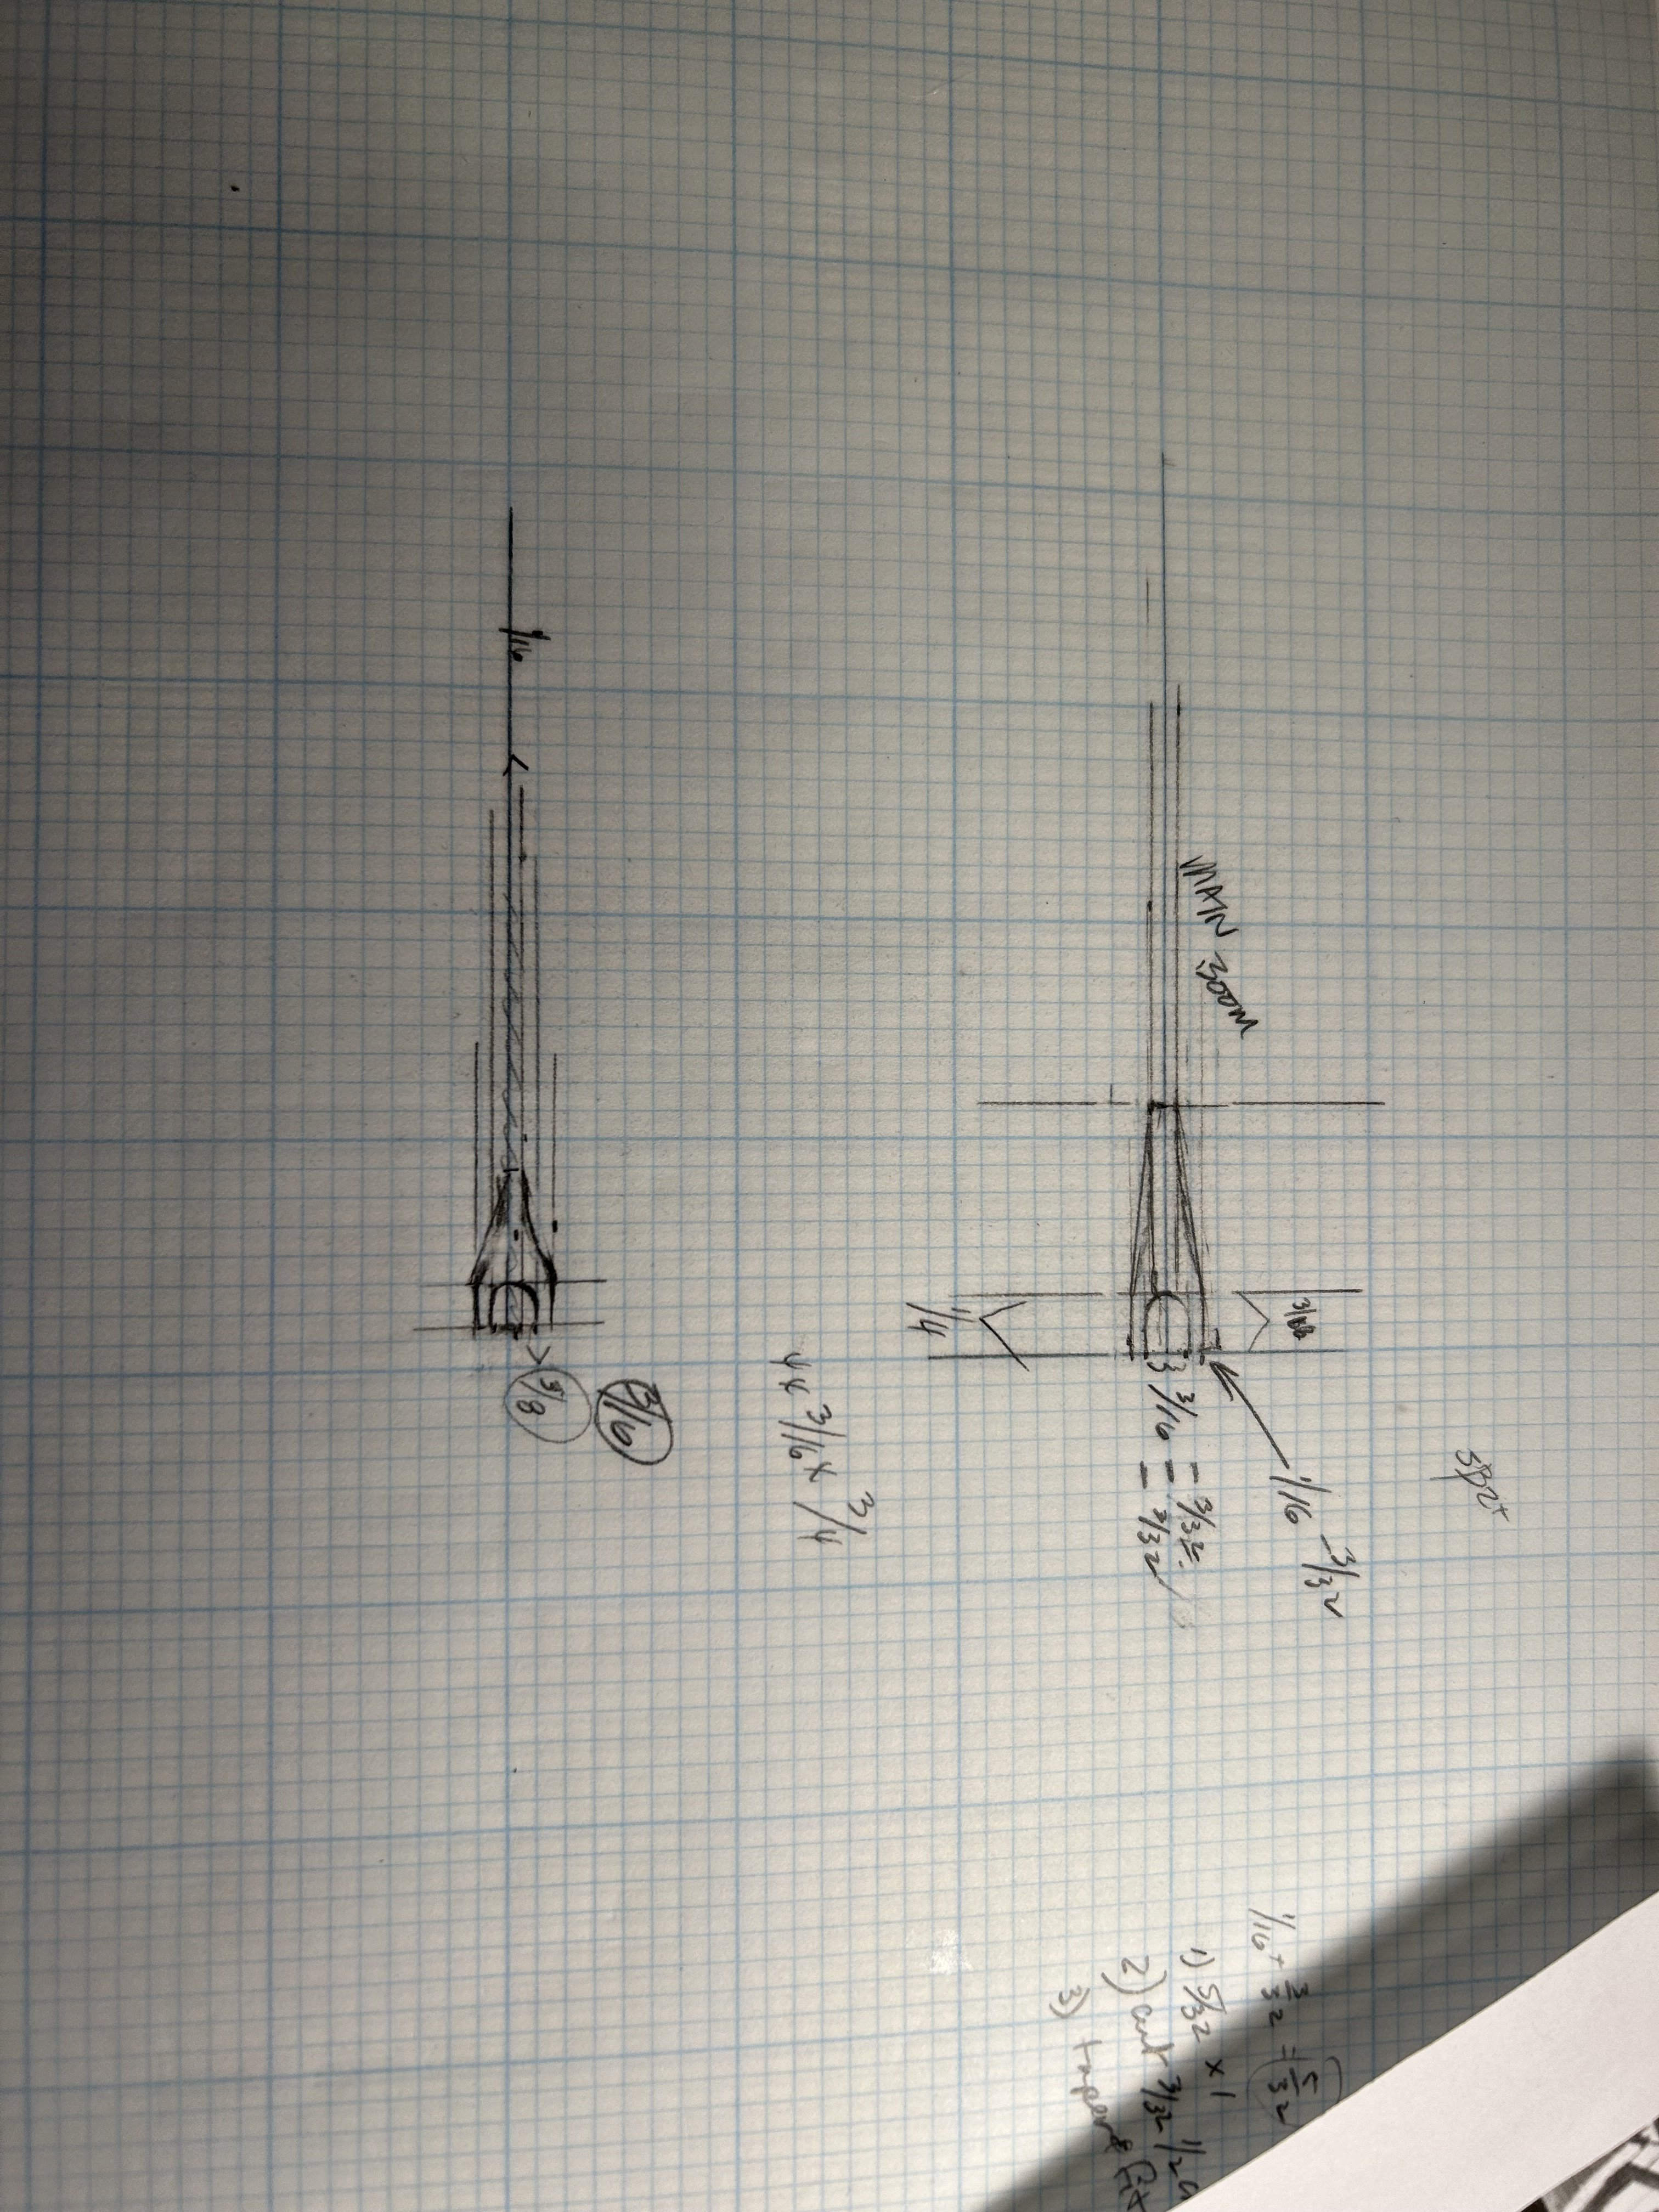
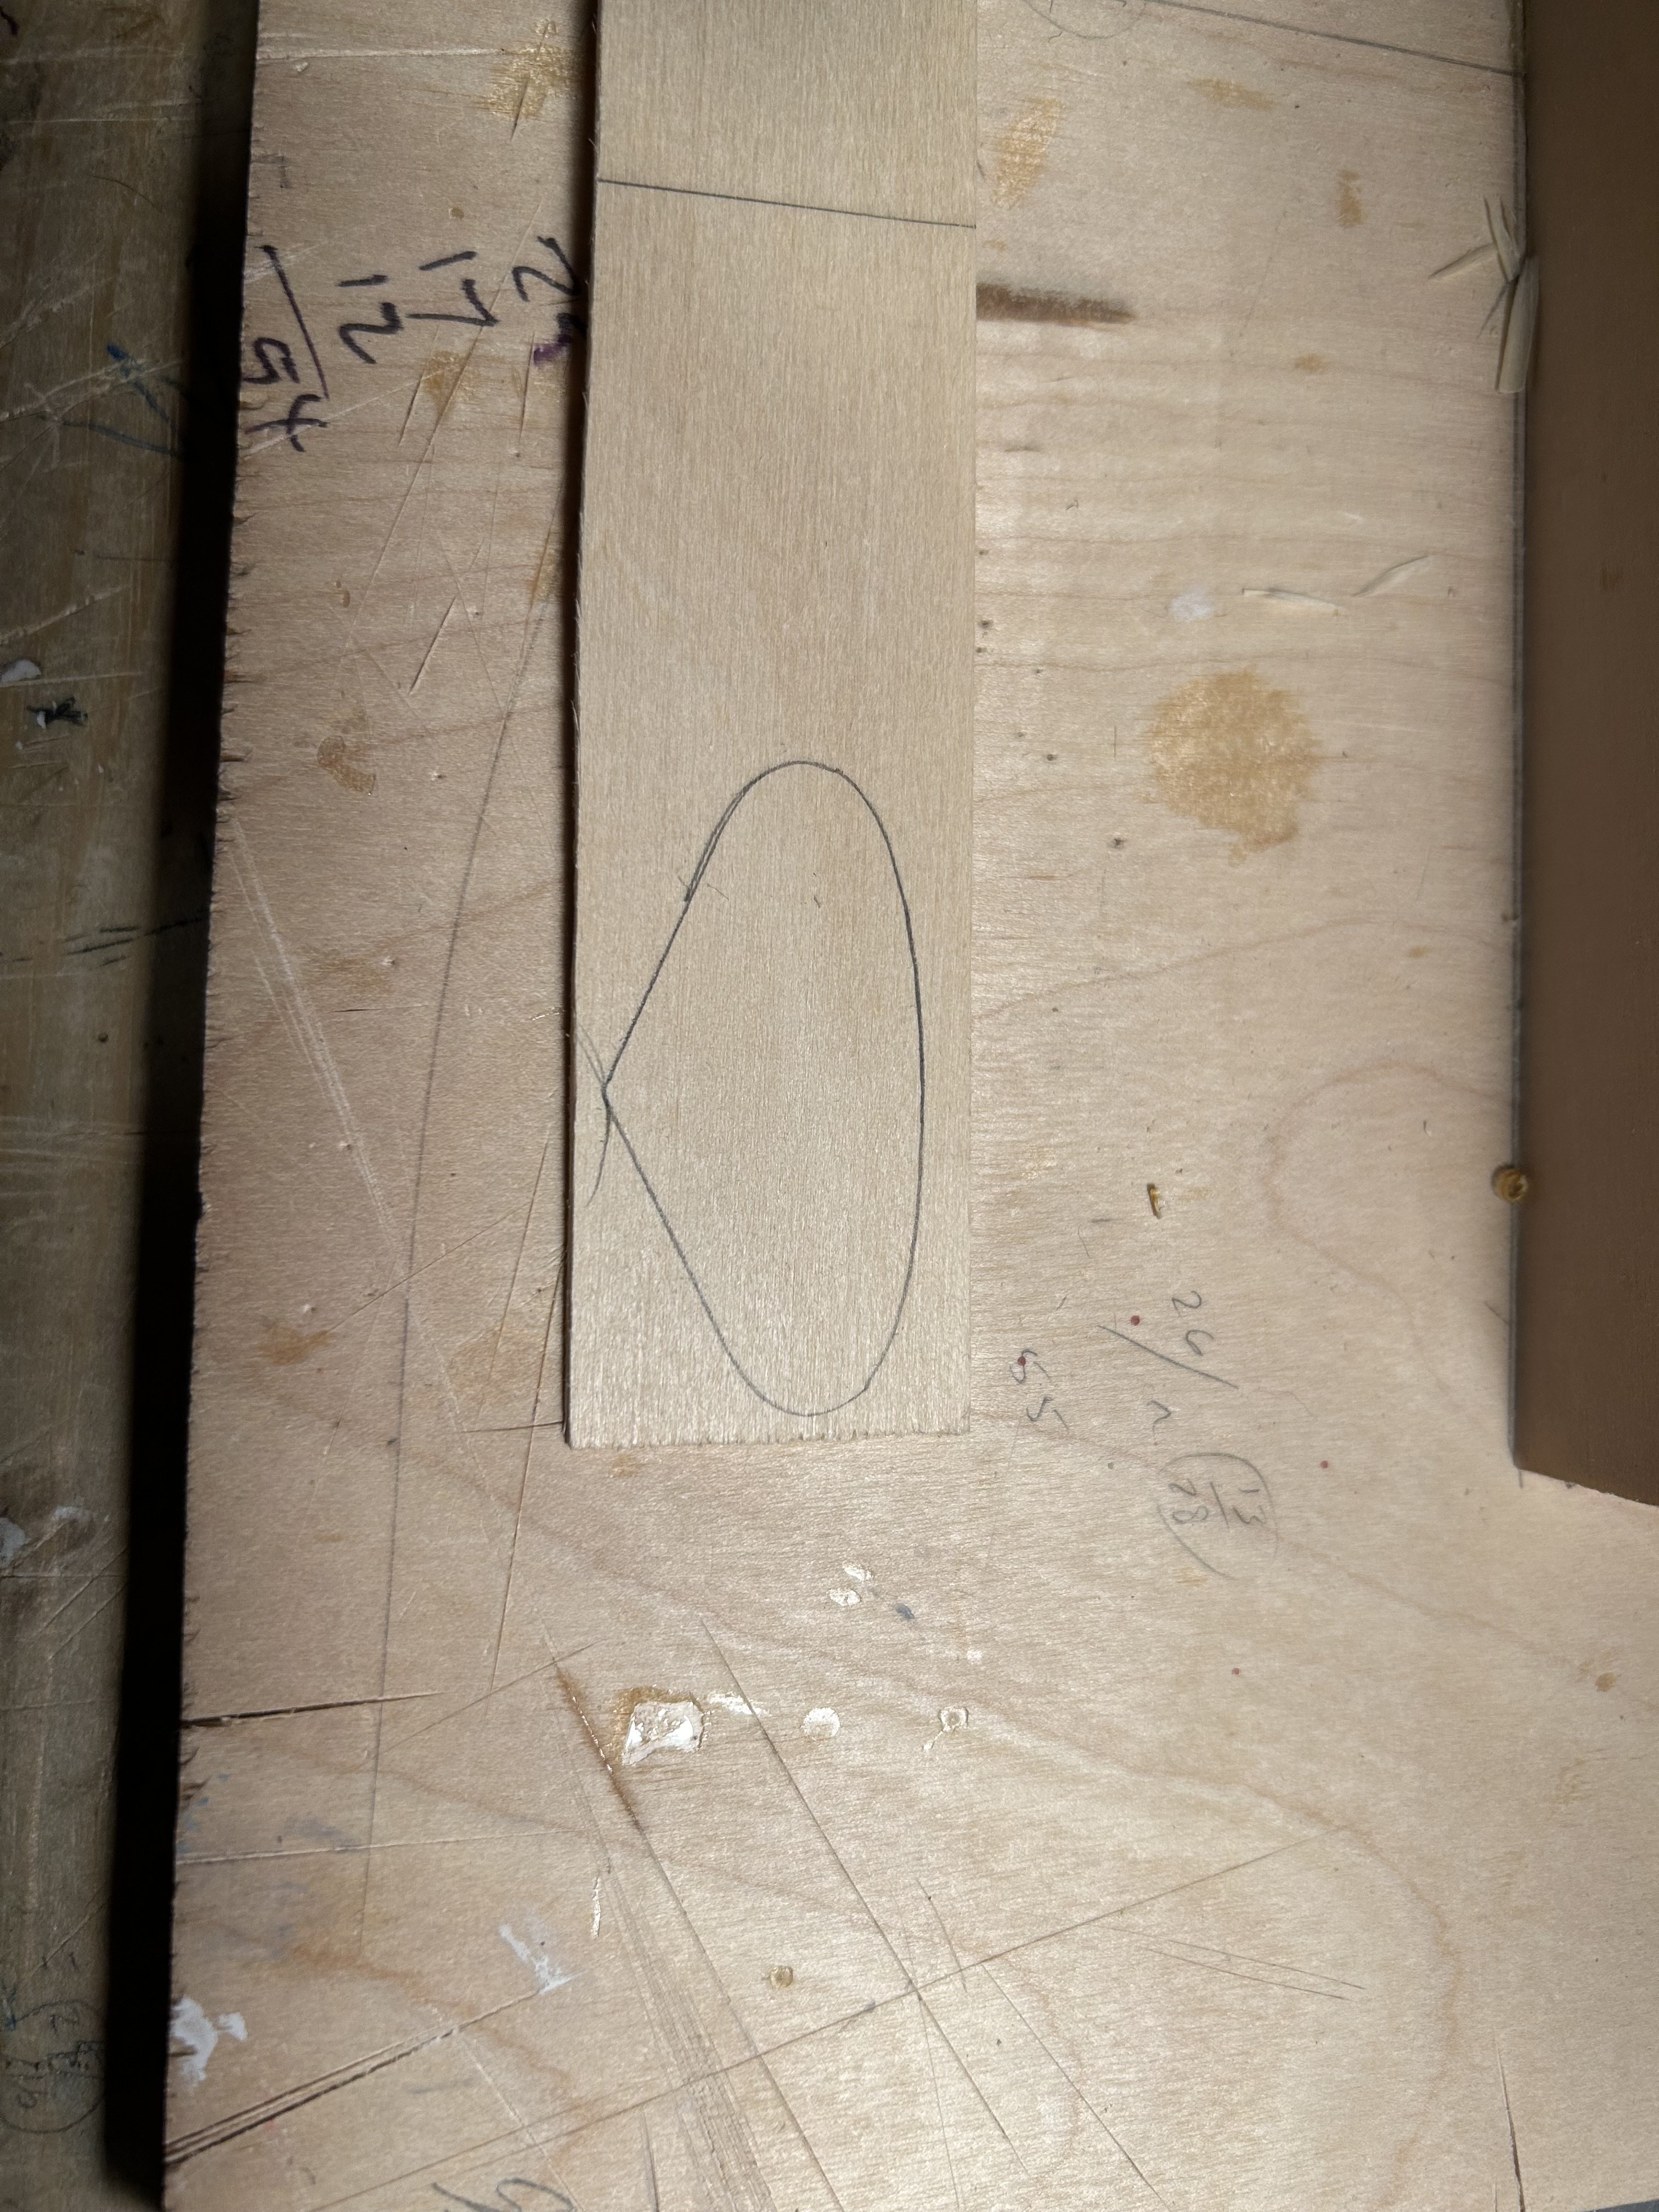
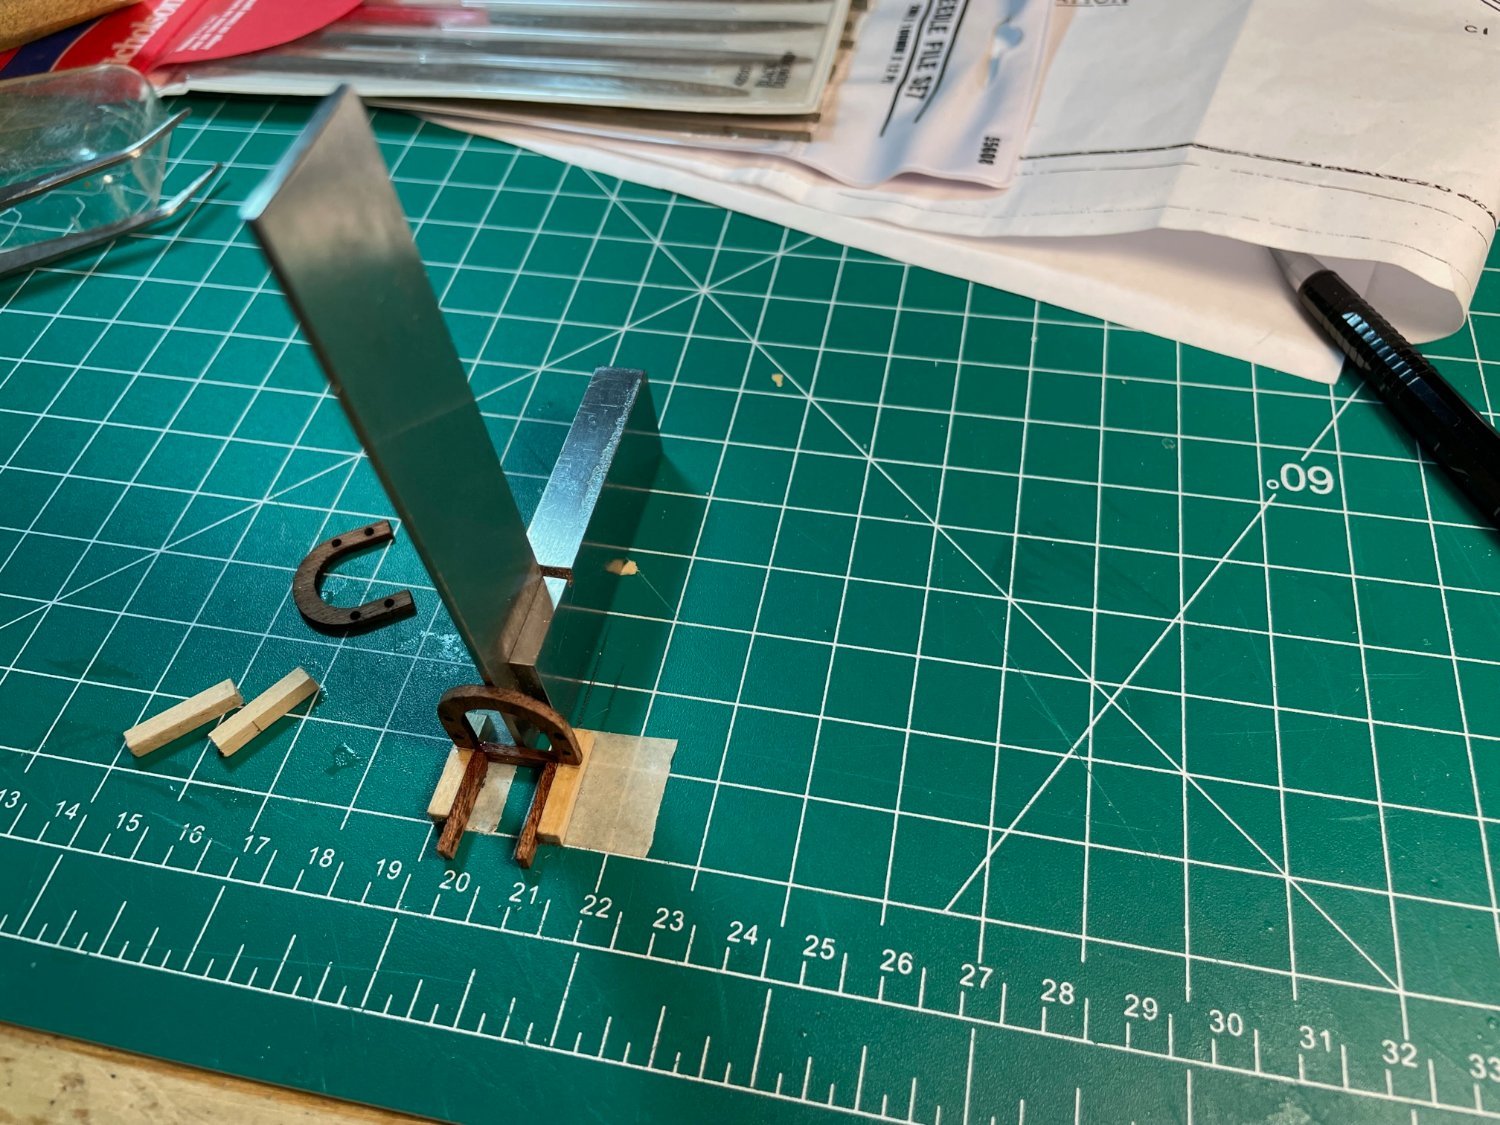
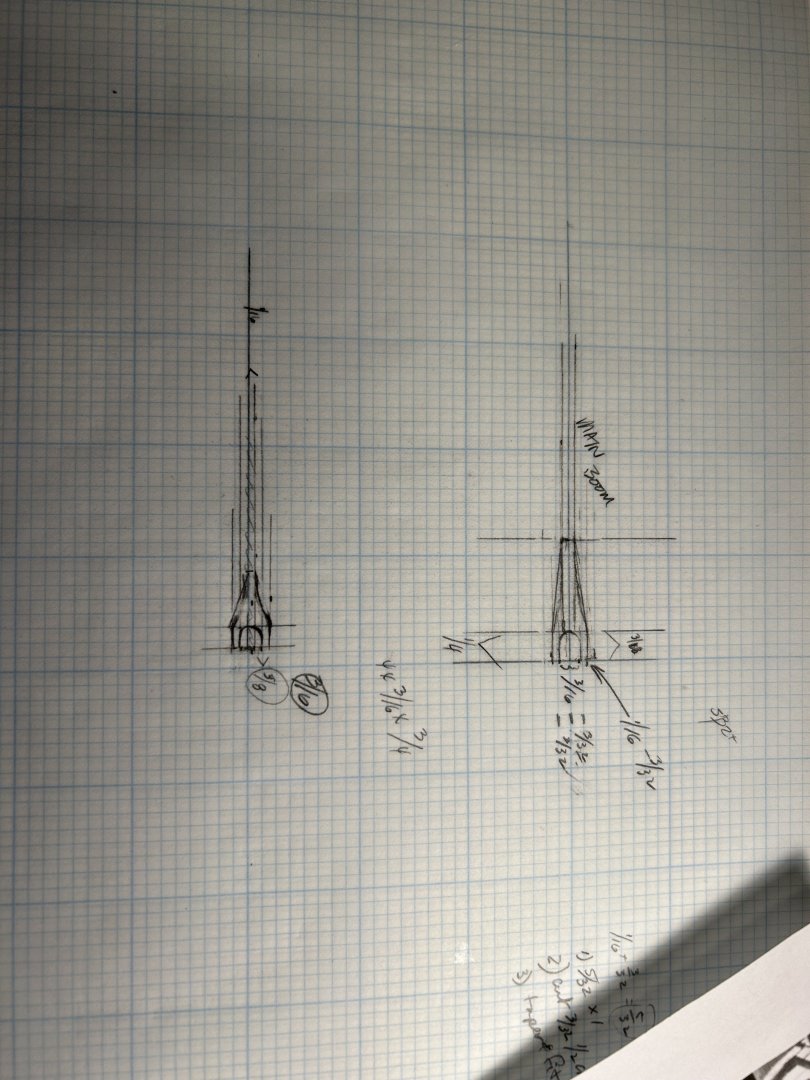
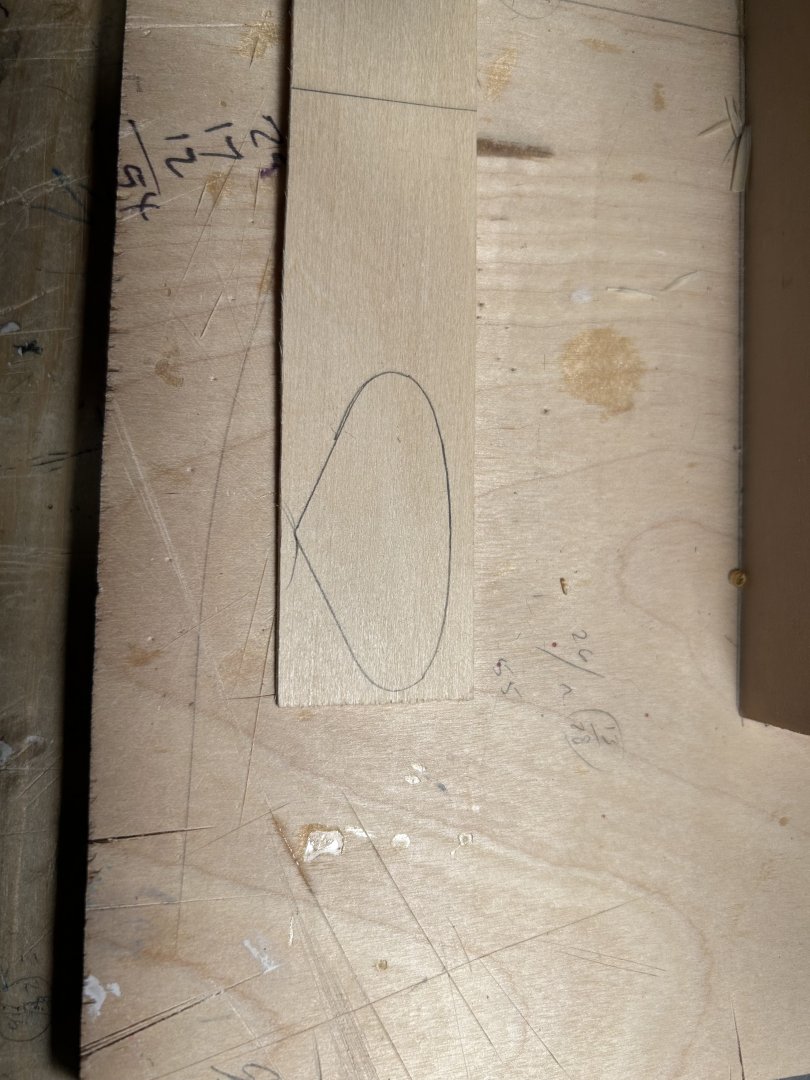
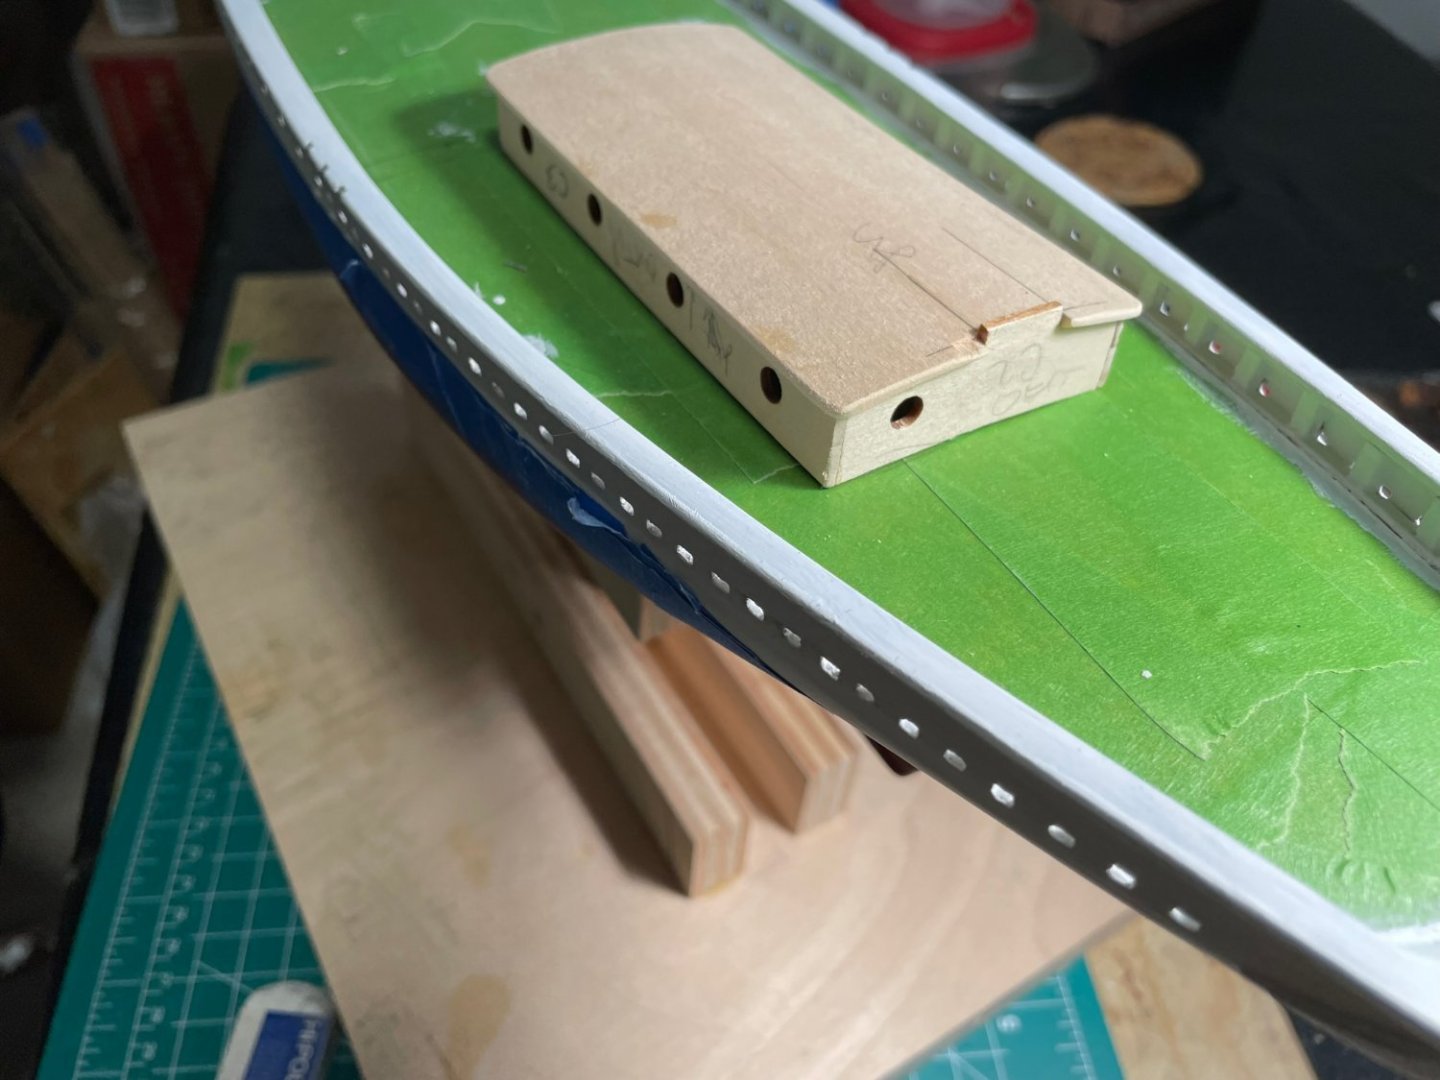
Rough templates for the boom saddles. I probably changed the values a bit after I took this picture, but this gives the basic idea. t I remade a transom because I want to try to duplicate the transom from a picture I have. Also, whether my error or a plans error, I could not get the transom in the kit to fit properly. I'll assume it was my error. I intend to trim this transom to shape once I finish planking and figure out where the after bullworks will land. I will probably paint the transom to match the boat color. I haven't decided on paint colors yet.
-
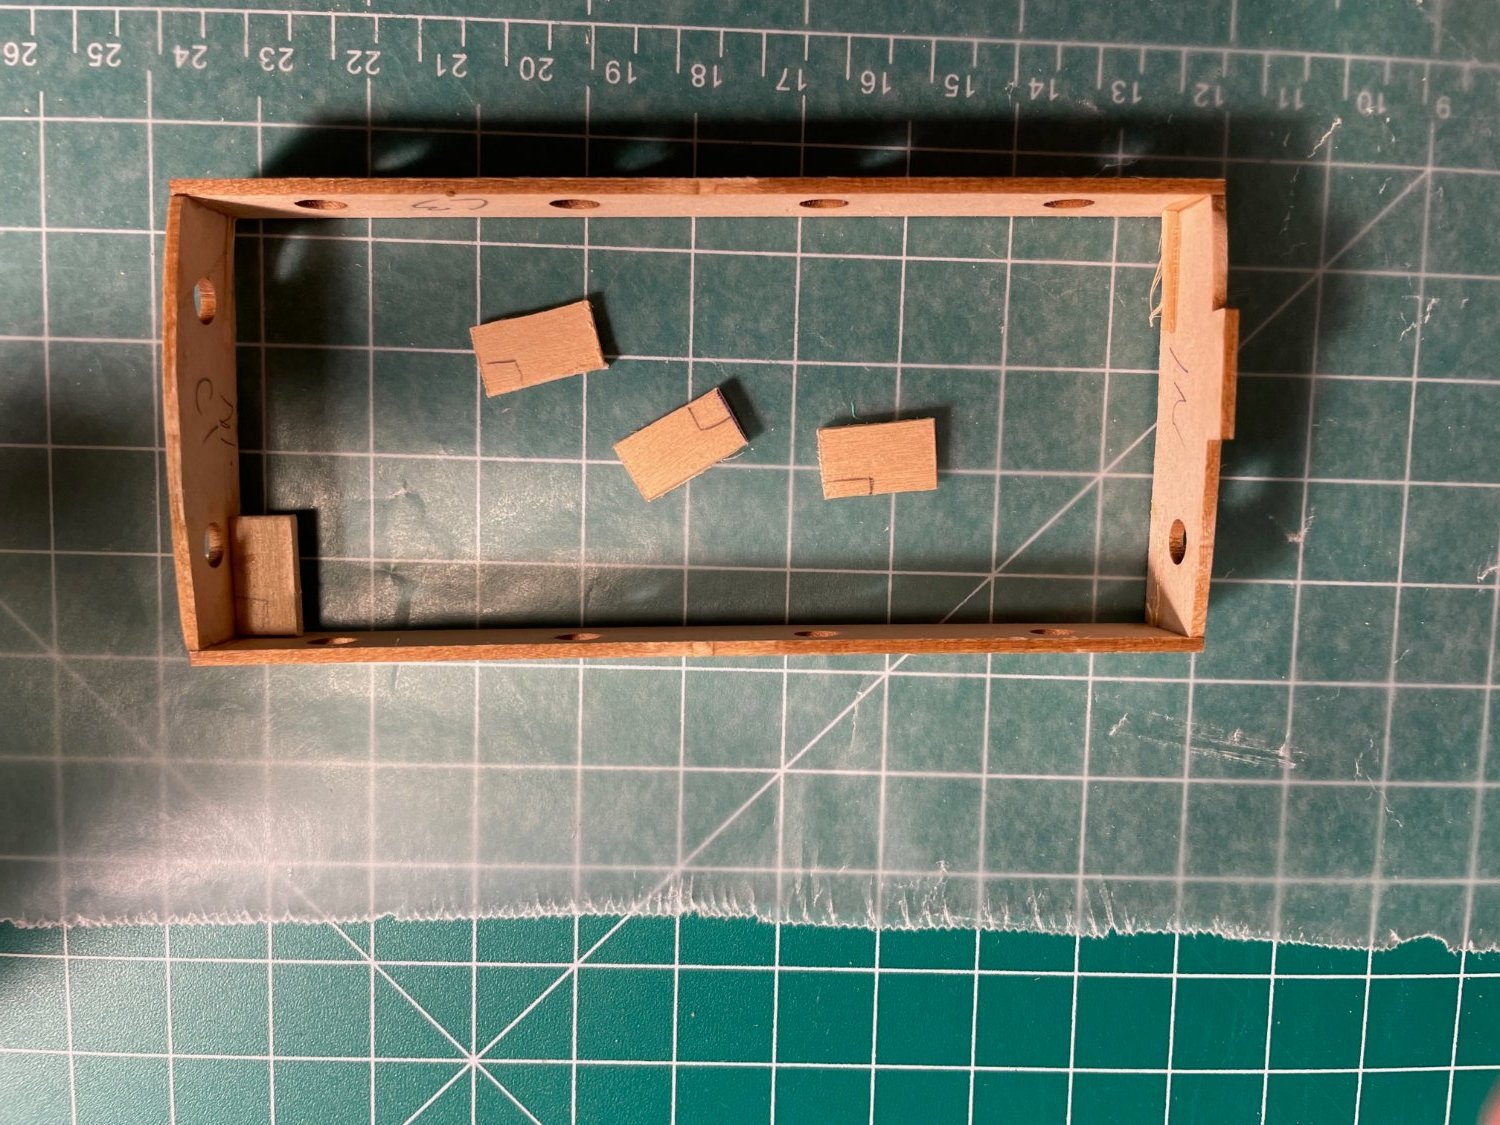
20 or so years ago my wife and I were in New England visiting (we had lived there before moving to the west coast) and we stopped in at Bluejacket. I think we stayed at a motel next door. I bought this kit but I never built it. The scale is pretty small and I'm not sure I can work at this scale any longer, but I'm going to give it a try. The plans look pretty straightforward. Instructions are clear. The kit seems well made and well stocked. Should be fun. I am planning to plank and paint the hull rather than build it in the dockyard style. In the first picture the frames are glued to the subdeck and keel. If you build this kit, and if the parts are still cut the same way on the mahogany sheet, be aware that frame 3 is pretty fragile. I broke the frame twice along the grain while I was fitting and before gluing. One other note is that I changed the mast step at frame 3 by cutting it square and eliminating the alignment hole. I did this so I would have more freedom to align the masts fore/aft and port/starboard when I install them.

-
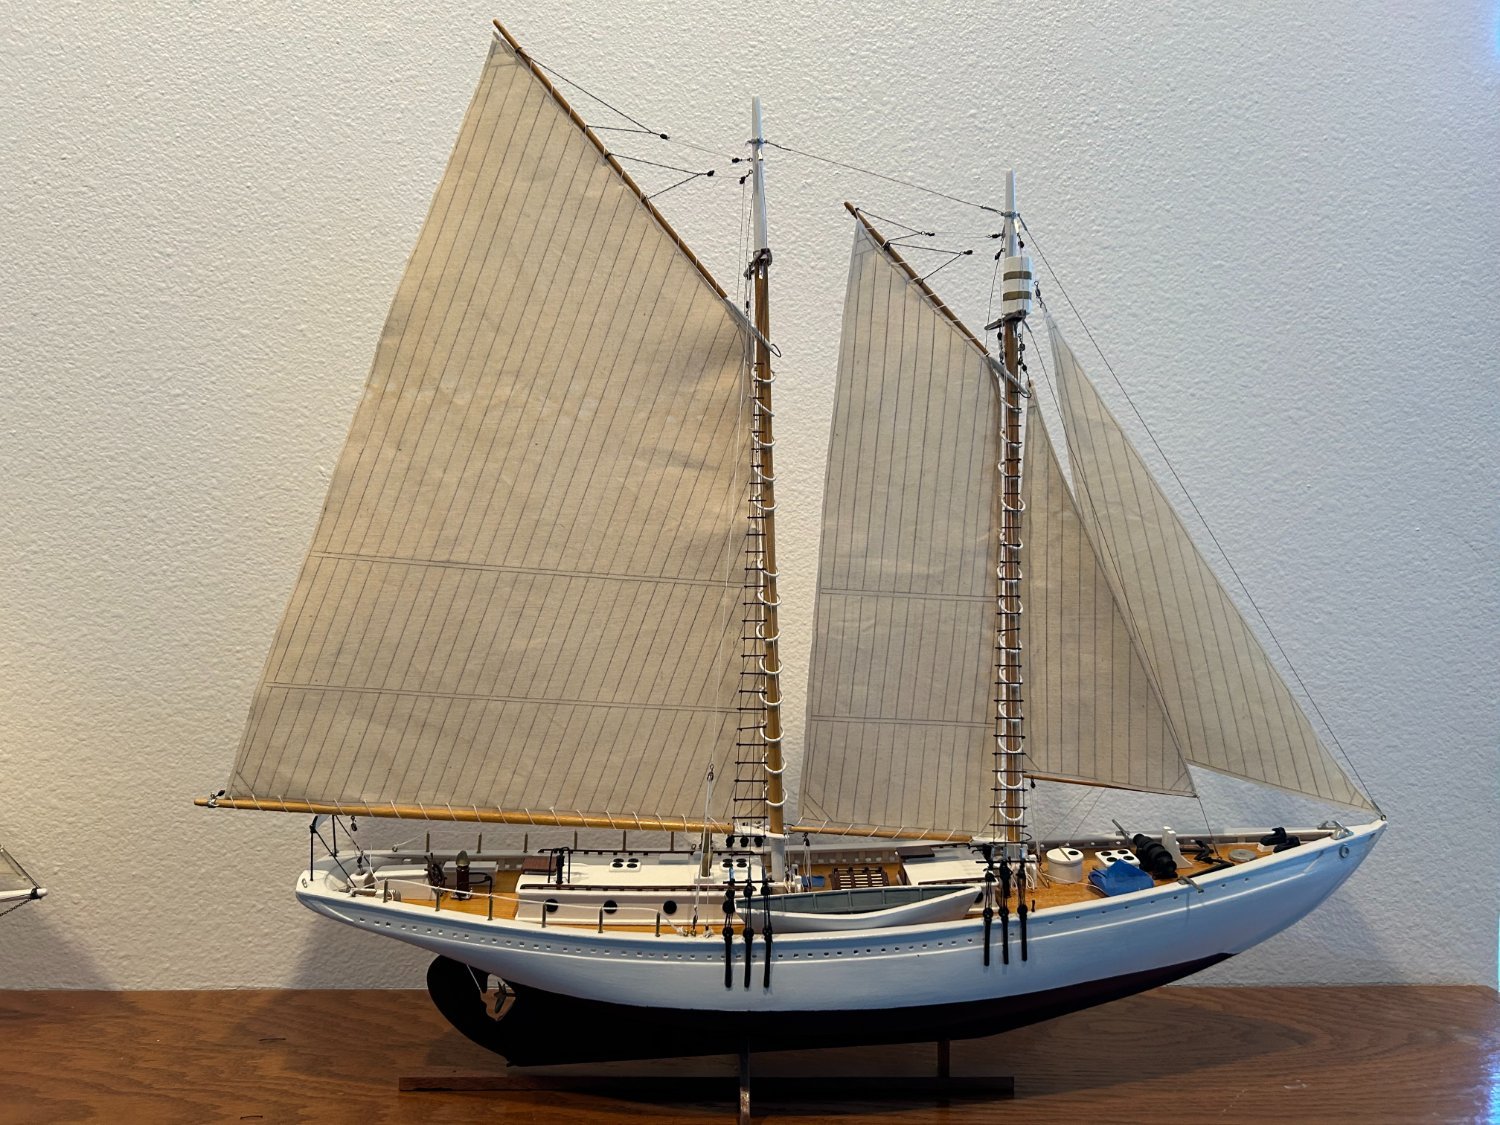
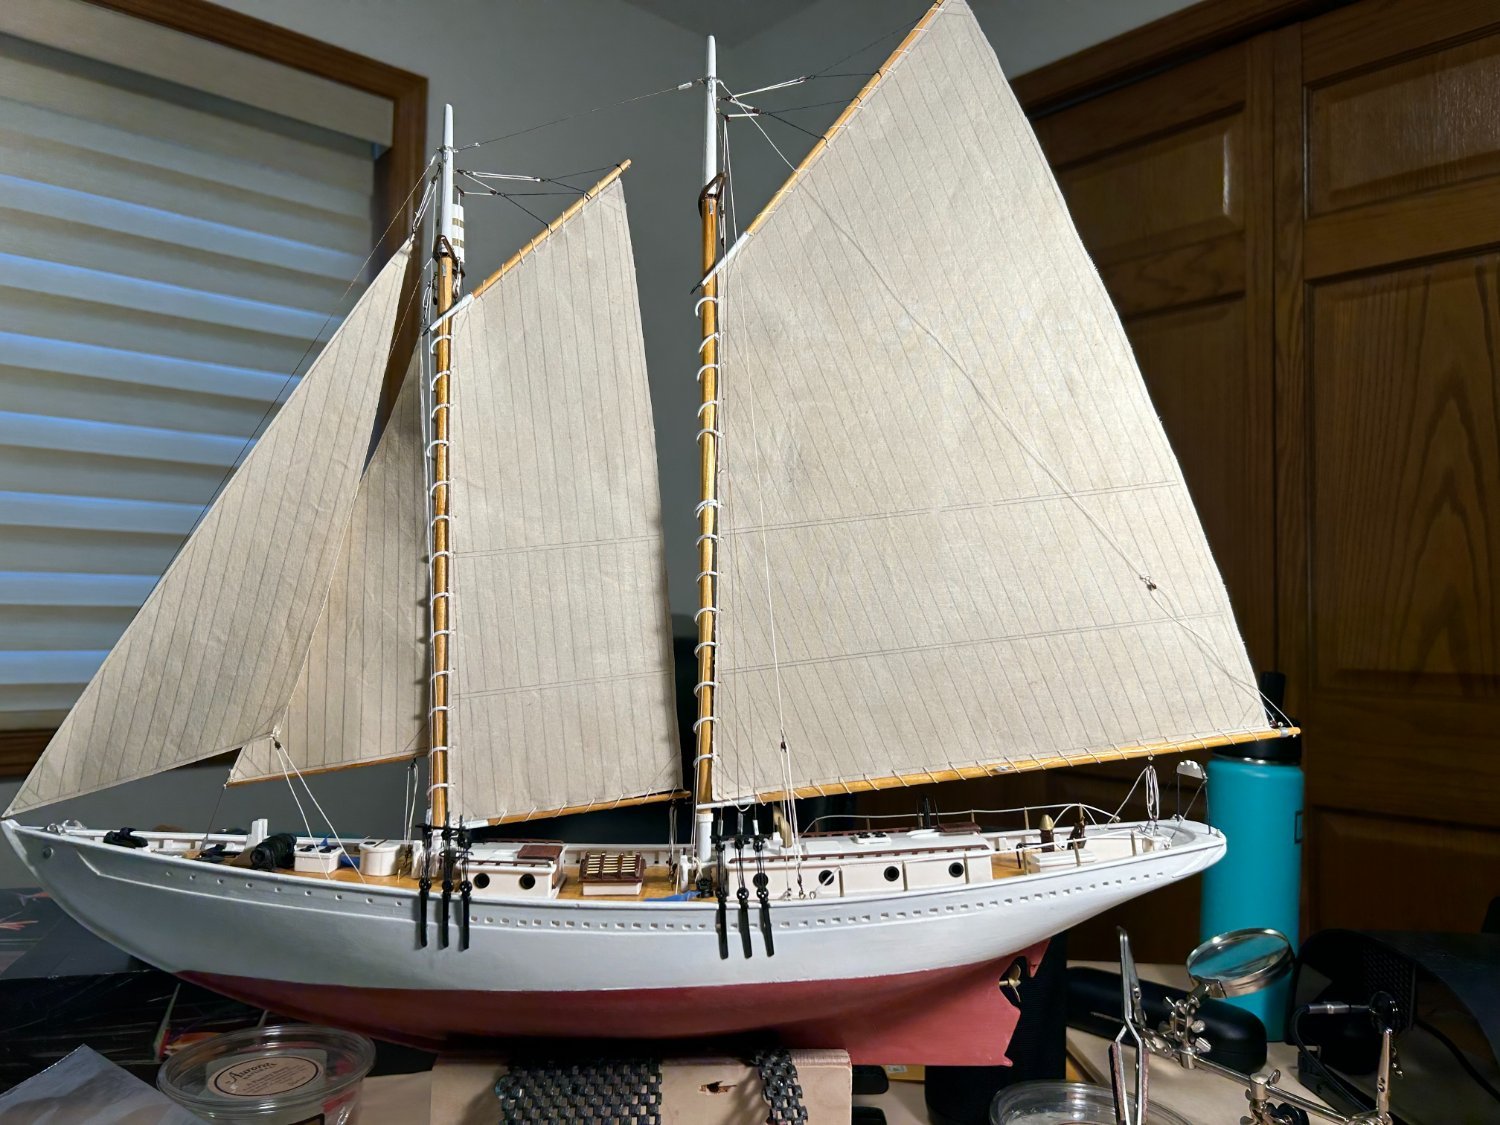
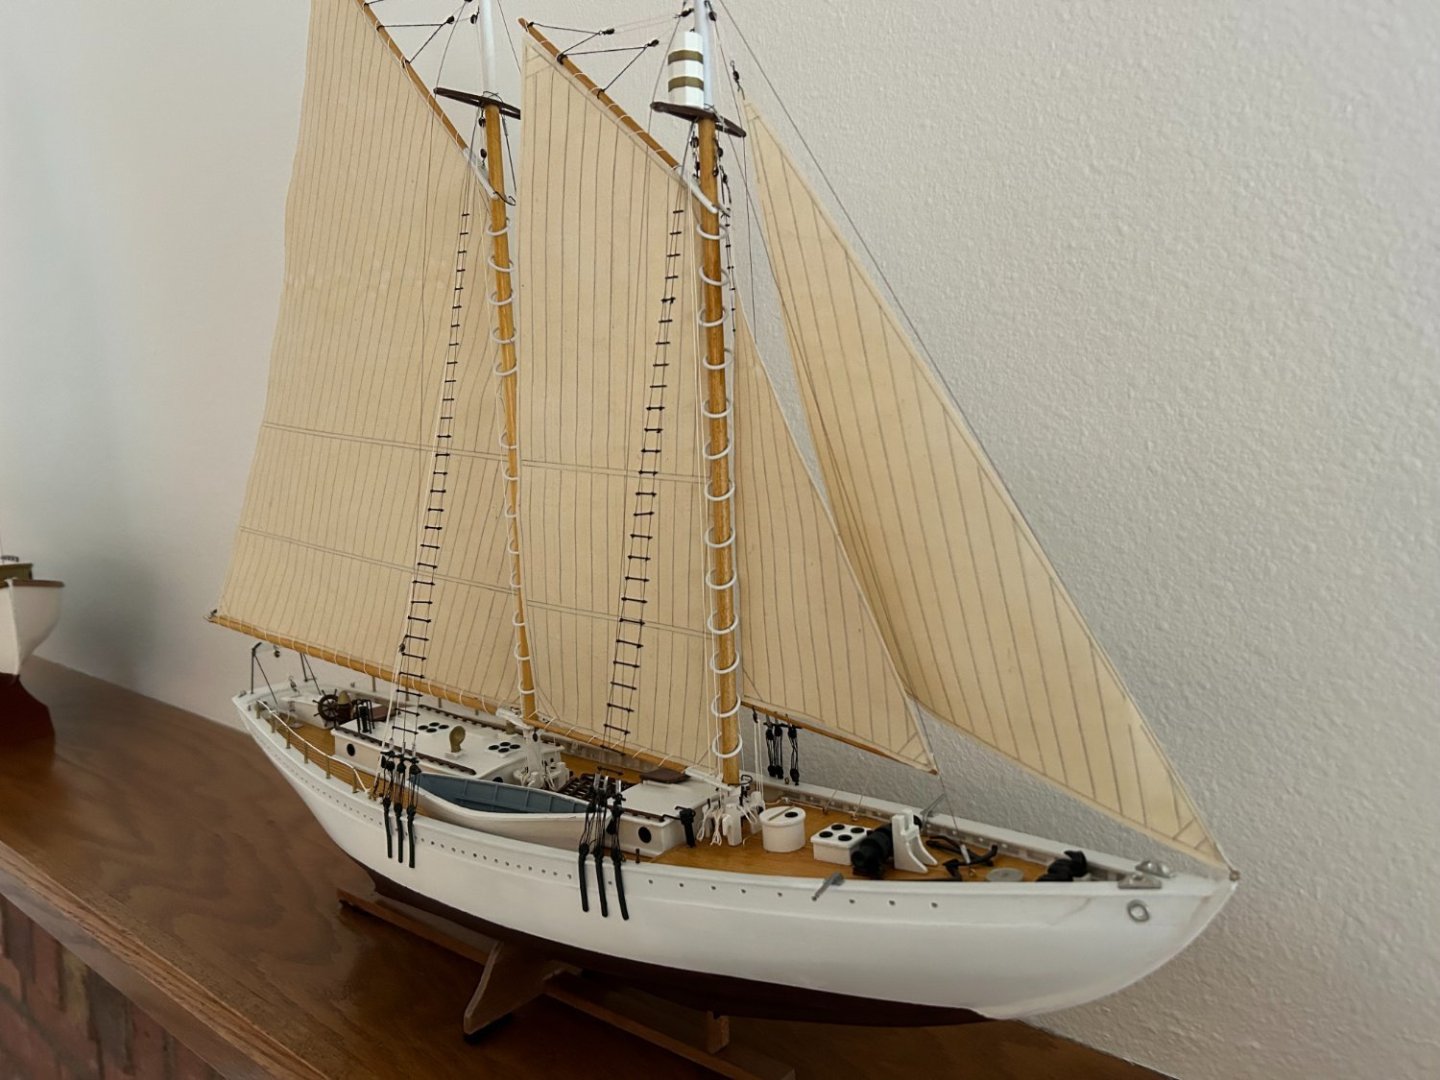
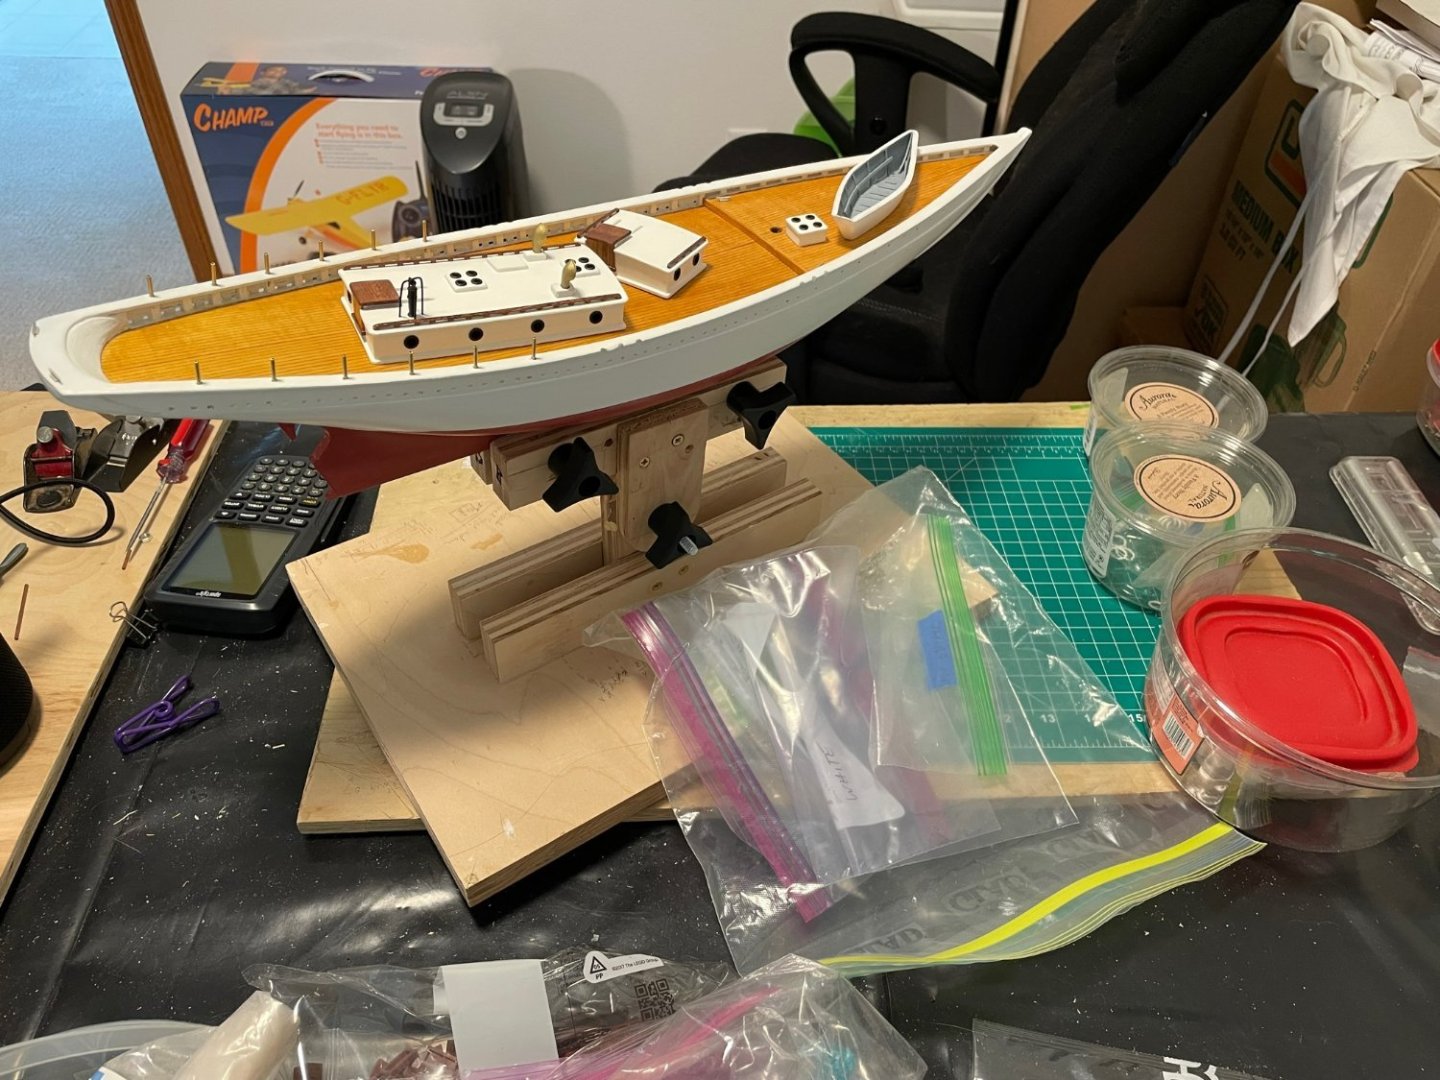
Finished - at least for now. I have a few changes I may make including a different stand, but for now I'm done. The battens for climbing the rigging were, as expected, a bunch of knots. I experimented with square knots and cow hitches, and neither worked out all that well. I eventually just put an overhand knot on each end of the batten and dabbed in a bit of thick cyano. Satisfactory if not perfect. Next time through I think I might try some fine waxed fly-tying thread and a small drop of think cyano to hold it. I think the waxed thread would hold the knot smaller and tighter. Here are a couple of final pictures. The Bluejacket kit was as advertised. The instructions were comprehensive. Precut parts were accurate and clean with a only reasonable amount of burning on thicker parts. Overall, I give the kit high marks. Thanks to everyone who answered my questions, commented, or just shared your build log and pictures. I learned a lot while building this kit and enjoyed it.

- 48 replies
-
- 10
-

-

-
- Bowdoin
- BlueJacket Shipcrafters
- (and 1 more)
-
Thanks. And thanks for the detail you included in your build log(s). Your notes were very helpful. Thanks to others as well. I learned a lot building this boat. I still feel like a beginner, but I also feel like I could take on another complicated build. The modelshipworld site is a real asset. I still have to figure out how to tie on the climbing batens. I counted something like 240 knots... I am half tempted to just leave them off....
- 48 replies
-
- 2
-
-
- Bowdoin
- BlueJacket Shipcrafters
- (and 1 more)
-
Want a laugh? I looked through these pictures this morning and nearly fainted. On one of the pictures the masts look like they are wildly out of parallel. I went to the hobby table, grabbed my small ruler, and did a quick check. Parallel to within 1/16 from top to bottom. I'm not much of a photographer, but I'm thinking the angle of the picture(s) results in parallax. Or something. Whew.
- 48 replies
-
- 2
-
-
- Bowdoin
- BlueJacket Shipcrafters
- (and 1 more)
-
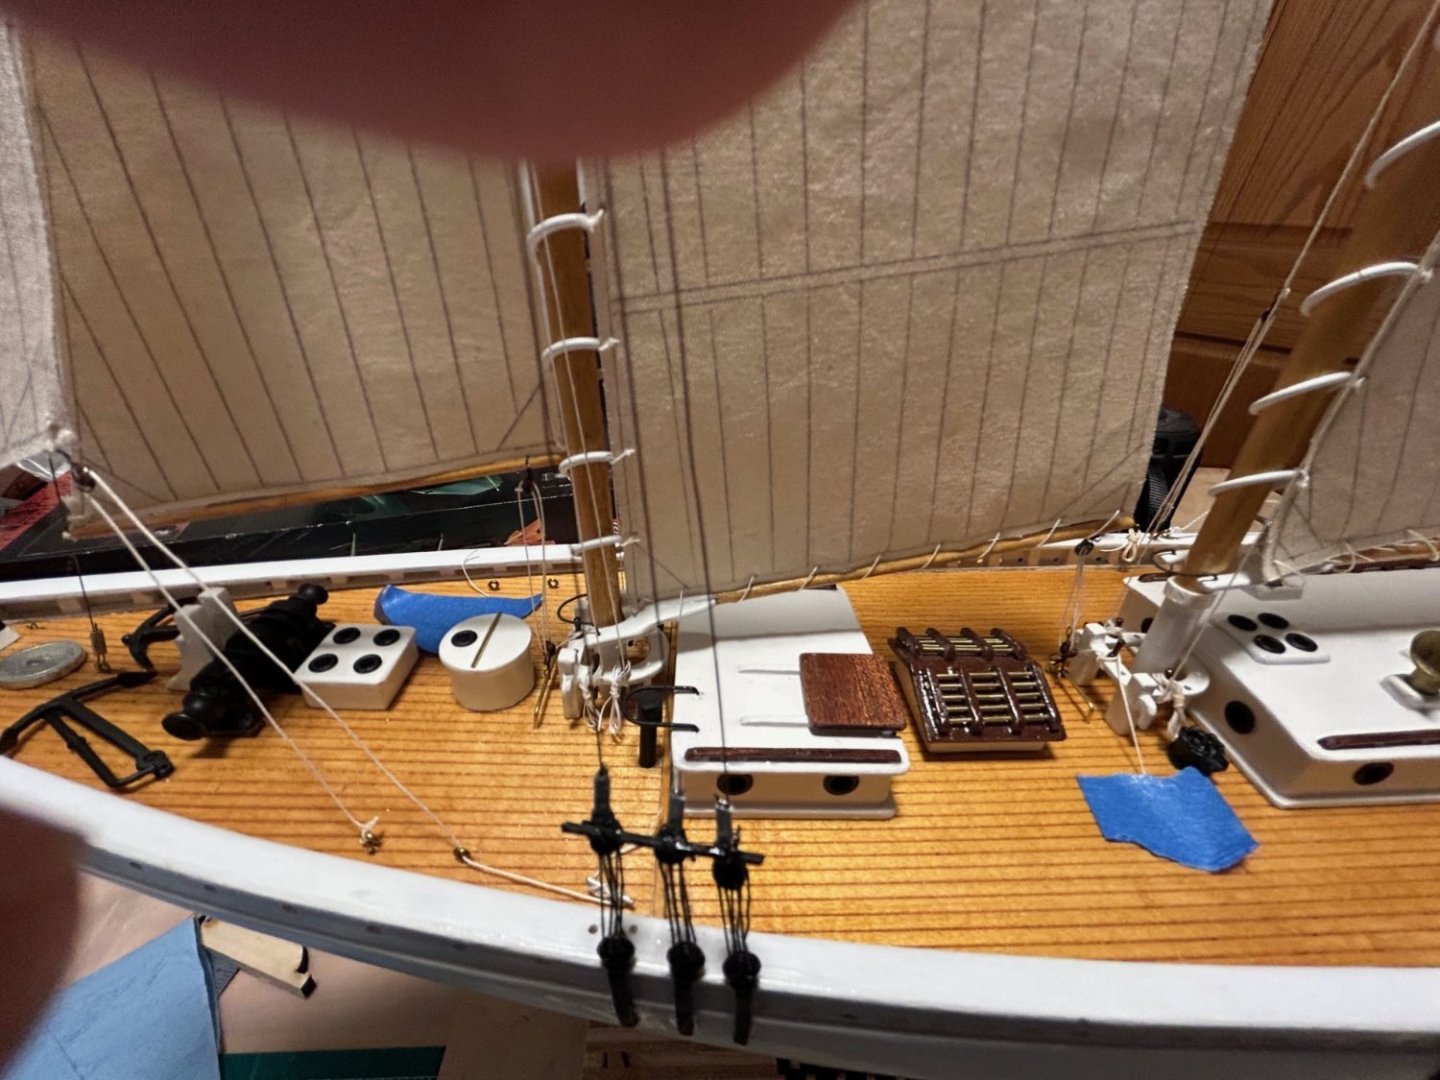
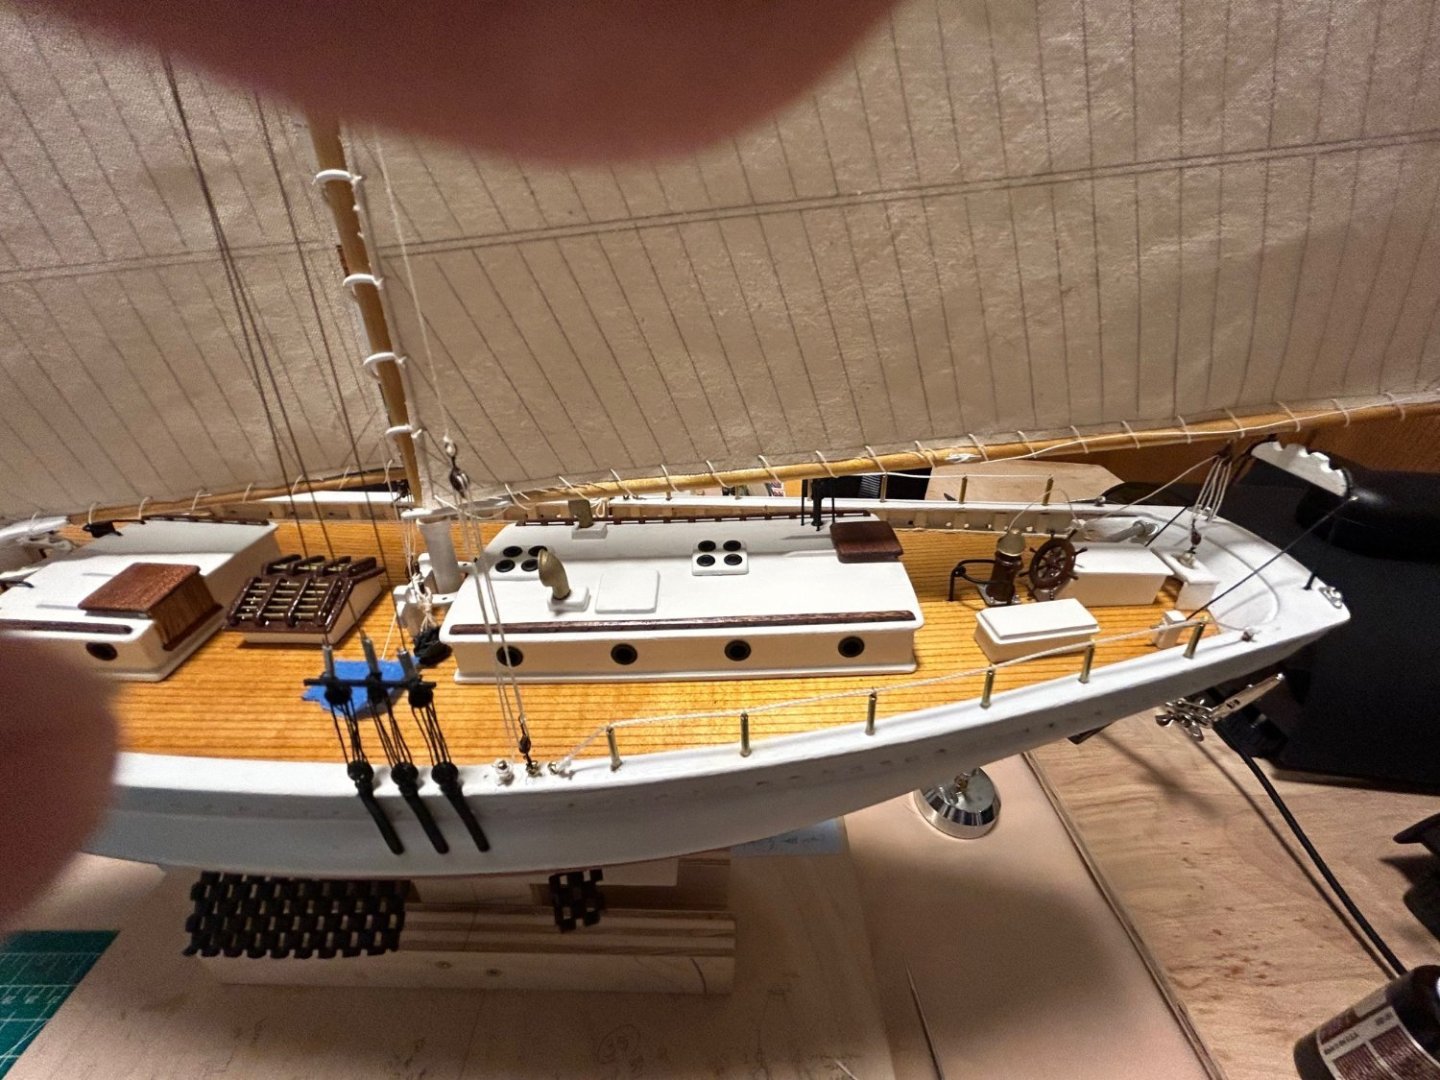
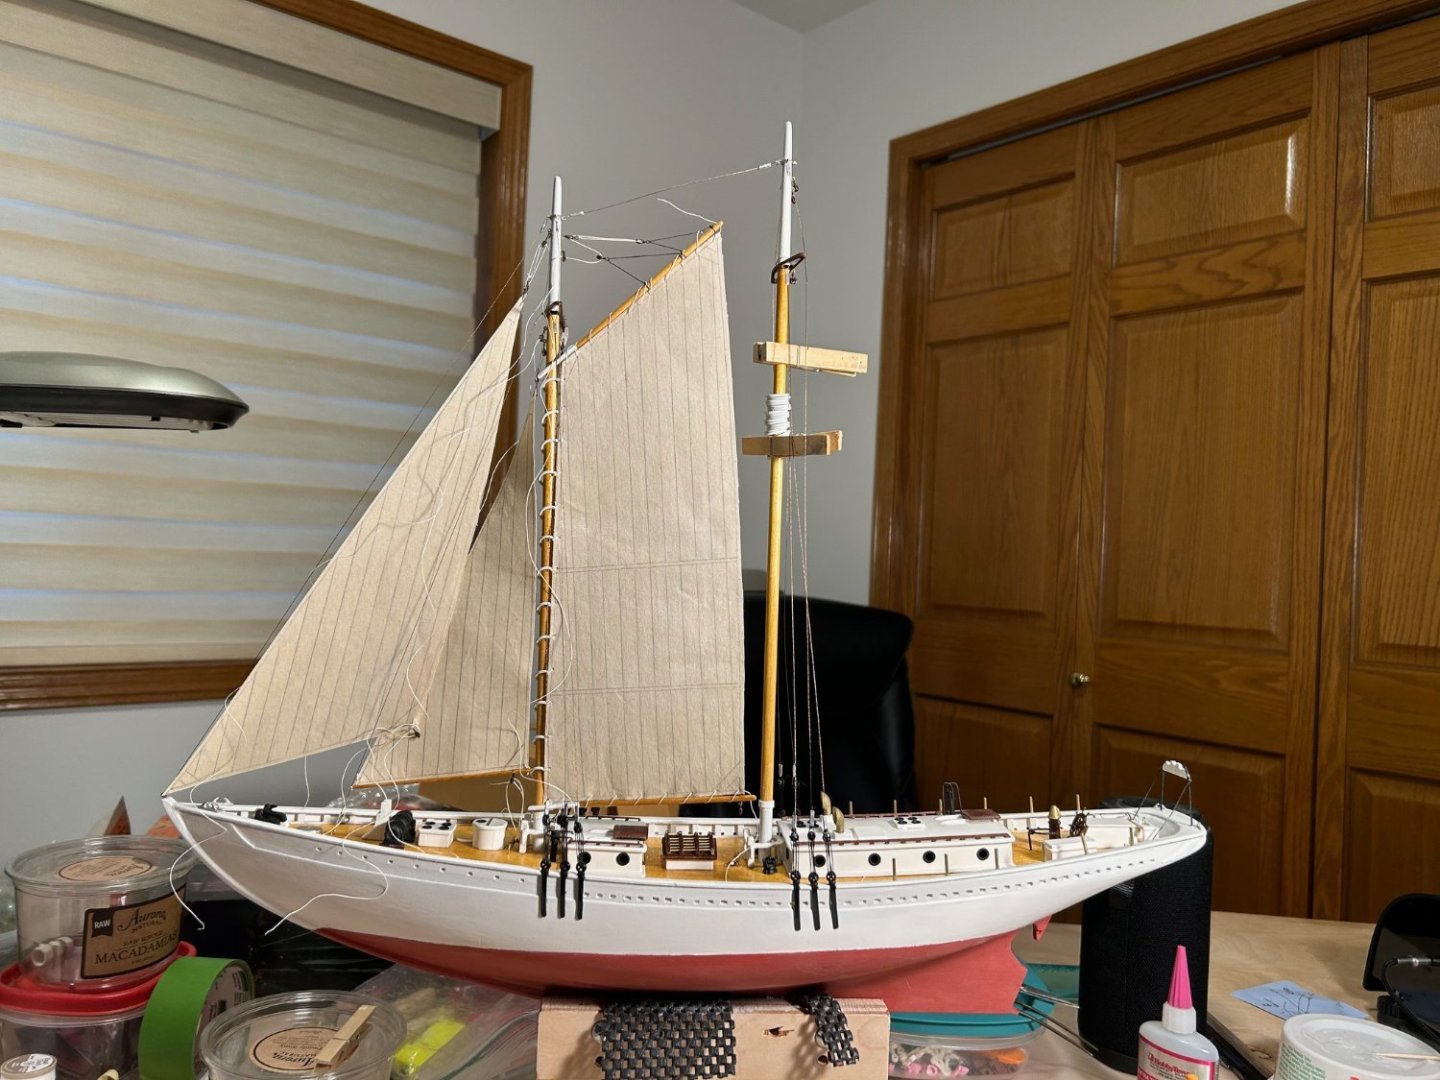
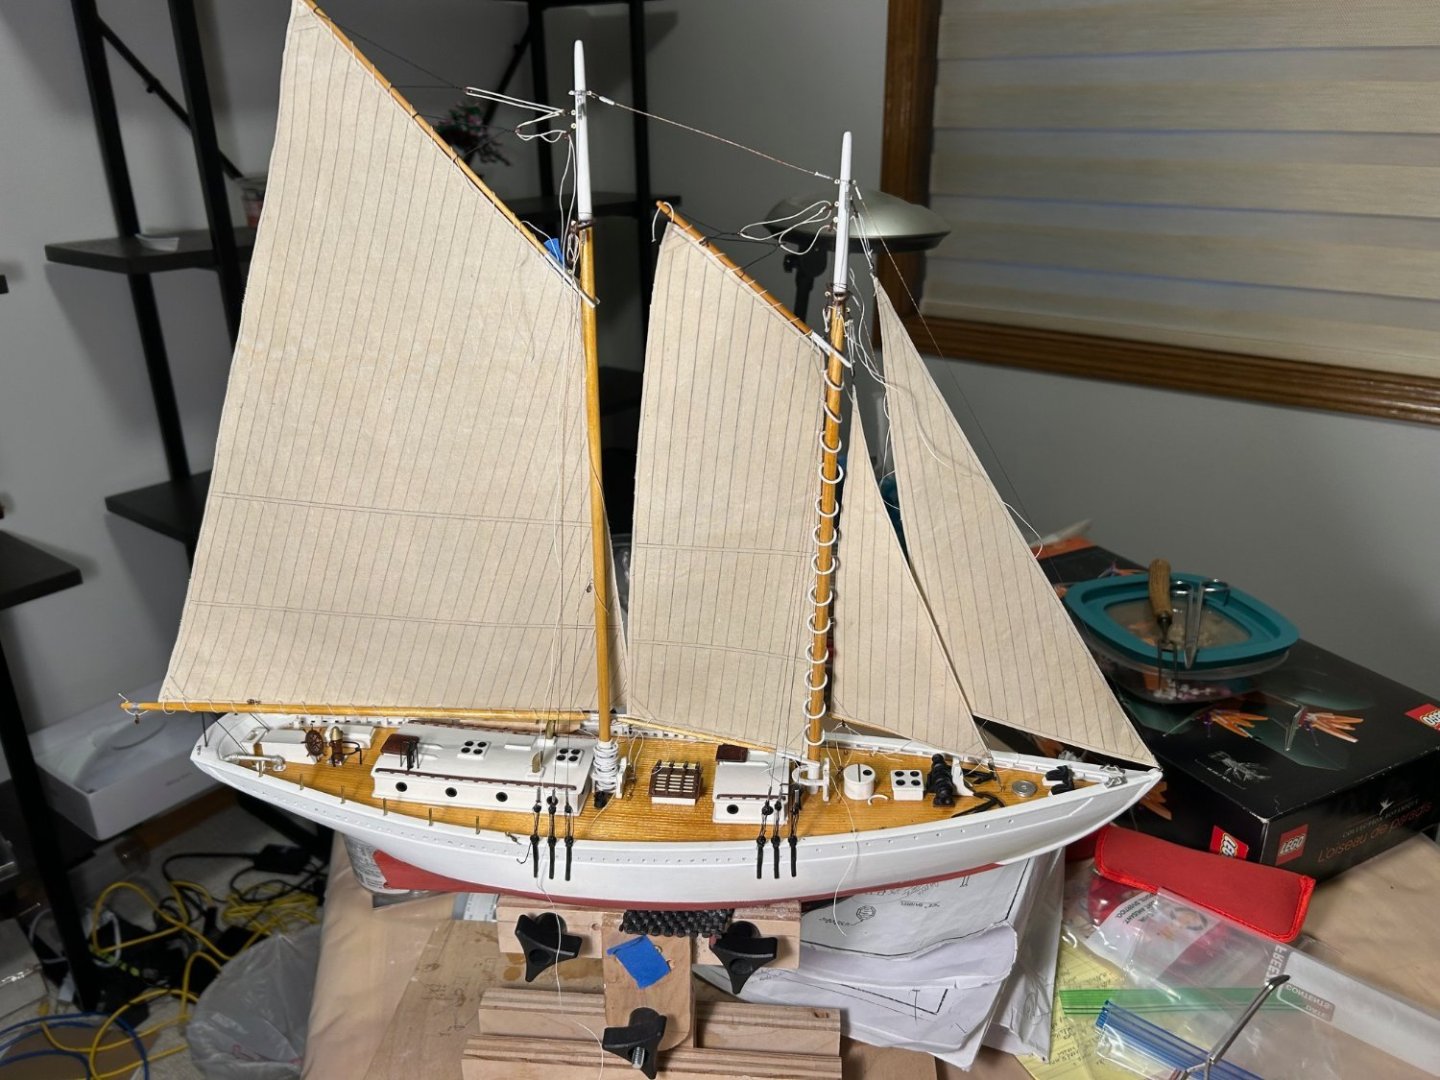
A few very near final pictures. I have to buy some thread to tie in the ratlines. Oh and the rudder needs to be mounted. About that... The other day I was reaching across my worktable while wearing my magnifiers and I smacked the mast. The model tumbled and the rudder as well as some of the standing rigging were damaged. A bit of a bummer, but in the end, after I remake and rehang the rudder, the only remaining issues are that the standing rigging isn't as tight as I originally installed it, and the deadeyes aren't as even. Stuff happens. In the pictures the sheets are not finally cleated and belayed. I may decide to push the sails to one side of the boat, and I want the option before I decide what tack to show her on. Deck level pictures Foredeck Mid Deck Afterdeck Foretop Maintop
- 48 replies
-
- 3
-
-
- Bowdoin
- BlueJacket Shipcrafters
- (and 1 more)
-
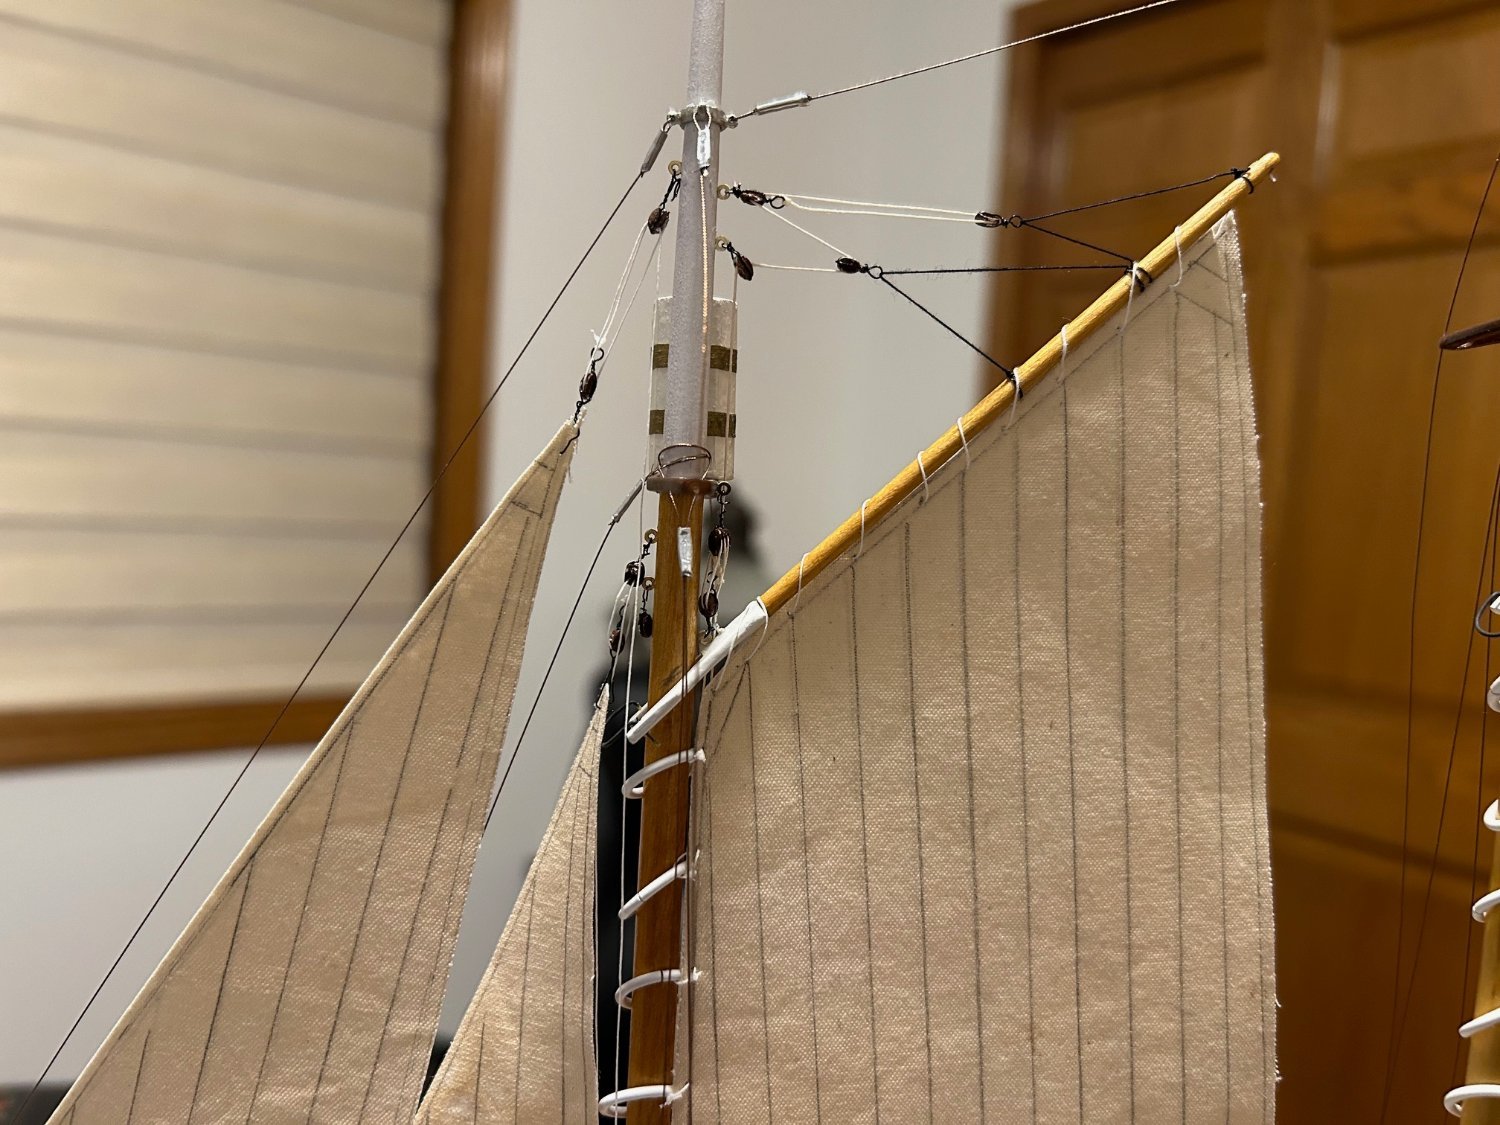
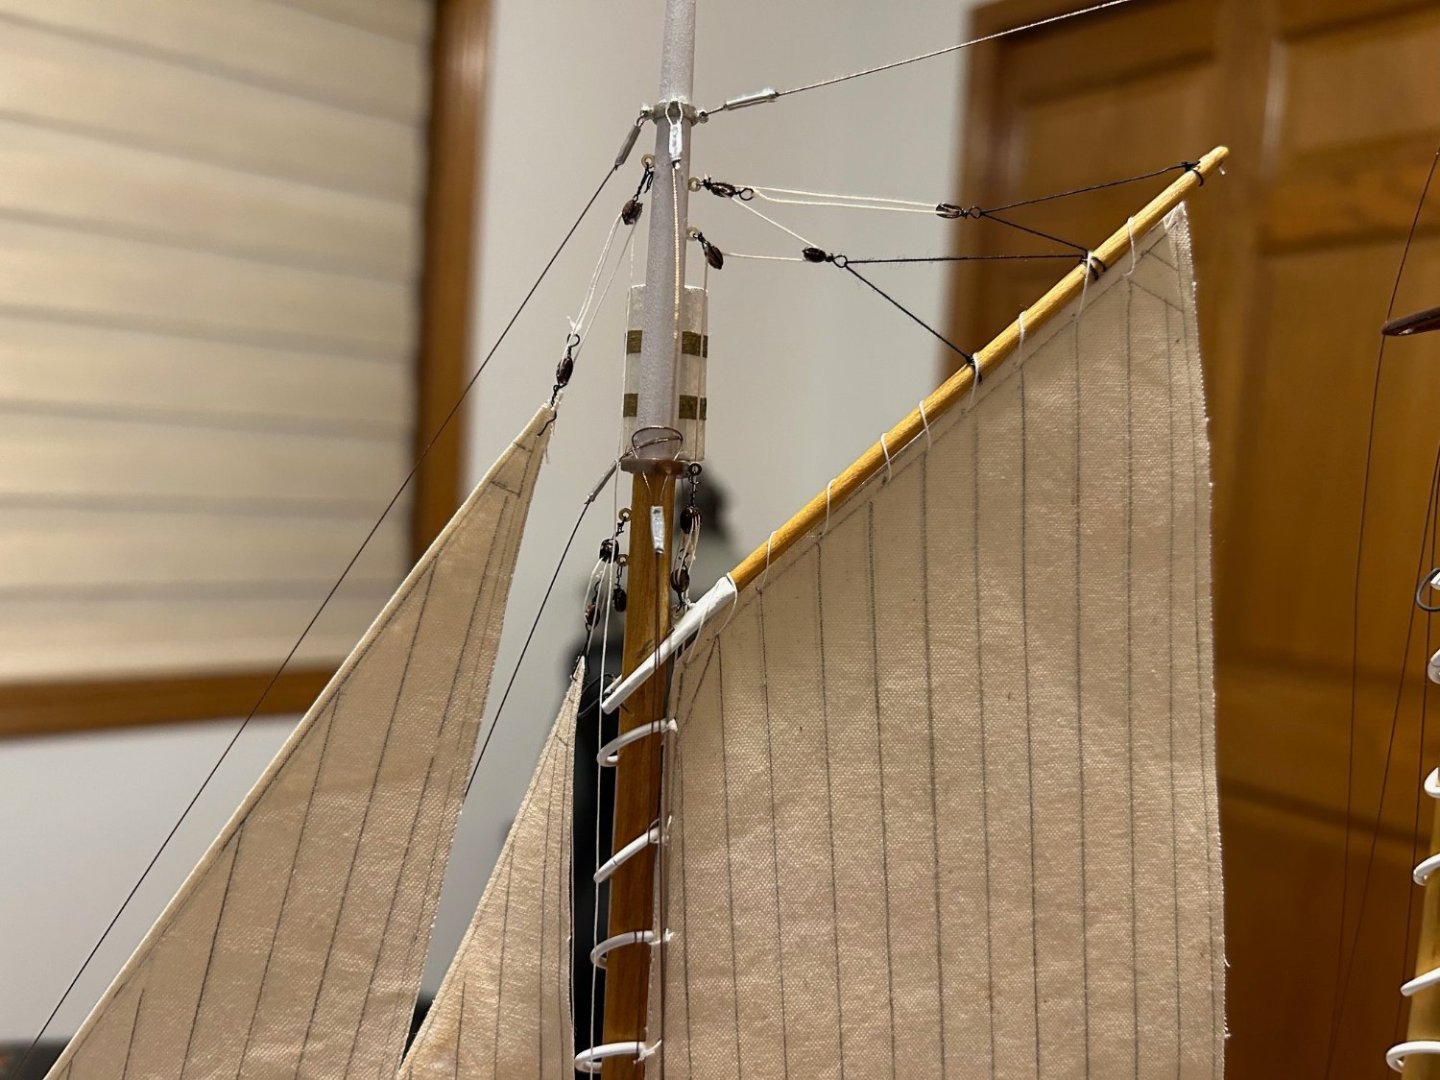
Running rigging largely followed the instruction guide. The foredeck photo shows the jib sheet run incorrectly. I will be fixing that. The main and foresail are laced to the masts. And I have no idea why the following is posting upside down. If I can't figure this out and edit the post, I will delete. Note that I have rotated the original every possible way before posting - and somehow this picture always ends up inverted.
- 48 replies
-
- 1
-
-
- Bowdoin
- BlueJacket Shipcrafters
- (and 1 more)
-
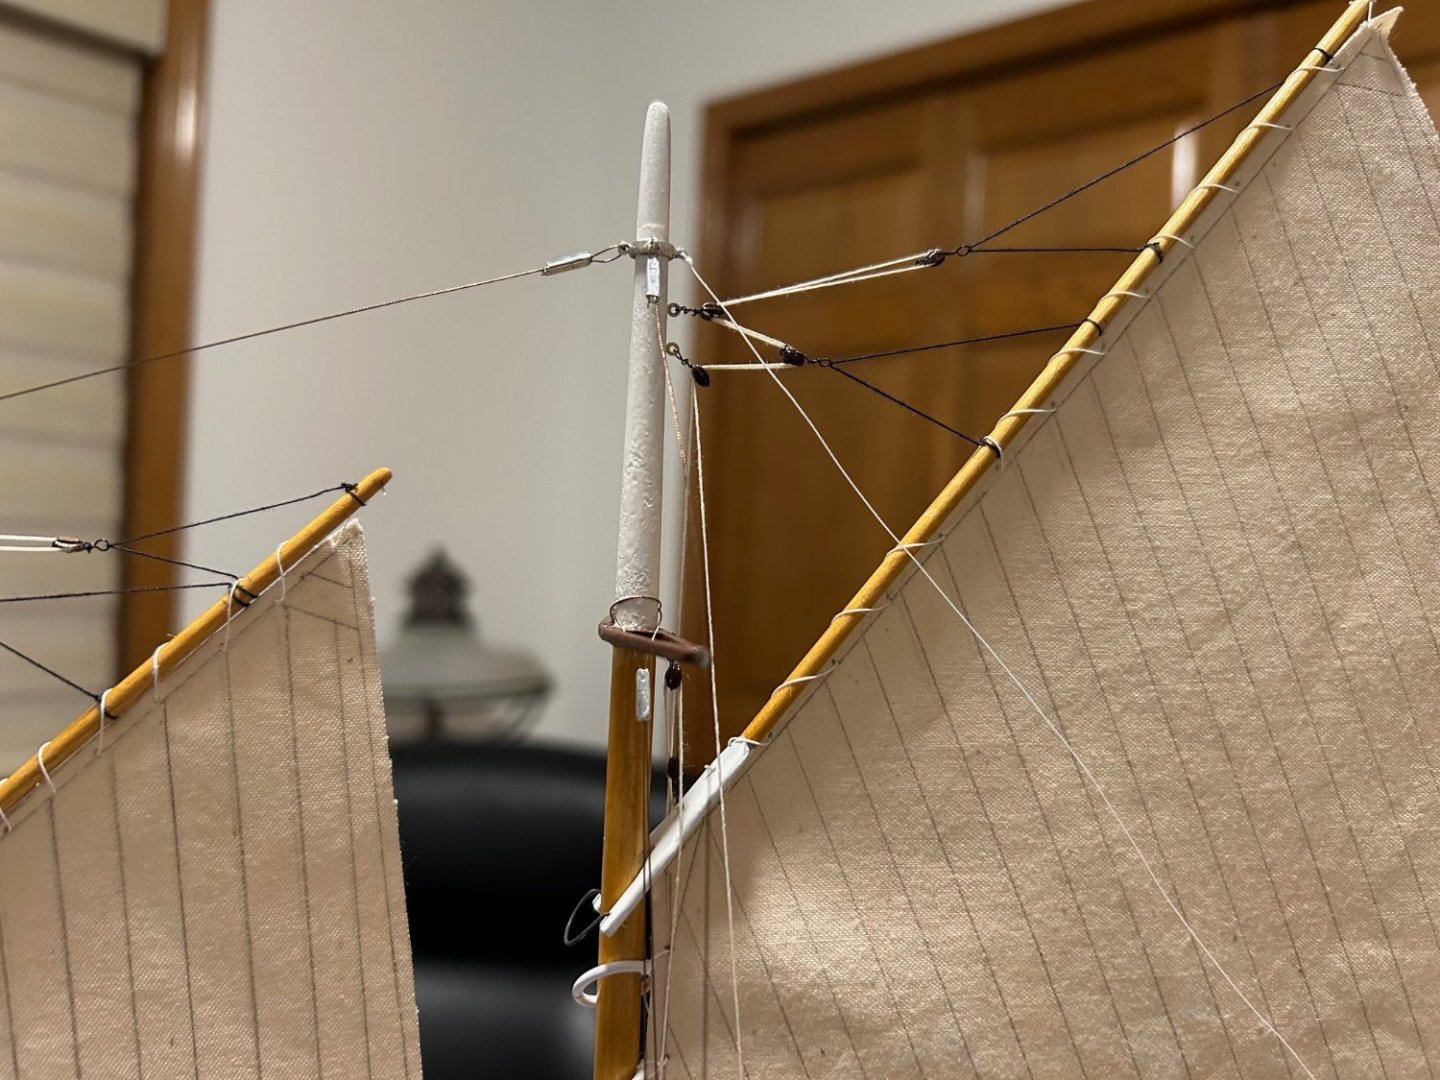
I was a little intimidated by the running rigging at first, but the instructions were generally very clear. I never could get the wire from the kit to attach to the small blocks without either munging up the block or ripping off all the paint, so I bought a roll of 0.3mm fine black wire from a flyfishing supply shop. I don't know what the coating on the wire was, but the wire didn't like to stay tightly twisted. Again it took me a good deal of practice, some new beading pliers, and an order of replacement blocks from Bluejacket before I got satisfactory, if not excellent results. I got better as I went along. I decided to install sails and see if I like the result. I bought some lightweight material at a local fabric store, dyed it in tea, and coated it with lacquer and a coat of clear poly. I wanted to make sure the stich lines were identical on both sides of the sails, so I traced from the plans and made templates for each side using the traced originals.

- 48 replies
-
- 1
-
-
- Bowdoin
- BlueJacket Shipcrafters
- (and 1 more)
-
I am going to dump several pictures that show building progress since last time I posted - which was... holy cow .... July. First, here is the deck mostly done and ready for rigging to start: Next, a picture of the standing rigging. The kit supplies braided wire for the standing rigging, and it took some practice to get the rigging tensioned properly. Clamping the rigging wire in place while crimping the ends and not losing tension was tricky - maybe there is a nifty special clamp. I ended up using document frogs that I borrowed from my wife's office supplies. To set the deadeyes even to one another, I created a little jig, based on some I have seen in this forum and comments from more experienced builders. I have misplaced the picture of the jig, but basically it was a piece of scrap bass 3/32 basswood cut and marked to the height I wanted the deadeyes to sit and then hollowed out to hold the deadeye. I then sandwiched the deadeye between this piece and another - and I could slip the shroud up between the sandwich halves.

- 48 replies
-
- 1
-
-
- Bowdoin
- BlueJacket Shipcrafters
- (and 1 more)
-
thanks. This is what I was looking for.
-
I am building a Bluejacket Dowdoin (1/4" : 1'). I'm just at the point of installing the standing rigging. I'd like the shroud deadeyes to be nearly parallel to each other when I attach the deadeyes to the chainplates. Can anyone suggest a jig to hold the deadeyes in place while rigging the shrouds? Thanks
-
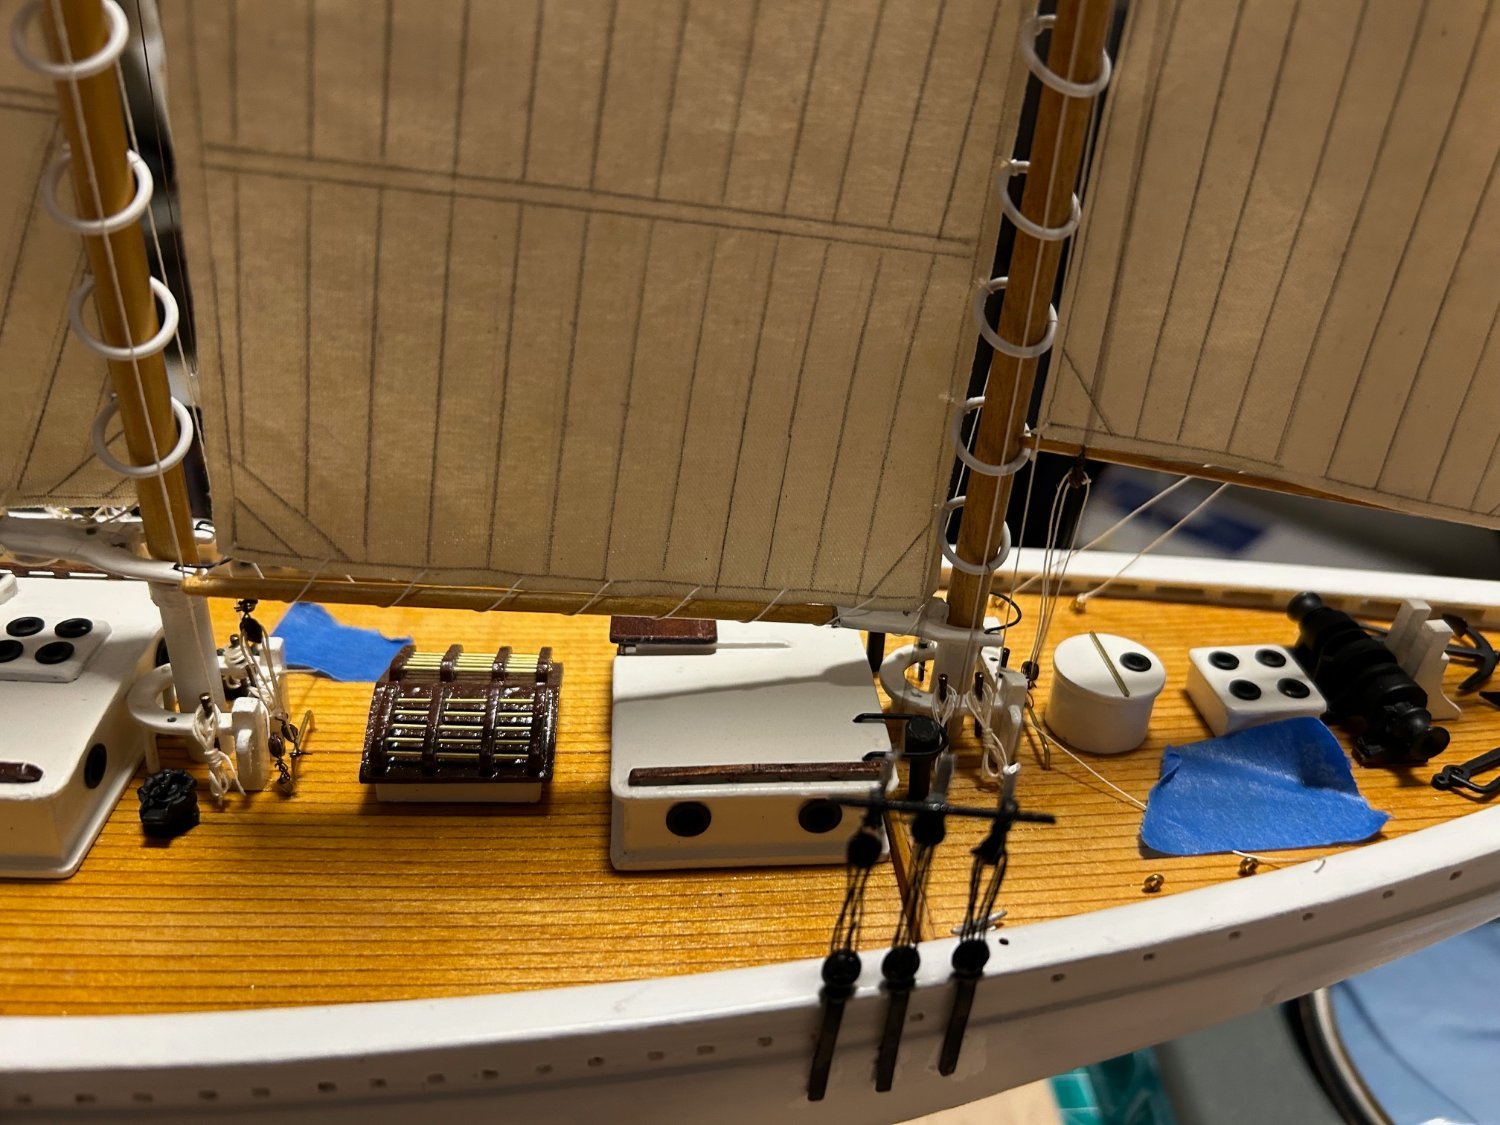
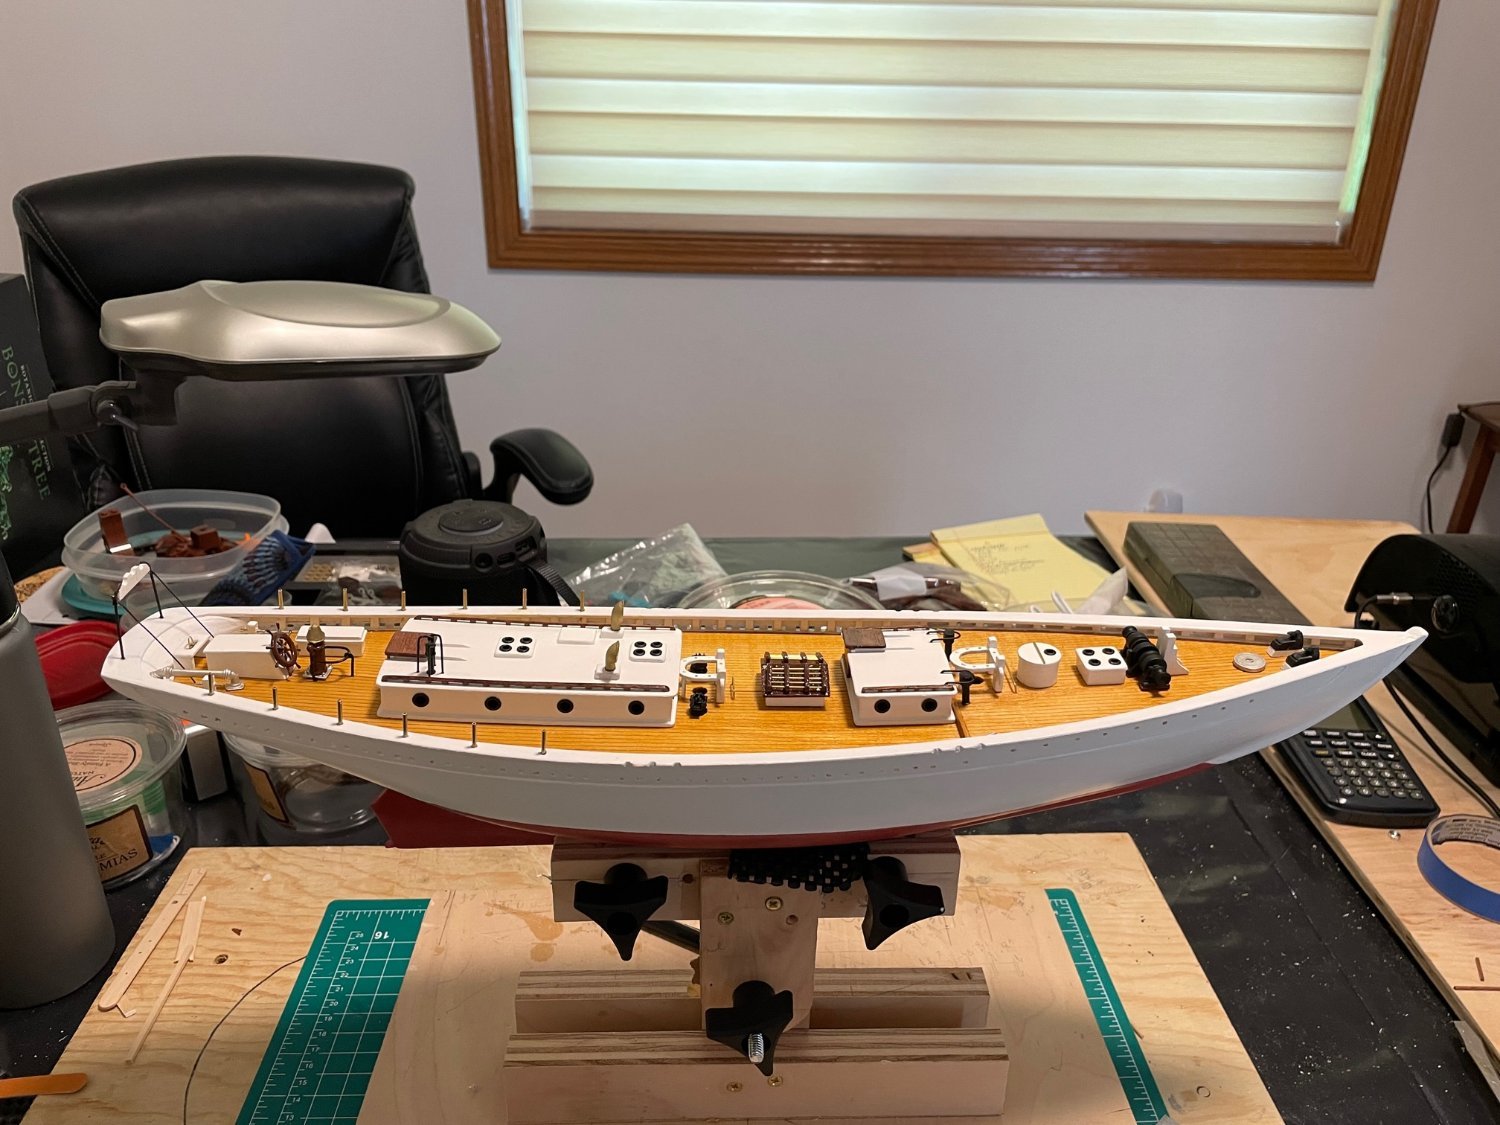
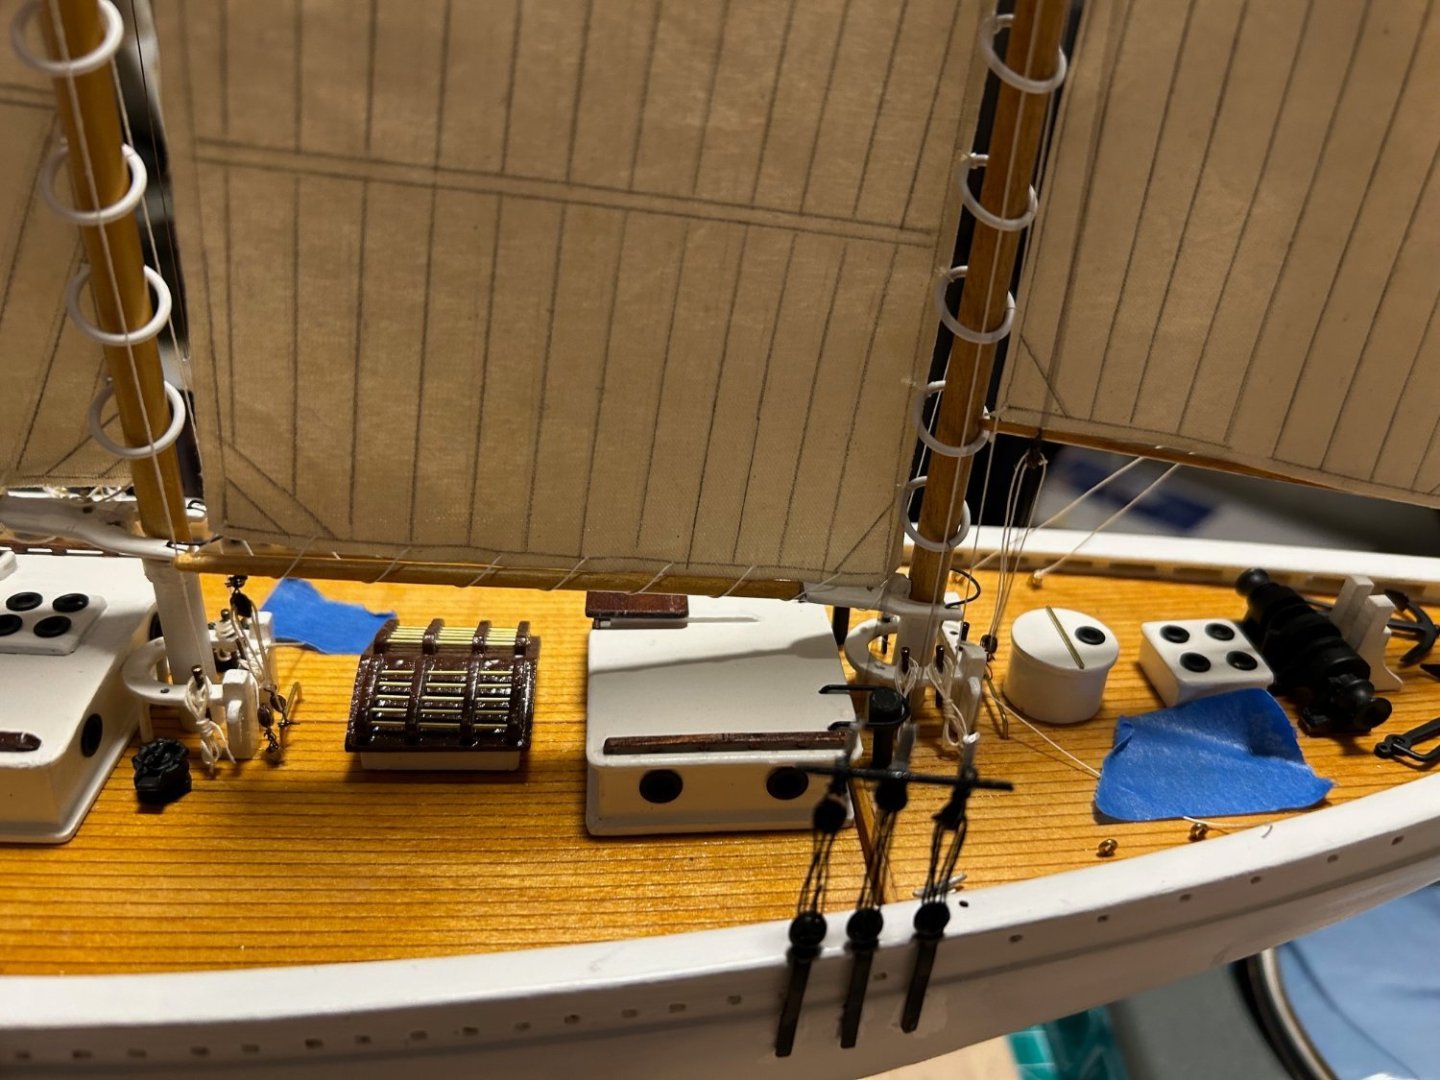
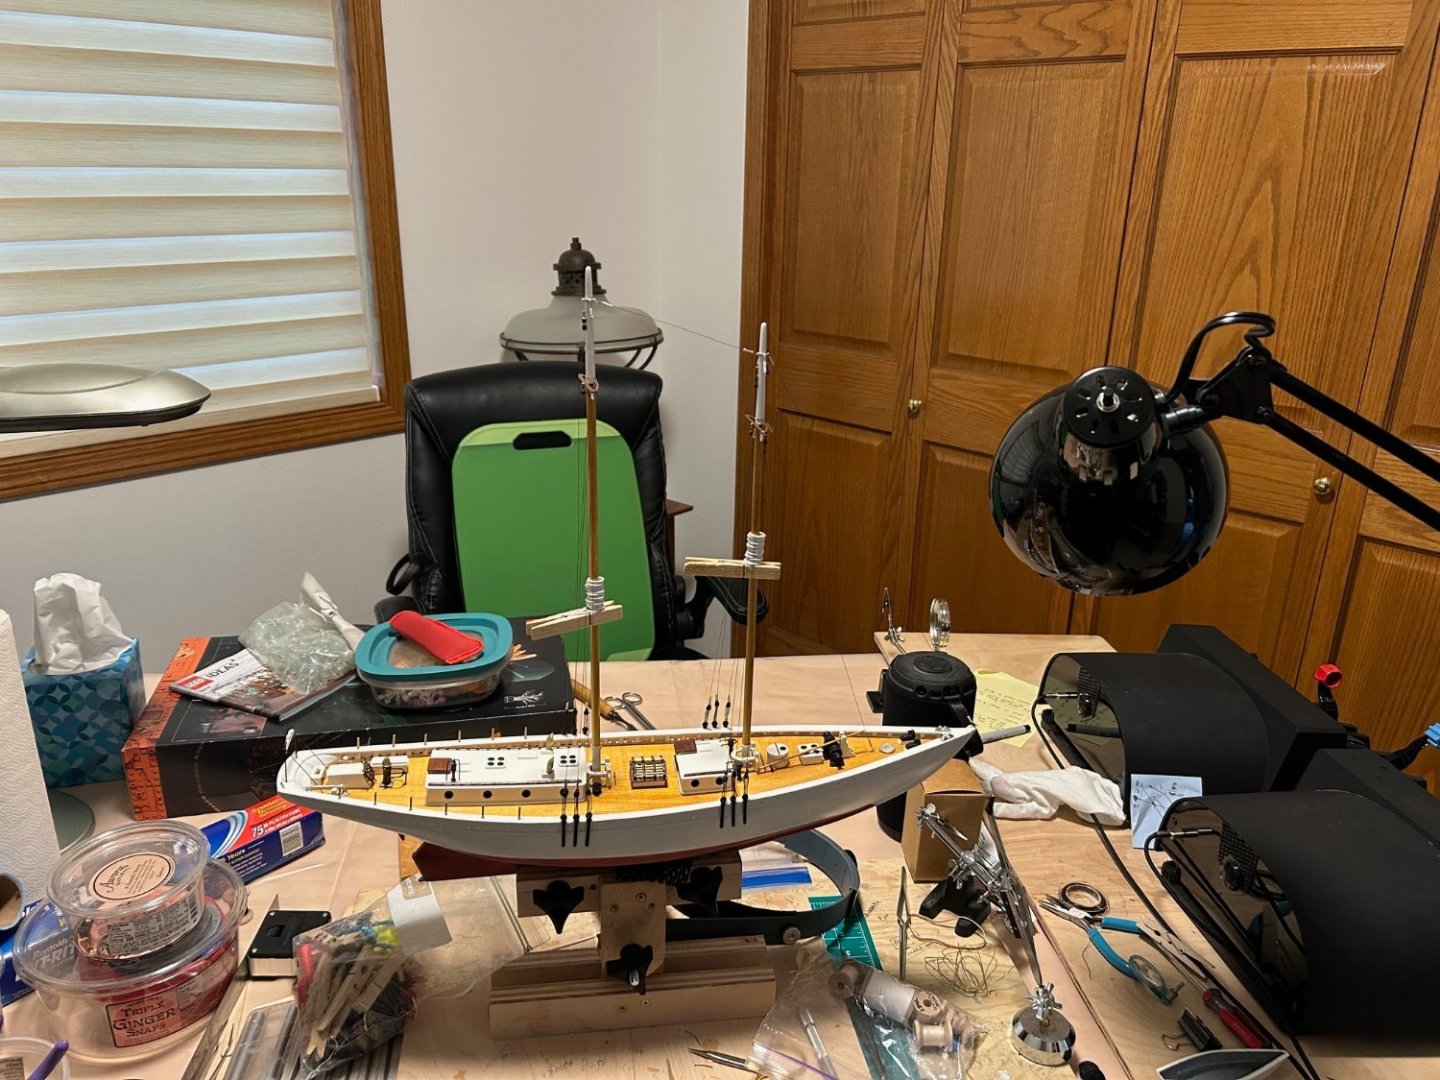
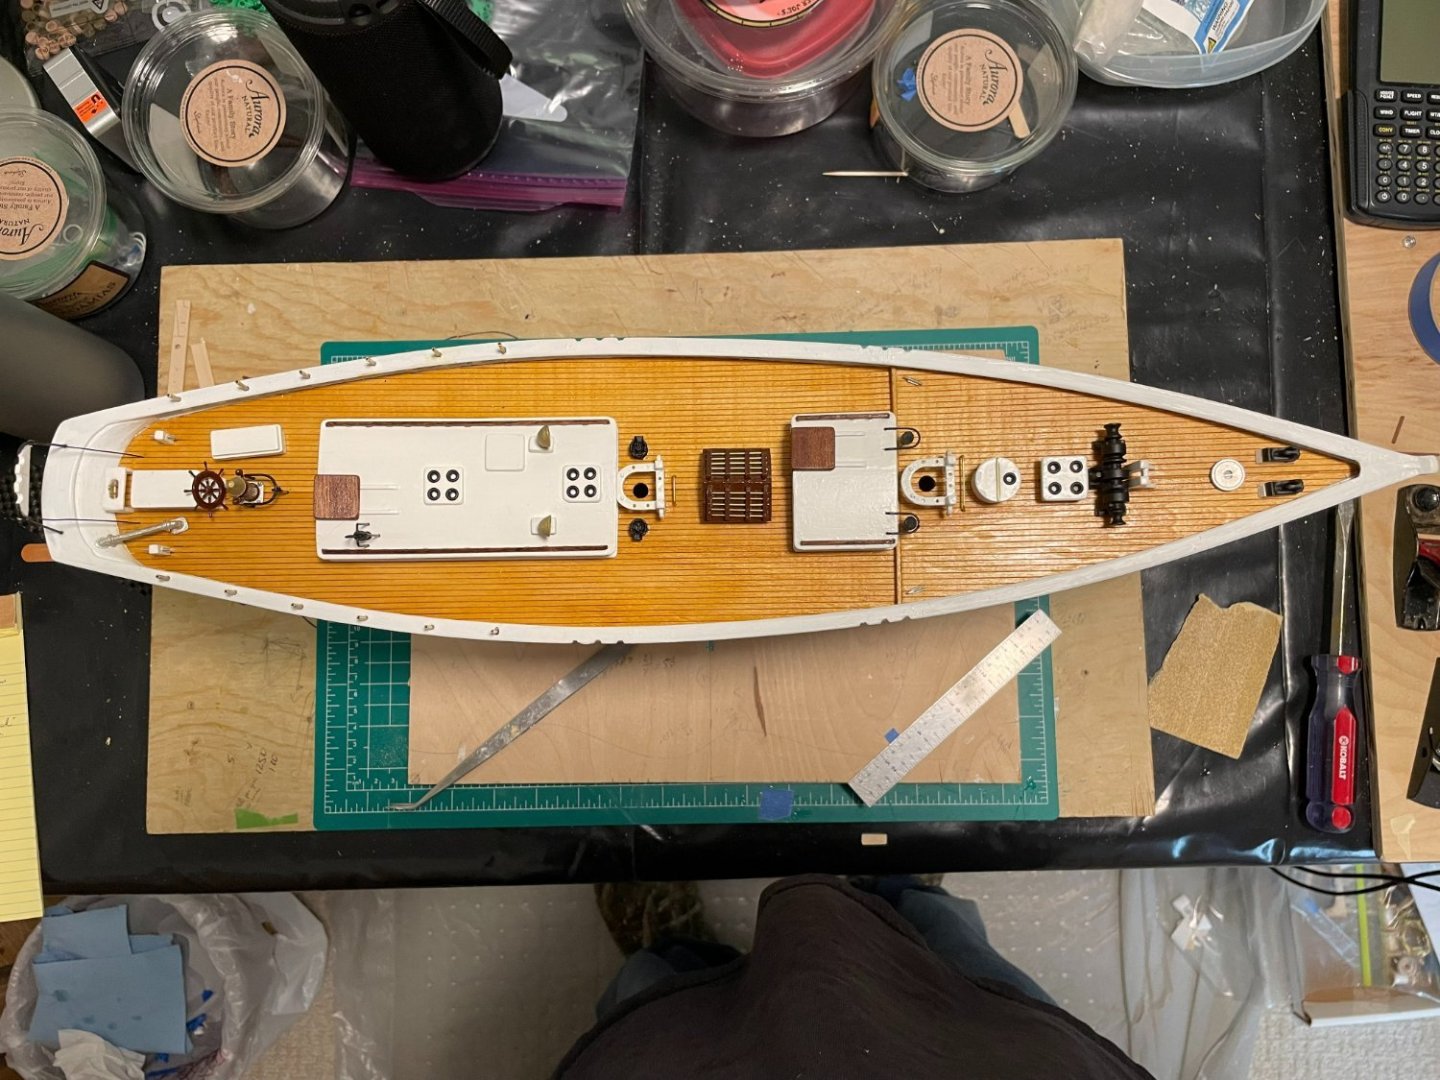
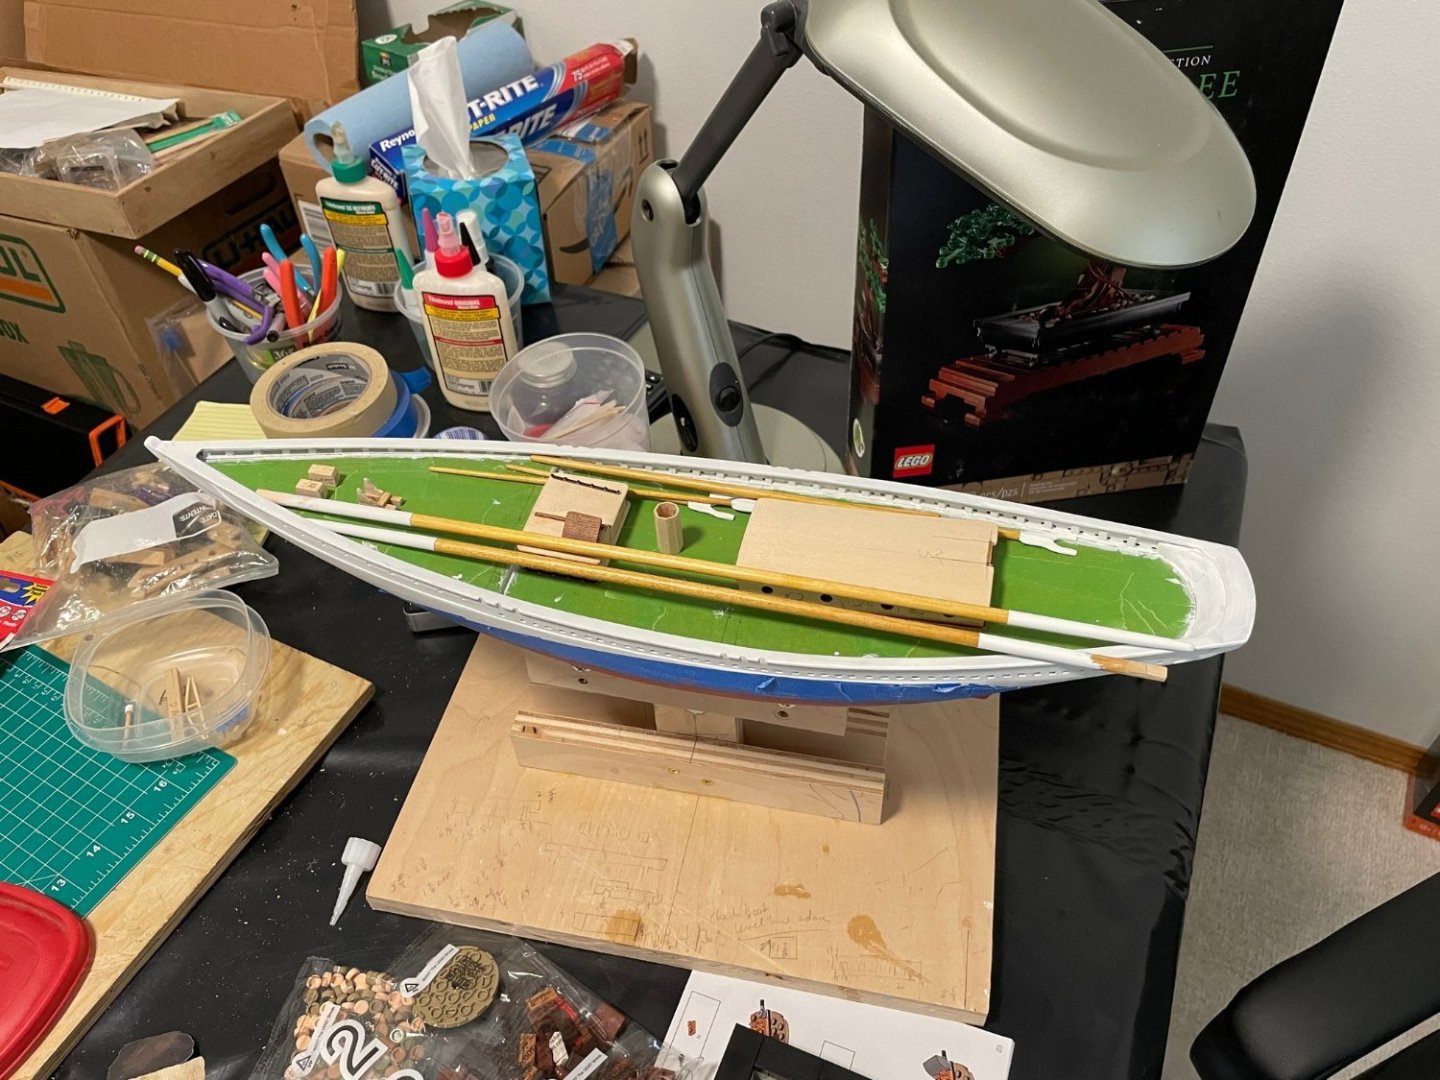
The deck is largely done. I have to cement on the chain brakes, and I want to touch up the paint in a couple of places, but then I'm going to start rigging. I am leaving the anchors off until I get well into the rigging because I want to see where all of the rigging comes to the deck. I don't want to accidentally glue the anchors where I need to run lines or line terminators. I haven't gone as far as some in adding additional detail. I can always circle back and add more detail later, and the rigging looks like fun. Here is one that is top down:
- 48 replies
-
- 5
-
-
-
- Bowdoin
- BlueJacket Shipcrafters
- (and 1 more)
-
Thanks for the link to a really nice piece. I've been looking over your Bowdoin for rigging guidance. Some very helpful pictures there.
-
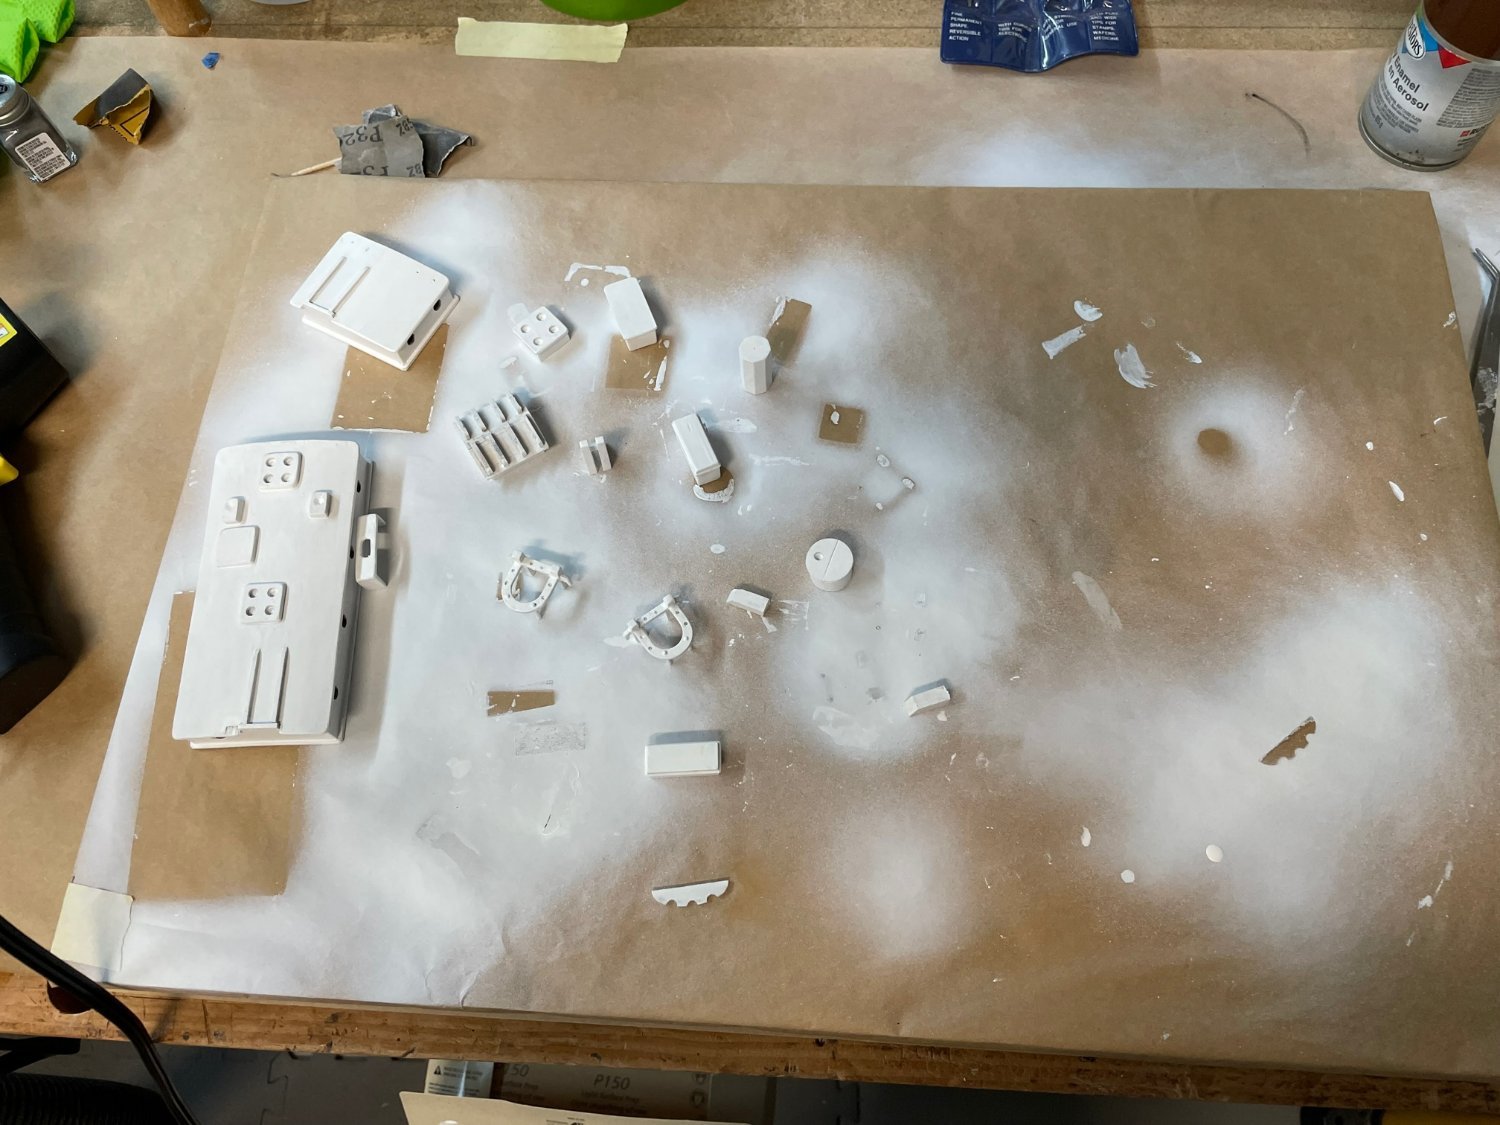
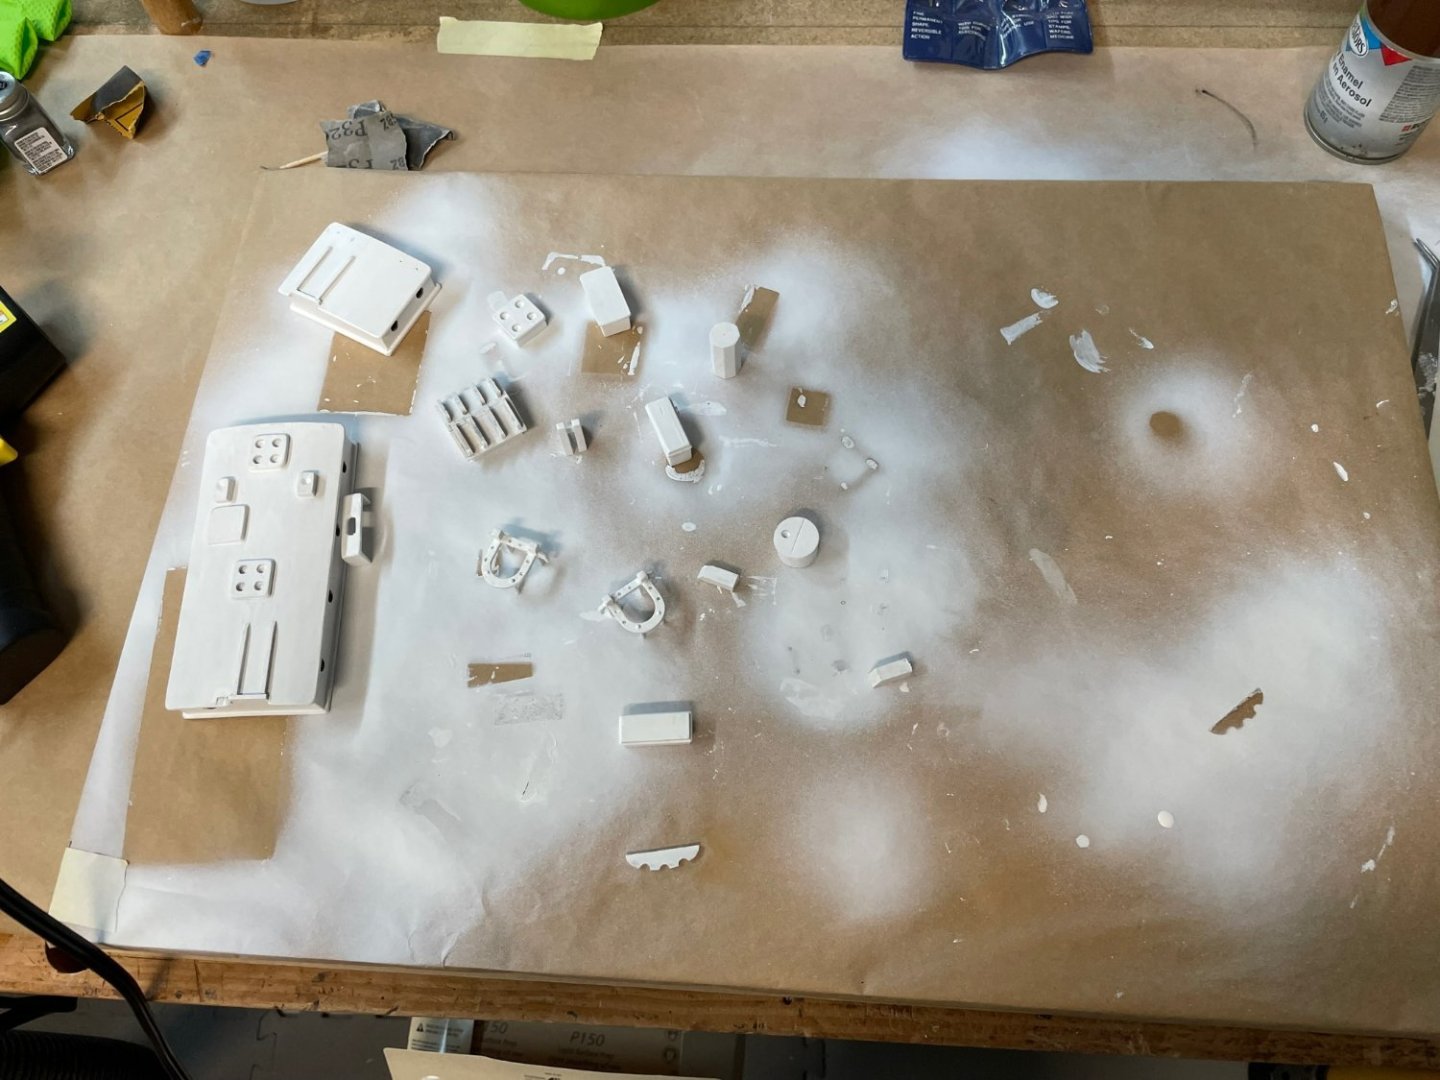
Despite no posts for a while, there has been progress. Model making time since my last post has been split pretty evenly between building the many sub-components and preparing then painting these parts. Here are some pictures as the model has been moving through the process. Building the taffrails. A little tricky keeping things square. Here is the main house. I subsequently shortened the hatch rails to be what I thought was more appropriate to the hatch cover size. I have a few comments on my paint job as I learn more. I wanted to avoid putting too much paint on the components and ending up with an unsightly buildup, and I knew the white I had been using was going to need several coats to cover well. So, I sprayed a hardware store enamel as a base coat and followed with a final coat of True North white to make sure the white on the components matched the hull. I'd say that experiment was not a gigantic success. Some of the components still ended up with a fairly thick coat in part because I'm a lousy rattle can spray painter. I think that if I do many more ship models I'm going to buy a small hobby sprayer because painting with a brush has its own problems and I like the True North paint better than the spray can paint. One observation is The True North paint is incredibly strong. The sprayed enamel I used for white and black parts is easily damaged. The True North is much harder to scratch even on unprimed metal parts. I had an aha moment when I painted the silver and bronze True North paint. Both paints initially went on pretty thick. When I thinned the paint a bit and repainted, the results were excellent. Of course, a quick look at the paint bottles for all the colors suggests thinning before using. Next time follow the instructions. Putting a coat of satin poly on the white painted surfaces enhanced the appearance, in my view, as well as making surfaces less likely to get dirty. I found I could even carefully mark pieces with a soft pencil and then completely erase lines when I needed. Some may not like the satin as opposed to a pure flat, and I get that. To each their own. This picture shows progress to date. The deck is unmasked and a final coat of shellac has been added. The plastic containers and plastic bags contain the painted parts that need final assembly and installation. The large components are not glued to the deck yet in case anyone was about to have a heart attack. Thanks to everyone who has commented or given suggestions so far.

- 48 replies
-
- 3
-
-
- Bowdoin
- BlueJacket Shipcrafters
- (and 1 more)
-
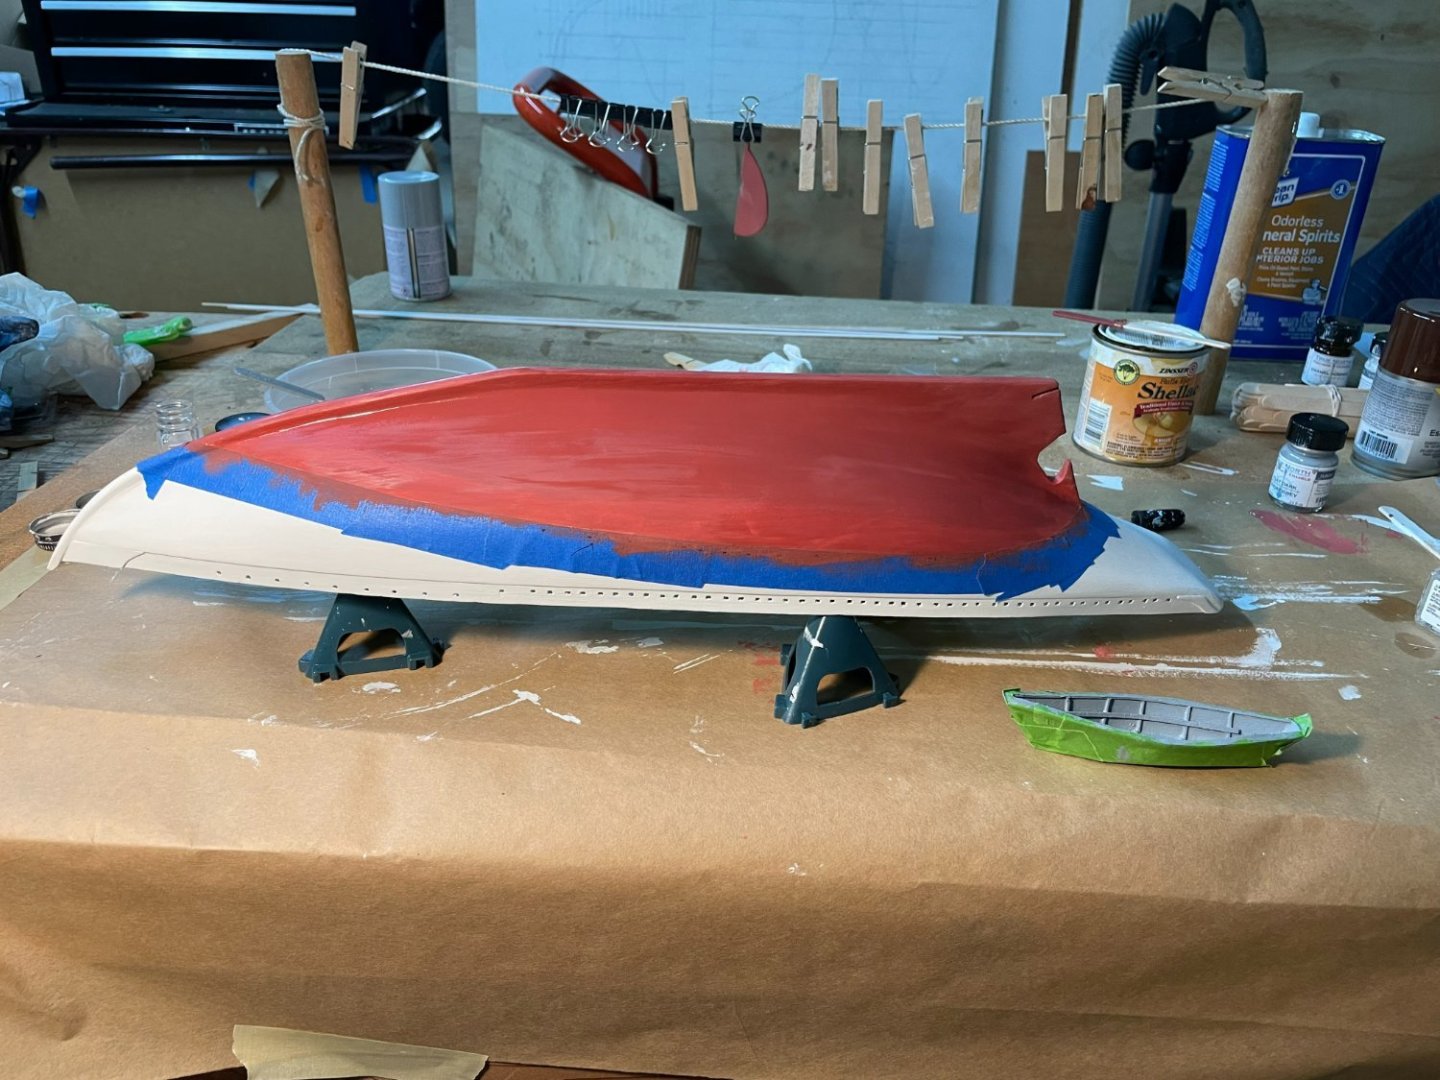
It is getting there. Long way to go yet. I have never tackled a rigging project as complex as this one will be, so I have some homework to do. I'm looking for references. Fortunately, there are a lot of parts to make and paint in the meantime. I have used both Water Putty and the MH Ready Patch for various parts of the project so far. The Water Putty was really great for rebuilding the stern area that I initially screwed up. I found I could mix it to a consistency that let me mold it to shape, and it held its shape well. I used the Ready Patch for fairing the hull and for general gap filling and smoothing. I like that it dries quickly and sands easily. It does seem to shrink a little, so sometimes needs a couple of coats. I'm not sure MH has an advantage over any other spackling compound, but it seems to work well. The deck is amber shellac over the bare wood. The Bluejacket people recommended it. The red is True North paints Antifoul Red. Thanks for asking.
- 48 replies
-
- 1
-
-
- Bowdoin
- BlueJacket Shipcrafters
- (and 1 more)
-
Thanks for the background Roger. I haven't been in probably 25 years, but when I lived on, and then regularly visited, the east coast, Mystic was one of my favorite places. I haven't subscribed to WB for several years, but I will look up their coverage.
-
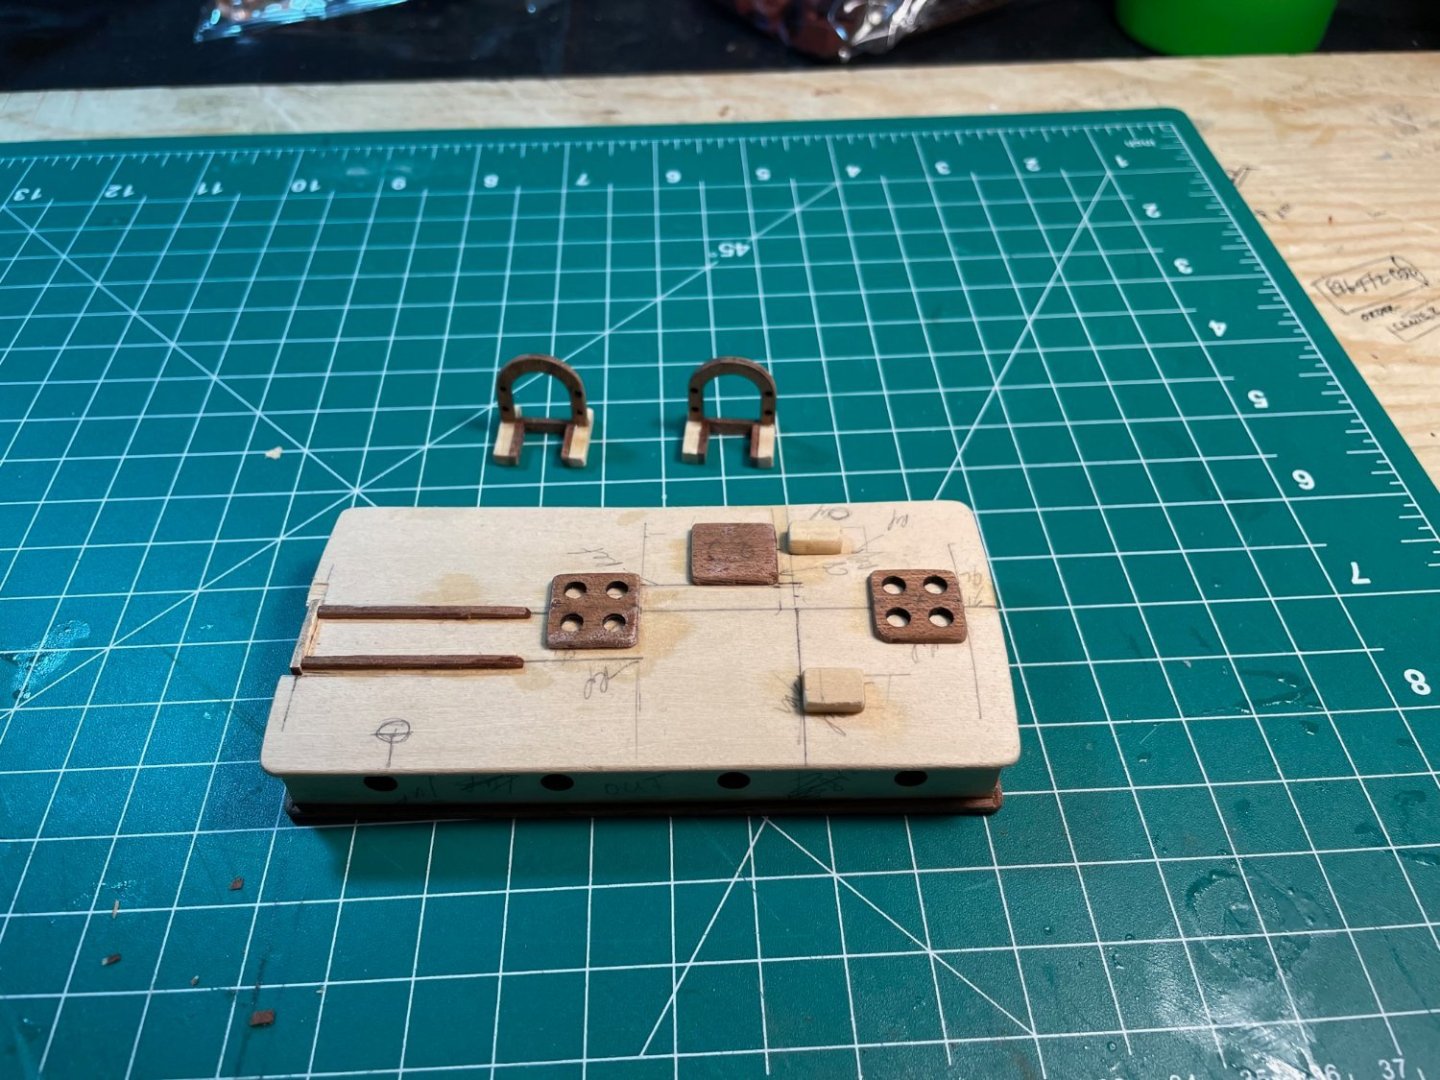
Well the hull is very nearly complete anyway. I still want to put another coat of paint (or two) on the cap rails and transom area, but the bulk of the work now is on the deck gear. My plan is to build as much of the deck gear and rigging as possible then paint all the parts before assembly. I think most people do this. To get the deck houses square, I temporarily attached square jigs at each corner. Glue to one side and then fit the other side without gluing to the jig. When everything is glued, just knock off the jig. It is easiest if you glue along the grain rather than cross grain because the jig just splits off without damaging the model's parts. The kit's house parts resulted in houses that fit the deck shape pretty well right out of the box. I placed each in position to scribe a fit, but neither needed more than a little sanding and filing to fit flush. I refitted the houses parts again after adding the trim pieces to the bottom of each and I don't expect too much work final fitting after painting. Parts, parts, parts. I have also completed the travelers and a few other small parts. Lots of painting in the future. The lego belongs to my wife, who shares our worktable. I'm pretty surprised at how nice some of the lego kits look when finished.

- 48 replies
-
- 3
-
-
- Bowdoin
- BlueJacket Shipcrafters
- (and 1 more)
-
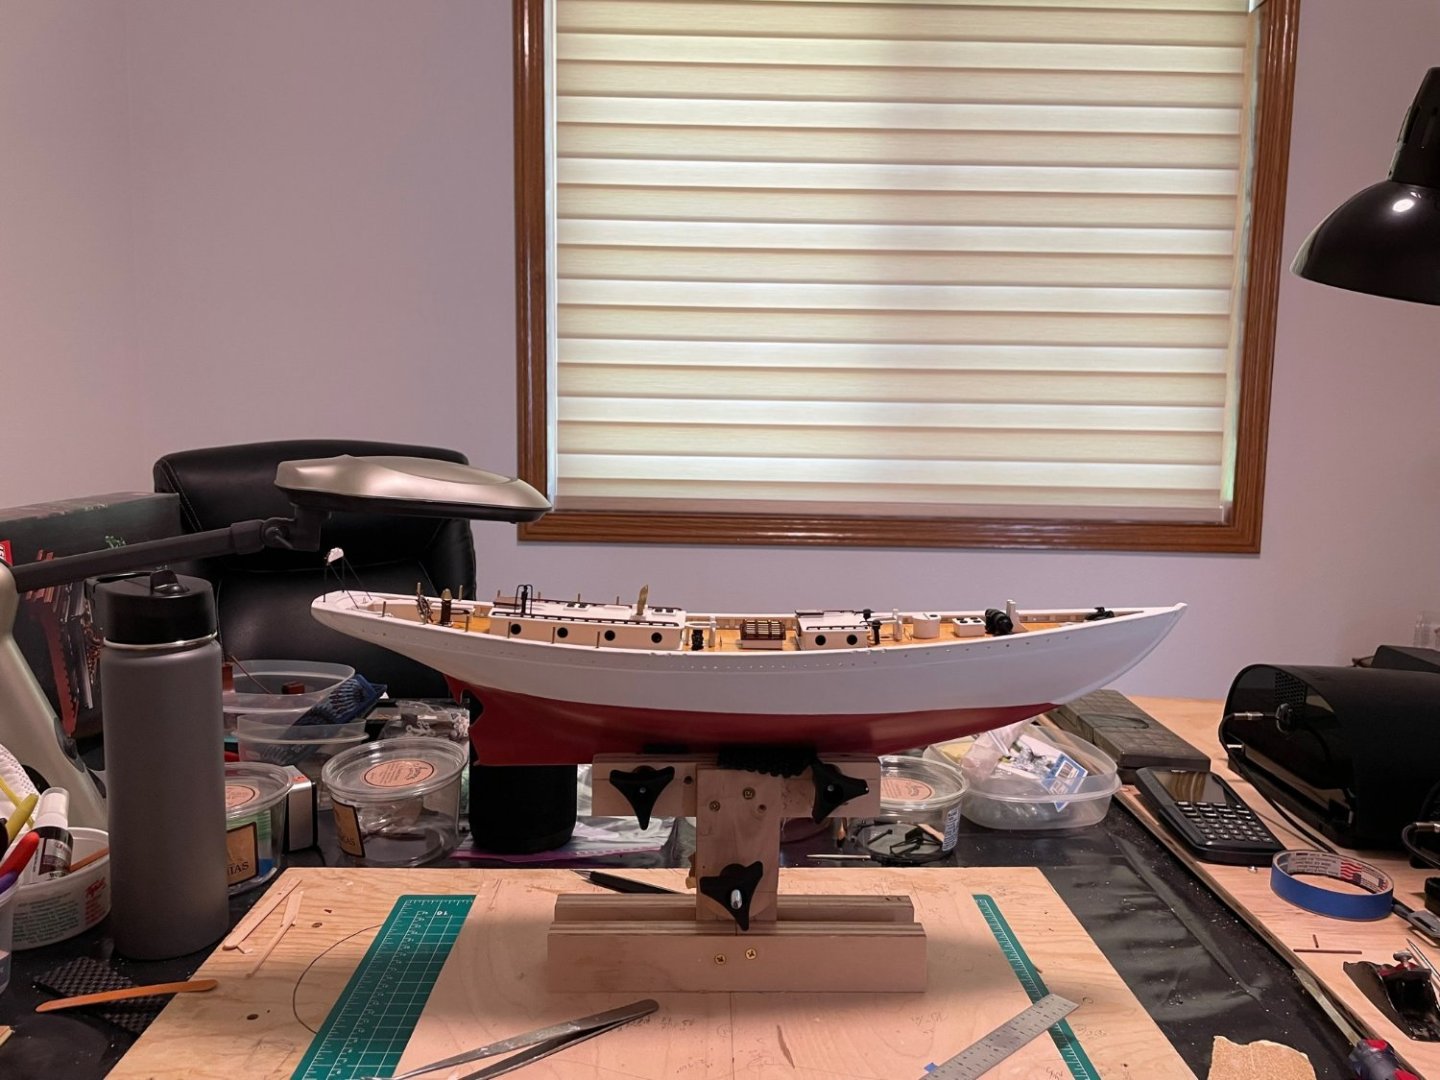
QUESTION: Does anyone have a decent rigging reference. I am familiar with small boat rigging, and even basic gaff rigging. But I don't have much experience with larger wooden boat rigging. I'm looking at examples on modelshipworld, but if anyone can point me to a reference they like, I'd like to take a look. Thanks in advance. The hull is nearly complete. Hull painted white and waterline struck. Striking the waterline on this boat was a bit of a trick because the hull has so much shape in the stern. The usual method ultimately worked - level the boat and then create an inverted L shaped tool of the appropriate height and with a pencil on the end. Where the stern tucks under the pencil had to be pretty long and that left room for error. It took me 4 or 5 tries to get it right. The cap rails went on pretty easily using 30 second CA and spraying a light coat of accelerator on the bottom of the rails. To close a question from earlier: NO, the rails did not stick well with the painted side down. In the past I have had some luck with CA penetrating the paint at least enough to get a decent bond. I don't recall what glue I was using. But this time around the CA stuck really well to the paint, but the paint to wood bond wasn't sufficient to allow the boards to be bent into place. According to plan, I tested the bond first, and when I determined the bond was going to be insufficient, I just glued the unpainted side of the cap rails to the frame heads. I'll figure out a way to get some paint to the underside of the rails, though from what I can see, I don't think anyone is ever going to notice that they aren't fully painted. I also cut the notches in the rails for the chain plates. Not much to say about that except trying to be careful to get them properly located and appropriately sized. I first fit each at the stem and let them run long past the transom. Then I cut and sanded them to final length and shape. Oh, and the depth gauge 2000 I used to mark the depth of cut on the cap rails before I cut the notches. Marvelous tool and more than up to the job. I'm including a picture of my copy of the tool on the picture of the hull ready for final paint and touch up.
- 48 replies
-
- 2
-
-
- Bowdoin
- BlueJacket Shipcrafters
- (and 1 more)
-
Thanks Nic. I am really enjoying this kit.
- 48 replies
-
- 1
-
-
- Bowdoin
- BlueJacket Shipcrafters
- (and 1 more)
-
This is some good information. Thanks for taking the time to give me your thoughts.
-
And, of course, after asking this question I found the post "Polyurethane vs Lacquer vs Shellac' This post has some provocative discussion of poly vs. shellac (which I used as a deck and spar finish). If anyone has any additional thought though, I would be glad to hear them And Spyglass shortly before I poster. I should have seen both before posting
-
I'm currently building a Bowdoin kit and I'm painting the hull and assorted parts to be installed after painting. I have read several recent posts regarding what paint to use for a build. On the hull I'm brushing True North enamel. I'll probably spray some other enamel from a can to cover the many small precast parts. I have a long way to go before this boat will be built and rigged and I'm concerned the hull paint job could be damaged during the remainder of the build. Has anyone got any thoughts on applying a clear coat over the final hull paint? I was thinking a satin or flat poly. I'm guessing a clear coat might keep the paint job looking better after the model is complete too. But I'm not a very experienced model boat builder, so I'd be glad to hear what others think. Thanks in advance