HOLIDAY DONATION DRIVE - SUPPORT MSW - DO YOUR PART TO KEEP THIS GREAT FORUM GOING! (89 donations so far out of 49,000 members - C'mon guys!)
×

GeneralNuisance
-
Posts
28 -
Joined
-
Last visited
Content Type
Profiles
Forums
Gallery
Events
Everything posted by GeneralNuisance
-
 Thanks for the input. After part time volunteering two summers now on a tall ship here in Michigan I think the thing I love most about doing these builds are the “flavors of life,” the little touches that reject perfection and embrace these being working ships that were apt to get scuffed, damaged, and dirty
 -
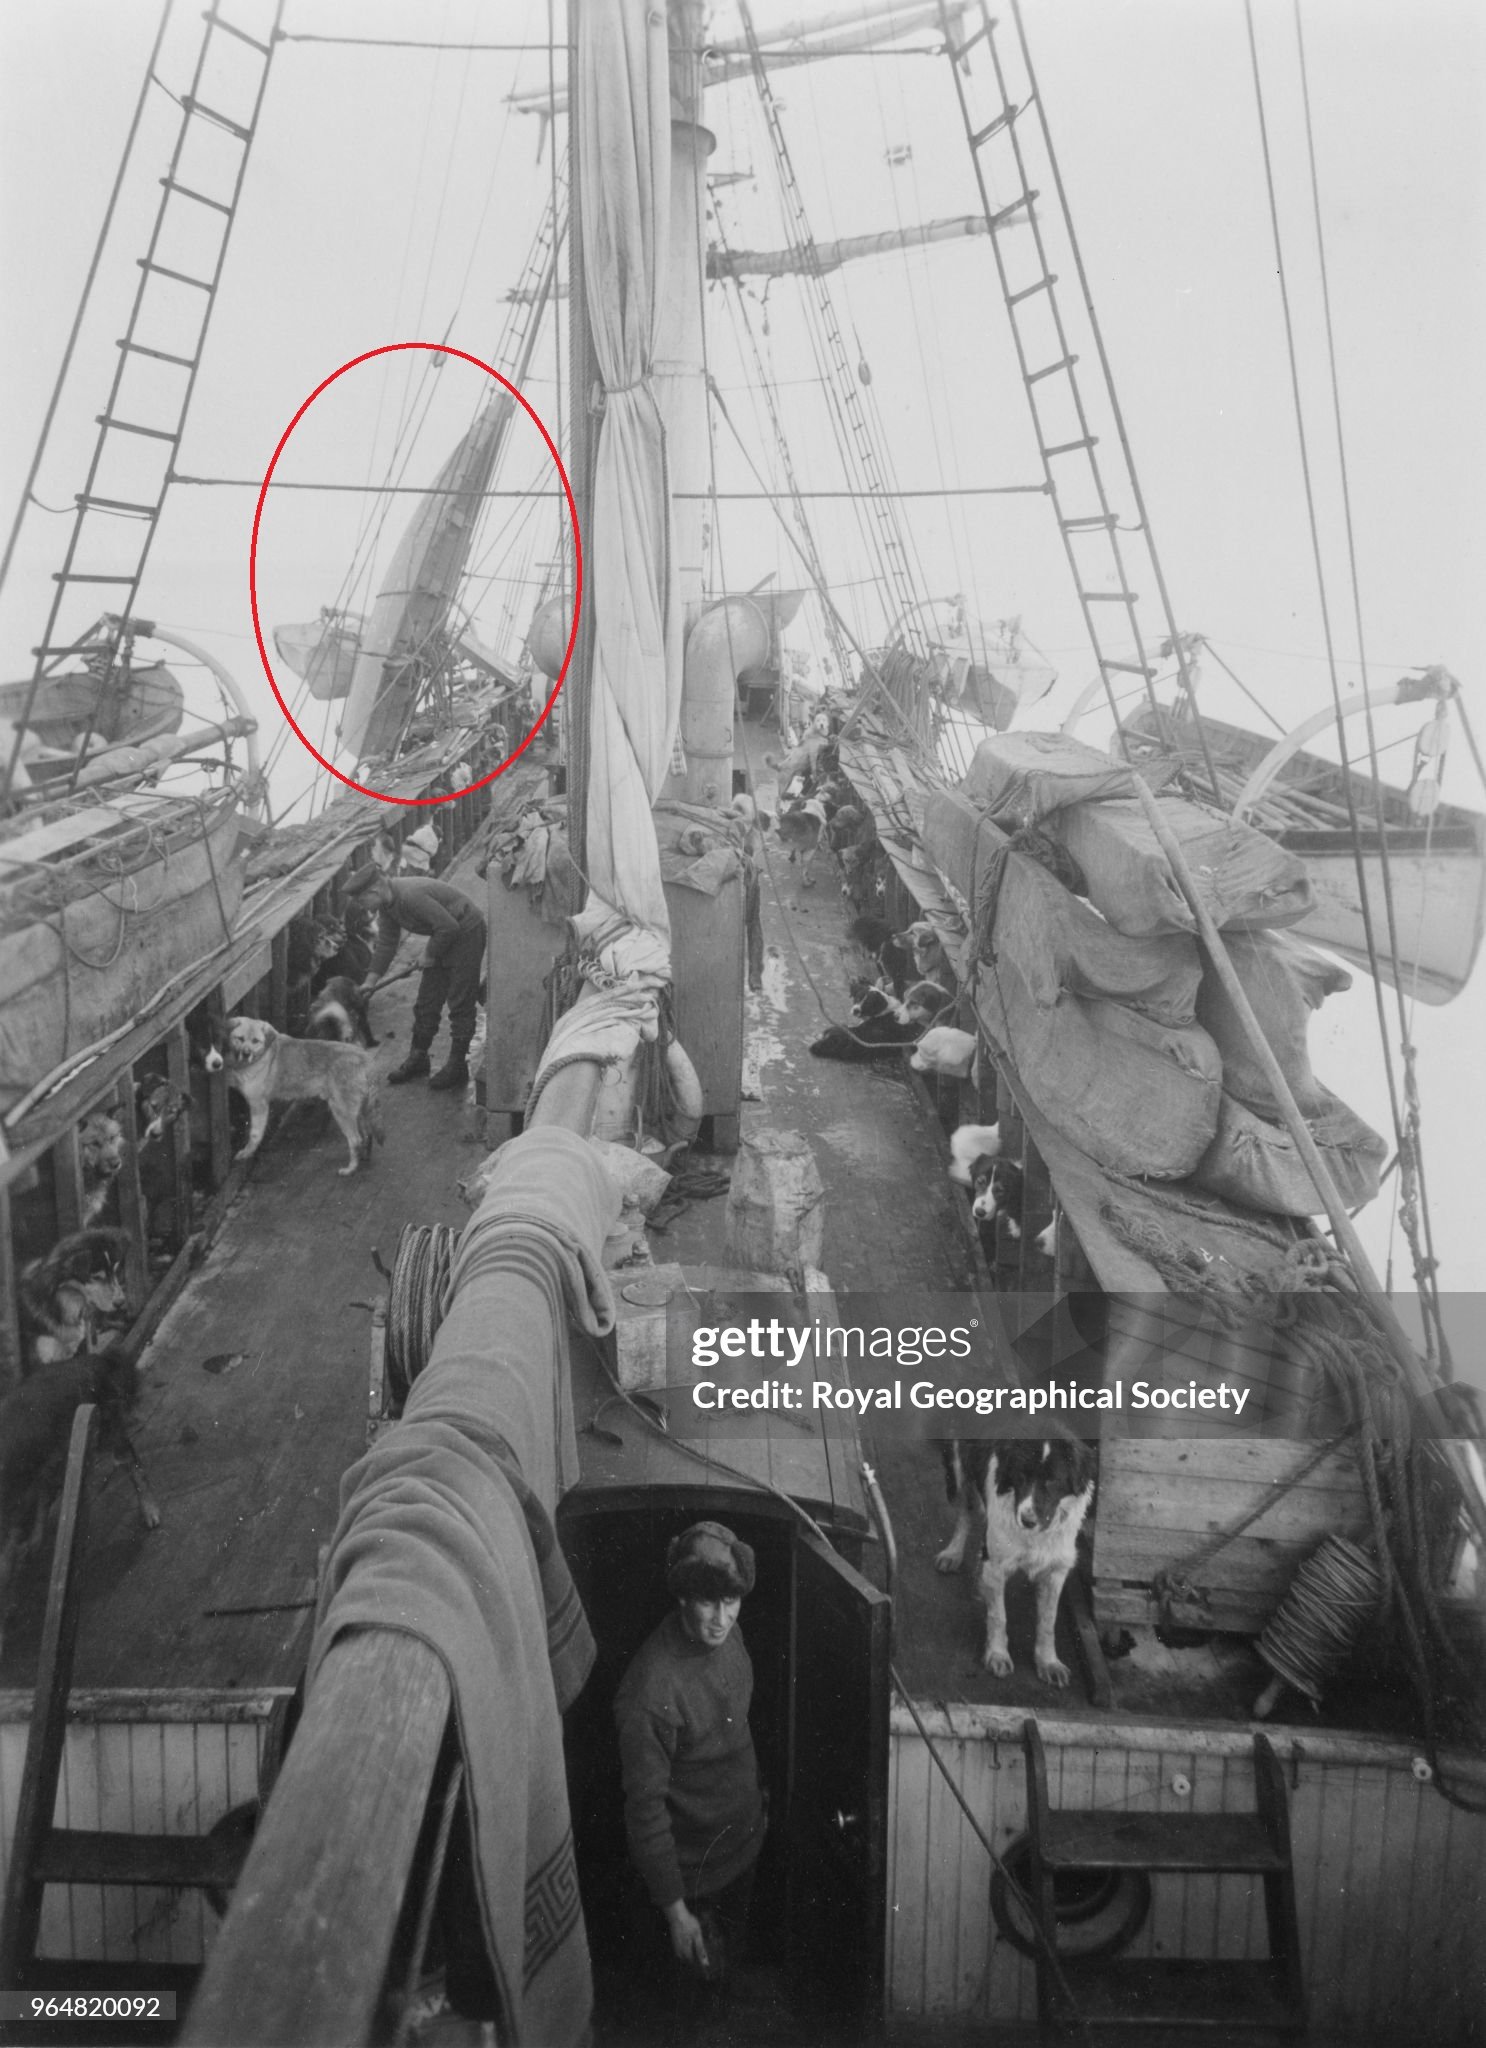
So in my early research in trying to get this ship designed I noticed there appears to be an extra boat lashed to the main mast's ratlines. As I'm doing some planning ahead I'm wondering if this would be a worthy addition to the build as it adds more flavor to the build. I recognize that might be me getting very ahead of myself but I think it's worth considering. @Tomculb any thoughts on this that could help?

-
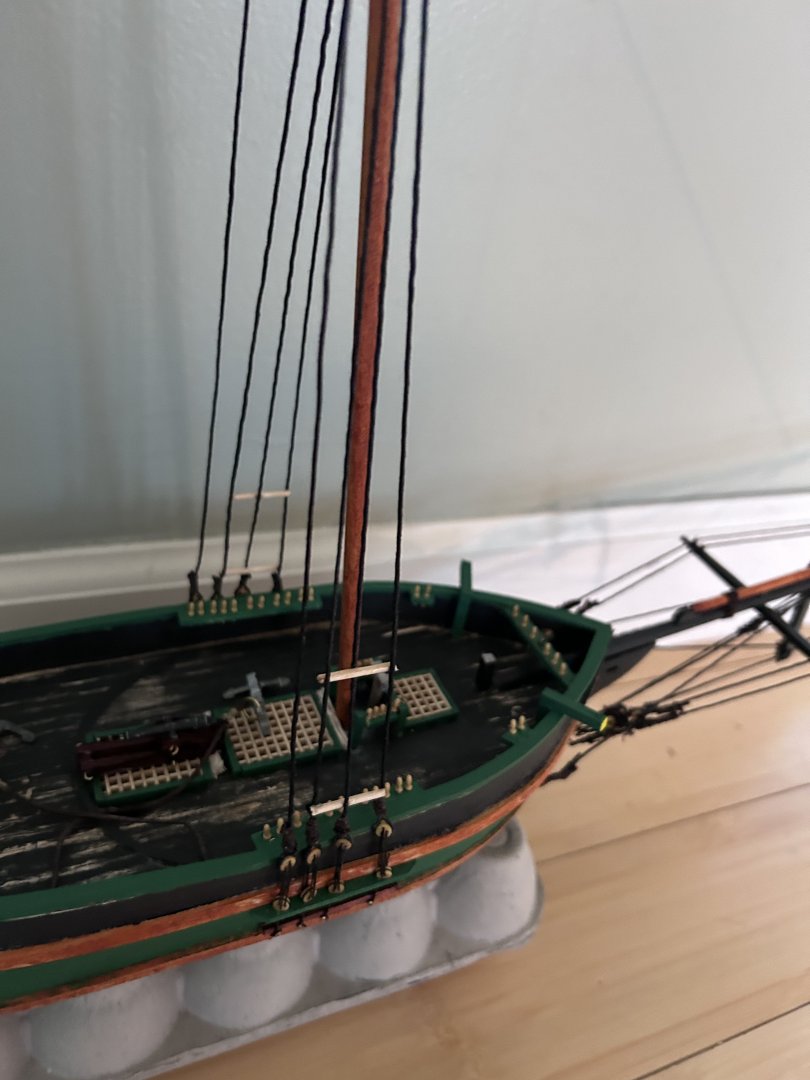
The jibs are in place as is the mizzen sail. I’m currently trying to find an effective way to shape the sails and would appreciate any suggestions that are effective.

-
Today it was the outer and staysail jibs. I love this part of the build when I start to really see it all coming together. I’ve got a lot of work to do yet but we’re making progress and getting closer
-
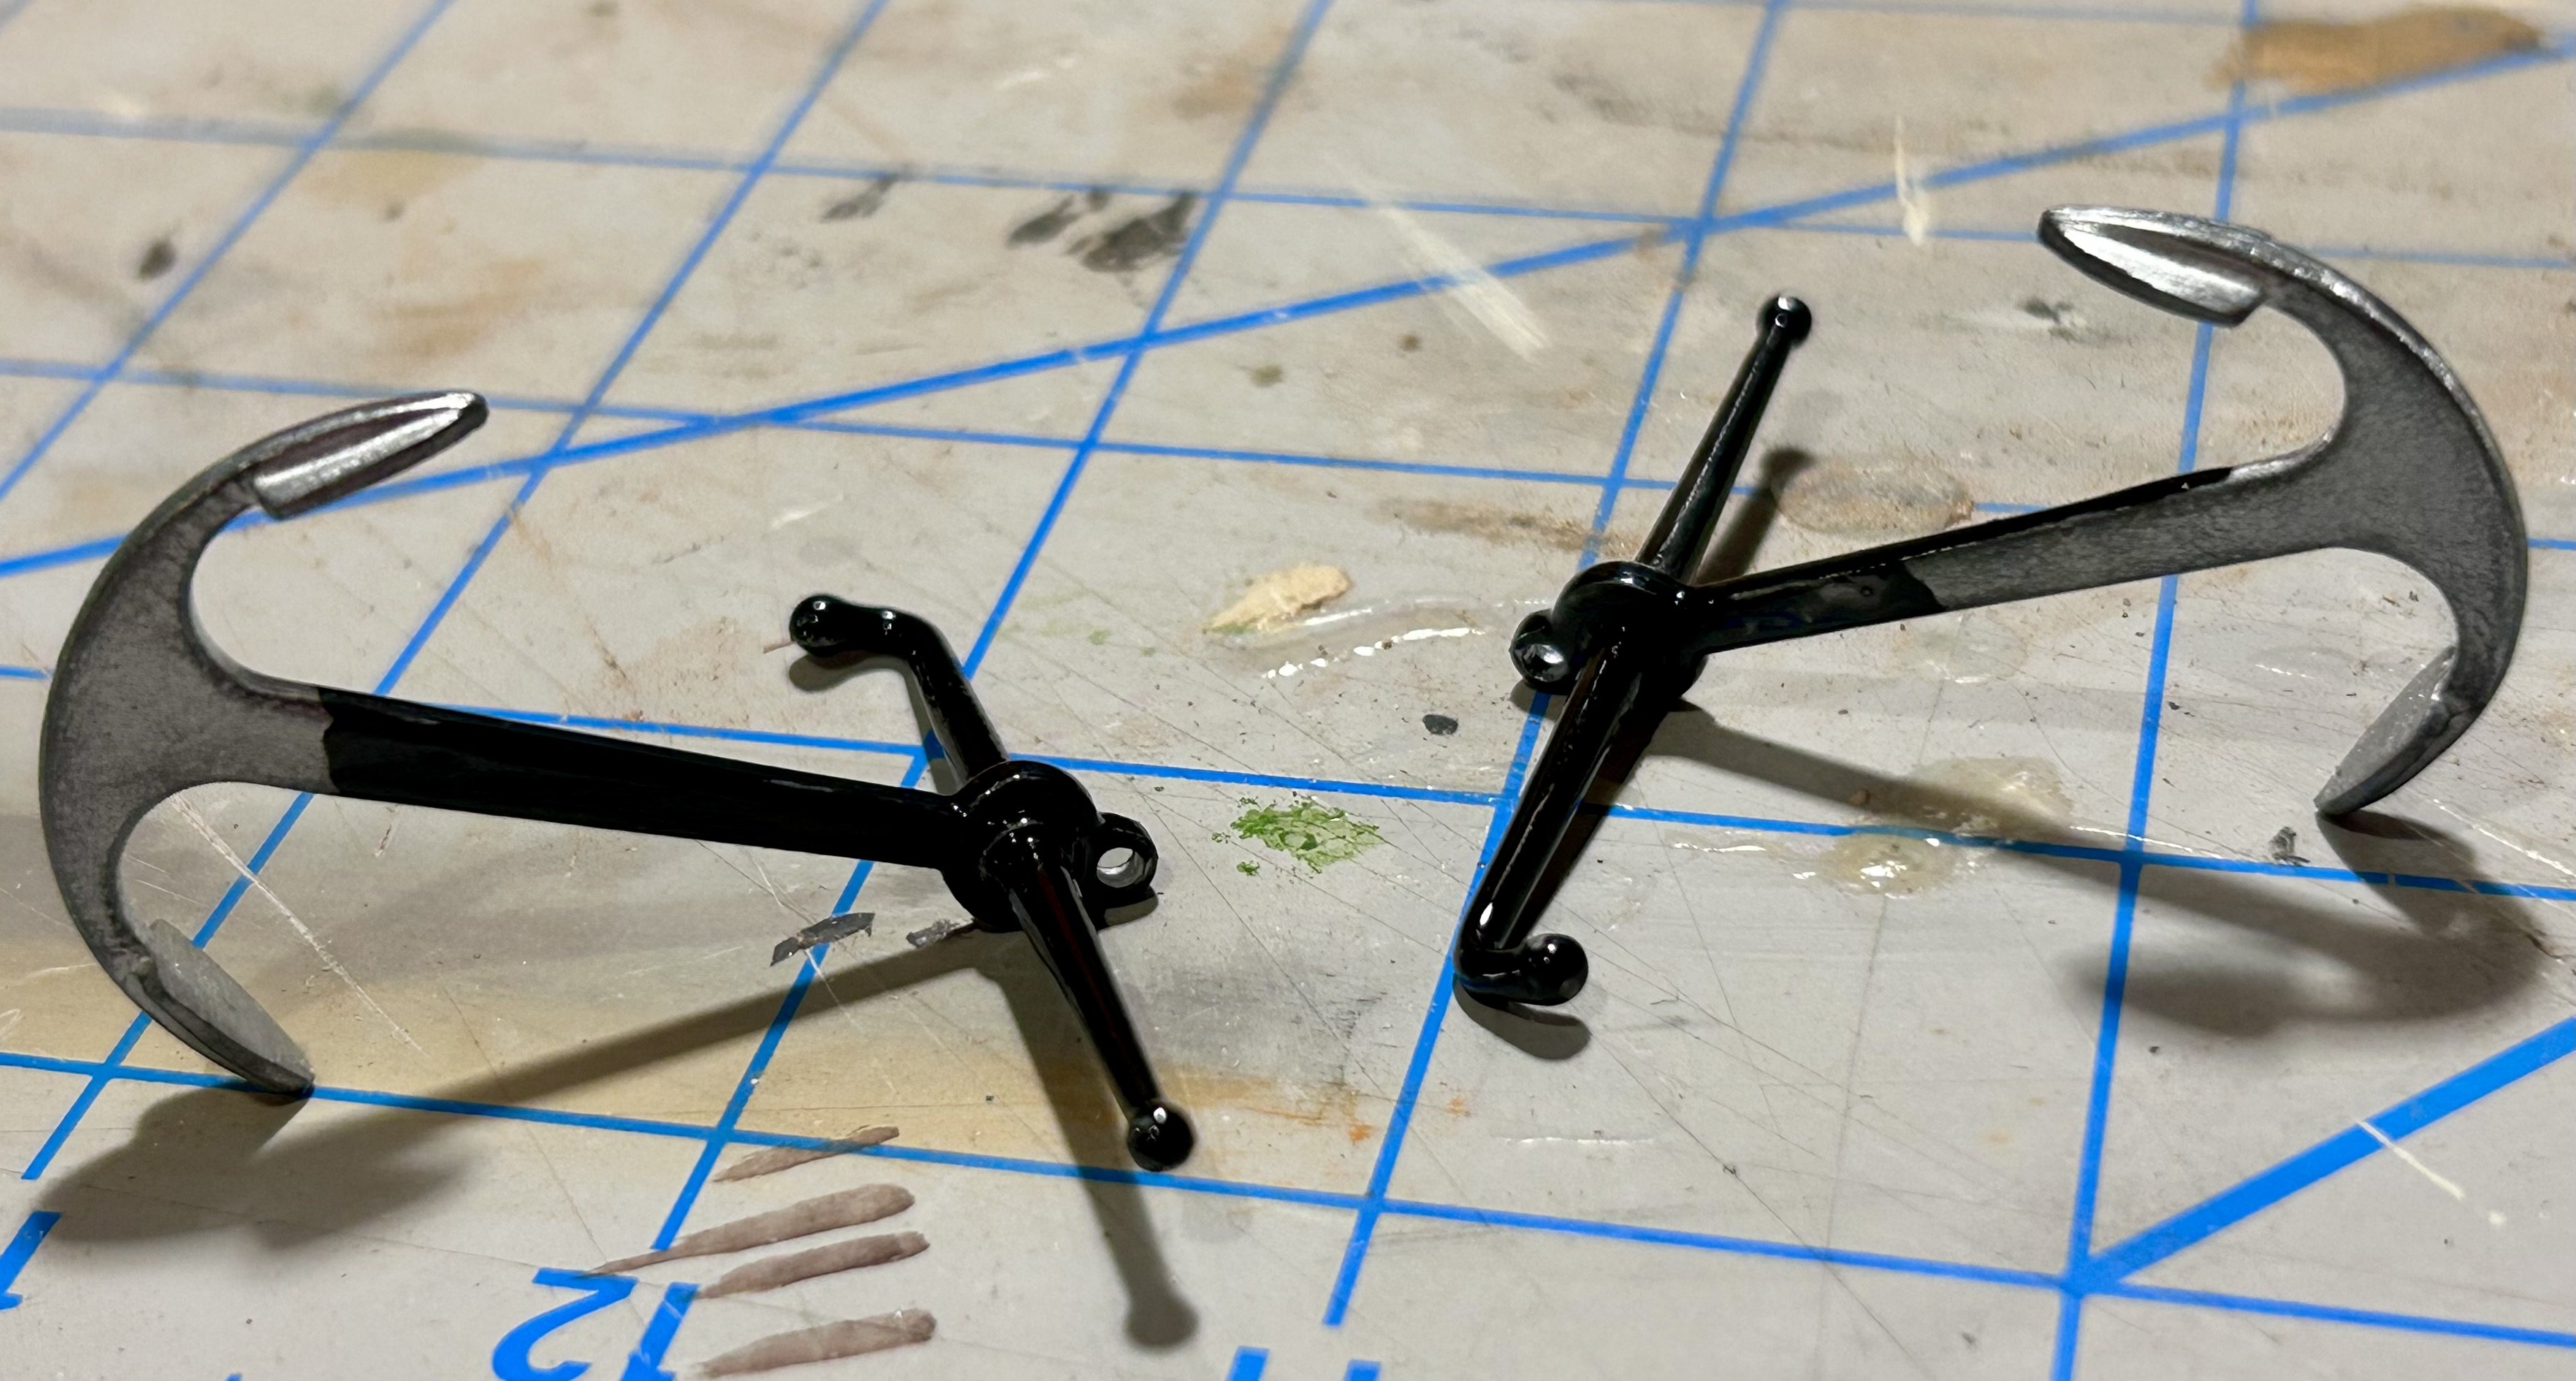
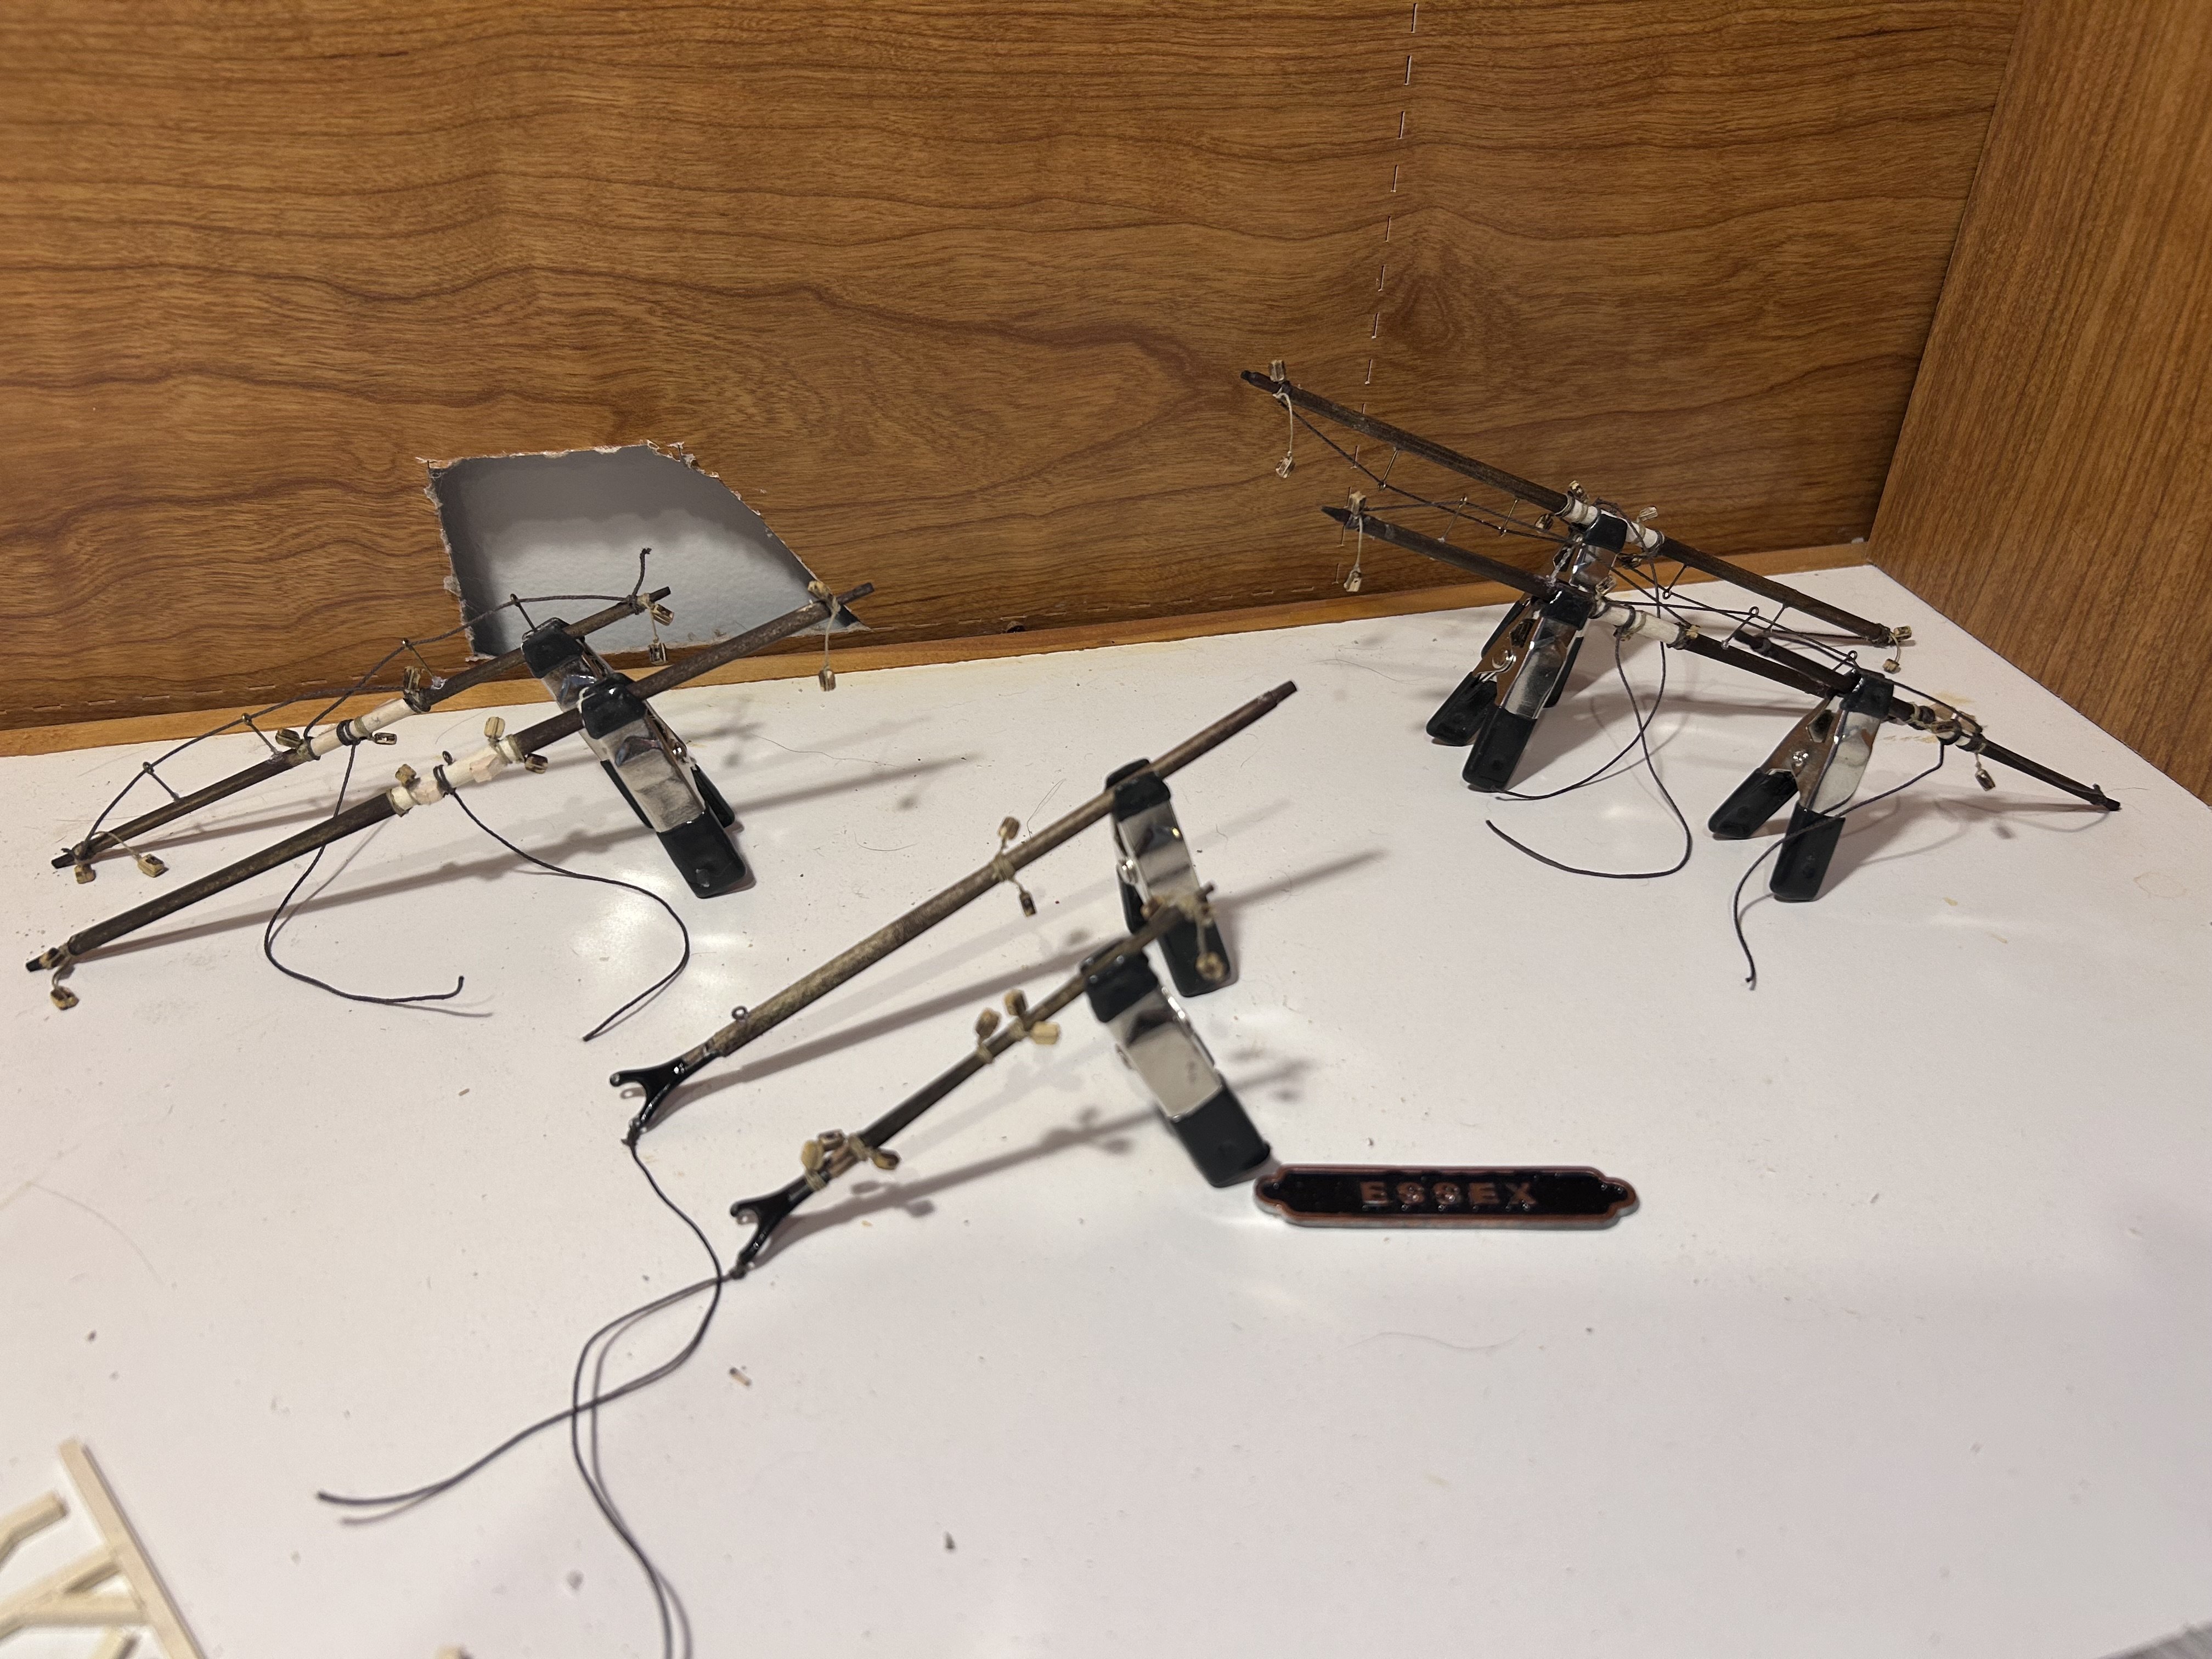
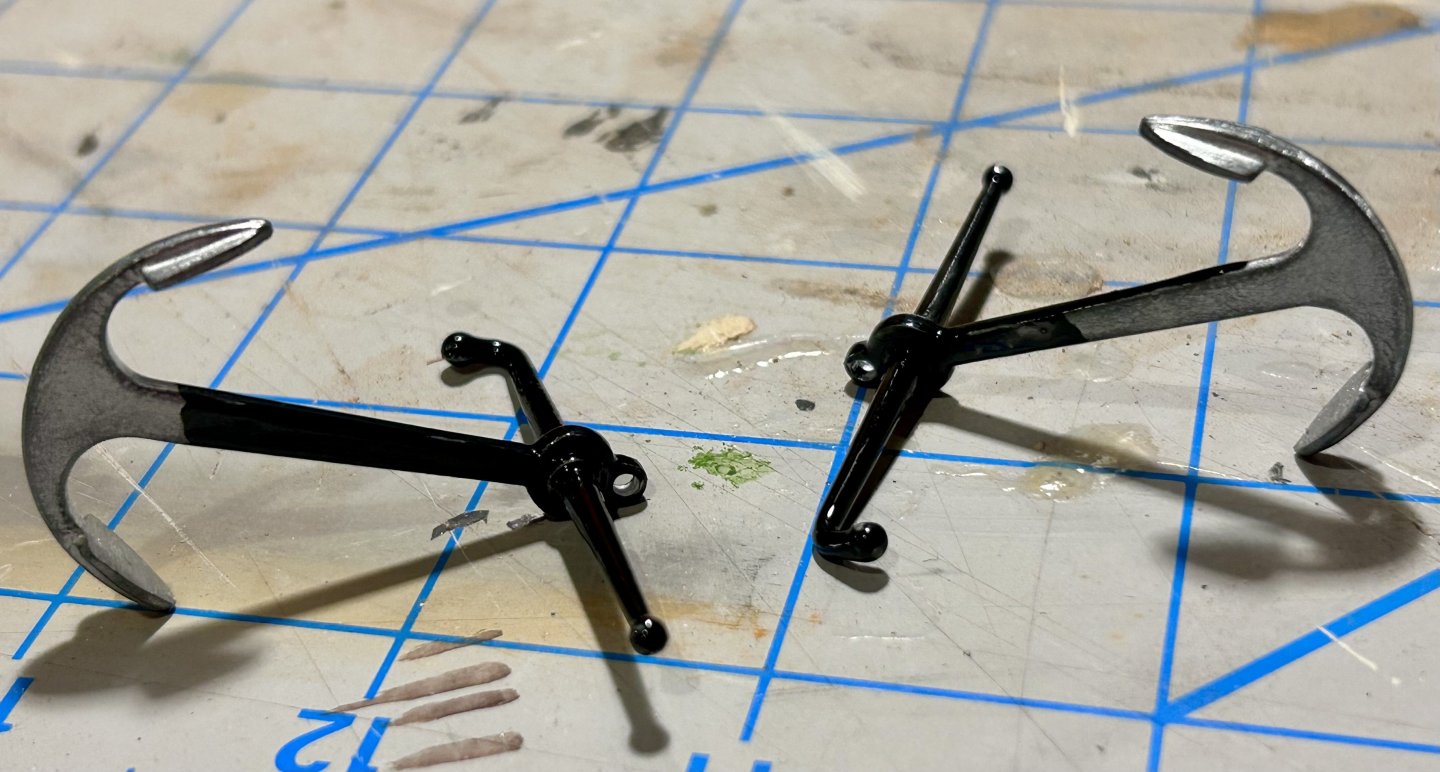
Starting off I wanted to do something small I could work into my rotation as I finish off Essex so I took to the anchors. I’ve seen some different choices for paint/staining on these and I opted for enamel paints. It gives it a little more of a shine than I’d prefer to be there so I’m not totally sold on whether I’ll keep this paint or strip it and add another. I found some difficulty in finding a glue that would properly bond the two parts of the anchor—which is part of the reason I went with the enamel because it acts like its own glue, though if anyone has some suggestions for another material I’d happily hear it out.
-
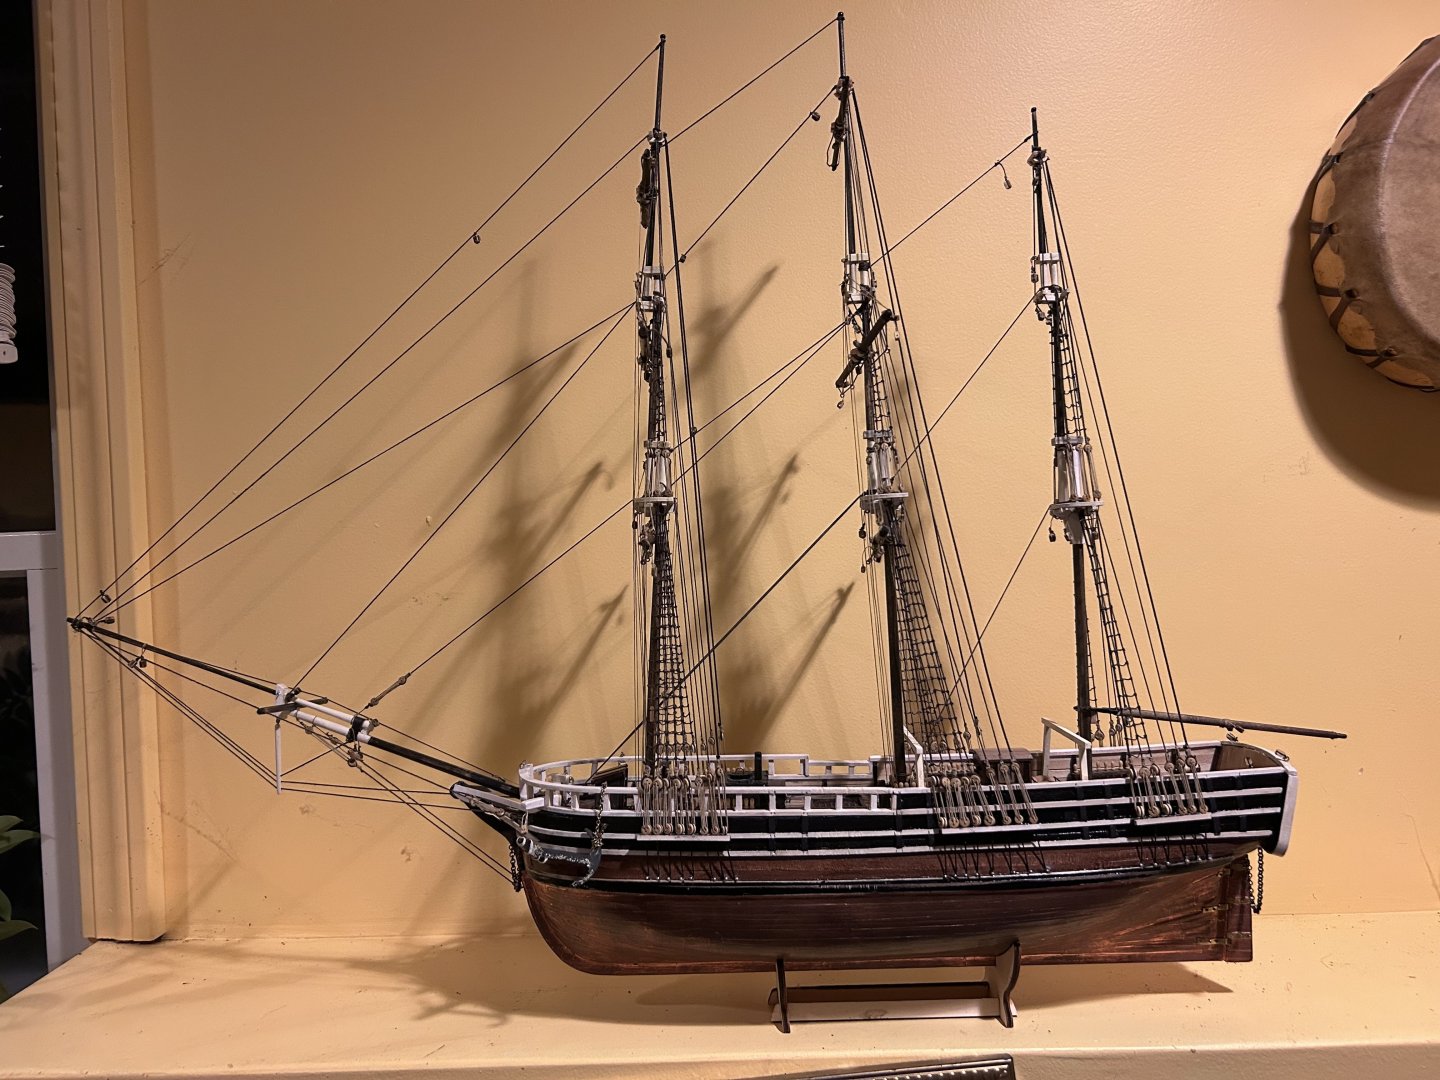
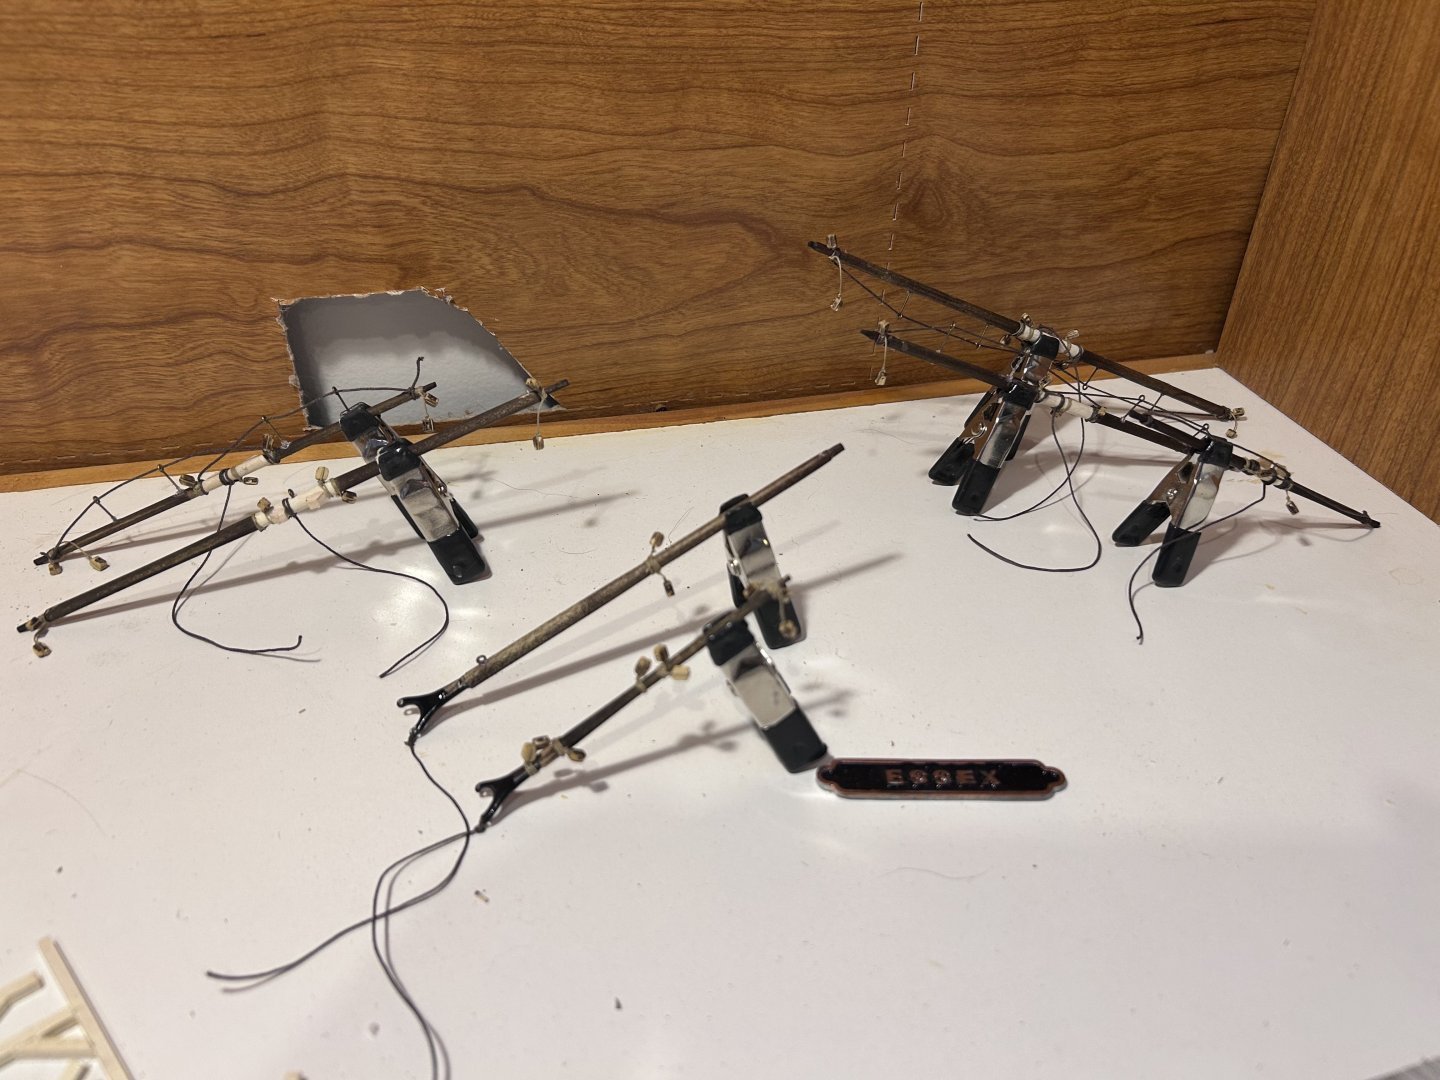
Got the yards on the mizzen finished. Next up will be lines and then the long work of sheets before I reach the finishing touches.

-
Got back to the shipyard and finished off the yards on the main mast. Of course I realized I somehow forgot one of the yards for the mizzen, so I’ll have to backtrack to get that together before I can put the finishing touches on the yard rigging.

-
Finished the yards today, time for a few days off for a family Christmas.
-
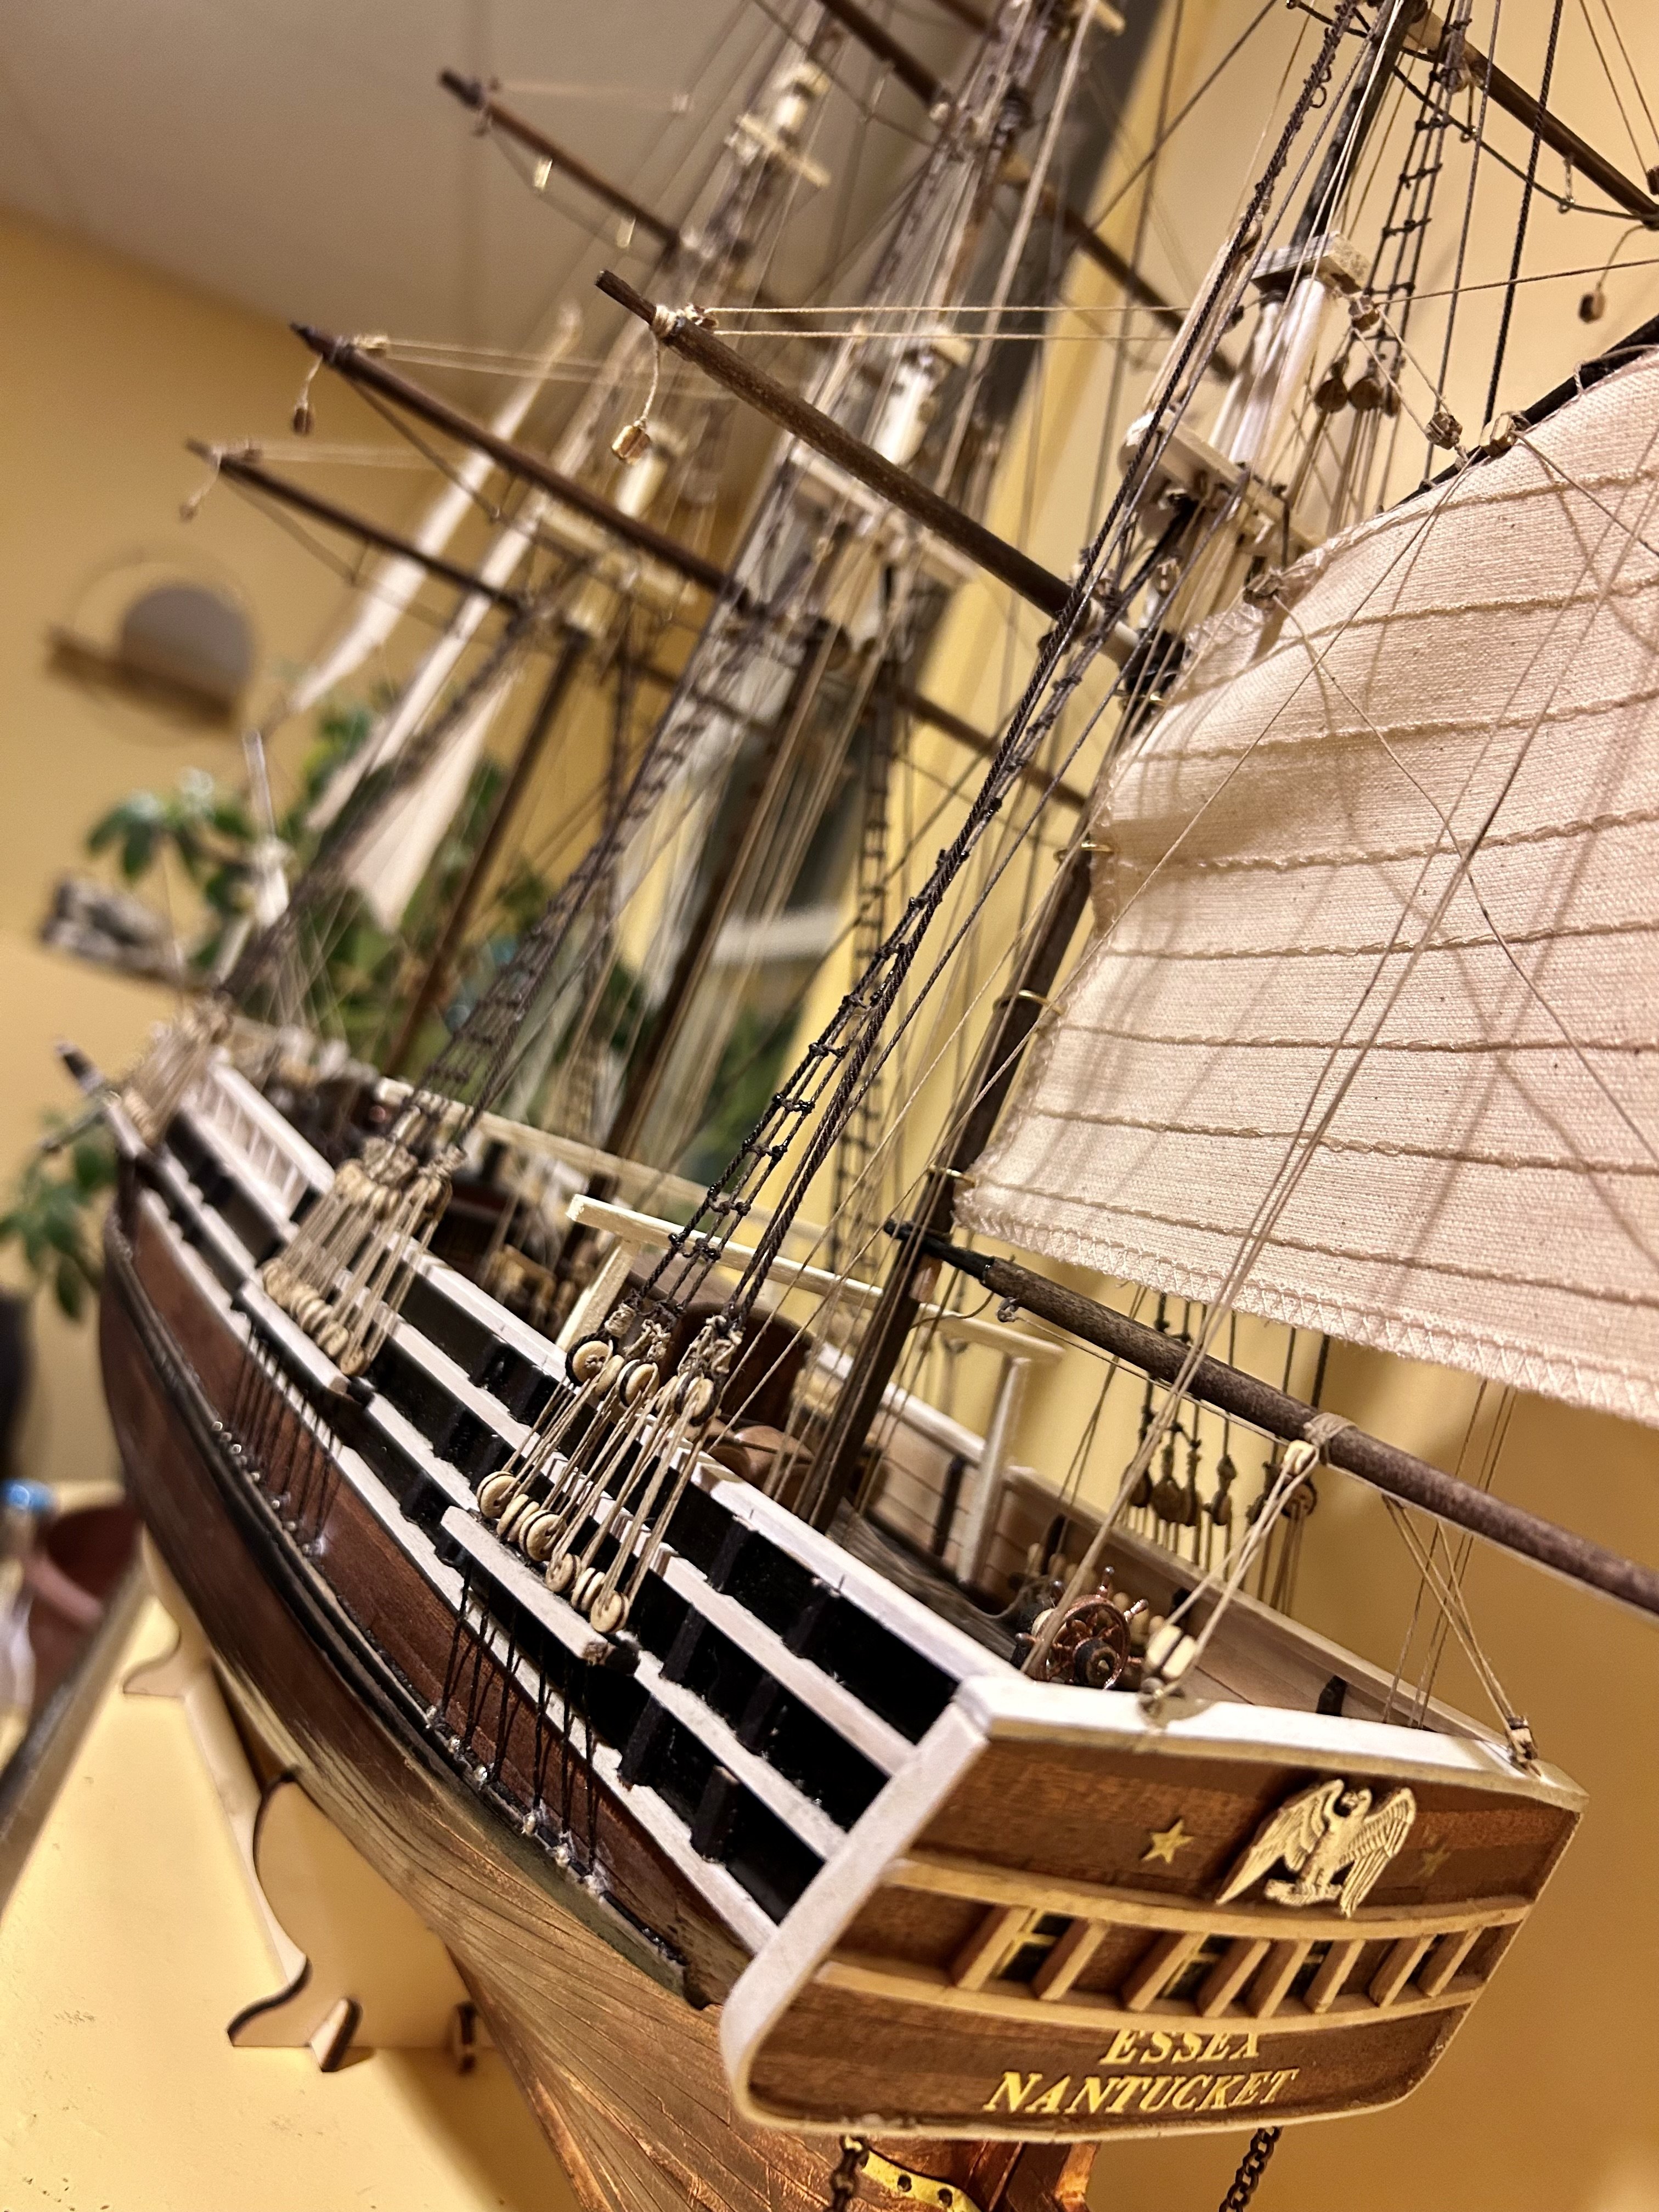
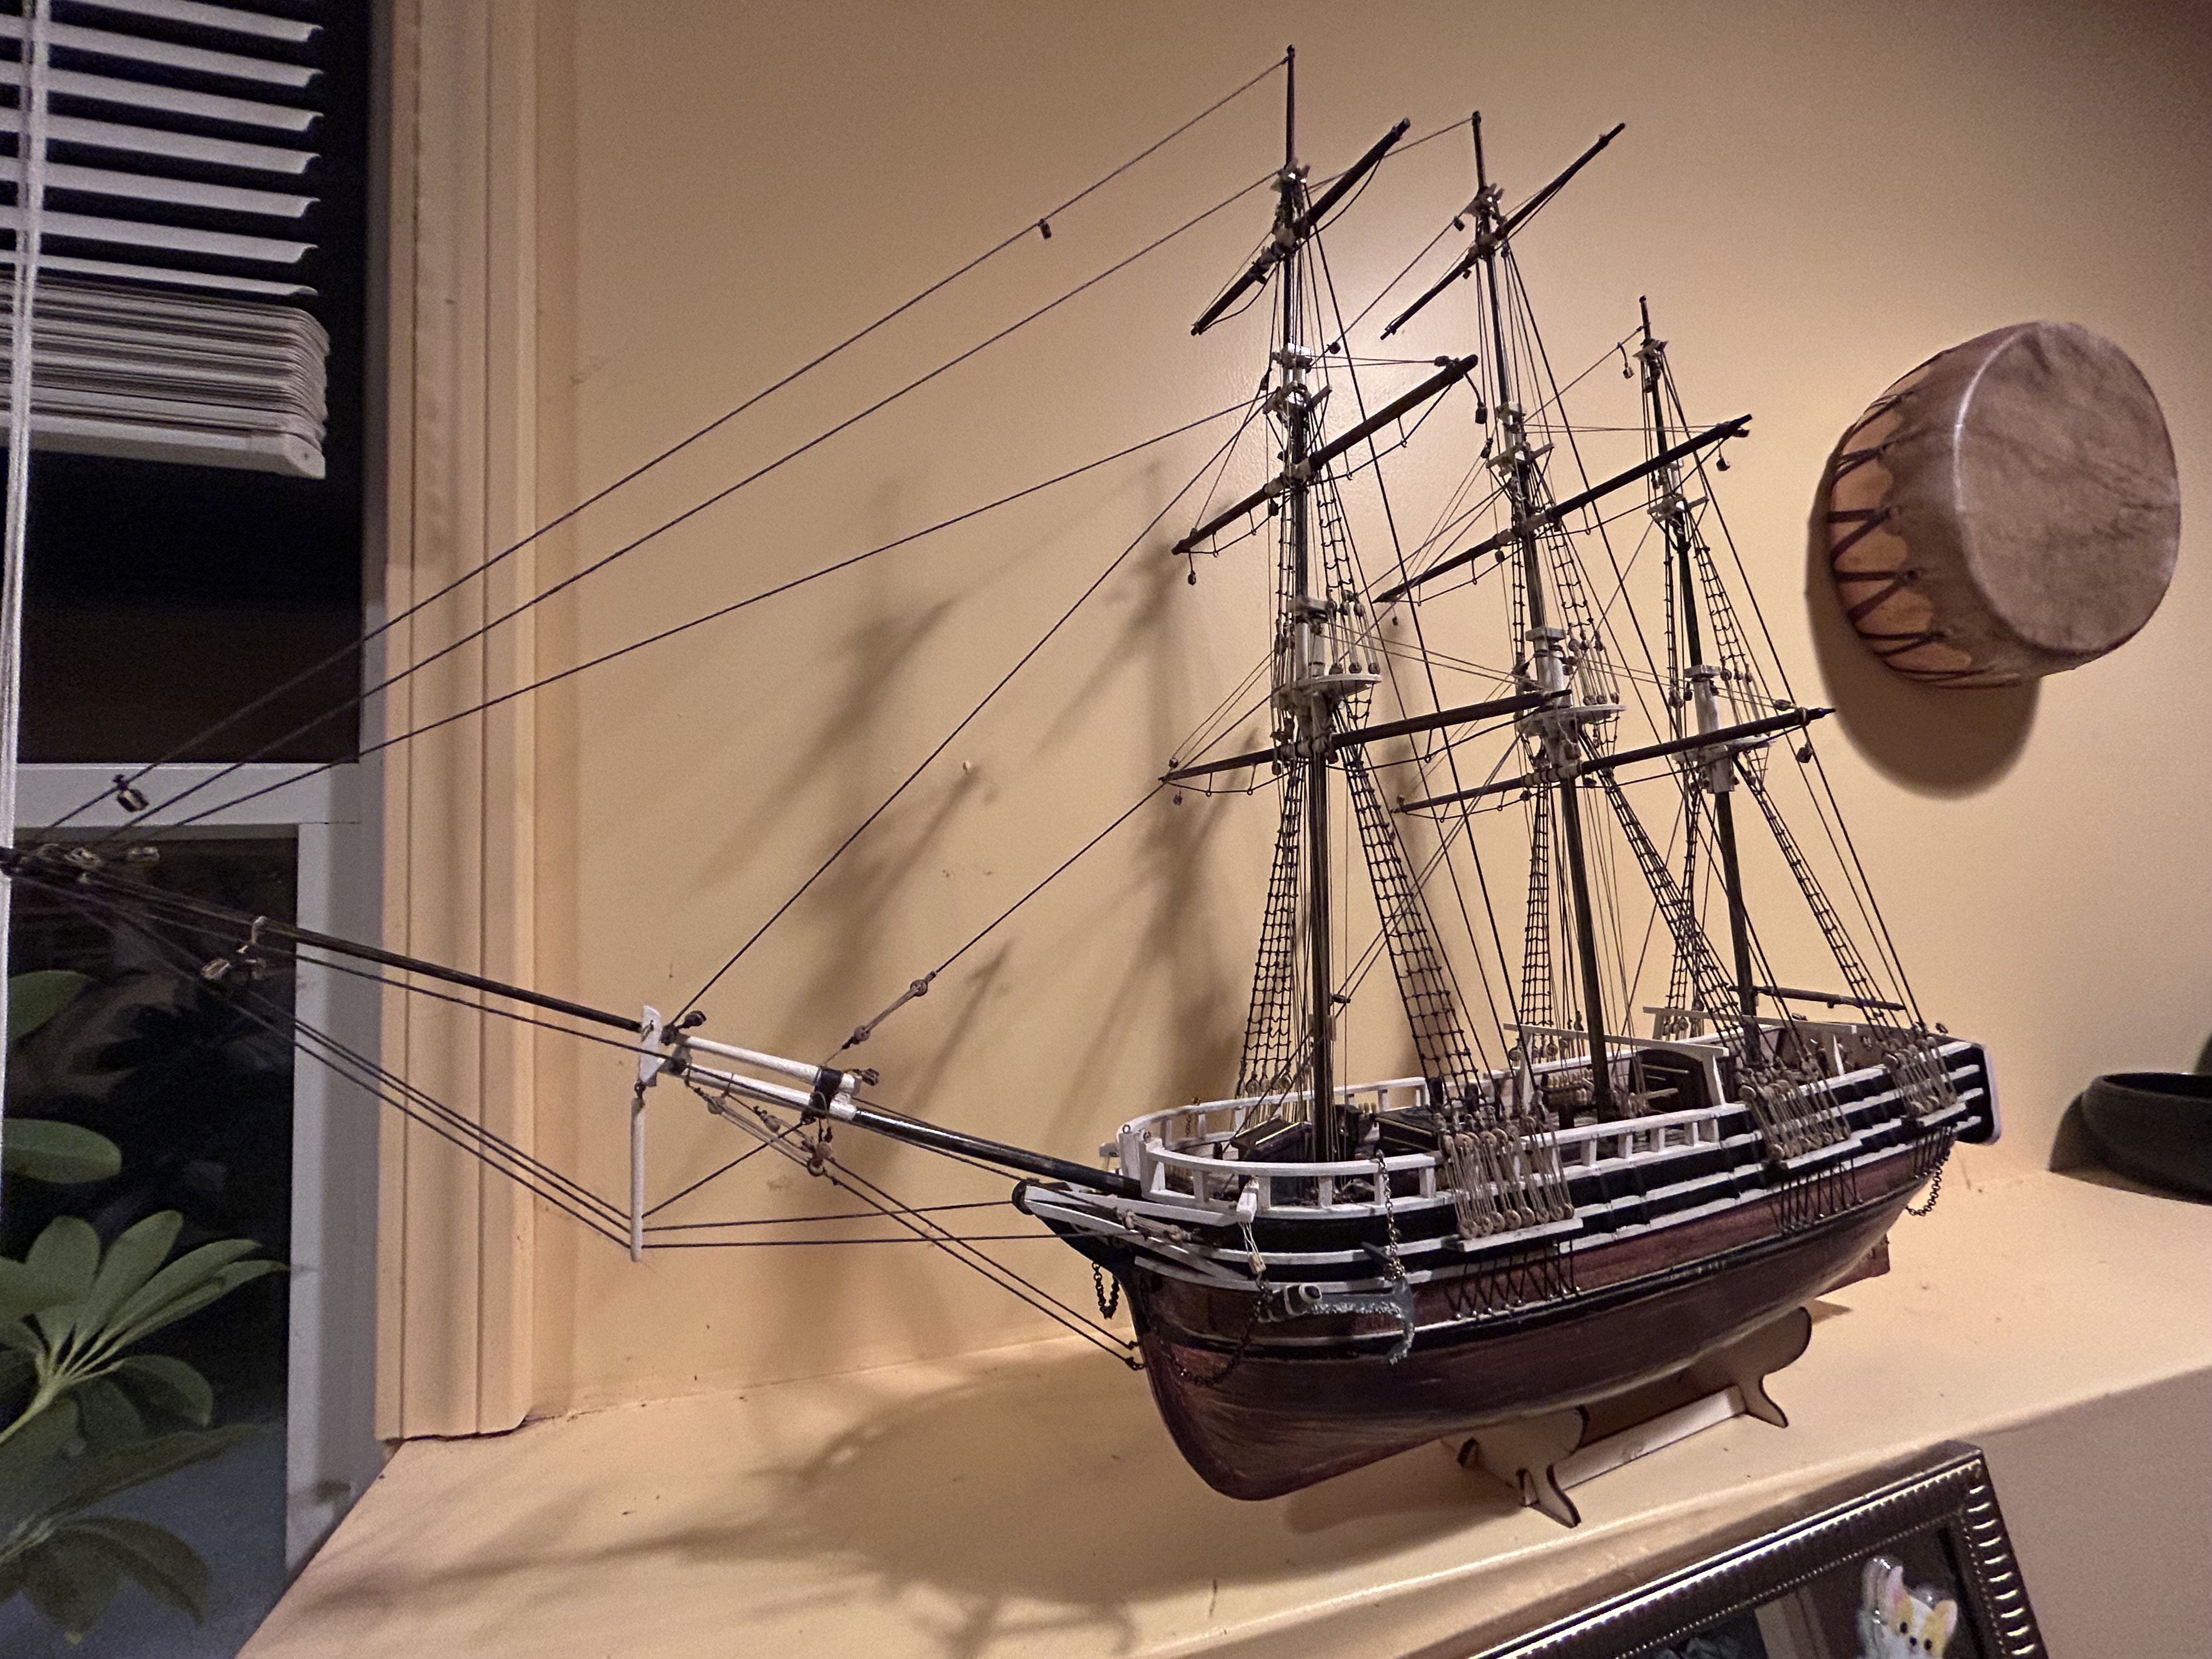
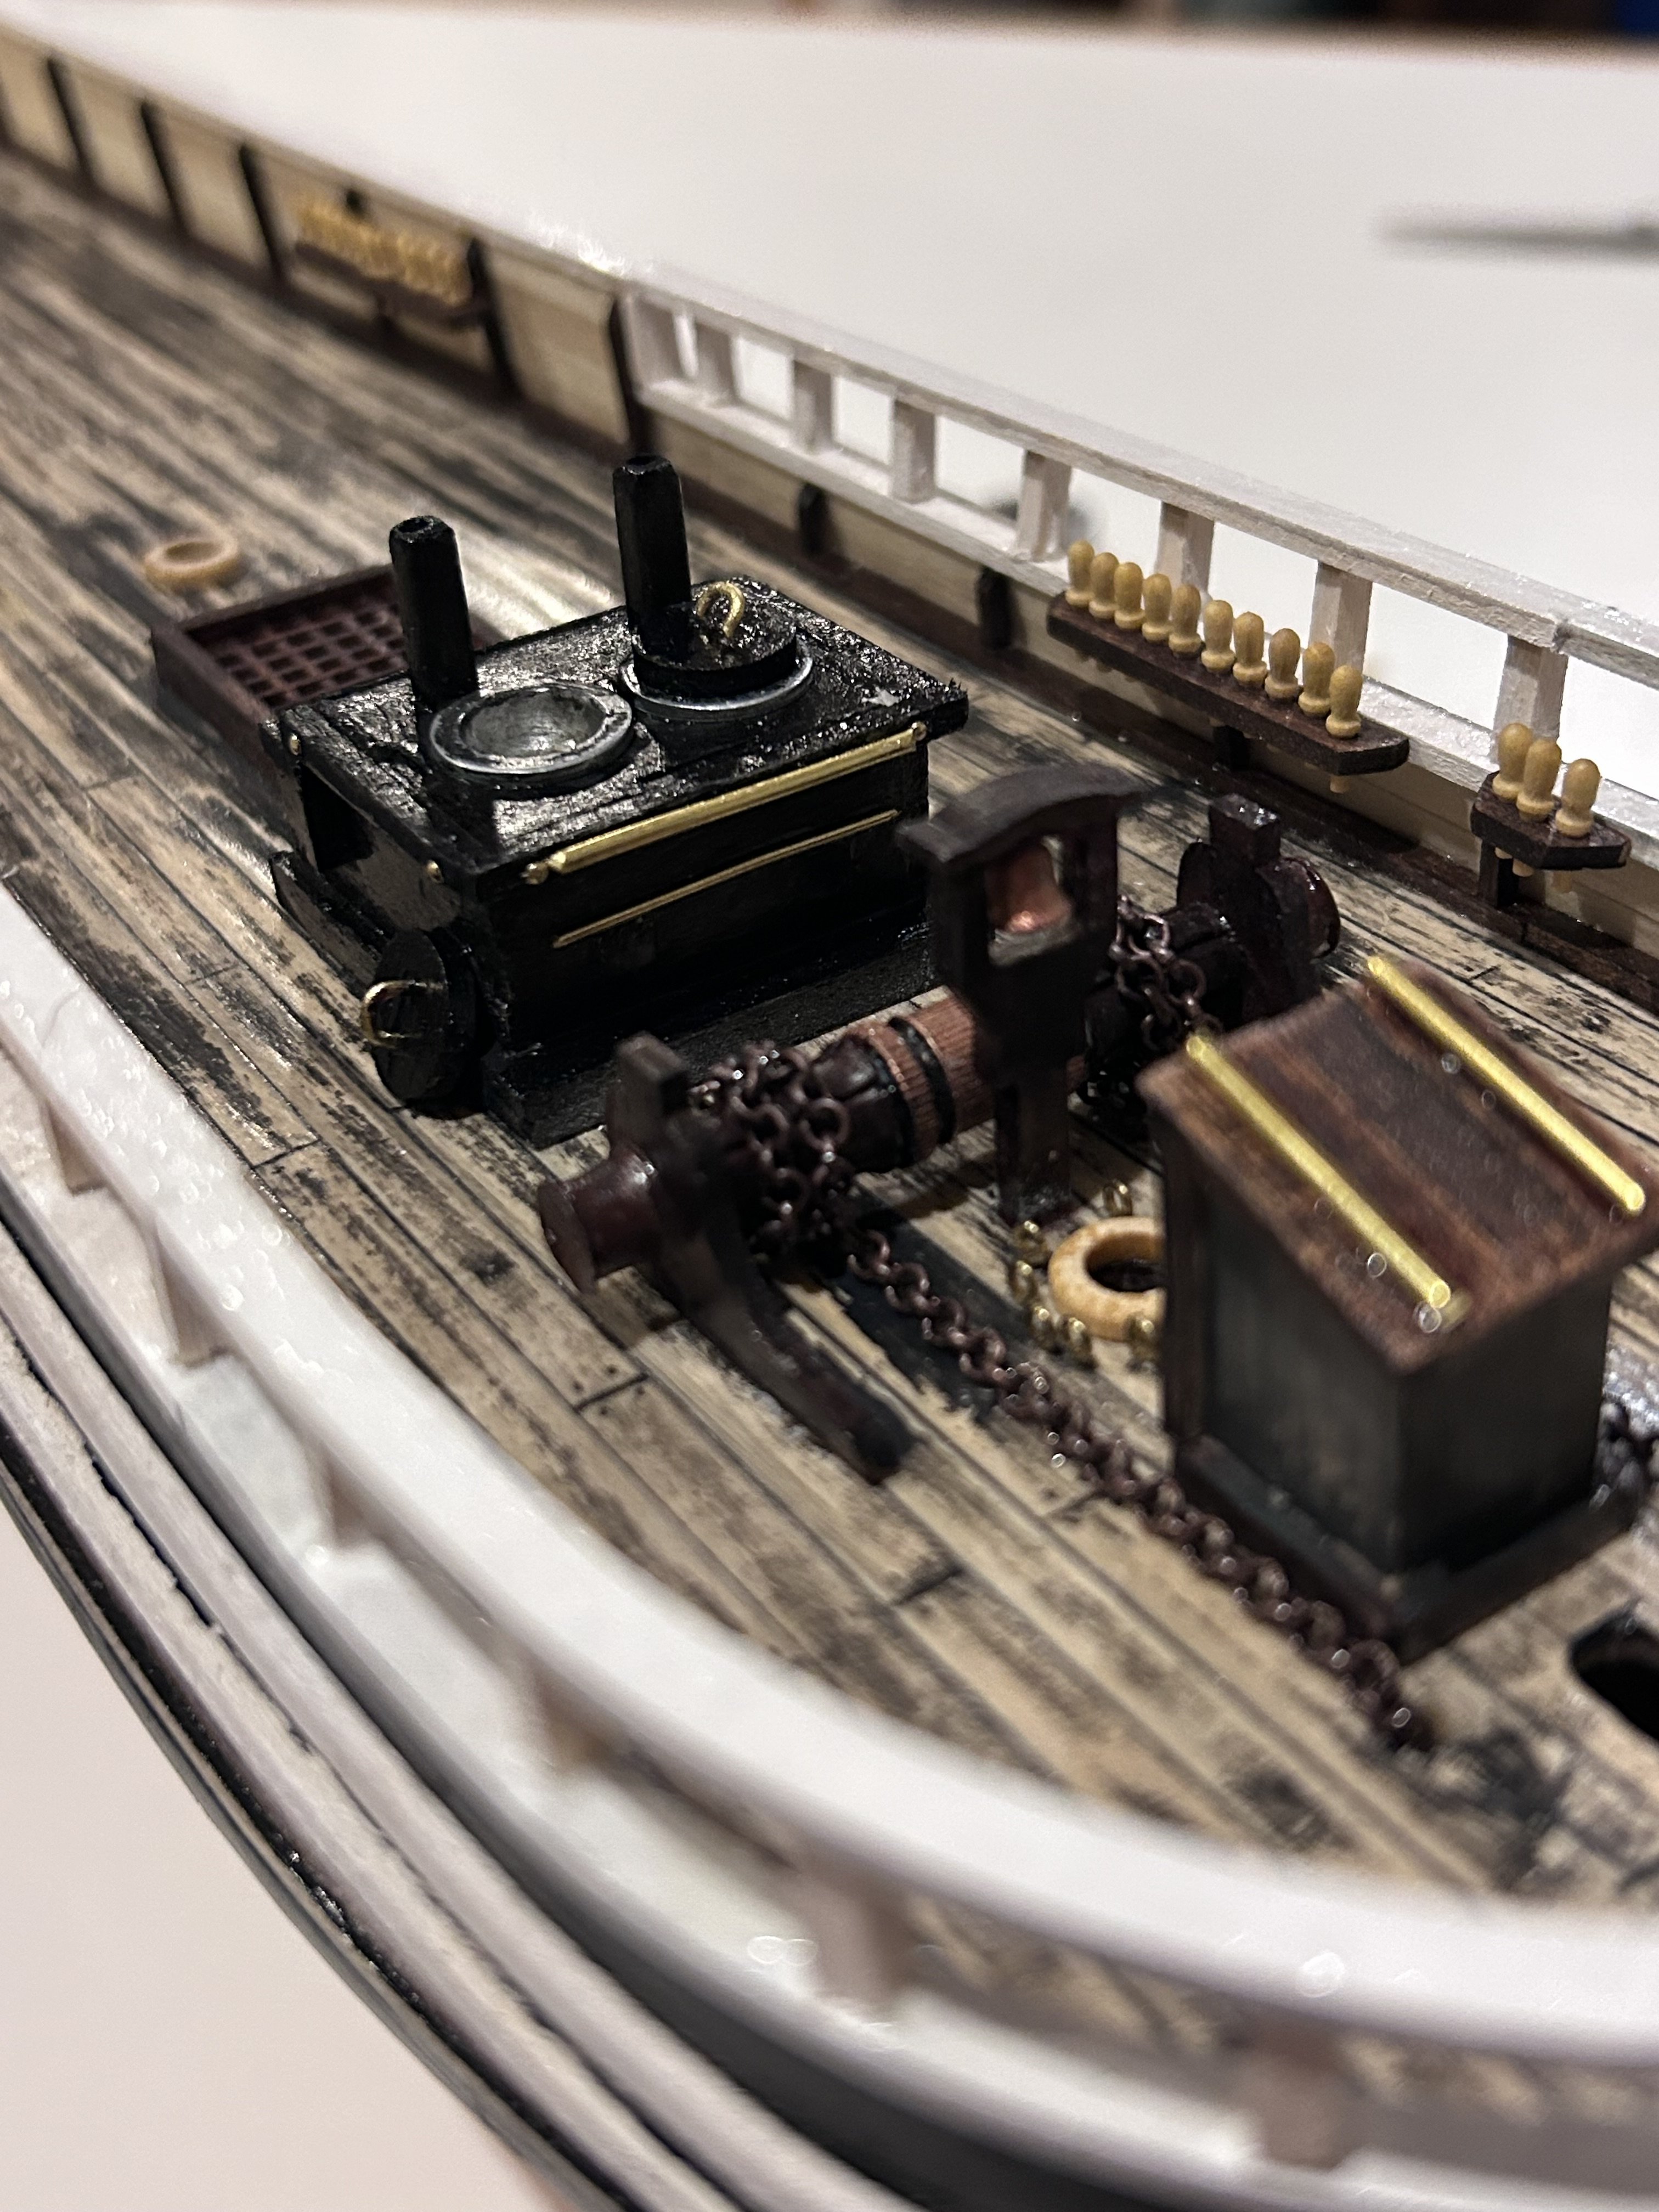
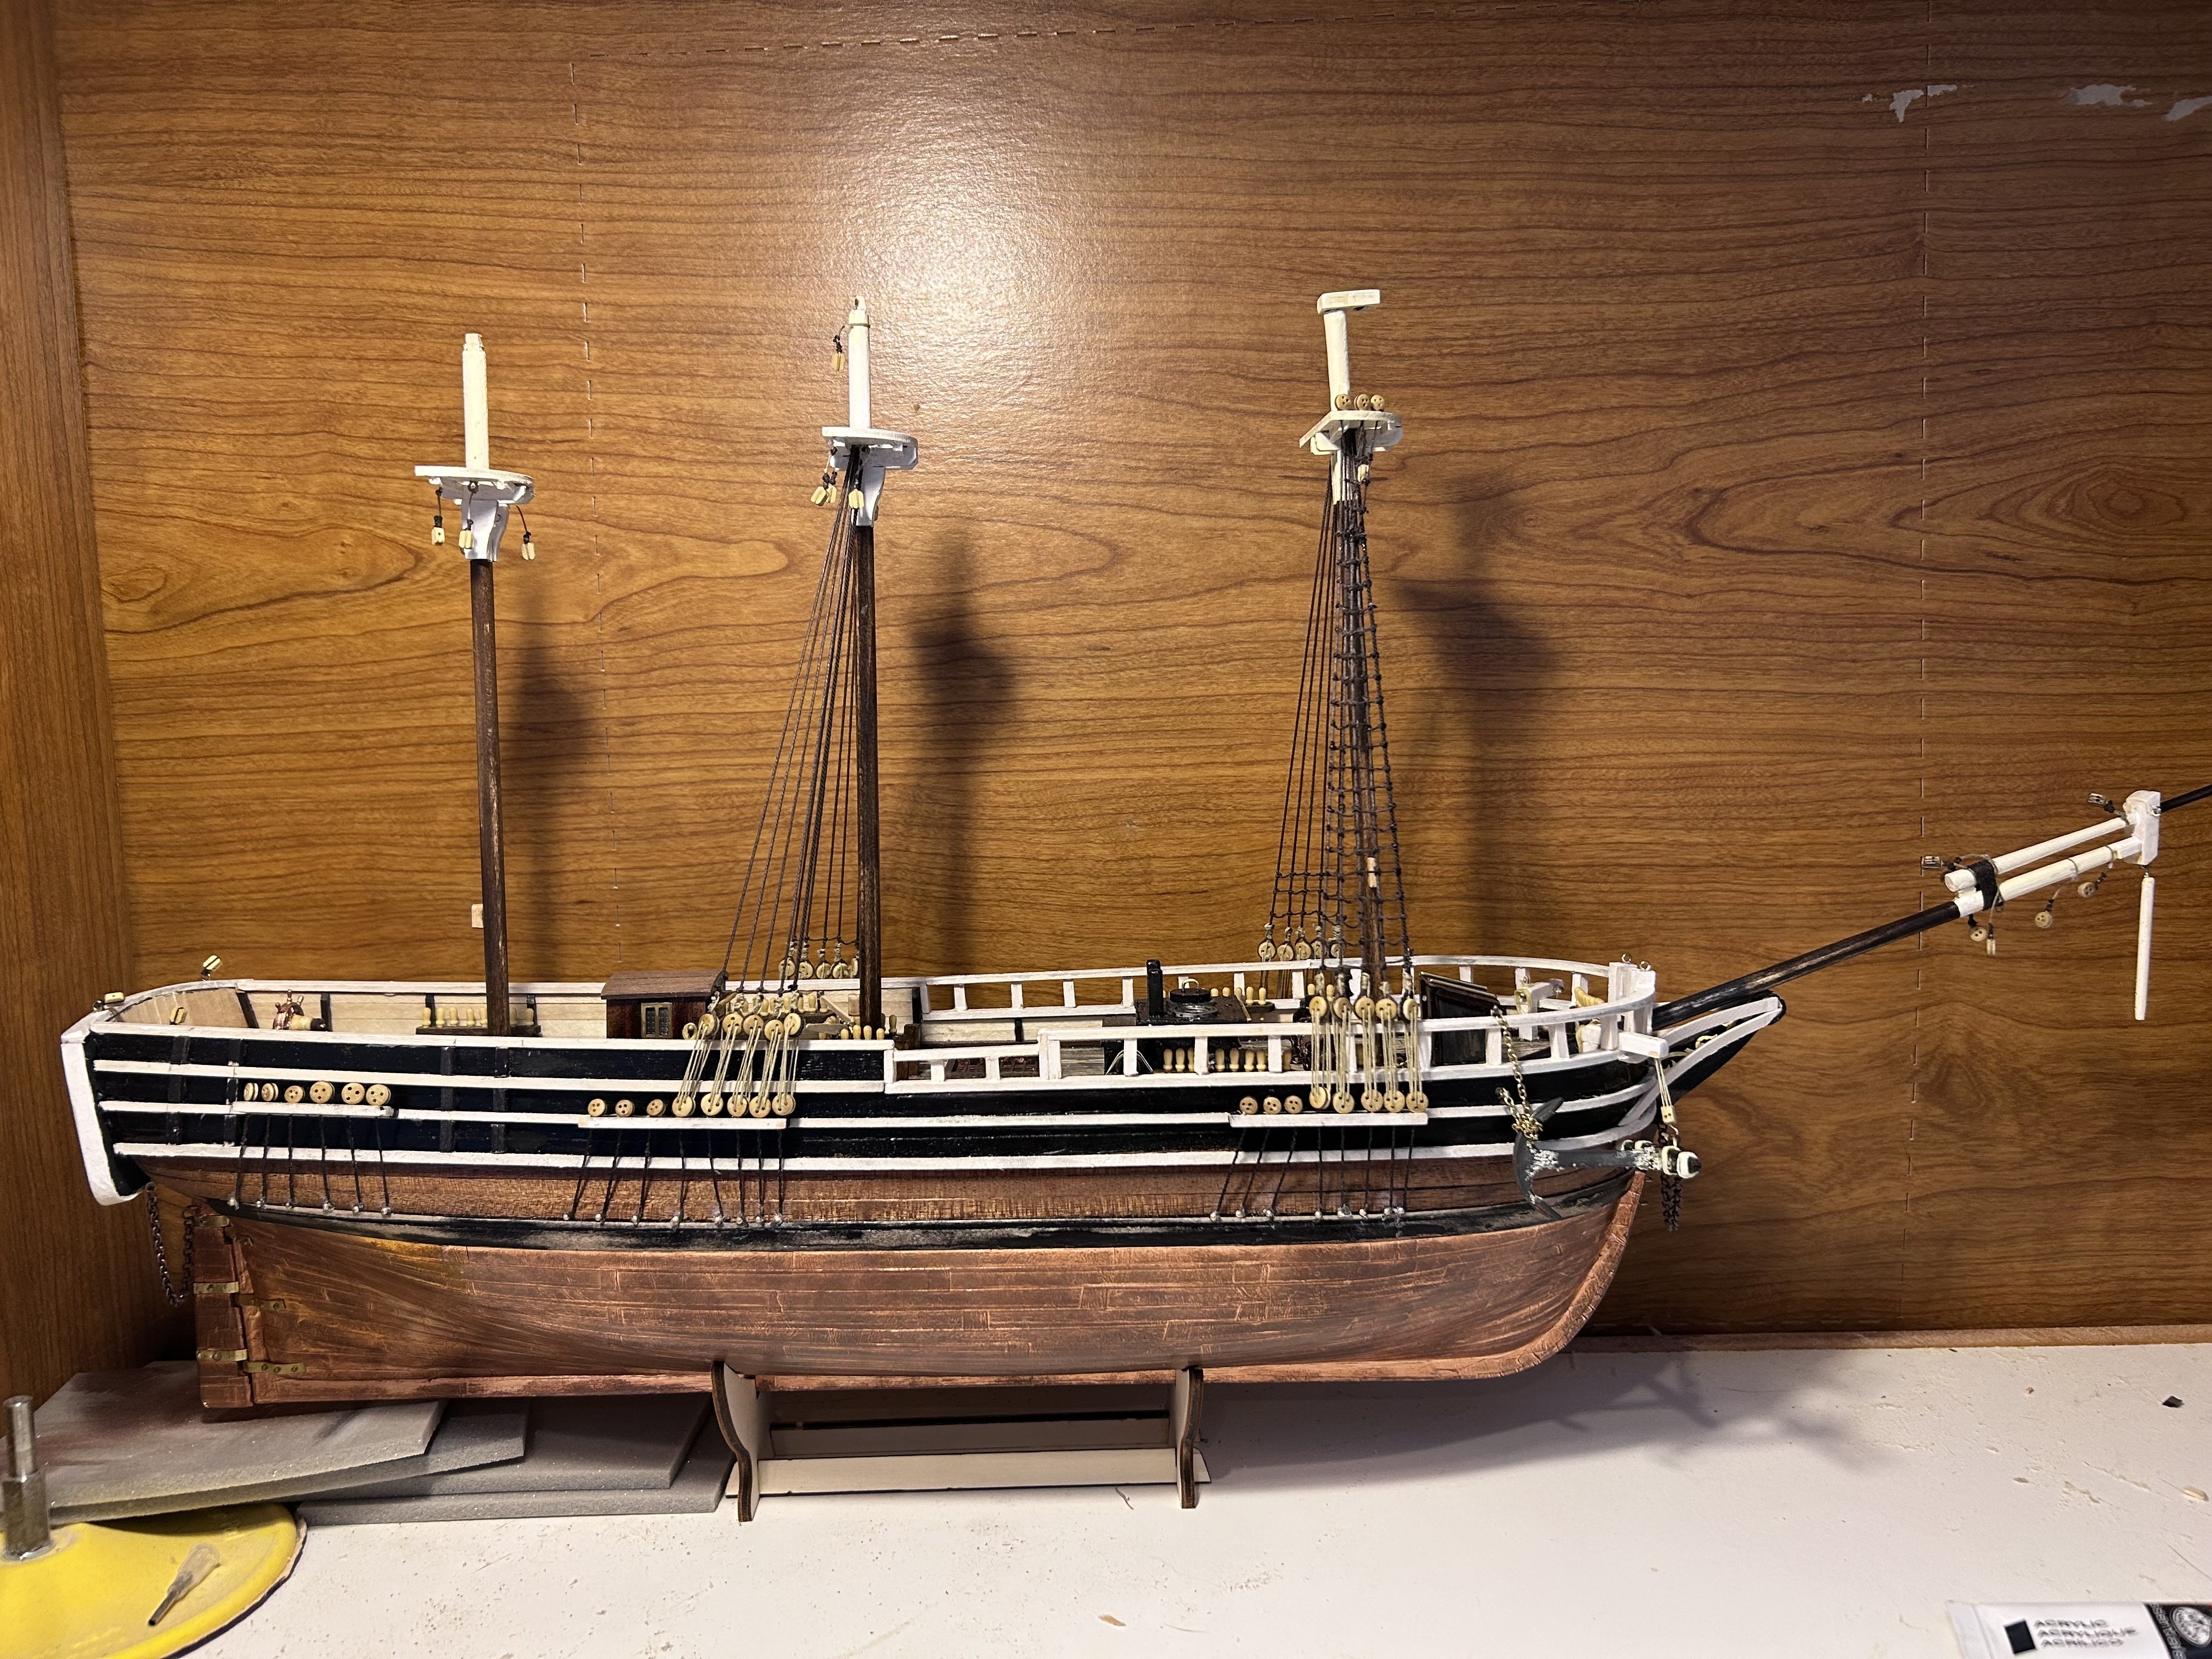
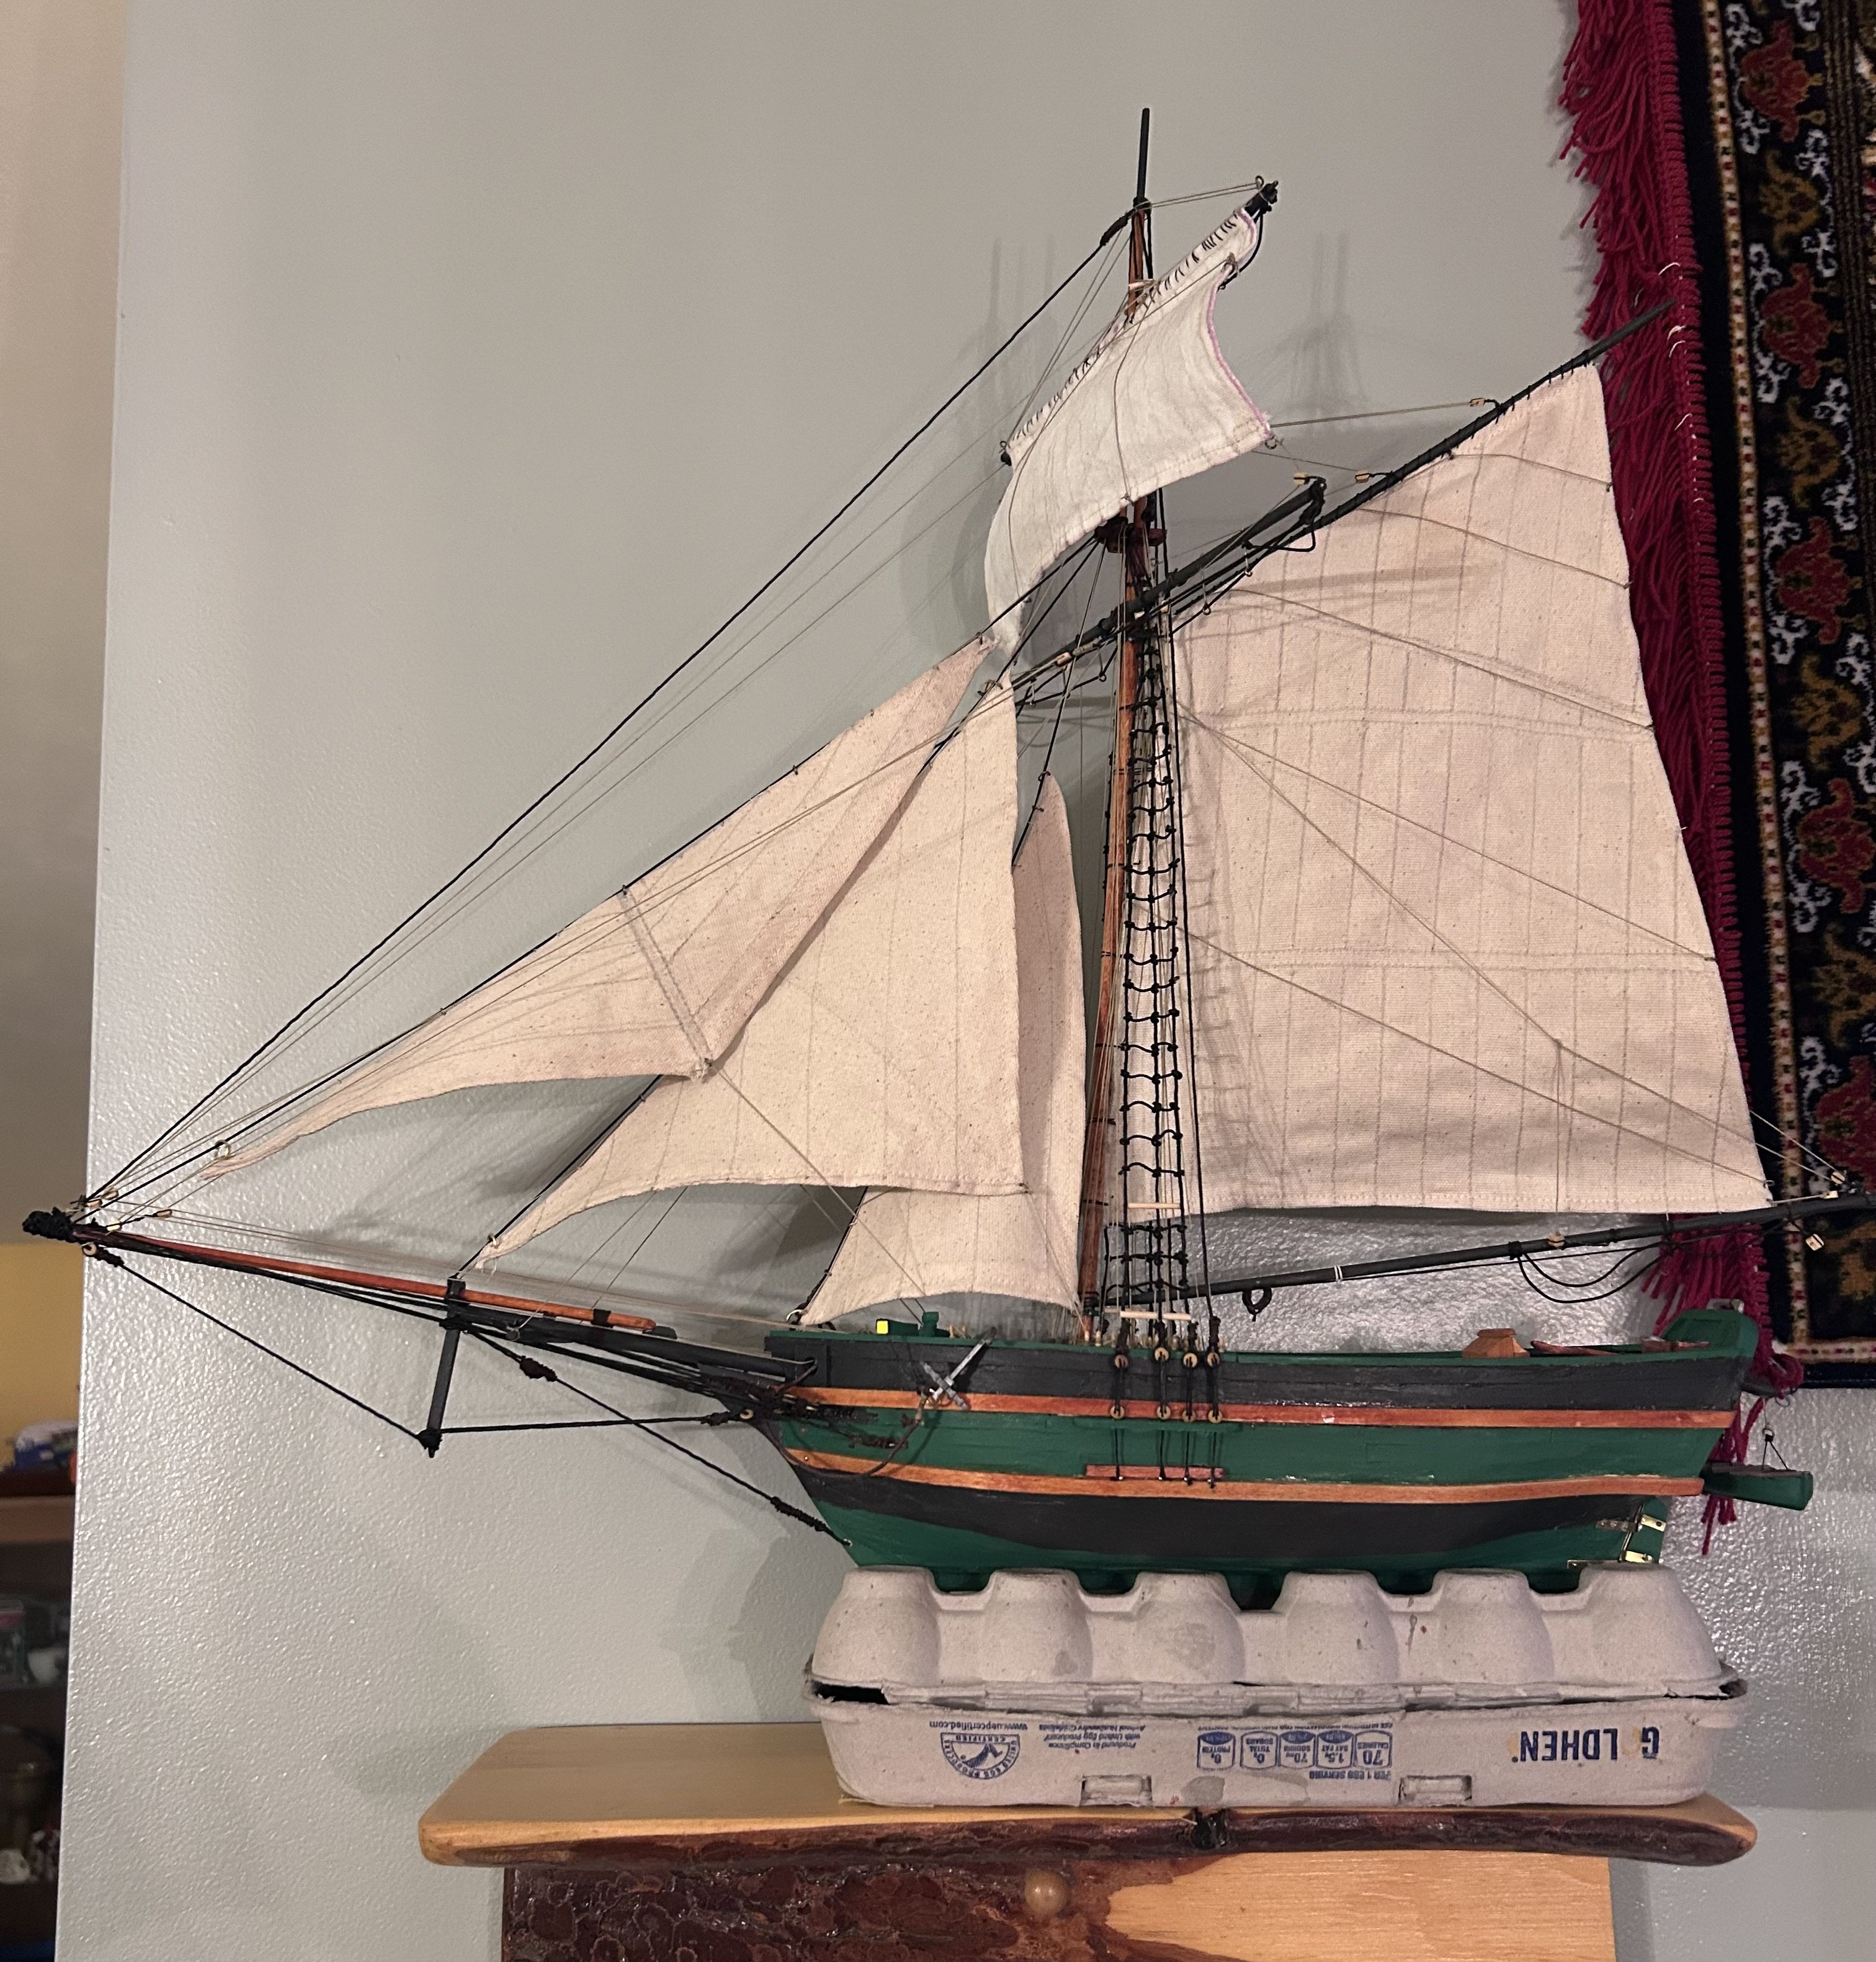
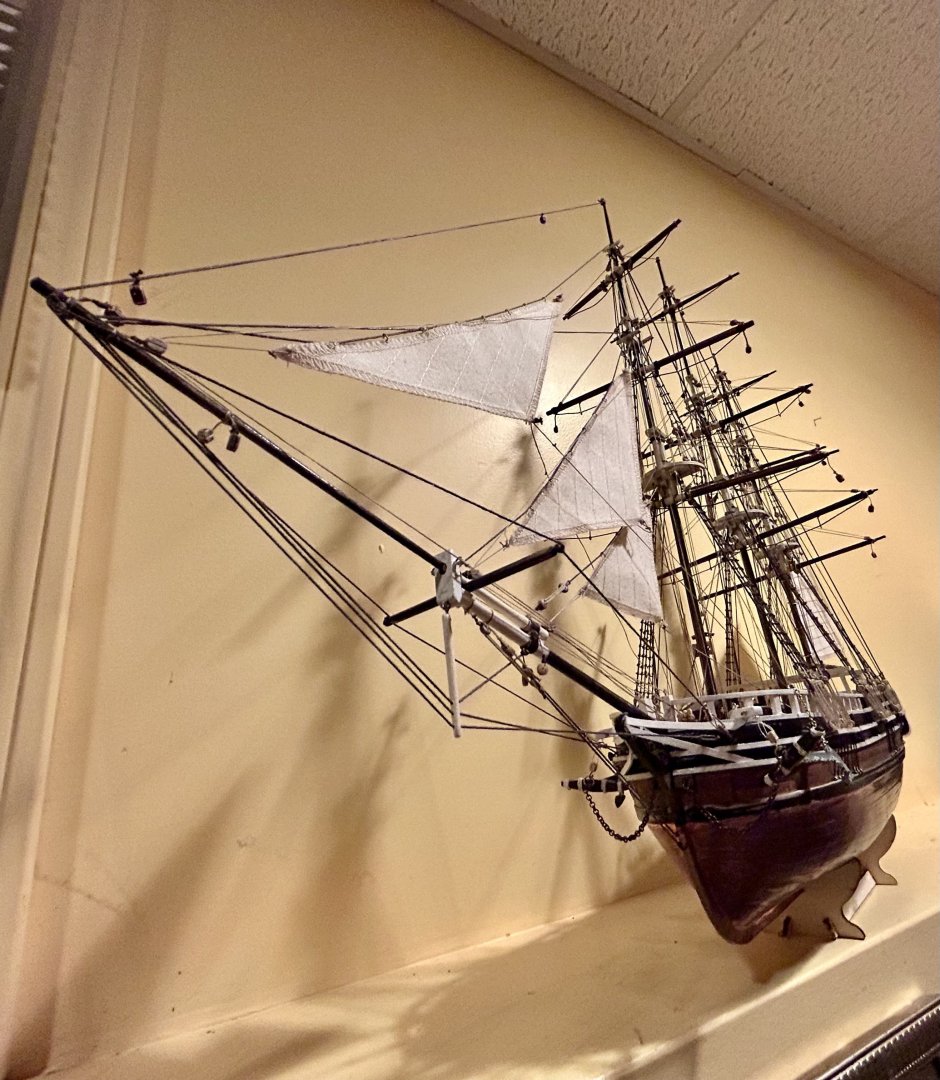
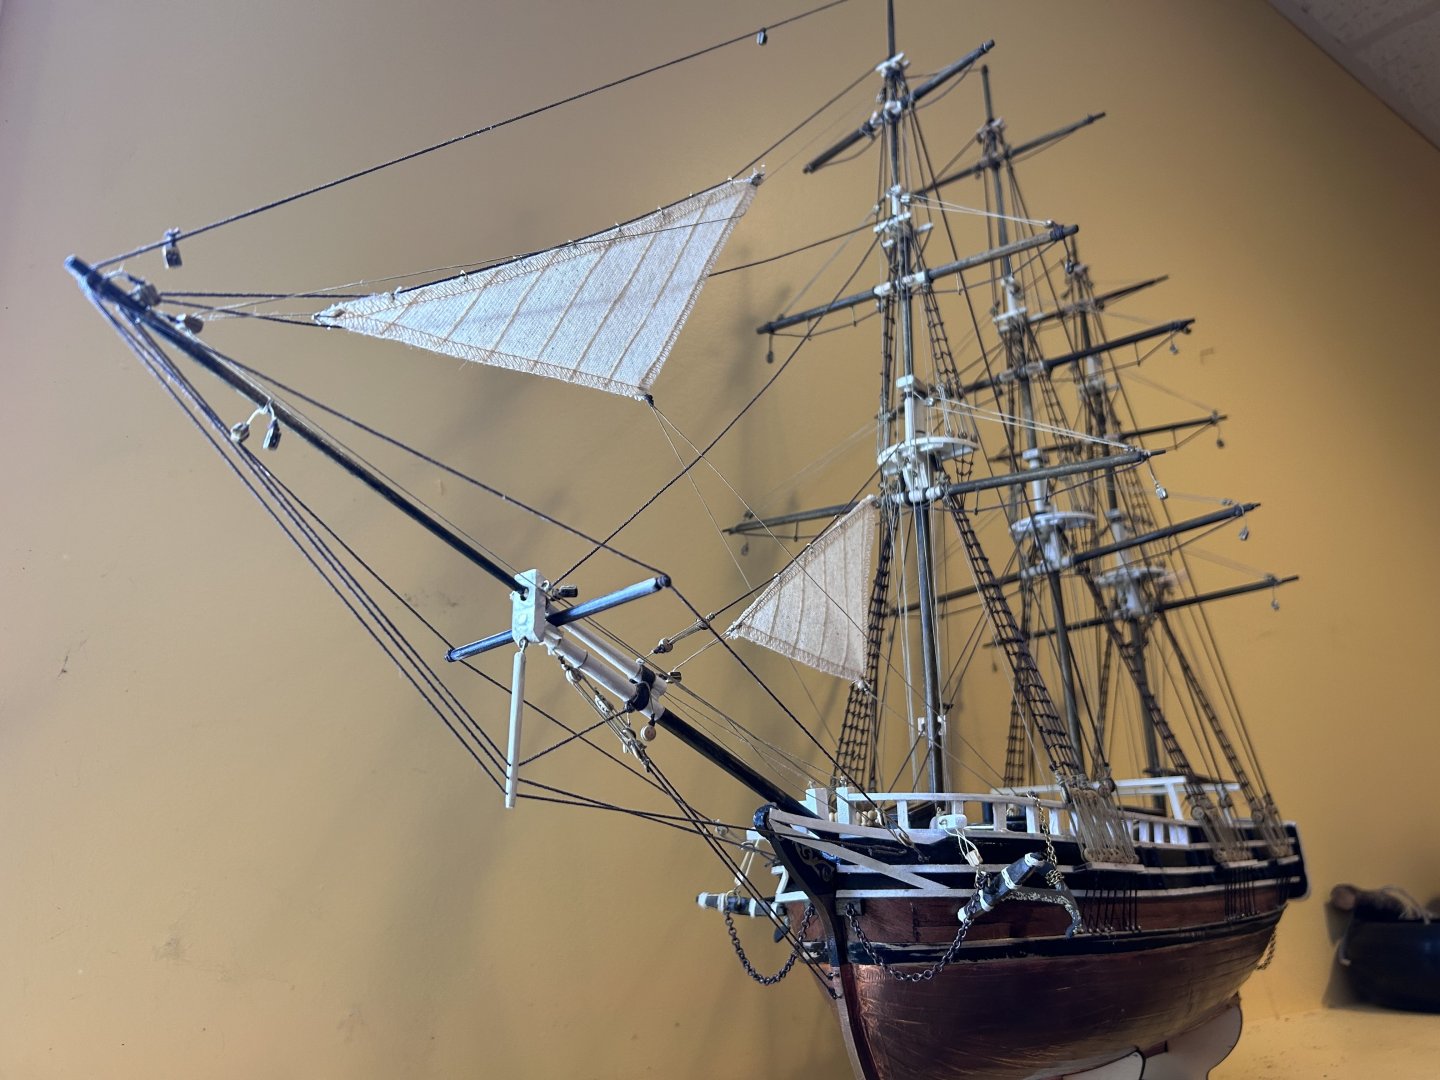
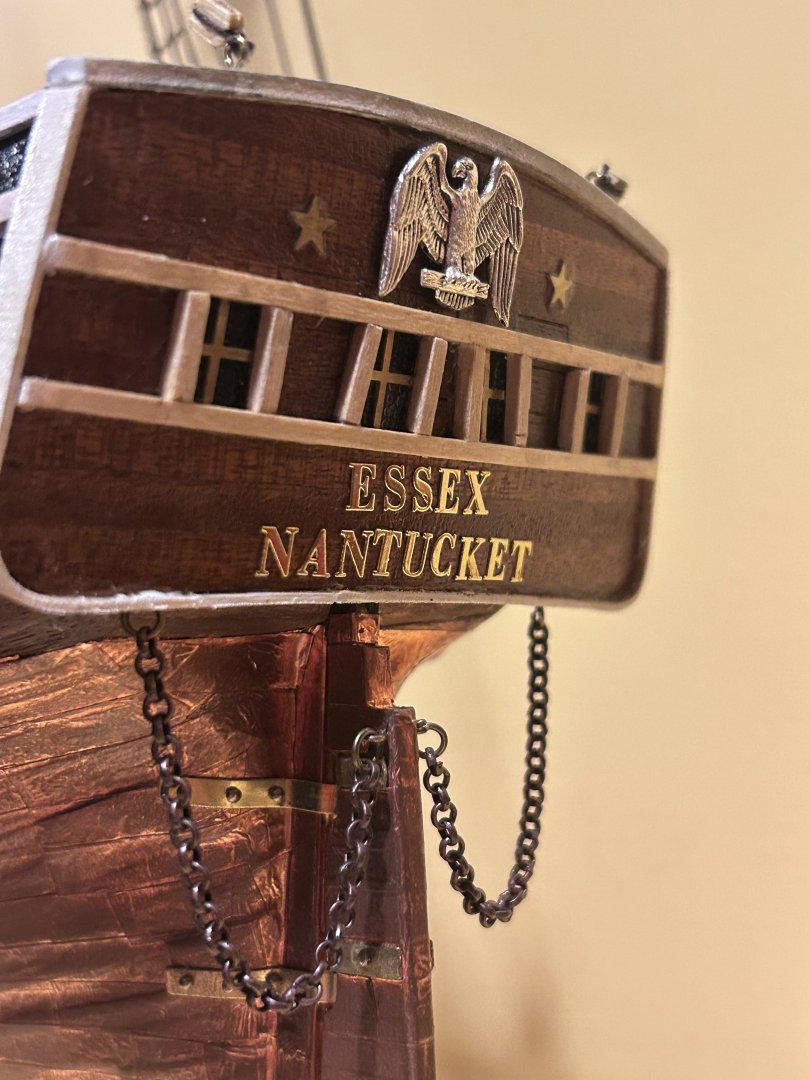
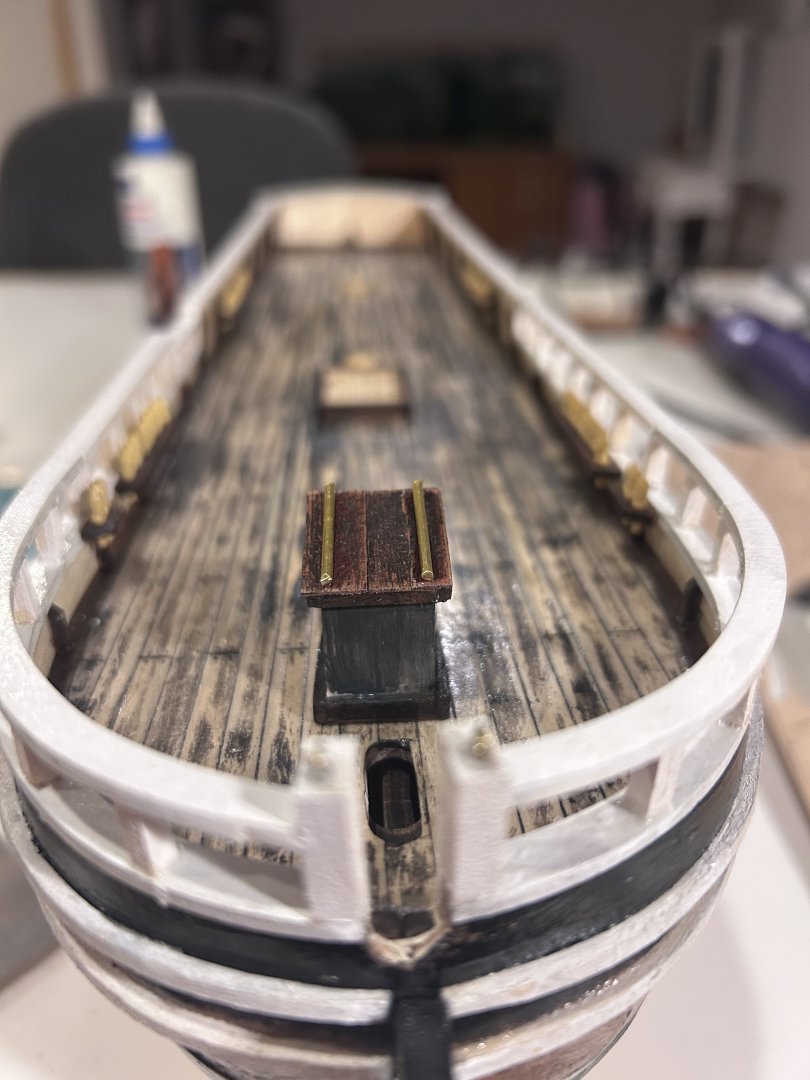
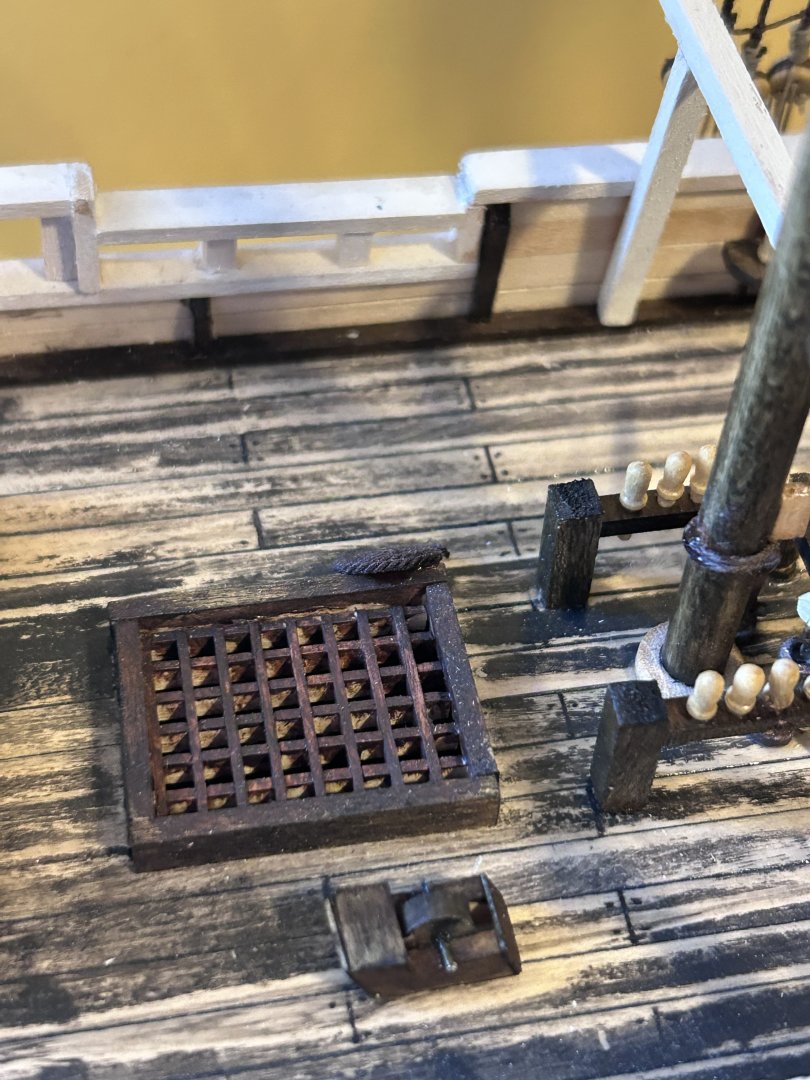
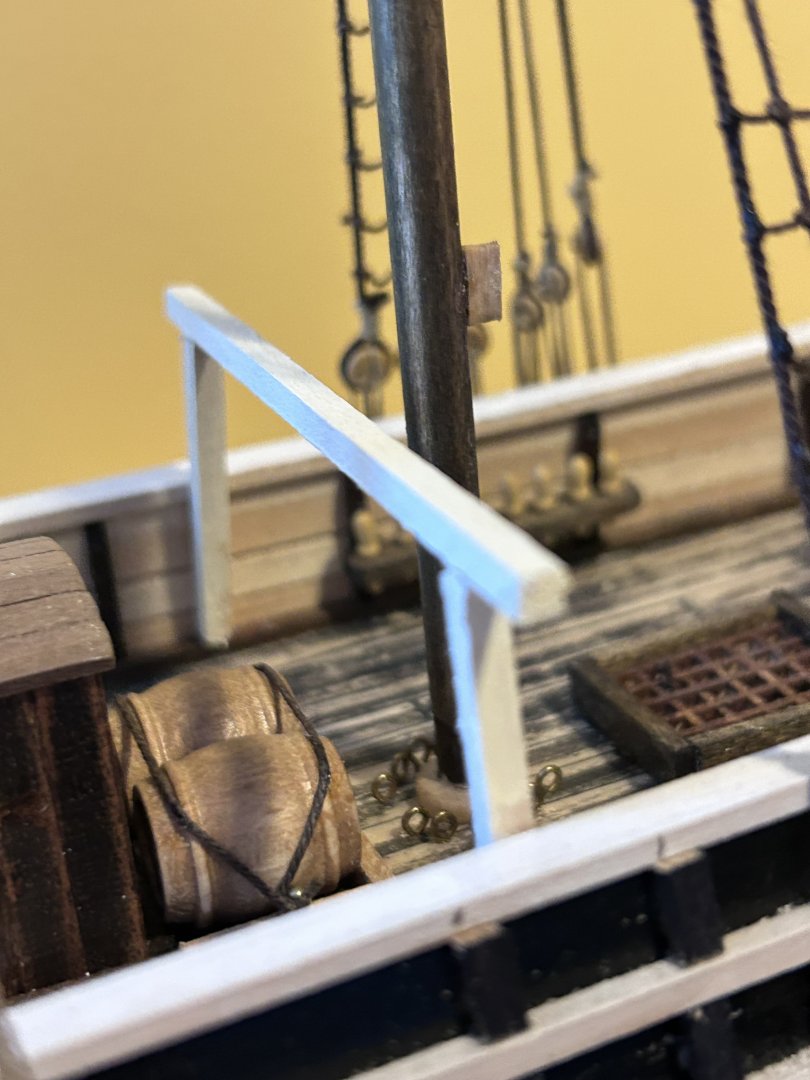
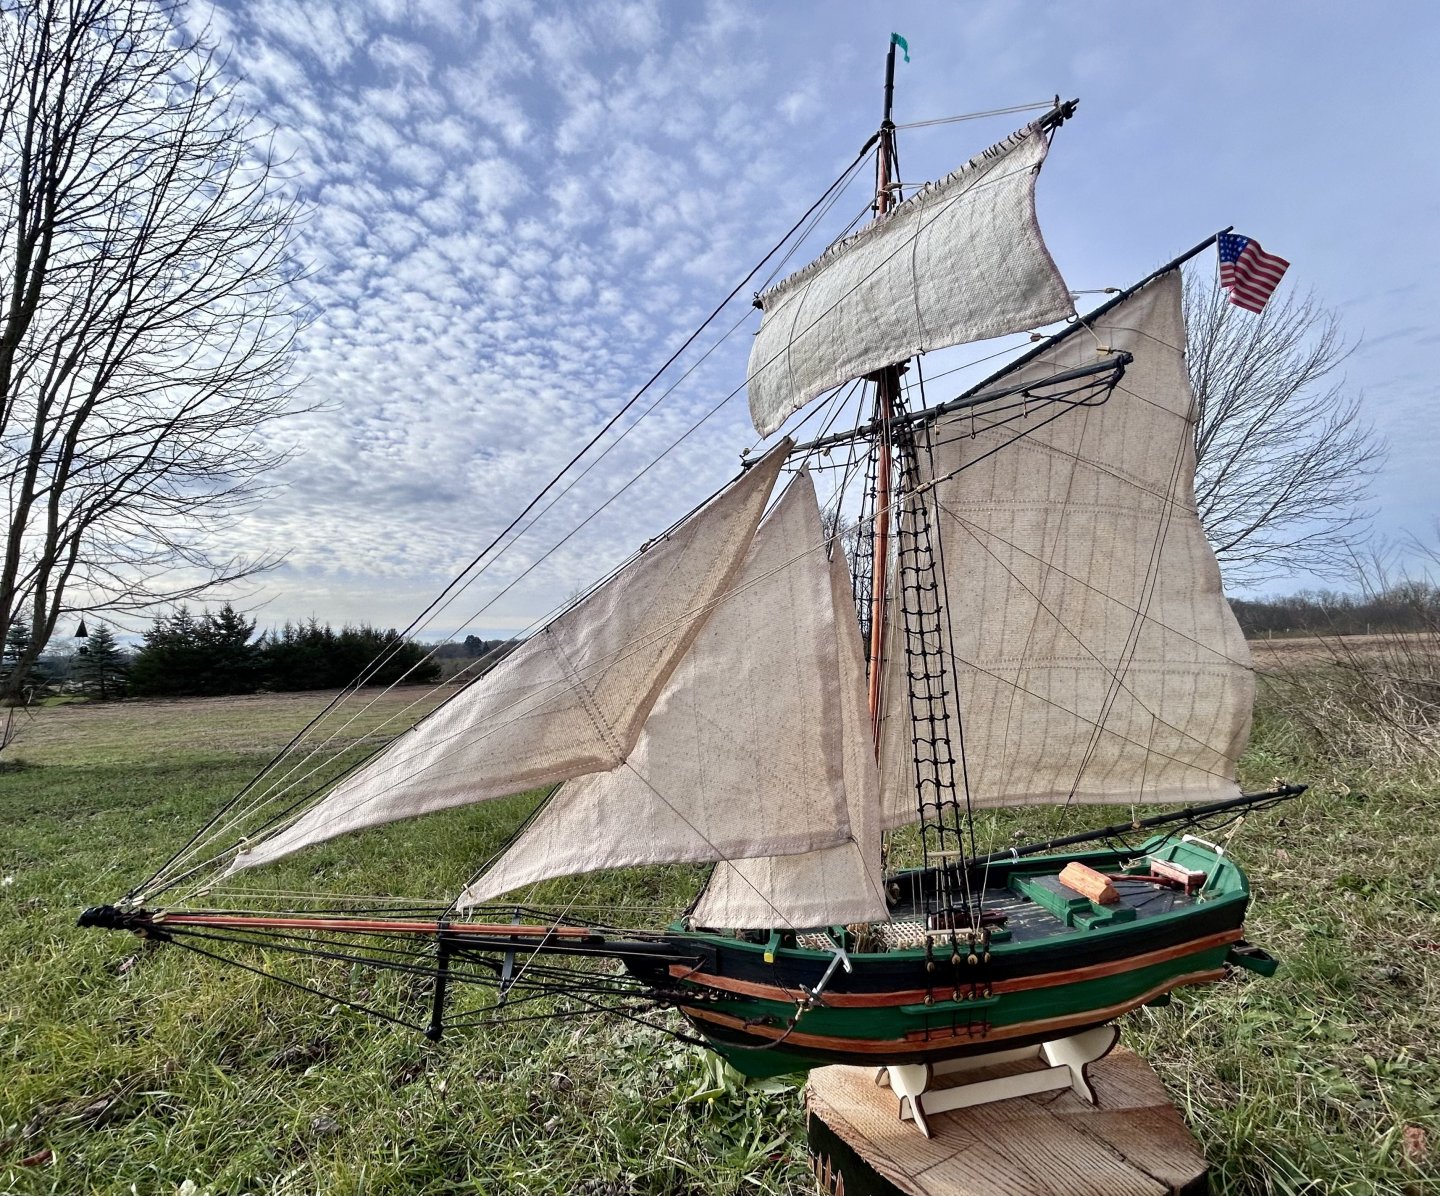
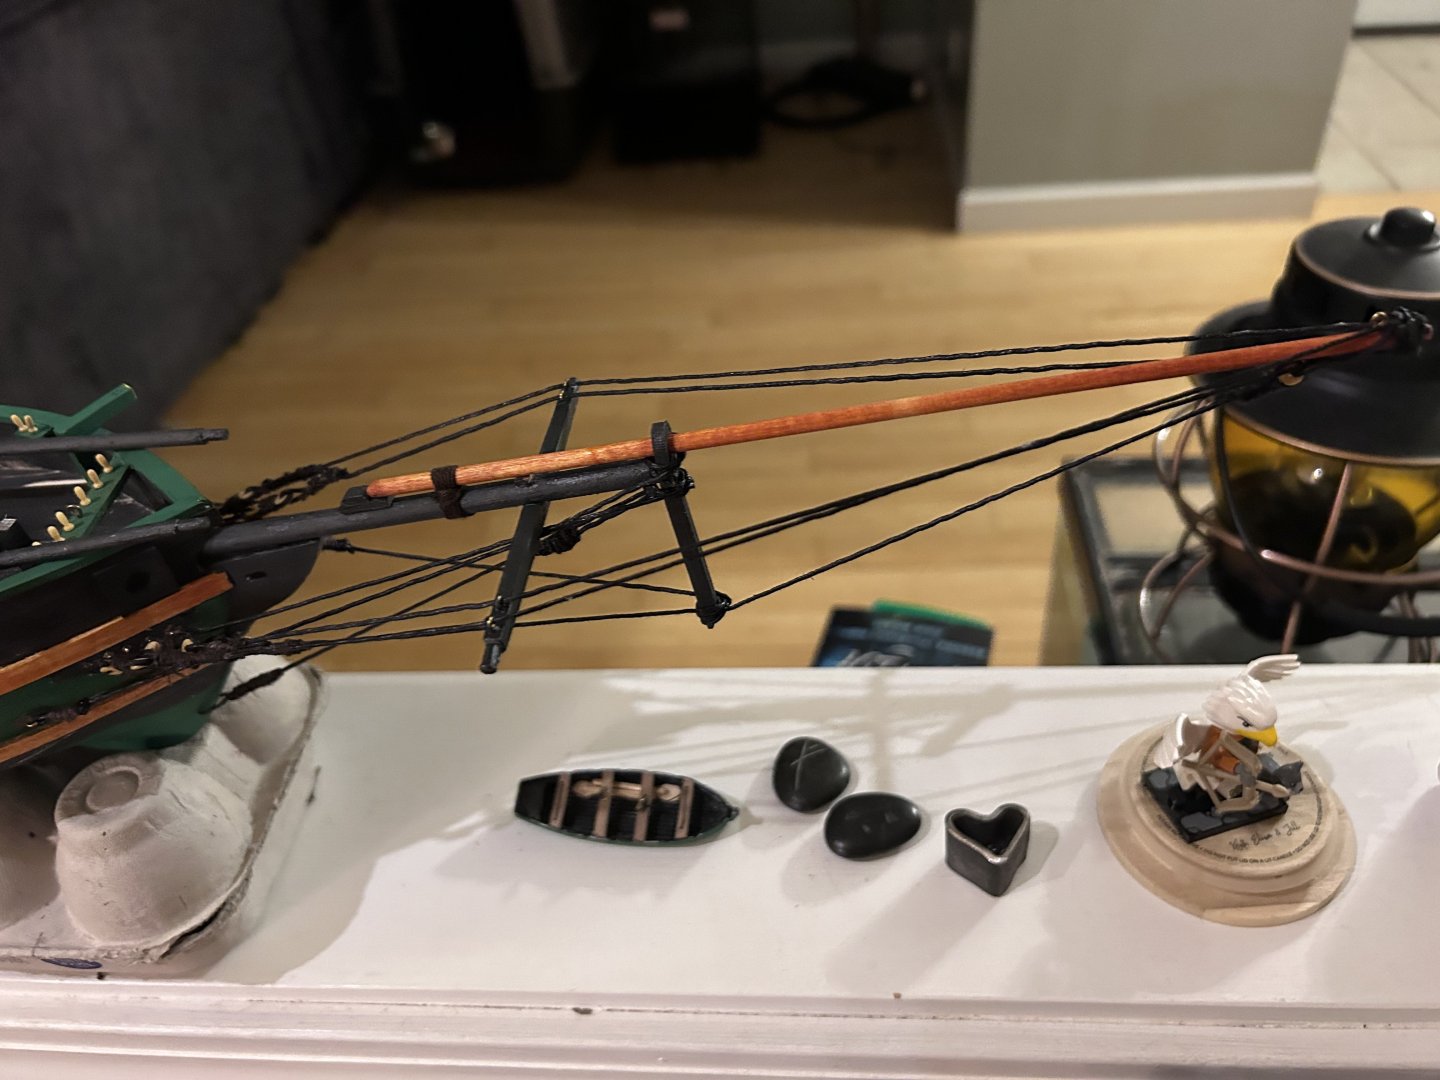
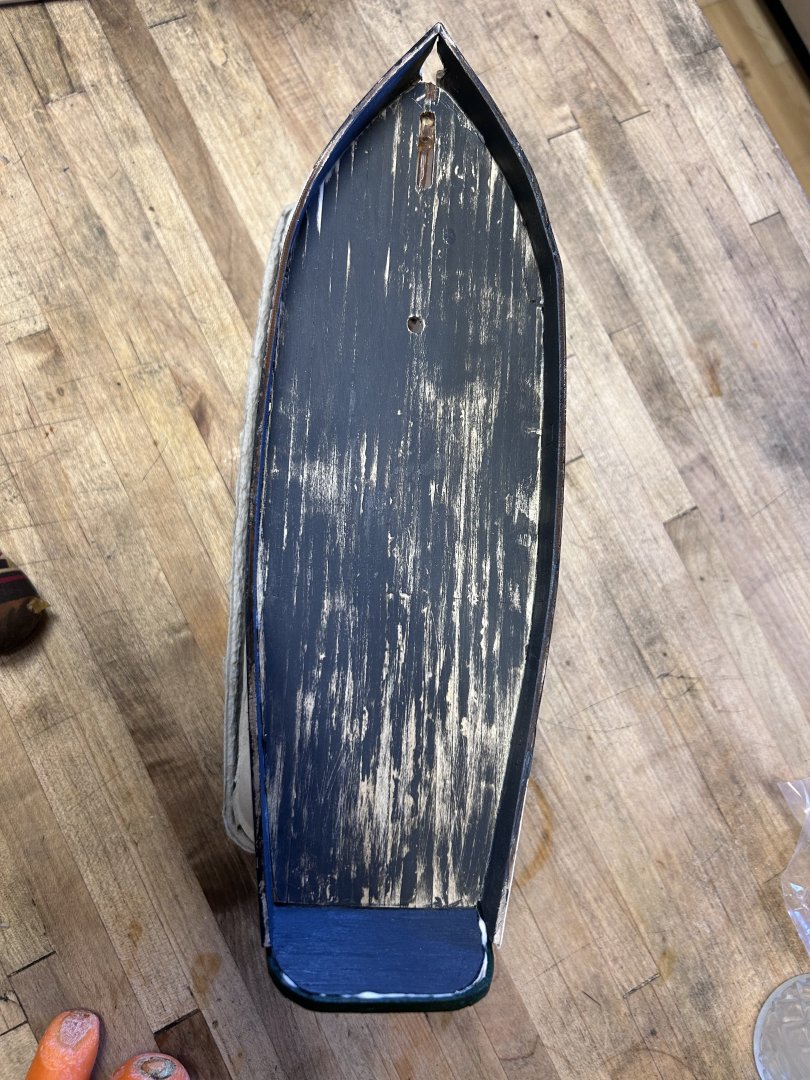
The first deviation is in the stern. After looking at the historical paintings, modern depictions (Heart of the Sea was a big inspiration), and watching videos from Home Harbor on YouTube, I opted for a different layout. This allowed for the eagle insignia as well as the placement of the name plate which, in this case, was made from some gold stickers. Finding the eagle was the real struggle, I bought a 100 pack of assorted eagle pendants online and the quarter style eagle ended up being the only one that fit… and so it became the eagle on the stern. You’ll also notice I added rudder chains that weren’t in the original build and while I know these wouldn’t sag this much on the real ship, again, I find the look of it like this to be striking and so artistry won over accuracy. Another change I made was in the tryworks. While the original style called for an exposed brick layout, I preferred the idea of a tarred or painted brick oven and so I went with that. Historically accurate? Probably not but it fits better with the aesthetic I’m going for. Next is the alterations in the deck. You’ll notice the weathering as I like to make my ships look as though they’ve been sailed for a few seasons rather than being the off the lot clean. My practical time on a ship then has shown me how quickly the paint on deck wears down so I think it has, once again, a nice look to it. In addition to this I made the decision of cutting an actual hole into the deck for the hatchway, I painted the interior black to lend a greater effect and depth. You’ll also notice the sharpening wheel and the coil of rope, again, for greater effect. I altered the wheel rigging as well into something functional. Now if I turn it the rudder will turn! Which I just found neat. Some barrels for texture. Finally I added a spritsail yard. The reason for this is, firstly, aesthetic, but also because in a great many of the paintings of the ship the spritsail yard is present (and once again it offers more line texturing so it got included).


-
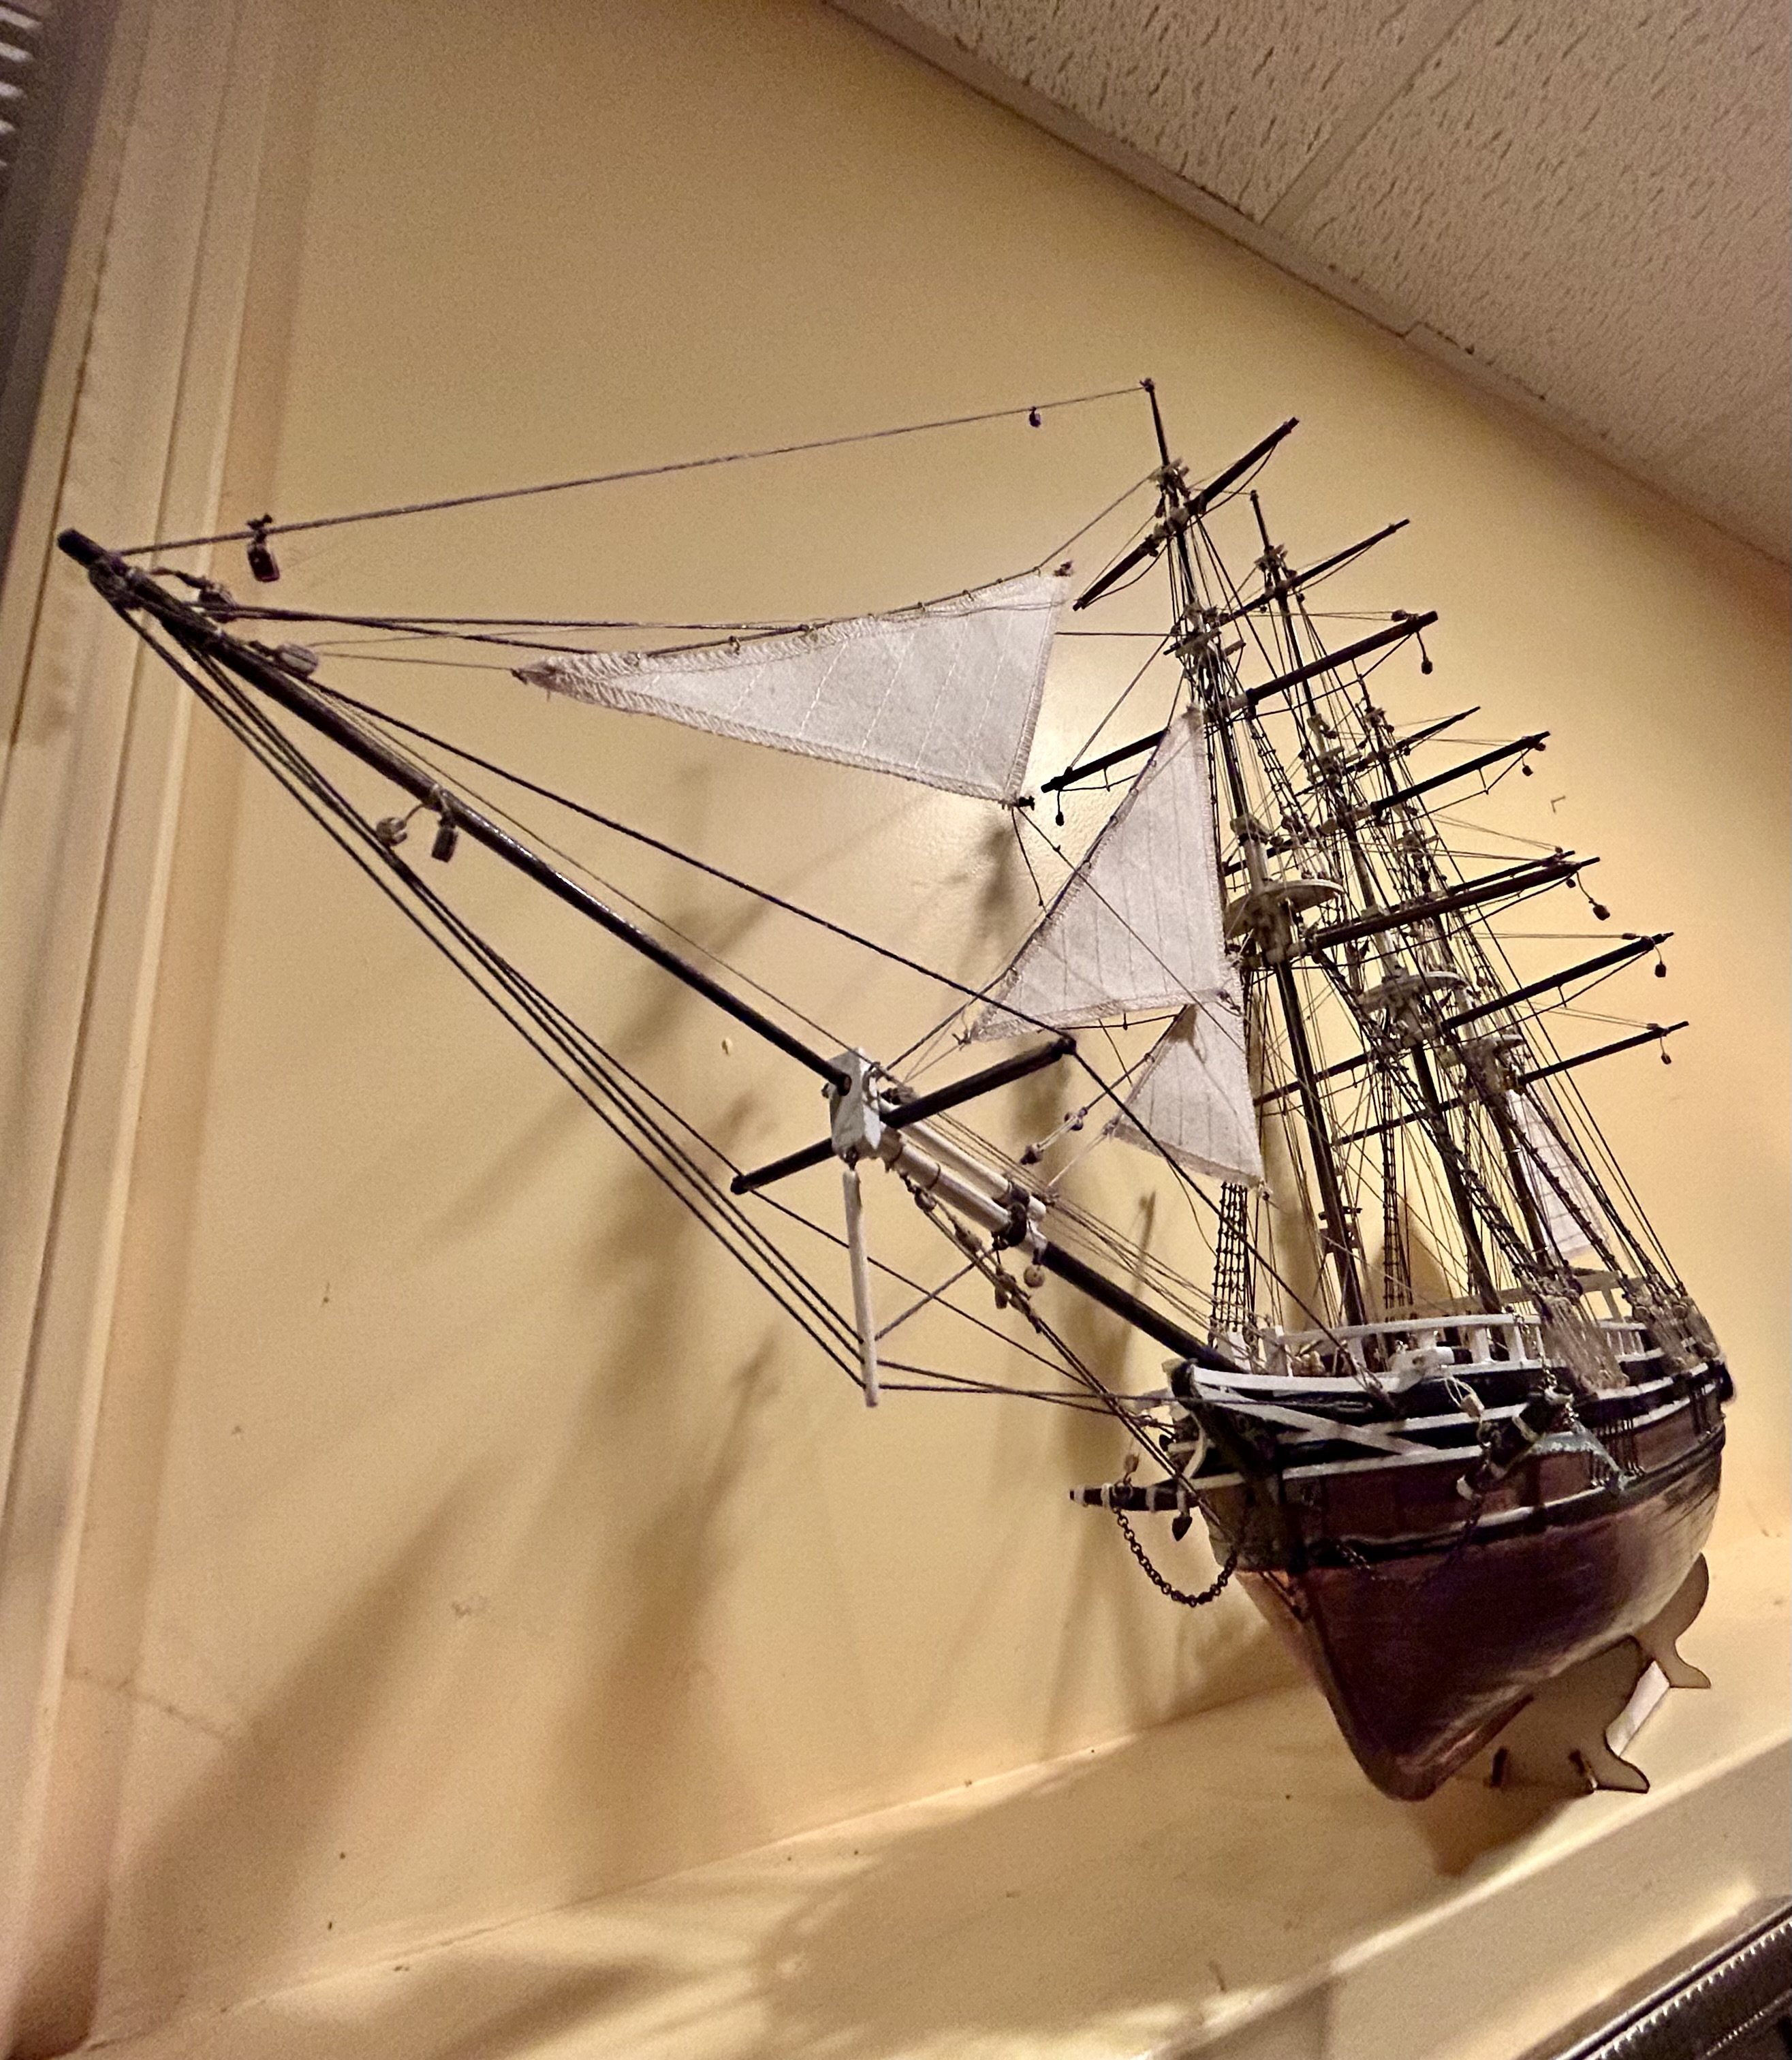
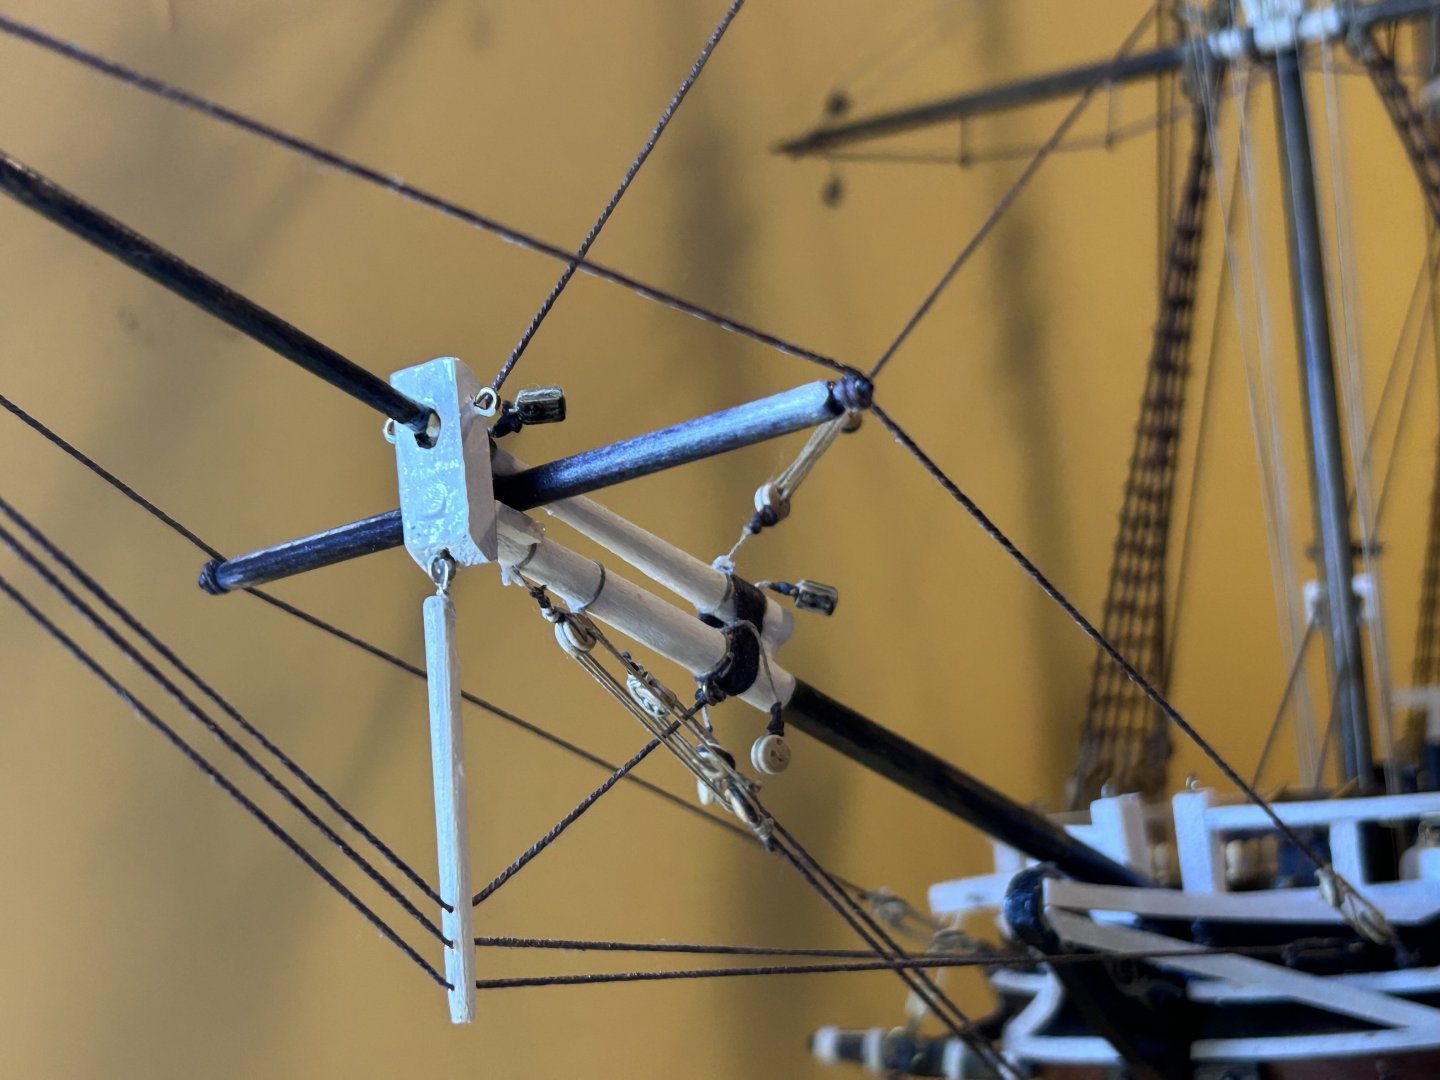
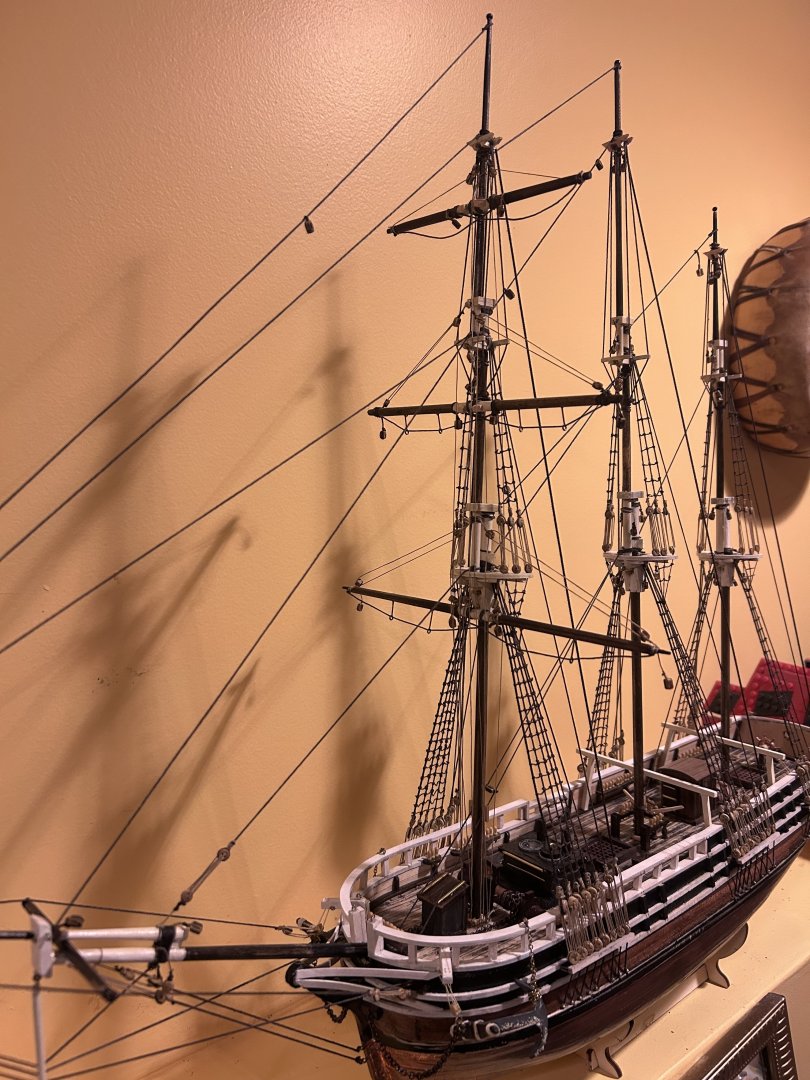
This is more a “final lap” type of post as I didn’t start it when I began the build but rather here during the final stages of getting the yards, rigging, and sails completed. Fortunately the rigging is where I think it all comes together. One thing I learned in this build was the history of coppering and so when learning about this I needed to add this as a feature as I think it adds a certain pop. This is a bit of a deviation from the build recommendation but as I refuse to pay the 50 odd bucks for the Occre paint I think I prefer it. That being said I didn’t go with the more accurate planking version but rather settled for applying it, at times unevenly. Does it look as good as if I applied the rivets and such? No, but it doesn’t really bother me as the overall effect is striking and it’s only upon close inspection that anyone would notice (and even then the only ones who would notice would be other shipbuilders). Next post will be the major deviations and modifications from the kit as it’s intended to be built.

-
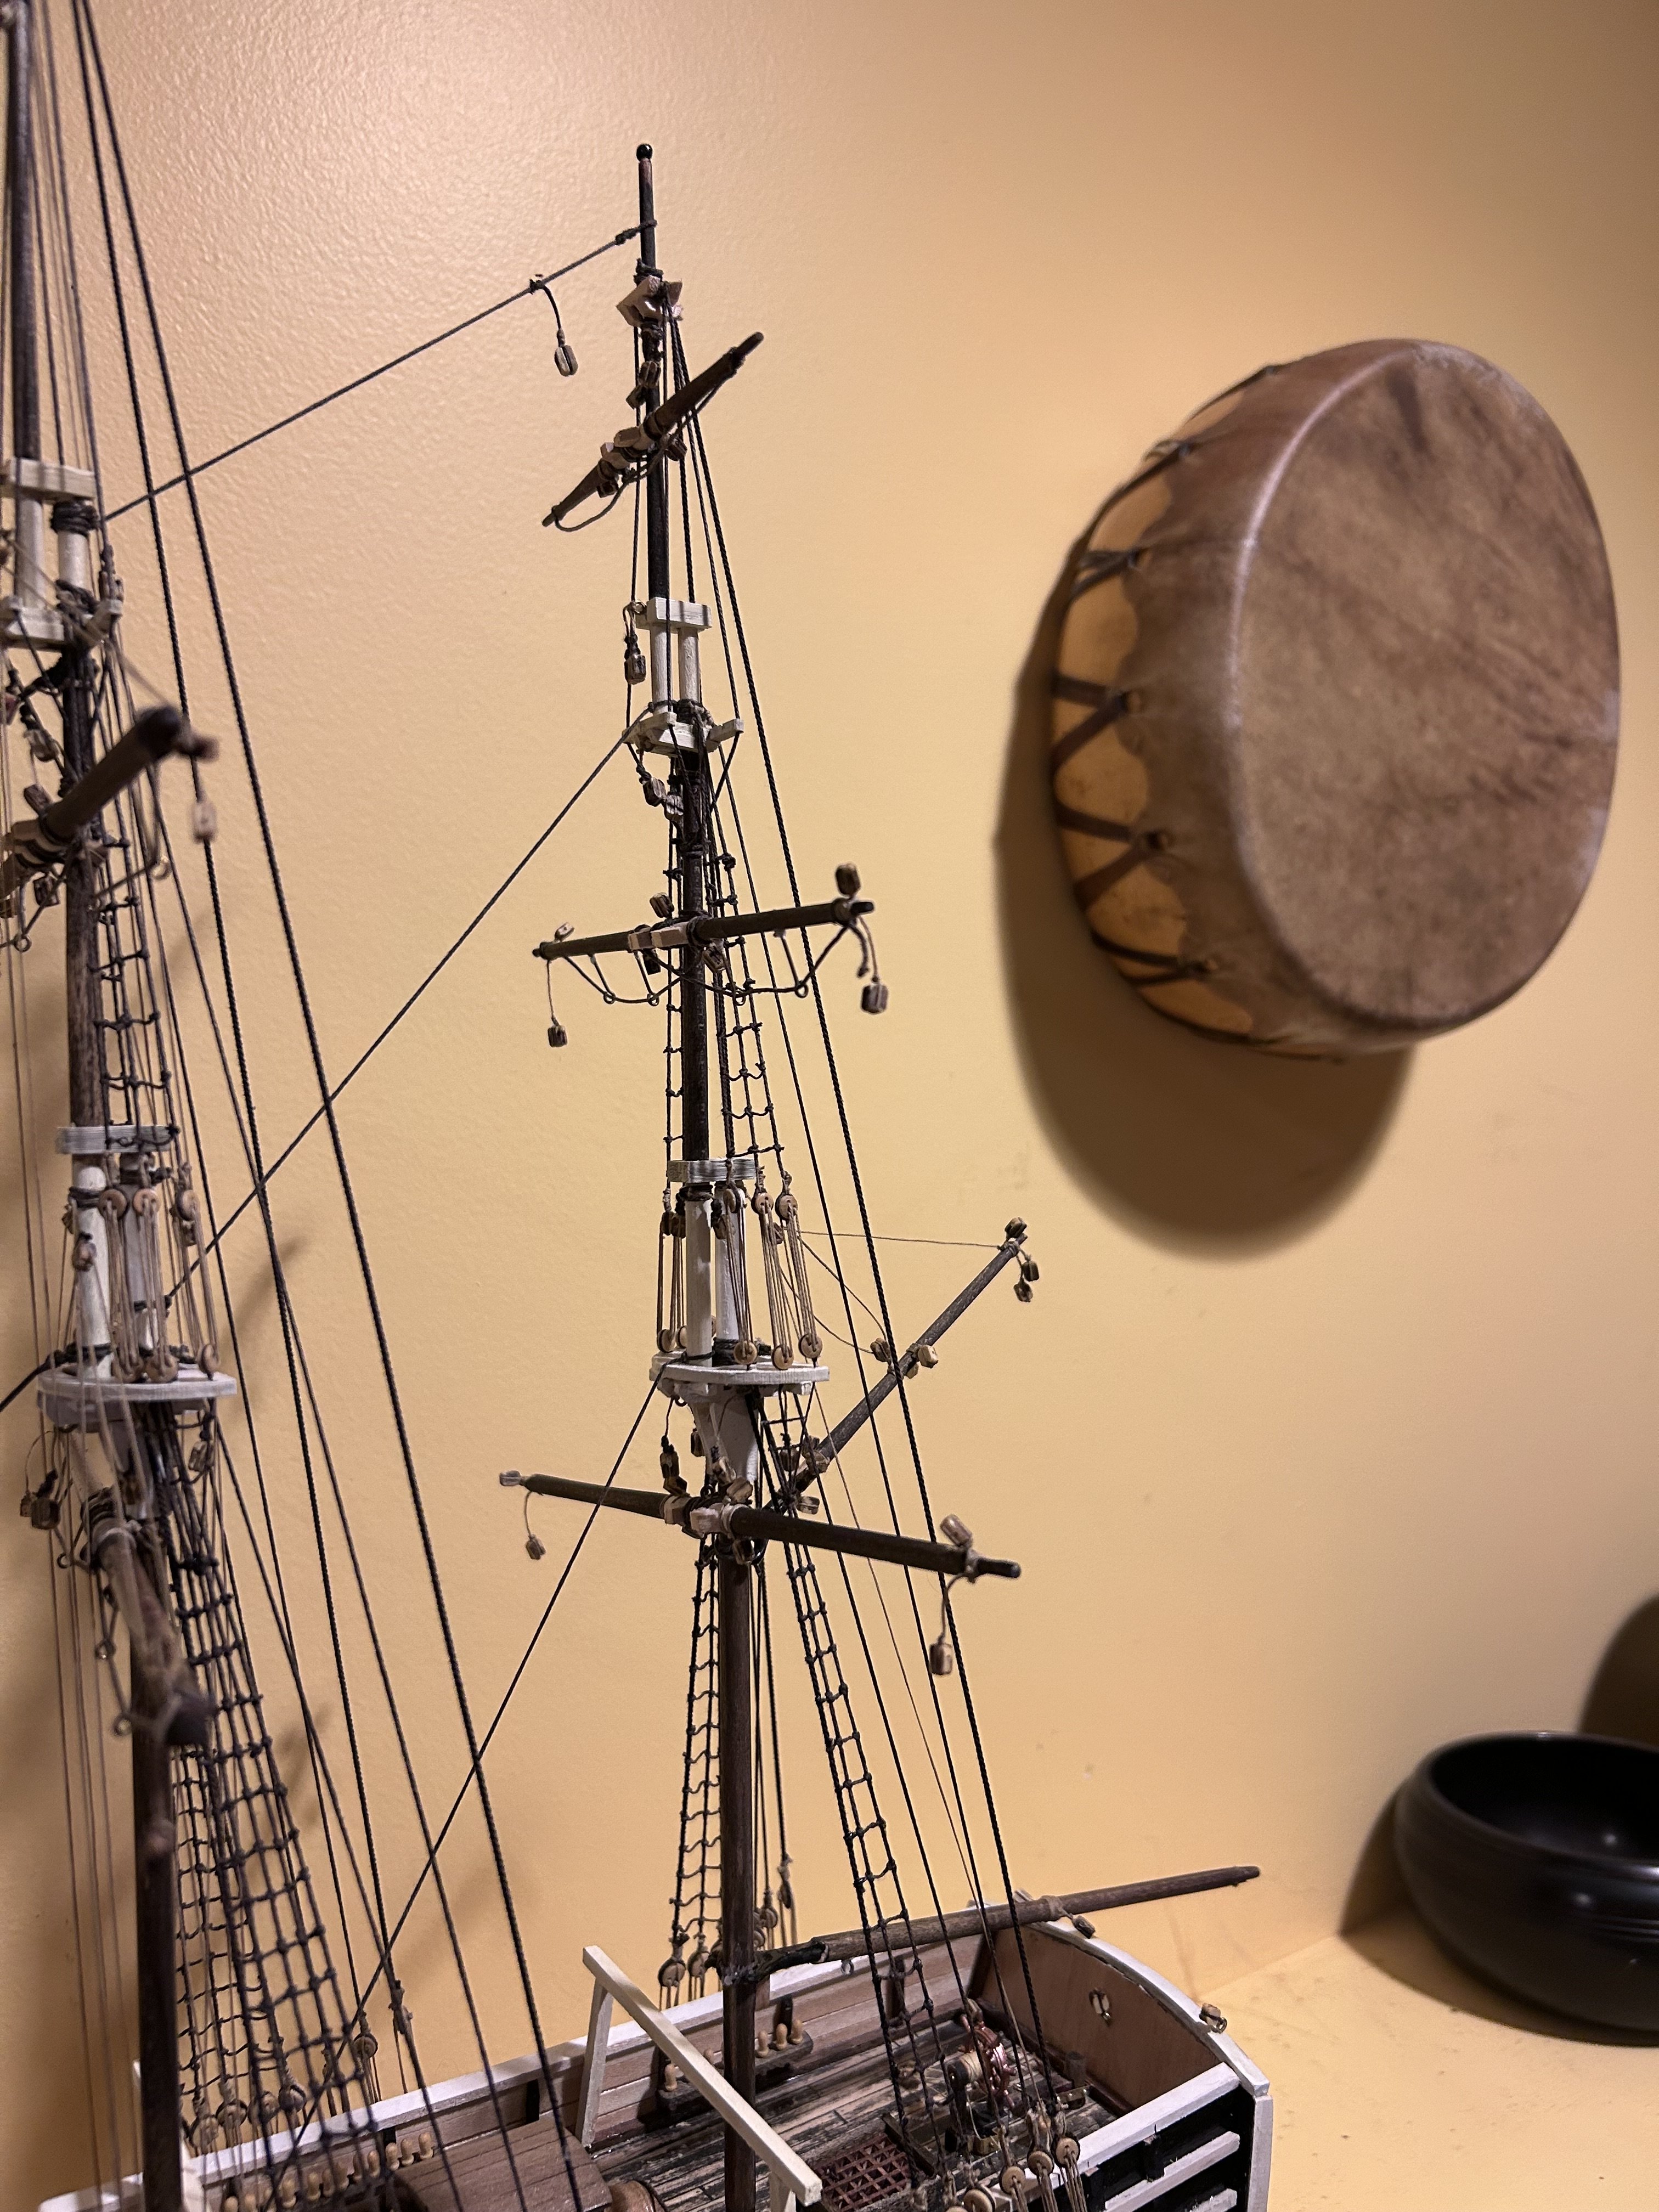
As a final note the rigging is, to the best of my ability, accurate to the original and would be fully functional if allowed to move.
-
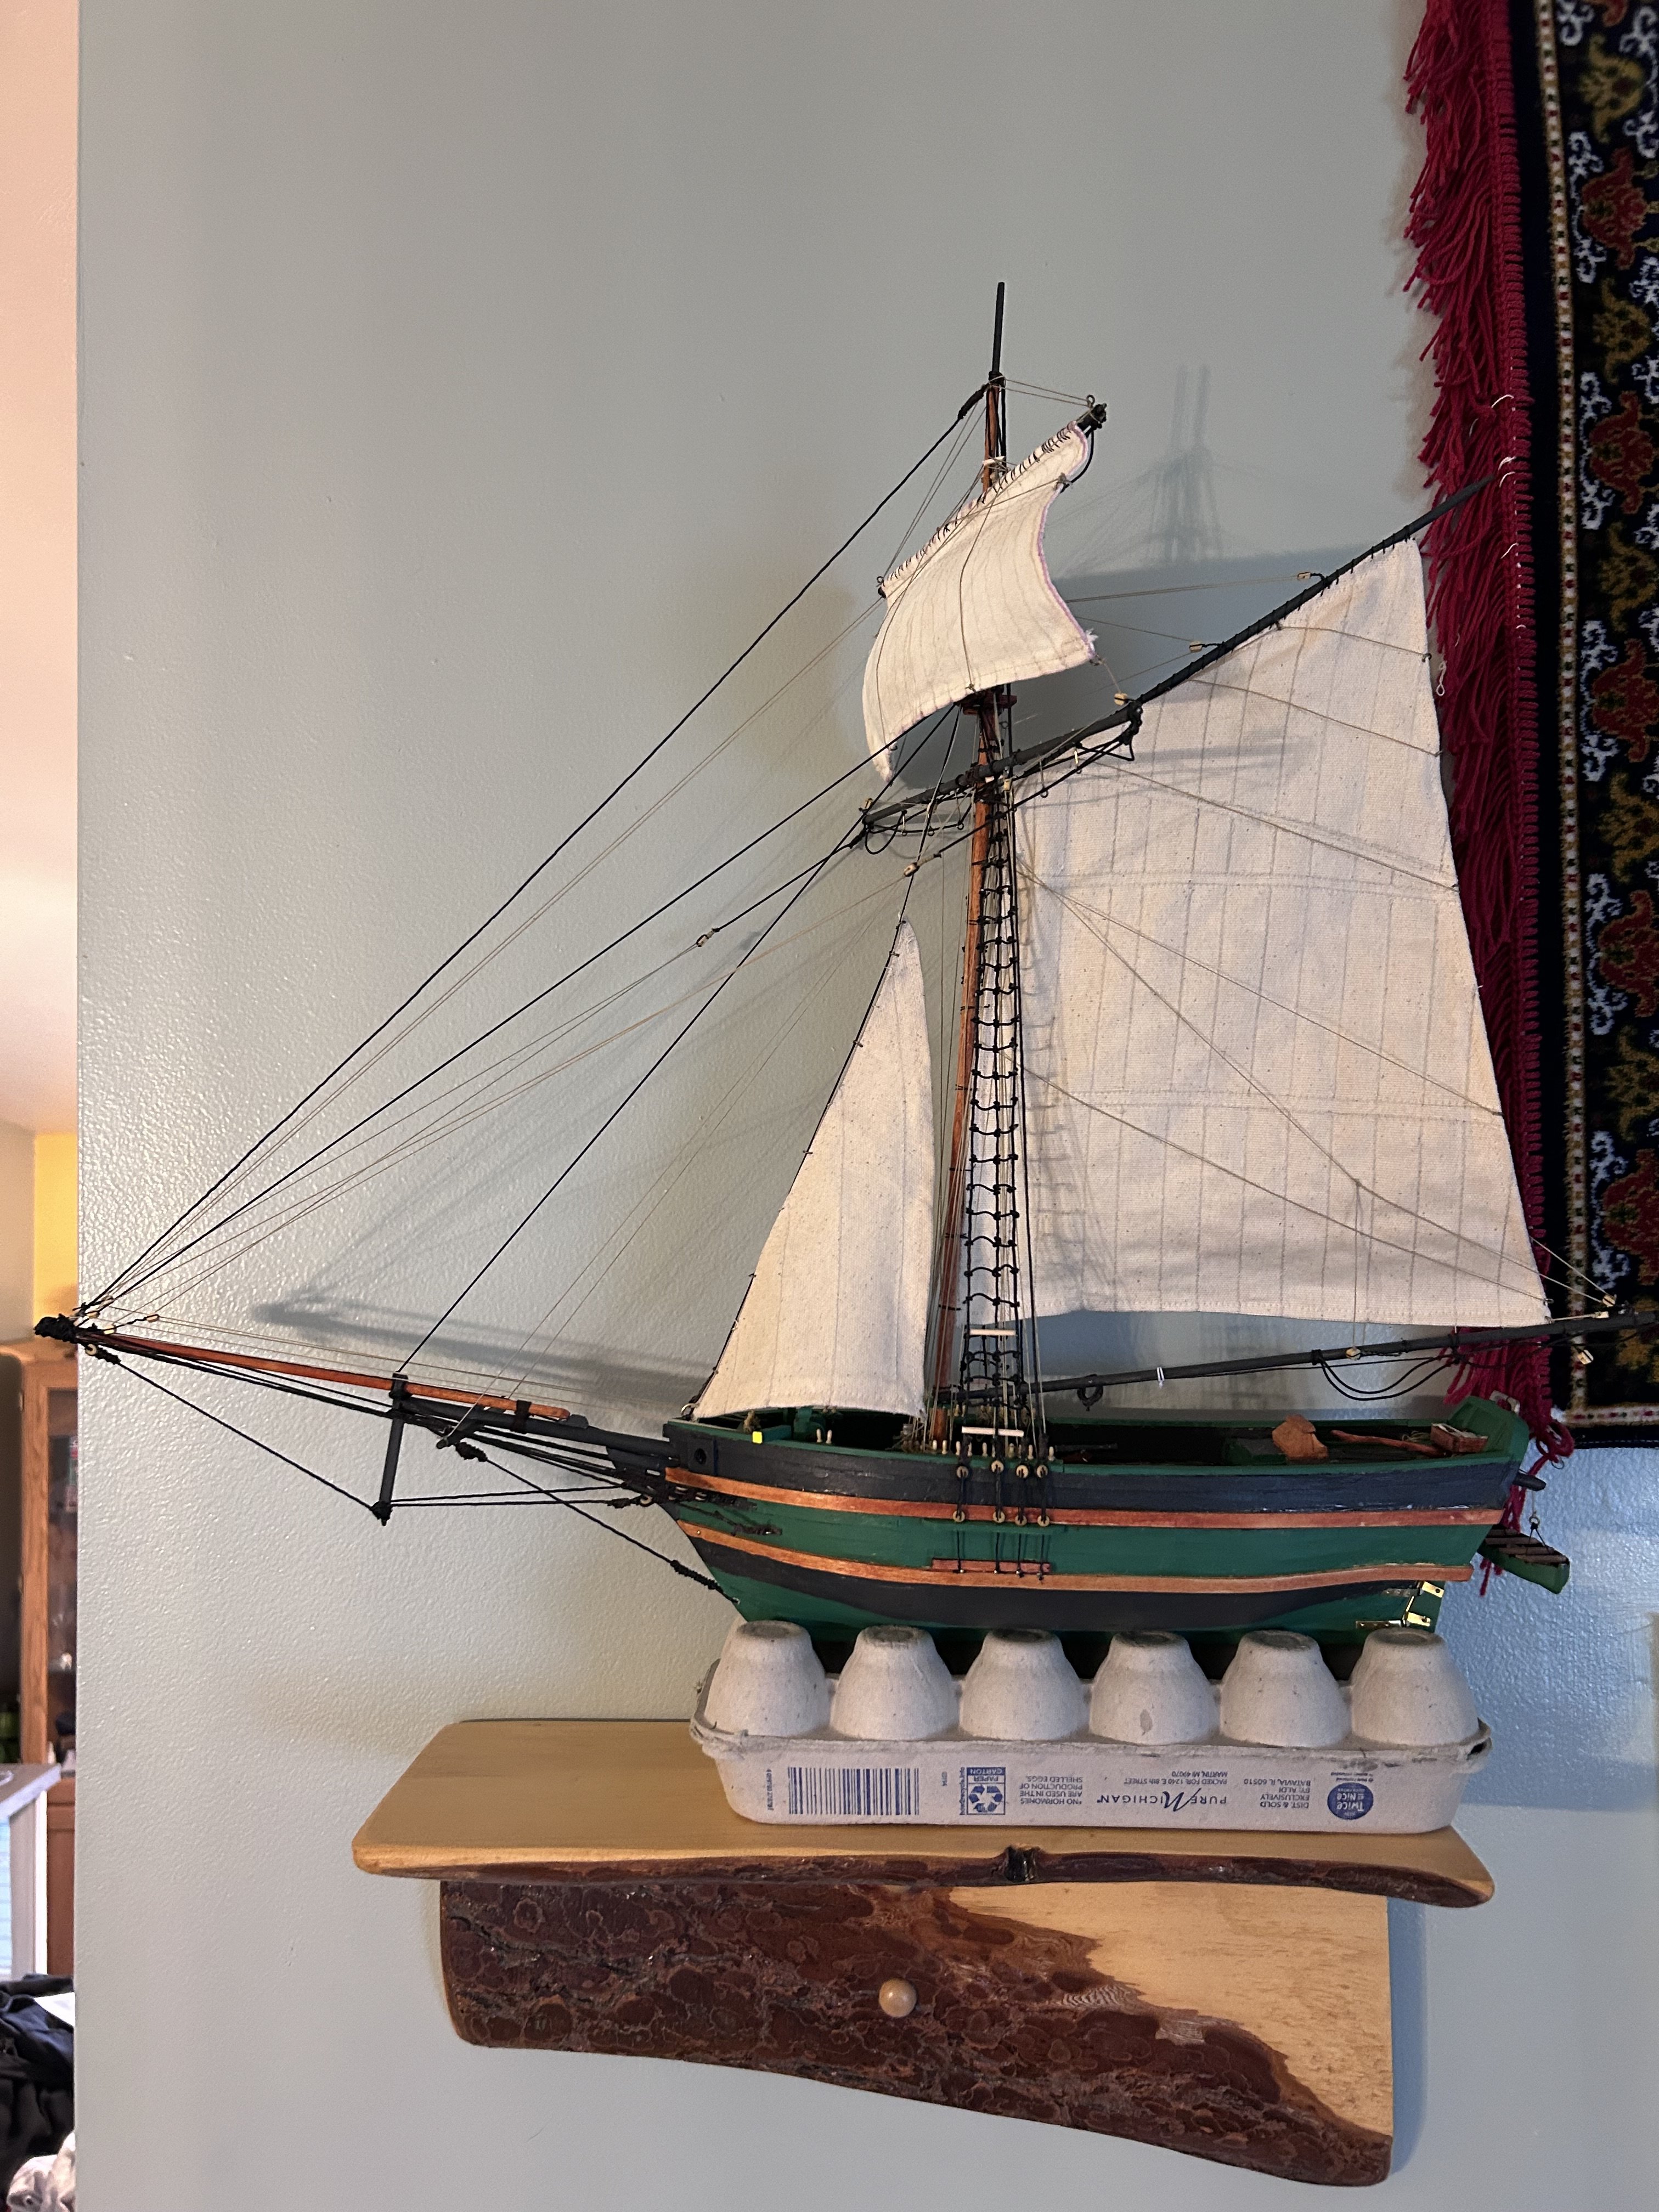
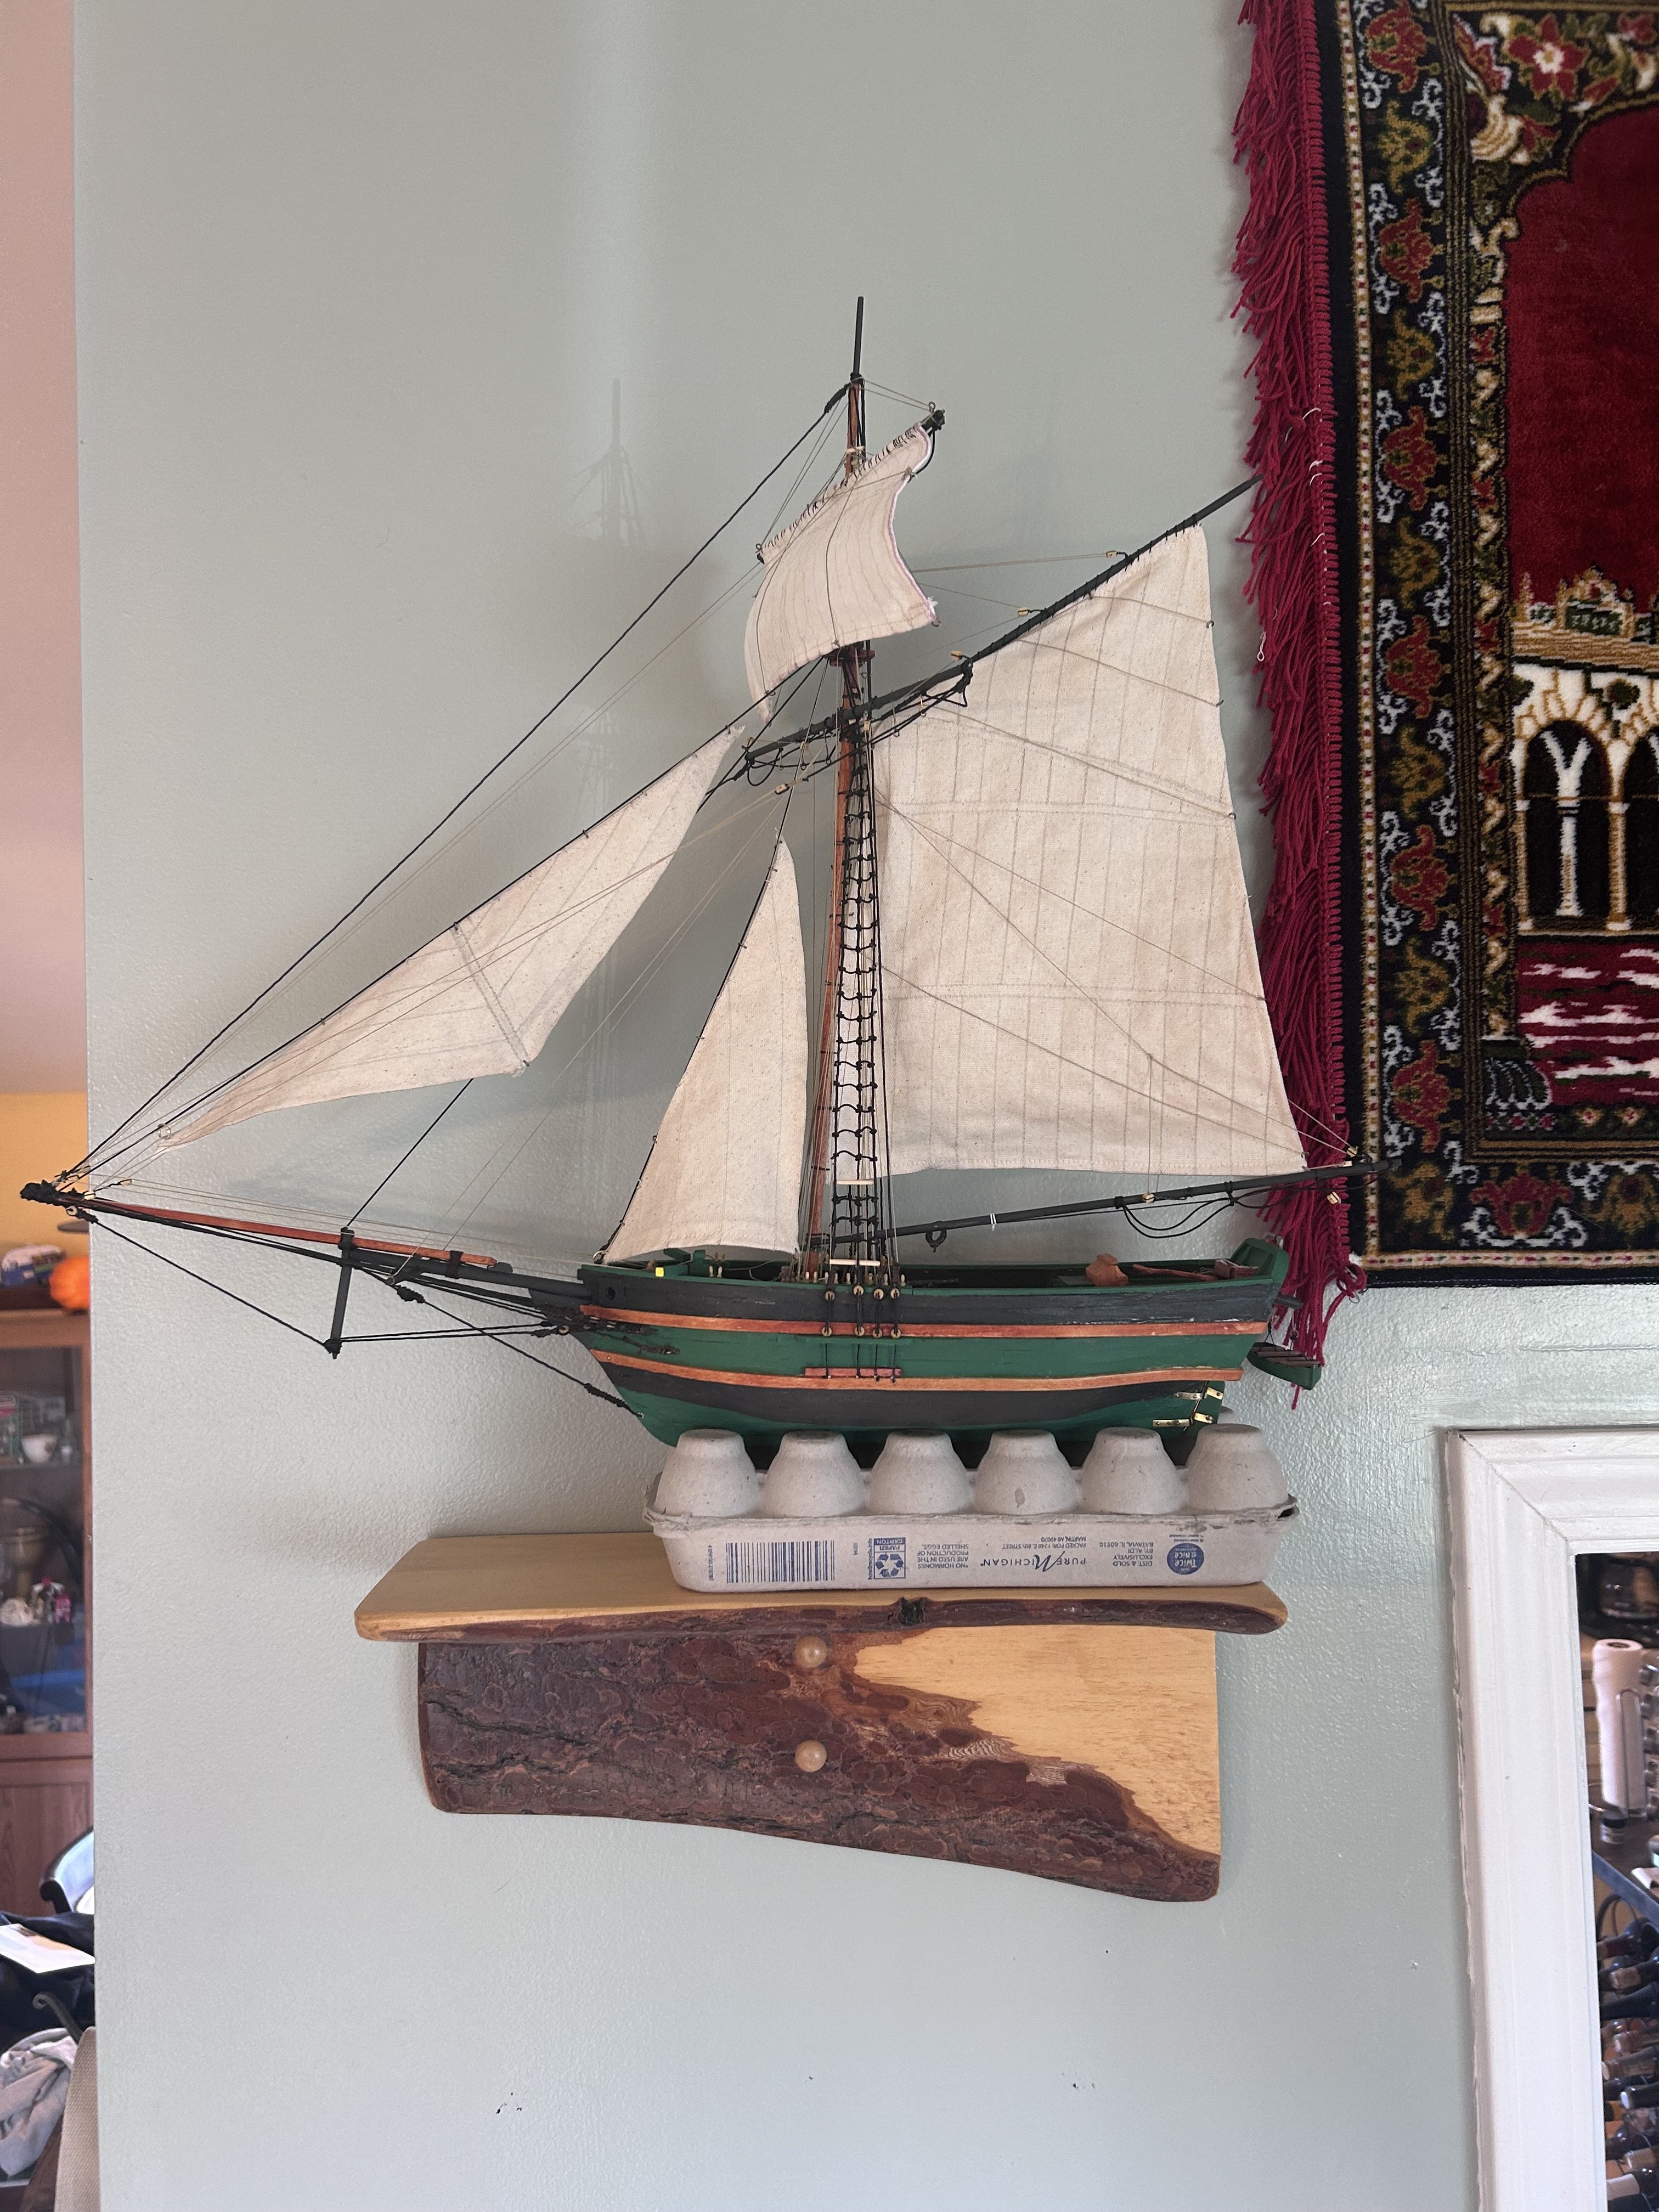
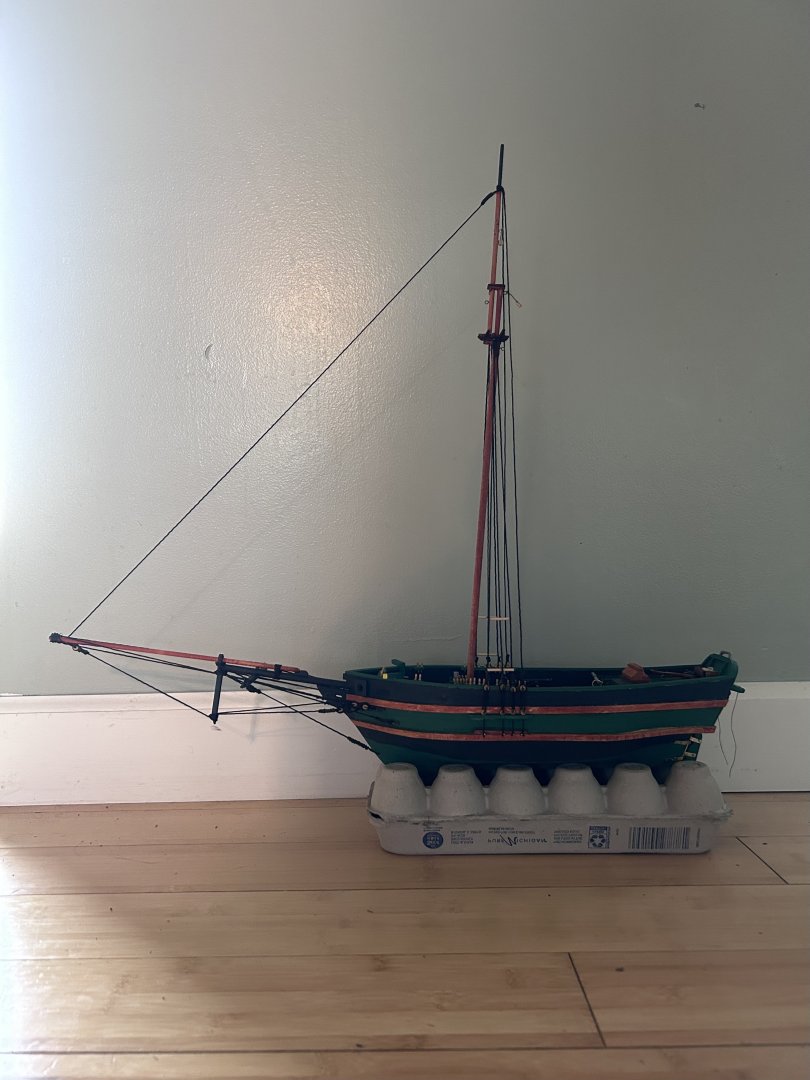
And finally we arrive at the rigging and sheets. From the top, main, and staysail. To the outer. And finally the inner. These properly scaled sheets were made for me by a friend who recently passed from a sudden heart attack. I’m grateful to her for this gift and it’s a nice way to honor her memory to have it included in my finished model. As I said at the beginning, I completed this model in November of 2024 and it stands as one of the best pieces I’ve done in terms of lessons learned. The ship is mounted on a piece of retired topsail yard from the original ship which I feel gives it a little extra personality. Thanks for reading along, next time I’ll have an actual log to follow along with as opposed to this log which has been retroactively reassembled. Im currently in the final stages of the Essex with the Endurance sitting and waiting to start.


-
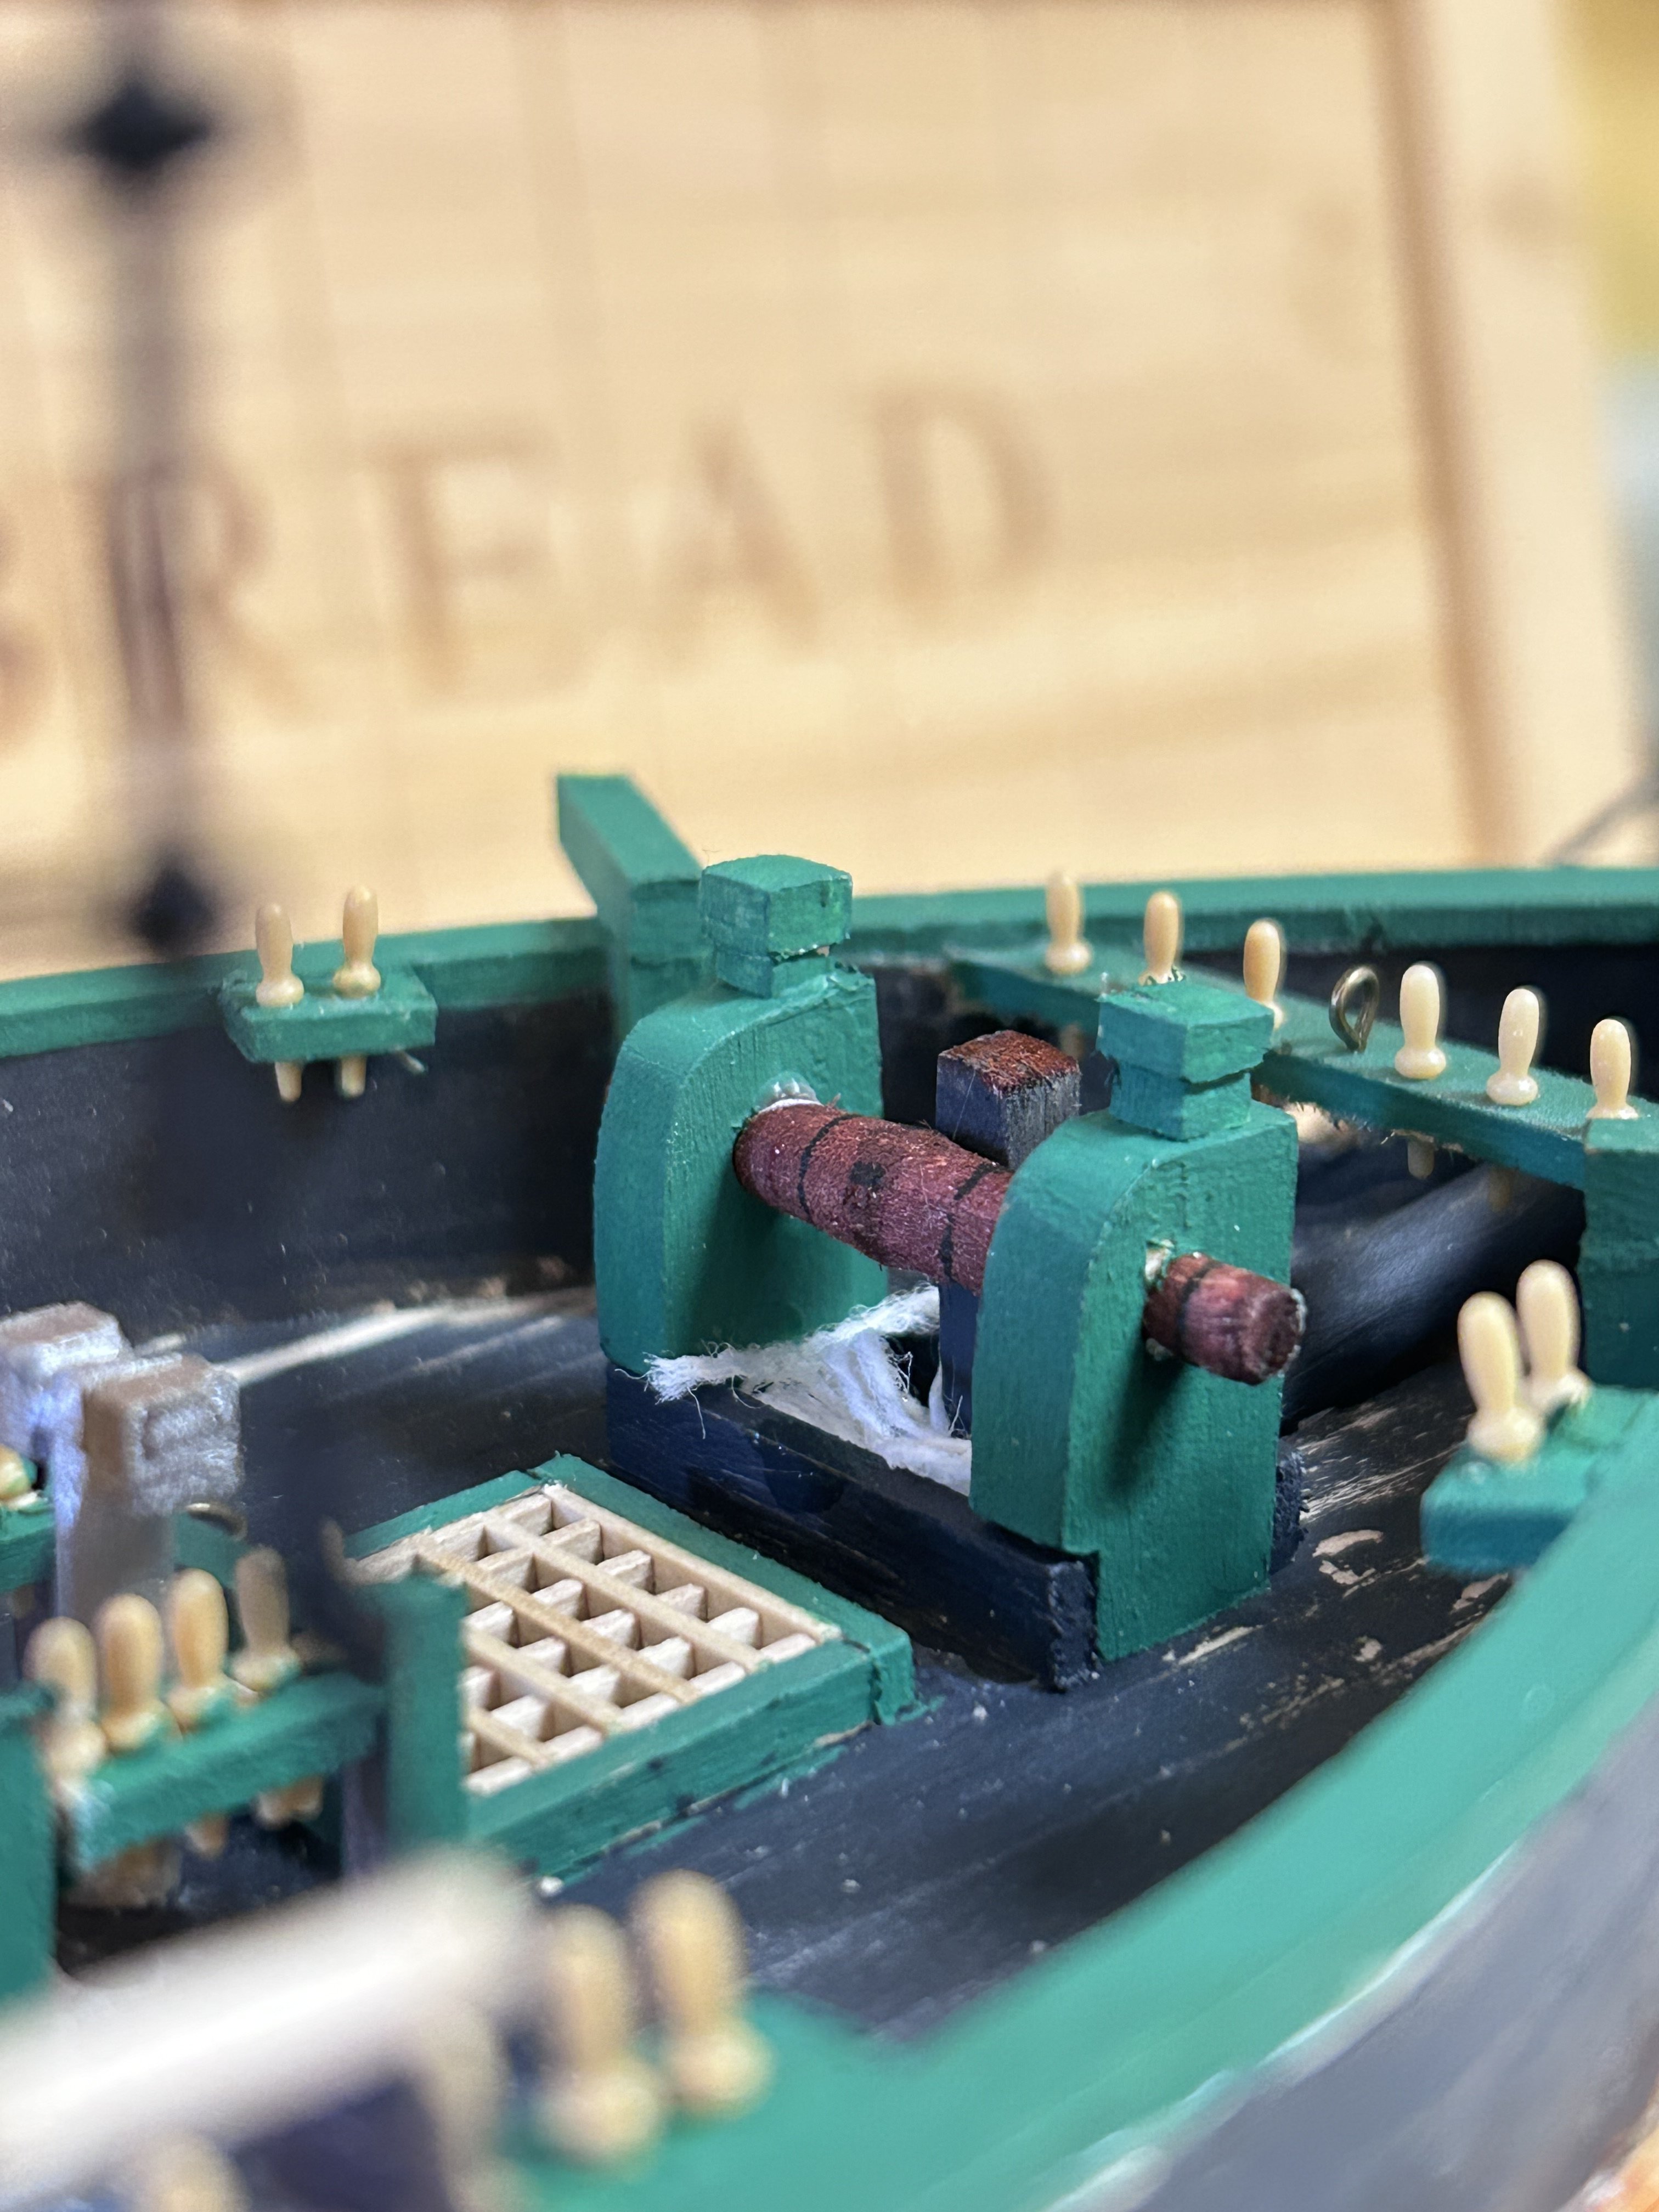
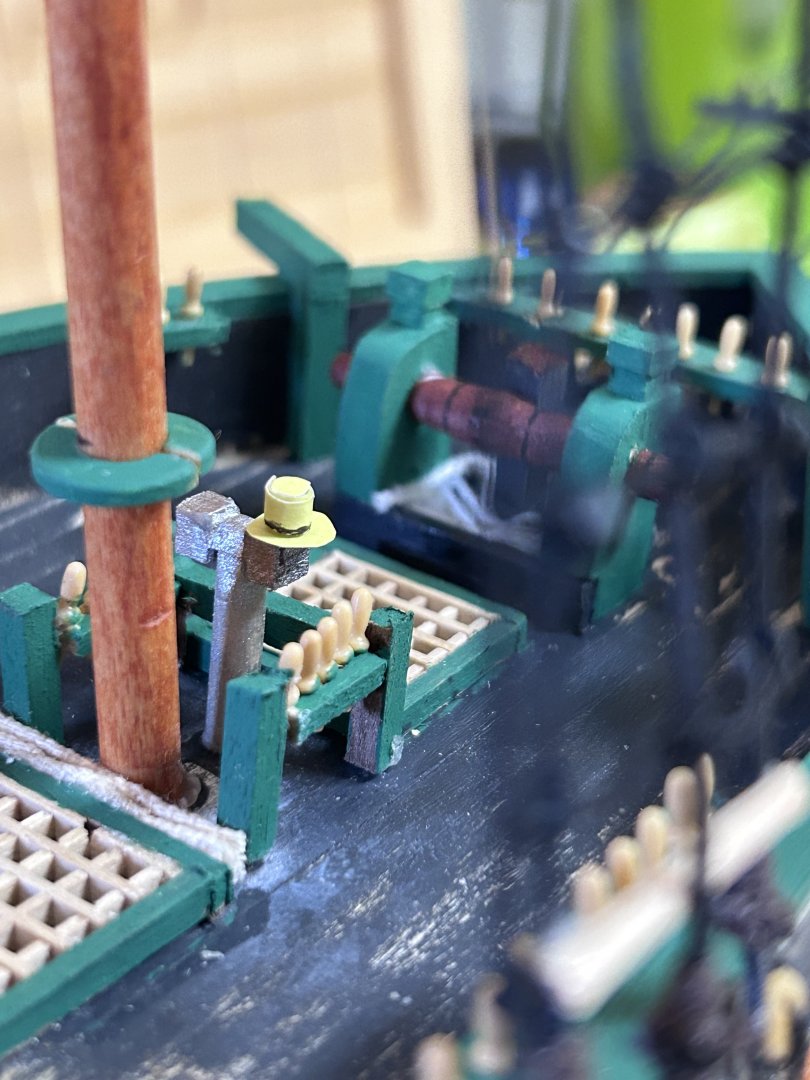
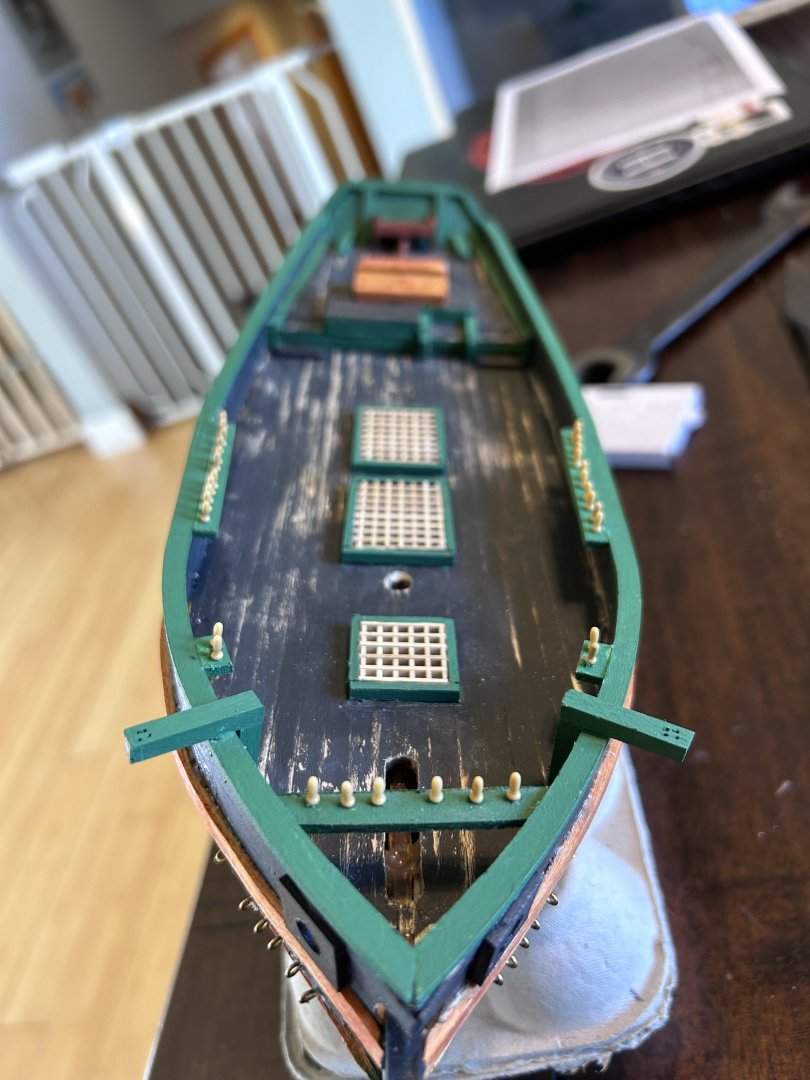
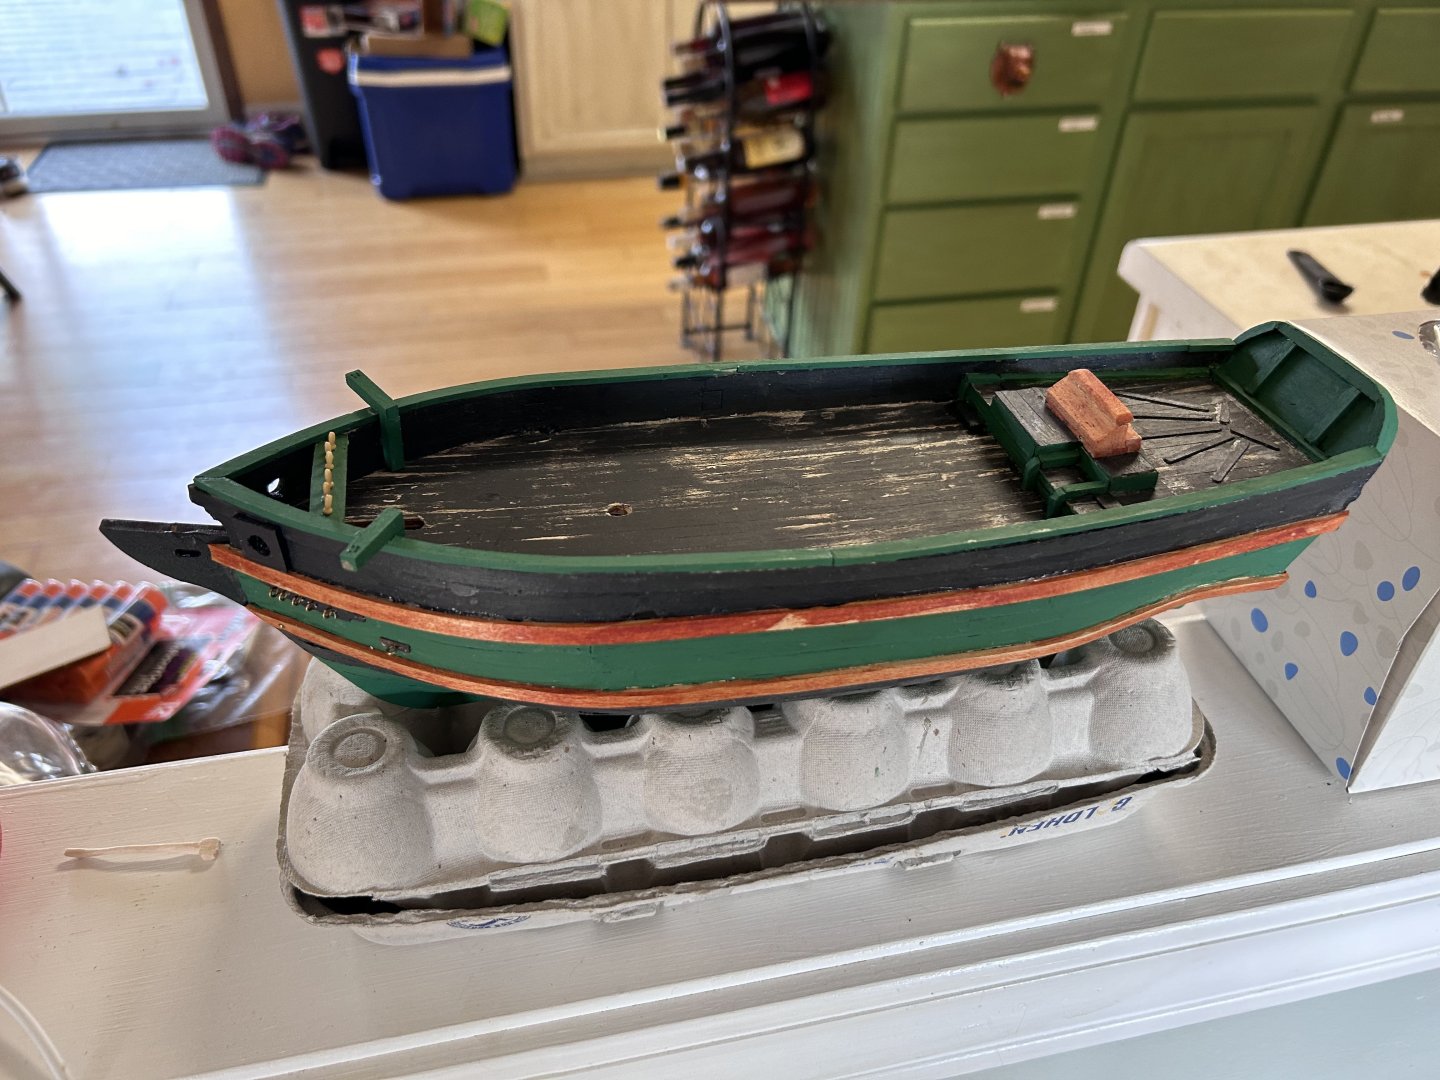
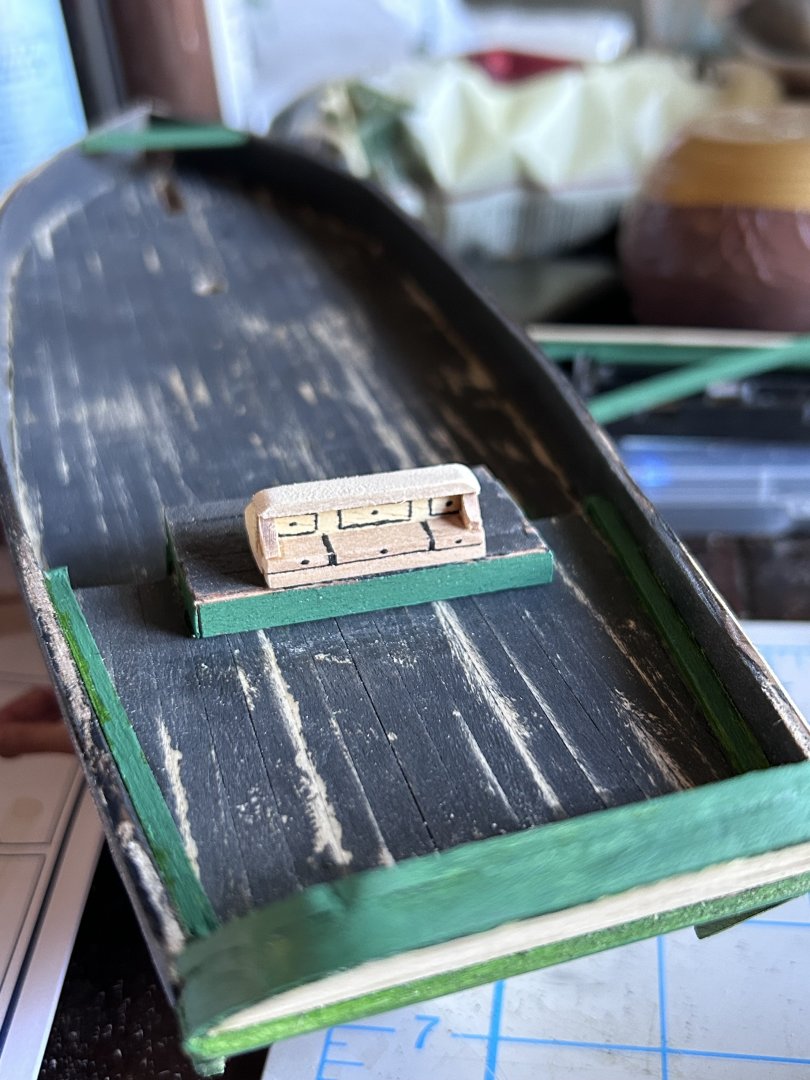
Deck detail. So first up I had to create a windless that matched the style of the ship’s while also maintaining the scale. This was the result. Other than it being a little taller than the real life version it stands as a faithful recreation. And what model would be complete without a few nods to friends. The friend who made my jacket regularly leaves his hat on the ship’s stovepipe so I wanted to throw it in as a little tribute to him. Finally we have the ship’s name plate and the small boat the Little Belt. While the recreation has an inflatable dinghy on the rear I, of course, wanted to spring for something a little more authentic (and make use of the small boat included in the Albatros) Much like the ratlines this is another one of those things that sits on the to do list to be redone at a later date with gold sticker letters.


-
Having the boatswain as a contact in my phone also proved immensely helpful. And thank you!
-
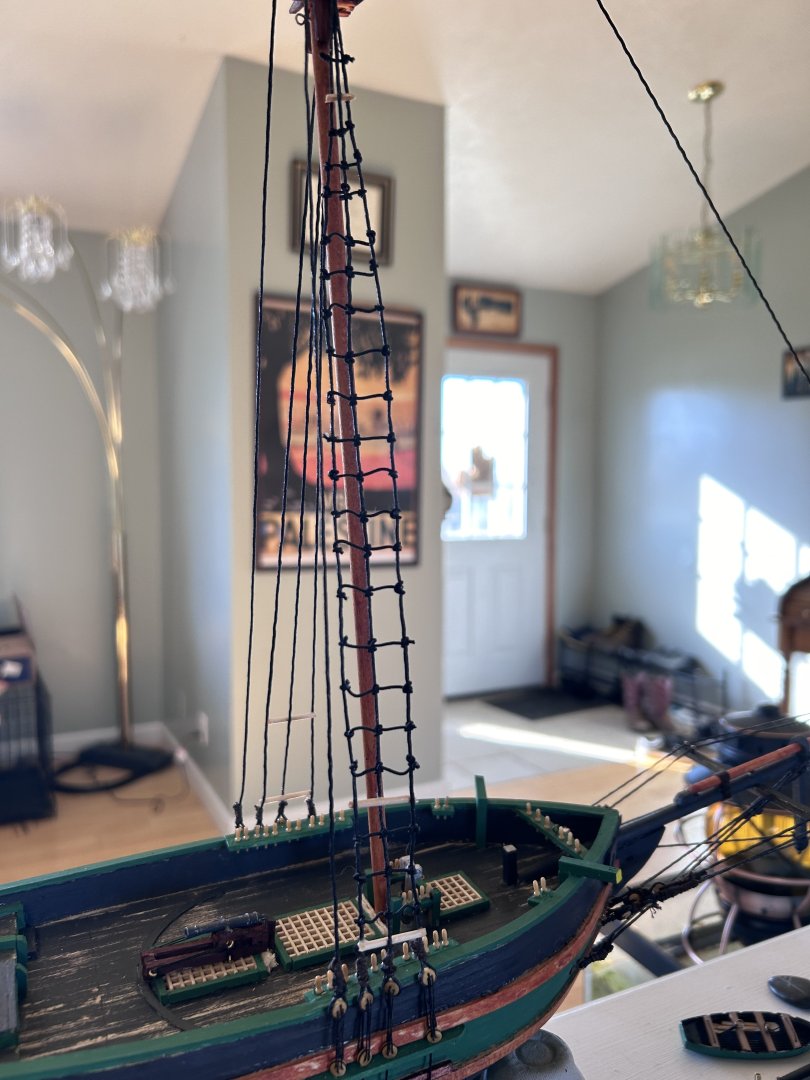
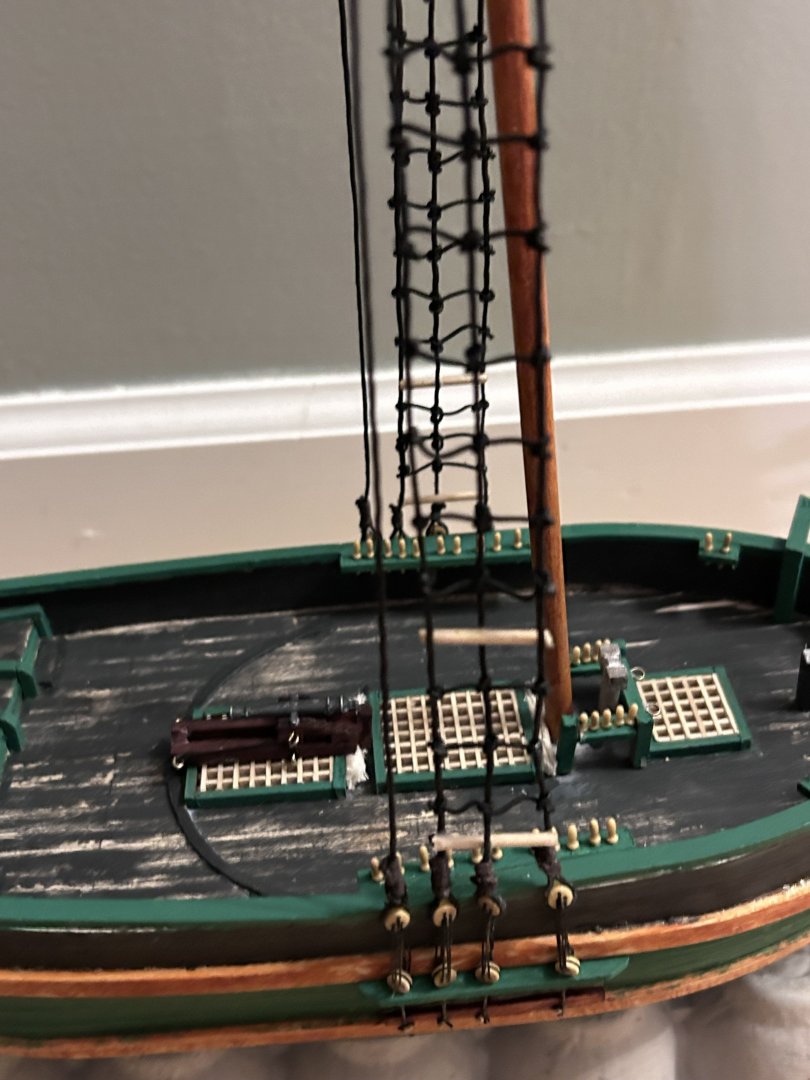
Alright, now time for the confession. This bit contains my biggest goof up and that is the use of an elastic like on the ratlines. As I realized too late this puts too much tension on the line causing it to twist. I ended up using toothpicks here for the lower wooden rungs on the ratlines. Yeah… ugly. I’m still not totally happy with this and one day I’ll likely go back and fix it but I just need to will myself to cut down the rigging and start over… which is easier said than done. With the rest of the rigging and sheets in place though this problem is not as noticeable as you’ll see in future comments.
-
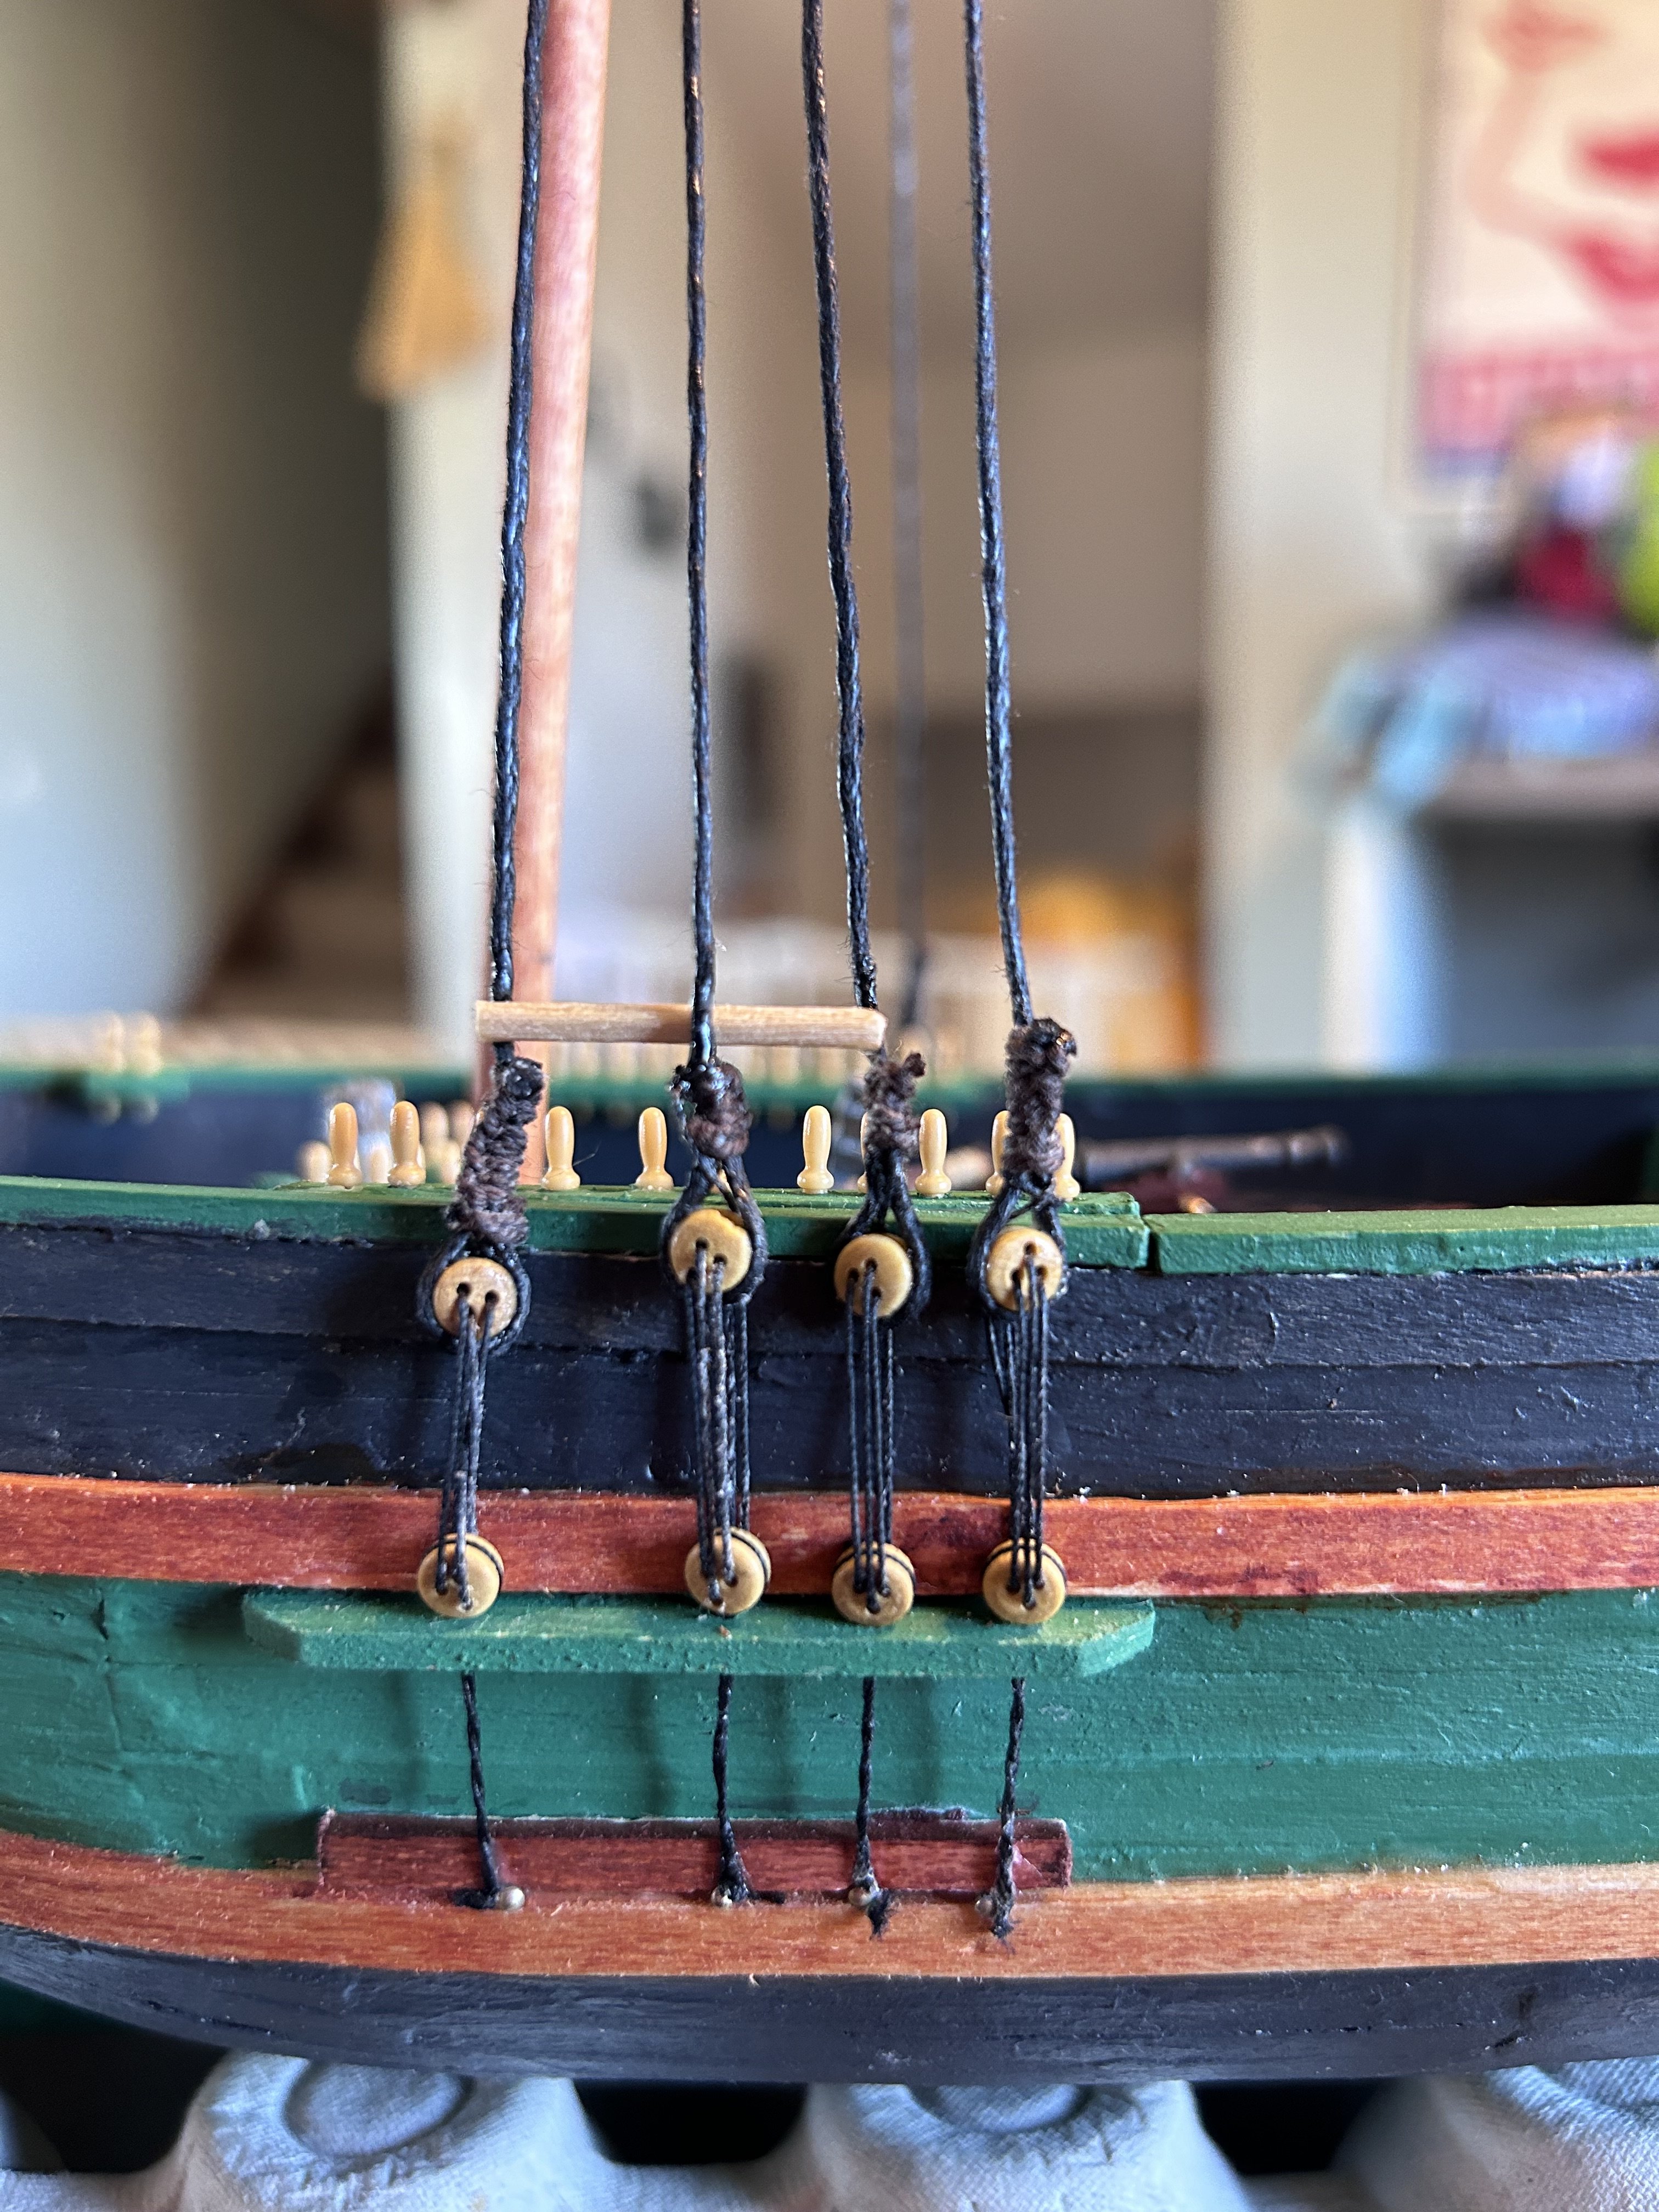
Time for line work. I’m really pleased with how these turned out and I’ve found that the rigging is really what makes the builds shine.

-
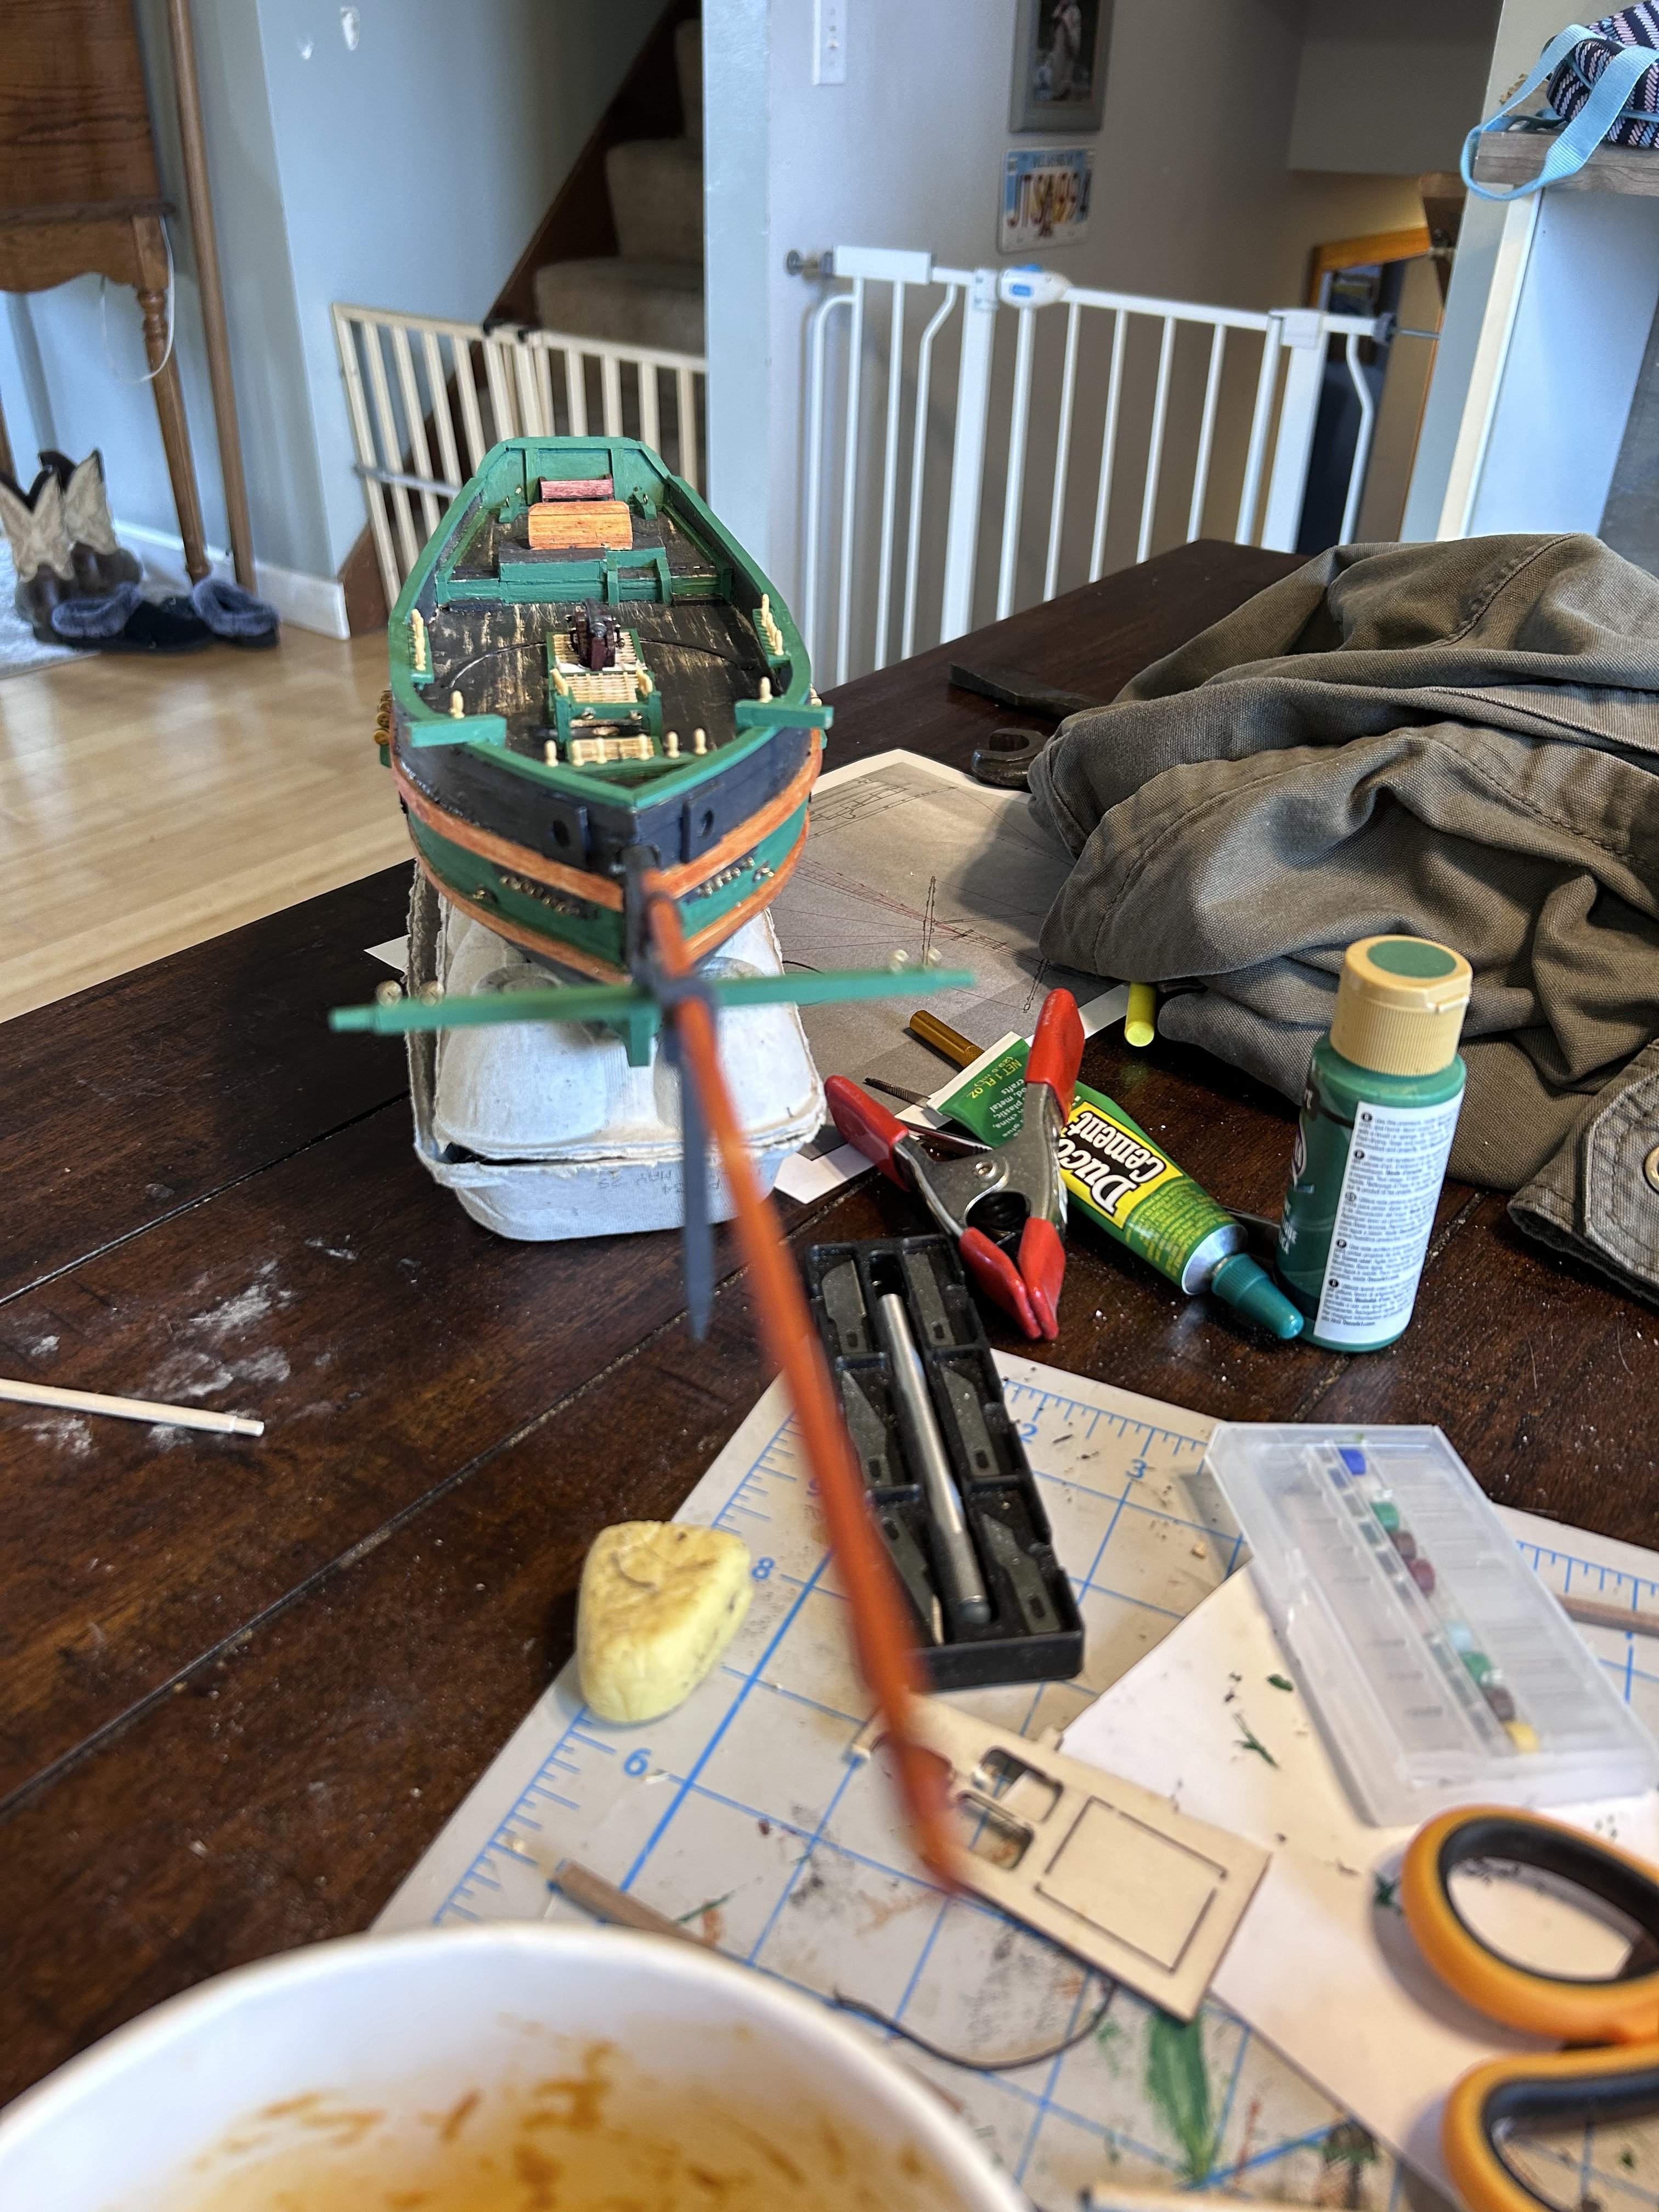
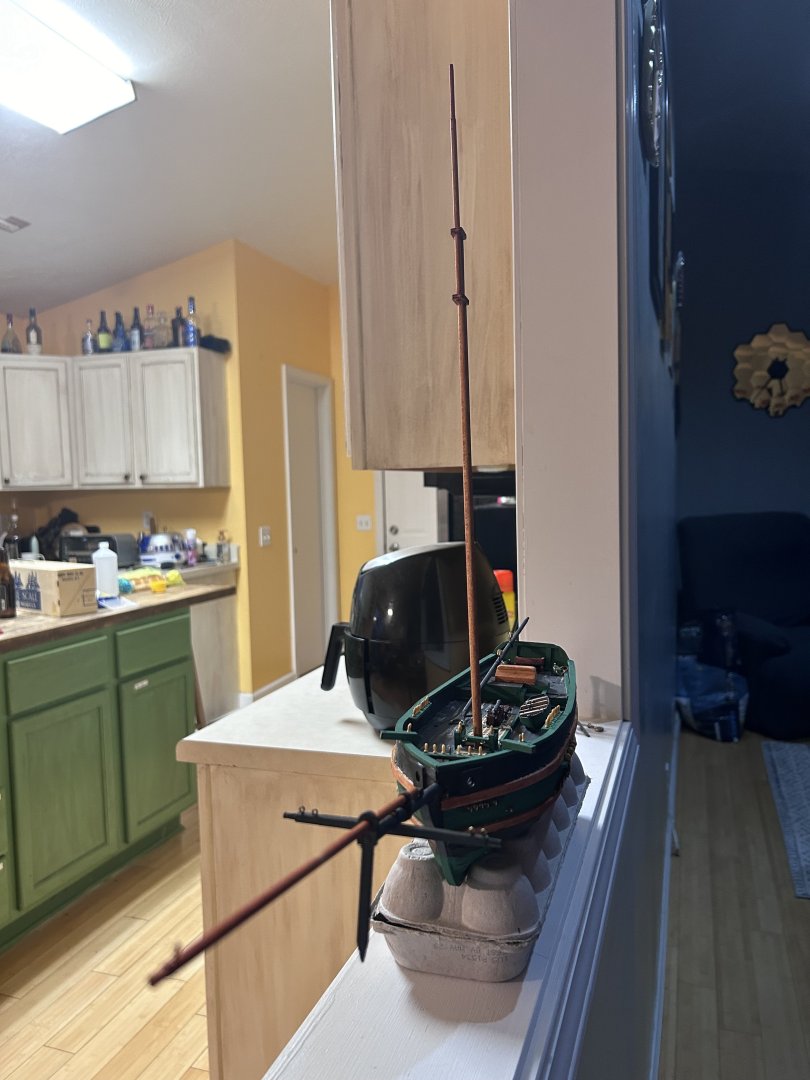
Next came something I dreaded most of all: MATH. Now the bowspirt of the Albatros is far shorter than that of the Friends and so I had to figure out what the length of it would be given the length of the hull. Now there’s a reason I got an English and a theology degree, because math is not my specialty. That being said I managed to deduct the equation to get the proportions correct (shocking I know) and the bowsprit and mast came out around the size it should be. I should also offer some credit to @kruginmi and his build log for the ship as it gave me a lot to work with to get it right.


-
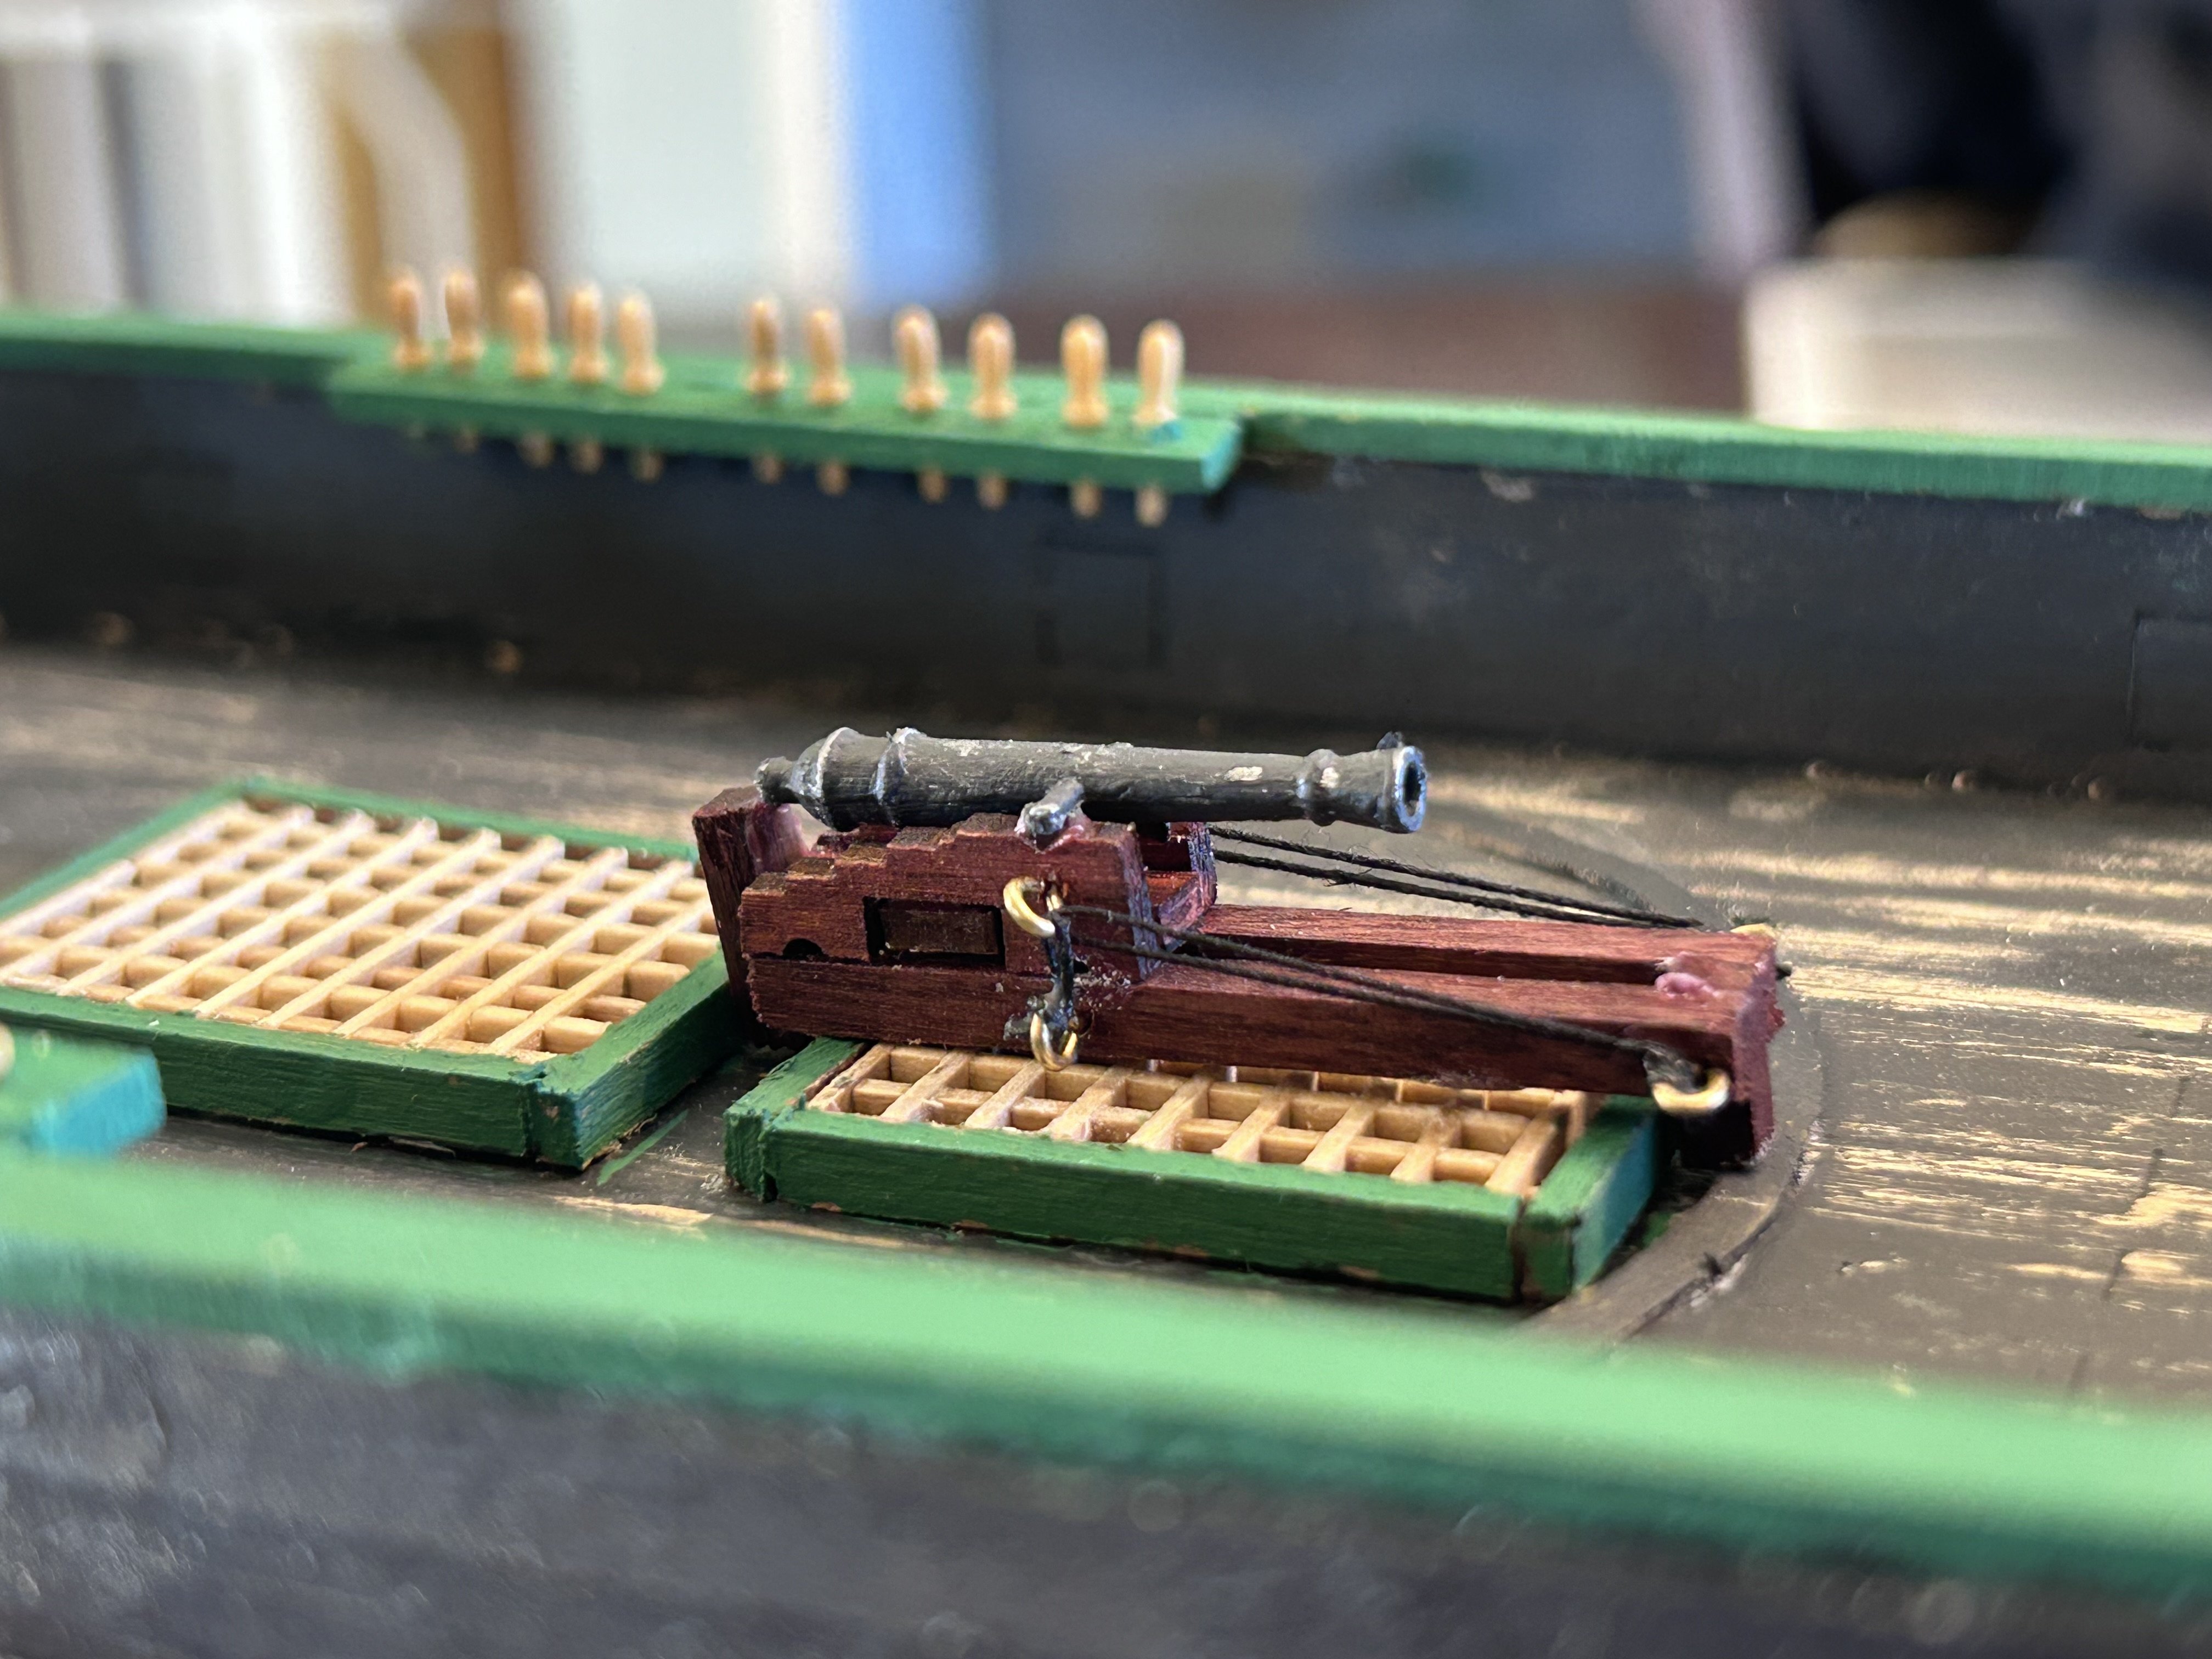
This is where it gets fun because just like with the real ship it’s time to play with the long gun! Fortunately in the category of “close enough” we have the long guns from the Albatros which when adjusted for scale become the perfect size for the 9 lb long gun. I really love how this turned out.

-
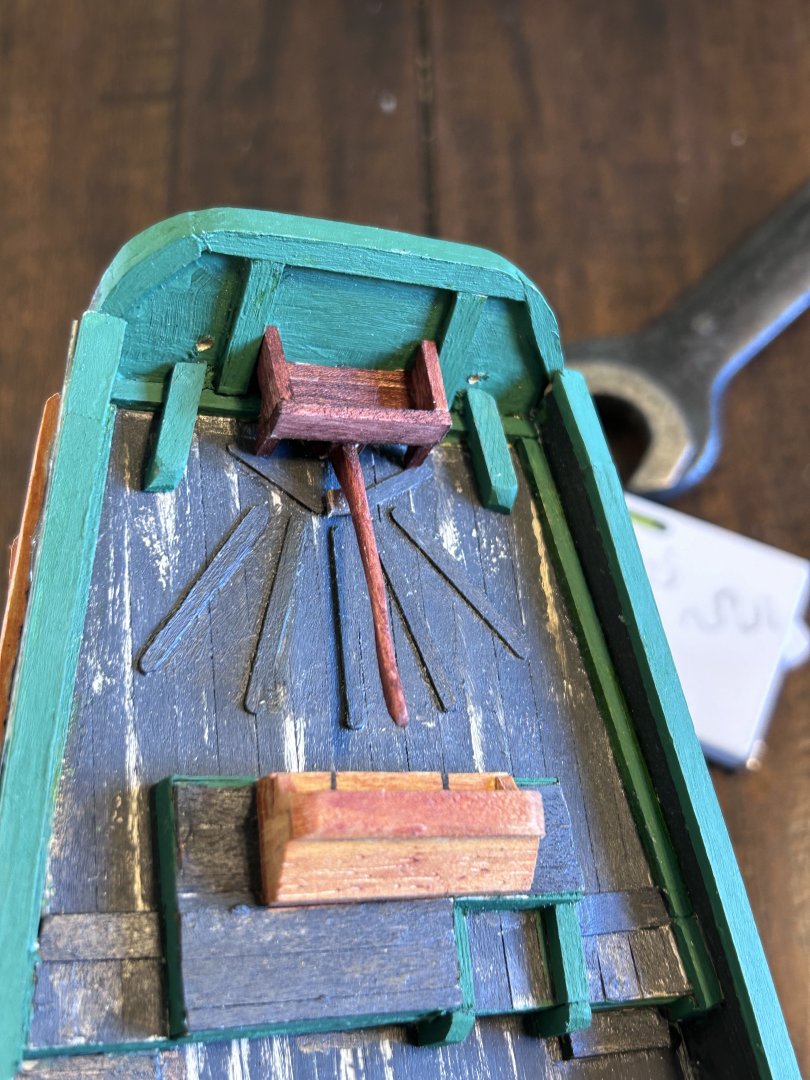
Next came the bulkheads and tiller. The Albatros came with more than enough material to put these together and from there it was just a matter of eyeballing it to get it “close enough” I actually really enjoyed making the tiller because that was mostly hand carved. Above it I placed a box that’s used to store excess mainsail line.
-
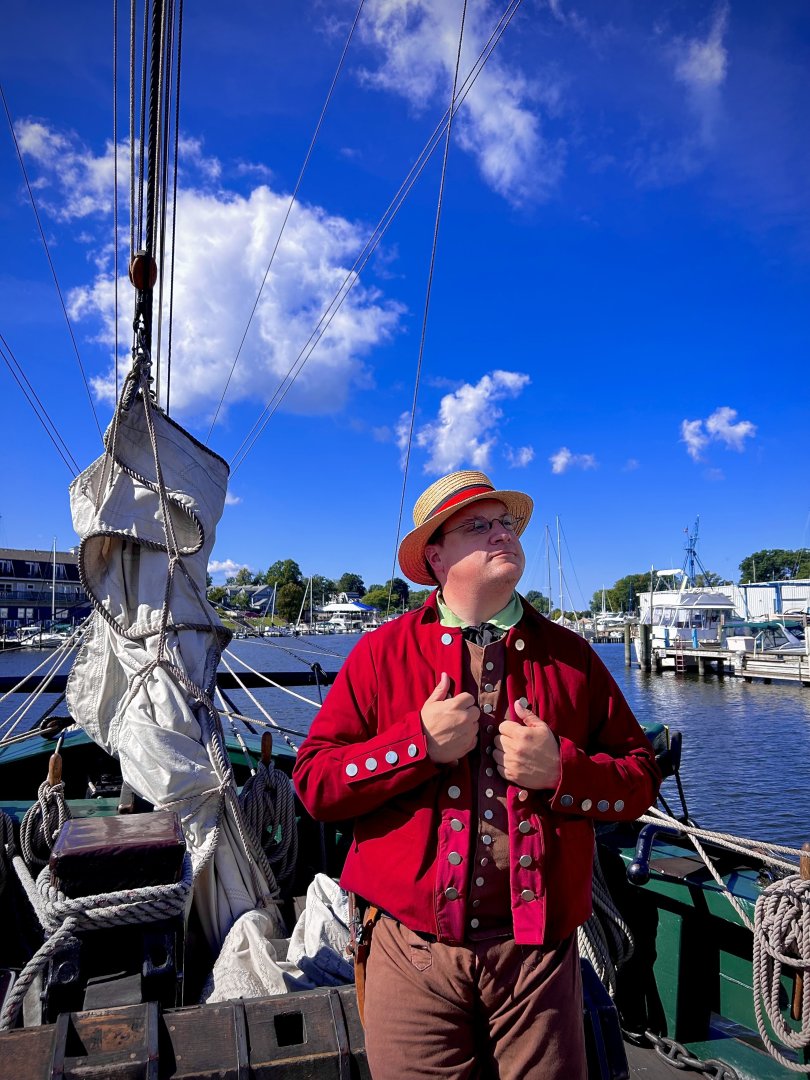
Thanks, when I was planning this build I spent some time trying to find a sloop that would match the style and ended up deciding that because I was already familiar with the Albatros, it would make a fine selection to work with. As for the outfit a friend made my jacket and vest and I’m very grateful for his skills.
-
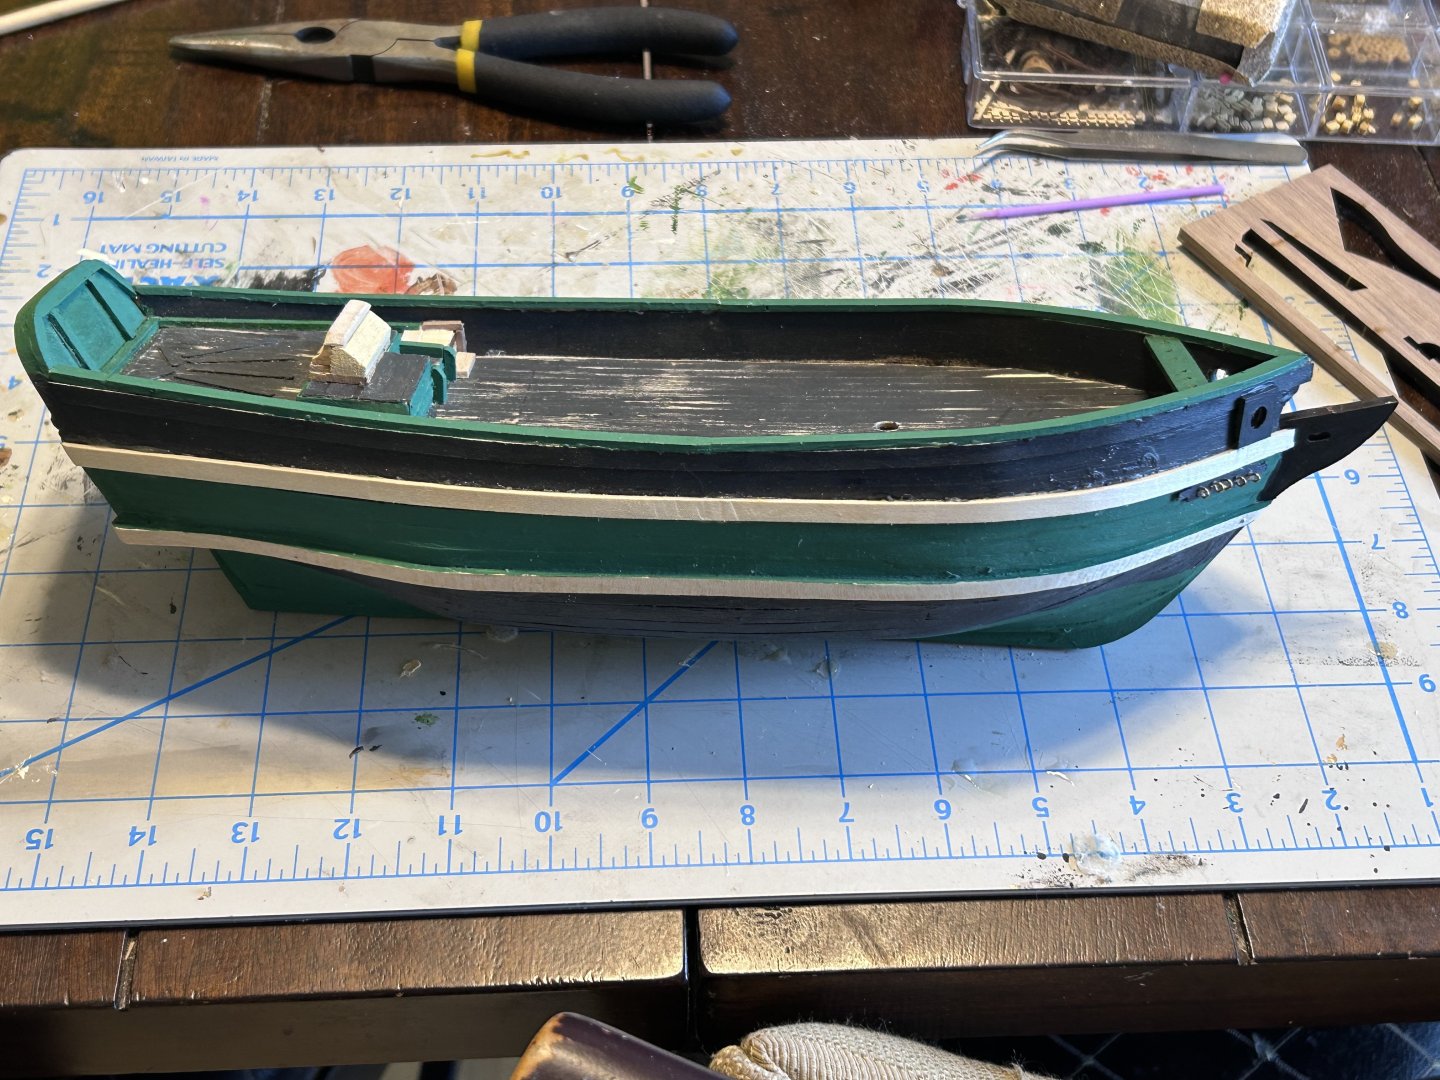
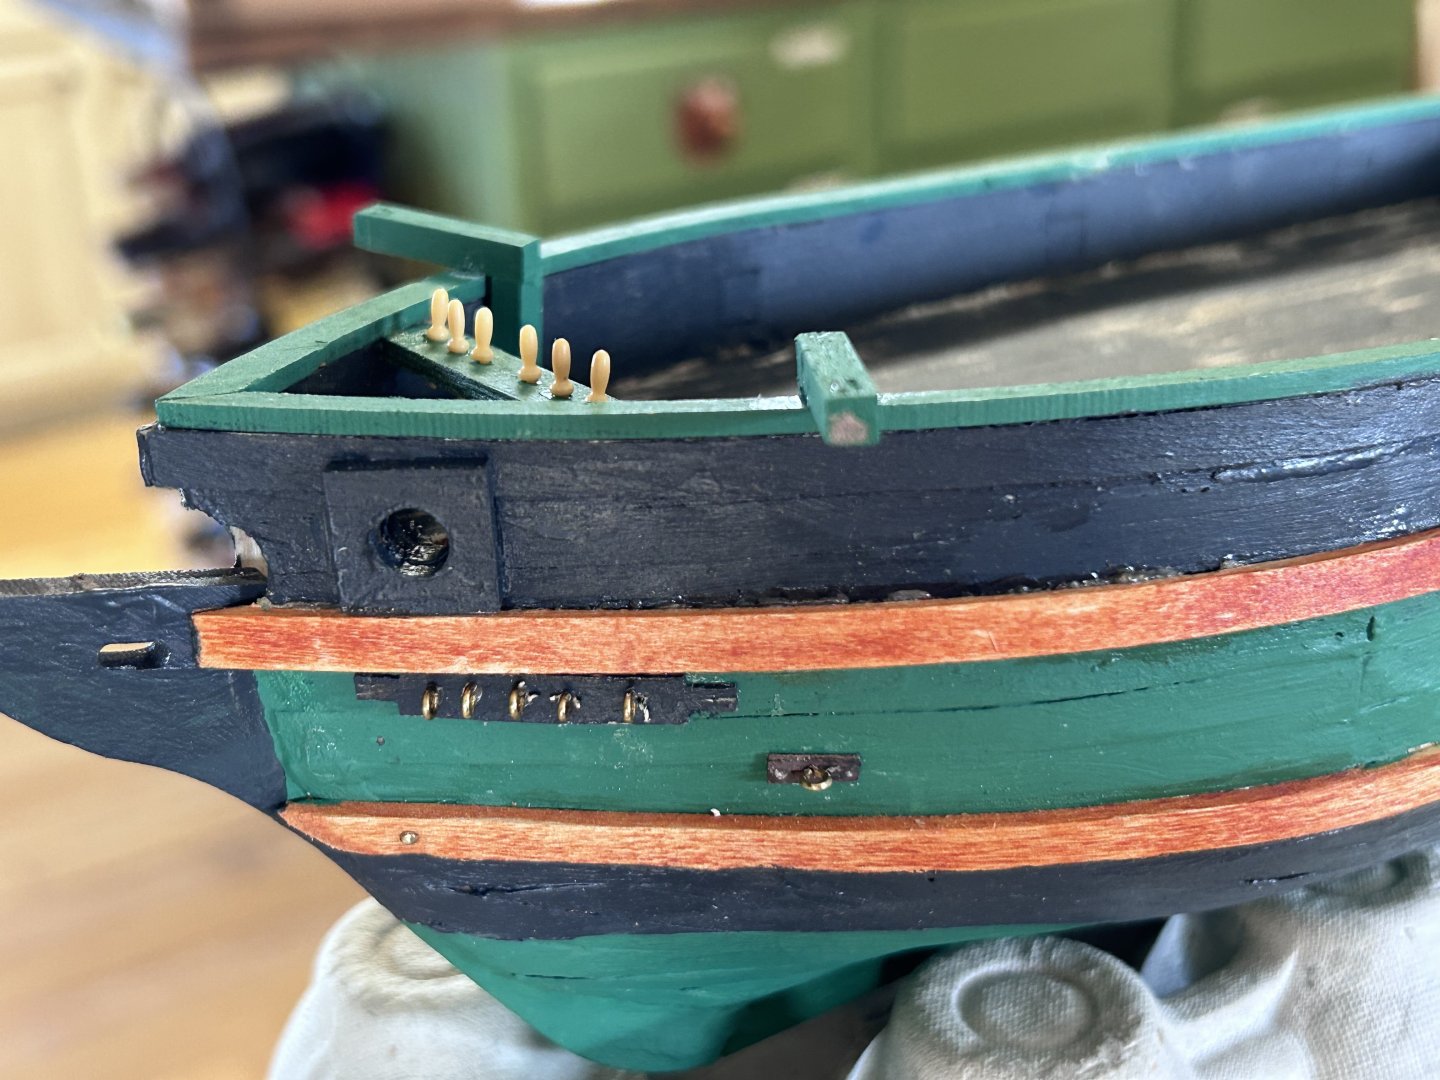
Next came the work on the gunwhales, gluing them down and then staining them. I found a green that matches the green of the ship (though I do have access to the paint from the ship so the day may come when I go back and paint it with the accurate color) and as for black I settled for a base acrylic that matched the color (no need to get super fancy). Up at the prow I added the various brackets that would be used for the rigging as well as the hawsholes for the anchors, forward pins, and finally the catheads.
-
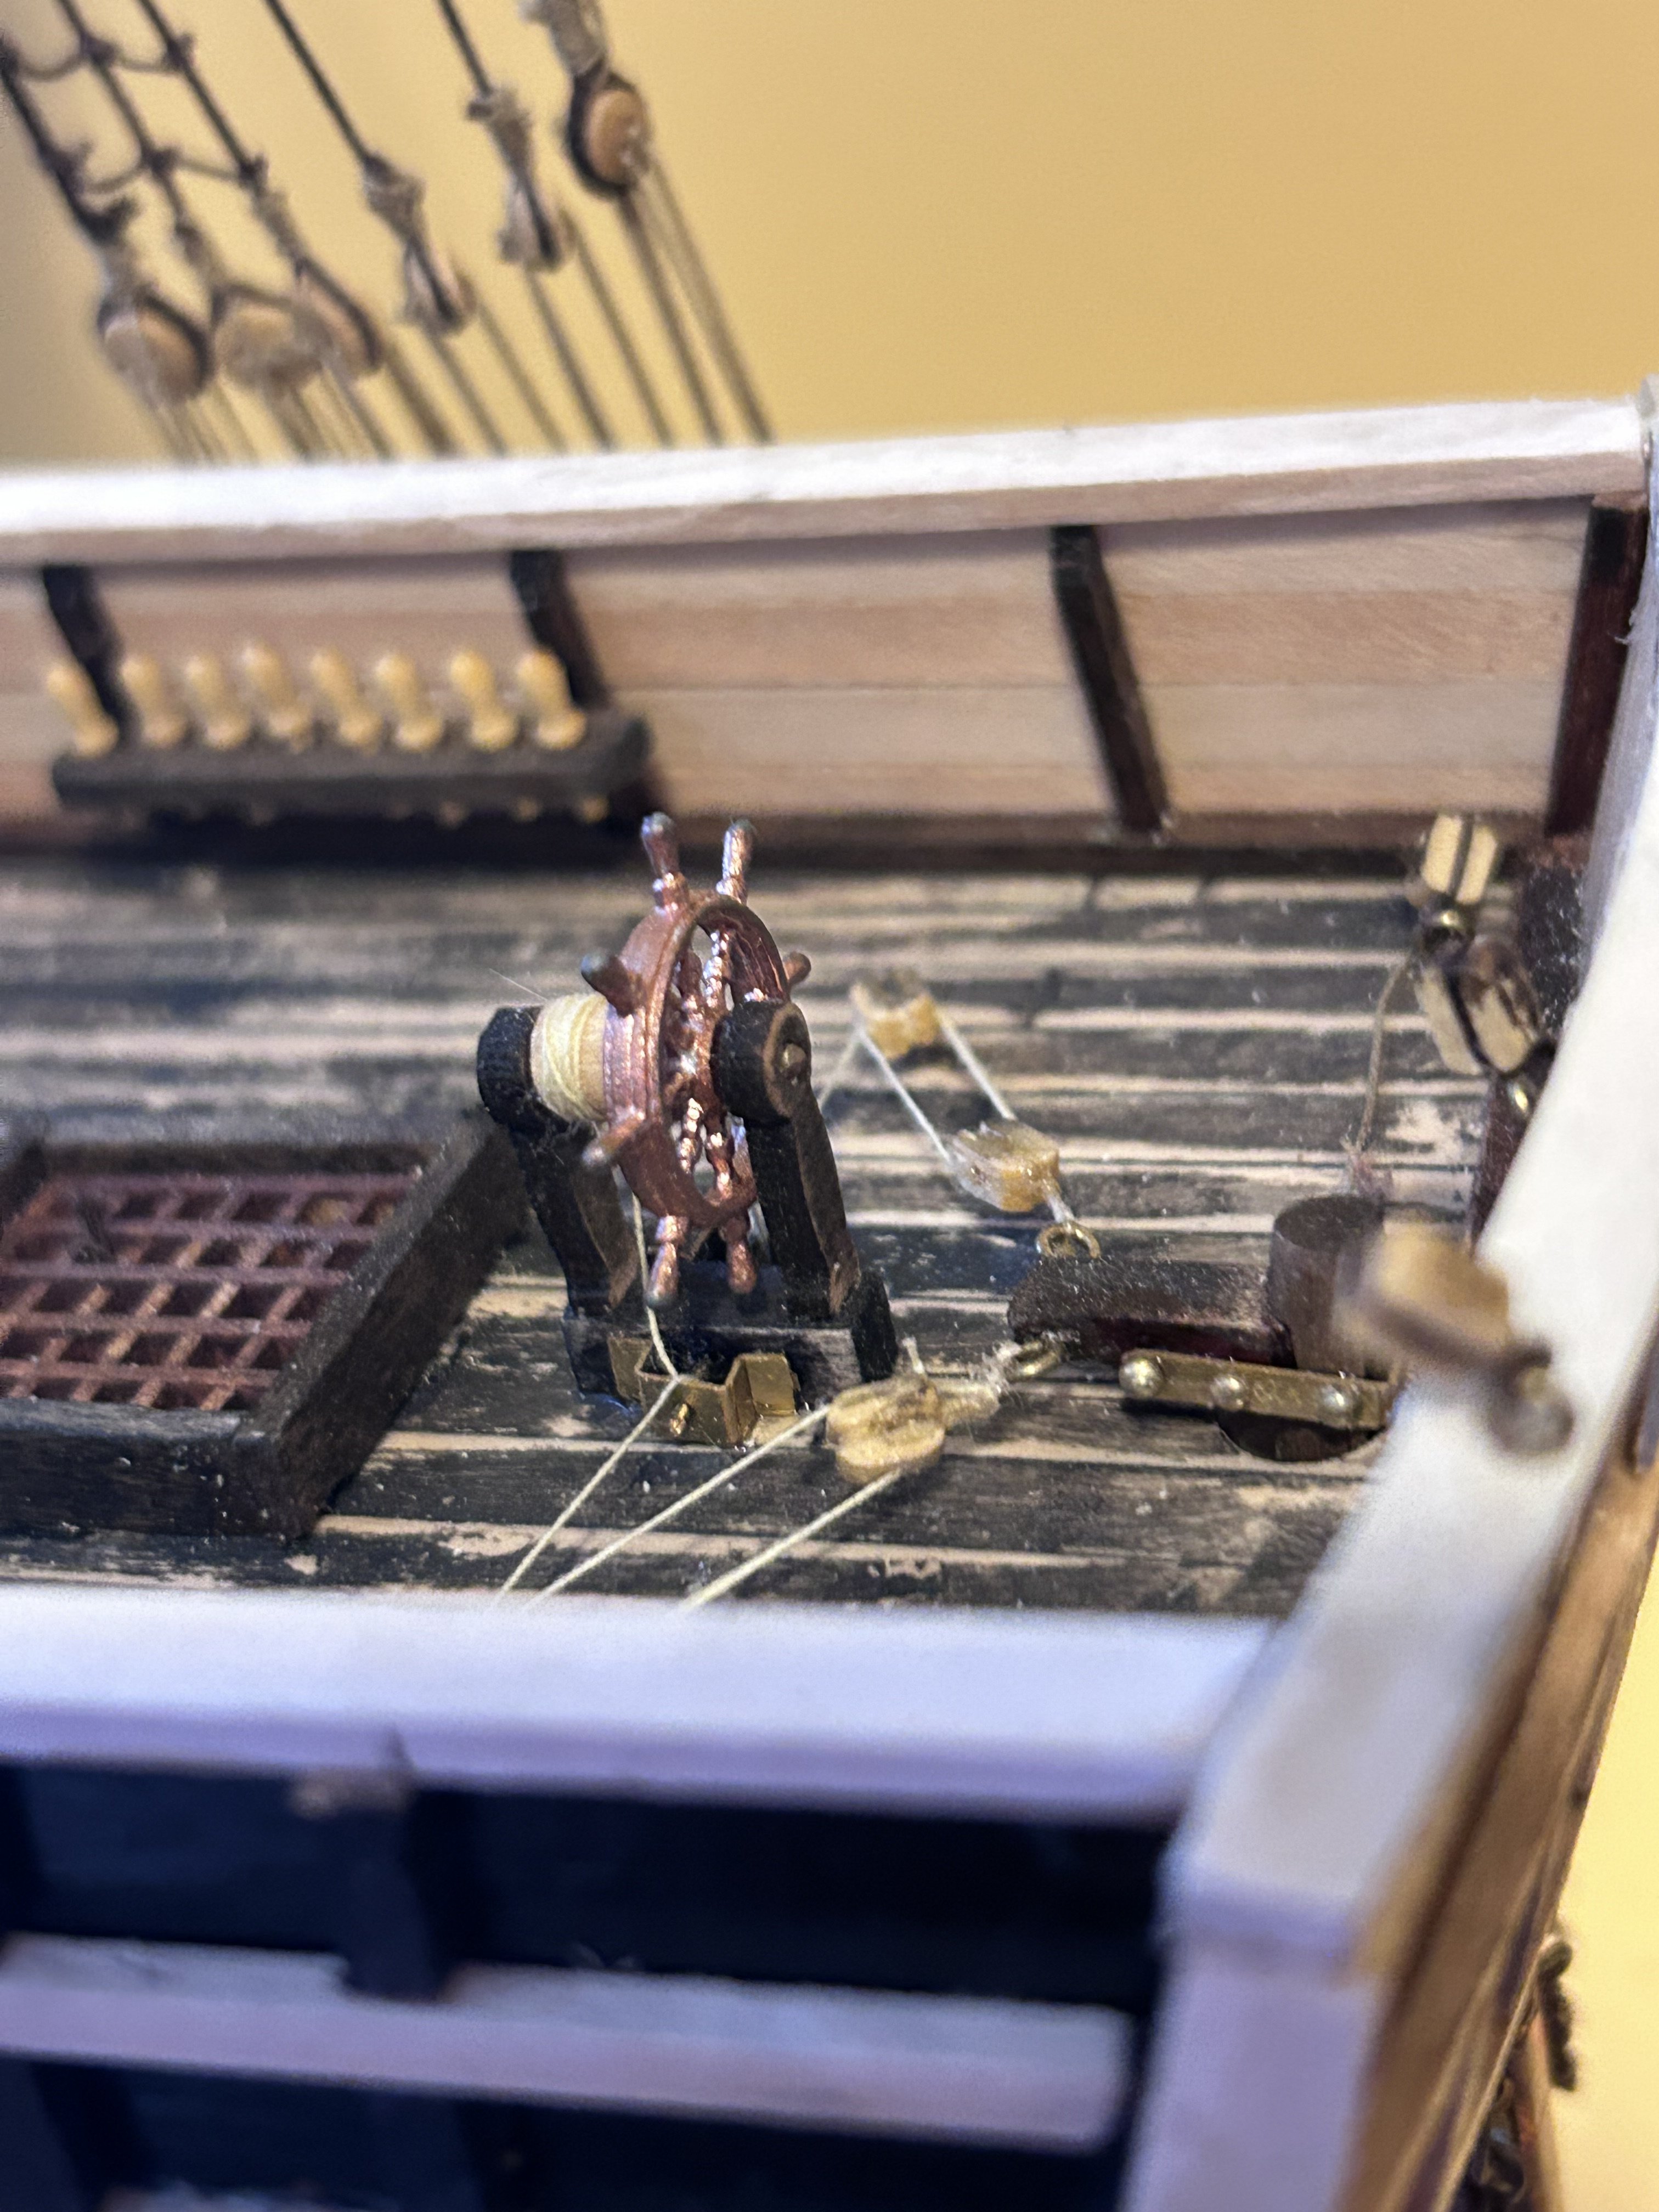
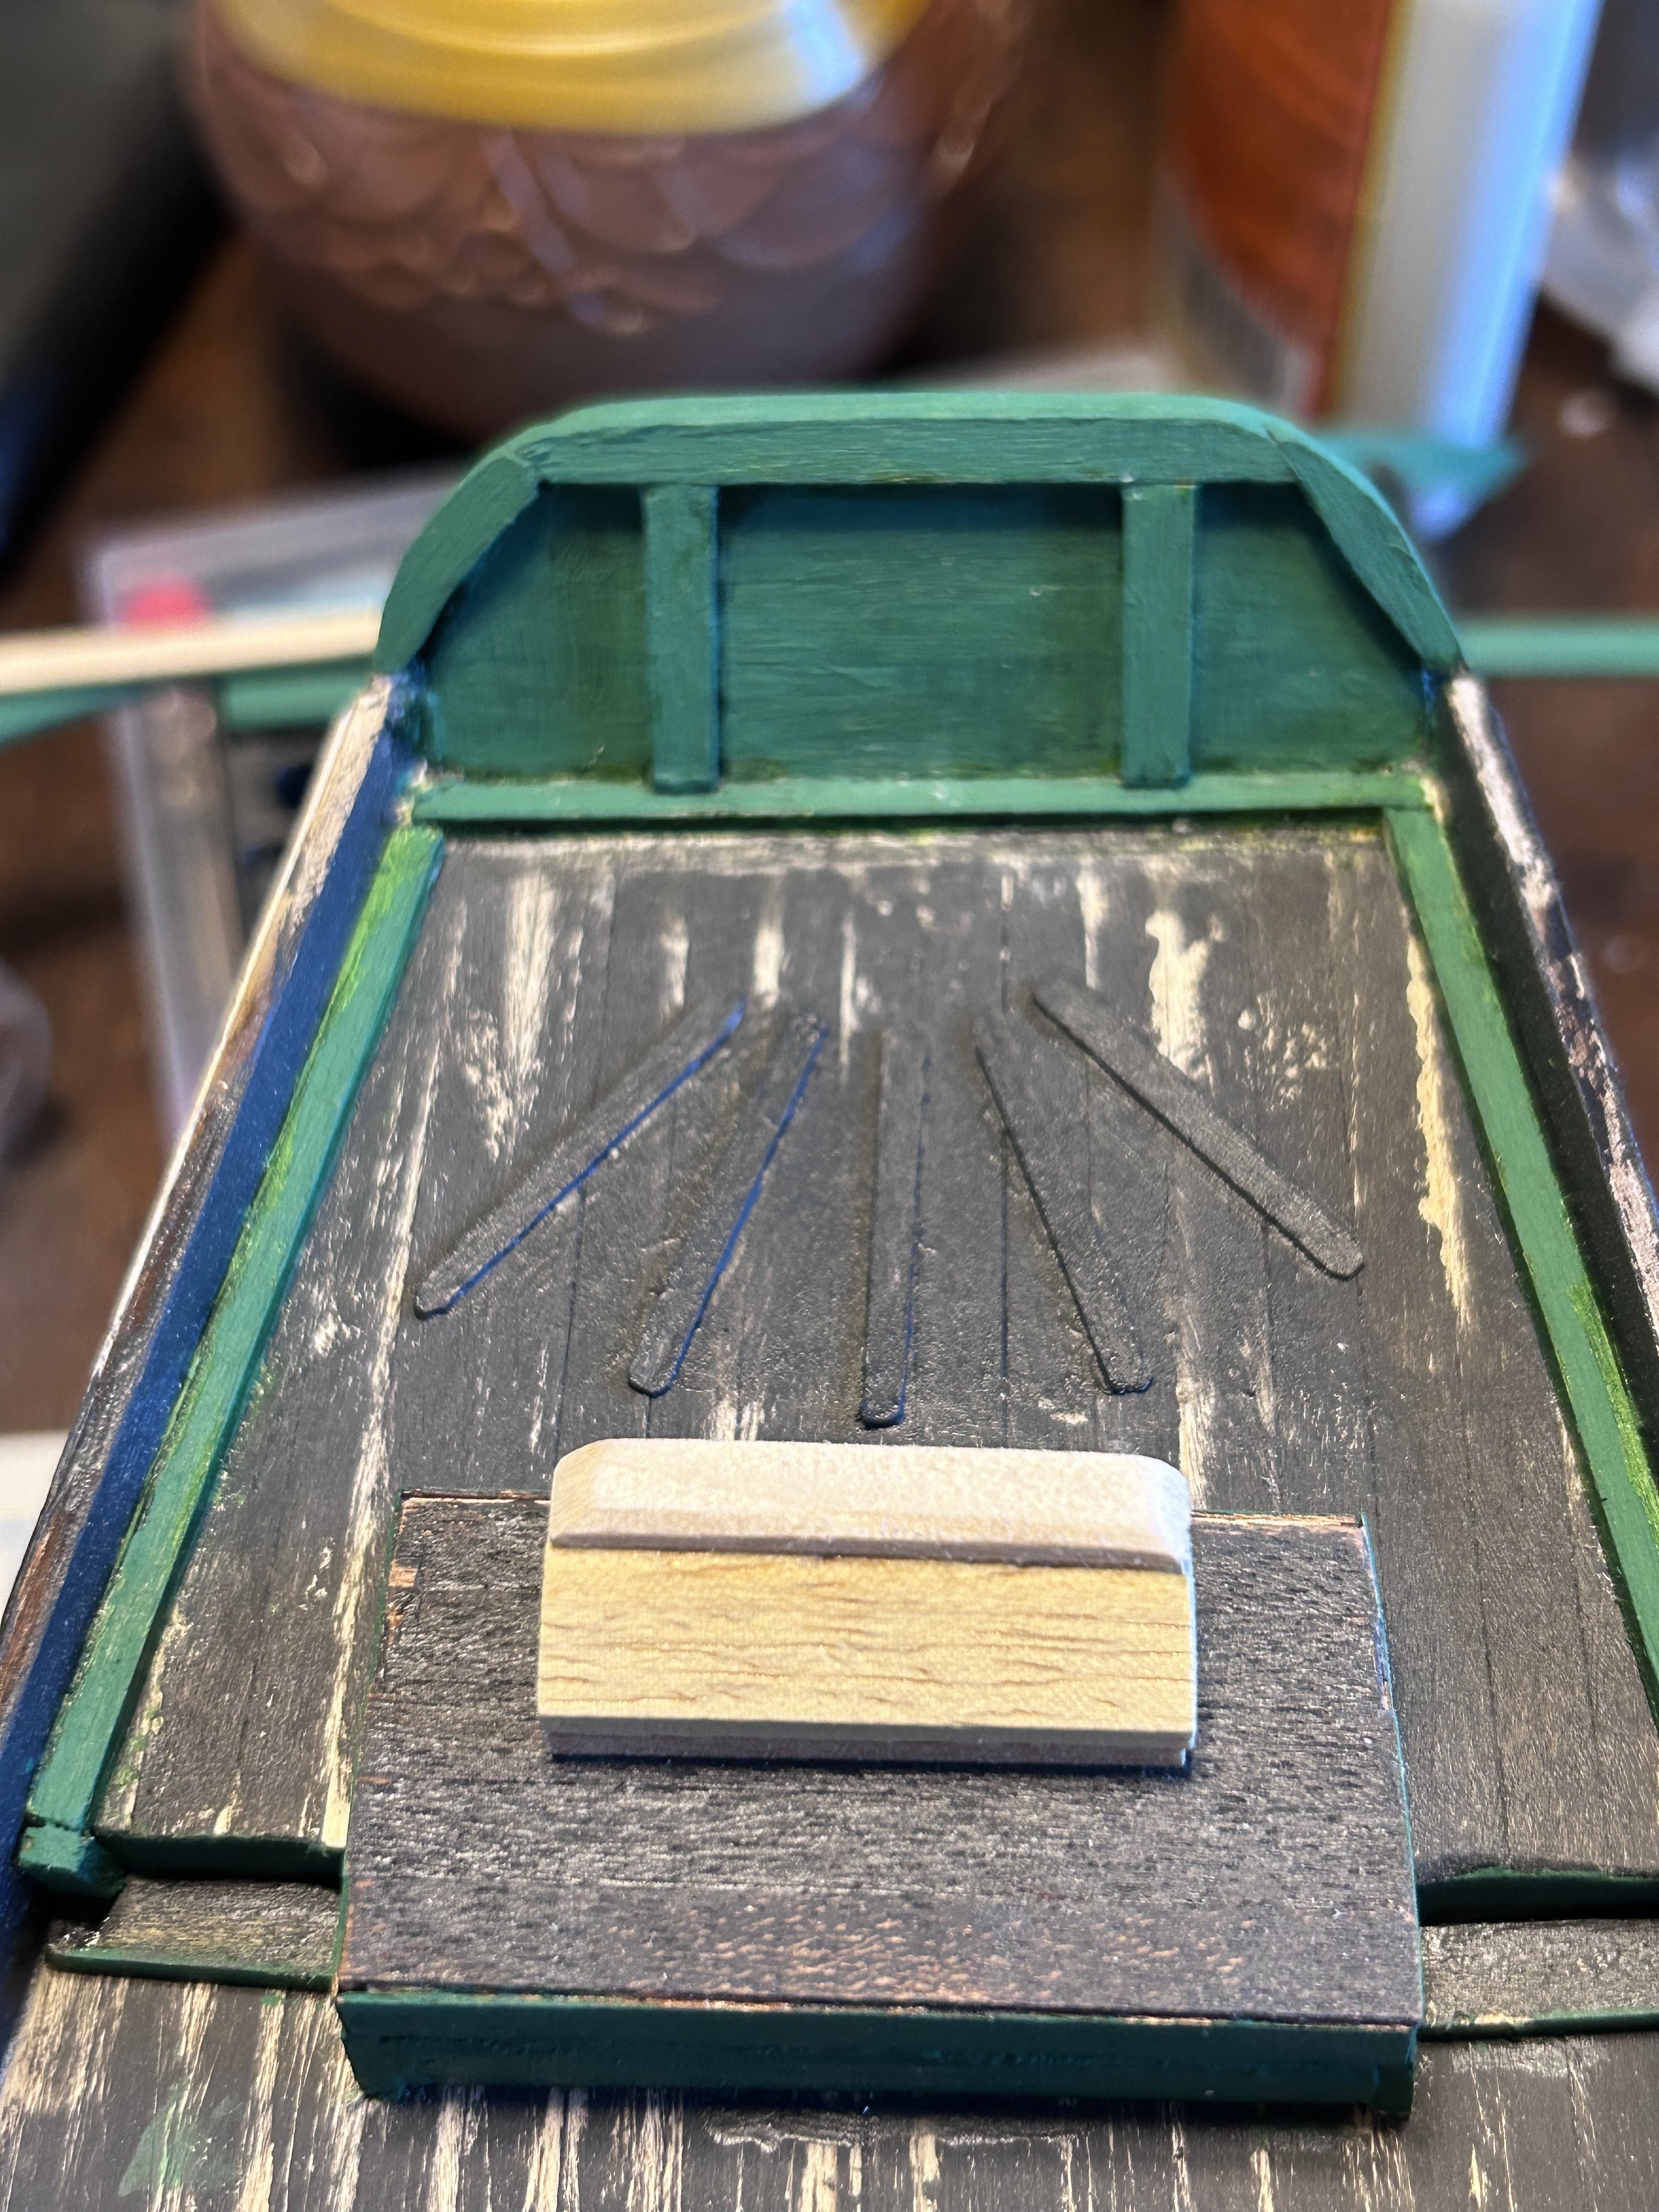
So now that the deck is assembled and properly weathered it’s time to add the upper deck, which once again means some custom cutting. In this case I used a thin piece of basswood and cut it into shape, after that I added the raised platform and binnacle and again; this was another instance where I went with “close enough” rather than 1:1 as the binnacle was made using one of the raised platforms from the Albatros. I also took the time to cut five strips down to make the floor markers which help in controlling the tiller. As for the binnacle I opted for hand drawing the lines, though I know the quality could have been higher if I’d carved them in I though this was a small enough detail that it didn’t matter that much.

-
Starting from an early stage though not the beginning, after adding the deck and doing the planking I realized I wanted to make the deck a little more authentic—which means weathering, lots of weathering. To quickly back up though, when starting this build I realized there were some key differences between my model and the Albatros from which I was pirating, namely the length of the ship, the fact that it’s only one and not two masts, and the height of the upper deck. So after some measuring and rudimentary maths (not 1:1 in this case as many of these measurements I did not have exact and I wasn’t focusing on 100% accuracy) I cut the length of the ship down by a few inches and removed the upper deck from the bulkheads. I also cut a new stern to more closely match the Friends. My goal in this build was always to meet somewhere in the middle between the historical ship, the recreation, and my own abilities and imagination and so any minor differences between the original and mine were differences I was willing to live with. Next post: the upper deck, binnacle, and tiller.
-
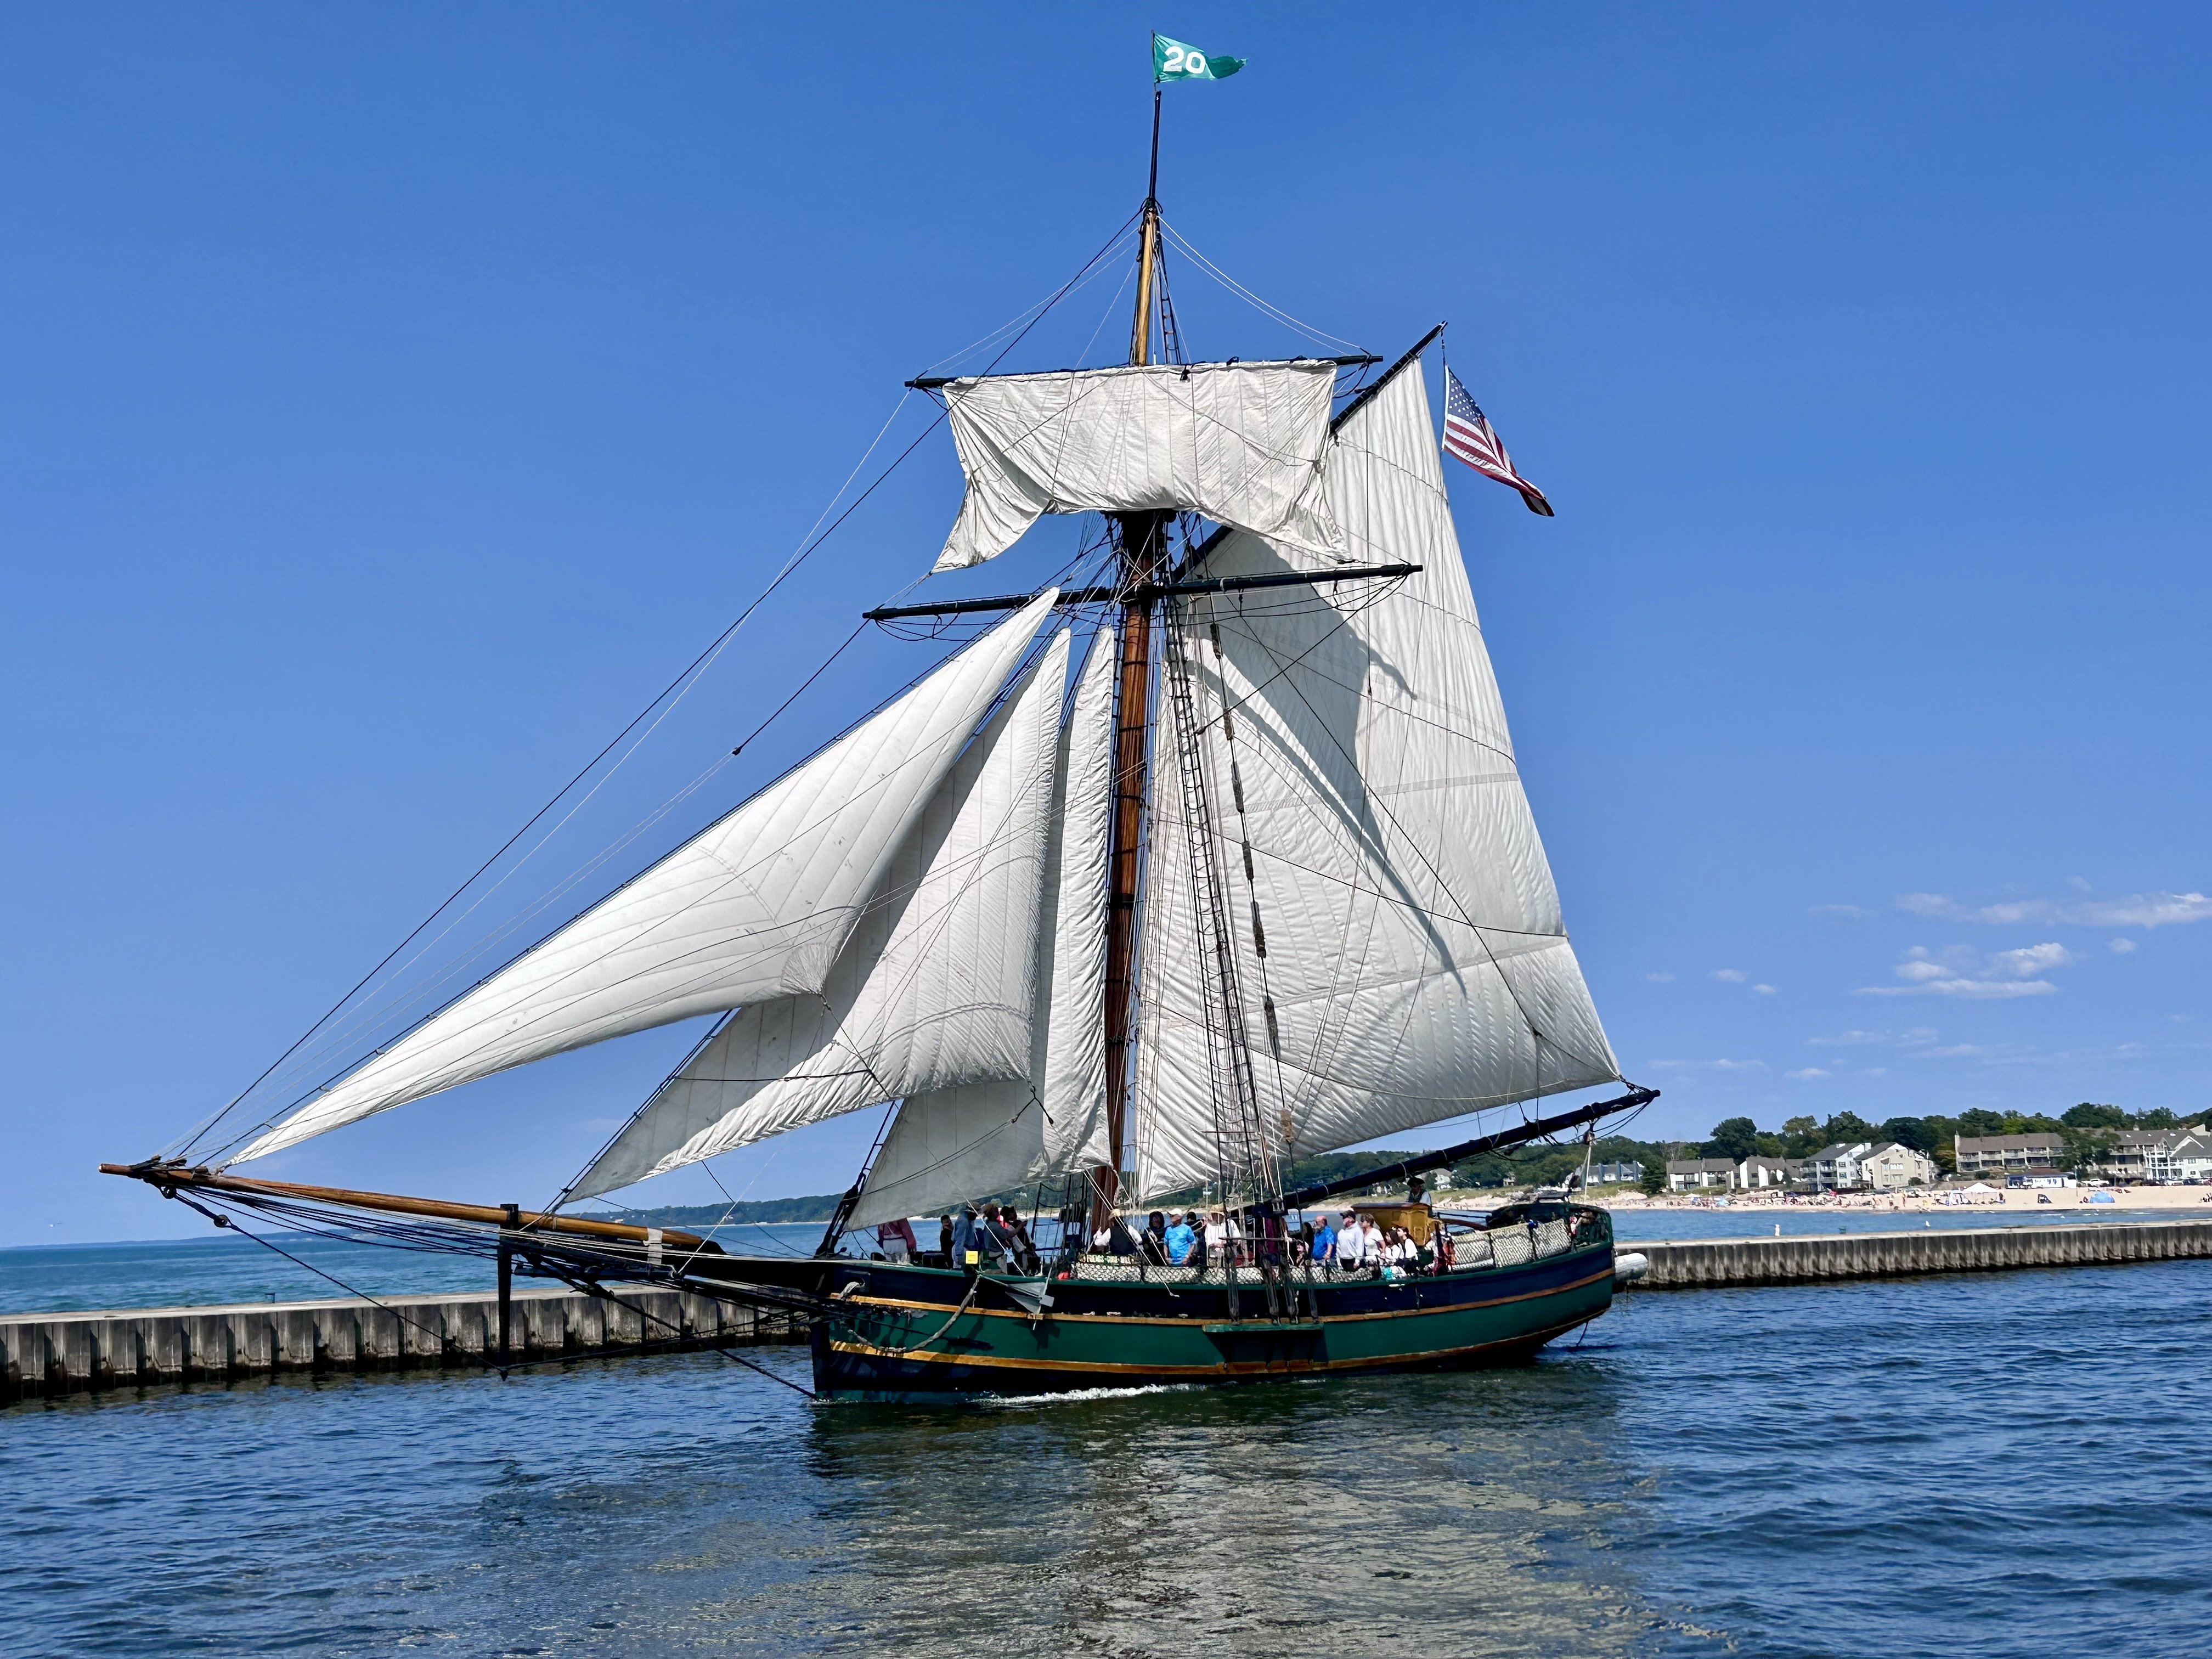
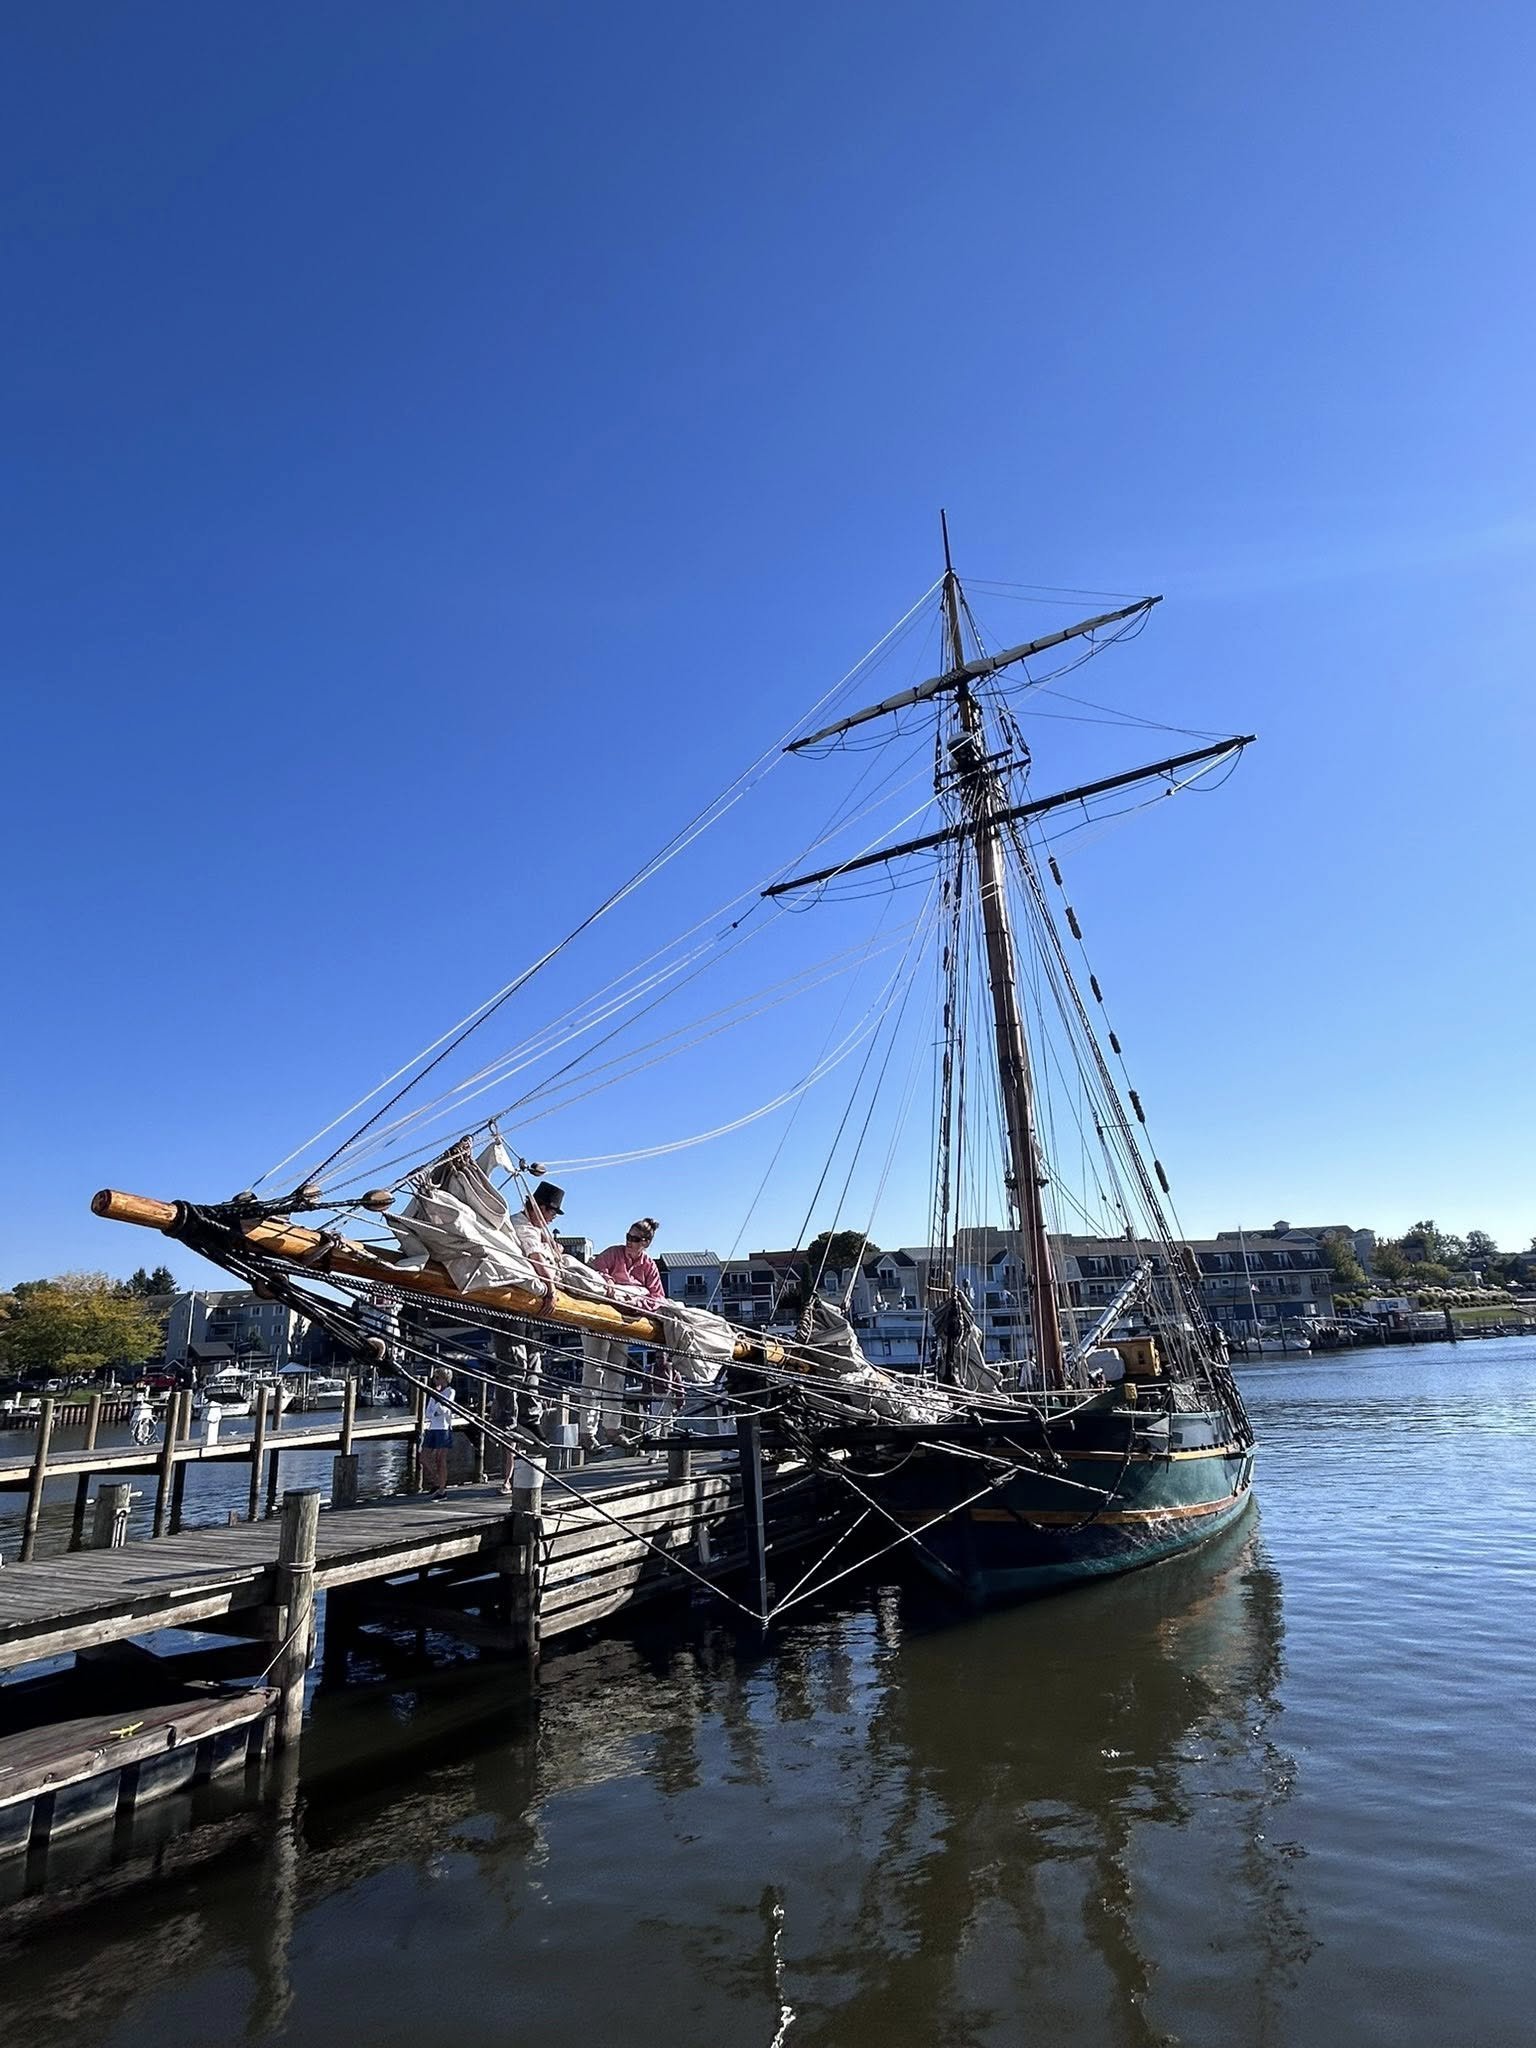
So to preface, this is not an altogether scratch-built model (cheating I’m sure but hear me out) rather it’s a model that uses much of the framework of another to pirate materials (Occre’s Albatros to be specific), but being as I took so many deviations from the original I thought it more appropriate to include it here rather than in the kit builds, (admins feel free to move it if you feel I placed it here wrongly). All that being said let me introduce you to a ship I built just over a year ago now, Friends Good Will. I want to assemble this retroactively as it taught me some important skills that I want to have some record of going forward. From the Michigan Maritime Museum’s page on the ship: ” Friends Good Will was built in Michigan at River Rouge in 1810 as a merchant vessel for Oliver Williams. At 47 tonnes burthen, the square topsail sloop carried cargo for her owner and others under the command of Master William Lee. In the summer of 1812, she was chartered by the federal government to take military supplies to Fort Dearborn, a small military and trading post at what is now Chicago. She was returning with furs and skins when she was lured into the harbor of Mackinac Island. The British, having taken the island just days before, were flying false colors above the fort ramparts. The British confiscated the vessel, cargo, and crew, renaming her Little Belt. She was armed, taken into service, and fought with the Royal Navy until September of 1813, when she was recaptured by United States Commodore Oliver Perry at the Battle of Lake Erie. Within an hour after the great guns fell silent, Commodore Perry mentioned her in his now famous dispatch, “We have met the enemy and they are ours: Two Ships, two brigs, one schooner and one sloop.” That sloop was Friends Good Will. Friends Good Will then served in the United States Navy, transporting General William Henry Harrison’s troops across Lake Erie in the successful invasion of Southern Ontario. She was driven ashore in a storm south of Buffalo in December 1813. In early January 1814, during efforts to re-launch the ship, the British unceremoniously burned the once-proud vessel during a raid on Buffalo.” ———————————————————————— Friends Good Will replica out of South Haven, MI Now, what, you might ask would make me want to undertake a build of such an obscure ship? Well, for the past two summers I’ve had the fortune of serving on her as a historical interpreter.

-
Plans for this project: 1. Build the yards first: when I reach the point in the build where these are applied I find myself wanting to rush out of impatience. My thought is if I have these prepared and ready I’ll be more excited when I reach this part of the build. 2. Utilize the experience of the other builders as well as the access to photos of the original ship to create a more accurate and higher quality build. 3. Rejoice that there are so few ratlines.