
Search the Community
Showing results for tags 'Display case'.
Found 2 results
-
 January 2014 – After 21 years of sitting in a large box of packing peanuts I decided to resurrect the Mamoli Constitution. Luckily I had packed everything carefully. The ship’s hull and some of the tools were in the box, the remaining wood and parts were taped up in the original kit box. The scale of the model is 1:93. I pulled the plans and started to review where I left the build off. I had completed the outer hull (which is double planked on bulkheads), including the green tiles representing each of the copper plates. The main deck was not planked and the forward bulkhead while started only had one plank on one side. I completed the forward bulkhead and proceeded to plank the deck. According to the instructions, each piece of Tanganyika needed to be cut to 80mm, then using a No.2 pencil you color the edges on both sides and the butt ends. I used white wood glue to glue the pieces down. I marked with pencil each of the deck penetrations, which were already done in the plywood. Then I carefully cut the wood and sanded/filed the edges back to the original hole size. This is an area where I see a fairly significant difference in the Mamoli plans and the Model Shipyards. The MS builds the hull in the bow into what becomes the forward bulkhead. The Mamoli construction includes the bow in the planking and adds the forward bulkhead once the hull is complete. This also means the bow is approached differently. I will get to that later. Once the deck was completed I put on the handrails. At this point, I decided a couple of points. First, my plan was to paint the model using the Constitution plaint set from MS and secondly, I wanted to modify the bow and the stern ornamentation to be more closely aligned with the looks of the MS model. This meant creating a method to add the scrollwork since the Mamoli did not include it other than two white metal plates to be affixed to the bow for the fiddlehead design. Secondly the stern did not have the two boards that ran from the lower stern over the windows and back down producing a nice double curve. These I created using 2x2mm walnut strips I bent with the heat bender. As a note, I found out that adding CA to the sides of the strip before I bent it allowed me to control the splintering which the walnut was prone to do. This might have had something to do with the wood strips being over 21 years old. Stern Galleries The kit came with two white metal pieces for the windows in the stern galleries. One was curved almost correctly, the other was straight. Unfortunately, when trying to bend the metal for the gallery, it broke along the central vertical piece between the windows. I was afraid to heat it before I bent it. I found both of the gallery pieces required much work in sanding and shaping before they could be glued into the model. Since I was painting the ship I could use sandable epoxy putty to add to smooth the pieces to the hull. I did end up having to remove more of this than planned since I thought the top of the gallery was more curved than flat. I used my Foredom Rotary tool, rilflers, sand paper, and dental tools to carve the gallery sides and put the modeling details back into it where I either ended up sanding them out, or they needed to be made to extend through the putty. I then added the 2x2 walnut strips around the stern and completed the stern with the side strips running down the gallery aft sides. These I extended 2 mm to match the 2x2s I added around the windows. The attached photo shows the Starboard Gallery. You can see the frame break on the bottom of the leftmost window. This was patched before painting.
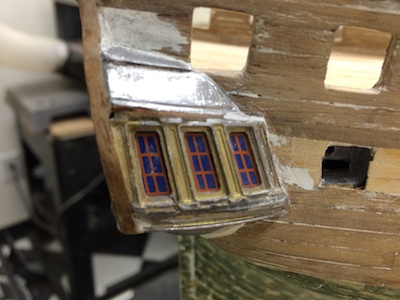
- 335 replies
-
- 1
-

-
- Constitution
- Mamoli
- (and 3 more)
-
Just finished my 1st wooden ship model. King of the Mississippi. Looking for ideas to build a display case for it.
