Supplies of the Ship Modeler's Handbook are running out. Get your copy NOW before they are gone! Click on photo to order.
×


frenchguy
-
Posts
113 -
Joined
-
Last visited
Content Type
Profiles
Forums
Gallery
Events
Everything posted by frenchguy
-
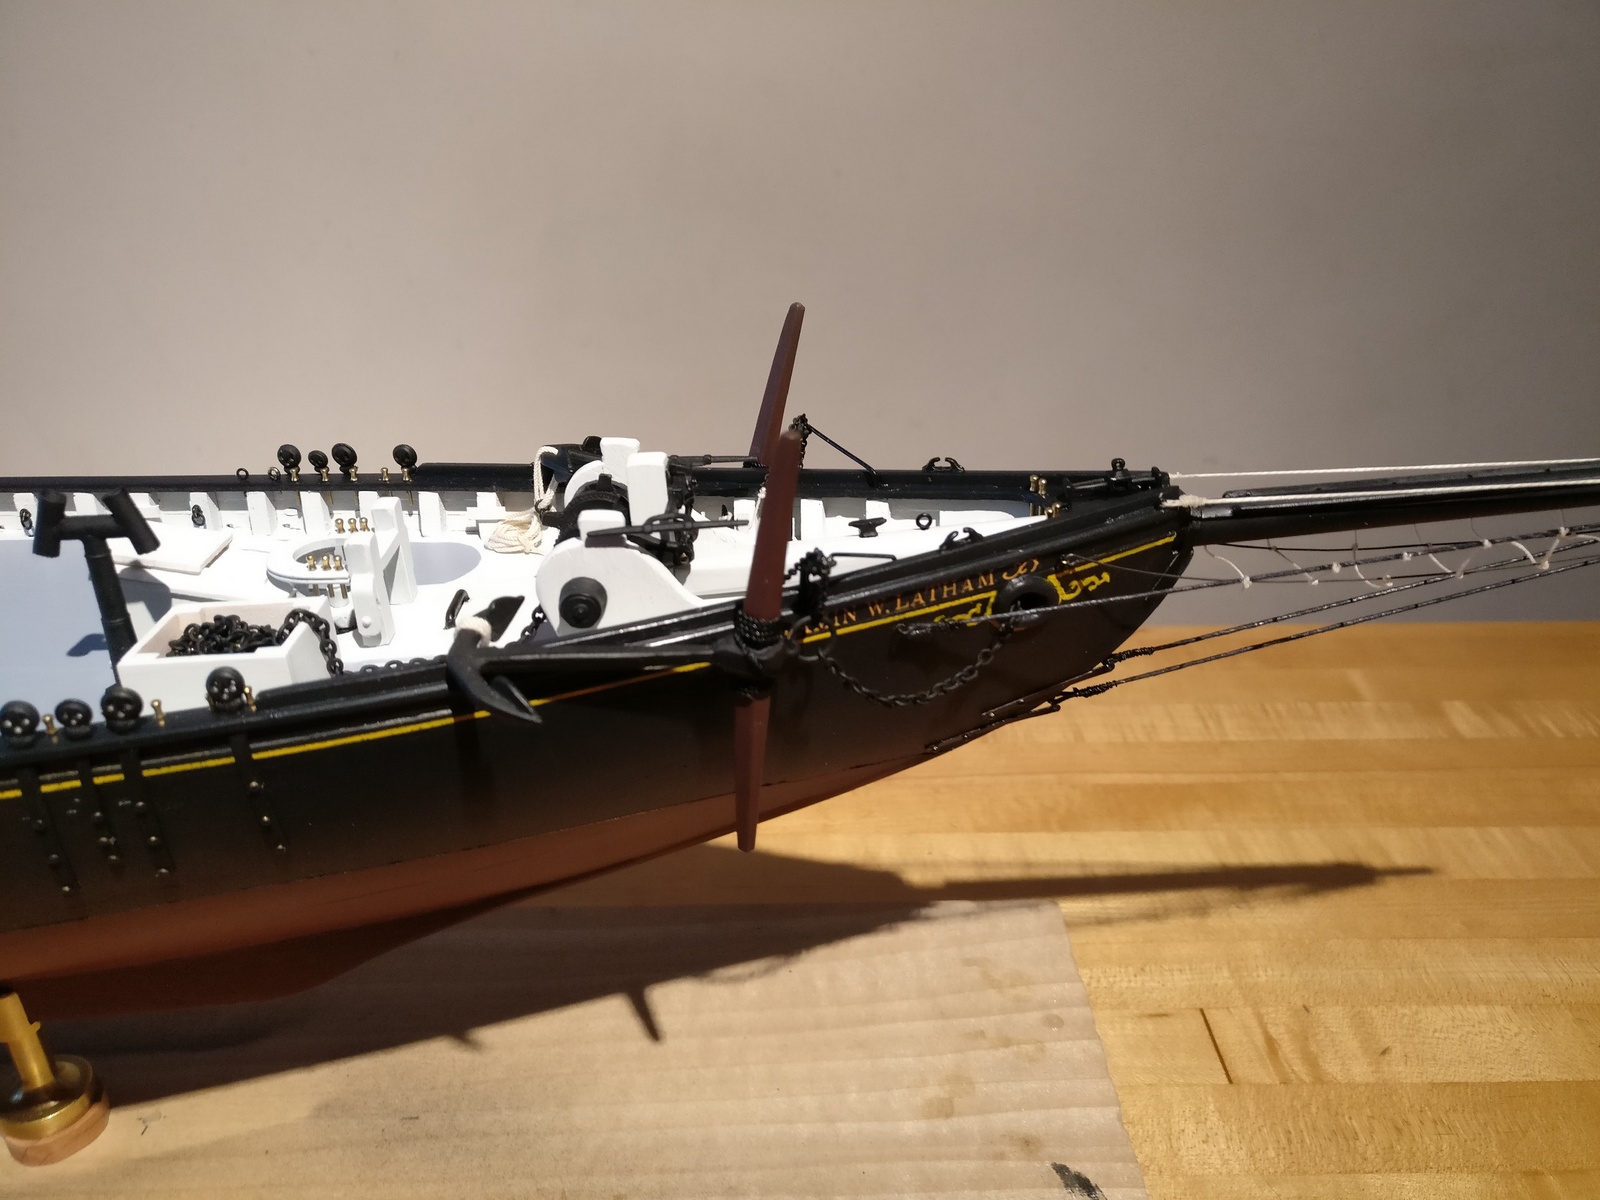
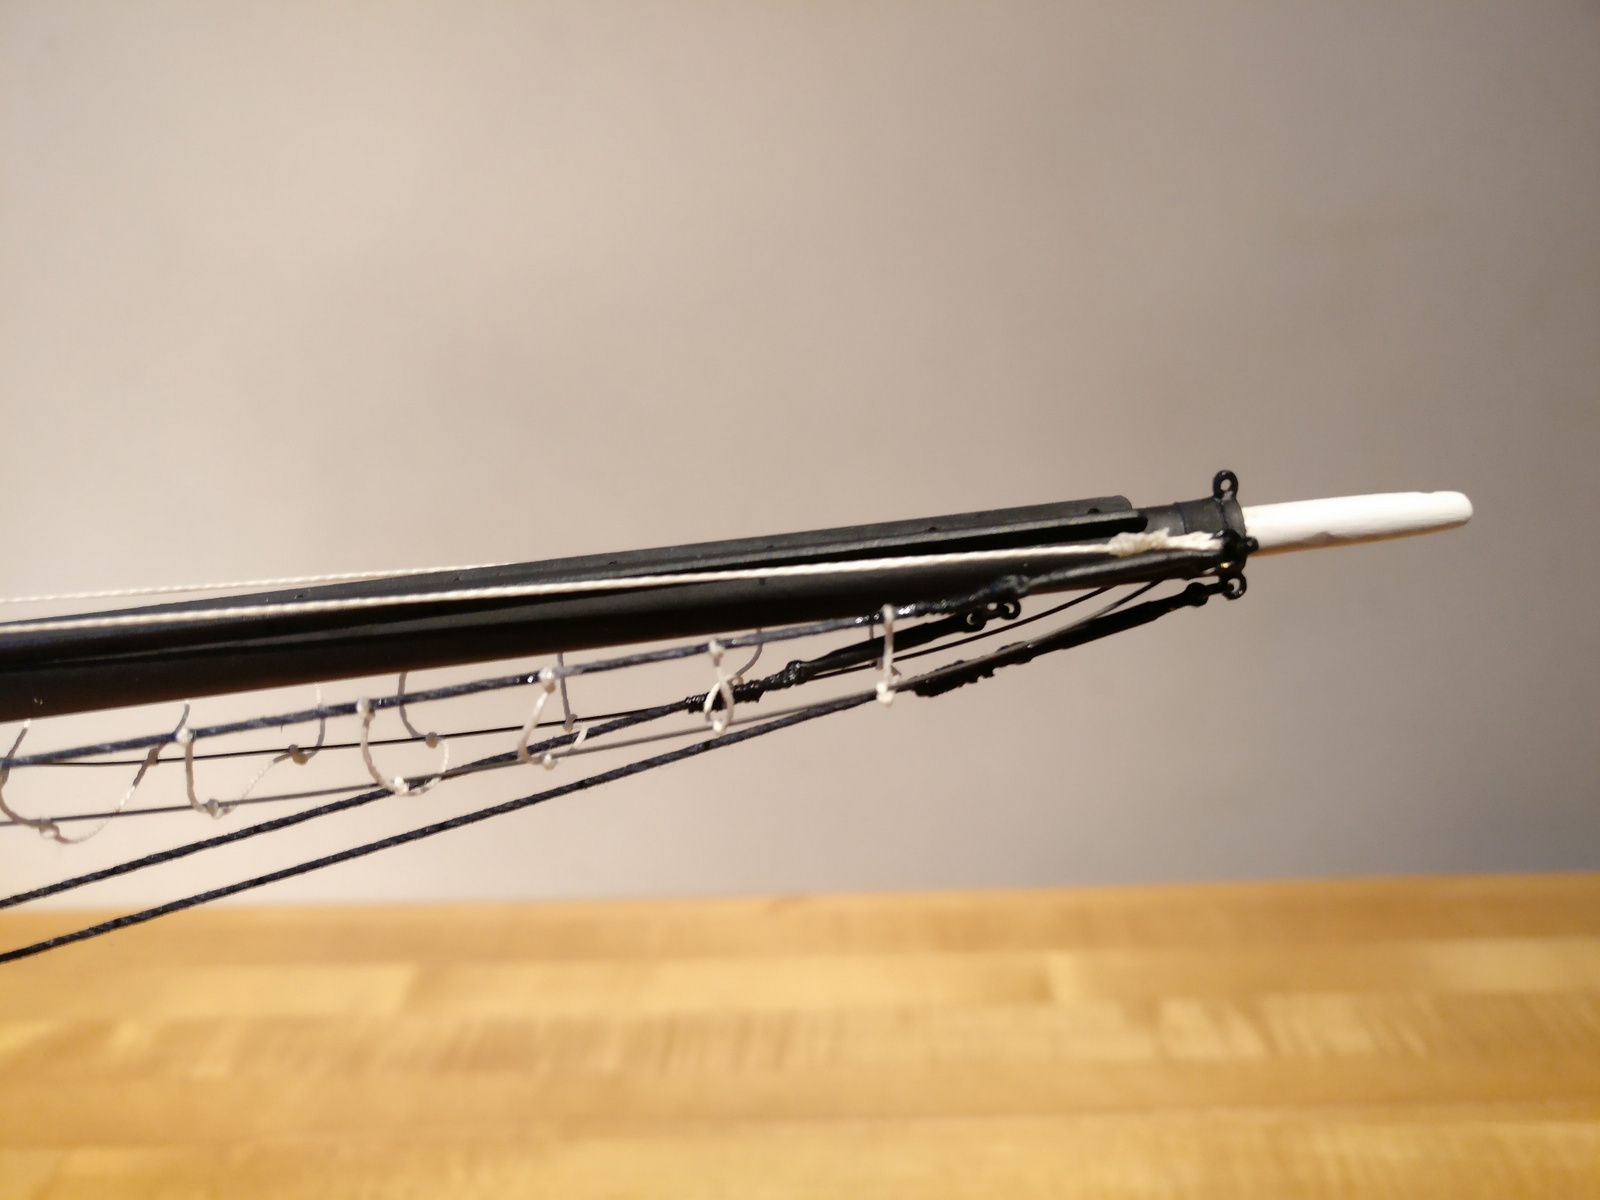
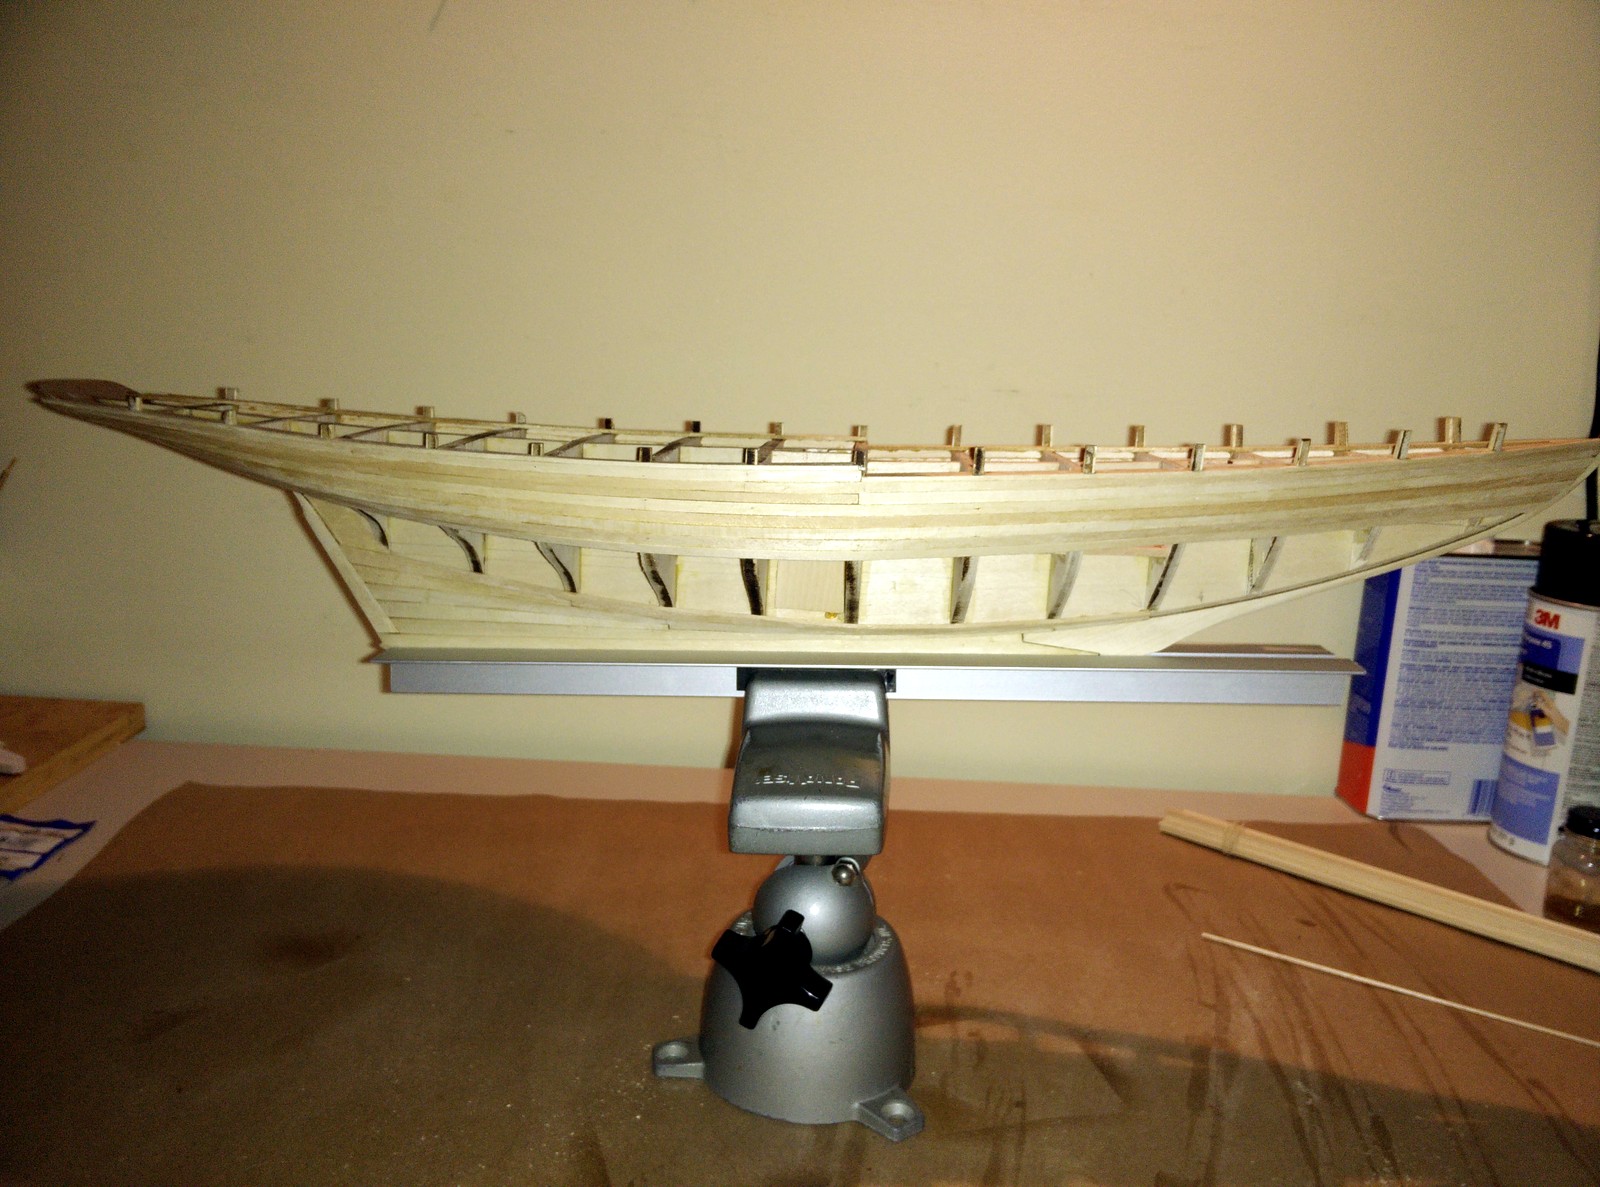
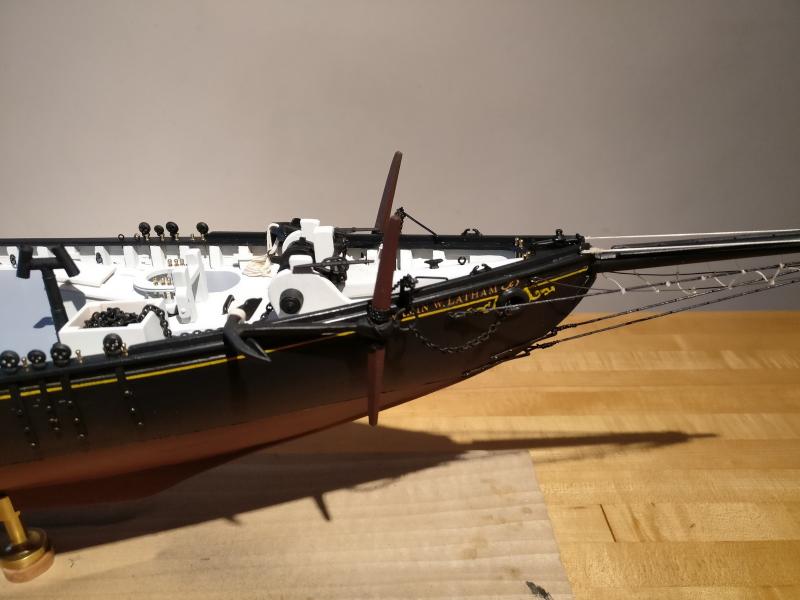
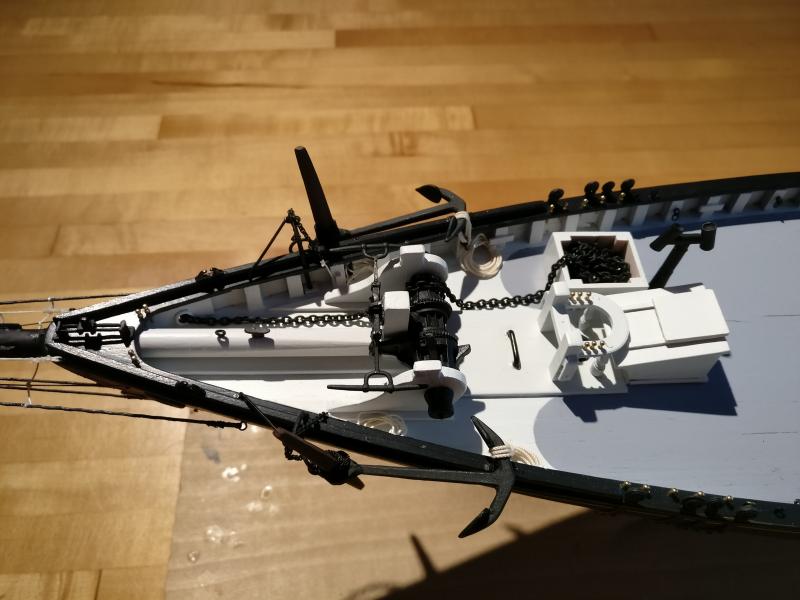
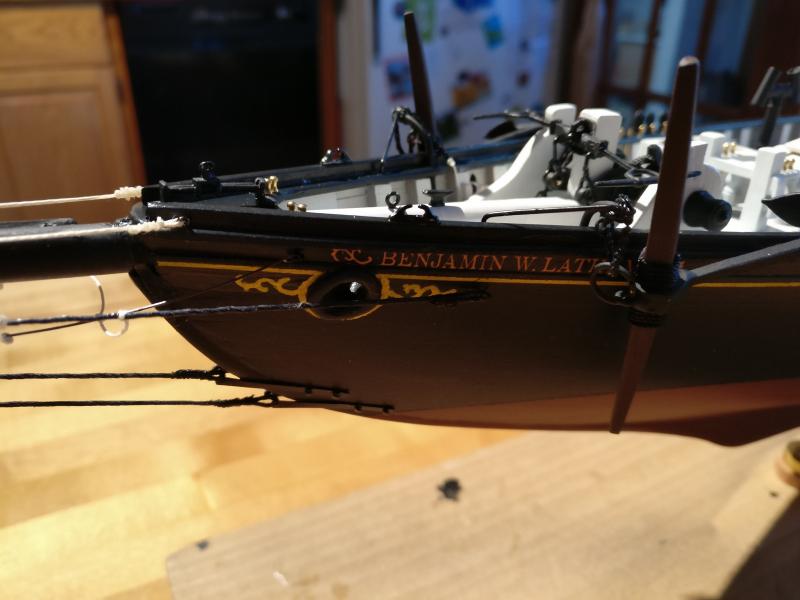
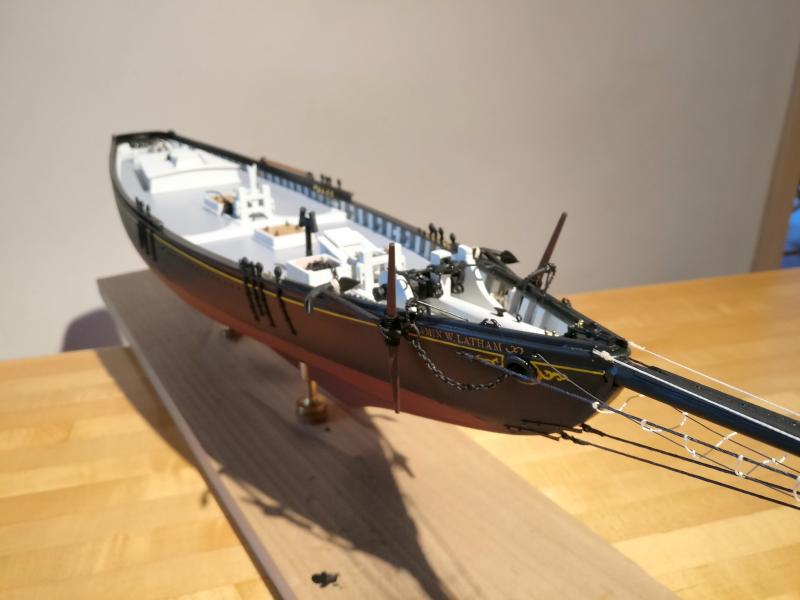
 I finished the deck, well about 90%, and not a time too son. Looking at my log, I started this kit in Nov 2014, but I logged only 227 hours so far. Can't wait until retirement . Anyway, here a few pics, I will start the masts and rigging next; with a bit of luck, I might be done this Summer... The seizing on that bowsprit drove me nuts, and it shows. By the time I finished, I was able to do some decent seizing, but i did not feel like going back and redo them all, especially becaue I had redone most of them already once...
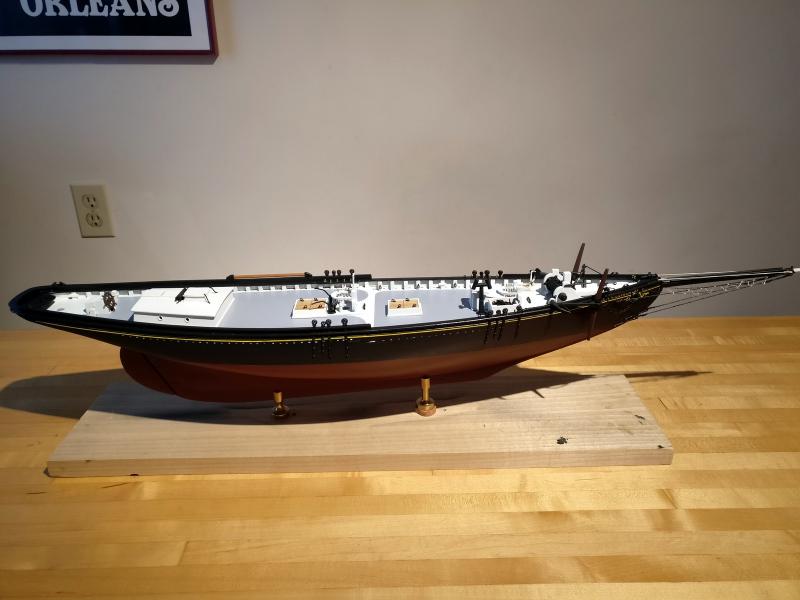


- 71 replies
-
- 16
-

-
- benjamin w latham
- model shipways
- (and 1 more)
-
Hello everyone, I am building the Benjamin W. Latham fishing schooner, scale1:48 : http://modelshipworld.com/index.php/topic/8617-benjamin-w-latham-by-frenchguy-model-shipways-148-scale/?hl=frenchguy I am working on the whole windlass, and I am looking for tips or examples on how to model a realistic purchase link and shackle between the rocker and the purchase arm (both Britannia fittings supplied with the kit). I don't want to put a copy here for copyright reason, but you can see what I am talking about on page 672 of Chapelle book on American Fishing Schooners. Thanks! Stephan
-
Hello, not great progress since April, but it looks like I I am finding time to get back to it ( I think I said it before but I have a real sailboat to sail during the Summer . Some pictures soon.... One drawback of waiting so long to build a model: the paint I purchased last year, and used in April, is starting to dry now that bottle has been opened... Anyway, working on the chainplates now. Stay tuned, and happy Labor day!
- 71 replies
-
- 1
-
-
- benjamin w latham
- model shipways
- (and 1 more)
-
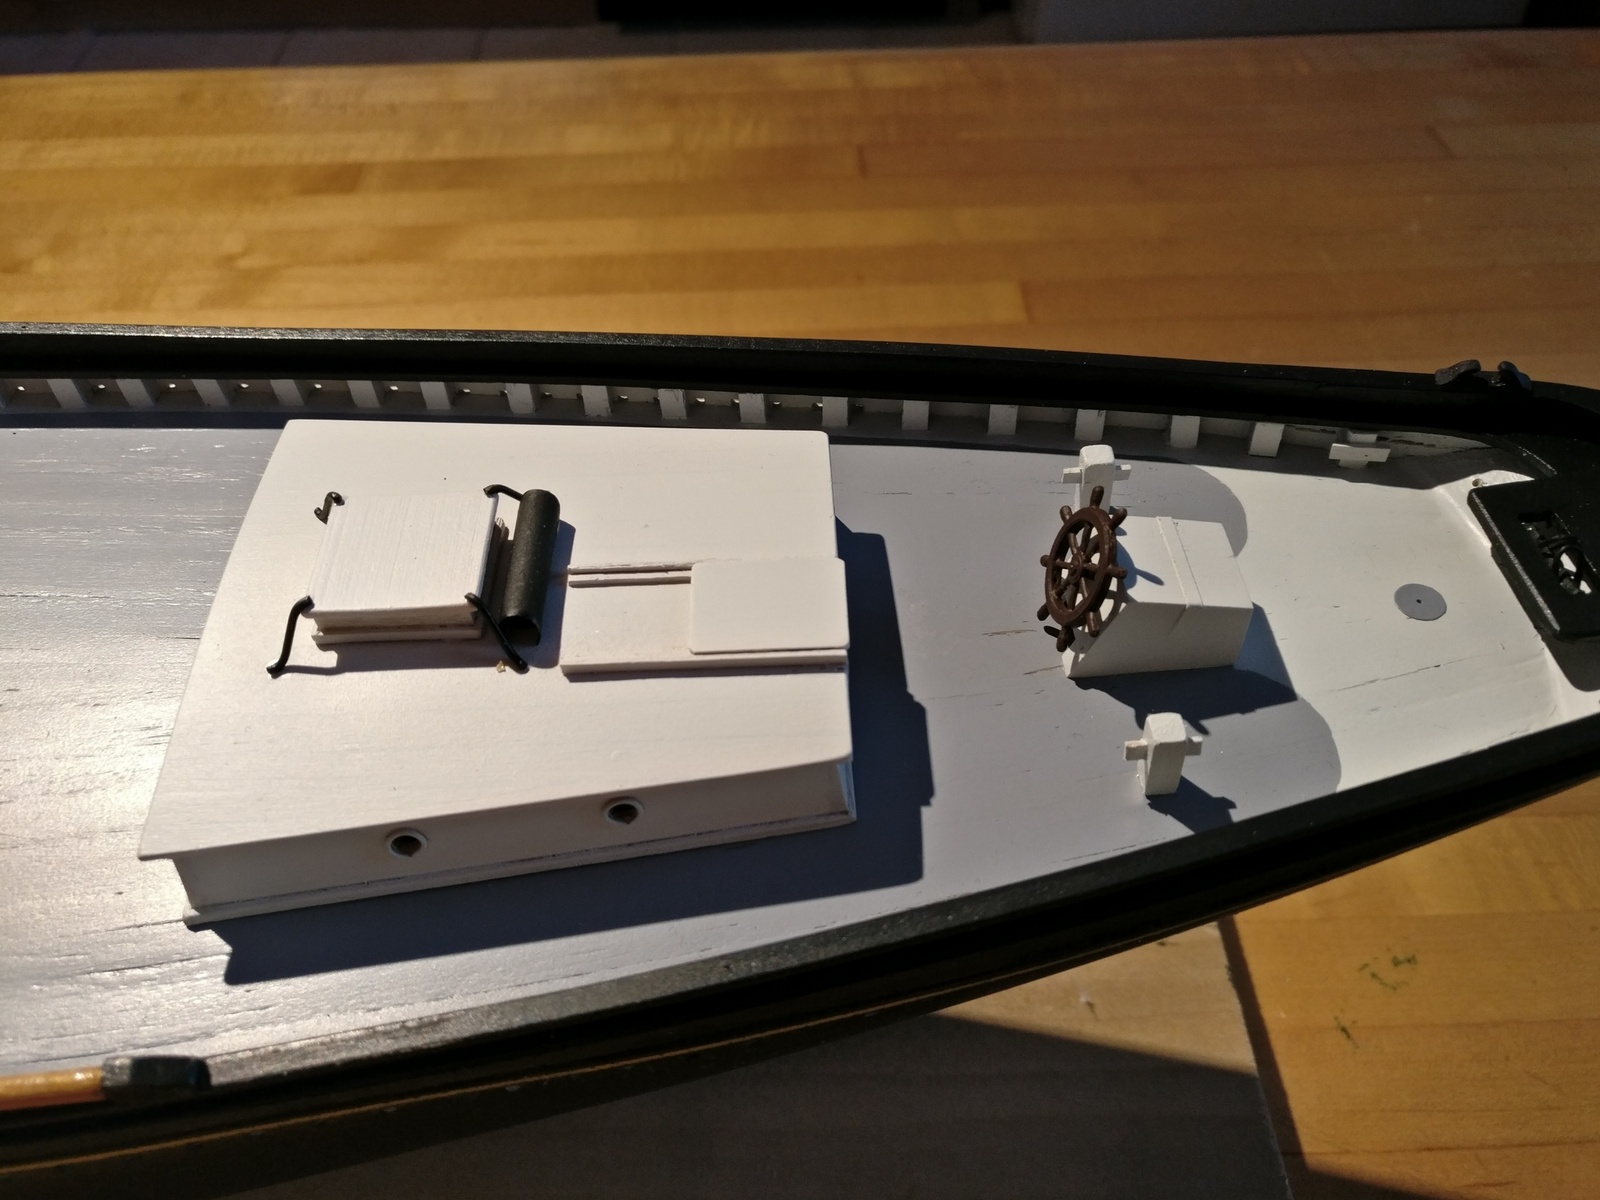
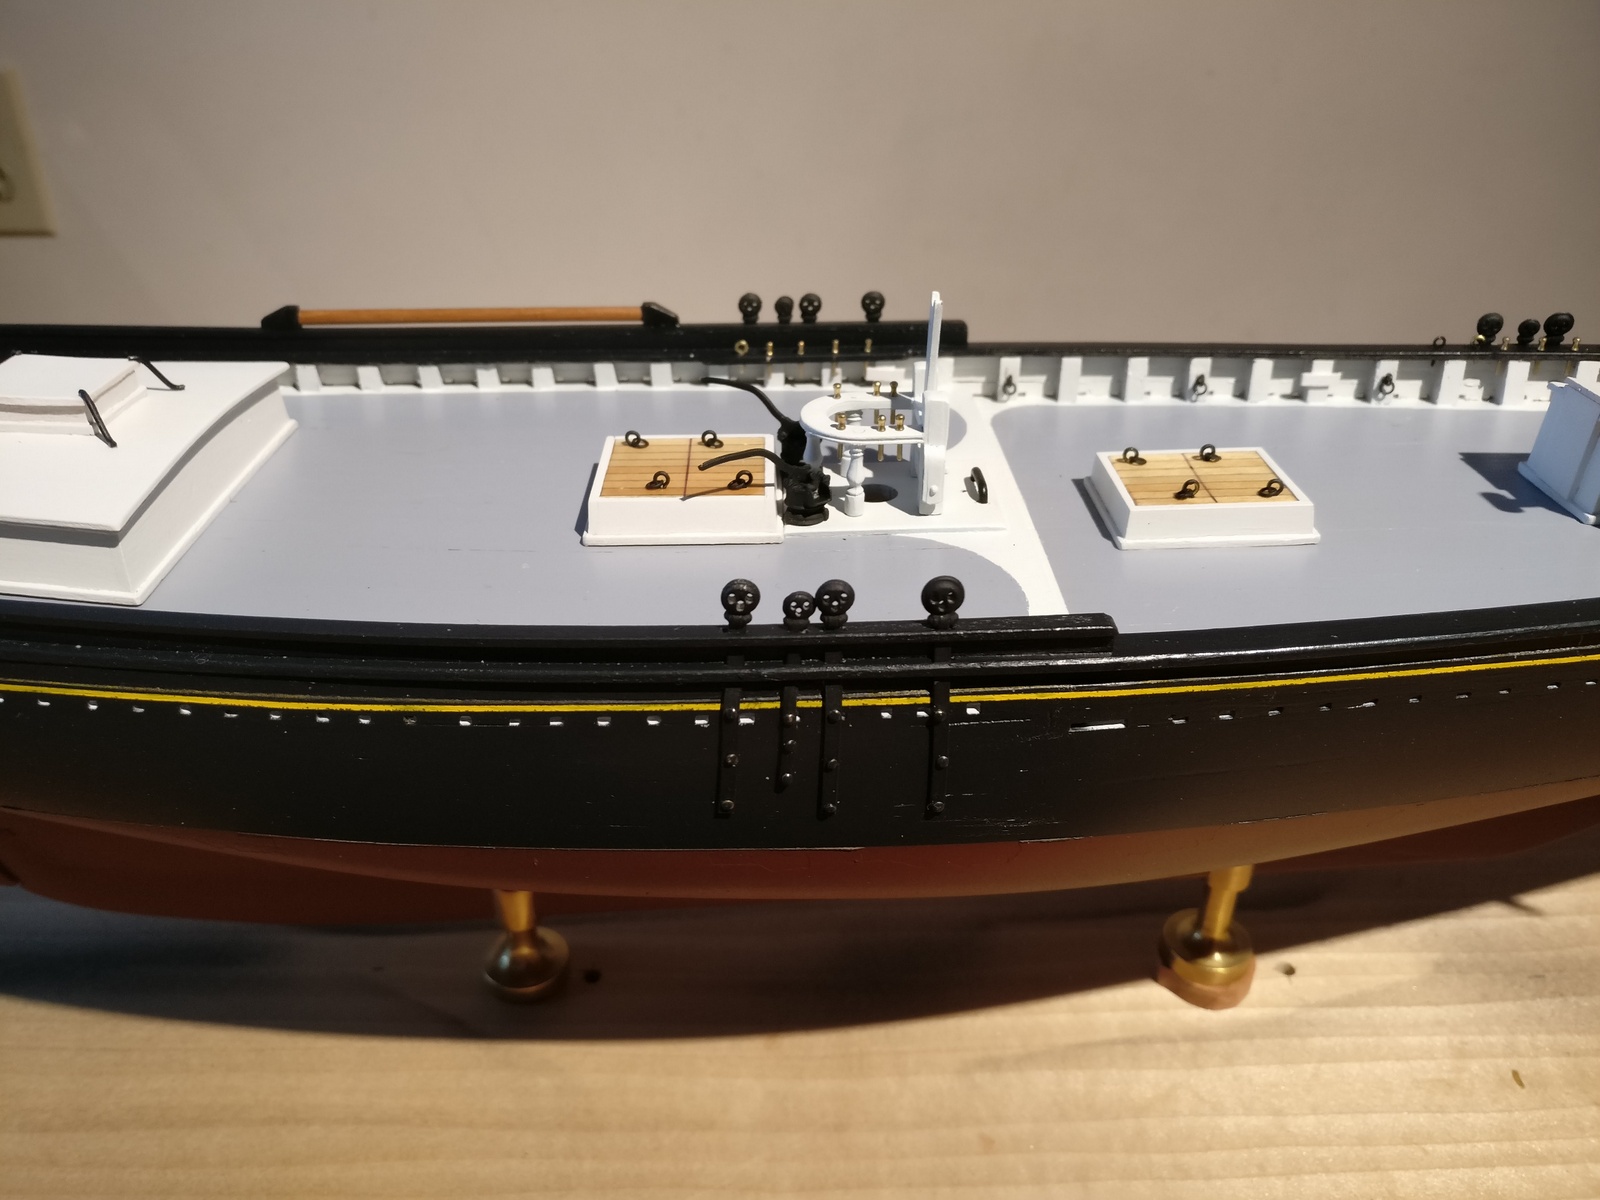
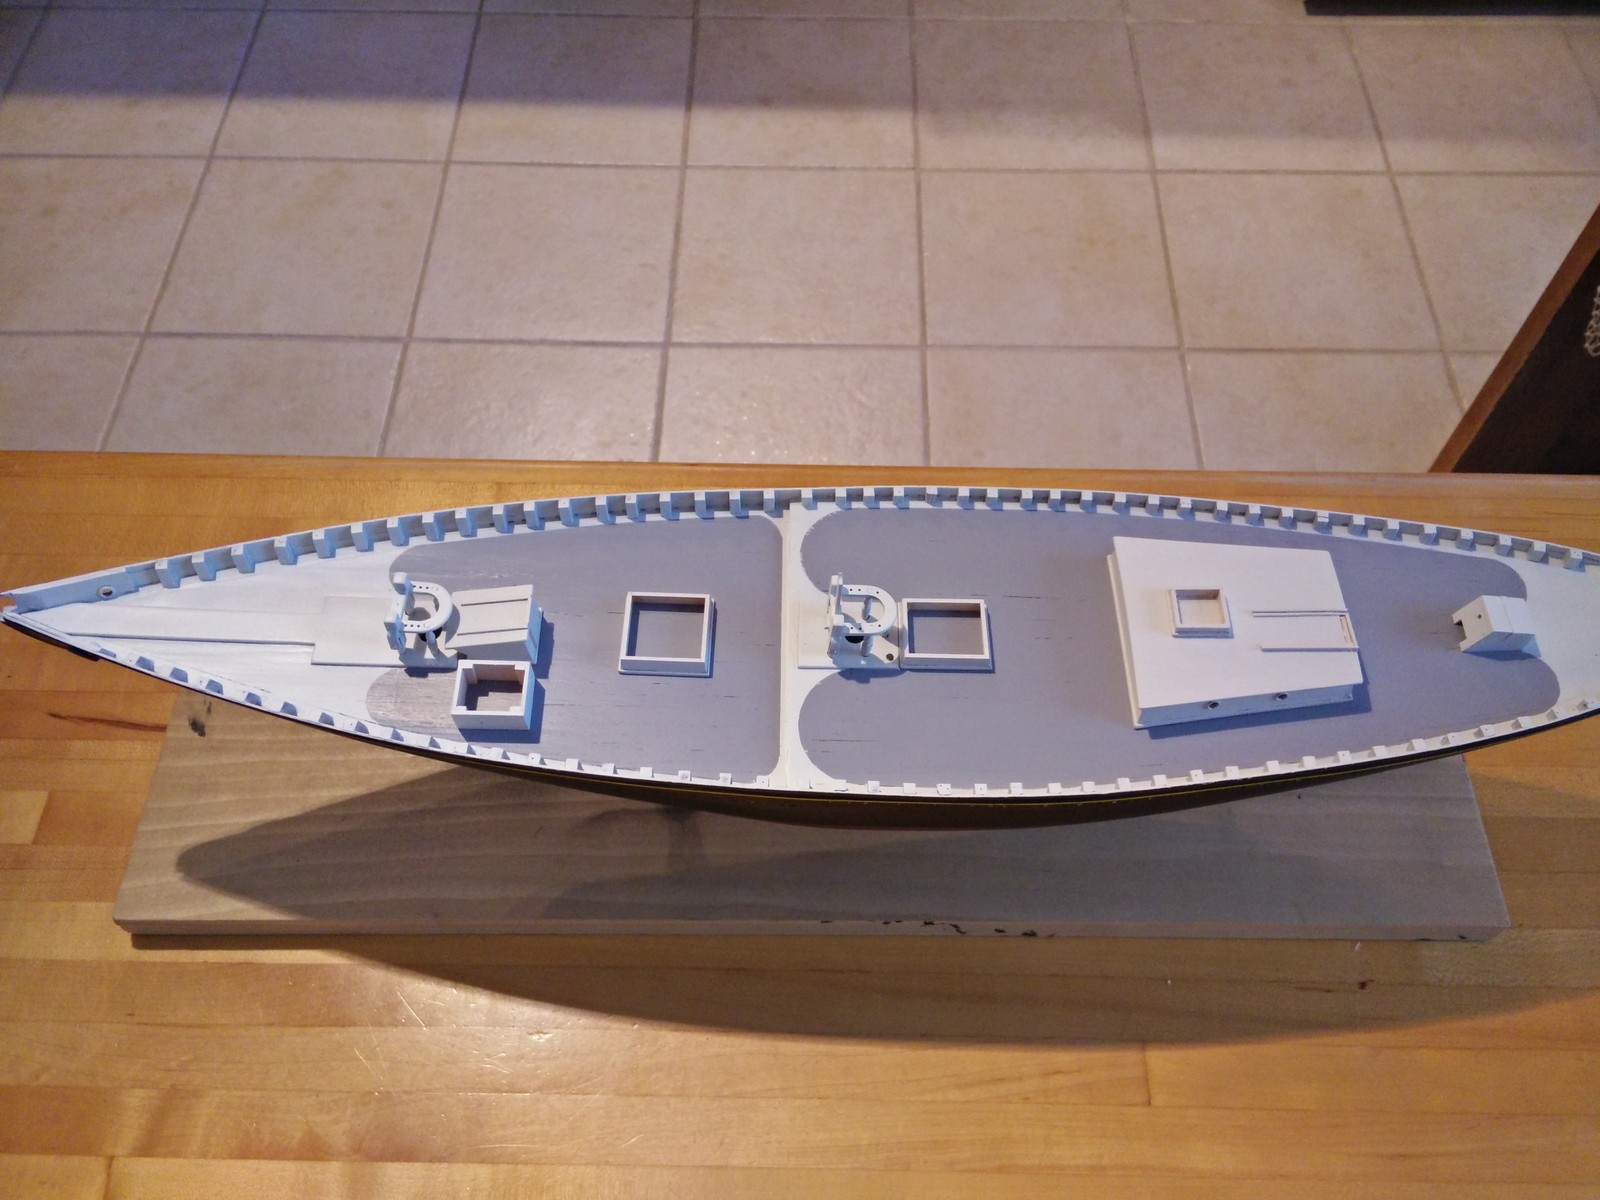
Work in progress. It did not start well, as the paint was still too thick and was clogging my airbrush. I tried a mix 50/50 with rubbing alcohol and that seems the right mix. The deck furniture are just placed in place, not glued. I still need to do a bit of a touch-up as some paint bled under the tape, but I am relatively satisfied with the results so far.
- 71 replies
-
- 7
-
-
- benjamin w latham
- model shipways
- (and 1 more)
-
Now you tell me! Sounds like a great tip anyway, i'll do it on my next model. Anyway, I was able to repair the damage using a good old 3M blue tape that I burnished with my fingers. It came up easily without talking any paint with it this time. I removed it rather quickly after painting, and the result was surprisingly good, no bleeding under the tape. Also (and I should really remember that), I use a Paasch airbrush, and I think the secret lies in multiple pass with really thin coats of paint. That way, the paint dries almost instantly and does not moist the tape, so the edge is really nice and clean. You veterans of painting must think Duhhh.. Regarding the deck, I have not started yet. Yes it would be nice to see the planking, I was thinking of airbrushing it, but that will surely cover the planking. What do you mean by a pin wash of darker grey afterward? How do I do it? Stephan
- 71 replies
-
- 1
-
-
- benjamin w latham
- model shipways
- (and 1 more)
-
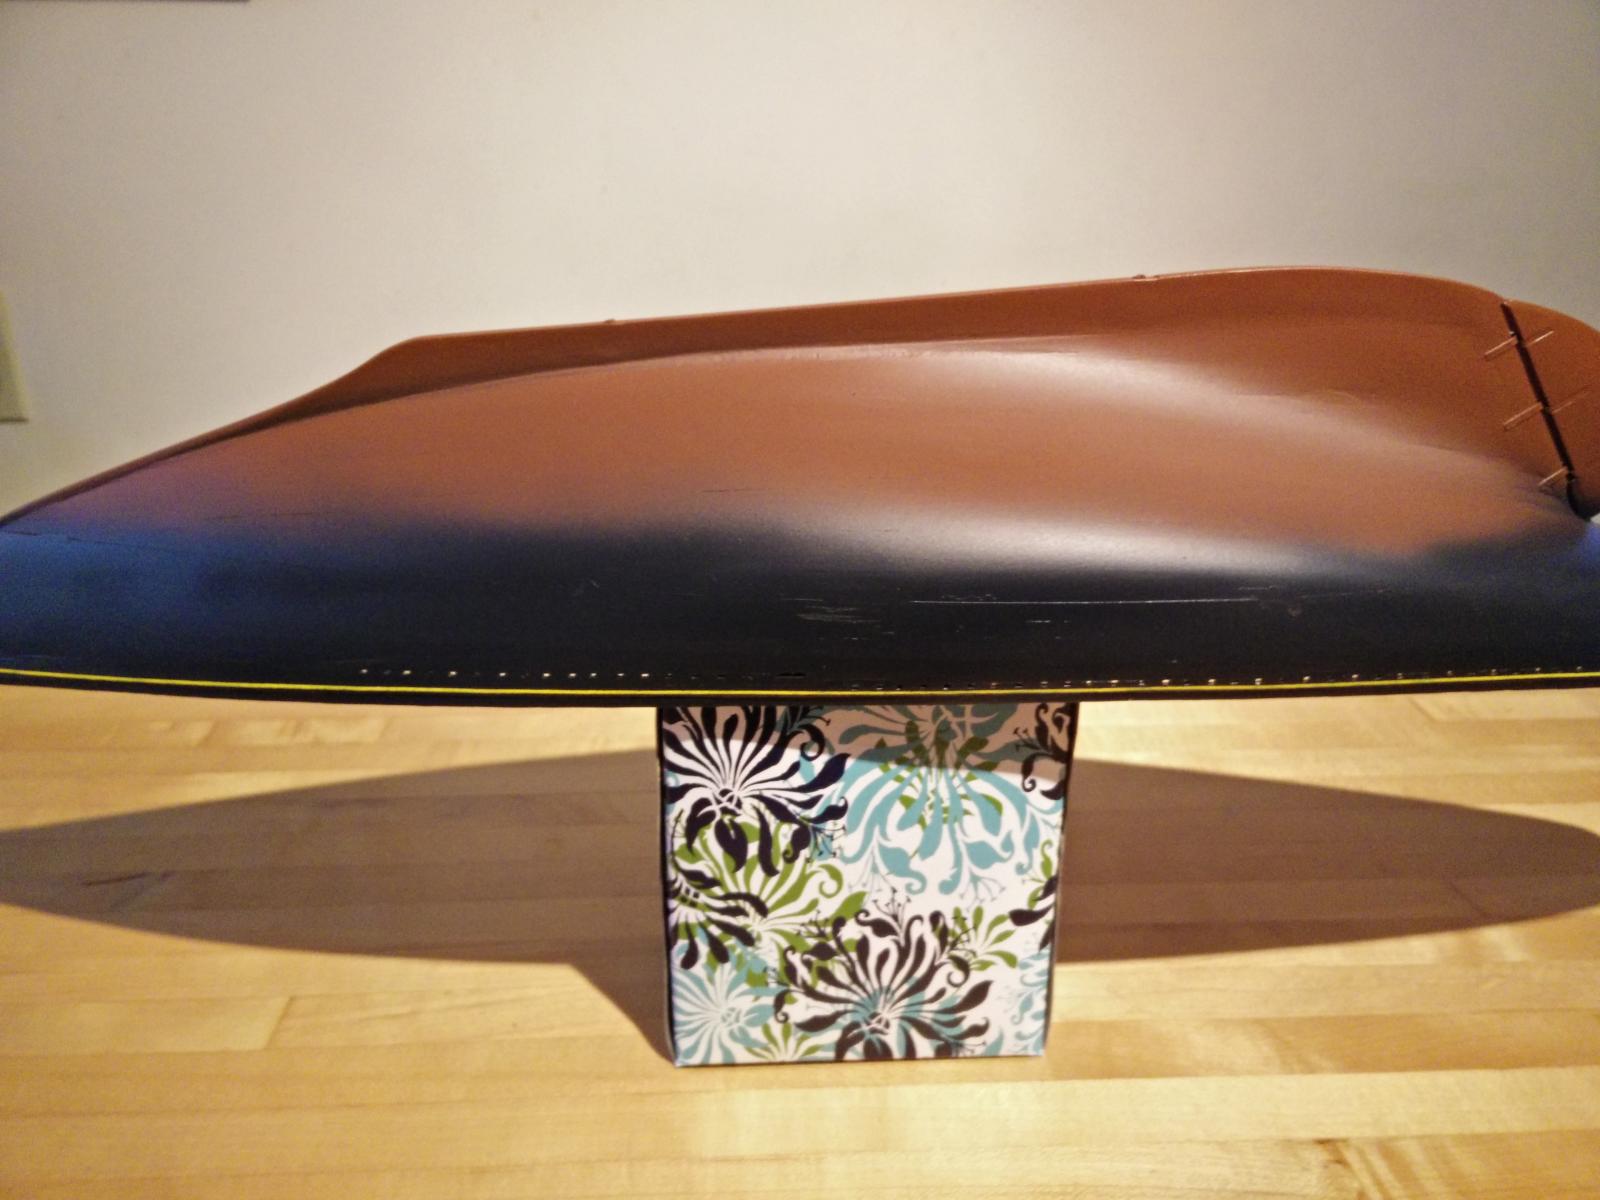
It’s been a while since I posted my progress. I started this model back in November 2014, and yet according to my work log, I worked only a total of 170 hours on it. So much for my determination at the time to complete it in one year… Over the winter, I built the deck furniture elements and prepared the hull, waiting for warmer days to start the actual painting. Well, I started the painting which has been so far and exercise in frustration. I usually use shellac to prime the wood and sand it with 400 grid sandpaper. I decided to use Badger modelflex marine paint and spray painting with my airbrush. I first applied a black coat, and then painted the larger than desired yellow stripe, which I then masked with Testor 1/32th pinstripe masking tape. I then applied another coat of hull black paint. Removing the pinstripe tape was ok, but there was some black paint bleeding under the tape. Then I marked the waterline and used electrical tape as masking tape before painting the bottom red copper. That’s when problems began. When I pulled the electrical tape, in some areas the black paint came along with it, leaving a mess along the water line. I believe the acrylic paint did not adhere well enough to the shellac substrate. I don’t recall having these problems with my previous models. I was using Floquill paint at the time, which may have been better quality. Also, I forgot to burnish the tape also before applying it, which may have caused the problem, and maybe I should have waited a bit more for the black paint to cure before painting the hull red ( I waited 24 hours). In any case, I will try to fix this, but It will not look great anymore. I have read –afterwards- on forums here that the Tamiya tape is the way to go. Painting the hull is always an exercise I dread, and with apparently good reasons. I don’t know if using Shellac in the first place is a good idea. I experimented some time back with Gesso, but I found it very difficult to sand. I wonder if other modelers are facing the same kind of issues. Also, I wonder if I would have the same issues, using enamel paint?

- 71 replies
-
- 3
-
-
- benjamin w latham
- model shipways
- (and 1 more)
-
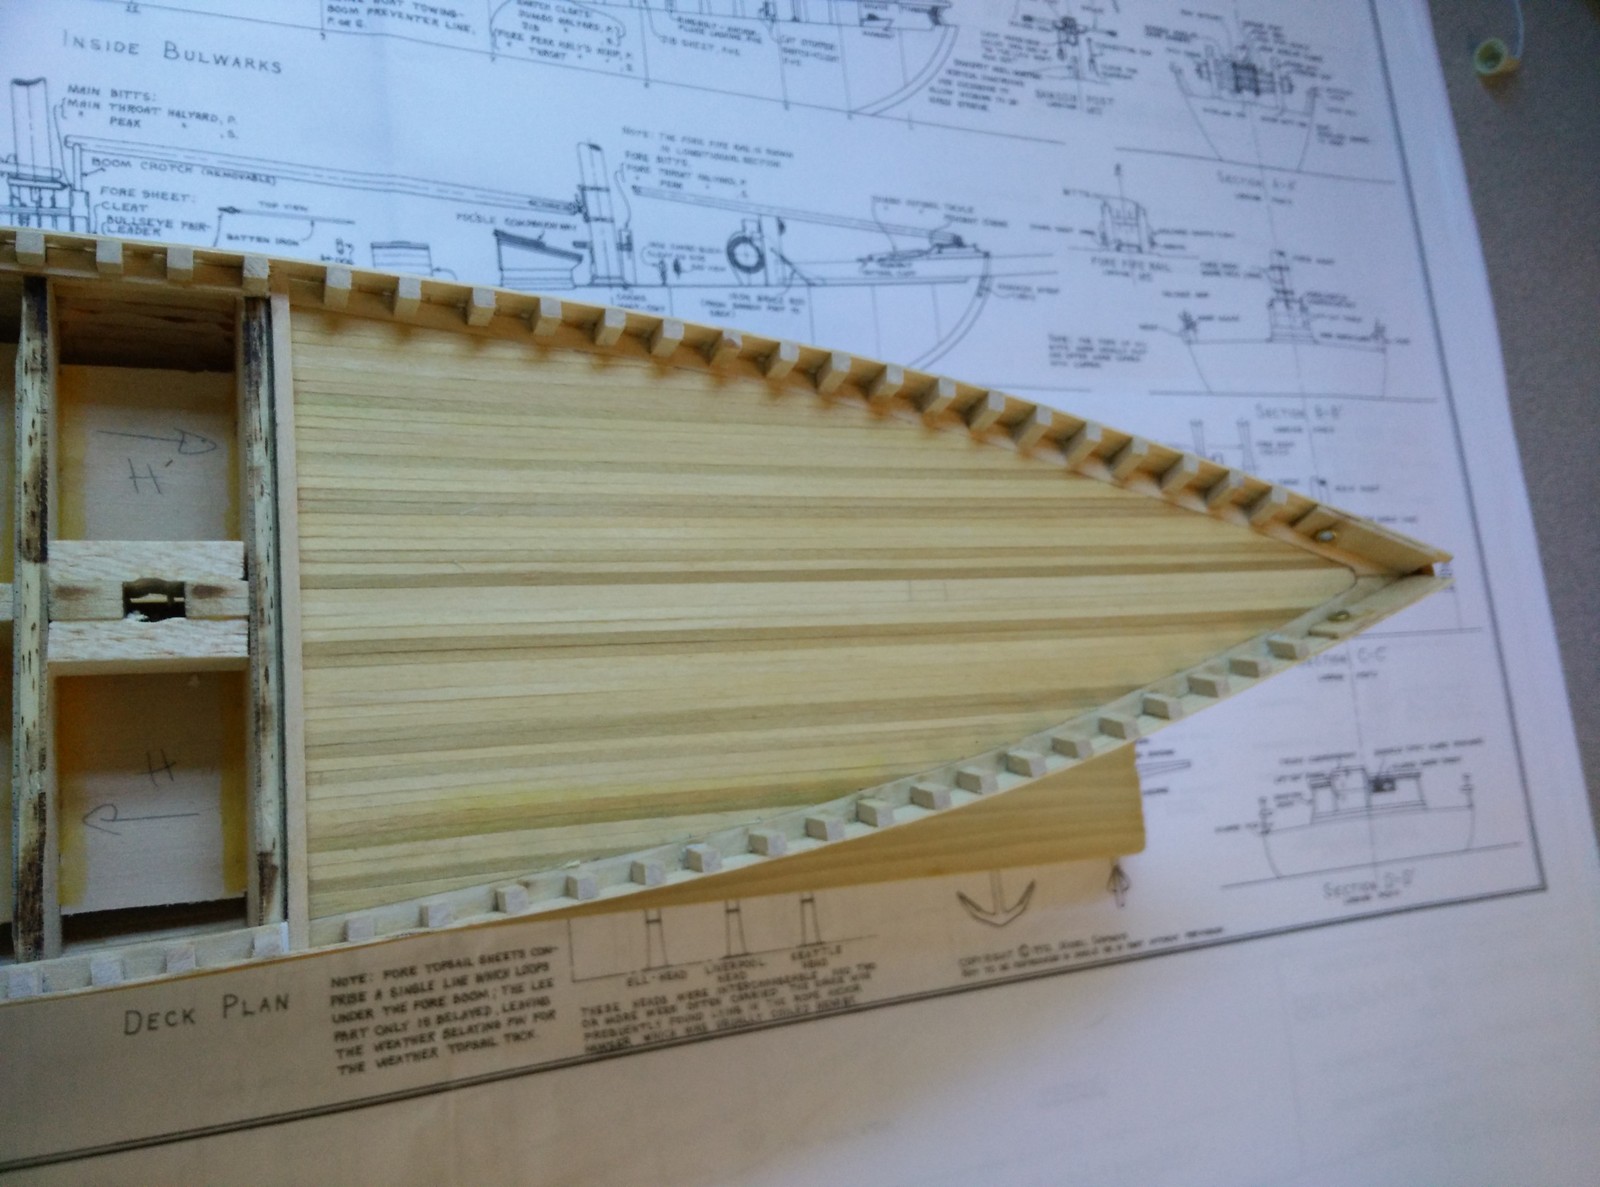
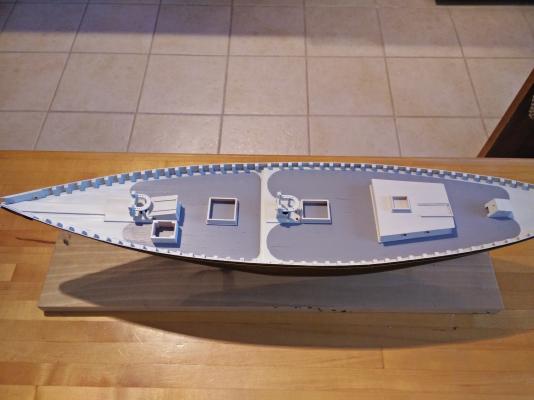
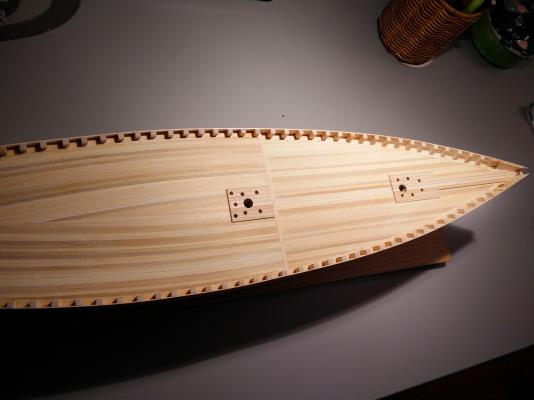
Well, it has been a very busy summer, but not for model building! I finally find the time to go back to my Benjamin Latham build. I completed the deck planking, and after a bit more preparation, I'll start painting. Here are a couple of pics from the deck planking final steps. almost done! I installed the thick pads for the mast and fifes rails. The thick pad for the windlass, I'll install after the deck is painted (lots of masking tape in that area).
- 71 replies
-
- 12
-
-
- benjamin w latham
- model shipways
- (and 1 more)
-
Hi Gary, your timing can't be more right... For the past 2 hours, I have been studying the plans and prototyping so to speak the main deck planking. I agree that I will have to some sort of nibing, to respect the flow of planks around the main cabin (although I doubt the planking will show after I paint the deck). I suppose if I dilute somewhat the paint, it will still show the hard work When I say some sort of nibing, I think I can get away with just tapering the end of the 3 or 4 planks at the edge. Doing the real nibs will be difficult as the waterway is already glued in. Just curious, how do you folks cut nibs in that case (aside from "carefully" ) Stephan
- 71 replies
-
- 1
-
-
- benjamin w latham
- model shipways
- (and 1 more)
-
Foredeck planking completed! Onto the main deck planking....

- 71 replies
-
- 8
-
-
- benjamin w latham
- model shipways
- (and 1 more)
-
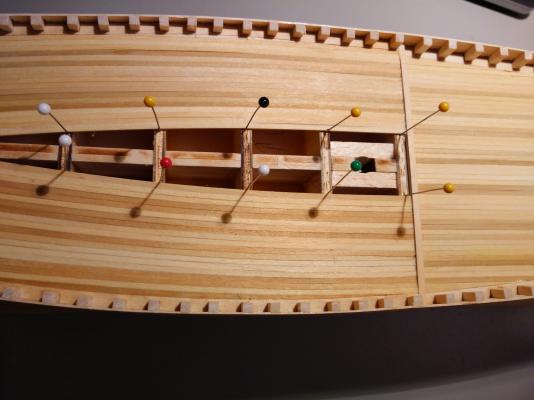
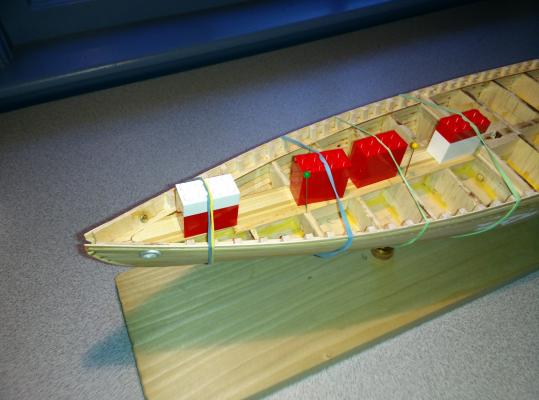
Progress update: I finished installing all fake stanchions, and started planking the deck. Since I’m going to paint the deck anyway, I’m using 1/8 x 3/32 planks instead of the 1/8 x 1/8 provided with the kit. After a futile attempt to cut nibs on the foredeck planks, I decided my Benjamim Latham will not have any nibing on the deck. Here is a picture of work in progress. I use the Elia’s patented Lego method to hold the planks in place while the glue is drying
- 71 replies
-
- 5
-
-
- benjamin w latham
- model shipways
- (and 1 more)
-
Hi Elia, I thought you might be interested in this article in the latest issue of BoatUS magazine: http://www.boatus.com/magazine/2015/june/the-real-mccoy.asp It’s about Bill McCoy who purchased the Arethusa in the 1920’s for a purpose that, let say was not exactly as glamorous as mackerel fishing There are some pictures of the Arethusa deck in there. Something I learned is that the wheel of the Arethusa was the model for the helm of the famous Gloucester Fisherman’s memorial in Gloucester.
-
Hi, I am building also the Benjamin Latham and I could not figure the transom part either. I suspect there is a problem in the laser cutout keel and the transom piece. I redid it three times and I am still not happy with the results. As someone else mentioned, check Elia's blog and pictures.
-
Quick update: I installed the great beam, and I'm in the process of installing all false stanchions (and replacing the ones coming from bulkheads extension). I also drilled the hawse pipes. The hull is ready for painting; I might do a first light coat to identify any problem. I was thinking painting the hull and deck completely after I finish the deck planking. So I will start deck planking soon, but I have a question which may sound stupid but here it is: since I decided to paint the deck, do I need to bother simulating the black caulking between planks on the deck? i don't think it will show up after I paint the deck (grey) Cheers, Stephan
- 71 replies
-
- 1
-
-
- benjamin w latham
- model shipways
- (and 1 more)
-
I have not posted in a while, but I'm still working on it. I finished planking the hull and completed sanding. I used shellac for surface preparation before painting. Talking about painting, I went recently to the Cape Ann museum in Essex to look at the Ben Latham model from Eric Ronberg. I decided to paint the deck grey, and will paint the waterway white, along with the semi circles on the deck. The transom gave me a lot of headache, hopefully it will turn out ok. As for the rudder, the third version is finally giving me satisfaction ! As a note, I am keeping a log to see how many actual hours I am spending on this model here. I will post pictures soon Cheers
- 71 replies
-
- 3
-
-
- benjamin w latham
- model shipways
- (and 1 more)
-
Basically, zero progress since last update, between vacation, snow shoveling and fixing ice dams in the house. Hopefully I'll resume this weekend.
-
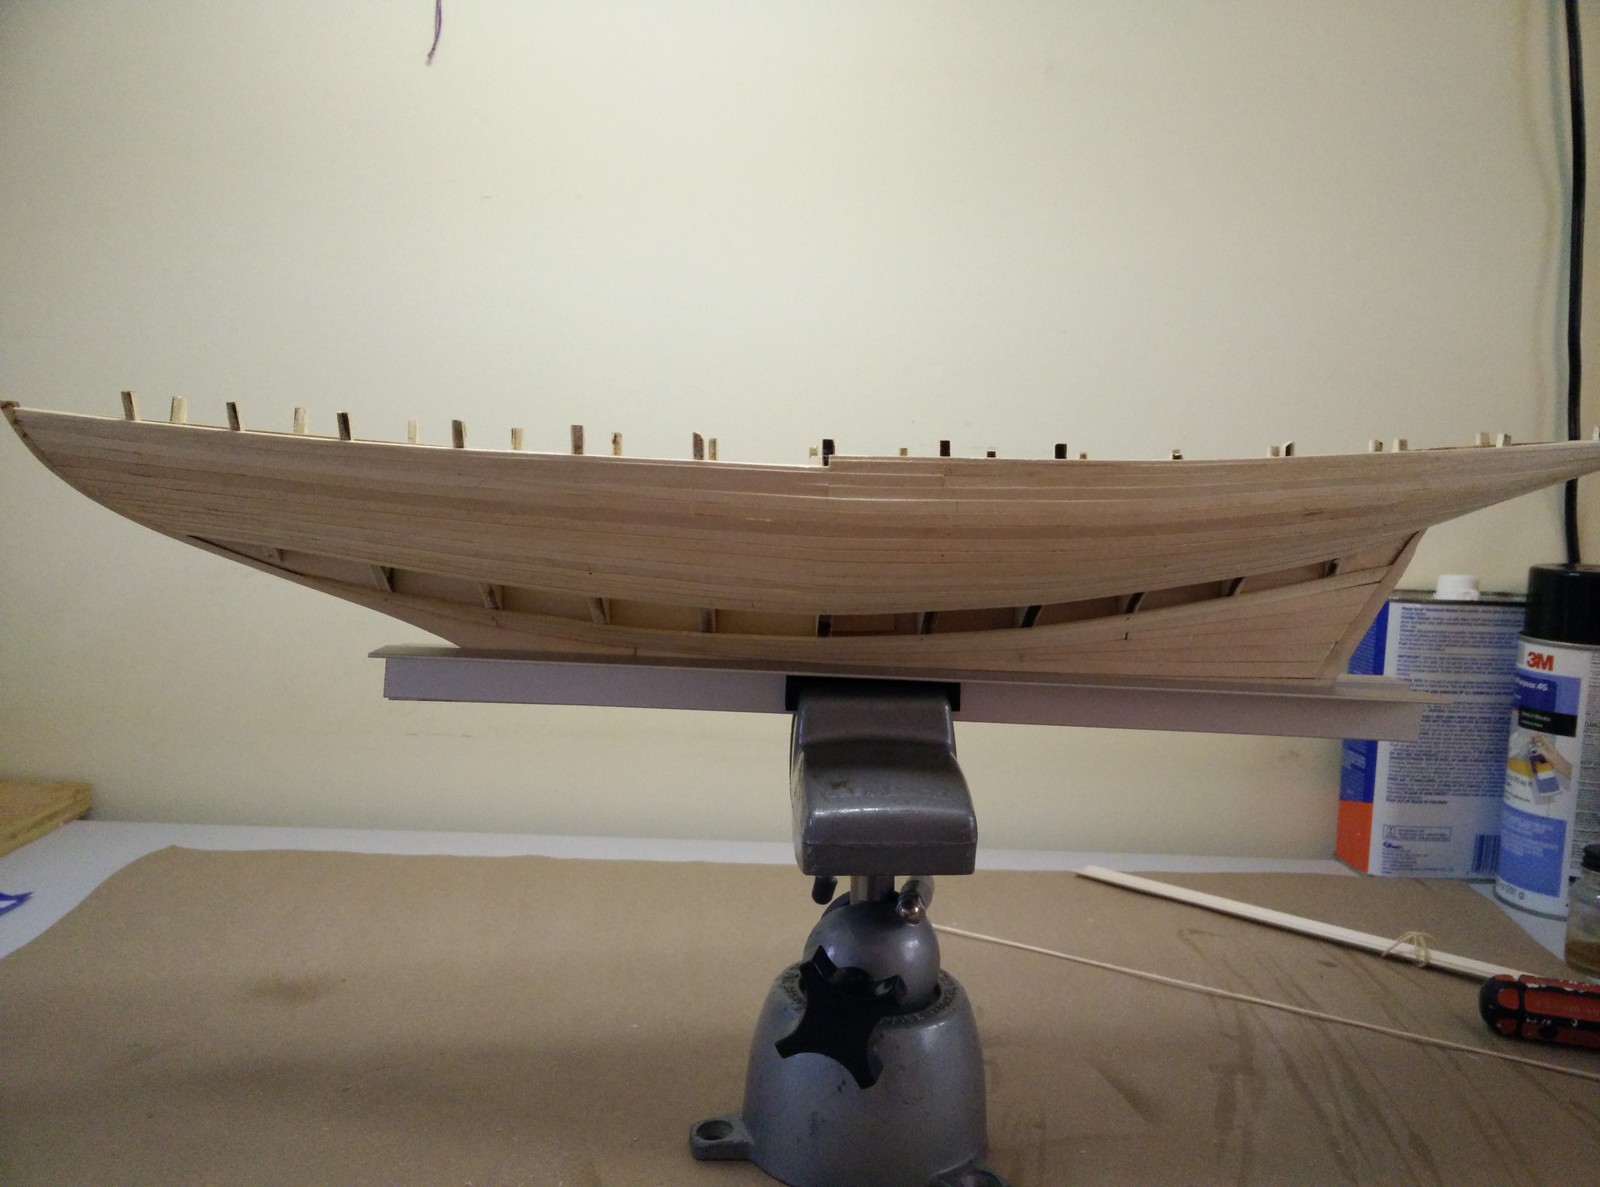
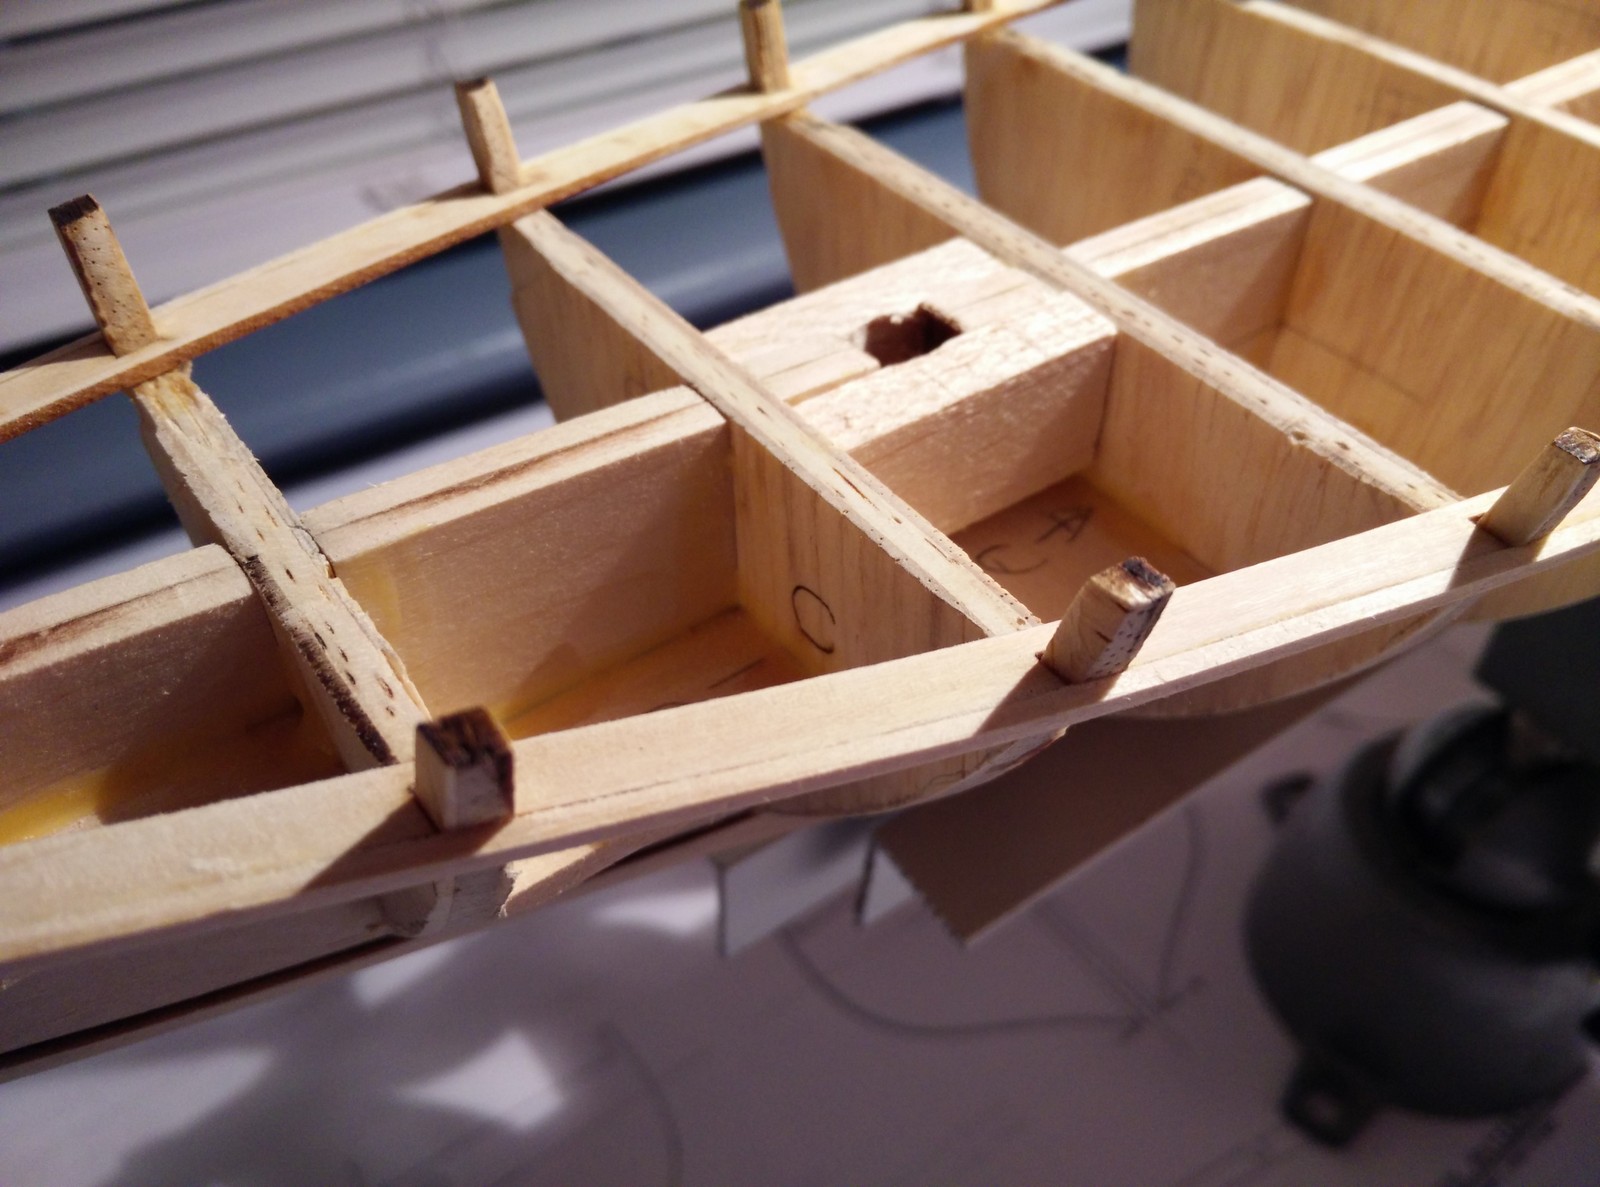
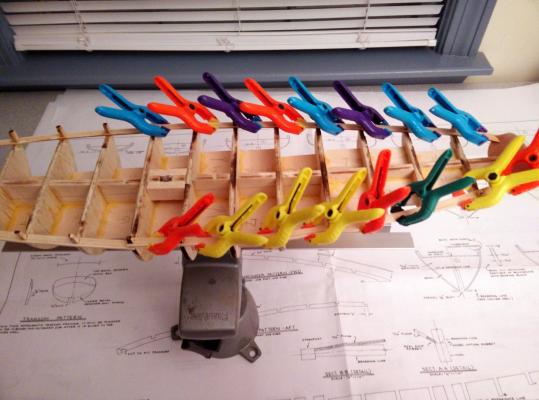
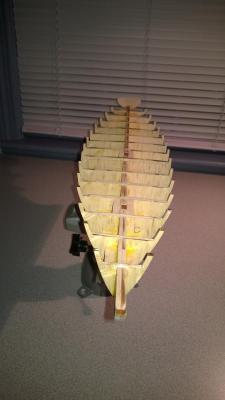
Today’s update: I –finally- finished planking the hull. I am reasonably happy with the result so far, except I noticed there is a problem created by the fact that one of the laser-cut bulkhead (“H”) was not symmetrical to the center line. I actually noticed when I started to dry fit the bulkheads that bulkhead B was way off center, and I fixed it. But I guess I forgot to verify all of the bulkheads at the time. Kind of weird, because you would expect a great deal of precision with laser-cut parts. I don’t think it will be too noticeable after I finish sanding, we’ll see. (Note to self: next time you get a model with laser-cut parts, verify they are actually correctly cut). I am now proceeding with the bulwark planking, cutting the scuppers before gluing the bulwark planks. Talking about bulwarks, I pretty much came to the conclusion that I will not use the stanchion extension from the bulkheads, and I will have to replace them all. Several got damaged and the quality of the wood is not great to begin with. So for now I keep them in place as a form as I am gluing the bulwark planking, ensuring that planking is not glued to the existing stanchions. I will then glue the other stanchions, and at the end replace the ones that come from the bulkheads (hope this makes sense) After that, I need to start sanding and preparing for hull painting, after which I will start deck planking. At least that’s the order I have in mind right now. I have been thinking a lot about color scheme for the Ben Latham, and I am thinking of a natural wood color for the deck (not painted), so that’s why I want to paint the waterways first. I know it may not be historically accurate, but I like this approach. I’m curious to have comments from readers out there.
- 71 replies
-
- 3
-
-
- benjamin w latham
- model shipways
- (and 1 more)
-
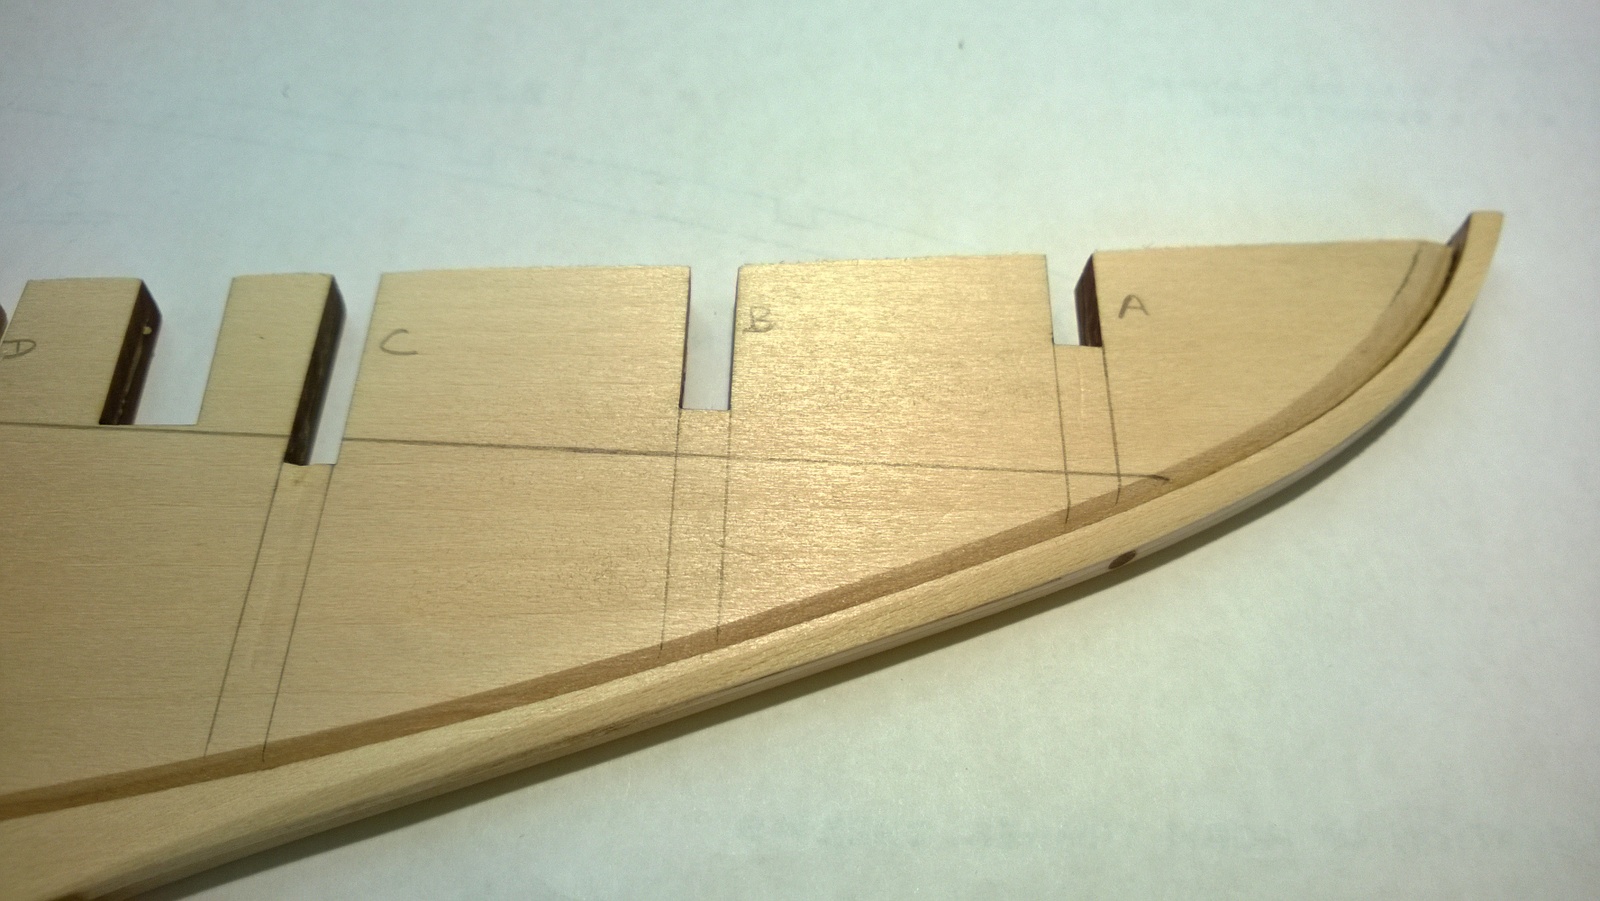
Work in progress; I completed belts "A" and "D" and belt "B" is in progress. I am trying to go by the book, although I took some liberty, especially when when it comes to nibbing. I think end result will be fine, although I am still worried about this transom piece...

- 71 replies
-
- 10
-
-
- benjamin w latham
- model shipways
- (and 1 more)
-
Things are progressing slowly, I redid the transom part three times, and I think I now have it right, we'll see... I finished gluing the planksheer and the 1/16 square strip on the outside of the planskhseer. I am ready to start planking. A few pics of work in progress: Gluing the square strip along the plansksheer: Close up of stanchion and planksheer, The stanchions will need to be sanded. Not all of them are in this shape, some were damaged and will need some reconstructive surgery

- 71 replies
-
- 6
-
-
- benjamin w latham
- model shipways
- (and 1 more)
-
As I am going through the construction of the Benjamin Latham, I finally realized what I was doing wrong in building the transom of Hesper. It will now have to wait until I complete my Latham kit, but I will get back to Hesper right after. Stay tuned...
-
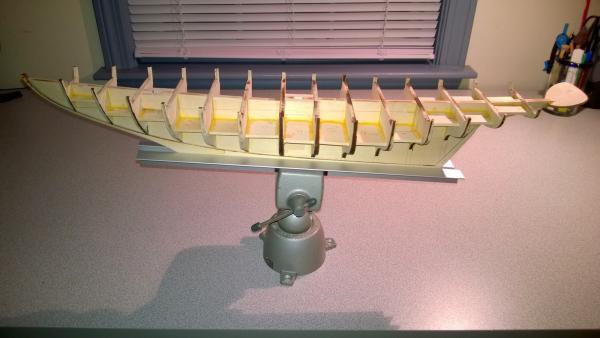
I finished preparing the bulkheads, adjusting them so that the planksheer fits nicely and is flush with the outside of the bulkheads. I beveled each bulkhead roughly and will do a final sanding before planking. The transom gave me some worries, as usual, and I decided I will do the beveling after it's glued in place. After dry fitting everything and ensuring everything looked properly aligned, I glued all bulkheads with the planksheer in place, for ensuring proper bulkhead alignment. (that yellow carpenter glued looks really ugly when dried). Next, glueing the planksheer and the 1/16 square strip along the hull; then I'm ready to start planking.
- 71 replies
-
- 8
-
-
- benjamin w latham
- model shipways
- (and 1 more)
-
Here is an update on my progress on Benjamin Latham. I have not started to work on the bulkheads yet as I wanted to finish the rudder first. I completed it today, but I have to say I am not happy with the results. I experimented with different approaches for the pintle, and finally used brass strip for the iron straps, recessing them into the rudder. I drilled holes for the bolts, and simulated them by filing the head of brass nails square before glueing them into the pre drilled holes. The end result looks out of scale, and looking at Chapelle book, they were 3” wide which translates to 1/16 wide on the model. The brass stripe I used is just too large, and I did not do a careful enough job at filing the nails heads. So I gonna scrap the entire rudder and start from scratch, maybe with just a paper strap as suggested in the instructions in the first place. In the meantime, I received my vertical sander, but the sandpaper provider is way too coarse to use, so I have to find finer sandpaper for it. I don’t think I will use it as to bevel the bulkheads anyway as I was planning; I prefer to do it by hand. With the long weekend, I may find time to start shaping the bulkheads and assemble the whole center keel and bulkheads. So until next time…
-
$6.57 would be money well spent! Which reminds me I have to purchase new blades...
-
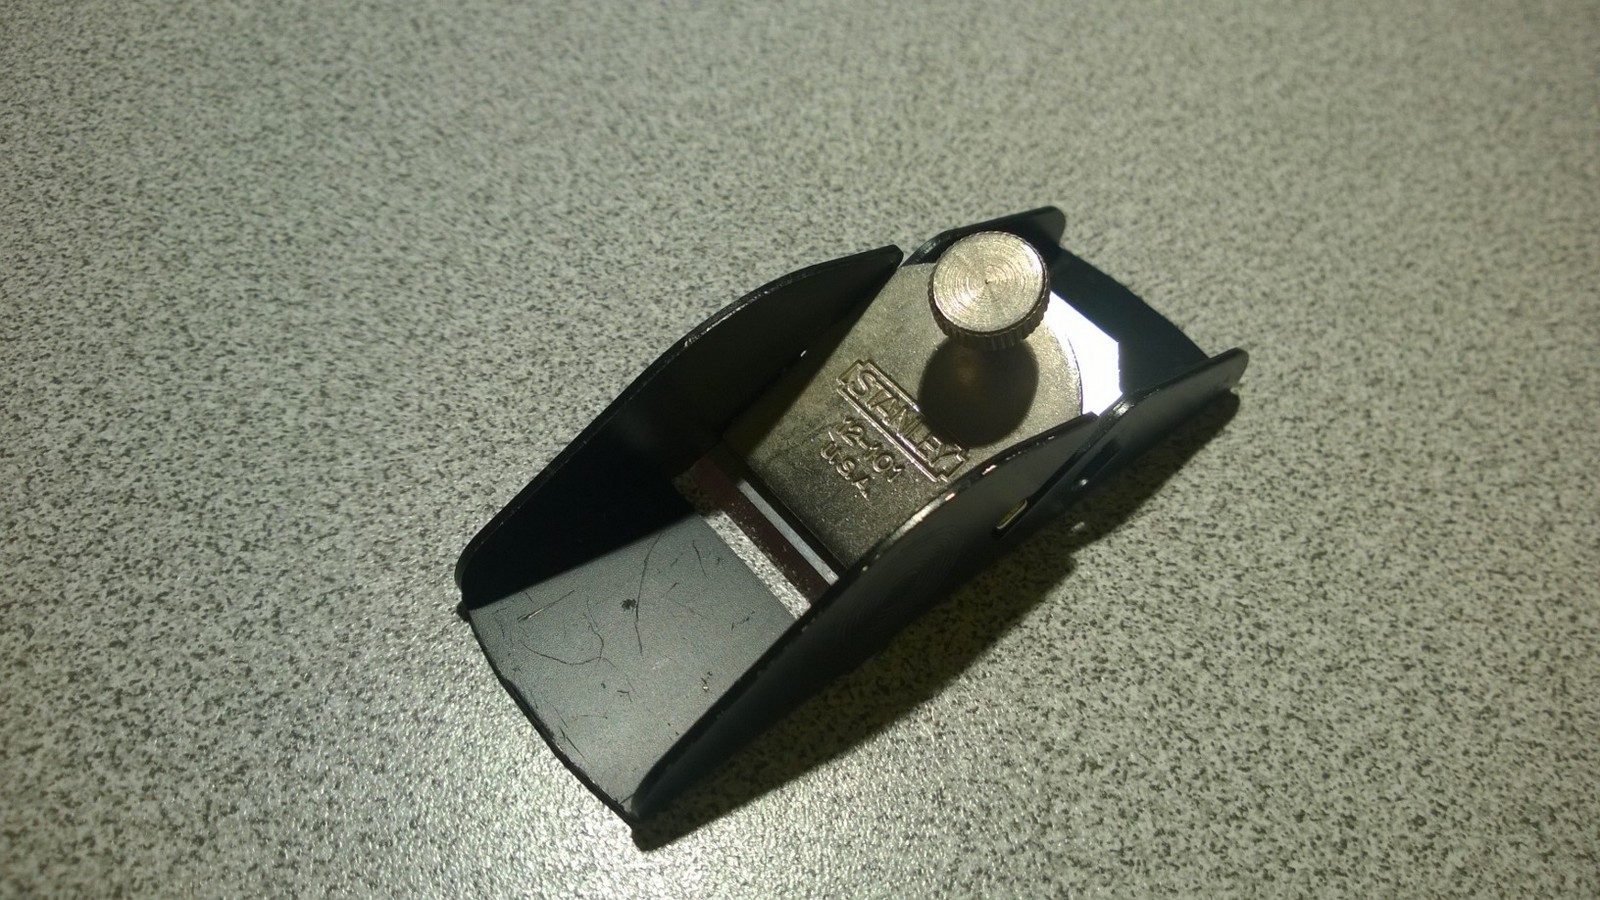
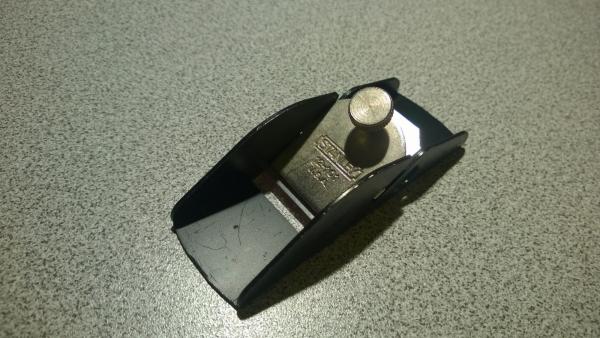
Hi, Yes, I find the stem bevel on this schooner very "elegant". The mini planner I use is from Stanley, all metal, very robust, made in USA. Model number is 12-101. I don't recall where I purchased it. Regarding next steps, I decided to work on the rudder and the gudgeons & pintles assembly before I start to glue the bulkheads.It's going to be a lot easier to mortise on the center keel while it's flat. Plus, I am waiting for my B-day gift to experiment beveling the bulkheads before I install them: a mini disk sander. Stephan
- 71 replies
-
- 1
-
-
- benjamin w latham
- model shipways
- (and 1 more)
-
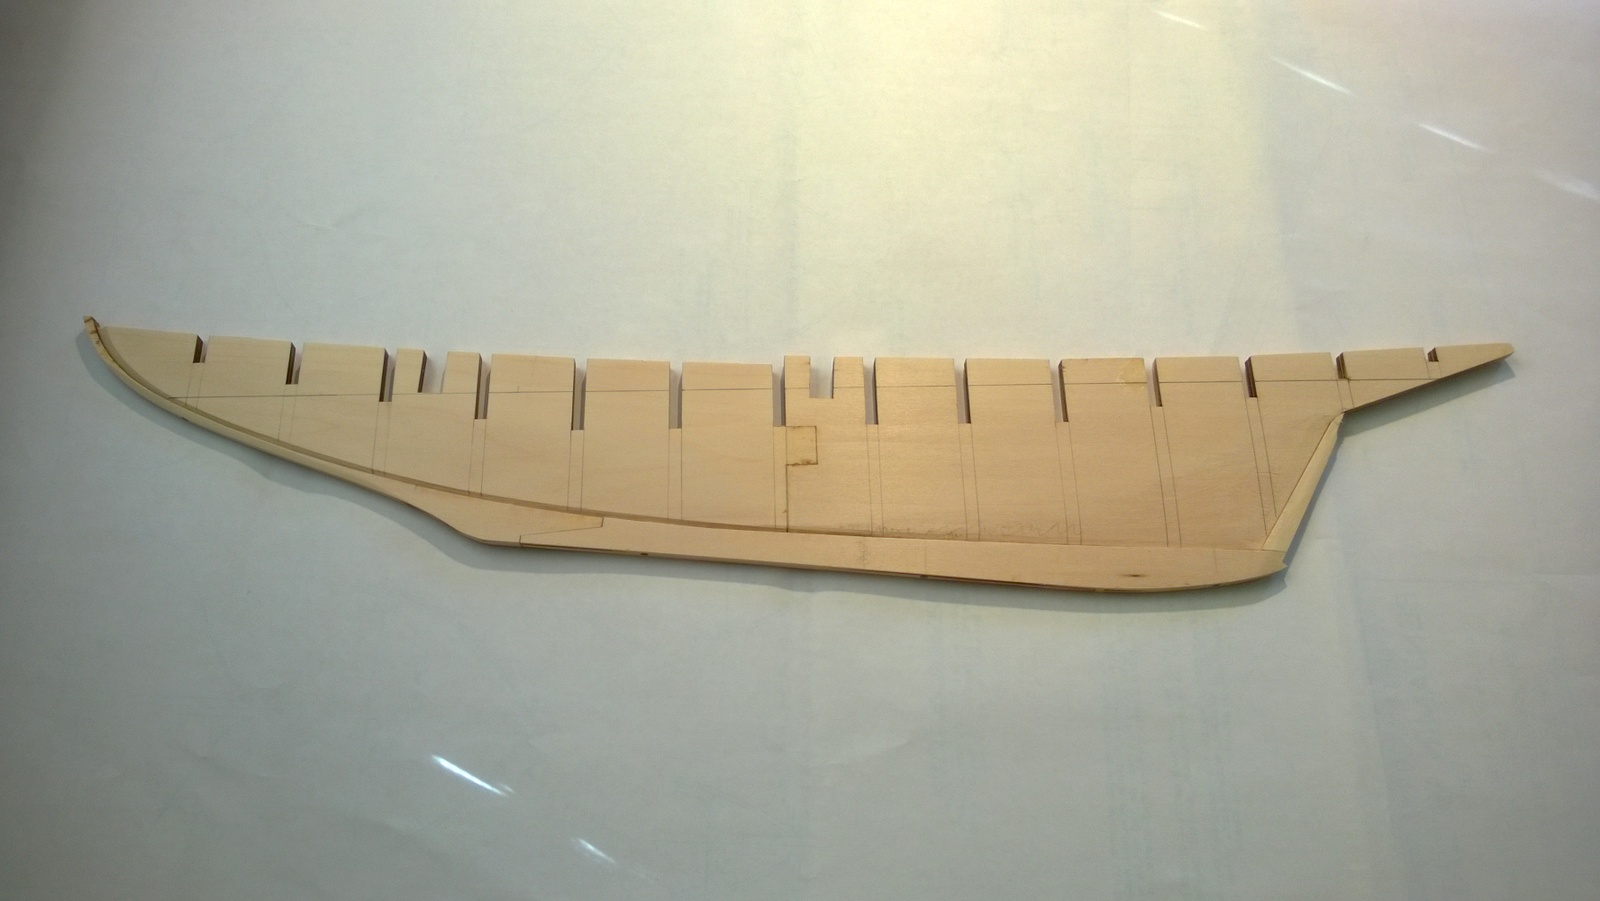
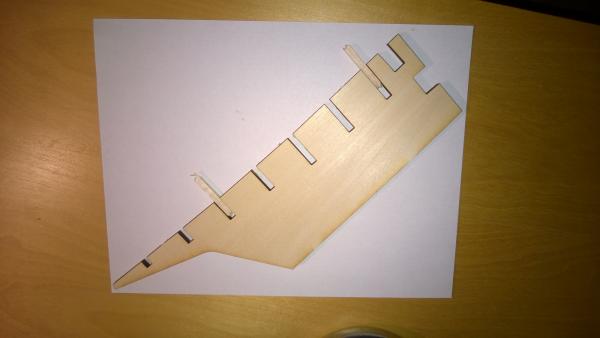
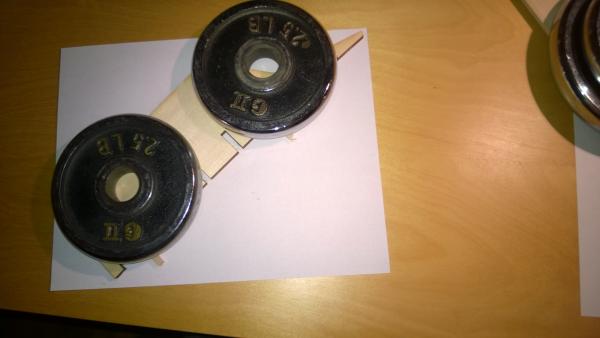
Center keel and Keel-Stem assembly The construction of the center keel is different from I have seen in previous kits. The center keel is made of 2 parts, but each part is made of two similar laser cut pieces, each 1/8 inch thick. So the first task is to glue together each part to form the two half keel parts ¼ inch thick. Needless to say, great care must be taken to ensure that the two pieces are perfectly aligned and flat during the drying process. I used 3/16 pieces of scrapwood (the thickness of the bulkheads) to ensure the slots are aligned perfectly: Then I let the two parts dry comfortably resting under a gentle 10 lbs of weight. I then assembled and glued the two halves of the center keel, ensuring the waterline aligns perfectly with the plan. After assembly, I cut the rabbet per the rabbet line using mostly a mini planner. I then assembled the parts of the keel stem and rudder (also each made of two 1/8 inch laser cut parts) and glued the keel/stem assembly, again using a lot of weight to ensure everything is flat. Finally I drilled a few holes in the stem and glued-in 1/8 dowels along the stem to ensure integrity of the whole keel and stem. The instructions says to taper the stem and sternpost before glueing but I prefer to do it after the whole assembly is completed: Here is a closeup pic of the rabbet and dowel at bulkhead A, also showing the tapering of the stem: Next, I will start working on shaping the bulkheads for dry fitting before glueing the bulkheads. Till next time… Stephan
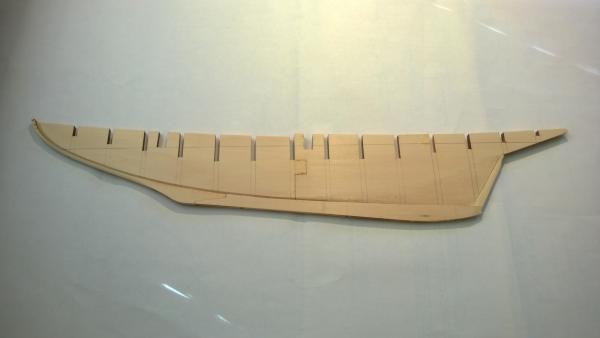
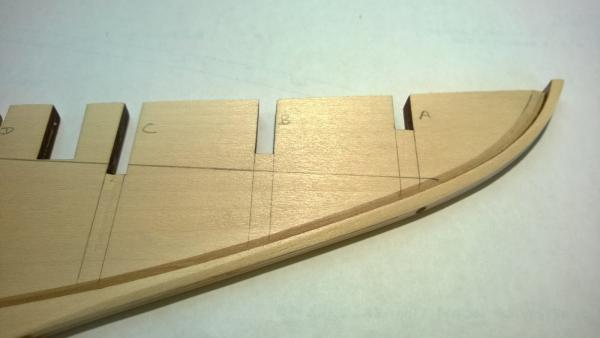
- 71 replies
-
- 9
-
-
- benjamin w latham
- model shipways
- (and 1 more)