Bob the Builder
-
Posts
35 -
Joined
-
Last visited
Content Type
Profiles
Forums
Gallery
Events
Everything posted by Bob the Builder
-
 I think I see what's happening now - in the photo where you're checking deck camber with the template...you weren't quite finished carving away the kit bulkheads - am I right?
 -
Charlie - I'm interested in your build because I'm working on the same kit. I find it peculiar though, of the shape of your deck camber out of the box, Mine was a lot closer than that out of the box... yet they're made at the same factory! I too had some work to do back at the transom though, and I too am adding hand-made decking, and tossing that odd stuff from the kit box...so we may experience some of the same problems along the way (not saying I can be of any help), but I am interested to see the angles you take. I have a feeling your meticulous approach is going to yield a fine subject. I have some progress photos from this weekend I'll be posting in my build log tonight - check it out if you get a chance...
-
Erik - I'm new to wood ship modeling too, but have many years from the plastic side, and found that the CA glues that I already had work here as well: Super Thin for creeping into areas that need strengthening...and a medium gel for surface-to-surface contact. Aside form CA, I also use Titebond and Elmer's Wood Glue for areas where I may have to tweak the positioning (like deck planking). I found something useful at Lowe's - GLUE DOTS. I was looking for a simple glue stick, and found these instead. If you need to temporarily place a piece, the dots will work...and when you're done, just roll the dot off with your finger and throw it away. I've used the dots to place copies of my plan sheet onto the decks for sizing and placement of details. Easy and clean to use, just roll the applicator across your surface and the dots will be placed for you! I see you want to leave your longboat hull natural wood - just keep the CA glue off of your surfaces, since those glues will not accept the stain color you may want to add later...otherwise you may have to do more sanding, and you could end up sanding your planks too thin. Ask me how I know
- 222 replies
-
- 5
-

-
- 18th century longboat
- model shipways
- (and 2 more)
-
I'm taking Chuck Seiler's advice, I'm gonna give the Sultana a good planking. I've sanded down the kit bulwarks, sanded the deck to fix the camber, and procured all the lumber I need, plus a little extra. Will have progress photos to post Monday... Thank you for the inspiration, Chuck!
- 44 replies
-
- 6
-
-
- Sultana
- Model Shipways
- (and 2 more)
-
Thanks to Chuck Passaro's supreme practicum on this kit, I have no worries about finishing (maybe not museum quality) but respectable for a first build..
- 44 replies
-
- 4
-
-
- Sultana
- Model Shipways
- (and 2 more)
-
Good advice, Jason. To me, a fix is problem solving, and I'm pretty good with that. My buddies from the plastic side would tell you that I am the king of fixes. Usually my problem is getting started on something I've never tackled before. I consider the possible approaches, and narrow those down to what is fixable without starting over.
- 44 replies
-
- 1
-
-
- Sultana
- Model Shipways
- (and 2 more)
-
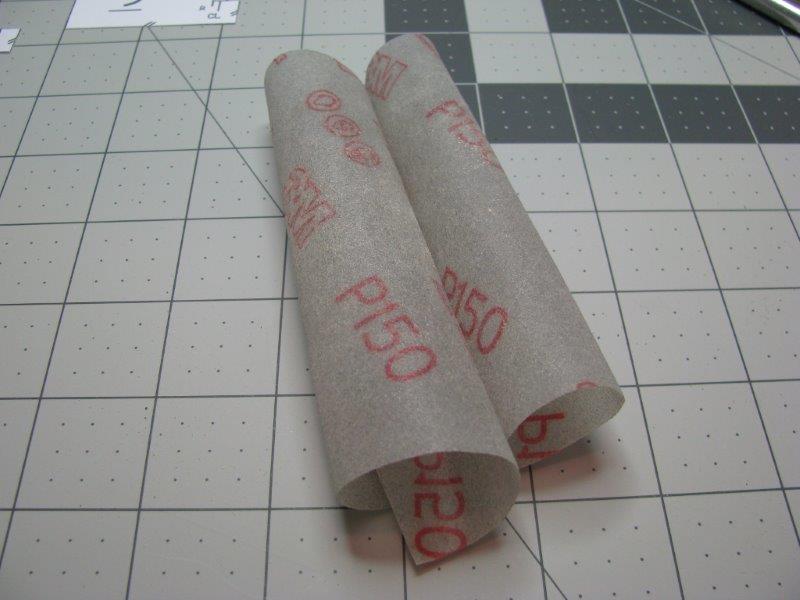
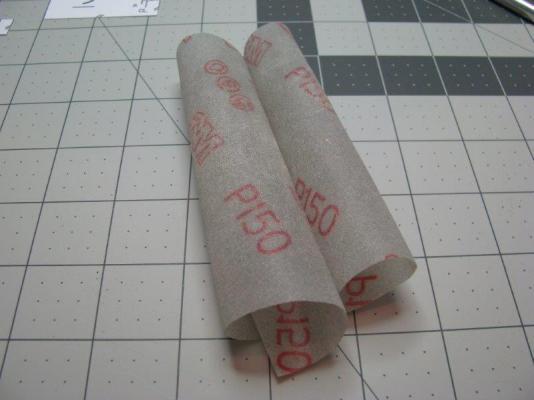
Several weeks ago, I picked up some 3M sanding supplies (for home and hobby) at Lowe's, and in my sandpaper pack was a bonus item to try -- I can't call it sandpaper, because it is not paper, but rather abrasive material on thin flexible plastic. This is GREAT STUFF! You can roll it, bend it, fold it, crease it for tight edges,... and you can do it over and over. For fairing a solid hull, put the material in the palm of your hand, spread your fingers slightly, and the flexible material will sand exactly where you need it. Very handy stuff -- thought you guys might be interested..
- 44 replies
-
- 5
-
-
- Sultana
- Model Shipways
- (and 2 more)
-
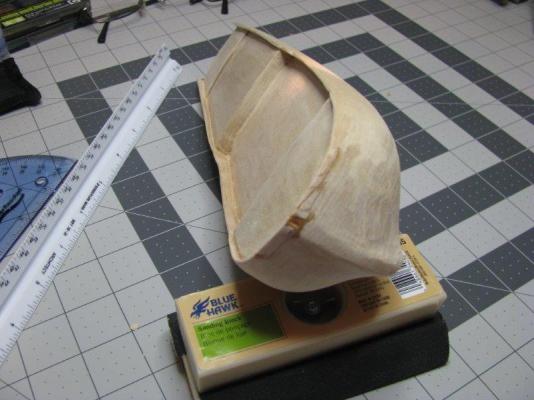
Started my 1st ship kit this weekend. The Sultana in 1:64 scale by Model Shipways. This a solid hull kit, so I had some sanding and carving to do so that the supplied templates fit properly. The carving was required on both the inside and outside of the bulwarks to achieve the correct scale thickness. At an early stage, my "carving" turned into something more akin to gouging, so I turned to my xacto knife with a #11 blade and actually found it easier than using my chisels, which I couldn't seem to get a sharp edge on, even after minutes on the honing stone. Note the repaired area in the front (sorry- still don't know my nautical terms)...I had already sanded the outside of the hull up to my stopping point that I had marked, THEN I started carving the inside of the bulwarks to the required thickness. That is when I cracked the thin basswood in a couple of places. At least the breaks were clean, so I salvaged the pieced, used thin super glue, and carefully and quickly put them back in place. I dared not try sanding the area yet, but it will be my next step now that the glue has had a day to dry. Hopefully, my damage control will not show up later, as this hull will be painted.
- 44 replies
-
- 3
-
-
- Sultana
- Model Shipways
- (and 2 more)