
HOLIDAY DONATION DRIVE - SUPPORT MSW - DO YOUR PART TO KEEP THIS GREAT FORUM GOING! (Only 75 donations so far out of 49,000 members - C'mon guys!)
×


ahb26
-
Posts
285 -
Joined
-
Last visited
Content Type
Profiles
Forums
Gallery
Events
Everything posted by ahb26
-
 After a couple more rounds of filling and sanding, the hull was ready for its initial coat of primer. As expected, the primer showed up some flaws and more sanding and filling was needed, but I'm generally pleased. On close inspection, I can see lumps where the bulkheads are under the planking, due to stretching the planks too tightly, especially on the starboard side. More bulkheads - or more experience - would have helped. I also established the proper angle of the keel with respect to the horizontal (there is a name for this but I forget it) and scribed lines on the keel so that I can replace it in my keel vice at the correct angle and elevation. I'll fill the lines when they are no longer needed. If I had it to do over again, I think I would attach the transom before any planking, then butt the planks into the transom - rather than sanding the ends of the plank the way I did. I filled the area under the transom to get the same effect, but if I wanted plank lines to show, that wouldn't be possible. I also have an issue at the top edge of the transom that I'll have to address later.
.jpg.7f79809ab5a06d4a51859a469d22fc80.jpg)
.jpg.c039b301fa0cc9b60d4d897bca905388.jpg)
- 106 replies
-
- 4
-

-
- bowdoin
- BlueJacket Shipcrafters
- (and 1 more)
-
Nic, thanks for the encouragement, and thanks also to others who are following along. Tale of the Transom, Part 2 As I went through a few cycles of sand, fill, repeat, I realized that I had yet to plank across the transom. I had thought of putting it off until the bulwarks were installed but figured I should do it before the last of the filling and sanding in order to blend it in. As noted in an earlier post, the transom has a slight curve in both the horizontal and vertical axes, so gluing straight planks to it was going to be a challenge. I also wanted to maintain the specified shape. I edge-glued four short planks and traced the shape onto them: Then I cut it out and covered the glued planks with boiling water. While they soaked, I sanded the approximate shape of the transom into a small block of softwood. The soaking dissolved the glue joints, so I clamped the individual pieces onto the block in their relative positions, then heated them with a curling iron and hair dryer and left them to dry overnight. Finally I re-glued them and clamped them in place on the same block, with wax paper between. The result was a built-up piece with curvature that made it simple to glue into place. I will need to fill around the edges so the planks appear to butt against the transom, and work the top edge to look more like the real thing, but I'm glad to have this part of the job behind me. EDIT: The top edge of the transom planking should be flush with the top surface of the transom block. See April 15 2019 post.
.jpg.890a0d84686de7ef14c56e0698354e9d.jpg)
.jpg.d8645133fd9e68432b634e431b7bac77.jpg)
.jpg.d0601b57affdc583b51a4faaba50c61e.jpg)
- 106 replies
-
- 4
-
-
- bowdoin
- BlueJacket Shipcrafters
- (and 1 more)
-
Starting to sand. A few of the gaps between planks are in excess of 1/32" (maybe 3/64") and I'm concerned that when these are filled, the wood will flex during further sanding and dislodge the filler. Should I be filling these cracks with epoxy or some other material before the Ready Patch goes on?
-
Happy New Year! Bowdoin's last plank was glued into place on the last day of 2018. The project log shows 78 hours total, with 42.4 hours spent on planking. (The log is an approximation at best. It only counts time hands-on the model, not the time spent on research or lying awake trying to puzzle out a problem.) Things did not go entirely smoothly in the month-plus since my last update. I found that I had introduced a significant bulge in the upper planking toward the stern (especially on the starboard side) that did not match up well with the lower planking, which was stretched too tight between the bulkheads. On the starboard side, the planks were not laying out well, and I had to tear out some of what I had done. I chalk it up to inexperience, although I'm not sure what I would do differently next time to avoid these problems. An in-person mentor would have been a big help, and perhaps more detailed instructions and a few intermediate bulkheads also. The photos are before any significant sanding. I have renewed my sanding blocks and purchased a can of MH Ready Patch in preparation for the next phase. Port side - the "good" side. I'm reasonably pleased with how the planks laid out on this side, but the execution leaves something to be desired, particularly toward the stern where the planks don't align well. Starboard side. It was a scramble to get this done at all, and I ended up cutting odd shaped planks to fill the gaps left by other planks going off at odd angles. I'll be happy when this is sanded and filled! - but I have detail photos to remind me of my sins. Stern detail. The port side is orderly, starboard less so. There are a couple of cases where I thought a plank would turn into two planks, but that didn't work out, accounting for the apparently unnecessary joints.
.jpg.1077f039bbdb976ebe825a5c9f5fd2bd.jpg)
.jpg.ab57b5b52a484fb77ca701a5a6f0c2b7.jpg)
.jpg.d612c64266c3557a3270d28b1d2f51e9.jpg)
- 106 replies
-
- 7
-
-
- bowdoin
- BlueJacket Shipcrafters
- (and 1 more)
-
Hello Don, glad you are following along. The keel vise is 13" long, and is made of scrap cherry left over from a kitchen remodel. Two weeks since my last update - it feels like longer. Not a lot of visible progress, but a lot of thought and some false starts and redos have gone into the two planks (per side) I've added. Plus, there was family here at Thanksgiving and other stuff going on. Here, the fourth plank (which is a drop plank at the bow) has been added and the fifth plank is ready to add. This is the most complicated plank so far since it also needs a stealer at the stern. I discovered that I can use a razor saw along with a plane to cut the tapered notches when the plank is clamped in my keel vise. It does a cleaner job than I can do with a hobby knife. Fifth plank in place. The port side is the "good" side since I do the starboard first, then apply what I've learned on the port. I'll need five planks for the middle frames, with one or two drop planks toward the bow. The stern will be an adventure, but it appears that drop planks will be needed there as well.
.jpg.1e93d95d52511c94733df2e88f3b1adb.jpg)
.jpg.ca5660e3615234204cb35dc0fc42c212.jpg)
- 106 replies
-
- 6
-
-
- bowdoin
- BlueJacket Shipcrafters
- (and 1 more)
-
I have done three strakes (plus a stealer) up from the keel on each side. My first stealer! Things are getting more complicated. These strakes have to fit into rabbets at each end and they have a slight taper at the forward end. They also have more twist, but soaking plus the hair dryer on high gives good results. (The curling iron is difficult to maneuver into these spaces.) The 4th and 5th bulkheads still need seven planks, but the 1st only needs three (or more, with tapering). I need to figure out how to make that happen as well as navigating the twists and turns and odd empty spaces at the stern. It's an education.
.jpg.eae2fb6ead7133a51945e51a7c689daa.jpg)
.jpg.6f08c2860f63ef08027ca07b8289636b.jpg)
.jpg.f7268578e5ab035dc4505ee19f1a3dd5.jpg)
- 106 replies
-
- 8
-
-
- bowdoin
- BlueJacket Shipcrafters
- (and 1 more)
-
The first five strakes have been glued in. I added thin strips at the stem to provide more glue contact area and bring the surface of the planks flush with the stem. (This also shows the mess I made of the first strake.) I also added thin strips at the stern for more glue contact. I soaked each pair of planks for a couple of hours, then formed them over the bulkheads, hit them with the curling iron, and left them to dry. The clamps and binder clips help keep the plank edges aligned. To glue, I ran a line of carpenter's glue along the edge of the plank being installed, well beyond the next bulkhead, then used CA at the bulkhead crossing. I then extended the glue along the edge of the plank and glued at the next bulkhead. I had to keep up the pace so the carpenter's glue wouldn't dry before I got it in place. It was a little messy but worked well. At the stern, I tapered the last two planks slightly (and a third plank on one side to make up for an earlier error placing the first strake). We'll see how that works out later. My keel vise worked pretty well as a plank vise, but the middle of the plank wasn't firmly gripped. A third bolt would solve that. I cut the tail ends of the planks to the approximate shape of the transom. Then I sanded in the plane of the transom. As I had hoped, the planks tapered to a clean edge along the previously shaped transom. The result is a pretty good match for the actual Bowdoin transom. Photo by Chase Davidson, used with permission of Maine Maritime Academy. The instructions say to start planking from the keel up at this point. I'm fairly pleased with the results so far - it will need some sanding and filling, but that's to be expected.
.jpg.4447226eee88db546b4ddf5d3a4e9609.jpg)
.jpg.9659f46a950c7a2ed84833bdfef9d82e.jpg)
.jpg.a5bbf66b38533bf70751a834710f4209.jpg)
.jpg.2113744e689f6dc00ac15843dd5cb3b6.jpg)
.jpg.aa6c13a2f6ec88fc39e41c4c0ef582e3.jpg)
.jpg.cb55d2323ddff529abafce164e9776b2.jpg)
.jpg.912b8f8a6b9e8ef7baa3c6660689159a.jpg)
.jpg.576a22792b893633ac95e2b98707517b.jpg)
- 106 replies
-
- 6
-
-
- bowdoin
- BlueJacket Shipcrafters
- (and 1 more)
-
Planking has commenced with the shear strakes on both sides. This is going to be a learning process. The logs I've looked at mostly don't go into the details of how the builder glues the planks to the hull, and the details I have seen cover various different approaches. I will be finding my way to a method that works for me and documenting it as I go along. I am always open to comments and suggestions! EDIT: It's worth noting that on the actual ship, the planking appears to extend to the height of the foredeck, not the (slightly lower) main deck. You can tell this by noting that, when seen from outside the ship, the main deck scuppers are cut into the topmost planks, not into the bottom of the bulwarks (as denoted by the horizontal break at the top of the planking). See the April 15 2019 post for more details. I went through the exercise of lining out the hull, making a spreadsheet with planking bands and stringing thread along the bulkheads. I'm not sure of the value of this, since I'll be using full-width (1/4") planks for the most part, which will not fit evenly into the bands. However, it does give me a sense of where I may want to taper or consider a drop plank in the bow. The stern is anyone's guess at this stage... Here's where I do the planking work. The plank soaking tank is clamped to the bench (thanks to ESF for that suggestion) and filled with water and a little household ammonia (as recommended in the Bluejacket instructions). The soaked shear planks were pinned and rubber-banded in place and heated to the sizzle with my wife's old curling iron. When dry, they held their shape well. Hanging the first plank felt like an act of faith that was not initially rewarded. I tried using a combination of CA to secure the plank at the stem and first bulkhead, with carpenter's glue along the run of the plank where it glues to the edge subdeck. I wasn't able to clamp the plank to get it tight to the subdeck, so I switched to using CA glue everywhere. I pinned the plank to each bulkhead and ran a bead of thin CA along the junction of the plank and bottom of the subdeck. By the time I got to the second shear plank, I had the clamps in play where possible and the process went smoothly. Next step is to hang the next planks down on each side. I'll investigate introducing a taper into these, although the instructions say the first five planks on each side should be used full width. As I said, it's a learning process - we'll see what happens.
.jpg.c254ea4fd020d44a1ff682bb4b3d4a87.jpg)
.jpg.e492f19d5183559273ae3fc290944341.jpg)
.jpg.2e6c5a28a7496b05f774ea1a4e775bad.jpg)
- 106 replies
-
- 3
-
-
- bowdoin
- BlueJacket Shipcrafters
- (and 1 more)
-
The waterways consist of 1/8" x 1/32" basswood strips. After cutting to length and shaping the ends, I poured boiling water on them and let them sit for a few minutes, then clamped them in position to dry. This was my first attempt at putting a bend into wood and it worked OK. After painting, I managed to glue the strips in without smearing glue (carpenter's) all over the deck. I am using the paint from Bluejacket's paint kit - Testor's Model Master lacquer primer and enamel top coat. I'm not impressed by the coverage capability of the top coat - need to work on my brush technique, but I think I'll find a flat white spray enamel for the hull and large cabin surfaces. EDIT: It was a mistake to paint the top surface of the waterways - I should have just painted the inner edge. The top surface should be left bare to allow a good glue joint with the false timberheads. Also, the waterway will get dinged up when the scuppers are cut. Finally, I noticed ESF (Steve) had an initial problem with the paint because he didn't stir the primer and it didn't dry well. I also didn't stir the primer. I have to put in a good word for Maine Maritime's Bowdoin Deck Restoration Archive. It covers an extensive restoration project in 2015-16 that replaced not only the deck but a lot of frame timbers and planking. The engine was removed and overhauled at the same time, and many systems were updated. The archive (start with the highest number page) begins with removal of deck structures and removal/demolition of the deck and old framework, then shows how the new wood is planed, shaped and installed. It's interesting to contrast the way the real ship is put together with the model. If you are building Bowdoin, the photos are an invaluable resource, but it's fascinating even if you're not.
.jpg.04d1721b3e05b49ef77117ceccd8cd91.jpg)
.jpg.7516a4b83ccdae6eaa3ccdf25b89e862.jpg)
- 106 replies
-
- 6
-
-
- bowdoin
- BlueJacket Shipcrafters
- (and 1 more)
-
Tale of the Transom "Let's carve him as a dish fit for the gods..." Julius Caesar Act 2 Scene 1 The transom block starts out as a C-shaped piece of 3/8" thick basswood. Most of it will end up as sawdust. The inner part is shaped first, using the supplied template to define the amount to remove. I used a Dremel sanding drum in my drill press to do most of the work. After painting the inside surface, I glued the block to the deck. At this point, the instructions are a bit vague. As best I could tell, I needed to shape the underside of the deck and block to match the line of the keel. I used a large sanding block to sand a flat surface, ending up with this: At this point, I started looking around. The laser cut parts include this template, which is not mentioned in the instructions: In The Arctic Schooner Bowdoin: A Biography, there are two photos that clearly show the transom, and it is this shape. (In the photos, from 1924 and 1941, the transom is painted a contrasting dark color. I may do this when I paint the hull.) I also located a photo from the recent Bowdoin deck restoration project that provides an excellent view of the transom, confirming the shape and also showing that the transom is right under the caprail at the stern, with no space between. That meant that I had to increase the angle of the area I had sanded to bring it closer to the top of the block. I also had to sand a slight arc (as viewed from above) in the surface to bring its top edge to the top of the block along the entire width. This got me closer to the desired shape, but the two triangular ares at the bottom corners still had to be removed. Here, one side has been sanded to the shape of the transom. I ran planks from the rearmost bulkhead to get an idea of how the surface should be shaped. Both sides sanded. I can see from the photo that I probably have a bit more to go to get them to match, and possibly more when I get to planking, but I am going to leave it alone for now. Next step is to paint and attach the waterways, and then - planking. Edit: I should have sanded right to the top edge of the deck rather than leaving the thin strip. See the April 15 2019 post for more information.
.jpg.c3635984f3e45d83f0b37be11687e648.jpg)
.jpg.e01390a9c6e1de961349c4a9ac90c3ed.jpg)
.jpg.ba8d90d080771523e6c4c157c702852a.jpg)
.jpg.cb990adafdc42f2934fb2ff0f405dfb8.jpg)
.jpg.317105f2ee5f81e1f9af0706049fa084.jpg)
.jpg.297f6f64f4a5aaa52fc6e1ba31608327.jpg)
.jpg.11116cc21fafc2fa4ba87dc078bffc4f.jpg)
.jpg.1d49af8a53329294eed3c4411f7e4574.jpg)
.jpg.af66dd270dfd0d8615ed02a3ef11f242.jpg)
.jpg.4623d0987a80e8bebe4ff85f84388c87.jpg)
.jpg.325b550a398ad03c8a081bc33d853df0.jpg)
- 106 replies
-
- 5
-
-
- bowdoin
- BlueJacket Shipcrafters
- (and 1 more)
-
I stained and varnished the decking sheets, and glued them to the subdecks. After scribing plank butt joints into the sheet, I used Minwax "aged oak" gel stain with liberal amounts of pre-stain conditioner. The result was a bit blotchier than I hoped but should be OK with all the deck furniture in place. I used contact cement, with a wax paper slip sheet to allow positioning. It's a bit nerve-racking as you only get one shot at it. All deck sheets in place, edges trimmed and sanded flush to the subdeck edge, mast holes opened out. Despite my best efforts, there is a slight gap between the edges of the main deck sheets toward the bow. Fortunately, that area is mostly covered in deck structures. I have also been working on the transom block, but I'll cover that in a separate reply once it's in place.
.jpg.166de8702149a82375b9b16268159472.jpg)
.jpg.c861863eb7de12b26740bbcc8774122f.jpg)
- 106 replies
-
- 5
-
-
- bowdoin
- BlueJacket Shipcrafters
- (and 1 more)
-
Work on the scribed decking proceeds, but I also broke out the laser-cut transom block and studied what needs to be done to it. The block is meant to extend 3/4" beyond the aft end of the keel, and the outside of the block will be shaped such that it aligns with the angle of the keel. (This will be more clear at a later stage.) If the deck were in the right place relative to the keel, this would place the block at the aft edge of the deck - but as noted earlier, the deck is 1/8" further aft on the keel than it should be. What to do? I was initially inclined to trim 1/8" off the deck, but thought better of it when I realized that the deck locates the upper part of the bulkheads. I didn't want to reduce the distance from the aft bulkhead to the transom, so I decided to extend the keel instead. In the bow, the incorrect position of the deck would result in a gap between the top plank and the deck. I added a strip of scrap wood to the edge of the deck and sanded it to fill the gap. I'm glad I didn't rush through these steps. It took me a while to recognize the problem, and a while longer to think it through and settle on solutions. Fortunately, I haven't yet cut the scribed foredeck down to its final shape.
.jpg.8689e17a91fff19ddd82fe5e4b5b76c6.jpg)
.jpg.35b24023cdcc9f26cfd42cac88cd672b.jpg)
.jpg.7048fe99e2d7f4911c7b76cf8d3a0bf9.jpg)
.jpg.5d39dcf63e5444946401264b7f6bfcfd.jpg)
- 106 replies
-
- 4
-
-
- bowdoin
- BlueJacket Shipcrafters
- (and 1 more)
-
Steve, thanks for the reply. I am logging my time but I also expect to be taking my time. As Nic at Bluejacket said, model shipbuilding is a relatively inexpensive hobby on a cost-per-hour basis, and the more hours, the lower the cost per hour. Currently, I am working on the deck planking and also tracking down and studying information on hull planking. At some point I will have to dive in and acquire the hands-on experience to go with the information. Your log will be most helpful for that and other tasks along the way.
-
Tom, Bob, Tasmanian - thanks for looking in! Bob, I hope you are back in commission soon. The deck has been completed and glued on. It was not a trivial exercise. The fore subdeck is made up of two halves of 1/8" basswood. As I was preparing to join them, I noticed that the joining edges are cut on a very slight angle. This provides a slight crown in the foredeck, matching the crown in the two bulkheads it sits on. Handy! Gluing the foredeck to the main subdeck. I should have clamped the edges better, but was able to fix the resulting gaps later. I needed all these rubber bands to get the proper compound curve into the deck. I left it like this overnight in hopes the deck would relax into position - it did, more or less. Where small gaps remained between the deck and bulkhead surface, I held the deck down by hand while the CA glue was setting. The deck is about 1/8" aft of its intended position relative to the keel. I noticed this during initial deck fitting, but even before the bulkheads were glued to the keel, it was very difficult to move the deck forward. I hope it doesn't cause problems. The deck in place, bulkhead extensions sawed off and sanded flush to the deck. (I'm glad to be rid of them. I broke most of them off and reglued them at least once during this process.) The next steps are fairing the bulkheads, planking the deck (with scribed sheet), shaping and gluing the transom block, and waterways. Then the real fun begins!
.jpg.449495b839dad06368cc3040ed26053d.jpg)
.jpg.e5f32702ef3fb35117cd6dd5b3f2cab6.jpg)
.jpg.86472dfed8289668d3aa38ffbe3e6c0c.jpg)
.jpg.b0bb497a6c85826cadaf46383fd23b41.jpg)
.jpg.1c7d5932d8c36ab7a441b86819ac4fa8.jpg)
- 106 replies
-
- 8
-
-
- bowdoin
- BlueJacket Shipcrafters
- (and 1 more)
-
I should mention that, for the first part of my career, I edited and wrote software documentation and specifications. In part because of that, I am a compulsive instruction reader and I seize on inconsistencies and any lack of clarity. With that in mind, if you are listening Mr. Bluejacket, please take my comments on the Bowdoin manual as constructive observations, not criticisms! The Construction Overview suggests completing the planking before fastening the subdeck to the hull. "Doing so makes this operation much easier." However, the construction photos all show the subdeck firmly attached to the hull during planking. Furthermore, the subdeck must at least be in place, at least for the first few upper planks, because it locates the bulkheads. And the top edge of topmost plank (shear plank?) lies flush with the top of the subdeck and should fit tightly against it, otherwise the bulwarks won't line up properly with the hull planking. All of this argues for gluing the subdeck in place prior to planking, losing the advantage of unfettered access to the interior during planking. Also, gluing the subdeck to the bulkheads will be easier if the planking is not present, since the subdeck must be held in place by a collection of rubber bands. Given all of this, I am inclined to glue the deck down before planking. While we are on the Construction Overview, it states that two different widths of planks are used. This does not appear to be the case.
- 106 replies
-
- 3
-
-
- bowdoin
- BlueJacket Shipcrafters
- (and 1 more)
-
Thanks Chris and Azzoun for the likes and response. I didn't start this log until I had completed some initial work (and reached my first issues). With the keel glued up, I broke out the bulkheads and sanded out the slots in the bulkheads and keel to allow the bulkheads to slide on easily. The keel and bulkheads are both 1/8" basswood, and the bulkhead extensions (timberheads?) are quite fragile. (It's interesting to contrast this construction with that of the Model Shipways Bluenose, which appears to use 1/4" basswood and plywood for keel and bulkheads, and use 15 bulkheads vs. six for Bowdoin. You could pretty much drive a truck over the Bluenose's hull.) T The deck is 1/16" thick and comes in two halves, which I pinned to a foam board and glued with thin CA. I had to file and sand the notches in the deck edges to allow the bulkhead extensions to slide in freely. I boxed in the mast seats in the keel and cut 1/8" tenons in the two dowels provided for masts. With the bulkheads set in place but not glued, I was able to do an initial trial fitting. At this point, I discovered that bulkheads 3 and 4 are slightly narrower than the deck. Whether this is due to expansion of the deck or inaccuracy in the parts, I can't say, but I had to enlarge the notches to allow the deck to be placed over those bulkheads. I could have saved myself some trouble by checking the bulkheads against the deck halves before the deck was glued, making sure the bulkhead centerline matched up with the deck centerline. So the first issue is whether to correct this by sanding the deck edges flush to the bulkheads, or by building out the bulkheads to match the deck. Other than that, the deck fits well, so I pulled everything tight with rubber bands and glued the bulkheads to the keel with CA. I didn't glue the deck to the bulkheads yet, that's an issue for another reply.
.jpg.c250e4f81c1876a912624a69f66a0a69.jpg)
.jpg.922aec4c05c9e213681869fec55f30ba.jpg)
.jpg.fc4f0fb288f6b75af7abf8cb17315a5d.jpg)
.jpg.d51167779d70cc1dc134e34bd3ec5635.jpg)
.jpg.215427f37e4287d5555854dc414f2495.jpg)
- 106 replies
-
- 10
-
-
- bowdoin
- BlueJacket Shipcrafters
- (and 1 more)
-
And so it begins. The contents of the box (less the manual and other documentation). I purchased the book from Bluejacket previously. First order of business was to build a keel vise. I have a lot of cherry left over from a kitchen remodeling project, and it comes in very handy for this sort of thing,. The edges of the 1/8" basswood keel have 1/16" strips glued on to form the final keel width and a rabbit for planking. Here the bottom strips have been glued on and clamped.
.jpg.c3450b4324a4441c386154179faef150.jpg)
.jpg.d39531861ce013c64d2c1a5cdfc9ffed.jpg)
.jpg.1b739269ecd69e5e5701261514bcd487.jpg)
- 106 replies
-
- 8
-
-
- bowdoin
- BlueJacket Shipcrafters
- (and 1 more)
-
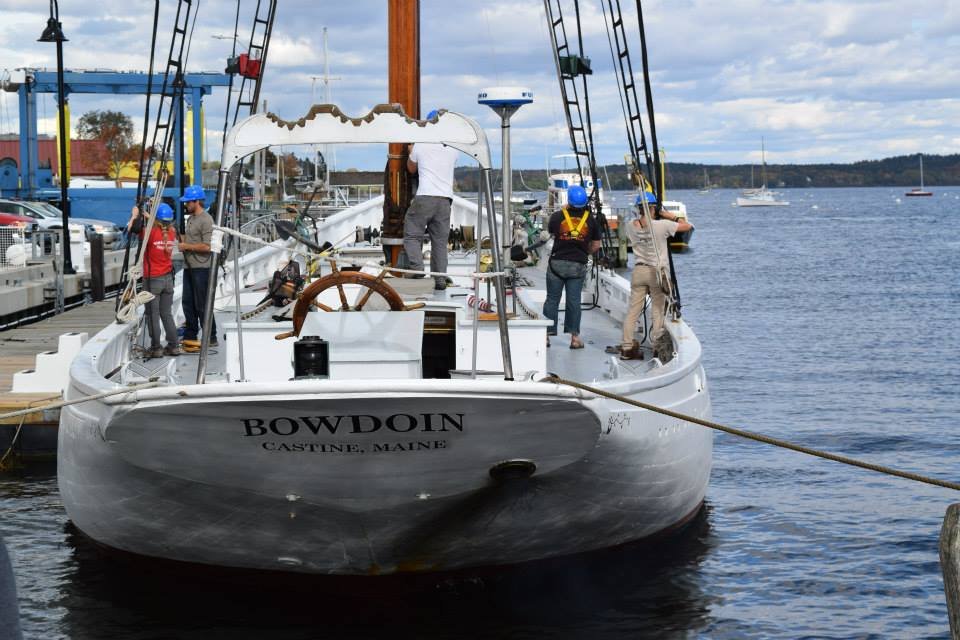
I took advantage of a brief trip to mid-coast Maine to visit Bluejacket Shipcrafters in Searsport and purchase my next project, the schooner Bowdoin. This will be my second plank-on-bulkhead model. The first was twenty-five years ago, Laughing Whale's small Friendship Sloop. (That kit lives on in Bluejacket's line; they acquired Laughing Whale some years back.) Bowdoin looks like a good project for reacquainting myself with the planking process, and I have ESF's (Steve's) excellent build log for reference. Why Bowdoin? As the official state sailing ship of Maine and sail training vessel of the Maine Maritime Academy, she has strong connections to the state. I have deep roots in Maine on my father's side, and my wife's parents had a cottage on the coast for many years, so we spent a good deal of time there. I like the looks of the ship, and the fact that she was built for Arctic research and carried out that mission with great success. I like the relative simplicity of the rigging (I've had my fill of square-rigged masts for now). I get a kick out of knowing that the kit was developed (originally by Laughing Whale) and is built right in Maine, a short drive from where Bowdoin is based in Castine. Bluejacket Shipcrafters. A wonderland of beautifully finished ship models. That's proprietor Nic behind the counter. (The camera was inadvertently set on the Toy Camera effect for this shot and the next.) And here's Bowdoin. This will be a long project. I want to do Bowdoin justice as her centennial approaches. This is a good opportunity to learn new skills and improve existing ones. I'm not going to rush. I think there are at least two other Bowdoin's in the works, but neither has broken cover yet with a log. I'm looking forward to sharing information with these ongoing projects, especially when I run into the inevitable problems along the way.
.jpg.d2fa7481e181ed3327a4011767200ca0.jpg)
.jpg.7093a54757cfe2e92cd2dc9bb8c88272.jpg)
.jpg.eba262069e3faca725f1ba4241e7b353.jpg)
- 106 replies
-
- 9
-
-
- bowdoin
- BlueJacket Shipcrafters
- (and 1 more)
-
As finished as she's going to be! It's been an adventure and I've learned a lot - about ships, modeling, and especially patience and perseverance. There are plenty of problems with the finished model, but a lot of good, painstaking work as well. I'm not eager to dive into another project right away, but I would like to build Bluejacket's Bowdoin if I think I can do her justice. I may do something less challenging first to build up my skills. Thanks to all who followed along and provided encouragement, and to everyone who shares their techniques and photos of their work. It sets a high standard that can be discouraging at times, but it's an invaluable resource for the novice.
.thumb.jpg.bec559f52e0b93a092d0eee01476623c.jpg)
.jpg.2fee96830d646e492e190f1b34def3cf.jpg)
- 74 replies
-
- 8
-
-
- Marine Model Company
- Joe Lane
- (and 2 more)
-
Wow, it's been a month since the last update. I finished the backstays and whisker stays, and turned to the last major task, the anchors. The kit provided no guidance, so I rooted around on here and in the Textbook of Seamanship to get some idea of what to do. Here is what I came up with: I didn't realize until I started researching that the cathead contains sheaves and a block is rigged underneath. The chain was purchased in link form from Bluejacket and assembled. The attachment at the throat of the anchor leaves something to be desired I have some minor touch-up to do, and I have to drill and finish the display stand furnished with the kit, but Joe Lane is essentially done. I'll take a final set of photos when she's mounted, but that will probably be a while.
.jpg.bb78385abe9f78ba2f9e0e84d688d21d.jpg)
- 74 replies
-
- 2
-
-
- Marine Model Company
- Joe Lane
- (and 2 more)
-
Making progress on the backstays. I tried tying the line to the mast, then lassoing the deadeye with the line and tying it on. That was going to drive me mad so I changed tactics, tying the line to the deadeye first and then tying the line to the mast. I re-used one of my block tying jigs for the deadeye: I made up another jig to get the spacing between top and bottom deadeyes. I found that I couldn't tie a secure square knot on the mast while maintaining tension on the backstay. It would loosen as I completed tying the knot. What worked for me was to tie a simple overhand knot, which would hold tension while I put a dab of glue on it. After the glue had dried completely, I added another half hitch and another dab of glue, then removed the spacing jig to release tension on the line. I've been reeving the deadeyes loosely (not tensioning and tying off yet) as I go along. Glad there are only eight!
.jpg.b5caca1a01300bd5da554d89d071ad79.jpg)
.jpg.b4d90b343df658815b226de3c590ed8b.jpg)
.jpg.6501999c11b6b21c9b54bd141317a882.jpg)
.jpg.e745fc3efde30946d99ab7e70d7e425d.jpg)
- 74 replies
-
- 3
-
-
- Marine Model Company
- Joe Lane
- (and 2 more)
-
The ratlines are done. I definitely improved as I went along, but I still had trouble with the ones at the top of the shrouds - it was hard to get the knots tight and small. And when they are that close together, they look larger. Anyway, the ratlines didn't turn out to be the frustrating ordeal I thought they would be. That said, I can't imagine doing a three-masted warship with six or more shroud lines per side, per mast... I also tidied up the rigging and put rope coils on the belaying pins. I had to repair a couple of places in the rigging; I'm not proud of the repairs but that's life. Next up are the backstays and whisker stays, after a week away to tend to grandchildren.
.jpg.5c2b27ad461f0c3cf3fa1412707eb3d6.jpg)
- 74 replies
-
- 3
-
-
- Marine Model Company
- Joe Lane
- (and 2 more)
-
Half way there. I need to work on eliminating slack without introducing a curve in the shrouds. The knots are getting easier, but the topmost ratlines, where the shroud spacing is almost non-existent, try my patience.
.jpg.5ac1b461051e46bbfe67670c3c2fd8c4.jpg)
- 74 replies
-
- 3
-
-
- Marine Model Company
- Joe Lane
- (and 2 more)
-
And so it begins... The paper backing is for vertical spacing only (I made it up for my practice shrouds, with different horizontal spacing). The most difficult knot is the initial cow hitch - I just haven't gotten the hang of it yet. The clove hitches and the last cow hitch are relatively easy, and I think I've gotten a handle on how to position the knots so the ratlines aren't too long or short. Three down, 97 to go
.jpg.81c573971f35783487f4ebe1d784cbc1.jpg)
- 74 replies
-
- 1
-
-
- Marine Model Company
- Joe Lane
- (and 2 more)
-
We have shrouds! After a week off with a family visit, I finally finished rigging the shrouds. Working with the larger deadeyes was relatively straightforward, compared to the smaller ones used with the topmast shrouds (and the backstays, not yet rigged). In anticipation of the next step, I also made up a set of dummy shrouds to practice tying ratlines.
.jpg.b04bc83322888c673a1947530601a237.jpg)
.jpg.bb6aa2b9c8e7588759935b38c8efece9.jpg)
- 74 replies
-
- 3
-
-
- Marine Model Company
- Joe Lane
- (and 2 more)
.jpg.ead15b7d71f2e0c703e875119c0843ea.jpg)