HOLIDAY DONATION DRIVE - SUPPORT MSW - DO YOUR PART TO KEEP THIS GREAT FORUM GOING! (Only 44 donations so far out of 49,000 members - C'mon guys!)
×

Zbip57
-
Posts
55 -
Joined
-
Last visited
Content Type
Profiles
Forums
Gallery
Events
Everything posted by Zbip57
-
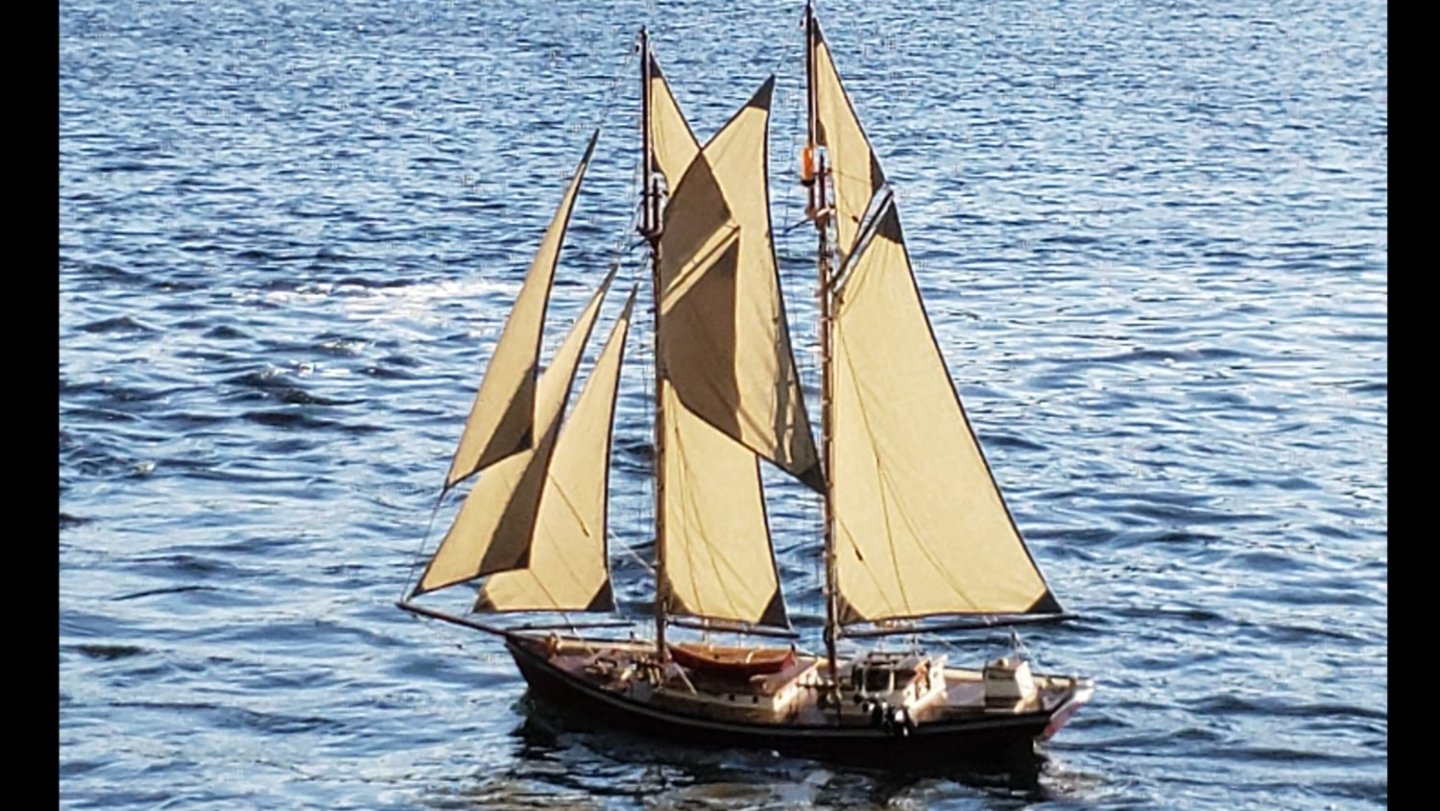
Three years later, my boat is still going strong.
-
 Have you got that endoscope yet, so you can show Bean her portrait hanging at the bottom of the stairs in Germania's below deck hallway? https://modelshipworld.com/topic/19848-schooner-germania-nova-by-keithaug-scale-136-1908-2011/page/42/#comment-733471
 -
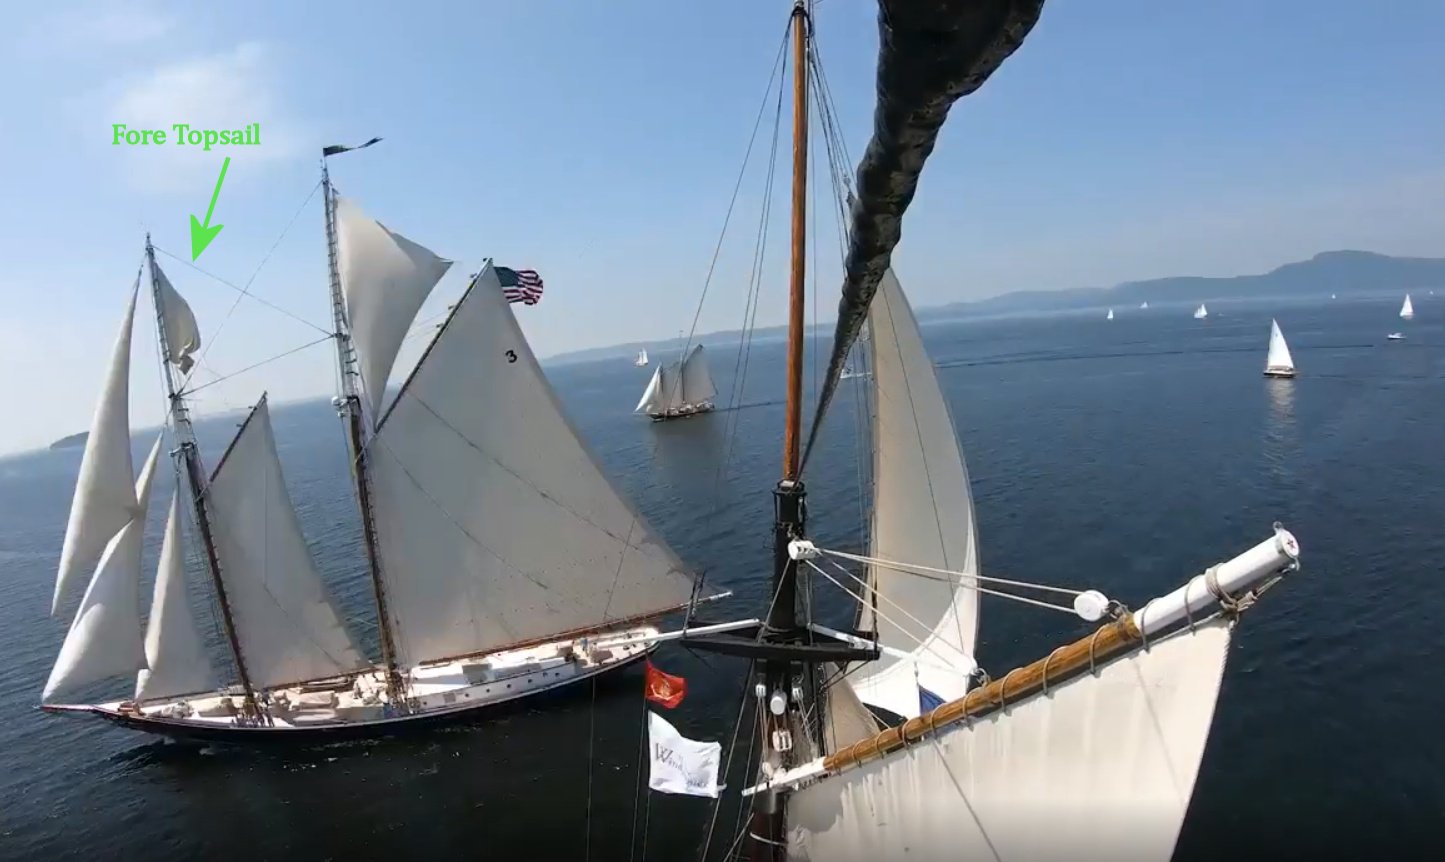
"We now return you to your regularly scheduled programming..." I haven't commented or complimented you nearly often enough on this thread. I followed your Altair build with rapt fascination, and now the Germania. Your skilled metal work and attention to the minutest details is absolutely mesmerizing. I always look forward to seeing every new photo posted and manufacturing trick revealed by you. You bring these gorgeous models to life in a way that sets my imagination running wild. The thumbnail for this video shows a fore-topsail being hoisted straight from the deck. And at 2:36 you see someone high in the rigging working on a brailled fore-topsail. This video really gets my blood flowing. So many beautiful boats.
-
These 360 cameras really are a nifty bit of kit. A nice feature is that the camera itself and the selfie stick are automatically digitally removed from the resulting image, so it appears as though the viewpoint is floating in space. You can still see the camera's shadow though in my previous video. In the unedited full-360 video, there are a couple of different modes to select from, stabilized or non-stabilized. In gyro-stabilized mode, the image remains horizontally level looking at one spot on the horizon as the boat rotates and heels under the camera. With the viewing angle aimed at a particular tree on the shoreline, it'll remain looking at that tree as the boat turns away. In non-stabilized mode, the view rotates with the boat as it bobs and turns. You can select the viewing angle to look at the bowsprit, for example, and it'll stay aimed at the bowsprit as the boat turns. In either case you can click-and-drag the view as it's playing on Youtube to rotate the camera view to any chosen angle. Click and drag to change the viewing angle. Stabilized - https://youtu.be/ZFflivuntpY Non-stabilized - https://youtu.be/wazhC7-KZ70 The fun part is in the editing. The camera records everything in a full 360° spherical view. So you never need to worry about having the camera "aimed" in the wrong direction. It sees everything. In editing you can then choose which portion of the sphere to focus on, and zoom in or out, to create effects like tiny planet. You mark the viewing angle and zoom level at selected points in the video, and the software transitions smoothly from one point to the next and exports the resultant mpg file. Mine was the cheapest first generation Insta360 One, and I didn't have it properly calibrated yet in those two sample clips above. You can see the stitching lines don't meet up smoothly where the front and rear lenses overlap. More recent versions of these cameras are much improved.
-
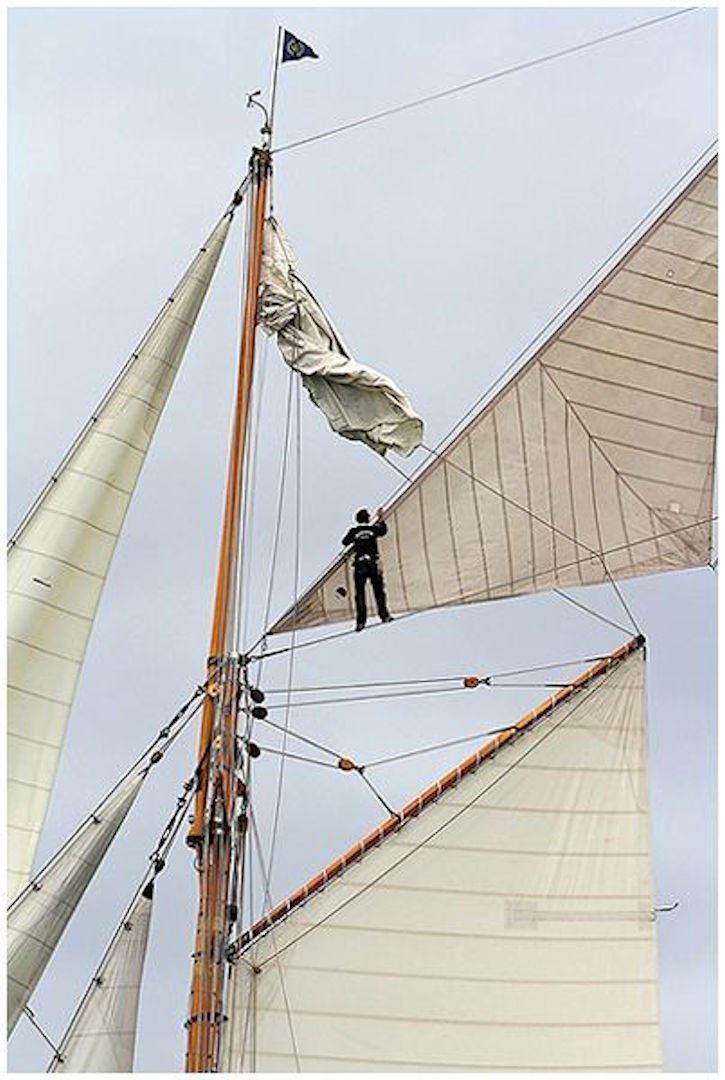
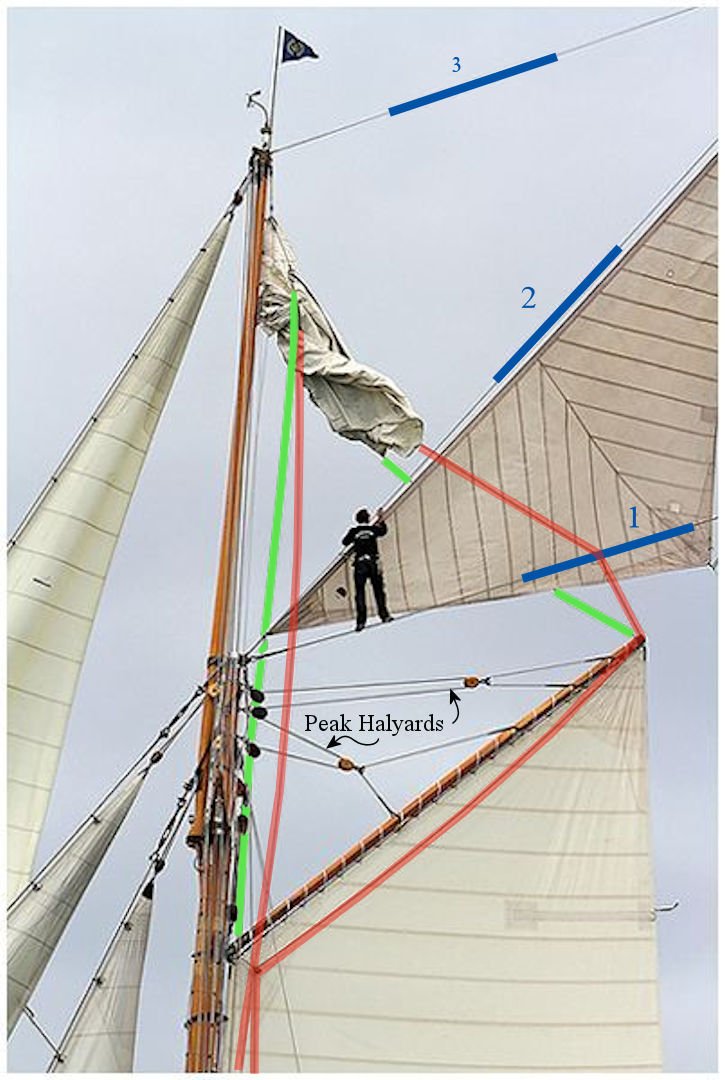
That last photo is particularly interesting. Of course the topsails can simply be left in place, set to one side, but they're less effective when tacked to the wrong side. But this last photo is peculiar because you can see the fore-topsail is deformed where it's pressing against the gaff peak halyards. It really should be flown outboard of the peak halyard lines. But what's interesting is that it is outboard of the cross stays running between the masts. How did they manage that? Here's a photo showing someone working on a fore-topsail. And here I've added some colouring to identify the lines. Red & Green to mark the Port and Starboard tack lines and sheet lines. And Blue 1,2,3, marking the cross-stays running between the masts. You can see that, if the fore-topsail is fixed to one side, when tacking it would prevent the gaff from swinging freely to either side under cross-stays #1 and #2. The small triangular fishermans sail is almost self-tacking as it can pass freely between stays #1 and #2. But it would still require two separate sheets, one to port and one to starboard, with the desired side pulled tight and the other lazy-sheet left loose. Here's an action shot of a fore-topsail being furled (brailled?) using a Clew line. And you can see how the main-topsail only needs to be lifted over the main-gaff peak halyards when tacking, or even simply left in place, because there are no cross-stays in the way of that one. But the fore-topsail needs somehow to come through the cross-stays on each tack.

-
It was an Insta360 camera on a long selfie stick. It sees and records everything in a 360° spherical view. You can do neat stuff in editing with that. I used on my R/C schooner too, with the selfie-stick clamped to the gunwale railing.
-
In 2019 I had the very great pleasure of going on a Maine Windjammer cruise on the Lewis R. French. She carries a main-topsail, but doesn't run a fore-topsail at all. The captain said they don't have Coast Guard certification for that much sail area, but I suspect it's simply because the fore-top is just too much of a hassle to tack. Their main-topsail had three lines attached at its foot (tack). There is a port-side and starboard-side tack line to stretch the sail down tight on the desired side. The third line (they called it a tump line) is also attached at the foot (tack) of the topsail, but runs up over a block at the top of the topmast. With both port and starboard tack lines released, pulling the tump line lifts the foot of the topsail up high enough to clear the highest portion of the peak halyard supporting the main gaff. The it's easy to pull the foot of the topsail over the peak halyard to either desired side.
-
This "squat" rig would be MUCH easier to handle when tacking. The smaller main topsail, and the fisherman, are "relatively" easy to reset from one side to the other when tacking. The stunning jackyard topsail is only good if it can remain set on one tack for a long time, because I suspect it needs to be lowered right down to the deck each time in order to re-hoist it on the opposite tack. The missing fore-topsail on this "squat" rig entirely eliminates the complication of having to tack that one. With a fore-topsail rigged, it prevents that gaff from swinging under the between-masts cross-stays. So the fore-topsail needs a complicated furling each time before tacking. I modified my Bearospace Irene R/C schooner from it's original 3-sail configuration by adding topmasts to support extra sails. I spent far too many hours scratching my head trying to figure out if it would be possible to tack the topsails, and I eventually gave up on that idea, as it's just too complicated. I cheated and just eliminated the cross-stays on my boat. Here's a little video showing what I had in mind, but there was actually more needed than just that.
-
I haven't posted in a while. My sailboat is still going strong. I had it out recently on another stormy day.
-
I've been watching in awe and have come to the conclusion that Keith's main joy in life is not so much the building of extraordinarily beautiful model boats. That's just a convenient excuse for him to continue exploring his true passion, which is finding ingenious ways to use his lathe and milling machines.
-
Here's a recent video update for y'all..
-
Your build quality is incredible, as we've come to expect from you. But all of your photos are also outstanding!
-
Rather than tying the helmsman to the wheel in a storm, they can chain him down to those pad-eyes! ☠️
-
Last summer we sailed on the Lewis R. French out of Camden, Maine. Here is what the mainsheet shock absorber looked like on her. It's definitely not a spring, just rubber donuts between metal disks.

-
Rather than just random deck debris, how are you at creating crew figurines? You could consider having some of these more elegant long-legged crew members model for you...
-
Keith, nobody but you would ever even have noticed the missing winches in the first place, nor have noticed the perfect patches you filled the holes with. But surely everyone would question the presence of deck debris like windsurfers or kayaks on the deck of any of your beautiful creations.
-
This is a little off-topic, as it involves neither modelling nor sailing, but I created another video this week using my Insta360 ONE camera. It was dead calm, with no wind for sailing, so instead I mounted the 360 on a pole clamped to the thwart of my canoe. Here's a 10-minute canoe tour of our lake showing the sorts of cool editing effects possible using this camera.
-
You're all set then. Funny story... We had just moved house. My wife made me throw out the 40 years worth of treasures (i.e. scraps and junk) that I had accumulated in the belief they might come in handy someday. "We're not paying the movers to ship that junk. Throw it all out!" So, in Gary's plans, he has little tidbits like, "Just use a small chunk of scrap hardwood for this piece or that piece..." Ya but, but, I just finished throwing out all those scraps, eh. For example, the mast hoops to which the sails are sewn are just sanded smooth slices out of a 3/4" PVC pipe. I think the plans call for a total length of about 4 inches of plastic pipe. I'd thrown all my scrap pieces out and, guess what? Home Depot only sells that pipe in 10-foot lengths!! I knew I couldn't fit that into my car so I had them cut the pipe in half for me. Then I had to argue with the cashier who tried to charge me double. It's just ONE piece of 10' pipe, cut into two 5' lengths. Sheesh.
-
Thanks Matt. I had a look at your build logs. Wow! If you can do such a beautiful job working on those tiny pieces you'll have no problem whatsoever in tackling any of the Bearospace designs. Gary sells plans for his three boat designs, Irene, Emma, and Annie individually at just USD$15, or $35 if you buy all three together. The 1/8" plywood construction is waaaaay simpler than the planked hulls you've been building. His plans include a comprehensive list of required materials, with pretty much everything available from Home Depot or your local hobby shop. I had never built a model boat before, but managed to complete mine over one winter. Then I went crazy over the following winter and added topmasts and topsails. As much as I enjoyed building the boat, for me the real enjoyment is in actually sailing it. And it's big enough to easily carry several onboard video cameras! See all my sailing videos at http://tinyurl.com/Kamanik There is a discussion forum thread devoted specifically to this Irene design on RcGroups with many helpful tips. Gary posted a fun video showing how far and wide his designs have already spread around the world and how people have added customization to their own boats.
-
Went for a 5-night cruise on a real windjammer schooner out of Camden, Maine. Highly recommended if you ever get a chance to do this!
-
Another fine day of sailing.
-
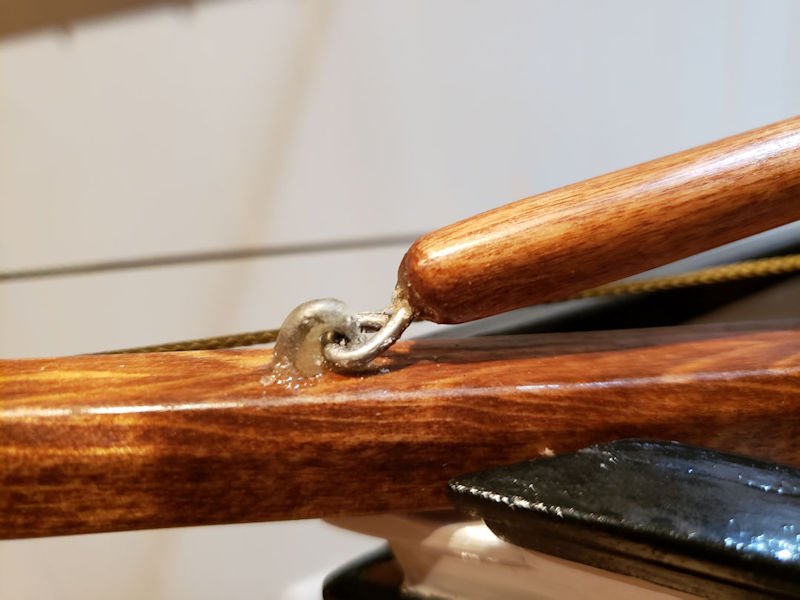
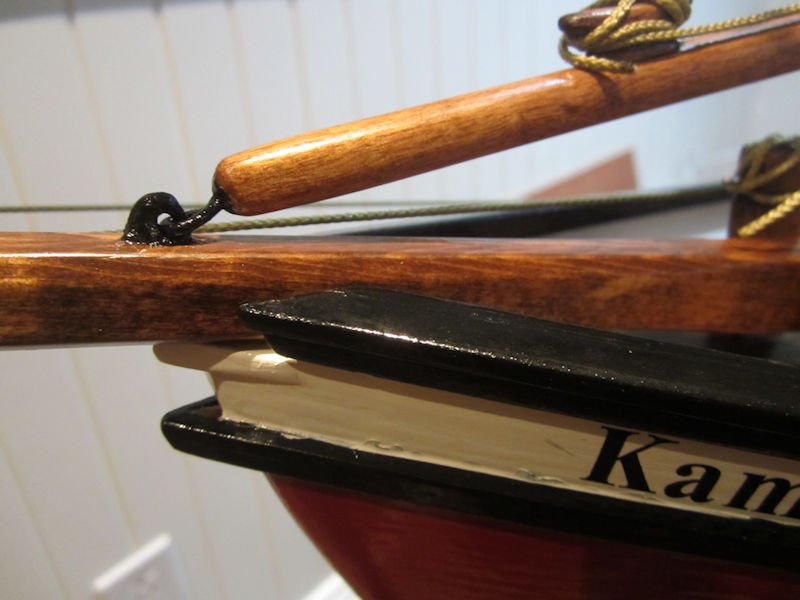
It was never a problem with the original full length jib boom because its travel was limited by the length of the jib sheet, even when fully spooled out. But with the shorter half-length jib boom required to make room for the extra flying jibs, and still the same original sheet travel, there's now enough slack that the shorter boom could flip over onto the wrong side of the retaining hoop on the bowsprit. Filling the bowsprit hoop with epoxy, and leaving just a small hole for the jib boom to pivot within. fixed the problem. But of course I couldn't resist touching it before the epoxy had fully set, so I made a bit of mess of that. I cleaned it up some by filing the epoxy smoother and painting it black. It's far from good, but good enough from far. Making the bowsprit hoop "fatter", and ensuring the inside diameter of the loop on the tip of the jib boom is small enough, it's now impossible for the boom to ride up and over to the wrong side of the bowsprit hoop.
-
Here's the video from my wet & wild day of stormy sailing. I ran into a small problem with the way the jib boom is hinged. The wire loops are too big, allowing the boom to roll over upside down. That way the boom gets jammed up and no longer swings from one side to the other. I fixed that by filling the hoop on the bowsprit with epoxy, leaving a much smaller hole for the eye on the end of the boom to rotate in. That works.
-
Hallo Nils. Grüße von Ottawa. The 360° camera is an Insta360 ONE. See here: https://www.insta360.com/ I made another couple of short video tests with it the other day for comparison. Both allow you to rotate the view to any desired angle. I should have first re-calibrated the camera though. The image was not stitched properly between the two fish-eye lenses, one facing forward the other rearward. This first video is automatically gyro-stabilized, so the view remains level and fixed at a point on the horizon until you rotate it to a different angle. That view looks like the camera is floating alongside while the boat dips and bobs and turns underneath it. You need to drag and rotate the view if you want to follow the boat whenever it turns onto a different tack. The second video is not stabilized. In this one the view tilts and dips along with the boat. You can still rotate the view to any chosen angle, and it will then stay at that same angle relative to the boat. Which view do you guys prefer, stabilized or non-stabilized?