
Geam
-
Posts
67 -
Joined
-
Last visited
Content Type
Profiles
Forums
Gallery
Events
Status Updates posted by Geam
-
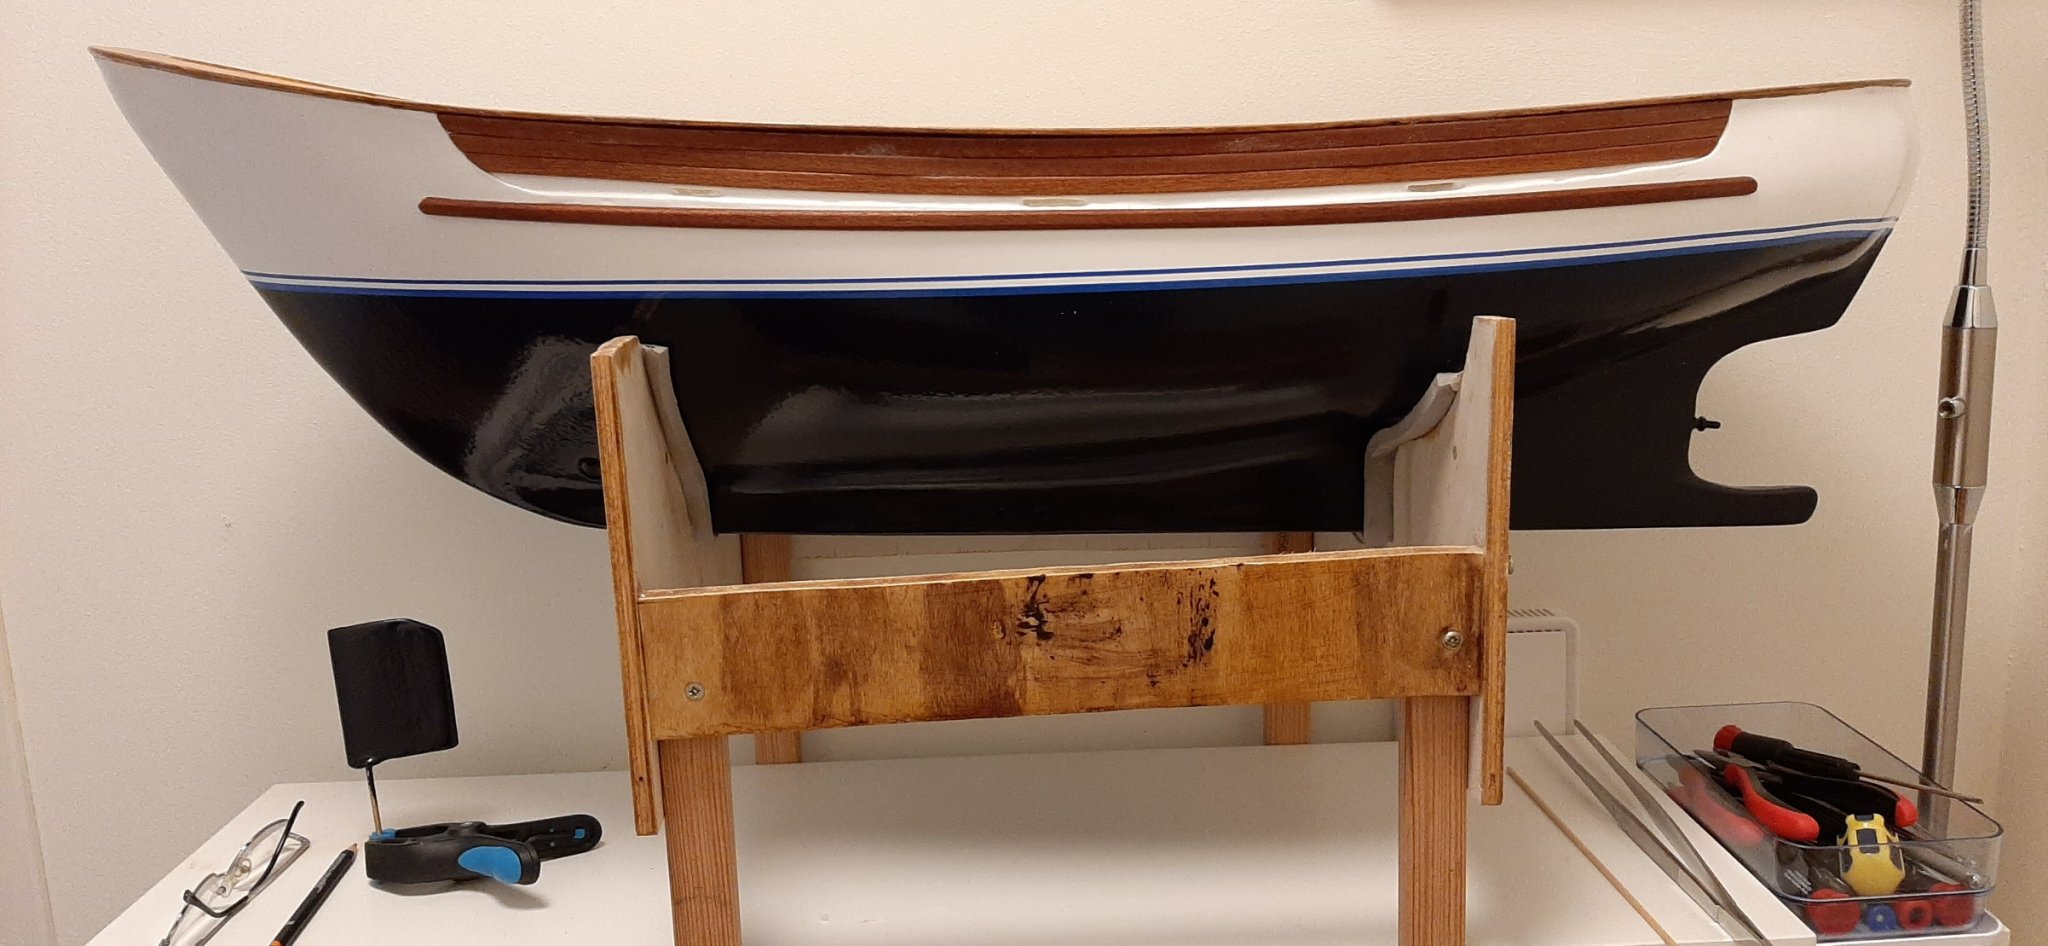
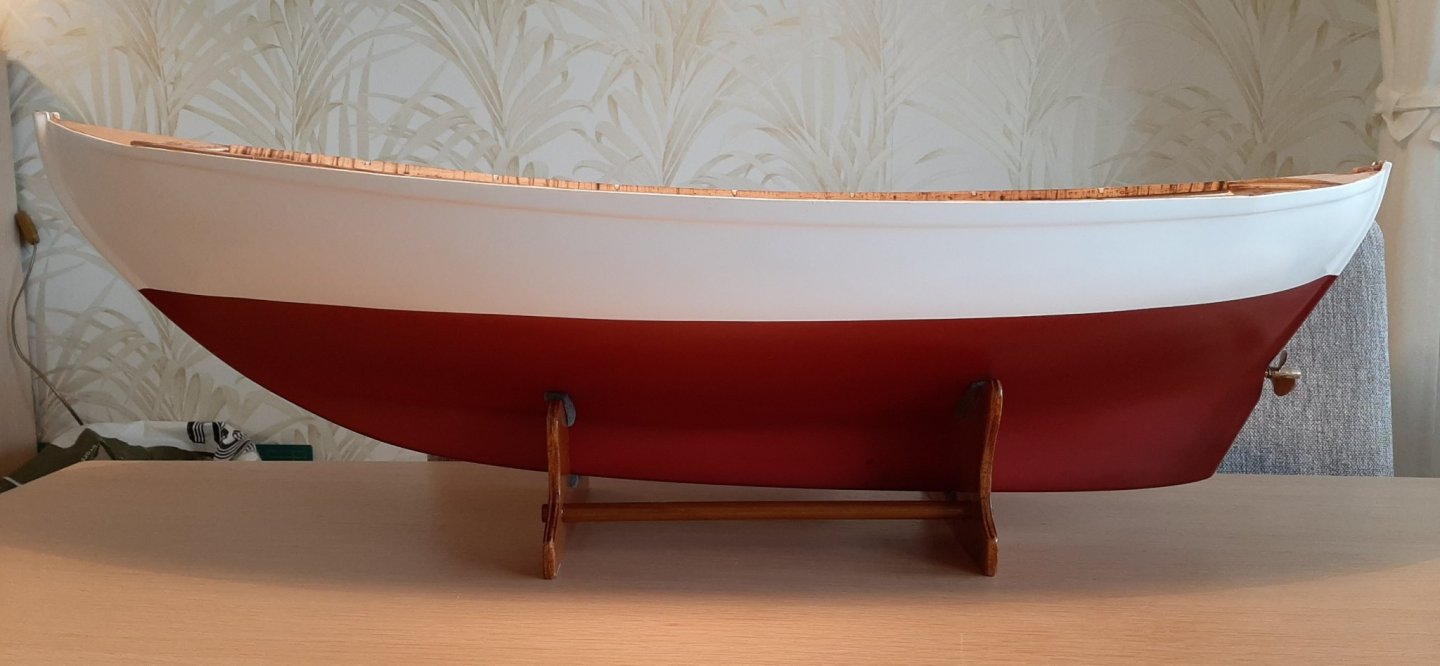
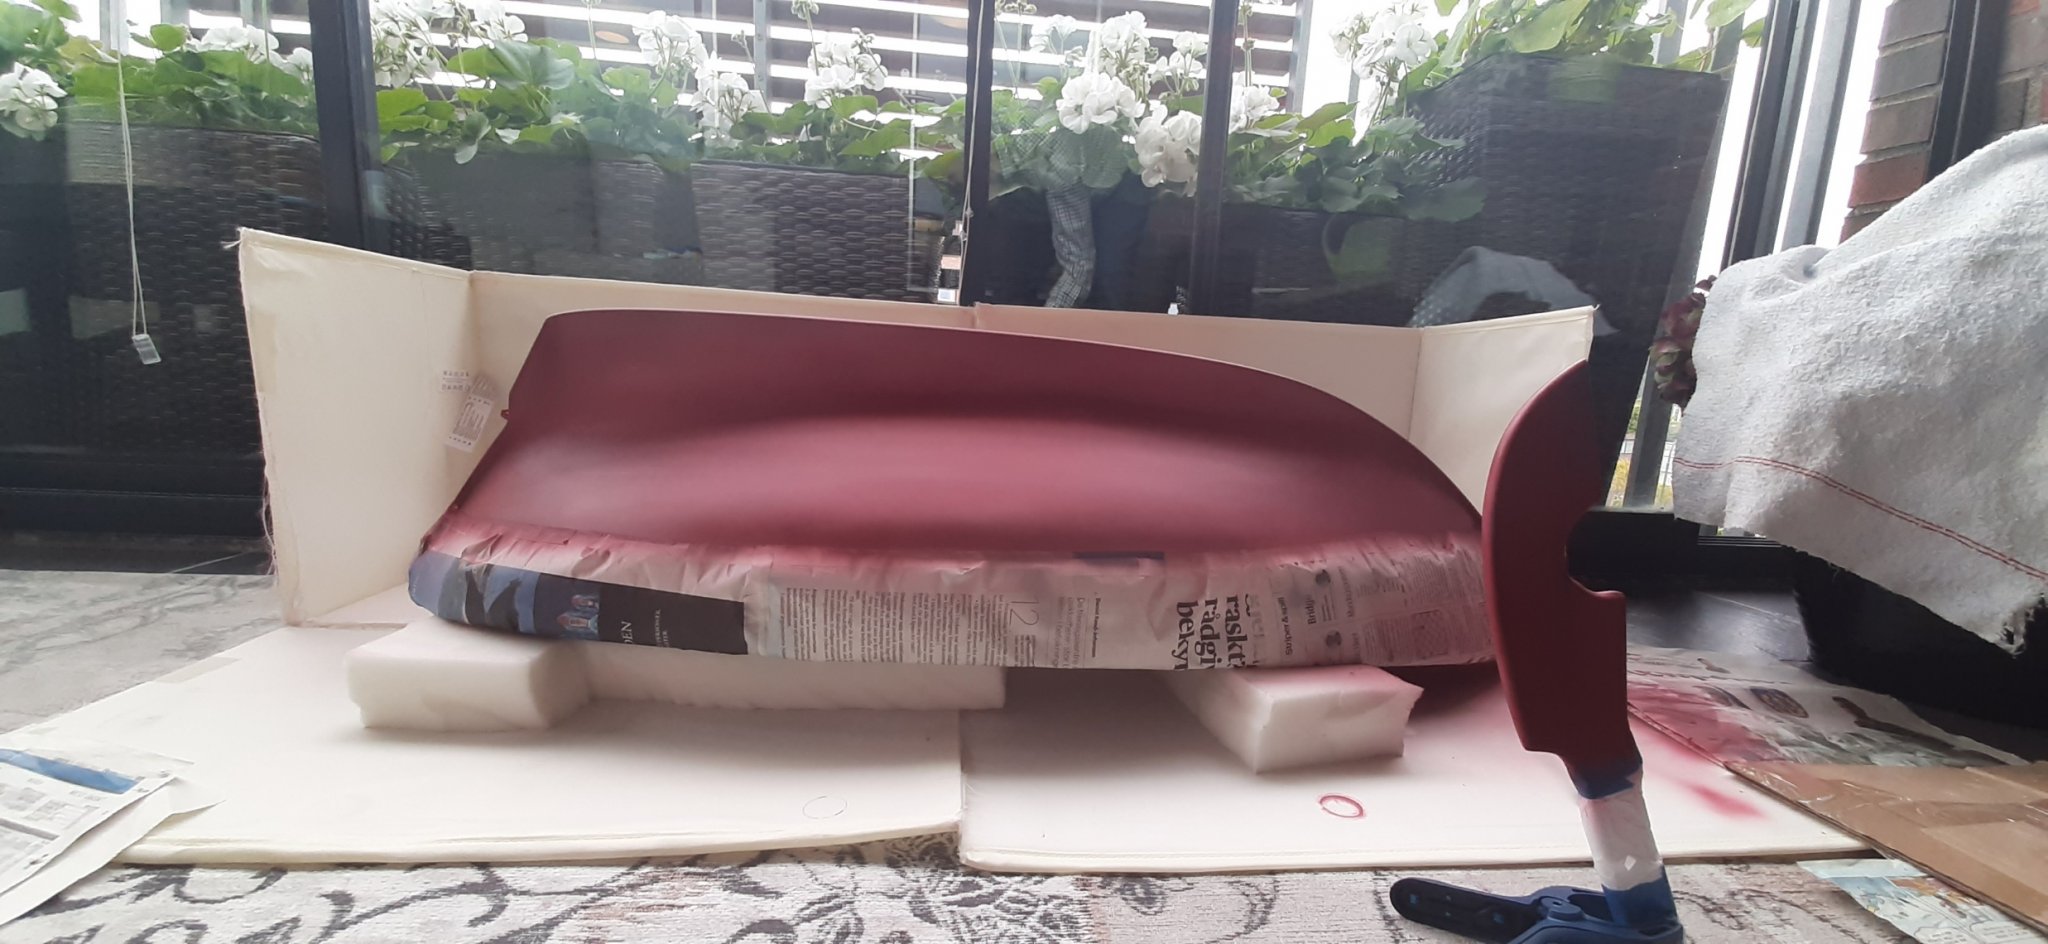
Colin Archer hull on the balcony today for airbrushing. Using standard Billing Boats "hull red" antifouling and white topsides.
Wish all a safe weekend,
George

-
Further to the last info about the Rudy: as half the world will already know, the Rudy can be adjusted to spray in a fan shape as apposed to round spray. This gives a better chance of laying down enough paint on larger surfaces to achieve a glossy finish -I hope! I'm very new at this, so I apologise if I'm stating what every body
else
 knew years ago 🥴
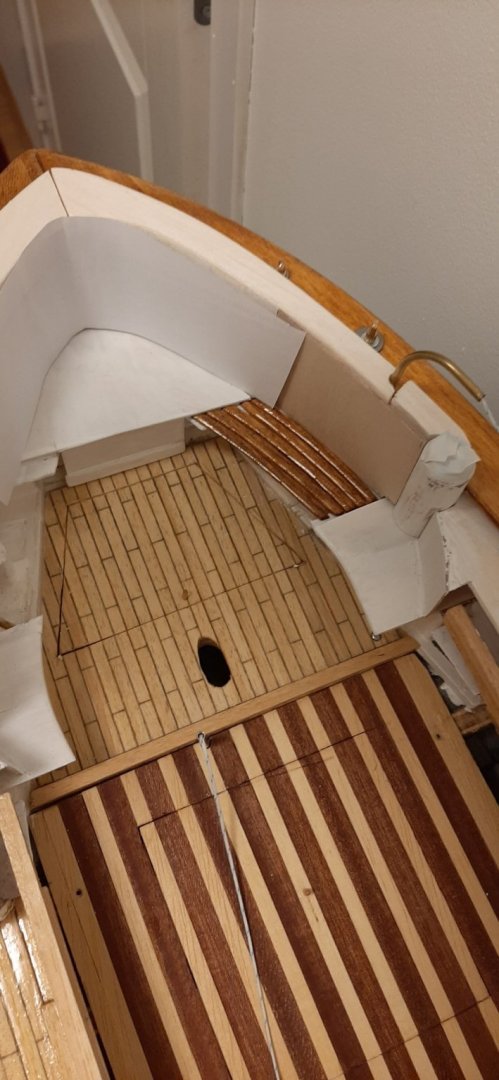
I'm working on the aft combings of the Fisher 34 motorsailer. Have been unsure as to how to construct the combings. Started off with a plan to construct in 1mm aircraft plywood but that seemed to be very fiddly. As the photos show I'm going for carved balsa block. Won't get a perfect finish but we're talking 'stand-off-scale here' not 'microscope viewing'!
-
Hi Bob, I though I sent you an answer last night (2330 in Norway) but see now that it was not sent. Just as well because I thought later that I should not really be discussing my airbrush finishes on Sundt's Colin archer thread.
I used Tamiya gloss white acrylic on my Fisher 34 (34" radio controlled motorsailer) but could only get a silk-matte finish. This was the first time I have ever airbrushed anything (and I'm now 69!) so I don't really know what I'm doing!
After spending some time Google-ing about airbrushing I think that I did not spray on heavy enough and maybe with a too thin needle for such a large area hull. The spray was drying too quickly after application.
When I spray my Billing Colin Archer hull I think that a silk-matte finish will look right so I should be able to get the required finish on that. The hull is ready formed in ABS plastic and is in fact already silk-matte! So maybe I only need to spray the anti-fouling area from waterline and down to the keel! Maybe just polish the white section a bit
 and leave it unpainted.
Thanks anyway for your info, stay safe,
George
- Show previous comments 1 more
-
Hi Bob,
I'll try to find a suitable CLEAR gloss topcoat . I don't think my cheap-ish airbrush can accept a wider nozzel but maybe I can buy another one with a wider spray pattern. There's now a lot of 'woodwork' on the hull as you can see from the new photo but that's varnished so It will not show if a bit of clear gloss gets under the masking tape.
I've had a look at Pen Duick, beautiful yacht. Many thanks for the info'.
Regards, George

-

-
My local hobby shop has 1 Hobbynox Ruby airbrush in stock; .8mm needle ( the first I bought was .3mm). They also have Tamiya X22 Clear Gloss. So with new inspiration from you Bob -who never gives up- I'll be rigging up my home made spray booth and having a new attempt at "more-gloss-on the-Fisher project".
I have a sort of build-blog on the Model Boats forum in the UK but I'm in here often to follow Sundt's Colin Archer build quite often so I will try to open a thread here and post a few words occasionally. Also, I can't keep writing stuff on Sundt's own post! Nor Bob's!
Regards, George
-
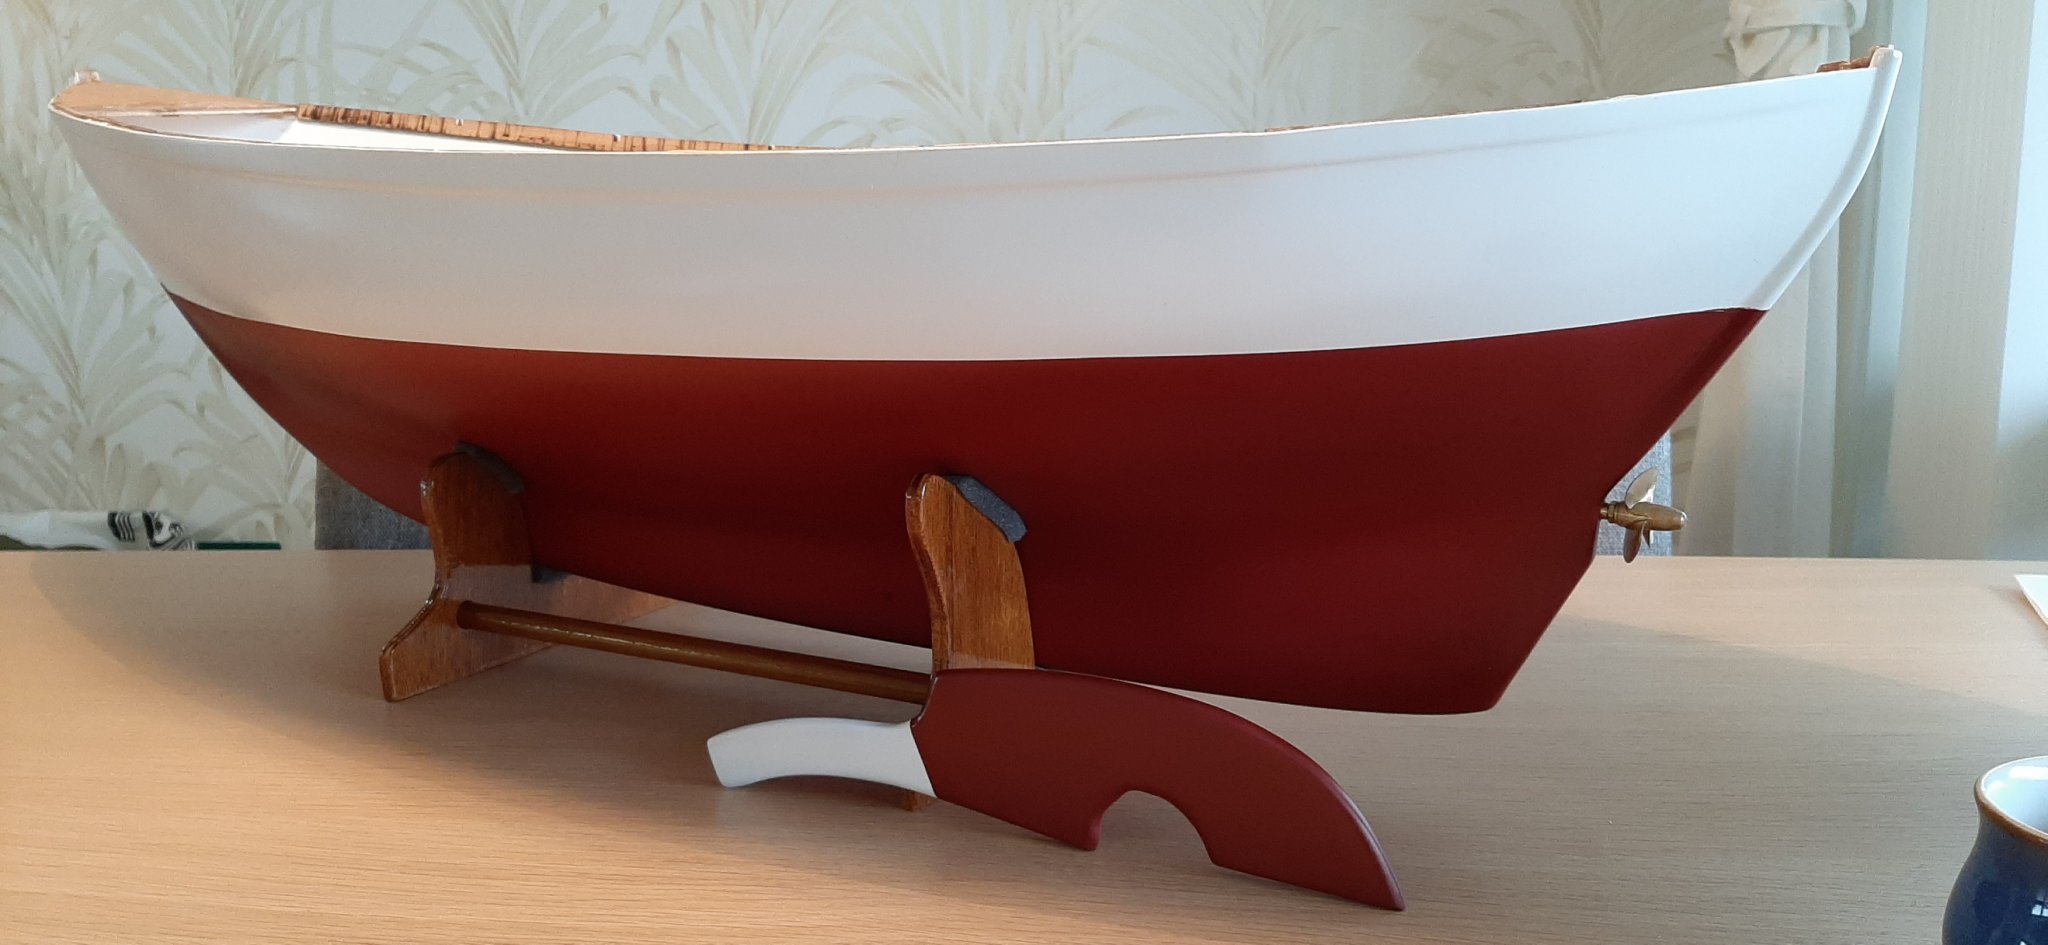
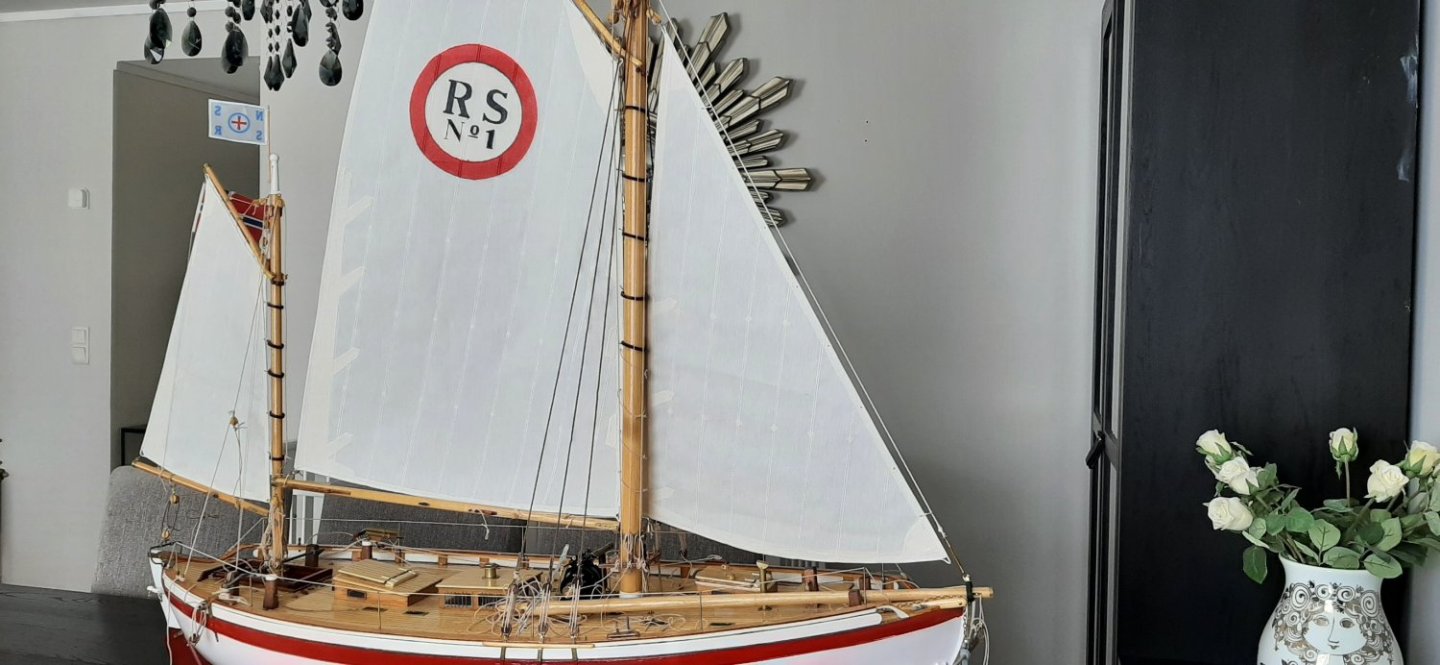
My Colin Archer is now 'airbrushed' as much as I dare until the rest of the boat is completed. I expect that I will have to give it more coats later as there will certainly be some damage while handling during the build. I wanted to test the whole 'airbrush thing' and ended up using the CA as the extended testbed. The finish so far is silke-matt. It's now going down to the cellar storeroom until I get more progress on the Fisher 34.
George

-
Picked up my Hobbynox Ruby airbrush and two jars of Tamiya clear gloss acrylic today. Instructions for Ruby were encouraging by confirming that it's good for larger hulls and aircraft projects. As I mentioned earlier, I think that may be why I could not get a glossier finish on my Fisher hull. But the present finish is not too bad and like some others suggest, it may be smart to leave it as it is. I'll need the new airbrush for the next hull -Colin Archer RS1- anyway. Maybe I will test it out by trying gloss on the Fisher silk-matte finish. Maybe I will chicken out, we'll see.
Regards, George
-
Regading the RUBY air gun (not RuDy as I wrote earlier!). The compressor I have now would not produce enough air pressure to blow through the wider nozzle 0.8 mm. It's OK for my small airbrush 0.3mm nozzle but not the 0.8mm Ruby gun. I do not want to buy even more gear for this (ie larger compressor) so I have returned the Ruby to the dealer.
Had another go at airbrushing the Fisher hull with my small airbrush -this time with added 'paint retarder' to the thinned clear gloss. Got a reasonable silky-gloss finish which I think is acceptable.
Next job is to try to repeat the process with the next hull: the 1/15th scale Colin Archer. Don't need a glossy finish on that so should be able to manage a reasonable result with the smaller airbrush. I'm going for Bob's info regarding a varnished top-coat to give a bit of resilience to the surface. Without retarder it'll probably dry fast enough to give me a silk-matte finish.
I find it a bit stressful trying to do things which I can't do 😬 but before too long it'll be one more thing I CAN do😁
Regards
George
-
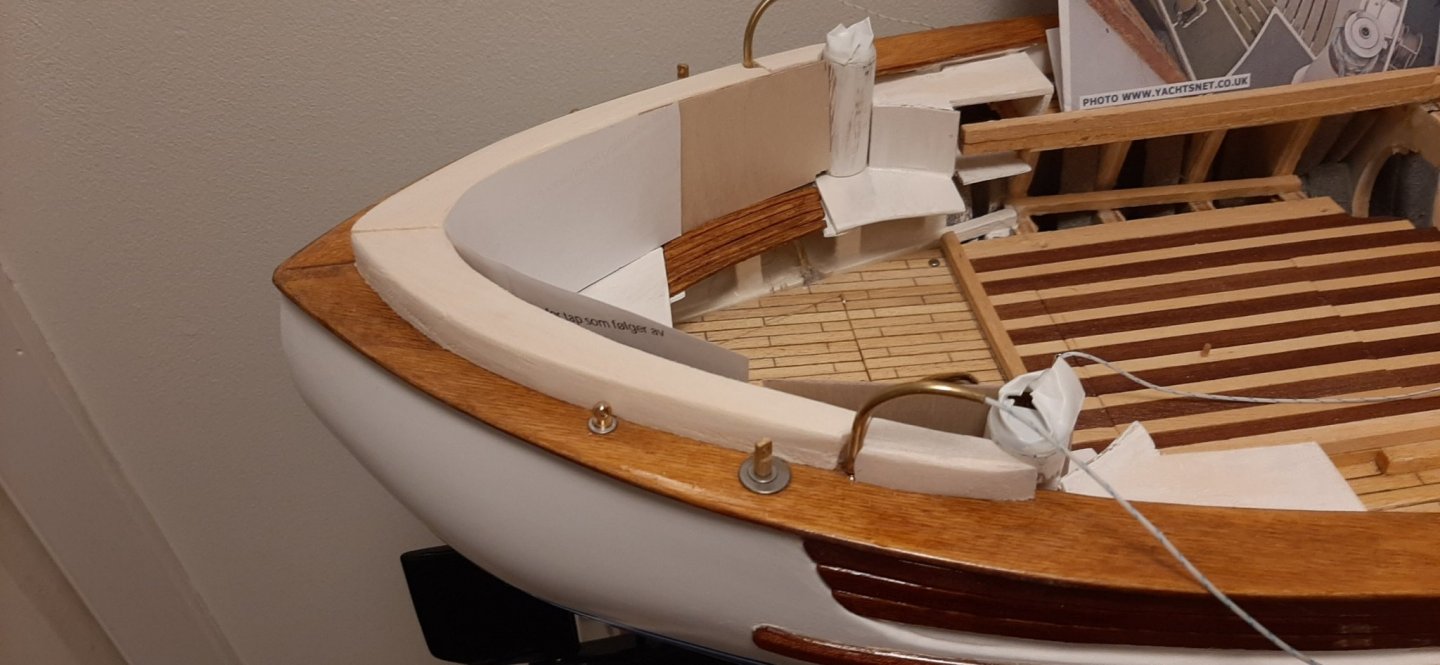
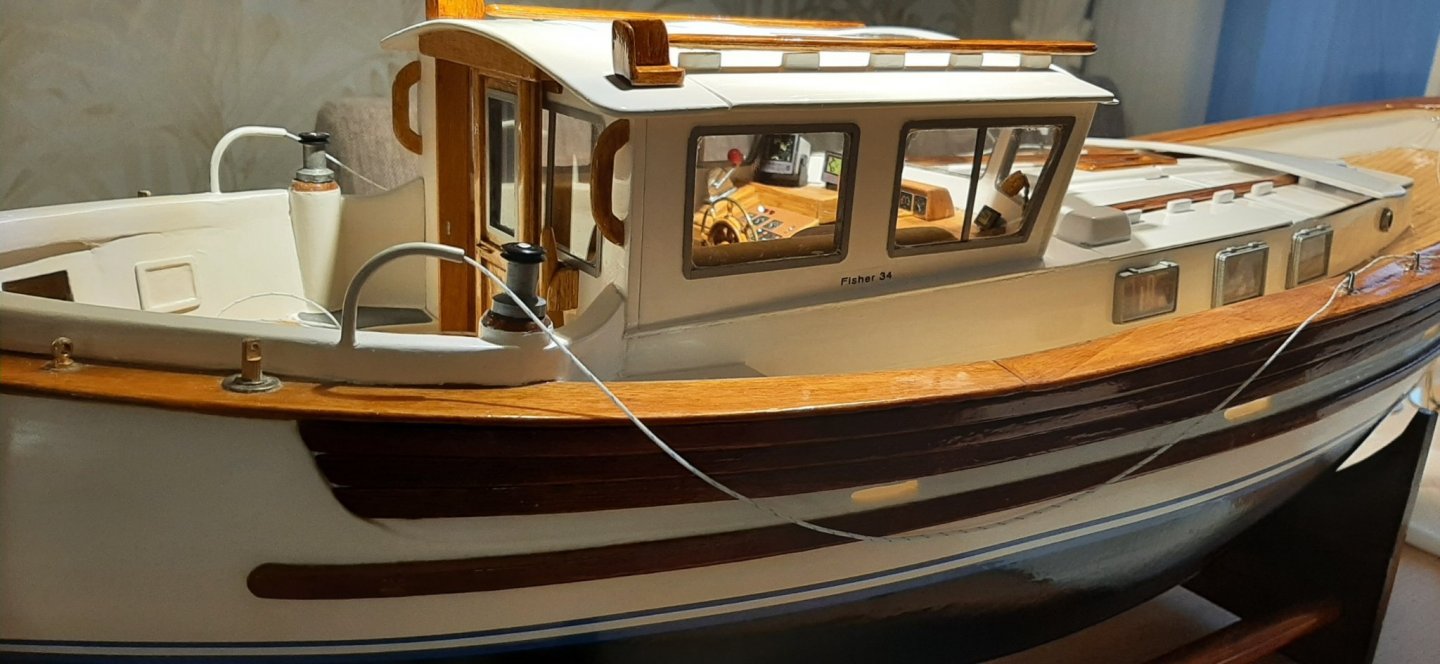
 Forward window frame now in place. Used silicon, thinking it would give best waterproof seal but wood glue would have been just as good. Photos show other parts just loose fitted in approx positions. Will try to install working nav-lights in due course.
George

-
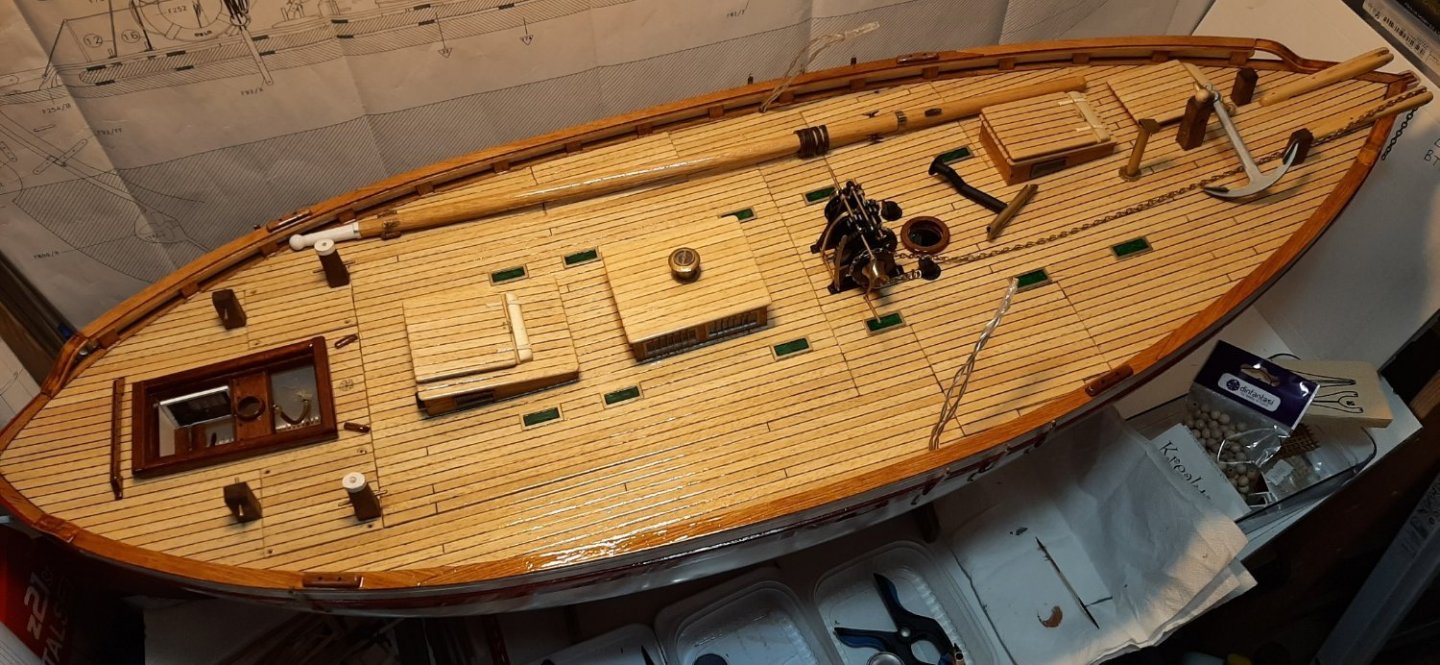
4 coats of varnish have now been applied to the deck and top of deck structures. The hatches were a little bit 'stuck' in place, but managed to prise them open again before the varnish dried too much.
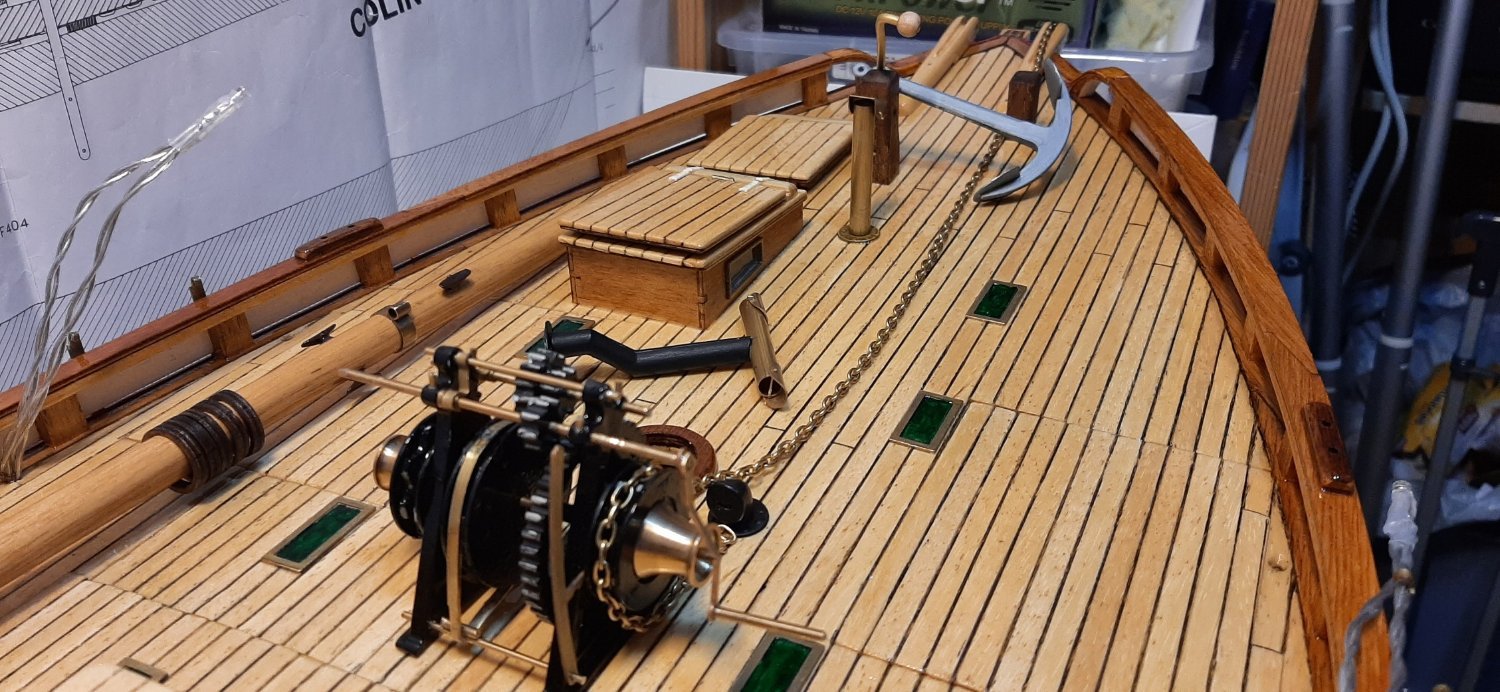
With the yacht back up in the flat again, I just had to test the look of the windlass on deck. The full size windlass is painted all black, but I will keep some of the brass rods unpainted to add a little contrast. In fact I will leave several of the real brass fittings unpainted. They can be painted black later if I feel for it. I am waiting for some 2mm brass nuts to arrive for the ends of some of the brass rods.
George
-
A bit delayed as usual due to non-hobby related matters but have hoisted yet another sail and threaded a few dead-eyes for the main mast shrouds. The flying headsail and mizzen shrouds are on the list for this weekend as are 'ratlines' on the starboard shrouds.
Nav-light boxes have to be lashed to the shrouds too.
I wish a good weekend to all.
George

-
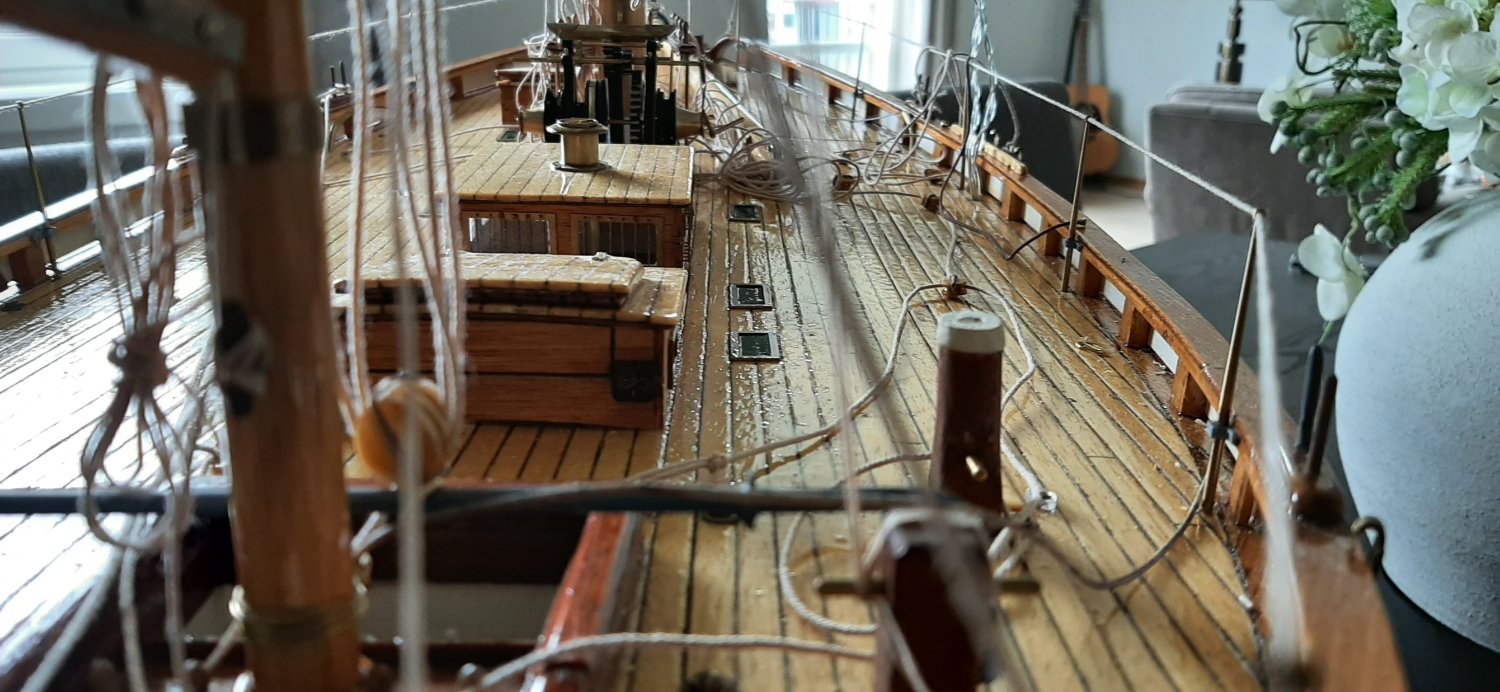
A boatspeed indicator is fitted to the aft companionway -as on the present fullsize version.
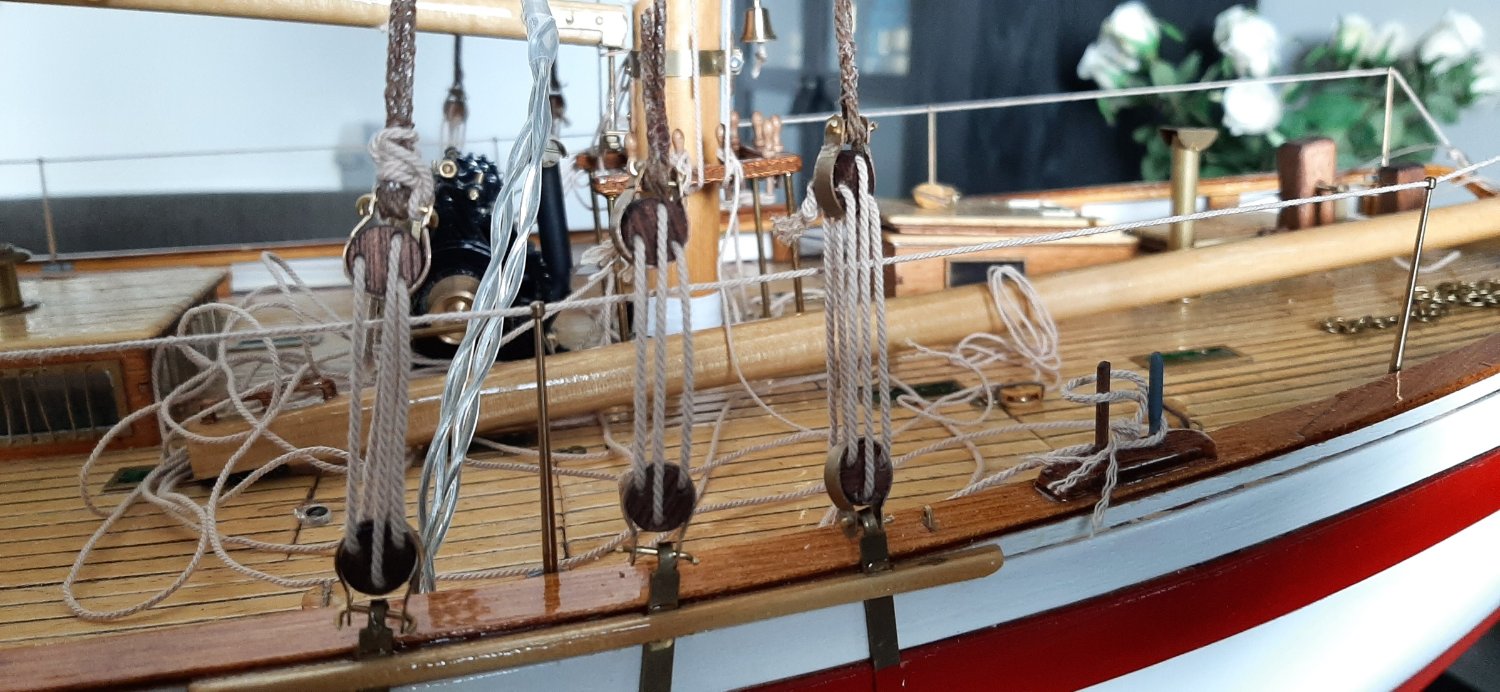
View from the helm shows the deck becoming cluttered with sheets and halyard ends. It will take a while to get all the 'ropework' properly stowed.
This weekend should see all the sails attached and hoisted. Then the standing rigging/shrouds etc. will be on the list for next week.
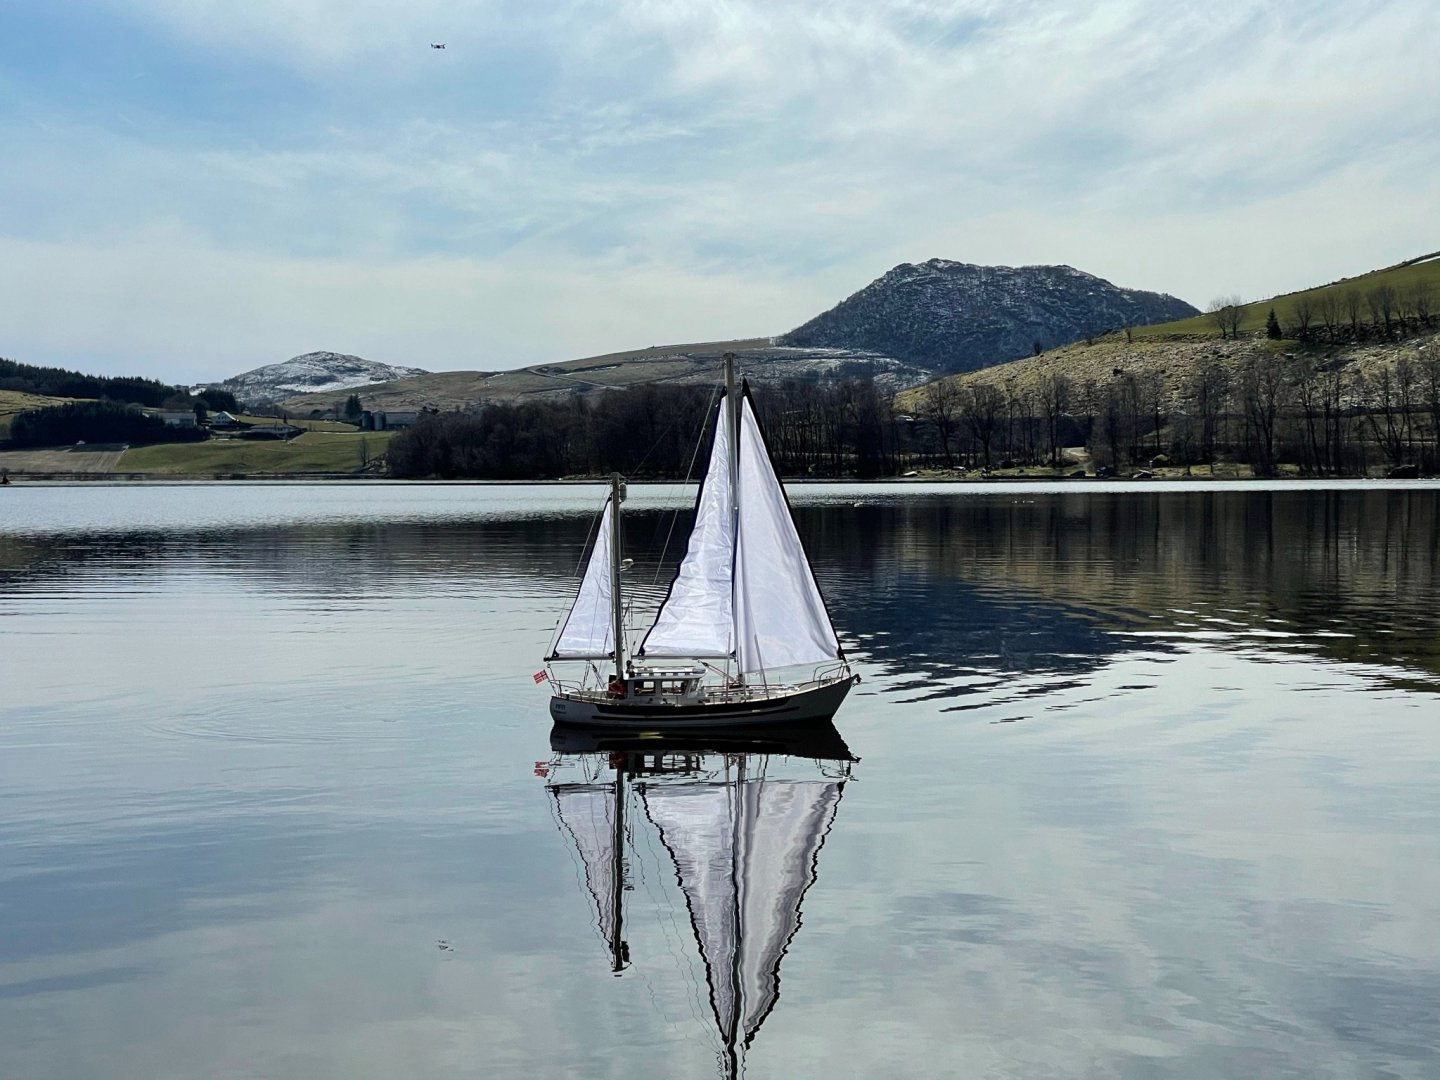
I'm hoping for a launch day sometime in August.
George

-
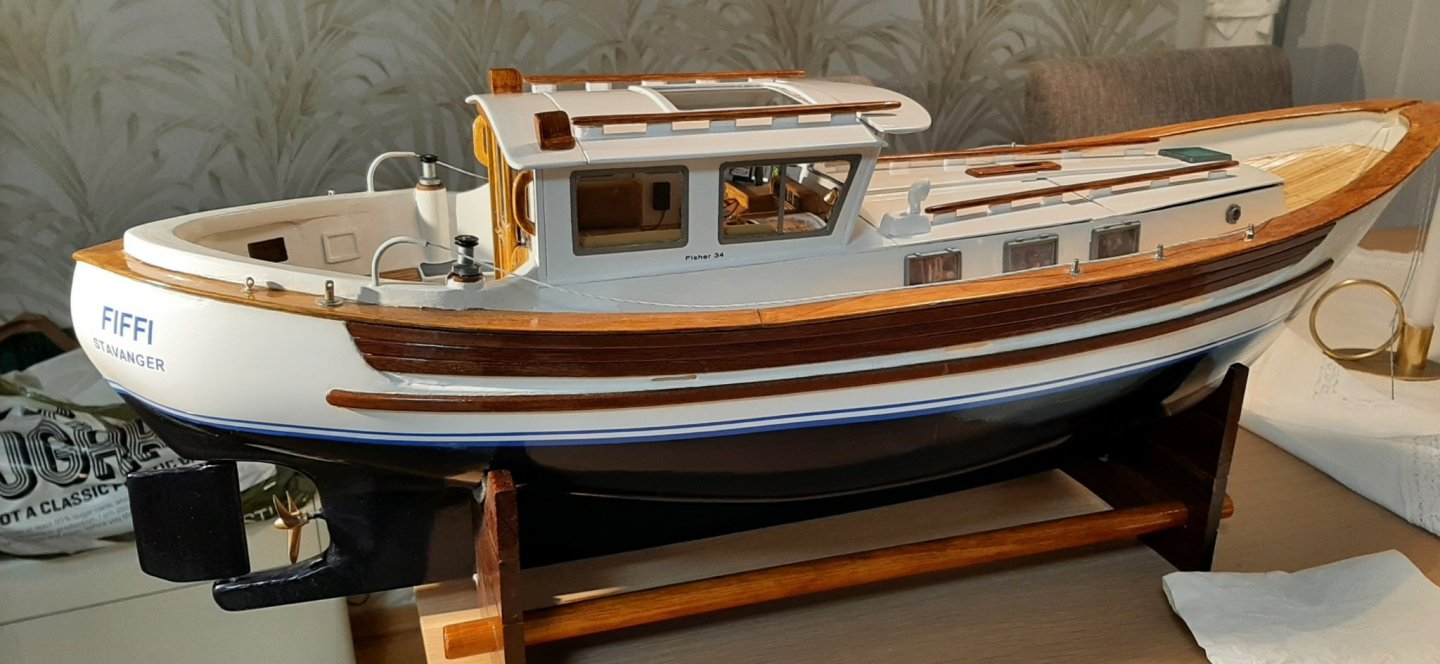
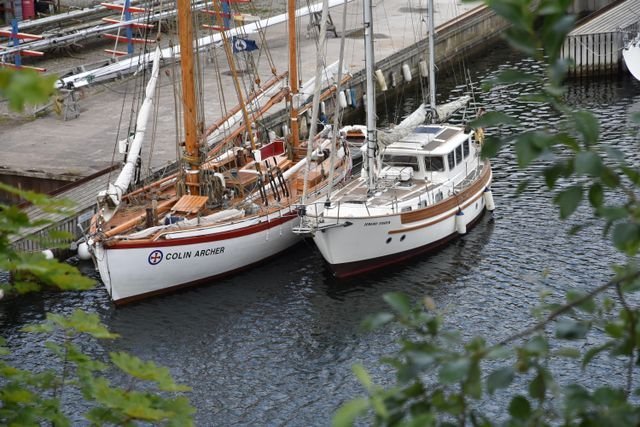
A friend in Eastern Norway has his Fisher 37 for sale. He moored it alongside the original refurbished Colin Archer for some 'mugshots'. Not often you see these two yachts in the same photo.
George

-
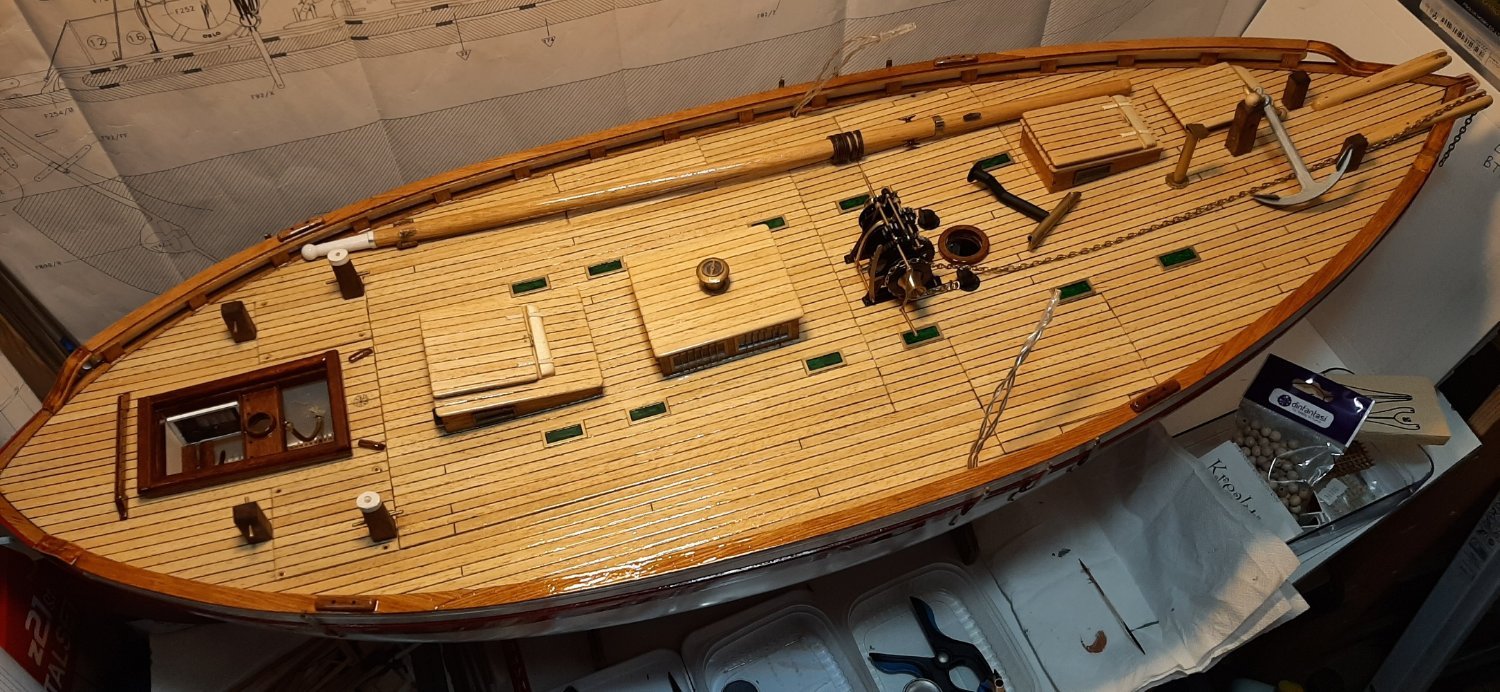
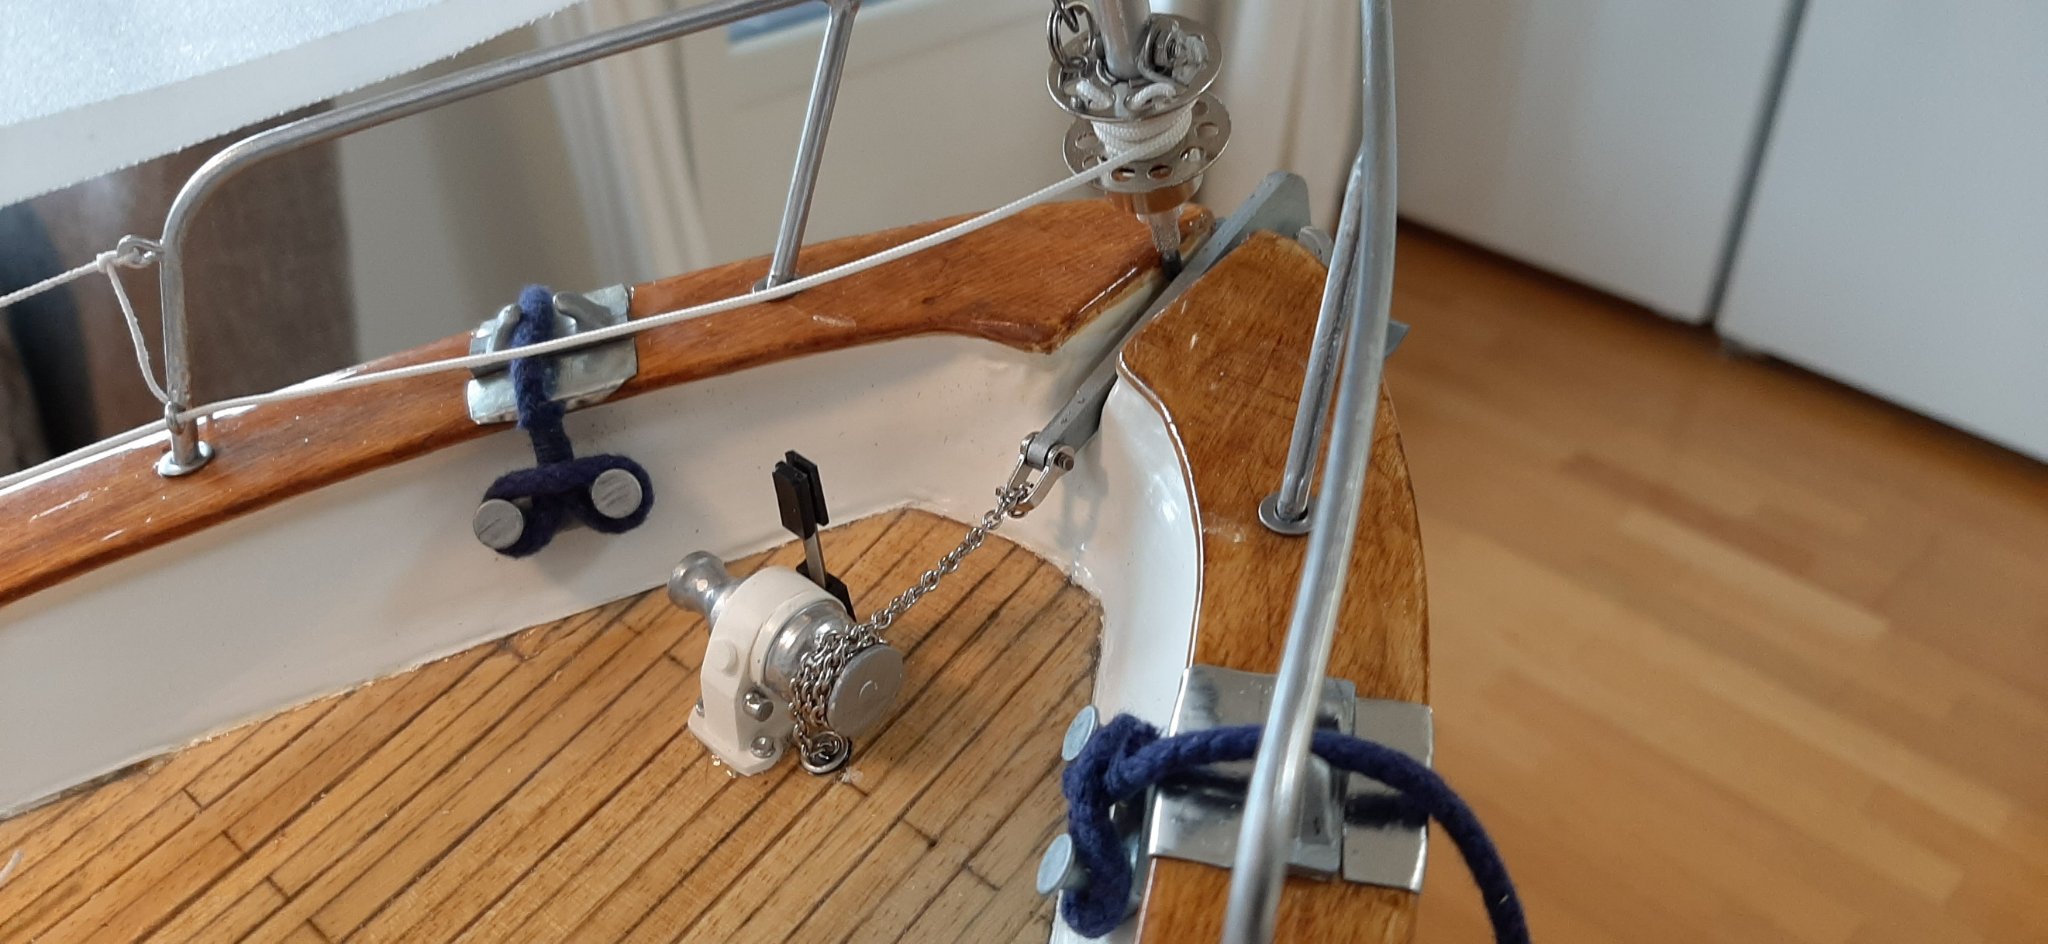
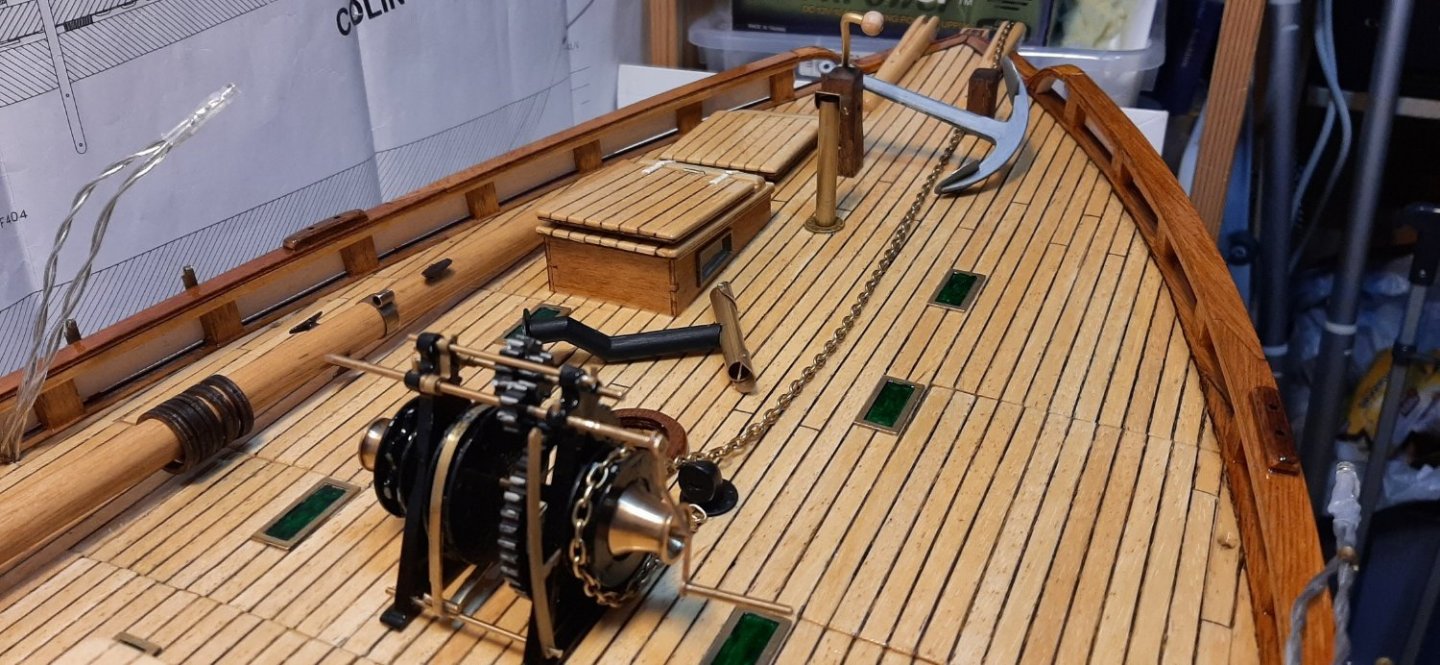
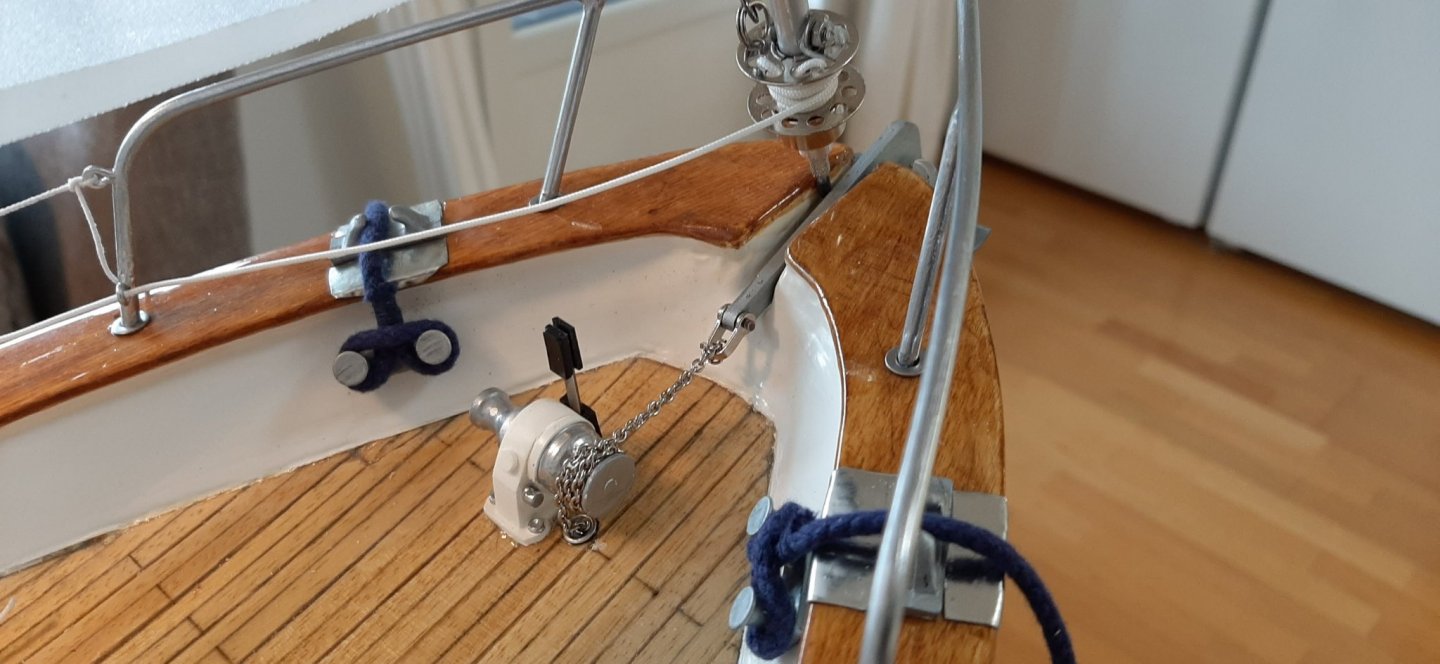
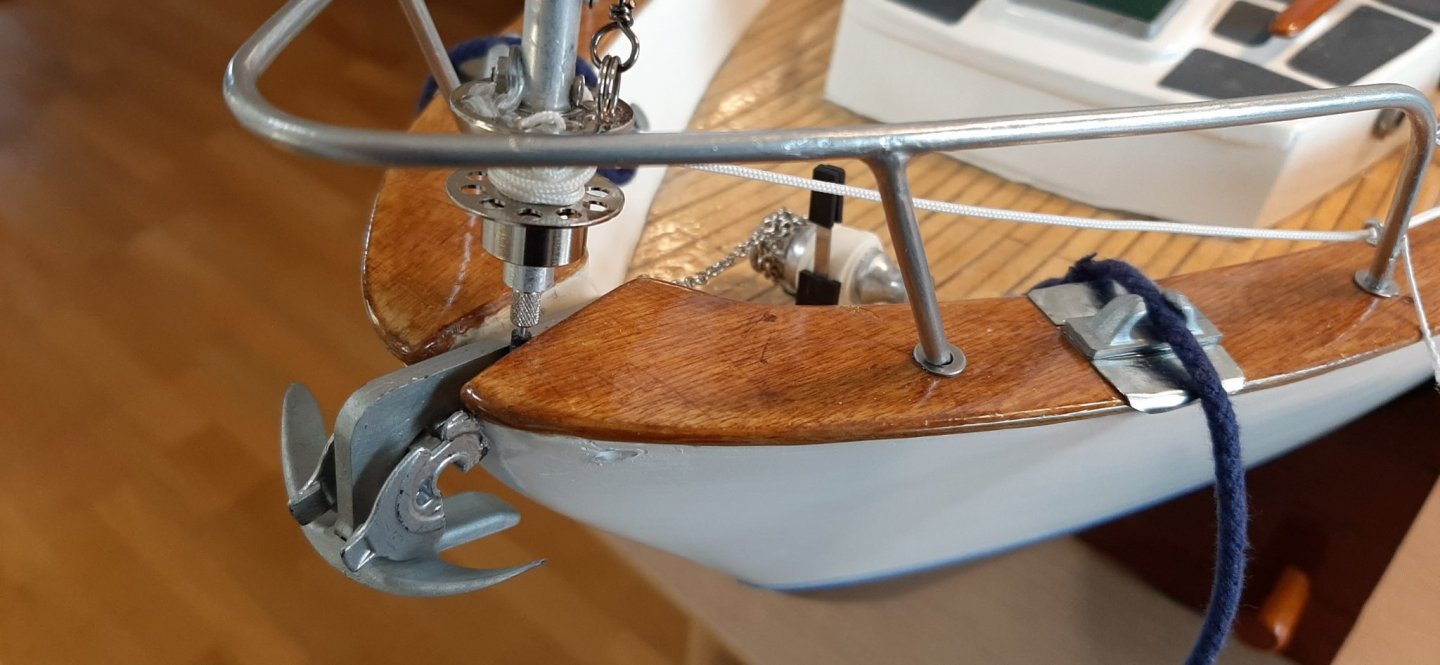
Added anchor windlass and manual operating handle. Also produced a stemhead fitting to hold the bruce anchor on the 'stemhead roller' -which is only a bolt, not a roller!
Trying to revive my old Roam3 action cam to get some on-board photos for the launch and first sail. Weather report is OK for Thursday and Friday. Setting up for automatic still photos only, don't think the stabilisation is good enough for video and have to open a You Tube a/c which I don't know how to do....yet.

-
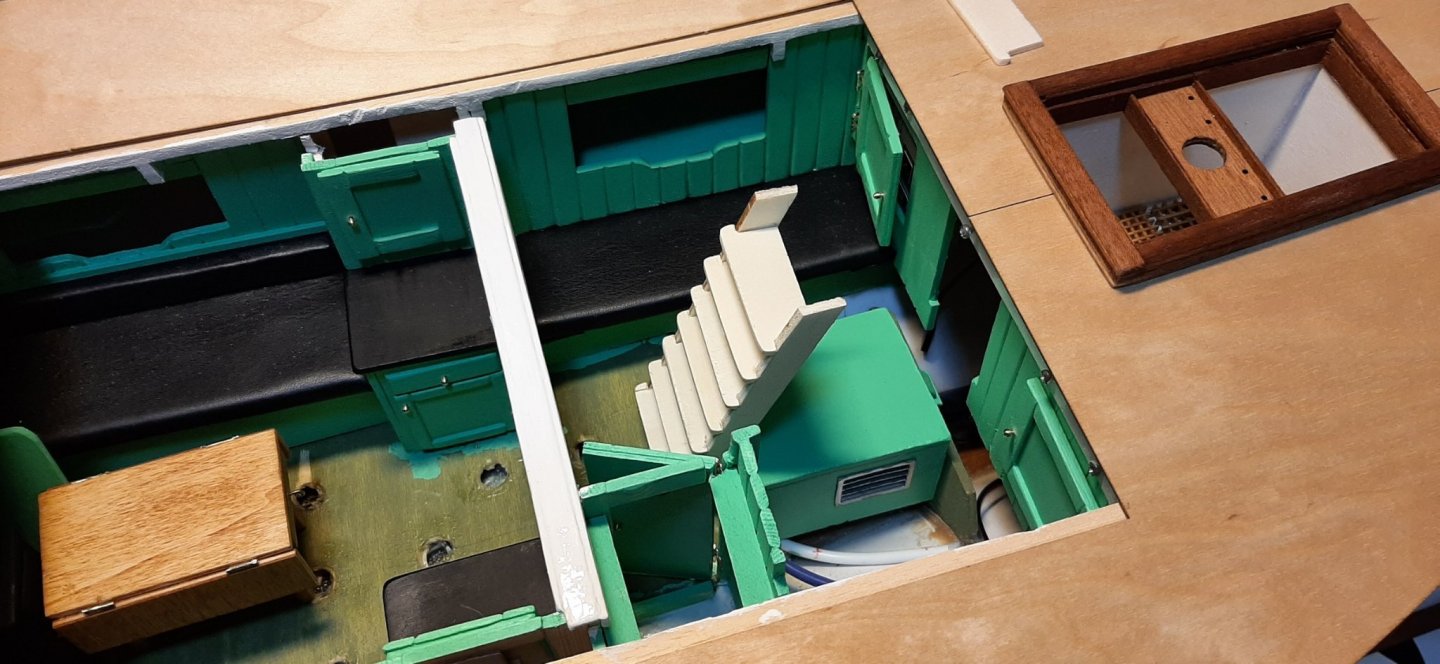
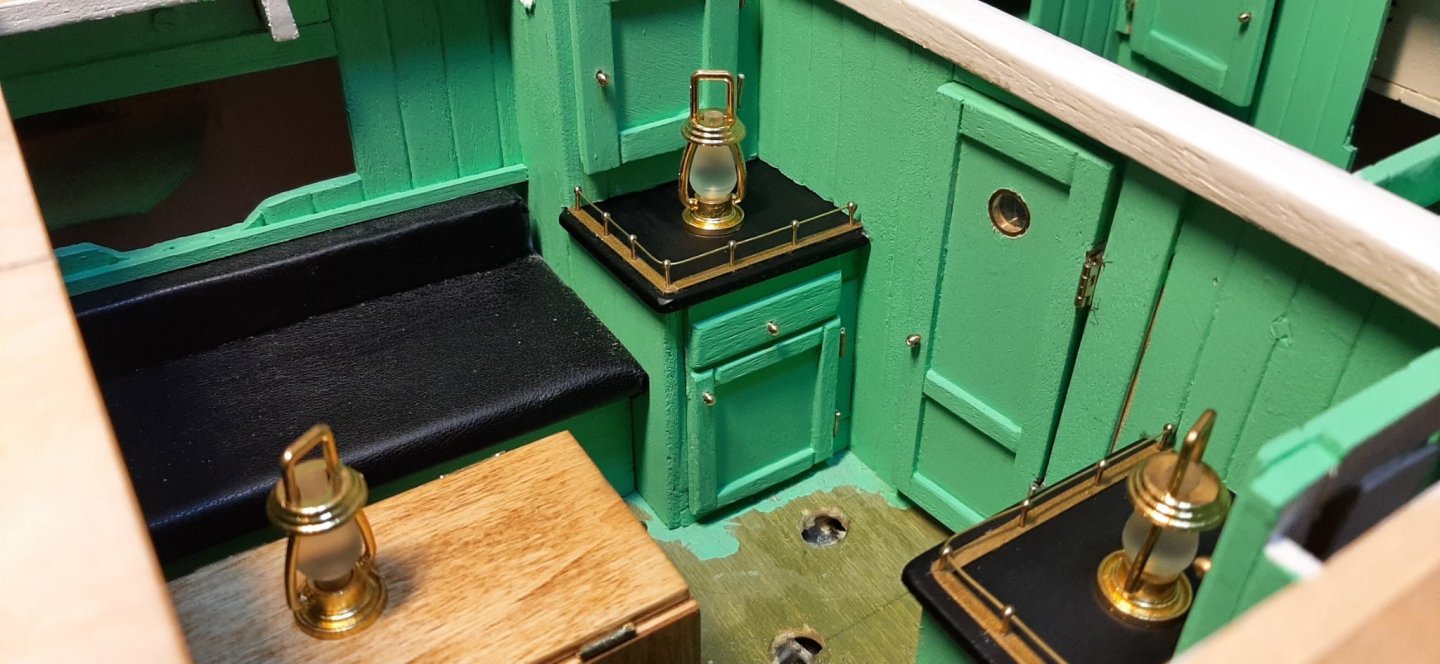
Added some (non-working) door and locker hinges and made the brass fiddle rails on the locker tops. The companionway steps are also in production.
-
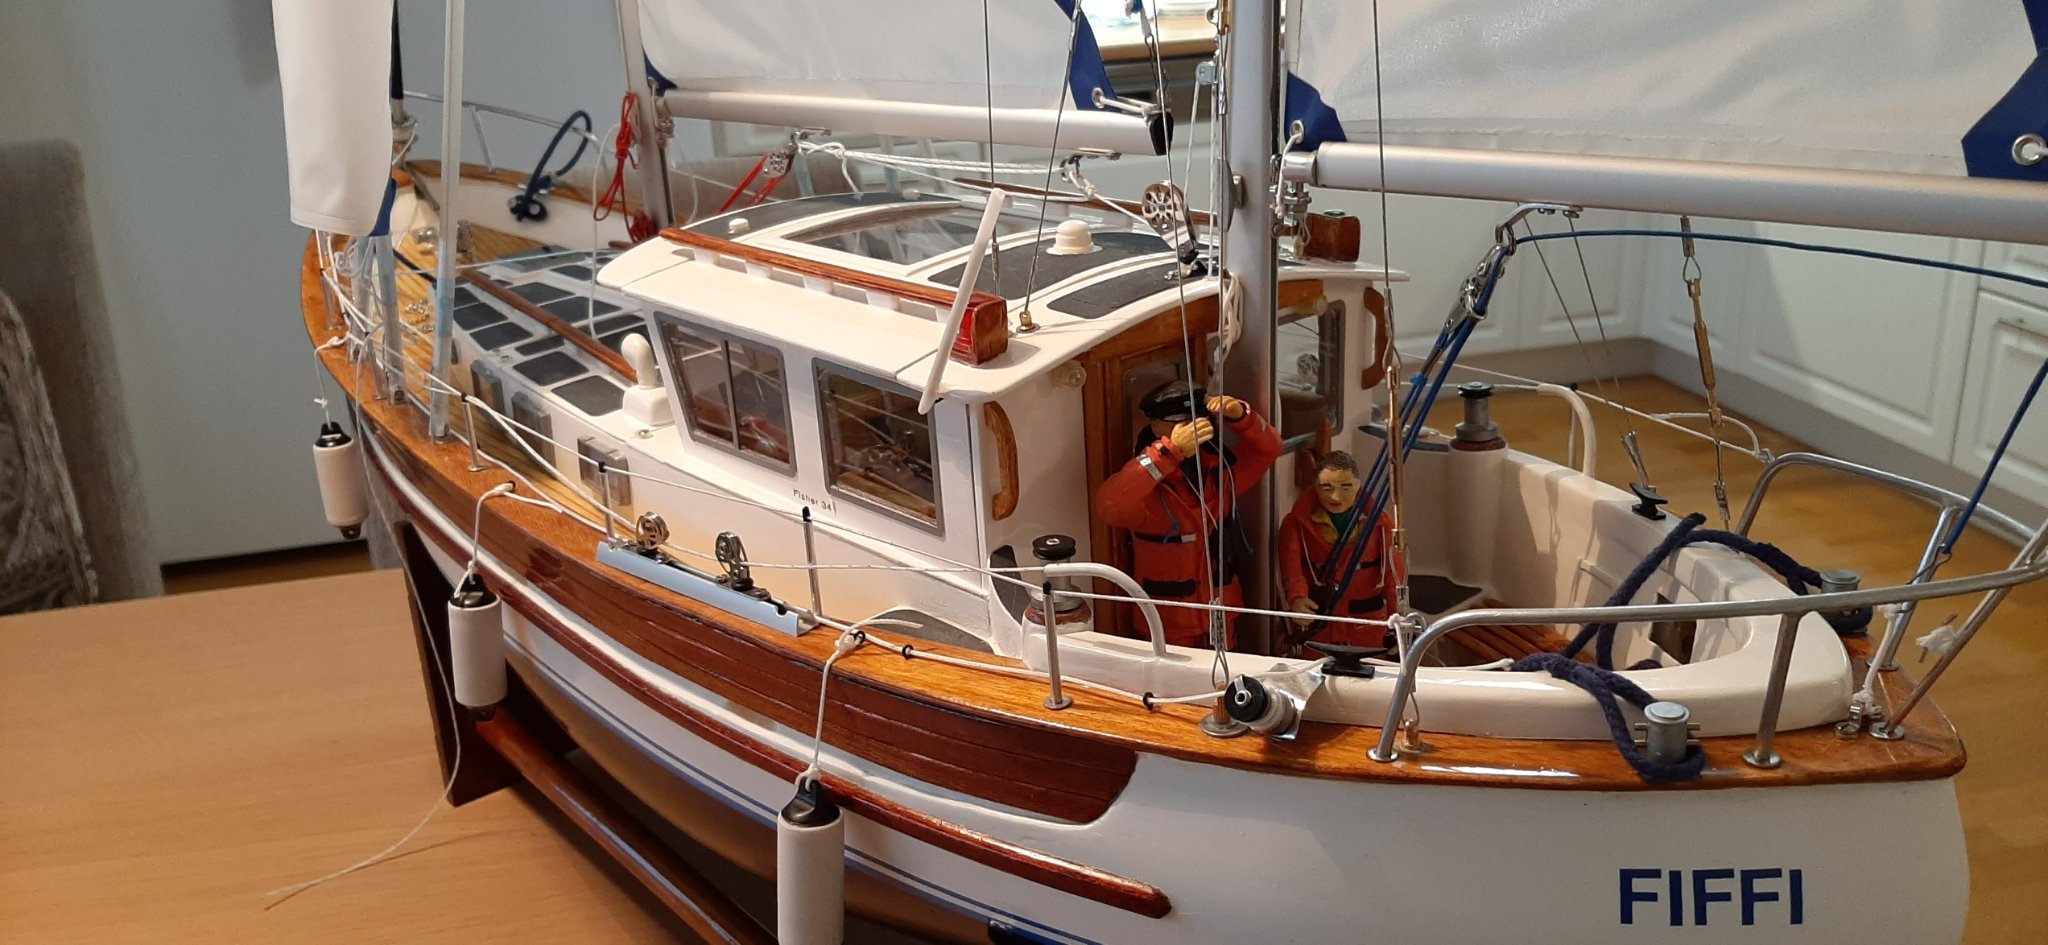
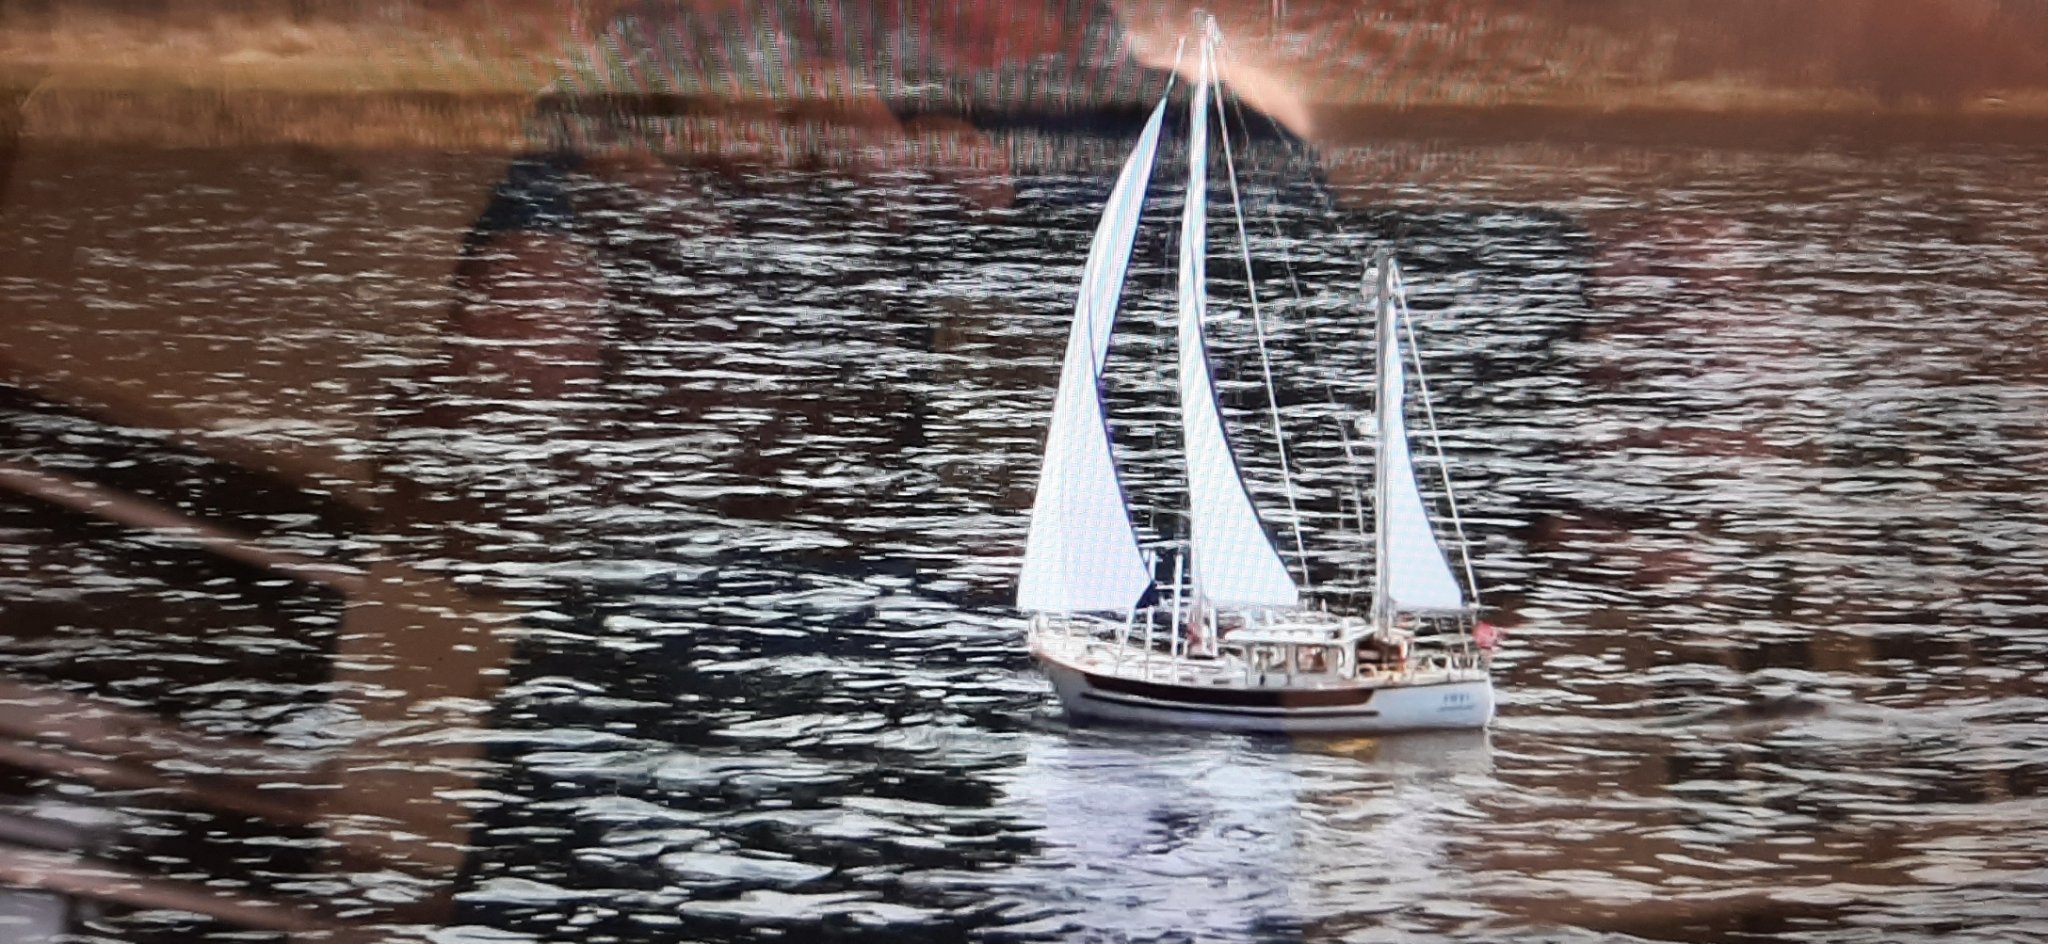
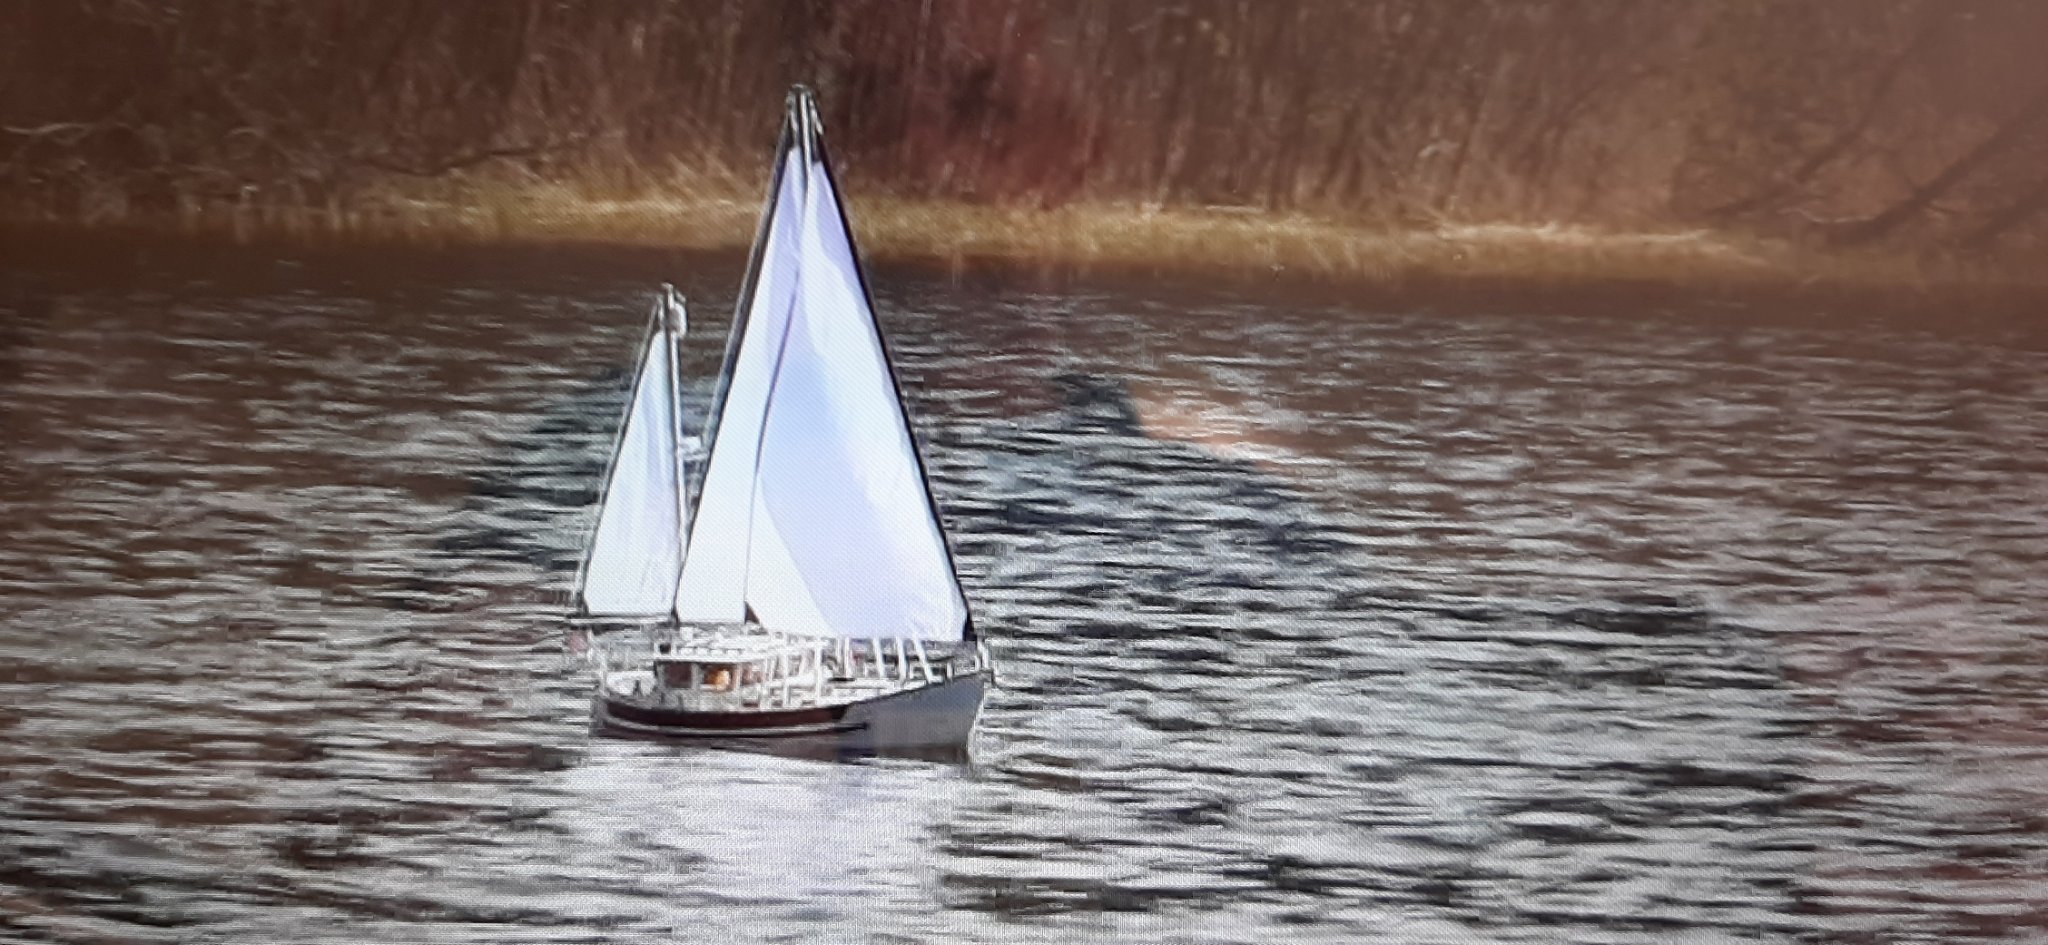
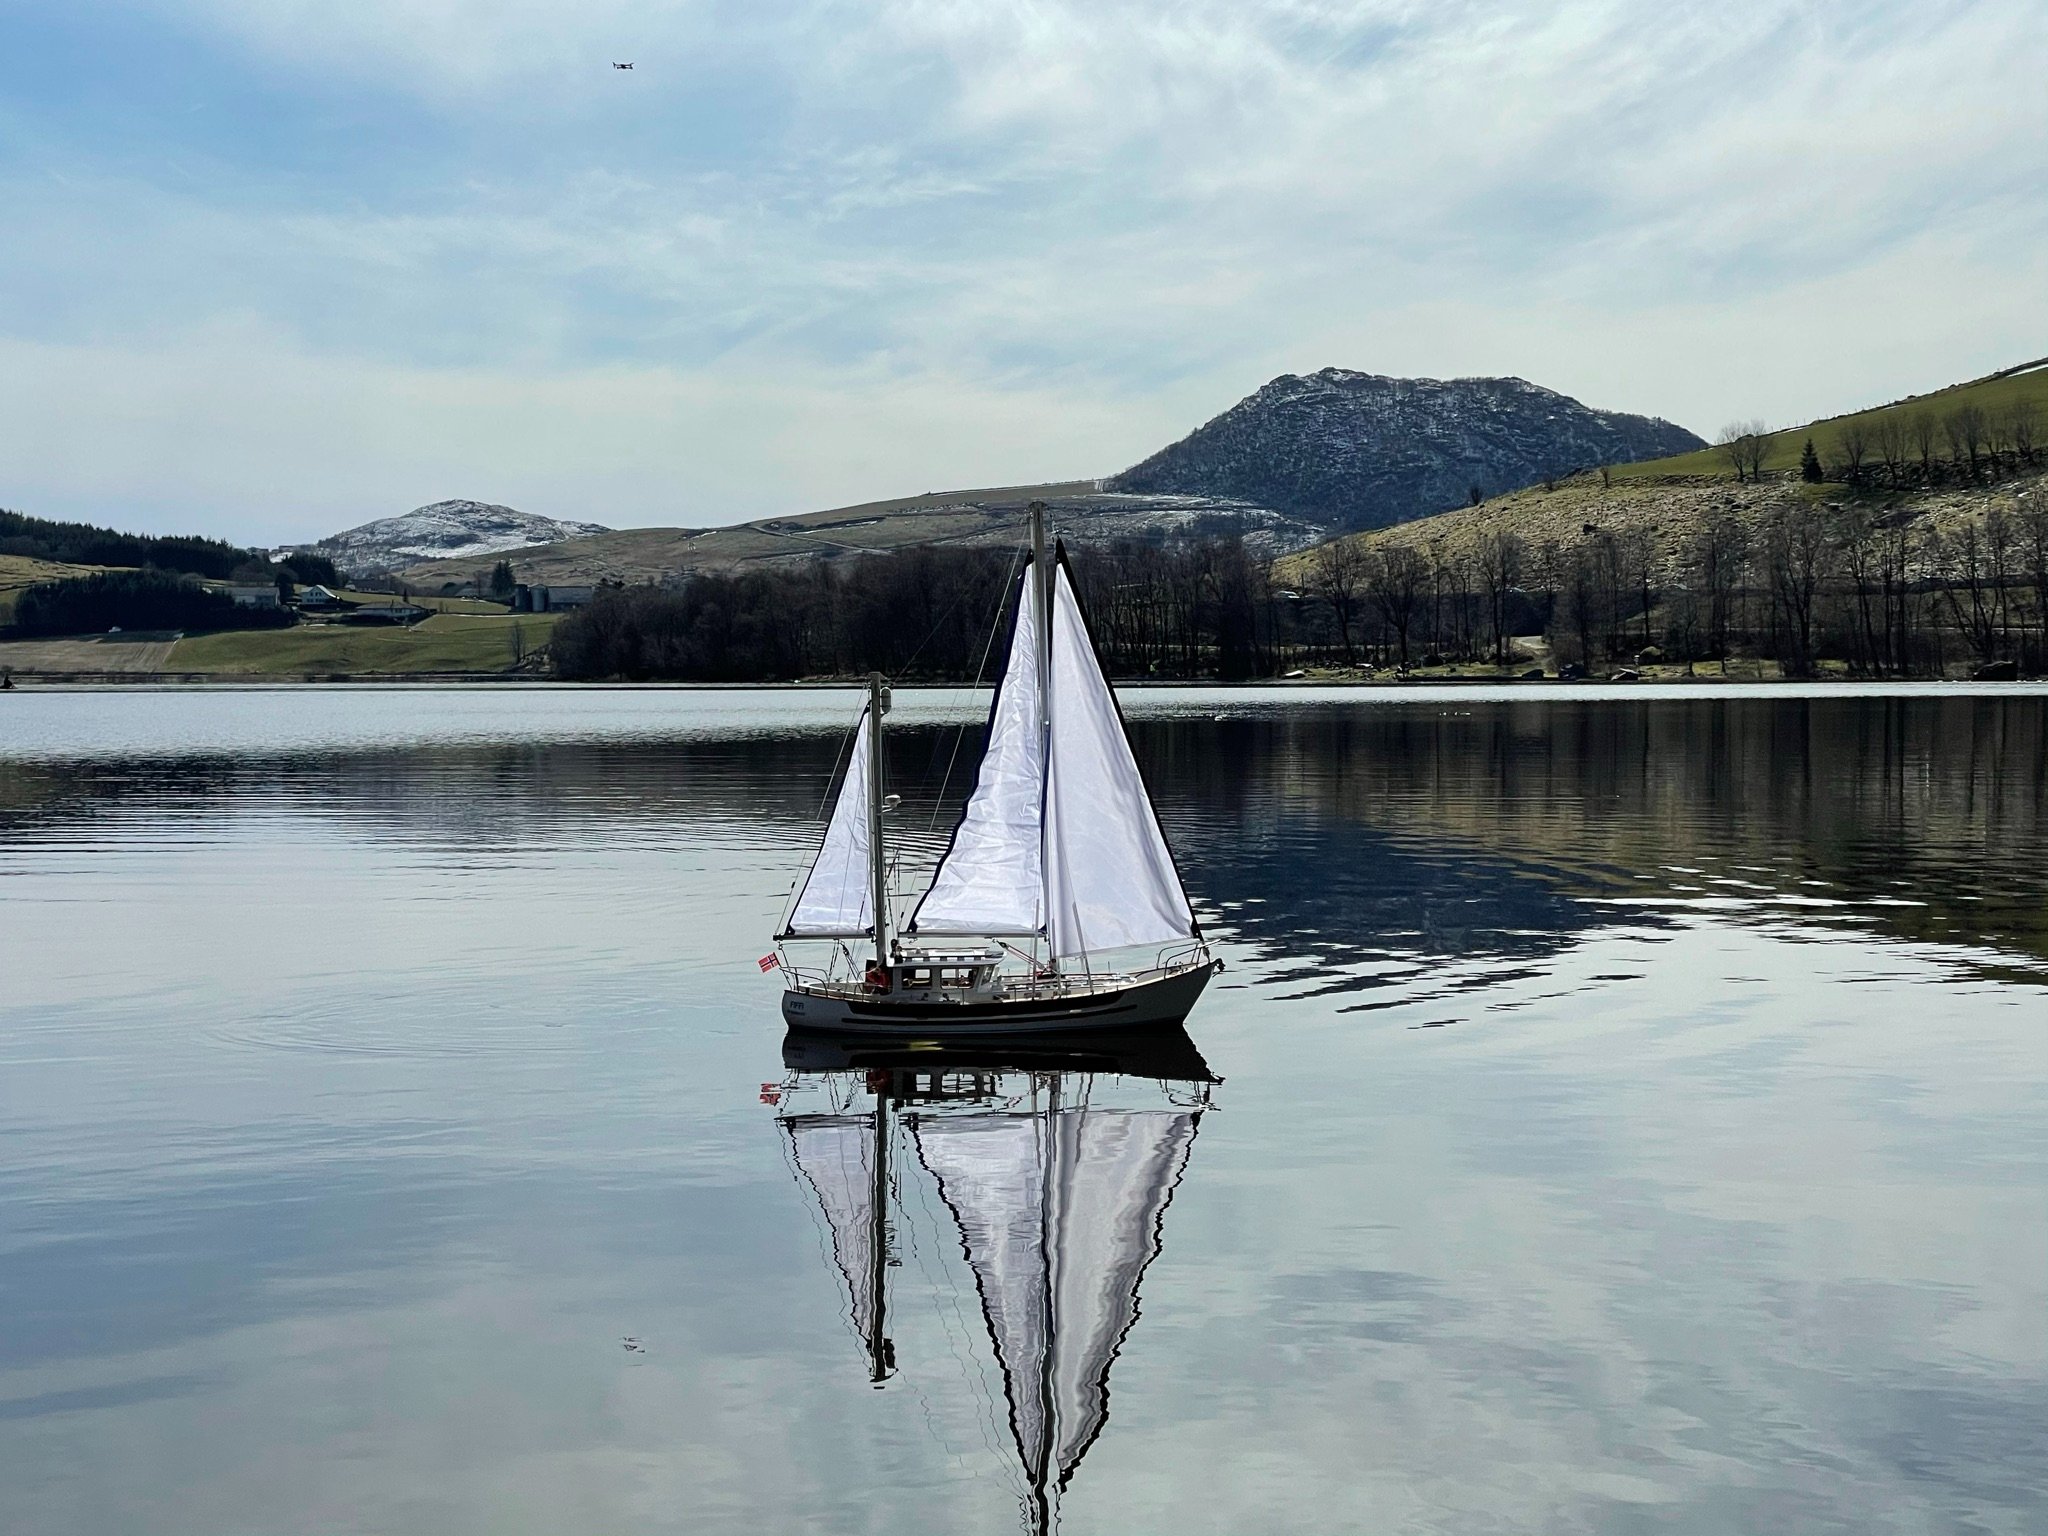
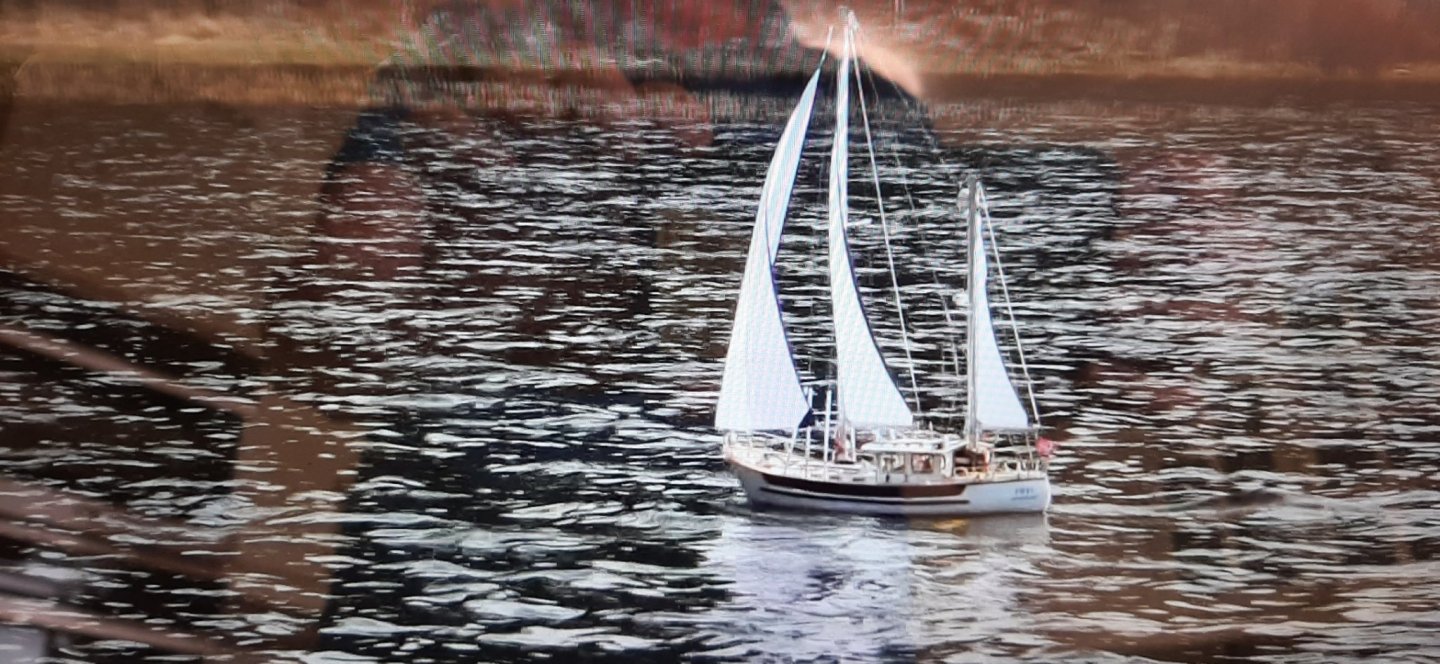
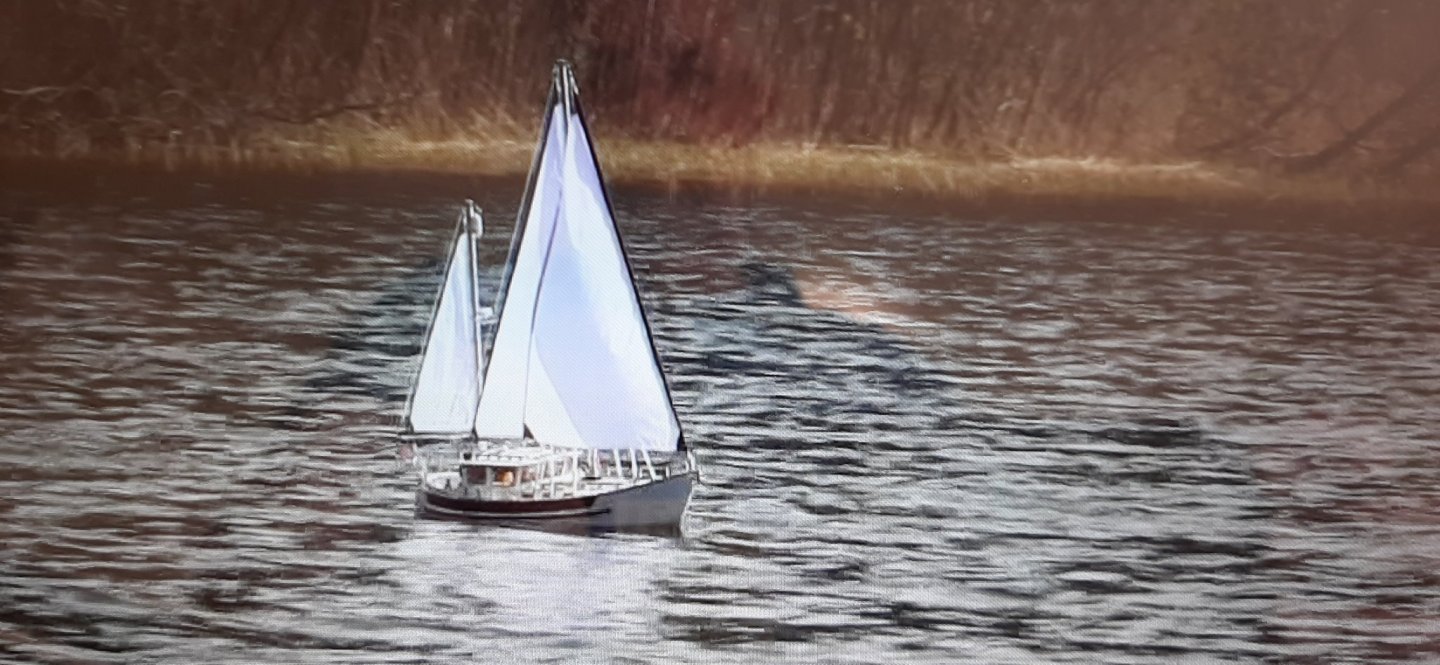
Admiralty assisted trip to a local lake today. Not much wind, but nice Wx and 17*C . Fisher sailed very well in fact in almost no wind. The family 'film crew' were there too, but not got any of their photos or film yet- Posting here a couple of poor photos from video on my PC screen.
Just a few cosmetic tweeks to do on the yacht before I close down the Fisher production unit and go over to the Colin archer. Not planning to write much about that as so many people have already built it and Carsten and Andreas are already active on this site with their Billing Boats CA models.
George.
-
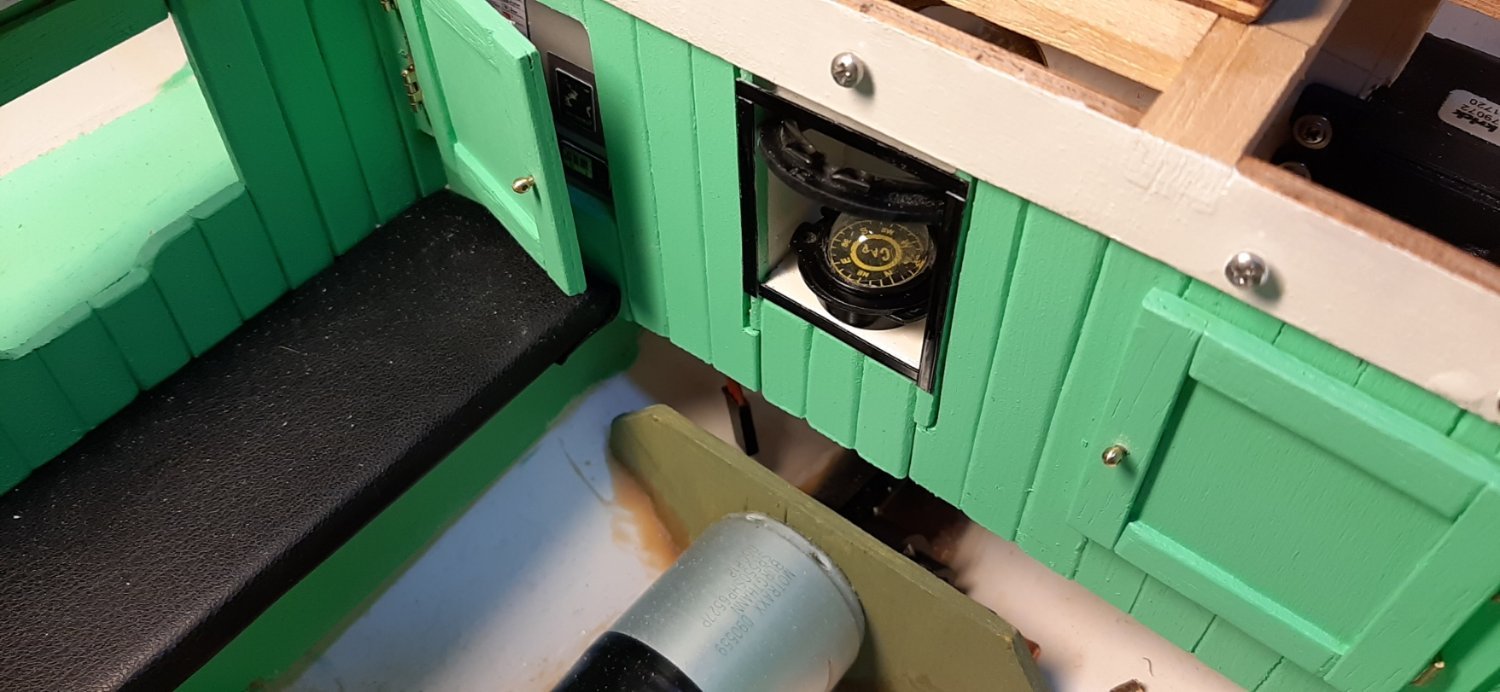
Aft bulkhead in production now. A locker on each side and a space to house the steering compass which can be seen by the helmsman through a porthole in the forward bulkhead of the steering well! The porthole and compass are not in place yet but they will appear eventually.
George

-
Apropriate beams/stringers have been cut away and a mainsail control winch has been fitted abeam the cockpit/steering well. The winch is a 4-turn Krick unit nr. 1004MG. The mainsheet will run via a brass guide tube, through the side of the well, up to a ring on the mizzen mast and to the end of the main boom. The winch drum will be fitted later in the build!
George

-
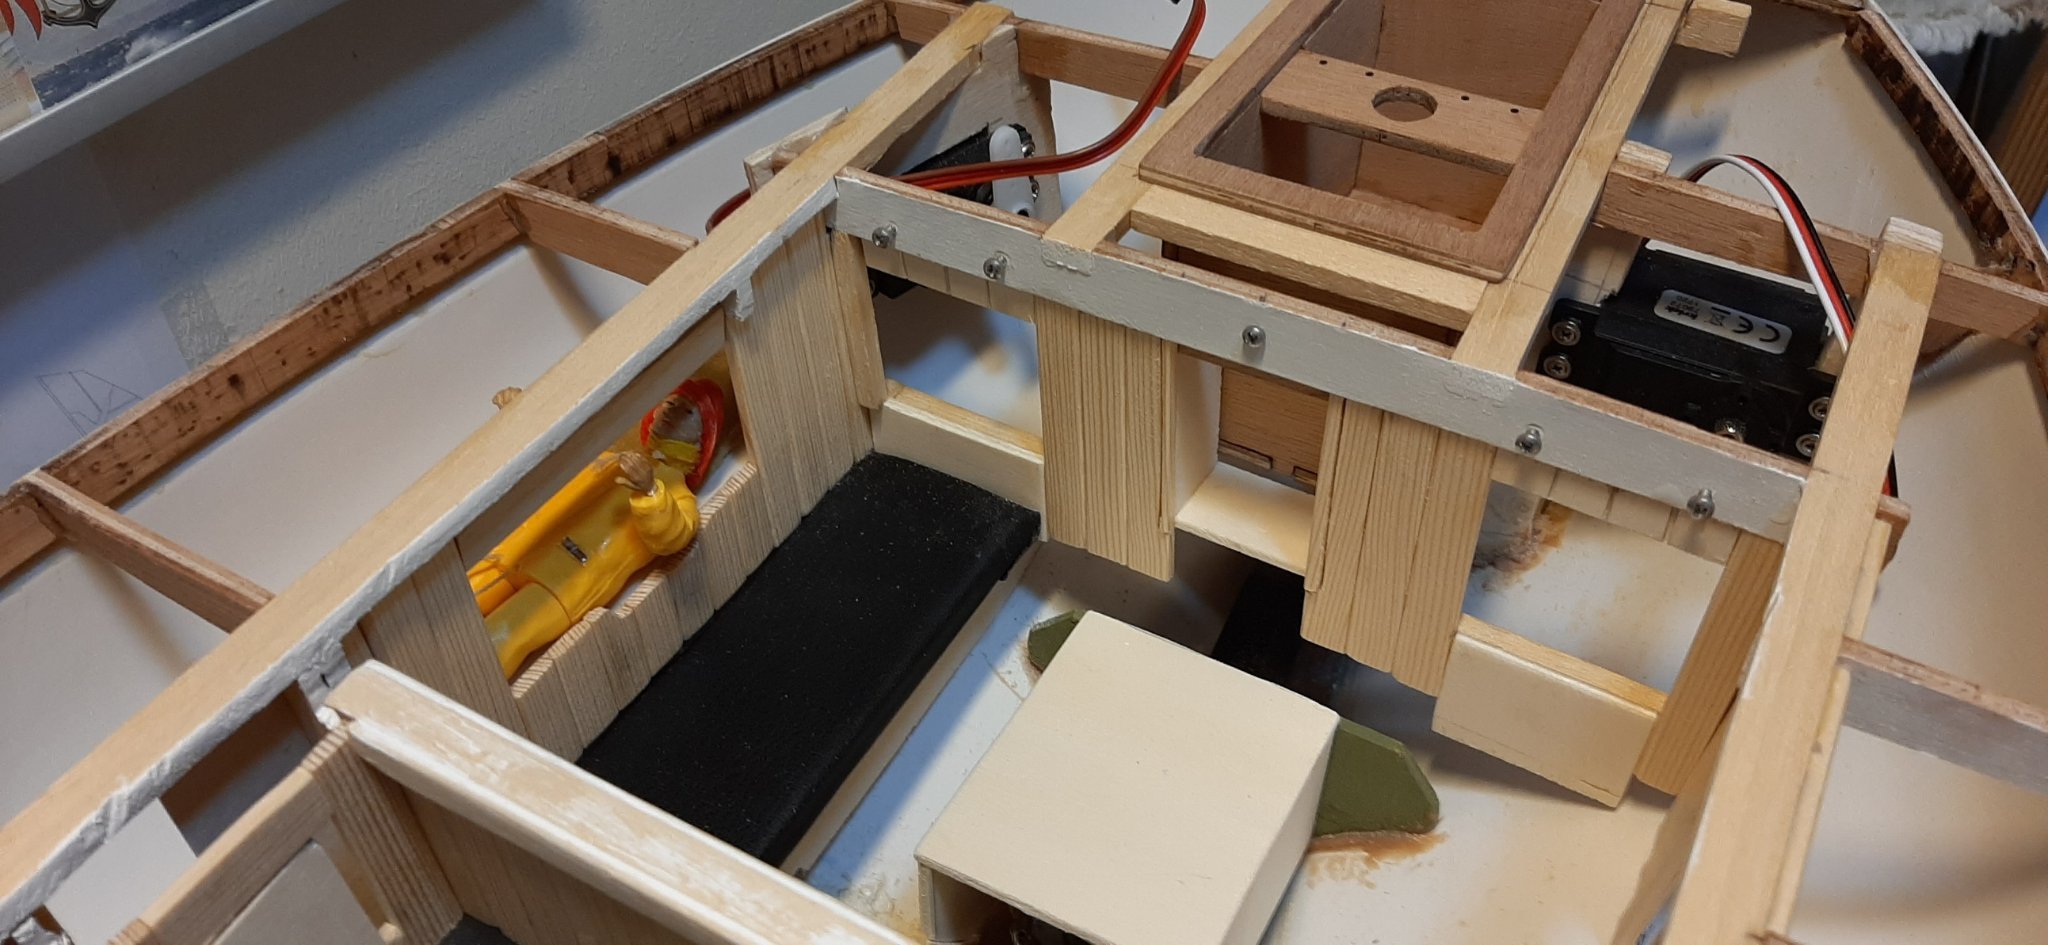
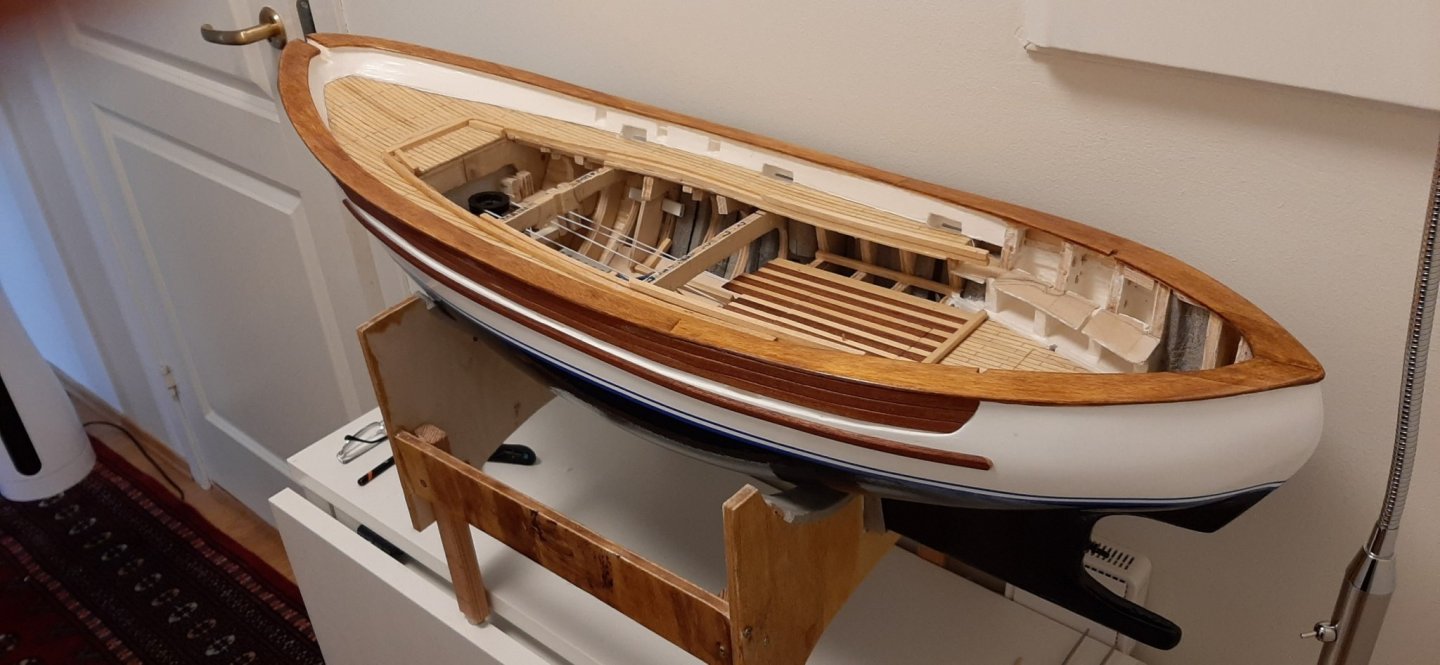
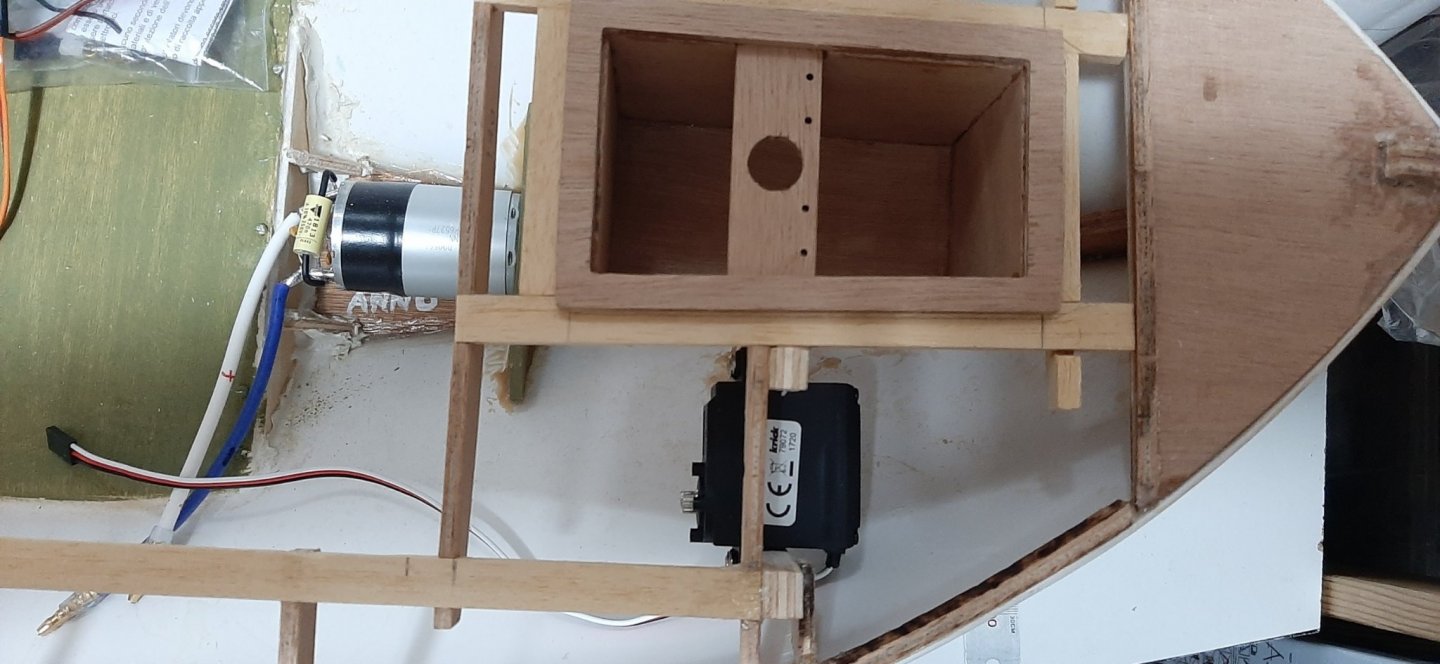
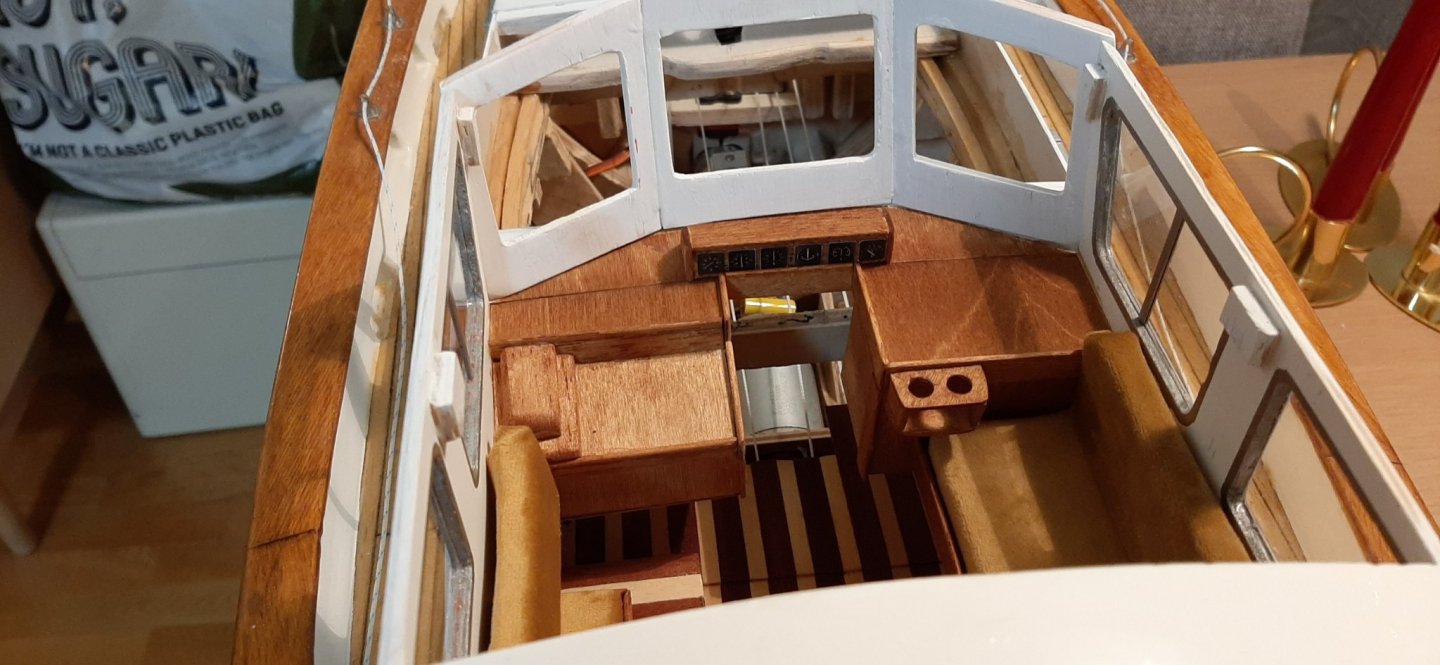
As usual, recent progress has been slow. More interior details have been completed and the R/C installation will start soon -ish. A lot of wiring to be threaded though the outer bulkheads and under the seating etc. Doing some head-scratching over the position of switches and fuse. A bit crowded due to trying to keep the R/C gear hidden from view, but accessable enough for maintenance.


-
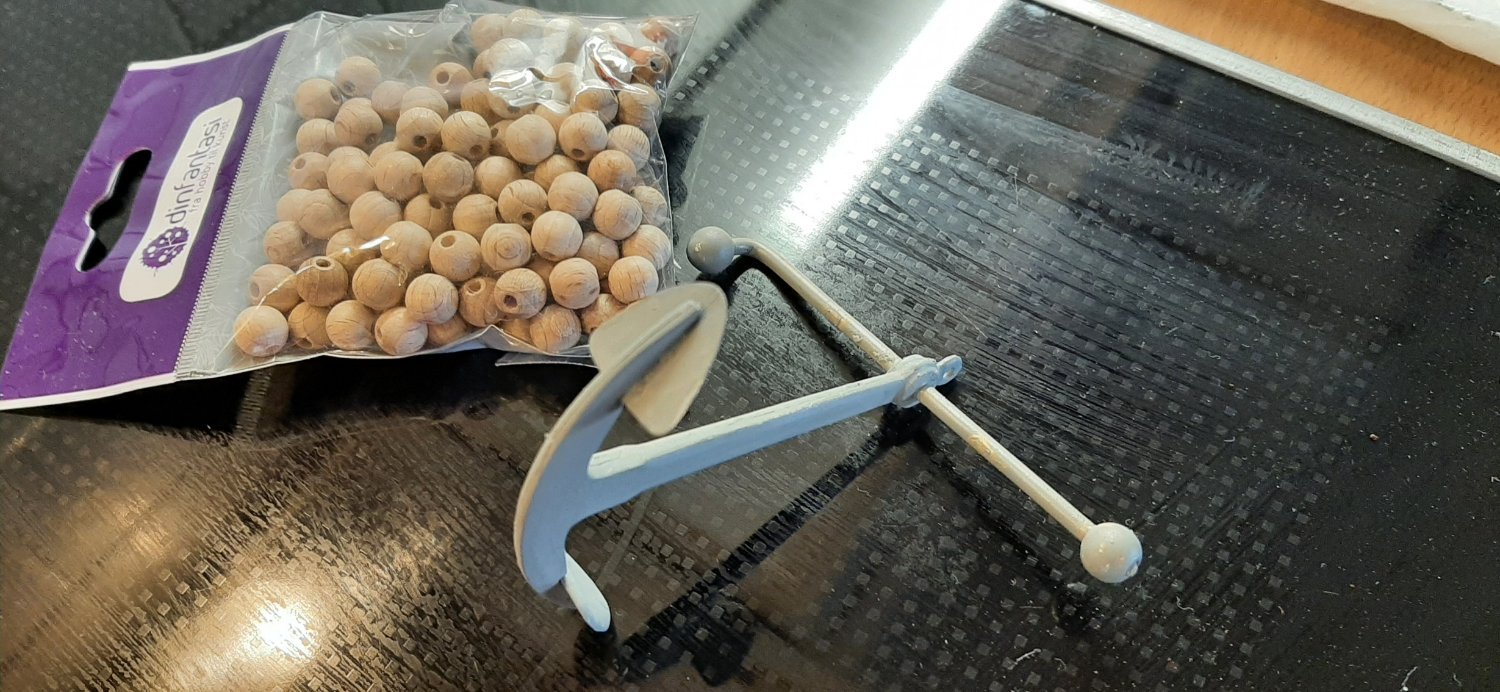
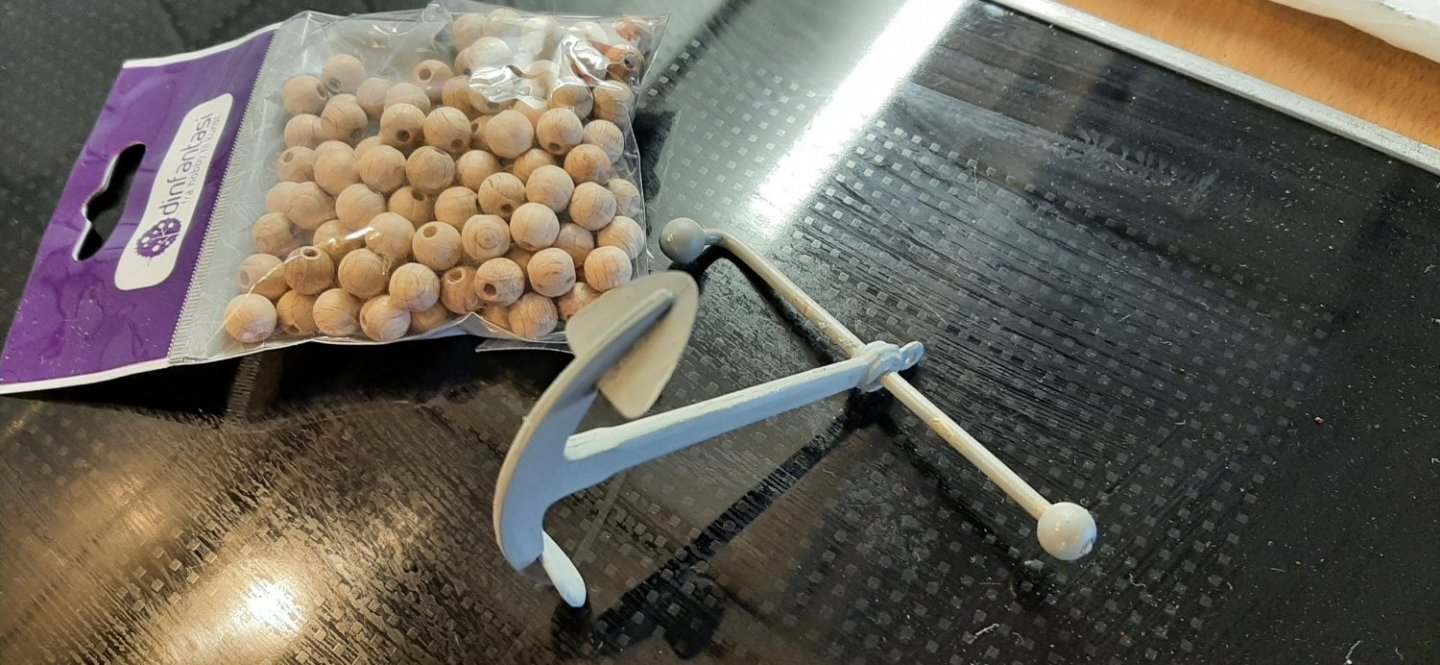
Assembled the anchor this evening. The hardwood spheres on the ends of the stock are marked as 6mm in the parts list. The ones in my kit were only 5mm part nr F347.
When I tried to drill out the hole to fit the diameter of the stock....it split. I thought they looked a bit small anyway, so out I went to the local sewing centre and bought some 8mm hardwood spheres. The smallest packet they had contained 140 spheres 🥴.
So now I can make 69 more stock anchors! Lucky boy🙂. I can use some of them as freight on the N-scale Chistmas train set.😬
Just thought I would share this useless piece of info'.
George
-
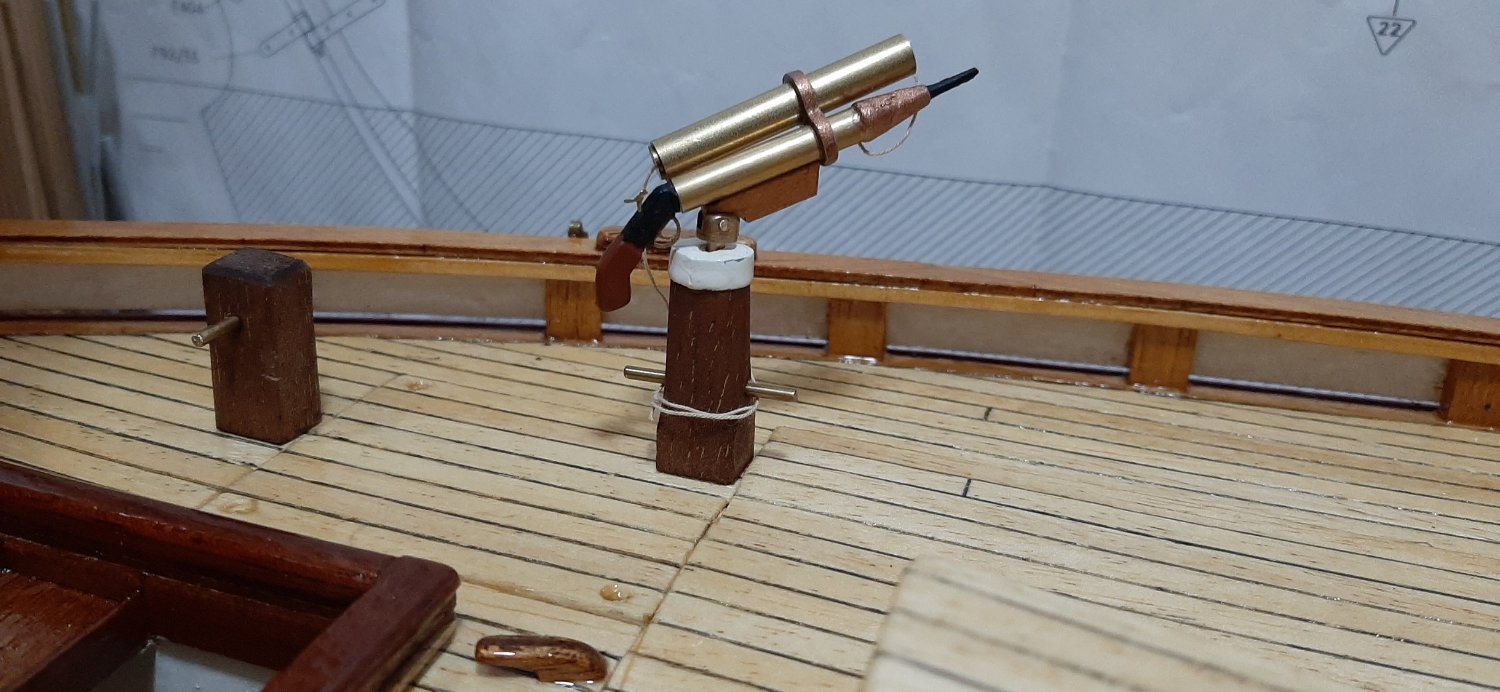
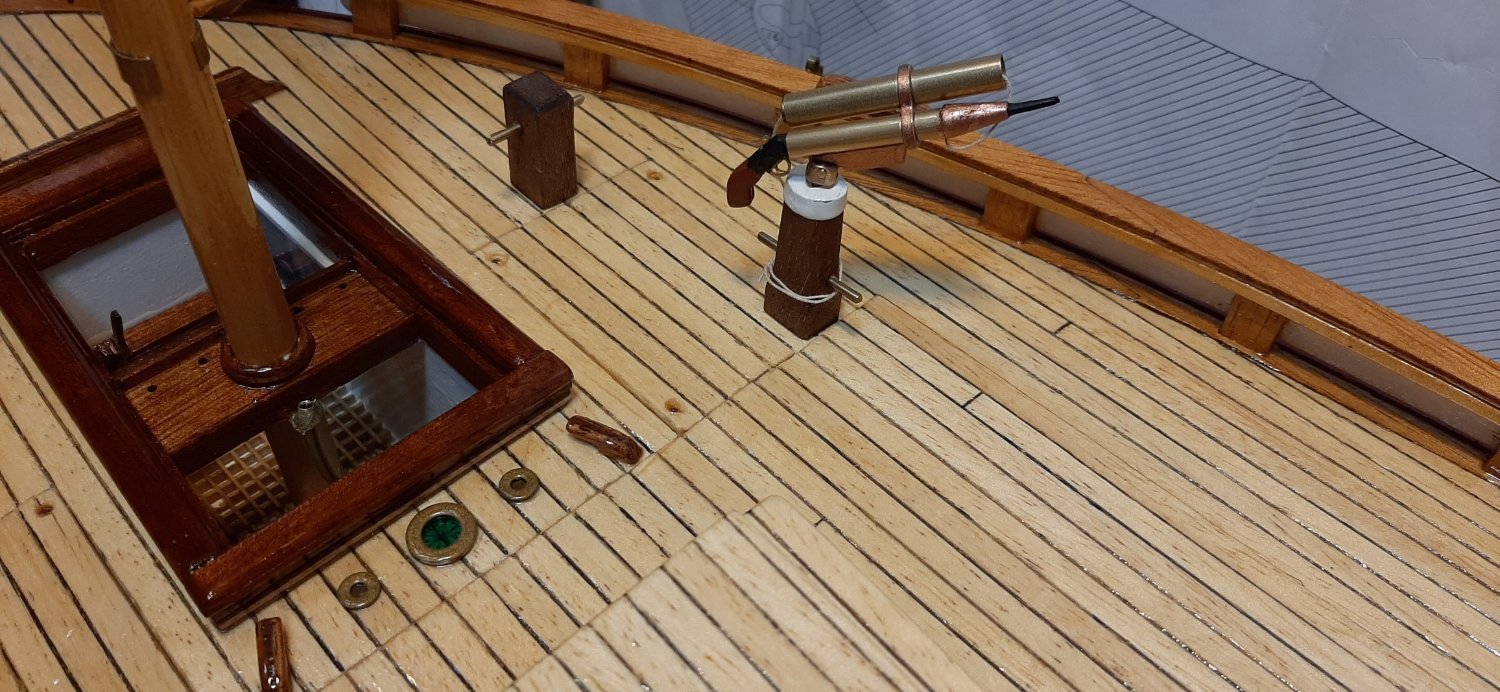
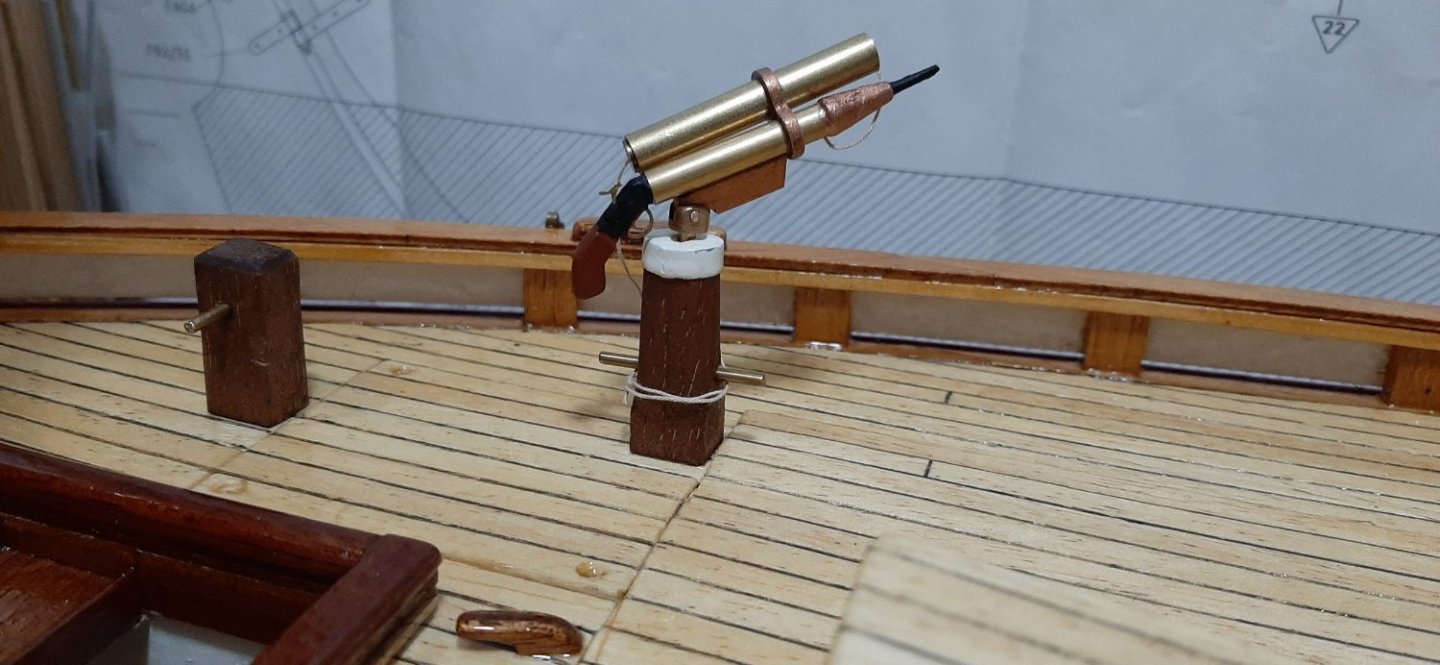
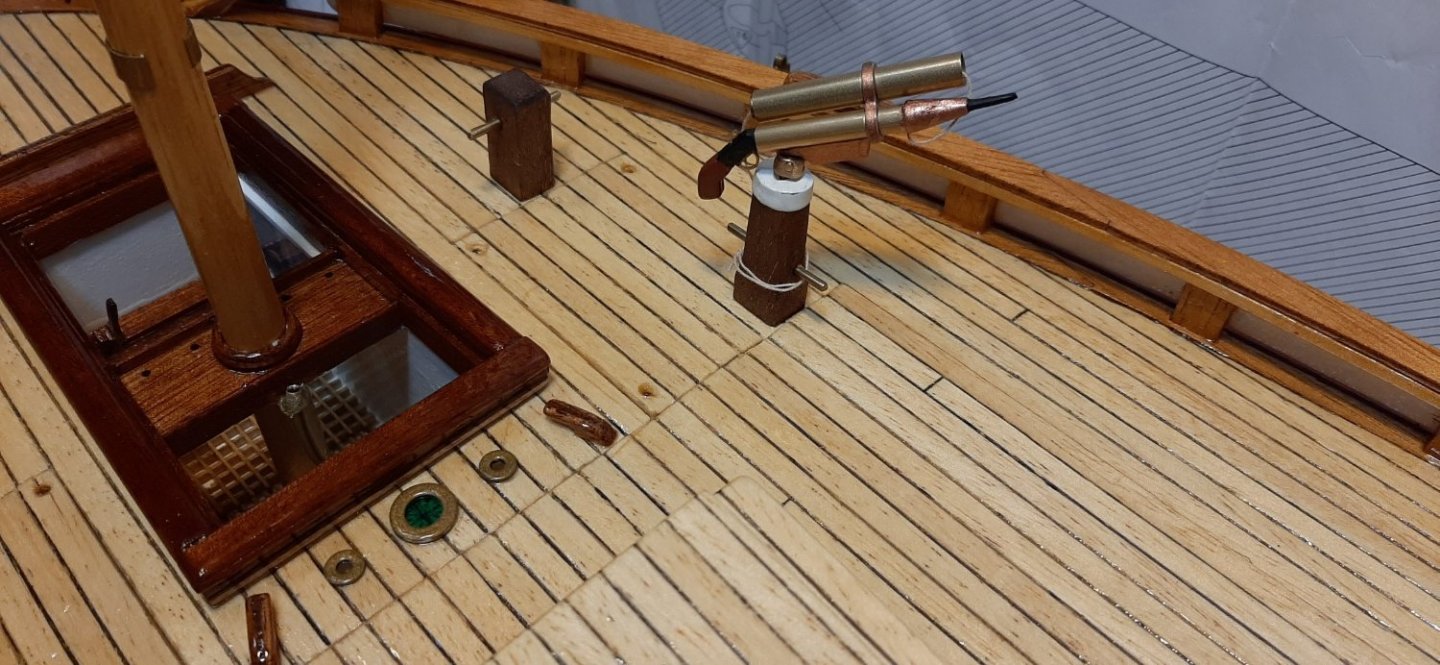
Assembled the line gun. Shoots a line over to a vessel needing a tow -for example. It's supposed to be black, but as with the windlass, I want some shiny, brass contrast on deck.
George
-

-
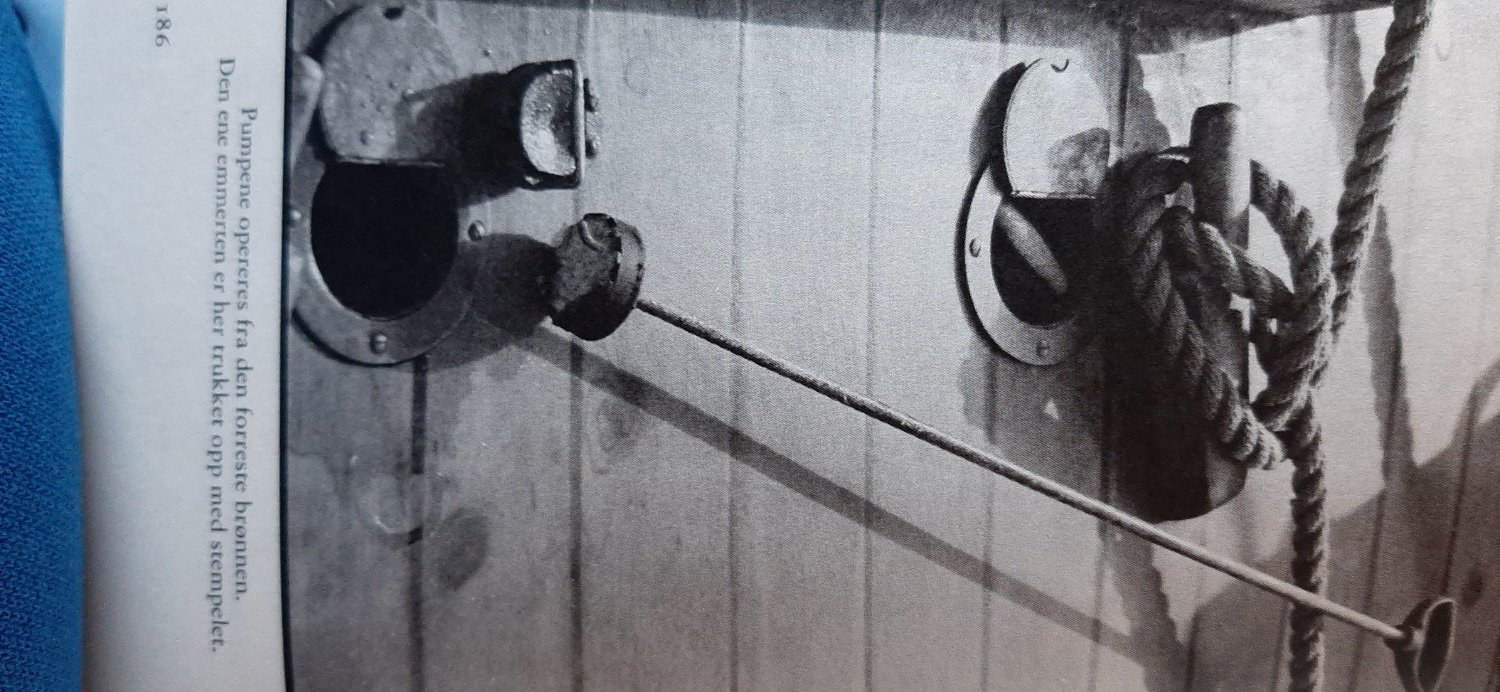
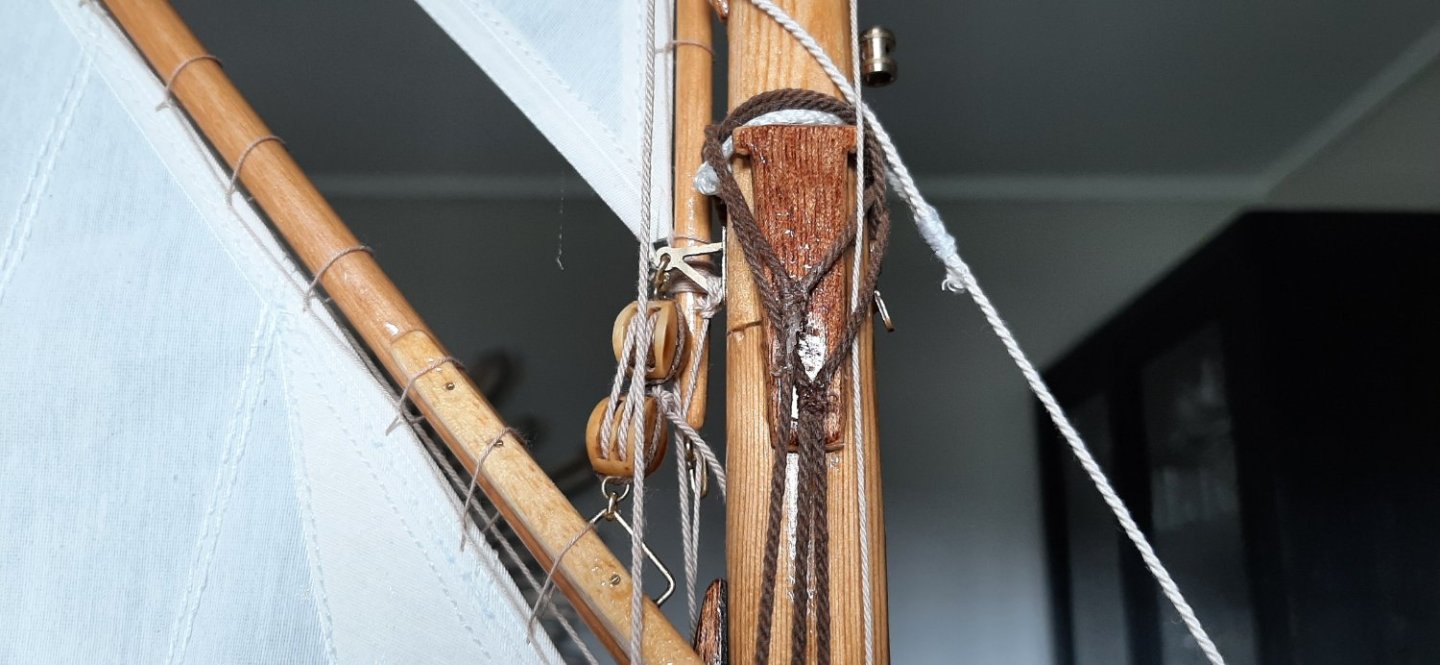
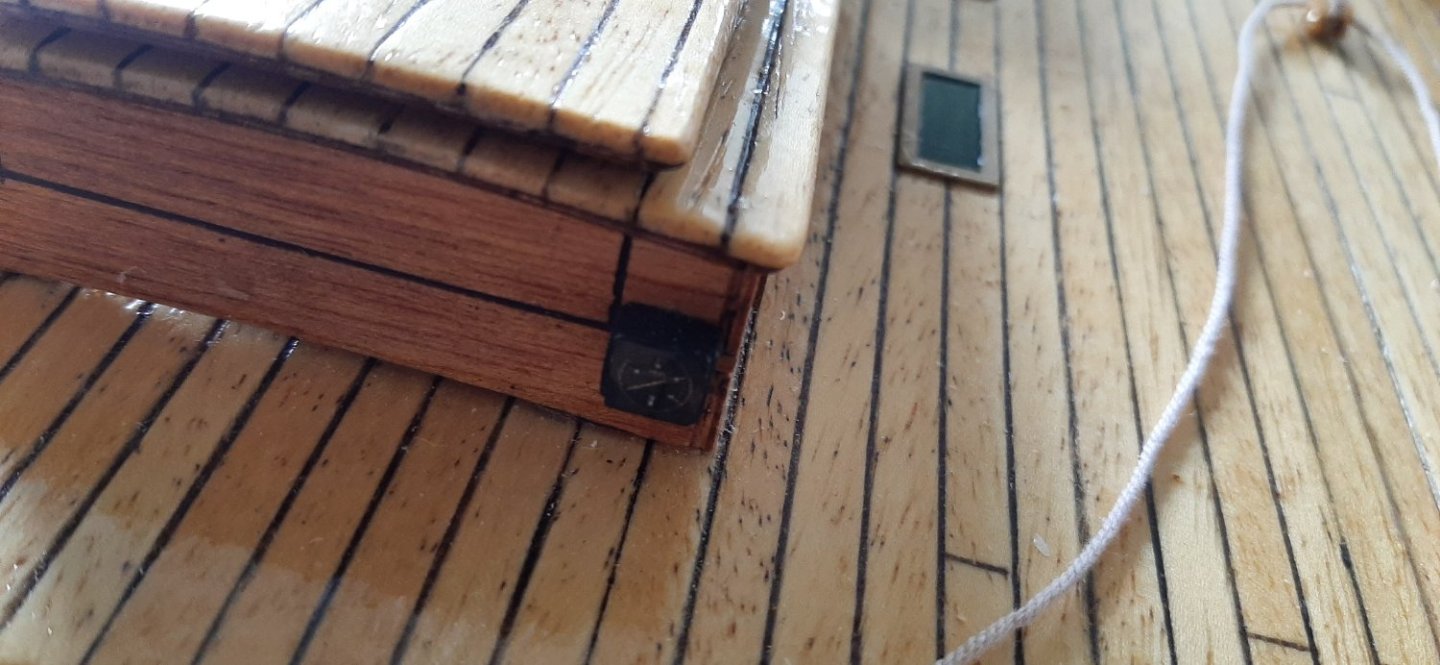
Hi Frodo. This is a long story.....The two small rings (steel washers painted brass) represent the two bilgepump outlets. I think these can be seen on the Colin Archer museum photo Gallery, but I'm not quite sure where I have seen this detail -I will check. There are two pipes that go down into the bilges to pump out any seawater which has leaked into the boat. Of course, mine are simply painted washers placed on deck! The centre of the washers can be filled with brass paint, but for some strange reason I found out that I would make it complicated.... the bronze metal in the centre of each small washer is not brass paint. It's from the metal top of french crémant Bourgogne Pinot Noir from 'vinmonopol'. A few drops of brass paint will do fine though!
The large ring represents a port hole/skylight which allows light to shine down onto the steering compass mounted in the aft cabin -foreward of the cockpit. This is a larger washer (also painted brass) with a small round piece of green acetate/plastic below. I used green acetate to indicate the colour below decks. Before I placed the acetate on deck I drew an outline of a compass rose on the deck. So if anyone looks closely, it looks like they are seeing the steering compass one meter below the deck.
The servo line for the main boom comes up just forward of the mizzen mast. It will pass through the brass ring part 505 which is lashed to the mizzen mast.
Now you know why I have been building this RS1 for a looonng time!😬
George

-
-
-
Bare for info' : I have by some small miracle managed to open a YouTube account and 'beam up' a few videos of the Fisher on the water. The quality is not that good but I see that in many posts. I have not managed to edit/cut the longest sessions, so it's necessary to jump through the videos a bit if they get boring. There's no music, but plenty of 'grinding' winches and 'buzzing-motor' sounds to get on with. I am very pleased with the function of the two-winch genoa system. It works better than I'd imagined. A bit more sheet travel is needed to be able to sheet in the genoa å little bit more and I'll work on that when time allows.
The videos can be found by writing "Model Fisher 34 motorsailer" on Google. Probably also by writing in YouTube too, but I have not actually tried that yet!
George
-
Been 'wielding' the scissors for two days now and cutting out all the 'treadmaster' patches for the coach roof sections. Stepped the masts this afternoon just to give myself some inspiration to keep cutting. Should be ready as planned to start the standing rigging for the masts by saturday. Friday afternoon is when we 'close shop' for a while and make something 'exotic' in the kitchen (to eat!) So one hour more with the scissors and ...I wish all a pleasant
 , safe weekend!
George -
Been doing a few fiddly jobs recently. Matt black stripes applied to the lockers, door frames and seaberth surrounds. Soon have to dig out the soldering iron and get the R/C components hooked up. When all that works, the deck will go on. I hope.
George

-
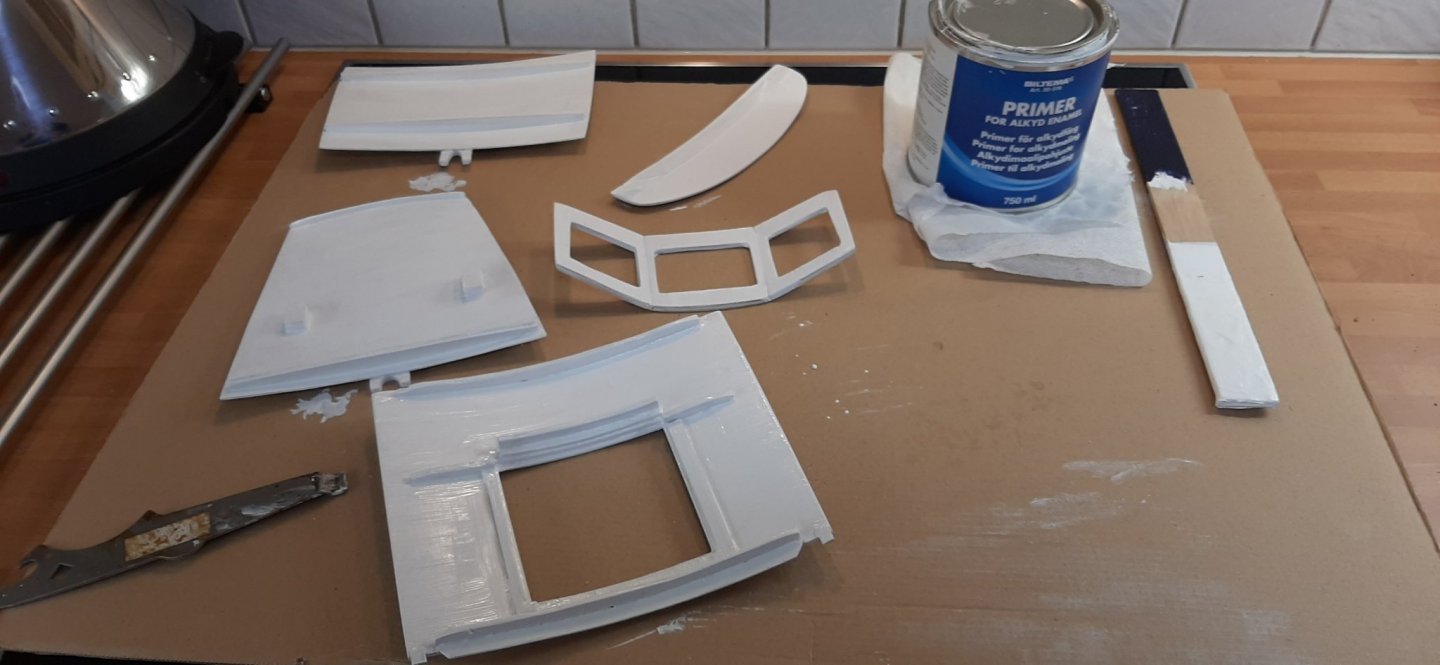
Build progress:
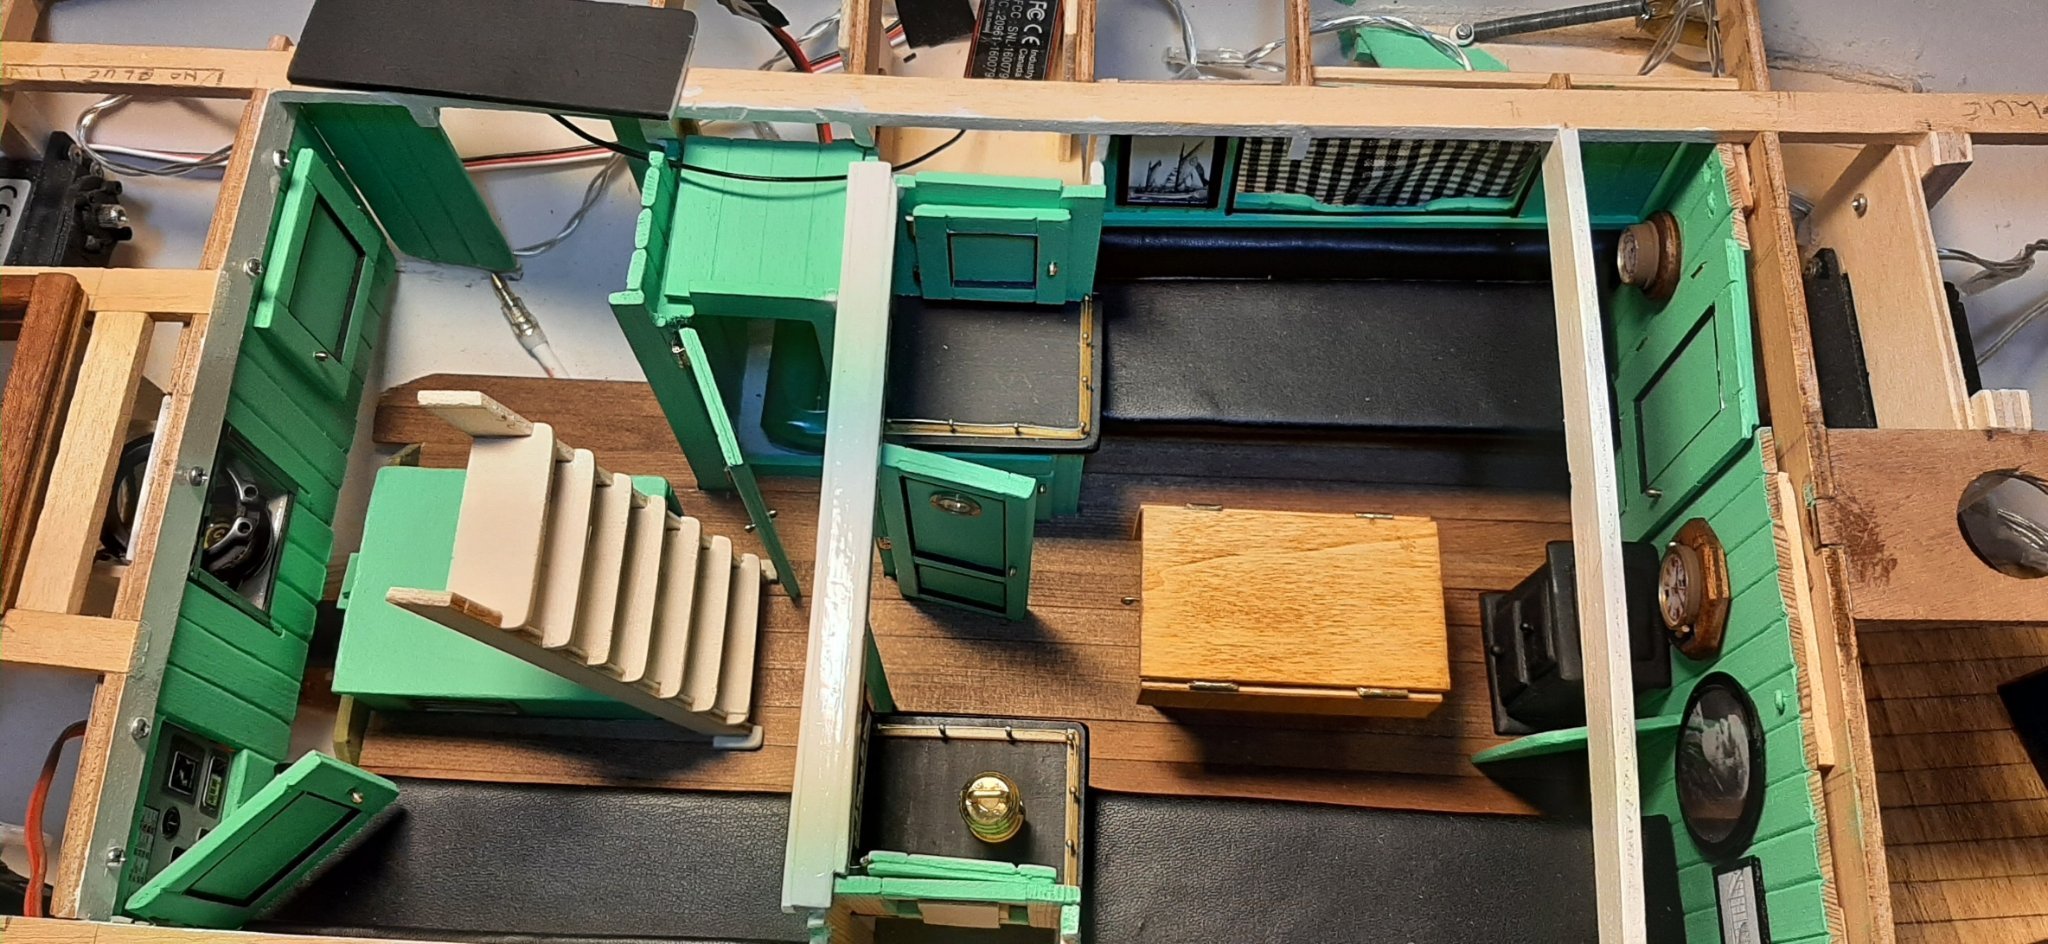
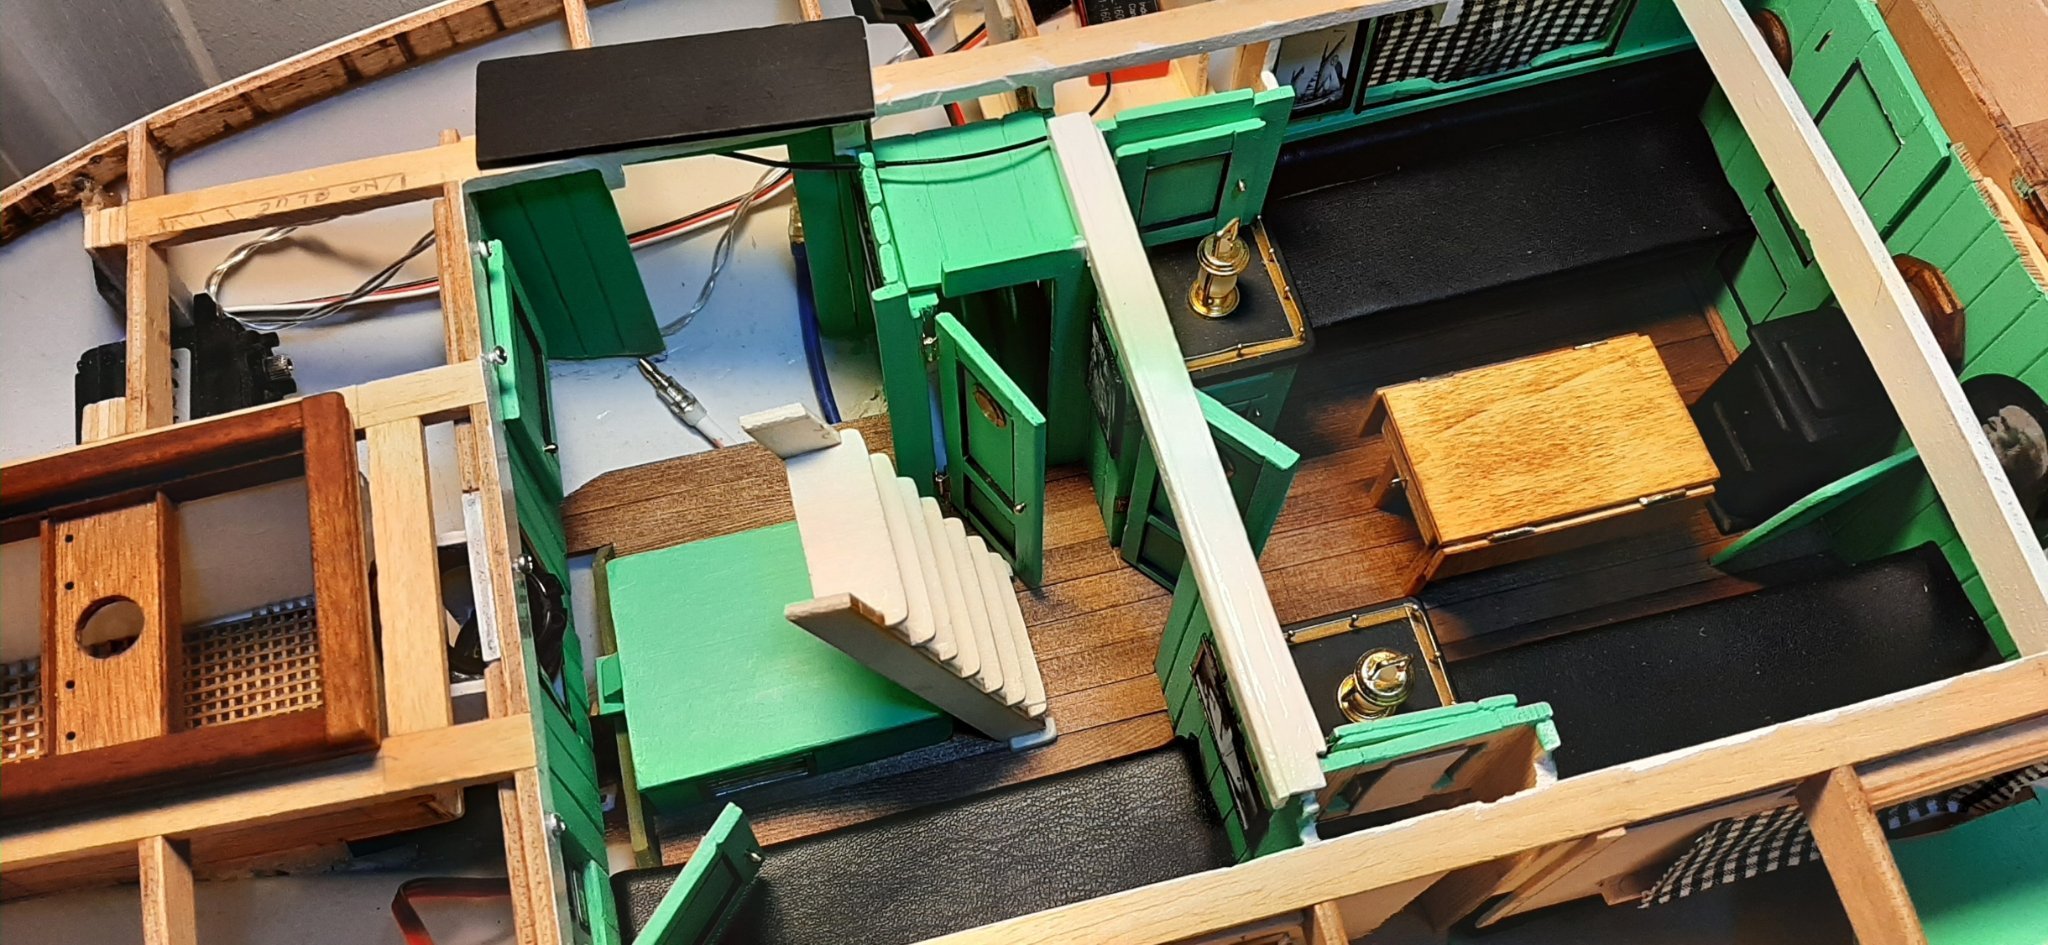
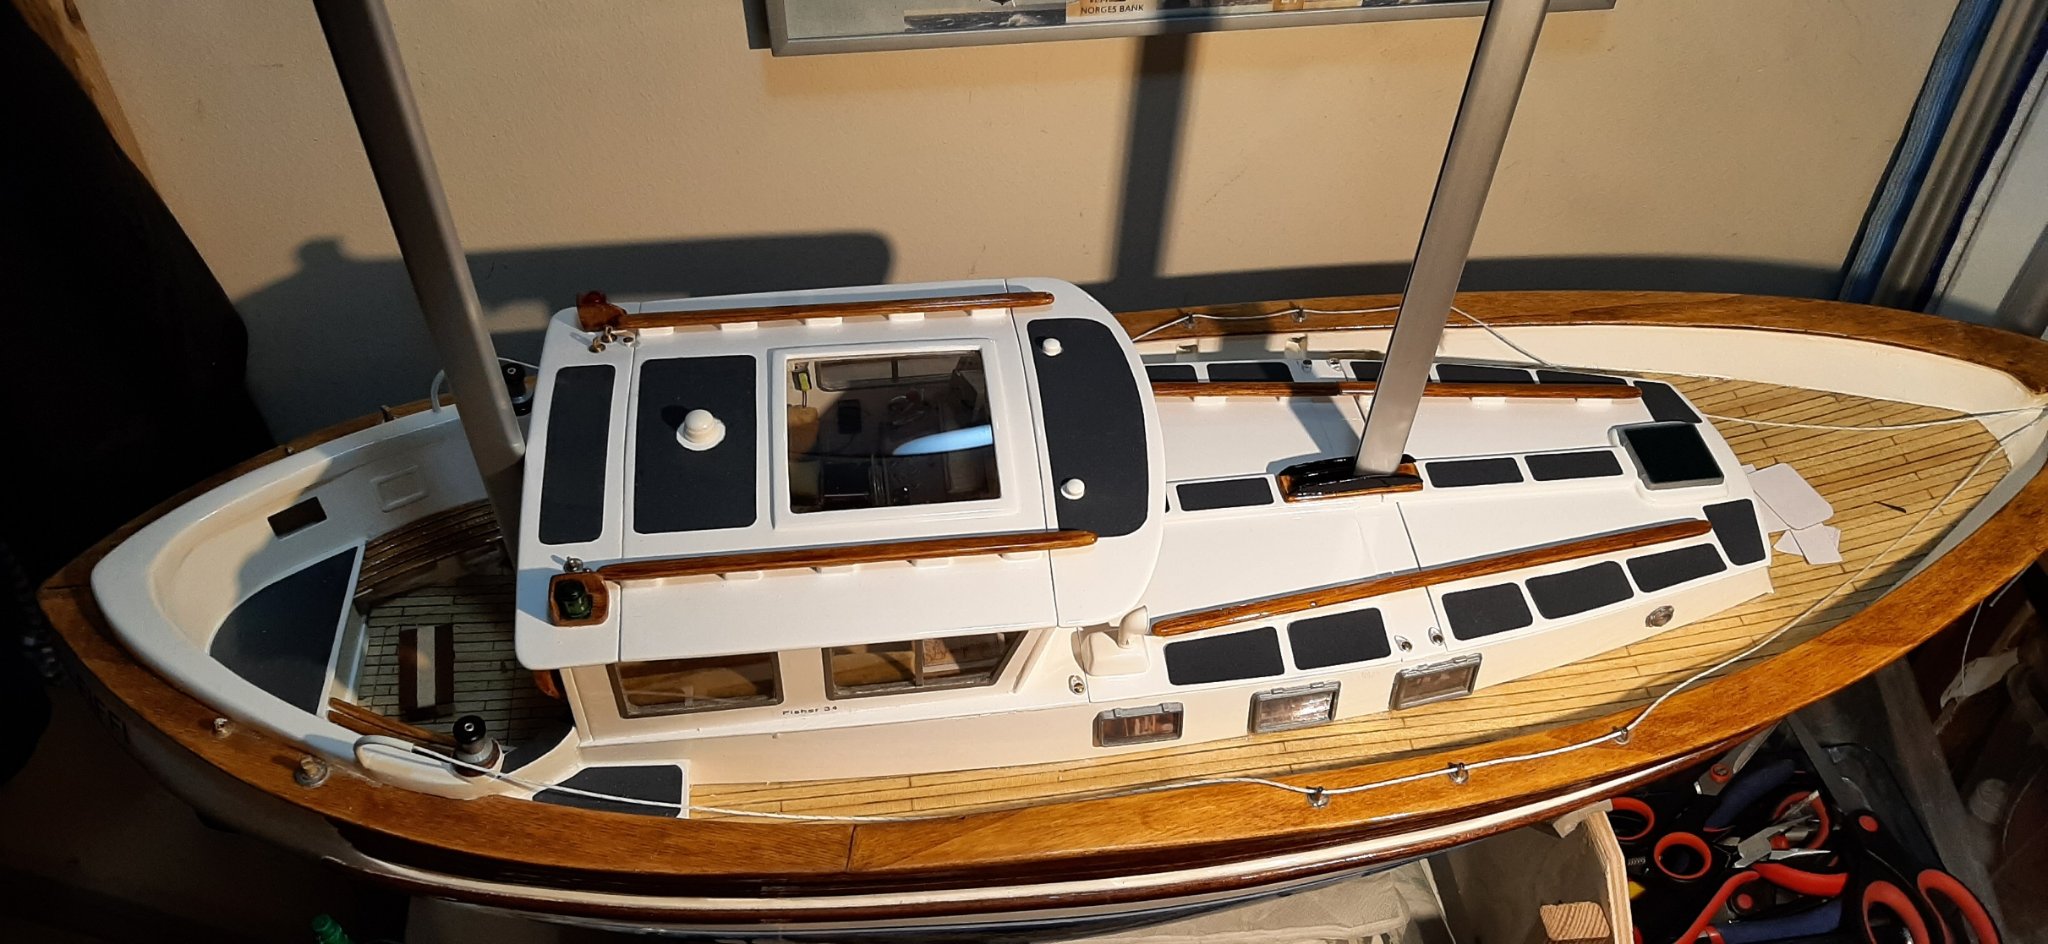
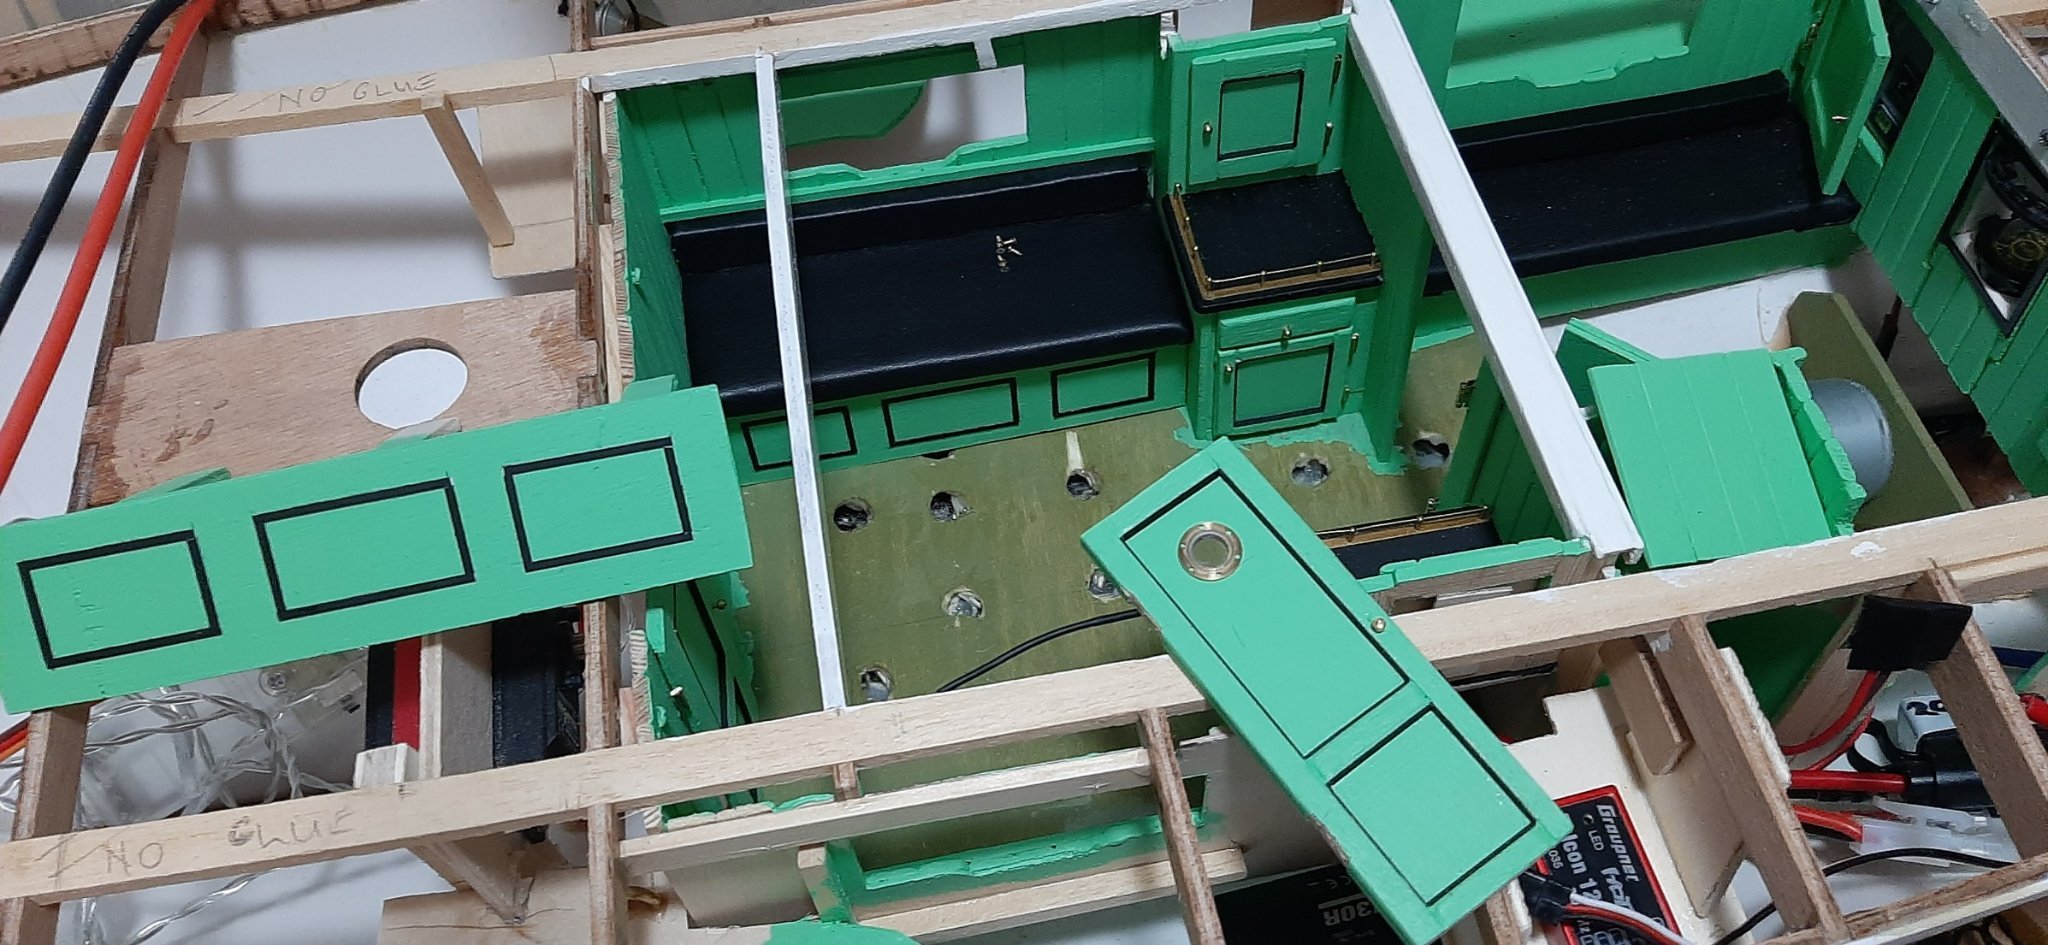
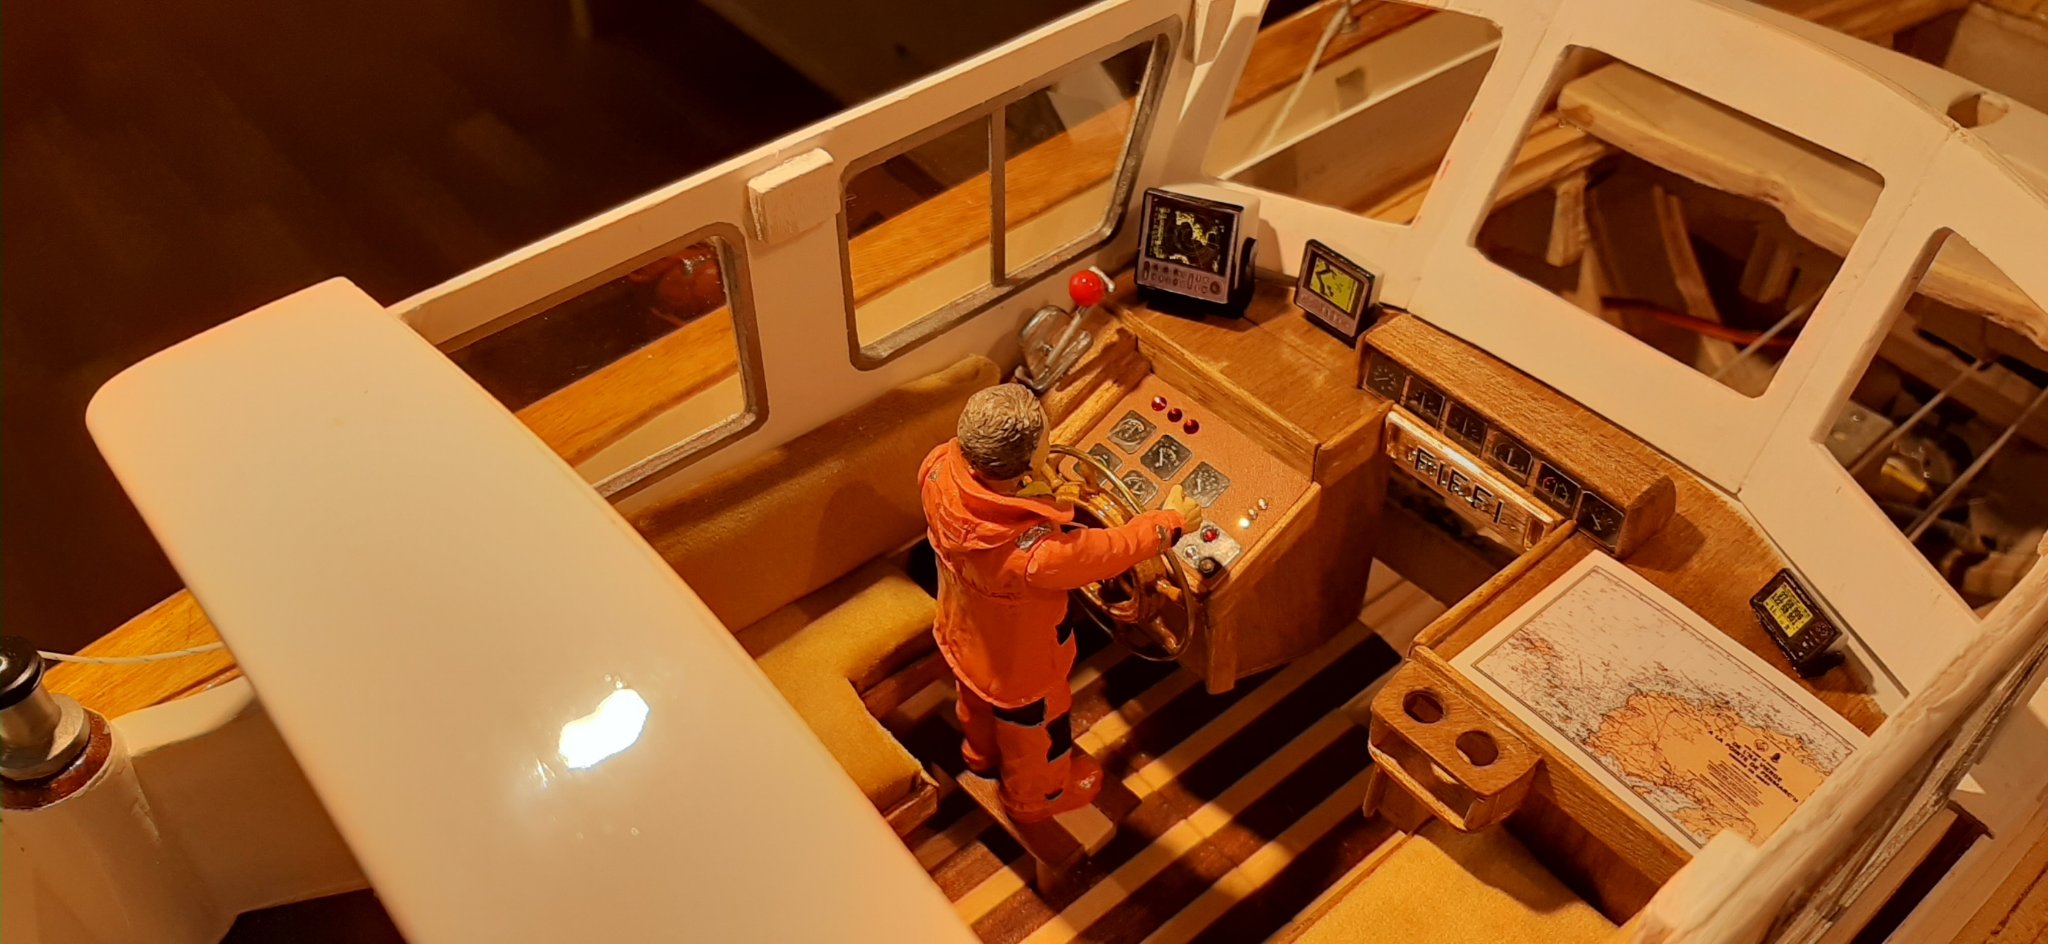
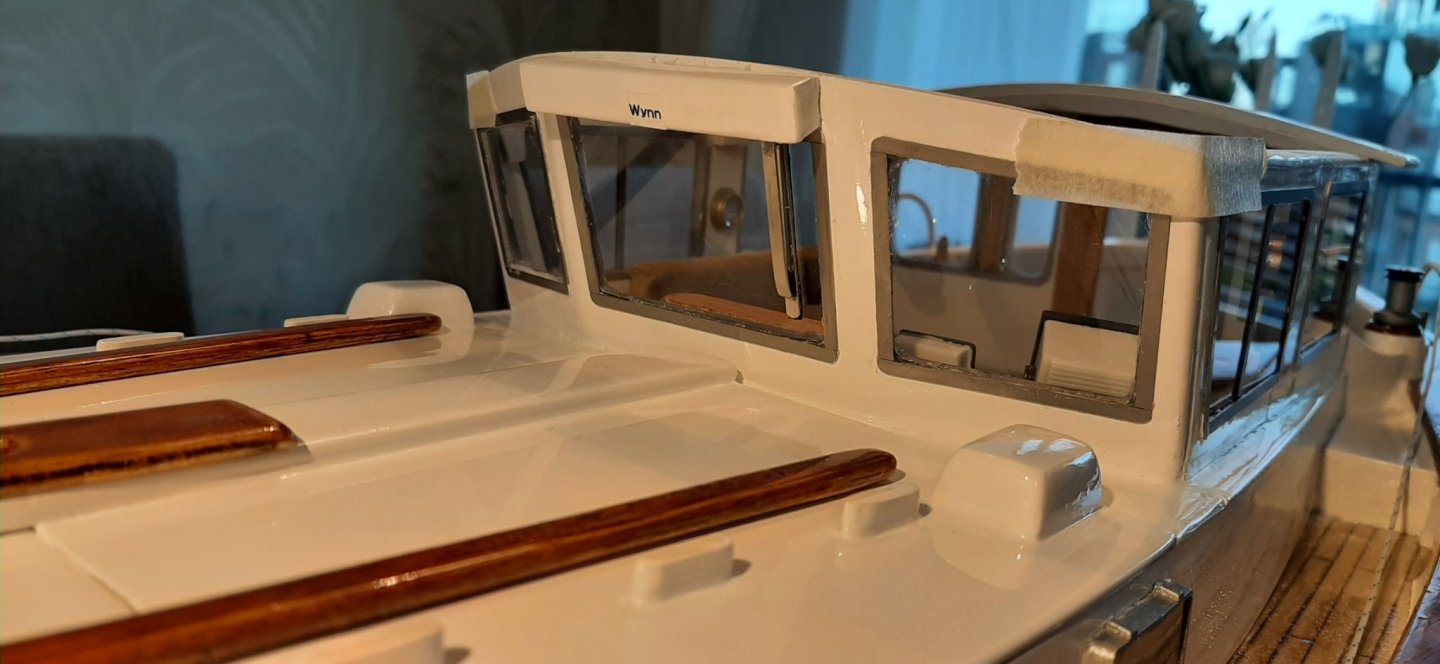
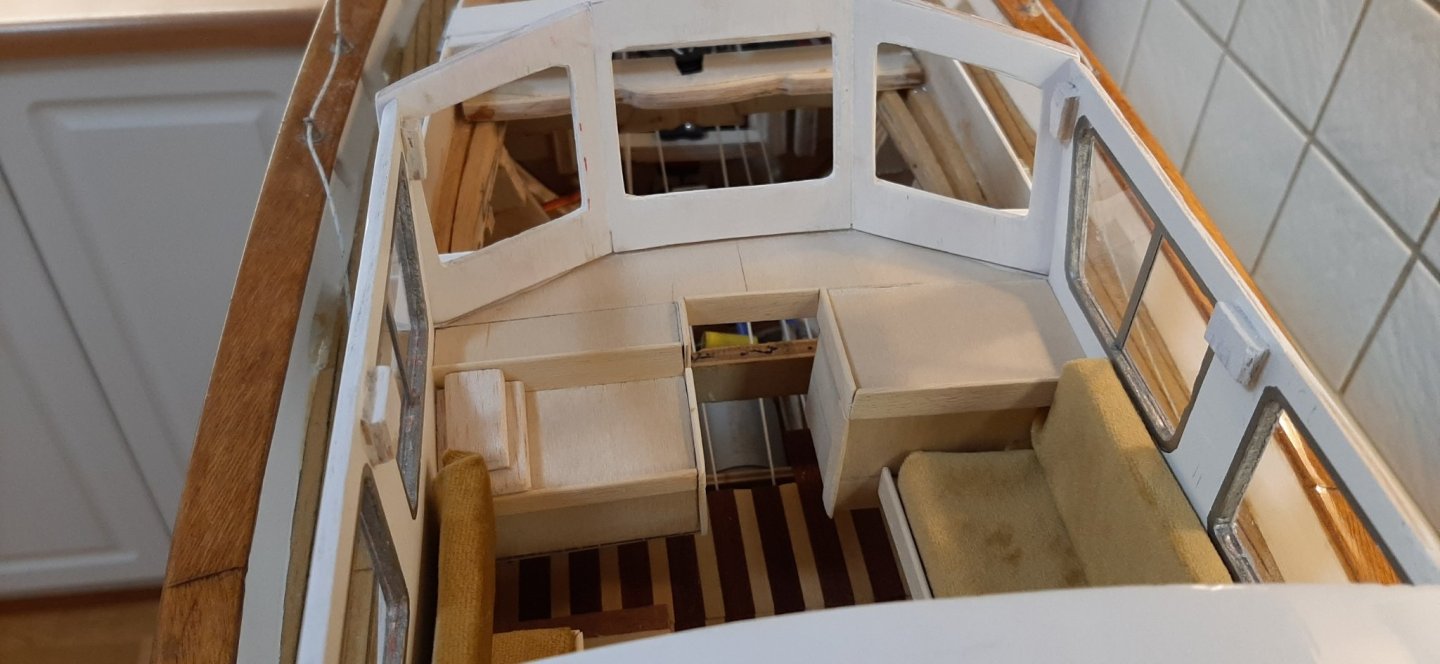
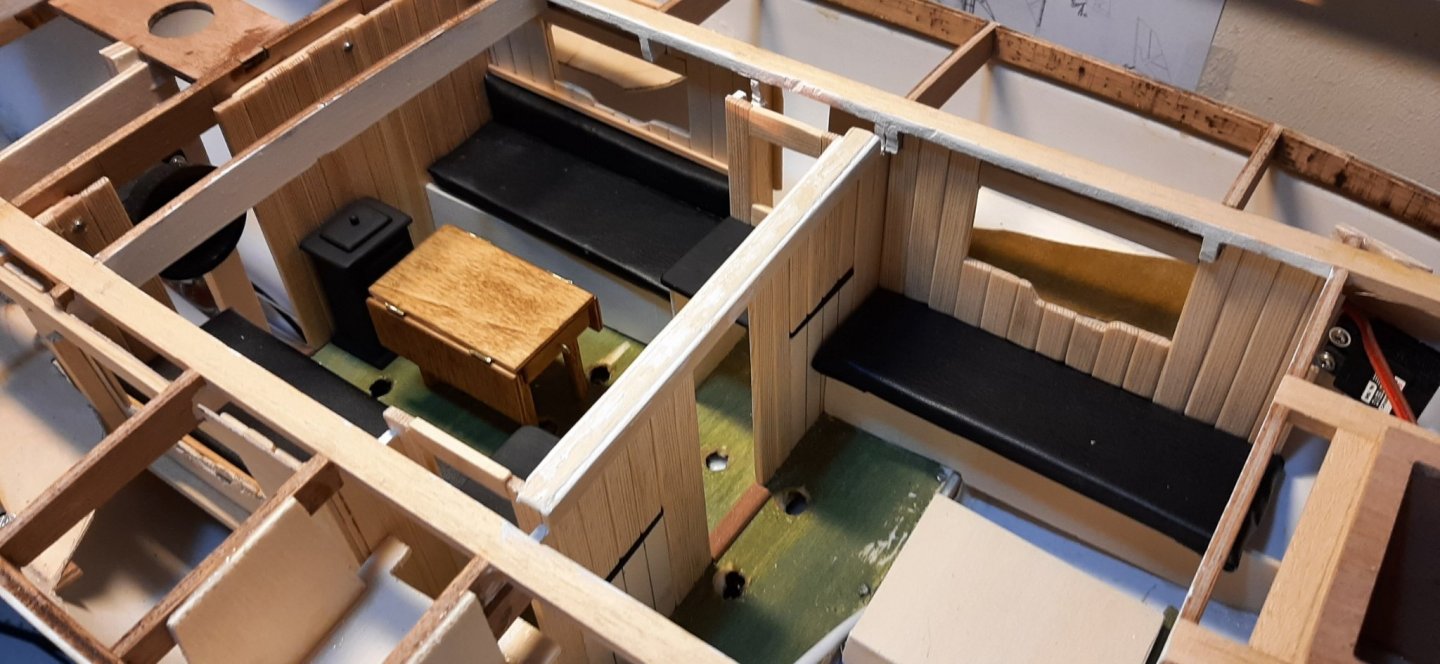
Started getting tired of painting white cabin-roof panels! Just one more undercoat to apply then sanding down for the gloss finish. Gone over to an attempt at wheelhouse interior furnishing and upholstery. Curtain material used on the cushions is a bit thick -which resulted in untidy corners. Will tidy it up a bit later. I wanted to try making the 'dolls-house' furniture and fittings for a while before going back to painting. Wheelhouse interior now with upholstery and teak stain on the woodwork. Front window frame is not glued on yet -just sitting loose.

-
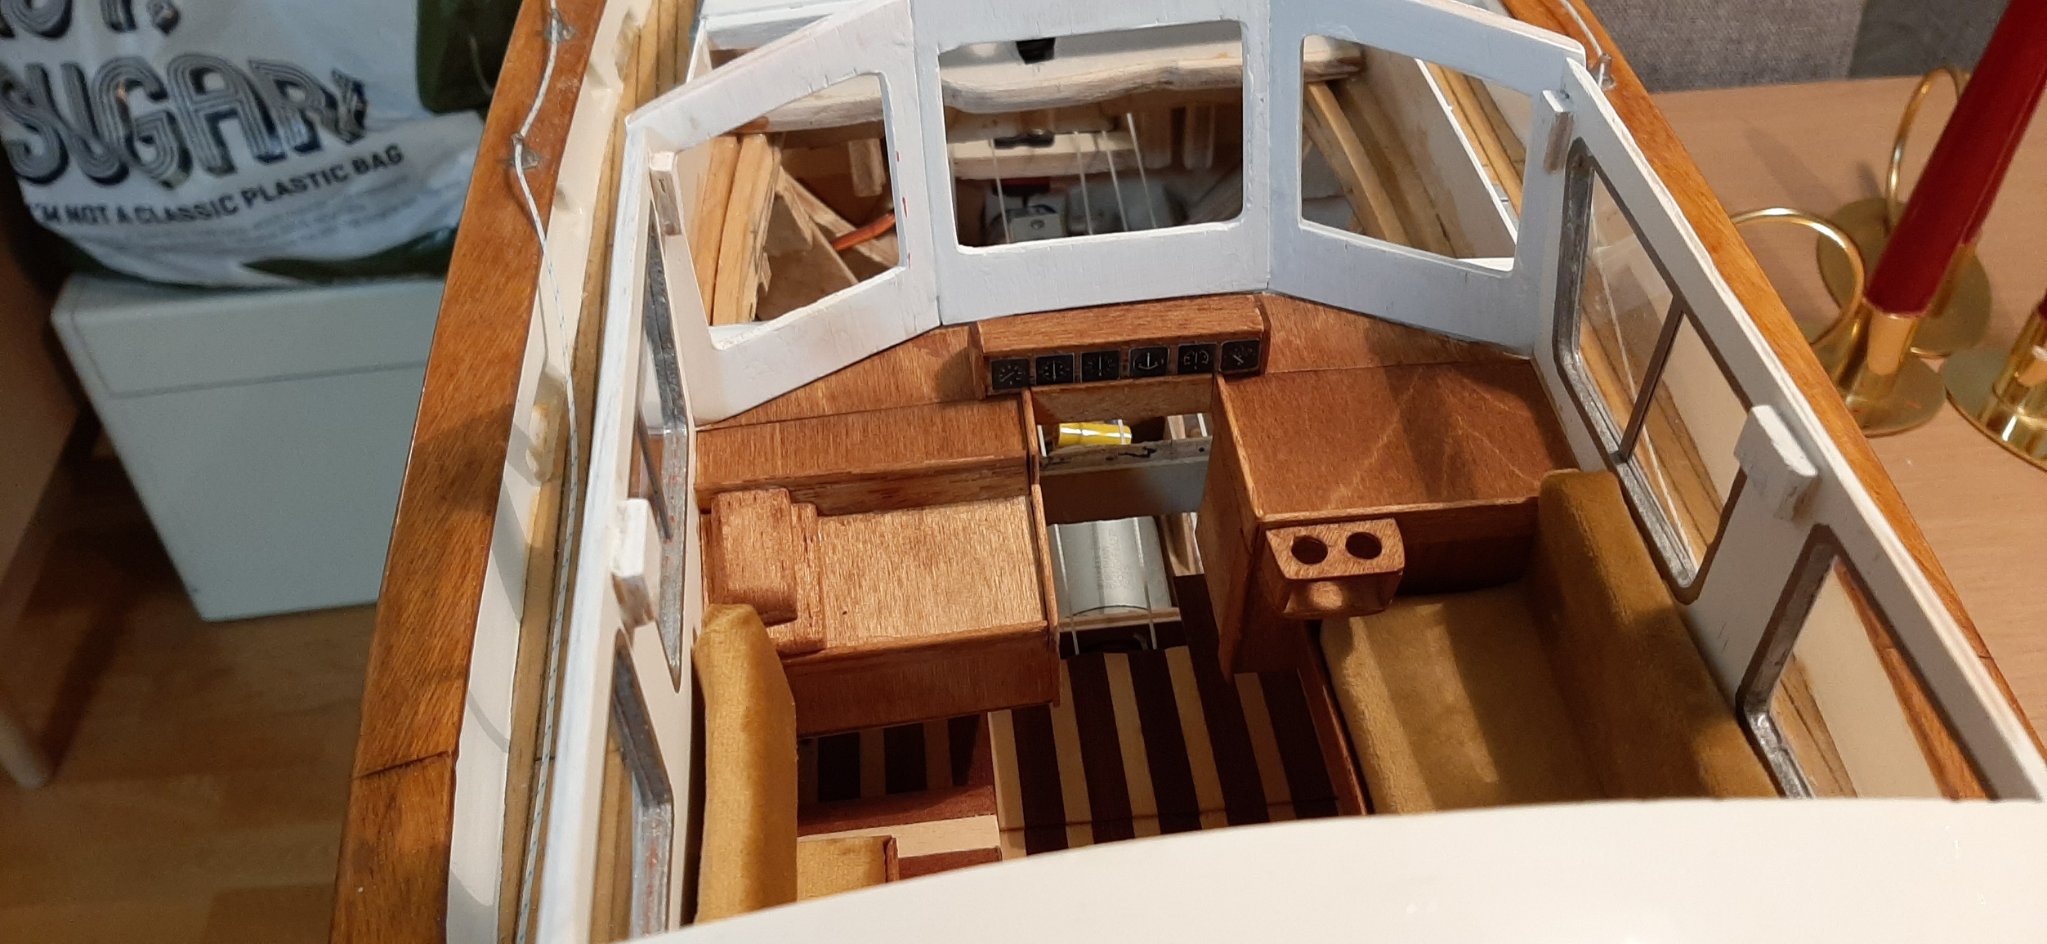
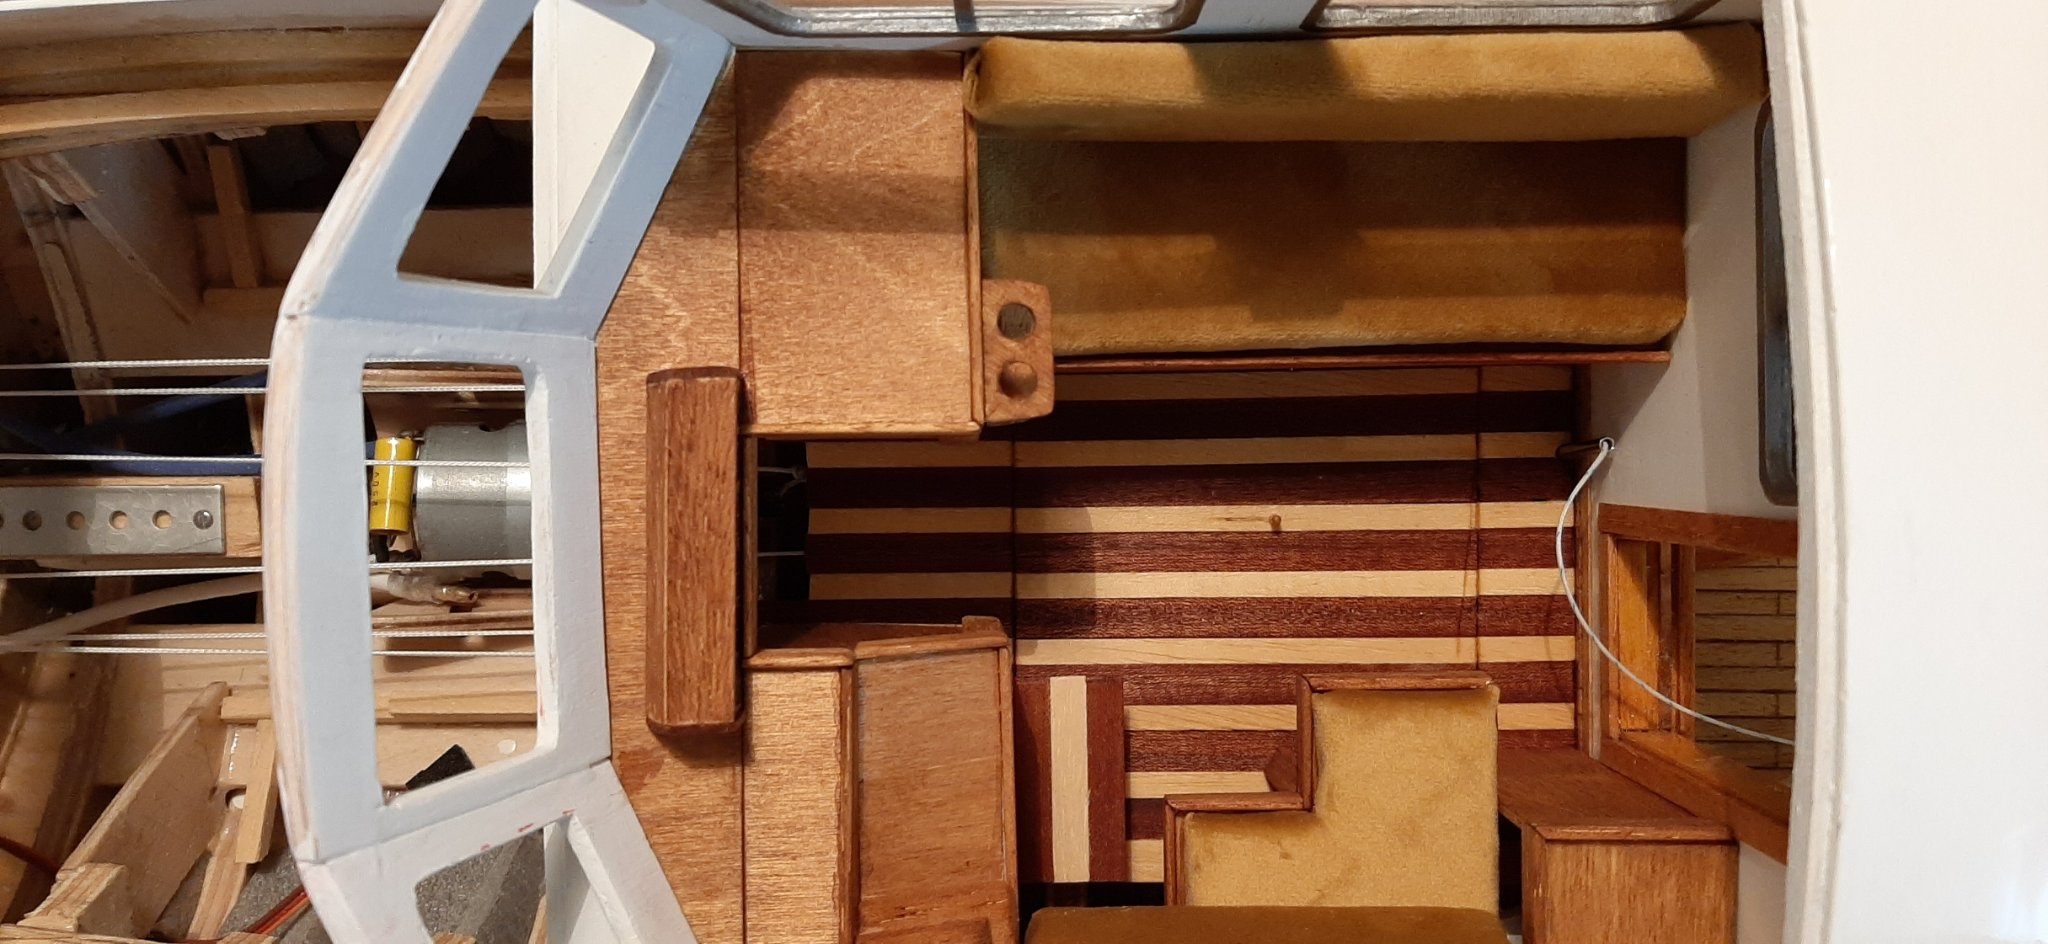
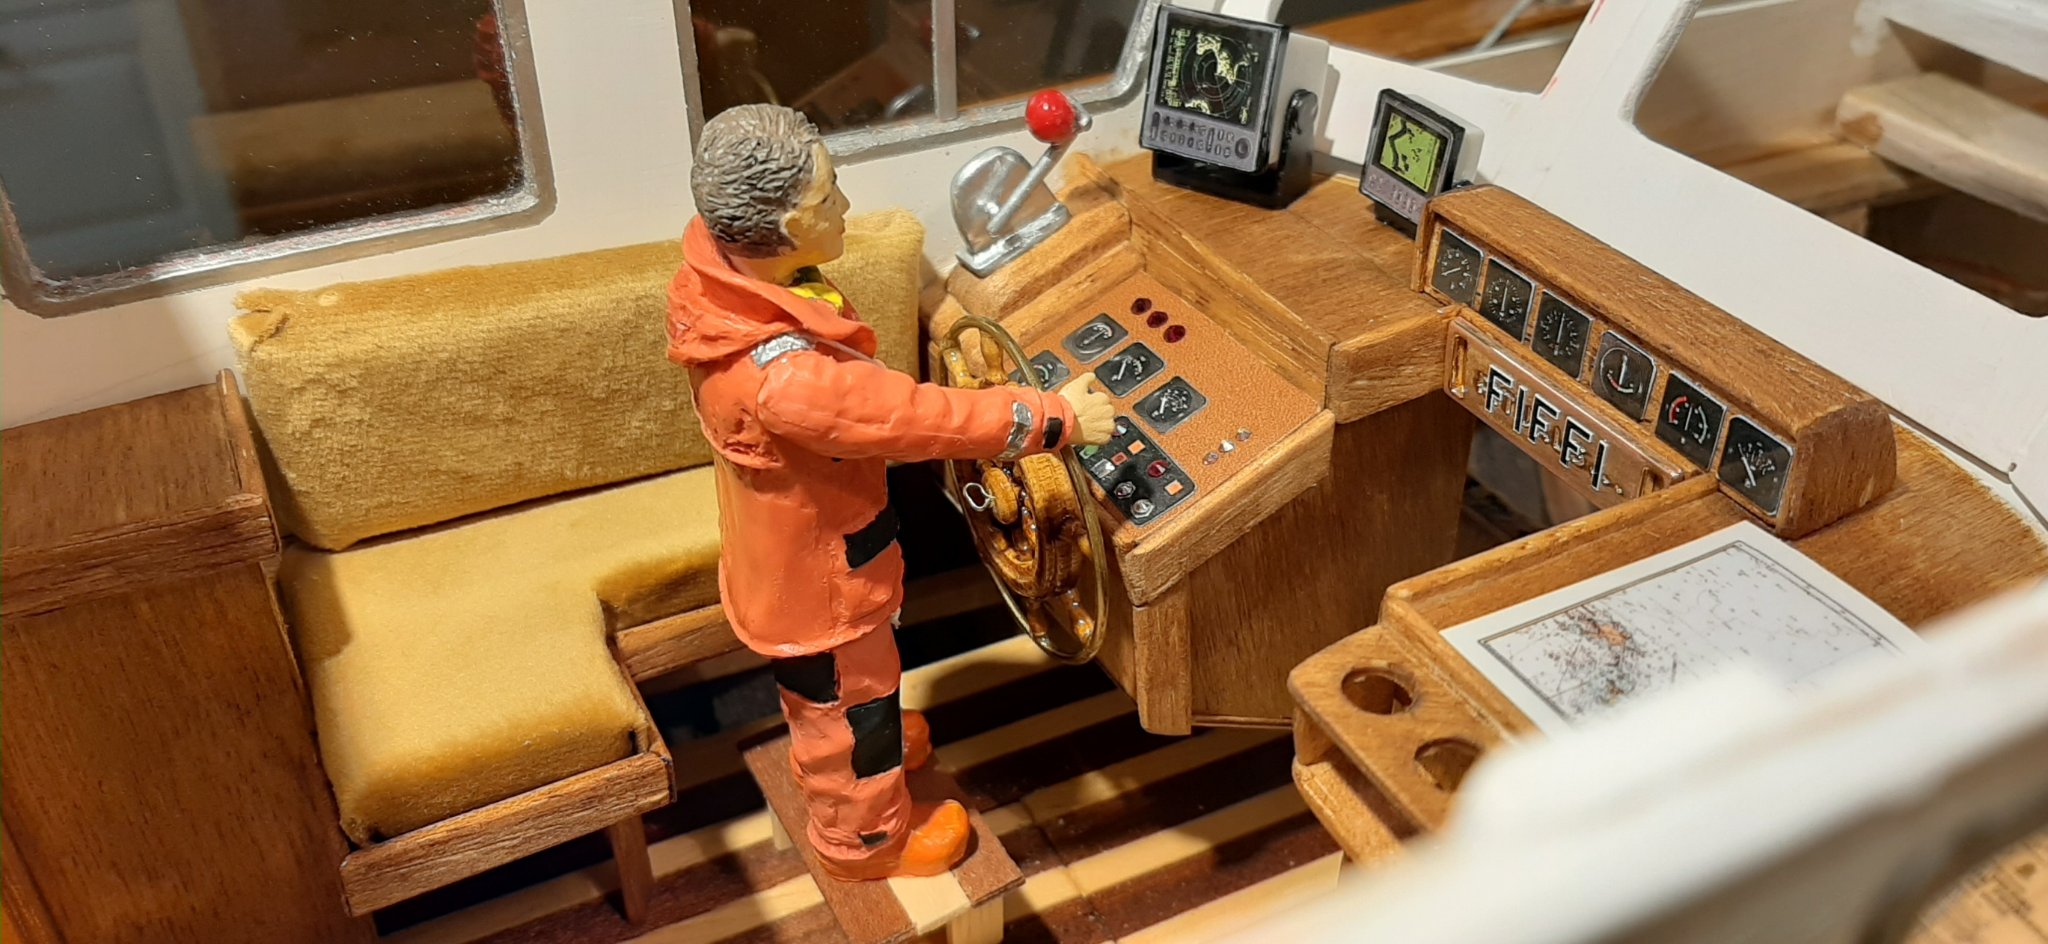
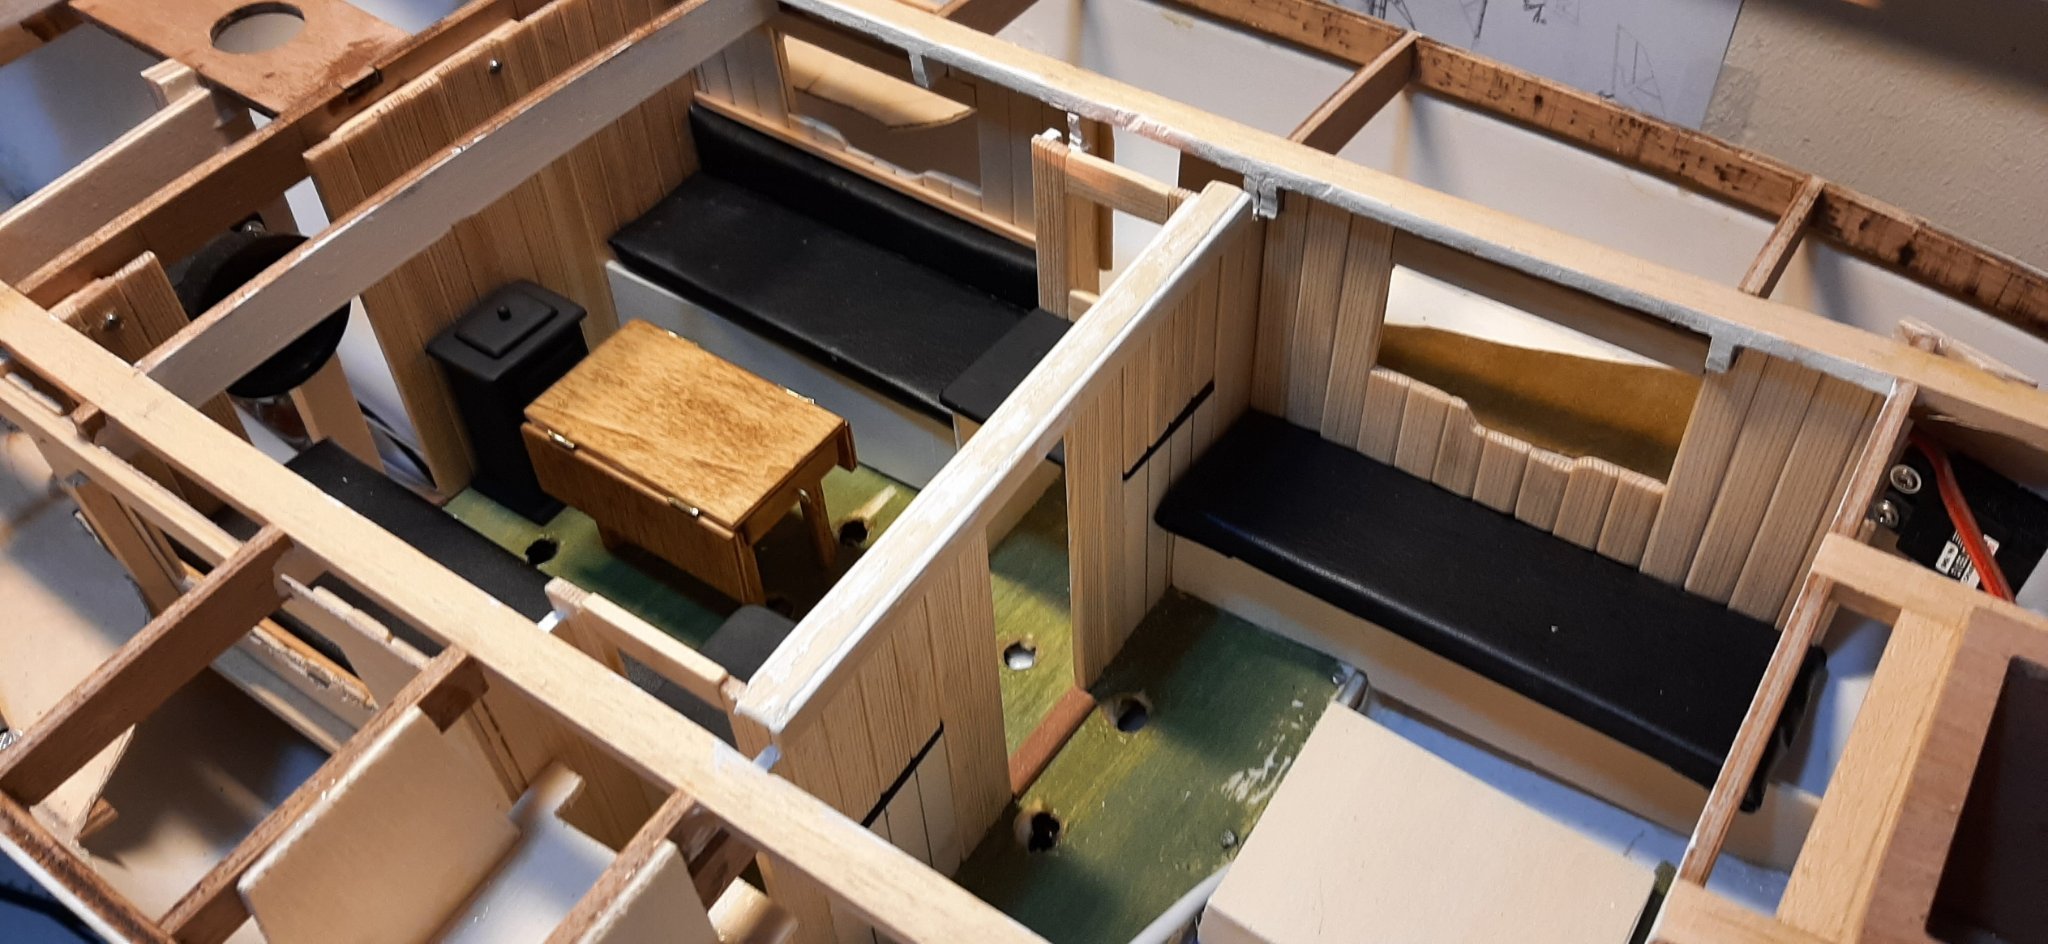
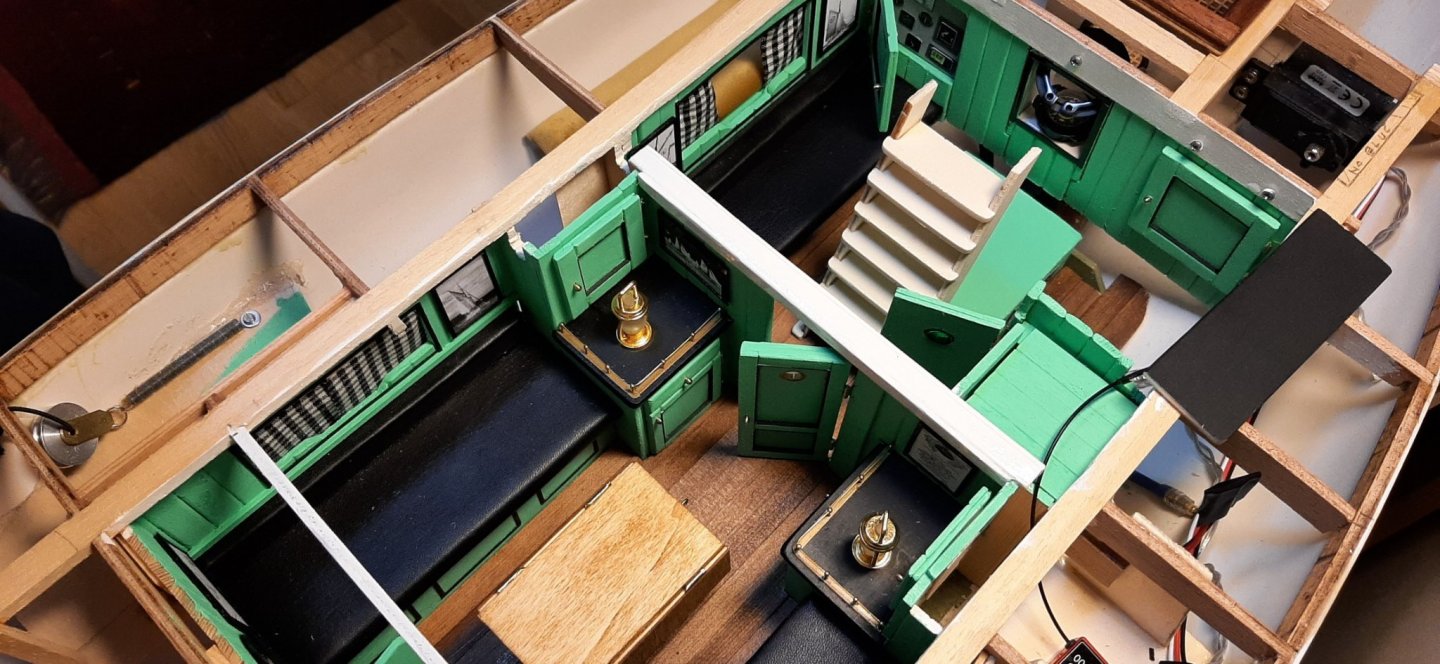
Bulkhead between saloon and what is termed as 'the hallway' has been installed. Don't know what else to call this area where the companionway steps will be. The 'hall' will enclose an aft sea berth to stbd, heads to port, engine, workbench to port, and a chart table on top of the engine cover. There is also a navigation area with a radar screen and GPS built into a locker and a rather large compass which can be viewed through a pothole from the steering well.
.thumb.jpeg.ee4d205046163acd786c8b7e92026d43.jpeg)