HOLIDAY DONATION DRIVE - SUPPORT MSW - DO YOUR PART TO KEEP THIS GREAT FORUM GOING! (Only 20 donations so far - C'mon guys!)
×


HakeZou
-
Posts
325 -
Joined
-
Last visited
Content Type
Profiles
Forums
Gallery
Events
Everything posted by HakeZou
-
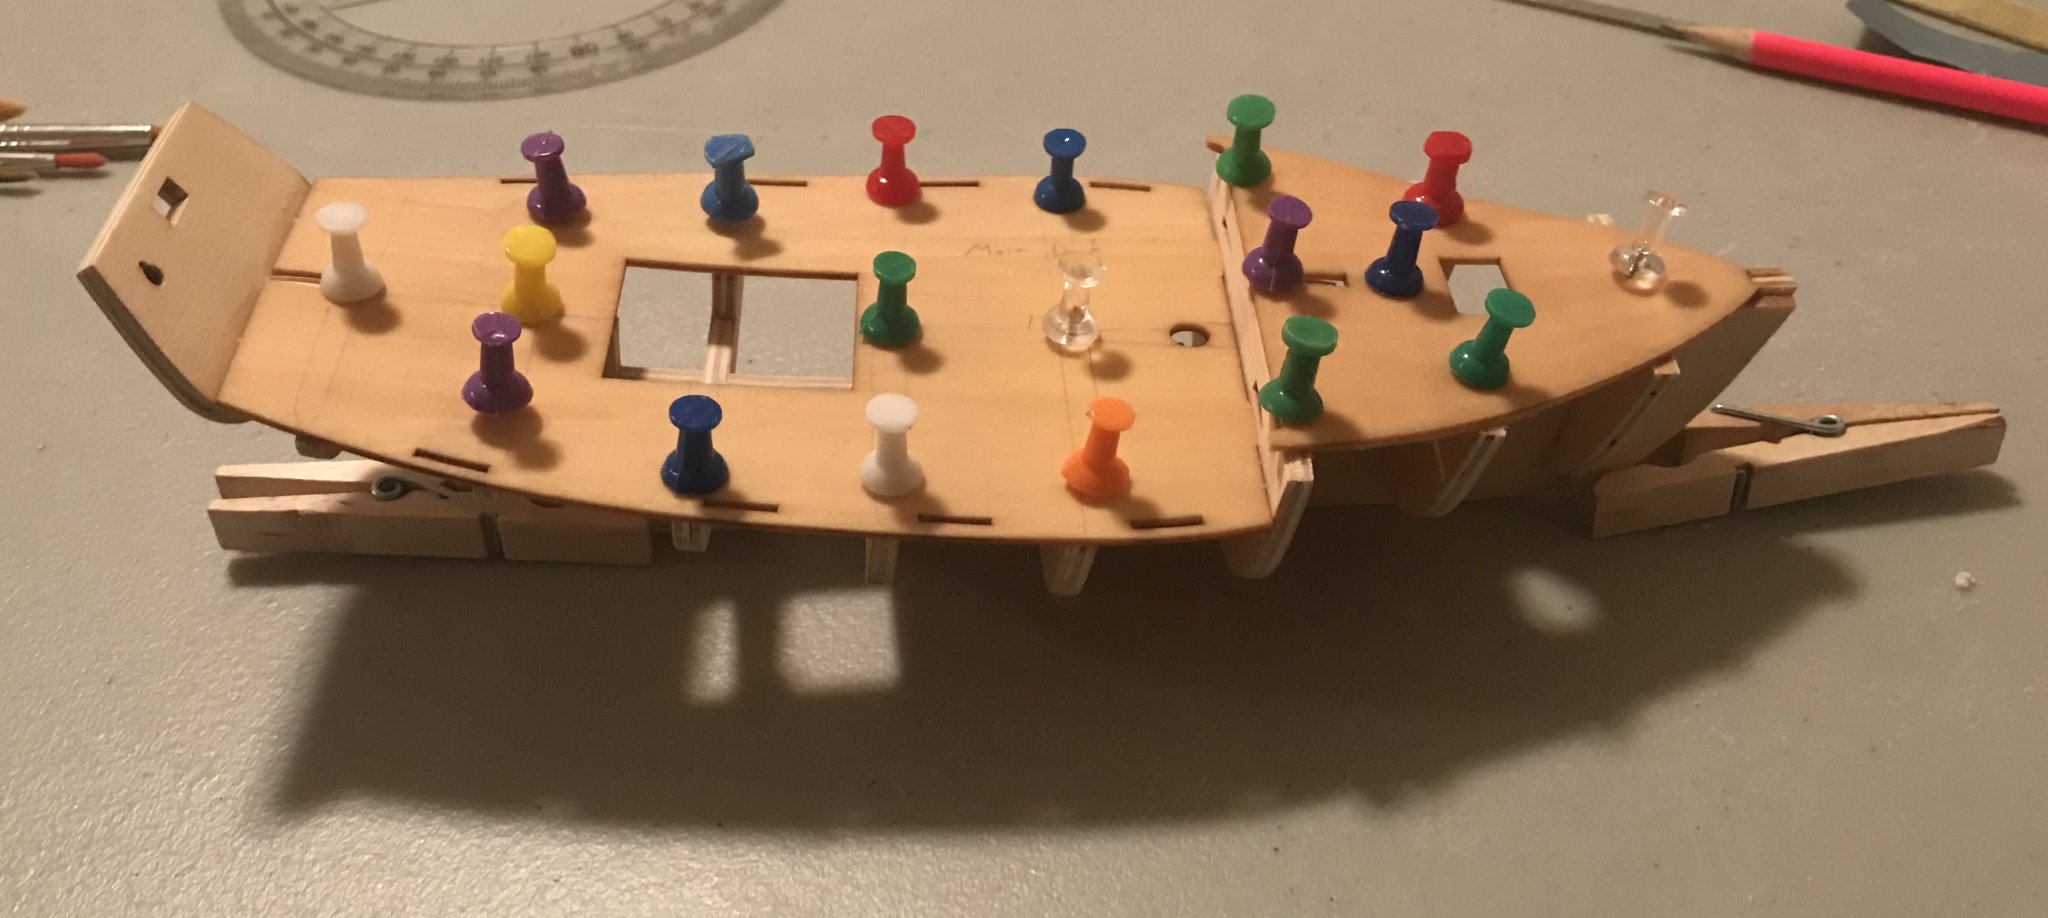
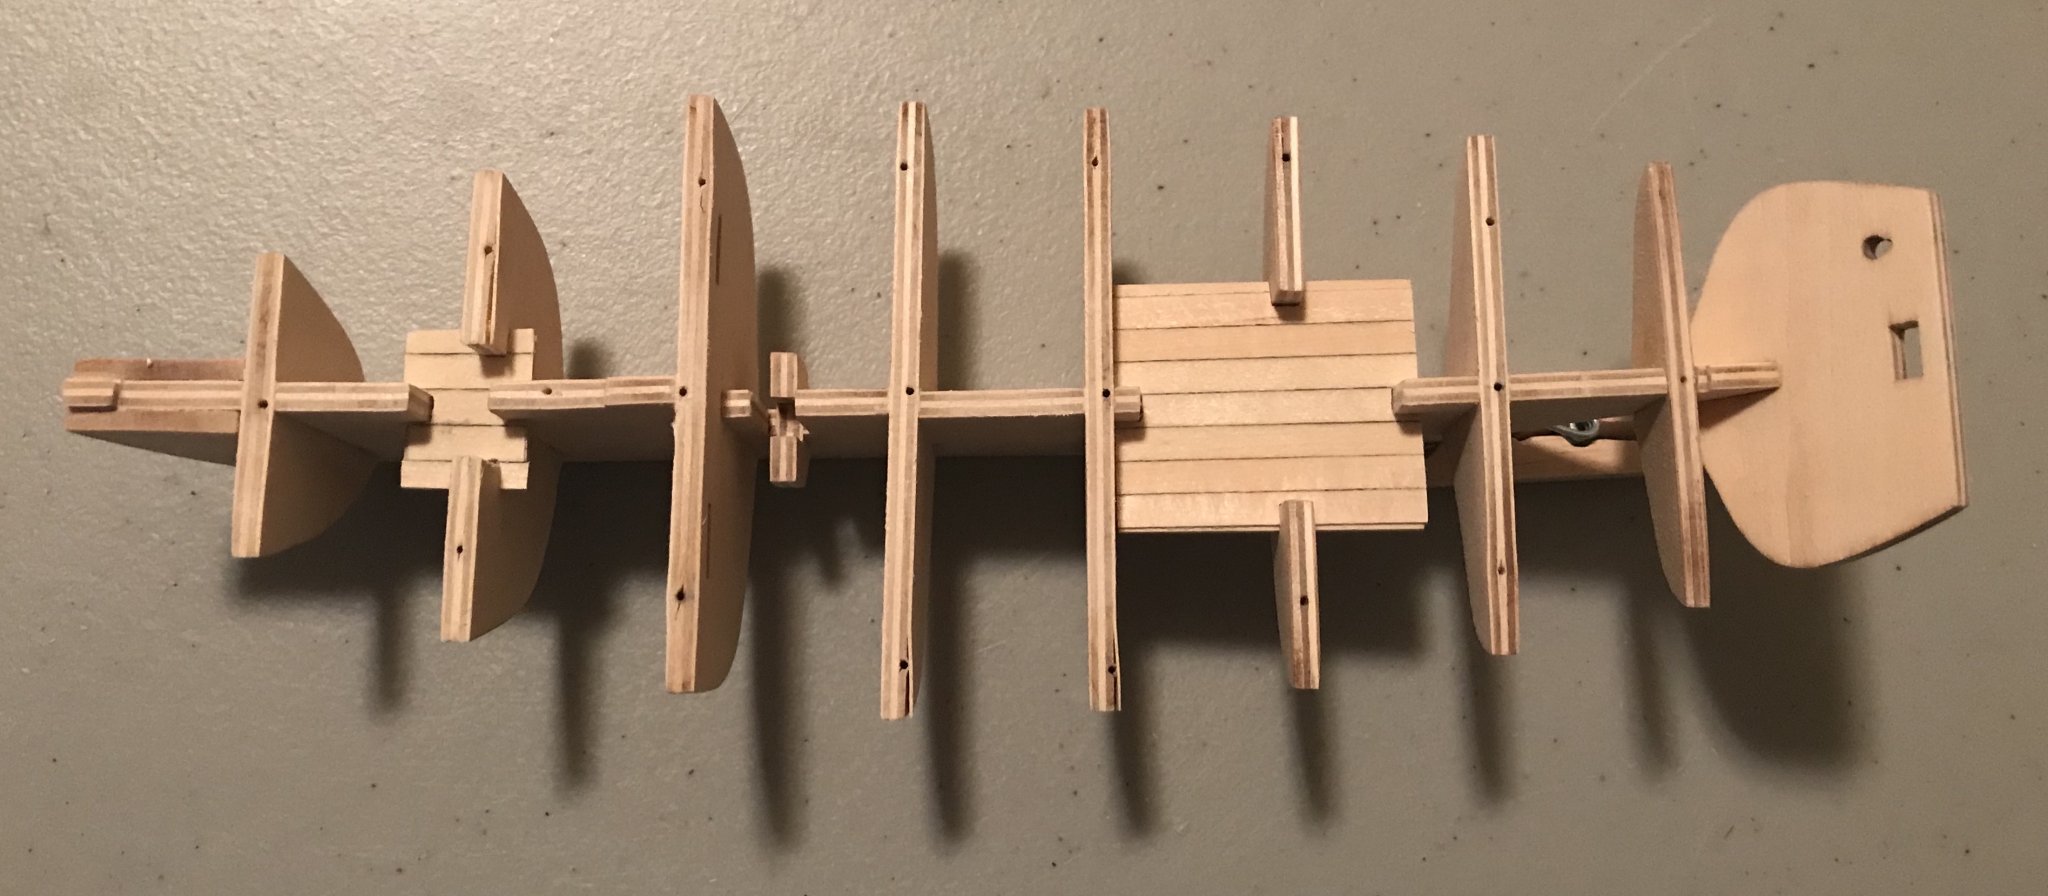
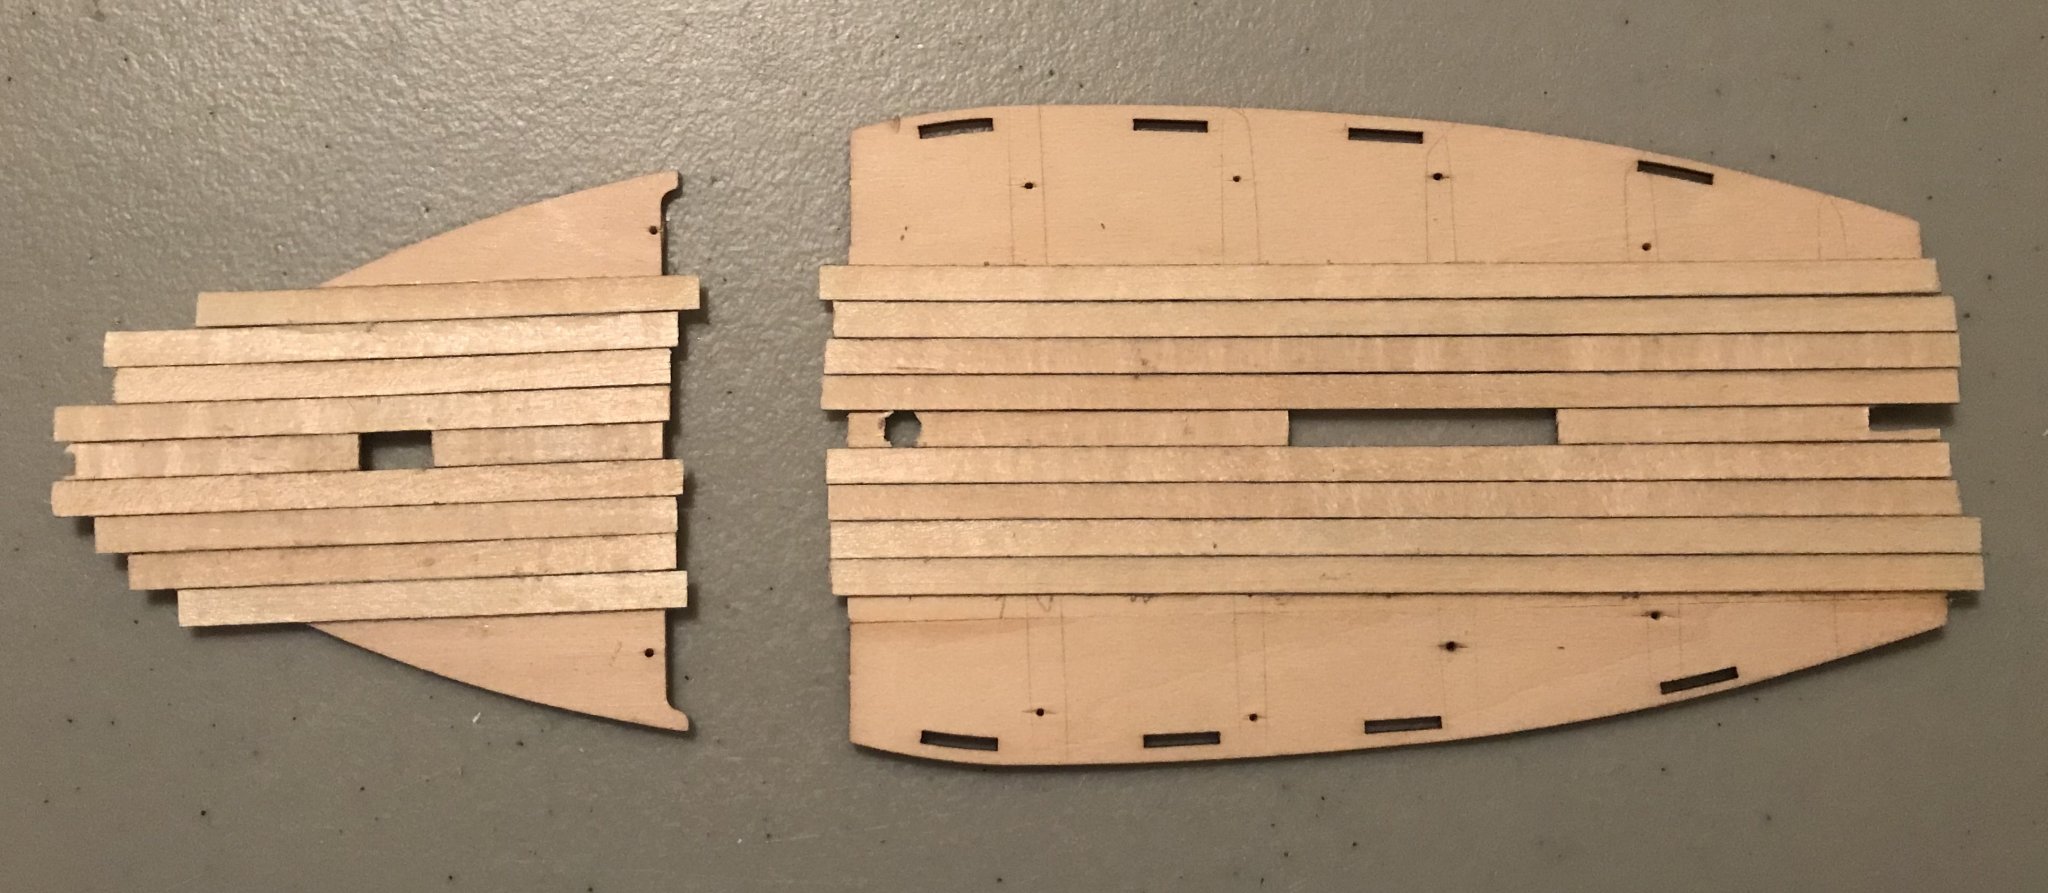
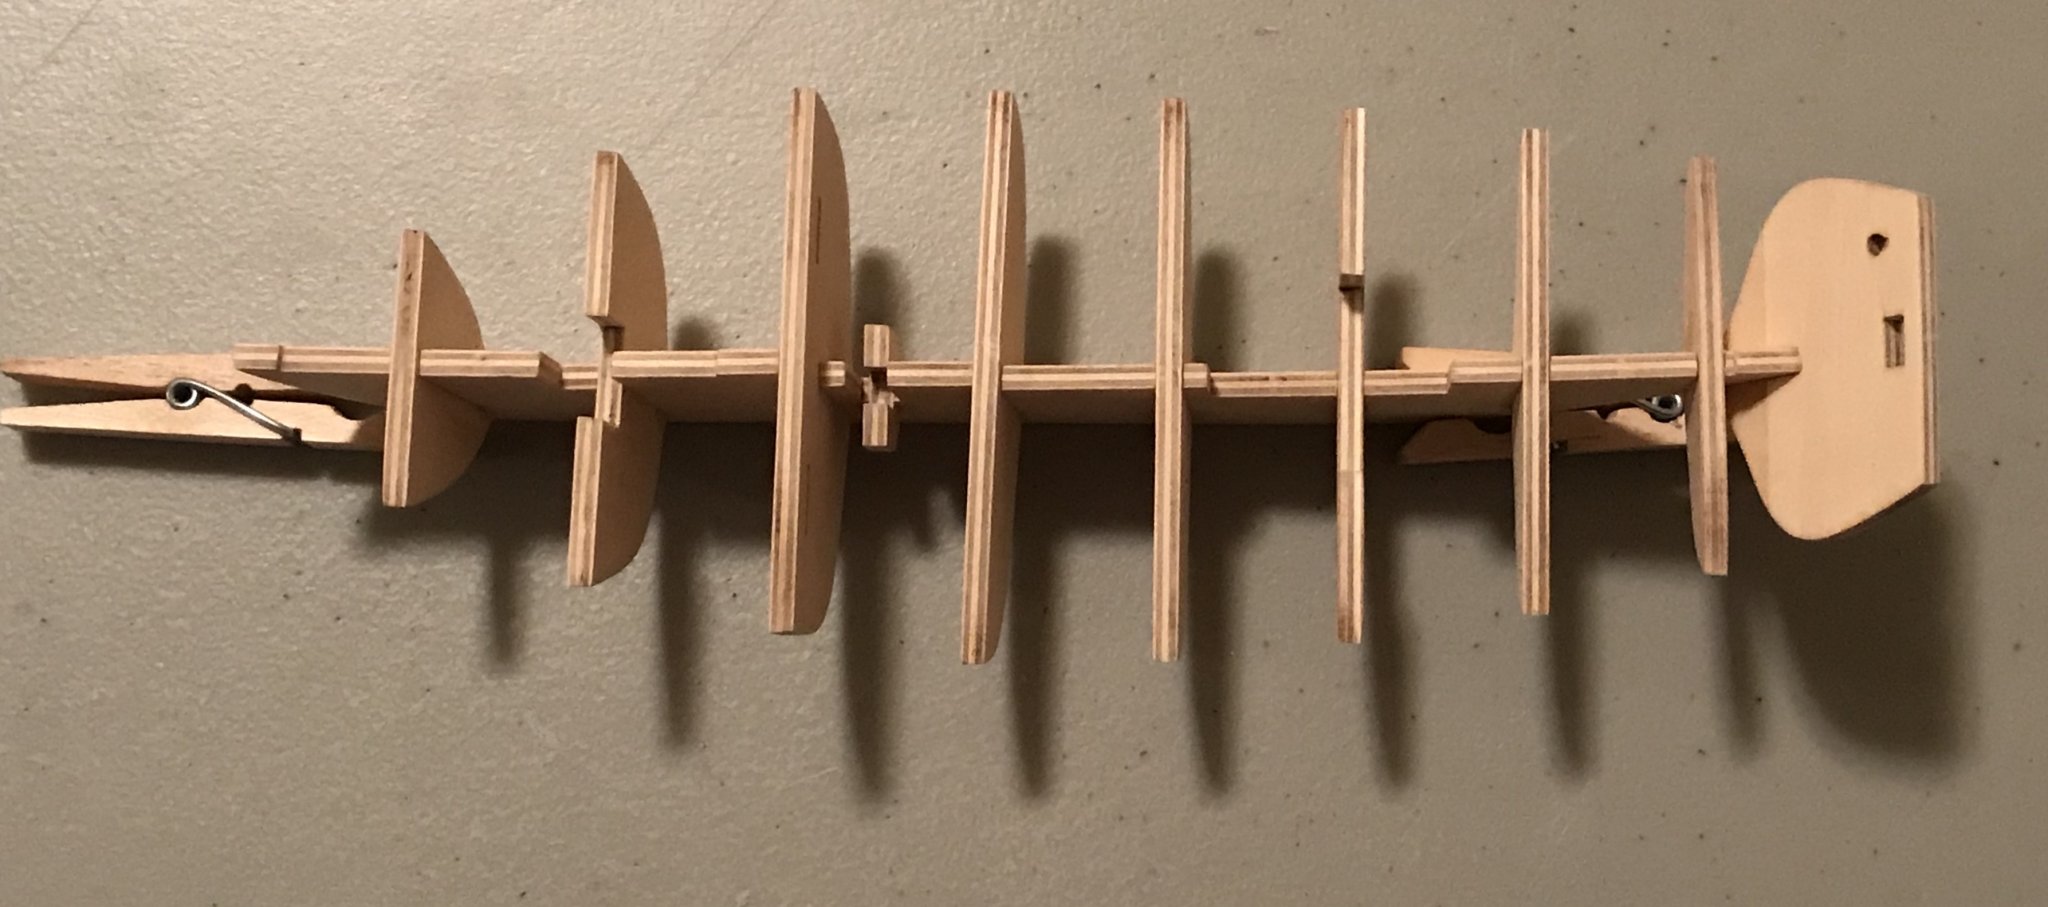
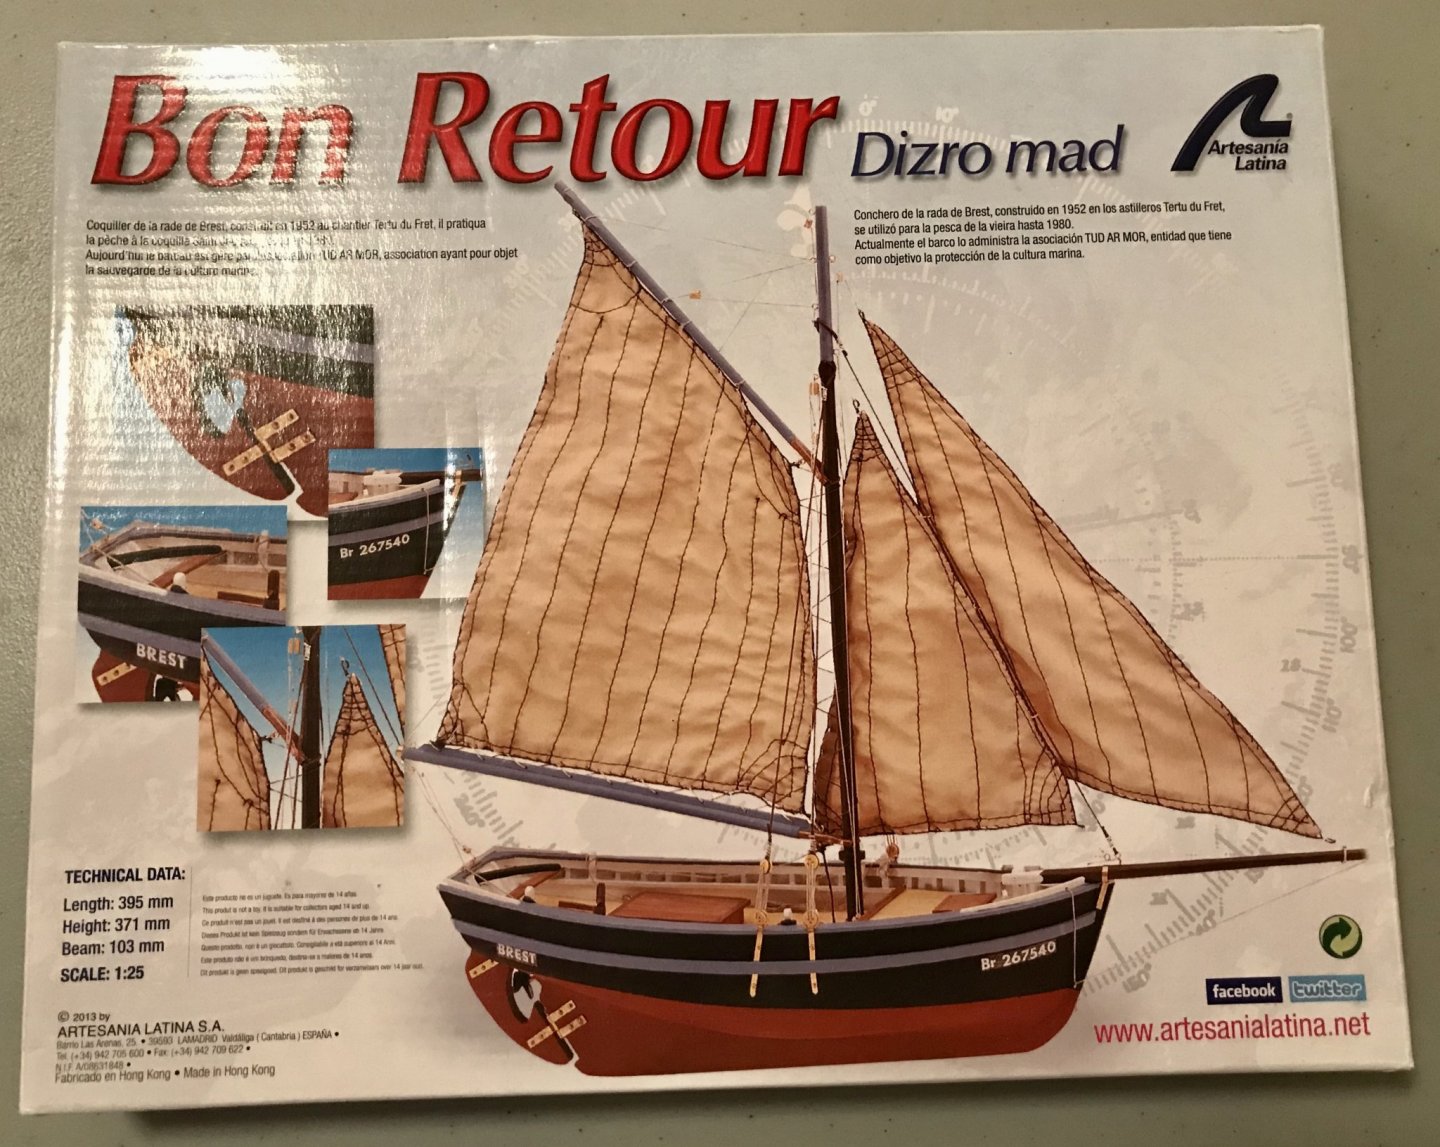
My first build was the Bon Retour. Everything on it is currently done except the rigging, but I'm waiting on replacement deadeyes, since I shattered one that had been poorly drilled. In the meantime, I read through the instruction book for La Provençale, which I had planned to be my second build. Discovering that the kit is much easier than the Bon Retour and that the instructions for La Provençale are much, much better, I decided (perhaps foolishly) to dive into the new kit that had been on deck. In particular, the rigging instructions are very detailed with clear diagrams. So, I've decided to set the Bon Retour off to the side for a few weeks while I work on La Provençale and learn more about rigging. Being a francophile and a novice model ship builder, I'm particular drawn right now to these French fishing boats as I improve my skills. (I also have Artesania Latina's Saint-Malo kit waiting for me after I finish these two.) This one is tied to some particularly fond memories for me. A few years ago, I was doing research on the Côte d'Azur and was staying in a little fishing village called Beaulieu-sur-mer, right at the top end of the Saint-Jacques-Cap-Ferrat peninsula. By chance, I saw posters up for a Fête de Saint-Pierre and decided to attend. The celebration is organized annually by the local Catholic church to celebrate the feast day of Saint Peter, the patron saint of fishermen and sailors. After mass was celebrated (outdoors, on a plaza overlooking the harbor), the priest blessed the fishing boat that had been built for this Fête. Then several men from the congregation—those who had been chosen to build the boat that year—hoisted it onto their shoulders and we marched en masse to the harbor. While the men rigged the little fishing boat, the rest of us boarded a ferry and sailed out to the bay. The priest gave a prayer the local fire chief tossed a wreath into the sea, commemorating all of the local fishermen and sailors who had died in the previous year. When we returned to shore, everybody cheered on the group of men with the small fishing boat as they launched the craft for a three-day vigil. The boat, they told me, was designed on the model of the boats in Galilee...but upon seeing La Provençale, I immediately recognized in it that little craft from Beaulieu! Unfortunately, I apparently thought it was rude to take a photo during the mass, since I have no photos of that boat, otherwise I'd share. And so, diving in. On Day 1, I opened up the box and inventoried the parts (sorry for the glare in the photo!), then read through the instructions a few times.

- 12 replies
-
- 2
-

-
- la provençale
- artesania latina
- (and 1 more)
-
The new deadeyes that I ordered won't be in until next week and I got a little impatient. So I (perhaps foolishly) started on the next kit on deck, Artesania Latina's La Provençale. Yes, another French fishing boat. I was only going to read through the instructions and look over the parts...but then I realized that it was a much easier kit with much, much better instructions! In particular, the rigging instructions for La Provençale are detailed and clear. (Admittedly, it's much simpler rigging.) So, I've decided to set the Bon Retour off to the side for a little bit while I work on La Provençale and learn more about rigging. Not off to the side for good, but for a few weeks, at least.
- 16 replies
-
- 1
-
-
- bon retour
- artesania latina
- (and 2 more)
-
Thanks, Roger! I see the John Leather book you recommend is also in Wefalck's bibliography, as are several other books by Cuncliffe. I'll definitely start with those these as soon as I can. Since my original post, I also stumbled across this video on YouTube (by Kevin...something?), which shows several details of a gaff rig in action: https://www.youtube.com/watch?v=K9_L-VGSbwc.
-
Thanks, Wefalck! I look forward to digging into the bibliography, which looks like a real wealth of information!
-
Exactly right, Wefalck. The kit is based on the Dizro Mad (Breton for "Bon Retour"); the société restoring is has a helpful Facebook page with quite a few photos that I've found helpful throughout the process. Everything on their is public, so one shouldn't need a Facebook account to take a look. French is no obstacle for me, so I'd appreciate any tips on French ship-building forums or book titles. Thanks in advance!
-
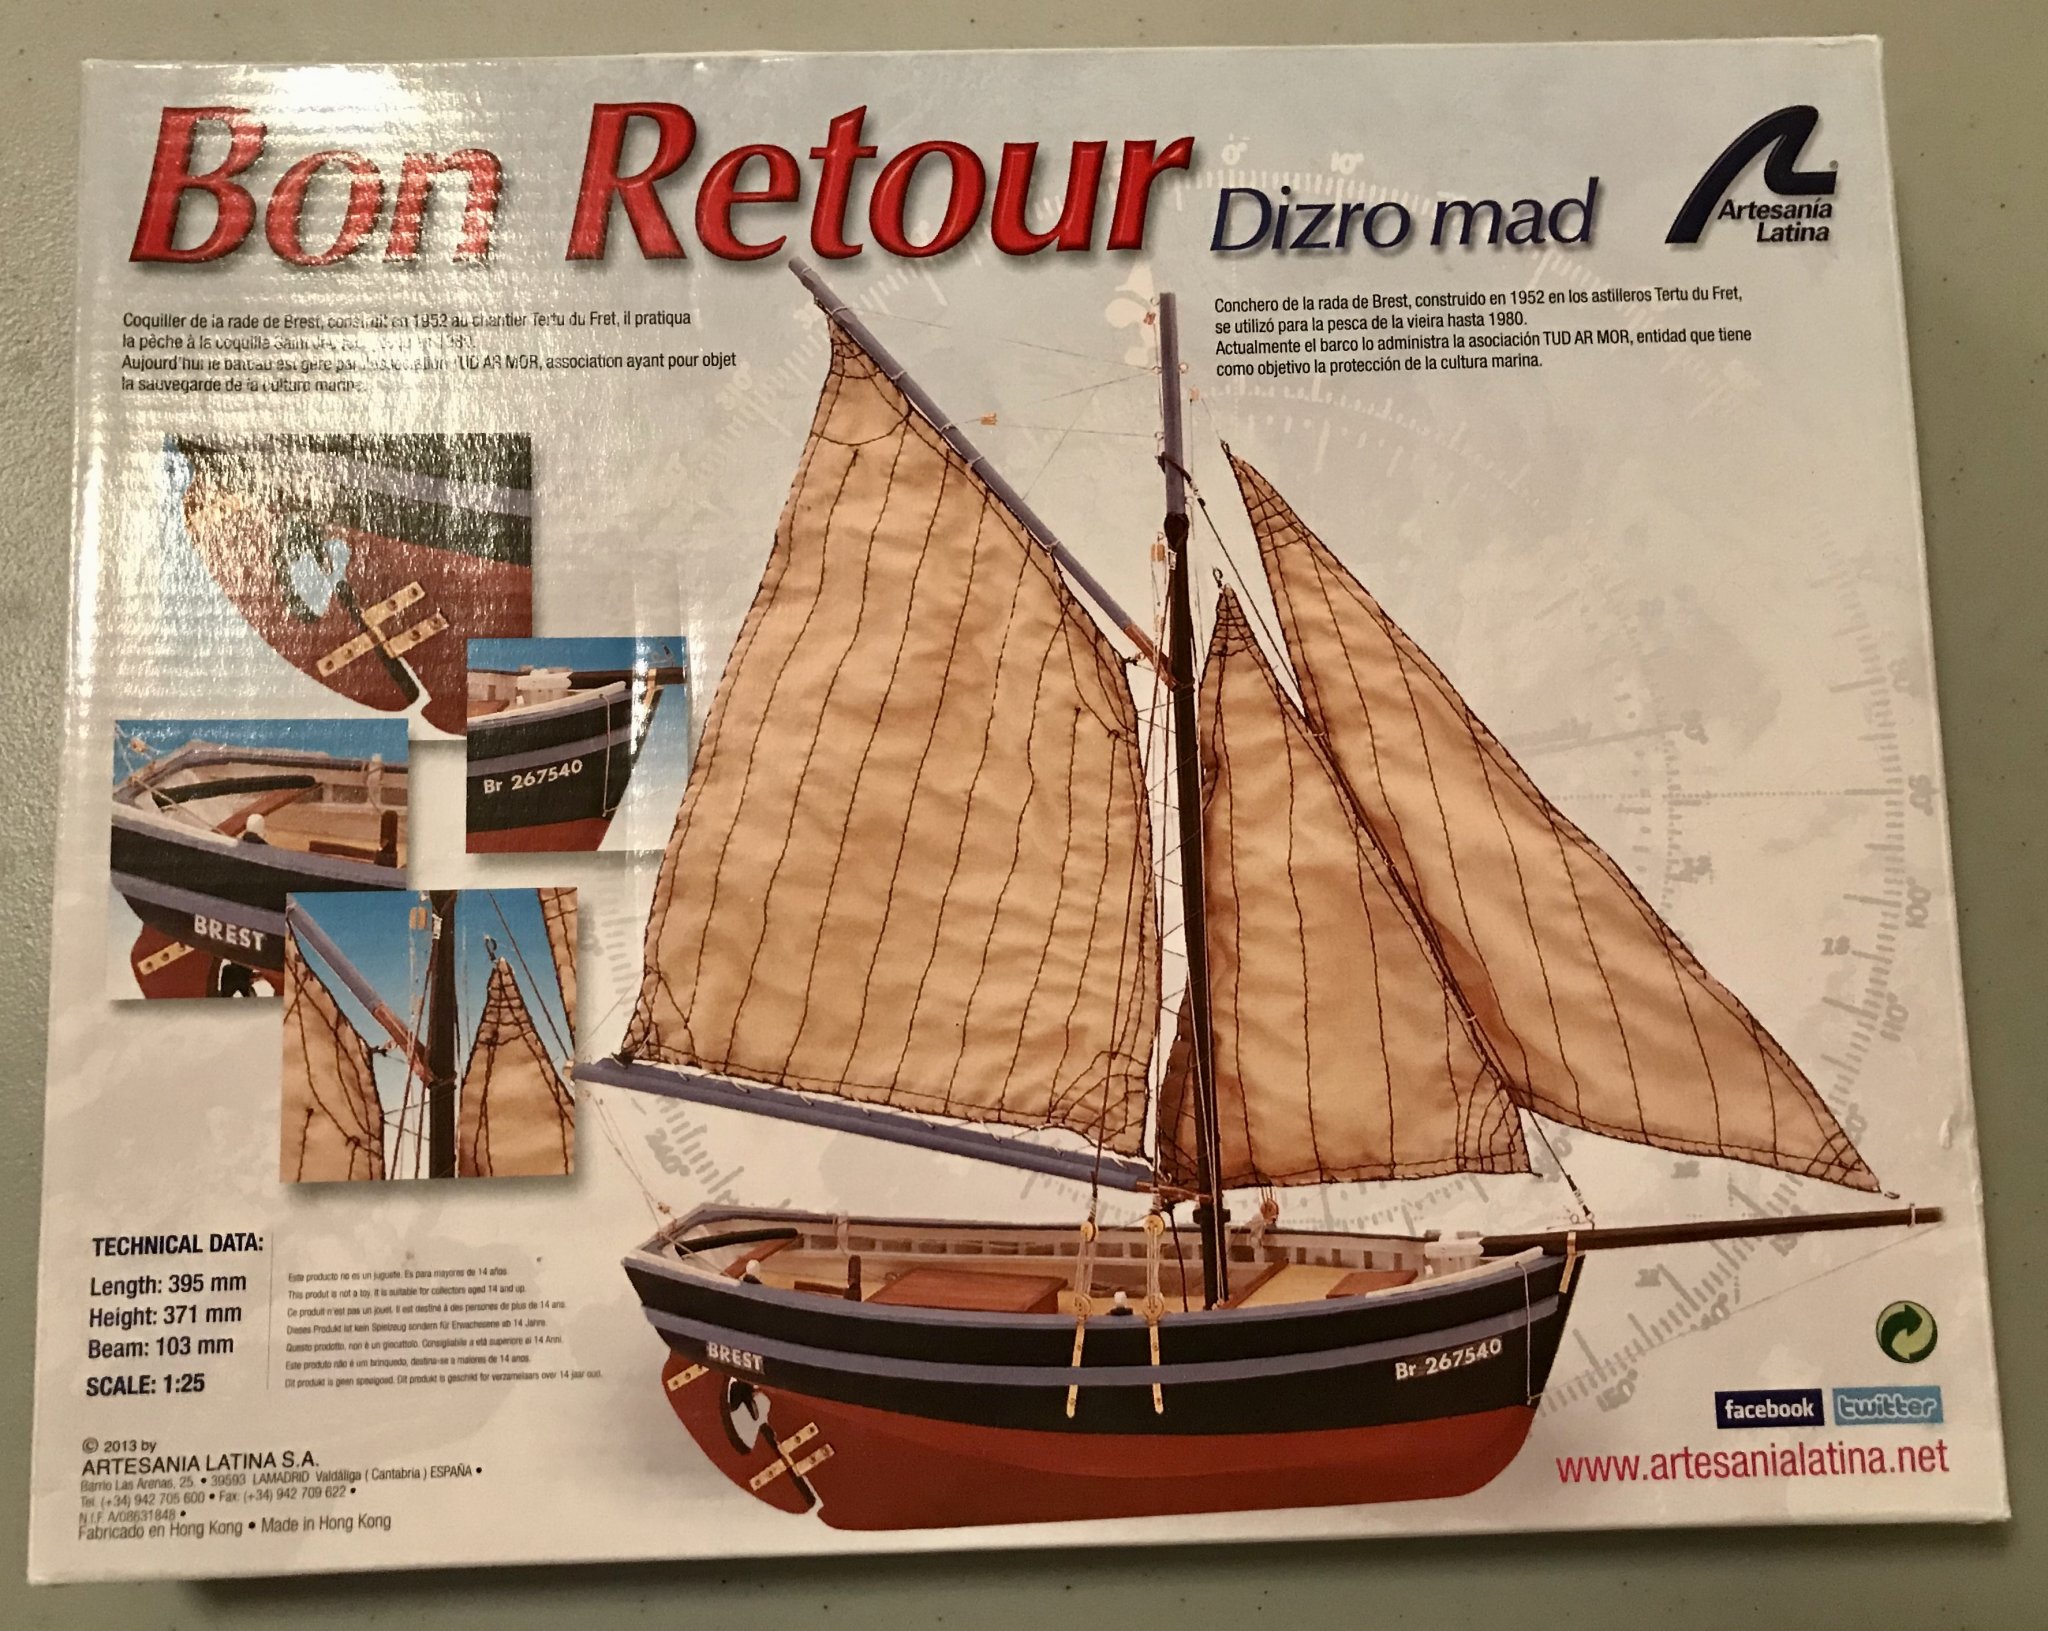
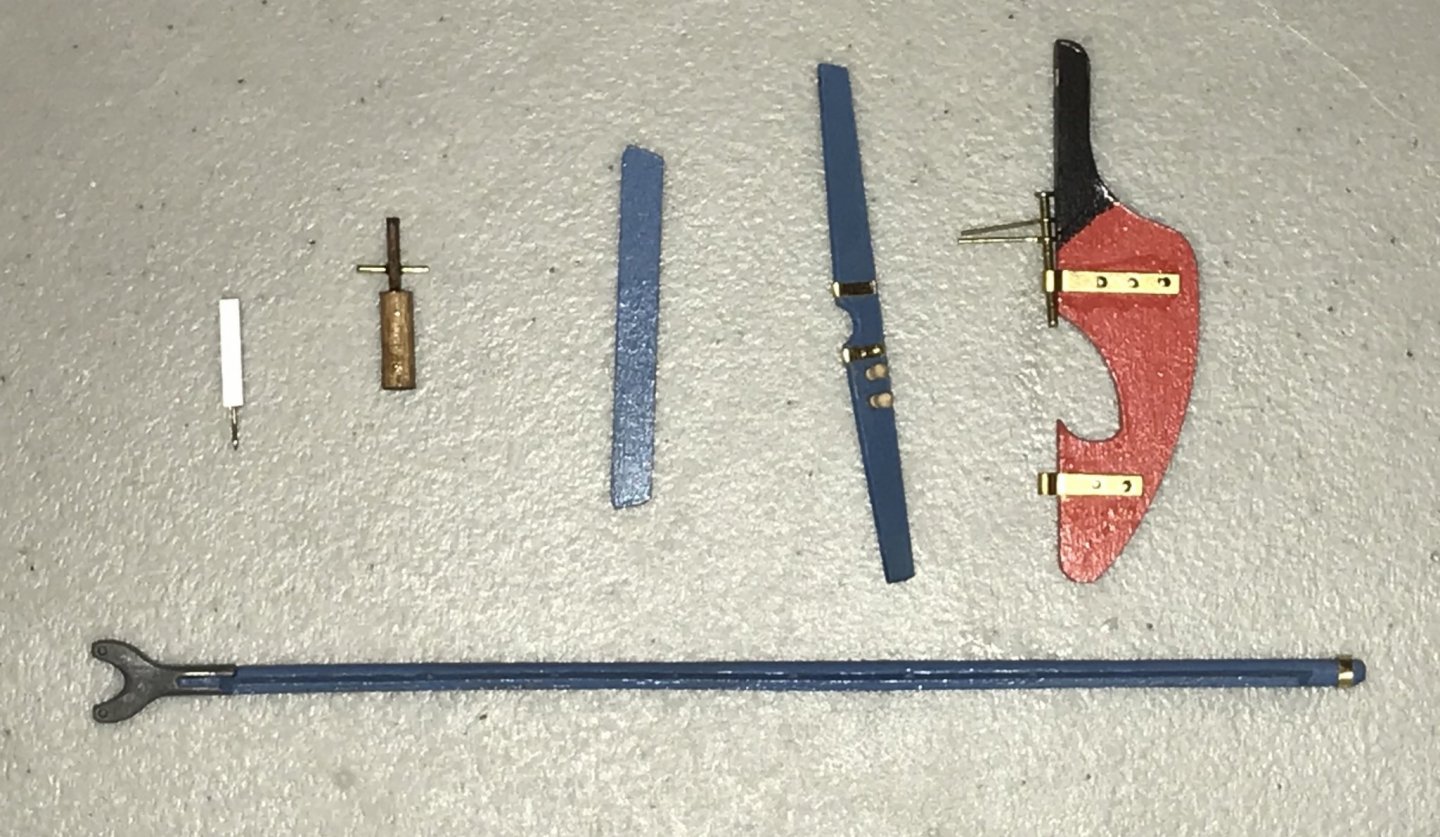
Hi all, I'm a newbie who's building his first kit, the Bon Retour from Artesania Latina. The ship itself is constructed and I'm now at the point of working on the rigging. Unfortunately, there are three factors working against me here: 1) my knowledge of rigging is minimal, 2) the instructions are no help (basically just saying, "Follow the diagram"), and 3) the diagrams are not as helpful as they could be (and not all "ropes" are labeled). I suppose I could add a fourth: the rigging in the photo on the kit's box is not identical to the rigging diagrams! I'm wondering if there is any sort of "Rigging for Dummies" resource out there? In particular, I'm having a hard time figuring out where and how the running rigging ties down. (The standing rigging is straightforward, as are the places that the running rigging attaches to the spars and mast.) I just learned today, for example, that halyards often connect to eyebolts on the deck, as appears to be the case here, since there are two halyards and two eyebolts on the deck. But beyond that...things get confusing quickly, so this is kind of information I'm looking for. The boat has three sails (gaffsail/throat, foresail, and jib), with one mast, boom, gaff, and bowsprit. The various "ropes" are labeled as travelers, stays, downhaulers, halyards, lifts, sheets, and a head luft. I think I'm good on the halyards, downhaulers, and jackstay, but I'd find it immensely helpful if somebody could explain (or point me to a resource that explains) the general function of the other types of "rope," along with a general sense of where and how they might be connected on simpler boats. I recognize, of course, that the ways these connect vary from ship to ship. If it helps, there are two belaying pins on the mastrack, 8 cleats (2 forward, 4 mid, 2 aft), two eyebolts on the deck for the halyards, two eyebolts on the stempost (one of which is for the standing rigging), and an eyebolt and a block on the stern (the block attaches to a block on the end of the boom). I've found the third chapter of Frank Mastini's Ship Modeling Simplified very helpful so far, but his examples for rigging are on ships considerably more complex than the Bon Retour, a single-masted fishing boat. I'm struggling to translate his explanations to what I'm looking at in my hands. I've checked the "Articles Database" on this site, and the articles that are currently there are all beyond the basics that I'm looking for. I've also searched the forums here, but haven't (yet) found quite what I'm looking for. Philthy (on MSW) and Invictaag (on BrexitModeller) have done build logs of this kit, but when it comes to the running rigging, they aren't quite detailed enough for my needs. Thanks in advance for pointing me in the right direction!
-
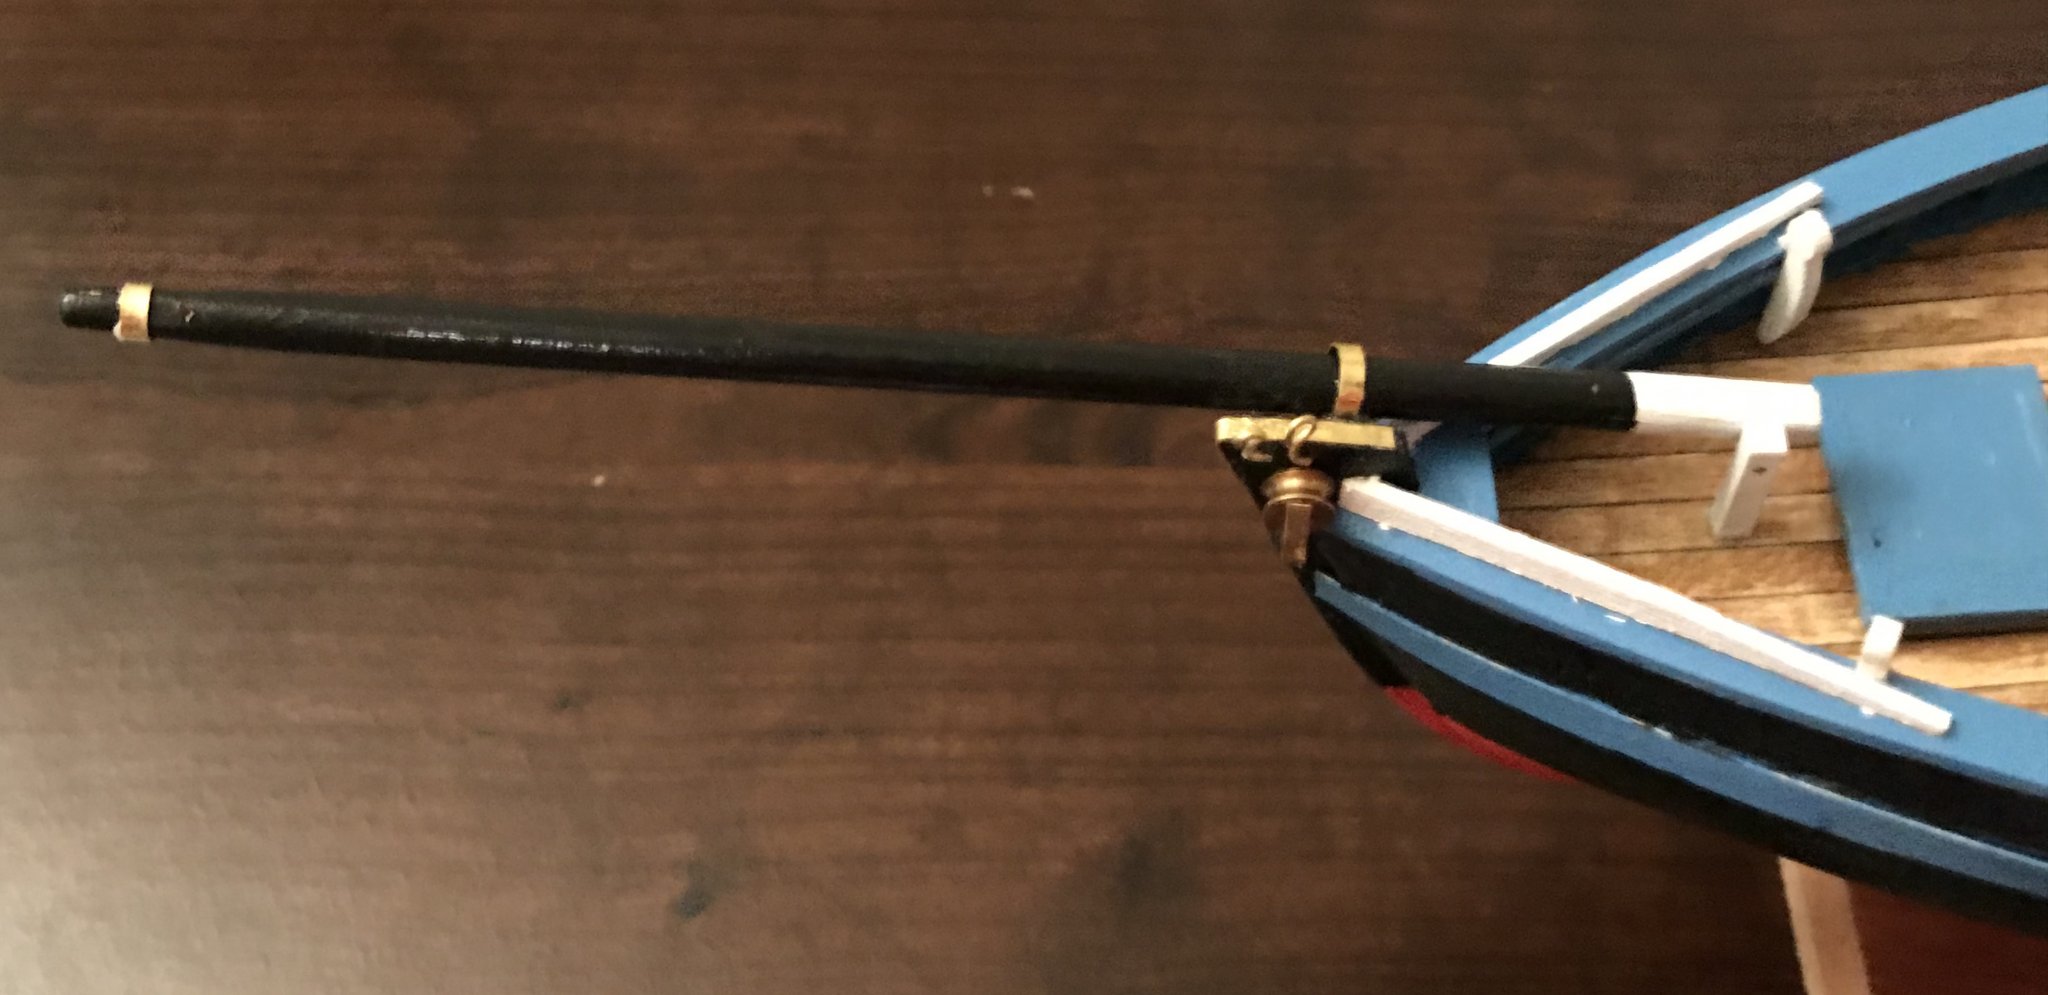
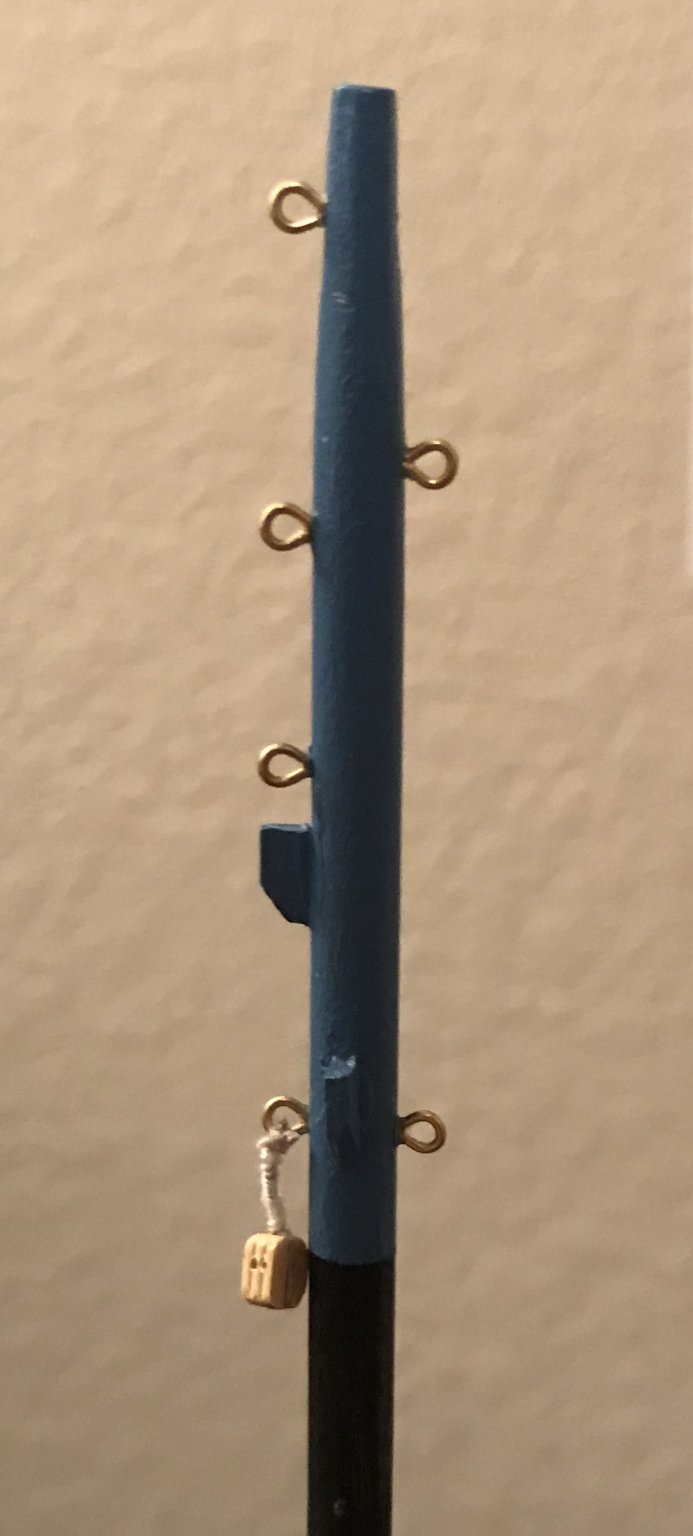
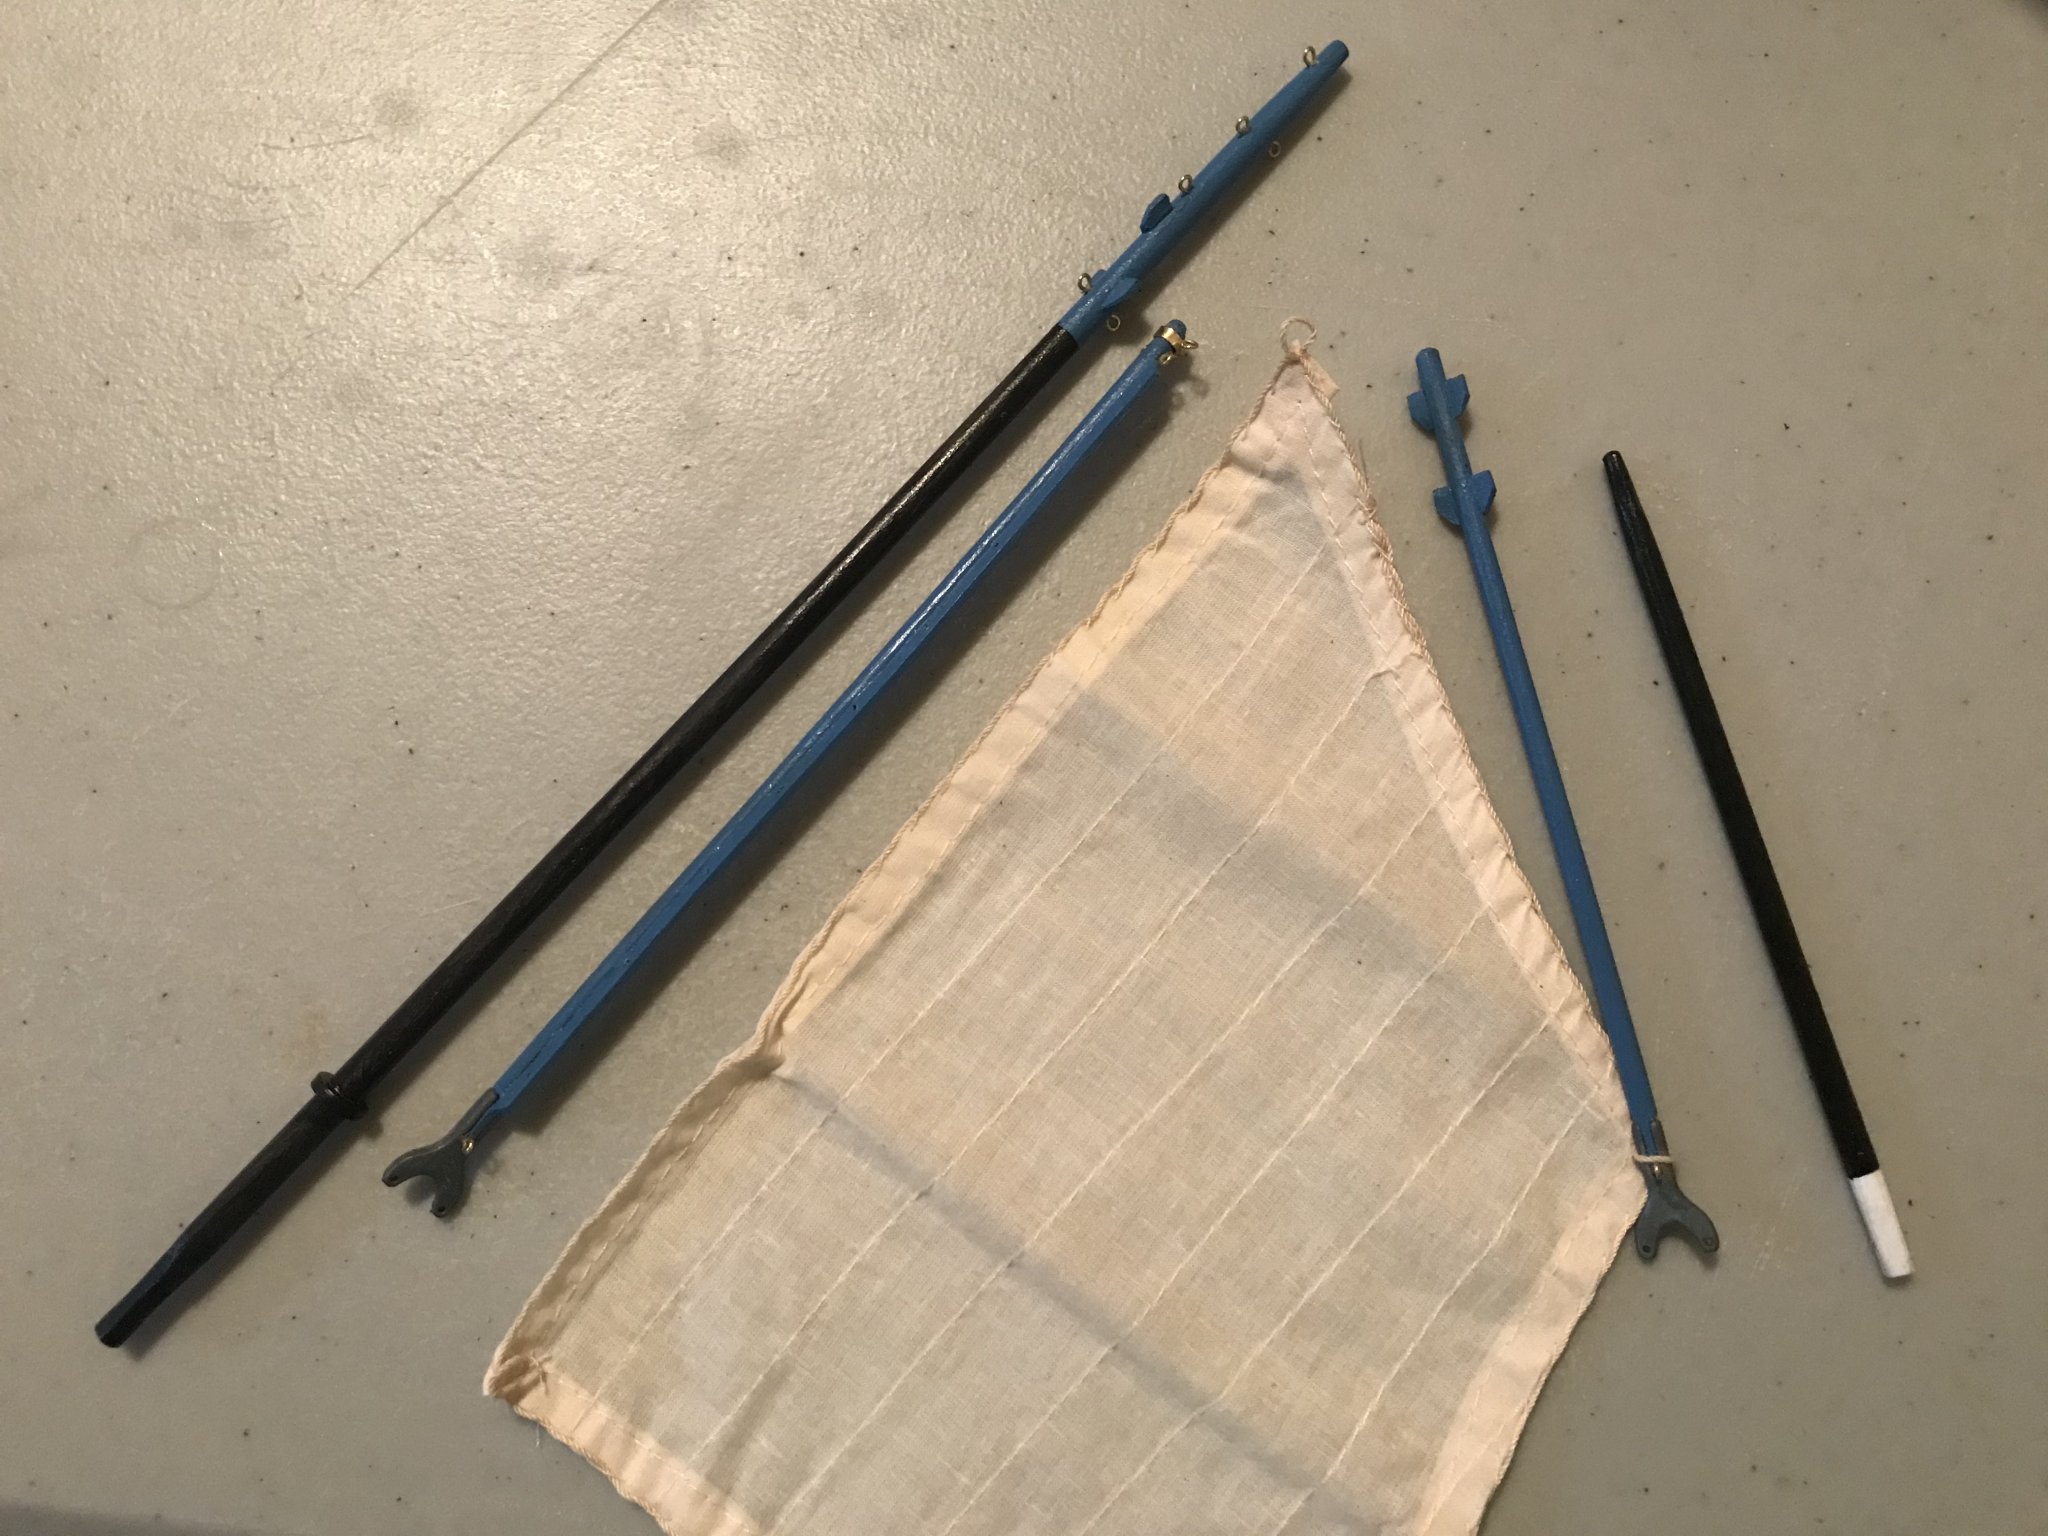
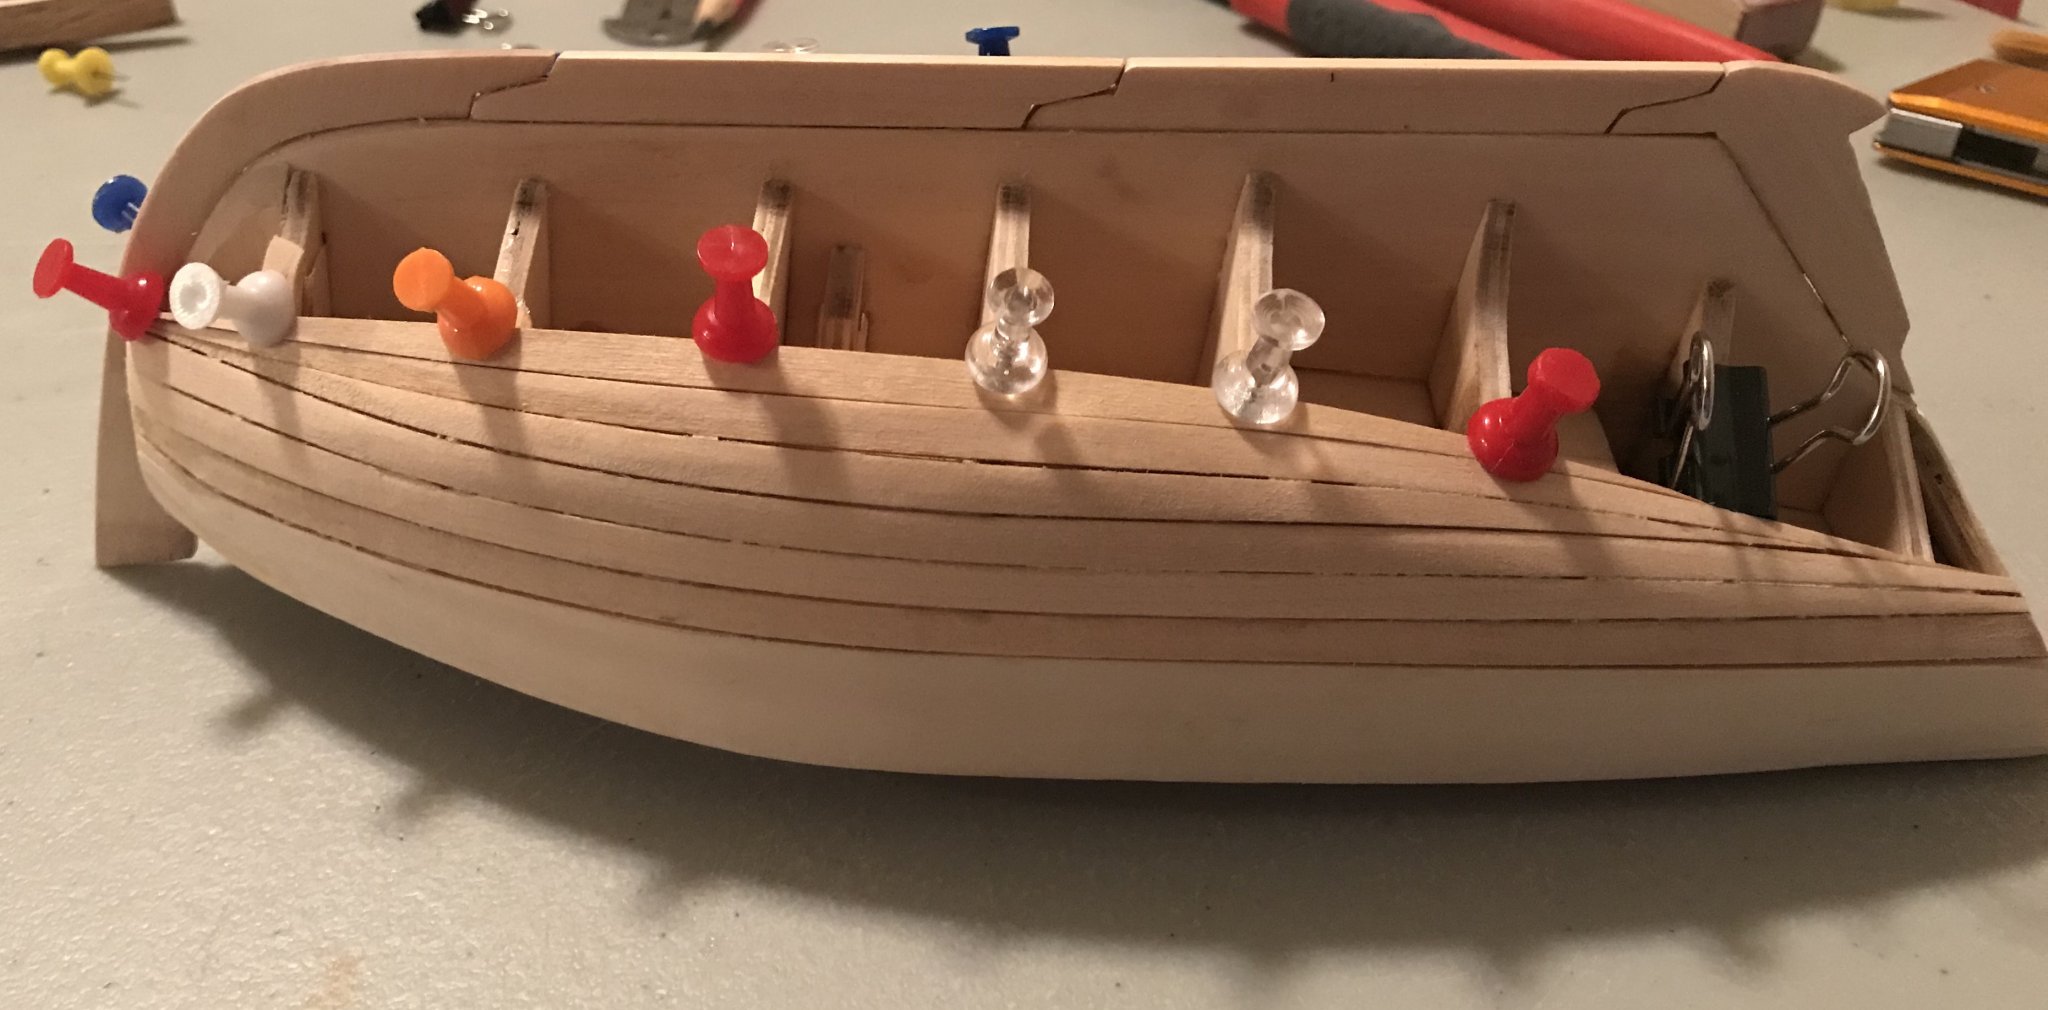
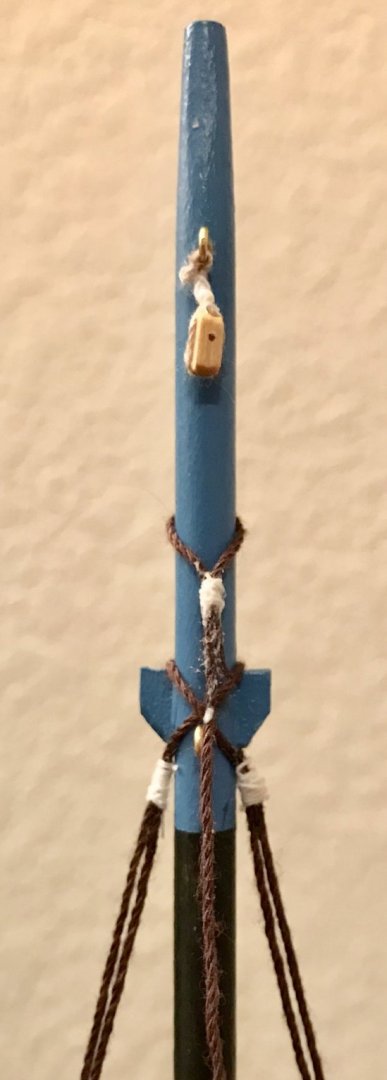
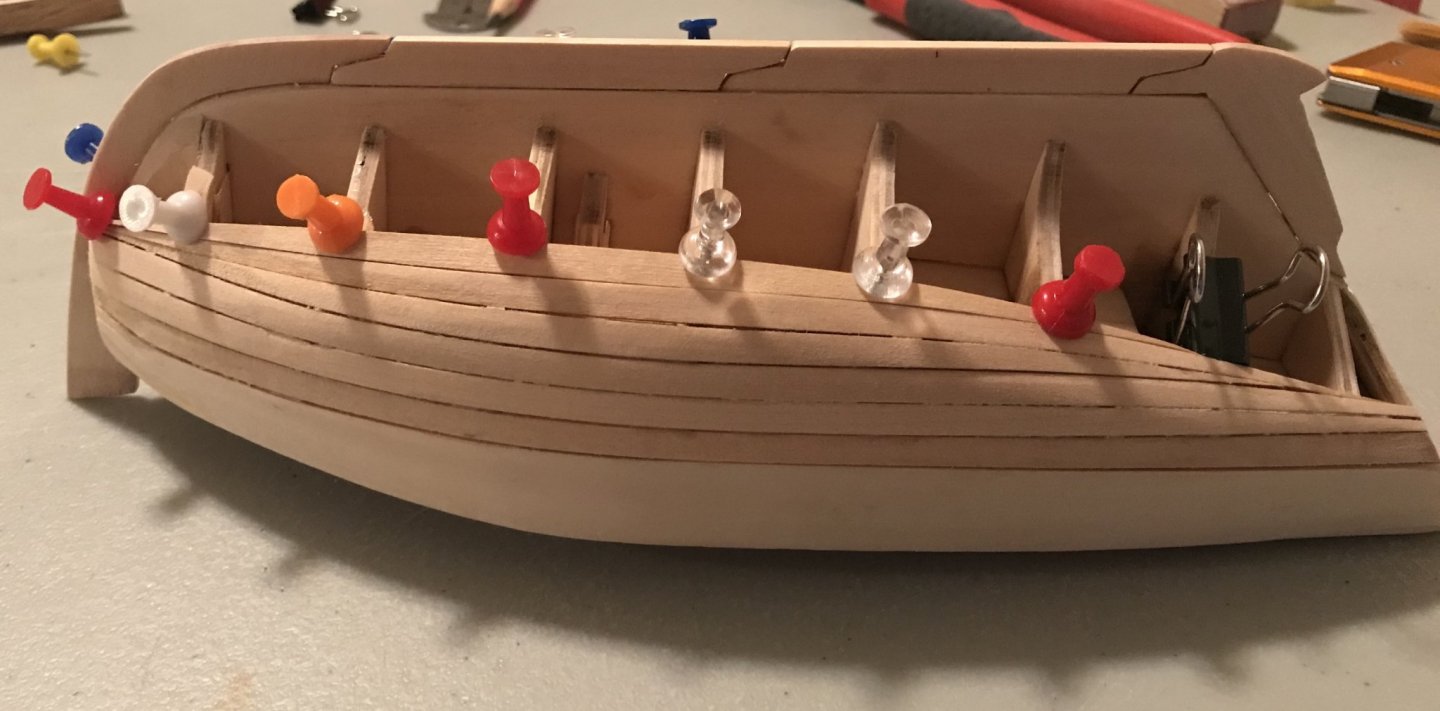
I've been reading up on rigging and so felt ready to take the first two steps. In Ship Modeling Simplified, Mastini describes a 13 step process for rigging a boat. Steps 1 and 2–5 are: 1) Fit masts with blocks; 2–5) Rig the futtock, lower, topmost, and topgallant shrouds. Since the Bon Retour is a fairly simple fishing boat, there are only 3 shrouds, so it was easy to think of these as a single step. I had already cut all the "ropes" and sorted them by diameter and length. Next, I seized the lines to the blocks and attached those—3 to the mast, 1 to the stern, 1 to the boom, and 2 to the gaff. Last (for now), I seized the shrouds to the mast. A note to others who might build this kit, the shrouds are labeled #111 Stay and #118 Double Rigging. Each piece of double rigging goes up from a deadeye, loops around the mast at a cleat, then comes down to another deadeye. The stay loops at one end around the mast at a cleat, then comes down to an eyebolt on the stempost. I seized each of the three loops around the mast with some sewing thread and a little dab of PVA glue. One of the deadeyes that came with the kit had holes drilled at an angle. When I tried to clean up the holes in the deadeyes, I shattered that one, so have ordered some replacements. Once those come in, I'll attach the shrouds at the bottom; for now, I'm using clothes pins as weights for the picture. Since installing the chain plate and lower deadeye, I've learned that the angle should have lined up with where the shrouds were eventually going to go. Another lesson learned. Photos are: side view of the blocks and shrouds on the mast, front view of the blocks and shrouds on the mast, and a shot of the whole boat from off the port bow. I've cranked up the contrast and brilliance, so the rigging is more visible.


- 16 replies
-
- 2
-
-
- bon retour
- artesania latina
- (and 2 more)
-
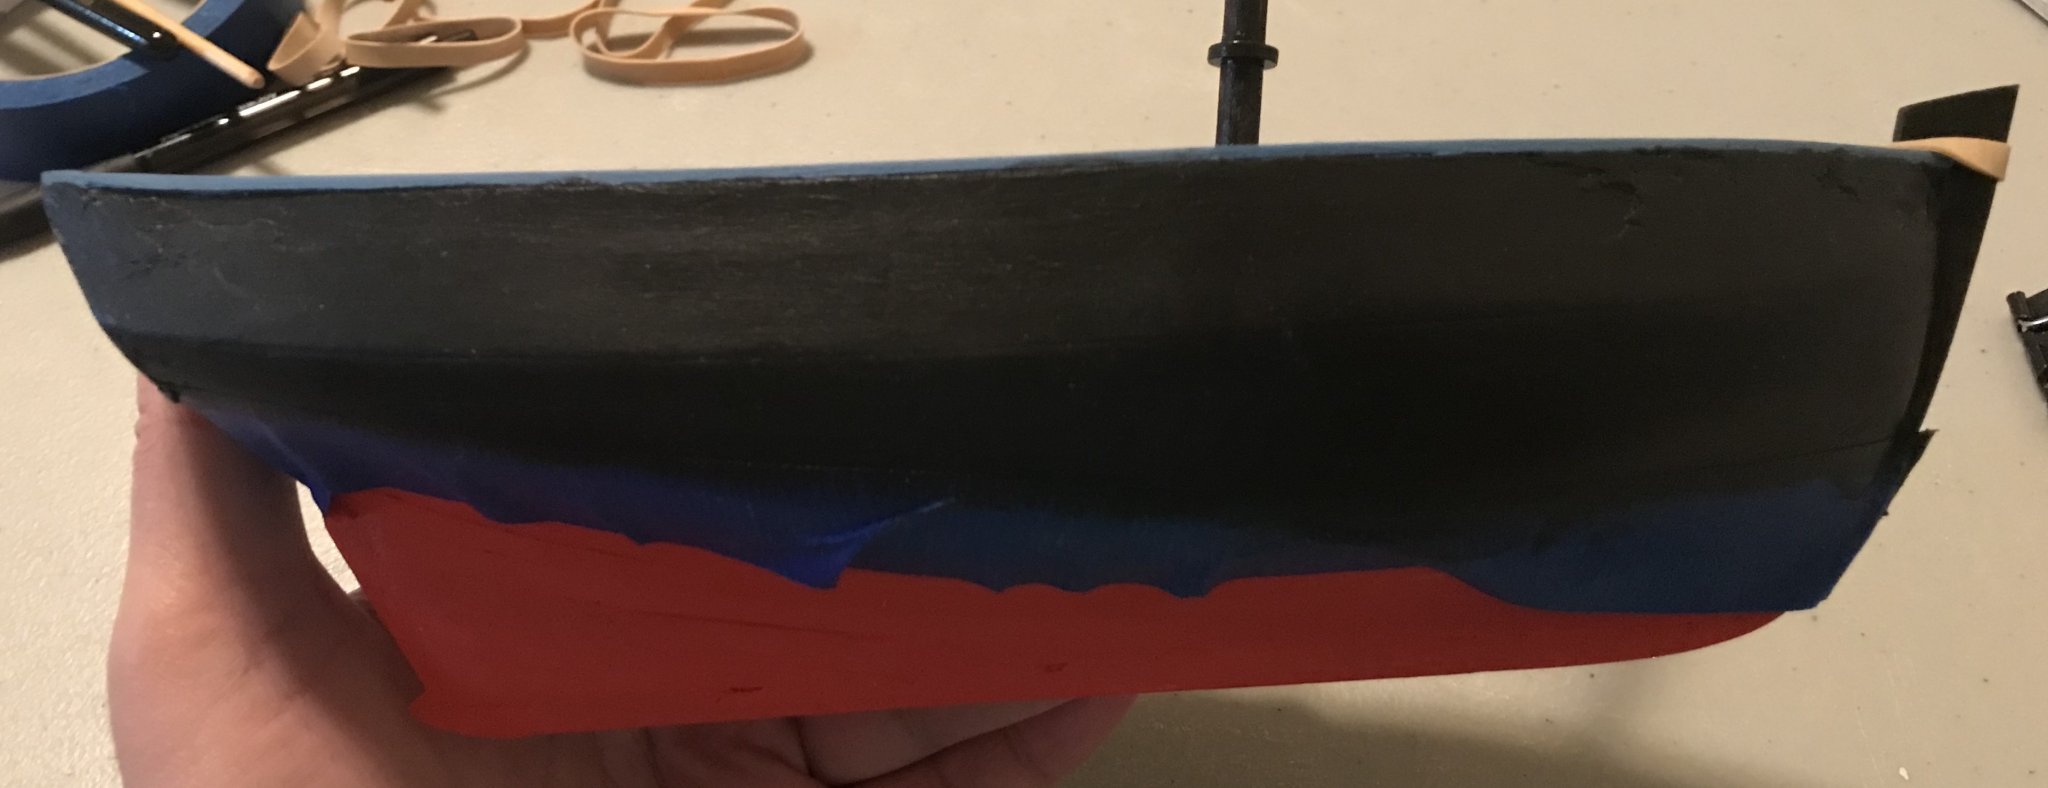
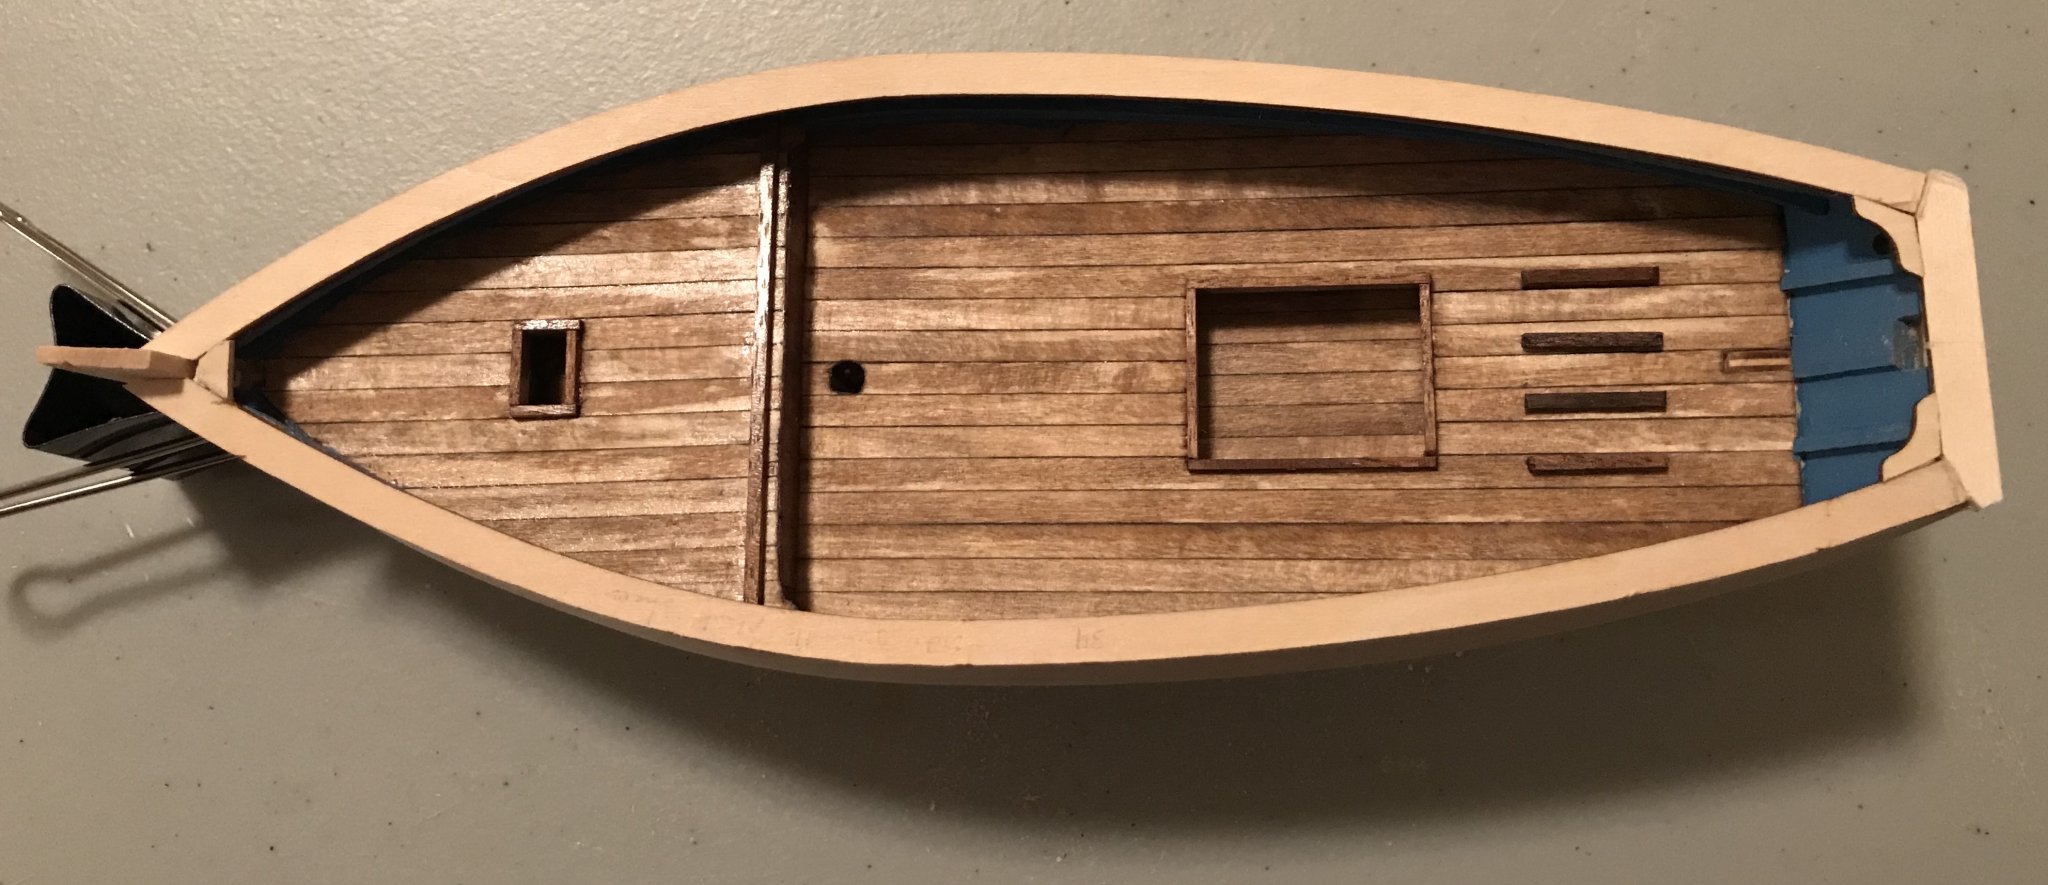
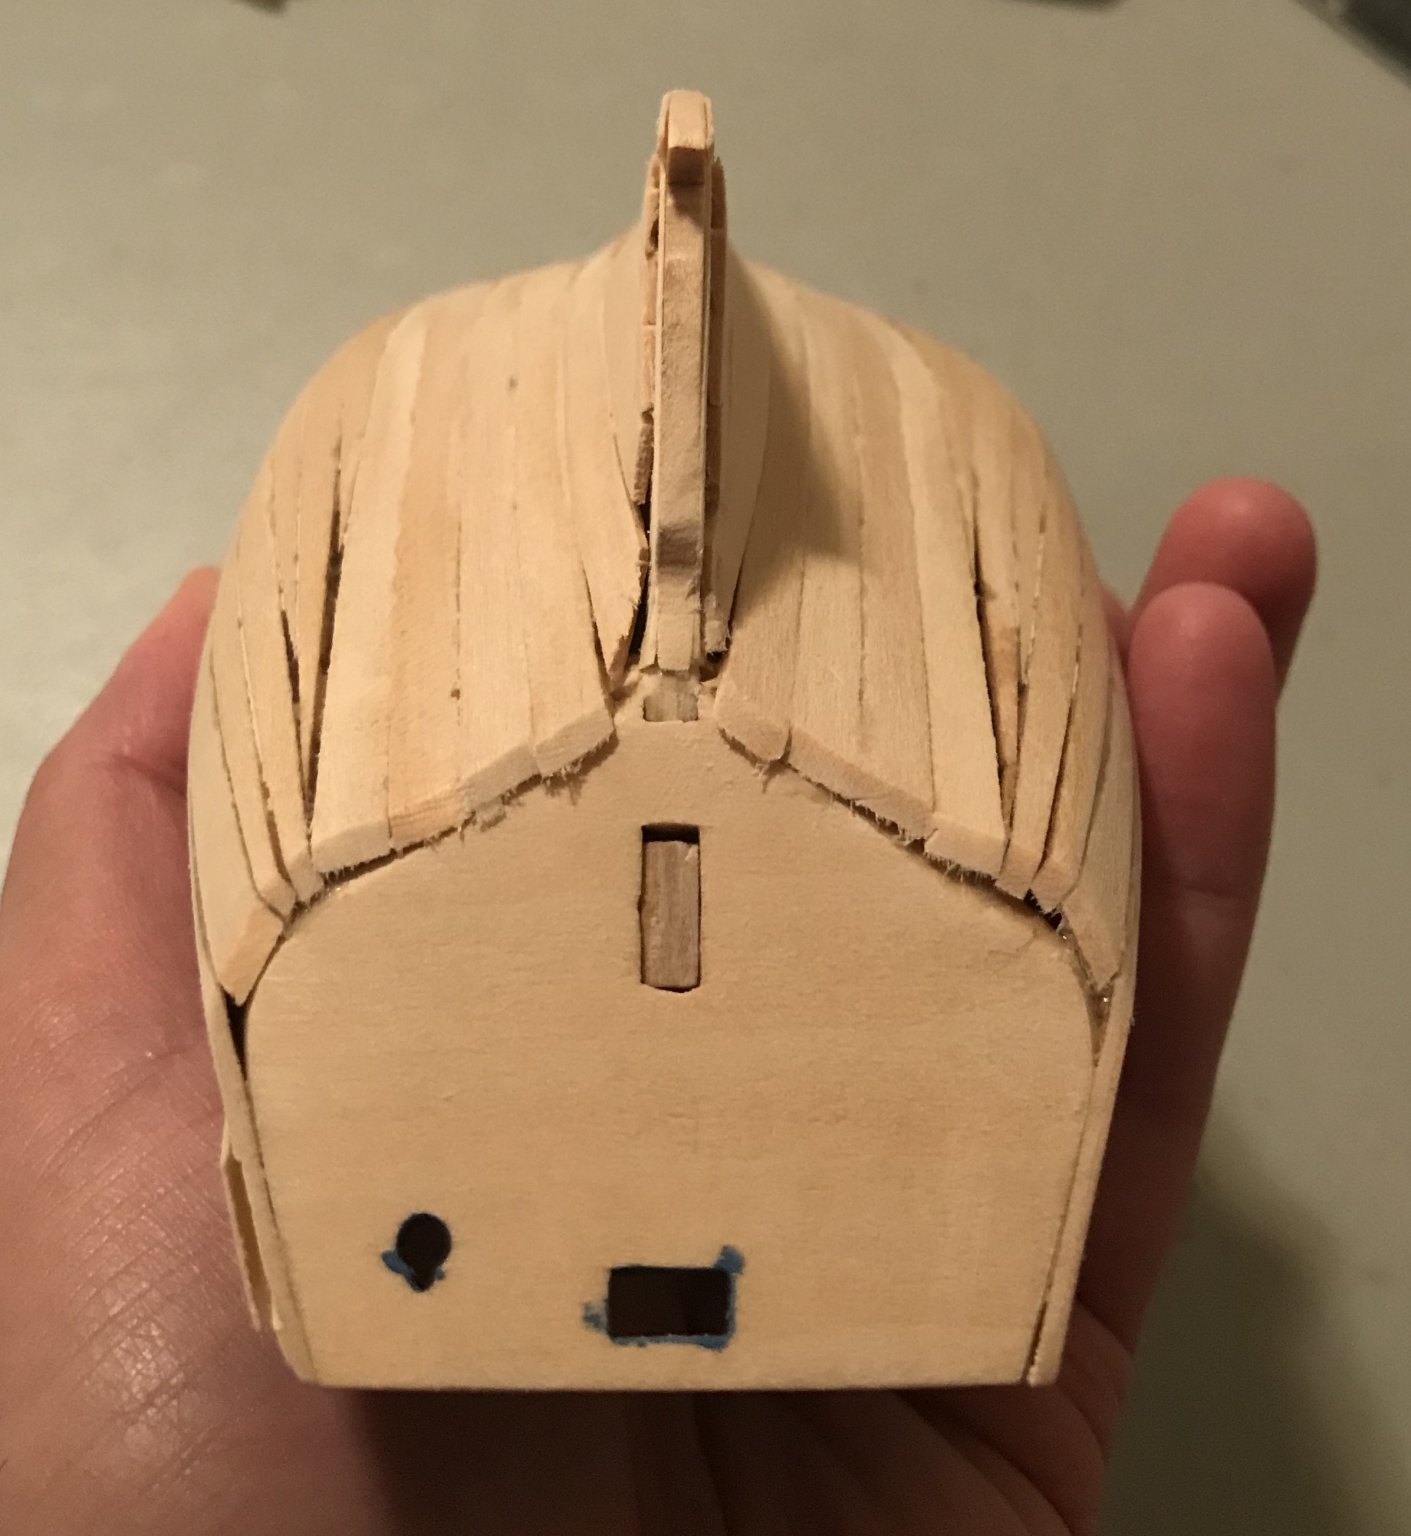
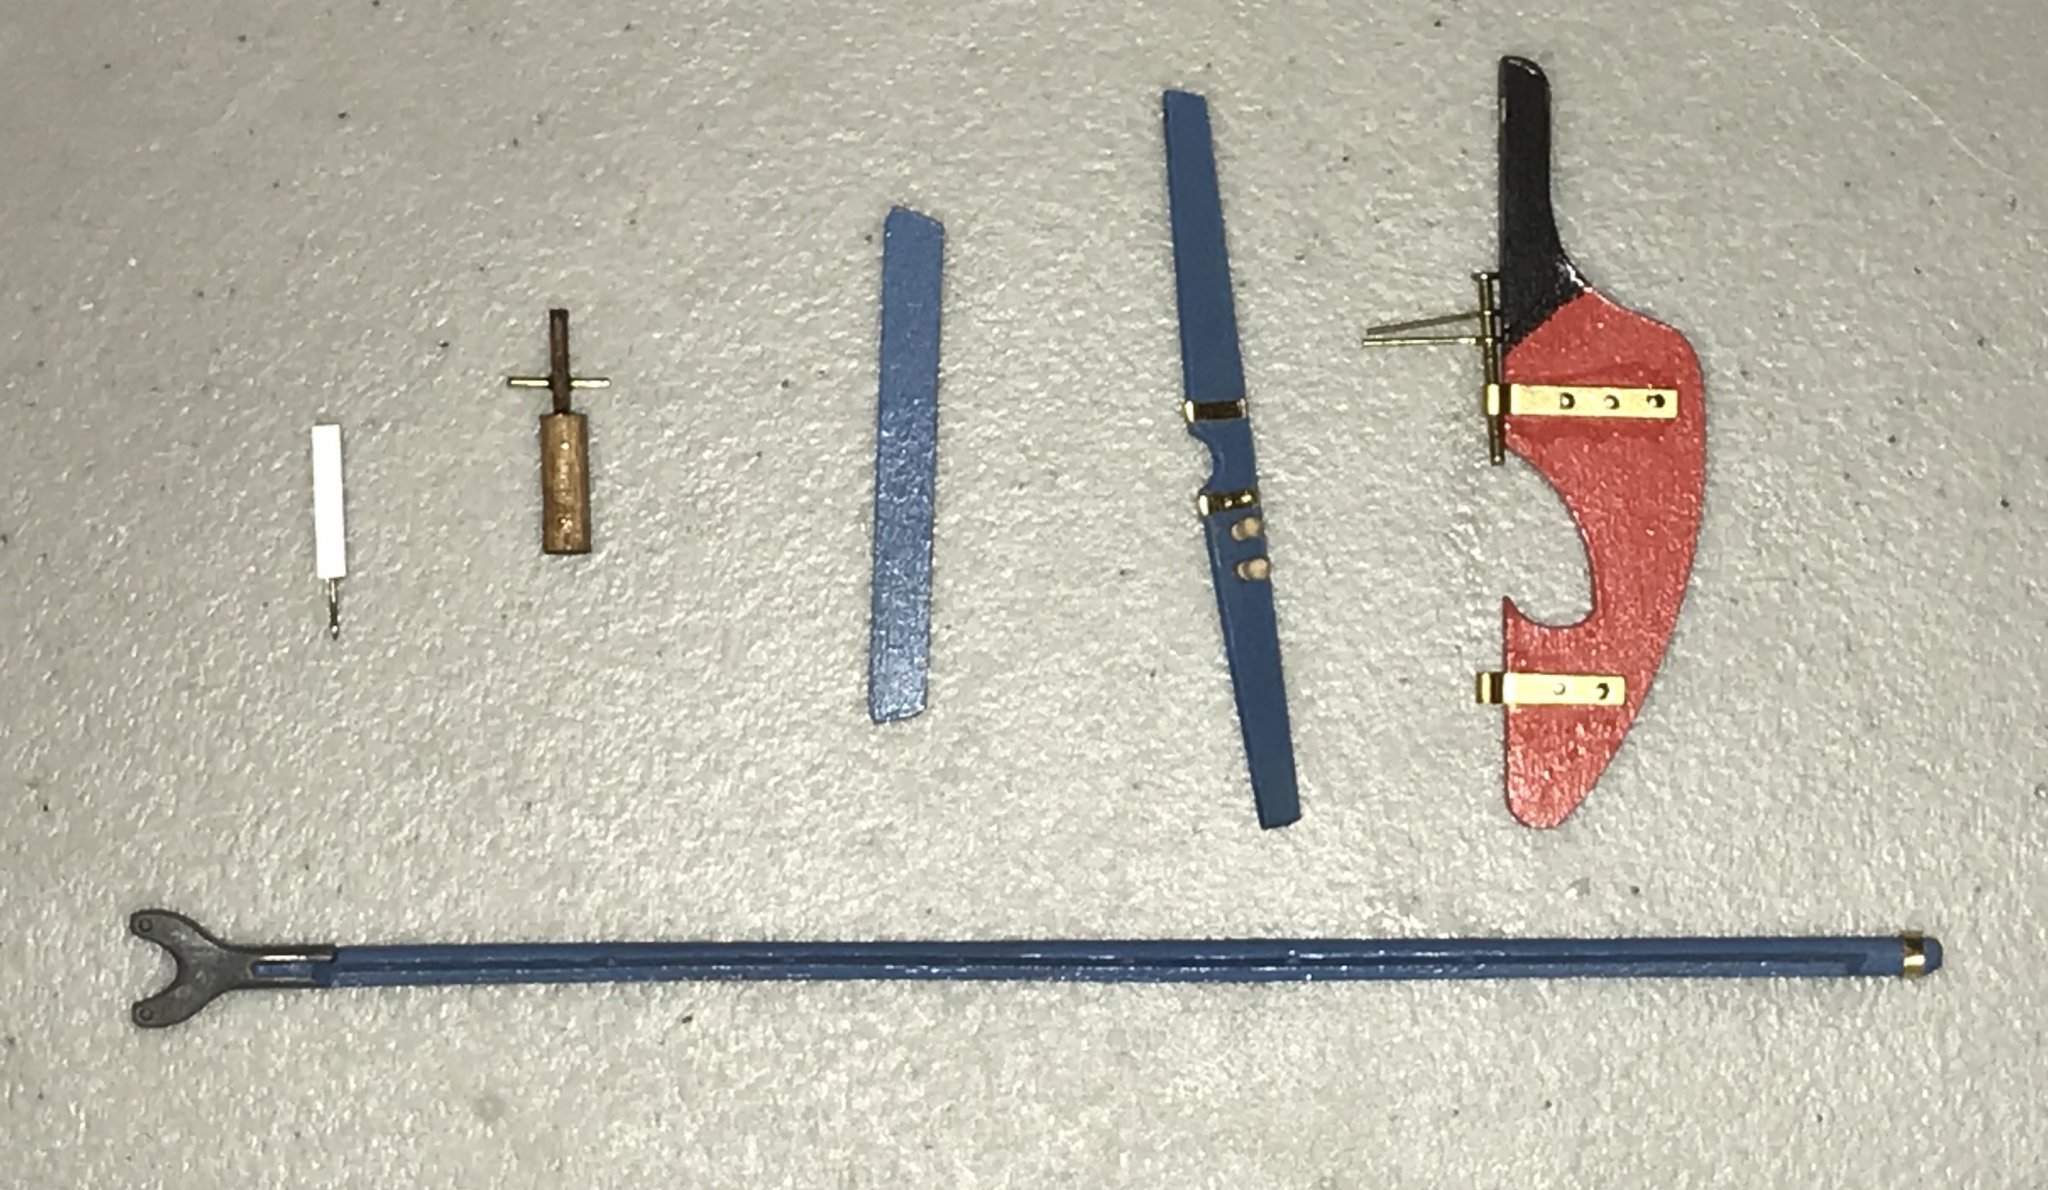
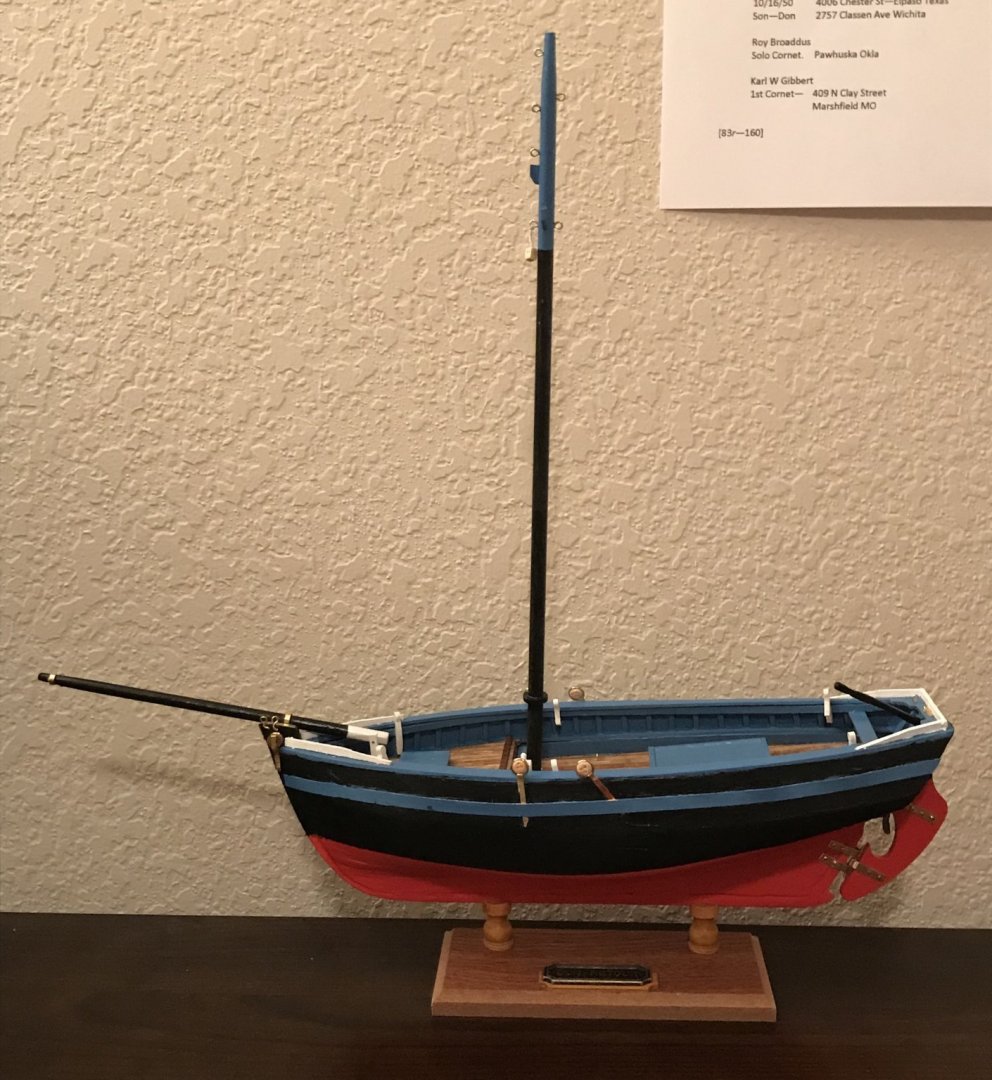
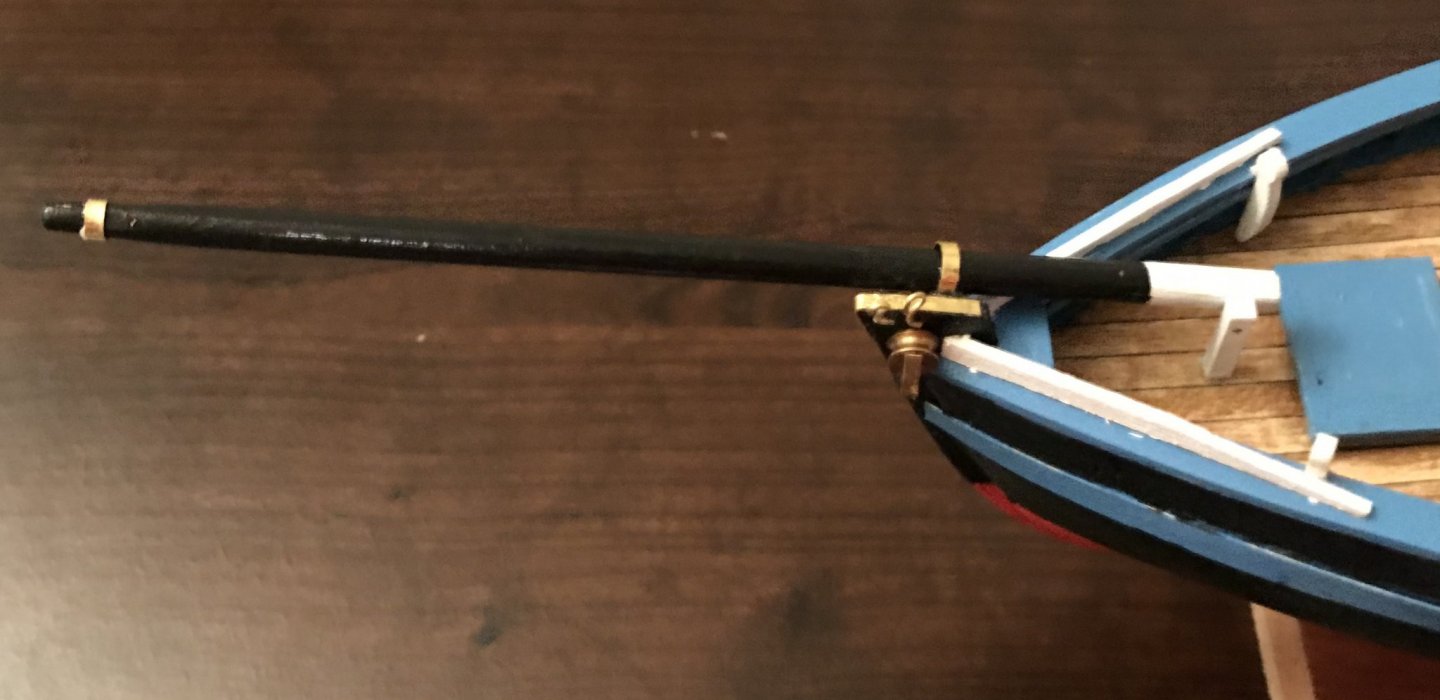
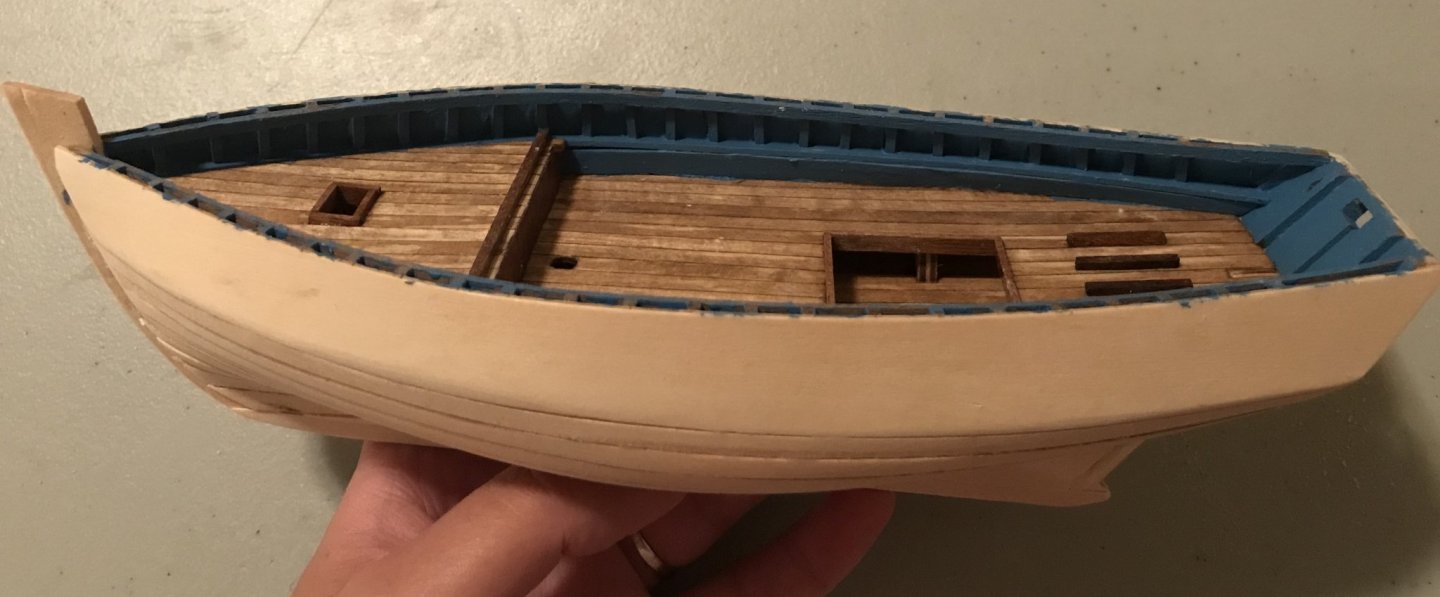
After a week of adding the various metal pieces and touching things up, I've just mounted the ship on its base! I still need to go over the hull with finish, but overall, I'm pretty pleased with how this first project is looking now. Certainly some imperfections, but I've learned a lot and I think I'm figuring out how to do the next project better. (Note: the mast and the mast brace haven't been glued in yet, so their angles are a little funky.) The rubbing strakes ended up being a real disaster for me. They are supposed to be made of 1.5x3 walnut. When I soaked them, the wood got kind of...fuzzy. Even after sanding, I couldn't get them to stay glued onto the hull and the paint didn't look very good. In the end, I cut off the original rubbing strakes and replaced the walnut strips with .6x5 basswood hull planking, since I had a few of those leftover. The three-dimensionality isn't there, but at least the distinctive blue stripe is! One of the issues I've faced is that I don't seem to have any tools that will allow me to punch a 1mm hole in a brass strip. There were a few spots were I should have done that, the most problematic of which was the support on the stempost. I ended up bending and trimming the two eyebolts so that I could glue them onto the side of the stempost, just above the pulley. Definitely not the prettiest solution, but I think it's probably reasonable given my limitations. Not a great photo and with some ugly looking glare on the bowsprit, but you can see the makeshift solution, at least. I've also been taking time this week to read up on rigging. For a beginner like me, Chapter 3 of Frank Mastini's Ship Modeling Simplified has been the best resource that I've found. The diagrams are very helpful and the explanations clearer than I've seen elsewhere (so far at least). I'm still really intimidated by the rigging, but have managed to attach the first block to the mast. Only six more of those to go! (Three on the mast, two connecting the boom to the stempost, and one that goes...somewhere. It's on the parts list, but I can't for the life of me find it in the rigging diagrams!)

- 16 replies
-
- 3
-
-
- bon retour
- artesania latina
- (and 2 more)
-
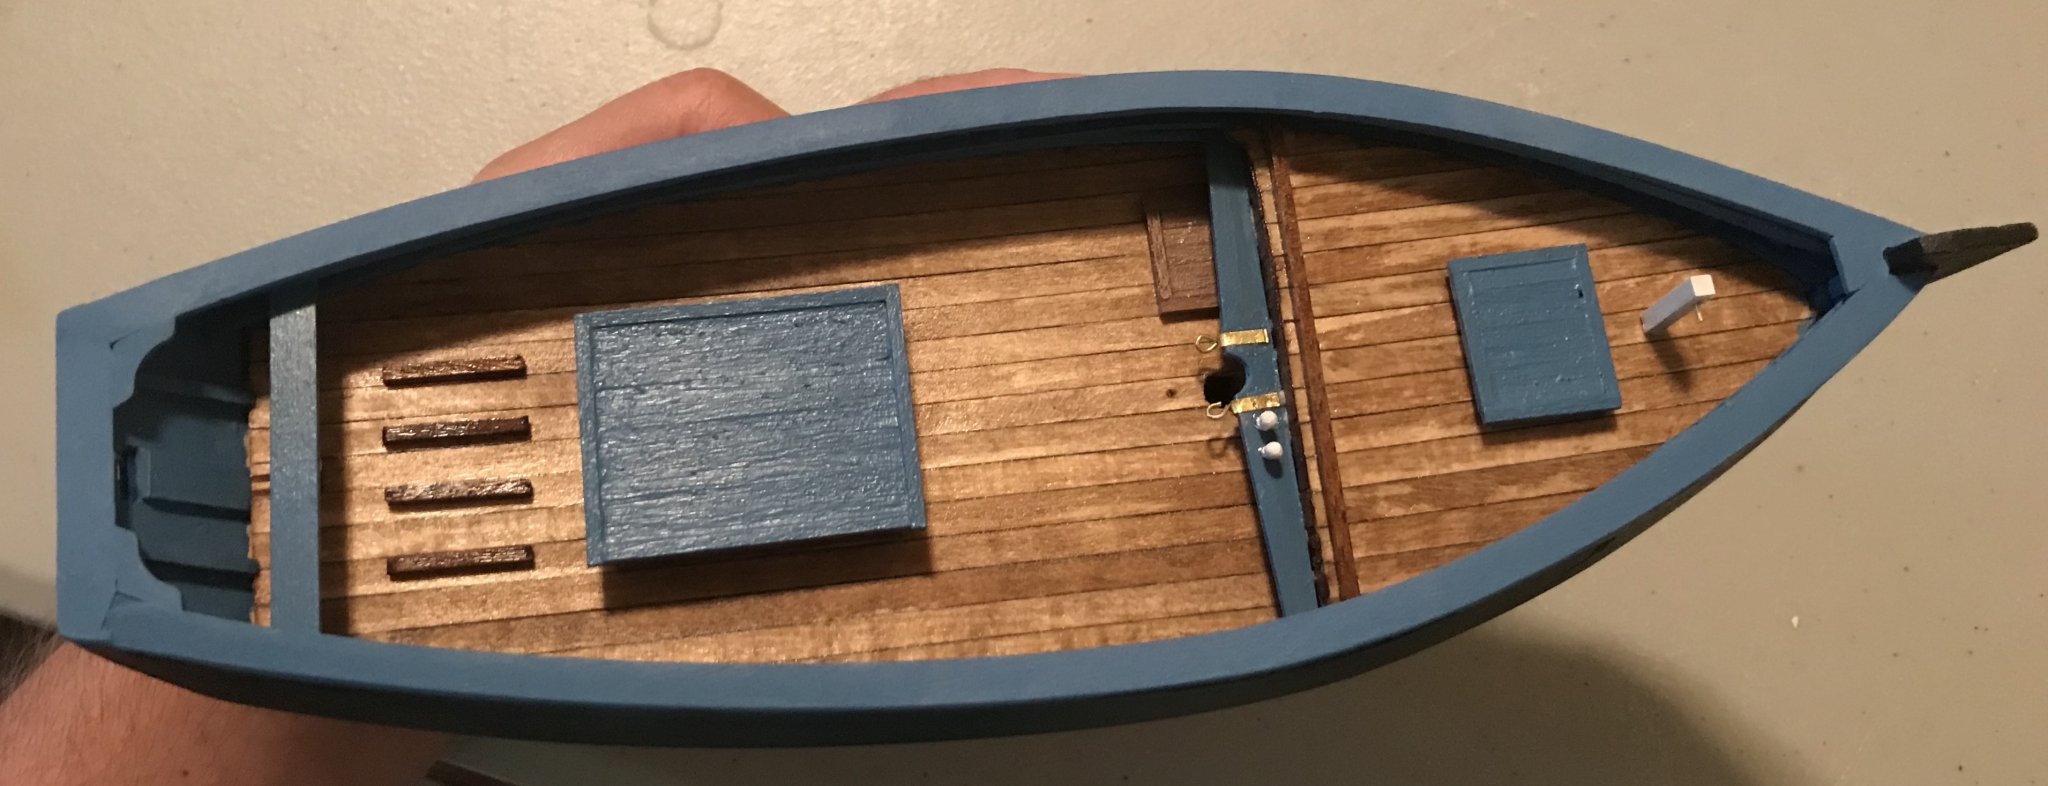
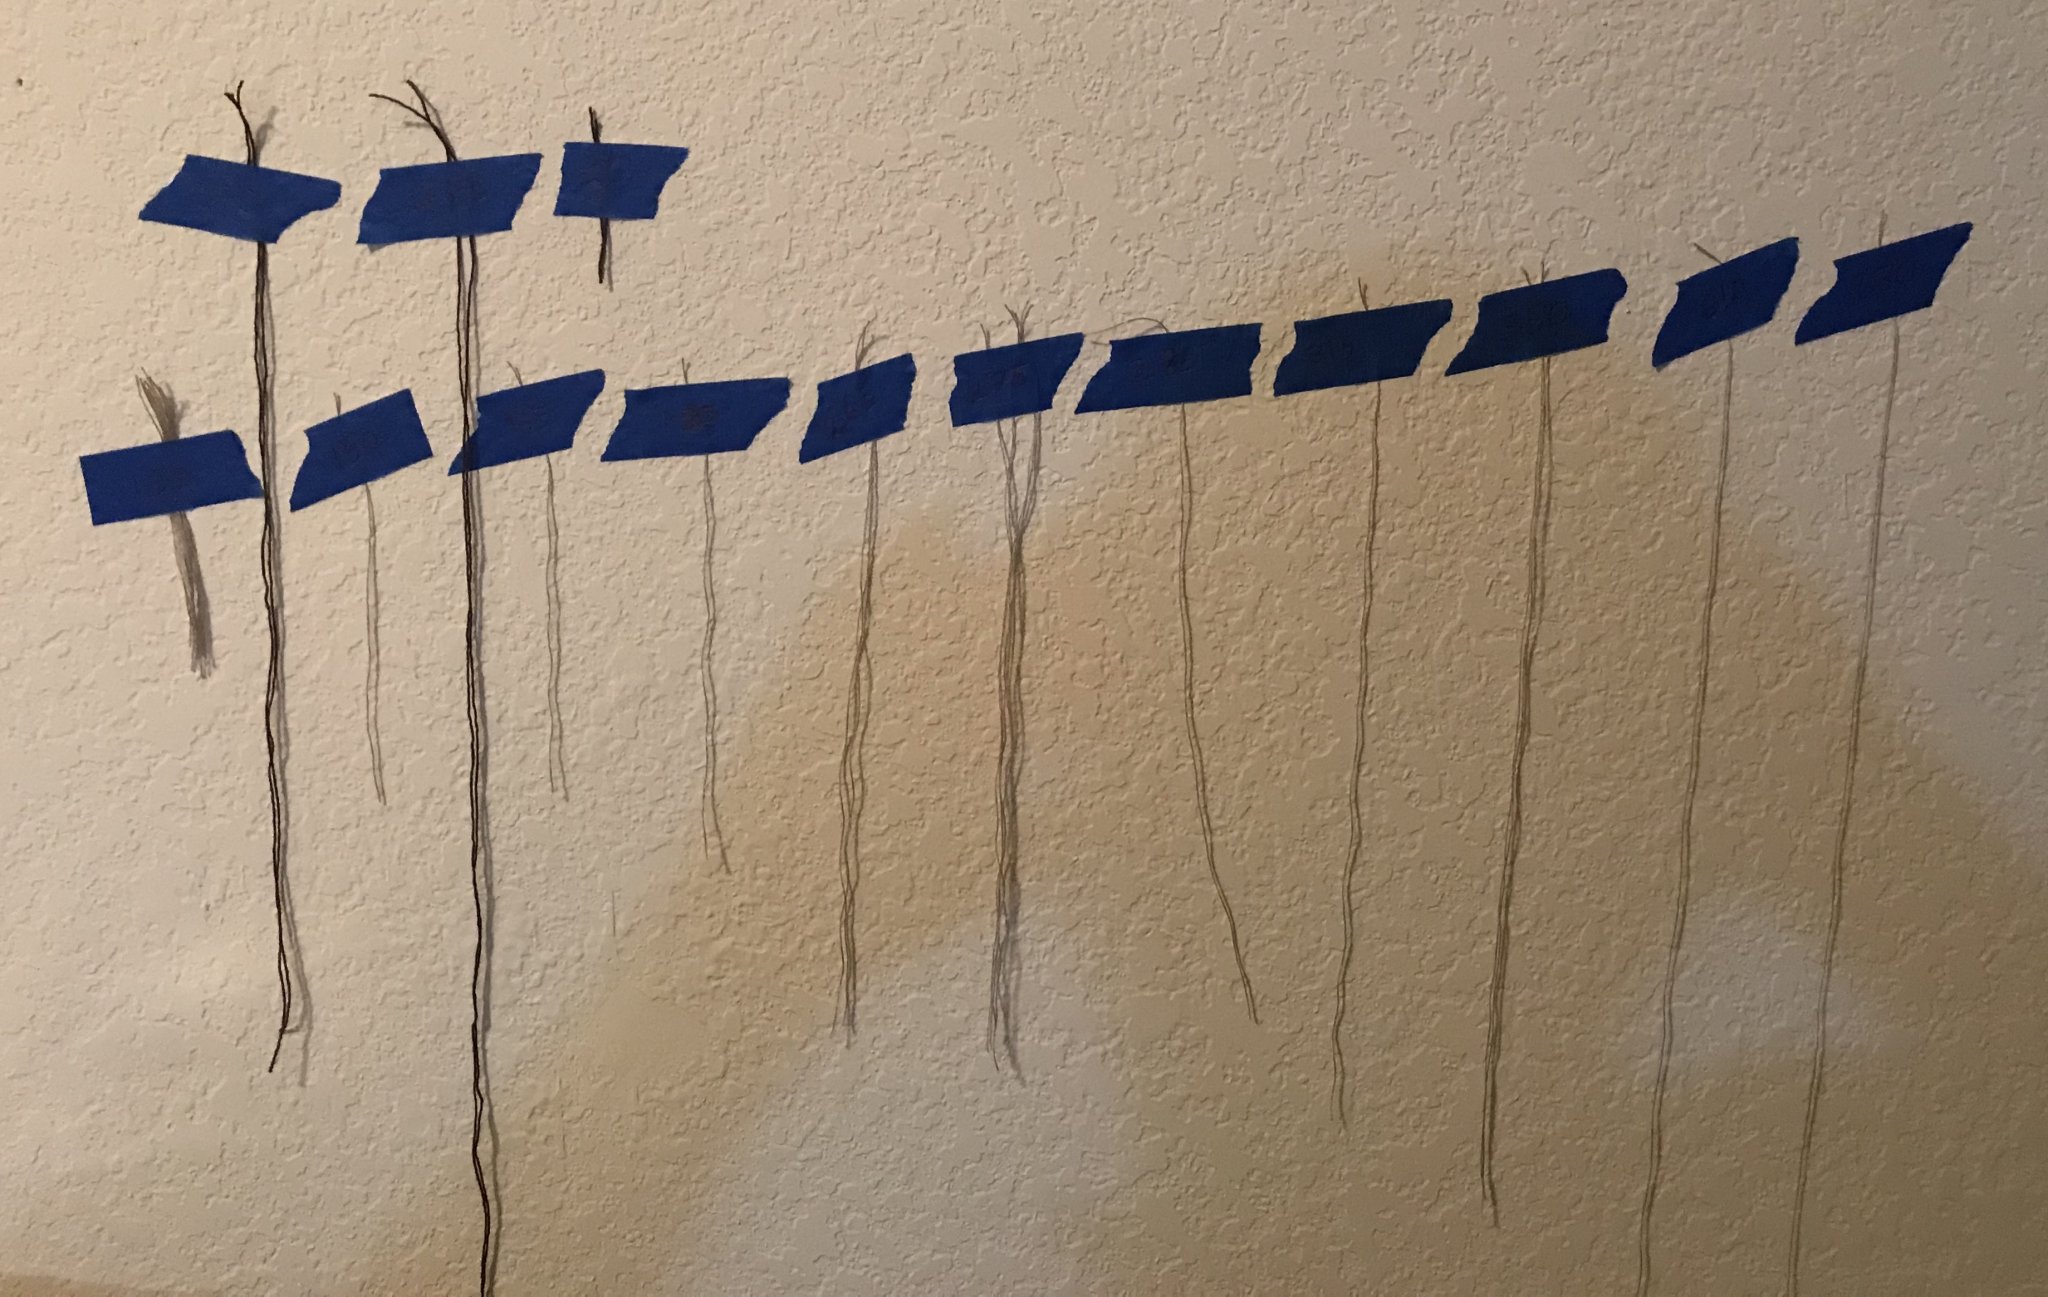
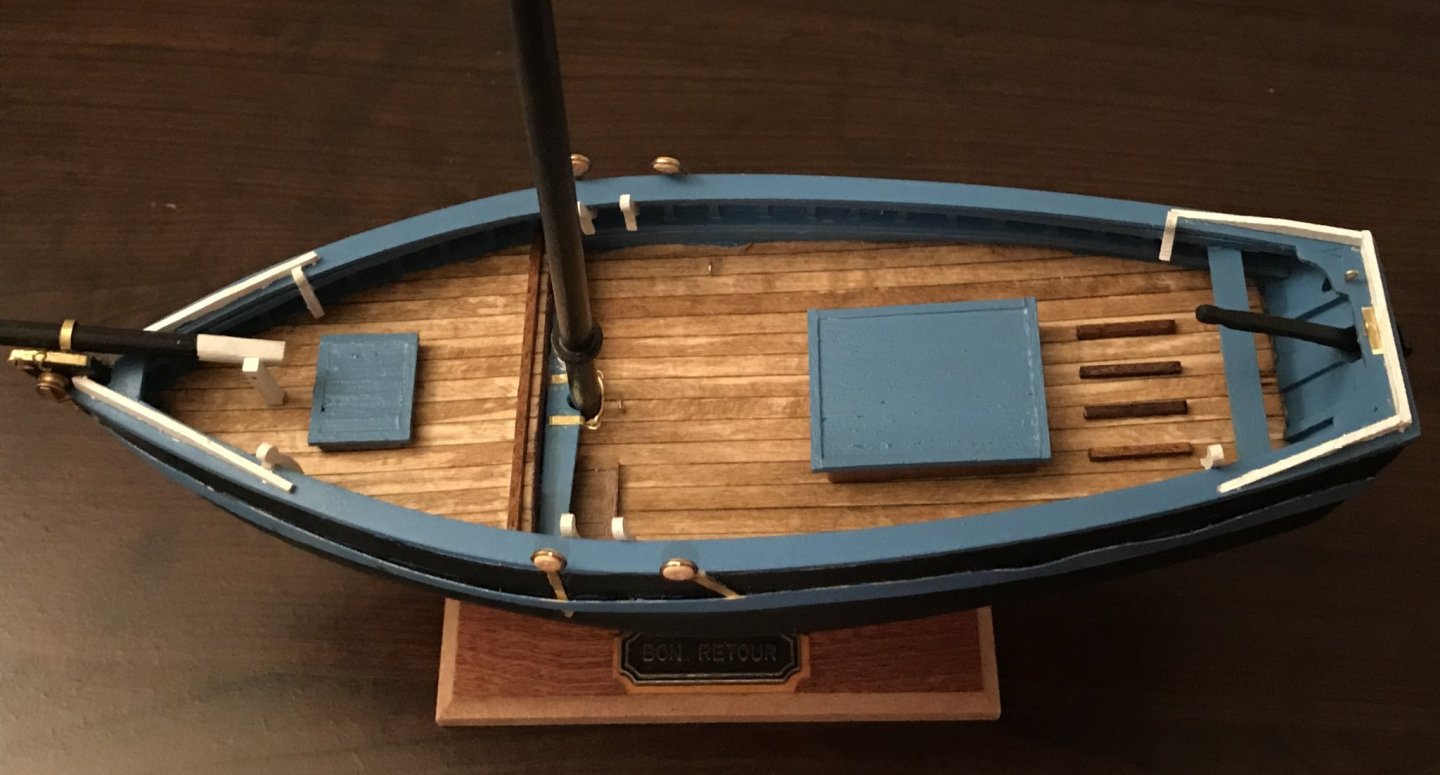
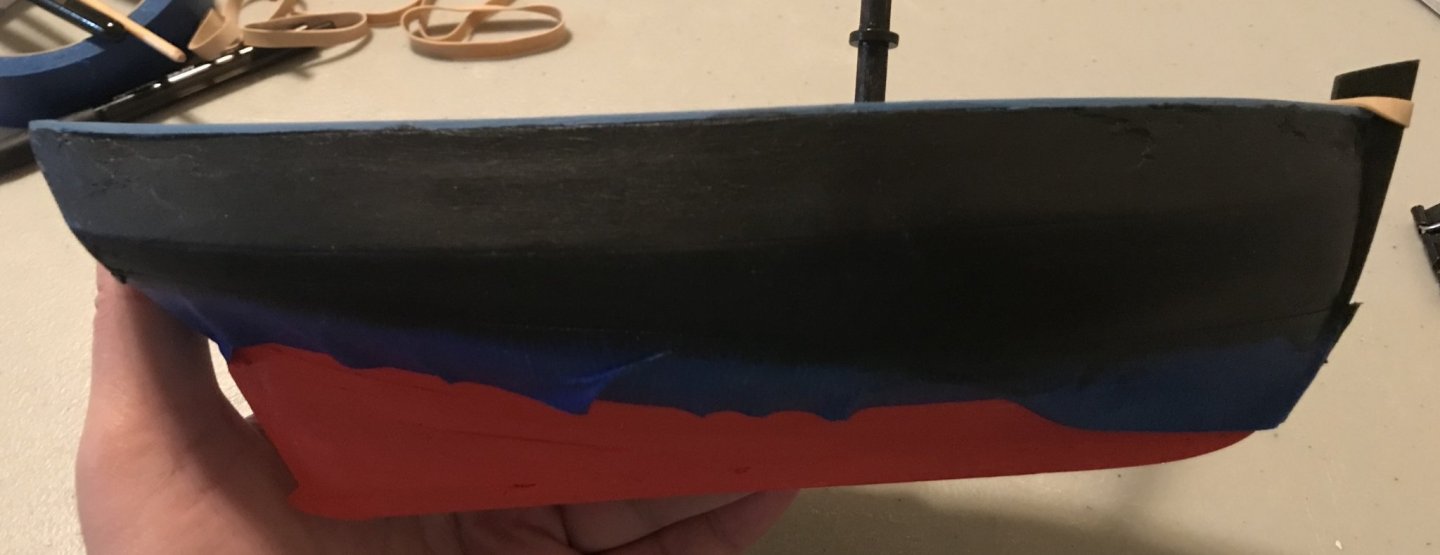
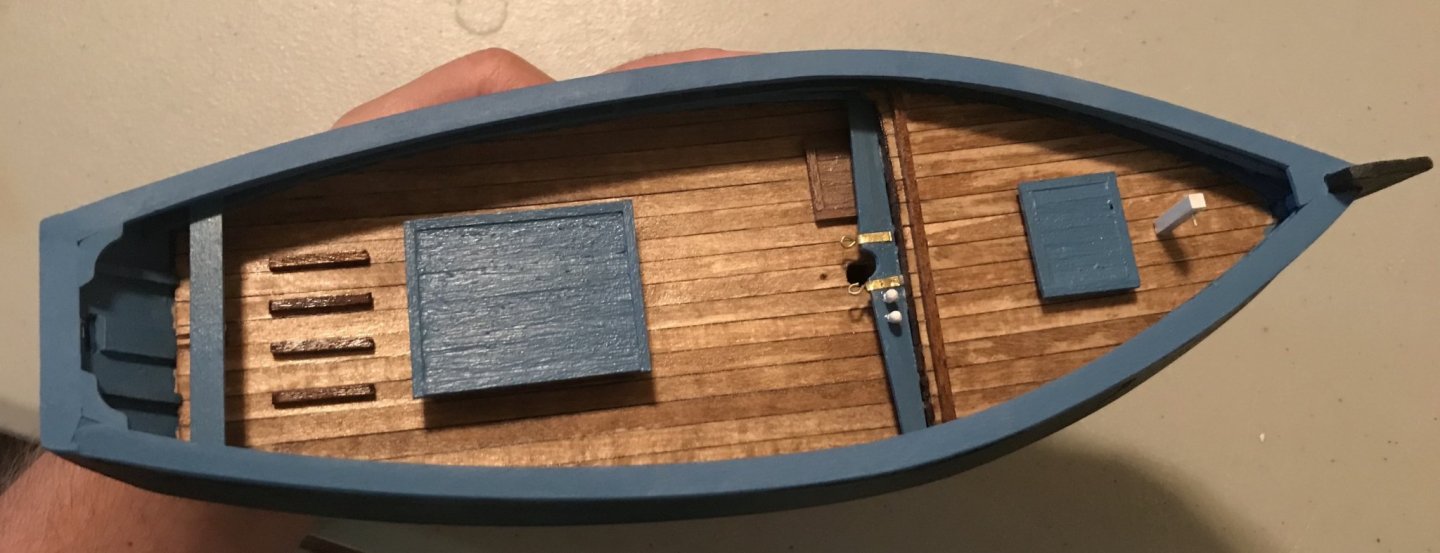
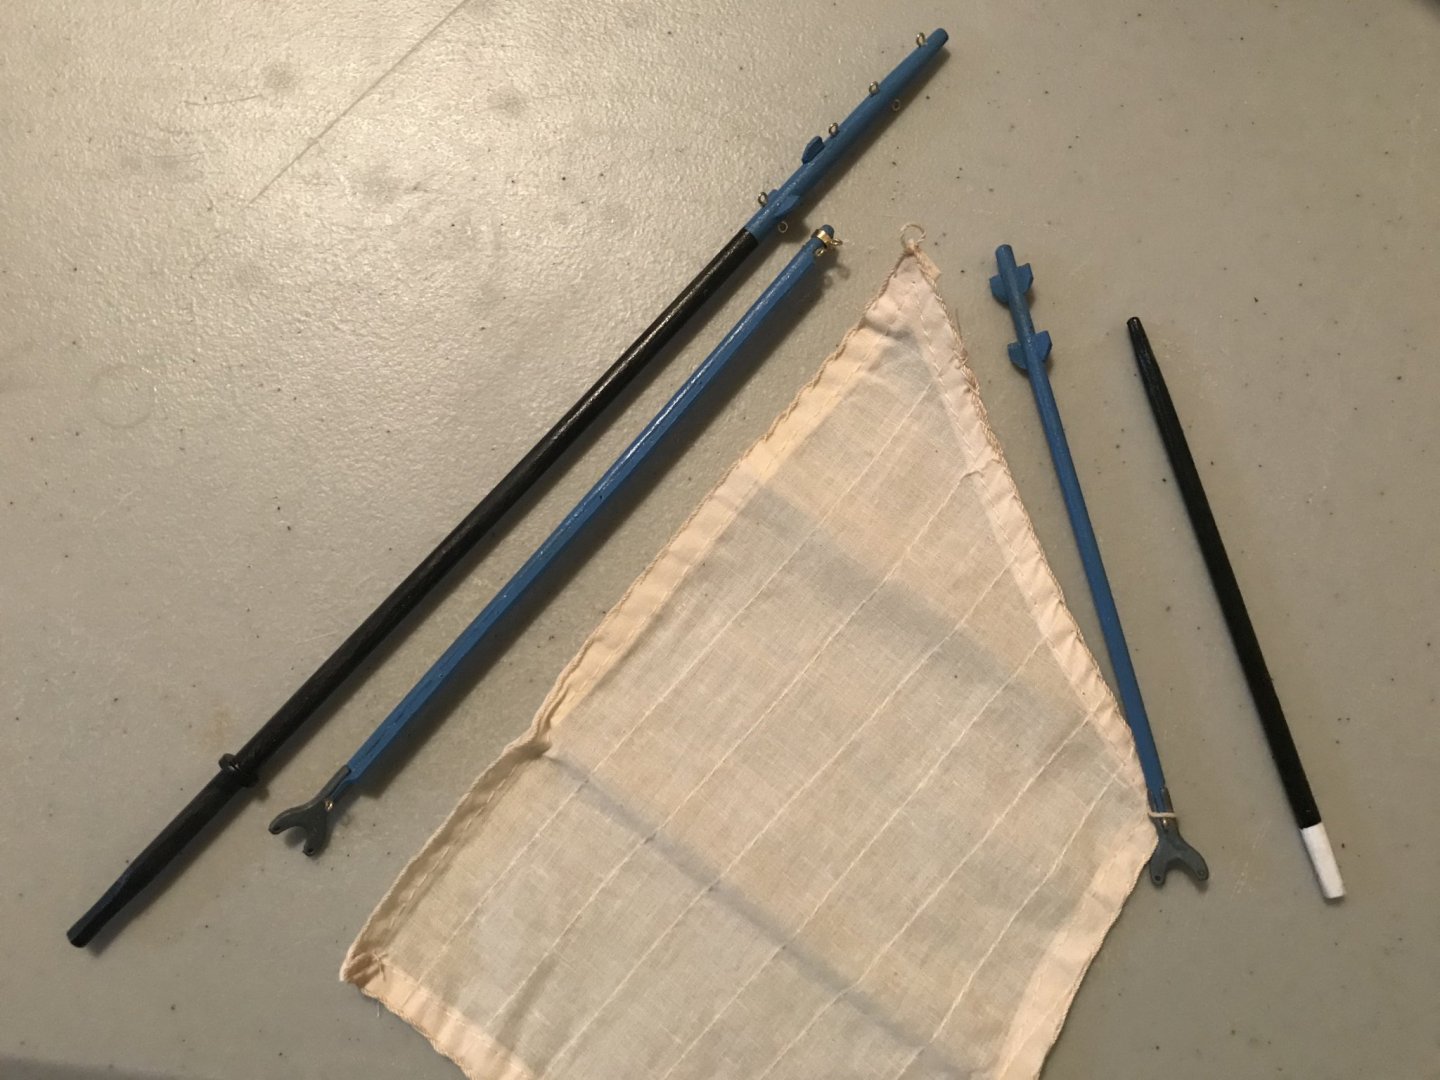
Some dramatic improvements since my last post! After the wood filler finally arrived, I cleaned up the hull, sanded like crazy, and am now almost done painting it. There's still some blue painter's tape on the hull, but once that's removed it'll just be red on the bottom, then black, then a blue gunwale. (Note: The mast is in the boat in this picture only because I was using it and a rubber band to help hold the mastrack in place while the glue dried. That has not yet been installed.) While waiting to apply the last coat of black paint, I decided to attach all of the bits on the deck. This includes (from front to back): the knightbridge, the forward hatch cover, the mastrack, the midships hatch cover, the main deck hatch cover, and the helmsman's bench. There are still a few pieces to finish painting—the rubbing strakes, 8 cleats, and the trim on both the prow and stern—but the end of this stage is in sight! In between everything, I've also finished up the mast, boom, gaff, and bowsprit (though this last one still needs a metal ring and a metal band on it). The main sail is attached to the gaff out of necessity, since the loop in the corner of the sail is too small to go over the cleats and the claw. Finally, after reading about the effects of the thread being wound so tightly around the spool, I cut the various pieces of rigging and taped them to the wall, in hopes that I could get them to straighten out a bit more. They are sorted here by type of thread (.15 or .5mm) and length. Not sure how much effect it's having yet (though there is definitely some!), but maybe if I steam them a little?

- 16 replies
-
- 2
-
-
- bon retour
- artesania latina
- (and 2 more)
-
This post is dedicated to the gunwales. As Invictaag and Philthy both noted in their build logs, these pieces just don't fit well in this kit. I've noticed throughout my work that all of the pre-cut pieces are cut generously, so that everything has to be sanded down to fit. Much better than the other way, right? In the case of the gunwales...they just aren't the right size. Some of the poor fit is certainly my fault, but I just can't believe I was *that* far off. So, for anybody else doing this kit, here's what I did: First, I trimmed the bits that attach to the stempost at the front. They are cut in such a way that the two side gunwales fit together beautifully with the stern gunwale—but that doesn't account for the stempost, which is about 4mm. So, I trimmed and sanded off about 2mm at the front ends. Second, the curvature of the side gunwales is too generous. After some experimentation, I ended up soaking the side gunwales for a couple of hours, then pinning them into position on the bulwarks. Because of the curve, I think I used a dozen clothes pins on each side. I left that overnight. The next day, I tried dry fitting them to the boat with the stern piece. No dice...the stern piece was several millimeters oversize in all directions. So, in the end, I glued the side gunwales into place, using a few rubber bands for downward pressure and about ten clothes pins on each side to keep the alignment right. I then left that overnight. Today, I started trimming and sanding the stern piece until it fit. I think I took about 3mm off each side and moved the angles (where it connects with the side gunwales) in by about 2mm. Glued it in place and I'm pretty happy with the fit, though I still need to sand things down and clean up the edges (note that the sides still overhang by quite a bit). The stern square stiffeners fit well, so I think my work on the back end is good enough. The bow stiffener, however, needed a lot of sanding to fit correctly. (There's still a bit of a gap, but I'll take the blame for that and will use some wood filler to cover it up.) Adding the gunwales really transformed the boat and made me feel pretty good about how things are going! If anybody has tips on adding eyebolts to the mast, boom, etc....I'm all ears! I need to do that soon and am a bit intimidated by the prospect.
- 16 replies
-
- 2
-
-
- bon retour
- artesania latina
- (and 2 more)
-
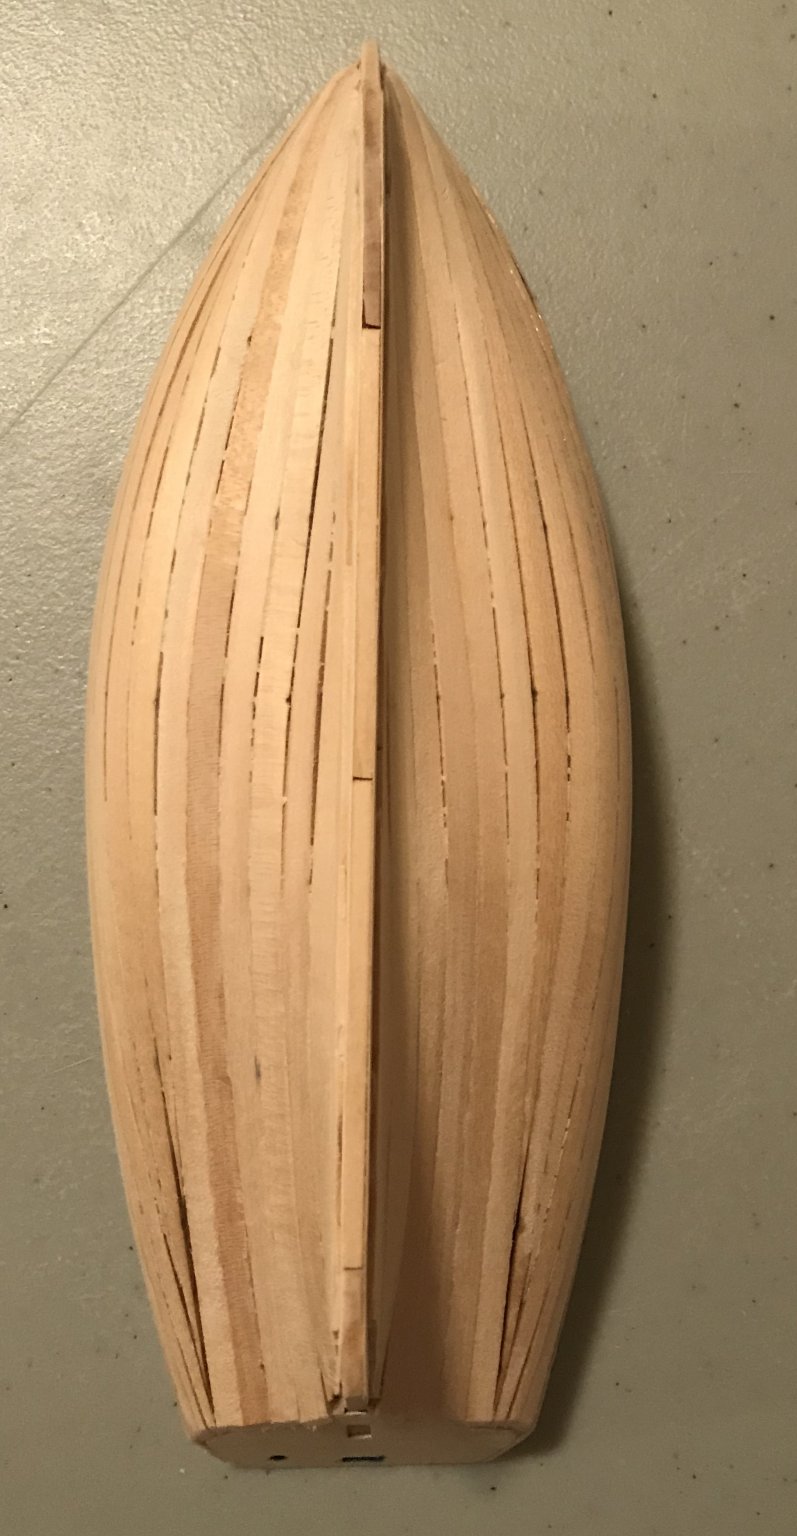
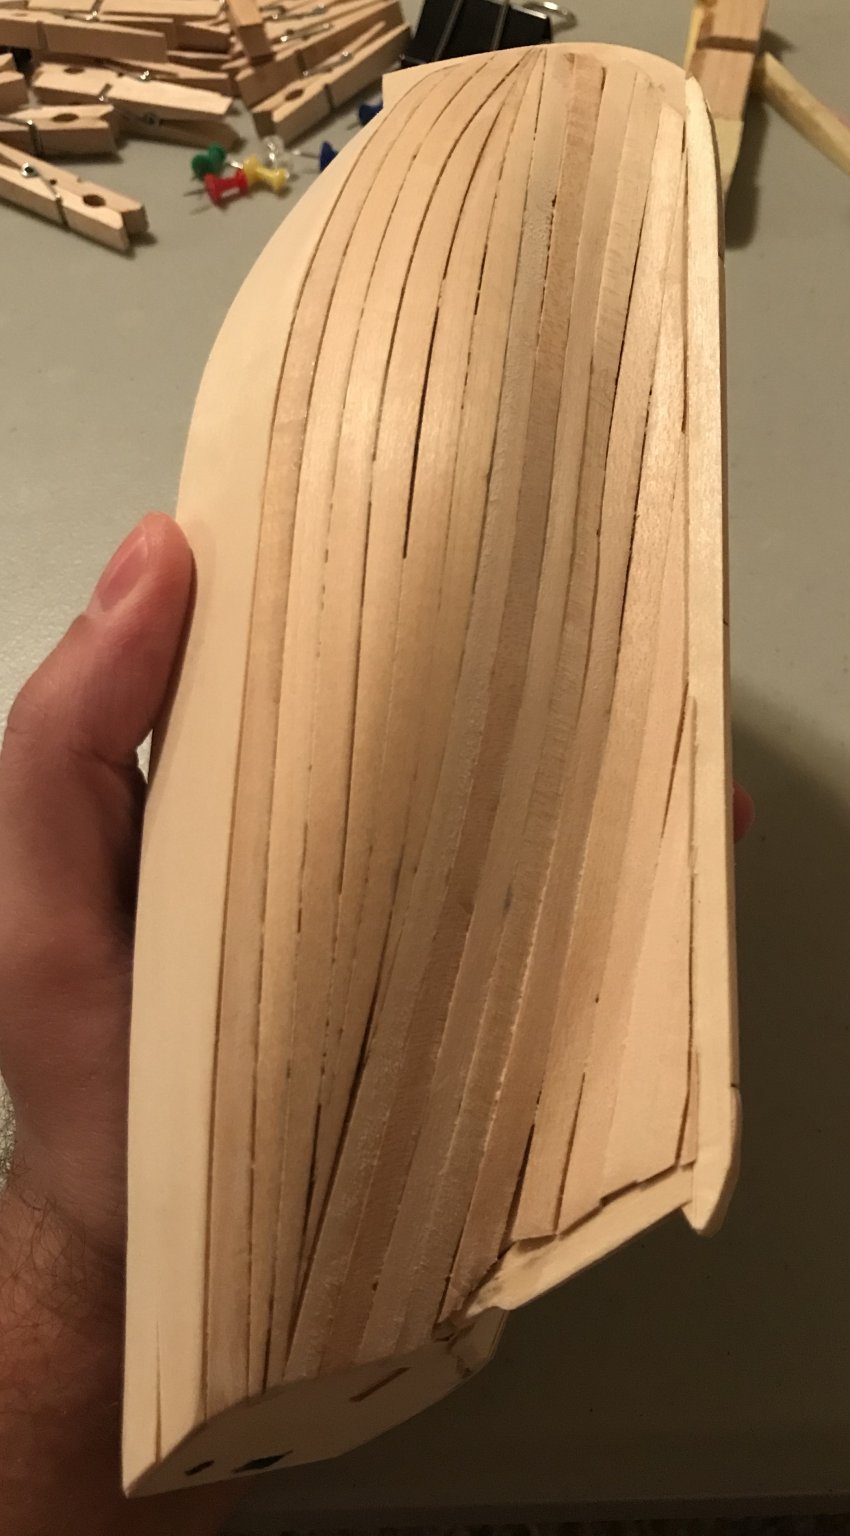
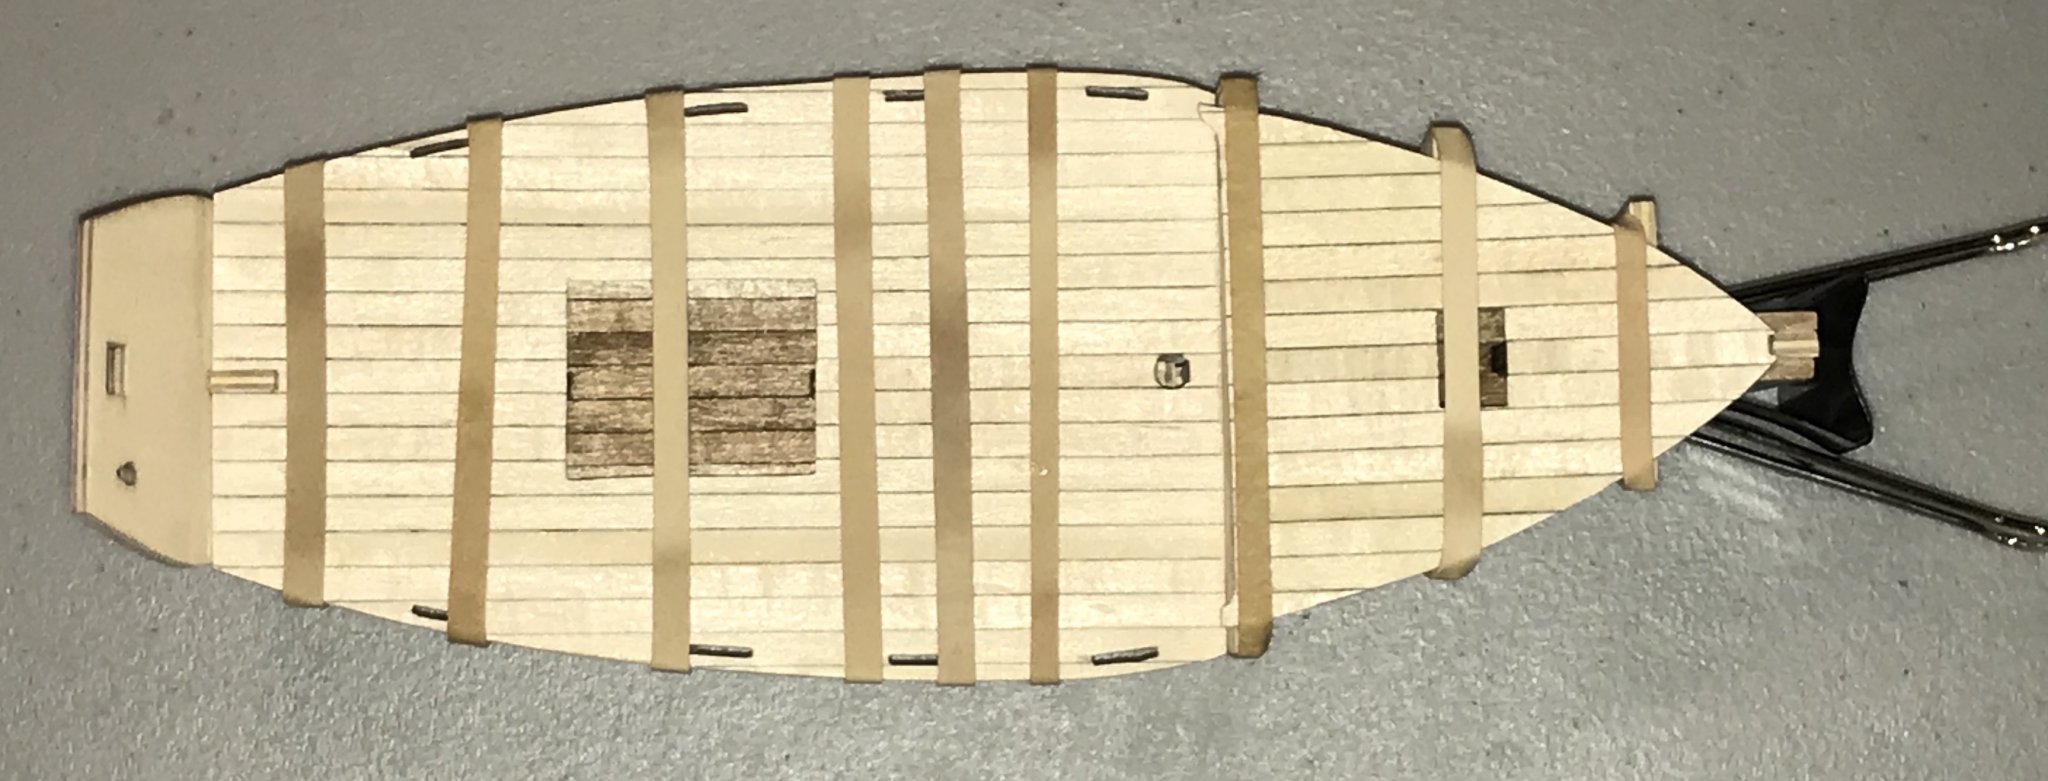
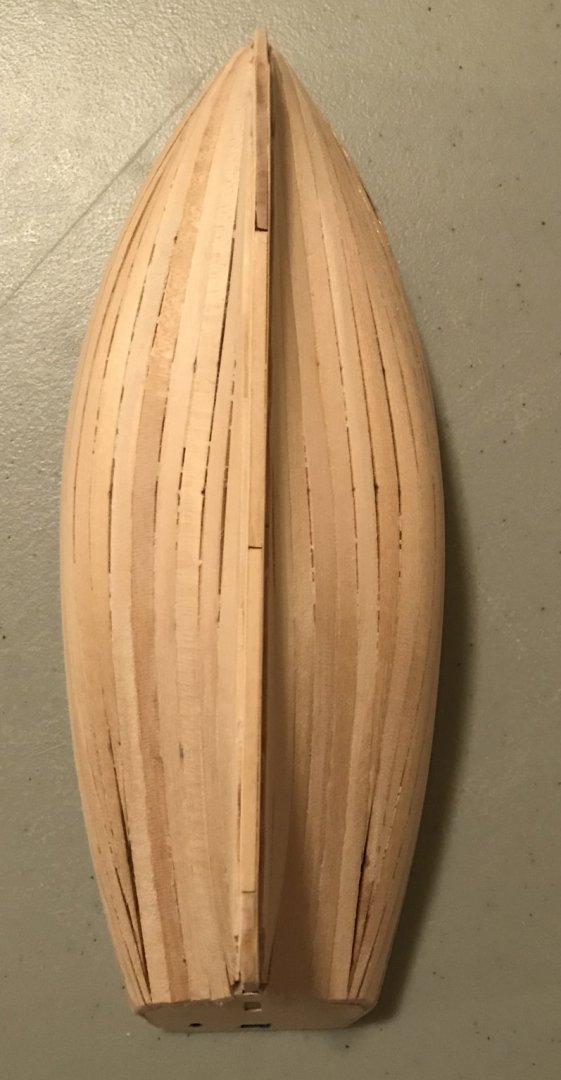
Since my last post, almost a week ago, I've been making steady progress on the hull. And at lunchtime today, the climax—I've finished planking the hull! Bearing in mind that it's my first build, I'm pretty happy with how it's turned out so far. However, the two sides are not perfectly aligned and there are some significant gaps. I have an order in or wood filler, so will finish cleaning up the hull once that arrives. The first three photos show different angles of the hull. The stern will be planked, too, so the imperfections there will soon be covered up. I've also taken opportunities in downtimes to work on some painting and some of the smaller bits. The fourth photo shows the deck, coamings, inner bulwarks, and futtocks. The gunwales will be added on top, which is why the paint on top looks a little sloppy. It was tough getting into the nooks and crannies, but I also tried to get as little paint on top as possible. The fifth photo shows (from left to right): the knightbridge, the pump, the helmsman's bench, the mast rack, and the rudder; the boom is across the bottom, with a jackstay on top and a metal band stiffener at the tip. With the glare of the flash and the zoom, those pieces look much better in real life! For the paint scheme, I've been regularly consulting the Facebook page for the Dizro Mad (the ship's actual name, which is in Breton; Bon Retour is the French translation). They have a lot of great shots of the boat in action! The group that owns the boat has just formed an association that will hopefully help speed up their restoration efforts, too.


- 16 replies
-
- 2
-
-
- bon retour
- artesania latina
- (and 2 more)
-
After some massive frustrations with planking the hull, I stumbled on the "Simple Hull Planking Techniques for Beginners" document put together by Dirk De Bakker, Greg Booker, and Dave Rogers. Wish I had found that sooner, but the link is here for other newbies who haven't found it. I made a couple of mistakes in the planking, which I'm crediting to poor instructions. For others doing this kit: 1. Follow De Bakker et al.'s advice to attach the keel pieces before planking; I'd even recommend doing that before the bulwarks on this kit, based on my issues with aligning those pieces. 2. The first two pre-shaped planks should be fitted with the pointy end by the stem post, rather than by aligning the butt end at the stern. Despite those early hiccups, the planking has moved forward steadily and smoothly and is generally looking better. I've soaking, shaping, and installing one plank per side at a time, with plenty of sanding afterward. Not completely smooth yet, but getting better. Definitely some gaps that will need wood filler. The kit comes with 10 pre-shaped hull planks, five for each side. The photo below shows my progress after installing the last of the pre-shaped planks. As a novice, these pre-shaped planks have been really helpful! I've also finished cutting all of the futtocks—48 for the sides and 2 for the stern! As with many things in this kit, the measurements are a bit generous, so there is a lot of work getting them down to the right size once they're in place. I installed them this morning and started sanding them down to match the bulwarks. They're still a bit long in the second photo, so I'll finish smoothing the side next time I work on the boat. (That gap between the inner bulwark and rail! Yikes! Every time I look at that, I have to remind myself that it's my first model ship and so it isn't going to be perfect!) Next steps: Install a garboard and finish planking the hull.
- 16 replies
-
- 3
-
-
- bon retour
- artesania latina
- (and 2 more)
-
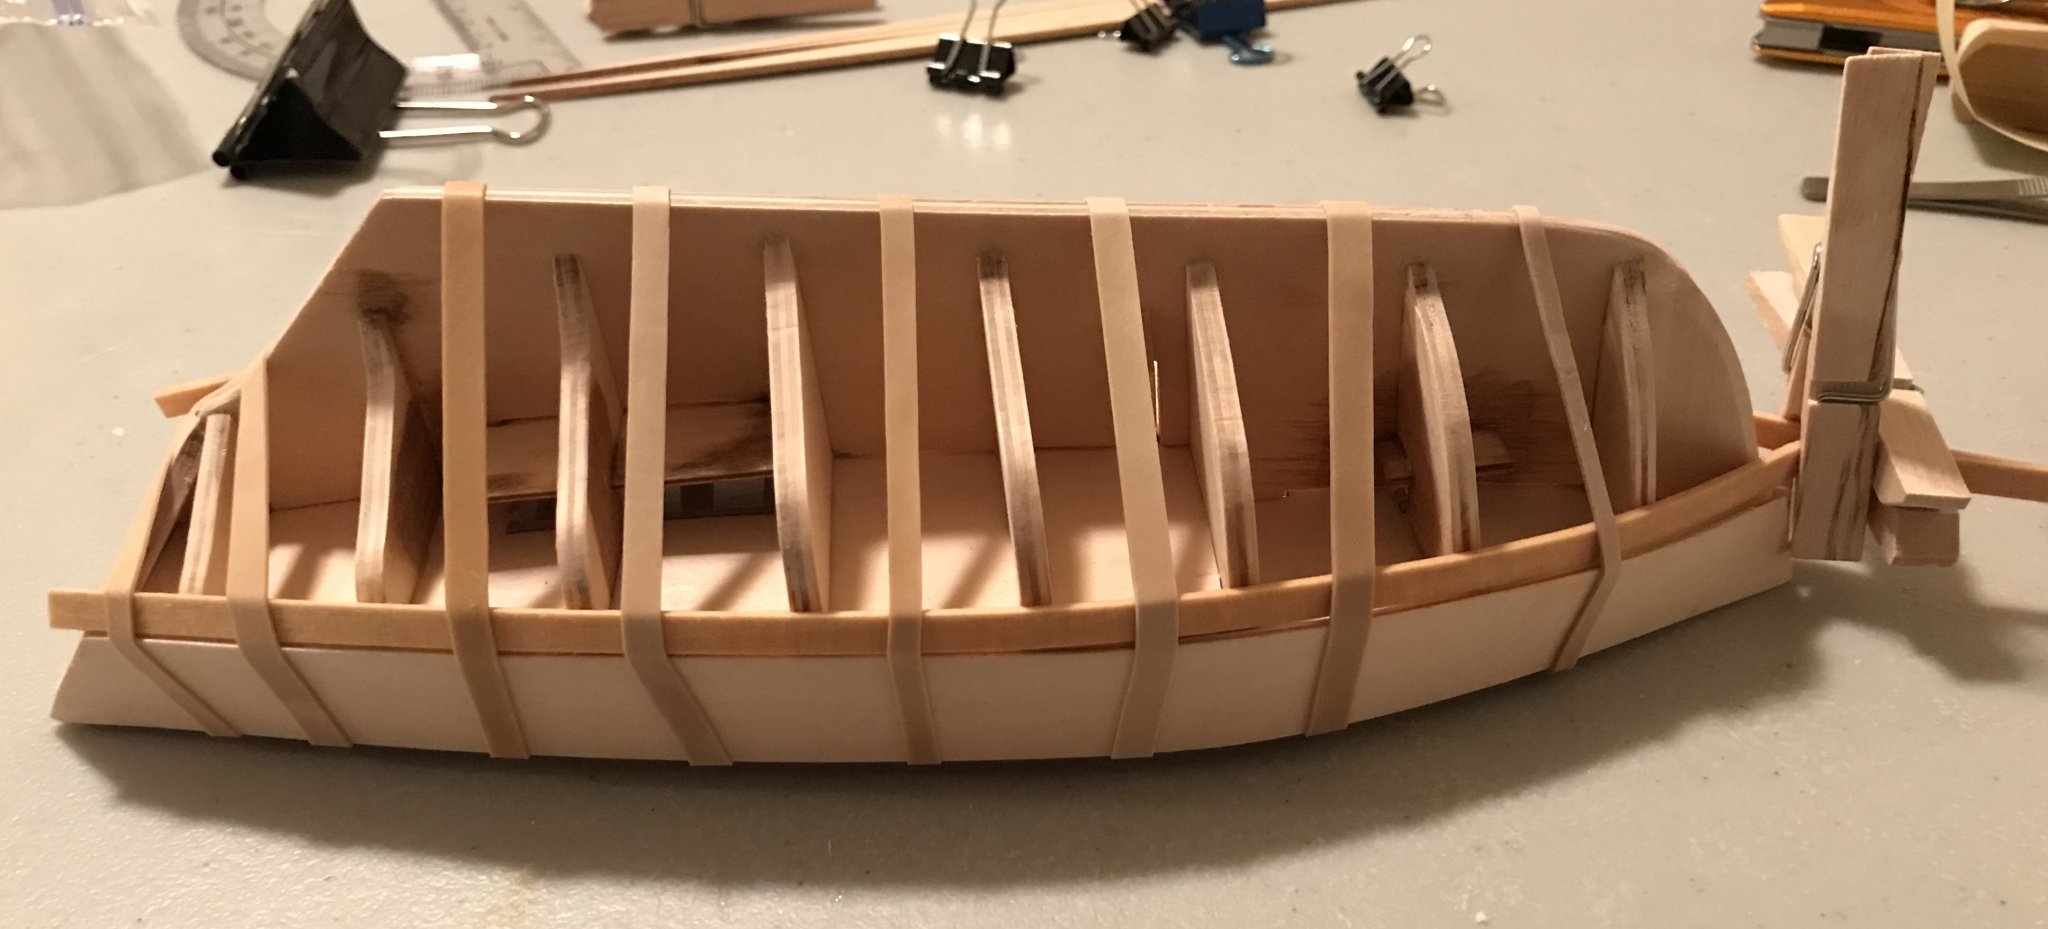
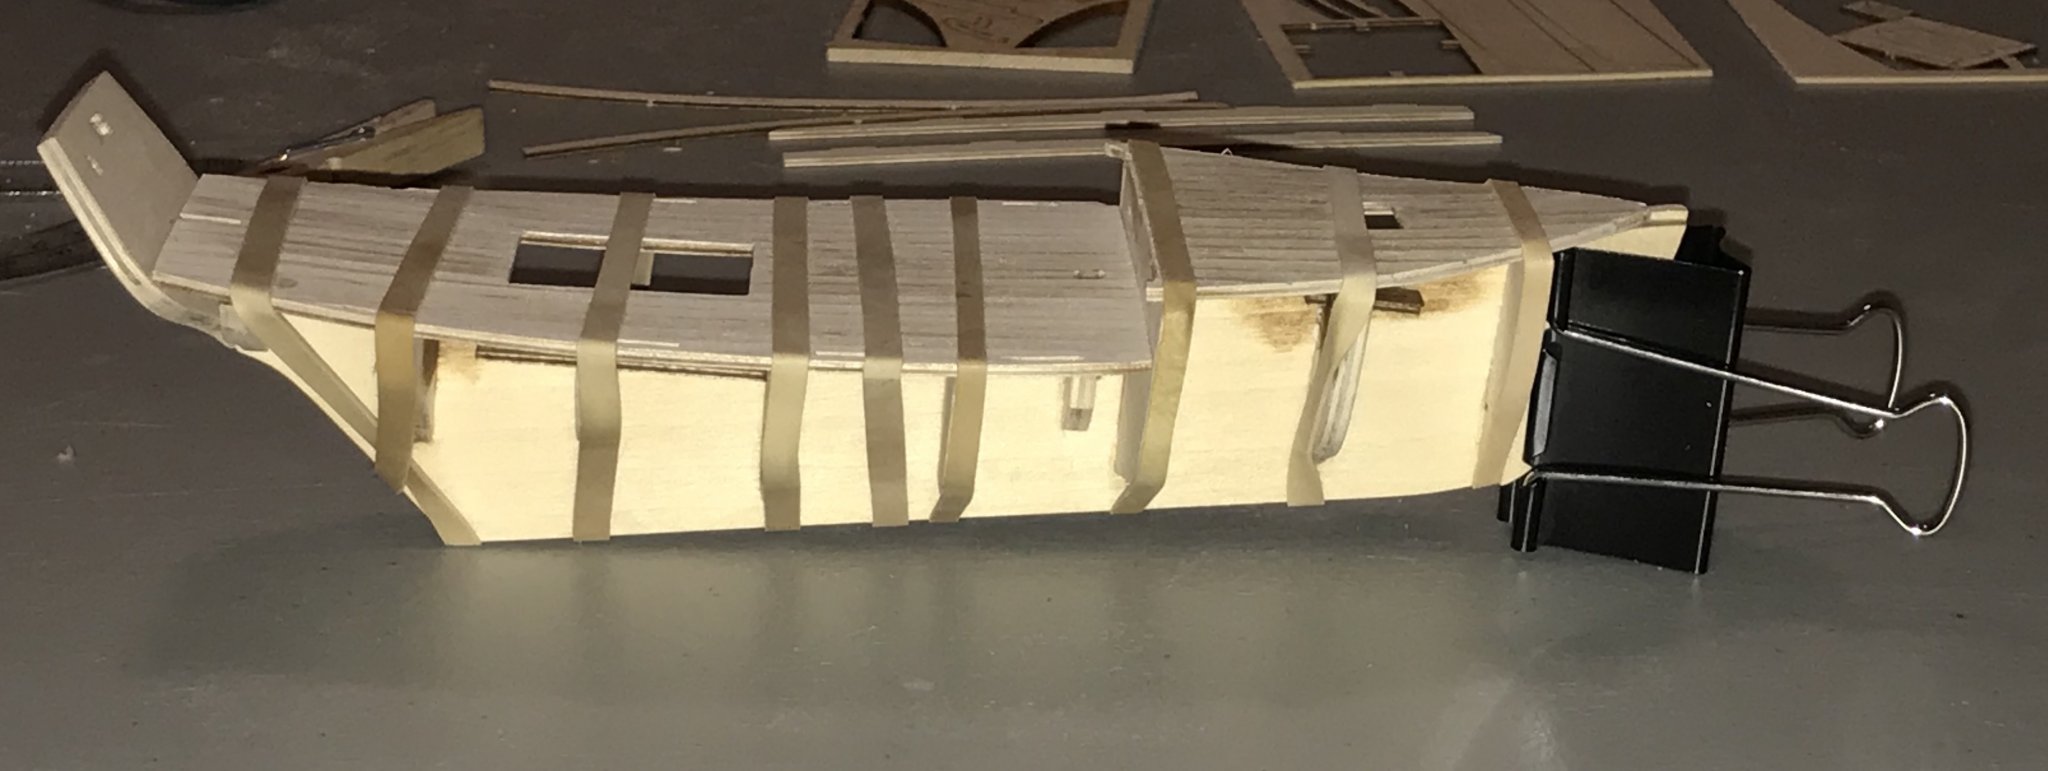
It's been a few days since I posted, since progress has really slowed. I've soaked, shaped, and glued the bulwarks. That was a frustrating process in a number of ways. Since this is my first ship, my tool selection remains pretty limited and I imagine that there are tools out there that would have helped—some kind of adjustable clamps, especially. The bulwarks on the Bon Retour are tricky to position, since they need curve both laterally and horizontally. They are cut with the horizontal curve in them, but getting the alignment in relation to the main and forward decks was not easy. With various combinations of rubber bands, binder clips, and clothespins, I got them mostly even—I think I can sand the left side down to match the right, but I'm also going to be keeping an eye on the hull planks. While waiting on the bulwarks, I took care of a few other details in preparation for future steps. I shaped the mast, boom, and gaff, then glued together the rudder and rudder stiffeners. I installed the coamings on the two hatches. And I installed the interior stern support and futtocks. After the bulwarks were finished, I soaked the first two hull planks, which I'm leaving overnight to take on their shape. Next steps: glue on the first two hull planks then soak and shape the first two pre-shaped planks on either side. (The kit comes with eight pre-shaped hull planks.) I also have 48 futtocks to cut; these will eventually be placed between the bulwark rail and the gunwales.

- 16 replies
-
- 2
-
-
- bon retour
- artesania latina
- (and 2 more)
-
My son climbed into bed with us last night and woke me up about 4am. Since I couldn't seem to fall asleep, I made my way to the basement and got an early start on the Bon Retour. I cleaned up the hatch covers that I'd assembled yesterday, then I started sanding the frame pieces and bow strengtheners in preparation for planking the hull. A quiet day, so I was able to spend a lot of time working on that sanding. Once I was satisfied with that, I soaked the remaining two bulwark pieces in preparation for shaping them. Since these will be visible on my boat, I didn't want to pin them into place. Silly me, I thought I could hold them both in place using a rubber band. I just couldn't get everything in place, so put one bulwark on a towel to dry until tomorrow (I'll soak it again then). After a re-read of the relevant post in Invictaag's build log I opted for a similar solution. I made some modified binder clips: I popped the metal loops out of small clips, then fit them inside medium ones. I clipped four of those along the side of the bulwark to hold it in place. Then, I wrapped a short rubber band around the back end of the bulwark to keep it tight against the stern. Finally, after some experimentation, I jury-rigged a way to use a rubber band to hold the front end of the bulwark to keep it tight against the bow. The final jury-rig: a clothespin standing inside the fore deck hatch (a perfect sized hole for that!) to relieve the tension on the top of the bulwark and keep it from curving inward, and a large binder clip pinned onto the opposite inner bulwark near the midpoint to keep the tension on everything. The photos are of the jury-rig, just in case it's helpful for anybody.
- 16 replies
-
- 2
-
-
- bon retour
- artesania latina
- (and 2 more)
-
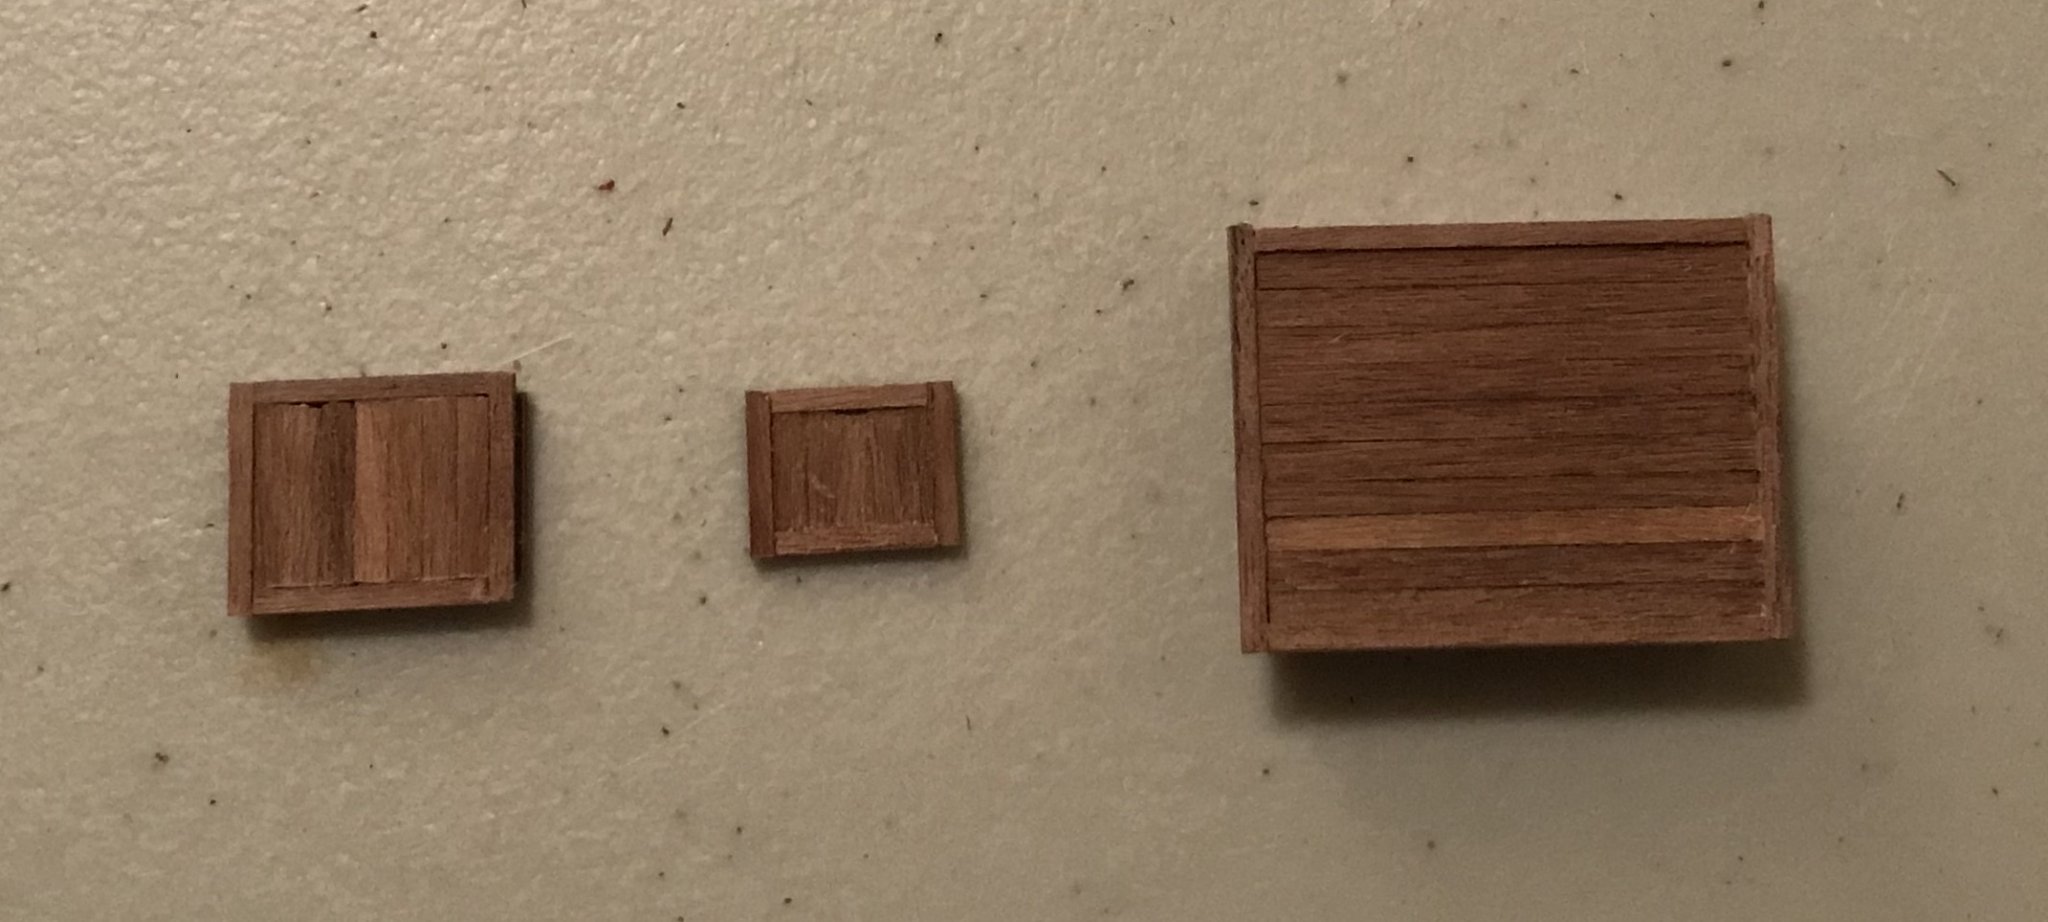
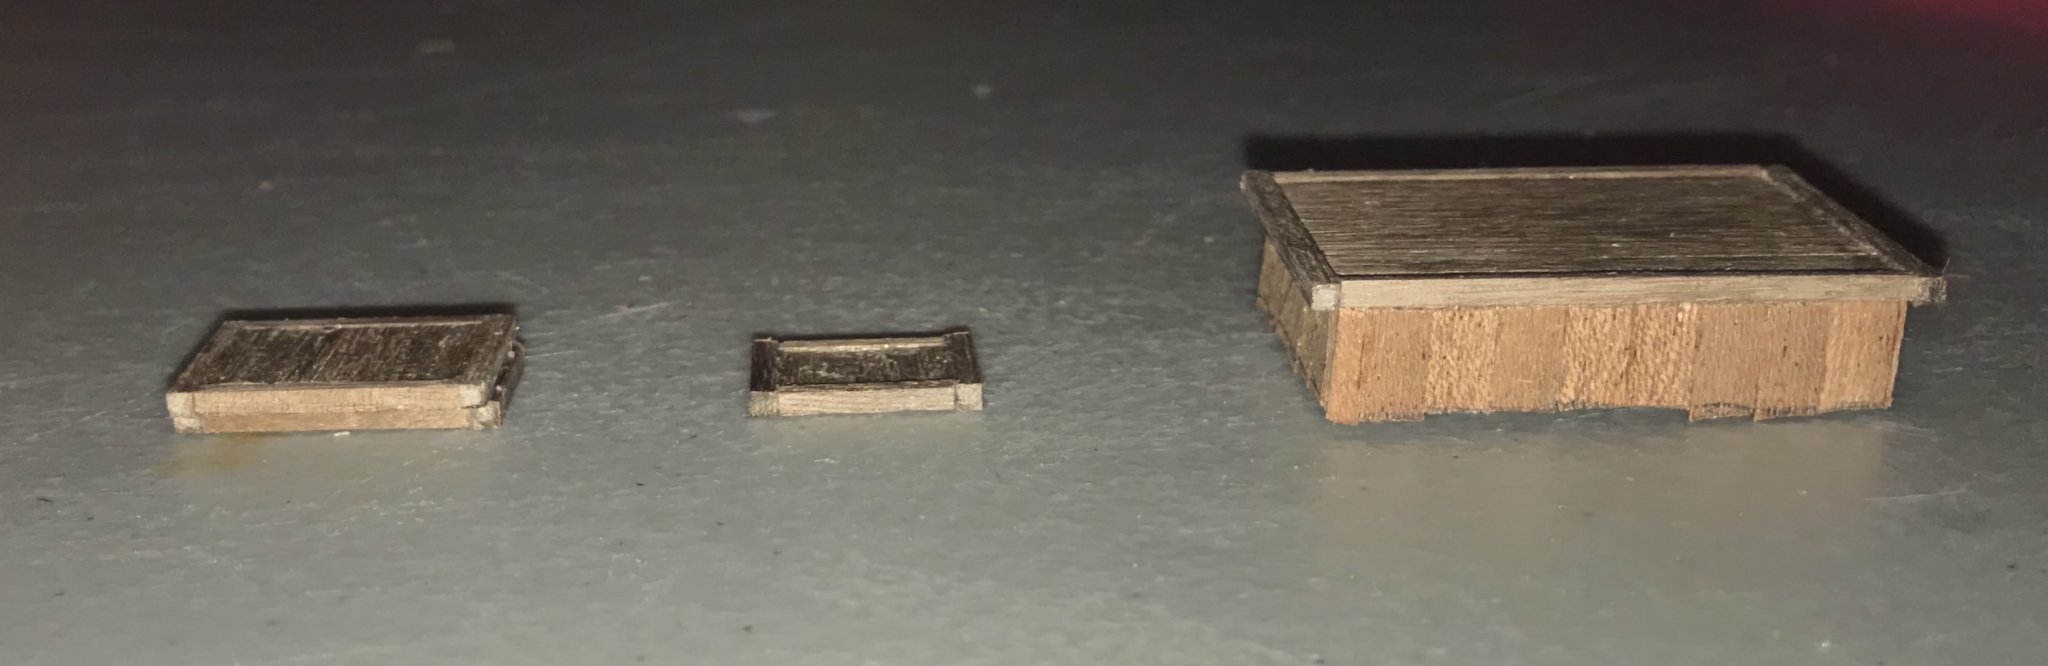
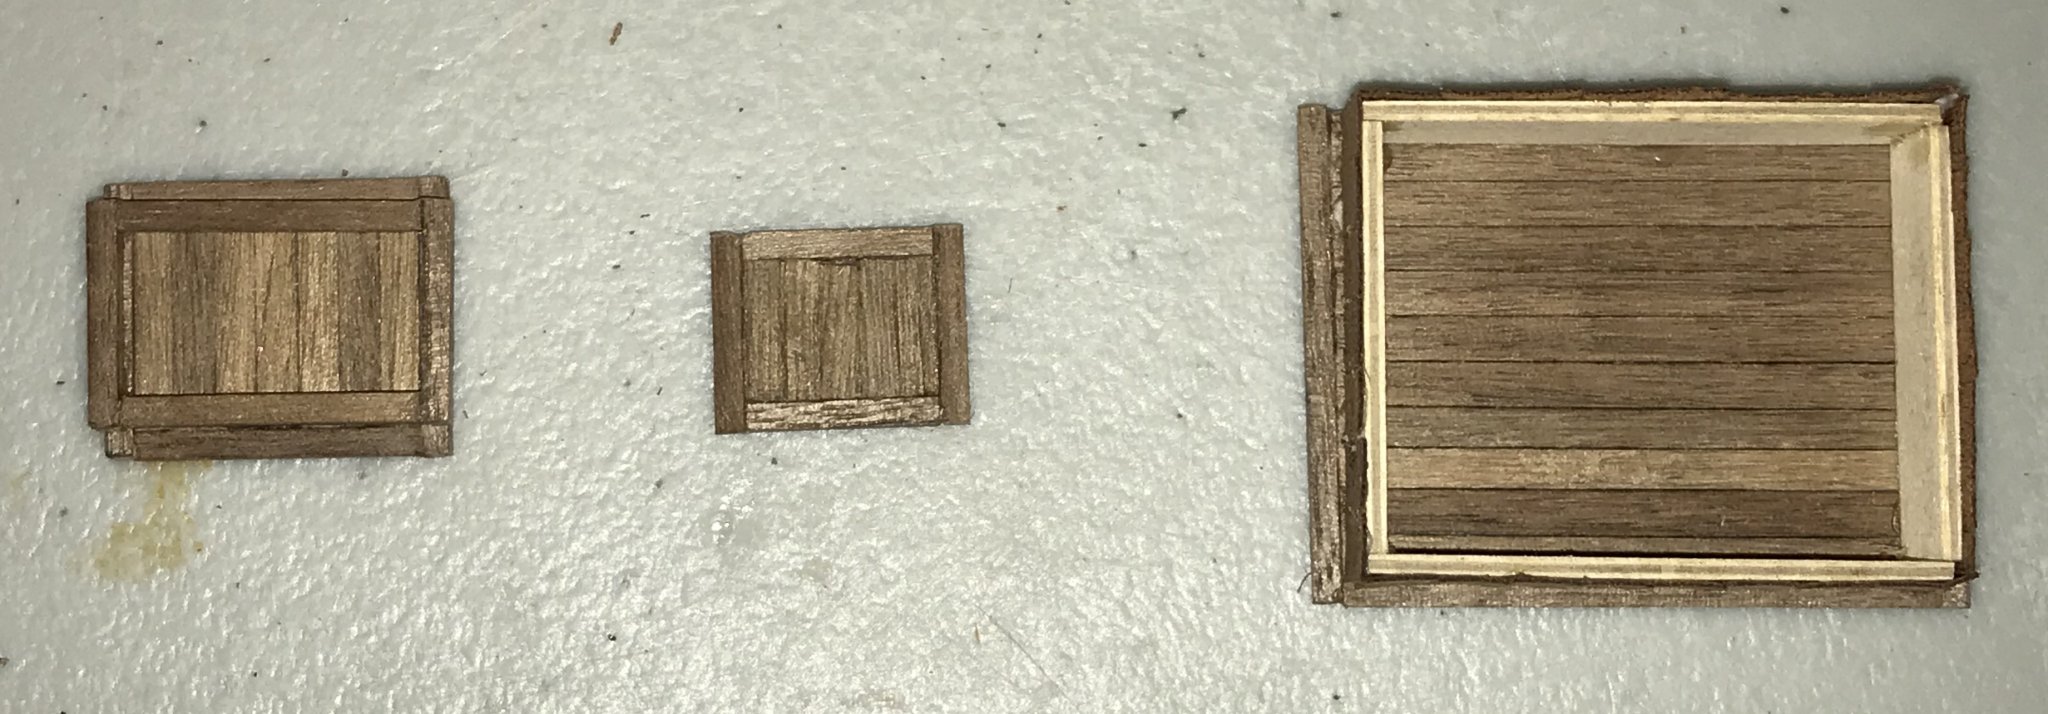
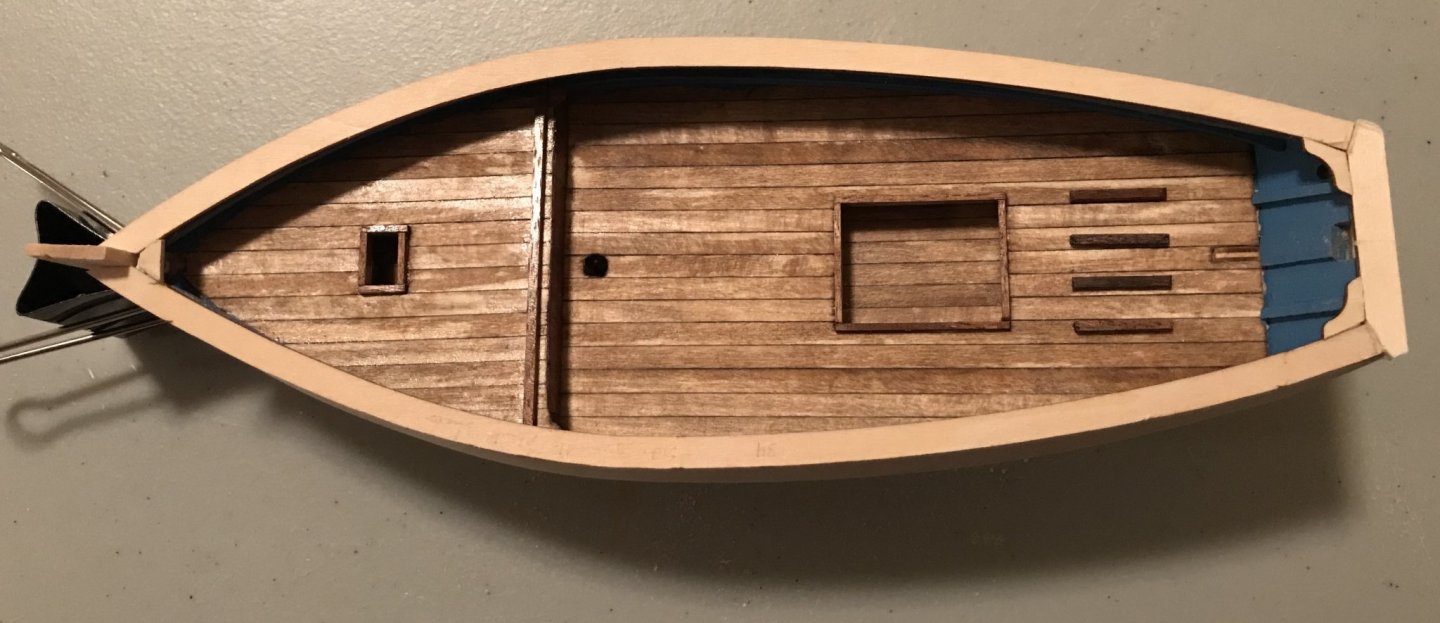
Still leaving the clips on the inner bulwarks to ensure that they stay put, so last night and today I decided to look ahead at some of the deck features. I keep reading that Artesania Latina is notorious for inadequate directions. That is definitely the case here. Photos 19 through 25 in the instructions are accompanied by the following: "From photo 19 onwards the making and location of the parts is simple, it is a matter of making up and placing these parts following the photographic process, step by step, using the parts and the plan diagrams as a guide." For a newbie like me...that's been a bit of a challenge. Things are mostly intuitive, though not everything is shown on the plan diagram. For example, the underside of the covers for the two main hatches are shown finished in photos, but not at all on the plan diagrams; the third hatch cover (which is flat on the deck and doesn't cover a hatch in the model) is partially obscured in the plan diagrams. In addition, there's an error in the parts list: the transverse forward hatch bulkheads (the longer pieces of the frame on the bottom of the hatch) should be cut to about 16mm, not the 21mm as the parts list indicates. I discovered this too late and am not sure how much excess 2x2mm walnut there is, so am just going to go with what I've done and sand it down. At least I can keep the hatch bulkheads from sticking out from under the hatch. Another lesson learned there. However, despite the challenges I have mostly finished up the three hatch covers, which had to be constructed completely from scratch. I took the photos while waiting for the last of the glue to dry, so please forgive some of the ugliness! I'll be doing some sanding and clean-up work later tonight or tomorrow. From left to right: the forward hatch cover, with bulkheads underneath; the midships hatch cover, which sits flat on the deck and is partially under the mast rack, which will be installed on the step up from the main deck to the fore deck; the "companion ceiling"/main hatch cover, which is lined in (untrimmed) mahogany planks. My work with the mahogany planks went much better this time. I used the wire snips in my needlenose pliers to cut them. Perfect size for these 5mm-wide planks and they handled the .6mm thickness with ease and without shattering the brittle wood. The planks didn't fit the hatch bulkheads perfectly, so I had to trim narrow slivers for each side. Next steps: soaking and shaping the remaining pieces of the bulwarks. If I have time, I'll start preparing the mast rack, bowsprit knighthead, and drain pump.


- 16 replies
-
- 2
-
-
- bon retour
- artesania latina
- (and 2 more)
-
A slow day of working on the boat today. Lots of waiting, so not much progress. I finished up Step #2 by lining the step with mahogany. I can confirm all accounts of mahogany planking as being very brittle and fragile! Last night, I managed to cut the strake into enough 12mm pieces to fit across the strip—and had to scrap a few bits, too. I also glued them into place. Today, I trimmed off the extra bit sticking up above the step. After cutting the first two on the right side, I discovered I needed to research a better method. In the end, I saw a suggestion to cover them in CA glue and then use fingernail clippers—worked like a charm! (My apologies that I can't figure out now where I read that! I should have saved the link...) The chipped spots on the right side will ultimately be covered by a bench, so I think that's going to be okay in the end. But definitely a valuable lesson learned for me! I've also started into Step #3. Last night I soaked one of the inner bulwarks for an hour and pinned it into place overnight with binder clips. I need to scare up some more of those clips, otherwise I would have done both at the same time. This evening, I glued that one into place and put the clips back on to help it stay put. I also sanded the rails in preparation for installing them once the two inner bulwarks are in place. I've started taking photos with the flash on...really revealed my inadequate sanding job on the deck in these photos! I've only posted one, which shows the portside inner bulwark and the mahogany lining.

- 16 replies
-
- 2
-
-
- bon retour
- artesania latina
- (and 2 more)
-
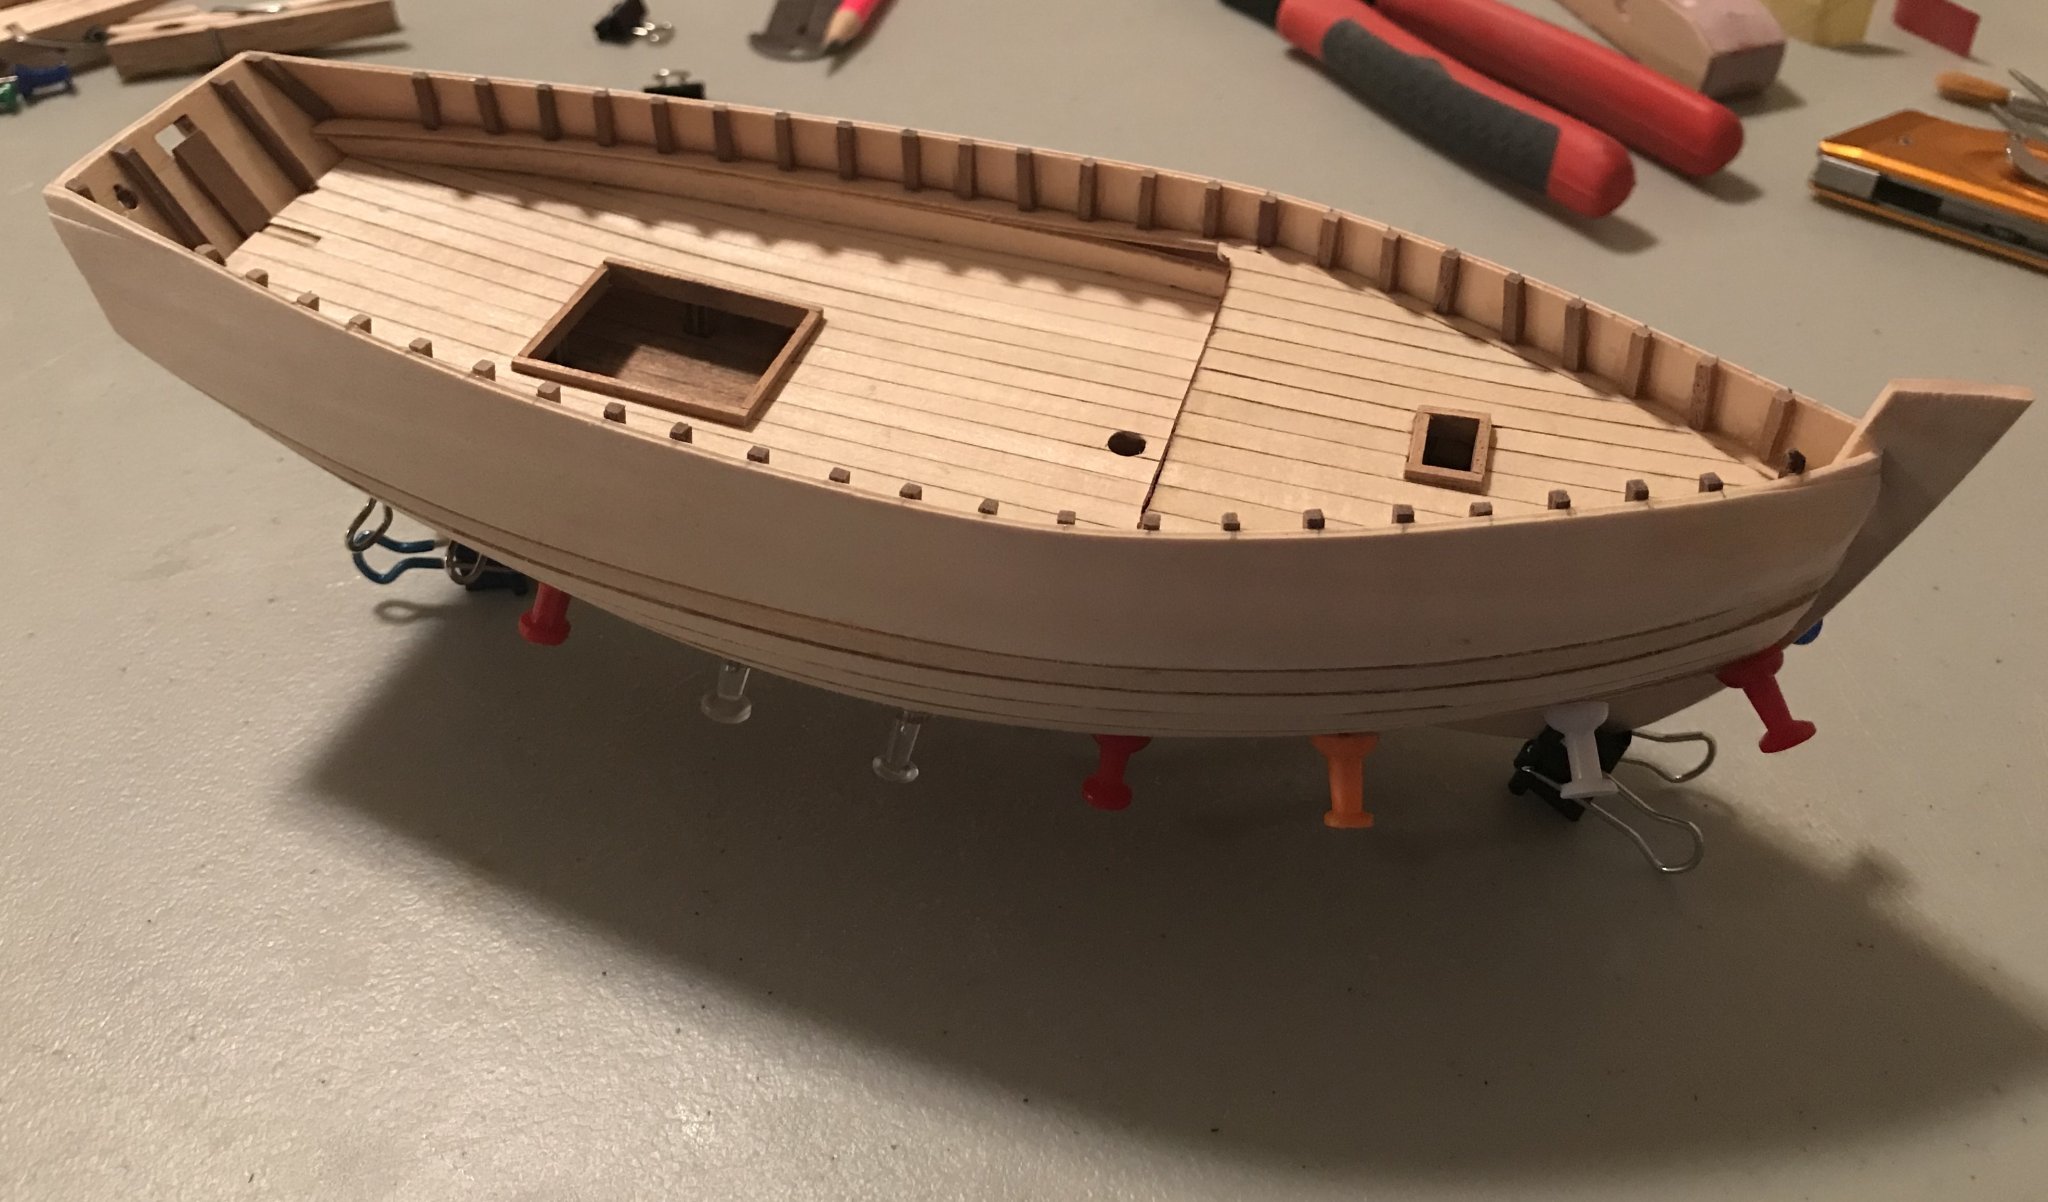
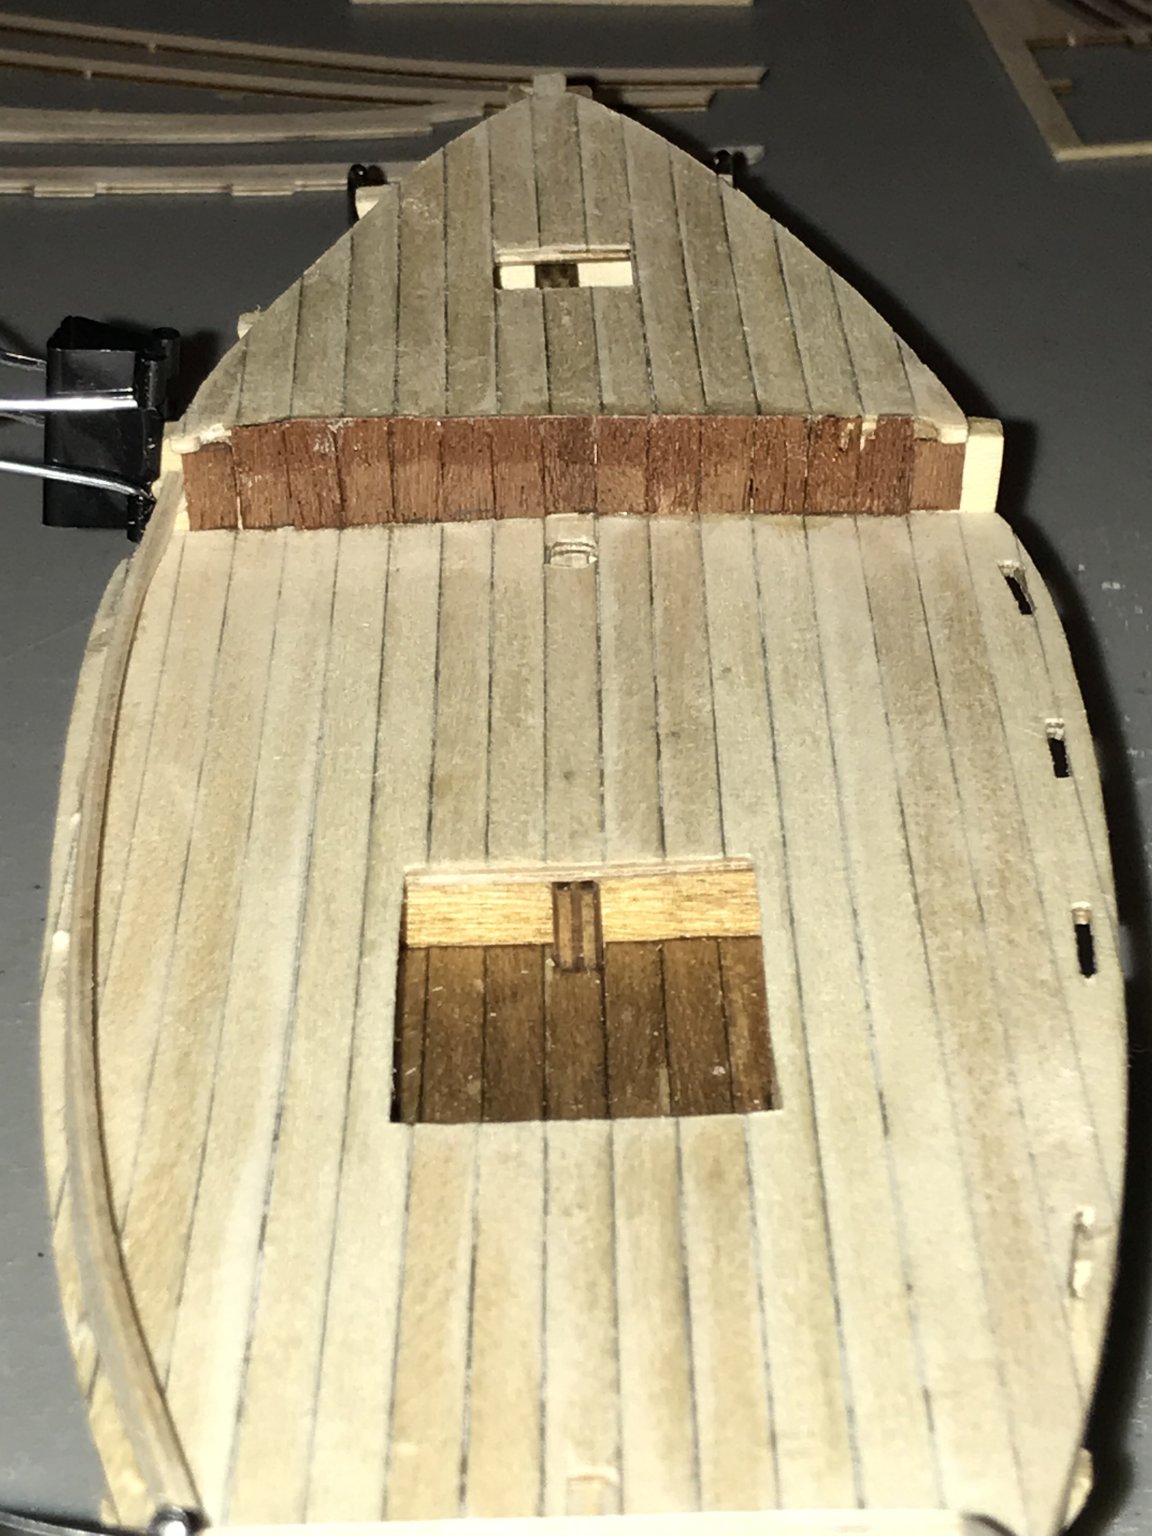
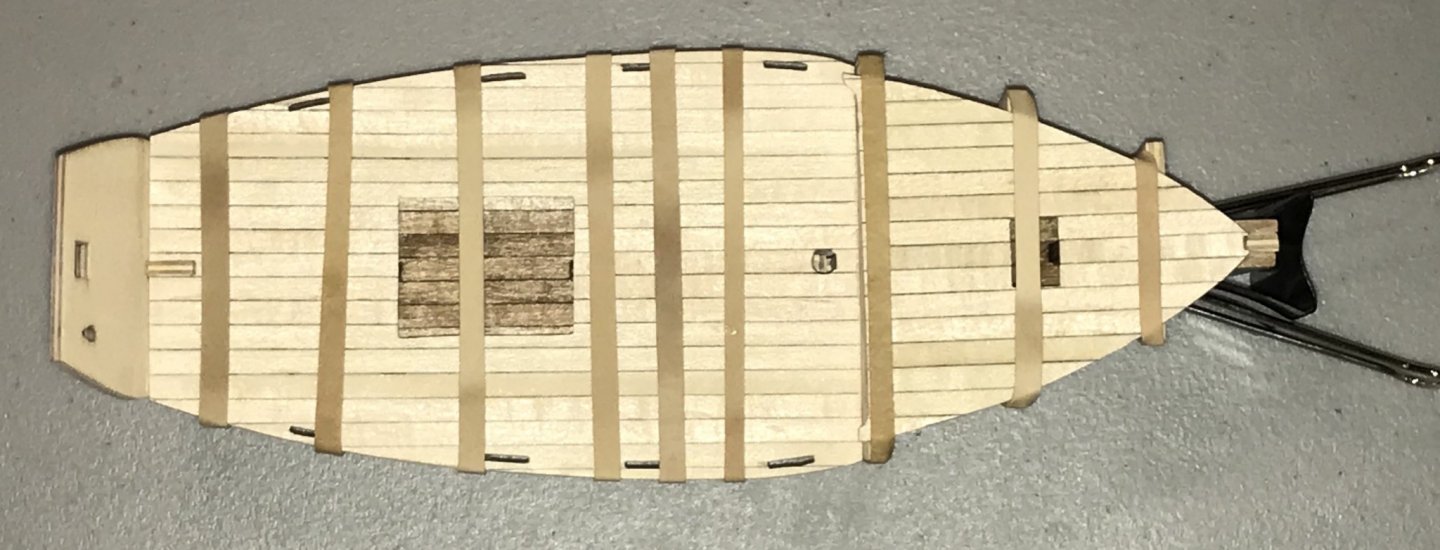
Very little homework to grade today, so I was able to spend a lot of time with the boat today. Finished up the deck planking in the afternoon (though forgot to get a clean picture). After re-reading the instructions and Invictaag's post on the main deck planking (see their post on September 1, 2017), I decided it would be more straightforward to follow the instructions. So, I laid planking all the way to the edges of the main deck. This meant I had to cut out the side holes. A real bugger to work the knife blade in there, but once I got enough clearance, my file was the perfect size to clean them. Tomorrow, I'll work on the bulwarks, which will be built on top of deck planking. Invictaag, on the other hand, installed the bulwarks first, then laid the planking just up to the bulwarks, with some tricky shaping as he got to the curves. Their solution might look cleaner, but mine made it a lot easier to trim the planks! This evening, I cleaned up the planking and mounted the decks on the frame. They're being held in place overnight by a bunch of rubber bands, which I straightened out after taking the photos. You can see the lower decks through the hatches in the main and fore decks. Hasn't been a perfect build, but at least it's starting to look like a boat! The wife and kids are even impressed at how it's coming together! Next steps: The last part of Step #2 is put some mahogany planking on the riser of the step up from the main deck to the fore deck. Step #3 focuses on the bulwarks. I've read in Invicatag's and Philthy's build logs that this is a tricky step, since the bulwark rails aren't cut quite right...we'll see how that goes for me.

- 16 replies
-
- 3
-
-
- bon retour
- artesania latina
- (and 2 more)
-
Thanks, Yves! I had no idea that Artesania Latina had gone out of business. More pressure to do good work on a "rare collectible," eh? Hours continue to fly by while I work on the ship. I spent time yesterday afternoon sanding down the tops of the frame pieces in preparation for the decks. Then I sanded and soaked the deck pieces, before pinning them into place over night so they could take on the necessary curves. I also planked the lower decks. As Invicataag noted in his build of this ship, the decks curve a lot (not helped by some mediocre craftsmanship on the frame on my part). Invictaag also noted how much detail/precision sanding is needed for this kit. Yup, much more than I anticipated and some of it was pretty tricky—especially the frame under the lower fore deck. That spot is definitely not perfect, but it's good enough and will be hidden from sight soon! This morning I woke up early, so went down to the basement to pick up where I left off last night. After unpinning the two upper decks, I cleaned up and installed the lower decks. Step #1 (frame and lower decks) is officially complete now! I also got started planking the main decks, but lost steam and mental focus before finishing; I'll work on that later. Next step: finishing the planking on the top decks, taking care to prepare for the bulwarks. Invictaag installed the decks and bulwarks before planking the main deck; I might do all that before finishing the planking, since there will need to be some careful trimming on the outer sides to make everything fit together. I'm also staining the lower deck areas with walnut stain. Note: the instructions say nothing about planking or staining the lower decks, since they aren't visible in the finished boat. I planked them so I could figure out how that process works before getting to the visible decks. Since Invictaag stained his lower decks and painted the surrounding bulkheads black, I thought I'd do something there, too. Again, good practice on a hidden part of the boat, but I'm also considering leaving the hatch covers loose, so that one could peek inside if one wanted to.


- 16 replies
-
- 3
-
-
- bon retour
- artesania latina
- (and 2 more)
-
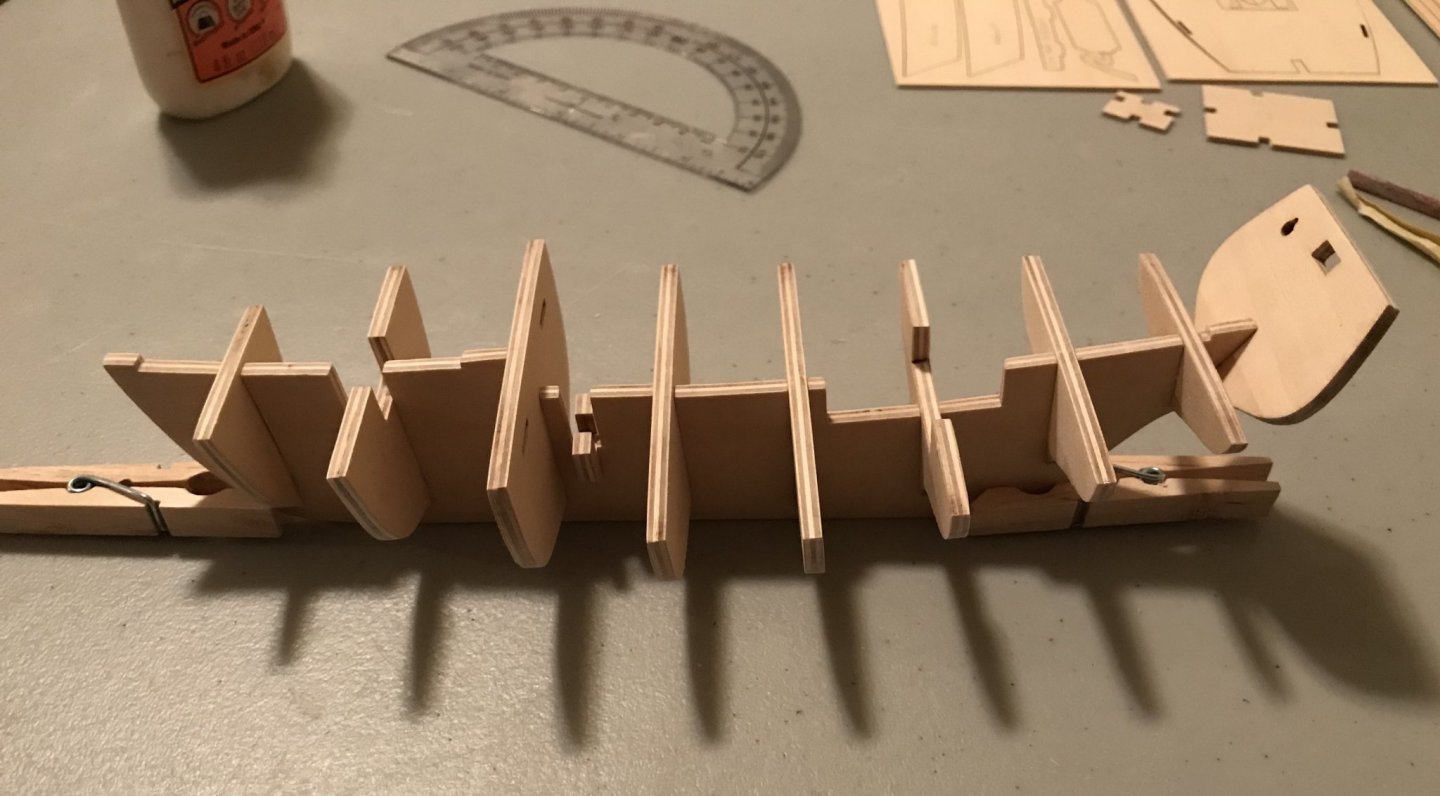
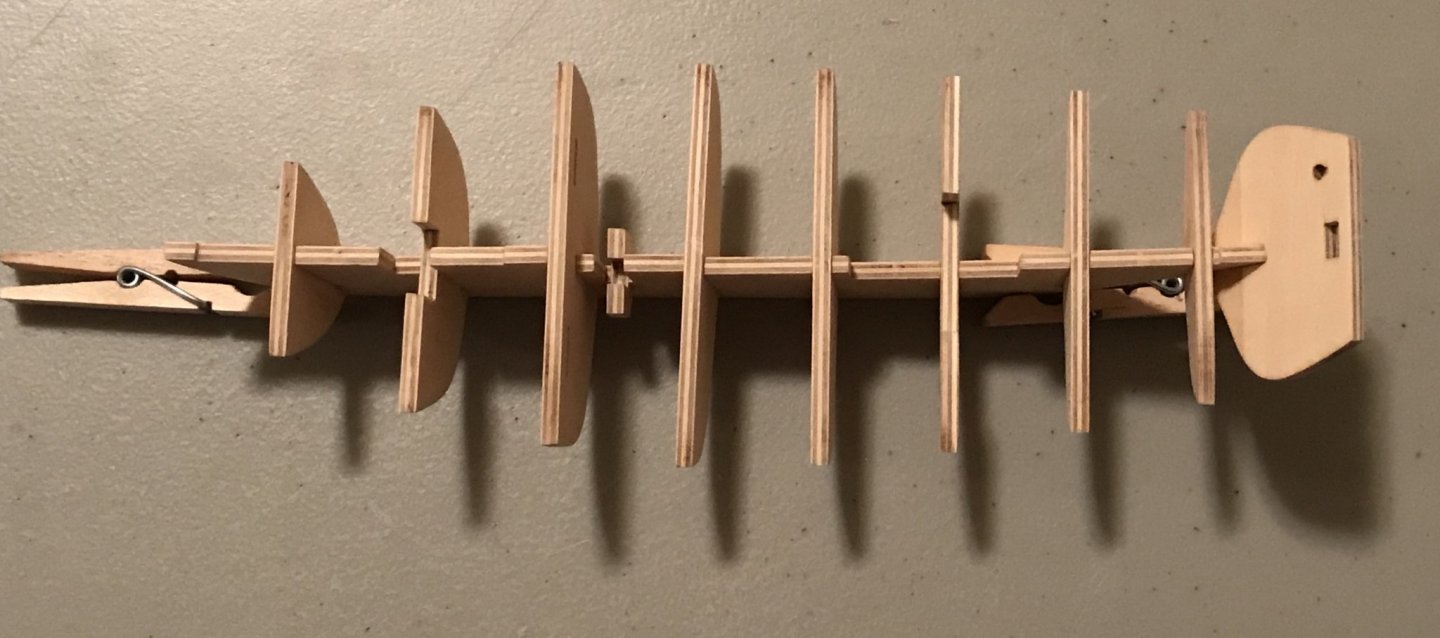
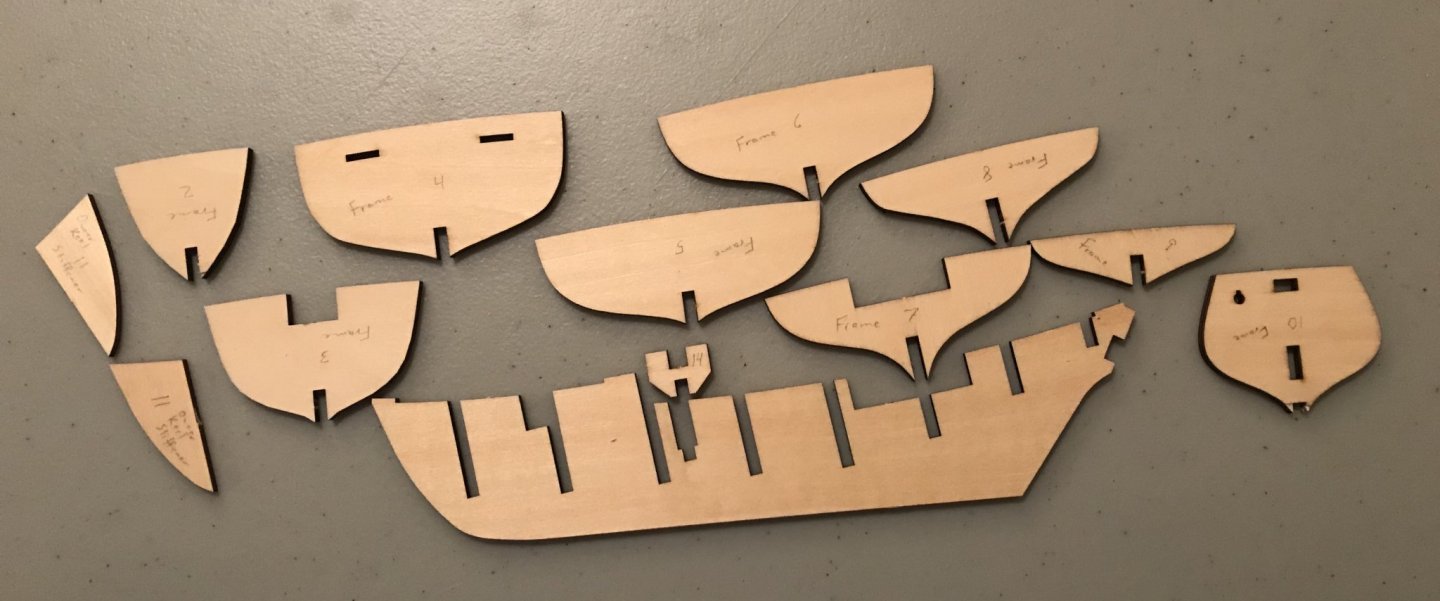
I spent much more time sanding yesterday than I had planned—amazing how fast that time went! So, with all of the pieces sanded for Step #1, I thought I'd jump in. Dry fit the pieces of the frame to the false keel and then glued them into place. A question for those with more experience: how tight is too tight when assembling the frame? How loose is too loose? I had sanded everything down to a snug fit. But once I added glue into the question, everything was suddenly tighter and I had to work a bit to get some of the frame pieces all the way into their slots. Next step: Sanding down frame pieces #3 and #7 so I can attach the lower decks. Also, attaching the outer keel strengtheners (the two pieces marked #11 in the photos in the previous post.
- 16 replies
-
- 3
-
-
- bon retour
- artesania latina
- (and 2 more)
-
I think model ship building is going to suit me. Sat down this afternoon to start sanding the false keel...and then suddenly it was dinner time. Tonight the wife went to bed early, so I thought I'd sand some more of the frame...and now it's 3 hours later. Really enjoying the meditation of things so far. The woodwork also brought back some deep-seated memories that I had forgotten about. Every summer evening when I was a kid, our neighborhood gathered in Eldy and Glendol's driveway. We'd all bring lawn chairs and just hang out chatting until after the sun set. Eldy was a really special guy who loved kids, so we all bonded with him. Even though he was about 60 years older than me, I thought of him as a friend when I was in elementary school. He had retired from our town's steel mill after an accident claimed two of his fingers. But in his retirement, he took up woodworking with a passion. He made model stagecoaches (from kits) and Conestoga wagons (from scratch). He also made rocking horses (and rocking elephants!) and a variety of knick-knacks for decorating the house. By the time I was 9 or 10, he'd taught me how to sketch designs on the planks, to cut them out with a band saw, to sand, and to use paint and stain. My first project was one of his classic designs: a Dutch sabot with three tulips growing out of it (all in profile, nothing too complicated). This ship is bring me full circle in a way I hadn't expected!
-
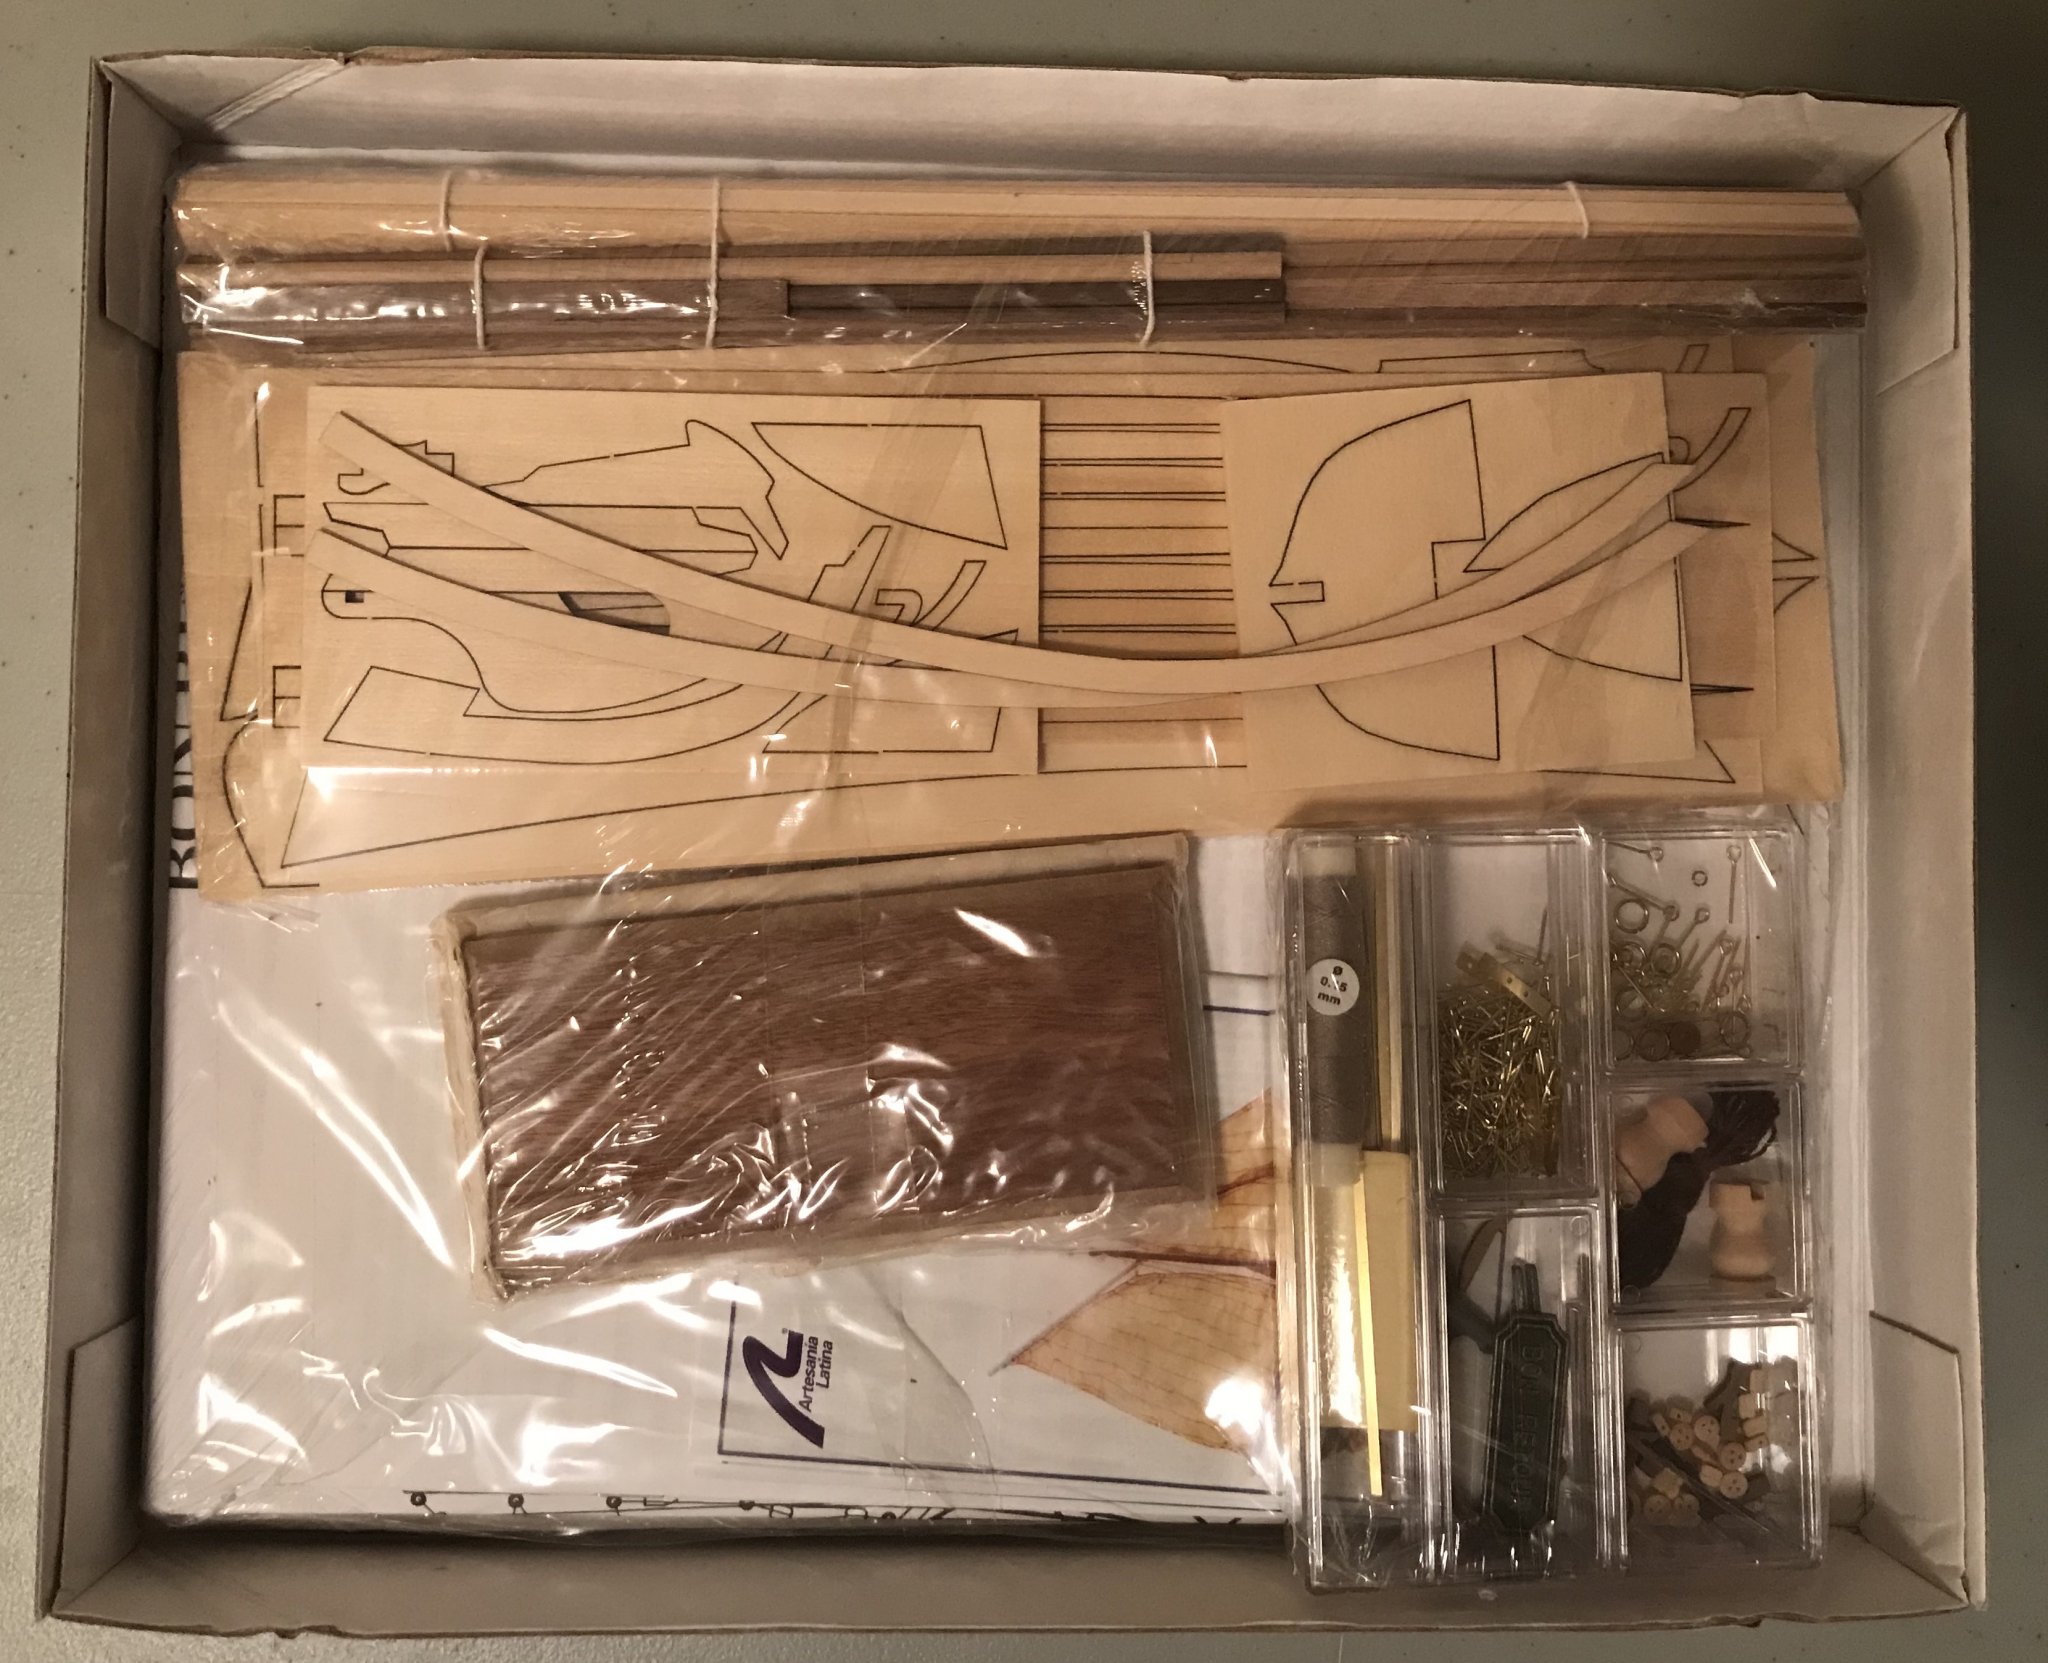
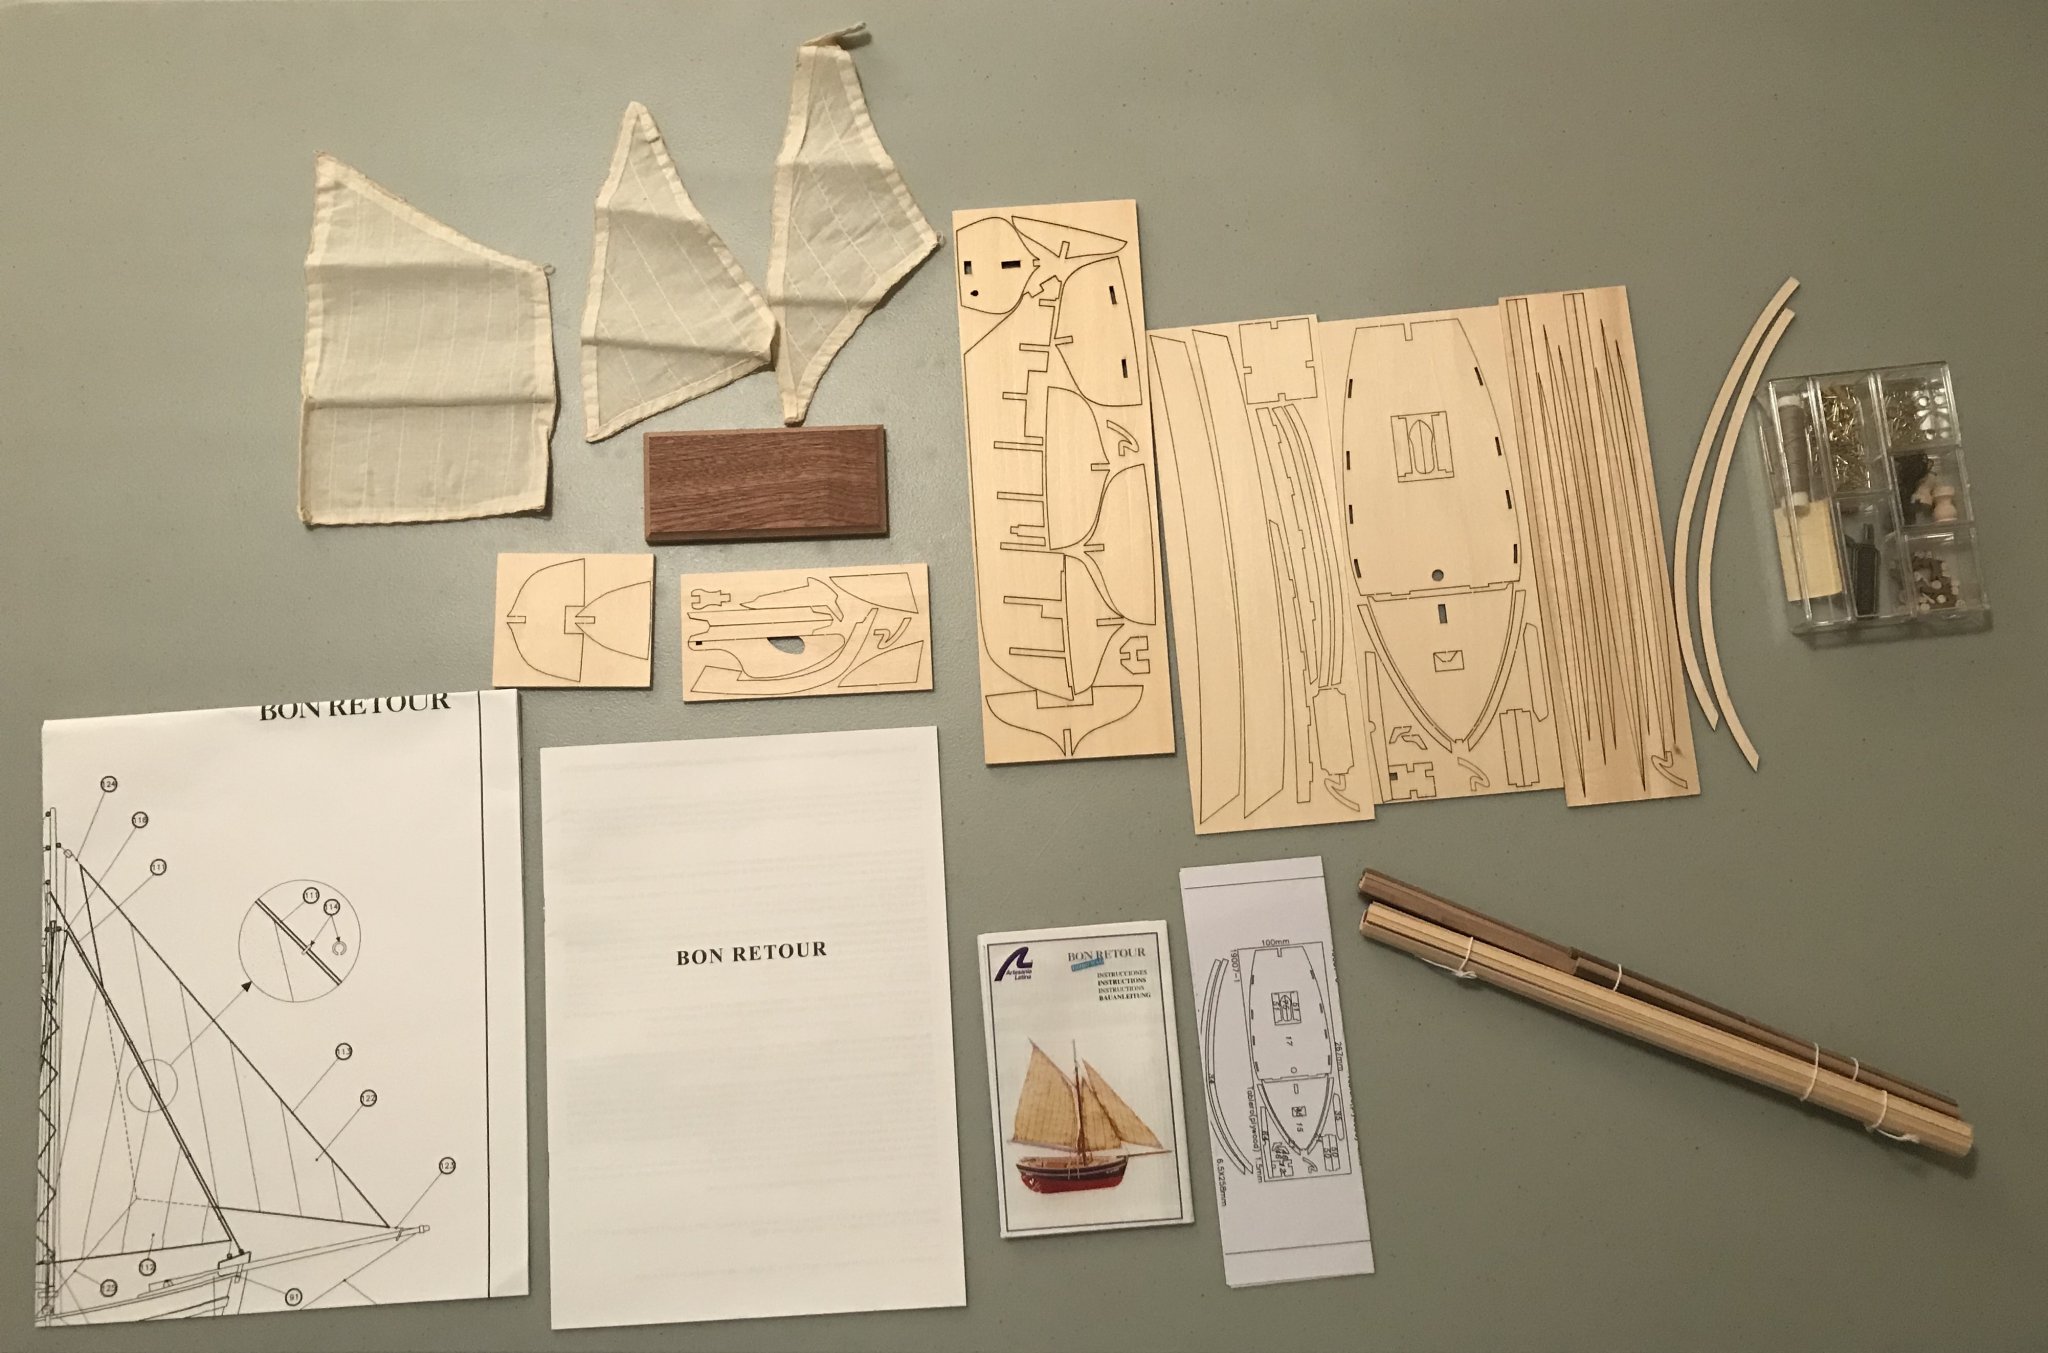
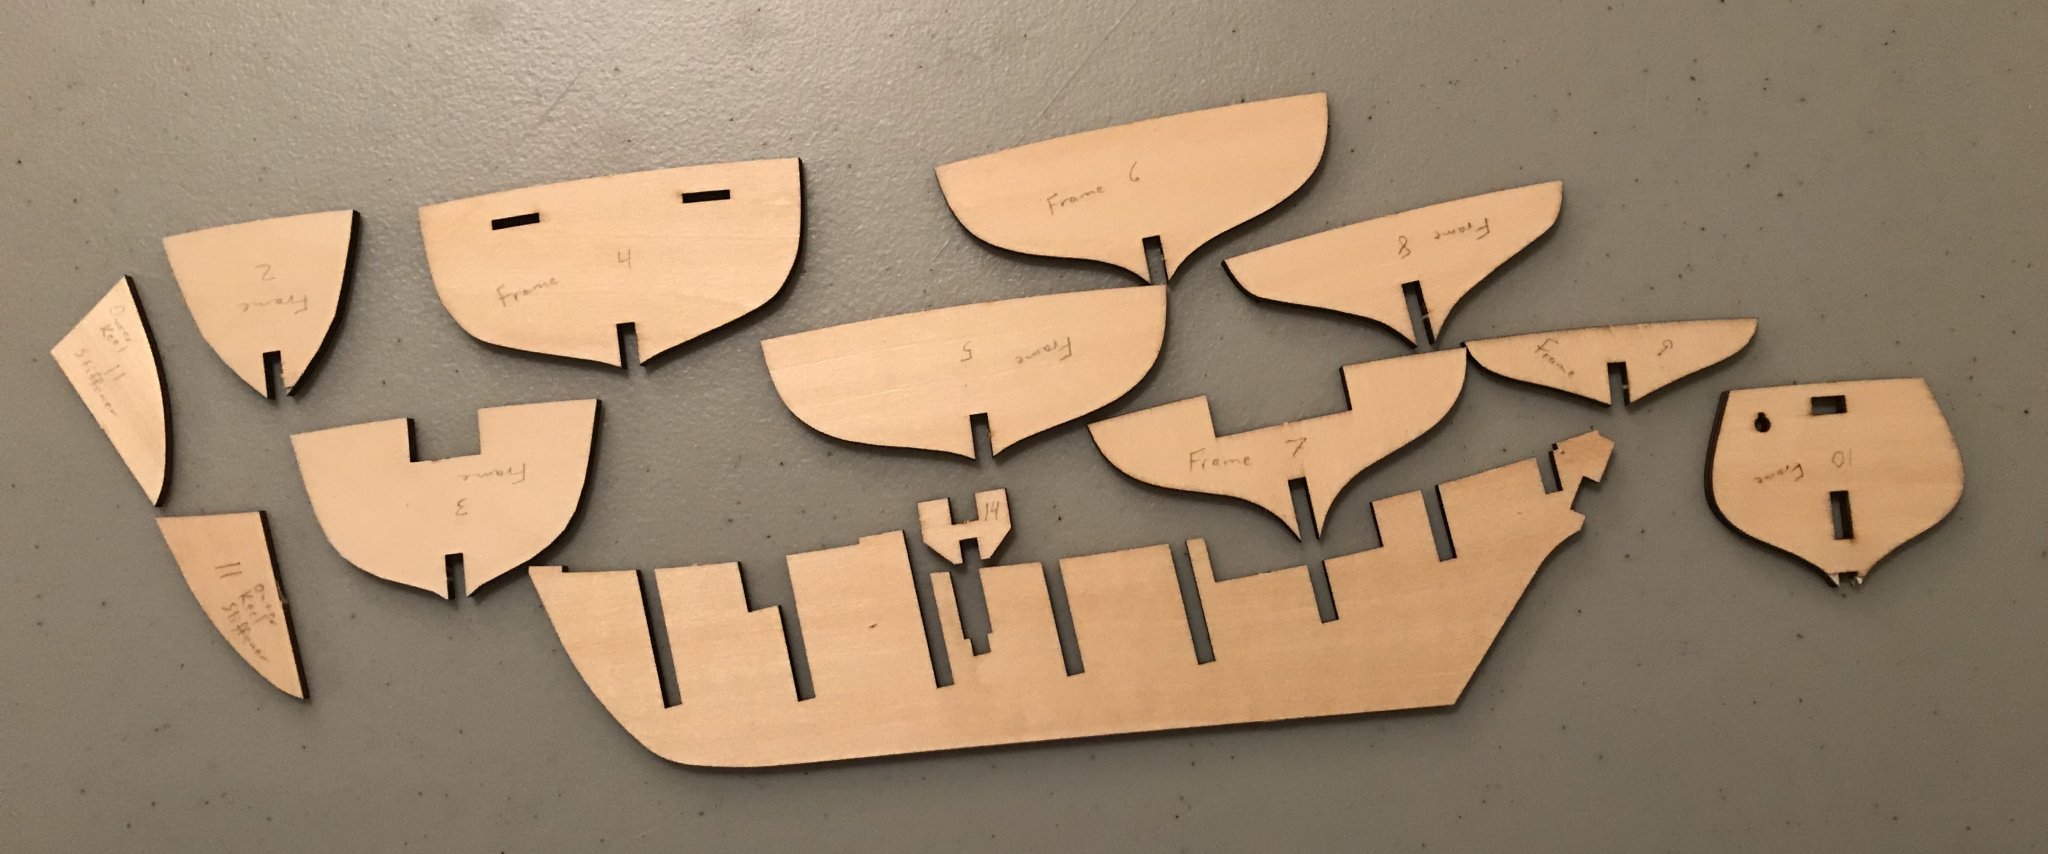
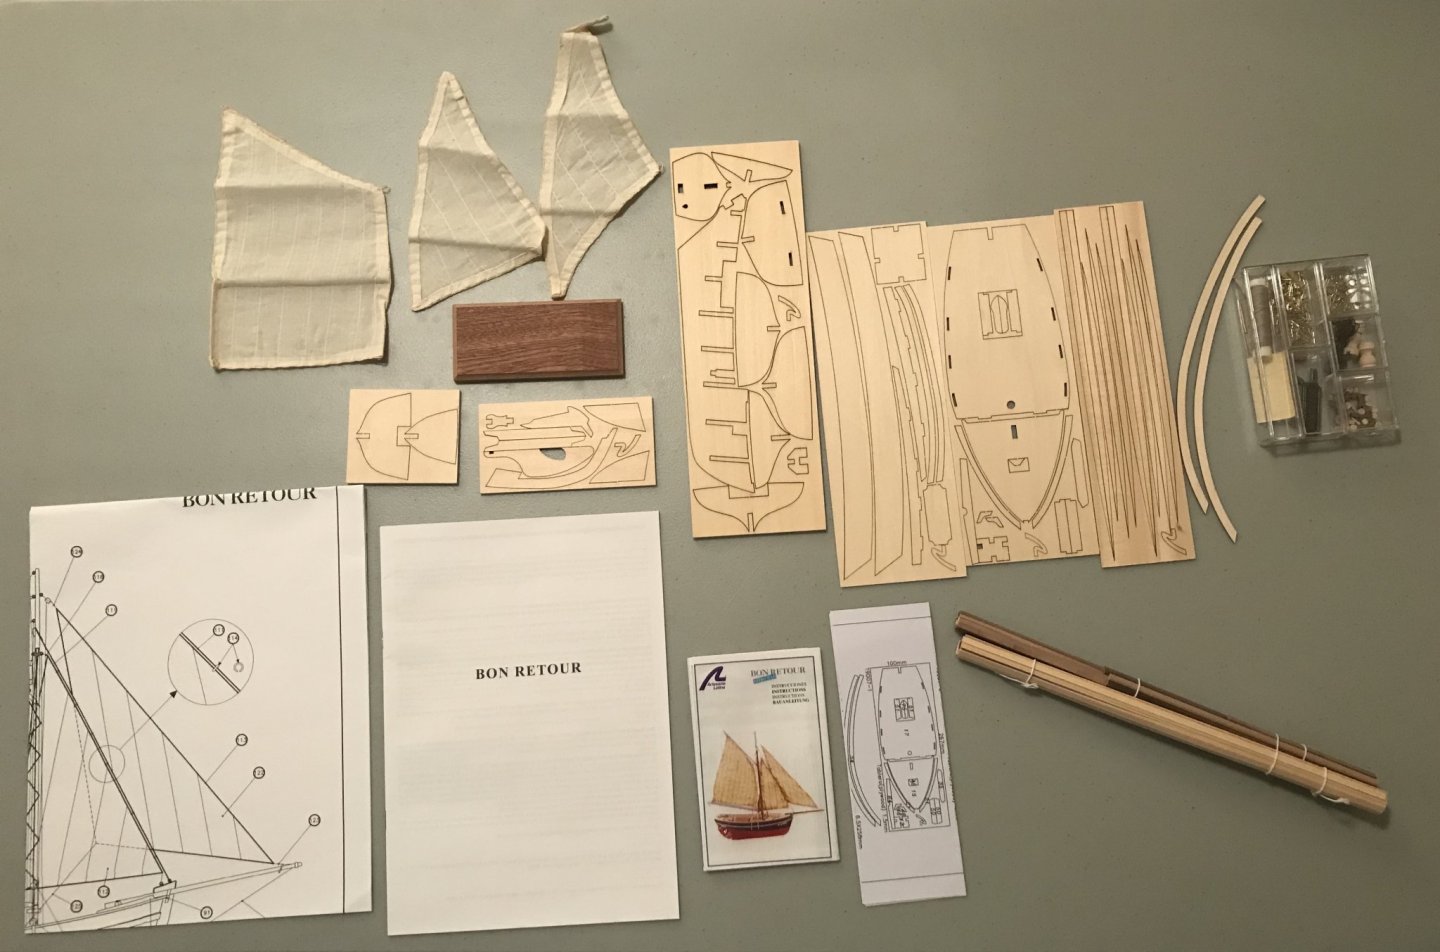
The much anticipated package arrived this morning! My goals for the morning were to unbox, inventory, and cut out the pieces for Step #1. (I've read Invictaag's build log about 4 or 5 times over the past two weeks, so feel comfortable with the instructions. I've also read Philthy's build log, but since he made some improvisations and alterations, I'm relying less on that one; probably a better source for those with more experience who can better appreciate what he's doing.) Since I'm a beginner, I'm not sure how useful my build log will be for others, but I know I'll have questions along the way and will appreciate all the help this community can offer! As a newbie, I have made a point to label all the parts, so I start learning their names. This was not always easy, since the inventory list in the instructions assumes a certain level of knowledge that I don't have yet. I'm mostly comfortable with all of that now, except for the long pieces tied together (planking, masts, etc.). I'm not 100% certain which pieces are which there. Easy enough to tell the difference between basswood, walnut, and mahogany, so I'll just have to measure pieces as I get closer in order to distinguish them. The inventory list assumes that some of the long pieces of walnut are already cut into smaller pieces, too. (Side note for others who might do this kit: piece #22 is omitted from the Spanish/English inventory list. They are in the French/German list, however, and form part of the bulwark on the main deck.) Some photos of the unboxing, inventory, and pieces for Step #1. Unfortunately, I caused some minor damage to piece #10 of the frame, which was the first one I cut out. I quickly figured out a better technique, though, and so all the rest are in good shape. Next step for me: sanding the pieces for Step #1.

- 16 replies
-
- 4
-
-
- bon retour
- artesania latina
- (and 2 more)
-
Thanks for the welcome, all! I had been torn between the Saint-Malo and Bon Retour kits. What made the difference was seeing Philthy's build log and, especially, Invictaag's build log on BrexitModeller. Invictaag's log is very detailed and filled with tips that I think will be helpful (even though it was quite intimidating on my first read-through!). I'll be sure to do a log here, since I have no doubt I'll need the feedback and tips from those of you with more experience. Got the shipping notification from Ages of Sail this morning, so the kit is on its way!
-
Hi everybody, another newbie here. We've all reacted in different ways to this pandemic. For myself, I've been having the urge to make something, to keep both my hands and my mind occupied, to have a large on-going project as a break from teaching and writing a book. Not entirely sure why I got so determined that it had to be a model ship, but here we are. I made plastic model cars and planes as a kid and, back then, I always thought it would be cool to make a ship. So I guess maybe this is an unfulfilled childhood fantasy. After much research on this forum and other sites, I finally bit the bullet last night. Ordered the Artesania Latina Bon Retour kit, along with some tools I didn't already have and some glue, stains, and varnish. Why the Bon Retour? Well...this site has some great advice for newbies to the hobby and I got intimidated enough by the kits I really want to make that I (wisely) chose to start with something simpler and more affordable. (Seriously, thanks to all of you who have posted guidance and recommendations for newbies, as well as those of you who've posted detailed build logs.) I'm a historian, so look forward to eventually building some of the ships that hold particular historical interest for me. I'm also a francophile, so am looking forward to doing some smaller French ships while figuring out how to do planking and rigging. Now, the long wait until the kit arrives and I can get started...