MORE HANDBOOKS ARE ON THEIR WAY! We will let you know when they get here.
×


Melissa T.
-
Posts
145 -
Joined
-
Last visited
Content Type
Profiles
Forums
Gallery
Events
Everything posted by Melissa T.
-
 Roger - Thank you. This is extremely helpful. I ordered a Dewalt scroll saw today and will take your advice on the wood. I also like the idea of diagonal planking on the bottom, below the chine. All things I would not have thought of on my own!
 -
Interesting - thank you Gary!
-
Thank you John - that is helpful!
-
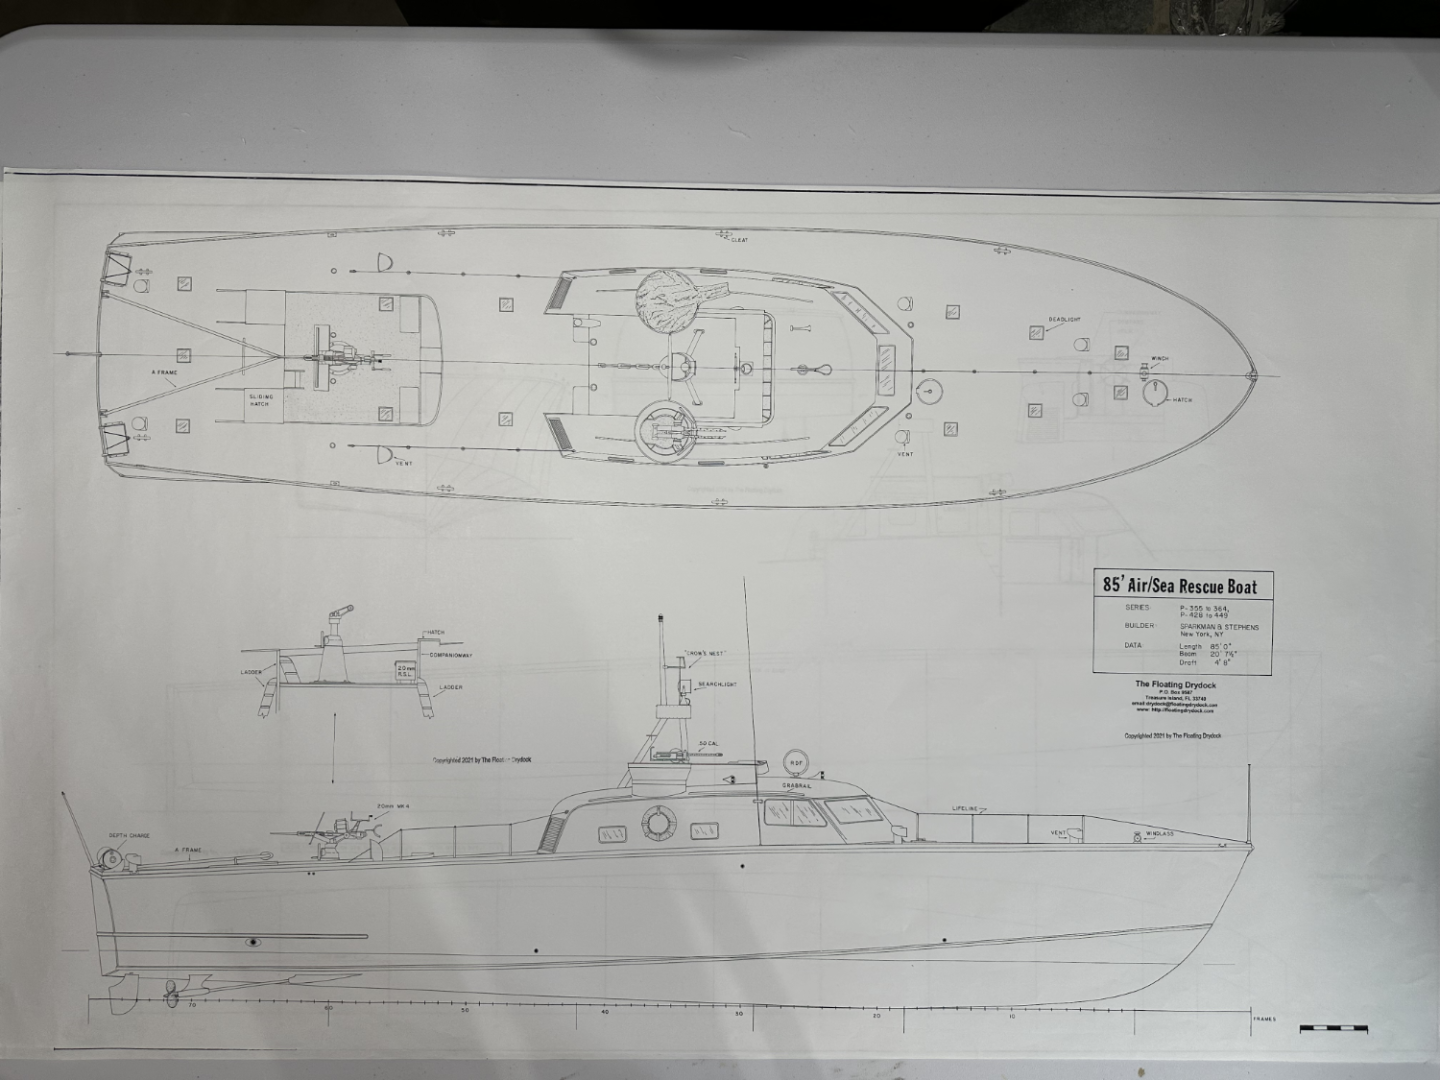
With three kits now under my belt, I decided to throw caution to the wind and attempt my first scratch build. My father-in-law, WO James H. Flynn, was first mate on board the P-564 an 85' rescue boat operating off the coast of Japanese-occupied Burma in World War II, and I want to build that boat in his honor. The CBI (China-Burma-India theater, though often more commonly thought of as "Confusion Beyond Imagination") is often overlooked, but these men served under extremely difficult circumstances and played an important role in hastening the end of the overall war in the Pacific. P-564 was specifically involved in reconnaissance operations of Japanese-held areas and the covert insertion of OSS teams into Burma in the closing months of the war. She was one of eight such vessels built in mid-1944 by Herreshoff Manufacturing in Bristol, RI. I was able to obtain a copy of the plans for the 85' ARBs, and from those I was able to make cardboard templates for a false keel and bulkheads. The plans are in 1:32 scale, so I decided to stick with that in order to keep things as simple as possible. I've also been able to find key accessories (like the 20mm cannon, etc.) online in 1:32, it was an easy choice. I am doing POB because that is what I am familiar with from kits. As I am not interested in learning CAD (again, keeping things simple), I decided to make a fiberboard prototype of the keel and bulkheads both to see if this project is even doable for me, and also so I could get a three-dimensional sense of what the hull actually looks like. (It has, for example, a fairly pronounced chine, which I'm not sure I would have realized without the fiberboard prototype). I've invested all of $20 in materials so far, so if this is a flop I won't have wasted a lot of money! Here's where things get serious, and where I could use advice from the experts on this forum. As this is my first scratch build, I am taking this very slowly, step-by-step, and trying to figure things out as I go along. The next step will be to build this framework in wood. Should I use plywood, MDF, or something else for the keel and bulkheads? What wood would be a good idea to use for the actual planking? Would a scroll saw, or something else, be advisable to cut out the keel and bulkheads? I'm attaching pictures so you can hopefully see what I'm trying to do and what I've done so far. Thank you for any advice you all have to offer!
.thumb.jpg.2b924b9792b35ba507ffd57681ac7ae2.jpg)
.thumb.jpg.755e676156e98edabb867e07a9c4a967.jpg)
.thumb.jpg.73679d0b70ecda478bdc97975f5ac227.jpg)
.thumb.jpg.db1209e7f6aca78b28ce05ef3254f8af.jpg)
.thumb.jpg.210c57fe43b79ecce72a7a86f0337c85.jpg)
.thumb.jpg.cd8e657b98189bbc628fec46c8c272a6.jpg)
- 63 replies
-
- 15
-

-
2023 Donations drive
Melissa T. replied to James H's topic in Using the MSW forum - **NO MODELING CONTENT IN THIS SUB-FORUM**
Just sent in a donation - money well spent to support MSW! -
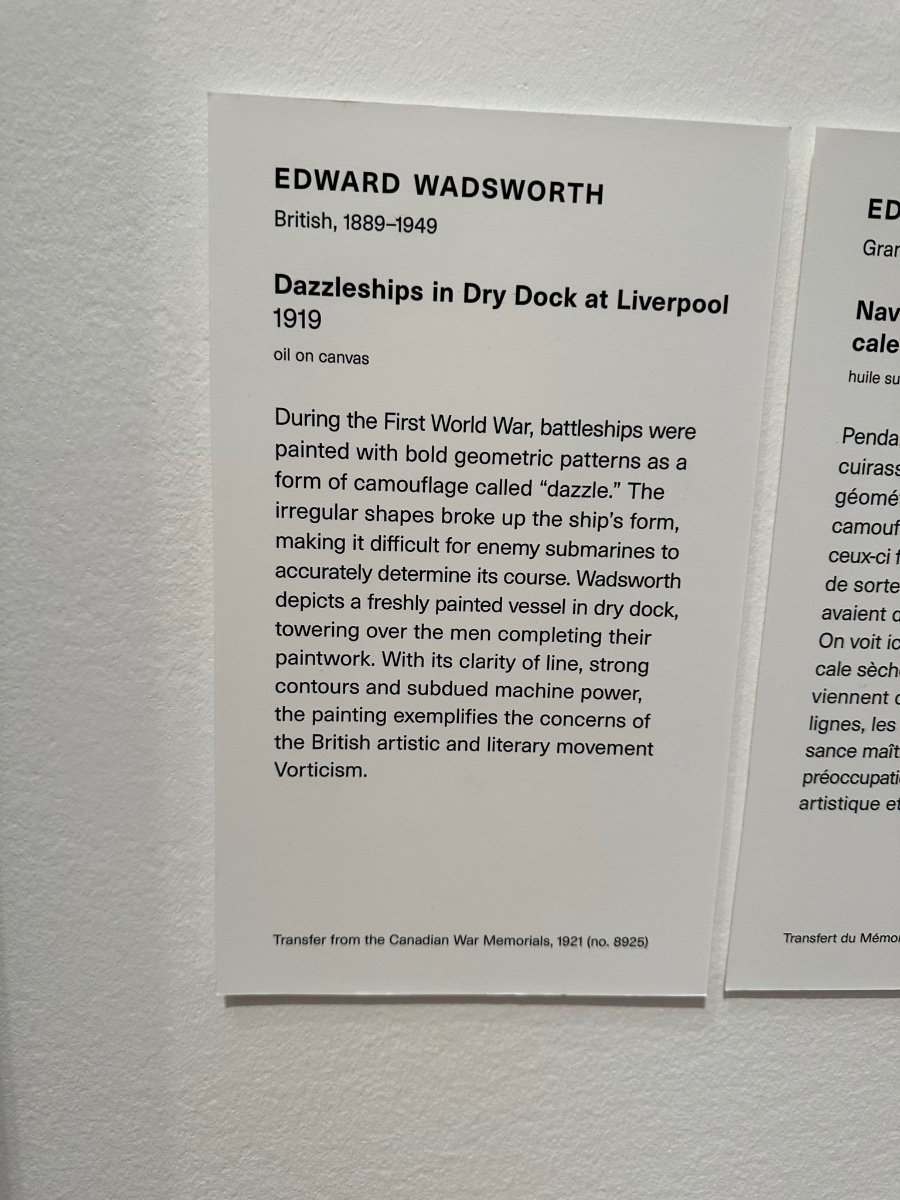
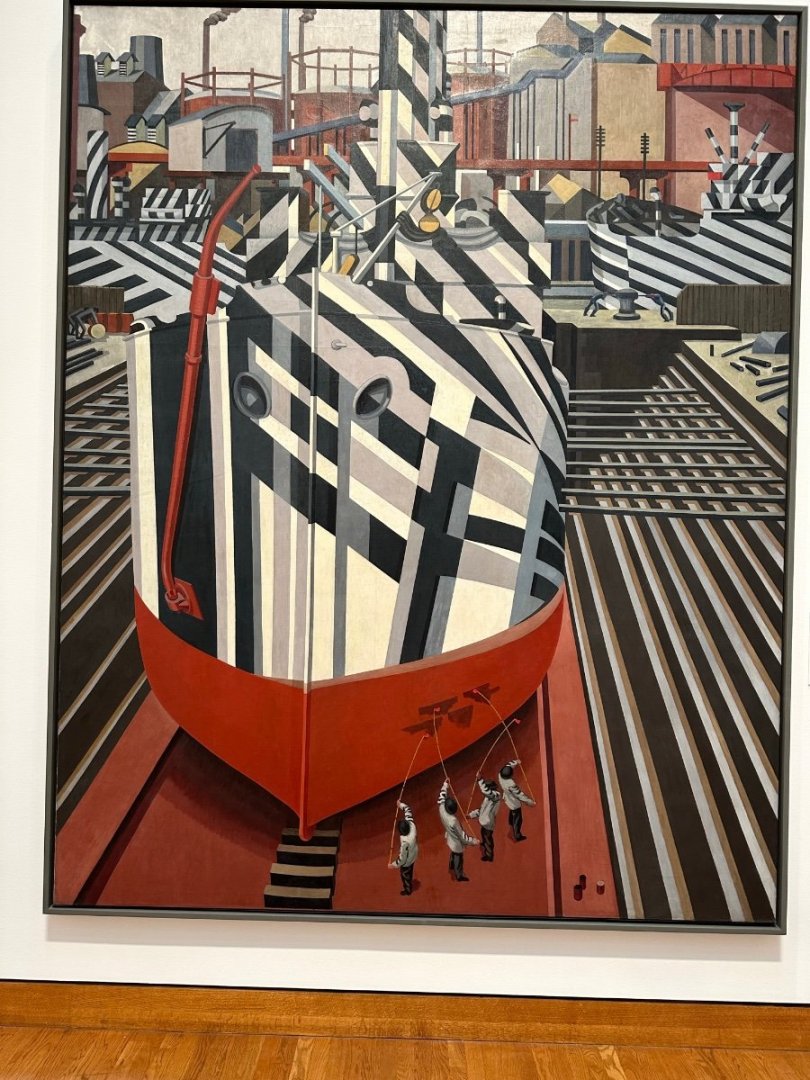
I happened upon this striking painting yesterday in the National Gallery of Canada in Ottawa. The British artist, Edward Wadsworth, did not invent the dazzle patterns, but apparently was involved in designing them for warships during WWI.
-
- 15
-

-
-

-
Tips for the Second-Time Model Builder
Melissa T. replied to Melissa T.'s topic in Wood ship model kits
Thank you, Toni. I appreciate your comments! -
Tips for the Second-Time Model Builder
Melissa T. replied to Melissa T.'s topic in Wood ship model kits
All good points on the CA glue. I'd definitely rather not use it at all as there are just too many things that can go wrong. Given your experience and insights, I'm going to try to avoid it altogether as I work through my Philadelphia. -
There’s a lot of excellent advice on MSW for the first-time builder, much of which I read carefully before embarking on this hobby. As I slowly worked through my second build though, I had some thoughts and insights that had not occurred to me previously and that I thought might be useful to the second-time builder. They may not apply for everyone, but they did for me. Here are my lessons learned from my second kit, from the sublime (at least to me!) to the ridiculous: 1. You’re first kit may well have been an entry-level kit to get your feet wet, as mine was. For the second one, pick something that appeals to you personally on an aesthetic or historic level. Make sure it’s something you can actually tackle successfully, but don’t be afraid to stretch just a bit. 2. Find a build log for your kit by someone light years ahead of you in skill level. Print out the pages for the steps you’re working on (after running them through Google translate if they’re in a different language). You won’t be able to replicate what they have done, but they will give you ideas on specific techniques to use and ways you can improve your own build. 3. The finished product is really cool and fun to look at, but by far the real joy is in the lengthy, painstaking process of building it. Don’t worry about how long it’s taking – revel in it. 4. It’s not so much a kit that you’re building, as it is a series of problems that you’re solving. Thoroughly research, ponder over, and test EVERYTHING before committing anything to glue. I love that aspect of this hobby – problem solver’s paradise. 5. It’s impossible to have too much workspace or too much lighting. 6. Invest in the right tools, and don’t go cheap on these. They will sometimes cost more than the kit, but pay off many times over in terms of a better result and much less frustration. 7. Annealing brass strips before bending is a thing. Who knew? (I actually had to look up the word “anneal”) Highly recommend getting one of those little butane torches for culinary use. Better ship modeling AND a crispy topping for your crème brulee – it’s a win-win! 8. CA glue is the worst thing ever invented by humankind. You have to use it anyway, because it’s impossible to clamp everything that’s been glued with PVA. Your fingers will get stuck together with the CA, and there will be unsightly glue stains where you least want them. But it works. When it absolutely, positively can’t be clamped, reach for the CA. Get the gel variety, and apply with a needle tip. I hate the stuff. I love the stuff.
- 10 replies
-
- 23
-
-
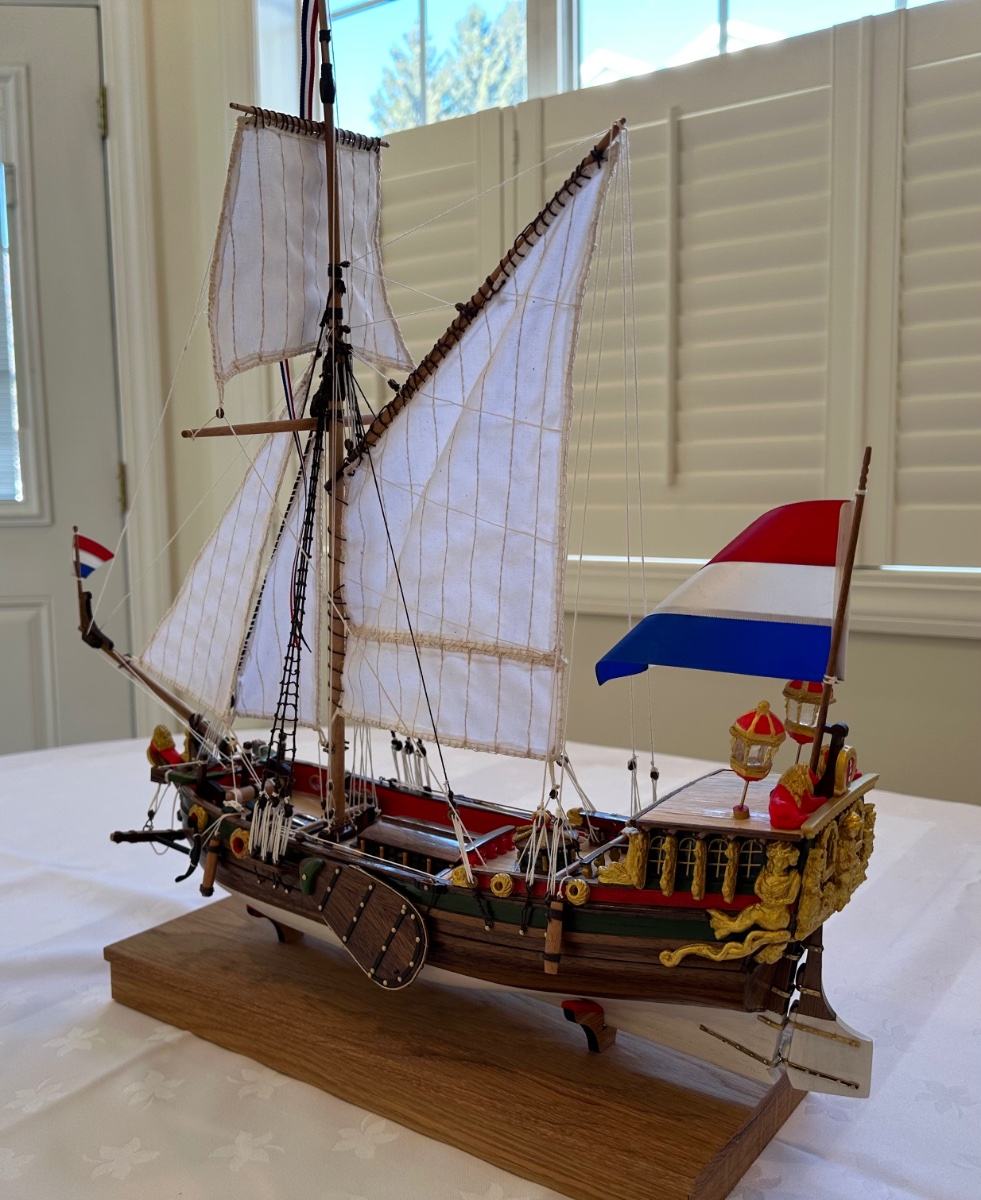
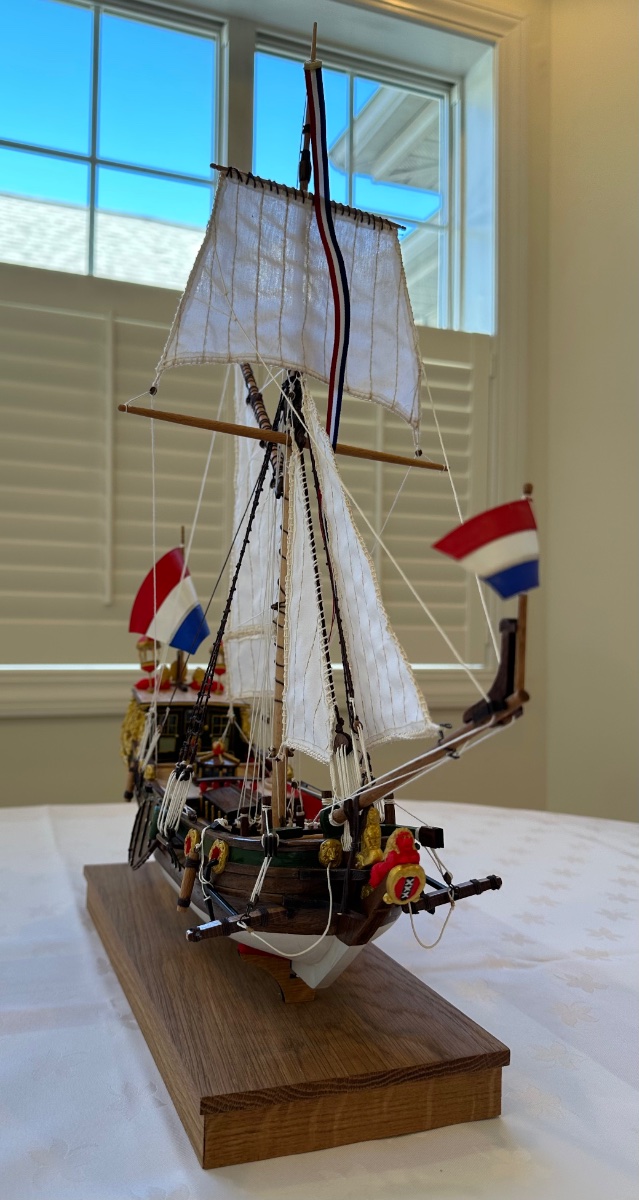
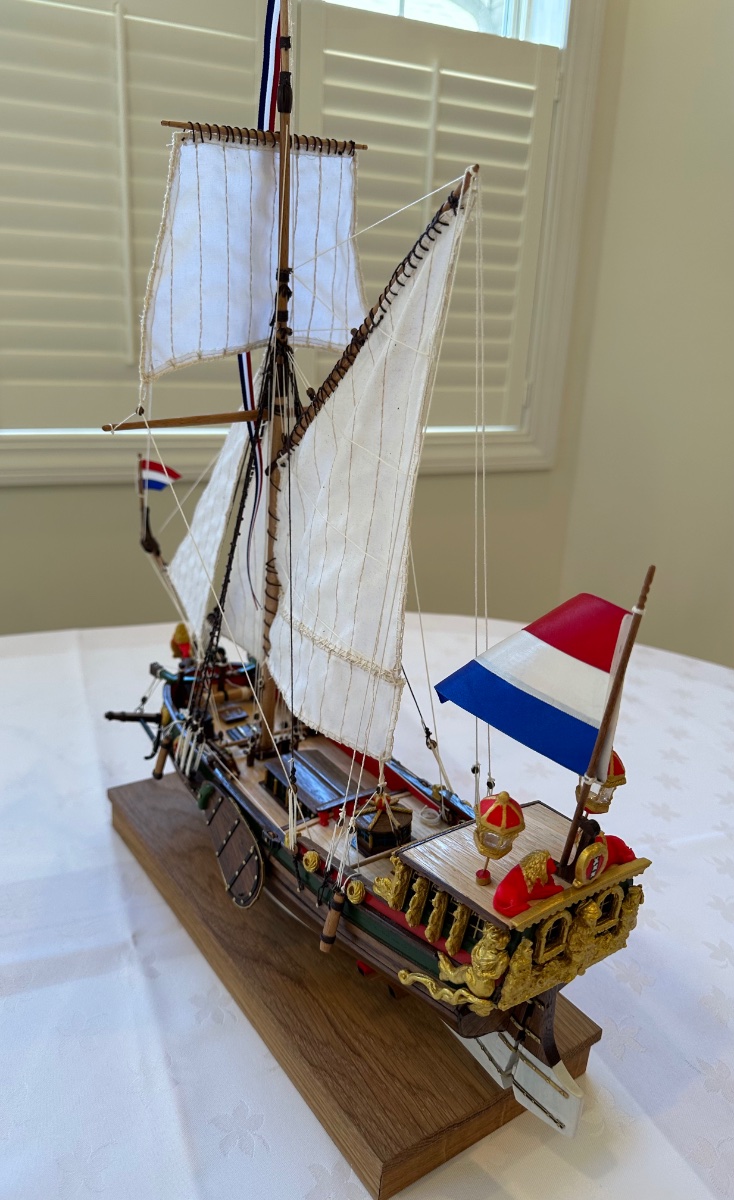
Thank you to all for your kind comments. And now for something completely different…
- 84 replies
-
- 11
-
-
- Statenjacht
- Kolderstok
- (and 1 more)
-
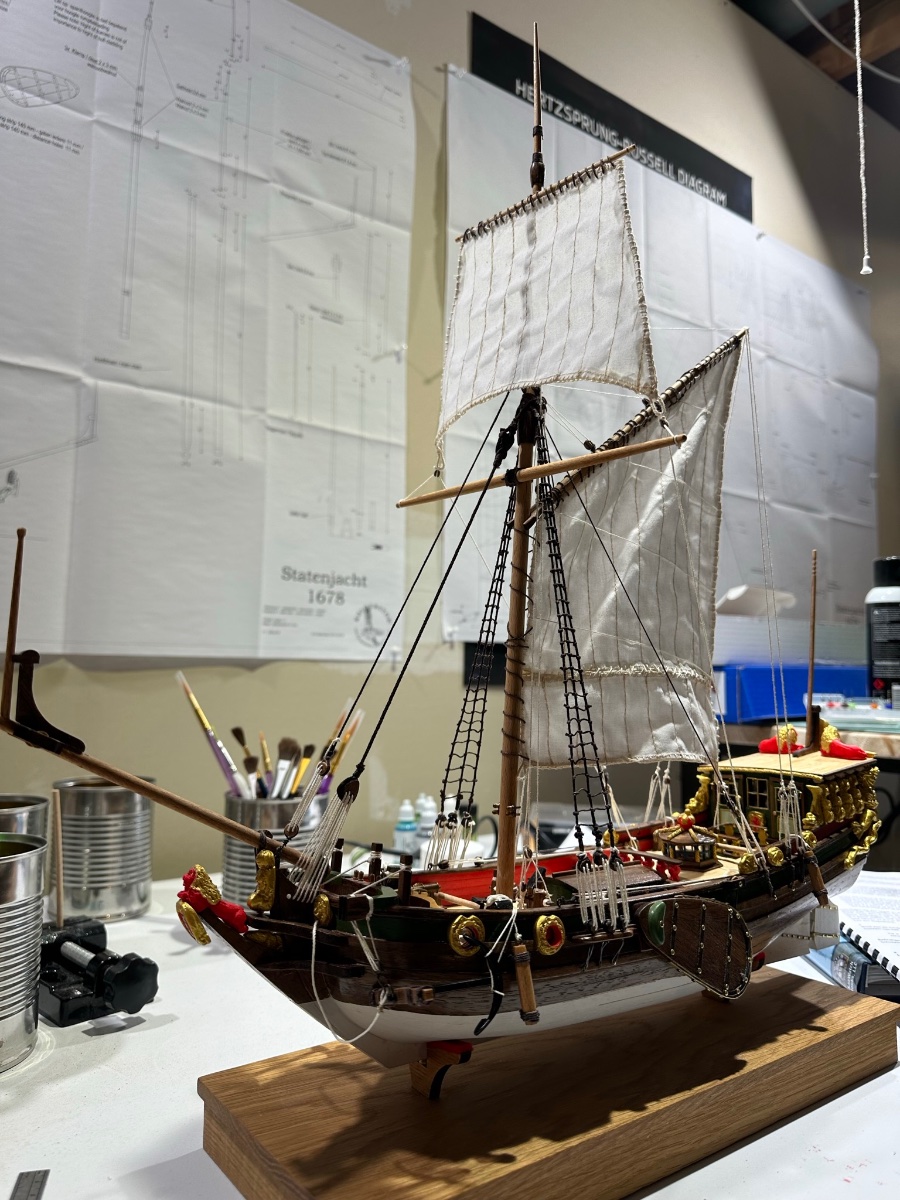
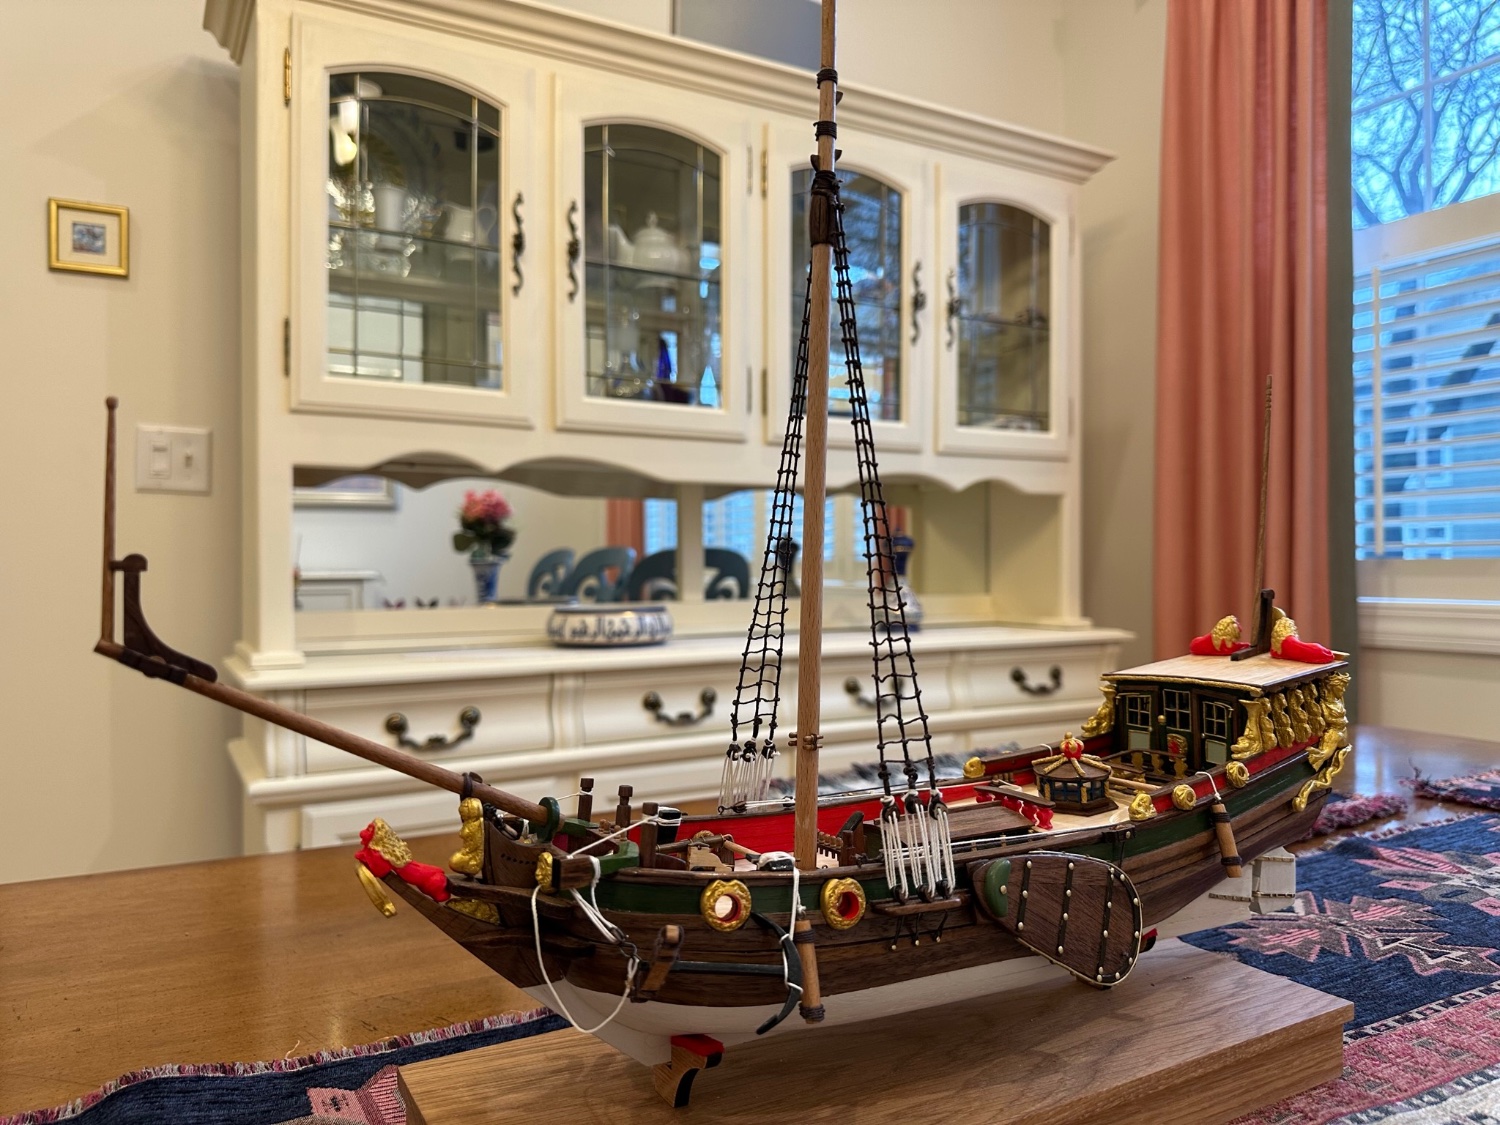
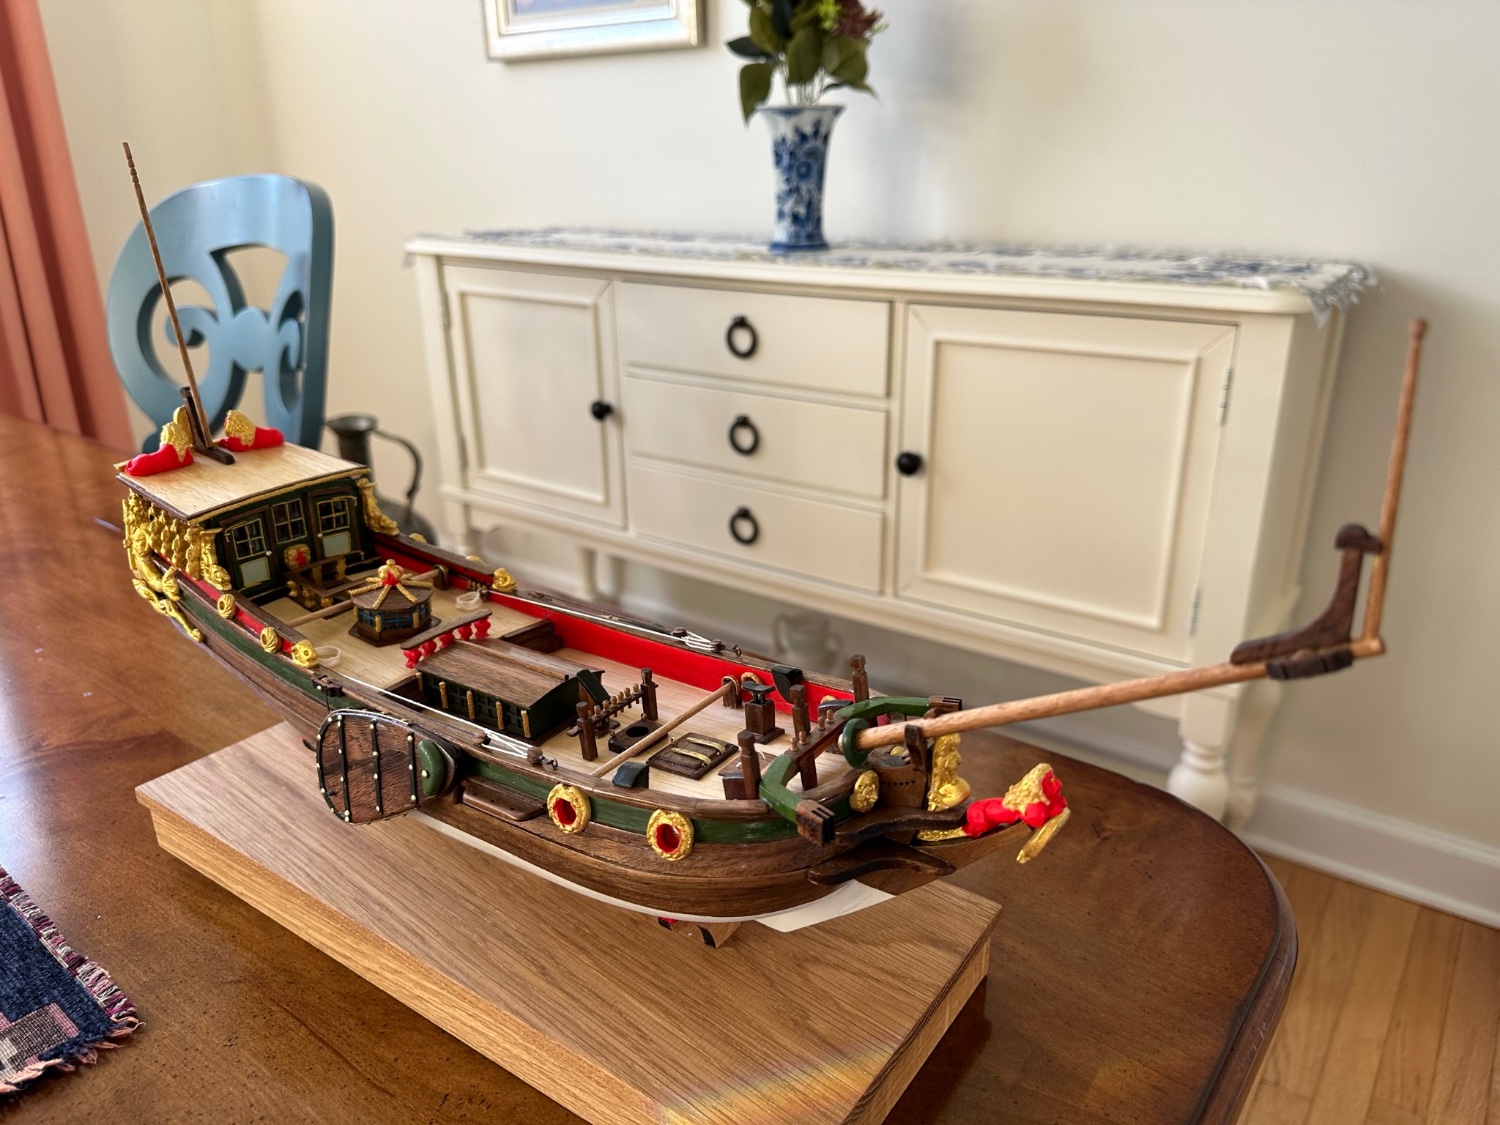
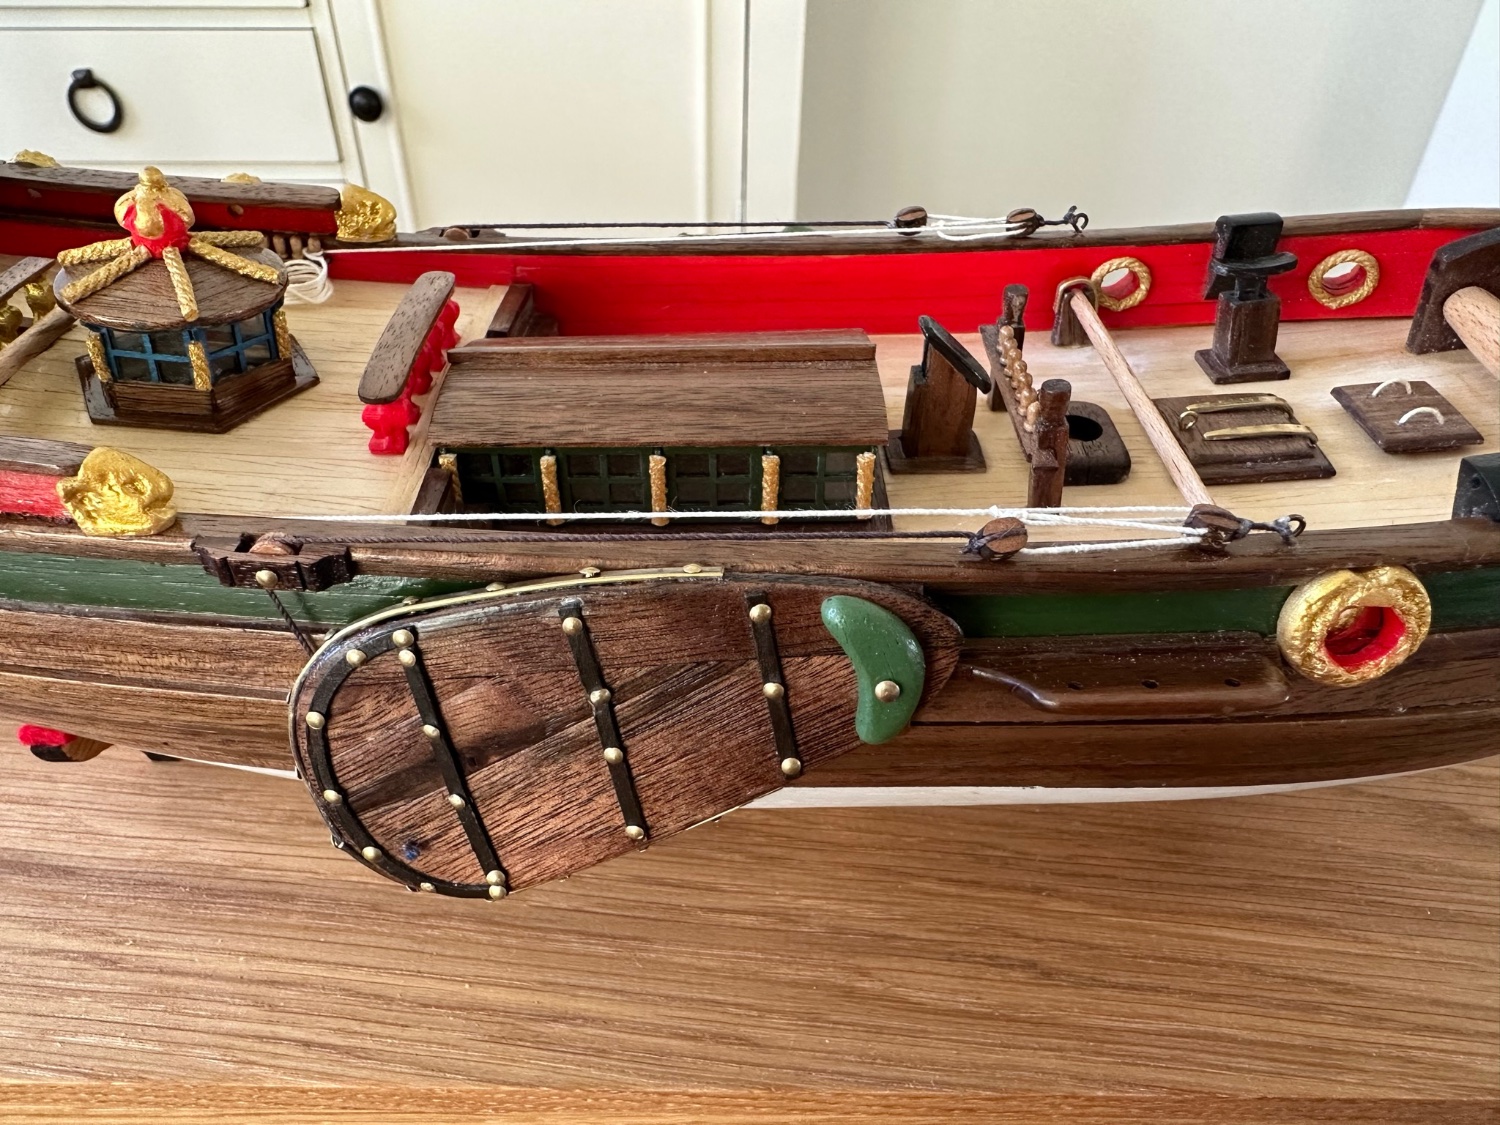
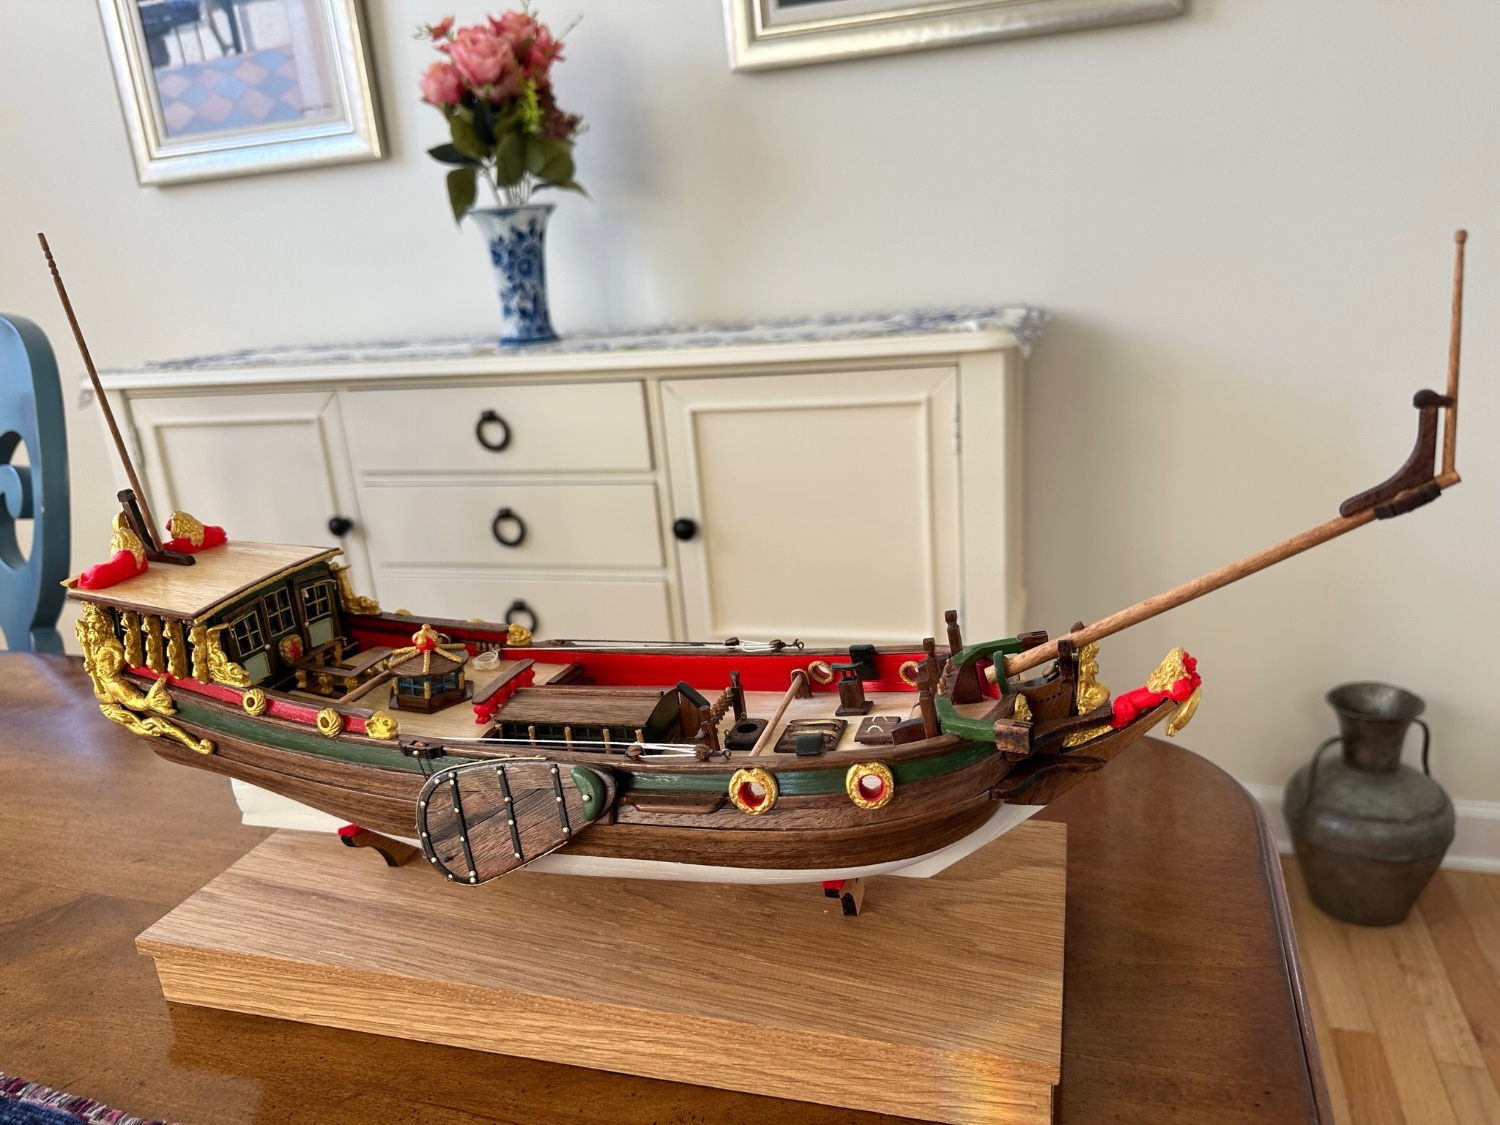
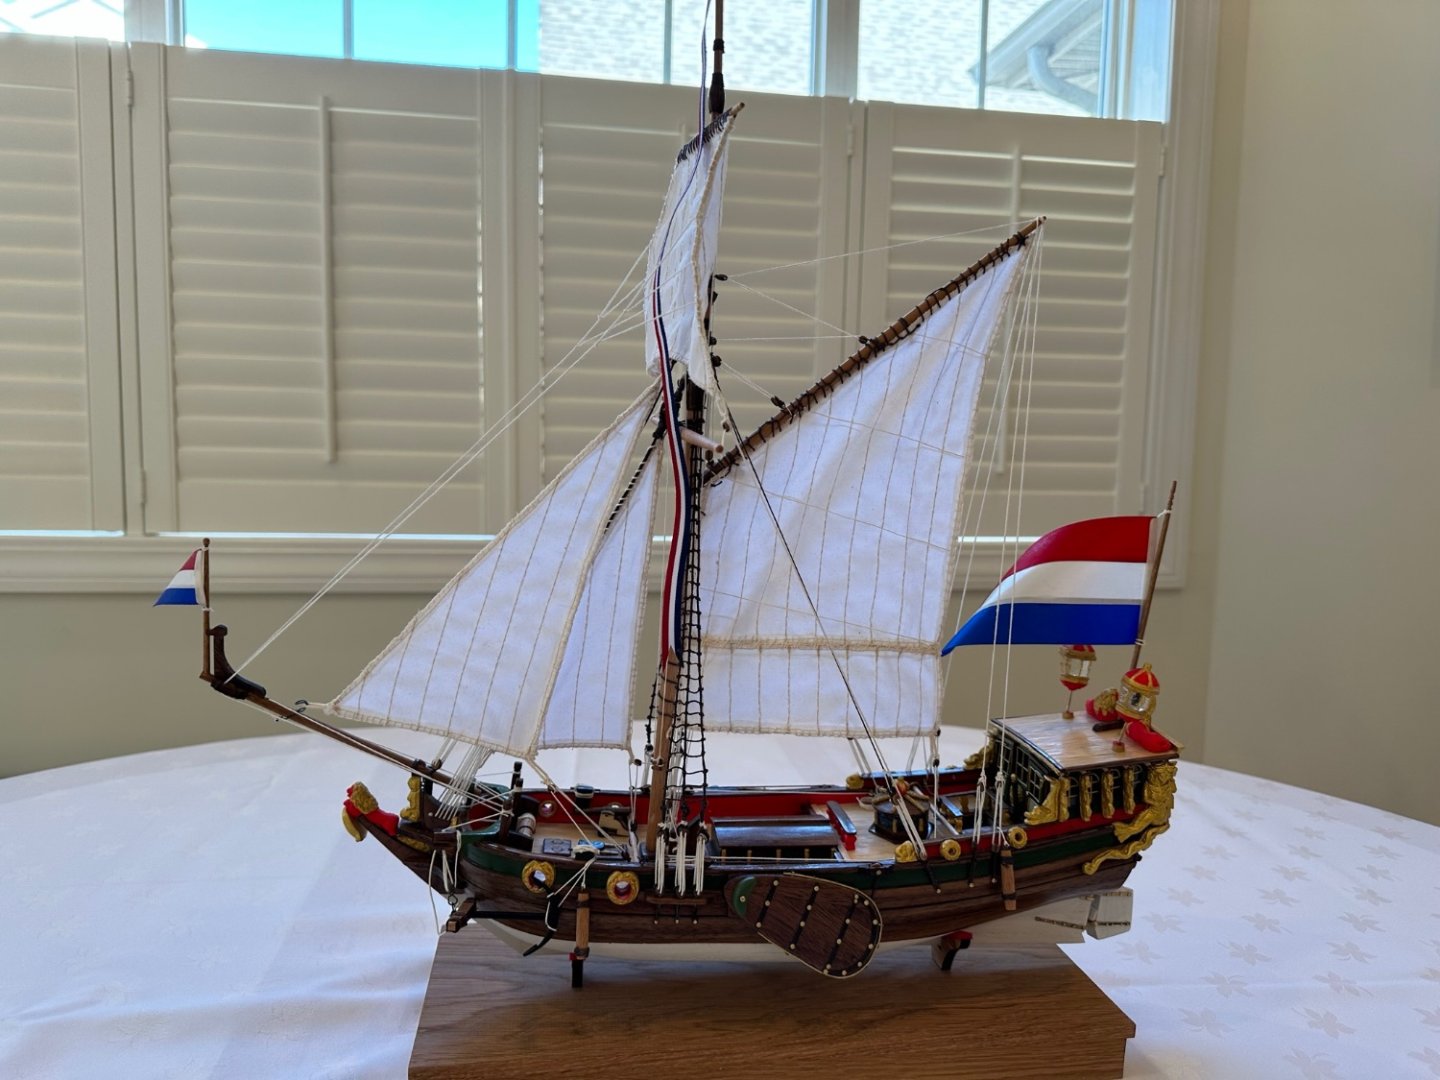
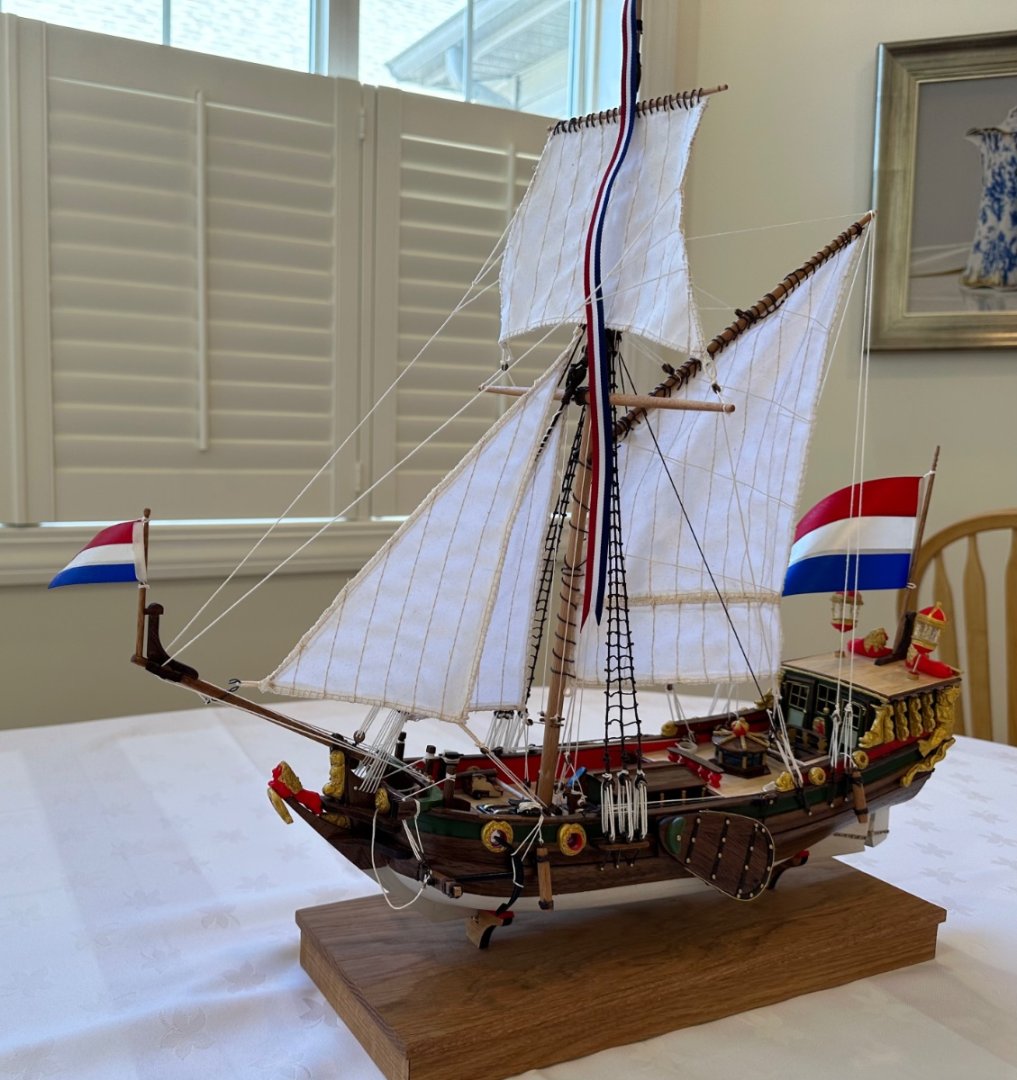
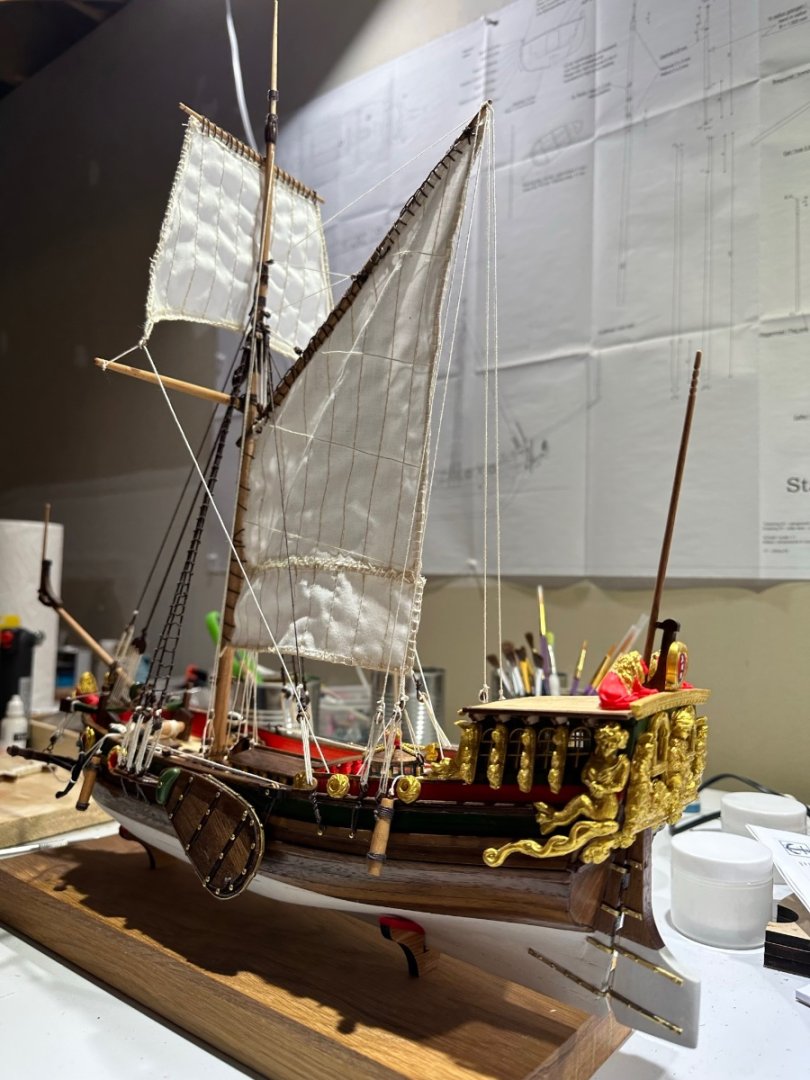
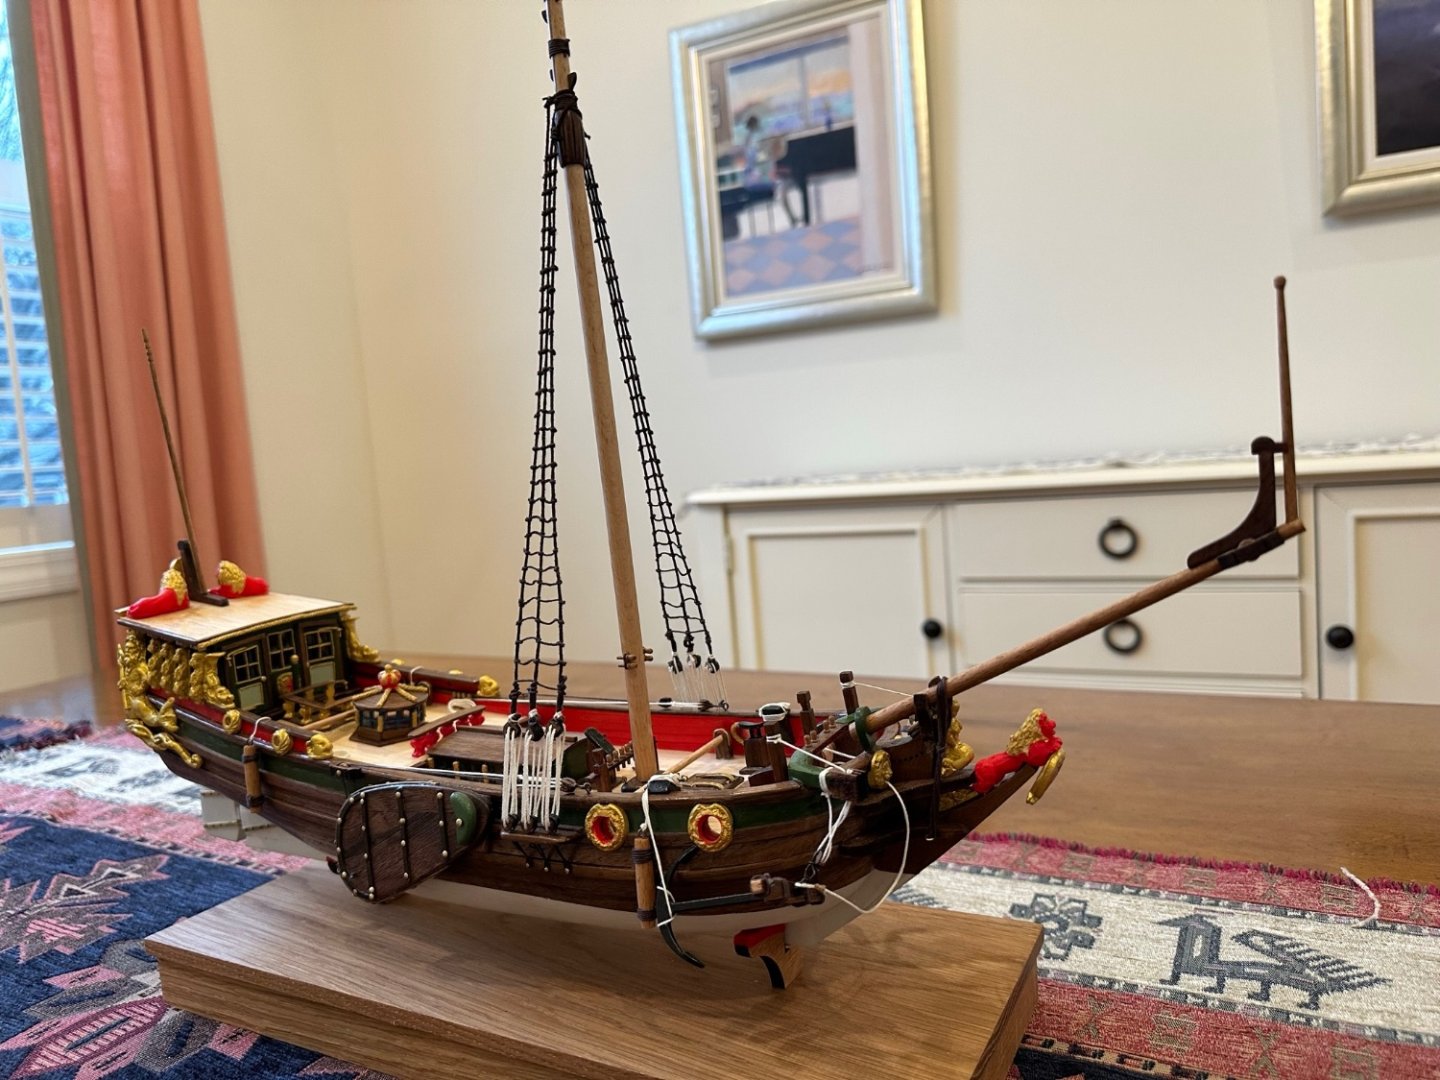
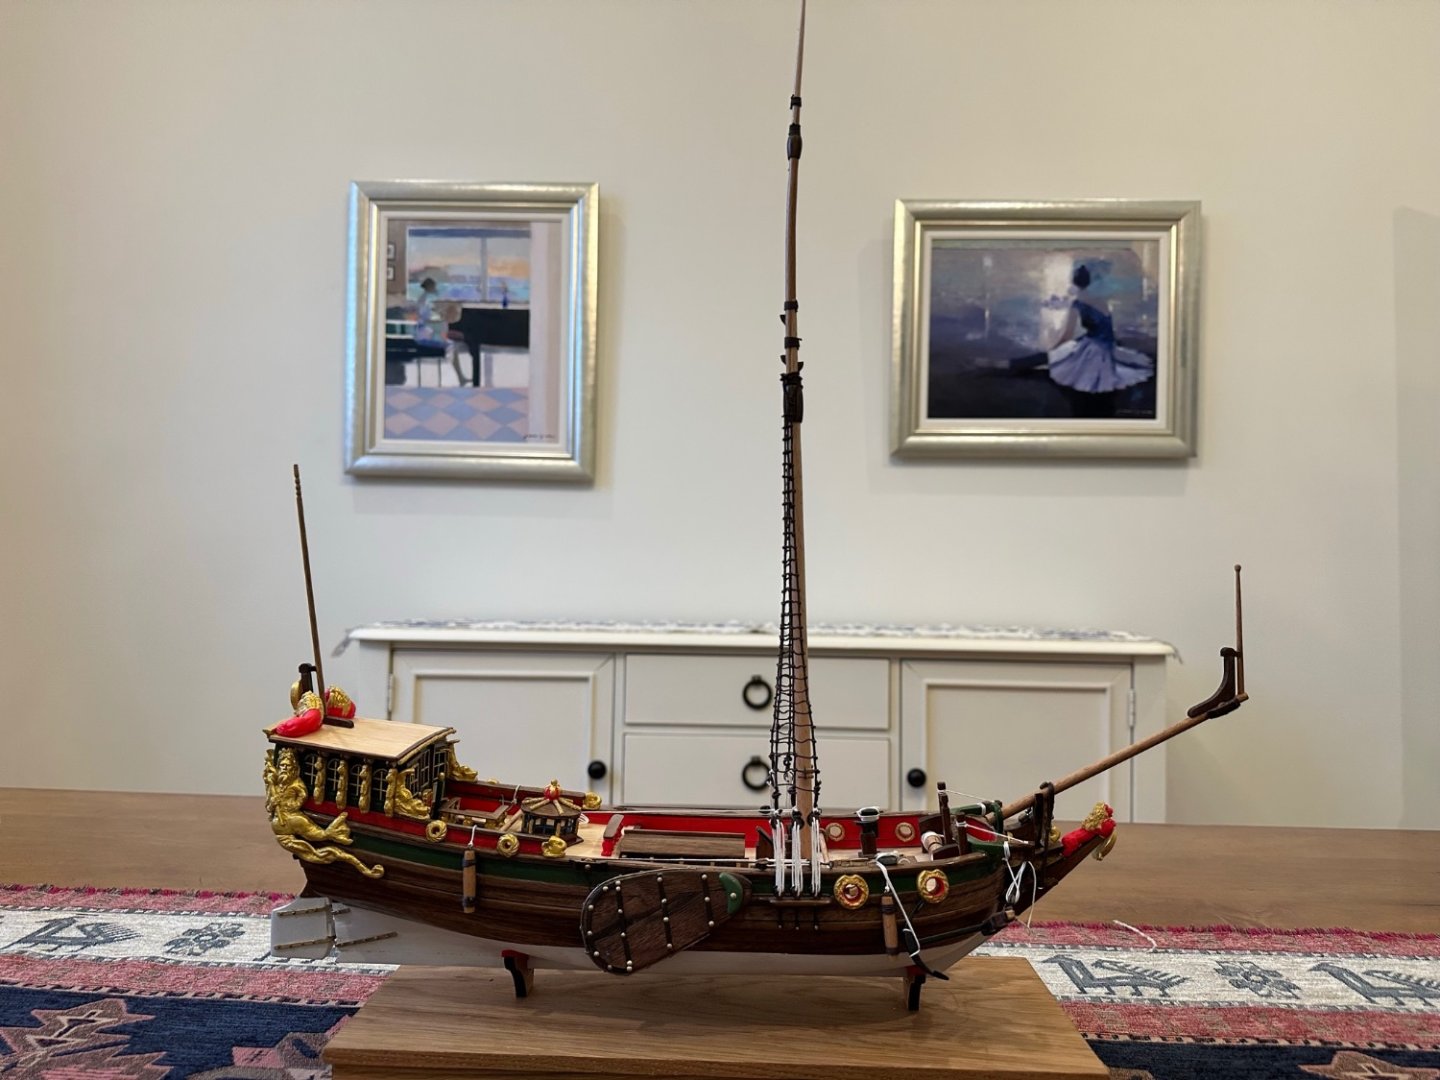
Finished! After an 11-month journey, I’m calling it a Statenjacht. It was a lot of fun, and I learned so much along the way. I wanted to build a kit for my second ship model that would be a stretch, and this definitely was that. Could never have finished this project without constantly mining MSW for the myriad tips, tricks and advice found here. Kudos also to Hans at Kolderstok for producing a great kit - highly recommend if you’re interested in 17th Century Dutch sailing ships. And I’m happy with the result. 😊


- 84 replies
-
- 23
-
-
-
- Statenjacht
- Kolderstok
- (and 1 more)
-
Stan - Welcome! Let me know if you have any questions on your Statenjacht. I’m nearing completion on my own journey with that kit. Melissa
-
Syhobbs - I just saw your post this morning and am glad Hans is helping you out. I have no idea whether I had the old or the new resin parts, though I did spend a great deal of time scraping and sanding them into shape so that they both looked good and fit where they were supposed to go properly.
-
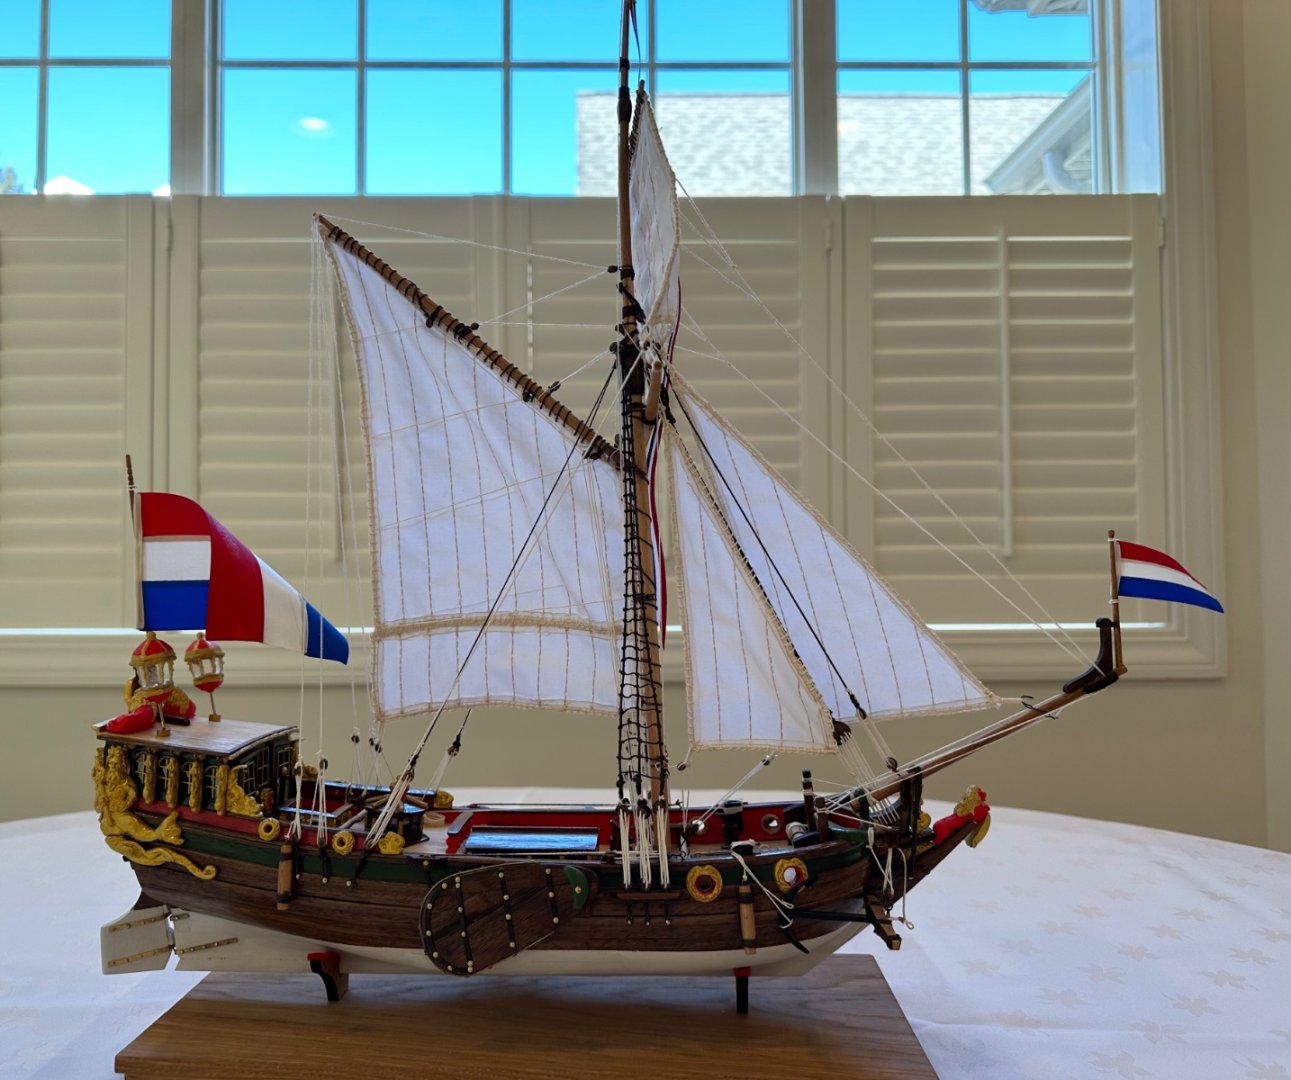
Thank you, Alex and Sjors. Here’s where I’m at now - deep into sails and rigging. The end is in sight, after a nearly year-long journey. It’s been (mostly) a lot of fun, and I’ve certainly learned a lot about ships and model building.


- 84 replies
-
- 15
-
-
- Statenjacht
- Kolderstok
- (and 1 more)
-
Thanks, Mark! It’s a great kit, and I’ve learned a ton building it.
- 84 replies
-
- 3
-
-
- Statenjacht
- Kolderstok
- (and 1 more)
-
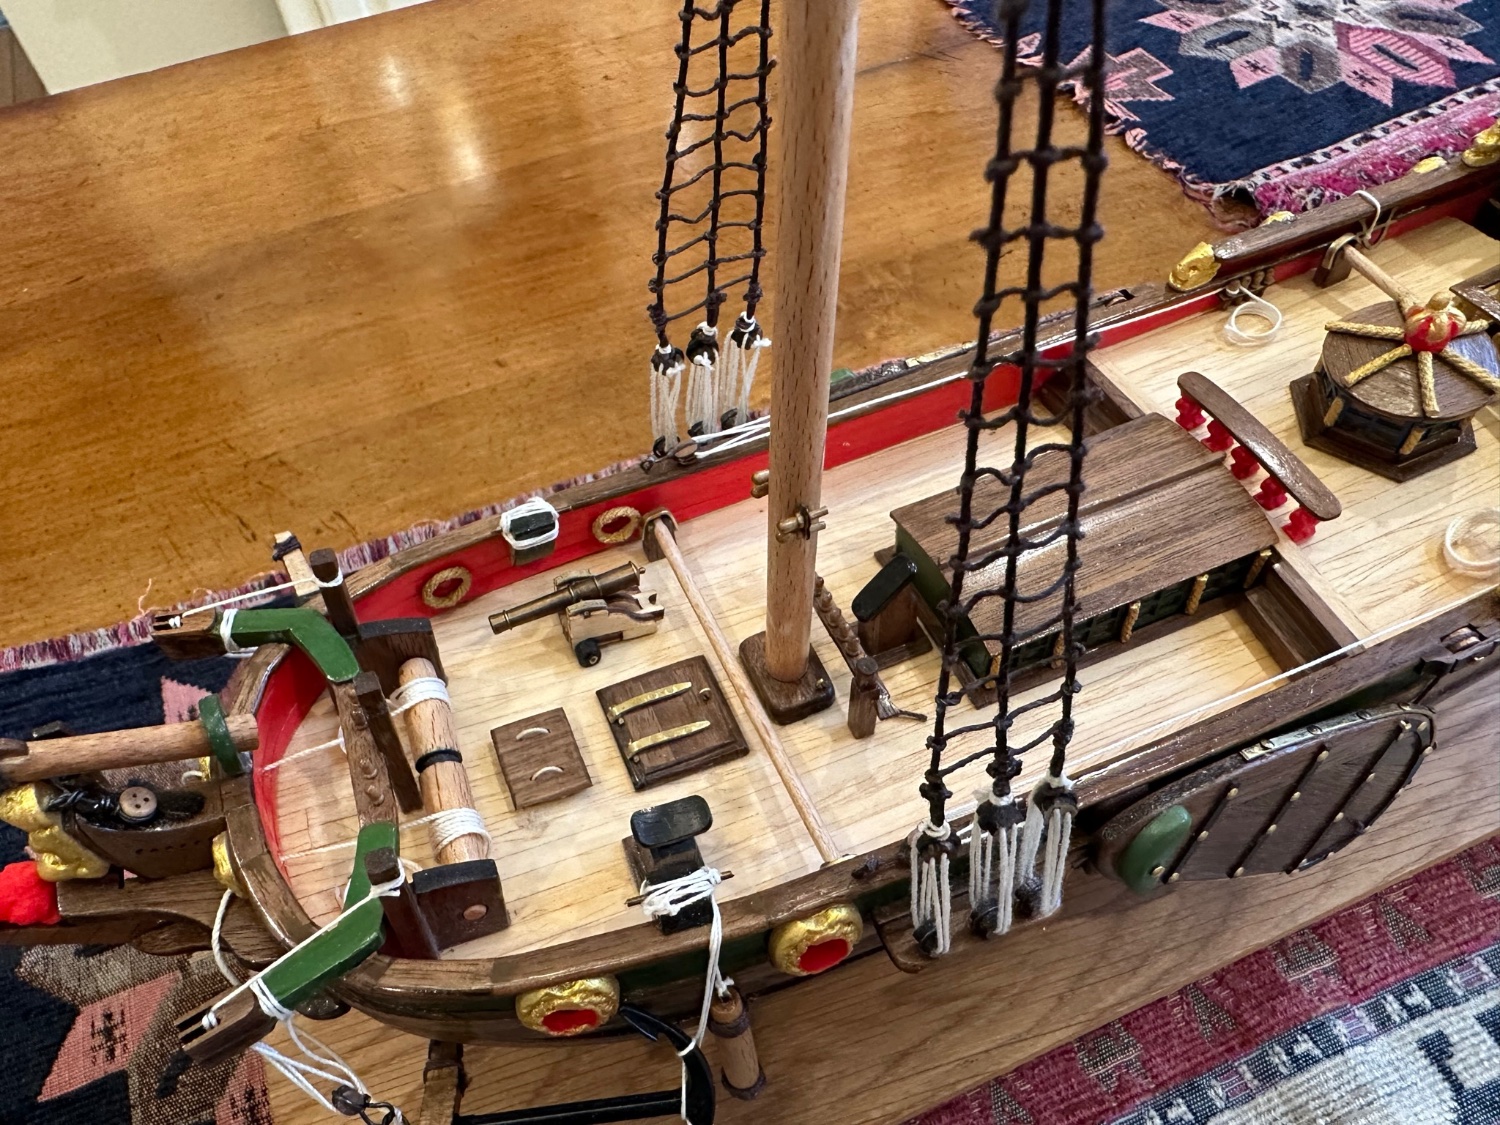
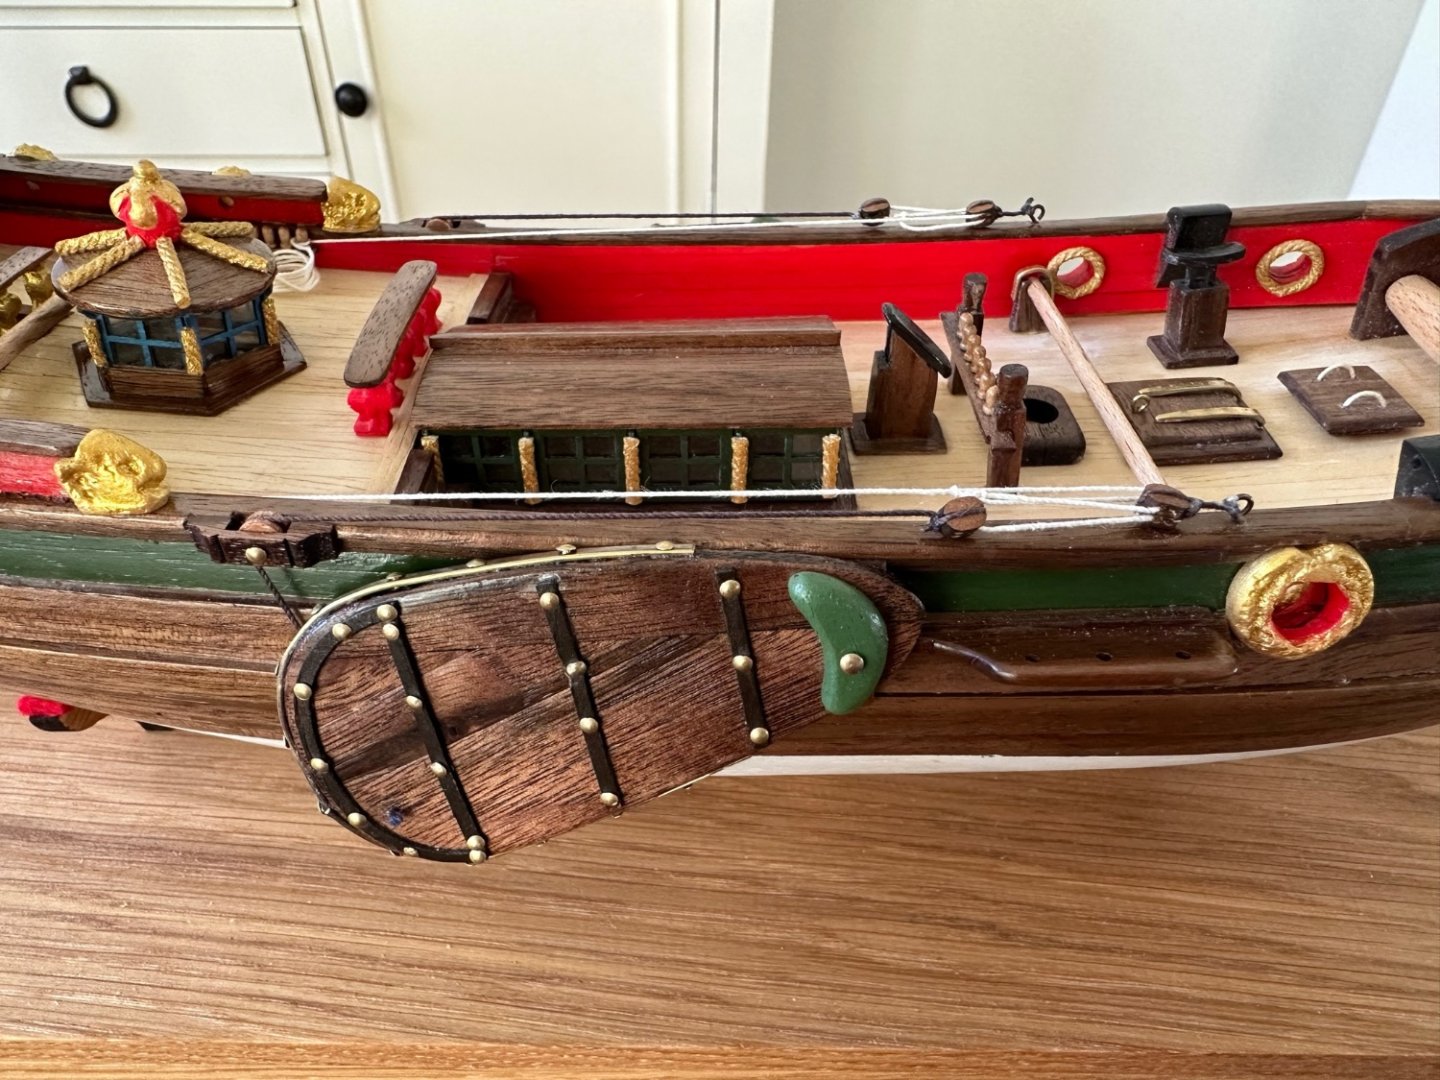
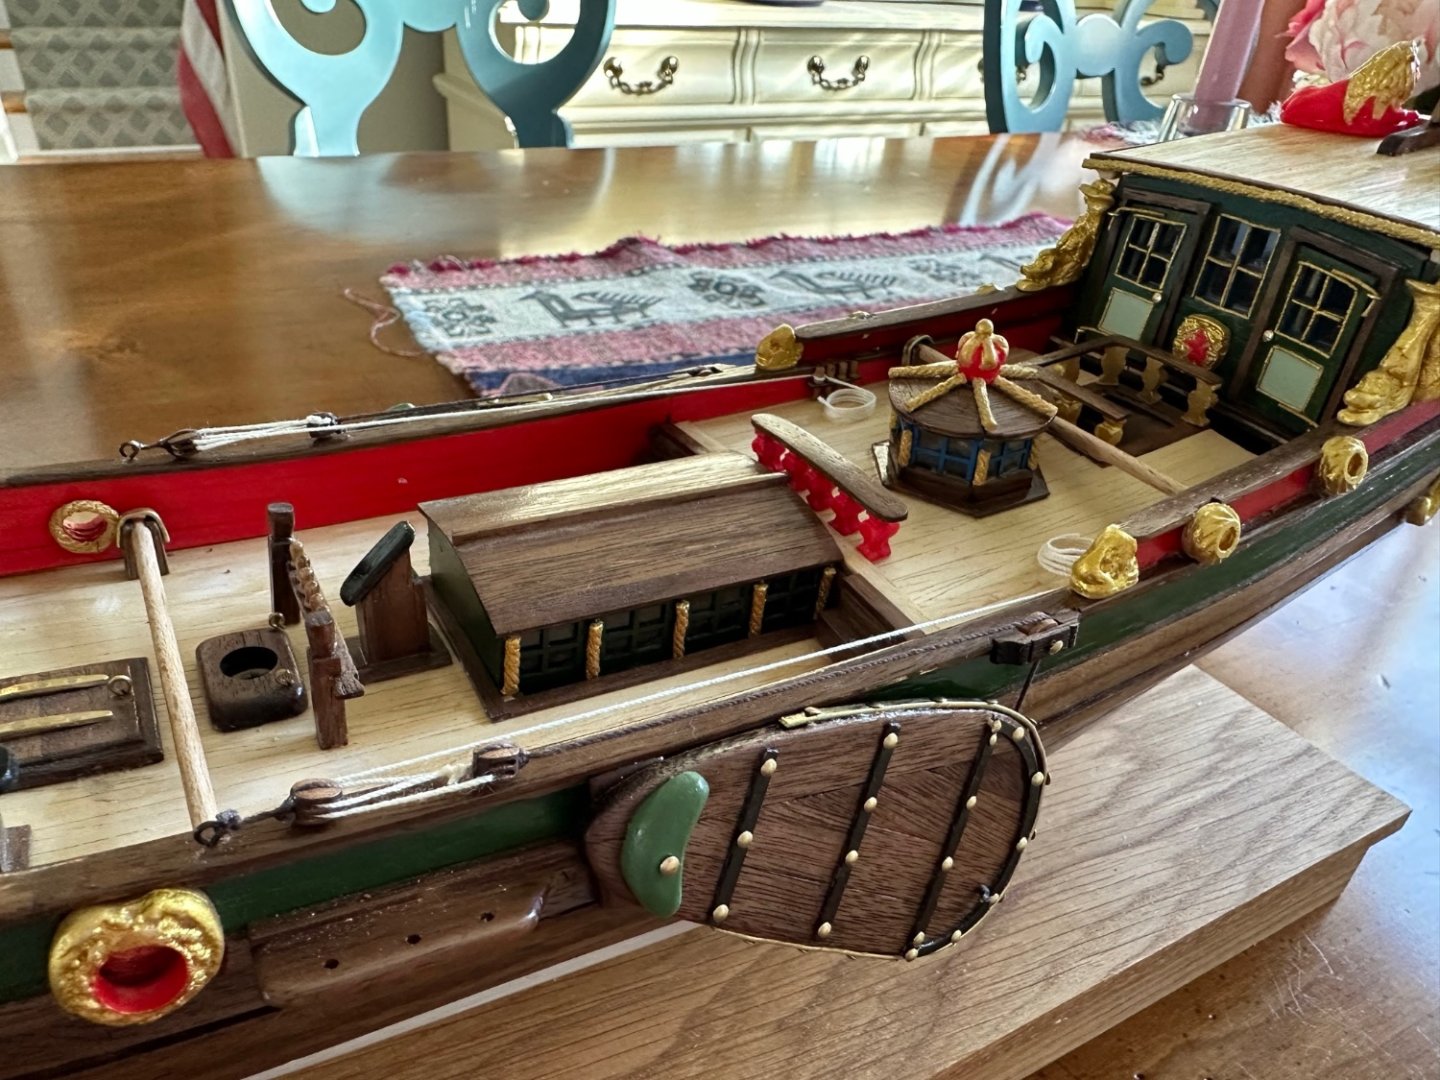
I realized I hadn’t posted anything in a while, so here’s the latest progress report. I had less time over the holidays to work on the Statenjacht, but now I’m able to pick up the pace a bit. I think I’m about 90% done, with only the rest of the rigging and the sails yet to go. I’m hoping to finish this by the one year mark in March! As others have said, definitely a hobby that rewards patience. Over the past week I did the ratlines. It was my first ever effort at these, and the tips on MSW definitely helped, especially using a 50/50 mix of PVA and water to seal and tighten everything. My results aren’t perfect by a long shot, but they’re not awful either so I’m basically happy with how they came out. Getting there!


- 84 replies
-
- 15
-
-
- Statenjacht
- Kolderstok
- (and 1 more)
-
Thank you, Hans! 🇳🇱🇳🇱🇳🇱
-
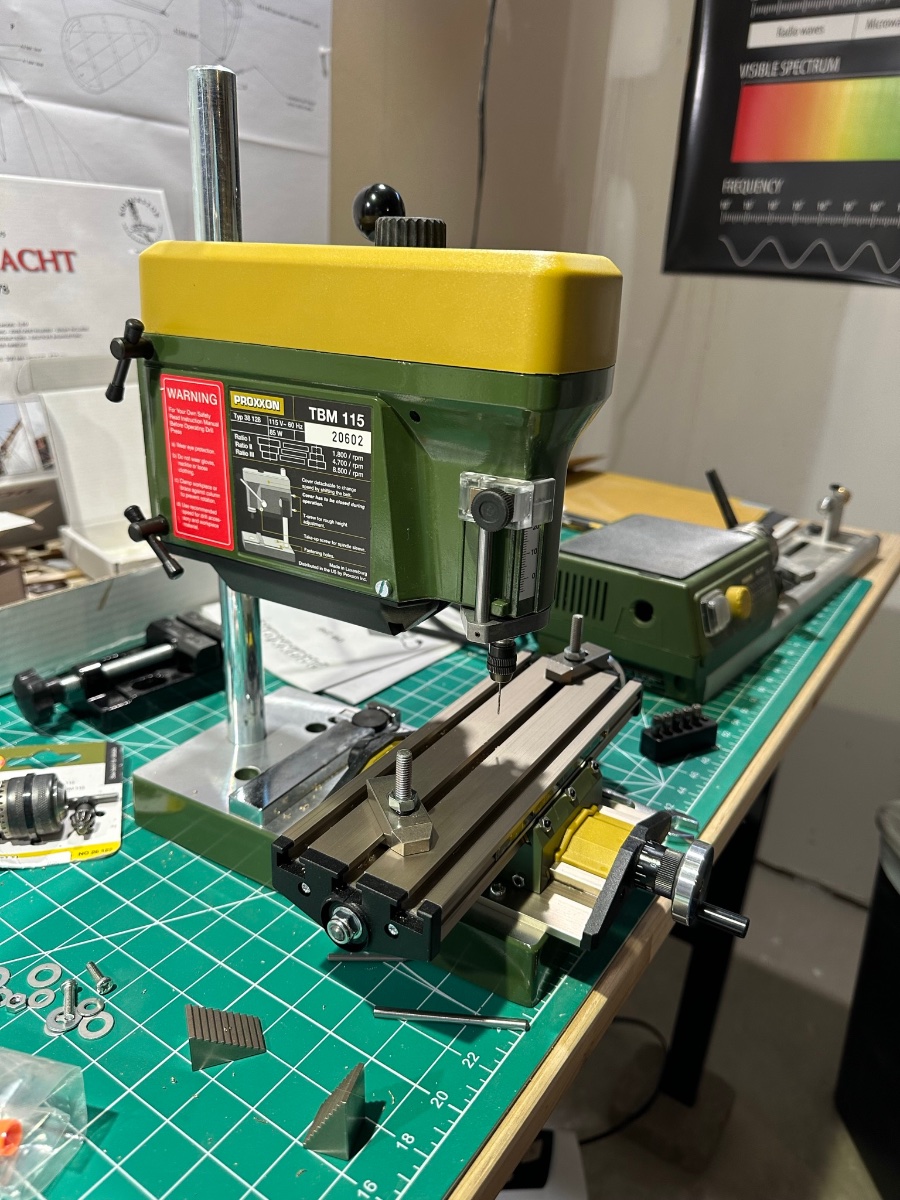
Brian - Thanks for the tip on bolt heads! I’ve only used the lathe a couple of times for the bowsprit and flagpoles, but will be using it more as I get into the masts. I will say though that I was able to taper these dowels in about 15 minutes, work that would have taken me a couple of hours sanding by hand. A definite time saver! I also got Proxxon’s mini drill press and x-y table. These made drilling holes in brass easy, and I couldn’t have done it without them. Highly recommend for this kind of work!

- 84 replies
-
- 6
-
-
- Statenjacht
- Kolderstok
- (and 1 more)
-
Looks great! I’m surprised there wasn’t enough fabric in the kit - I had plenty to spare, so I’m wondering if Bluejacket just made a mistake when they packed your kit.
-
Thank you, Keith - this model shipbuilding thing is quite the journey!
- 84 replies
-
- 3
-
-
- Statenjacht
- Kolderstok
- (and 1 more)
-
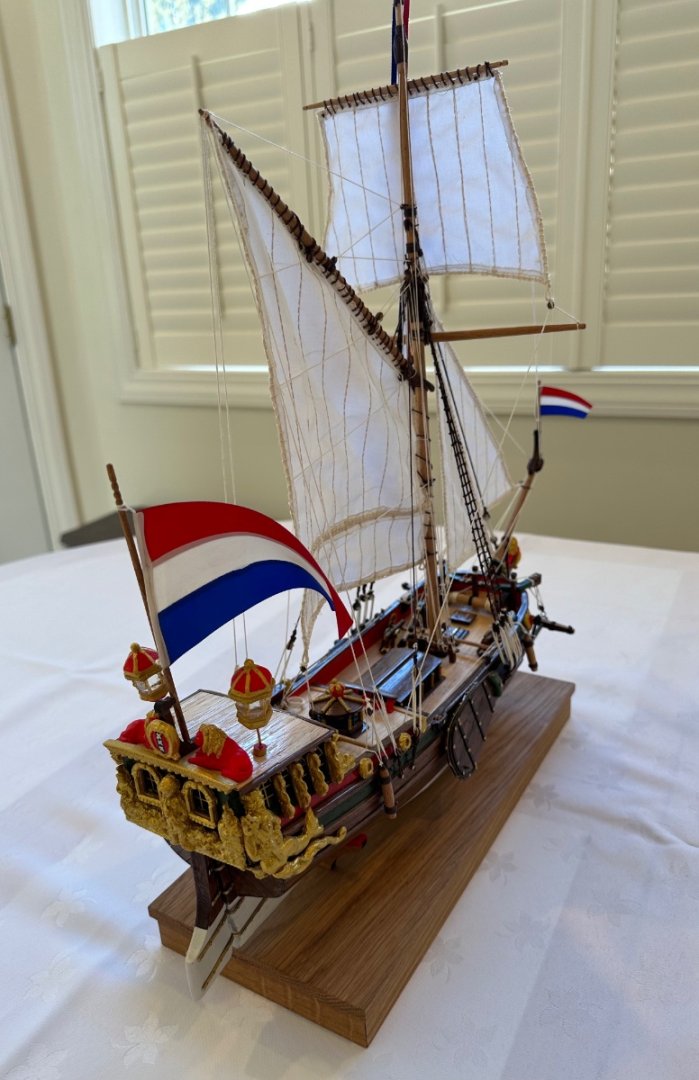
I’ve now built and mounted both of the leeboards - working with brass (for the narrow strips along the edges of the leeboards) turned out to be a huge learning curve with much trial and even more error. After a lot of research on MSW, I figured out there was no way to drill the necessary holes in a 2mm wide brass strip without a drill press and an x-y table attachment. Once I had those tools in hand, I used a mini-blow torch from my kitchen (that I normally use to make the crisp topping on crème brûlée!) to anneal the brass. I had read about that on MSW, and it really does make the brass more pliable and easier to work with. Finally, I figured out that carbide tipped drill bits were necessary, as HSS just didn’t cut it (pun intended). All of this research and trial and error occupied most of the past month, but I’m pretty happy with the result and I’m definitely gaining some new skills. Onward!


- 84 replies
-
- 18
-
-
-
- Statenjacht
- Kolderstok
- (and 1 more)

.jpg.a54f947b06046e8ffacf0bdbb69c7761.jpg)
.jpg.8316c199a9db2cb76113f6f0f7a80440.jpg)
.jpg.735b7728f51ec5fe496bf846ba9ec88b.jpg)
.jpg.0acaa7765b3fd871359347259f6d5c10.jpg)
.jpg.e8a8fd127fde2c57e9540bbb0fed3823.jpg)
.jpg.0d062fbb91afd20dde0381086f4b350c.jpg)