k-slak
-
Posts
65 -
Joined
-
Last visited
-
 Canute reacted to a post in a topic:
Picket Boat #1 by k-slak - Model Shipways - 1:24
Canute reacted to a post in a topic:
Picket Boat #1 by k-slak - Model Shipways - 1:24
-
Canute reacted to a post in a topic:
Picket Boat #1 by k-slak - Model Shipways - 1:24
-
k-slak reacted to a post in a topic:
Picket Boat #1 by k-slak - Model Shipways - 1:24
-
k-slak reacted to a post in a topic:
Picket Boat #1 by k-slak - Model Shipways - 1:24
-
 k-slak reacted to a post in a topic:
Picket Boat #1 by k-slak - Model Shipways - 1:24
k-slak reacted to a post in a topic:
Picket Boat #1 by k-slak - Model Shipways - 1:24
-
robert952 reacted to a post in a topic:
Picket Boat #1 by k-slak - Model Shipways - 1:24
-
Keith Black reacted to a post in a topic:
Picket Boat #1 by k-slak - Model Shipways - 1:24
-
Keith Black reacted to a post in a topic:
Picket Boat #1 by k-slak - Model Shipways - 1:24
-
Keith Black reacted to a post in a topic:
Picket Boat #1 by k-slak - Model Shipways - 1:24
-
Keith Black reacted to a post in a topic:
Picket Boat #1 by k-slak - Model Shipways - 1:24
-
Keith Black reacted to a post in a topic:
Picket Boat #1 by k-slak - Model Shipways - 1:24
-
Keith Black reacted to a post in a topic:
Picket Boat #1 by k-slak - Model Shipways - 1:24
-
 My spouse does metal and plastic modeling of tanks, planes, and cars and we were discussing weathering options. Definitely planning on some rusting and calcium like build ups as well as coal. Will be a fun and maybe a little dirty. Thanks for the kind comments.
 -
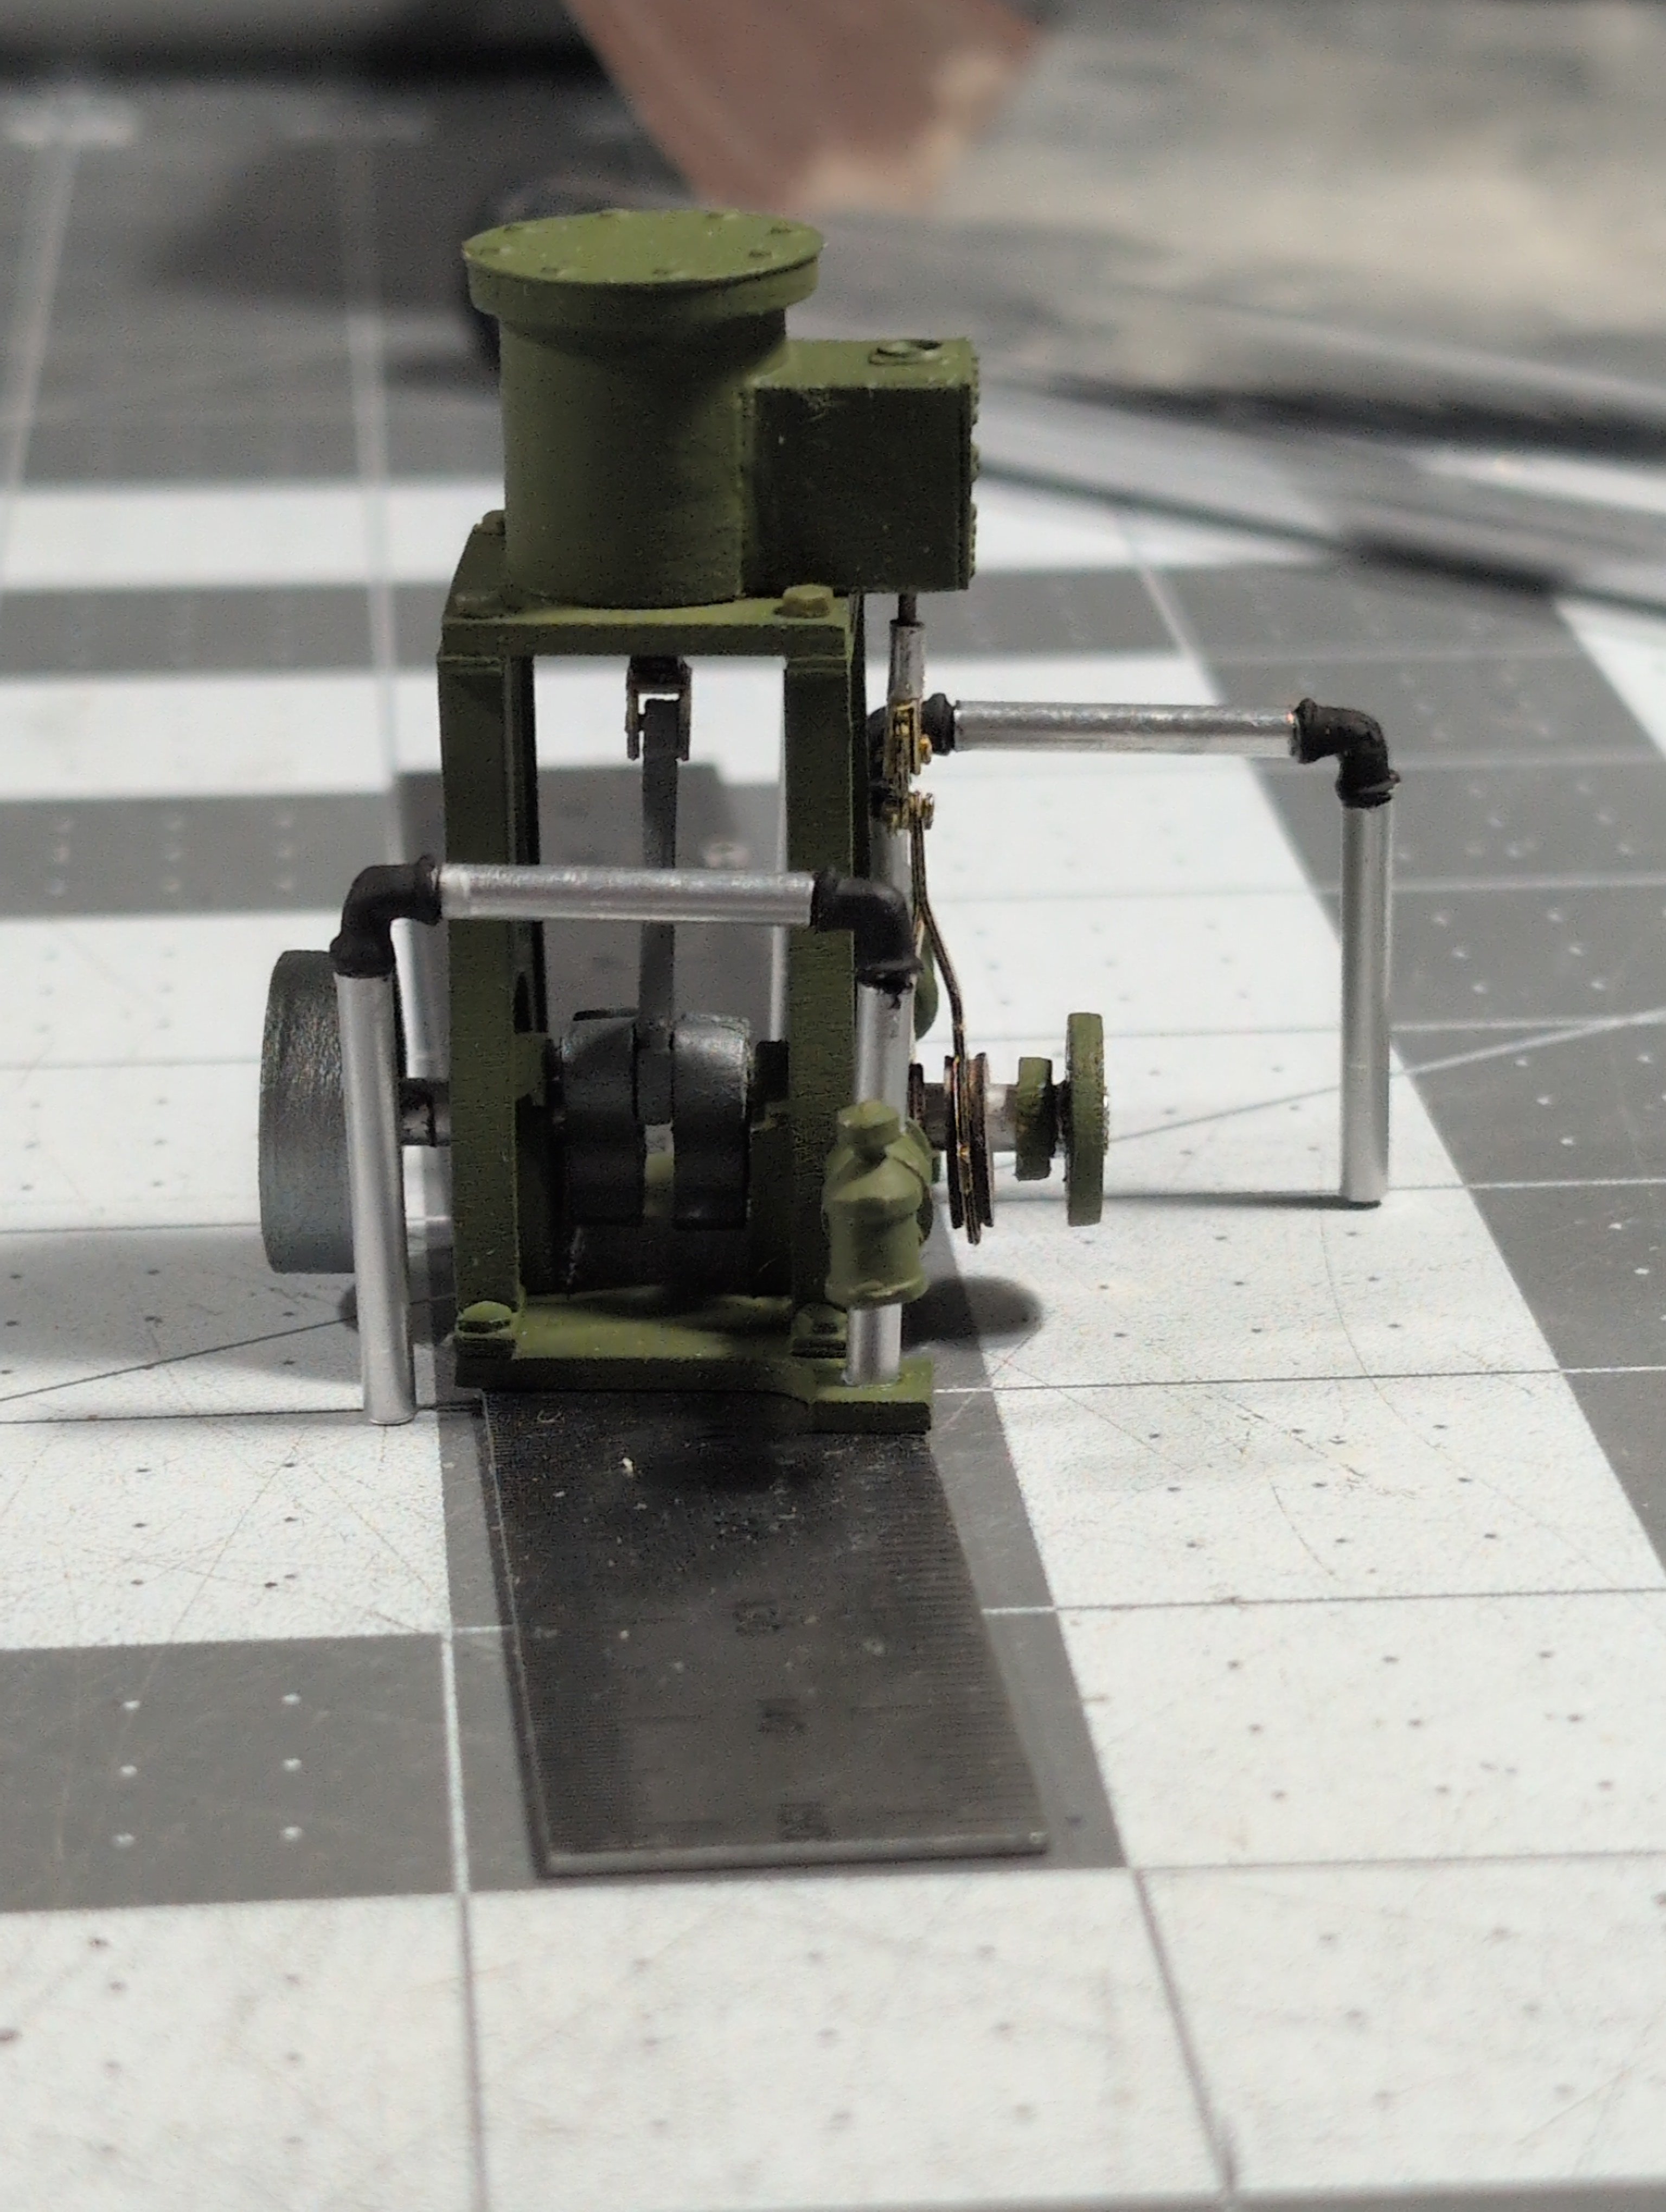
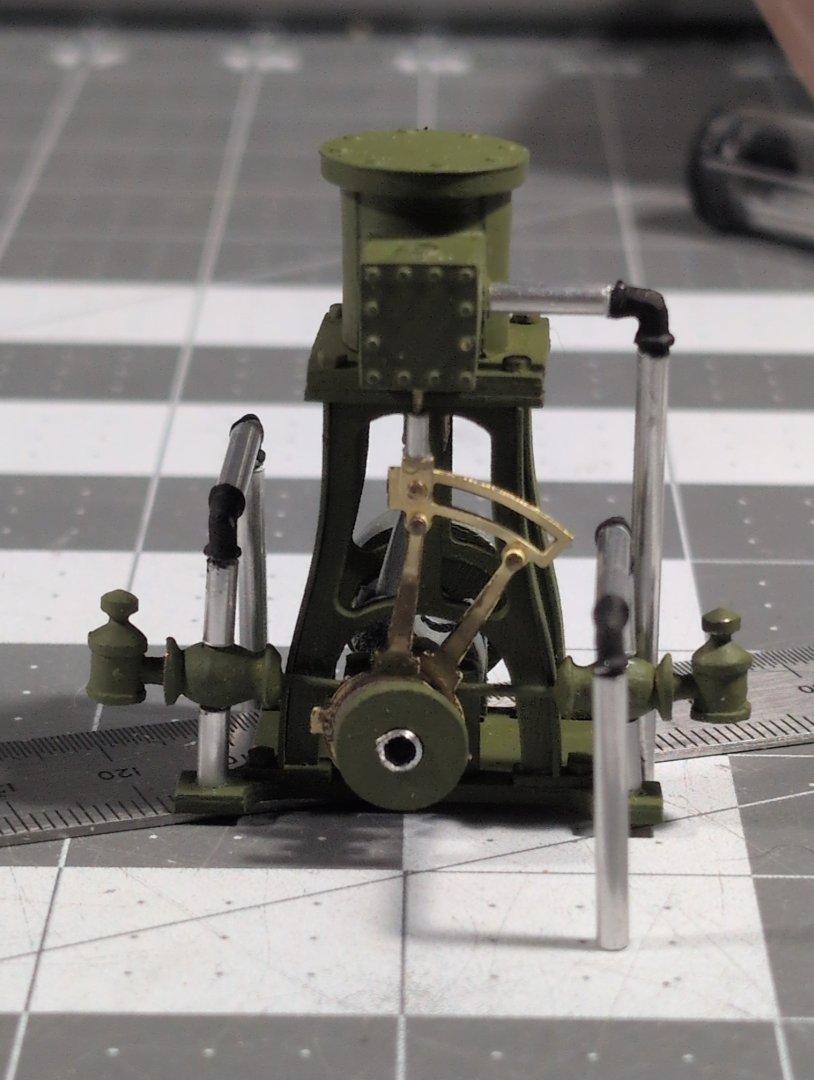
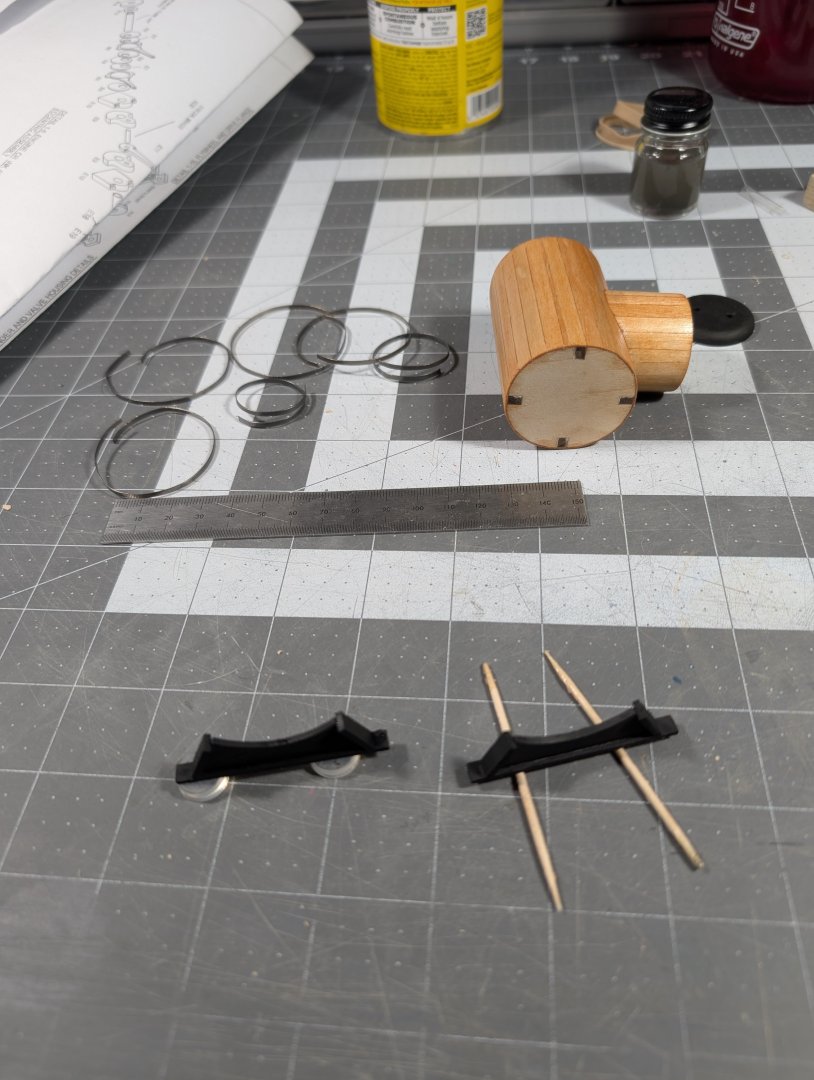
Completion of the boiler. As noted in my last entry I completed all the pieces of the boiler and placed inside the boat for spacing as I complete the engine. Steam engine I spent most of my free time working on the engine this last week. It's shocking to spend all day working on something and in the end you have this tiny thing that looks like not a lot of progress unless you know what went into it. I opted to paint the engine parts No1 Light Green (FS34151) I liked the look of it a little more and seems more dingy than the brighter green I saw in other models. I have also opted to paint the connectors (elbows, valves, etc) black as this toned down the shiny look of everything. I have notices a few pipe sections committed from the instructions and/or not broken down in the drawings but seem to just appear in later drawings (I.e. Check valve on boilers and Steam Exhaust on engine, and the plumbing assembly going from the boiler to the engine). So I'm using the drawings and pictures to hopefully piece together the requirements. Next is the Condenser and Hot Well construction and installing the pieces in the boat and installing the final long aluminum plumbing piece to complete the connection.

-
 k-slak reacted to a post in a topic:
Picket Boat #1 by k-slak - Model Shipways - 1:24
k-slak reacted to a post in a topic:
Picket Boat #1 by k-slak - Model Shipways - 1:24
-
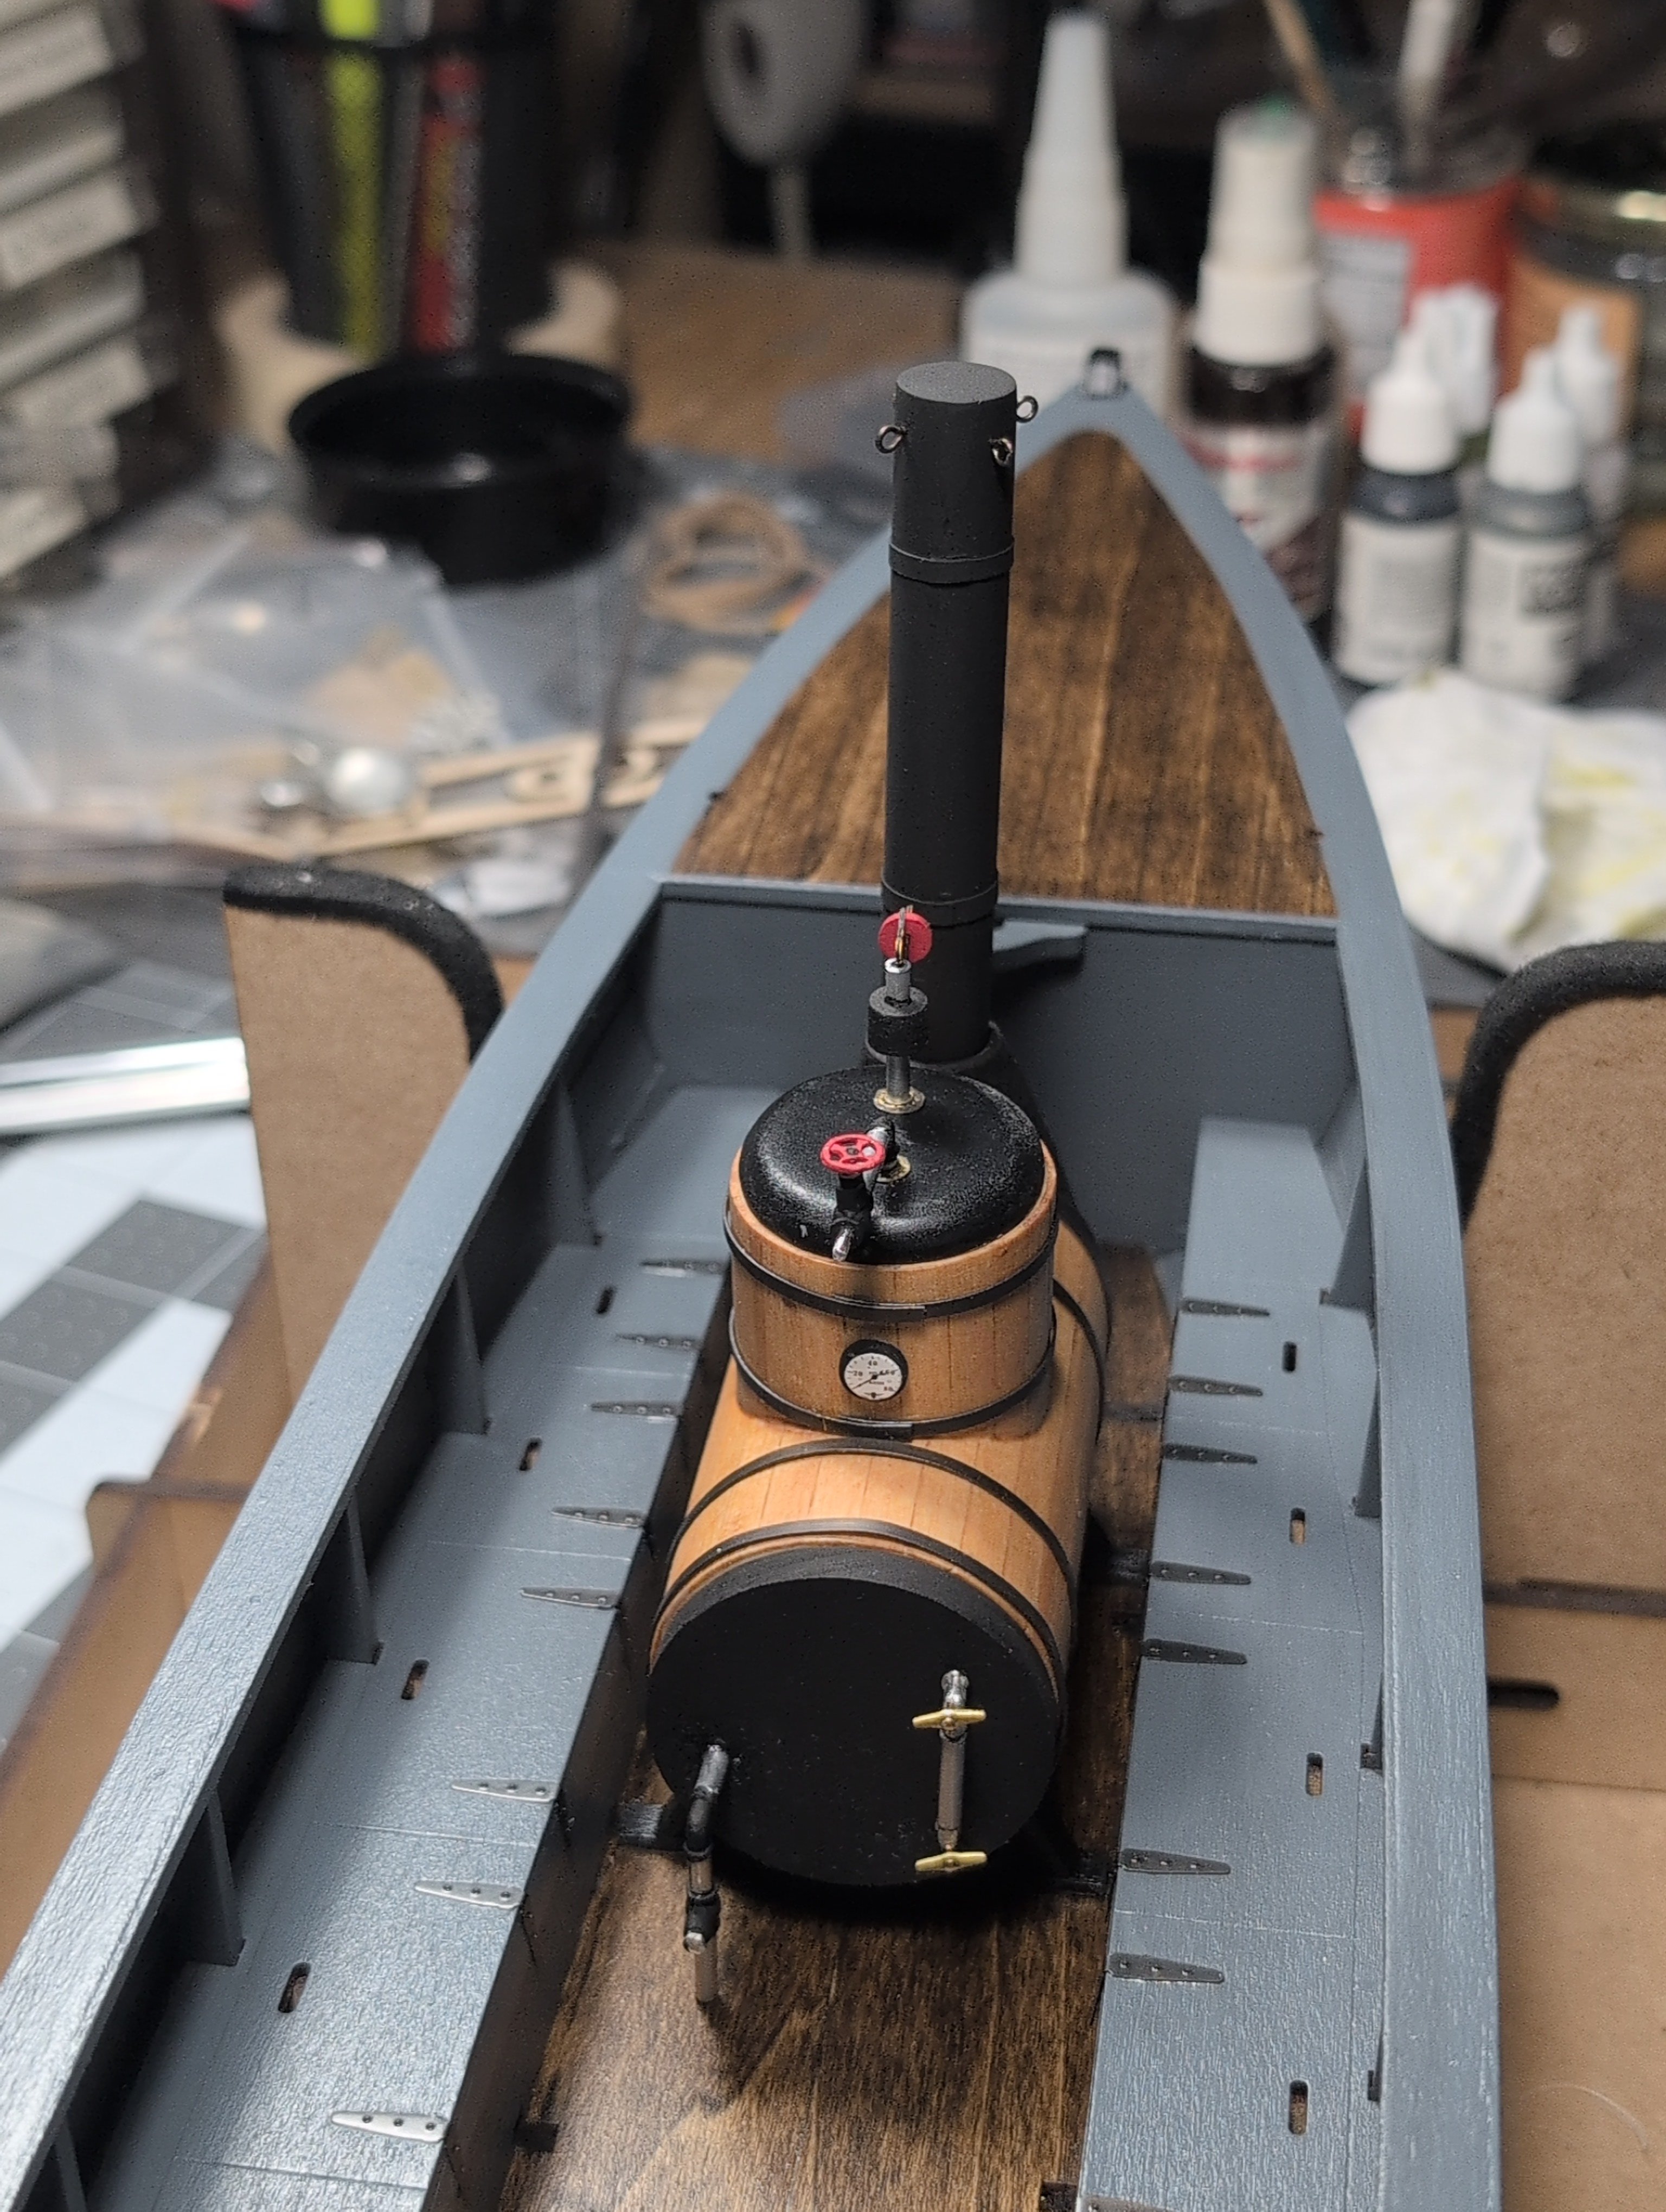
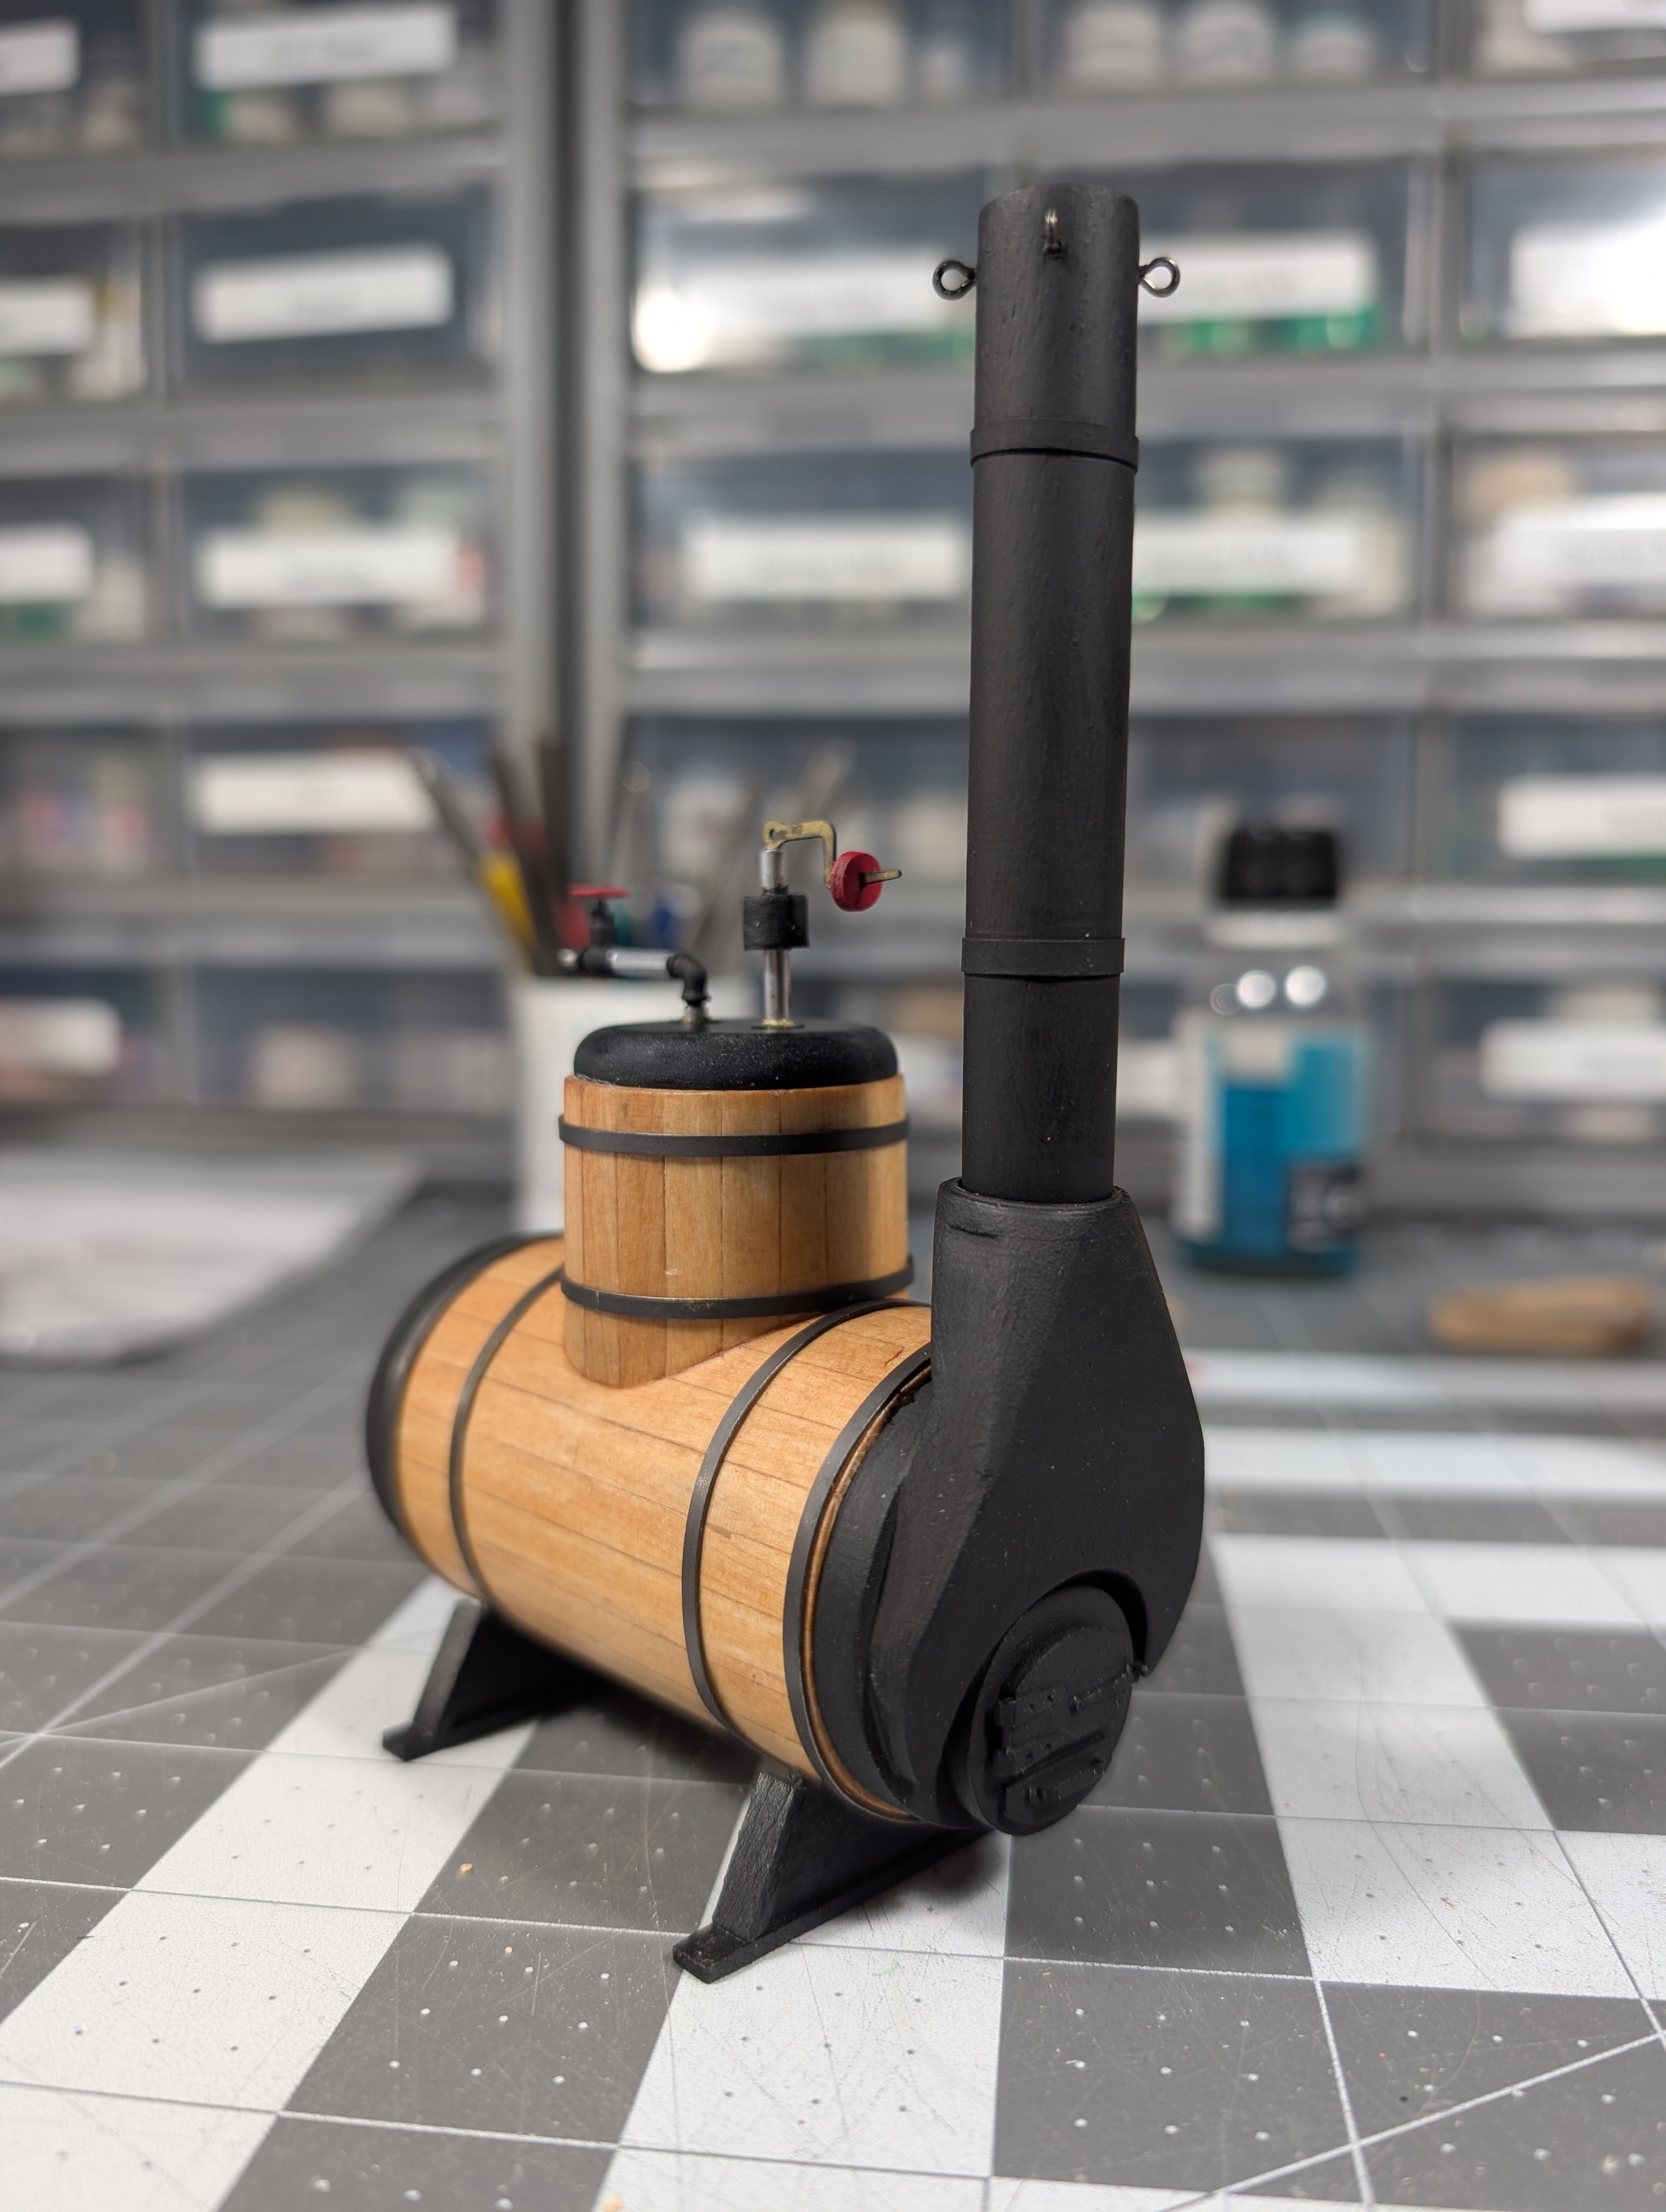
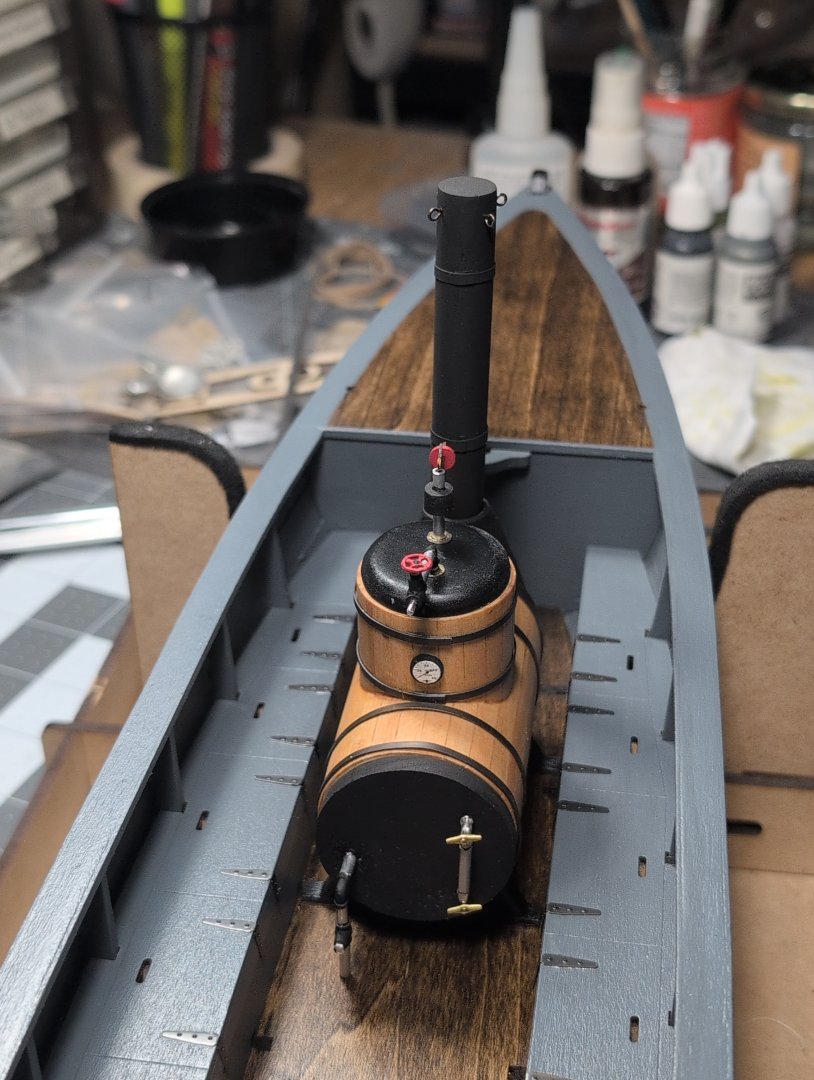
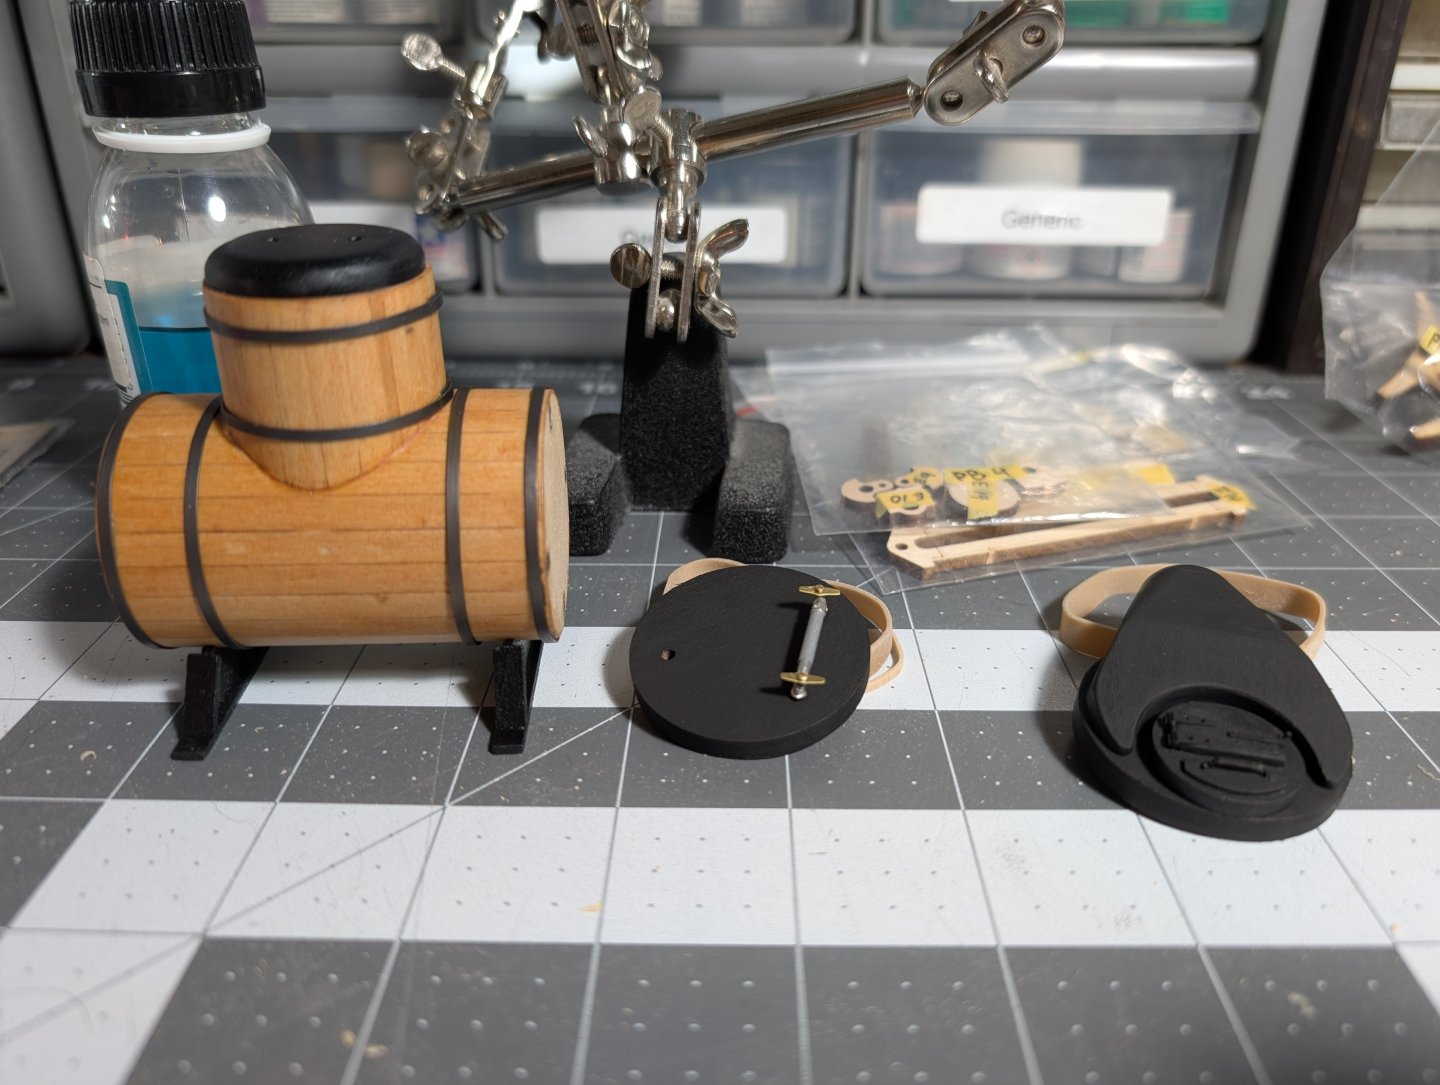
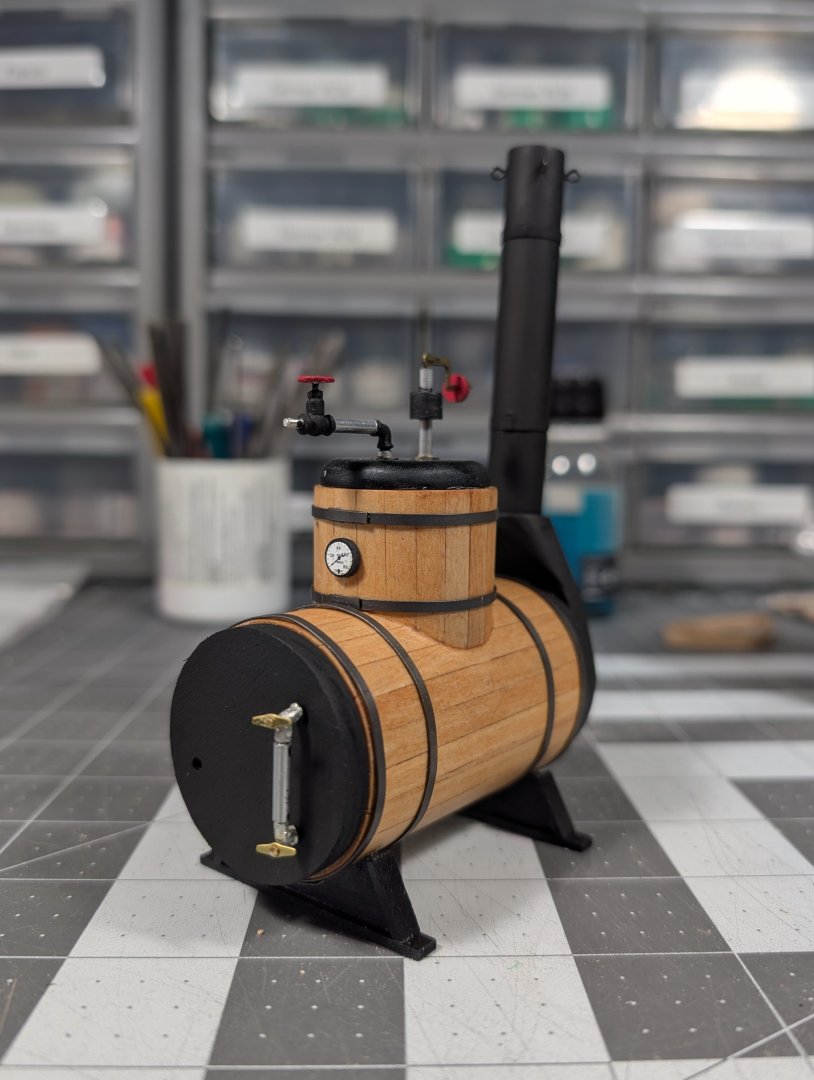
Hull is completed with a coat of semi gloss lacquer. And got to move onto building the boiler. I opted for using brass bands instead of the paper for the boiler wraps. Wrapped them around a bottle about half the diameter then placed into a blackening solution. The boiler top I had to think of it as a button and the shaping went great. I also finished it with a black lacquer - flat finish. Building the boiler ends was simple. Getting the wood to finish smooth with the acrylic paint was harder than anticipated especially on the stack but I got there eventually with a few rounds of filler, paint, and sanding. The stack bands ended up being cardstock painted black as I couldn't get the bands of brass to glue and stay put. Overall the final look is good. When putting ont he boiler ends I drilled a small hole in each piece at center and put in a small pin this allowed me to get it centered and then just worry about things being oriented right. The pressure dial in my kit was a "cut from cardstock" situation but the cardstock was blue. So, I worked with my partner to find a gauge from one of his over kits that looked close to correct. It's not perfect but gets the idea. One part I haven't done yet is the check valve that come out and goes into the "floor" in review of instructions it wasn't noted when this is to be done but it was definitely in the assembly picture. I'll likely come back to this next build session. Here is the 90% finished Boiler with fire box and stack. I'm hoping to do some good weathering on the pipes as the boat and system looking pristine doesn't seem right. If anyone has some ideas on how I'll take it. I have access to oils, acrylics and lacquers.

-
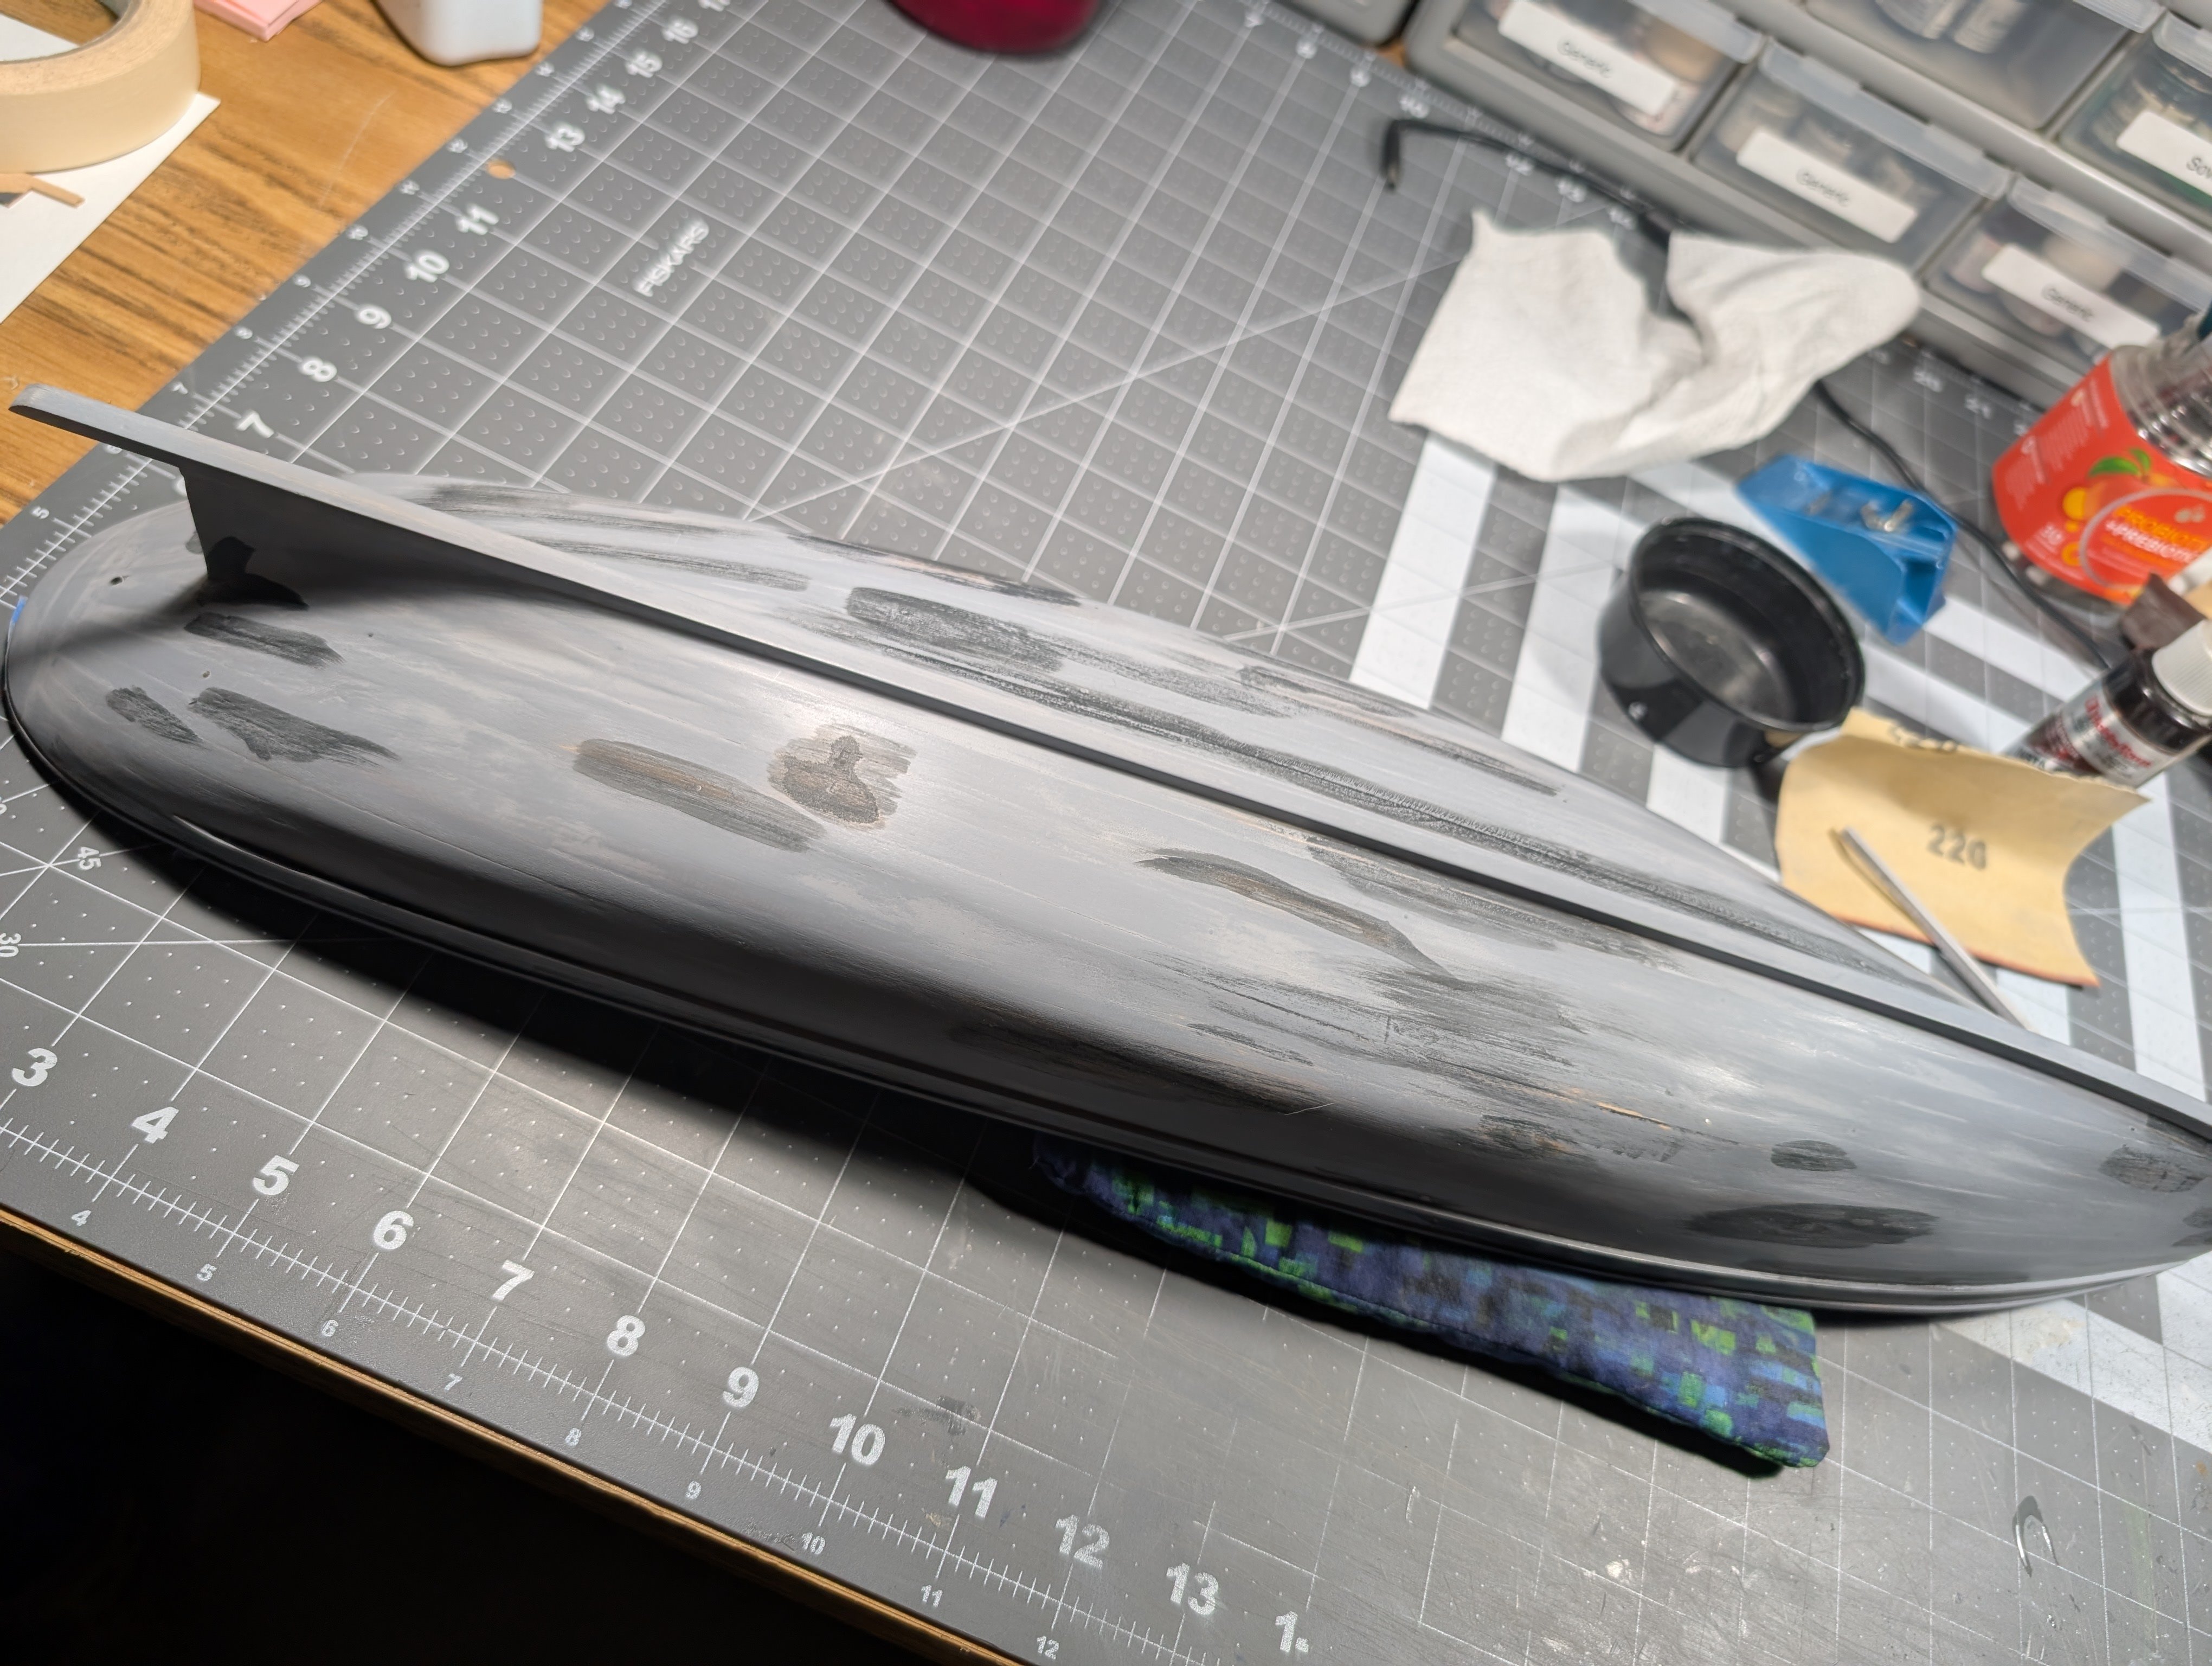
Quick update that got me through painting of the hull. First I completed touch up of the stain and Grey on the inside. Highly recommend folks write down what color paint they used before they out it away and have to find it later. Then we primed the hull then filled the low spots and sanded down the high spots. Primed again and repeated the process. I haven't done much other work for the moment but I have done some of the pot metal items seam clean up.


-
k-slak reacted to a post in a topic:
Picket Boat #1 by k-slak - Model Shipways - 1:24
-
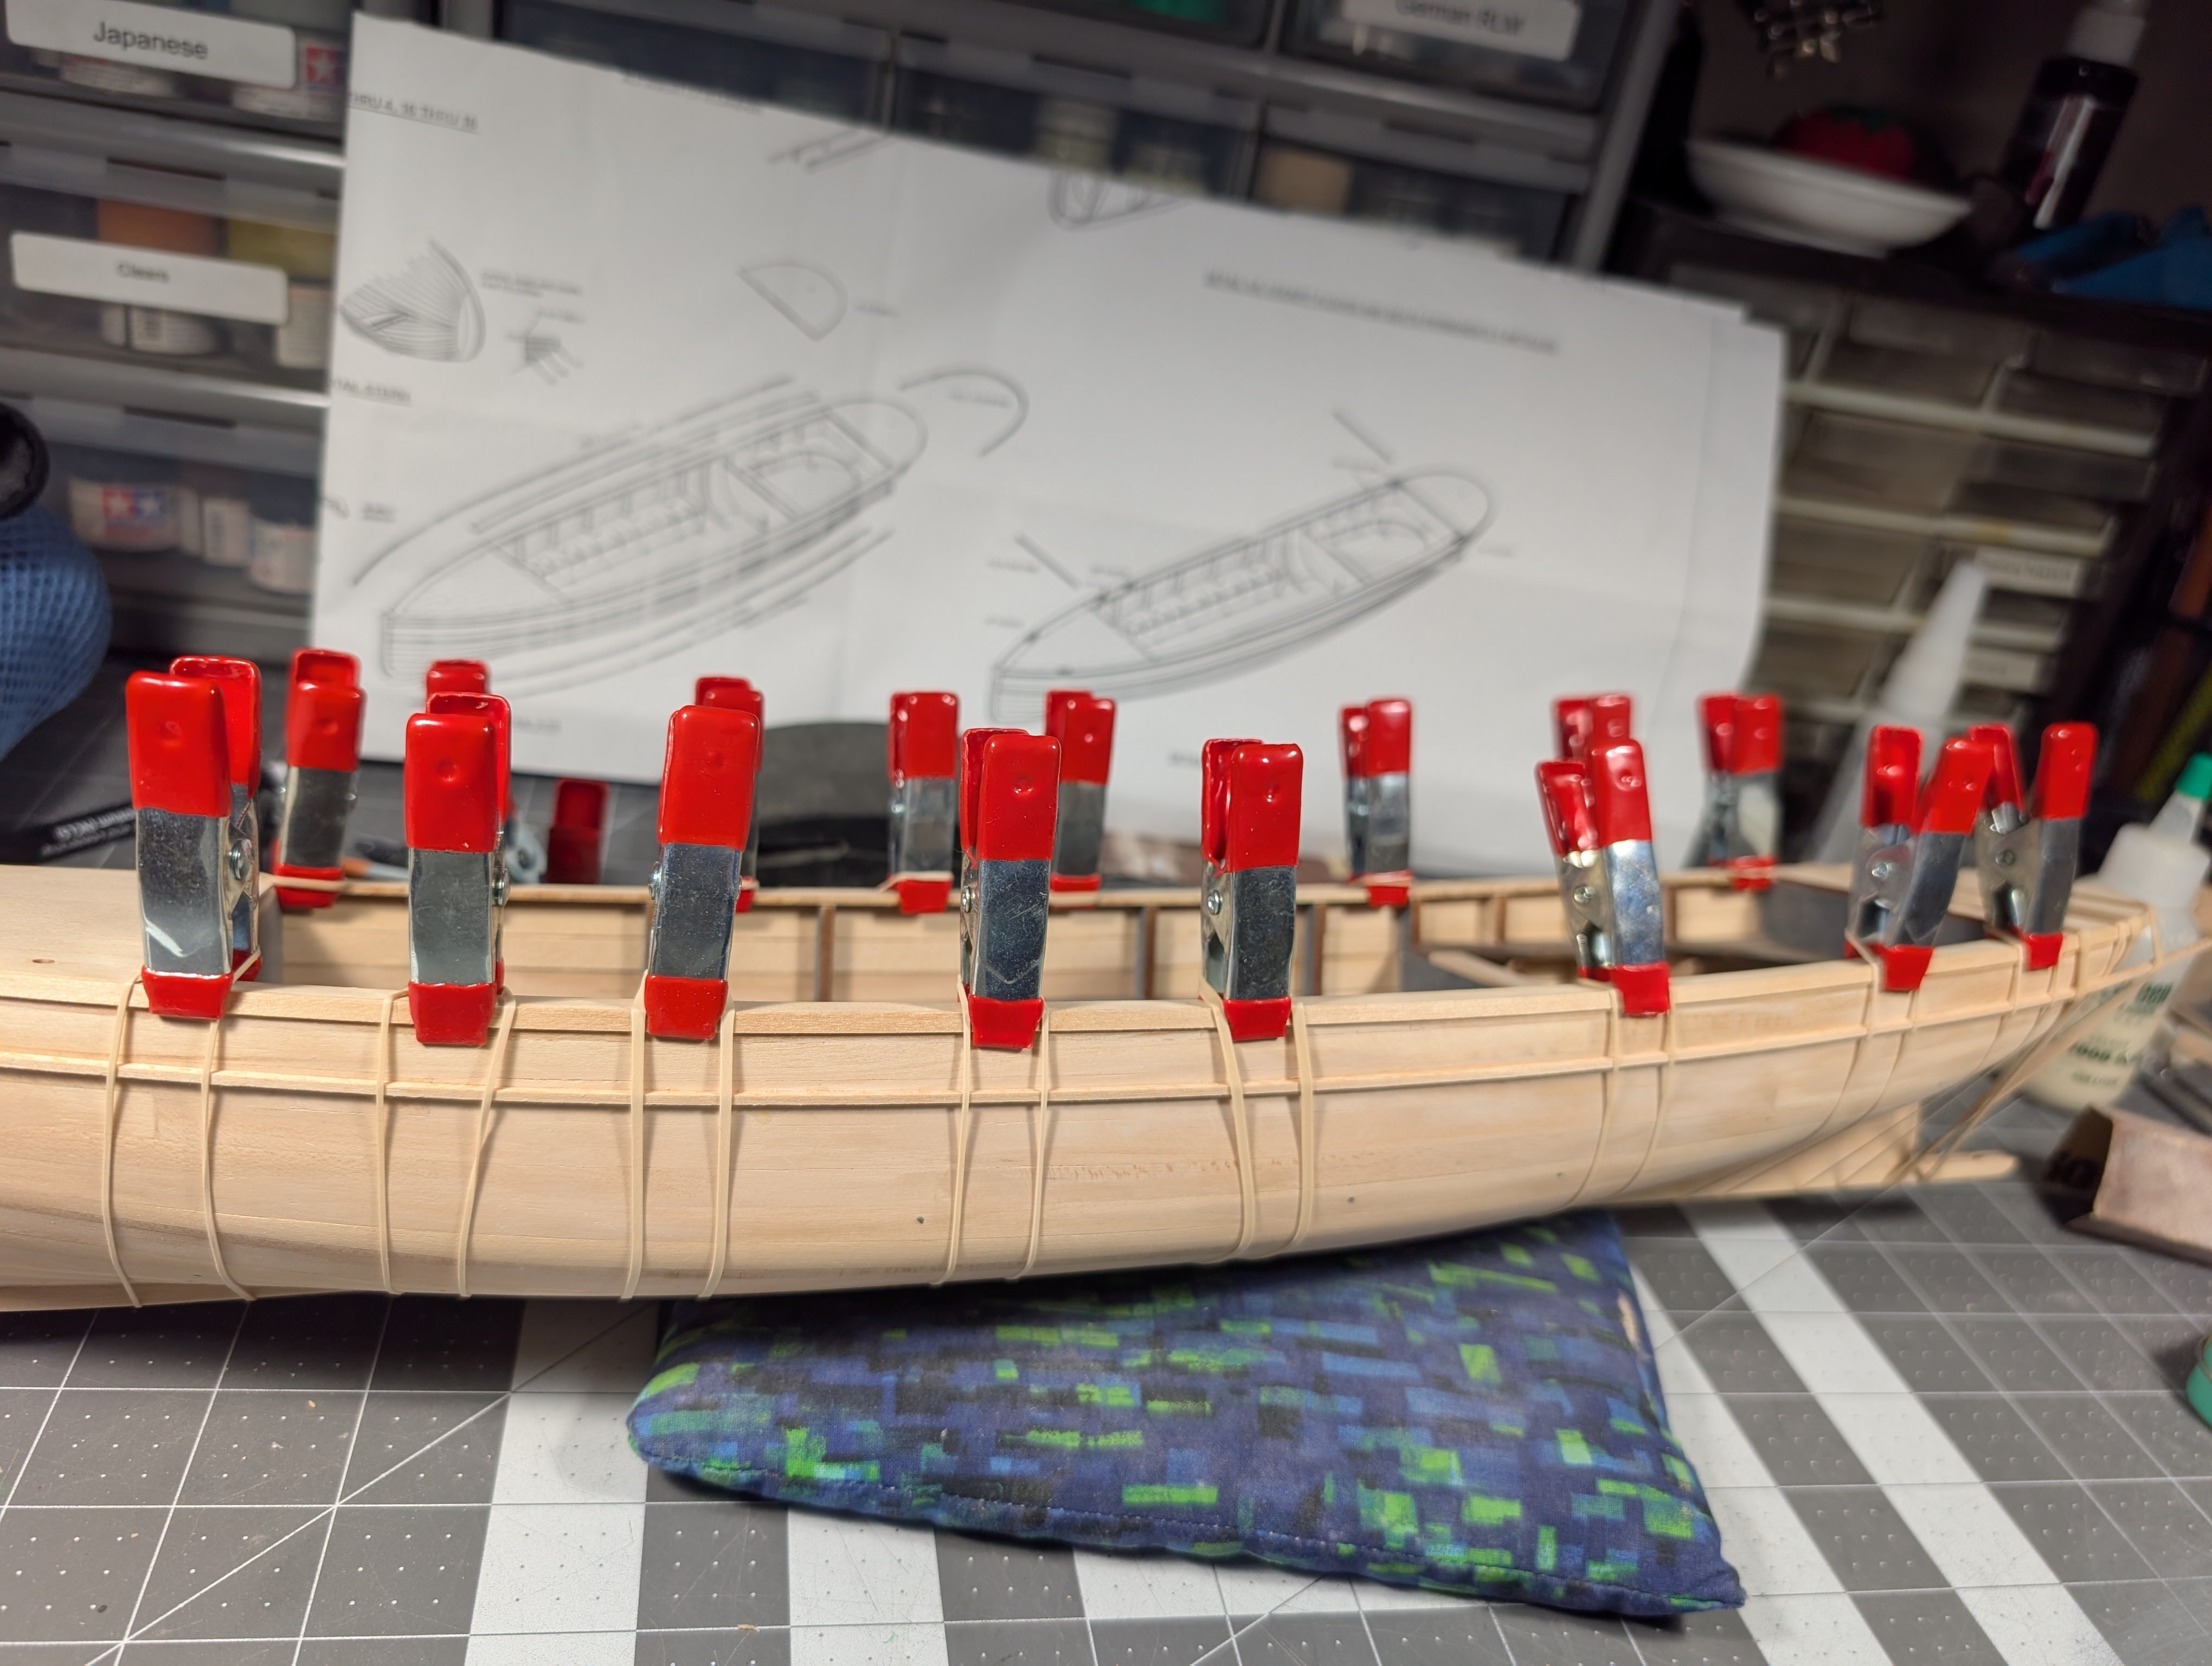
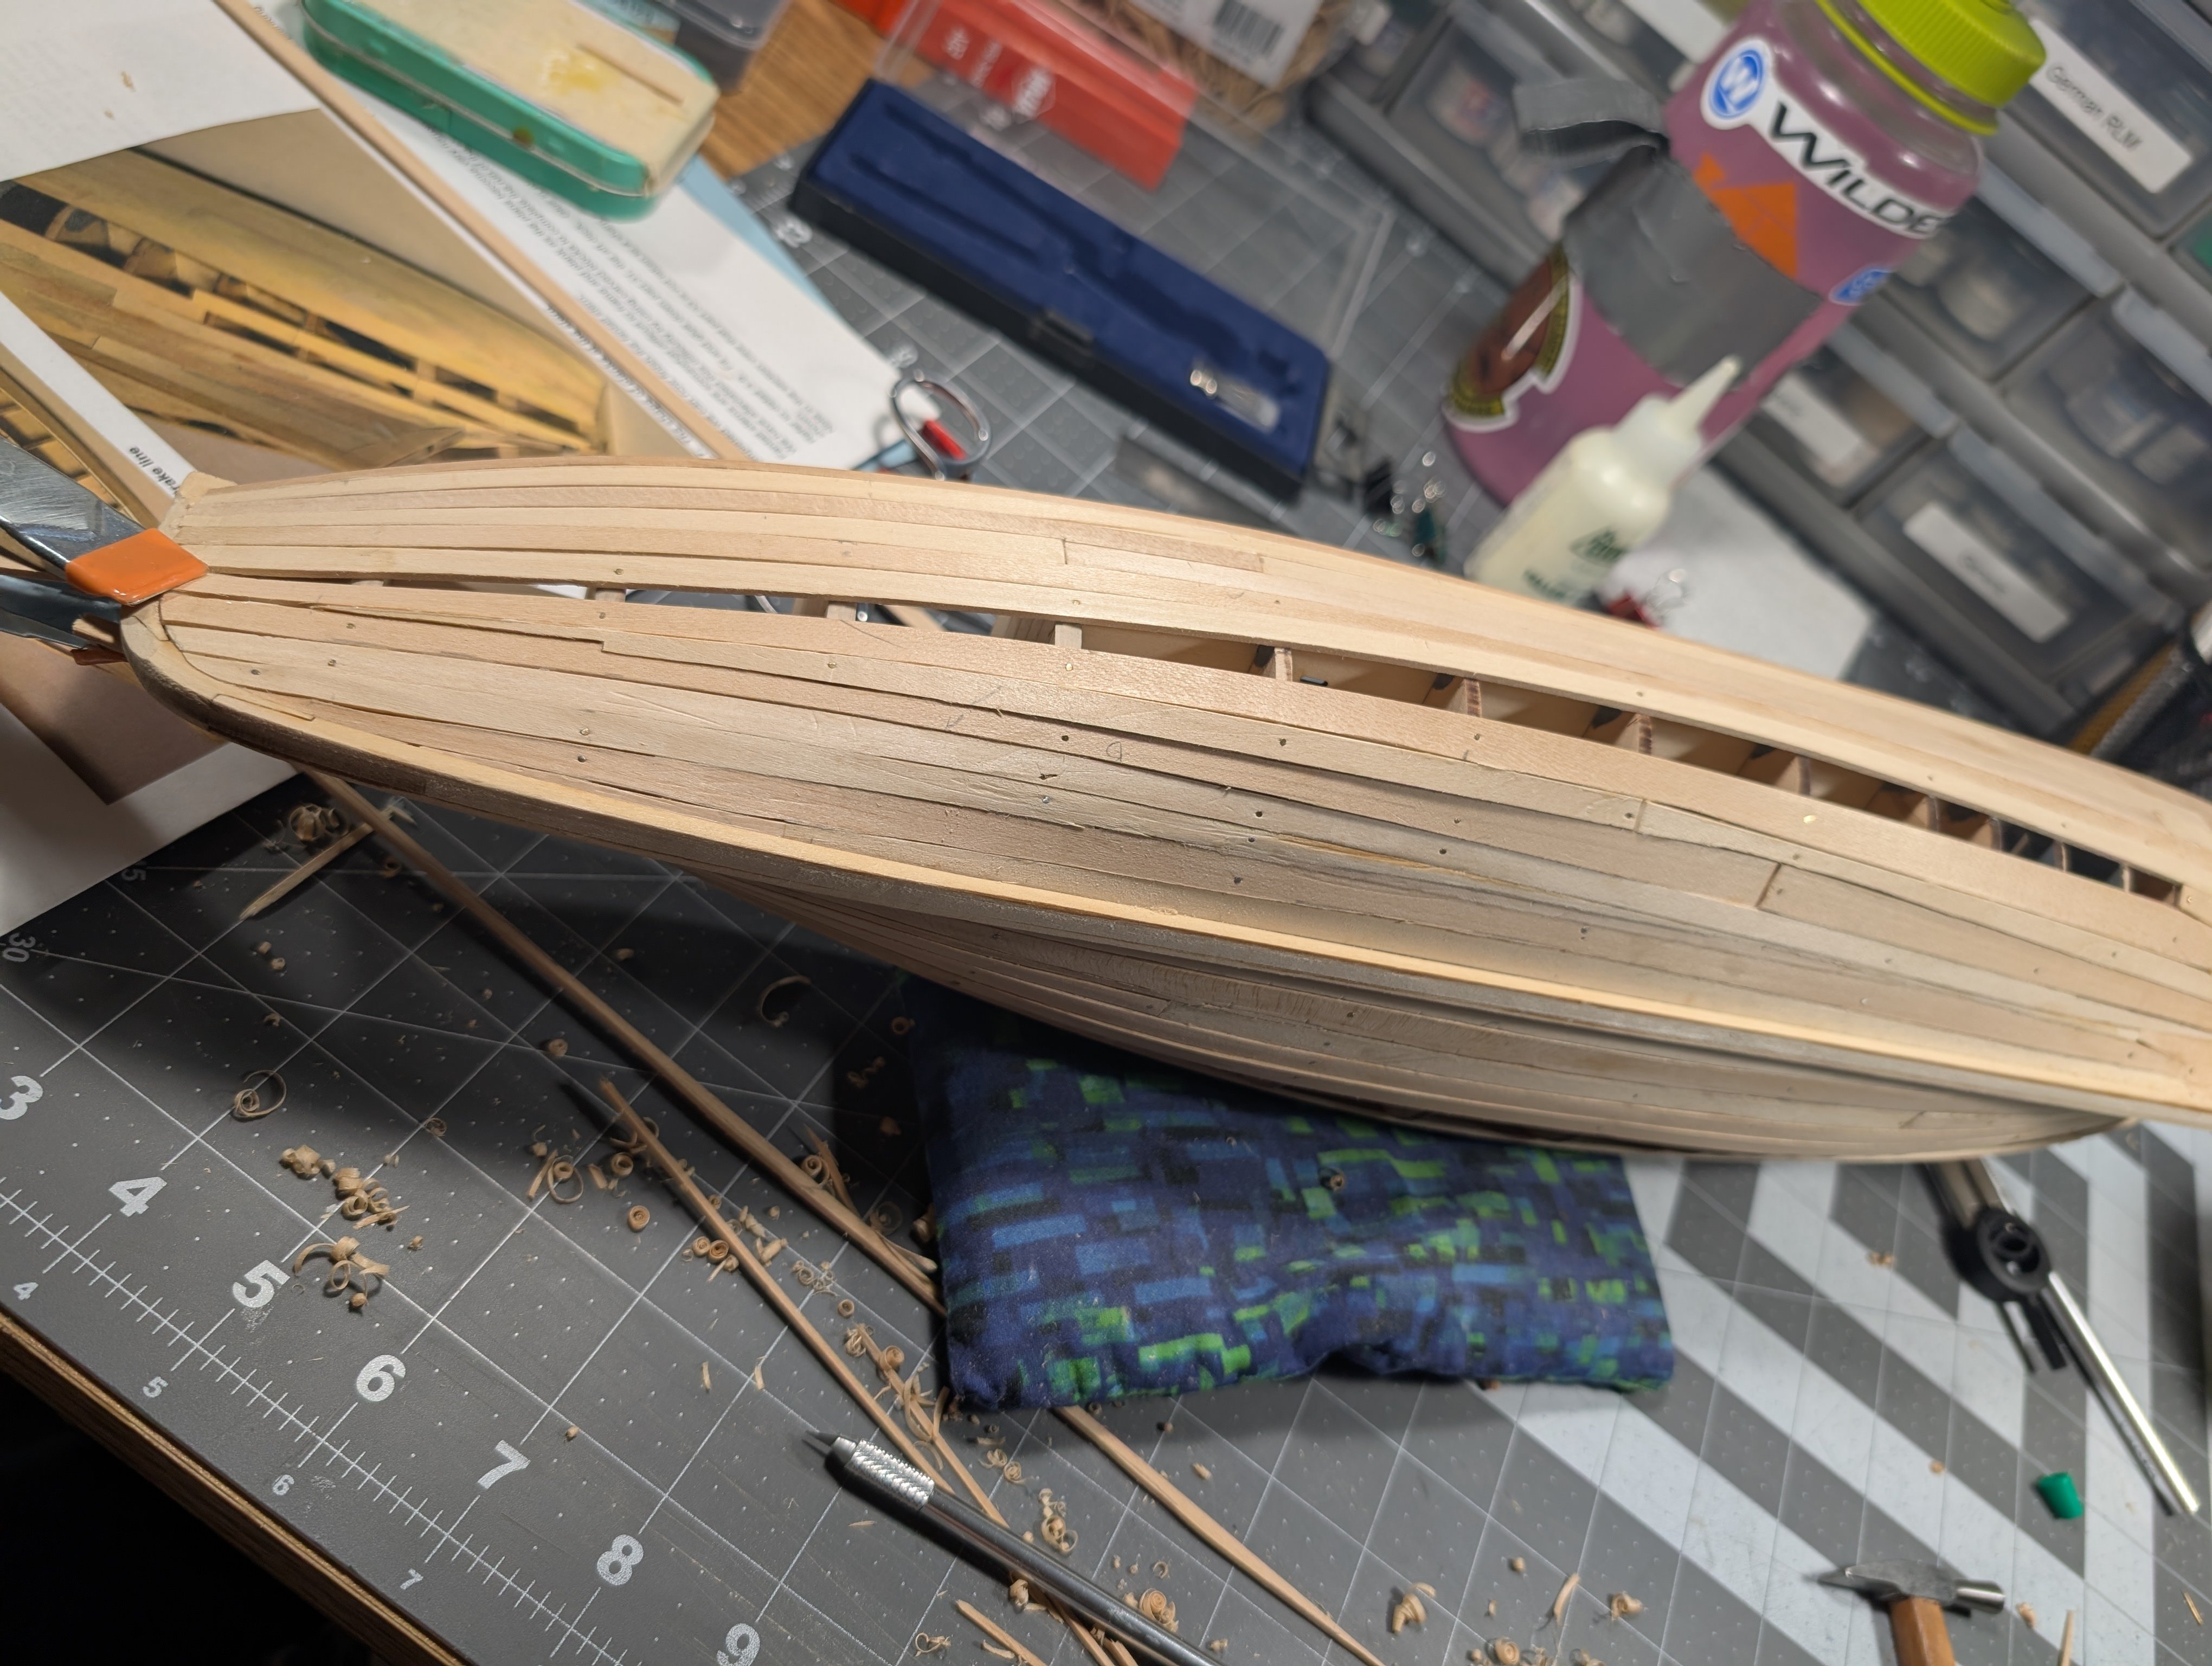
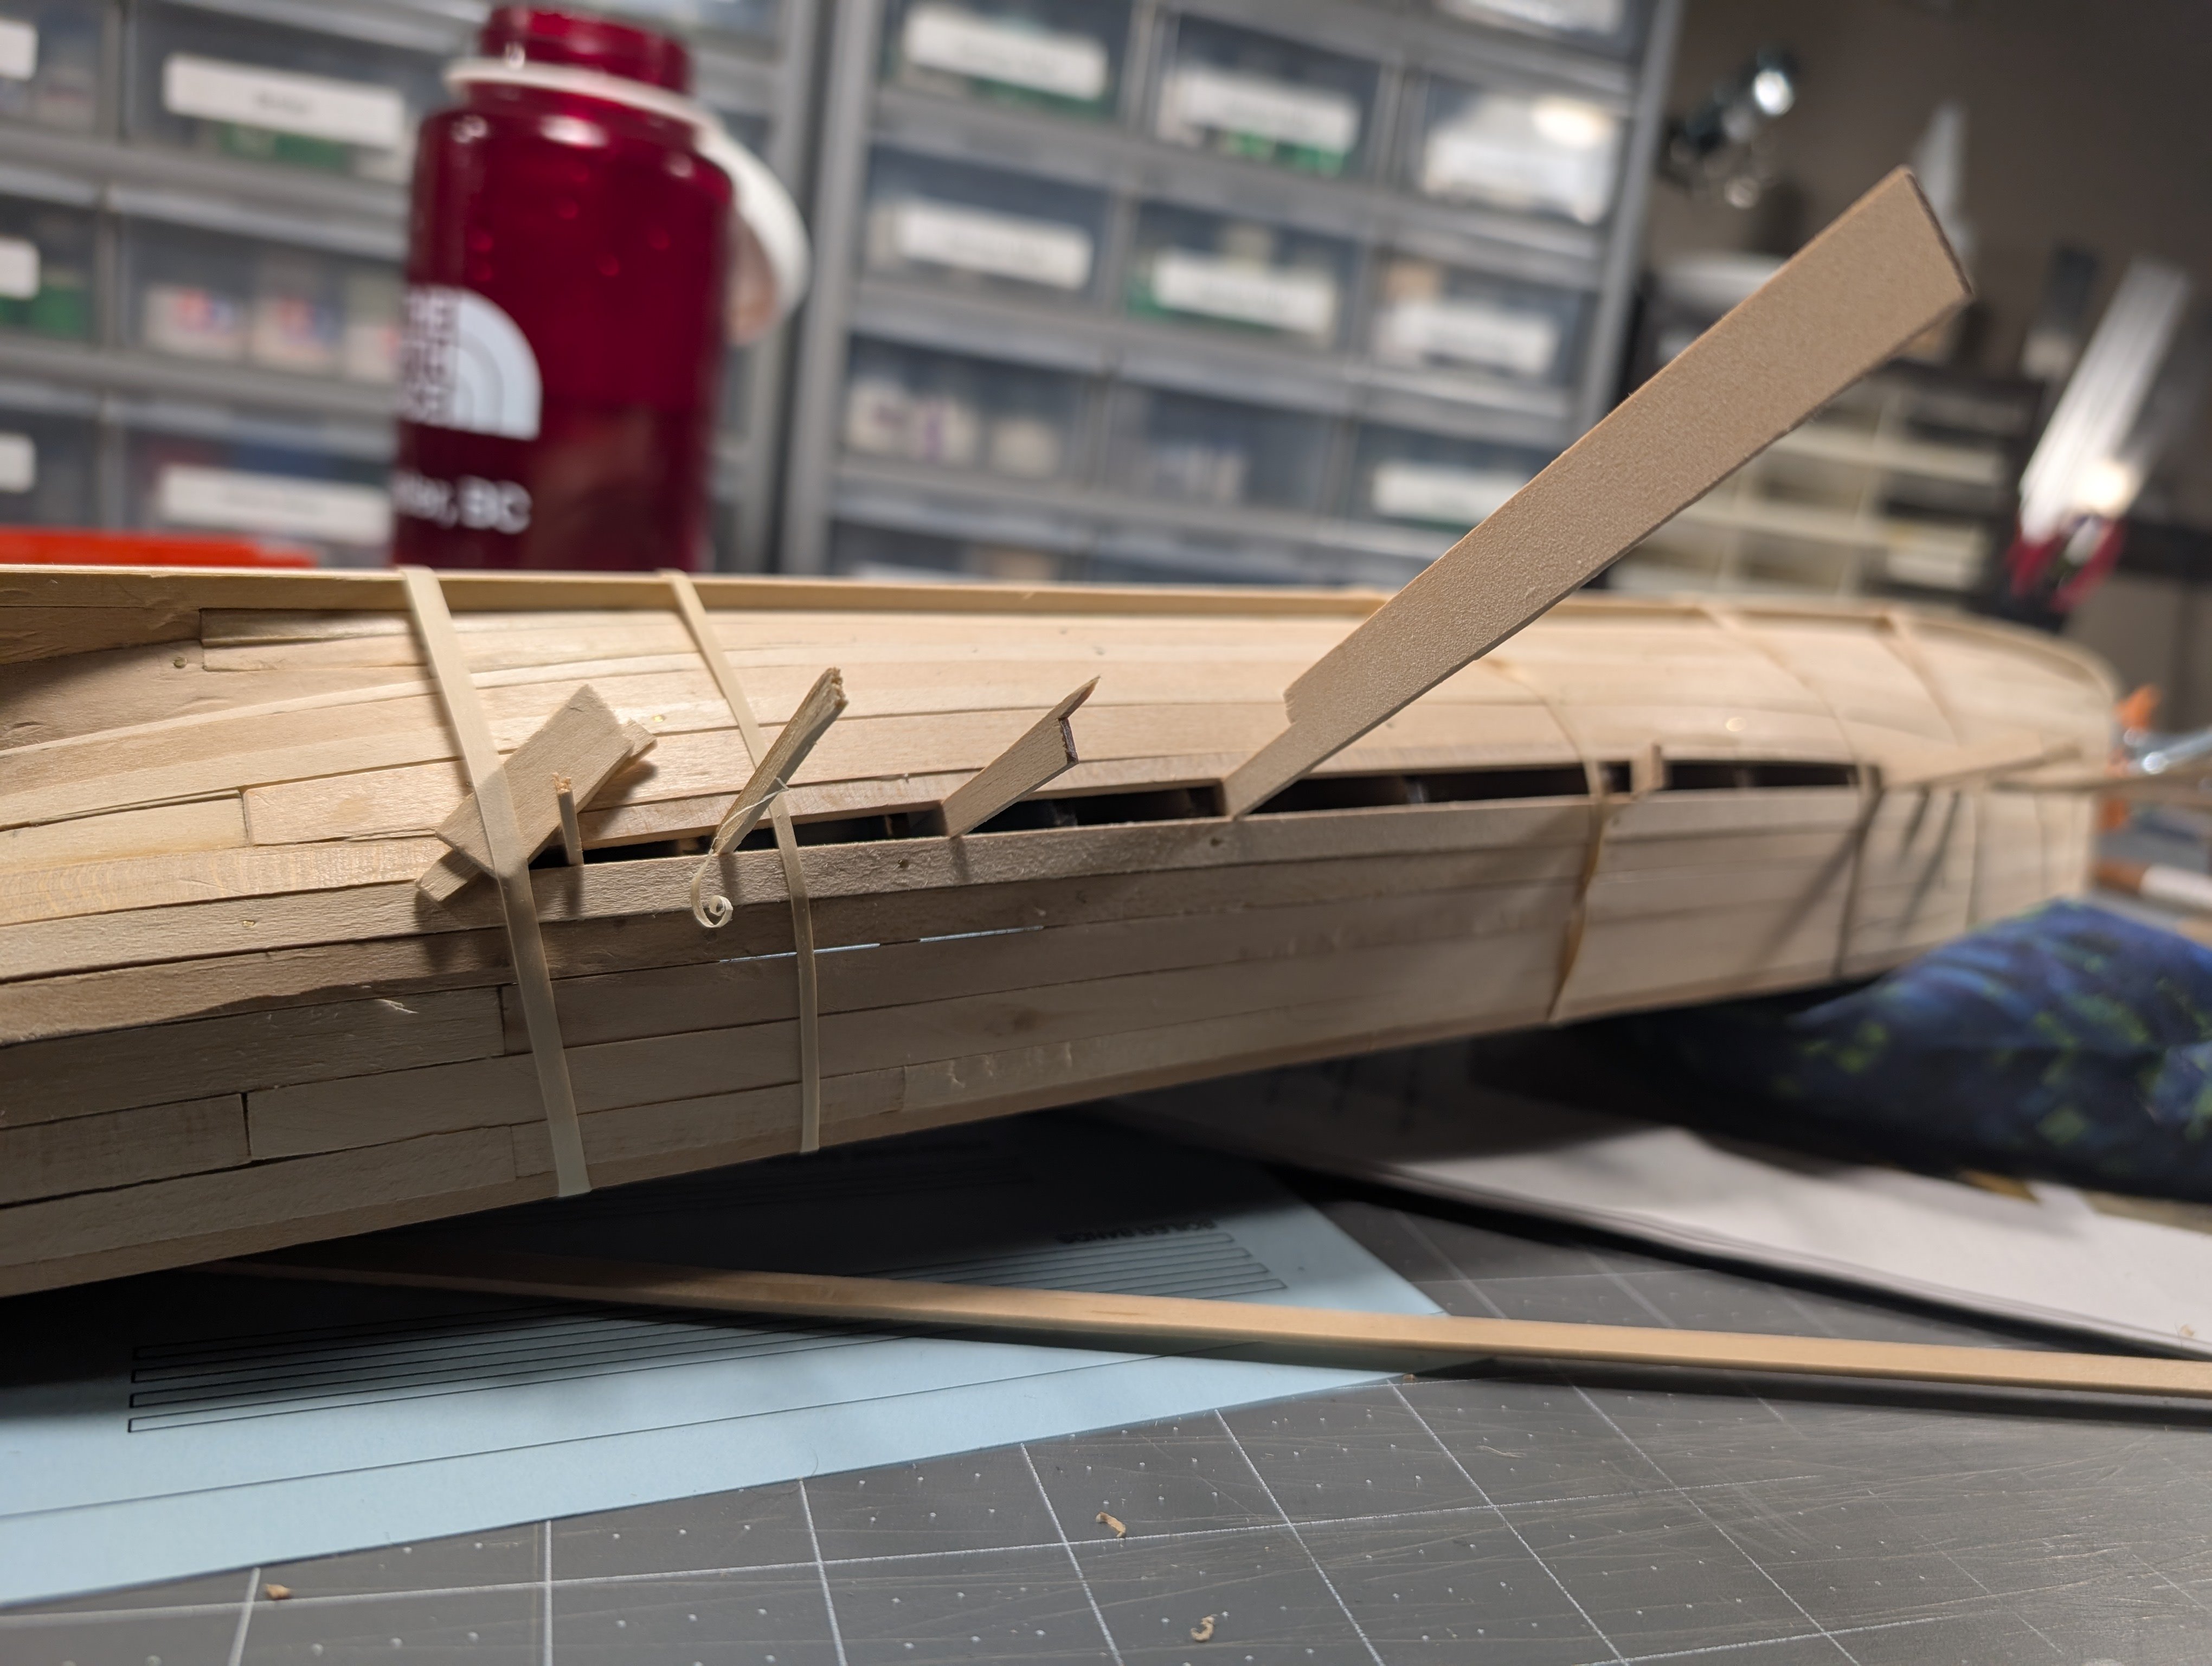
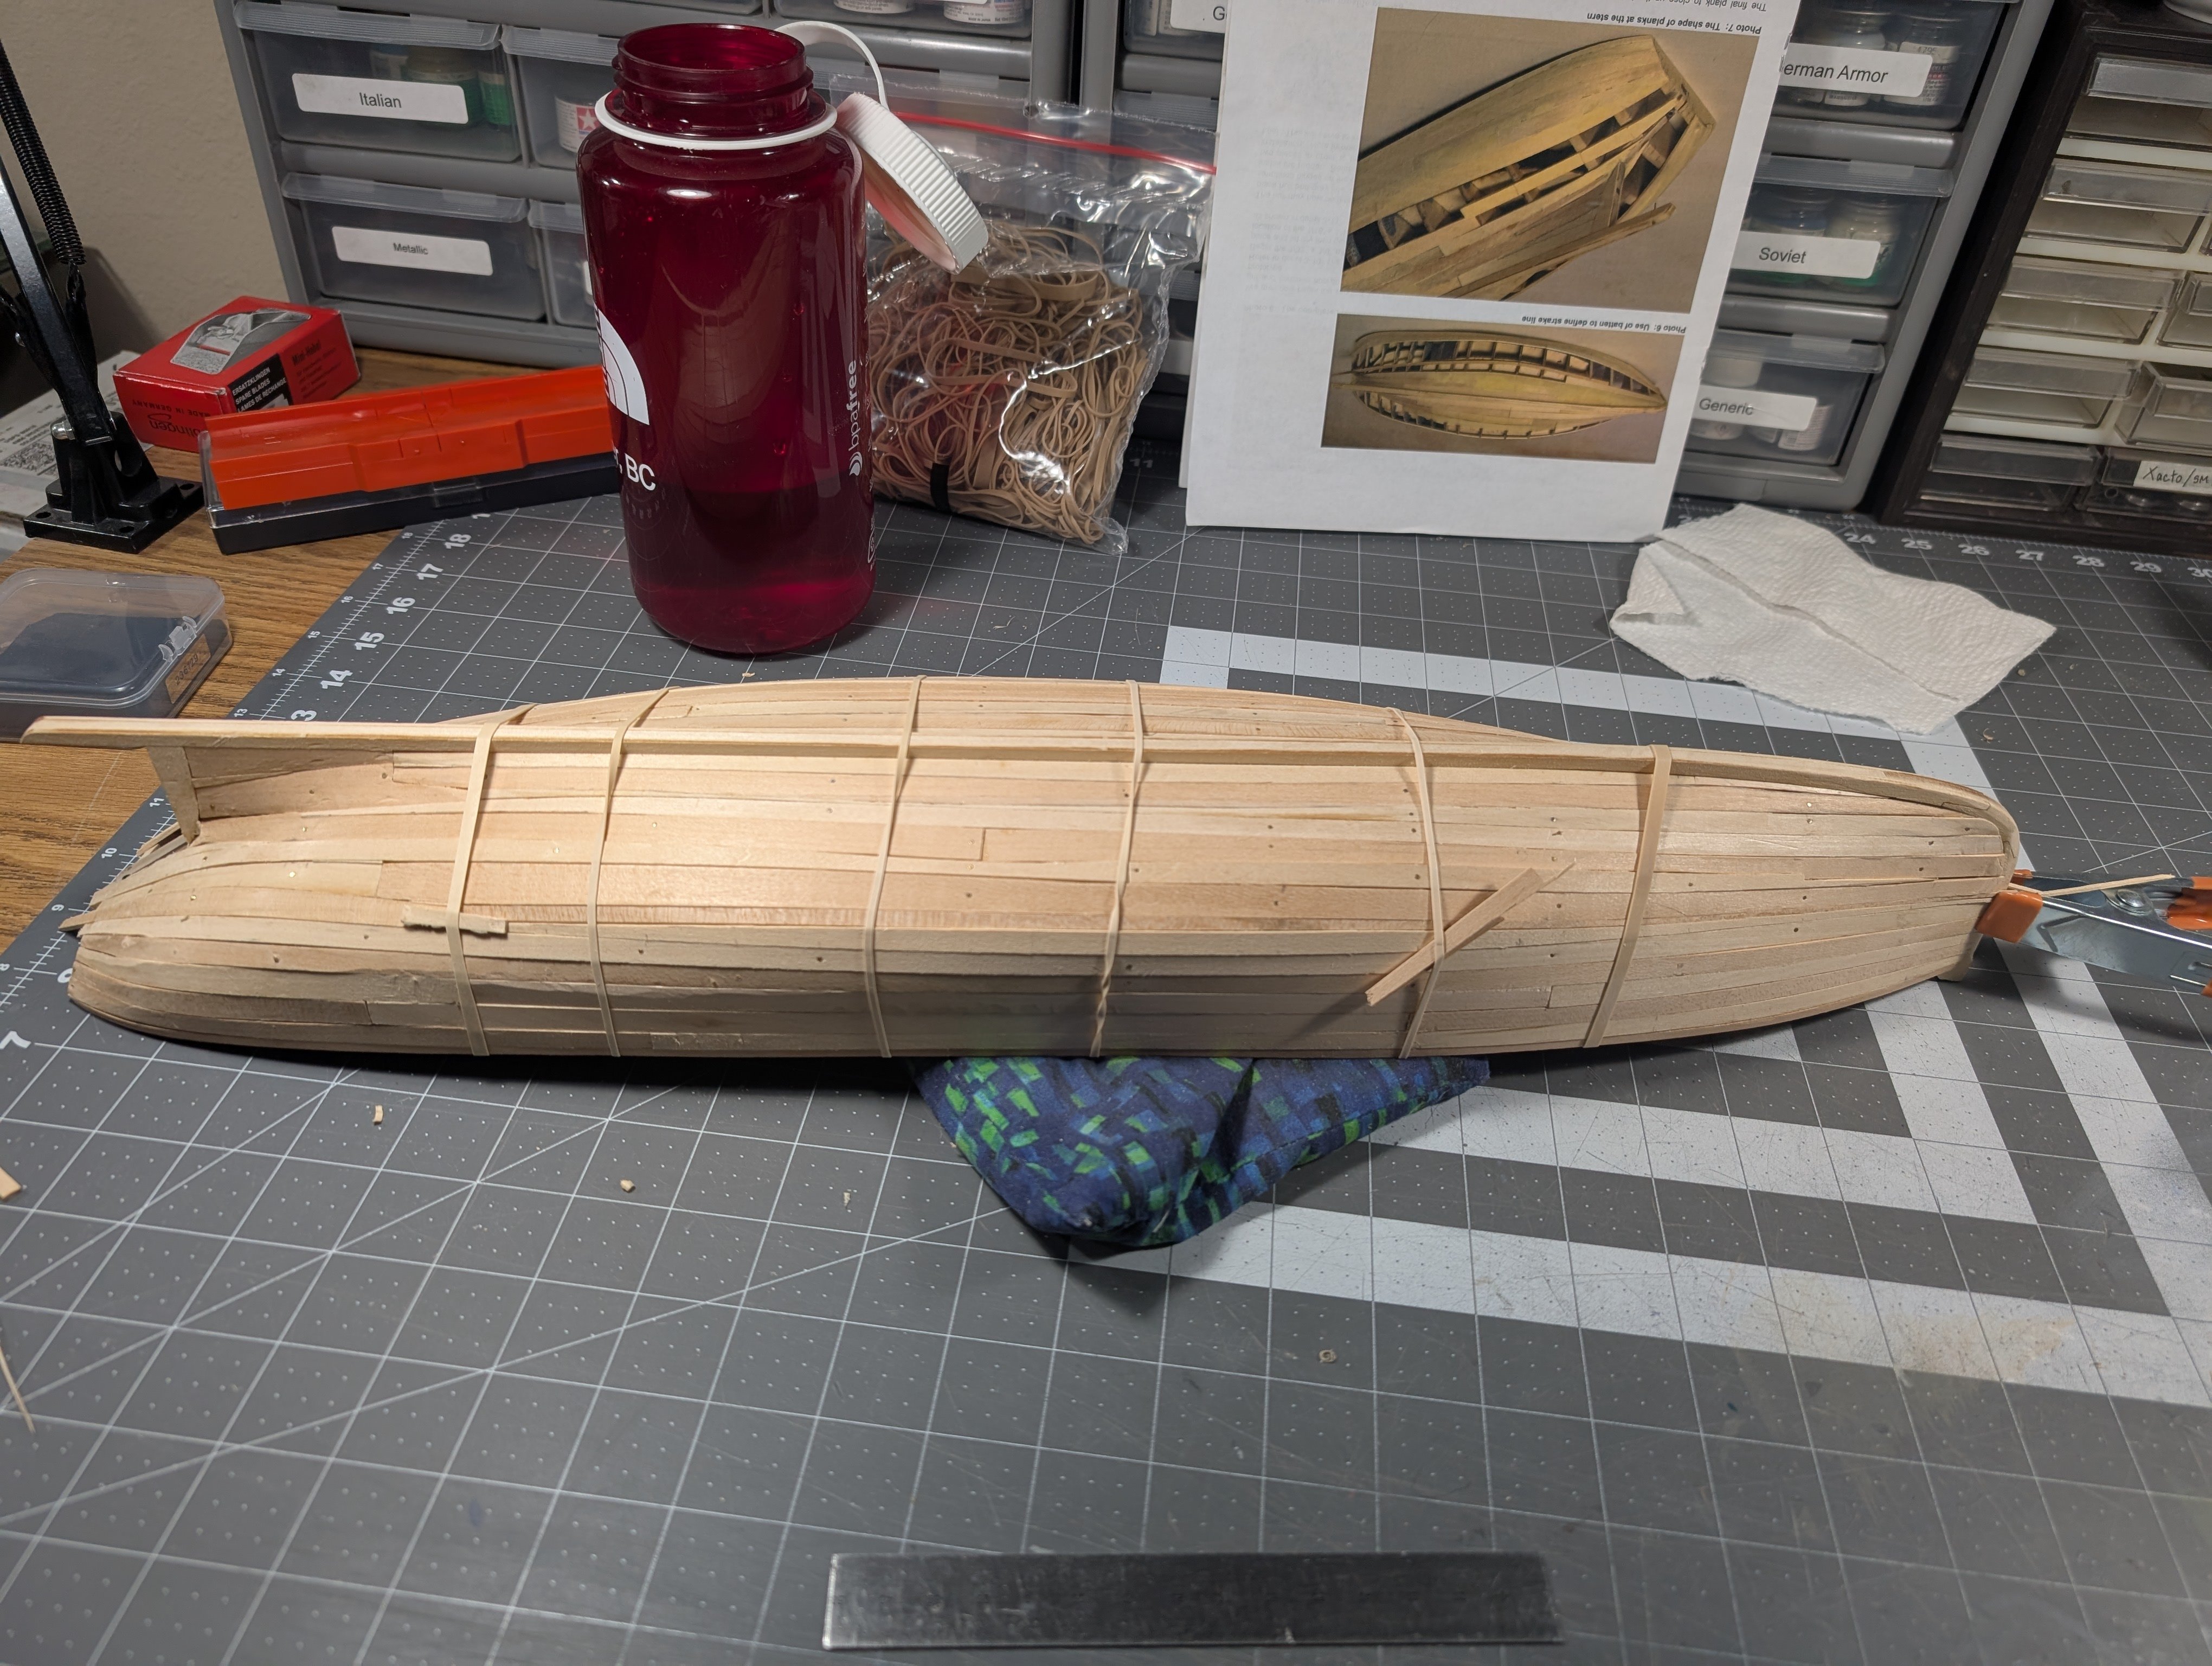
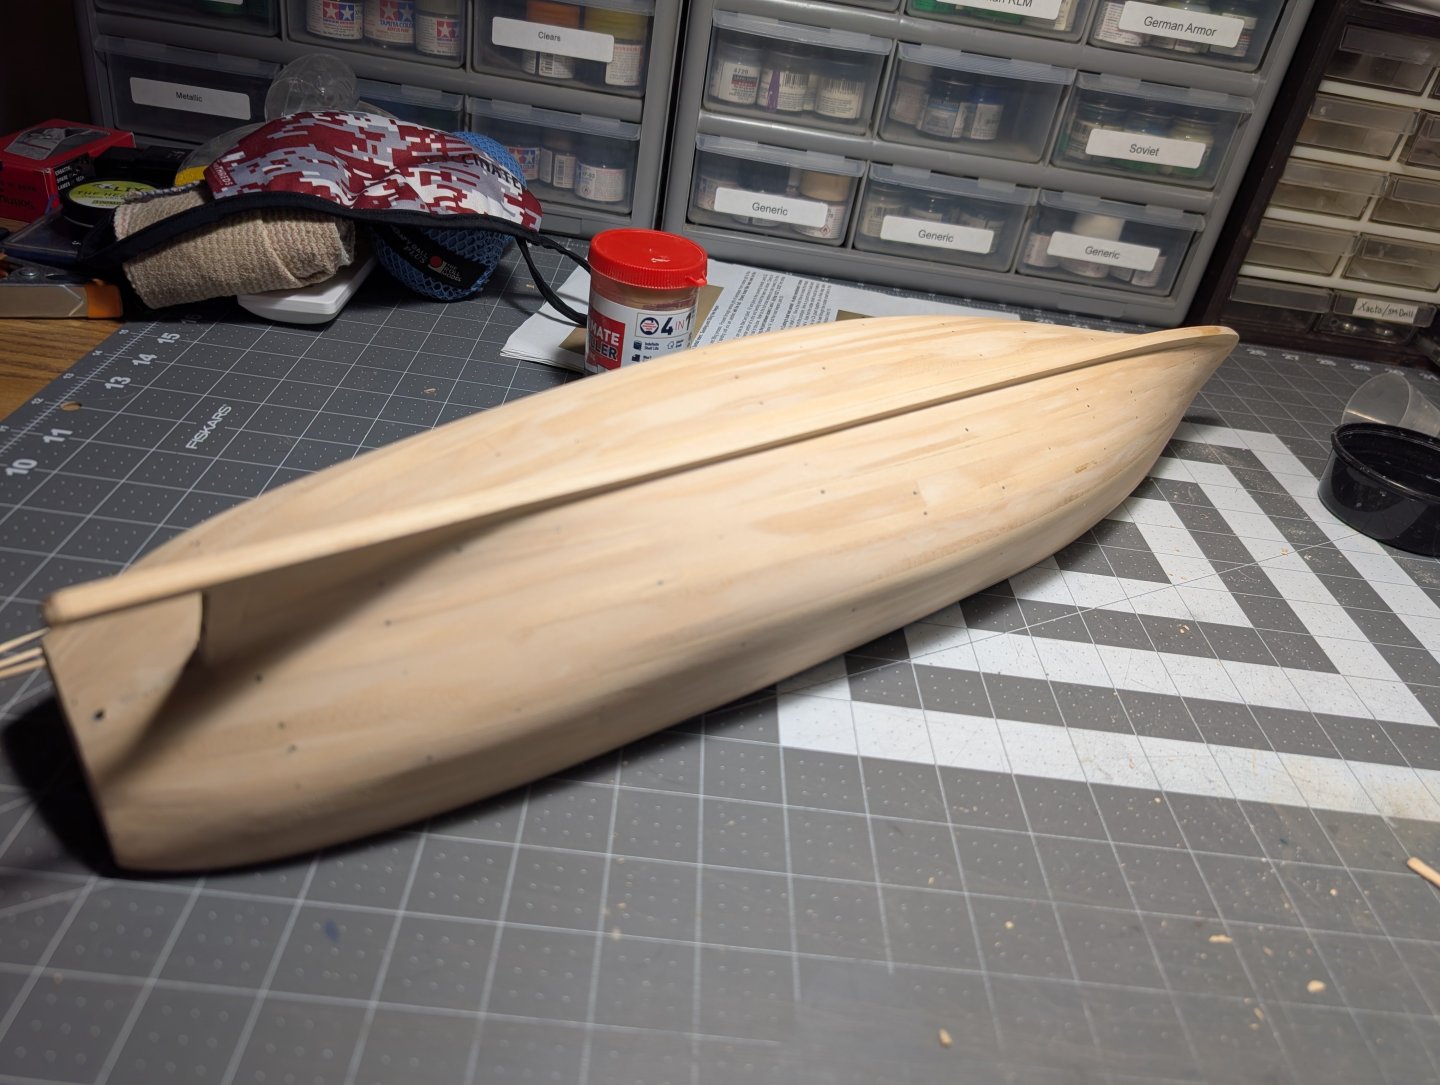
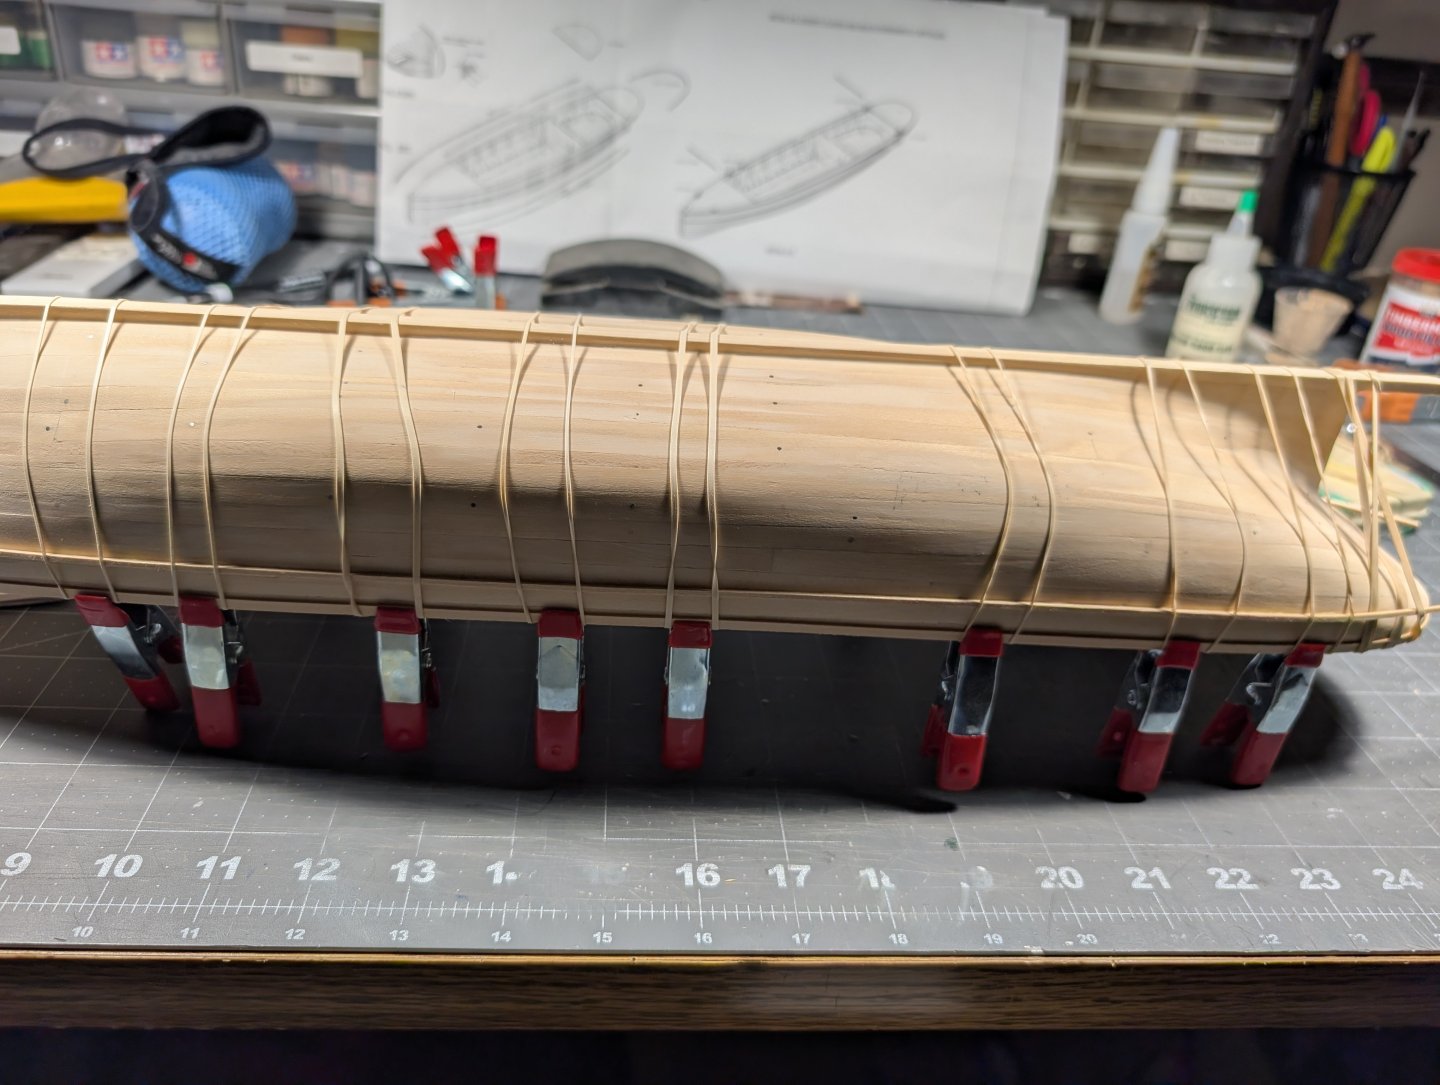
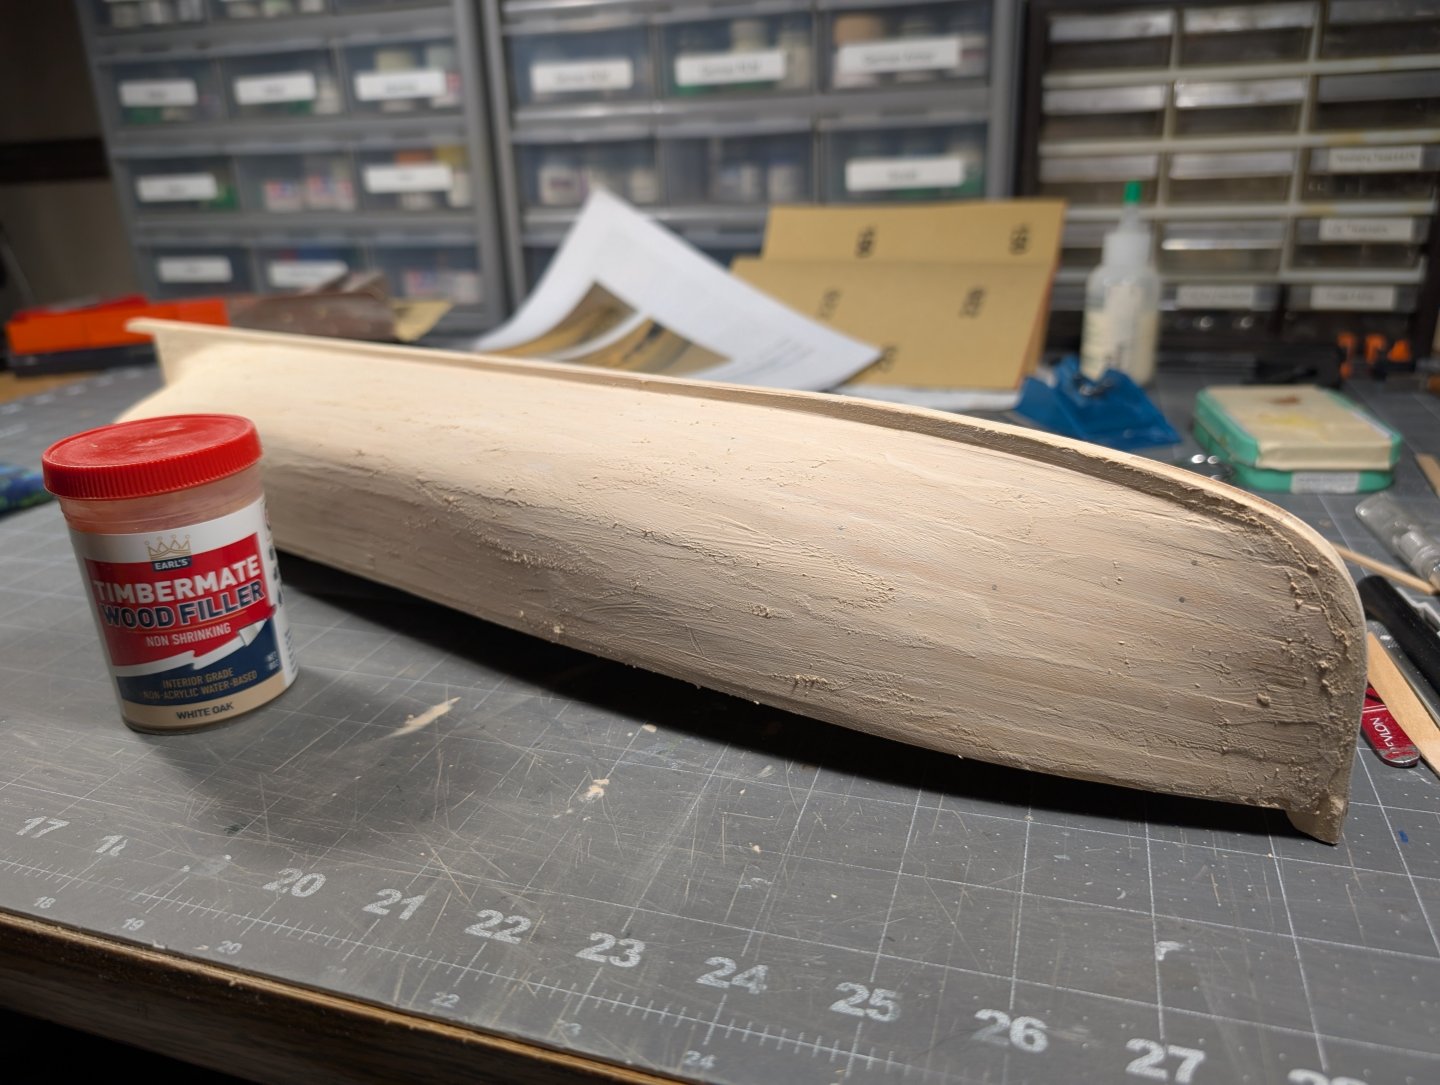
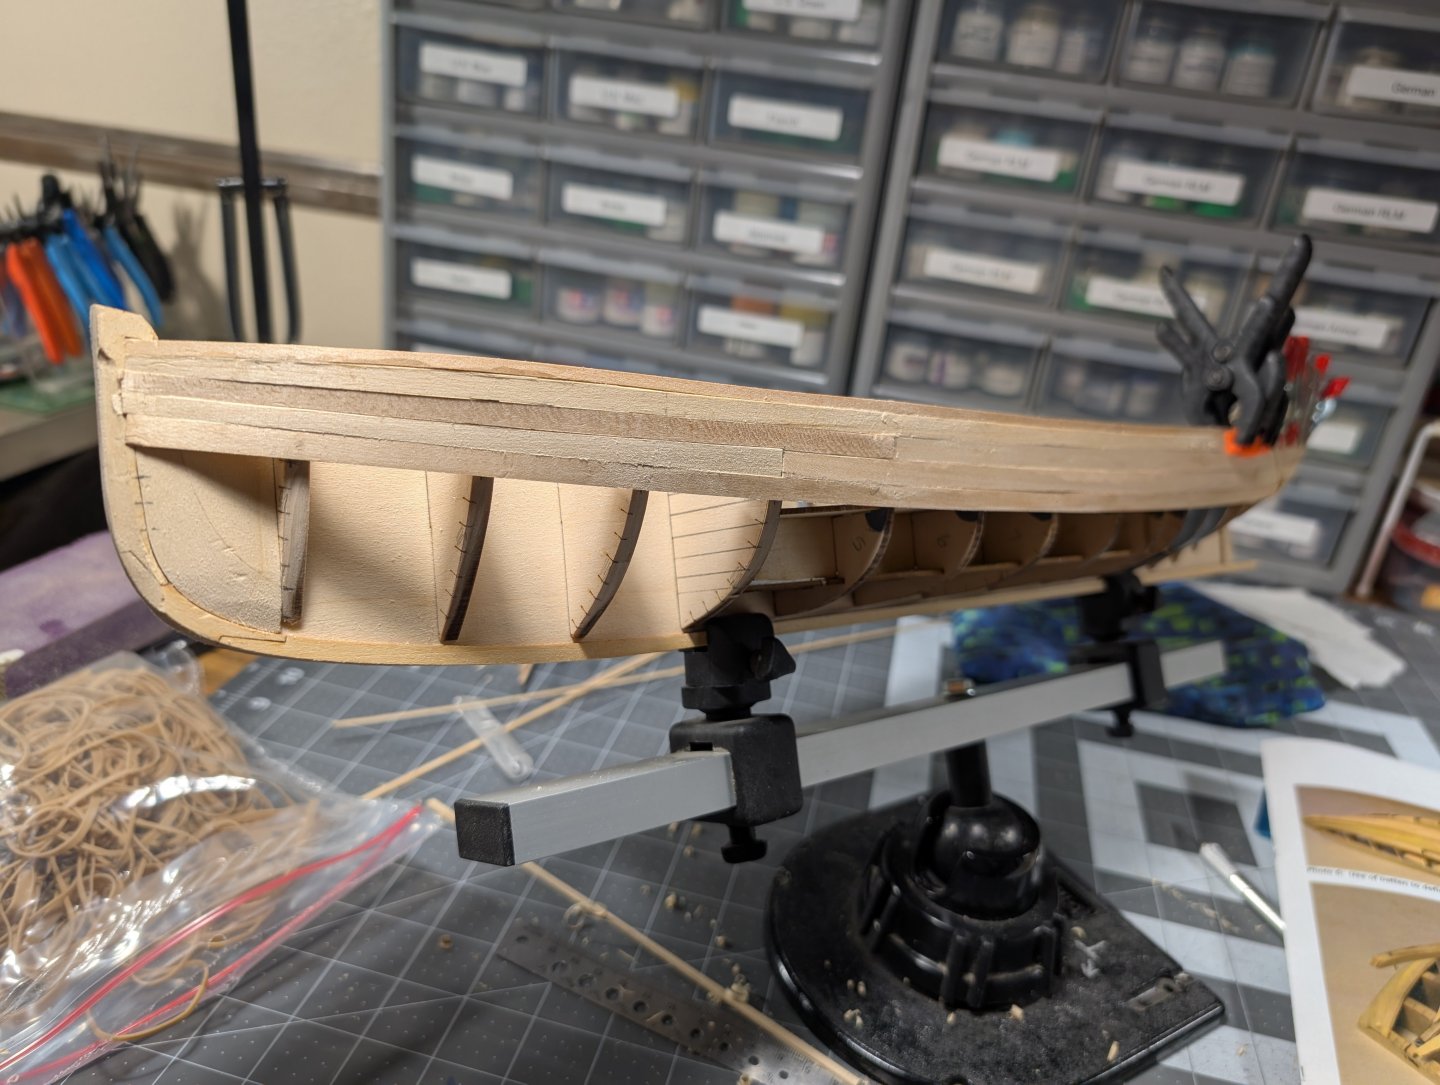
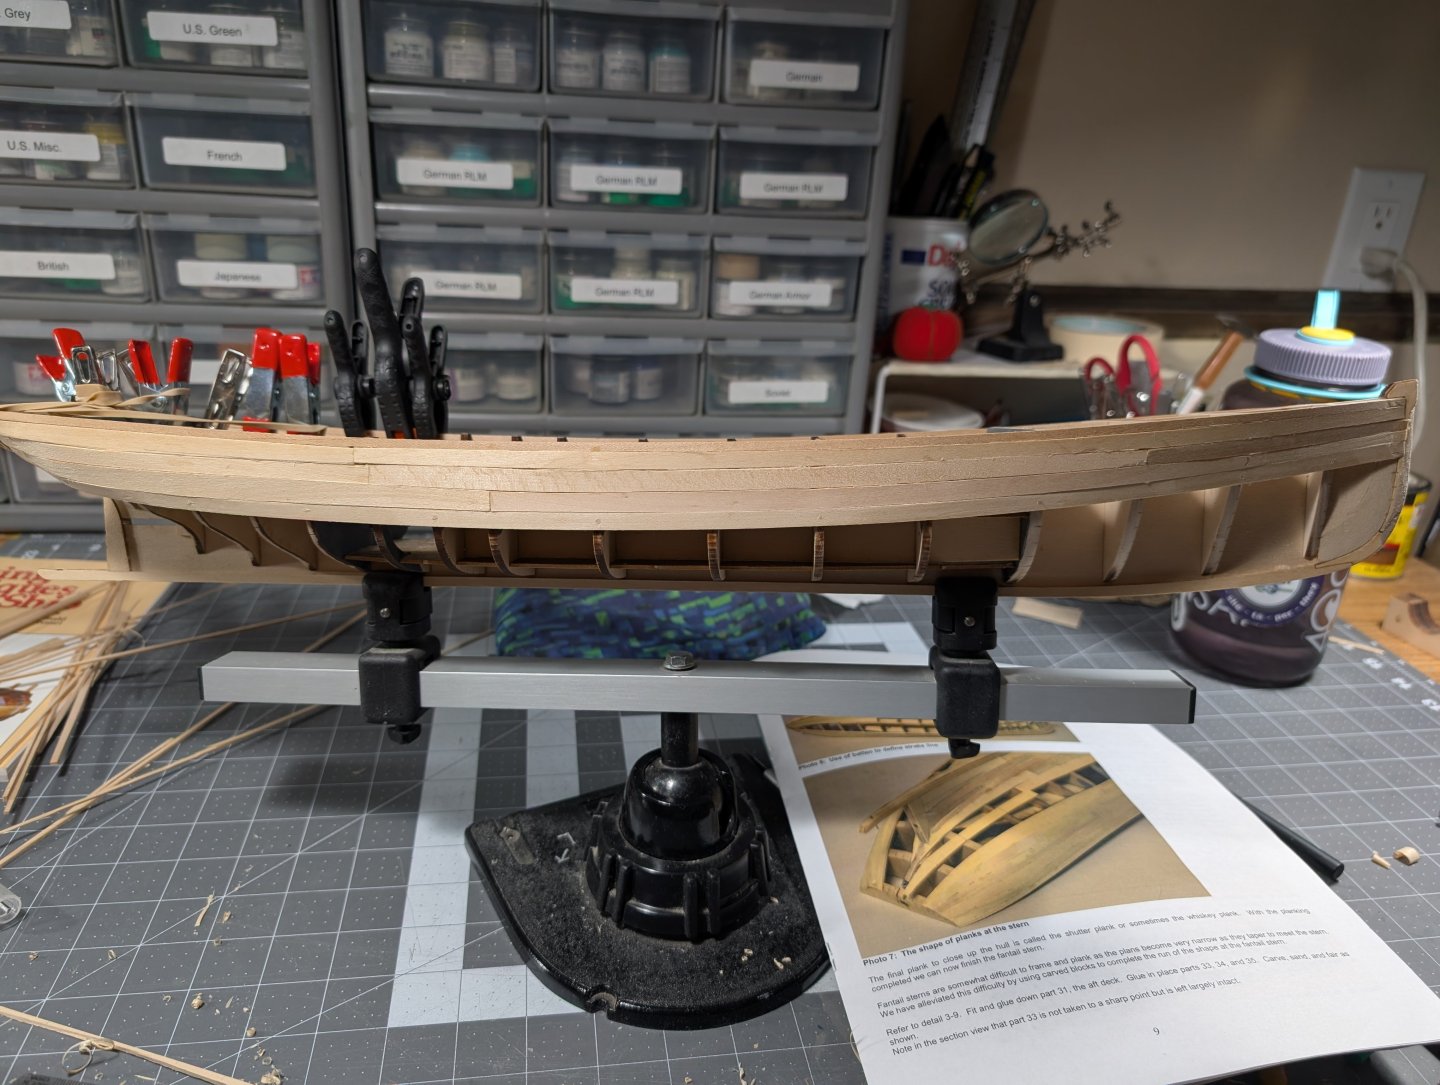
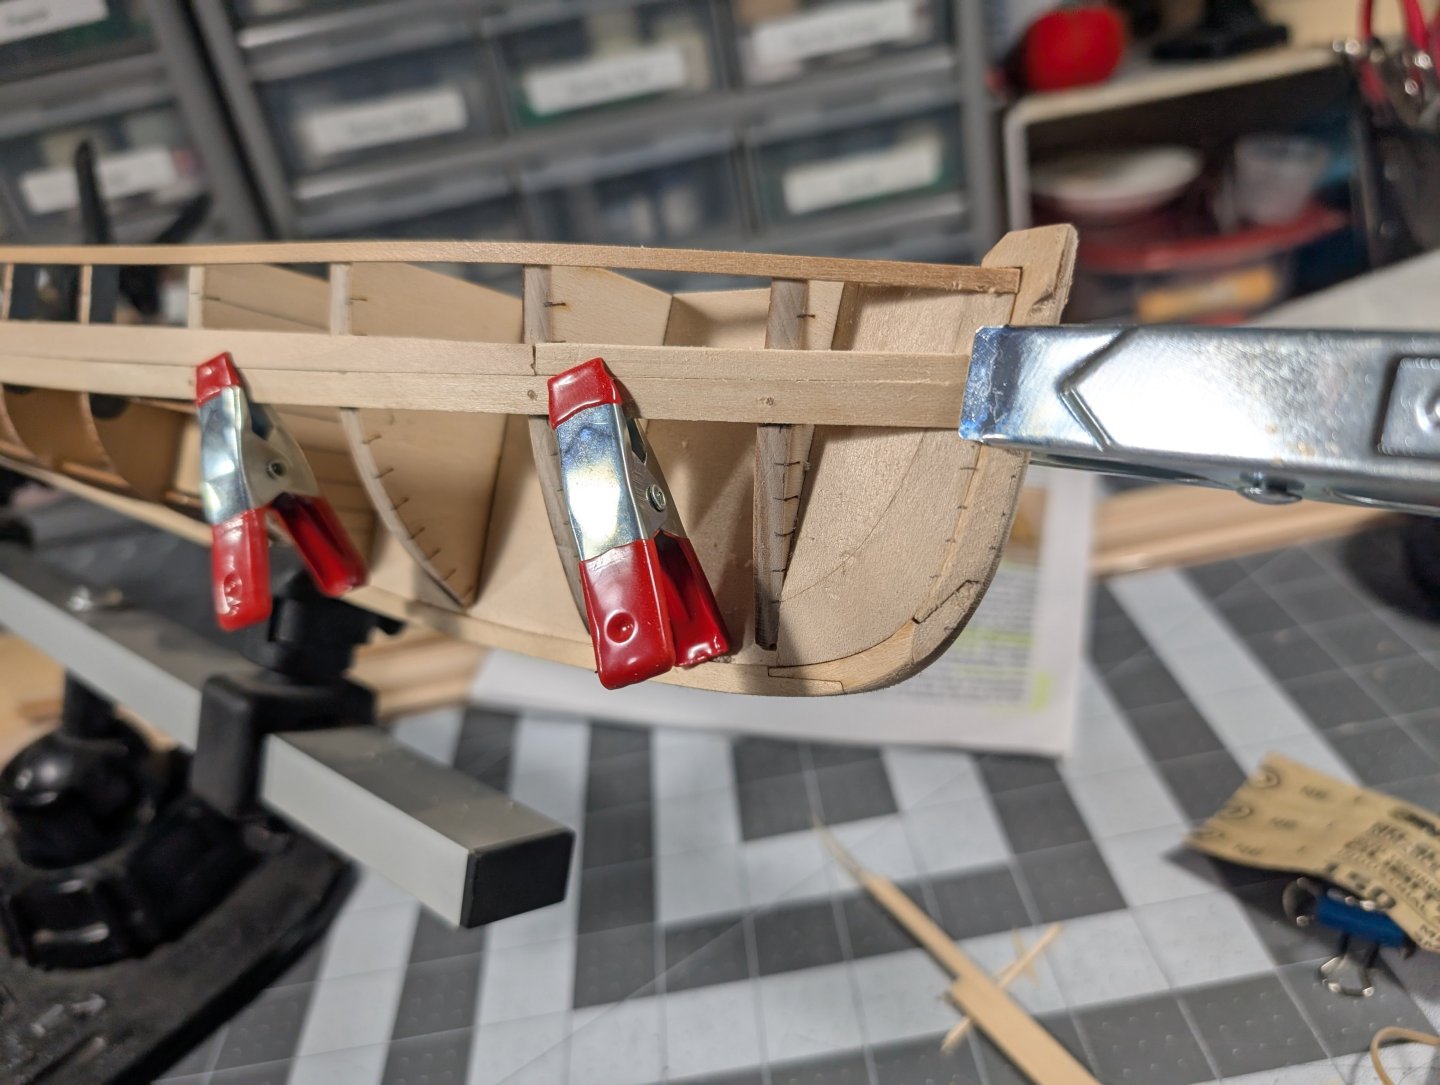
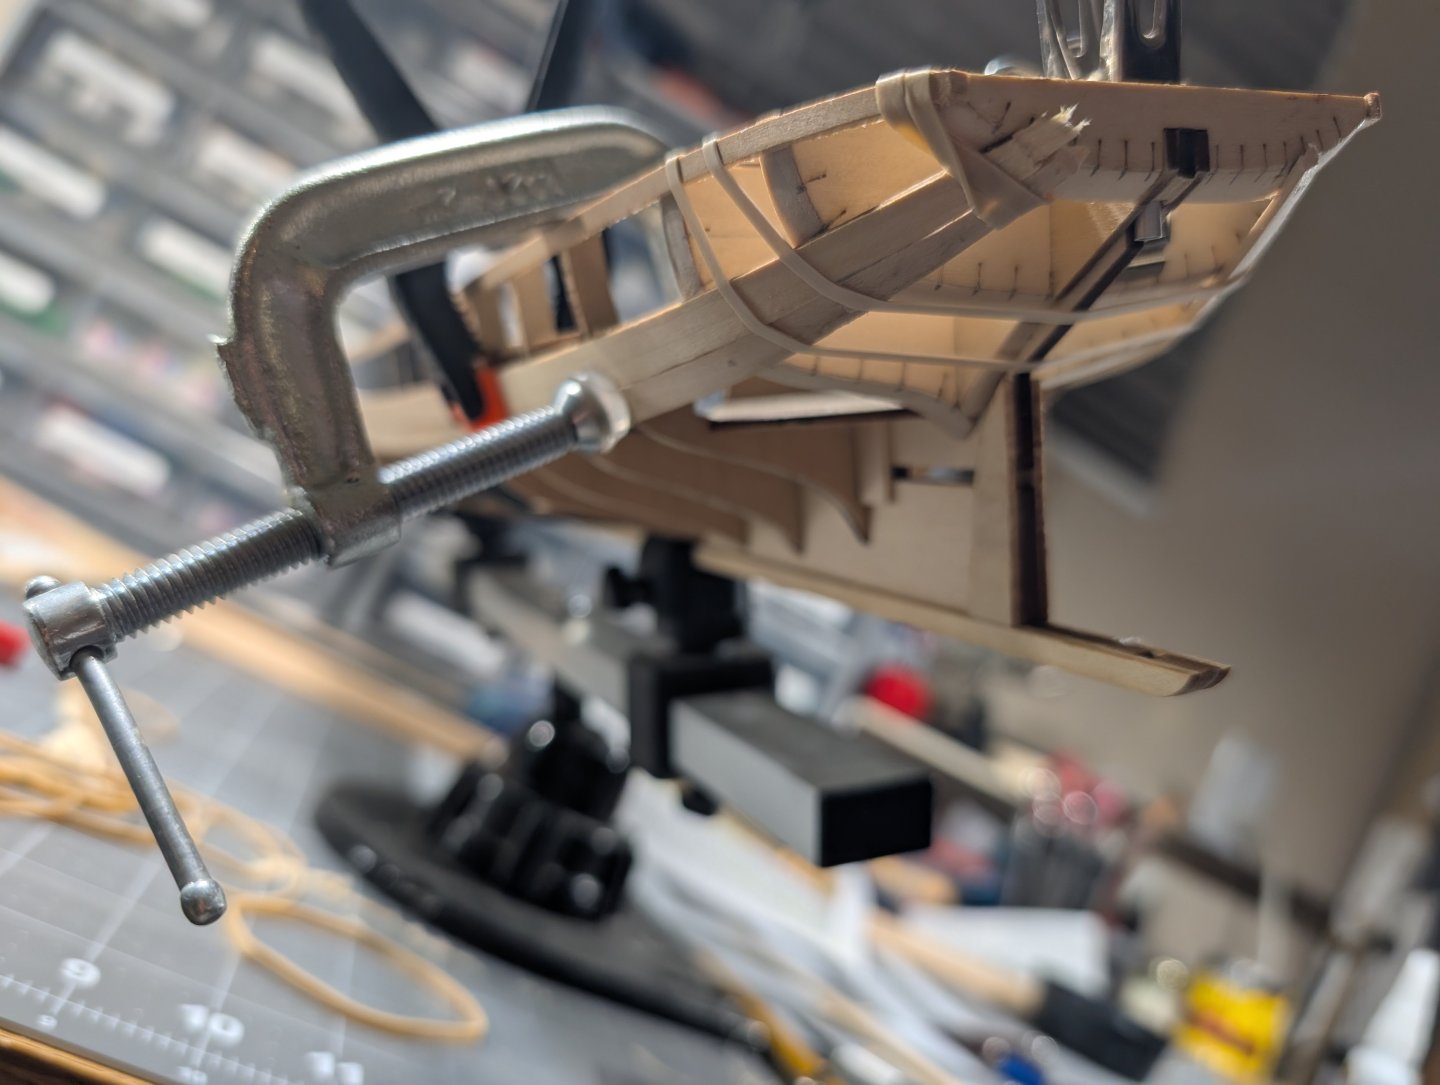
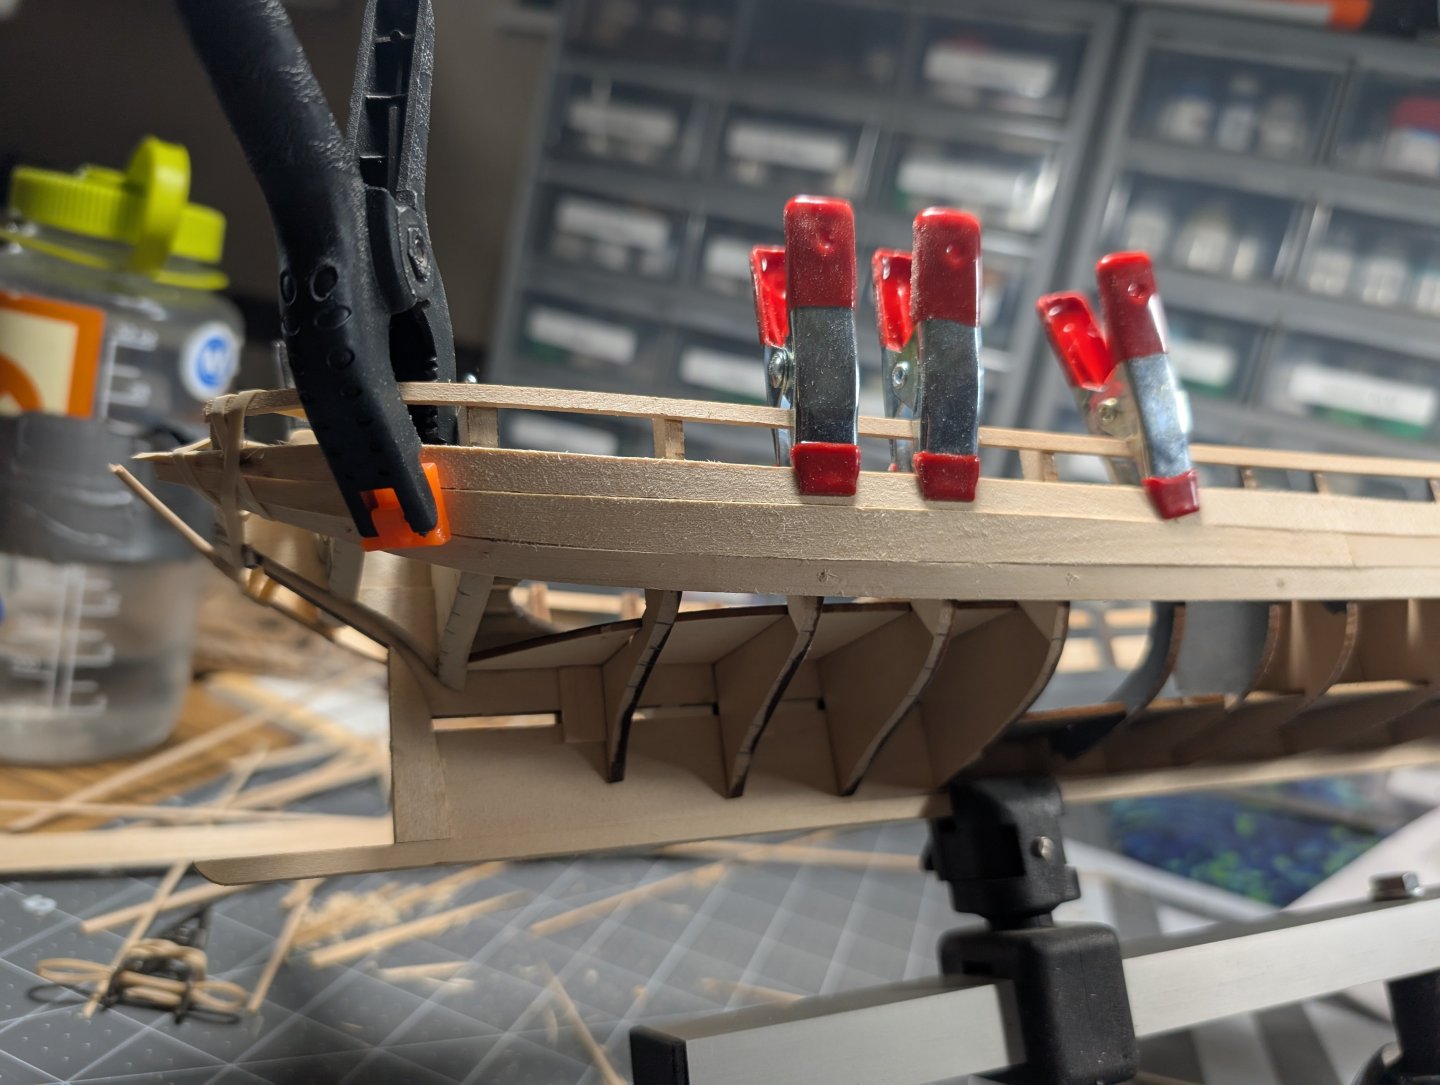
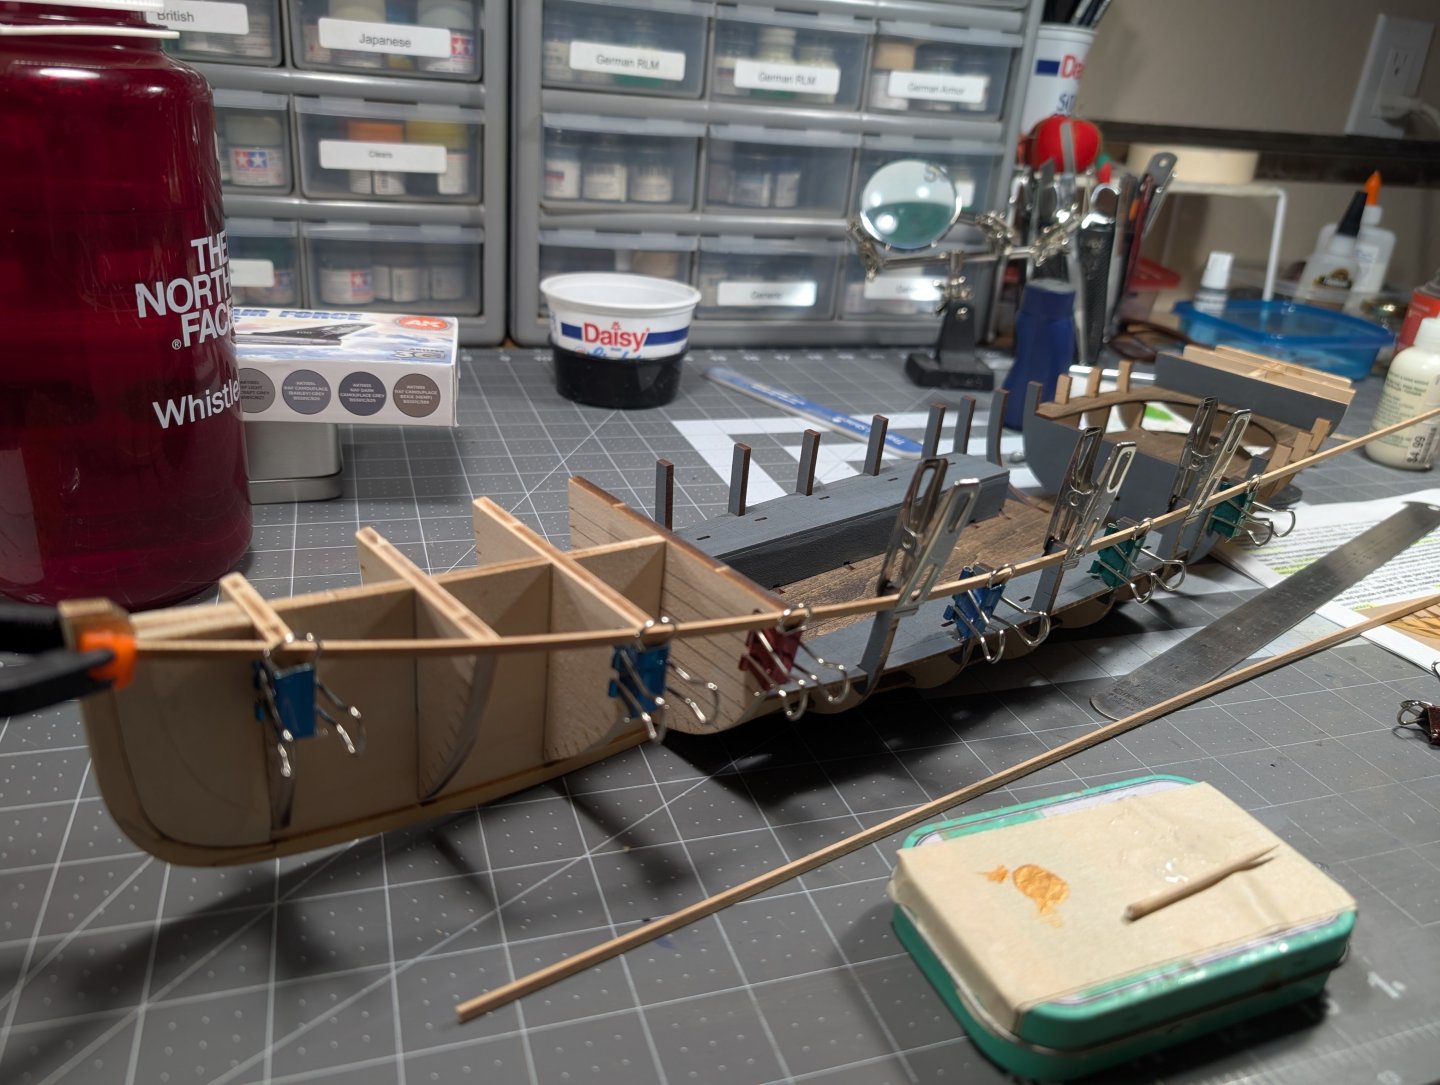
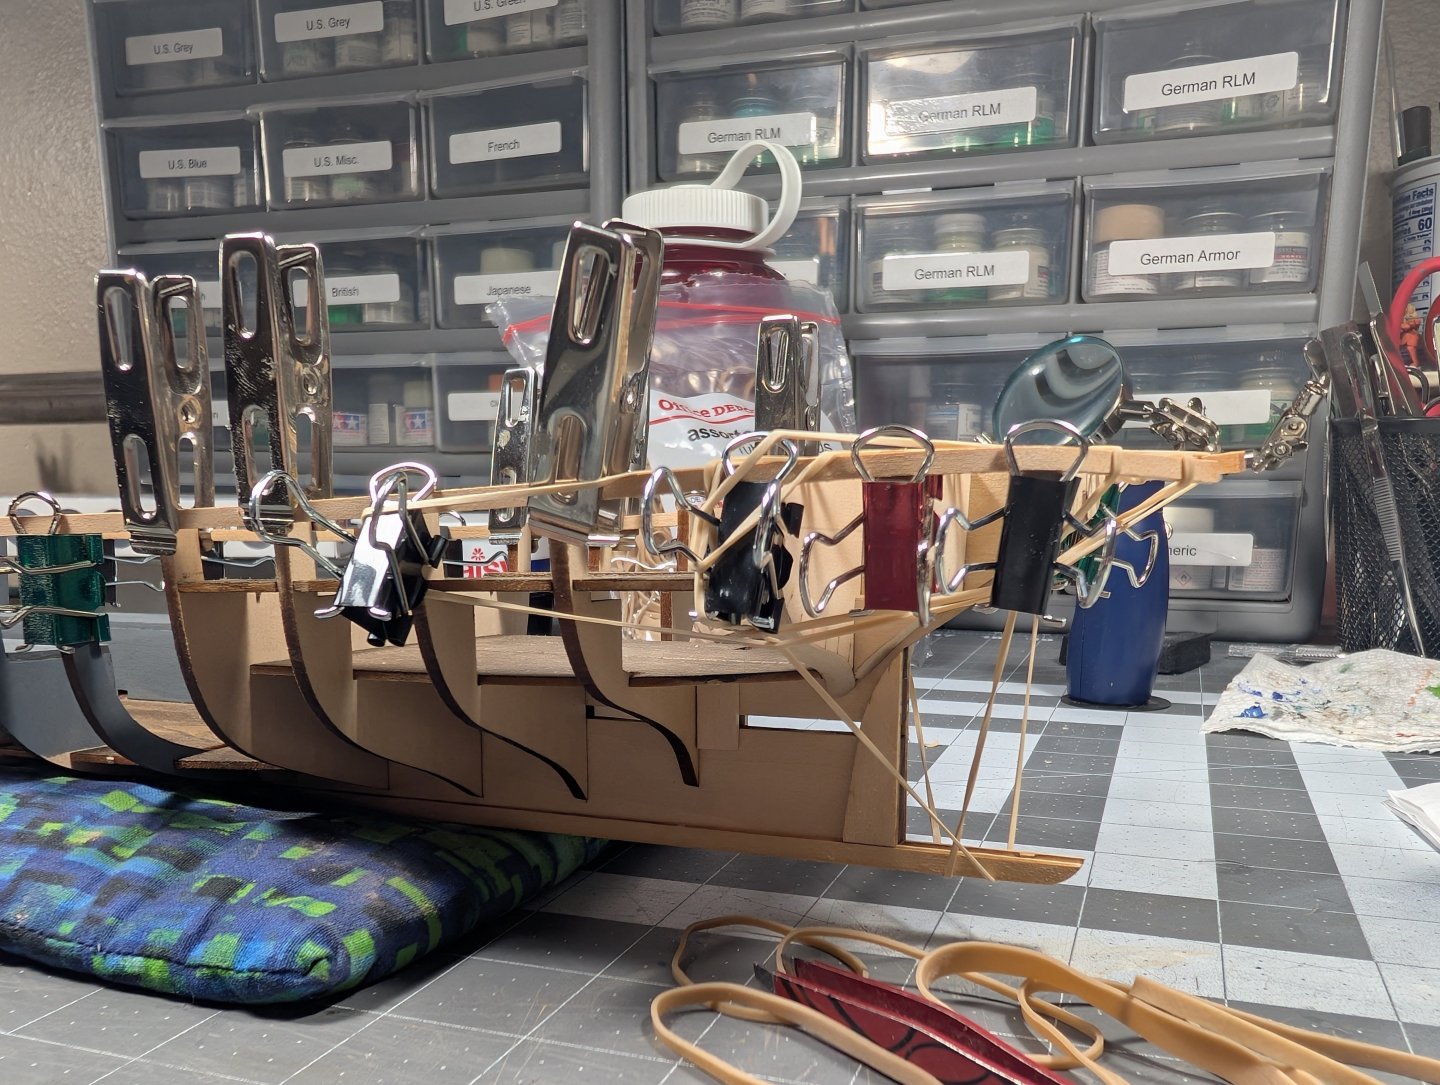
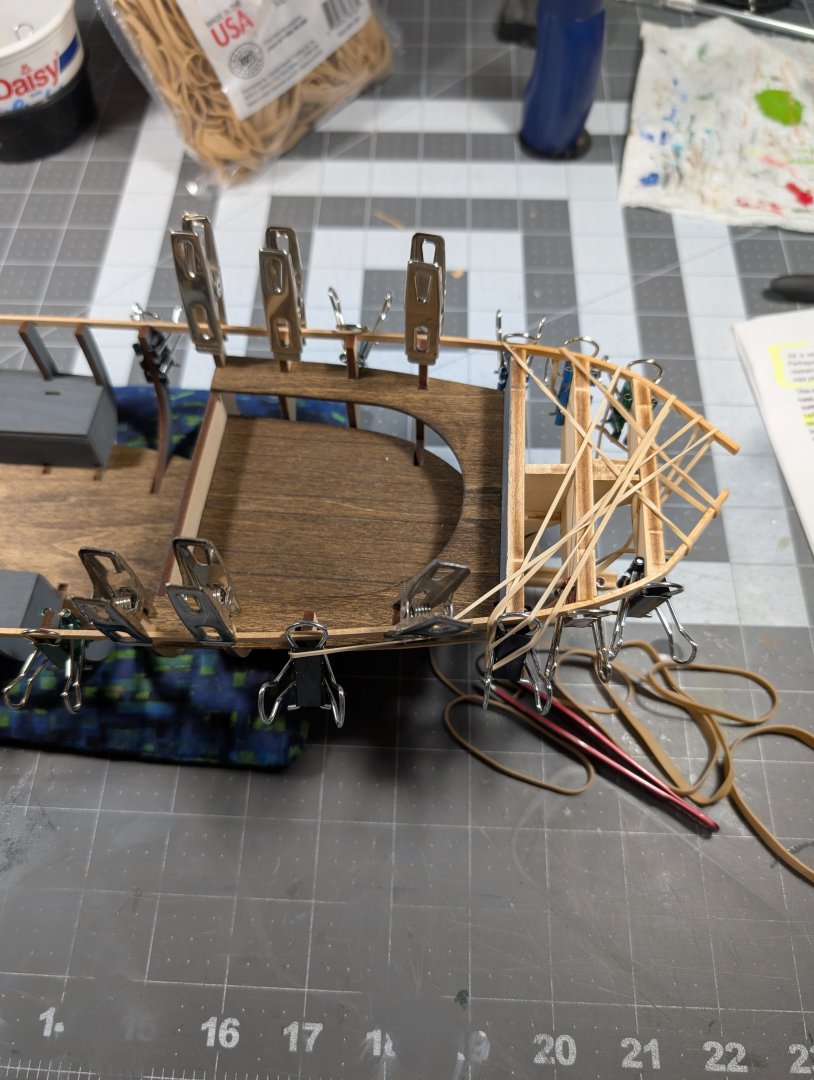
with planking done I moved into the sanding of this lovely hull. along the way I find the usual plank that wasn't quite glued well so when you sand it pushes the plank down and when you let off it appears to still be high. I was thankful for the ability to access move of the planks from the inside and ran a small bead of superglue and then a dab of excelerator while I pushed it from the outside. This seemed to set them well. I chose to use the superglue since I'll be painting the outside of the hull instead of staining. If I was going to stain instead I would have used wood glue and stacked some extra pieces in the outside of the hull to push the plank in while the glue sat. superglue was much faster. I ended up doing two rounds of full coverage with wood filler followed by sanding. I used an old 180 grit sanding block (the squishy kind) and the followed that with 220 grit. I use the sanding "sponge", smaller variable side 1-1.5' block and a 2"x1"x1/2" block to get into the various spaces and angles. I did unknowingly take too much off the end so you'll see a good layer of filler there to counter my mistake. The instructions for the shape of the bow edge were not super helpful so I made a guess. here is my stern with "fixes" plus the last pieces to round it out. Next steps were to add the rub rails which went better thank I anticipated. since clamping is almost impossible at this point so I decided to use clips and then wrap rubber bands around the hull. This worked out surprisingly well. Next up is decking


-
Planking didn't go as planned but I got it figured out for the most part. It isn't pretty but it works. I really struggled with the planks being so wide in this kit. Im used to them being 5-6 mm wide not 10+ mm wide. The keel and stern intersection were rough with the curve and the spacing. I used my hot round iron and water to steam and curve the piece and with some hand twisting and clamps to hold it in place. As I got to the middle section I realized the last few planks might be rough. The method for making the previous planks didn't really work anymore so I started measuring the space left and dividing it between the number of planks left. This seemed to work. I did resort to using brass nails from another completed kit to help hold planks down. I have not had success with dowel or toothpick nails in the past and since I would be painting the hull i figured why not use the simpler option of the brass nails. The last two were hardest as you lose places to clamp and I didn't want to use nails on such thin planks. So I pulled out my rubber band stash and used scrap plank sections that had some taper on them so I could snug the planks up while the rubber band gave the downward pressure. Here is quick view of it done and letting the glue dry. Today I completed an initial sand of the entire hull then applied a thin player of wood filler on the high spots and filling in the low points and gaps. I'll let it dry tonight and then start more serious sanding later this week depending on whether my furlough status continues or not. Happy building everyone!


-
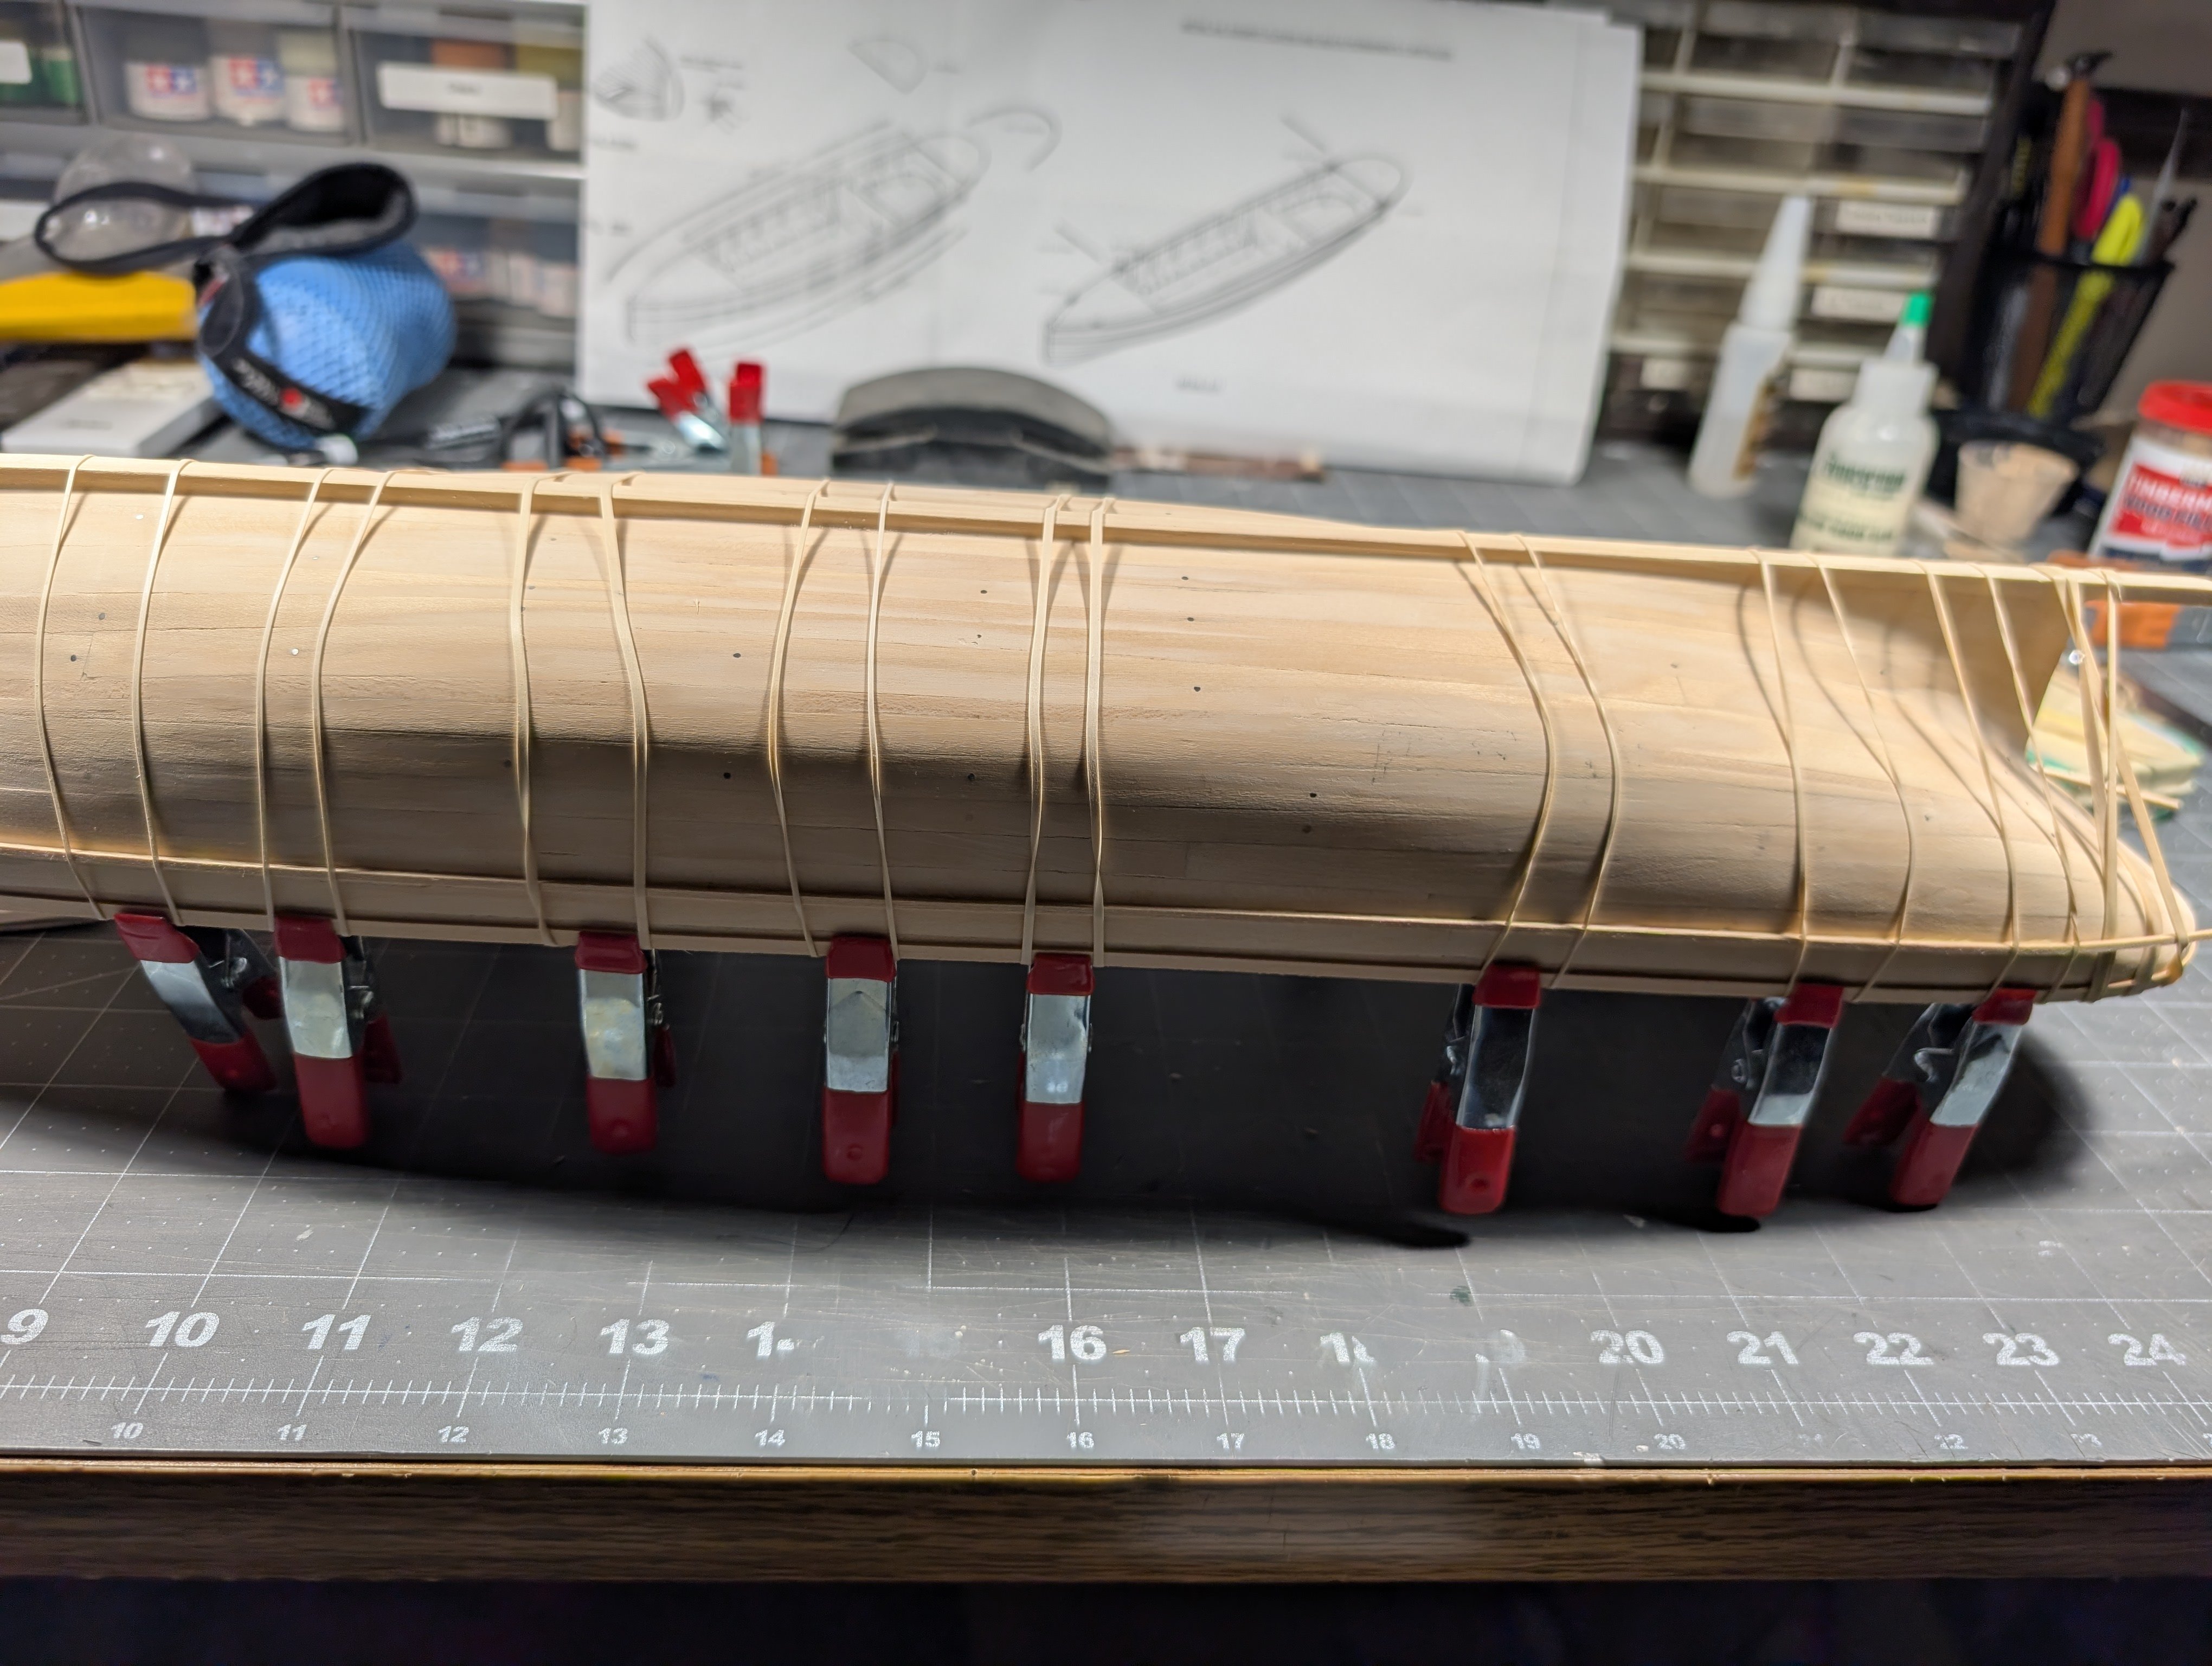
We bought a late 1960's jeep and thats taken me away from this boat. But a few weeks ago I got the last few planks on the upper half and then flipped it over and started at the keel. I used a keel holding vice for the upper planking. Once i took it off and flipped over i am using a homemade fabric rice pack which works great! I need to make another one and have it a little bigger. I am struggling with the plank shaping on the underside but slowly figuring it out.
-
k-slak reacted to a post in a topic:
Picket Boat #1 by k-slak - Model Shipways - 1:24
-
Been a while as work has been nuts and motivation low and to be honest I have been avoiding starting planking. I completed the breaking up the haul into sections as recommended and placed one plank so help with spiling. I stopped there many week ago. When reading about the spiling I was so confused and couldn't picture how this would actually work. My spouse told me to just try and if I needed more planks we could get some locally or pull from my other builds left over stock. So I jumped in and he handed me a compass and I started. I was surprised that it actually worked! I opted to split the lengths into 3rd's and the offset by a bulkhead or two. I had some issues with the second row as I forgot to trim the oft side. Have to go back later and fix it by hand. I used a c clamp to help get a plank to get set right as it wasnt laying well even with water and iron. Also continue to utilize rubber bands and clips to help hold the plank ends in place. Took me about 2 hours to get 4 planks (two on each side). Its looking good.


-
@gjdale and @Mike Collier I hope this build log is helpful. As mentioned in my first post its gonna be a while as I can't sit for modeling more than about 1-2 days a week due to busy work schedule and werkend events in summer as well as motivation :). Thanks for following along though
-
June 15th weekend I got a little more completed with the inside of the boat and the top plank (spacing on the name of it). But its looking great. The rubber bands were so helpful. Glad the instructions mentioned and I looked at a few other build logs to see how it was actually done. Game changer. I will probably try to use this same technique on other plankings, soaking and small bends hasnt had much success for me. Next up is planking. I've picked up a variety of books over the last year on planking and hoping to try out a few of the techniques here on the picket. My plinking looks pretty good on my other ships, but I've always felt that there was a better way or one that was less frustrating. I think I've uncovered some techniques that should work well. Question for those who have done this. Model: how did you adjust to the different width with planking that is provided in the kit. Seems that planks should be approximately the same width visually on the boat. So do you engrave or graphite in a line for the larger pieces after install or just leave it as is? Thanks for your help in advance.

-
k-slak reacted to a post in a topic:
Picket Boat #1 by k-slak - Model Shipways - 1:24
-
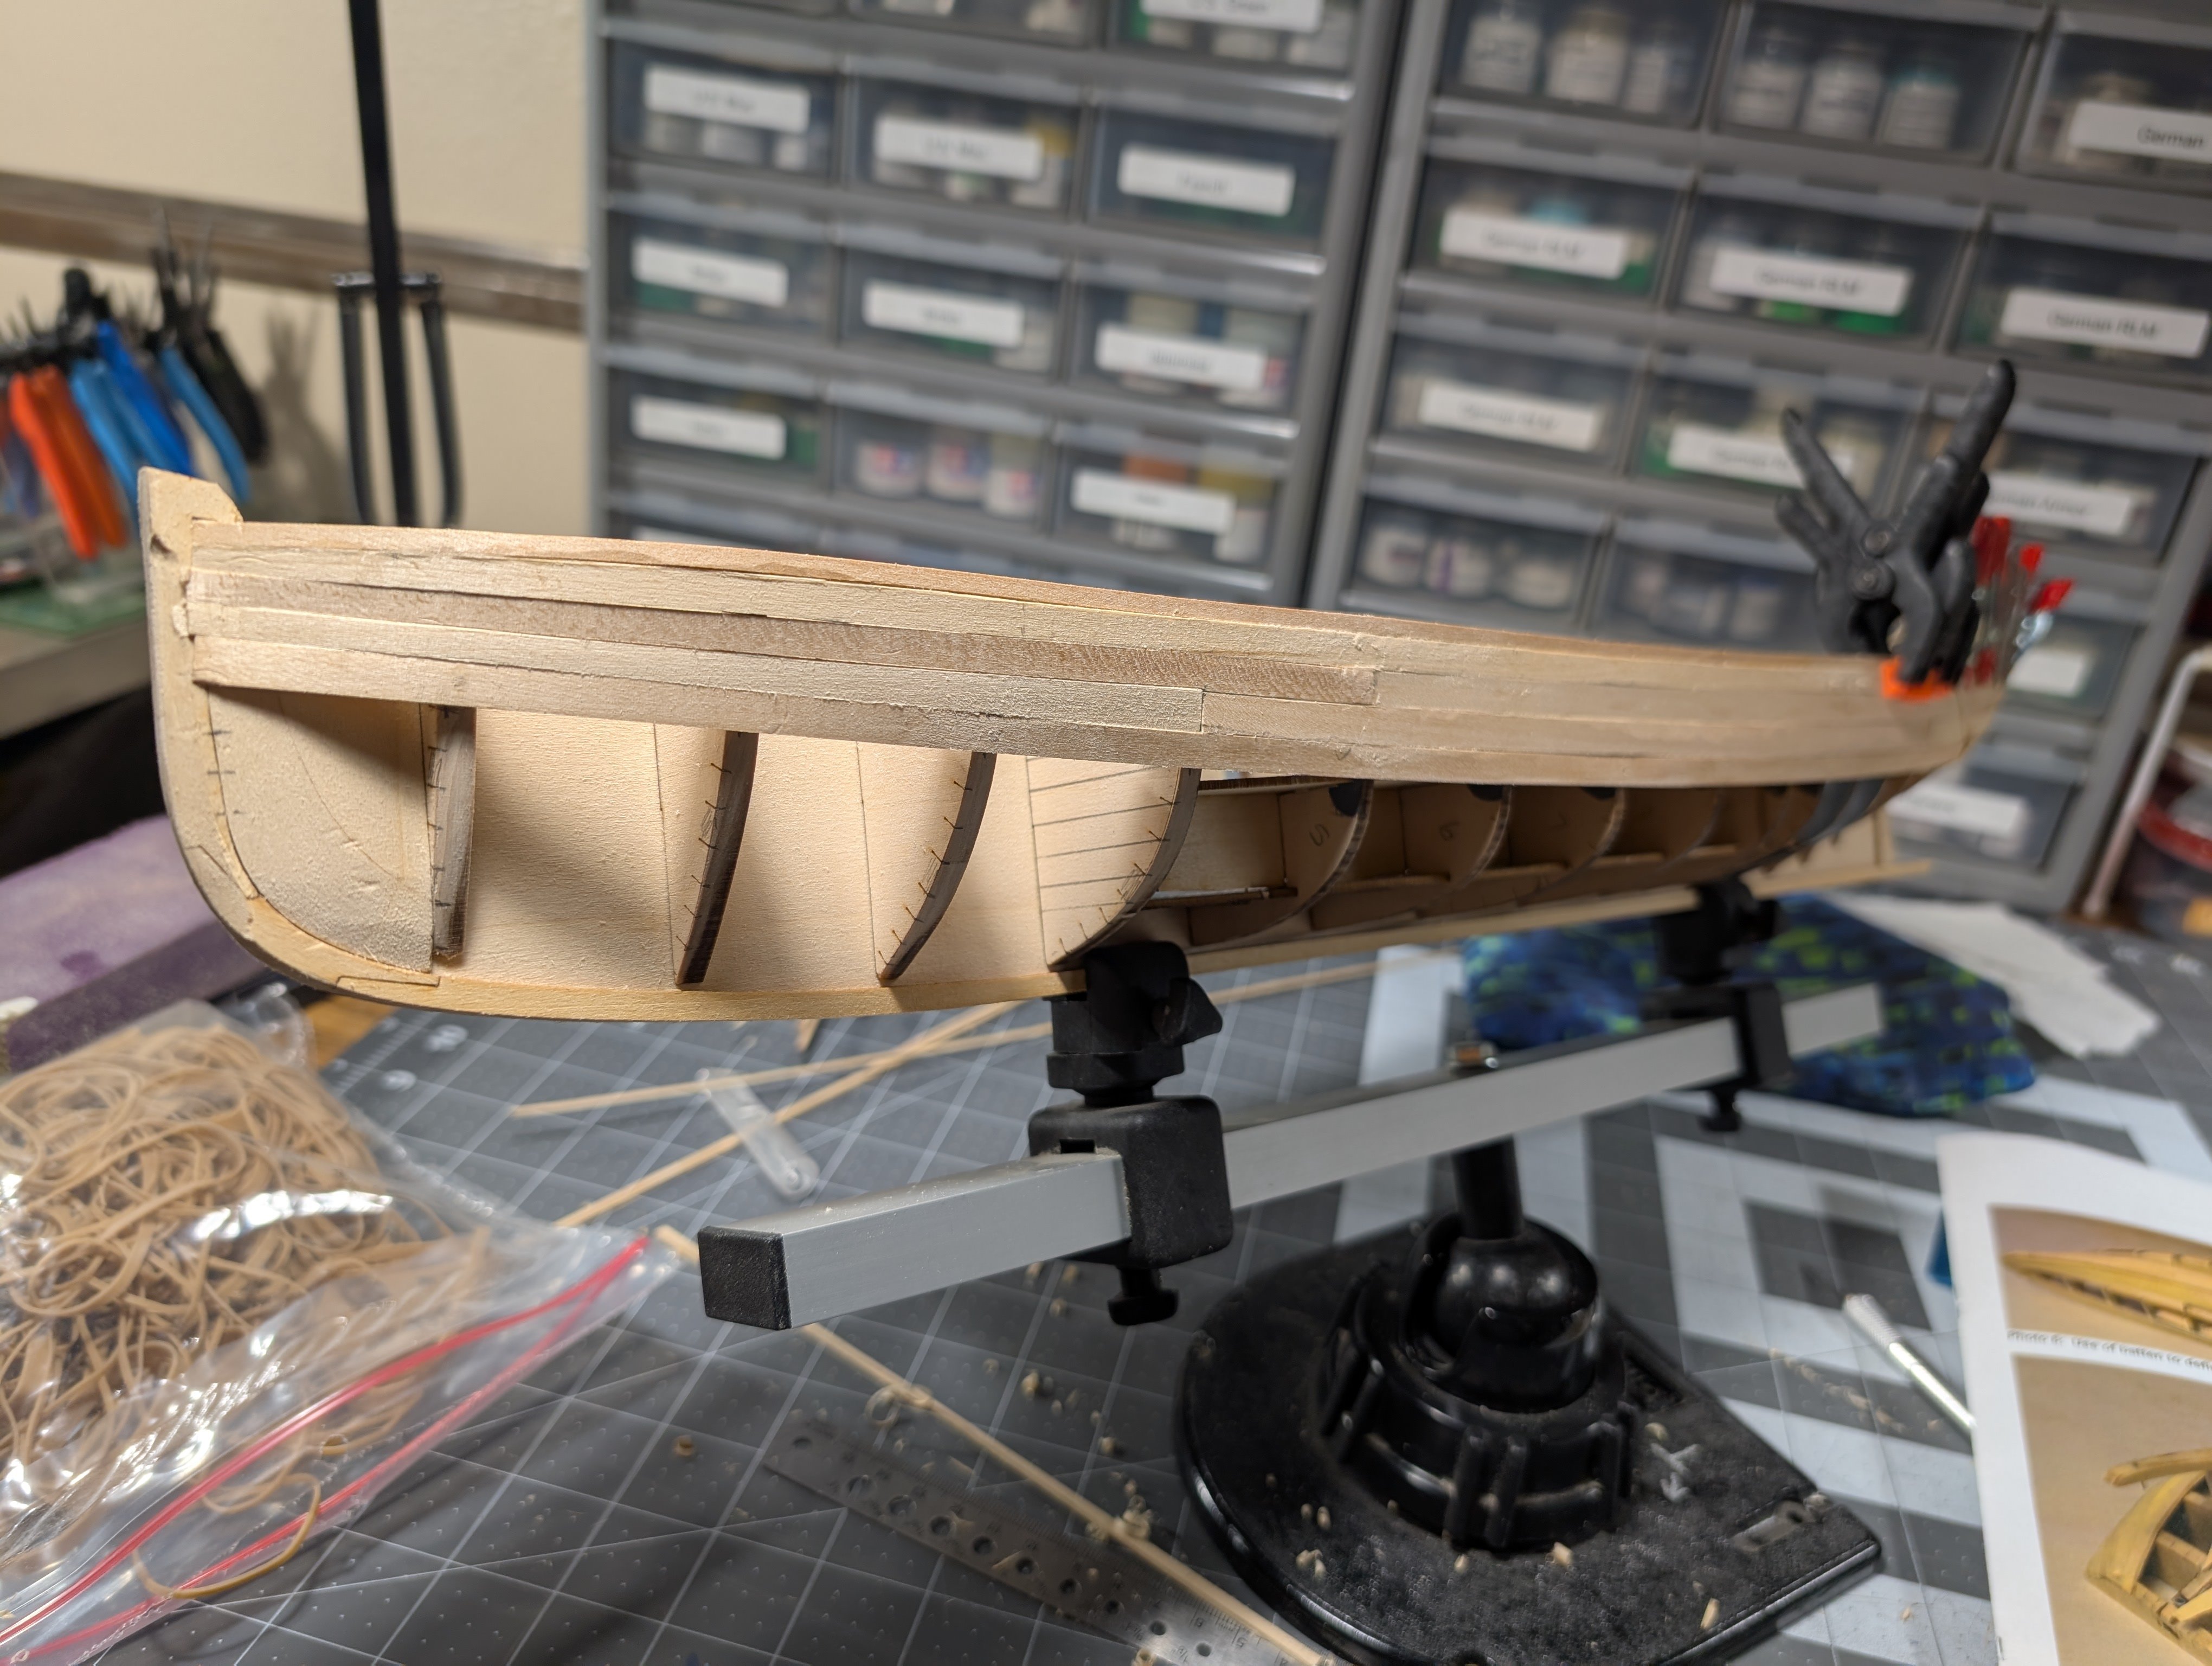
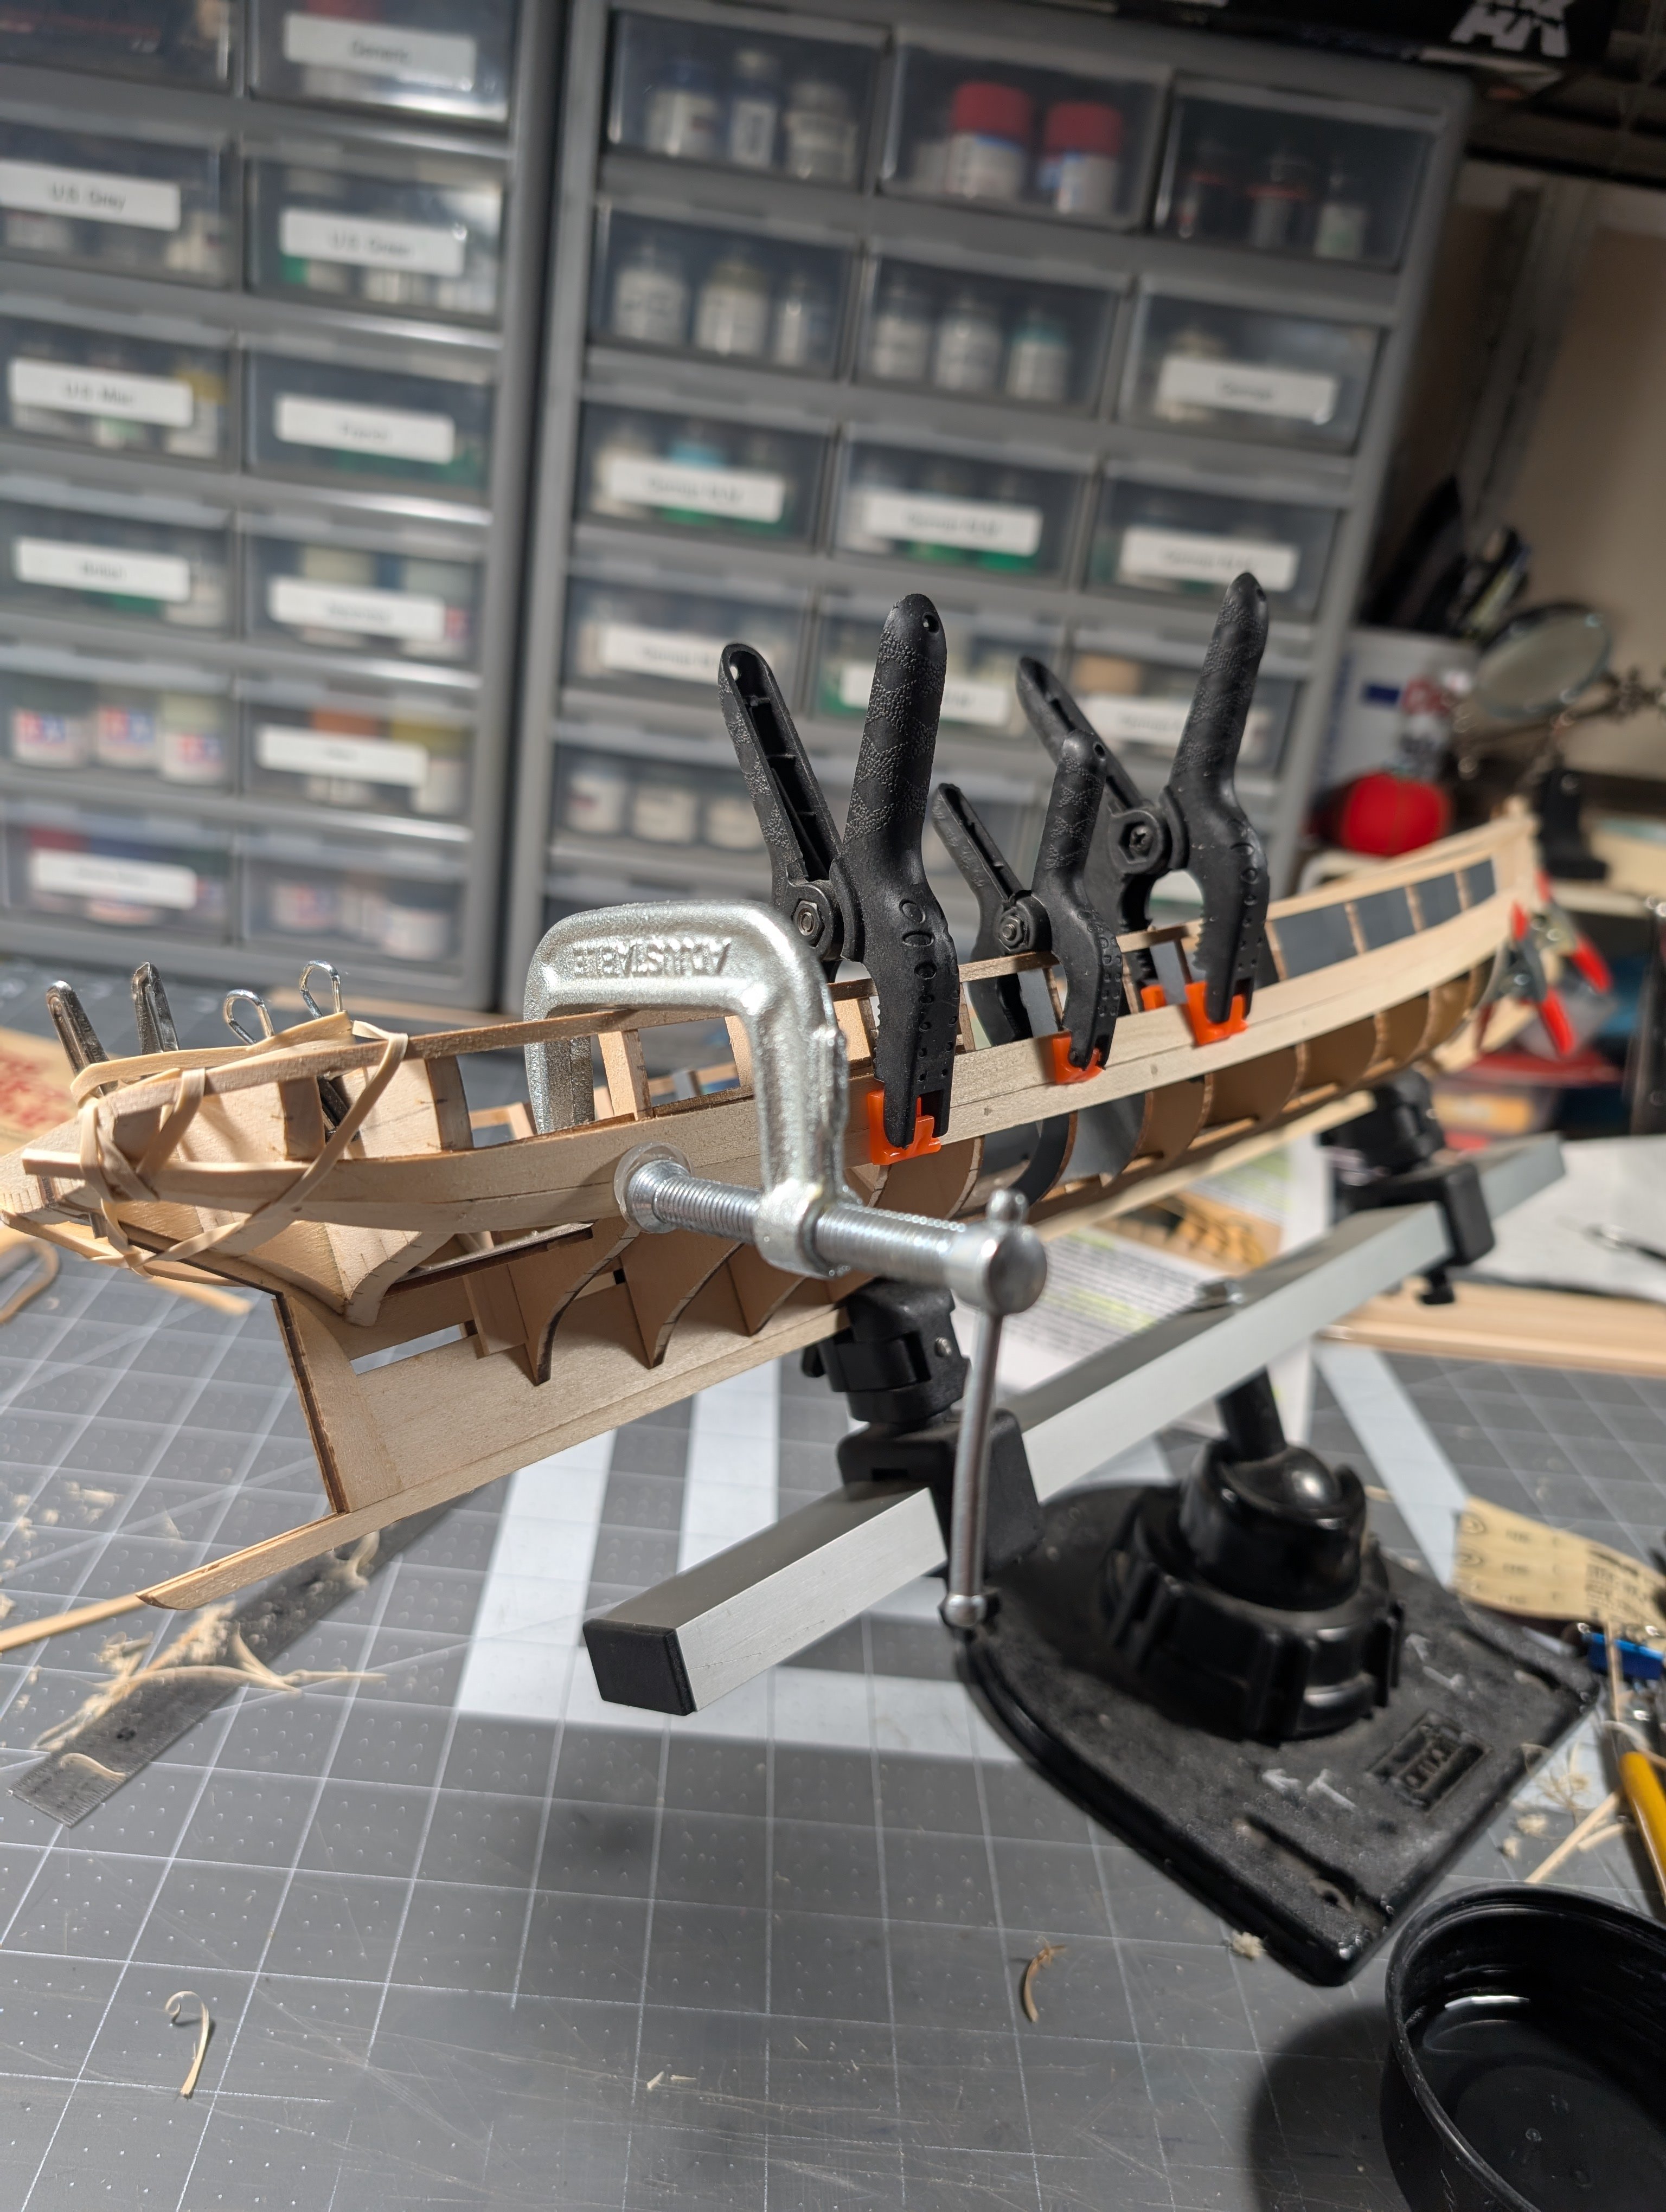
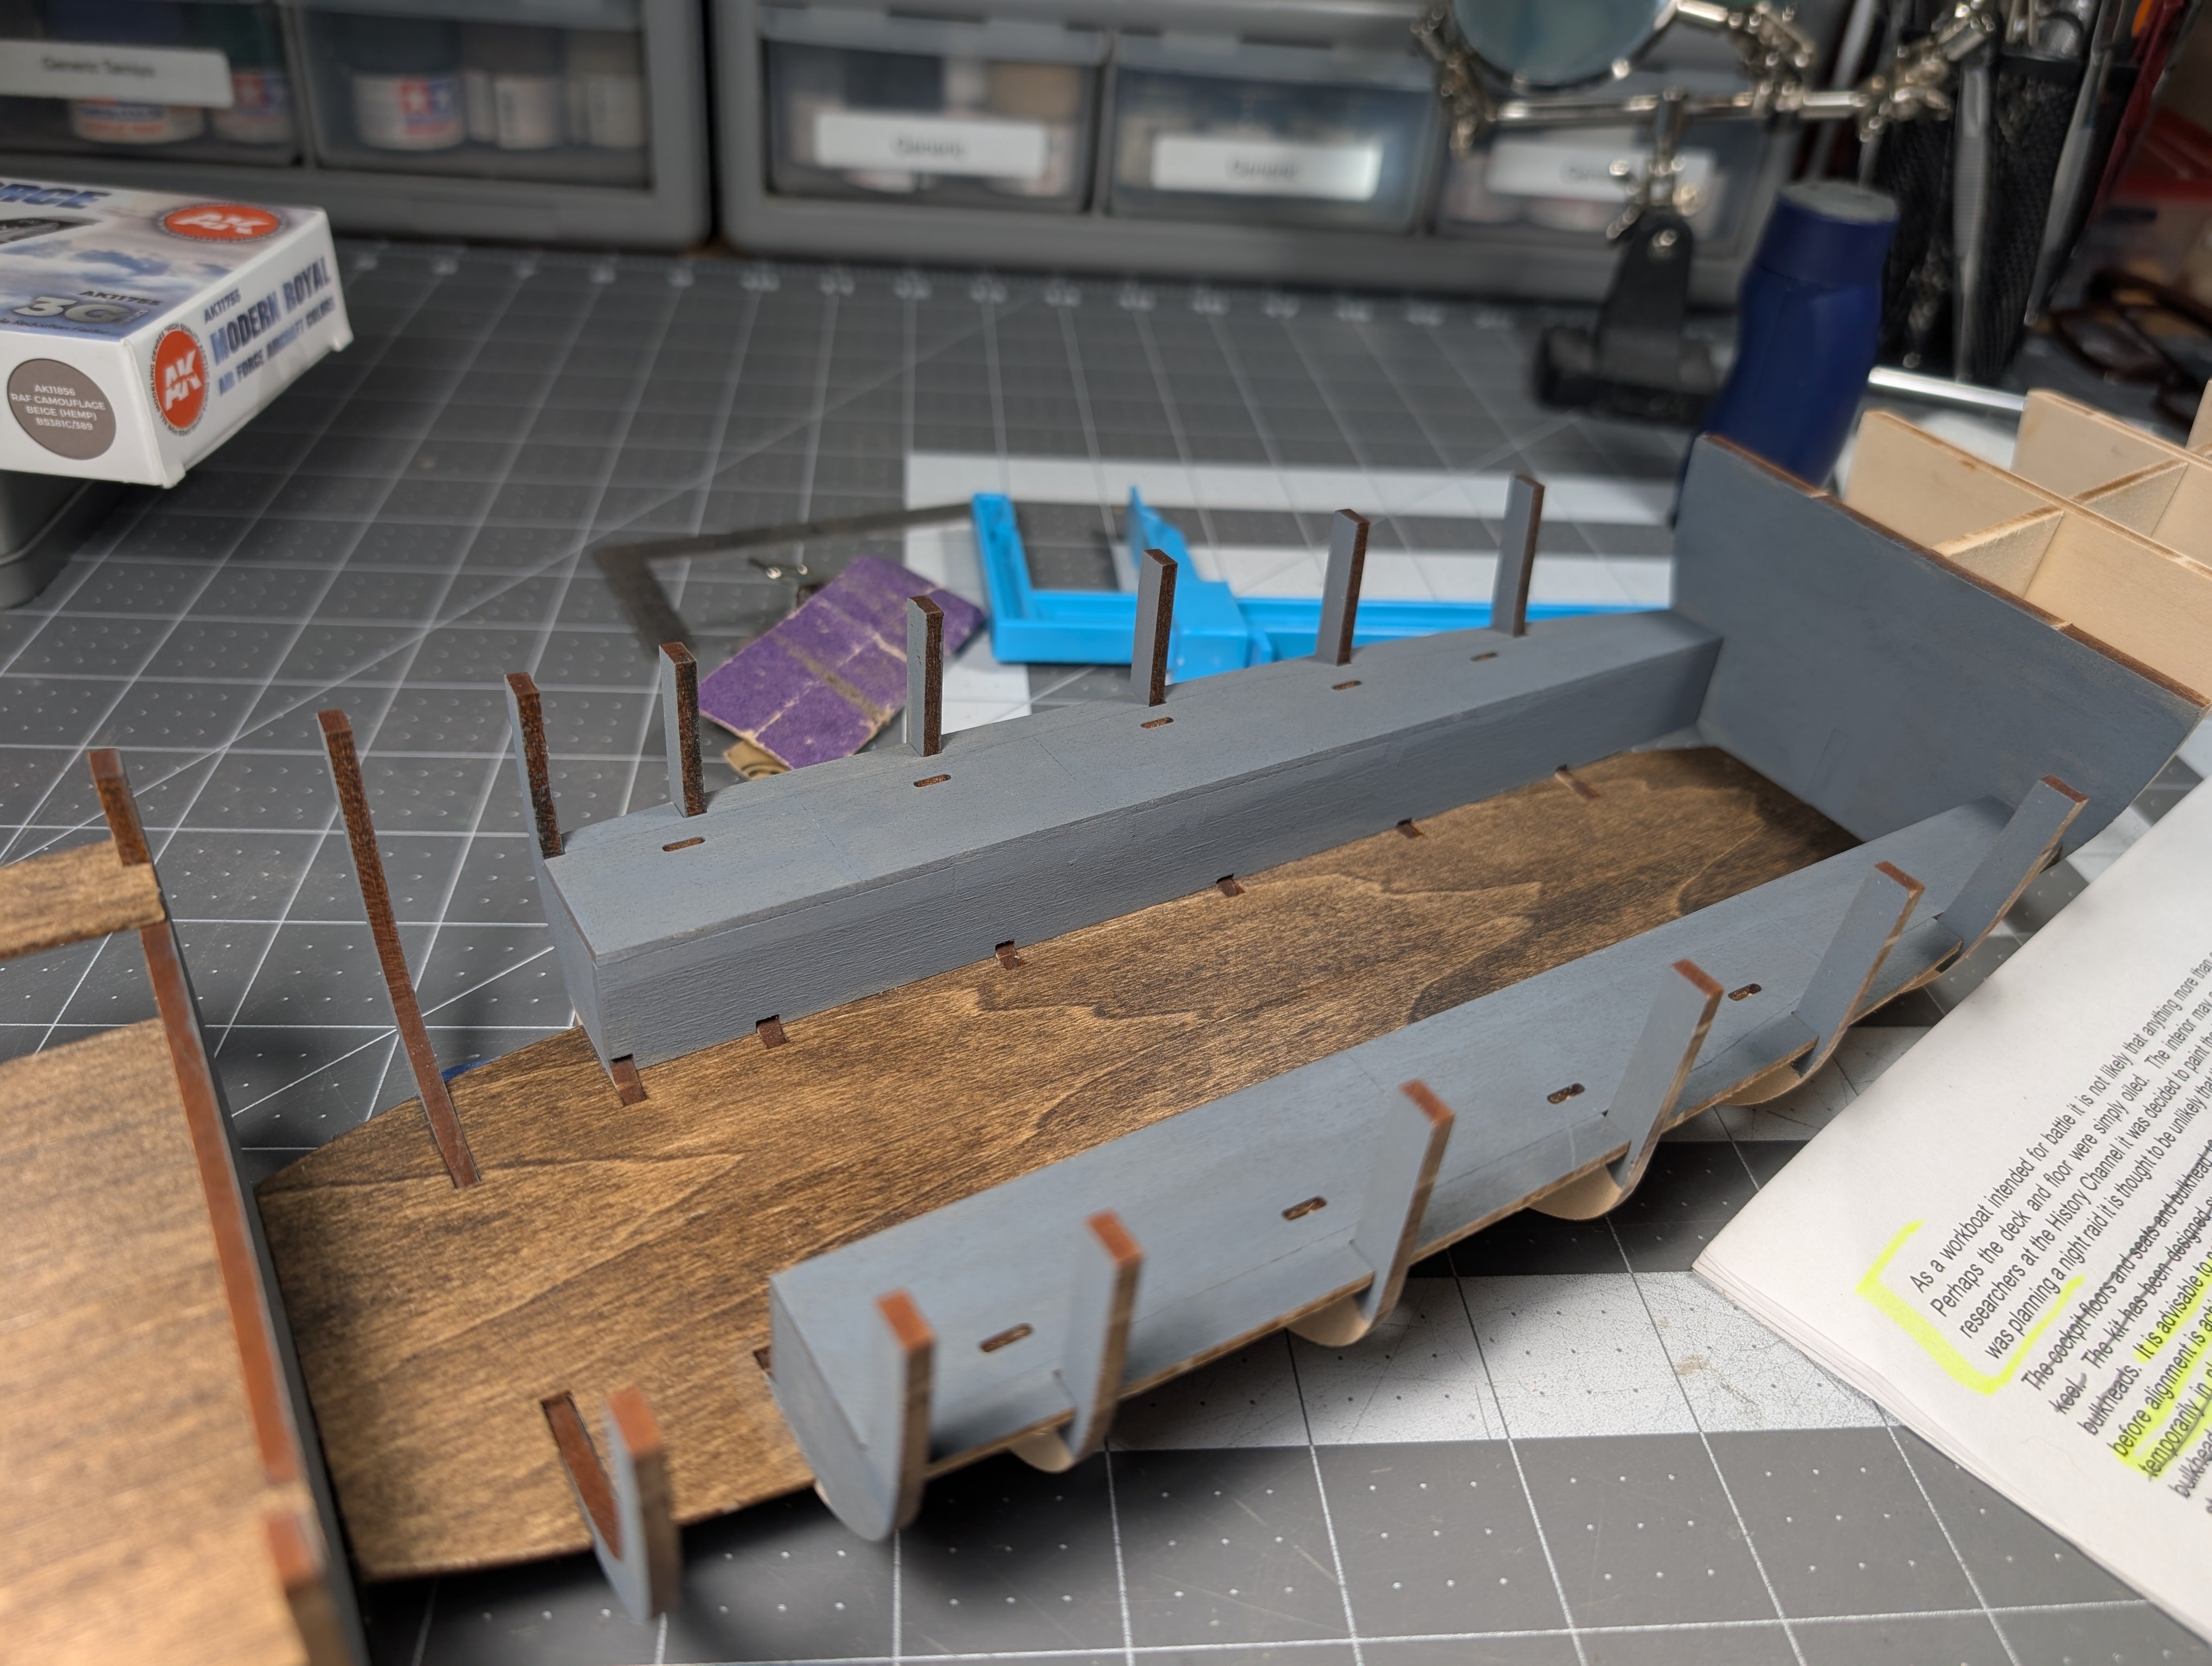
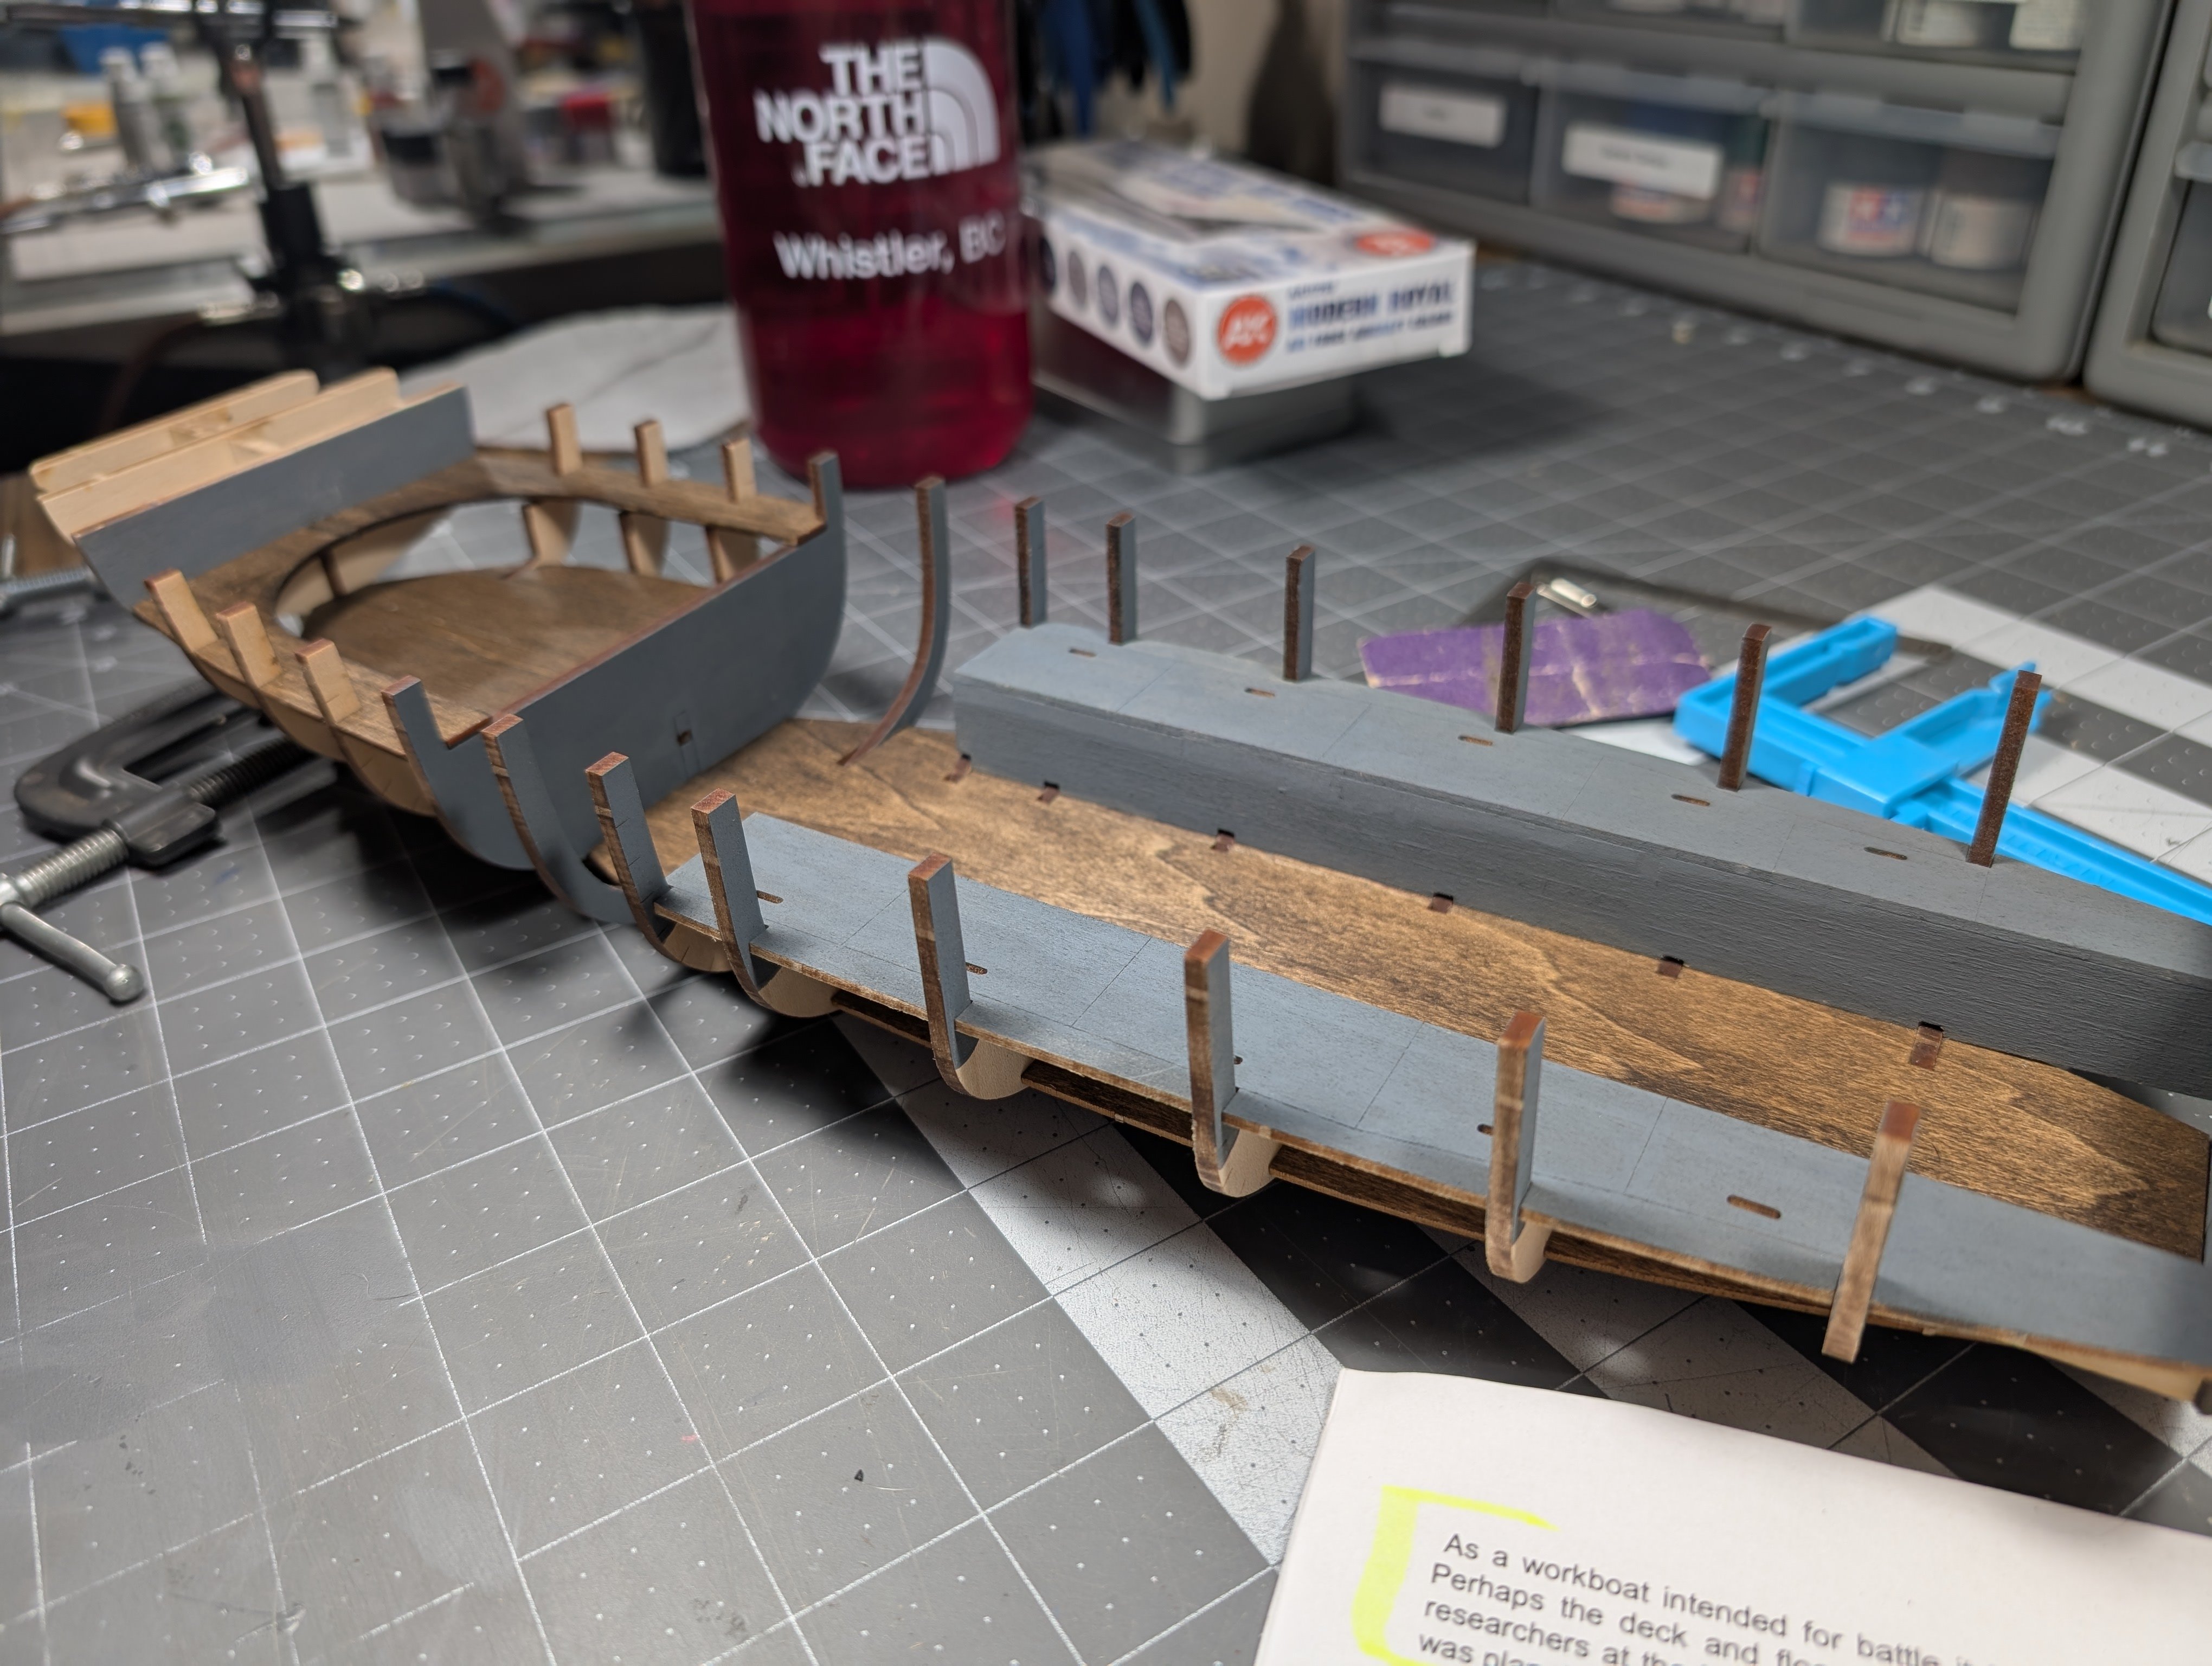
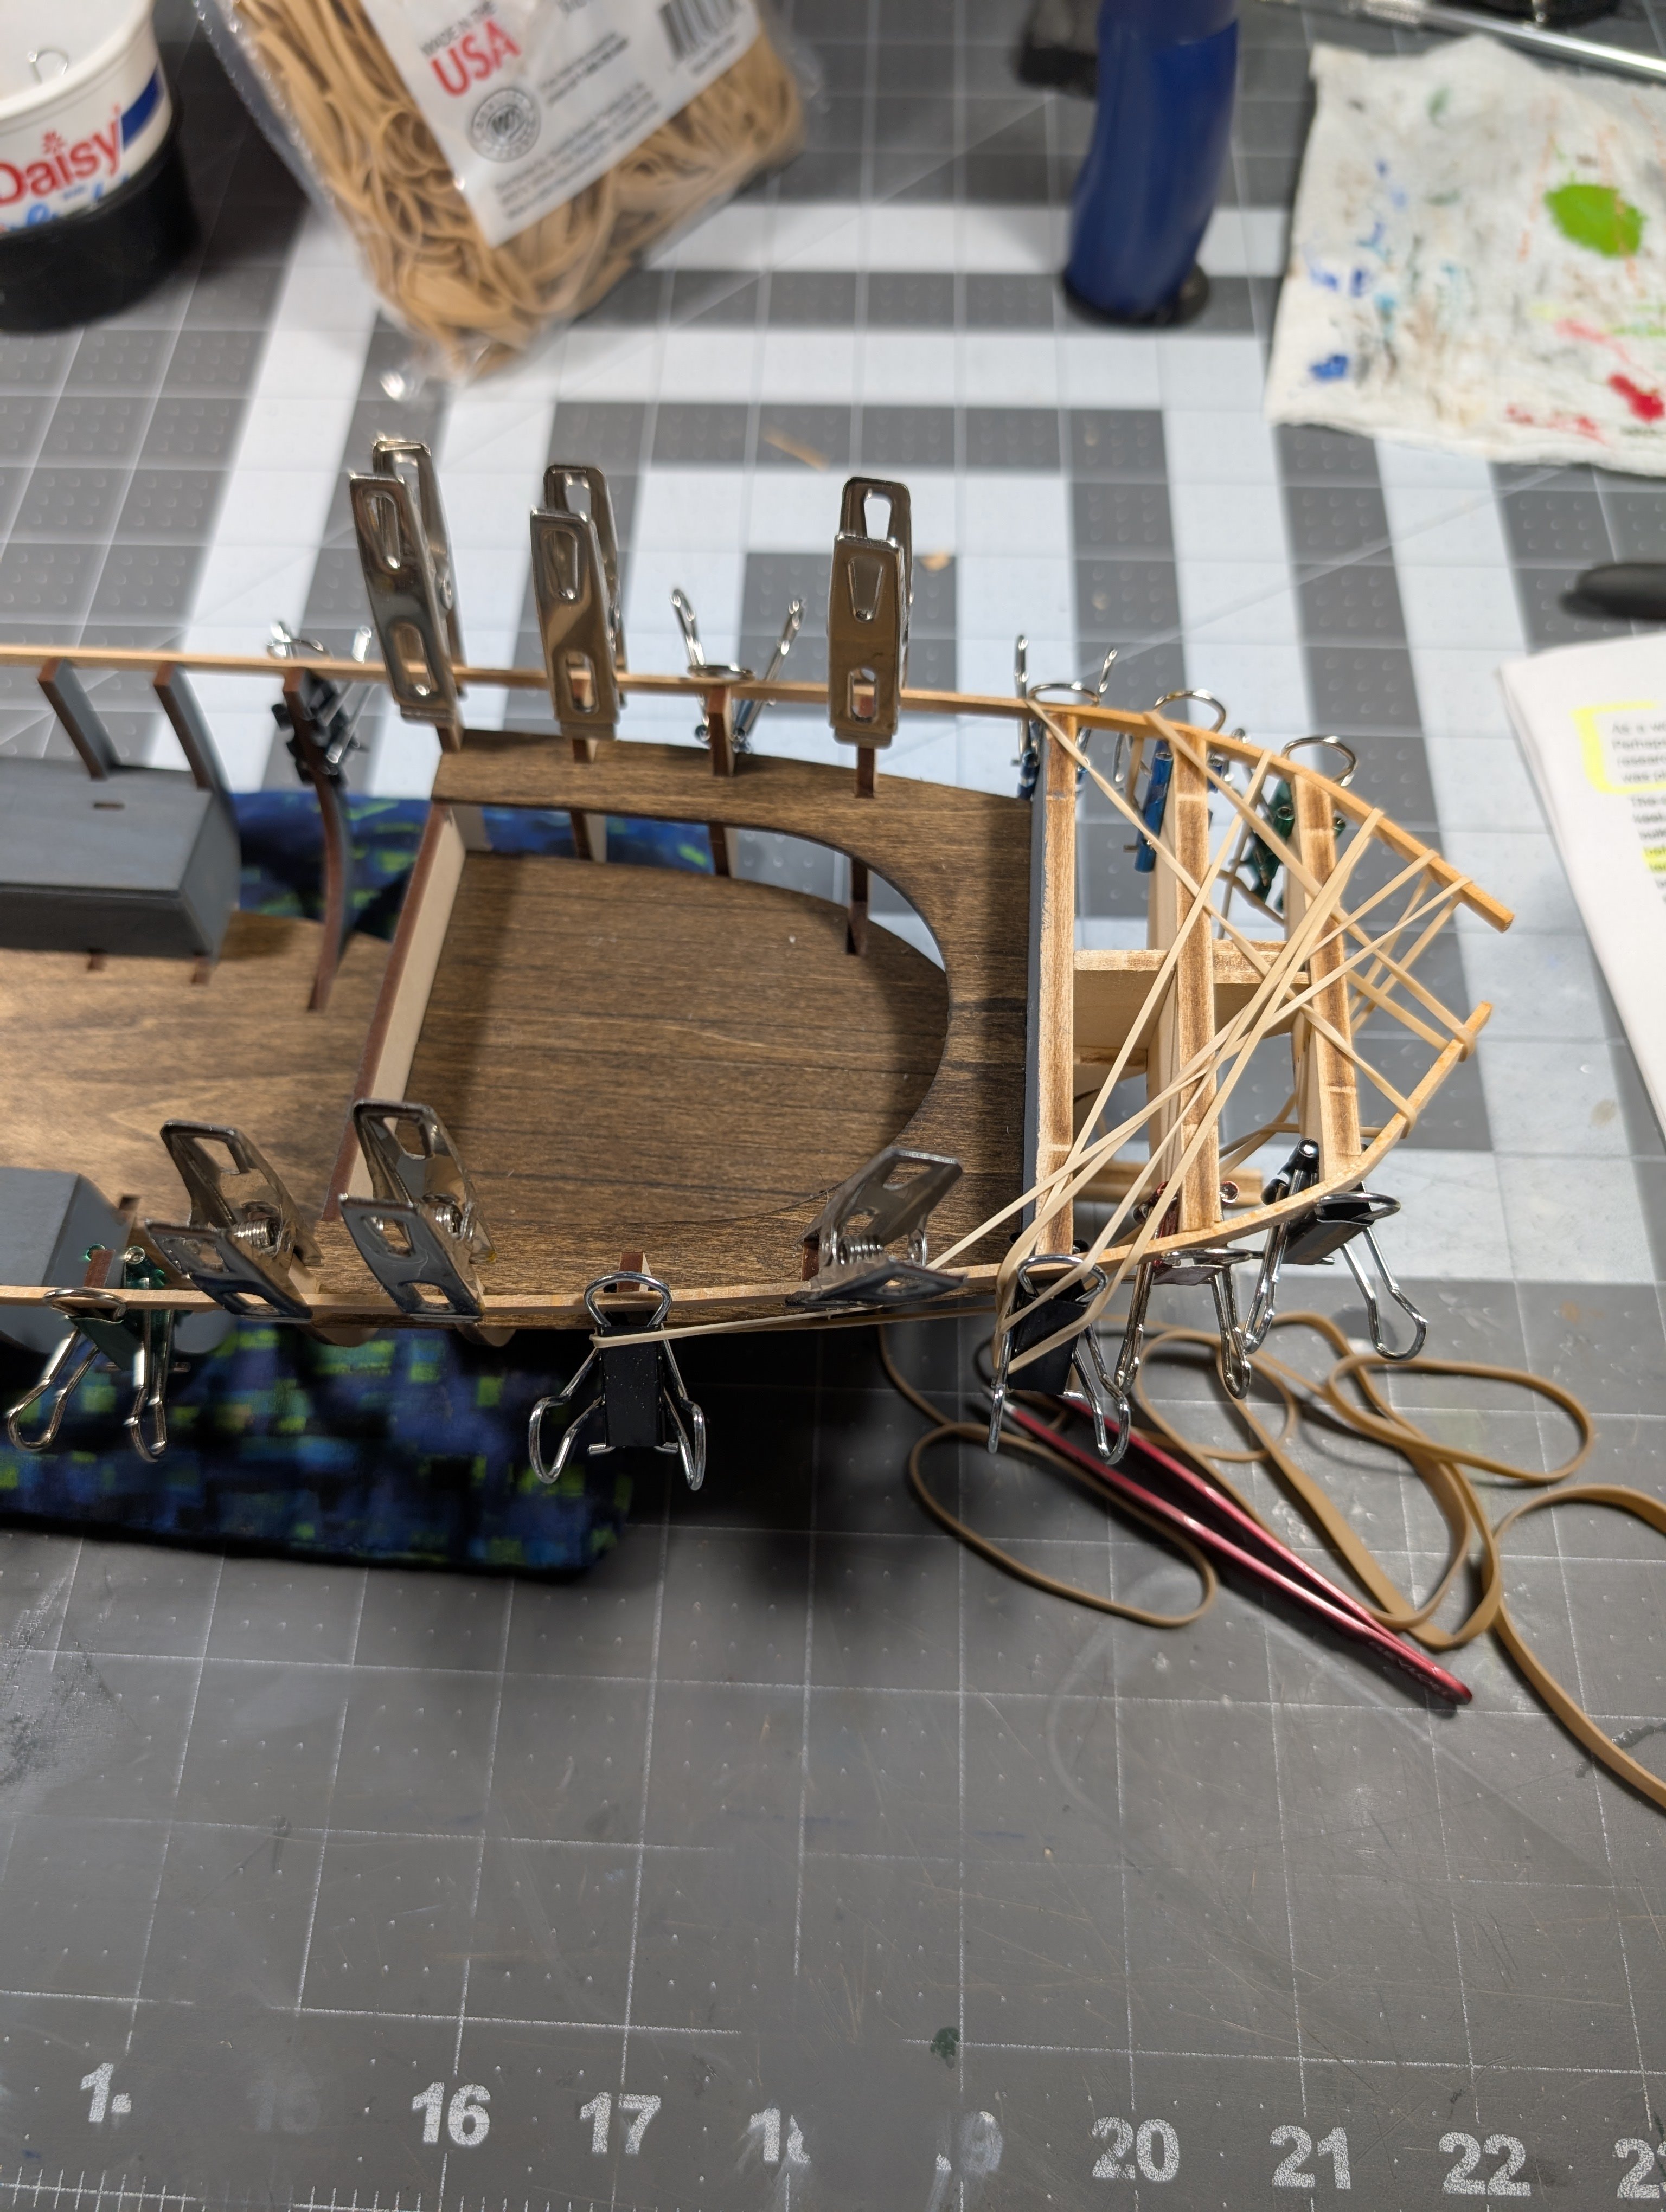
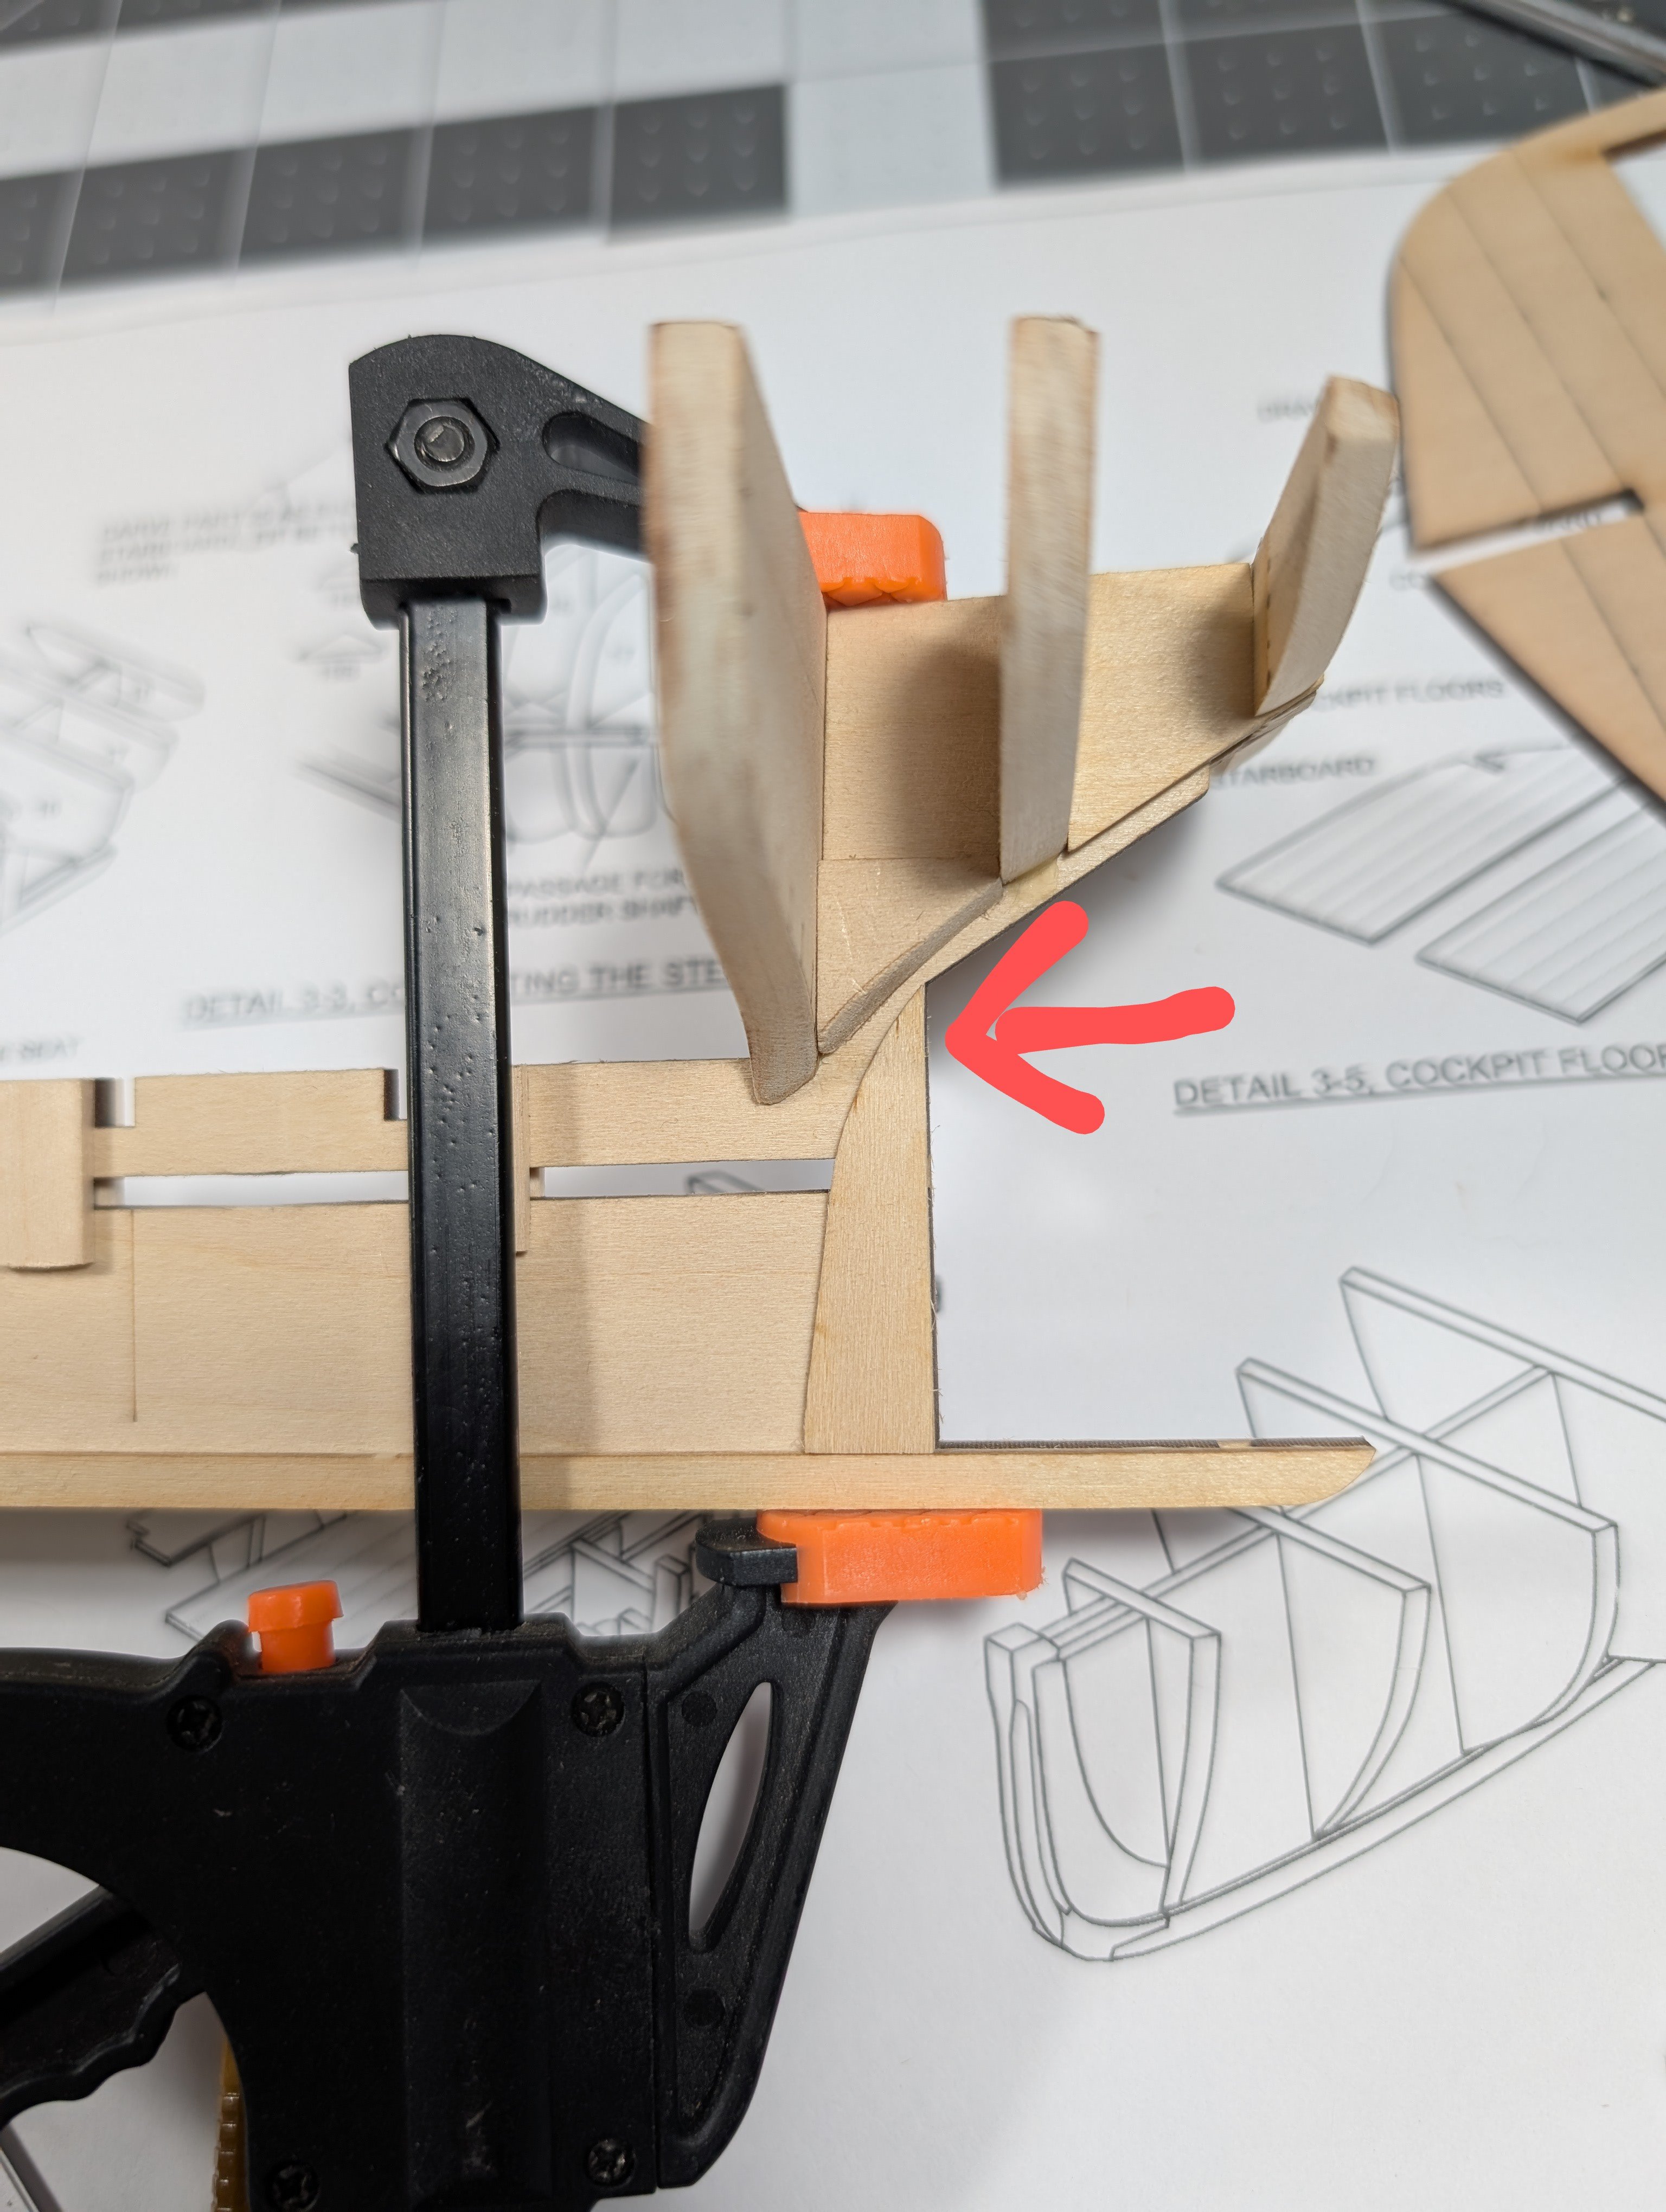
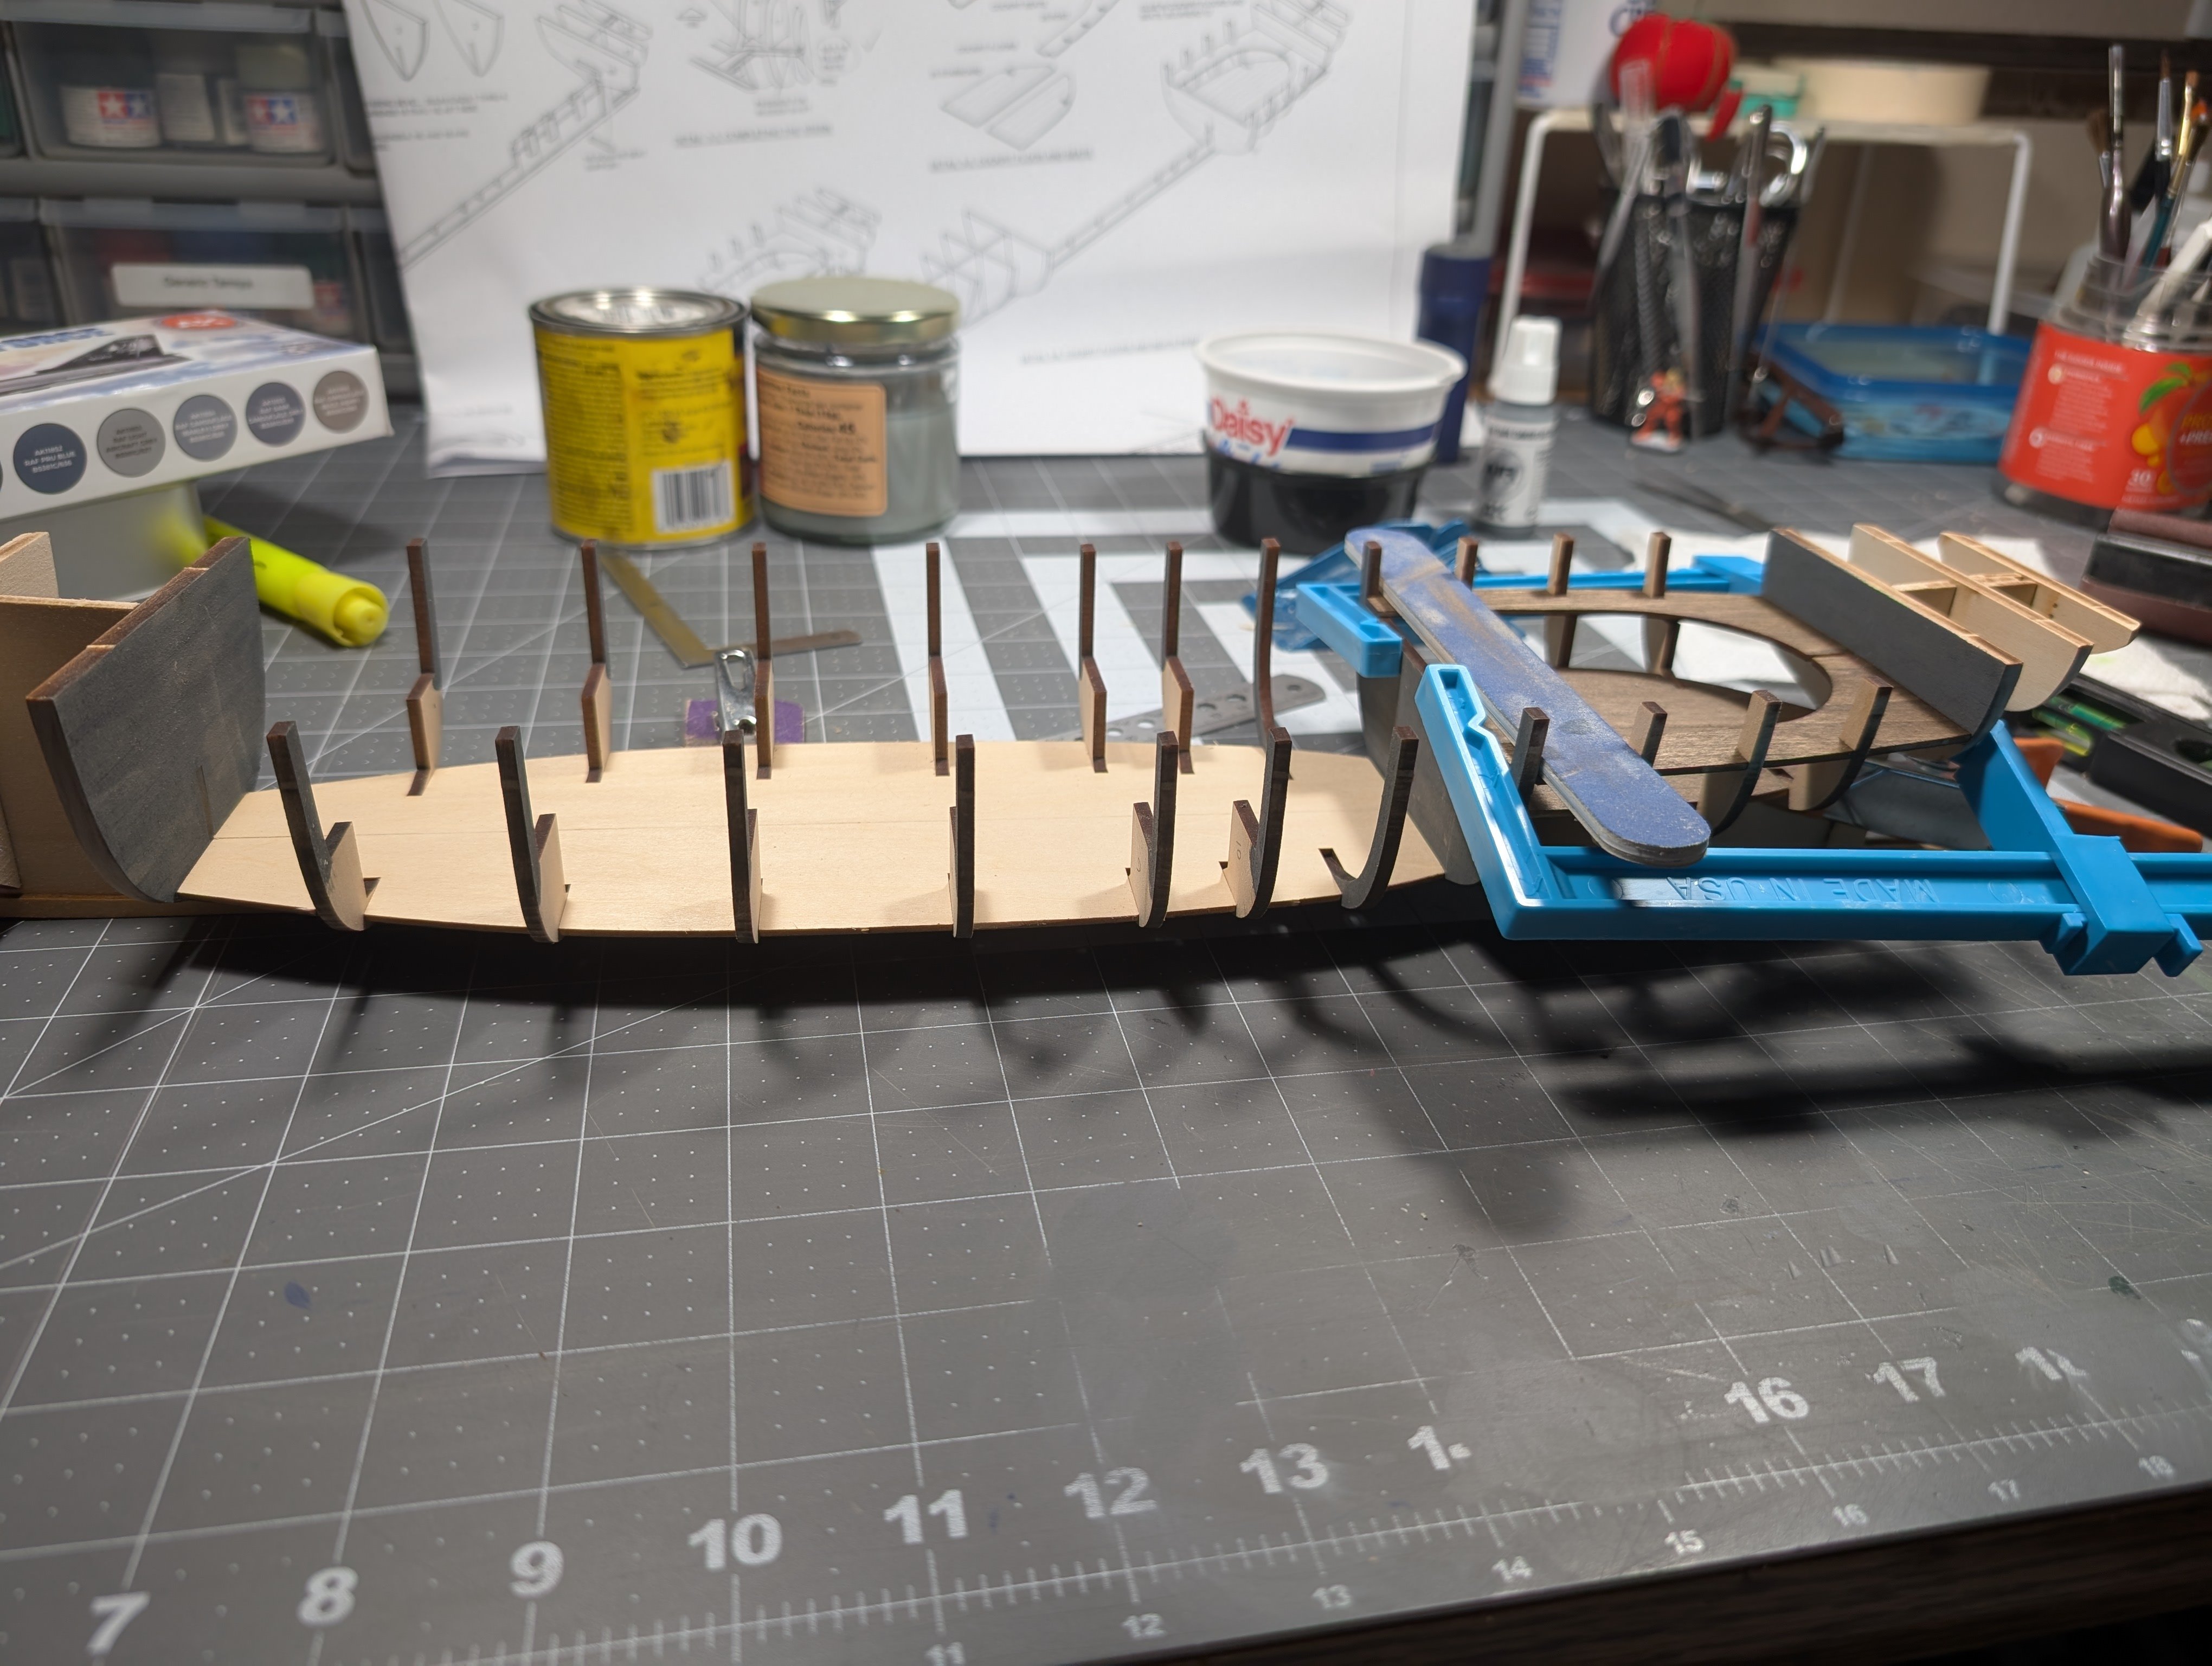
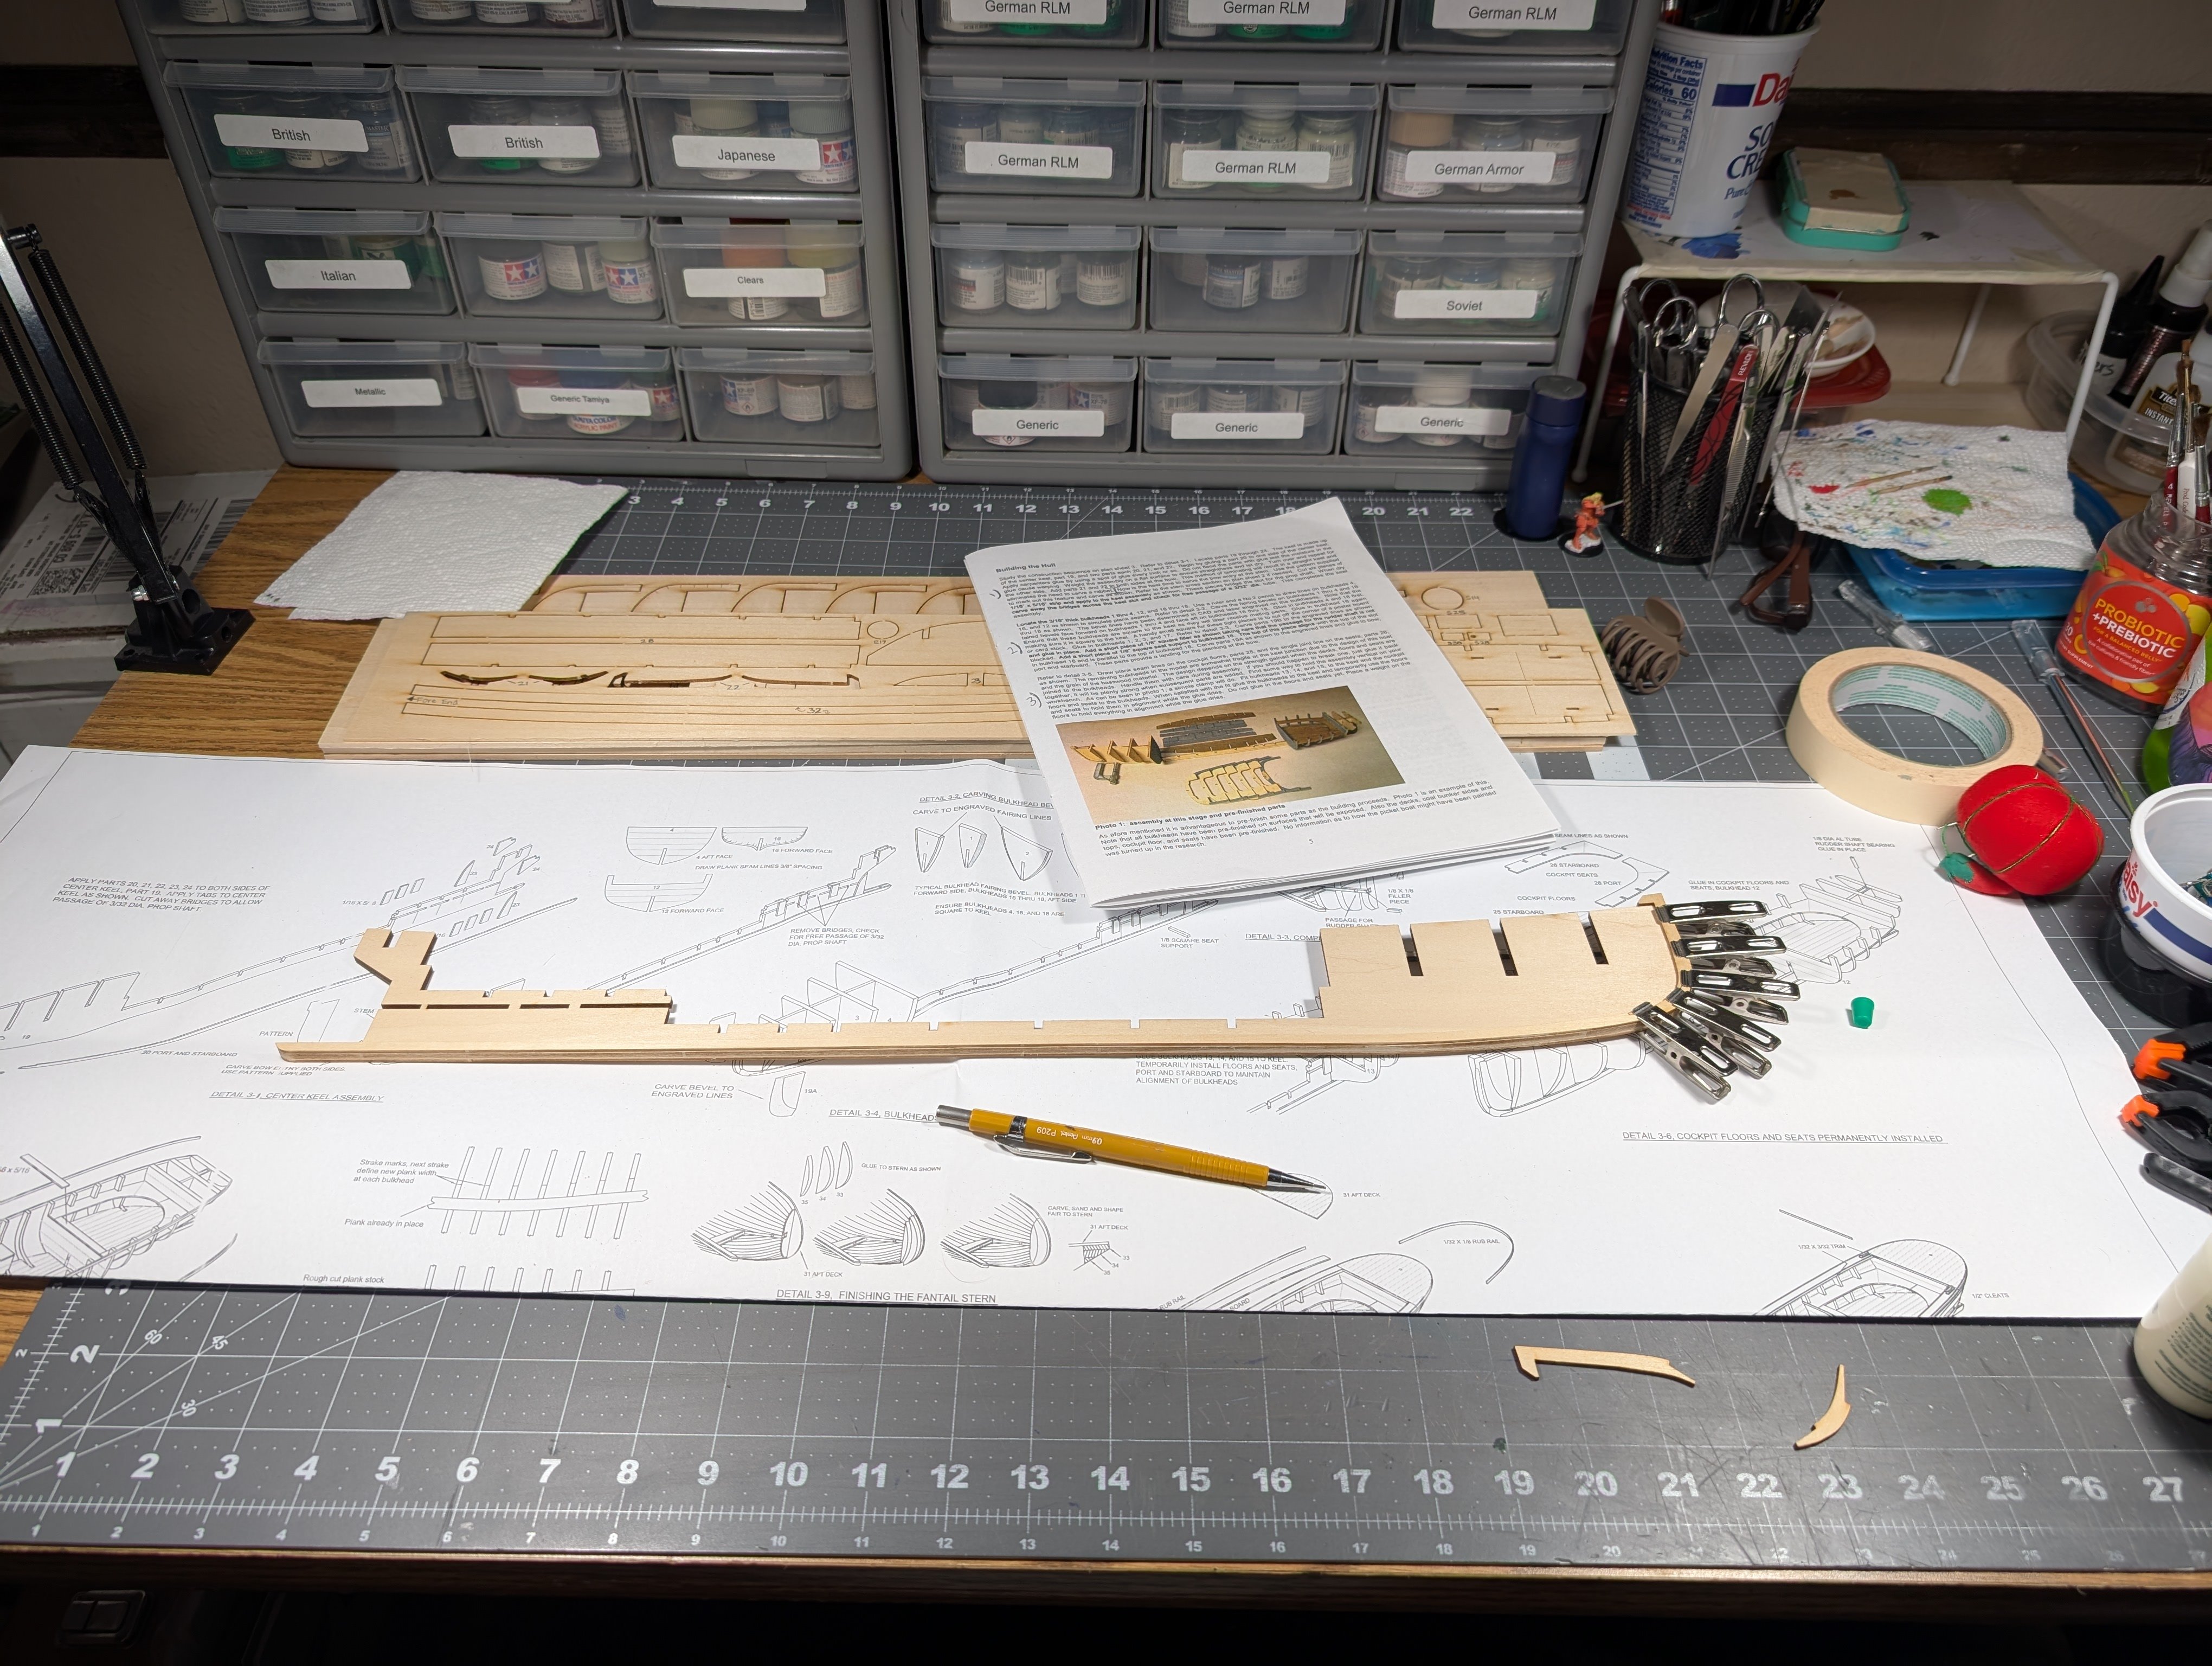
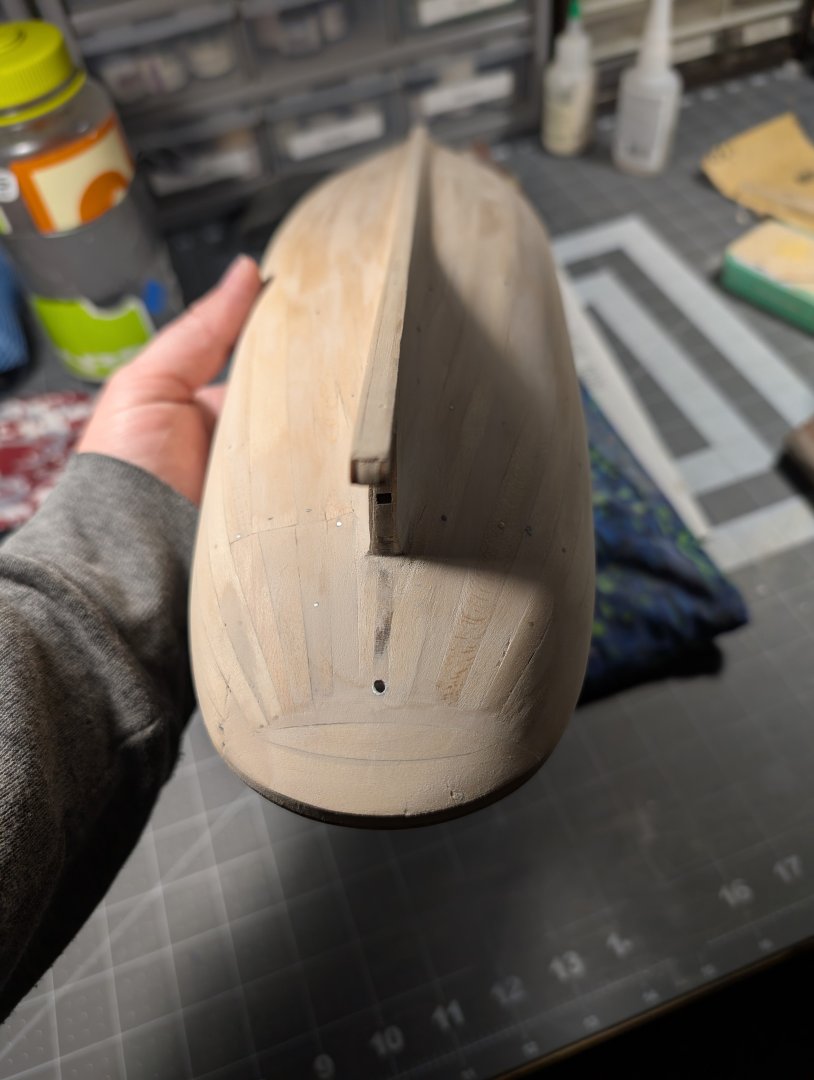
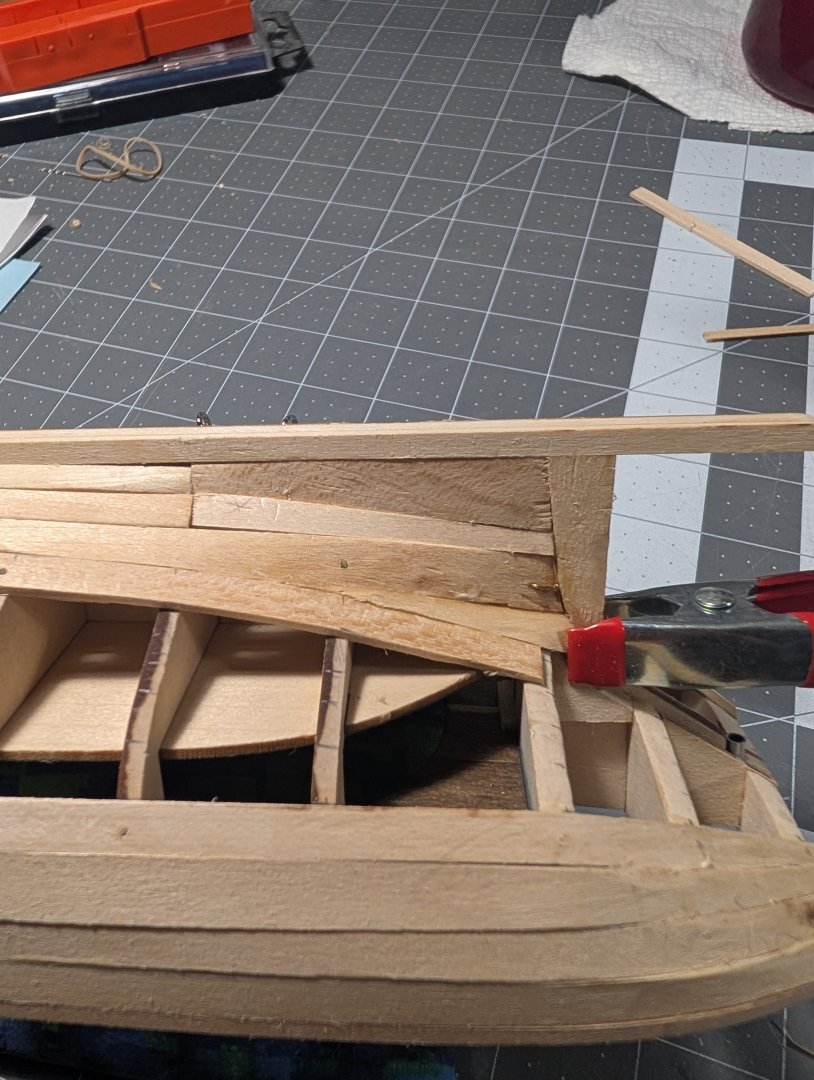
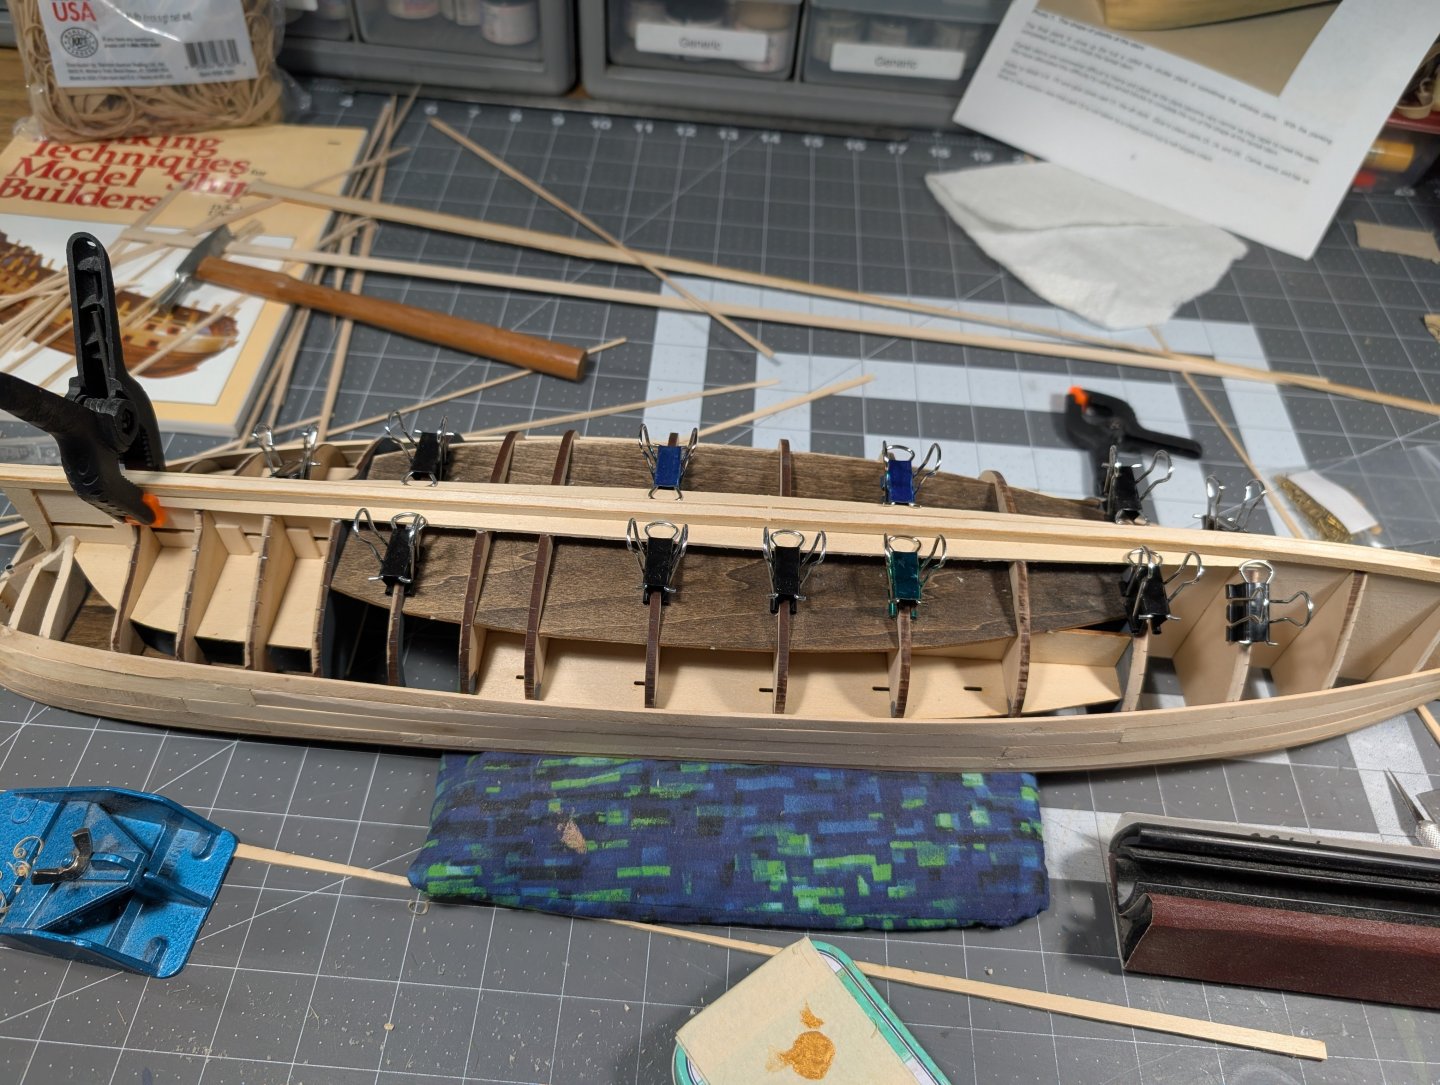
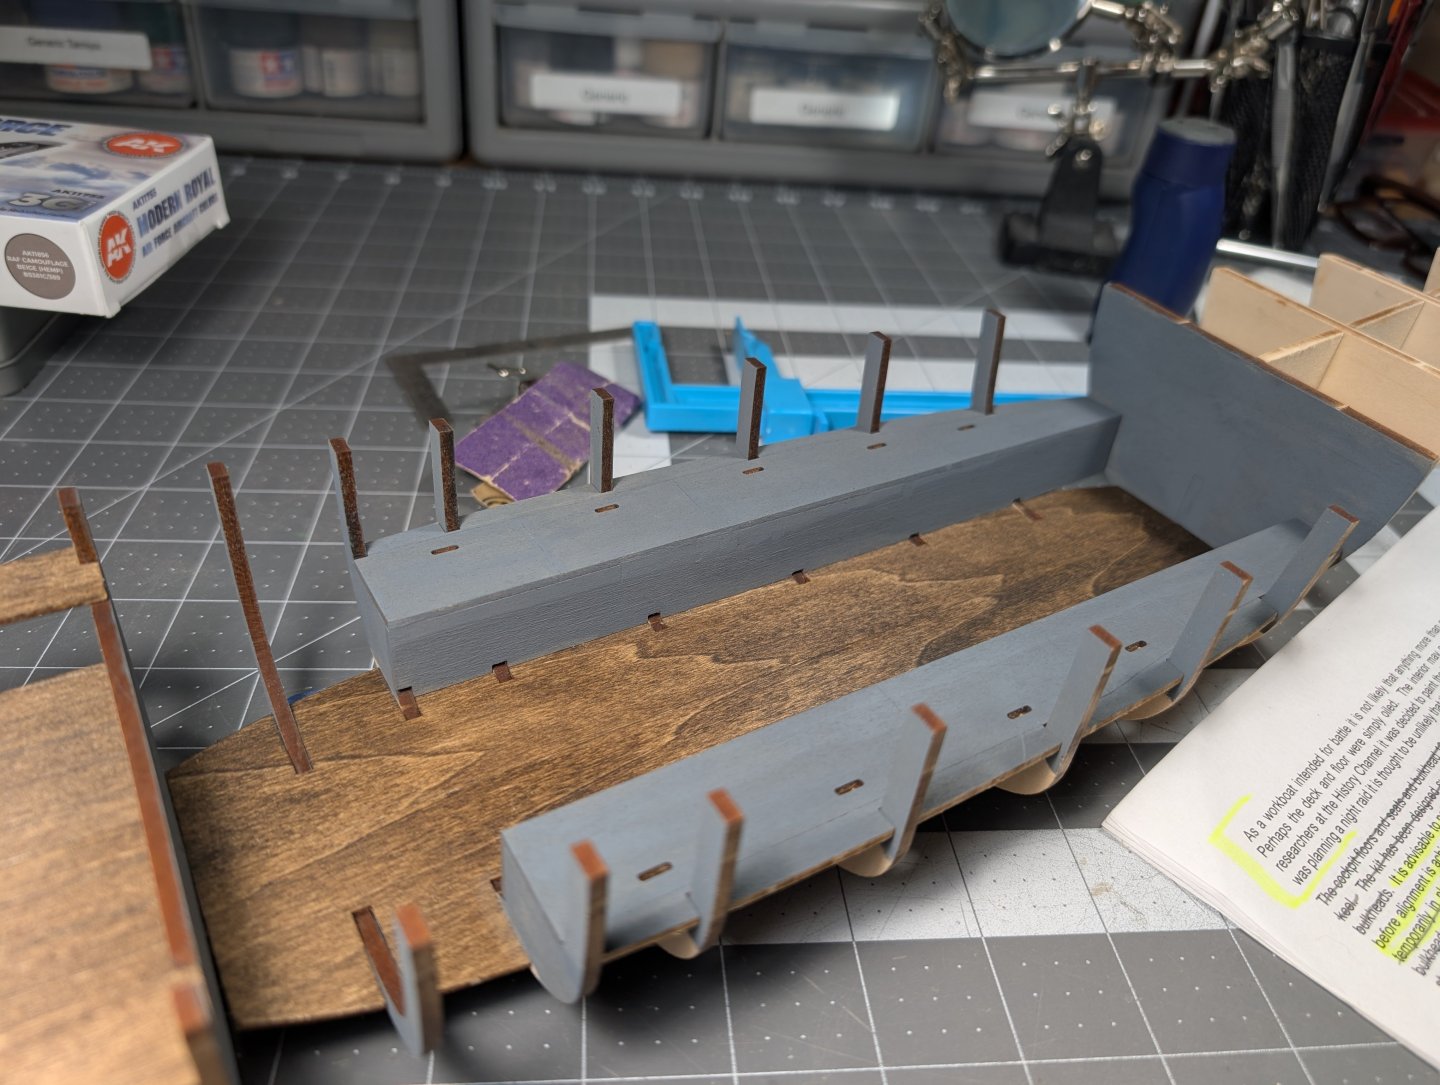
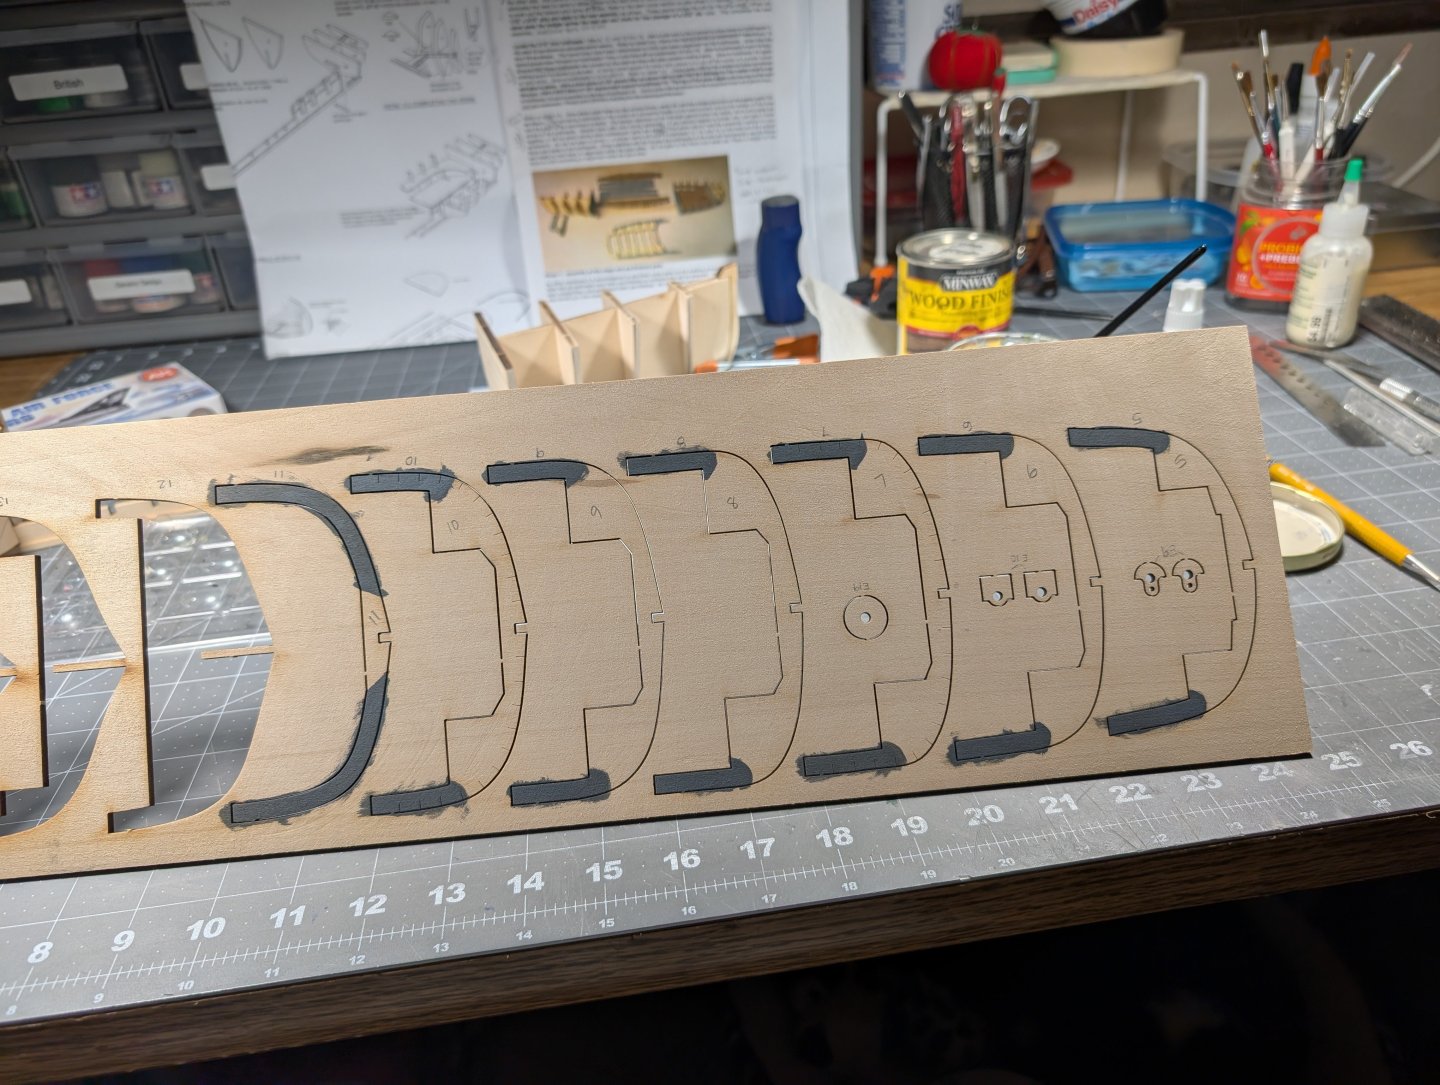
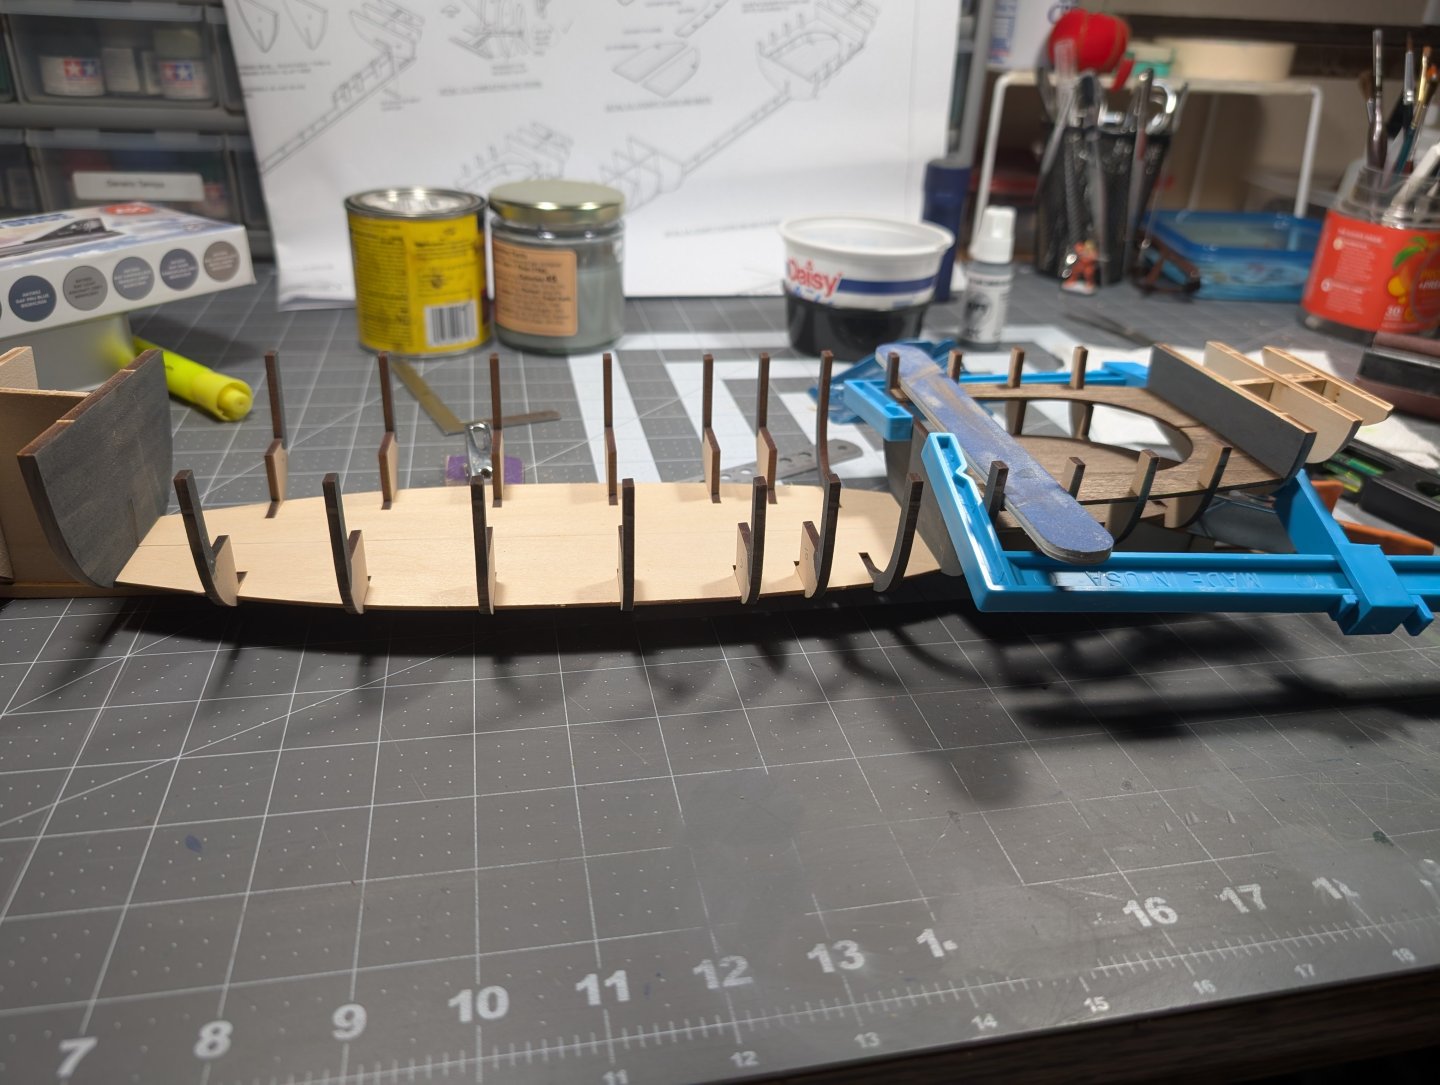
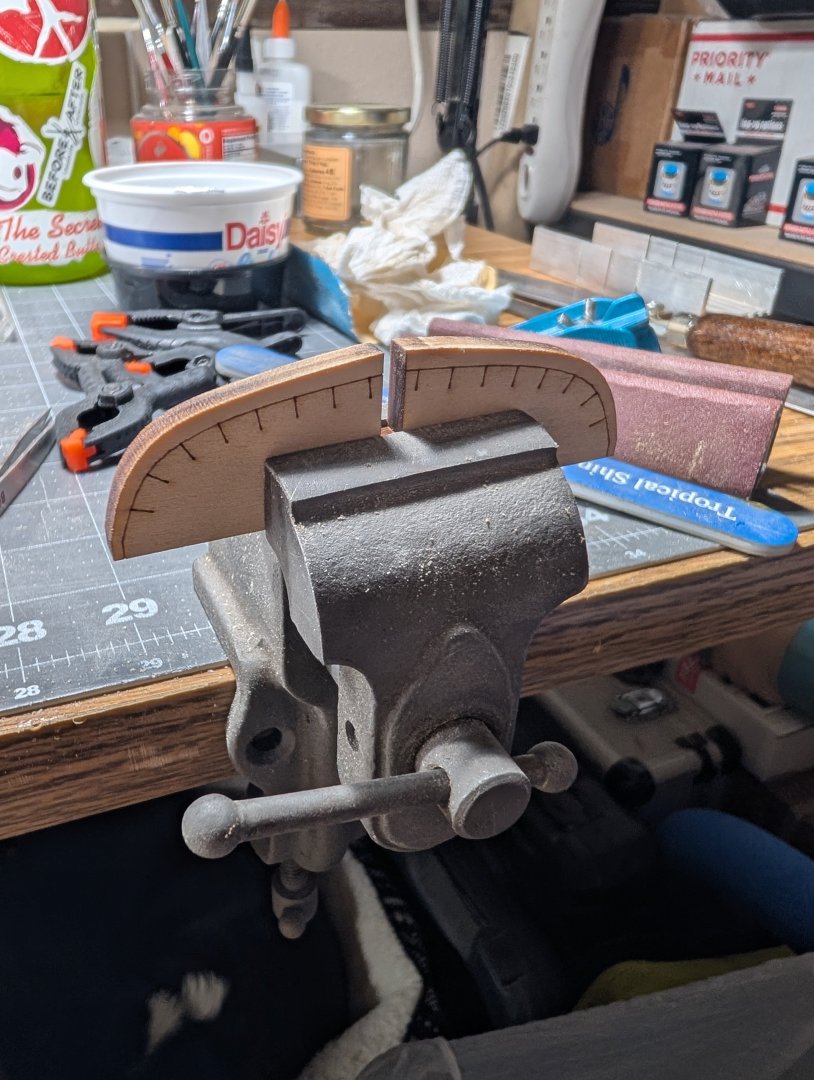
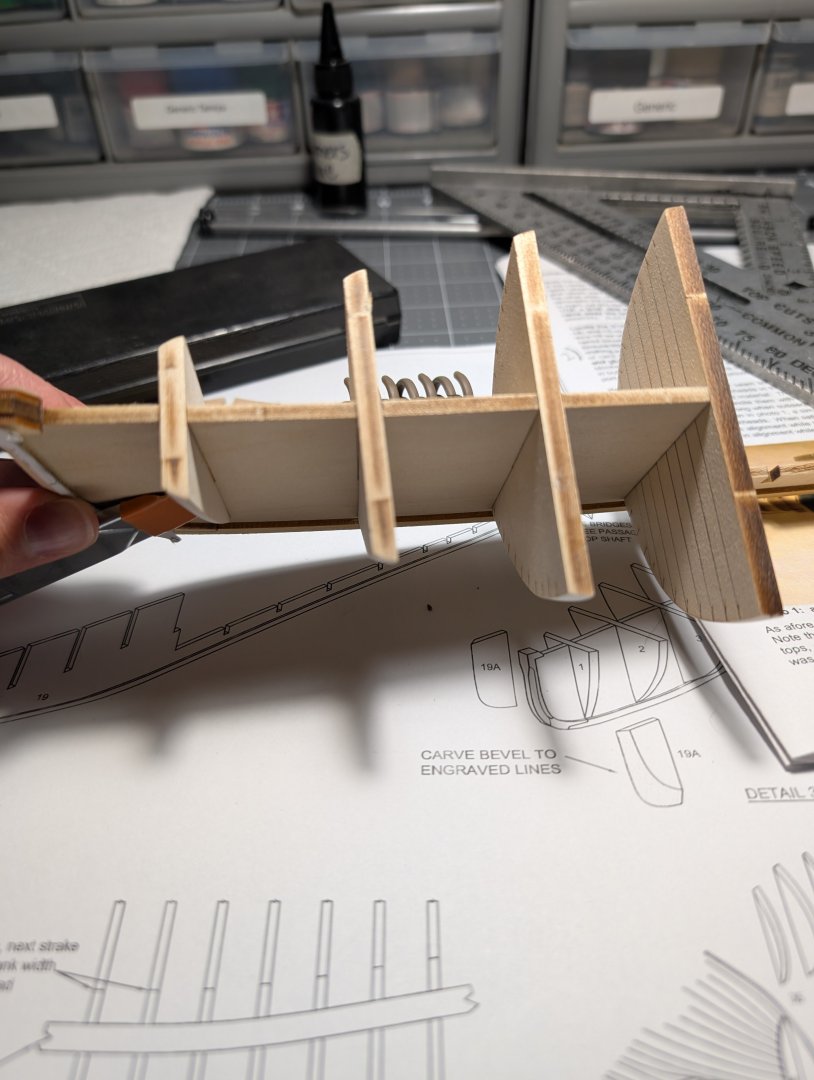
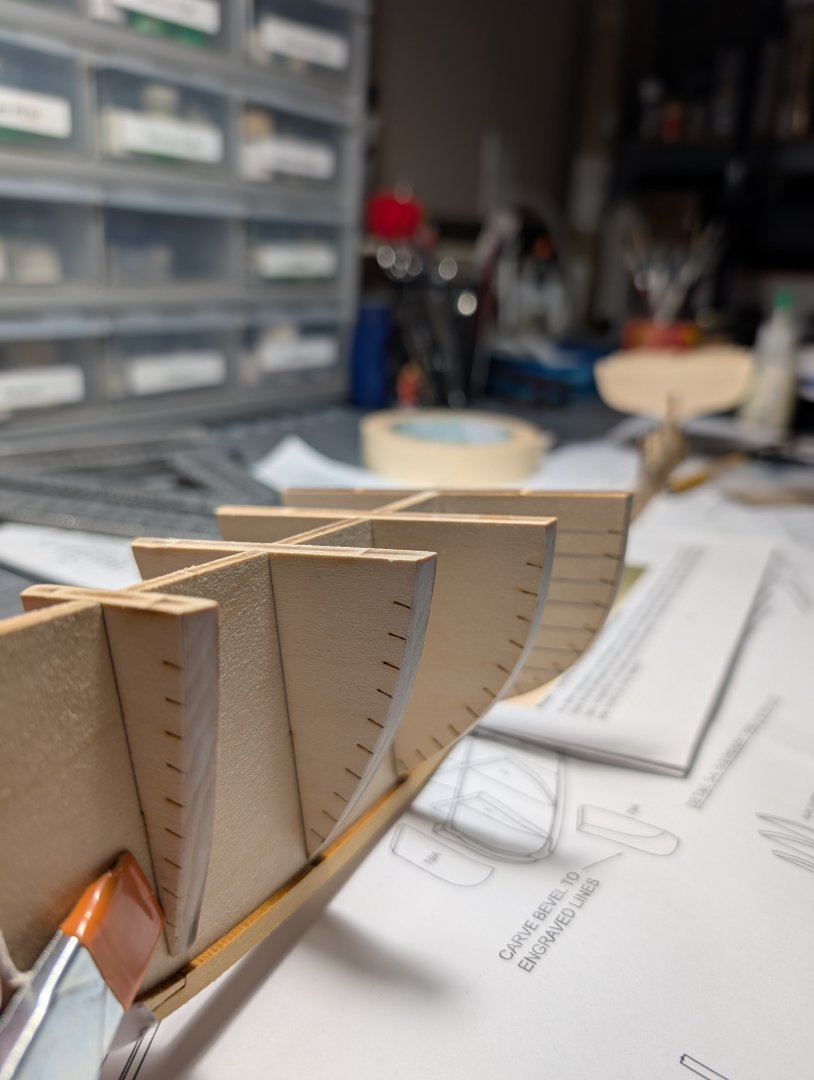
Good session today of building the bulkheads and benches. Small annoyances with instructions and figuring out there is a "right side" to pieces and a not so right side with the slightest bevel on the edge. To start the day i completed the fill piece next to the rudder shaft passage at the stern. I ended up using section from the plywood sheet instead of the 1/8 square strip stock. It was the right thickness and trimmed it to the right size. In the process I definitely cracked the stern clean off. Thankfully the supporting structures around it were solid and I was able to glue it back in place but that was a rough way to start. Then I identified the floor and seats and remaining bulkheads. Per instructions I decided to paint and stain before installing. Due to the note about the bulkhead pieces being fragile i opted to sand and paint with them still in their sheets. Then i used knife to cut the tabs close and used a small file to remove what was left. I made an error in staining the floor and benches of stern by staining the wrong side. Figured that out after going to install. Restained, checked fit and glued. I made a decision in this placement noticing there was a gap if you line the seats up with the bulkheads. It looked like moat people half the gap but I will end up doing a gap fill once things dry. I pointed it out here. I also glued everything togather in this section and placed file and my small metal planer as weight for the dry time. Lastly for todays session I completed the install of the rest of the bulkheads gluing even numbers first usinf the floor to help position and checked for 90 degree off the keel. Half hour later I installed the rest (odd numbers) and put floor back in. Next time Ill pull the floor again, stain, and then glue into place.


-
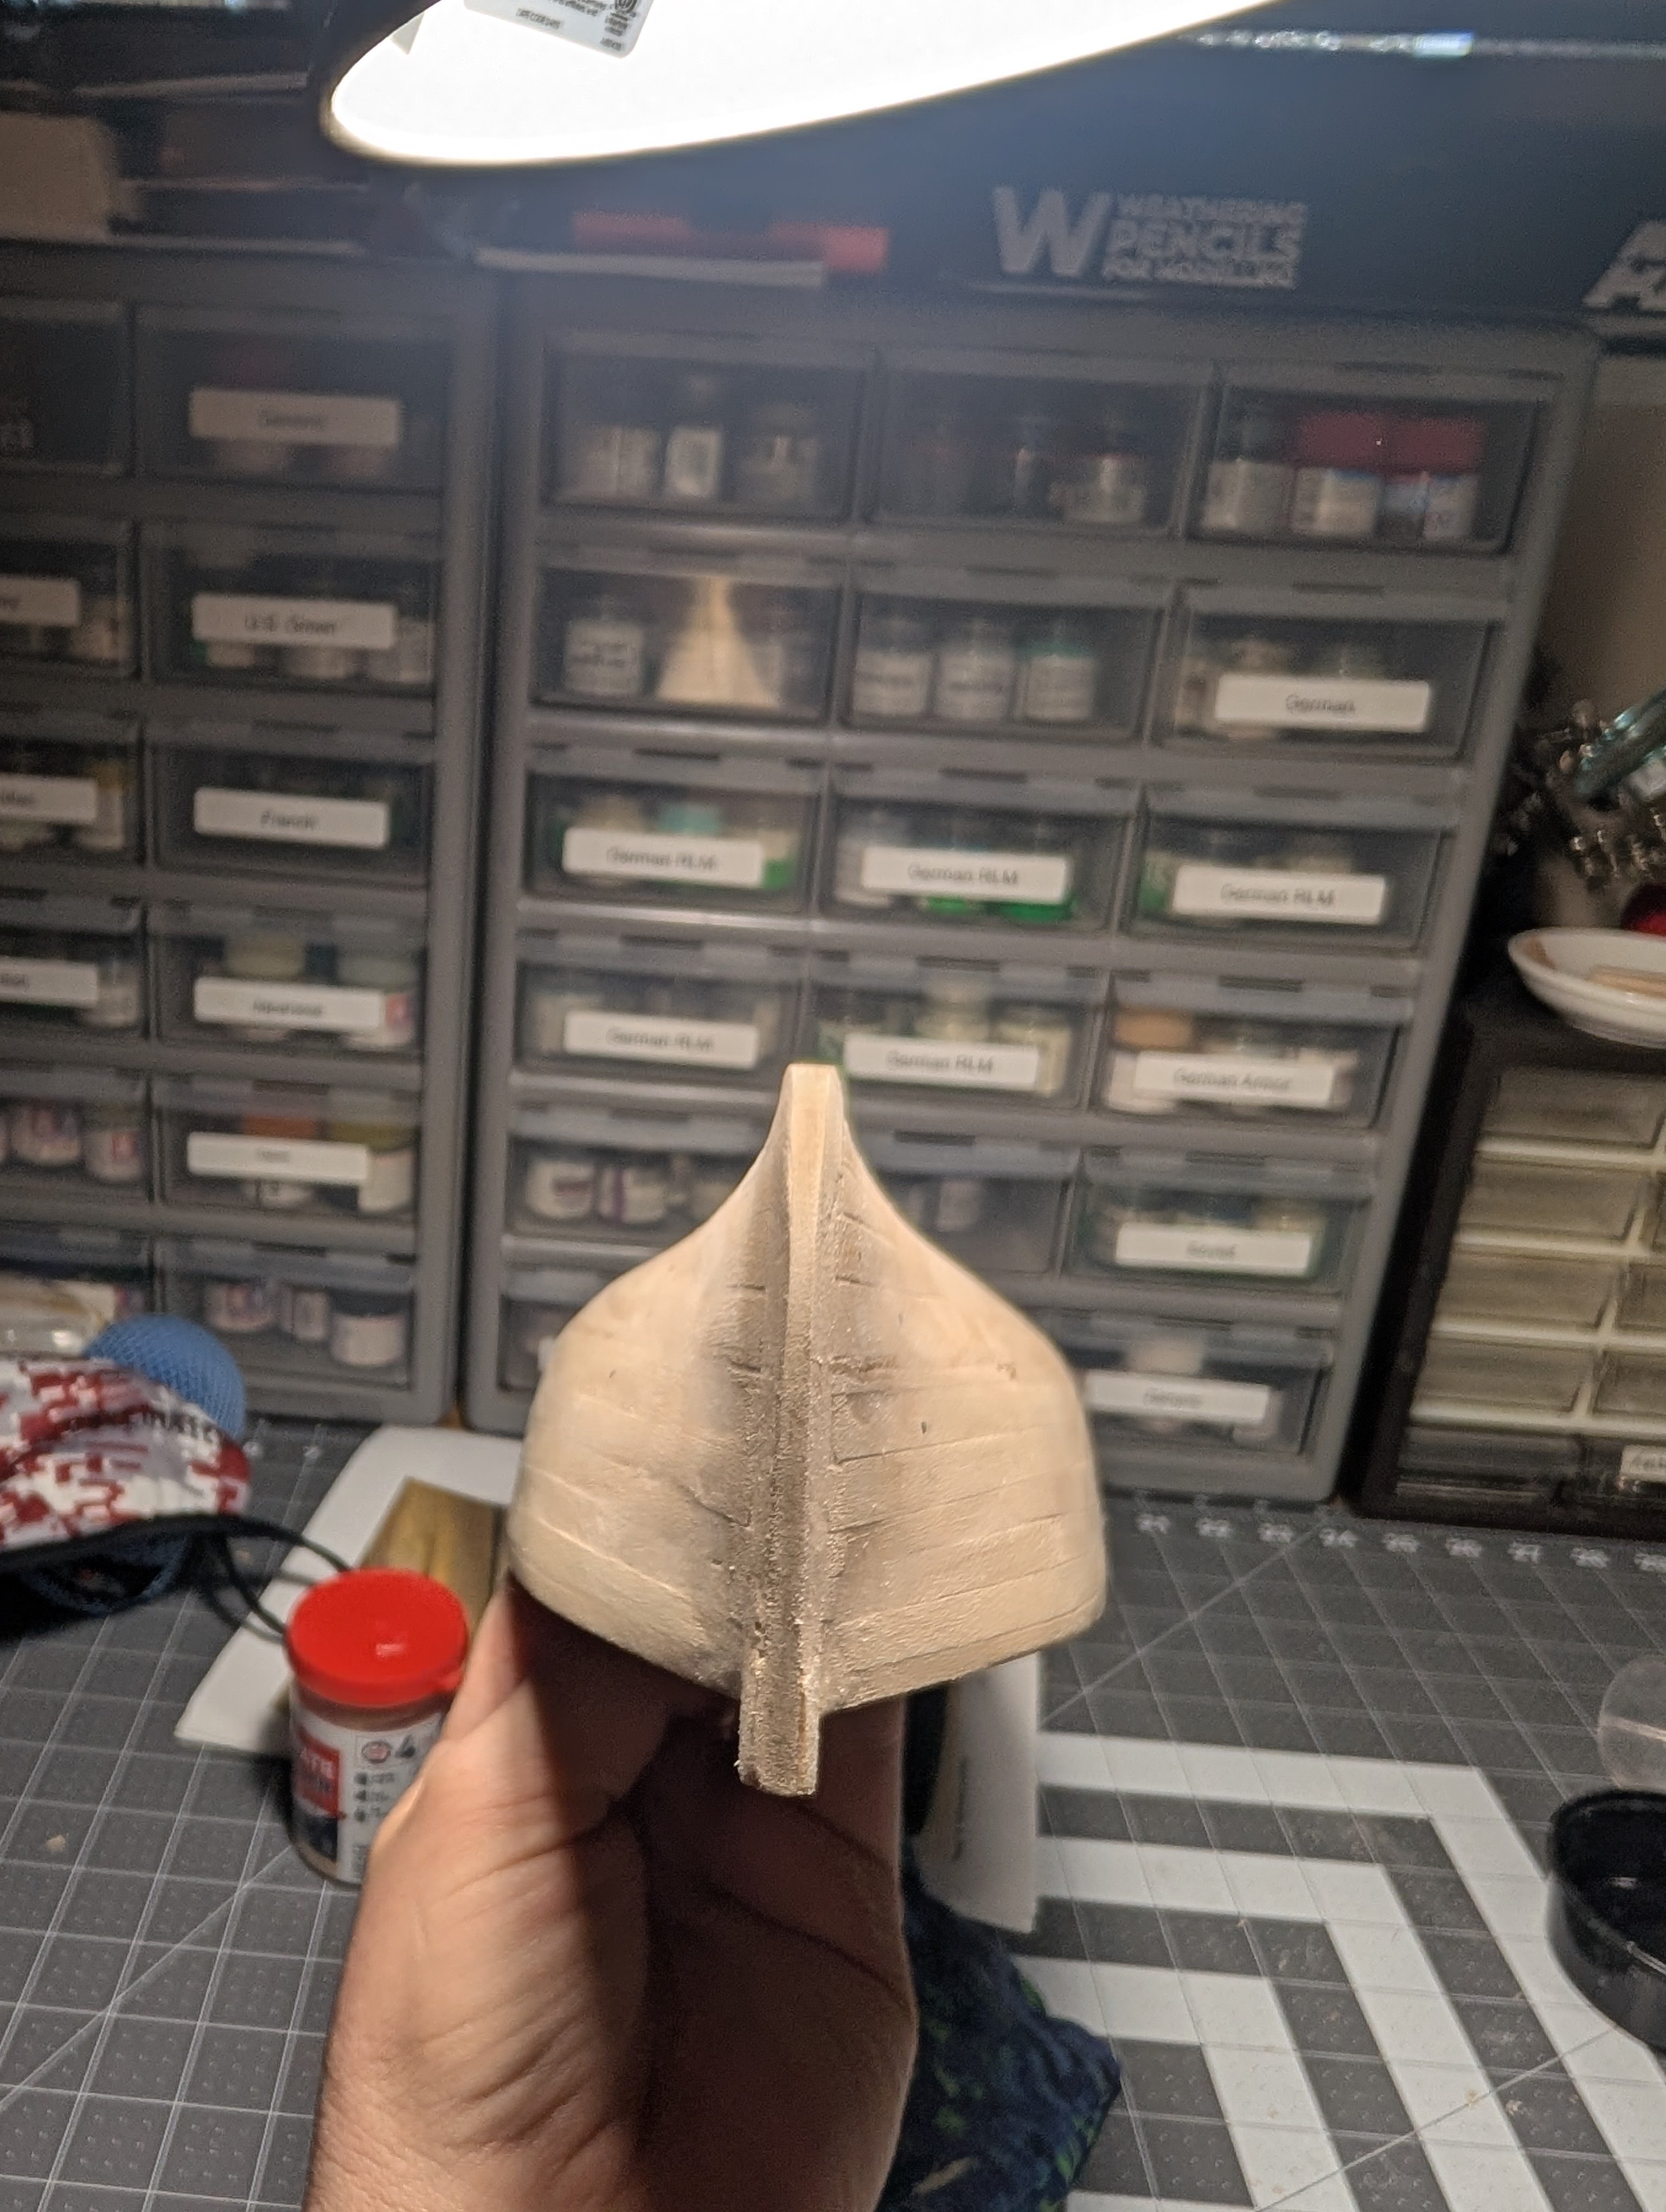
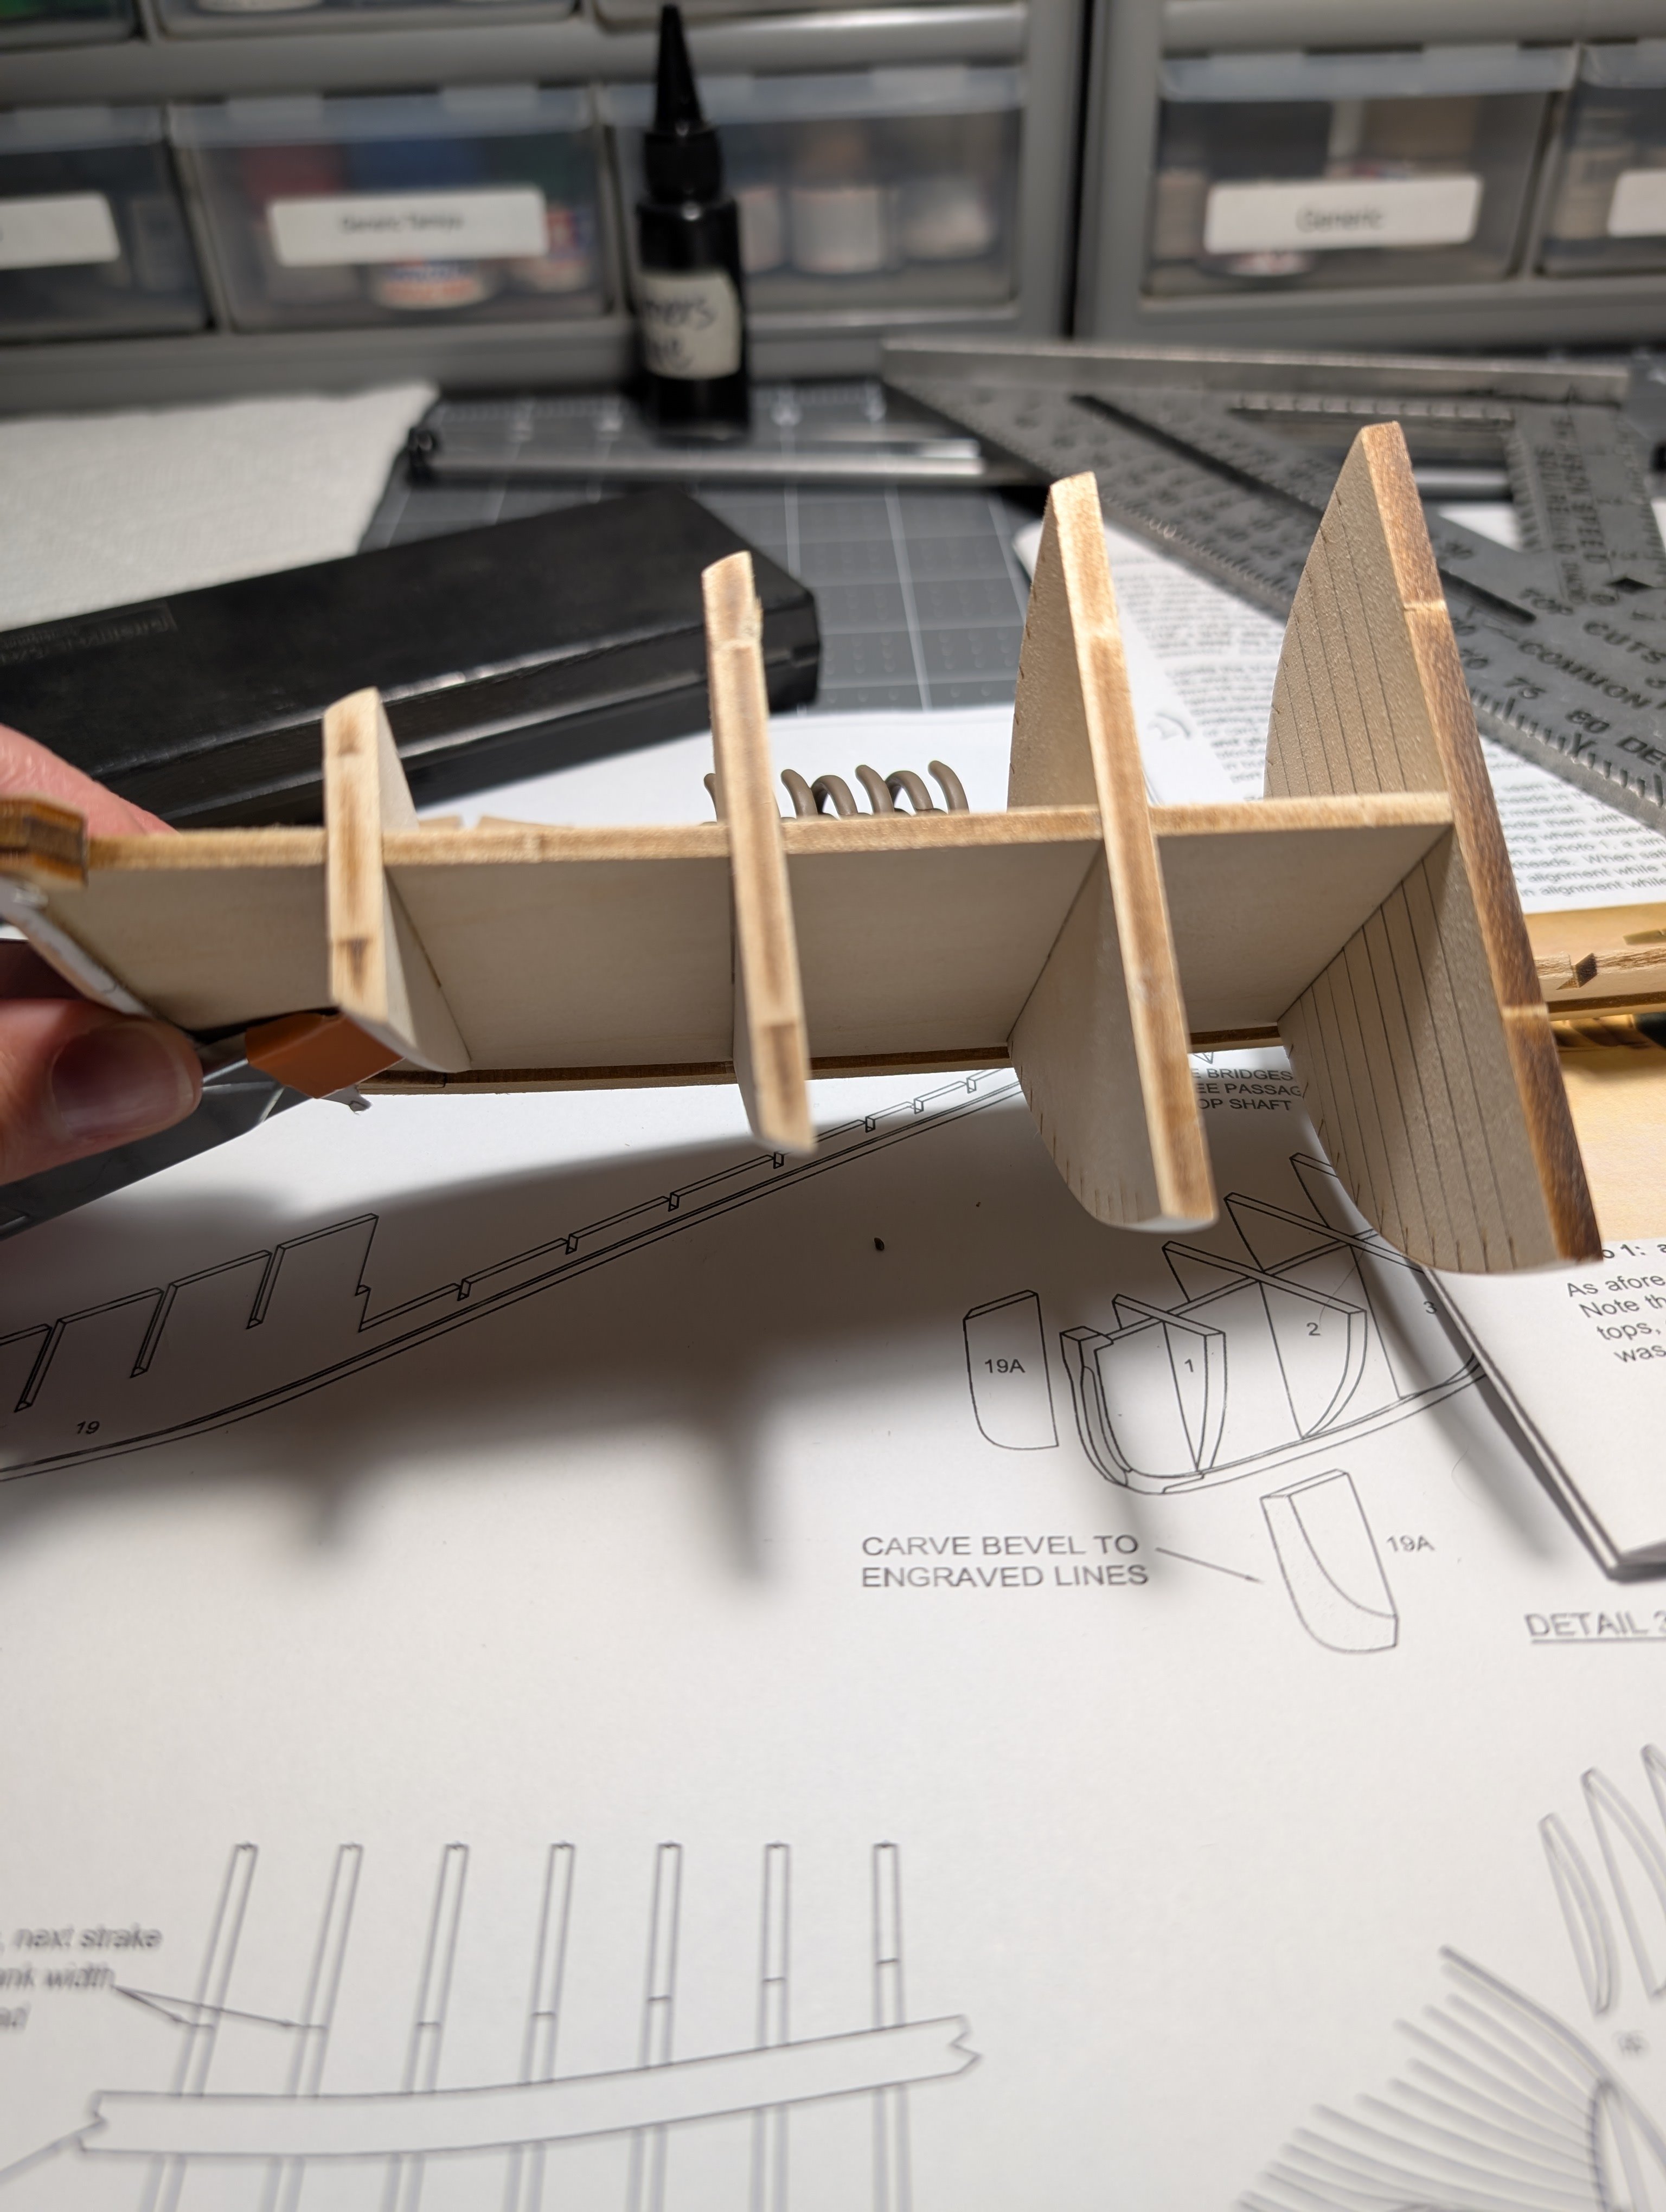
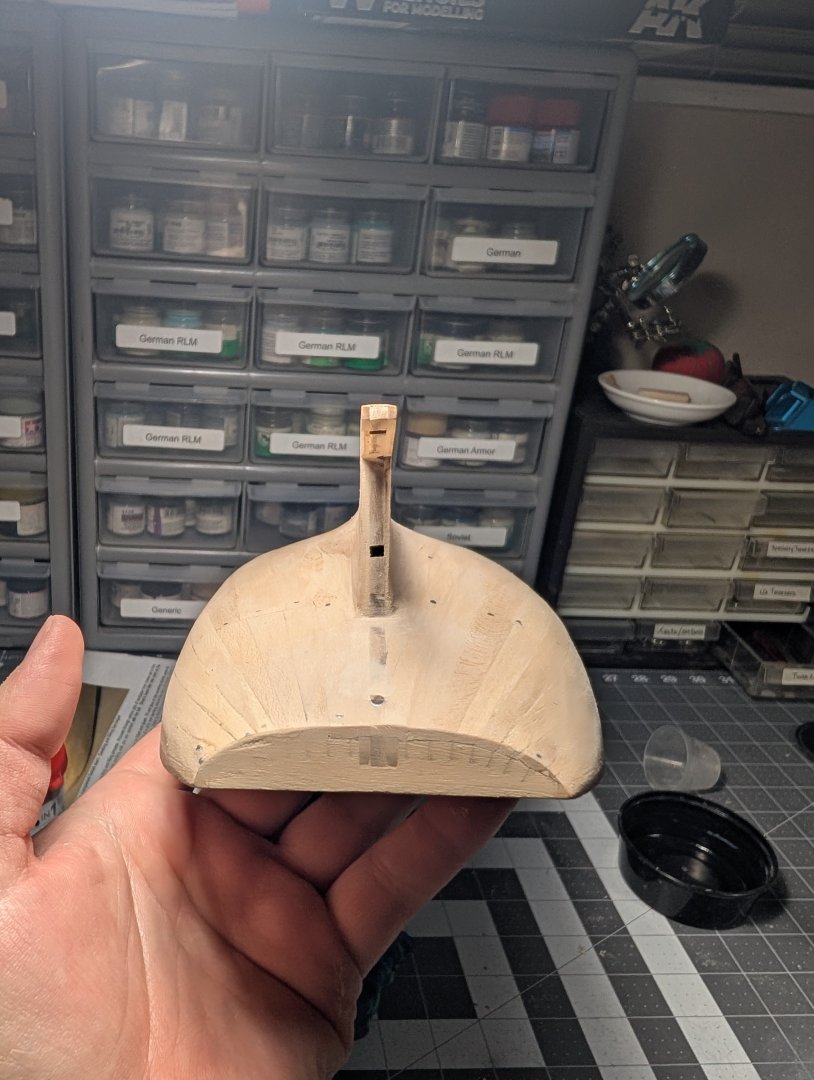
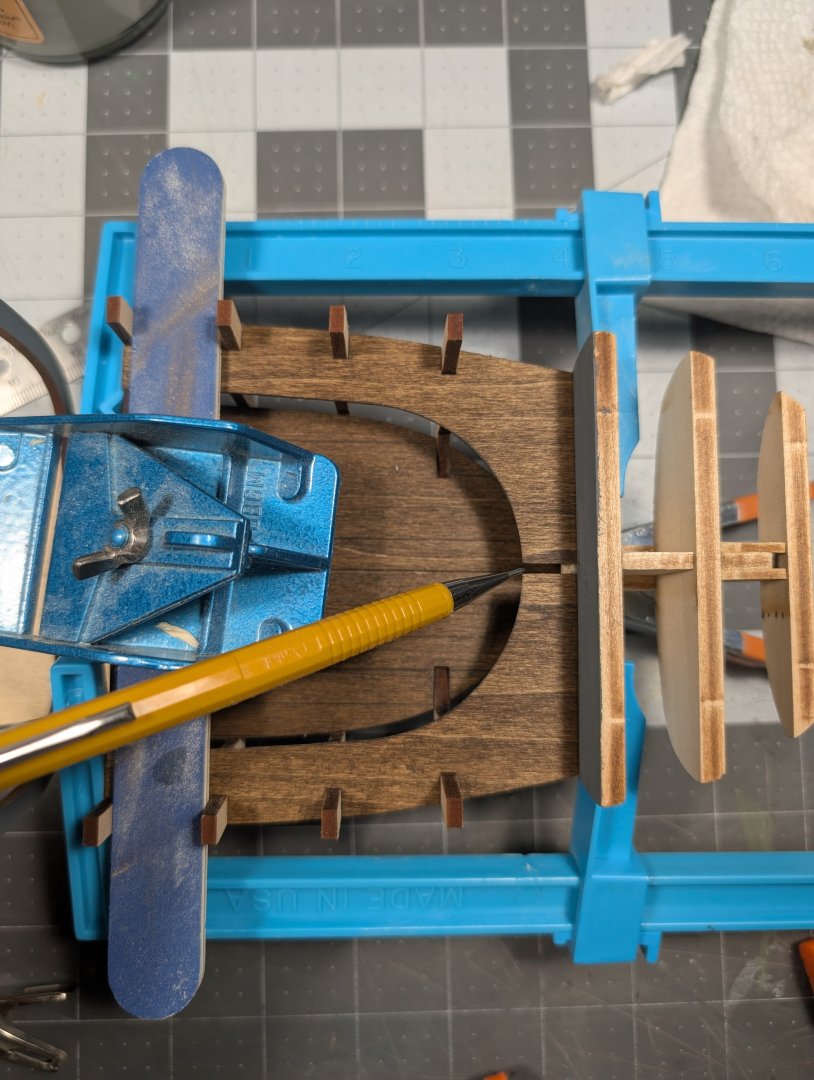
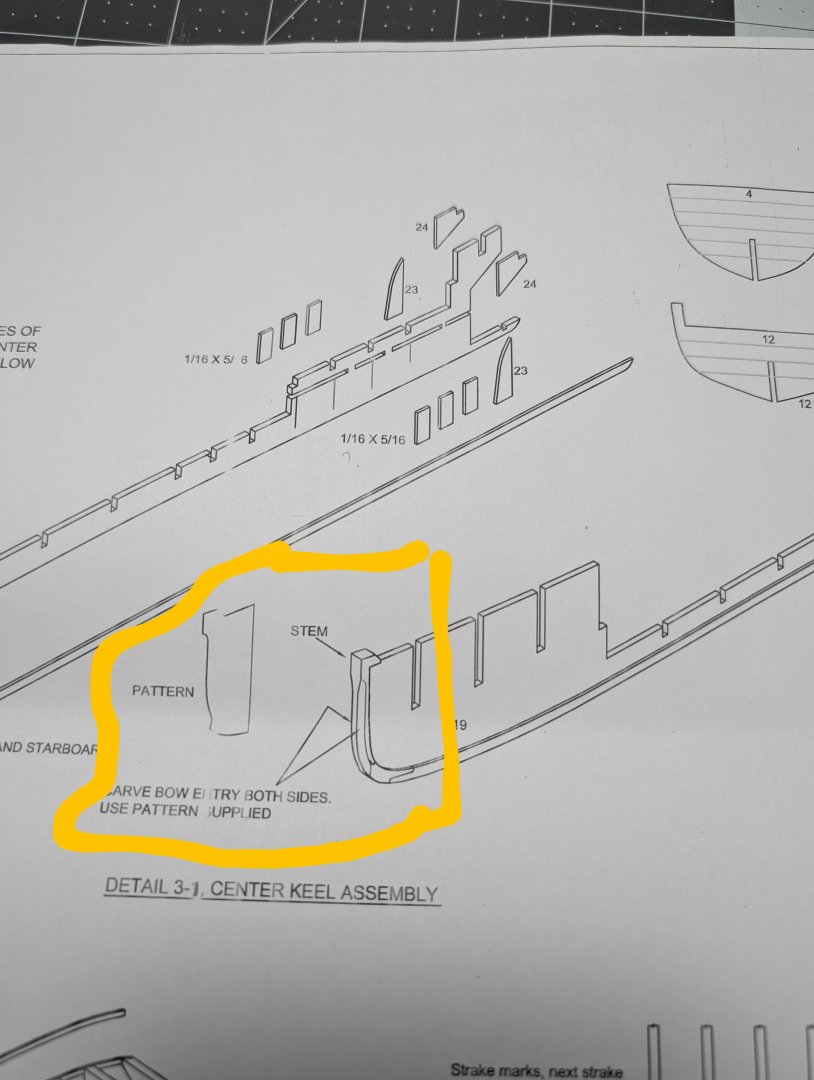
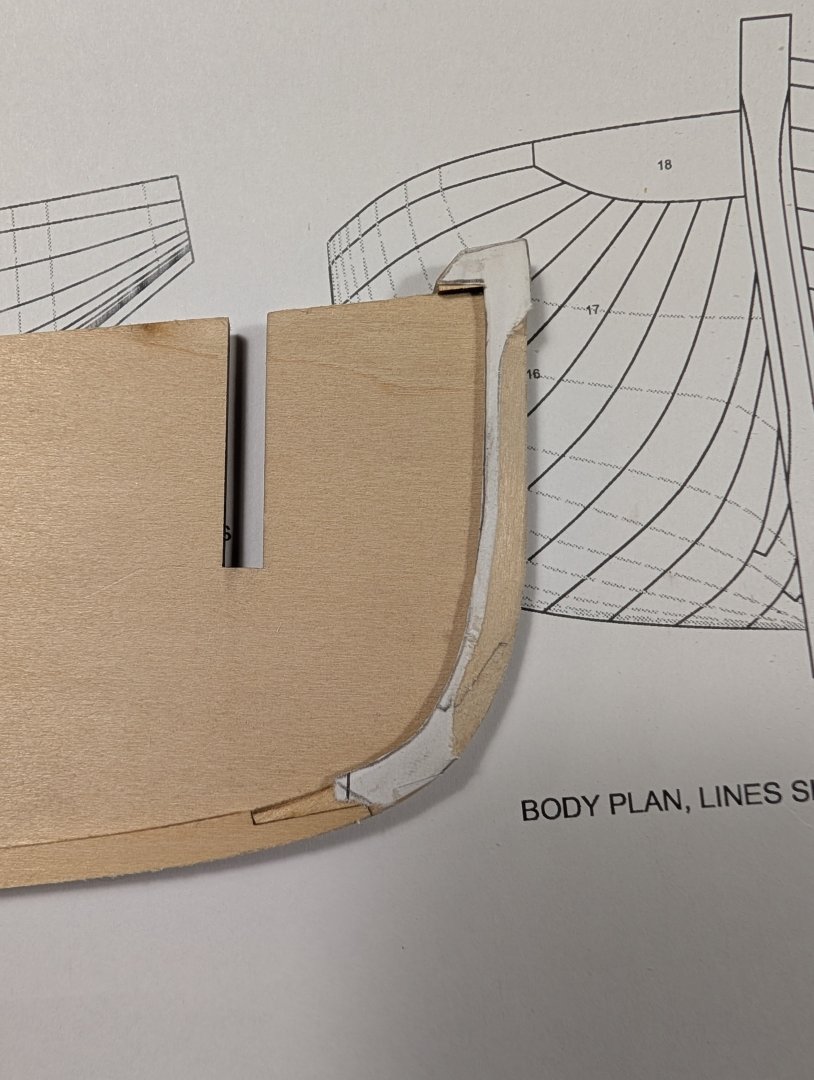
Next boat on my bench is Picket Boat #1. I have many to choose from but most are tall ships. I thought this would be a good way to practice and develope better planking skills along with some other unique/different features. For those that will follow along know this build log will be slow as I can only really work on it during weekends and we just started car show season (we have some 1950's cars). I'll try to post as I make progress and hope to share a little more frequently than I did with my first build log. We got this kit in a trade a while back. After laying it out about a month ago I found I was missing two lazer cut pieces. Nothing huge to keep me from starting but I delayed and reached out to Model Shipways. Took a little biut got the parts in and that motivated me to start. So with new sandpaper on the block and pulling out the files the dust started flying and glue flowing. I find early that, like many logs have mentioned, while the instructions and drawings are great compared to other brands, it is still written so that the reader/modeler needs some background or knowledge of ship building. The section that tripped me up the most was the center keel assembly. It mentions on the drawings to reference a template but in my review of the plates I did not locate a template. So using a different image I traced the center keel and made my own template then carved away. Picture below shows the plate in the set. Then picture of keel as O carved. I wrapped up my bench session with the bulkheads, shaping them and then putting in place and ensuring they were 90 degrees off keel. Overall made some progress and its not going back in the box anymore :). (I drew the lines on the wrong side of the bulkhead as this won't be visible I opted to not erase)


-
k-slak reacted to a post in a topic:
HMS Bounty by k-slak - FINISHED - Constructo - 1:50
-
k-slak reacted to a post in a topic:
HMS Bounty by k-slak - FINISHED - Constructo - 1:50
-
k-slak reacted to a post in a topic:
HMS Bounty by k-slak - FINISHED - Constructo - 1:50
-
FINISHED! - See Completed Ship photos here: https://modelshipworld.com/gallery/album/2969-hms-bounty-constructo-150/
- 32 replies
-
- 1
-
-
- Bounty
- Constructo
- (and 1 more)
-
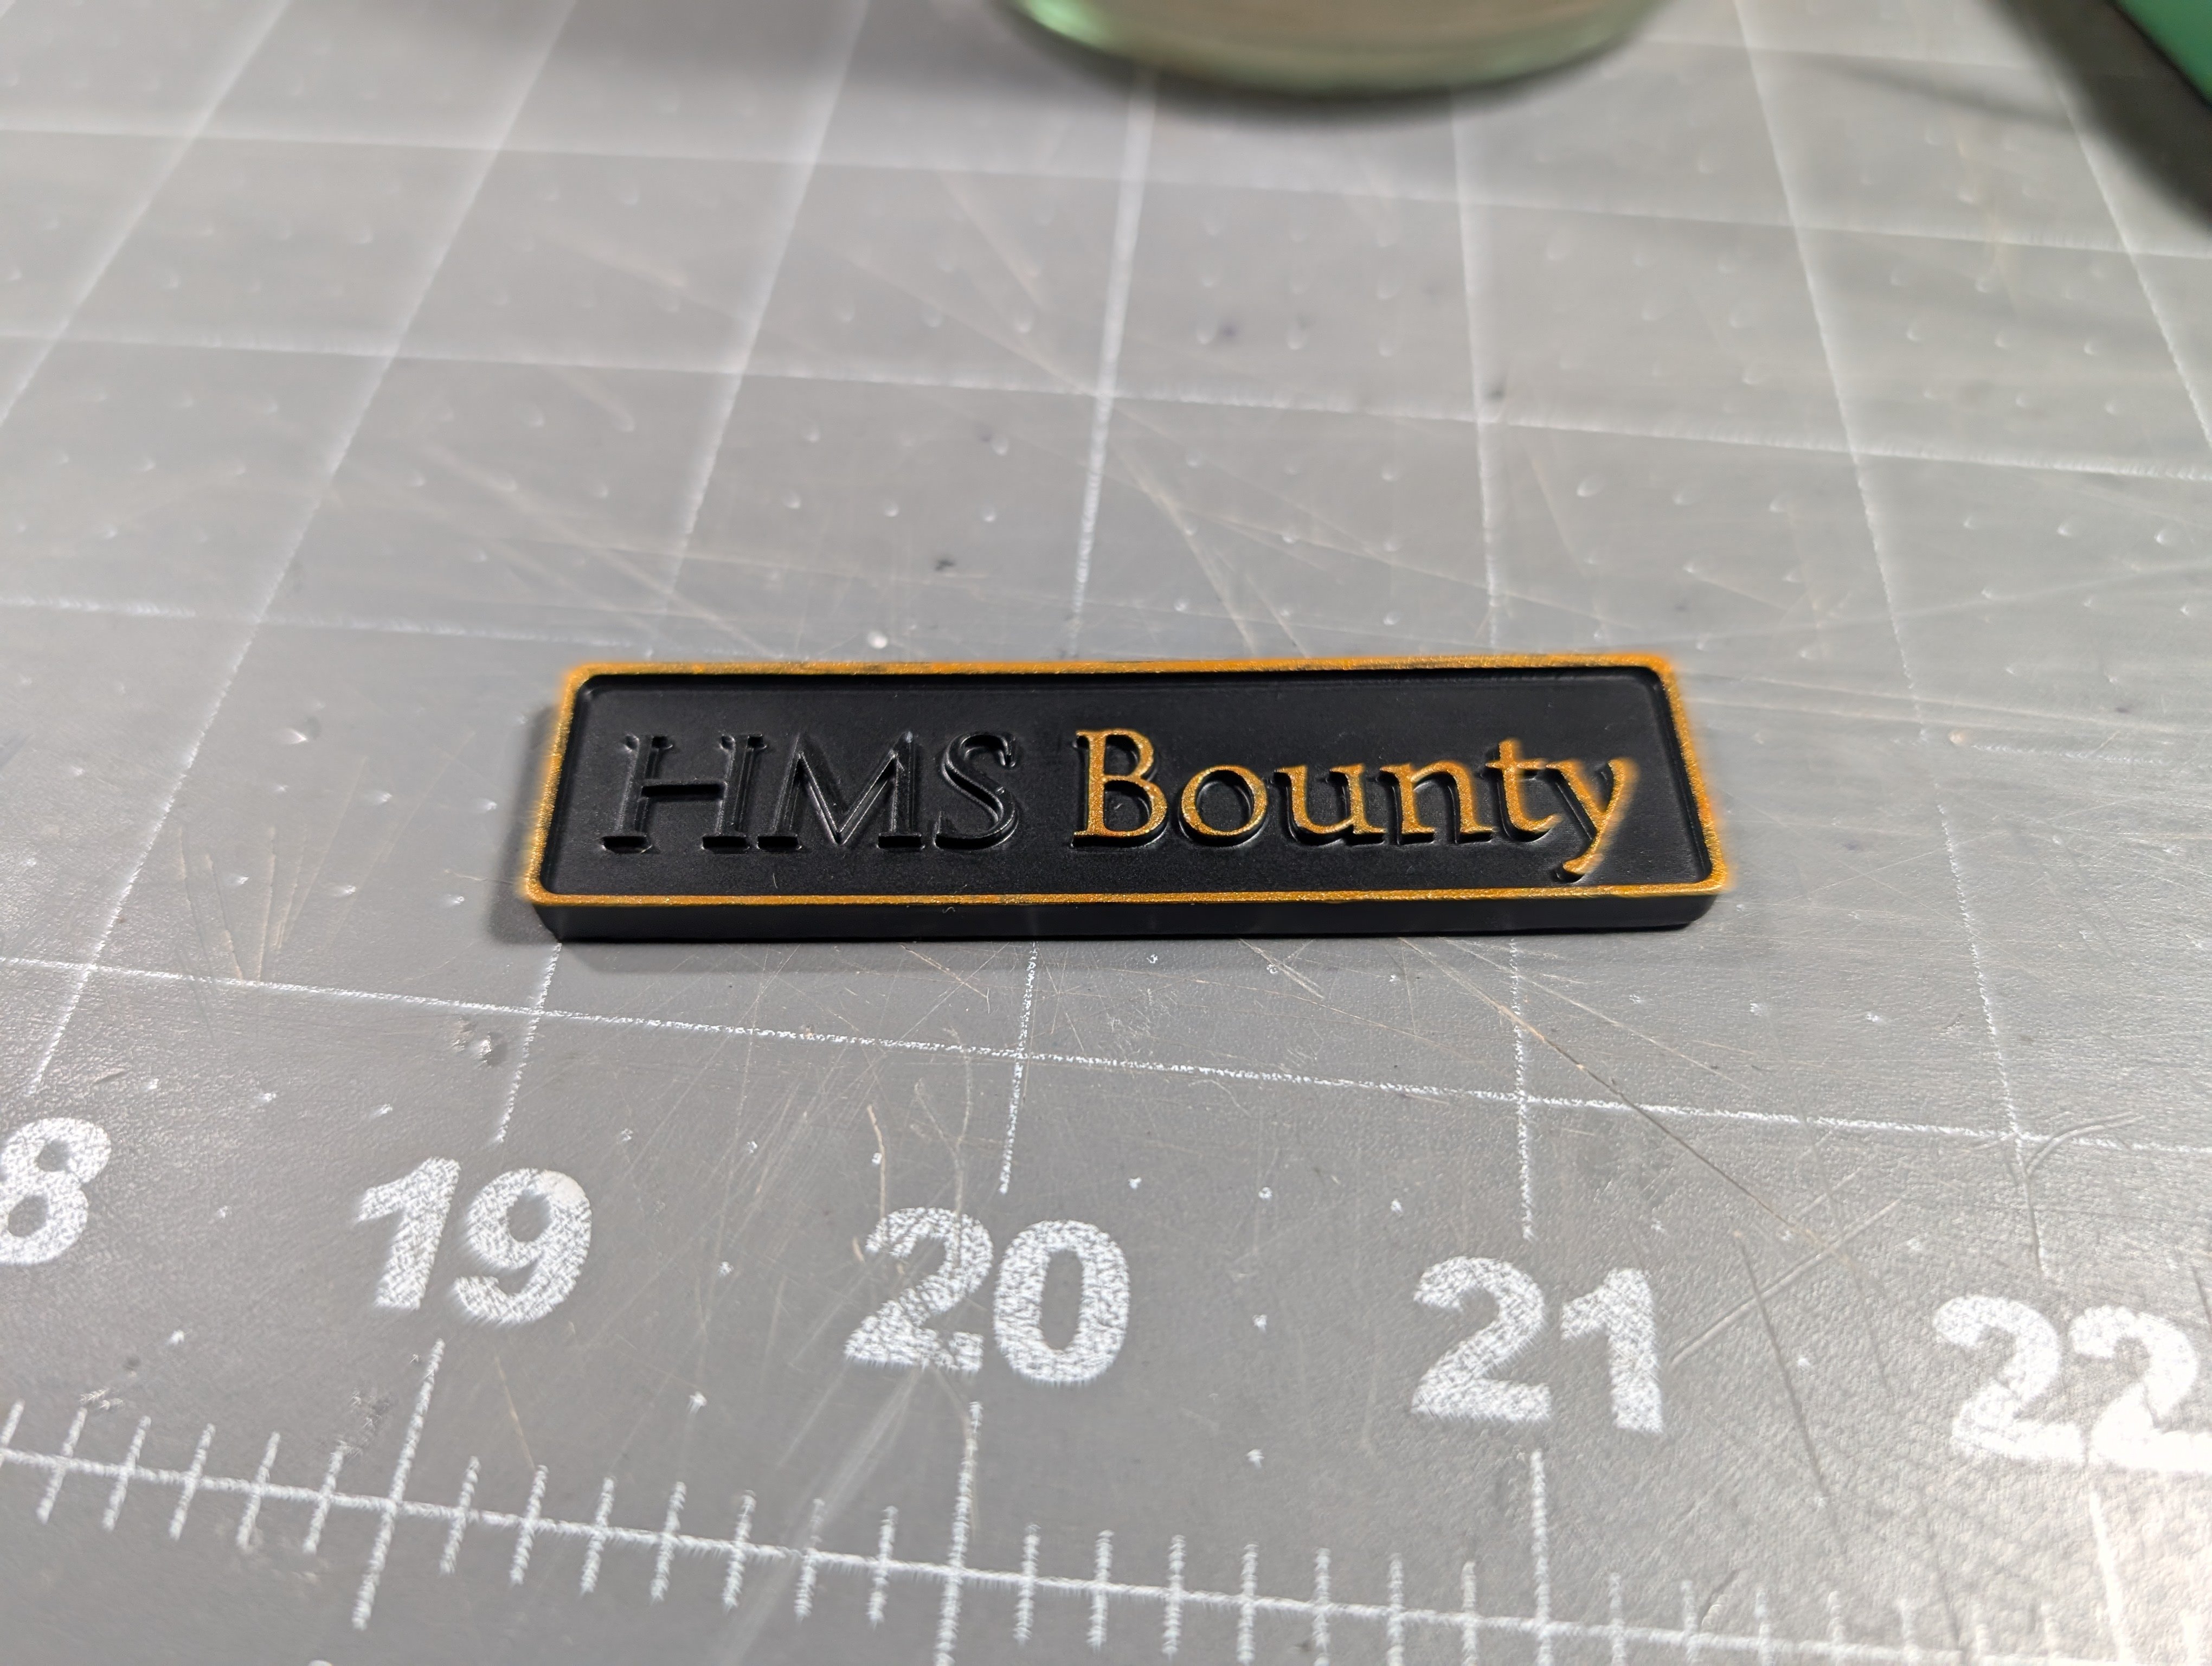
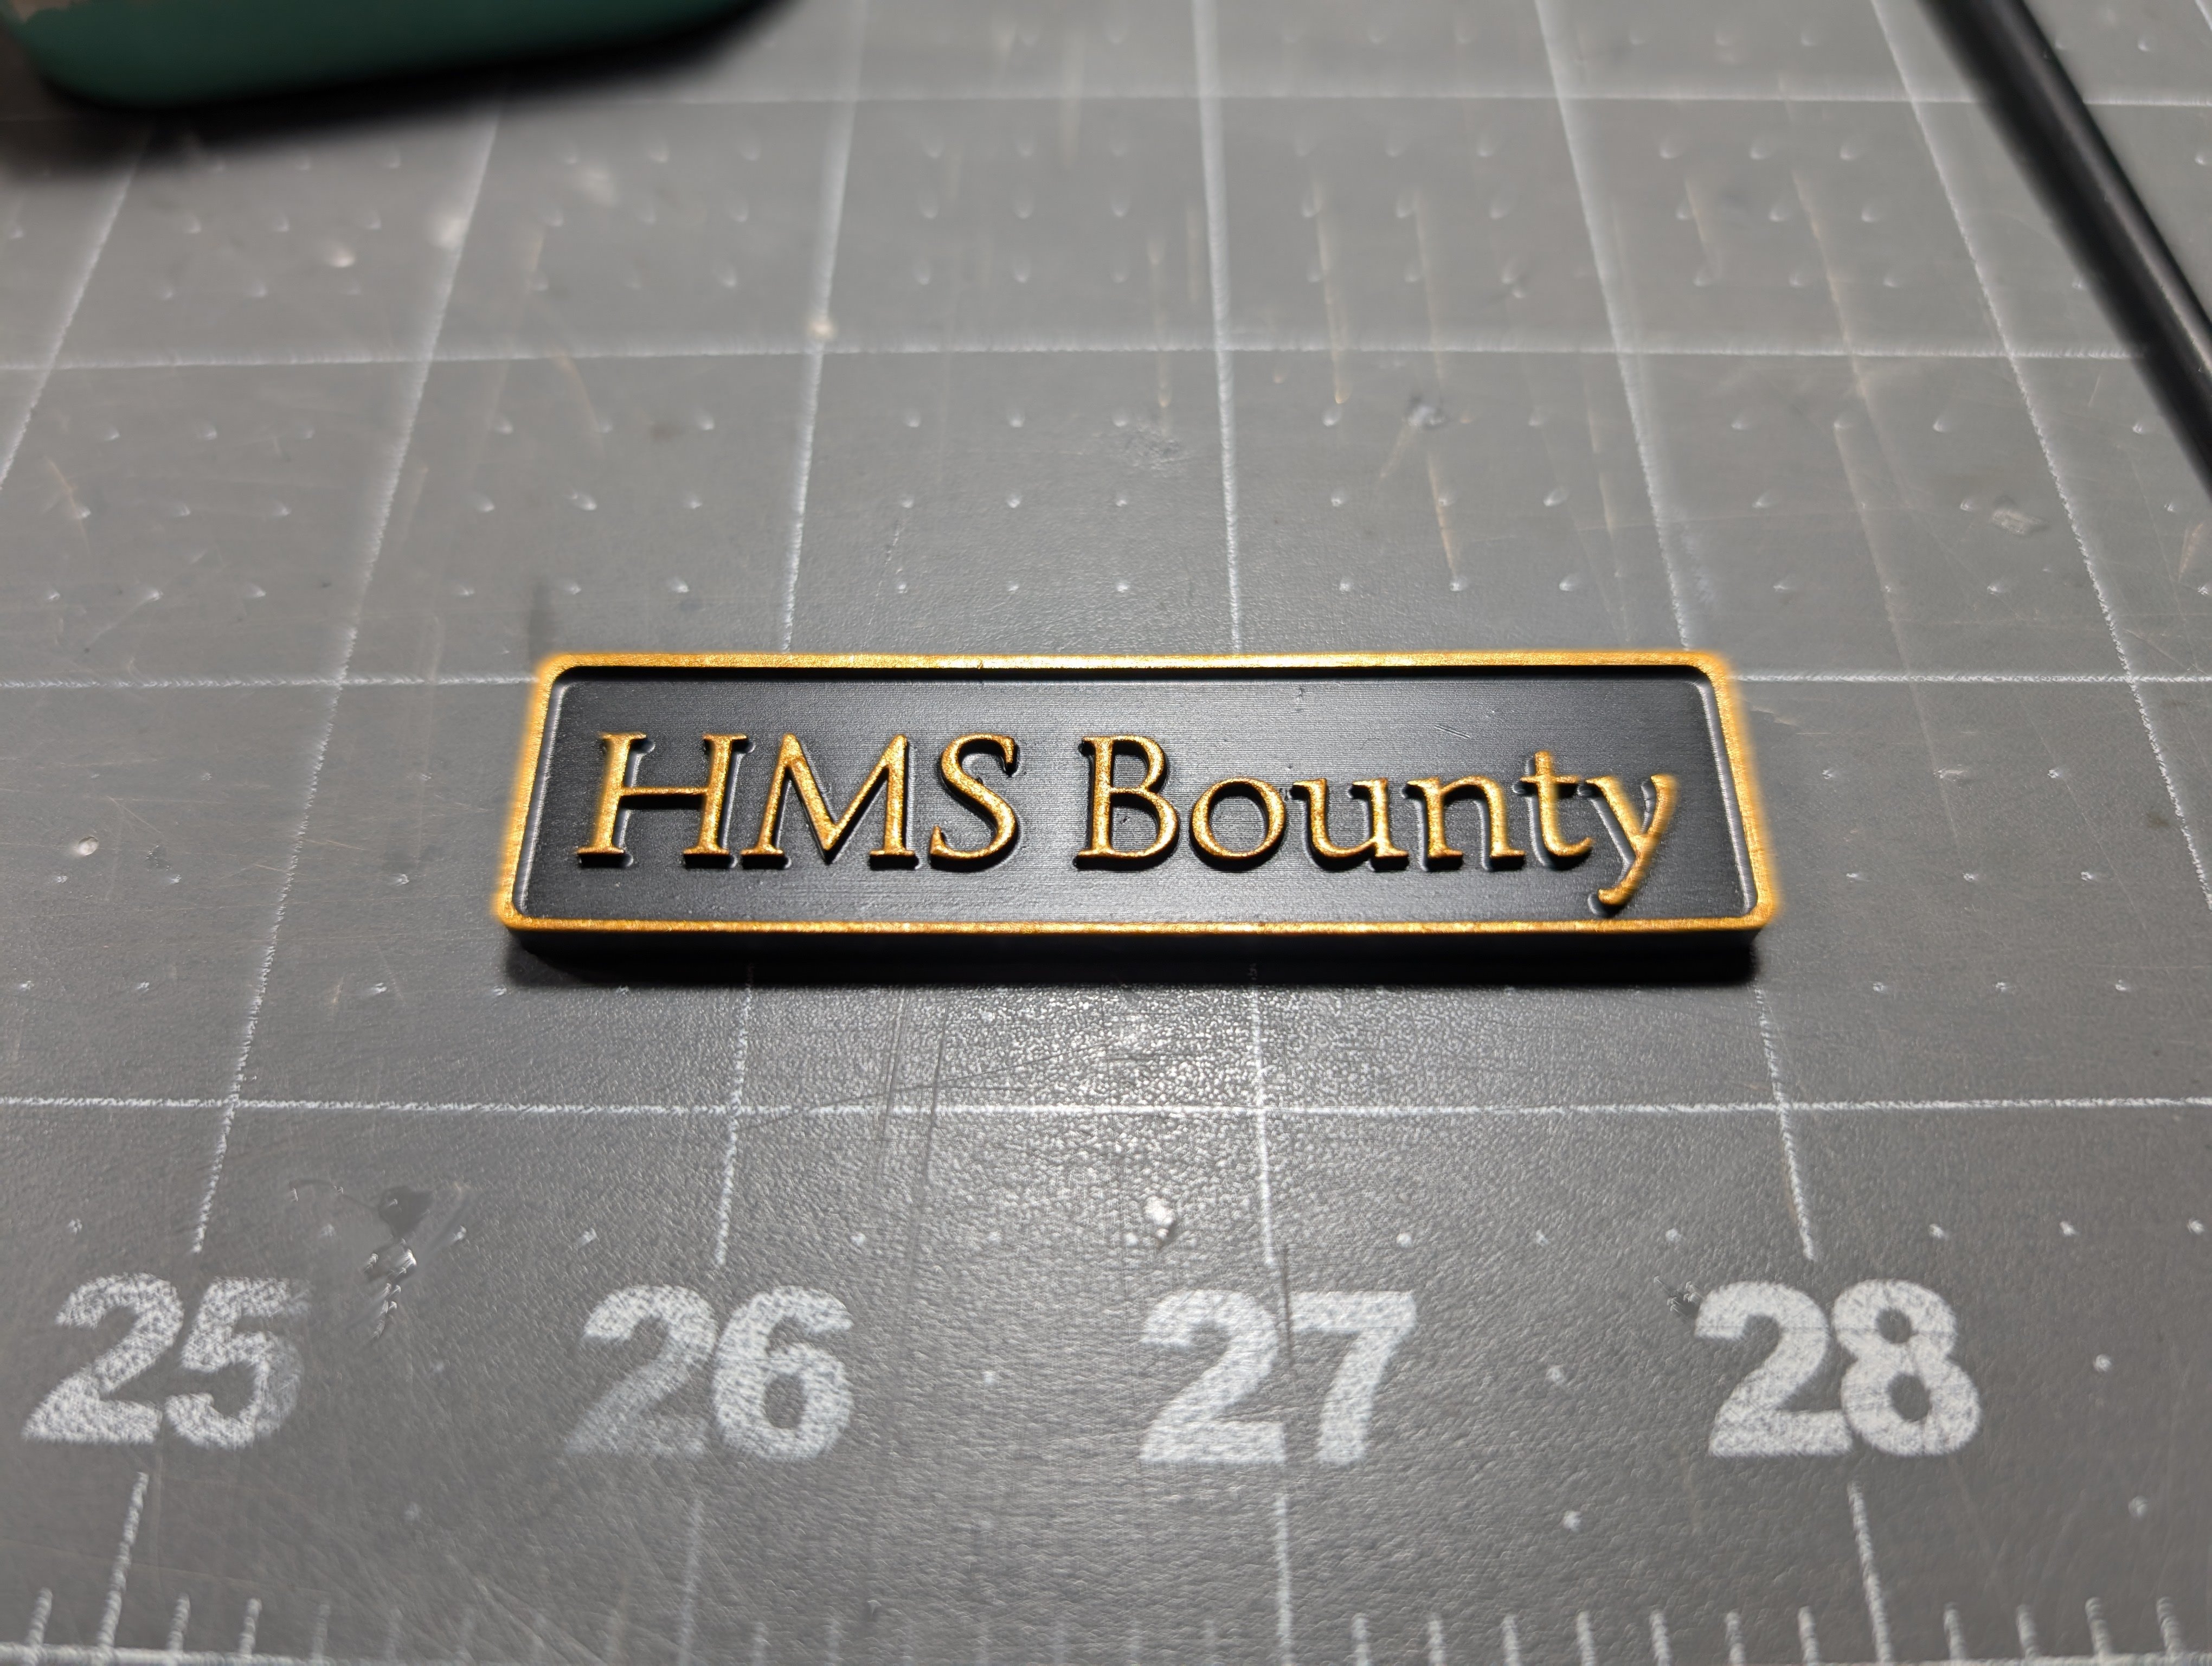
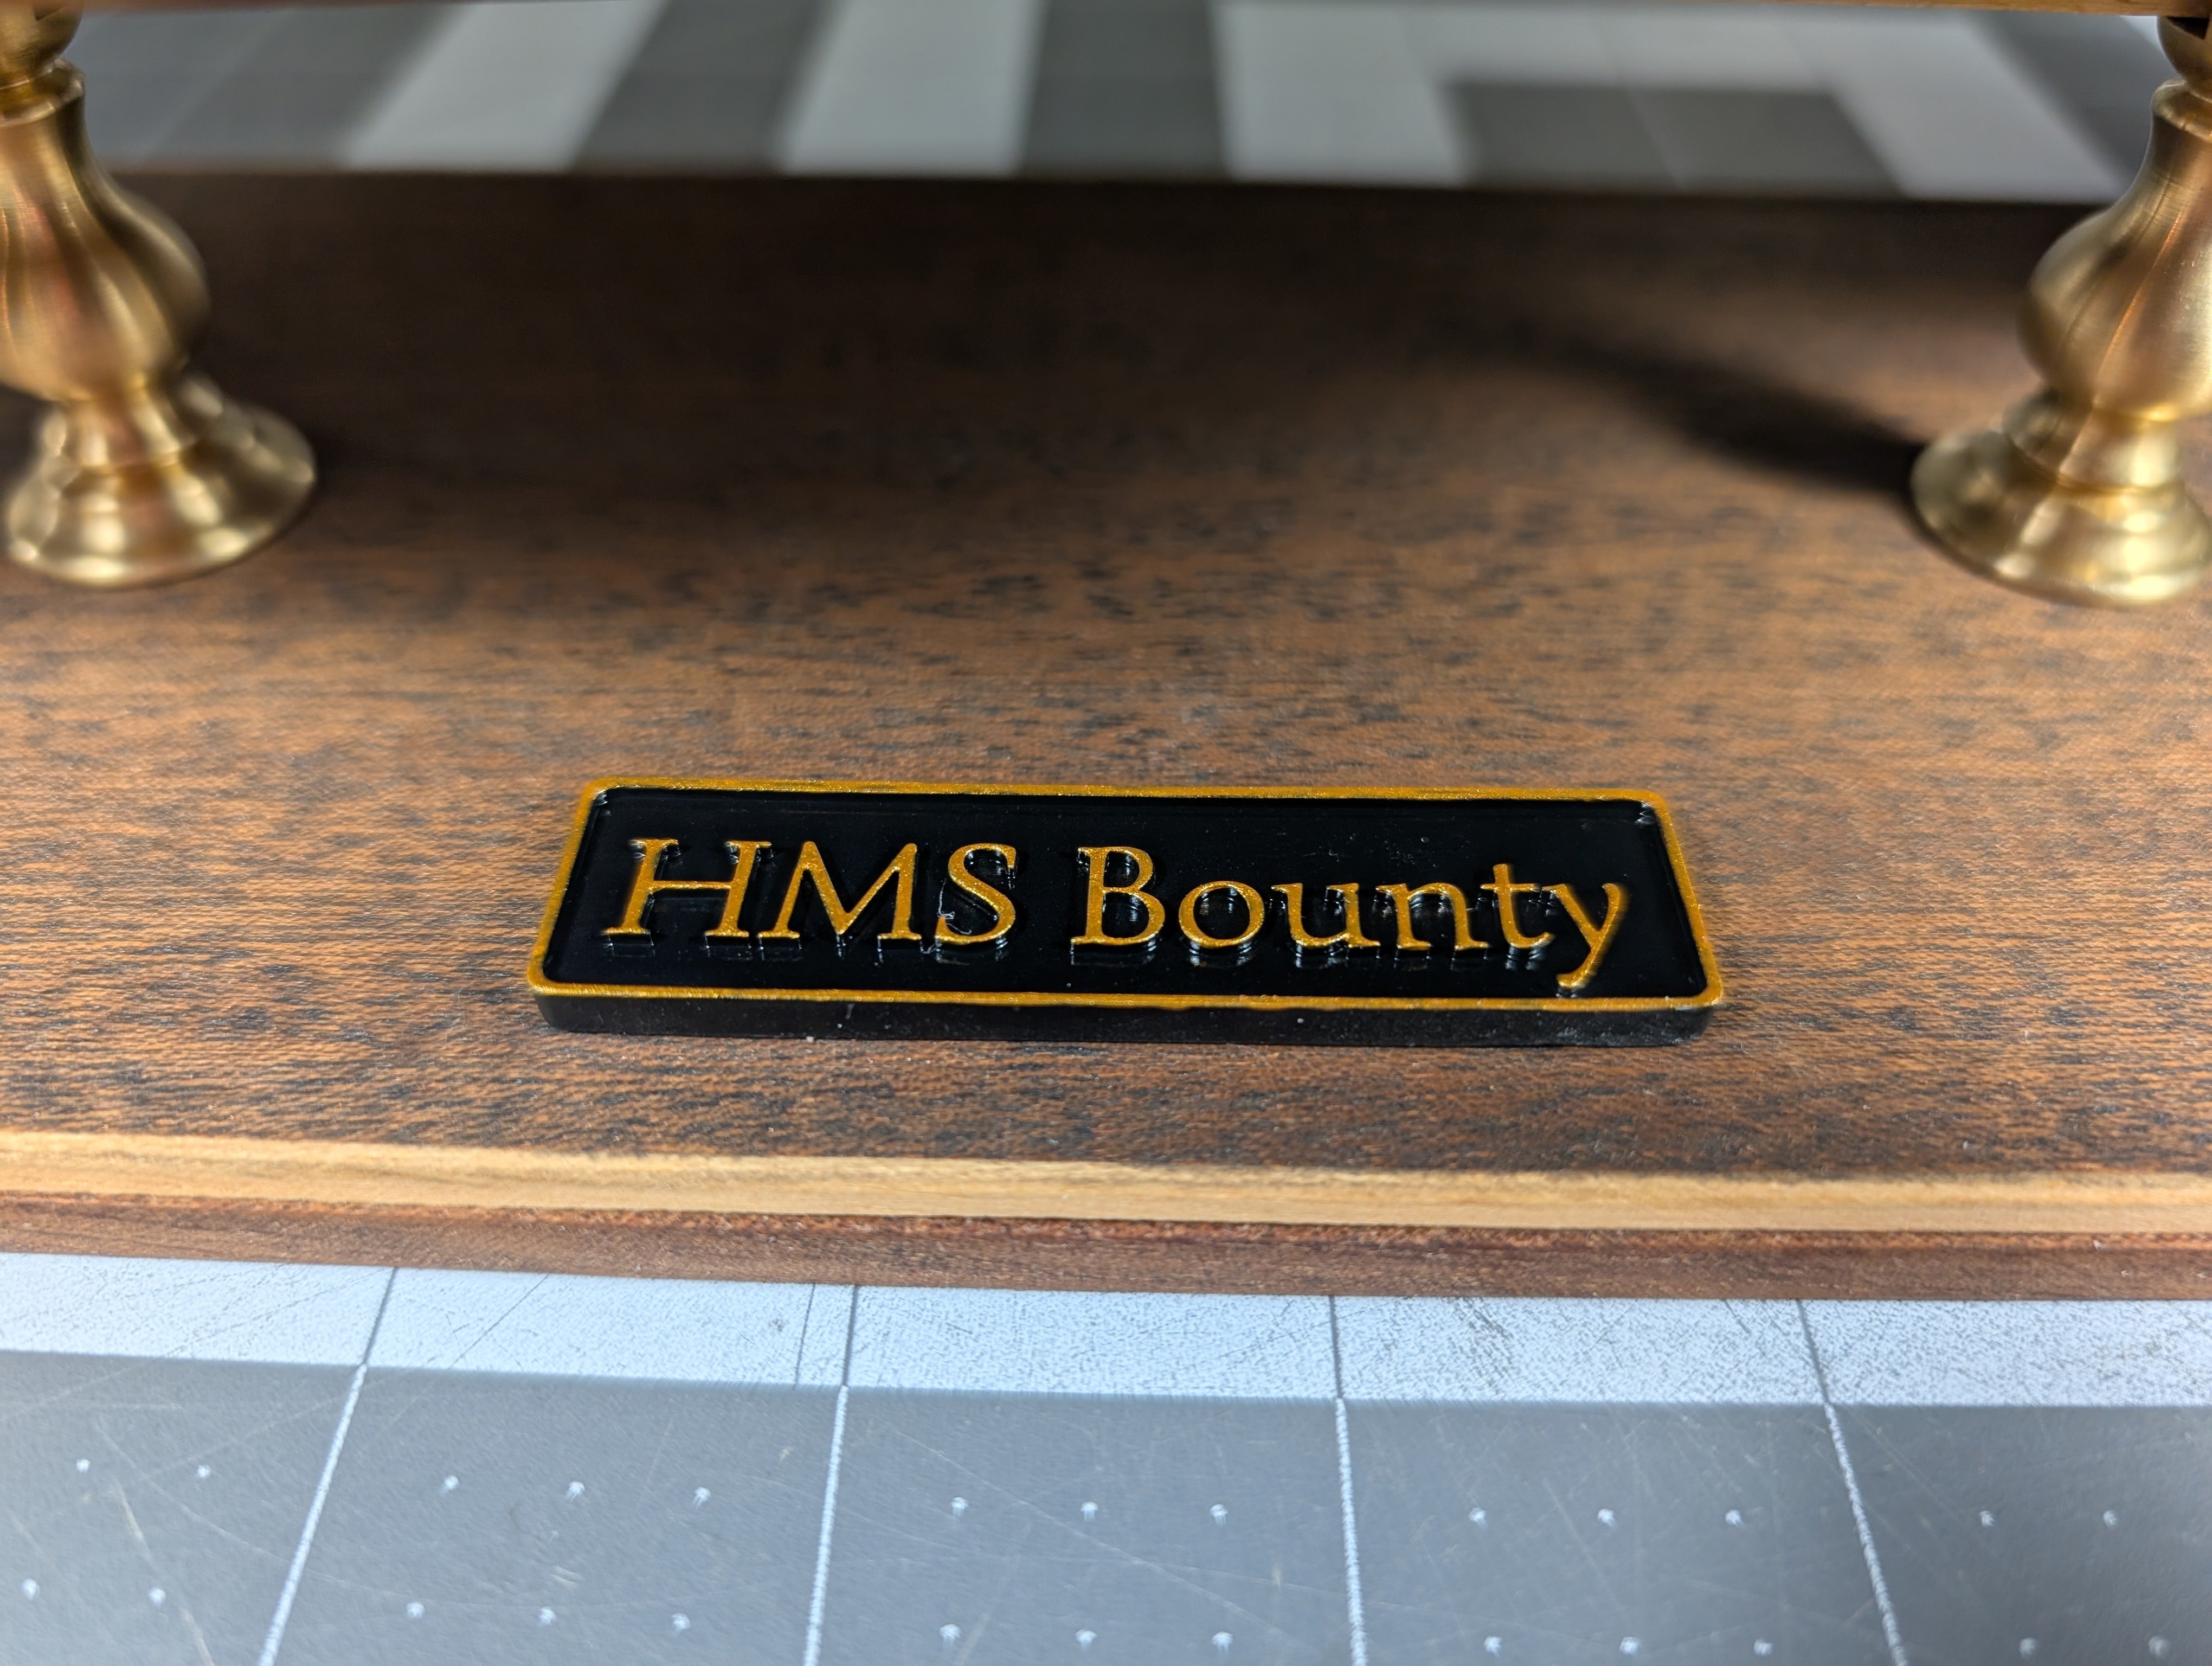
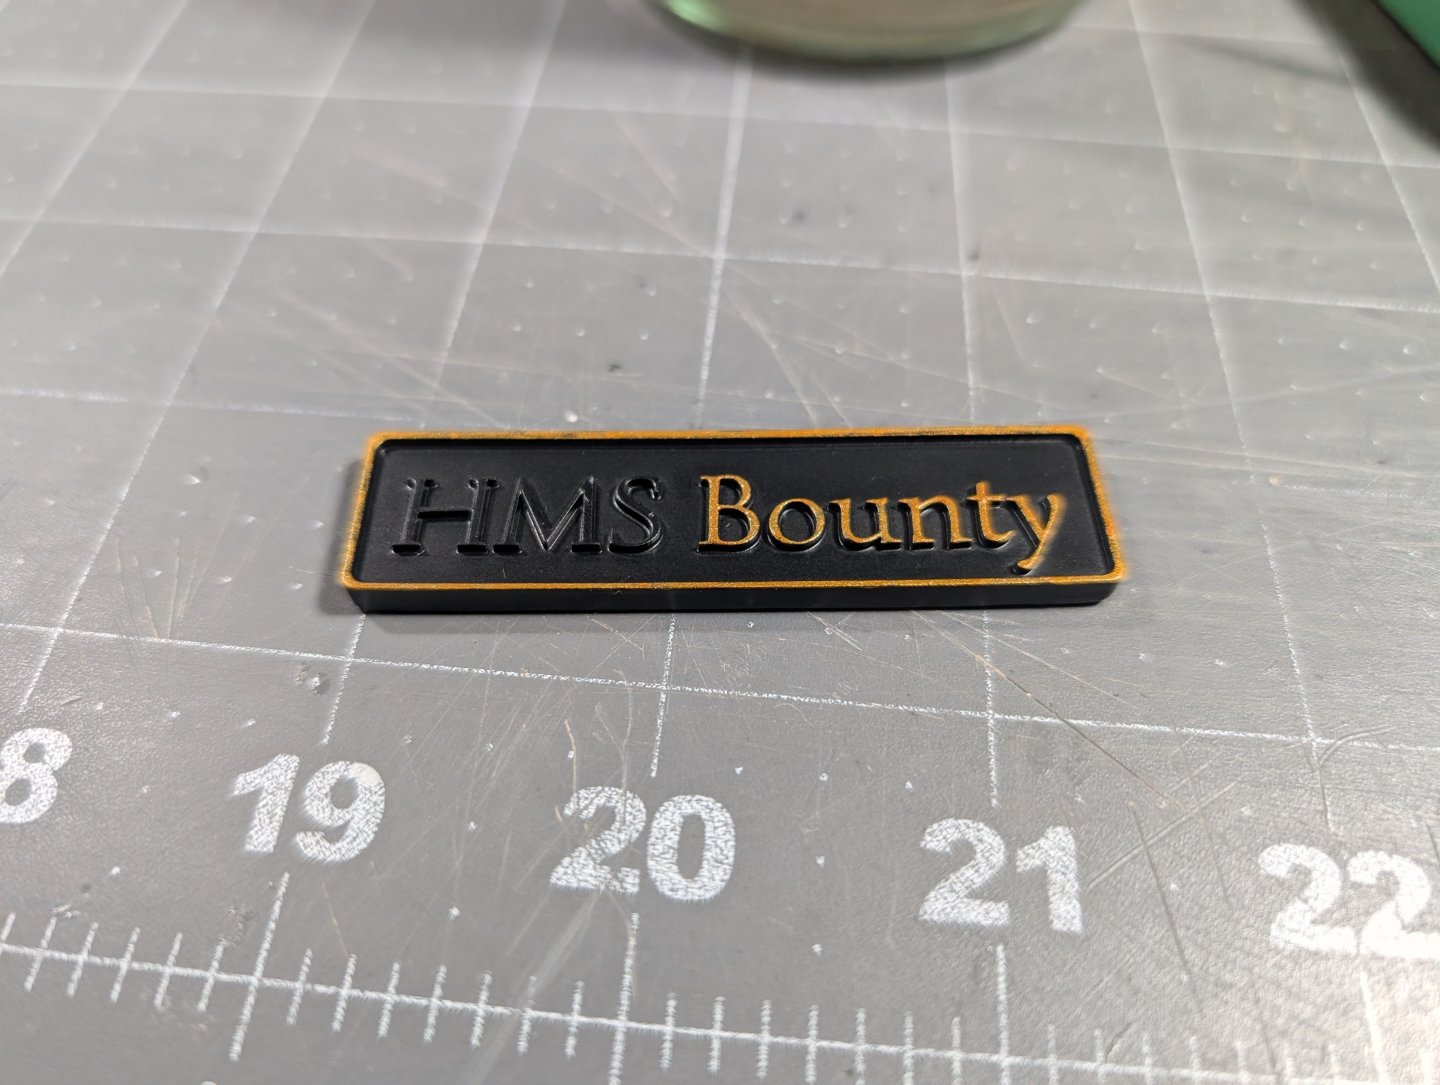
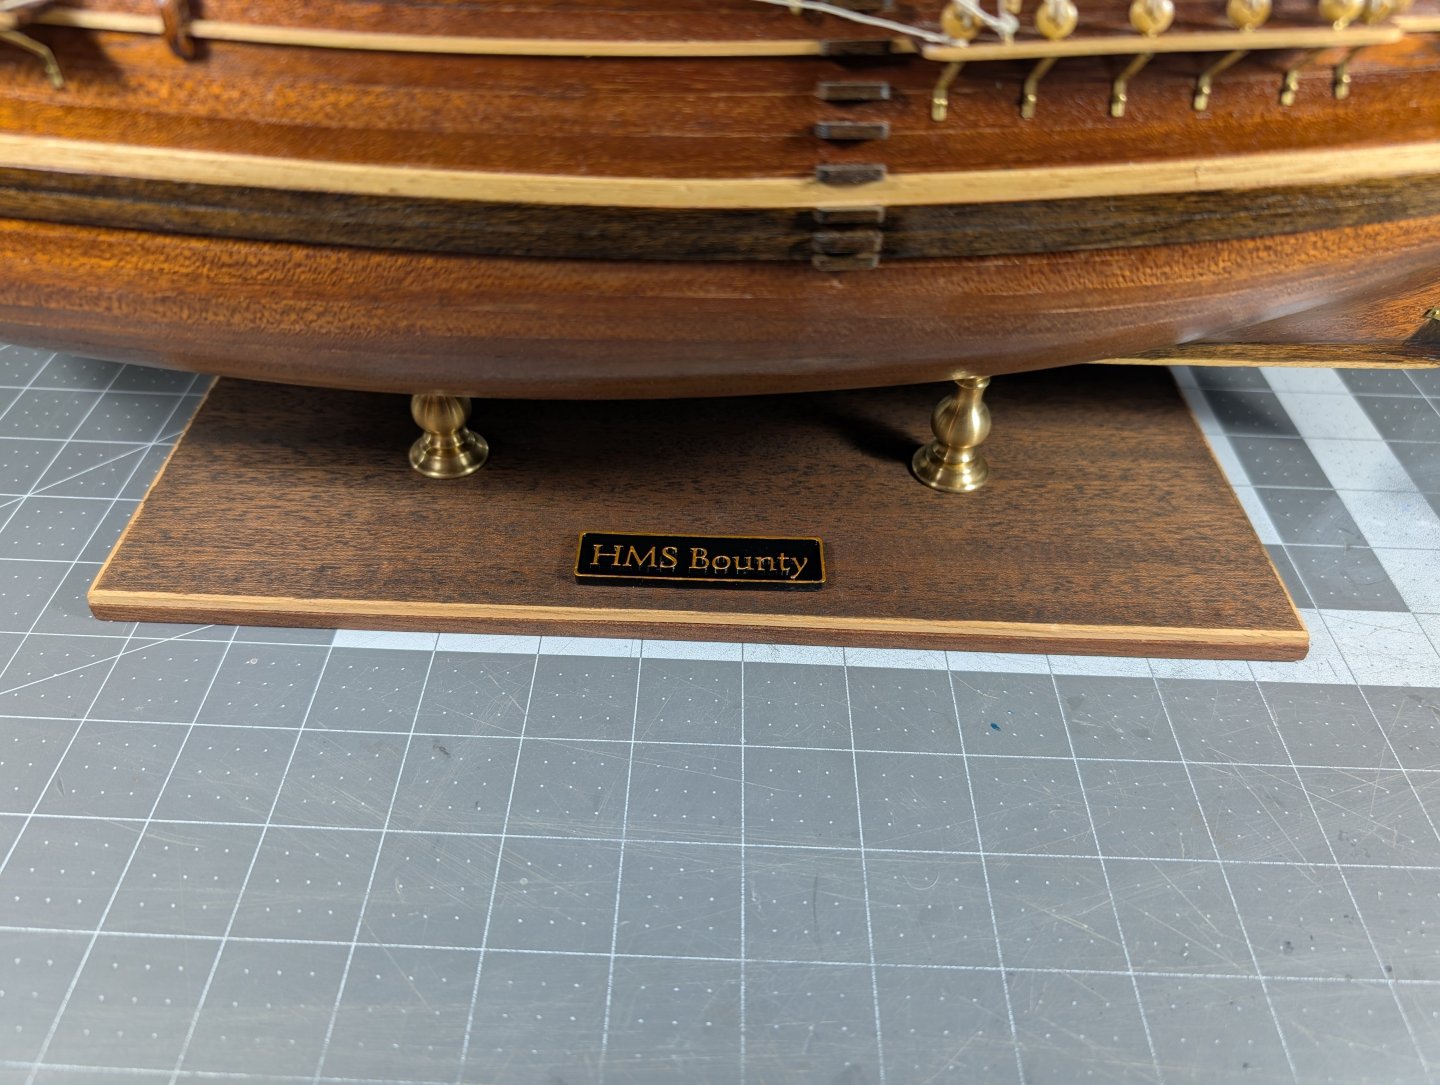
One last build log post, maybe. I went to the wood shop yesterday in contemplation of a name plate. Through the meandering of shop and mind I put my thinking together with my partner and we decided to try something with our 4D Resin printer. Over lunch we found a website for name plates and you can download the STL files for free. Once we got home we sat down and built a name plate with an appealing font, downloaded the file, and then scaled/size down. https://www.nametag-designer.com/ If you use this site, note that the size defaults to almost 36in long. So if you are going to size down you have to make everything a bit bigger than you would suspect (like base plate 50mm, Letter height 65or so mm) it will feel too much. but it worked out so well. Once printed we sanded and primed it. Then my partner helped me use the air brush to cover it all in black. After I had some Golden Metallic Acrylic paint from my D&D character paint set and used a toothpick to over the tops of the boarder and letters in Gold. Clear coated the top and glued to base. I am very happy with the completed look and that it now feels complete to be placed on the shelf. Next up will post final photos to Finished Albums. Will post link here once I get the album created.


- 32 replies
-
- 6
-
-
- Bounty
- Constructo
- (and 1 more)
-
I did something similar to this on my HMS Victory Cross section. At the time I didn't think about different diameters of dowel. That is a great note! I ended up pulling all the flags off the ship. We did some online research on how many and what flags were ever flying on the ship at one time when it was underway vs. at port. From what I found there would only be two flags frown: 1x British red commissioning pennant HMS 1606 pattern and the 1x Red Ensign. Based on the design and time period what came in the kit is totally wrong anyway so i have to print, make, or order flag that are correct. Since I have finished everything else I have decided to go flagless at the moment. I took final photos yesterday and will be adding a name plate then calling this one complete! That said your advise will absolutely be utilized in future builds, thank you so much for following this build and helping to answer some of my questions. So helpful.
- 32 replies
-
- 3
-
-
- Bounty
- Constructo
- (and 1 more)