jlheureux
-
Posts
170 -
Joined
-
Last visited
Content Type
Profiles
Forums
Gallery
Events
Everything posted by jlheureux
-
 That makes total sense actually. Good point. I think it's pretty cool how different countries approached problems differently. I remember the awesome Horatio Hornblower series when they took a French ship and the crew commented on how "the frogs don't use footropes"
- 116 replies
-
- 1
-

-
- constellation
- artesania latina
- (and 1 more)
-
Mtaylor- is the difference cosmetic or are their pros and cons to each type of port in practice?
-
Hey- how is it coming with the build? I'm building the kit myself.
-
Thanks Foxy; If I get what you're asking you're wondering about the single door flip up style gunports instead of a 2 piece segmented shutter style gunport. I don't have the pictures on me but with this model the kit specifies making the gunports throughout the ship this way with the one piece flip up door. It WAS nice using wood instead of pre-fab crappy metal doors, and I like the addition of the line on them that my SF didn't have. One random pair of gunport doors I believe right up by the bow had a two piece shutter in the plans, but for consistancy sake (as well as laziness sake-Don't build when you're tired / have had more than one beer) I just made them consistant throughout. If there is one thing I've learned on here is I'm the captain of my own ship build and I do what I want! Anyone a little more historically inclined on here have any info on the difference between gunport types?
- 116 replies
-
- 1
-
-
- constellation
- artesania latina
- (and 1 more)
-
So, I'm feeling like my light colored wood is looking a little monotone. Anything else I could do to add a bit of weathering or to otherwise just give it a little more texture?
-
I agree with what has been said completely. Read through it all carefully. I found this whole kit is more advanced than my first and also more detailed so you gotta think ahead to what each step means and once you get to rigging be darn sure what every single piece of thread on the rigging diagrams represents in terms of function and where it ties off before you get started. Thanks for referencing my build folks! It's an honor to be cited as someone who has it even half right. Lol. Double planking is very different from single planking, that was another big change from my first. That thin laminate for the second layer of planking is super frogging brittle. I recommend moisturizing it in a humidifier before working with it to keep it nice and supple. The only real trick is the lower gun deck. Rig all the cannons before you out on the upper deck and also measure many times where those gun ports go in relation to the gundeck, the cannons, the ladders, as well as the shrouds you will need to eventually add. Check out my pics and if there is anything I can do to help hit me up with a private message or on my thread. I can take more pics if you need em. I'm about 4 months into this build with lots of breaks.
-
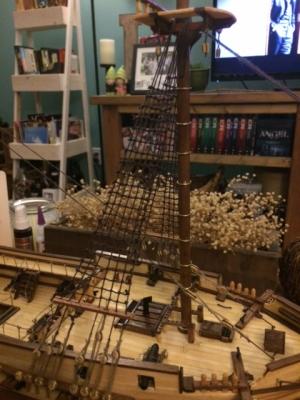
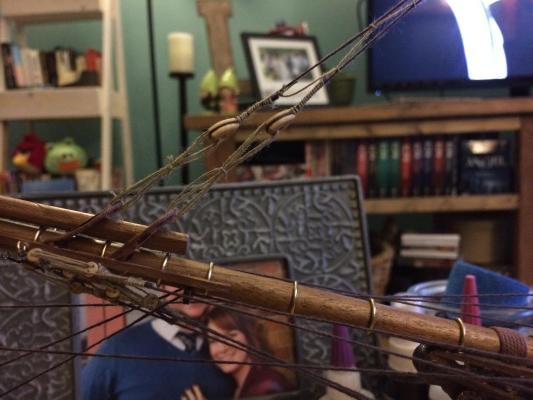
Yea for the anchors they are hoisted up on the cat heads then I figured secured for travel I did a similar feature on my San Fran and just kinda likes it better than just dangling anchors. In reference to your question about the masts it helps me stay focused to go just one step at a time. I installed the lower masts and stays then am working on the lower shrouds one mast at a time starting forward and working aft. I will then owns talk the topmasts and rig them up. Then I'll do back stays and finish up the masts. The. I do yards pre-sailed. Stay tuned for my starch method to adding some body, and again start forward with the lowest mast and working up and back. Just seems to work for me. It also seems to help keep my large bear mits mobile enough. It creates more workspace doing it this way. Just how my brain works, and also how the rigging diagram is laid out. I go step by step with how they lay it out.
-
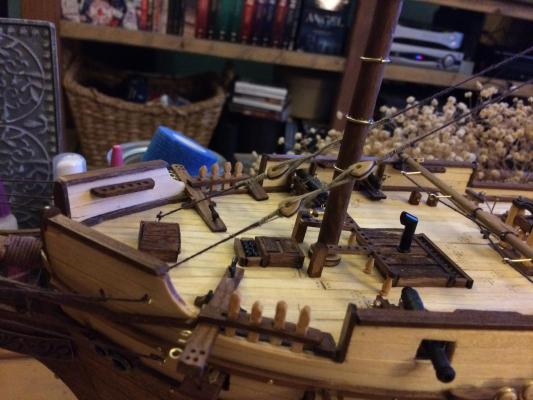
Been working on my ship. I took a little time off to brew some beer and hit the gym. I've always got something going on. I got the anchors rigged and on. I tie the catheads to the anchor in a way that I like, but I'm told that they would hoist them by the business end of the anchor in real life. Eh. I like how I rigged em. Except for one or two points I know I am going to have some overlap with portholes. I gotta measure better in the future. Finished shaping and putting together the upper masts and got them test fitted. Not secured yet, hence they look a little wonky. I also got the foremast main shrouds up and tied. I think they came out pretty well. A little loose, but I got better as I went along. I think the deal is the first set on every ship I do will be slightly sub par. I guess it's a skill you really gotta keep practicing. I prepped out my lines for the mainmast shrouds but I gotta wait for my lady to get the lines seized on the deadeyes. May take a few days.

- 116 replies
-
- 4
-
-
- constellation
- artesania latina
- (and 1 more)
-
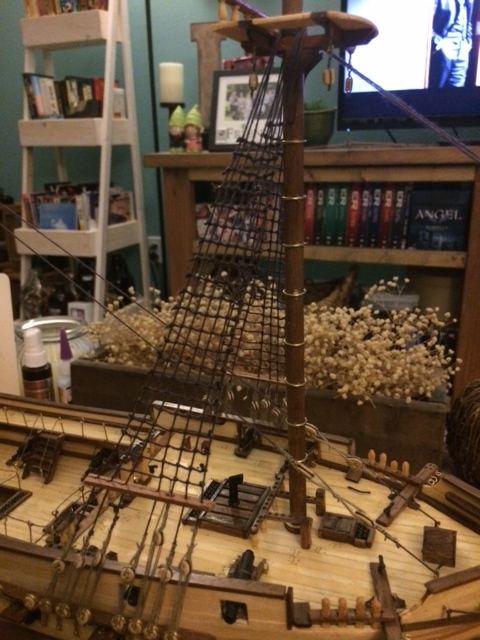
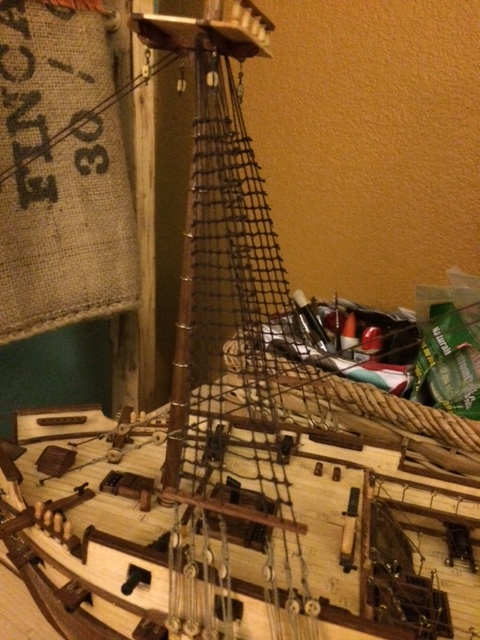
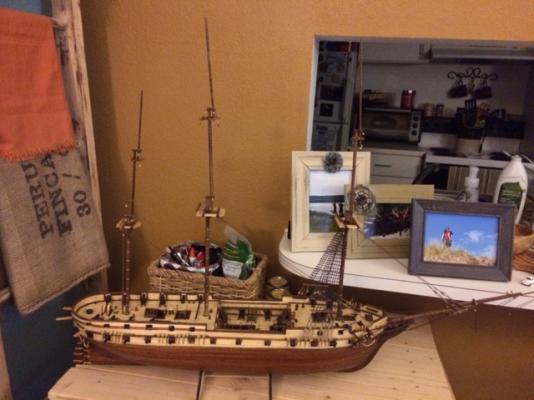
I wish that this Constellation had MORE sail. I like the look of those little horizontal sails in between the masts, but I know not every ship had things like that. I've been slowing down a bit now I'm up to rigging. I find when I try to rush things at this stage I mess up. But I am so looking forward to getting it done and seeing the final product, as well as starting my next ship although I'm really going to have to negotiate with the Mrs space wise. We already have no blessed clue where we're putting this one. It is significantly bigger than my San Francisco...
-
Dude that ship is looking nice! I shoulda done what you did with going back to the dark wood on the gunwales. That looks sweet
-
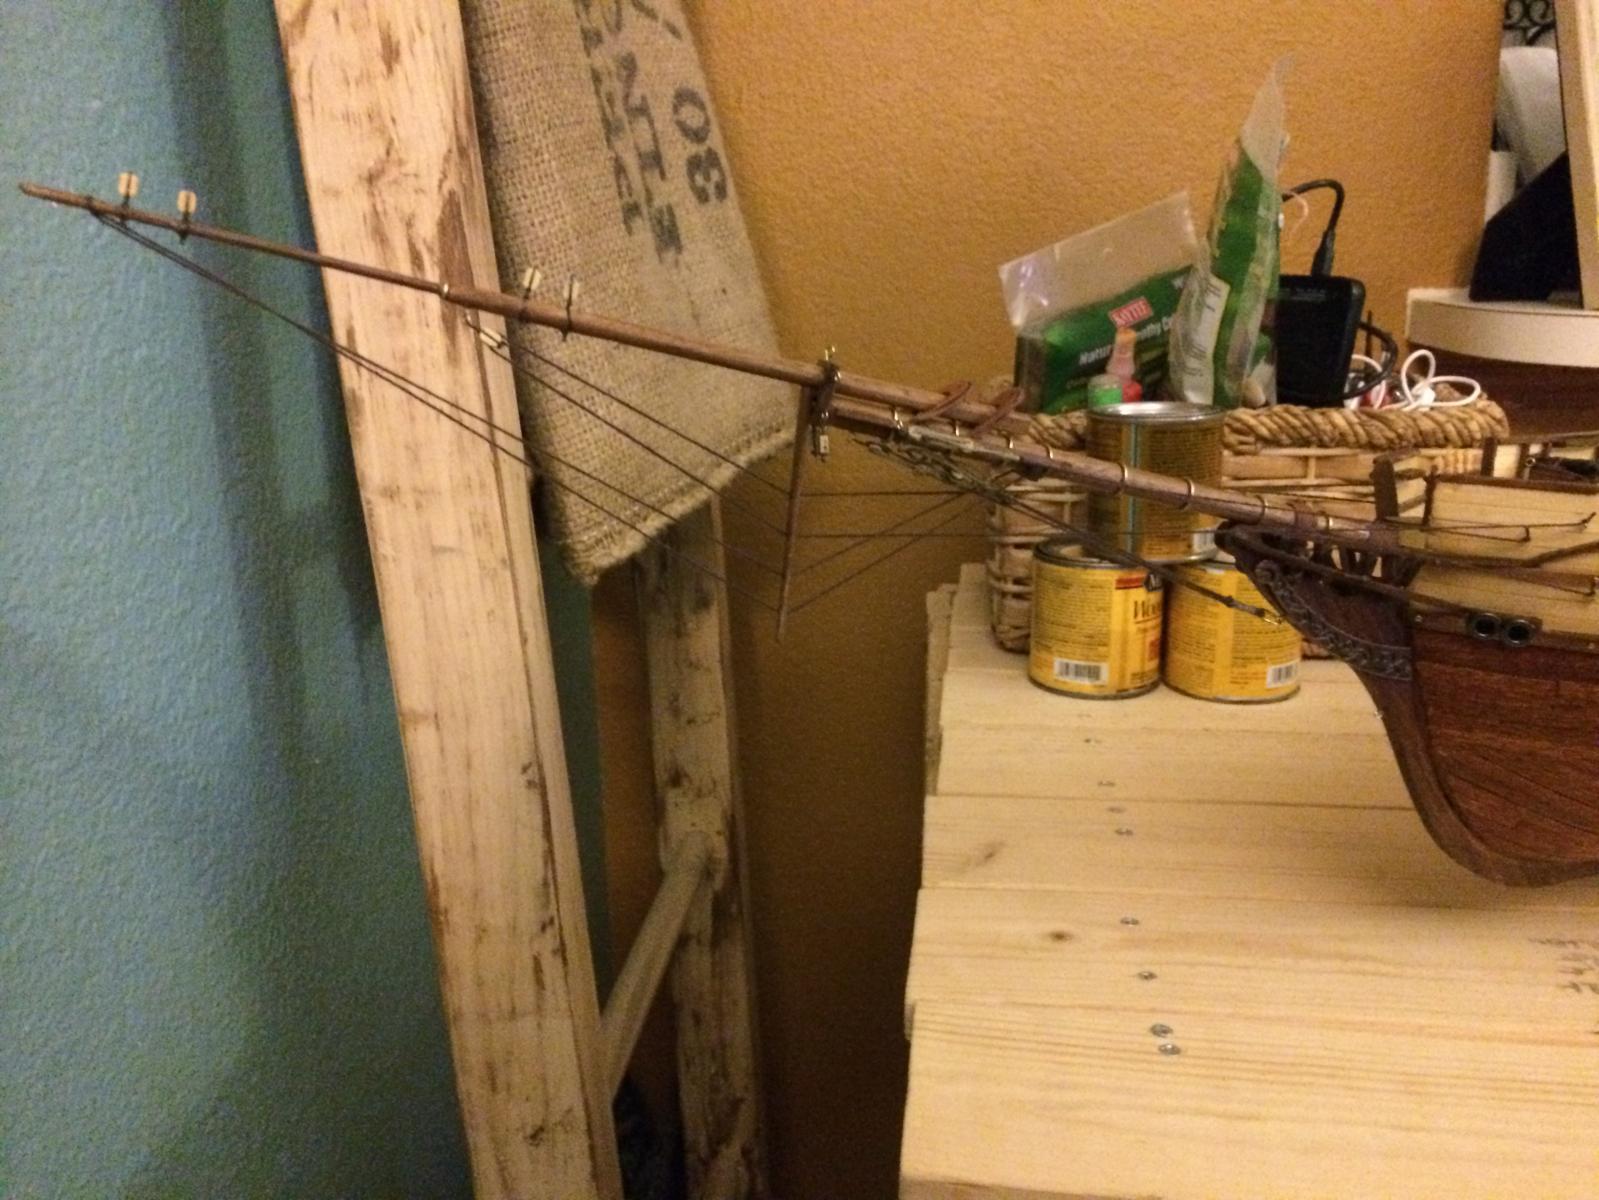
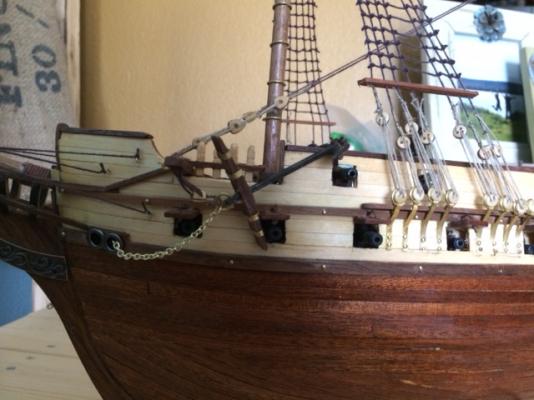
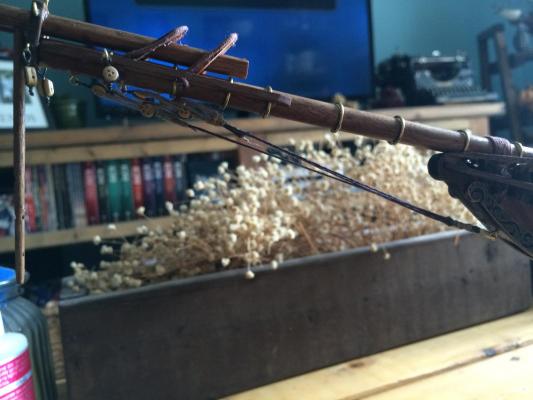
Gotta put the sail on! I got a trick with some spray on heavy starch and an iron to sort if stiffen up and pre-form the sails. I did it on my San Fran and it made them look more wind filled. Can you upload a pic of where exactly you affixed the spritsail yard to the bowsprit? I'm trying to figure out how to fit it in there cause with all those stays there are a ton of lines running under there.
-
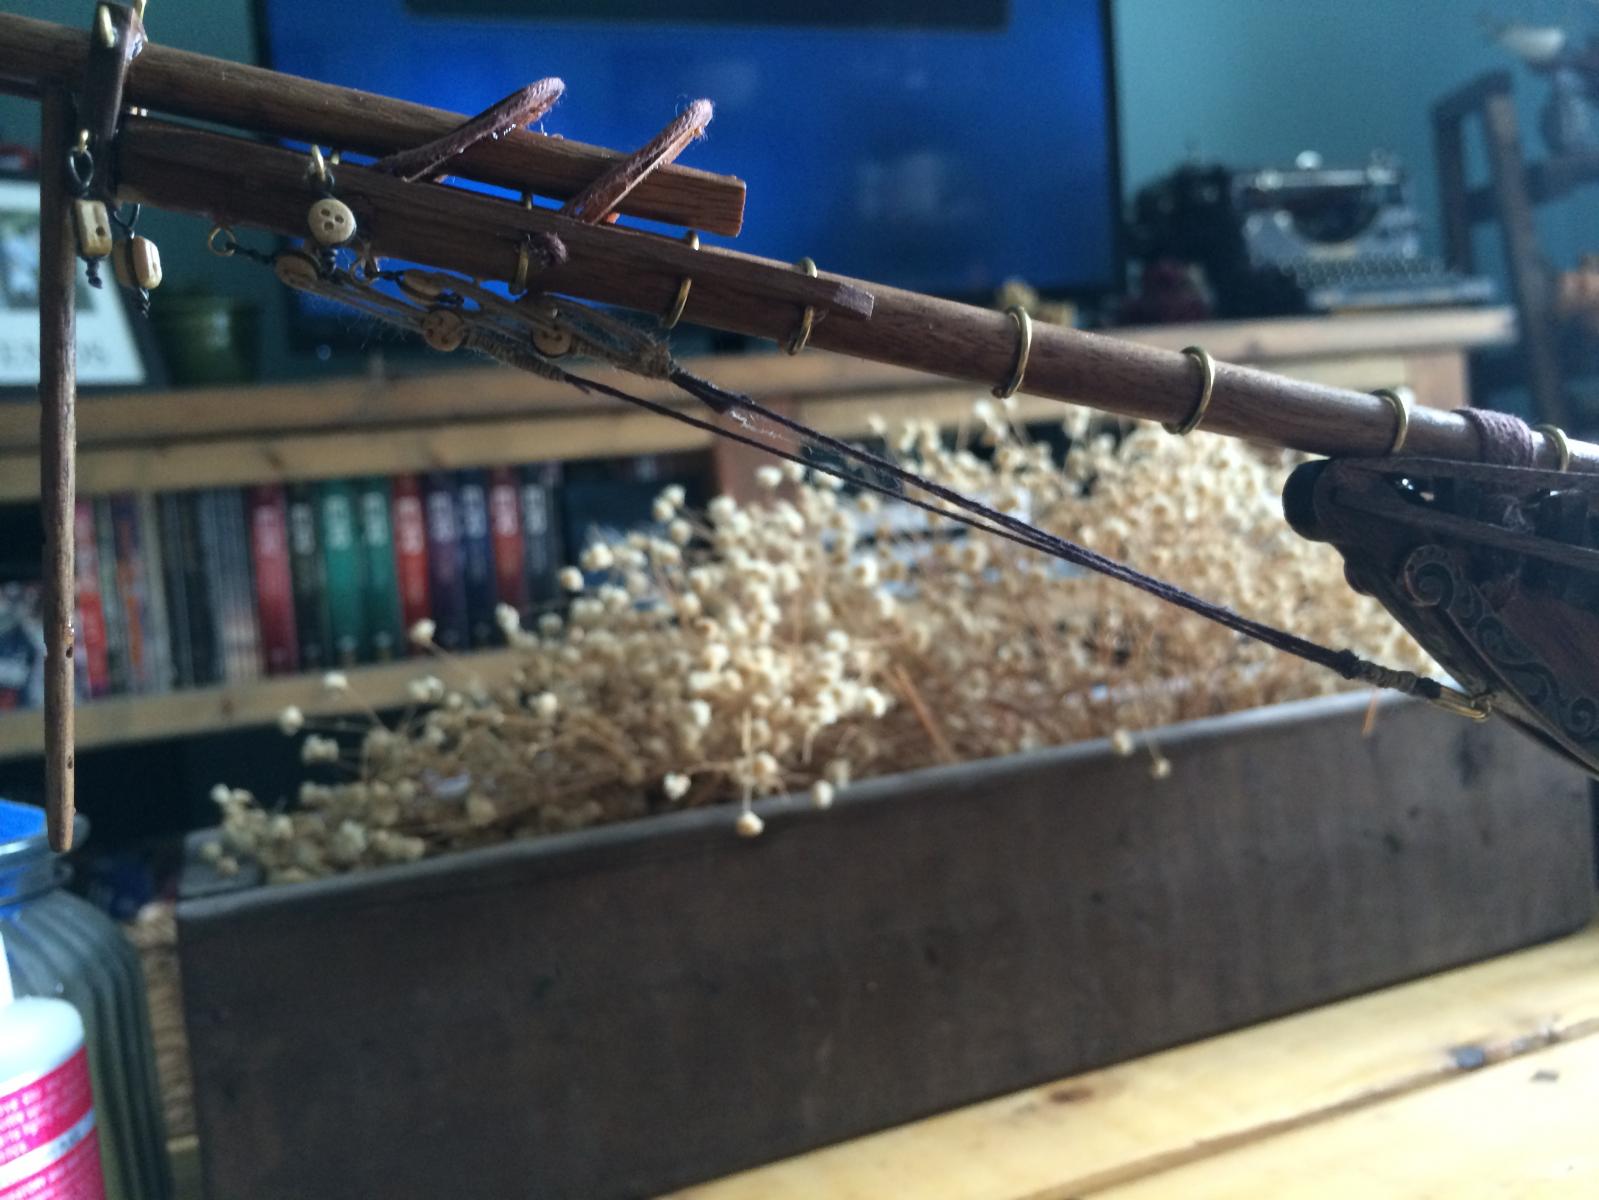
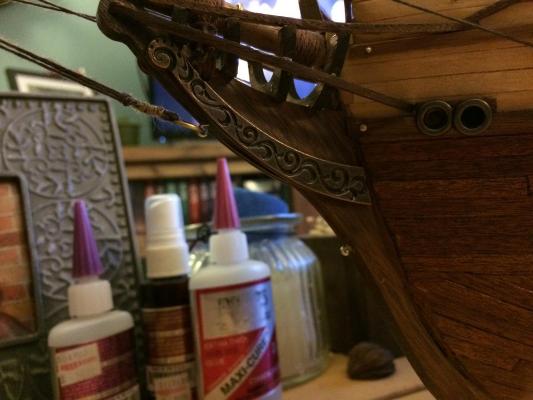
Man. What a difference a couple of masts and a little bit of line will do to a model. It looks like a ship now! I started with the bowsprit. The deadeyes underneath in photo one were a lot of fun as were the other stays that are built into this component. This is very different from the San Francisco and I really liked the added detail. I then added the lower portion of the three masts and did the stays. I like the triangular dead eyes. My wife was super helpful as a walking talking serving machine and I like the effect. I have the sense that it will work better to just put on these lower masts and do the shrouds before I attach the topmasts. Any opinion either way? My only question is now i have all that line run on the bowsprit where exactly do I afix the sail? Either way I do it there will be a line going over or under or inbetween the yard / sail. I think I got it but it seems a little crowded under there if that makes any sense. Fun anecdote: So I worked for like 3 hours rigging the deadeyes and tying them on underneath the bowsprit. Then I tied it off to the eyebolt on the bow as instructed annnnnnd promptly went to clip the end with a nail clipper and snipped the whole damn thing. I'm sure others have had that sort of experience. Nothing like undoing an entire evening of work in one snip. LOL.

- 116 replies
-
- 4
-
-
- constellation
- artesania latina
- (and 1 more)
-
I made all my masts and fighting tops this weekend. That was fun. The bowsprit especially was much more involved in this kit and I enjoyed it. I'm almost to rigging and this kits rigging diagram isn't as good as the San Francisco was so I'll just take it one line at a time. Anyone have any reference shots they used?
-
Any other thoughts on the line? Where could I get something that would be appropriately colored and gauged in mass for this kit?
-
Overall I like the look and feel. I can't wait to get masts on her. I feel like it looks pretty close. Part of me wishes I'd painted. I just really like the look of natural wood. My goal is to paint my next one up. I'm thinking that MS Armed Virginia Sloop? Try something a little cheaper, but a new company and MS seems to create some new challenges and opportunities. What do you folks think of it? One Q: doesn't look like it comes with canvas though.
-
Quite true mtdoramike...I'm always the worst critic!! I find that finishing work helps a lot too. Once I get a coat of poly on it I'm thinking the whole thing will really come together. Masts and sails go a long way too. Planning on painting my next one for the next level, but I just love the look of natural wood so much. Thanks for the compliment Rich. They're kind of hard actually. Just to get all the steps completely even. I made my steps a little wider than the instructions but I like a wide stair.
-
I got a couple if rough spots on the second layer of planking. That strip was so thin and brittle. But overall I'm pretty happy. As I keep learning I'll get more precise. Some of my cuts are not perfect or 100% square but it's all good.
-
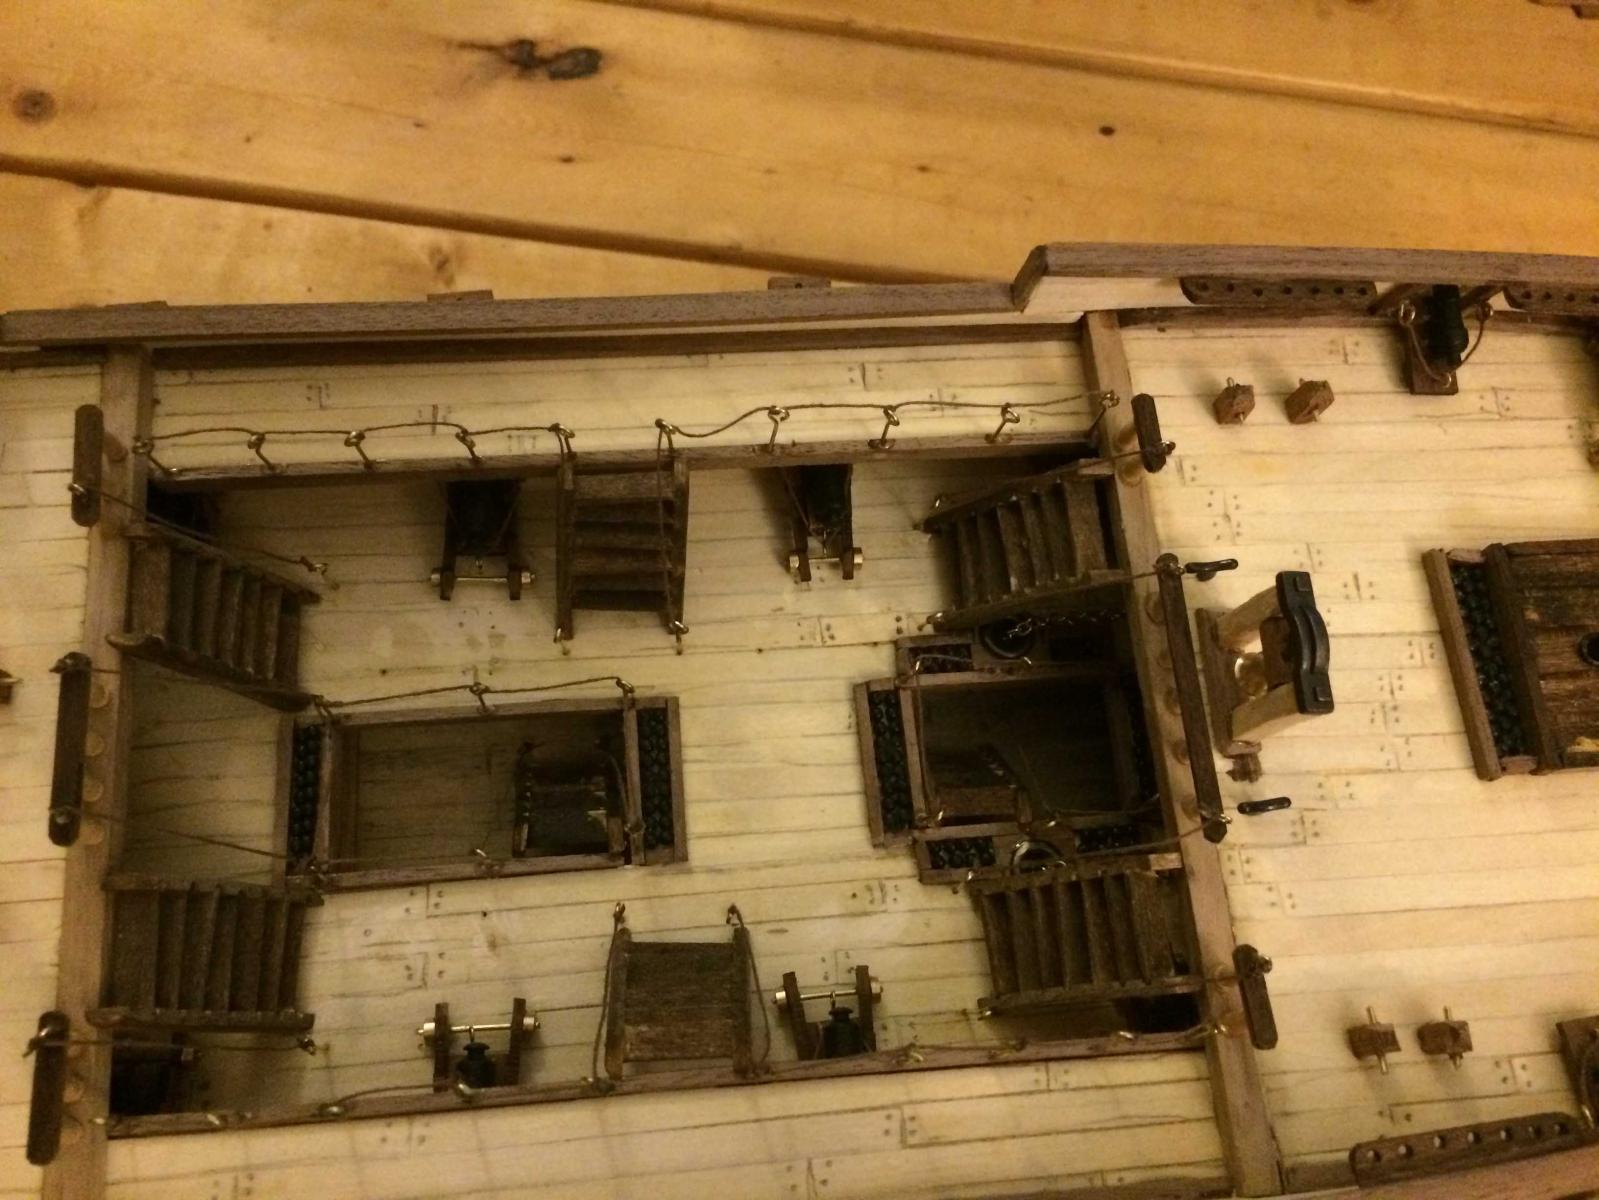
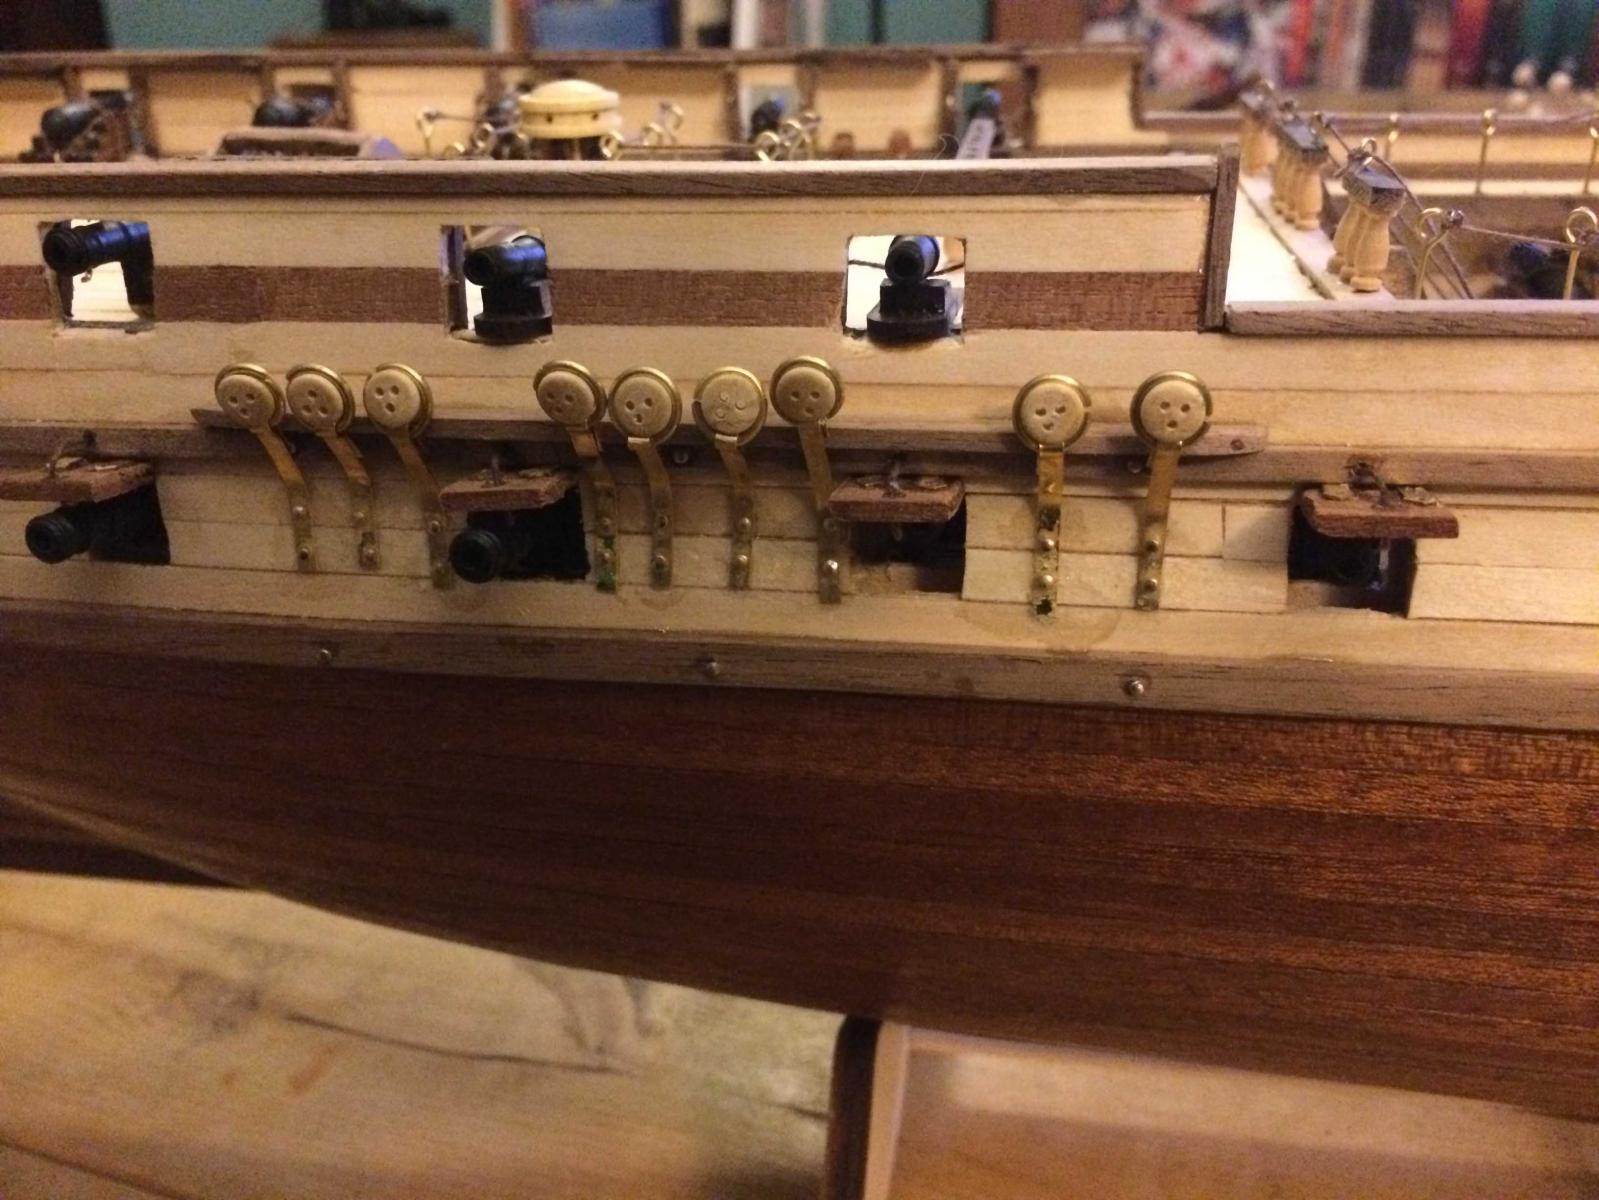
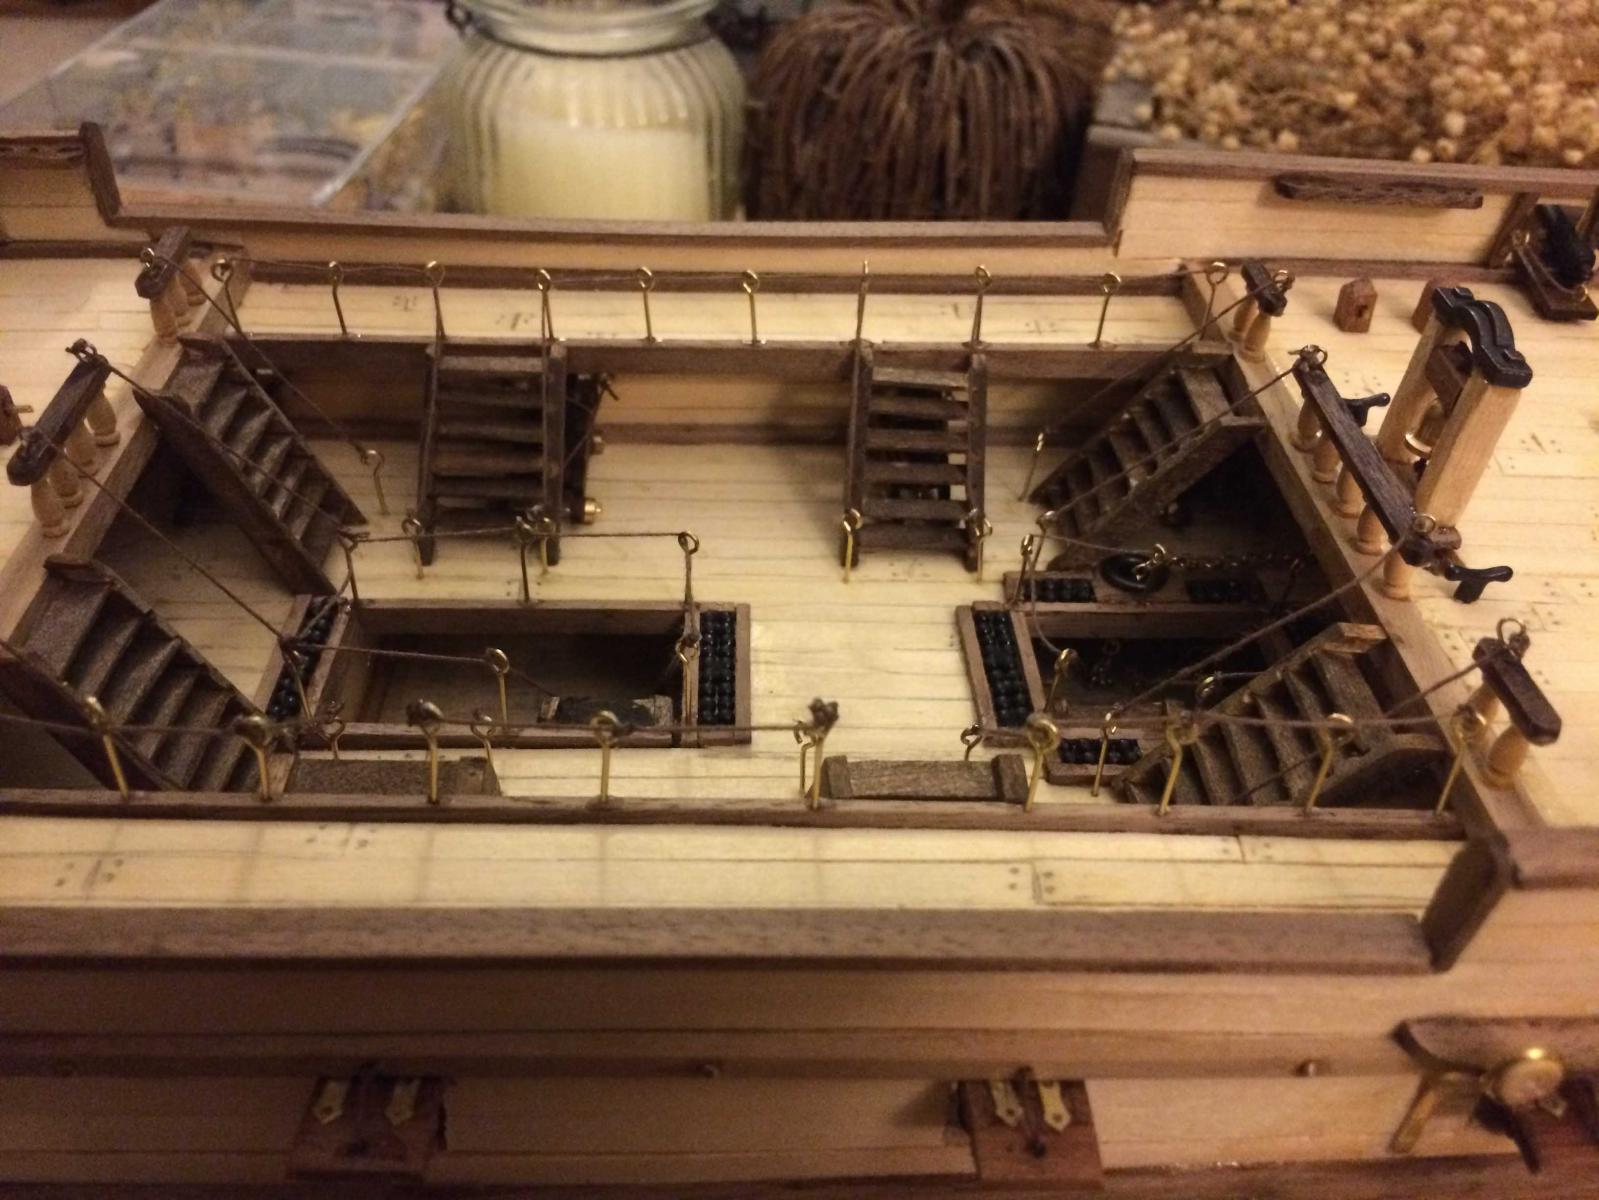
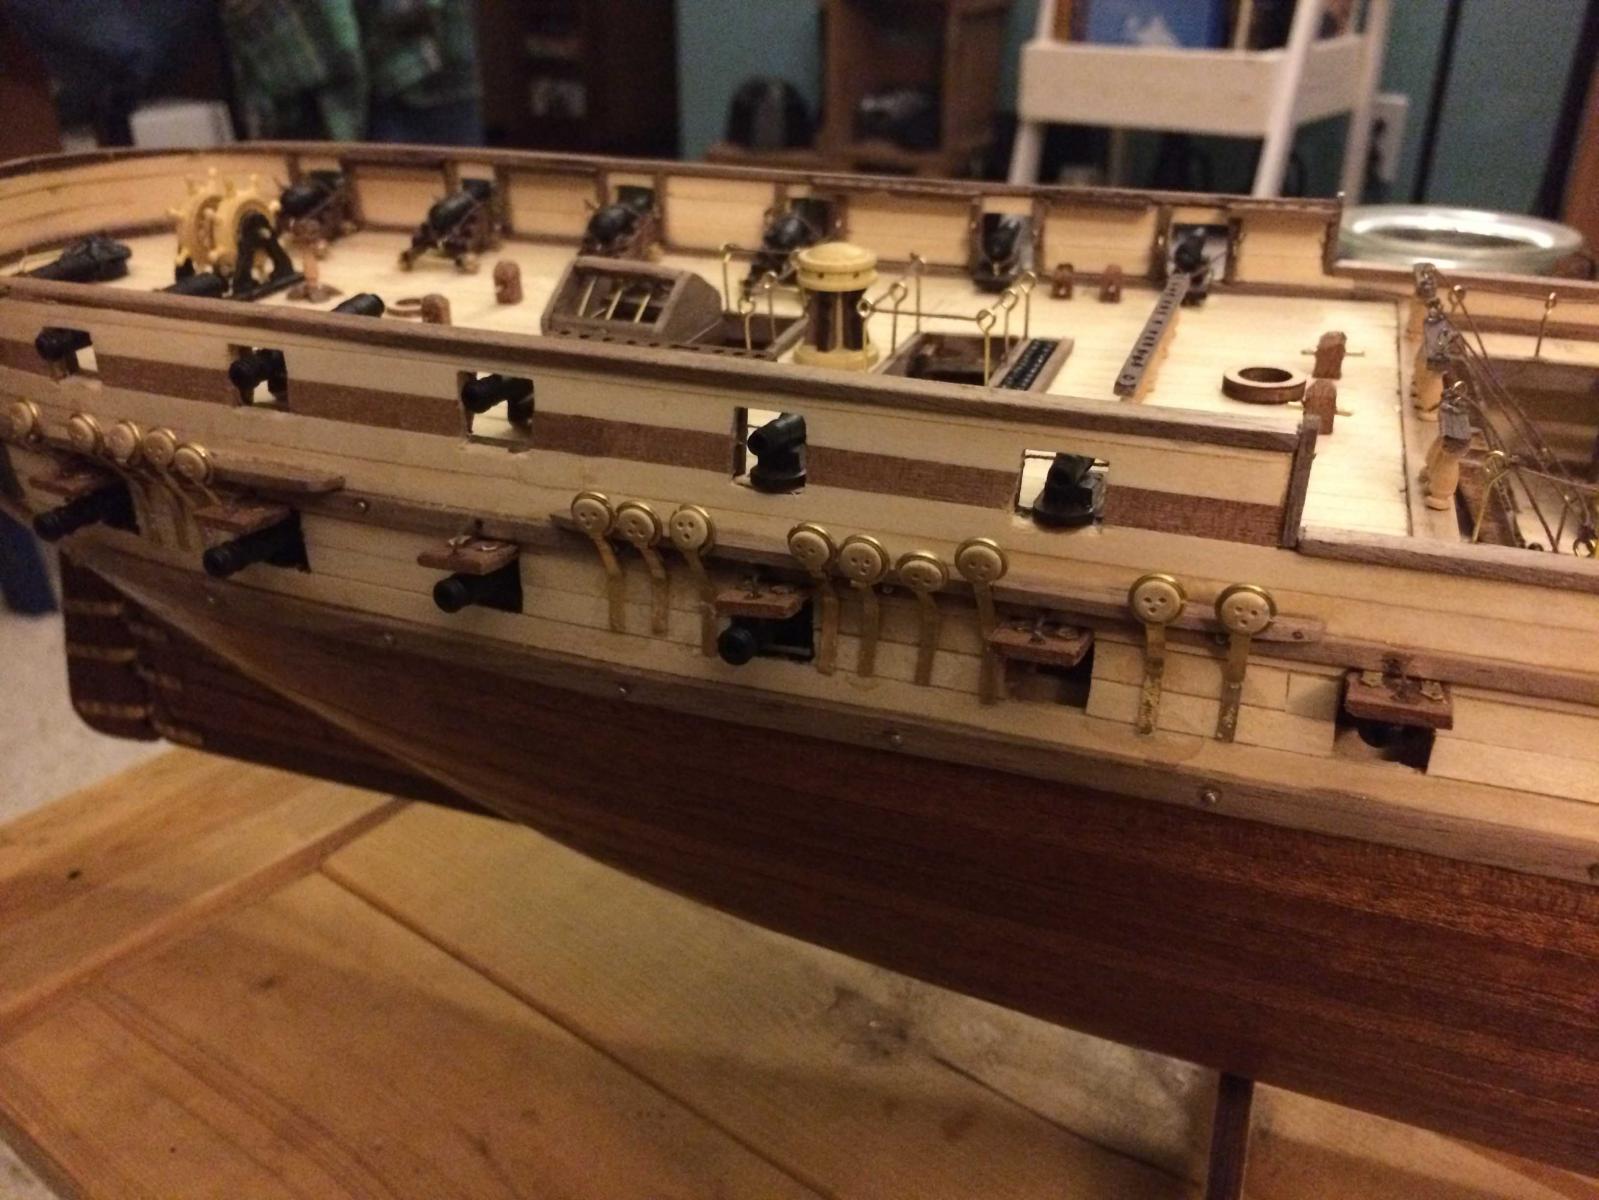
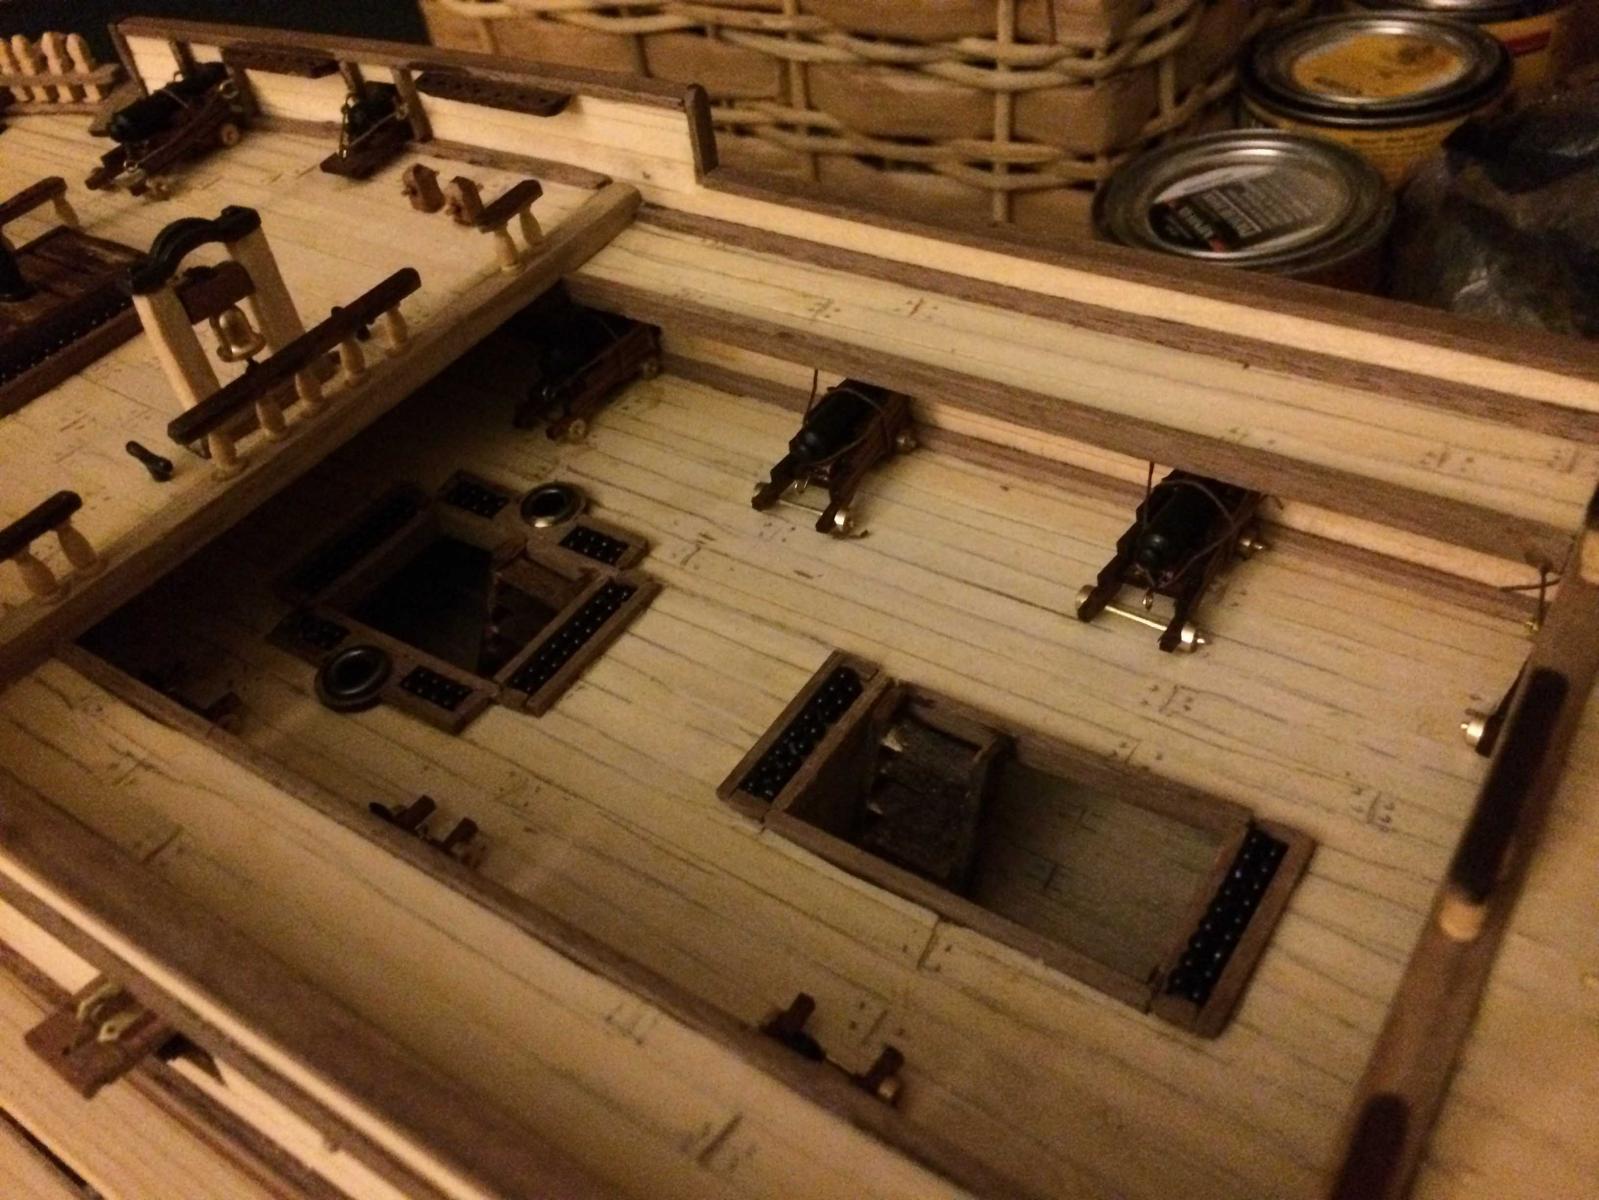
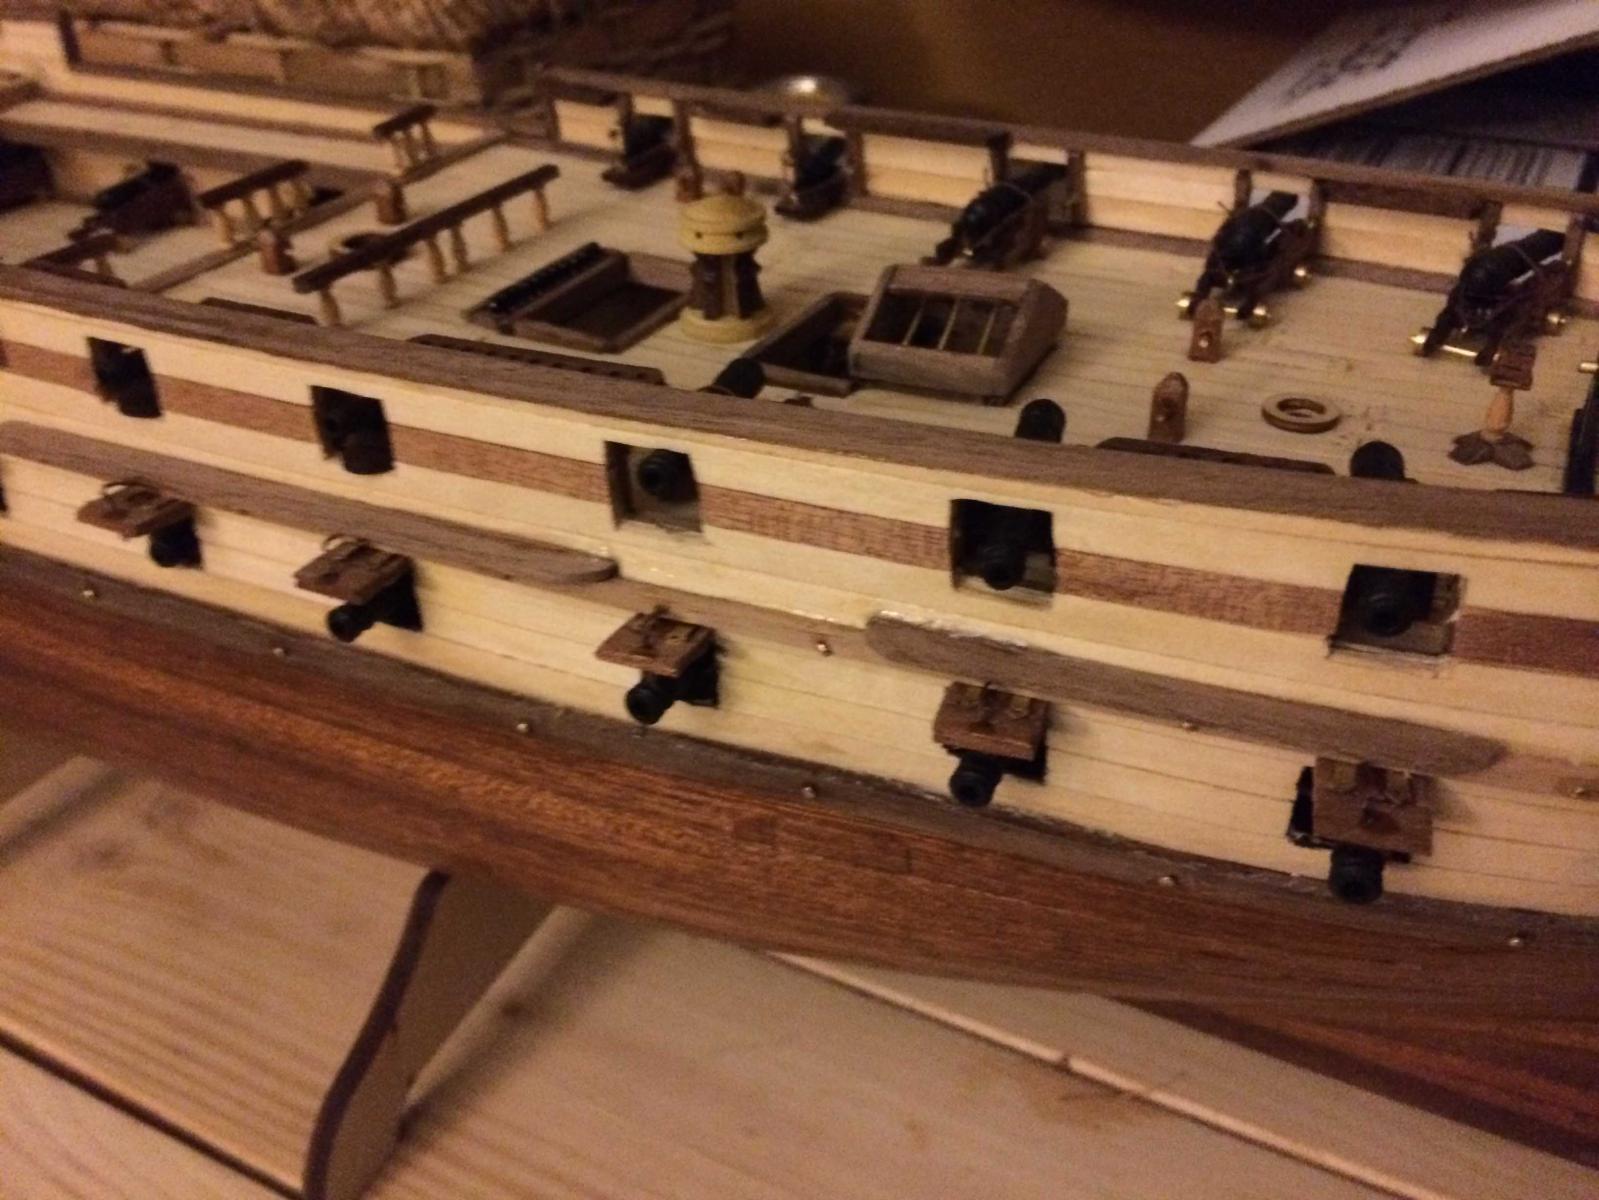
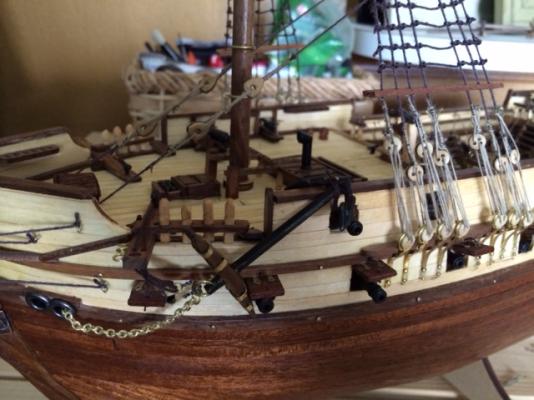
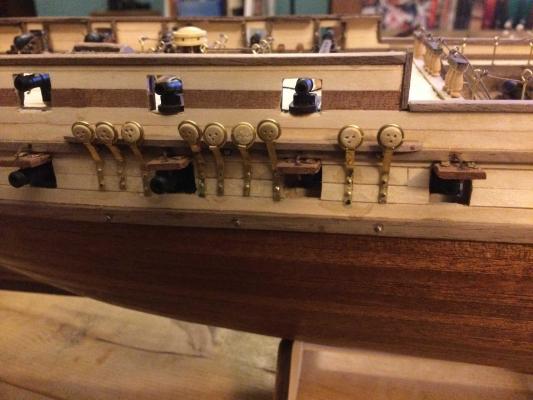
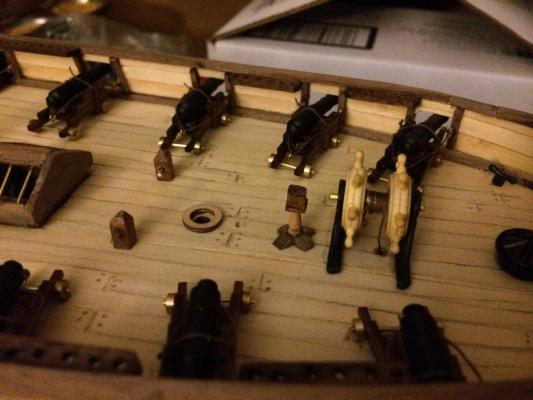
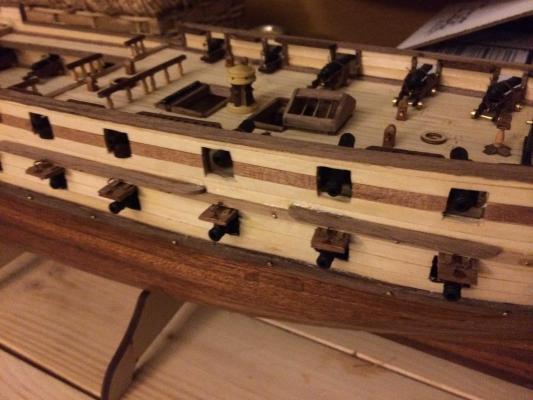
So I redid those stairs and I like them much better now that you can see the lower deck cannons. Working on finishing up the chainplates. Decided to just go ahead and do all the brass brass and focus on the practice on construction this time around. I"m not going to be painting this ship so I'm just going for modeling and natural woods. On my next ship I I plan on utlizing paints and will blacken my brass to start trying to get more authentic colors. Question: Gunports on the main deck (top deck) don't get any sort of gunport lid or cover? Do they just stay how they are? What a great hobby.

- 116 replies
-
- 4
-
-
- constellation
- artesania latina
- (and 1 more)
-
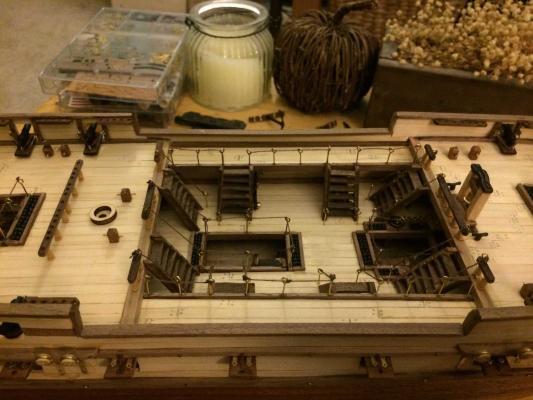
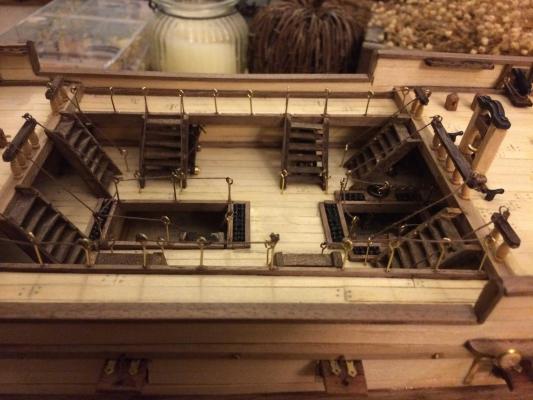
What's a hog?? I think what I'm going to do is take out the two ladders and replace it with one ladder each in between the cannons. As my wife notes "well for Acuracy with the cannon directly behind that ladder they wouldn't be able to fire because there is no space for recoil right?" She's so smart.
- 116 replies
-
- 1
-
-
- constellation
- artesania latina
- (and 1 more)
-
I'm second guessing myself on the ladders for the second deck. On mine it just sort of worked out that the stairs mask the cannons and so you really can't see that lower gun deck very well. I could move the ladders and try to re position them I guess....Any suggestions?
-
Double posting I know! So I got the ladders stained and in place. Stain does not like to take to places that have superglue on it and ladders do NOT like to be built with woodglue so we had a conversation. In the future I'll either fight it out with the wood glue, or I will do what I'm probably going to do with this model which is to spot paint the spots that didn't take the stain with some water based paint. I also got the railings up on the lower decks. Let me tell you that was not an easy time. The long brass pins went in fine, but tying the line through those pins was very difficult. Not tying, although I'll admit it WAS a little bit tricky since that lower deck is a confined little space. I have tweezers though, so not bad. What was difficult was getting the appropriate tension between posts for the lines. That was difficult. I'd get the right tension then tighten my knot and it would go all loose. I would get one end perfect and then have to re-do it later. I re-did it a couple times and overall I am happy with MOST of the lines. I think once all the masts, sail and rigging fills up the deck I won't notice any of the individual ties that I didn't like. I also started with the chainplates and deadeyes to run along the outside. Exactly enough components for this process so I needed to be careful. Bending the brass around the ring and fitting the deadeye into the ring was timeconsuming and difficult, but I didn't end up needing to heat anything, just bend really carefully. On this part I am taking the time to drill out two holes on each chainplate with a pin vice so I can use the rivet nails. I like how the finished product looks although I got some sticky finger syndrome as I was gluing. I need to take the time to finish drilling out the starboard side and then do the port side. I broke two pin vice bits drilling the metal, but am nervous that if I use the dremel the drill will walk and screw up my whole deal so I'm taking the time to do it by hand. I could have blackened the brass. However, I didn't know how to do it at the time and wanted to make progress. I also don't think the brass looks bad. I think for the purposes of the model it works and once I clearcoat I think they'll pop nicely. After I finish the port and starboard chainplates on the hull I believe I will be ready to finish staining and clear poly coating my hull. I really look forward to this step as I believe that the whole thing will pop. I have found that I often am not totally happy with my work and then once I stain and clear coat it I all of a sudden feel like it looks good and comes together. I guess I can see that. I also paint Warhammer 40k and other 28mm miniatures and often feel like crap about my paintjobs until I detail the base and hit it with clear coat and then all of a sudden it just works. This has been a great project and I feel my skills slowly improving. This is a more complex kit than the SF so it's a good stepping stone on my way to a HMS Victory! I have not needed to rely on the instructions too much but hope to be tackling masts in a week or two and then I'm sure I will have to slow down because that's a whole different can of worms. What should I start daydreaming about doing next folks?

- 116 replies
-
- 5
-
-
- constellation
- artesania latina
- (and 1 more)
-
Moving onward at a nice clip. I finished getting the rest of the deck furniture on. The wheel mounted. Had a tiny bit of trouble getting the line through the deckholes on the wheel. I've noticed it's always the last thing I I try to do for the night that gives me the most trouble. I didn't like the cannonballs. The way I framed the spaces for them on the box just didn't look right, they were chrome and I would have needed to blacken / paint them, etc. I ended up using left over black metal chain I had from my San Francisco which was already black, was easier to work with and I'm pretty happy with how it looks. On my next one? I'll try to measure and trim better the alleys for the cannon balls and fight with blackening them. I also didn't have enough cannon balls for what I laid out and I wanted my ship to be armed to the teeth! My next step was to place the cannon ports. The kit had me using mahogony strip to make the covers. This wasn't to bad. Dremeling the ports into uniform shape and sanding them went pretty well as well. Gluing brass onto wood is a real pain in the butt and then when I tried to get into drilling holes for the pins on the hinges I admit I got a tinge frustrated. I decided to opt out of that. For all you vets out there you can criticize if you must but I like how the finished product looks, they're small enough and tucked under the rail enough that a bystander won't really be able to tell. I got the ropes to hoist attached and I like that, once again a learning opportunity. ON my next ship I'll approach it a little bit different and I think it will come out better.

- 116 replies
-
- 4
-
-
- constellation
- artesania latina
- (and 1 more)
-
Does that blackening agent work well? I have some updates and photos to post. Will try to get to it tonight. Most ready to start doing some masts.
-
About to start doing anchor chain and the chinplates and lower deadeyes for the shrouds. How do you reccomend I approach the brass. I feel like it should be black but spray painting will probably not work. What is that stuff folks use to blacken metal and would it work in this case?